

Page 1
QUICK-START GUIDE
CONTACT
Should you have any technical questions, please contact an ekey
reseller!
START-UP
Please follow the steps below to start up the system:
1.) Make everything you need ready to mount the devices as
described in the mounting instructions supplied with the devices.
2.) Wiring
Do not connect the system to the mains yet! The electrical
connection of the system can only be carried out by a
specialist!
Connect the wires as described in the ekey home wiring plan
supplied with the devices.
3.) Check the wiring.
4.) Conclude mounting the devices. Close all the device housings
which you had to open in order to be able to proceed with the
wiring.
5.) Read carefully the following chapter
„Operating the finger scanner“. The correct operation
(i.e. swiping the finger o ver t he sensor) o f the
fingerprint scanner is decisive for the proper
functioning of the whole system.
6.) Connect the power adaptor to the mains.
The electrical connection of the system can only be
carried out by a specialist
!
The ekey multi CP DRM 4 displays the language selection
The ekey home finger scanner indicators are as follows:
7.) Now start at point 1: INITIALIZING THE DEVICES of
„Programming the system“.
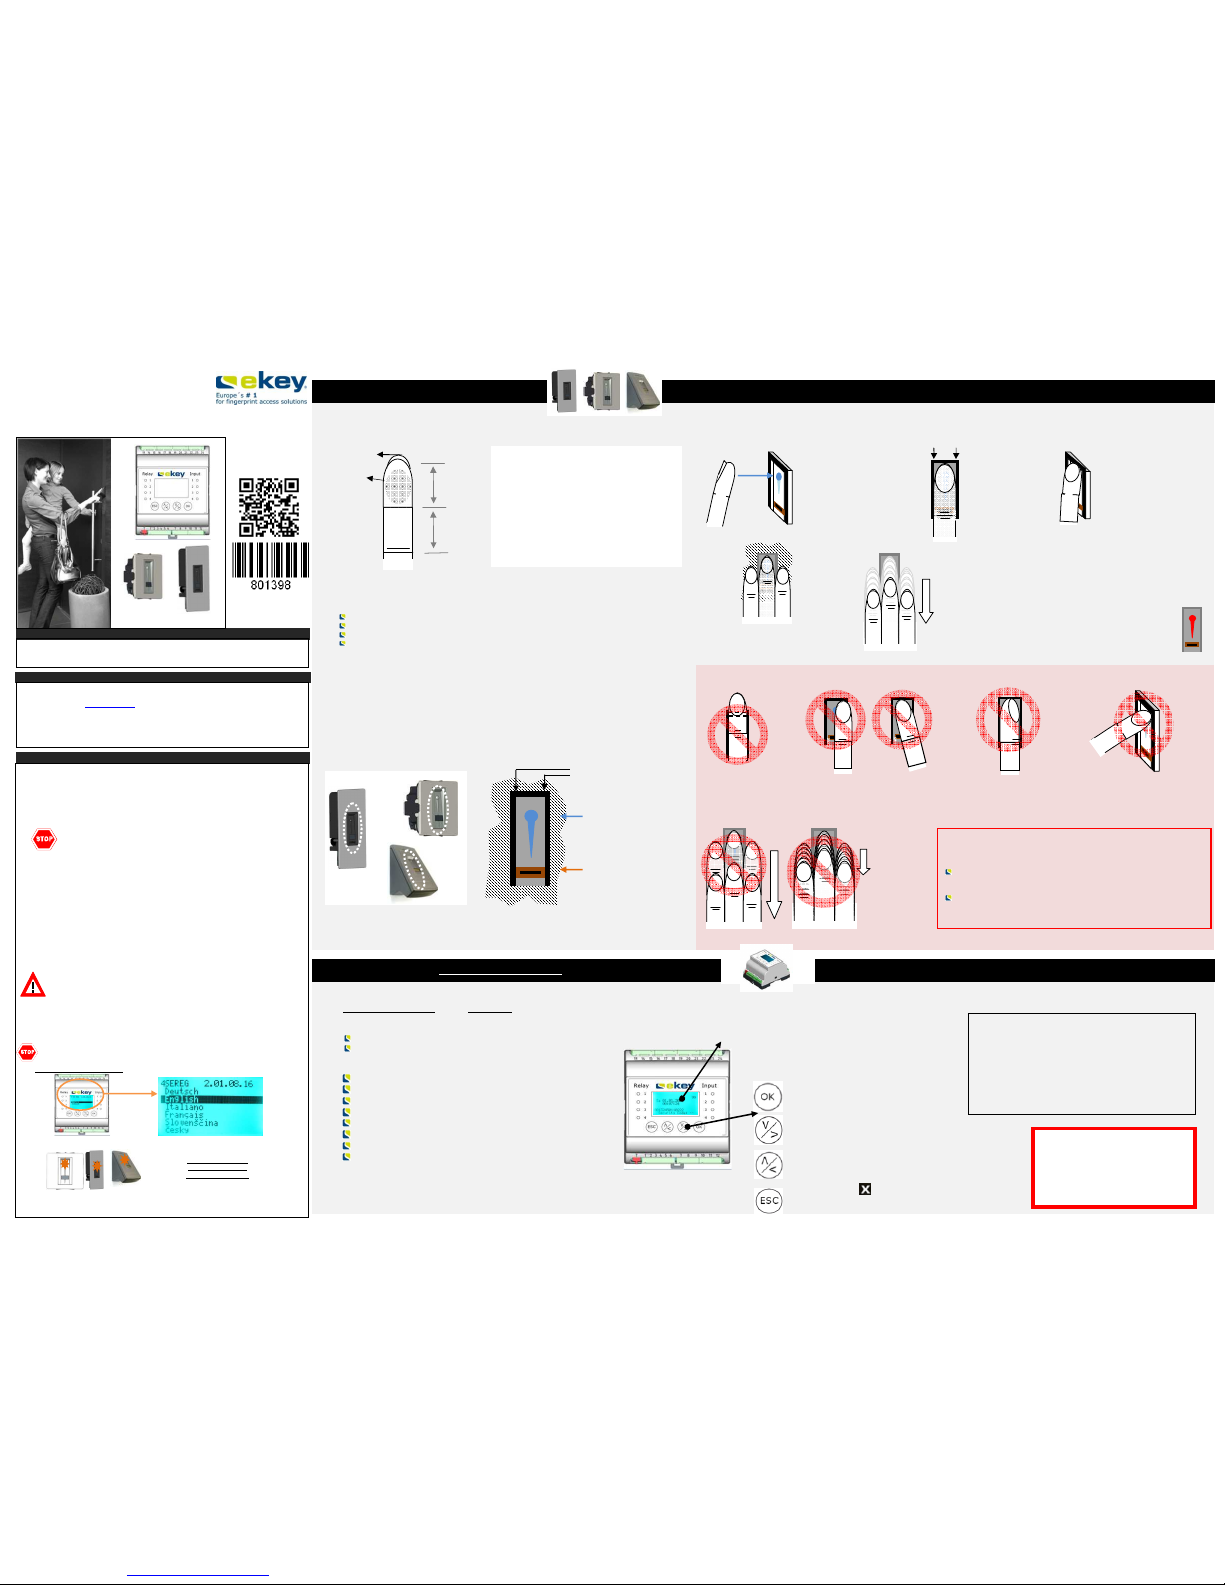
2 Operating the finger scanner
The function of the finger scanner is to capture and analyze the image of your finger, and then
compare it with a reference template. Which part of your finger should be captured?
A finger scanner works like a camera. It makes a picture of the bottom si
de, the papillary lines, of
your finger´s third phalanx. However, this picture must be of good quality, so that physical access
can be granted whenever necessary.
Imagine you wish to make a picture of someone, and this person
keeps fidgetting
runs by and you try to make a picture of him at that exact moment
hides half of his face behind a tree
etc.
What do you think these pictures will look like? On some of the pictures you will not even be able
to recognize the person.
The finger scanner works in the same way. The finger scanner can only read all the information
contained in your finger, and consequently open your doors securely and reliably, if you move
your finger down across the sensor evenly and in the right position.
Let us now look at where you should place your fingers and at which speed you should move them
across the sensor, so that the „pictures“ of your fingers are perfect.
It is necessary to capture an image of the
3rd
phalanx. On the contrary, your finger scanner
will not function properly.
In order to ensure this, take care to operate the
finger scanner correctly. It is fundamental to
place your finger correctly in the finger recess
and move it down across the sensor at the right
speed. Ergonomically speaking, the best fingers
are the index, the middle finger and the ring
finger. The thumb and the little finger may
not be used!
2.1.Function of the finger scanner 2.3. Operating correctly the finger scannner
PLACE
the middle
of your third
phalanx directly
on the finger
recess pin point.
BE SURE to place
your finger exactly
in the middle of
the area between
both finger recess
edges.
Lay your finger straight and flat
on the finger recess.
Ideally, when positioning your
finger on the finger recess, stretch
the remaining fingers, holding them
close to the „swiping“ finger. This
helps keep the „swiping“ finger
even.
Now without changing the inclination of your finger, move it down across
the sensor (the entire hand). Take care to swipe your finger at the right
speed. BEWARE: The entire movement (swipe) should take about
1-1,5 sec
.
Use this as a benchmark. You should not need much more or much less
than that. If you swipe your finger too fast, then the status LED shows
„red“
2.4. What you should not do
2.2 The finger recess
– the control element
Place your third phalanx
higher than the pin point
Not place your finger in the middle
of the finger recess, or not place it
parallel to the finger recess edges.
Rotate your finger in the
finger recess.
Place your finger at a too
steep angle with the
finger recess.
Move your
finger too fast
or too slowly
across the
sensor.
The finger recess allows to place the finger correctly so that a finger picture of good quality
can be captured. It actually is the control element and consists of
- Pin point - Sensor - right and left recess edges
Take care to position your
finger as flat as possible
over the finger recess.
There should be only a
small slit left between
sensor and finger.
If you move your finger across the finger scanner in one of the
ways mentioned here, then the scanner will not be ab le to
extract the information it needs about your finger image. It
will therefore not function properly:
Poor recognition performance: Yo u will have to swipe your
finger several times across the sensor before being able to
induce the door to open.
Reference templates cannot be saved: You are not able to
save a finger in the system, because the finger scanner gets less
information.
Do not modify the position of the finger phalanges
during
the swipe (e.g. by bending the third phalanx).
There is no need to exert any stronger pressure. Move
your finger across the sensor as if you would wipe bread
crumbs off a table.
PIN POINT
SENSOR
Left and right recess
edge
Finger nail
3rd phalanx
(phalanx distalis)
2nd phalanx
(phalanx media)
Finger image
(papillary
lines) of the
3rd phalanx
speed
>>
3. Programming the ekey multi CP DRM 4 system
The ekey m ulti CP DRM 4 in the ekey multi system is m eant to
program and parametrize the system.
Using the
LCD display and the
4 buttons,
you can
Register users and enroll their fingers
Delete users
Enter the security code
Change the security code
Set time zones
Change the relay switching times
Retrieve LOG data
Reset to factory settings
The menu navigation is intuitive and very easy. You will find
step-by-step detailed explanations of each specific menu
function on page 2.
3.1.Function of the control panel
3.2.Controls and their symbols
Security code
Factory setting
99
3.3.
Programming the system
Now start programming the system. The menu
sequences for each single function are
explained below. Let us not forget to mention
the security code. You n eed it in order to be able
to make changes in the system. The factory
default setting for this code is 99. Change
this code to another o ne o f your choice as
soon as you have started up the system.
The
OK
button allows you to register
values and move to the next menu level.
The
Down arrow
and the
Right arrow
buttons allow you to set values and to
navigate in the menu.
The Up
arrow and the
Left arrow
buttons allow you to set values and to
navigate in the menu.
The ESC button allows you to exit
a menu level or to cancel entries.
The LCD display guides yo u through the menu,
allows you to read status messages and to set
given features.
ekey multi CP DRM 4
Networked access system without PC, with
fingerprint scanning
NOTE ON THE DOCUMENT
This quick-start guide as well as the additional information and instructions on the
supplied DVD are not subject to updating. You can find the most up-to-date version of
these documents on www.ekey.net. Subject to optical and technical modifications, any
liability for misprints excluded.
WARNING !
In addition to these instructions, also observe the information on the DVD
supplied together with the product.
ID17/
174/0/83:
Version 2 dated
5.12.2012
ekey home FS OM
ekey home FS IN
ekey home FS WM
flashing orange
speed
<<
Page 2
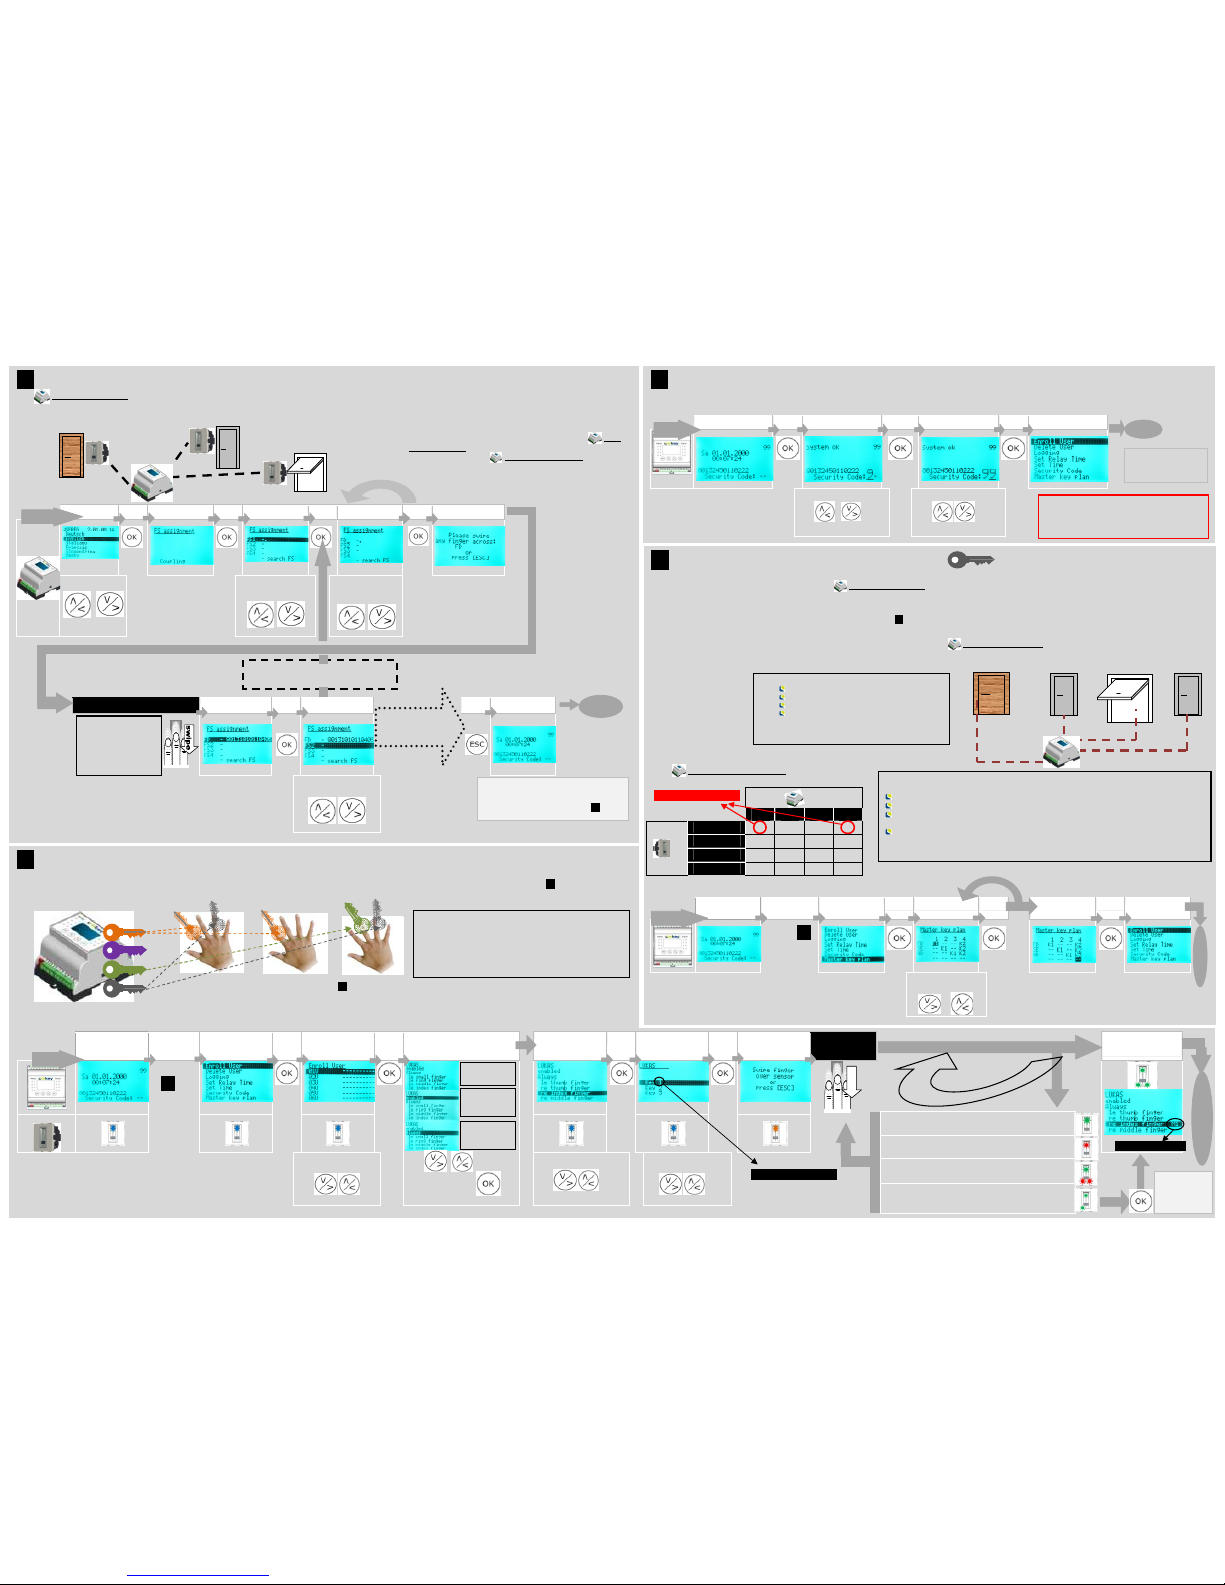
4:
RECORDING FINGERPRINTS AND ASSIGNING KEYS
Now you will define which functions you can carry out with your fingers, i.e. how the system reacts when you swipe a specific finger over one of the
finger scanners. To do so you must first enroll your finger in the system and then assign a key defined in the master key plan (3:) to this one
finger. You can save up to 99 fingers in the ekey multi system.
DISPLAY
Security
code
DISPLAY KEY
STROKE
DISPLAY
Select user num ber
KEY
STROKE
Enter USER NA ME, TIME ZO NE AND
STATUS
Select FINGER KEY
STROKE
SET KEY KEY
STROKE
Select FINGER
SWIPE THE
FINGER OVER
THE SENSOR
DISPLAY
3x green = finger
accepted
See
2:
Use to navigate
in the menu and to
enter data!
Select user
number
Select FINGER
Select key
number
ZIEHEN
Key number
F
I
N
I
S
H
E
D
START
The finger
has been
enrolled!
NAME:
9-digit
STATUS :
enabled
locked
TIME ZONE A,
B or ALWAY S
Key number
at least
3
times
It has not
yet
been possible to
capture 3 fingers, or
the captured finger is of poor quality.
The f
inger image
is
of very poor quality. Try it
once again, read Chapter 5
The quality of the finger image is good, but not
excellent. You may either exit enrollment by
pressing
the OK button
or try
once more!
T
he device
has not
discerned
any finger swipe.
Read chapter 5
3:
MASTER KEY PLAN
What is a key?
IMPORTANT INFORMATION!
Your finger is the key!
In the ekey multi CP DRM 4 system, it is possible to define up to 4 keys (K1 – K4). Each user may be
assigned one or more virtual keys by assigning his fingers to this/these key(s). But first you need to set Keys 1-4 with the help of this master key
plan.
Depending o n the number of finger scanners registered in Part 1:, a standard master key plan is defined w hich is immediately e nabled. You may
however customize this master key plan at any time.
In order to generate a master key plan, you need to know which relay o f the ekey multi CP DRM 4 opens which door. If yo u do not know this,
enable the Test mode and switch the relays in sequence to see which door opens with which relay. Details about how to enable the Test mode can be
found in the Operating Instructions on the DVD supplied with the product.
The ekey multi CP DRM 4 master key plan:
Relay
1 2 3 4
Finger
s
canner
FS1= FD
K1 K2
FS2= SE
K1 K2
FS3= GD
K1 K2
FS4
How to undertake changes in the master key plan
DISPLAY
Security
code
ANZEIGE KEY
STROKE
DISPLAY
Select key
KEY
STROKE
DISPLAY KEY
STROKE
DISPLAY
See 2:
Select key
(K1- K4)
In this example,
Relay R1 actuates the front door
Relay R2 actuates the side entrance door
Relay R3 actuates the garage door
Relay R4 actuates the back entrance door
To generate a master key plan, you need the
following allocation: relay to door
The master key plan shows which relays the keys actuate in the system.
For instance
:
Key „K1“:
If a K1 finger is swiped over the FD finger scanner, then Relay 1 switches.
If a K1 finger is swiped over the SE finger scanner, then Relay 2 switches.
If a K1 finger is swiped over the GD finger scanner, then Relay 3 switches.
Key „K2“:
If a K2 finger is swiped over any of the 3 finger scanners, then Relay 4 switches.
Keys K3 and K4 are not used here but are available for any upcoming needs.
Follow this procedure for each
position =
16x
RELAY R1
RELAY
R2
RELAY
R3
RELAY R4
Key number
F
I
N
I
S
H
E
D
START
1:
INITIALIZING THE DEVICES
The ekey multi CP DRM 4 must be given notice of new or replaced devices. It can administrate up to 4 finger scanners.
DISPLAY KEY
STROKE
DISPLAY KEY
STROKE
DISPLAY KEY
STROKE
DISPLAY KEY
STROKE
DISPLAY
Select language
SELECT FINGER SCANNER
POSITION
ENTER 3-DIGIT
NAME
SWIPE FINGER
DISPLAY KEY
STROKE
DISPLAY KEY
STROKE
DISPLAY
SELECT NEXT F INGER
SCANNER PO SITION
ZIEHEN
All the finger
scanners have
been registered
Your
finger scanners are for instance mounted at the front
door, the side entrance door and the garage door. The
electrical connection alone is not enough for the ekey
multi CP DRM 4 to know which scanner is mounted where.
You must inform the ek ey multi SE REG 4 abo ut the
mounting position of the finger scanners. Thereto, please
follow the steps below.
Garage door
Relay 3
Front door
Relay 1
Side entrance
door Relay 2
The devices have been initialized.
Now you need to define the master
key plan. Please check 3:.
FINISHED
2 x
Swipe any finger of
your choice over
the scanner you
wish to assign to
this position.
Repeat for each finger
scanner
START
2:
ENTERING THE SECURITY CODE (Factory setting = 99)
The security code allows you to avoid
system manipulations by unauthorized people. Change this code as soon as you have started up the system, in order to be protected against
manipulations. For more details about how to change the security code, please check the Operating Instructions on the DVD supplied with the product.
DISPLAY K EY
STROKE
DISPLAY KEY
STROKE
DISPLAY KEY
STROKE
DISPLAY
SECURITY COD E Digit 1
SECURITY COD E Digit 2
You now a re in the main
menu an d can proceed
with change s in the
system.
FINISHED
START
Should you have entered 3 times in a row
a wrong security code, then your system
will be locked for half an hour!
Picture it this way: Your finger is a key.
You have here as many keys available as those
you defined in the master key plan. You can
assign fingers to them now. You can assign the
number of fingers you wish to each key.
The keys defined in the master key plan (
3:
) are to be assigned to the fingers during the finger enrollment procedure.
1 finger can only be 1 key! You can therefore only assign one key to one finger!
Jack
Tom
Lukas
 Loading...