

eKey home CP WM 1, ekey home CP WM 2, ekey home CP WM 3, ekey home CP IN 1, ekey home CP IN 2 Quick Start Manual
...
3. Programming the system with the ekey home CP WM 1(3) and with the ekey home CP IN 1(2)
The fu nction of the ekey home CP WM (IN)1(2,3) in the ekey
home system is to program and parametrize the system. Using
the
7-segment display and the
4 buttons,
you can
Register users and enroll their fingers
Delete users
Enter the security code
Change the security code
Change the relay switching times
Reset to factory settings
The menu navigation is intuitive and very easy. You will find
step-by-step detailed explanations of each specific menu
function on page 2.
3.1.Function of the control panel
3.2.Controls and their symbols
3.3.
Programming the system
Now start programming the system. The menu
sequences for each single function are
explained below of this document. Let us not
forget to mention the security code. You need it in
order to be able to make changes in the system.
The factory default setting for this code is
99. Change this code to another one of your
choice as soon as you have started up the
system.
The OK button allows you to register
values and move to the next menu level.
The Right arrow button allows you
set values and navigate in the menu.
The Left arrow button allows you to
set values and navigate in the menu.
The ESC butto n allows you to exit a
menu level or to cancel entries.
Symbol for the 7
-
segment display
on the
ekey home
CP
Represents that which is displayed o n the control panel during
the programming procedure and when it is operational.
QUICK START GUIDE
Before you start p rogramming the system with the help of this
quick-start guide, the system must be mounted and wired
according to the m ounting instructions and wiring plan supplied
with the device. Please follow the steps below:
1.) Make everything you need ready to mount the devices as
described in the mounting instructions supplied with the devices.
2.) Wiring
Do not connect the system to the mains yet! The electrical
connection of the system can only be carried out by a
specialist!
Connect the wires as described in the ekey home wiring plan supplied
with the devices.
3.) Check the wiring.
4.) Conclude mounting the devices. Close all the device housings
which you had to open in order to be able to proceed with the wiring.
5.) Read carefully the following chapter
„ 2 Operating the finger scanner“. The correct
operation (i.e. swiping the finger over the sensor) of
the fingerprint scanner is decisive for the proper
functioning of the whole system.
6.) Connect the power adaptor to the mains.
The electrical connection of the system can only be carried out
by a specialist!
A couple of seconds later, 2 red dots show up on the display of the
ekey home CP WM (IN)1(2,3).
The ekey home finger scanner indicators are as follows:
7.)
Now st art at point A: INITIALIZE DEVICES of „Programming
the system“.
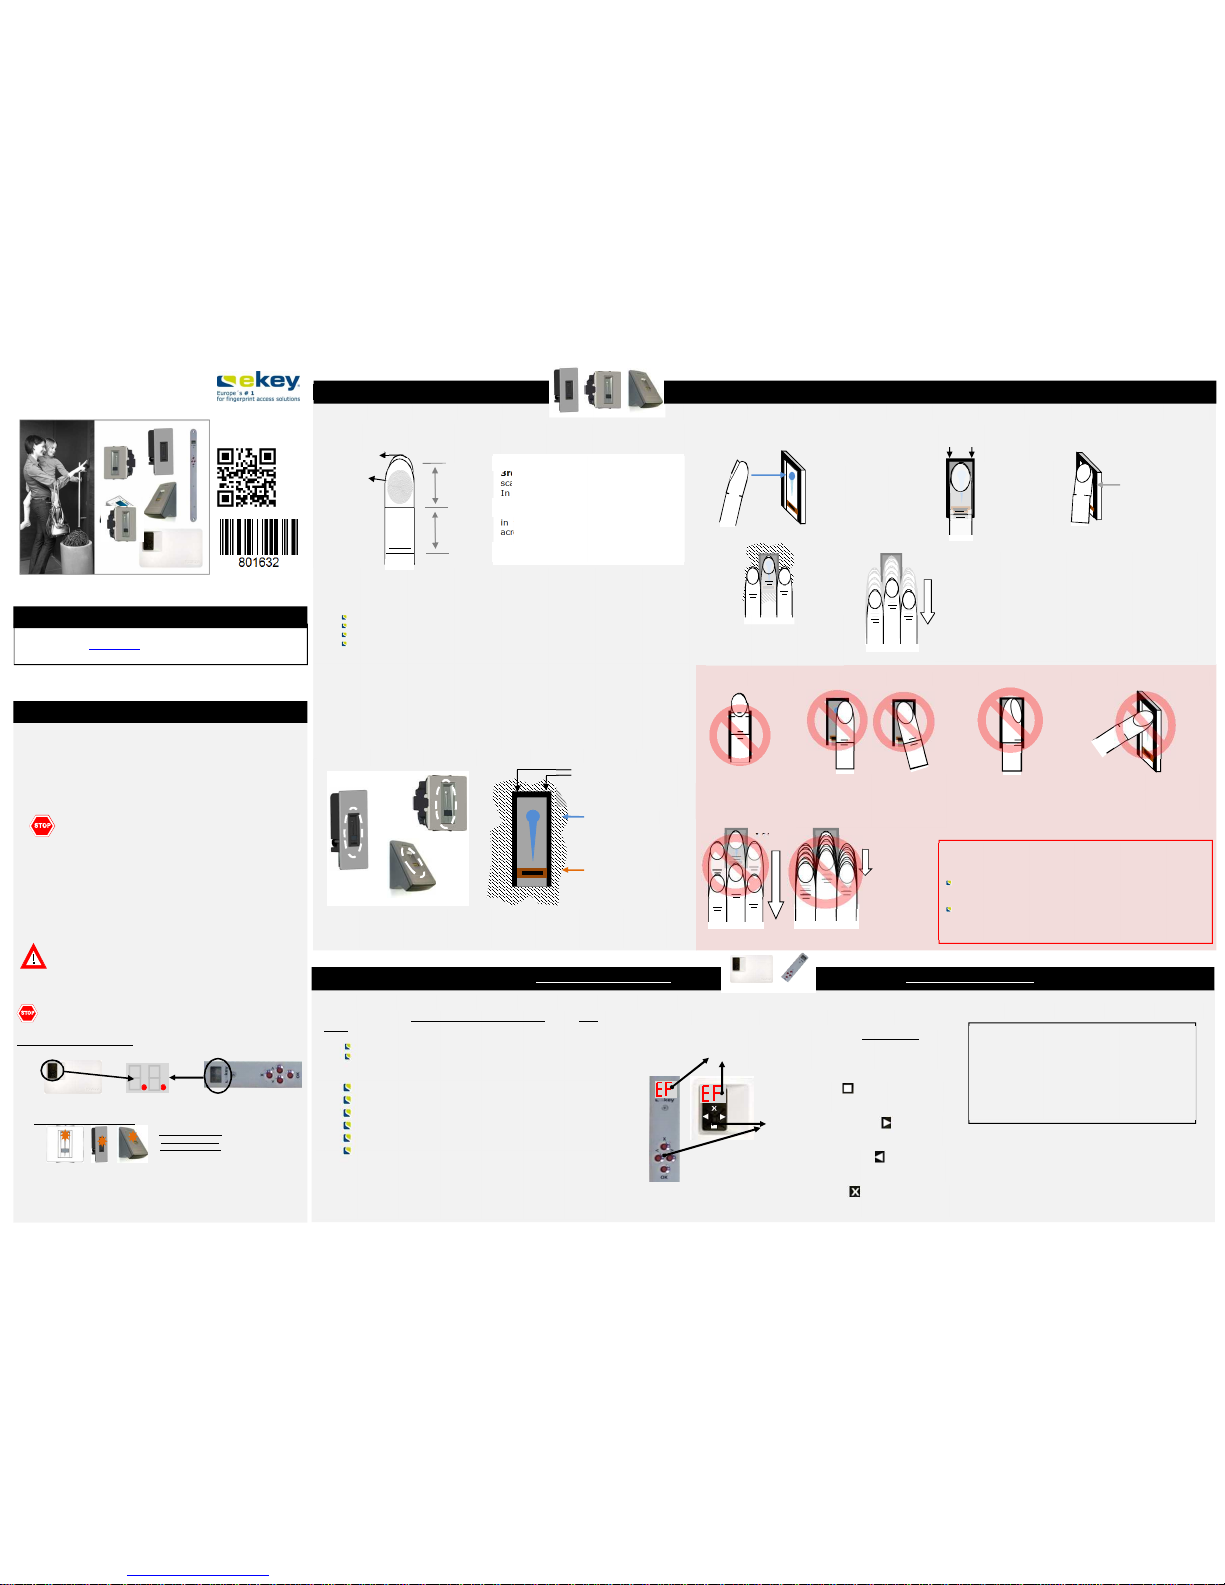
2 Operating the finger scanner
The function of the finger scanner is to capture and analyze the image of your finger, and then
compare it with a reference template. Which part of your finger should be captured?
A finger scanner works like a camera. It makes a picture of the bottom sid
e, the papillary lines, of
your finger´s third phalanx. However, this picture must be of good quality, so that physical access
can be granted whenever necessary.
Imagine you wish to make a picture of someone, and this person
keeps fidgetting
runs by and you try to make a picture of him at that exact moment
hides half of his face behind a tree
etc.
What do you think these pictures will look like? On some of the pictures you will not even be able
to recognize the person.
The finger scanner works in the same way. The finger scanner can only read all the information
contained in your finger, and consequently open your doors securely and reliably, if yo u move
your finger down across the sensor evenly and in the right position.
Let us now look at where you should place your fingers and at which speed you should move them
across the sensor, so that the „pictures“ of your fingers are perfect.
It is necessary to capture an image of the
3rd phalanx. On the contrary, your finger
scanner will not function properly.
In order t o ensure this, take care to
operate the finger scanner correctly. It is
fundamental to place your finger correctly
in the finger recess and move it down
across the sensor at the right speed.
2.1.Function of the finger scanner
2.3. Operating correctly the finger scanner
Place the middle of
your third phalanx
directly on the
finger recess pin
point
.
BE SURE to place
your finger exactly
in the middle of
the area between
both finger recess
edges.
Lay your finger straight and flat
on the finger recess.
Ideally, when positioning your
finger on the finger recess, stretch
the remaining fingers, holding them
close to the „swiping“ finger. This
helps keep the „swiping“ finger
even.
Now without changing the inclination of your finger, move it down
across the sensor (the entire hand). Take care to swipe your finger
at the right speed. BEWARE: The entire movement (swipe) should
take about
1-1,5sec
.
Use this as a benchmark. You should not need much more or much
less than that.
Do not modifiy the position of the finger phalanges during the
swipe (e.g. by bending the third phalanx).
There is no need to exert any stronger pressure. Move your
finger across the sensor as if you would w ipe bread crumbs off a
table.
2.4. What you should not do
2.2 The finger recess
– the control element
Place your third phalanx
higher than the pin point
Not place your finger in the middle
of the finger recess, or not place it
parallel to the finger recess edges.
Rotate your finger in the
finger recess.
Place your finger at a too
steep angle with the
finger recess.
Move your
finger too fast
or too slowly
across the
sensor.
The finger recess allows to place the finger correctly so that a finger picture of good quality
can be captured. It actually is the control element and consists of
pin point - sensor –
right and left recess edges.
Take care to position
your finger as flat as
possible over the
finger recess.
If you move your finger across the finger scanner in one of the
ways mentioned here, then the scanner will not be able to
extract the information it needs about your finger image. It
will therefore not function properly:
Poor recognition performance: Yo u will have to swipe your
finger several times across the sensor before being able to
induce the door to open.
Reference templates cannot be saved: You are not abel to
save a finger in the system, because the fingerscanner gets less
information.
Finger nail
3rd phalanx
(phalanx distalis)
2nd phalanx
(phalanx media)
Finger image
(papillary
lines) of t he
3rd phalanx
V >>
ekey home
CP WM
(IN) 1(2,3)
Access system with fingerprint
This quick-start guide as well as the additional information and instructions on the
supplied DVD are not subject to updating. You can find the most up-to-date version of
these documents on www.ekey.net. Subject to optical and technical modifications,
any liability for misprints excluded.
ID4/
129/0/53:
Version 2
dated 22.6.2012
ekey home FS
WM
ekey home FS IN
ekey home FS OM
flashing orange
Note on the document
1 Start-up
PIN POINT
SENSOR
L
eft and
right recess edge
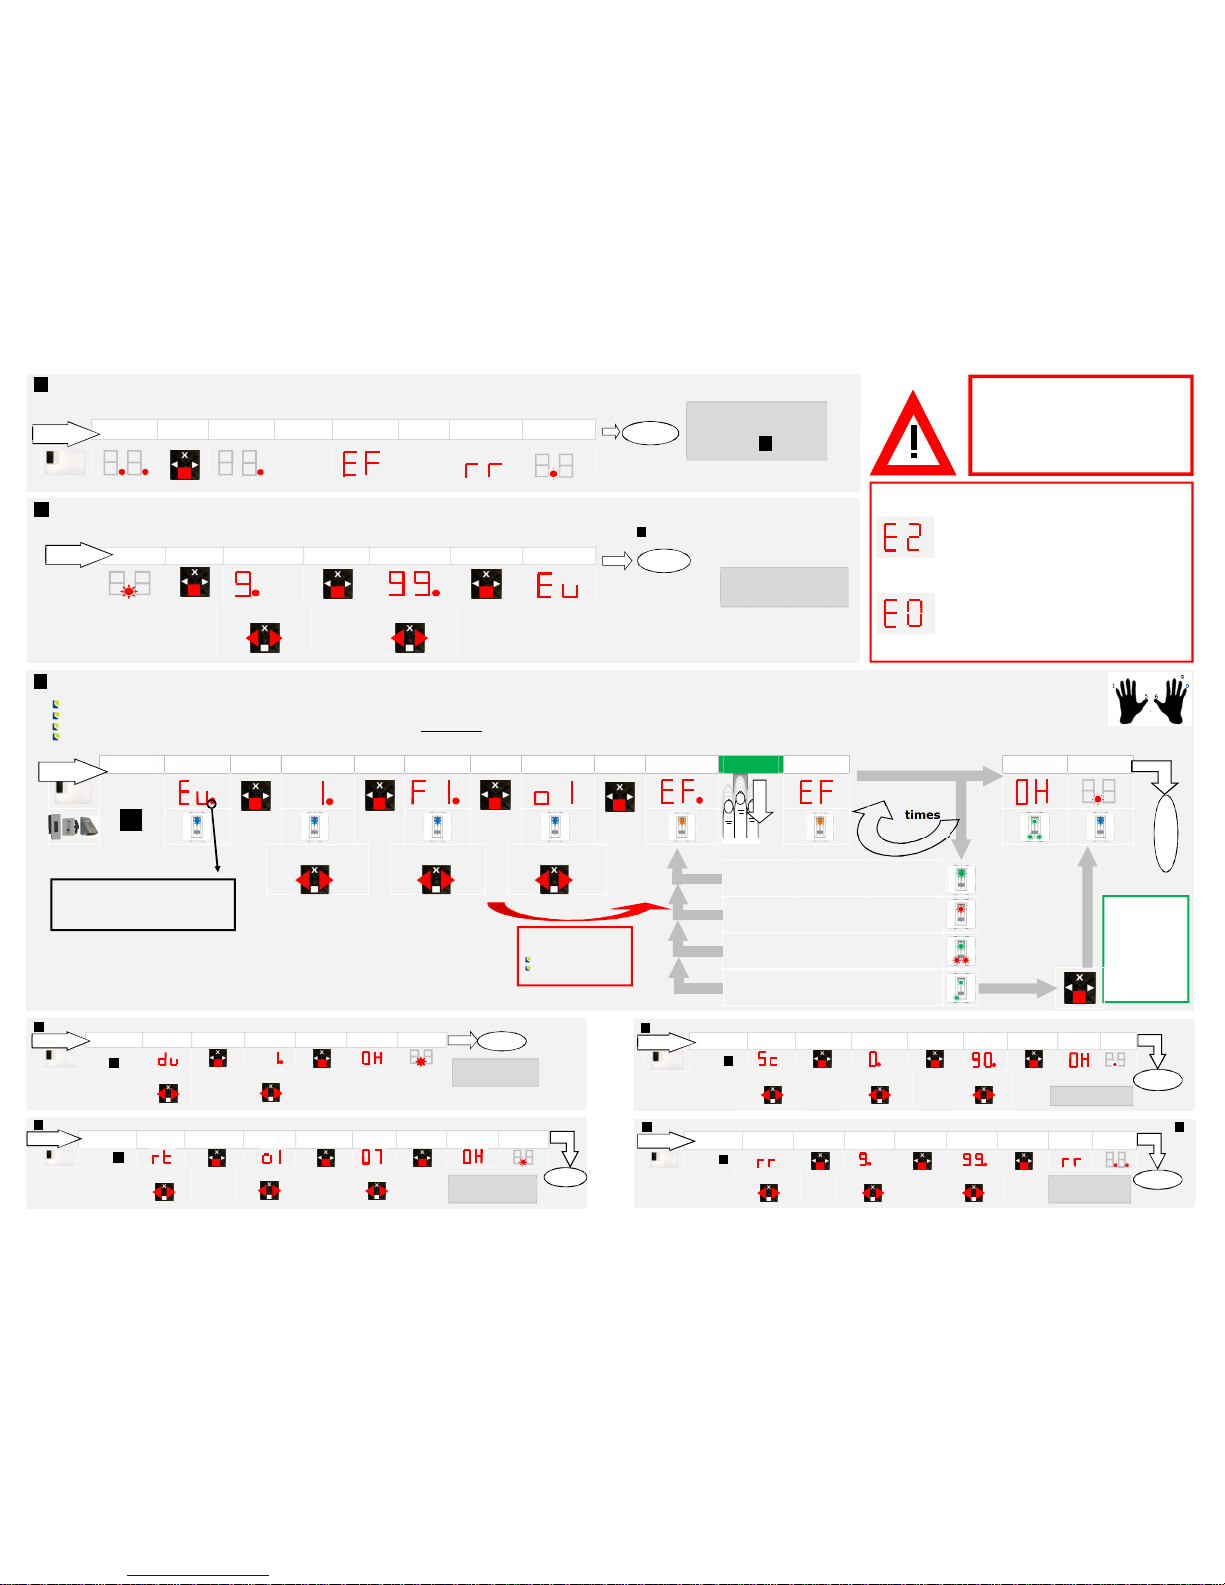
C: RECORD
ING FINGERPRINTS (Eu)
With Enroll User the following occurs:
Allocation of a user to a memory space: 0 - 99
Selection of the fingerprint number: F1 – F10 (F0)
Allocation of the fingerprint to a switching relay (with ekey home 2, 3 and PC): o1 – o3; od (Relays 1 and 2 switch together with one finger)
Finger enrollment: a finger must have been captured at least 3 times, before it can be saved as a template. Depending on the quality assessment this may have to be done regularly!
CODE
DISPLAY KEY
STROKE
DISPLAY +
SETTING
KEY
STROKE
DISPLAY +
SETTING
KEY
STROKE
DISPLAY +
SETTING
KEY
STROKE
DISPLAY Swipe USER
FINGER
DISPLAY
DISPLAY DISPLAY
SEE
B:
Select 0-99 for
USER NUMBER
Select F1-F10 for
FINGER NUMBER
Select RELAY o1-o3
or od
ZIEHEN
START
The red dot only lights up if the
memory is already occupied (a
USER or fingerprint had already
been saved to this position)!
It is
not possible to choose
the relay o n control panels
featuring only one relay:
ekey home CP WM1
ekey home CP IN1
It has not yet been possible to capture 3 fingers, or the
captured finger is of poor quality.
The finger image is of very poor quality. Try it once again,
read Chapter 2 of the Operating Instructions.
The quality of the finger image is good, but not excellent.
You may either exit enrollment by pressing the OK button
or try to achieve an excellent quality!
Although a finger has been swiped over the finger
scanner, the device has not discerned any finger swipe.
Read chapter 2 of the Operating Instructions and then
D
O
N
E
3 finger
templates
have been
captured
successfully!
Your user
finger has
now been
enrolled!
Recommended f
inger
numbering F1-F0
A: INITIALI
ZING THE DEVICES
The devices have to be initialized. Only after this can fingerprints be saved. Proceed as follows:
DISPLAY KEY
STROKE
DISPLAY KEY
STROKE
DISPLAY KEY
STROKE
DISPLAY DISPLAY
The devices have now been
initialized. You may start
enrolling users->
See C:
DONE
START
Security code
Factory setting
99
B: ENTERING THE SECURITY CODE
The security code is used to prevent unauthorized people having access to your system and thereby changing data. The factory default setting for this code is “99”: change this code straight after
having started up the system in order to ensure protection from manipulation. The necessary entries to change the code can be found in section F:.
DISPLAY KEY
STROKE
DISPLAY +
SETTING
KEY
STROKE
DISPLAY +
SETTING
KEY
STROKE
DISPLAY
Security code
DIGIT 1
Security code
DIGIT 2
START
DONE
Now you can make the
entries and data changes
in your system.
Der NEUE
Sicherheits code ist
damit ak tiv!
F: CHANGING THE SECURITY CODE (Sc)
ENTER SECURI TY
CODE
DISPLAY +
SETTING
KEY STROKE DISPLAY +
SETTING
KEY STROKE DISPLAY +
SETTING
KEY STROKE DISPLAY DISPLAY
SEE B:
Select
MEN
U
ITEM Sc
NEW
CODE
DIGIT 1
NEW
CODE
DIGIT 2
DONE
START
G: RESETTING TO FACTORY SETTINGS (rr)
Warning! All stored fingers will be deleted! The system has to be re-initialized (see A:)
ENTER SECURI TY
CODE
DISPLAY +
SETTING
KEY STROKE DISP LAY +
SETTING
KEY STROKE DISP LAY +
SETTING
KEY STROKE DI SPLAY DISPLAY
SEE B:
Select
MEN
U
ITEM rr
Security code
DIGIT 1
Security code
DIGIT 2
Your device is now
back in its delive red
condition!
STAR
T
The NEW security code is
now active !
D: DELETING USERS (du)
ENTER SECURI TY
CODE
DISPLAY +
SETTING
KEY STROKE DISPLAY +
SETTING
KEY STROKE D ISPLAY DISPLAY
SEE
B:
Select
MEN
U
ITEM du
Select
USER
NUMBER
STAR
T
The selected USER
has been deleted!
Relaisschal tzeit für das
gewählte Re lais ist
eingestel lt!
E: RELAY SWITCHING TIME (rt)
–
The switching ti me of each re lay can be set from 1 sec to 99 se c..If 0 is set then the relay works as a toggle relay.
ENTER SECURI TY
CODE
DISPLAY +
SETTING
KEY STROKE DISPLAY +
SETTING
KEY STROKE DISPLAY +
SETTING
KEY STROKE DISP LAY DISPLAY
SEE B:
Select
MEN
U
ITEM rt
Select RELAY
Switching time in
seconds (1-99)
STAR
T
The rela y switching time for
the selecte d relay has been
set!
Errors codes on the display:
Error code „E2“: You have entered the
wrong code three times in a row. The s ystem
will be completely locked for 30 mn.
Error code „E0“: There is no data connection
to the finger scanner. Check the wiring and
make sure that all the devices ares connected
correctly to the mains!
At least
3
times
 Loading...