

EisSound 426A2 User And Installation Manual
USER’S AND INSTALLATION MANUAL
426A2 CONTROL UNIT
DAB
CC-1122ENG-05
1
2. Features & Technical Characteristics
3. Installation
7. Operating
5. Settings Menu
4. Installation Menu
6. Programming Menu
1. Quick Reference Guide
4
6
14
7
8
9
2
Important Safety Instructions
Before installing the unit, please read and follow the instructions provided in the
Installation Manual included .
Before operating the unit, please read and follow the instuctions provided in the User´s
Manual thoroughly and save it for future experience.
WARNING -To reduce the risk offireorelectricshock:
install in accordance with the manufacturer’s instructions
do not expose this apparatus to rain or moisture
do not use this product near water
do not attempt to dissamble this unit
do not block any ventilation openings
do not install near any heat sources such as radiators, stoves or other
equipments that produce heat.
You are cautioned that any changes or modifications not expressly mentioned in this
manual could void your authority to operate this equipment.
This product has been designed and tested to provide reasonable protection against
harmful interference in residential installation. However there is no guarantee that
interference willnot affect ina particular installation. Inthese cases, reorient the receiving
antenna, try to increase the separation between the equipment and the source of
interference and/or connect the equipment into an outlet on a circuit different from that to
which the source of interference is connected.
The entire risk of the installation, use, results and performance are borne by you.
When used as a mechanism to disconnect from the current network, a socket plug, or a
device connector; the disconnecting mechanism must be easily accessible at all times.
Protect the power cord from being walked on or pinched particularly at plugs,
convenience receptacles, and the point where they exit from the apparatus.
Only use attachments/accessories specified by the manufacturer.
as power-supplycord or plugis damaged,
liquid has been spilled or objects have fallen into the apparatus, the apparatus has been
exposed to rain or moisture, does not operate normally,or has been dropped.
Attention should be drawn to the environmental aspects of battery disposal.
Use a certifiedtechnician for installation, repair and/or maintenance of this equipment and
comply with all the regulations in force in each country. Servicing is required when the
apparatus hasbeen damaged inany way,such
CAUTION
DO NOT OPEN
RISK OF ELECTRIC SHOCK
!
Table of contents
CC-1122ENG-05
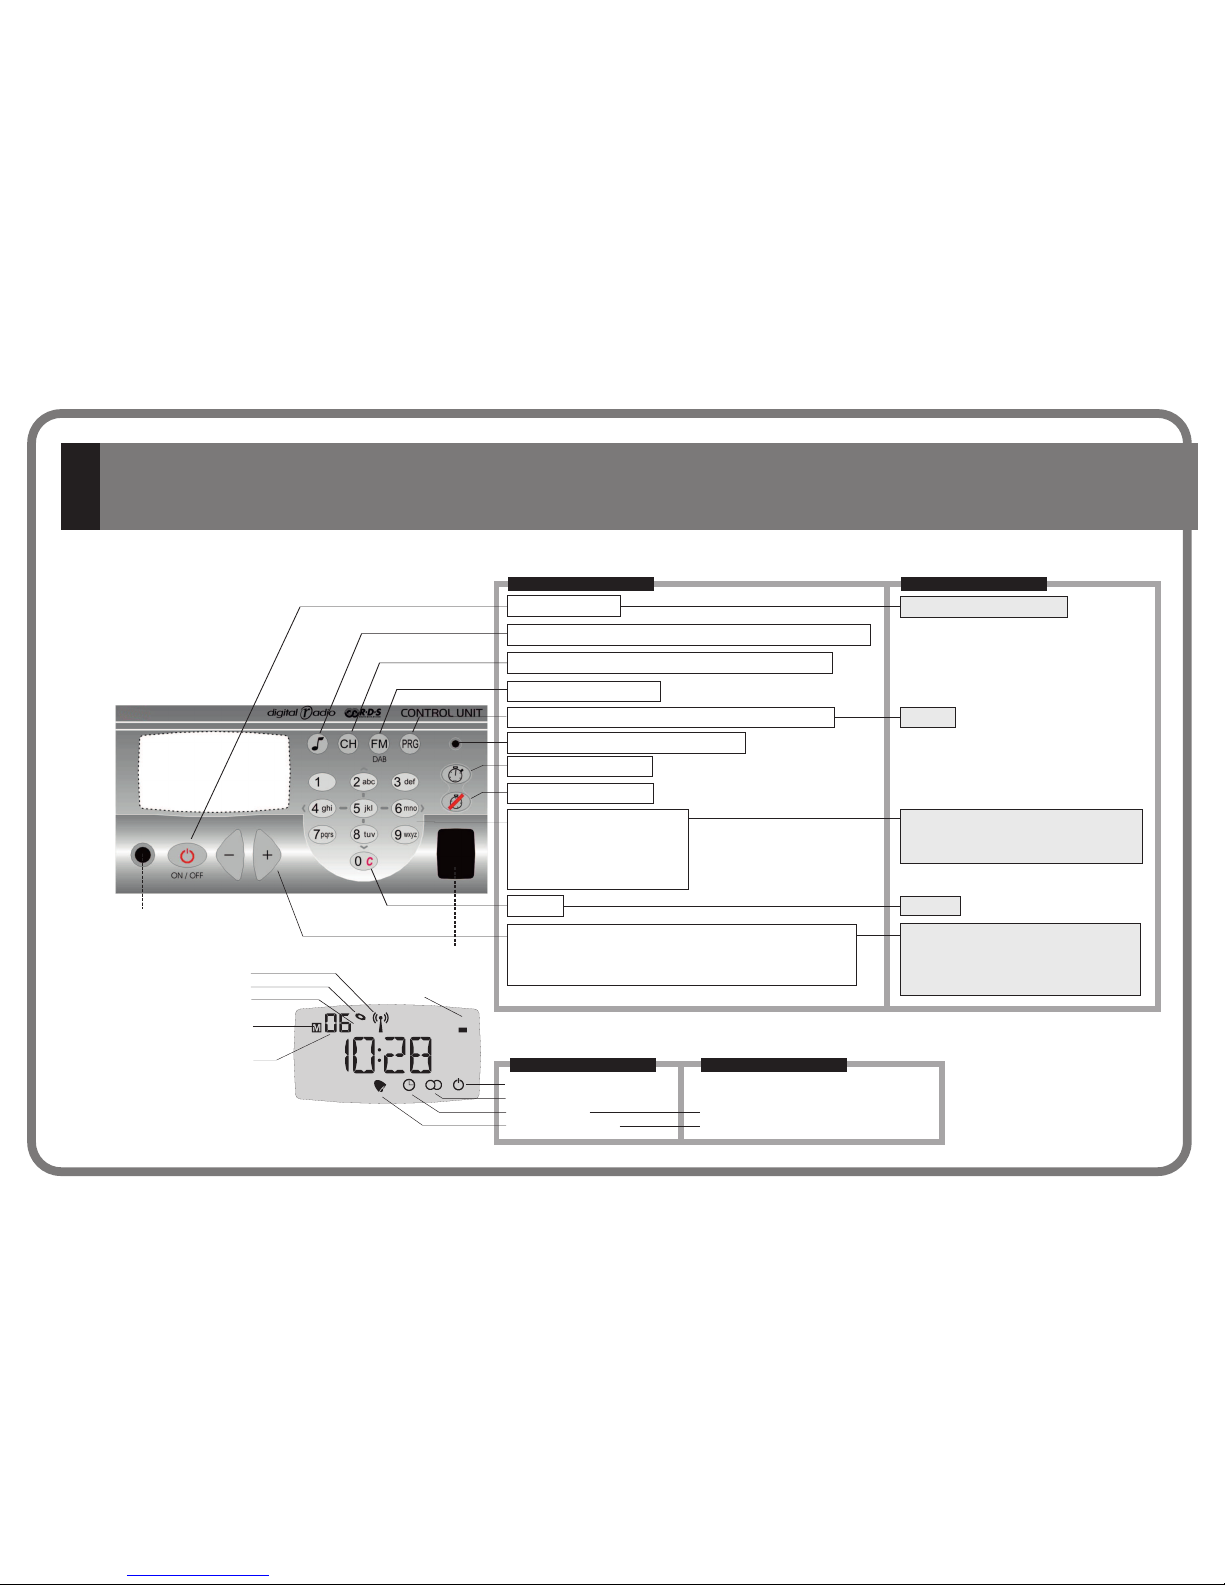
music enabled
station tuned in stereo
sleep enabled
auto-standby enabled
alarm 1-2 enabled
alarm 1-2 enabled and snoozed
day of the week
pre-set memory selected
FM/DAB tuner memory
pre-sets
FM/DAB station tuned
FM tuner
audio adjustment mode (volume-bass-treble - loudness - balance)
audio channel selection (FM - DAB - discman/MP3/iPod input)
FM/DAB tuner
access to program / settings / installation menus
start acoustic timer
acoustic timer enabled (flashing)
stop acoustic timer
numeric keypad
FM station frequency
FM&DAB memory pre-set
programming options
delete
adjust keys
IR receiver
discman/MP3/iPod input
off/on
Audio levels (volume-bass-treble-loudness-balance)
Automatic station seek
Digit-by-digit frequency band forward/reverse
store
discman/MP3/iPod
1 2
FM
1
4
3
2
7
6
5
NORMAL
STATIC FLASHING
PROGRAMMING
exit programming menu
numeric keypad
numeric selection of setting to be selected
scroll through the programming options
delete
adjust keys
selection of program setting to be selected
scroll through options in the same
programming level
2
1. Quick Reference Guide
CC-1122ENG-05
16
EIS
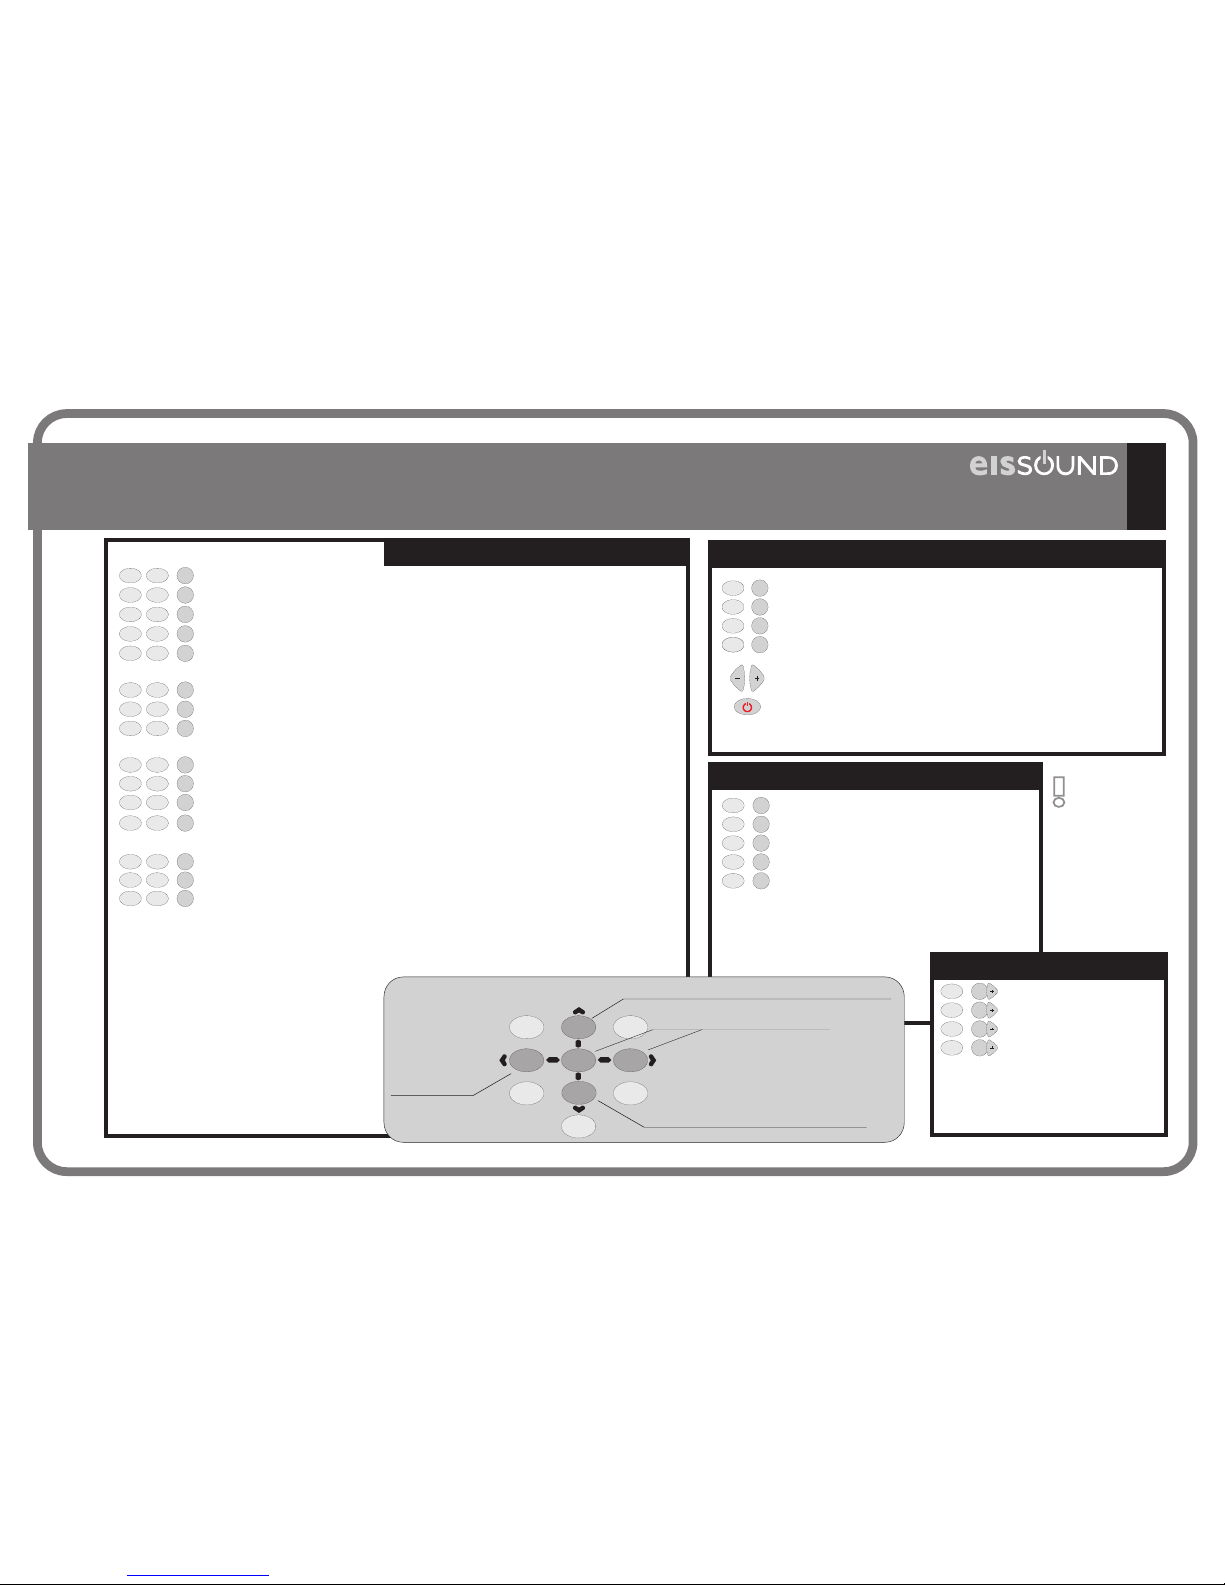
3
CLOCKS
Alarm 1 (ON/OFF status - Hour, minutes - Days of week - Type - Volume)
Alarm 2 (ON/OFF status - Hour, minutes - Days of week - Type - Volume)
Auto Standby (ON/OFF status - Hour, minutes - Days of week)
Sleep
Time (Auto time set - Hour, minutes - Day, month, year)
FM TUNER
FM Search sensitivity (4=max ... 1=min)
Autoscan FM
Delete FM tuning pre-sets
DAB TUNER
Initialize DAB
Autoscan DAB
Delete DAB tuning pre-sets
Update DAB stations
ADJUSTMENTS
Store “IDEAL” settings
Dimmer off
Dimmer on
1
1
1
1
1
1
2
abc
2
abc
2
abc
2
abc
5
jkl
4
ghi
4
ghi
4
ghi
4
ghi
3
def
PRG
PRG
PRG
PRG
PRG
1
2
abc
3
def
3
def
3
def
3
def
PRG
PRG
PRG
1
1
2
abc
2
abc
3
def
3
def
PRG
PRG
PRG
PRG
PRG
PRG
PROGRAM MENU
Alarm 1 status ON/OFF
Alarm 2 status ON/OFF
Autostandby status ON/OFF
Store “Ideal”
Activate Ideal mode
(2") Enable sleep
1
2
abc
4
ghi
3
def
PRG
PRG
PRG
PRG
8
tuv
QUICK ACCESS FUNCTIONS
(2") Language
(2") Control Unit greeting
(2") Permission to store/delete pre-sets
(2") IR remote Control Unit
(2") Delete settings
1
2
abc
5
jkl
4
ghi
3
def
PRG
PRG
PRG
PRG
PRG
SETTINGS MENU
INSTALLATION MENU
(2") Mono/Stereo
(2") Audio output
(2") Delete installation
(2") Software version
1
2
abc
4
ghi
3
def
PRG
PRG
PRG
PRG
(2") indicate
to hold a
key down
for 2
seconds
21
54
8
7
0
C
3
6
9
abc
jkl
ghi
pqrs
tuv
def
mno
wxyz
Scroll back to the previous option within the
same level.
enter the level
exit the level
Scroll forward to the next option
within the same level.
3
def
PRG
4
ghi
CC-1122ENG-05
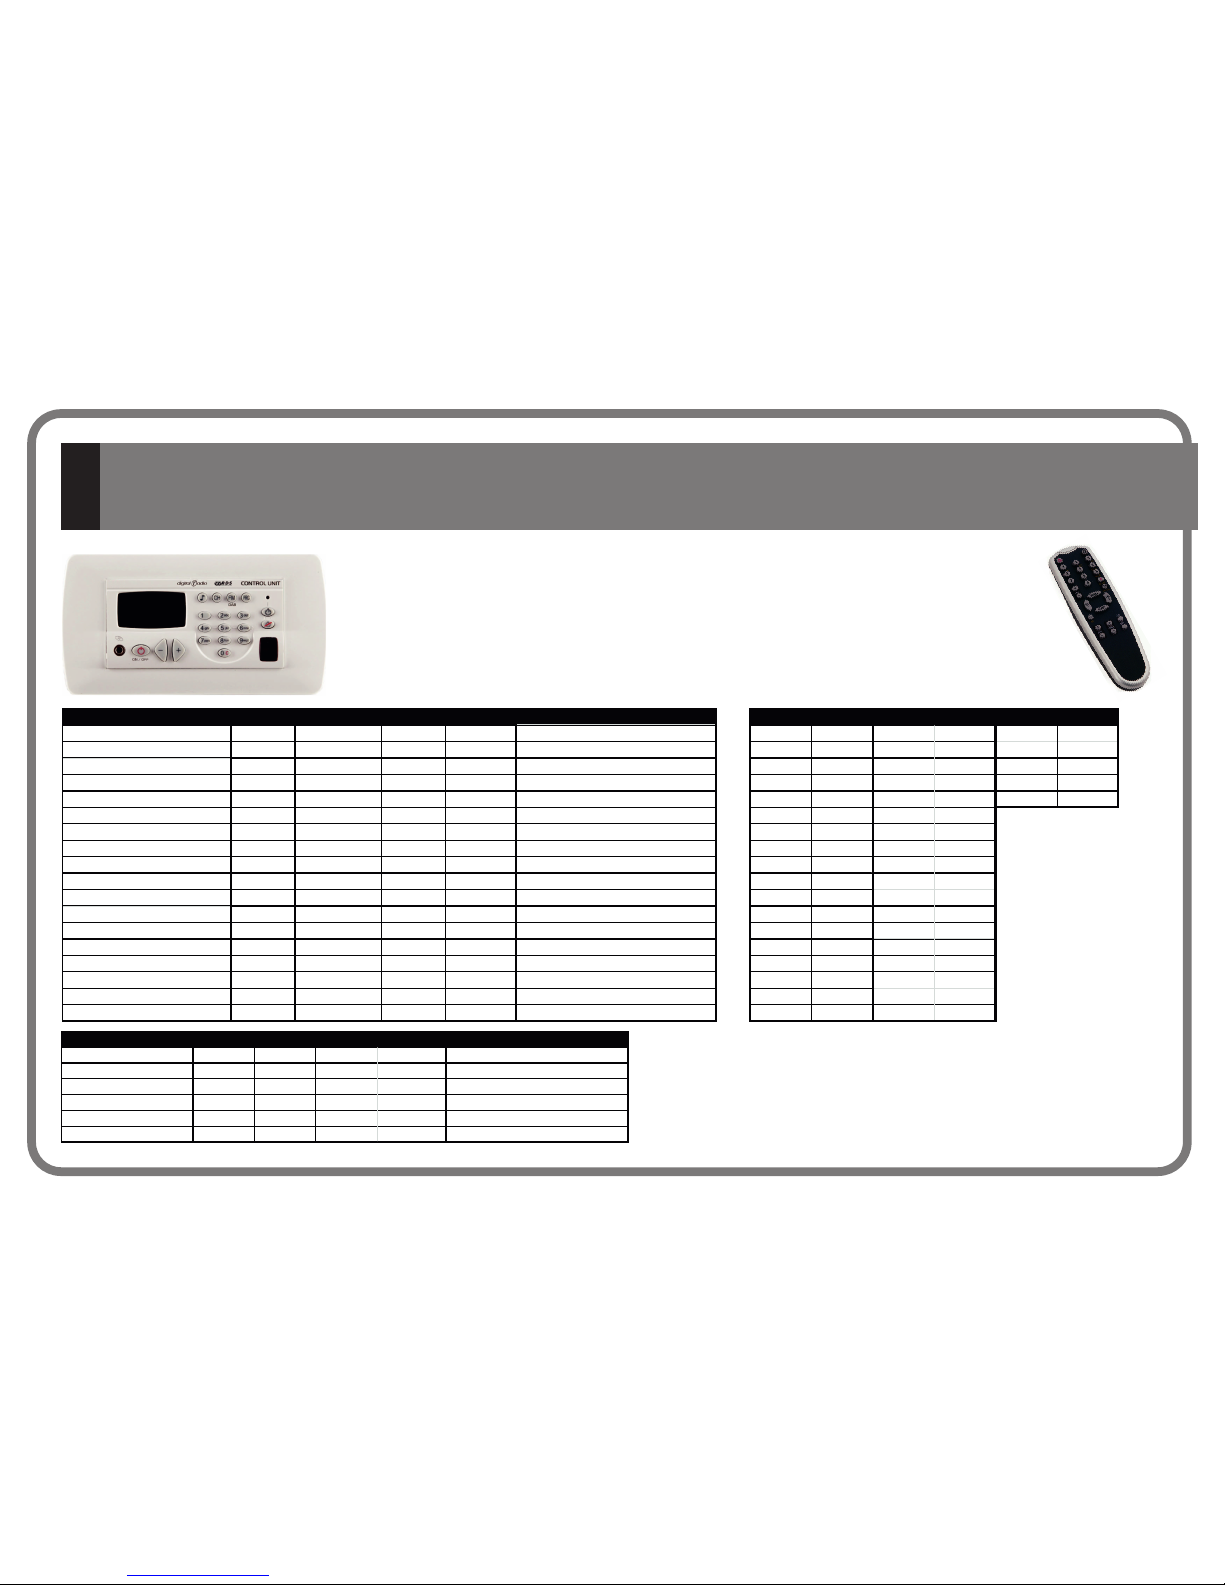
- FM radio with RDS services (50 memories)
- DAB (Band III) digital radio (50 memories)
- External source sound input (discman/MP3/iPod, ...)
- Clock & calendar
- 2 alarms
- Autostandby
- Sleep timer
4
2. Features & Technical Characteristics
- Acoustic timer
- Easy view LCD display white light
- Different colours available (accessory)
- IR remote control available (accessory)
426A2 MIN NORMAL MAX COMMENTS
Measurements 135,5x70,5x44 mm exterior (width x height x depth) CHANNEL MHz CHANNEL MHz CHANNEL MHz
116x54x36 mm cavity (width x height x depth) 1-5A 174,928 18-9B 204,640 35-13C 234,208
99x51 mm frontal (width x height) 2-5B 176,640 19-9C 206,352 36-13D 235,776
Voltage 15 16 Vdc terminal 2 3-5C 178,352 20-9D 208,064 37-13E 237,488
Consumption demand 26 215 600 mA terminal 2 4-5D 180,064 21-10A 209,936 38-13F 239,200
Input signal 100 mVeff jack 3,5mm 5-6A 181,936 22-10B 211,648
Input impedance 70 100 130 Kohms jack 3,5mm 6-6B 183,648 23-10C 213,360
Output signal (16 ohms) 1,5 W terminals 05,06 7-6C 185,360 24-10D 215,072
Passband 20 15.000 Hz 8-6D 187,072 25-11A 216,928
Distortion 0,3 0,4 % 9-7A 188,928 26-11B 218,640
Frequency range 87,5 108 MHz FM 10-7B 190,640 27-11C 220,352
174 240 MHz DAB (Band III) 11-7C 192,352 28-11D 222,064
Antenna impedance 75 ohms terminals A,M 12-7D 194,064 29-12A 223,936
Antenna sensitivity 1 uV FM (SNR=26dB) 13-8A 195,936 30-12B 225,648
-93 -96 dBm DAB (EN50248) 14-8B 197,648 31-12C 227,360
AD converter precision 8 bits 15-8C 199,360 32-12D 229,072
Number of station pre-sets 50 FM 16-8D 201,072 33-13A 230,784
50 DAB 17-9A 202,928 34-13B 232,496
DAB (Band-III) frequency table
11298 MIN NORMAL MAX COMMENTS
Measurements 181x50x52 mm exterior (width x height x depth)
Voltage 185 230 265 Vac 50Hz, terminals F,N
Power 8 W terminals 2(+),4(-)
Output voltage 15 16 Vdc terminals 2(+),4(-)
Output current 530 mA terminals 2(+),4(-)
Consumption demand 12 W
CC-1122ENG-05
16
EIS
5
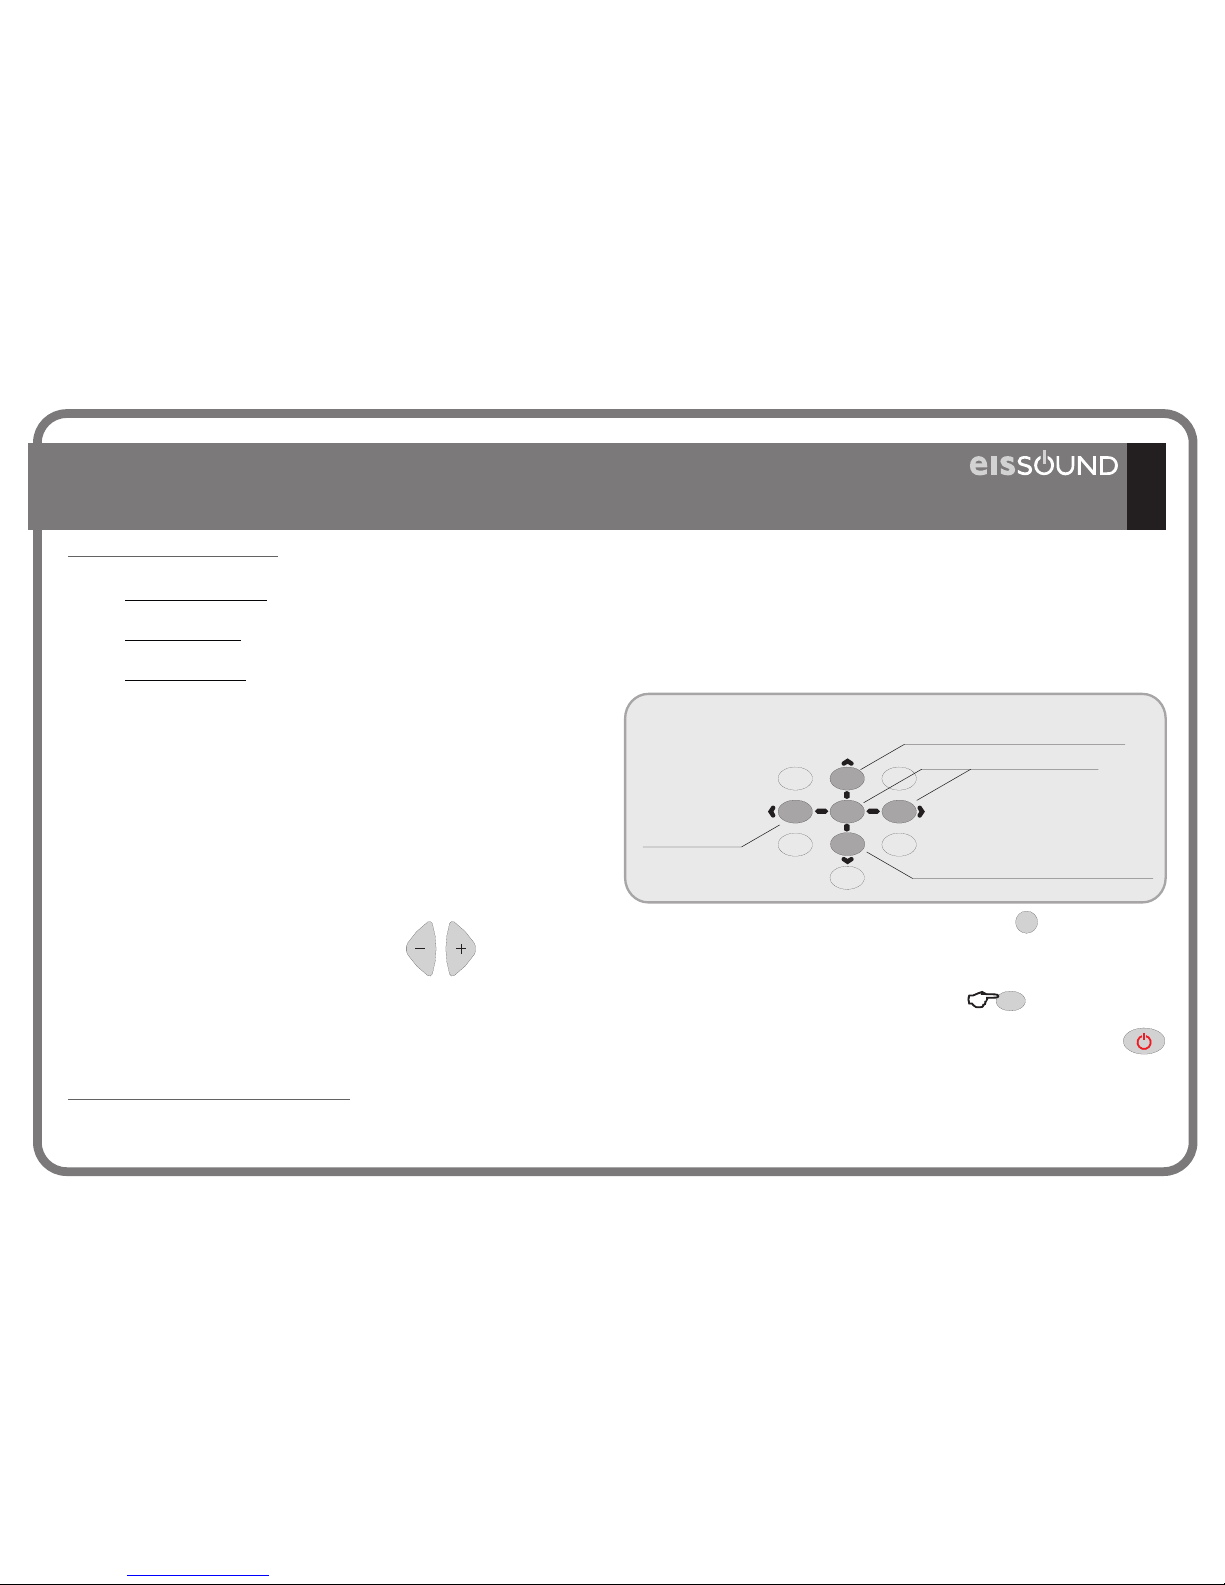
The 426A2 Control Unit has three program menus of settings at different access levels.
Discusses the settings related to the proper operation of the system. These settings should be programmed by a
professional.
Discusses each user’s custom operation mode. None of these settings will affect the system’s operation and, once defined, the
settings will usually not have to be changed.
Discusses features that are programmable by the user and which are easily changed.
Installation Menu:
Settings Menu:
Program Menu:
«
«
«
The program menus are structured in level and sub-level menus.. The
following operations and keys in the menu will scroll the user between
settings of the list of options.
When a setting to be programmed appears on the
display, it will be flashing, indicating it is ready to
be programmed.
If more than one setting is available (for example,
days of the week or digits of a date) use the +/keys to scroll forward/back.
The numeric keys can be used to change
a setting. In some cases, in addition
to the numeric keys, the +/- keys can also be used
to change settings
How to use this manual
Quick Access To A Menu Option
As an alternative to scrolling through the menus to find an option, directly key in the option code followed by the menu access key (see code list in
chapter 1. Quick Reference Guide
Once you select the desired setting, press the PRG key to store.
The entry will begin to flash quickly, indicating that the new setting has been
stored.
To delete an entry at any time, press the ZERO key for 1”
To exit a programming option without storing a setting, press the ON/OFF key.
PRG
0
C
1’’
Scroll back to the previous
option within the same level.
enter the level
exit the level
Scroll forward to the next
option within the same level.
21
54
8
7
0
C
3
6
9
abc
jkl
ghi
pqrs
tuv
def
mno
wxyz
CC-1122ENG-05
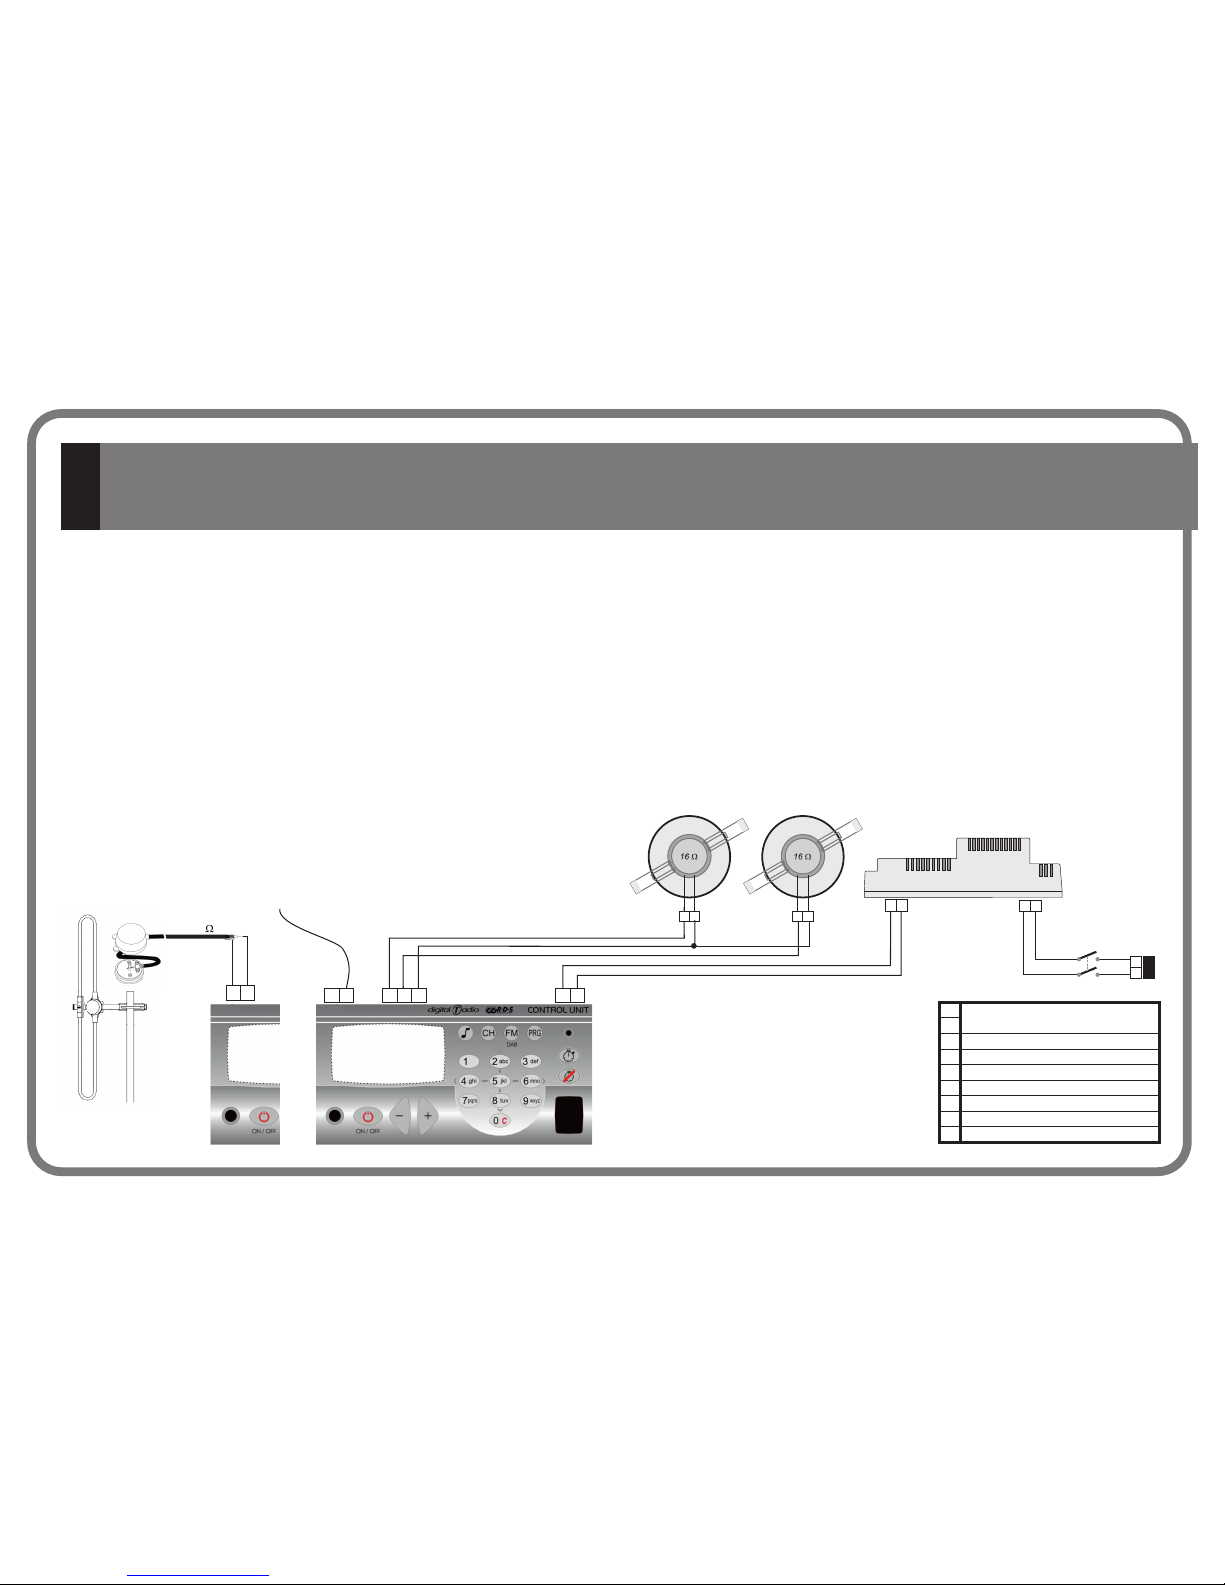
CONNECTING TERMINALS
15Vdc Sound regulator power supply
Mass
2
4
05
06
04
N
L
Left loudspeaker output (red terminal/+)
Right loudspeaker output (red terminal/+)
Common loudspeaker ouput (black terminals/-)
230V Power supply
FM&DAB tuner antenna signal
FM&DAB tuner antenna mass/screen
A
M
·
·
·
·
·
·
·
·
·
Installation involves four elements: a power supply, a Control Unit, an antenna and loudspeakers.
If the room is to run in MONO connect any of the speakers and set the Control Unit to MONO. (See 4.1. Mono/Stereo Installation)
Default speaker output is set to 16 ohms. Also, 8 ohms speakers can be connected, in this case, the Control Unit must be set to 8 ohms. (See 4.2.
Audio Output Installation).
If it is necessary to connect an amplifier or power supply to a Control Unit's sound output, the Control Unit must be set to AMPLIFIER. (See 4.2. Audio
Output Installation). Connect the amplifier to terminals 2, 4, 05 and 06 on the Control Unit.
All wire sections are 0.25 mm except supply wires (terminals 2 and 4), which are 1 mm . The network tapping wires are standard.
To connect the FM/DAB antenna, connect a 76 cm wire to terminal A or connect a 75 ohms antenna input to terminals A (signal) and M (mass).
Improving the FM&DAB reception: extend the aerial antenna wire and adjust the angle for best reception. Be sure to locate it as far as possible from
any sources of electrical noise such us halogen lamps, HVAC, fluorescent bulbs, etc.
It is advisable that the direct current that provides power
to the power supply (ref.11298) be connected to a
specific Automatic Switch in order to isolate and allow
you to disconnect the Audio System independently from
the rest of the electrical appliances in the home.
2 2
WE STRONGLY RECOMMEND TO CONNECT A DAB AERIAL (75 ohms antenna amplified) to receive more programmes with improved
sound quality
6
3. Installation
426 A2
power supply
Control Unit
loudspeakers
+
-
0506 4M 04 2
+
-
A
76 cm
+
-
75
+
-
Red Black
4 2
N L
LN
BlackRed
112 98
230V
M A
CC-1122ENG-05
 Loading...