

Page 1
DualBoard
™
GETTING STARTED
Page 2
GETTING STARTED
eInstruction TouchBoard
™
Page 3

eInstruction Corporation is a leading education technology
company providing software and hardware solutions that help
educators drive academic progress every day. We want you
to have the best experience with our products and encourage
you to visit our web site at www.einstruction.com for our latest
product information and updates that would be in addition to
the Getting Started Guide included in the box.
Click on any of the eInstruction products to access product
information, software downloads, documentation, and training
information.
Please recycle
www.einstruction.com
www.einstruction.eu
www.einstruction.it
www.einstruction.fr
www.einstruction.es
www.einstruction.de
Page 4

Contents
eInstruction TouchBoardTM At-a-Glance 4
Getting Started 5
What is in the Box?
Mount the eInstruction TouchBoard 5
Install the Software 6
Install the Content 6
Workspace User Guide 7
Connect the eInstruction TouchBoard 7
Connect the Video Projector 8
Getting the Most Out of eInstruction TouchBoard 9
TouchBoard Calibration Windows 7 9
Device Manager Calibration 10
Gestures 11
Gestures Table 11
Mouse Actions Table 12
Saving, Exporting and Printing a Workspace
presentation
12-13
Storing the TouchBoard pen 13
Mobility Solution - with eInstruction AdjustIt Pro Stand
TM
14
Support and Troubleshooting 14
Hardware and Software Requirements 14-15
Appendixes
A: Limited Warranty for TouchBoard
B: Declaration of Conformity
C: Compliancy
D: Contact
™
Page 5

TouchBoard
TM
At-a Glance
Congratulations on your new eInstruction TouchBoard. eInstruction gives
teachers the ability to engage all types of learners with a high level of interactivity.
Built on the popular functionality of the DualBoard™, the eInstruction TouchBoard
features touch technology. You and your students can interact with the
whiteboard using an eInstruction TouchBoard pen, TouchBoard wand or
their nger.
When the eInstruction TouchBoard is combined with one or more
Mobi™ mobile interactive devices, they create an interactive, collaborative
learning environment that is unsurpassed. Mobi is the rst mobile interactive
whiteboard designed to support student-centered collaborative learning and
give you the freedom and exibility to manage your class and deliver engaging
lessons from anywhere in the room.
The eInstruction TouchBoard comes with the award-winning WorkspaceTM
software. Workspace enables you to create and assemble the interactive lesson
content, and gives you the ability to control the content using the eInstruction
TouchBoard. It also gives you the ability to incorporate and work with teaching
material in multiple formats from any source, including ExamView® content, webbased content or third-party curricula.
Do not assemble or use this proDuct before reaDing the installation instructions.
assemble anD use this proDuct only in accorDance with the installation instructions.
Page 6
5
Mount the eInstruction TouchBoard
Attach the four mounting-brackets to the board, positioning the brackets between
the hanging marks on the back of the board. Using four of the eight self-
anchoring screws provided, attach the rst two wall-clips. The top two wall-clips
should be 39.6 inches apart (100.5 cm). The location of the bottom two wallclips should be determined after the installation of the top two wall-clips. Ensure
that the wall-clips are securely fastened and level before attempting to hang the
board.
It will require at least two people to safely lift and mount the board on the wall.
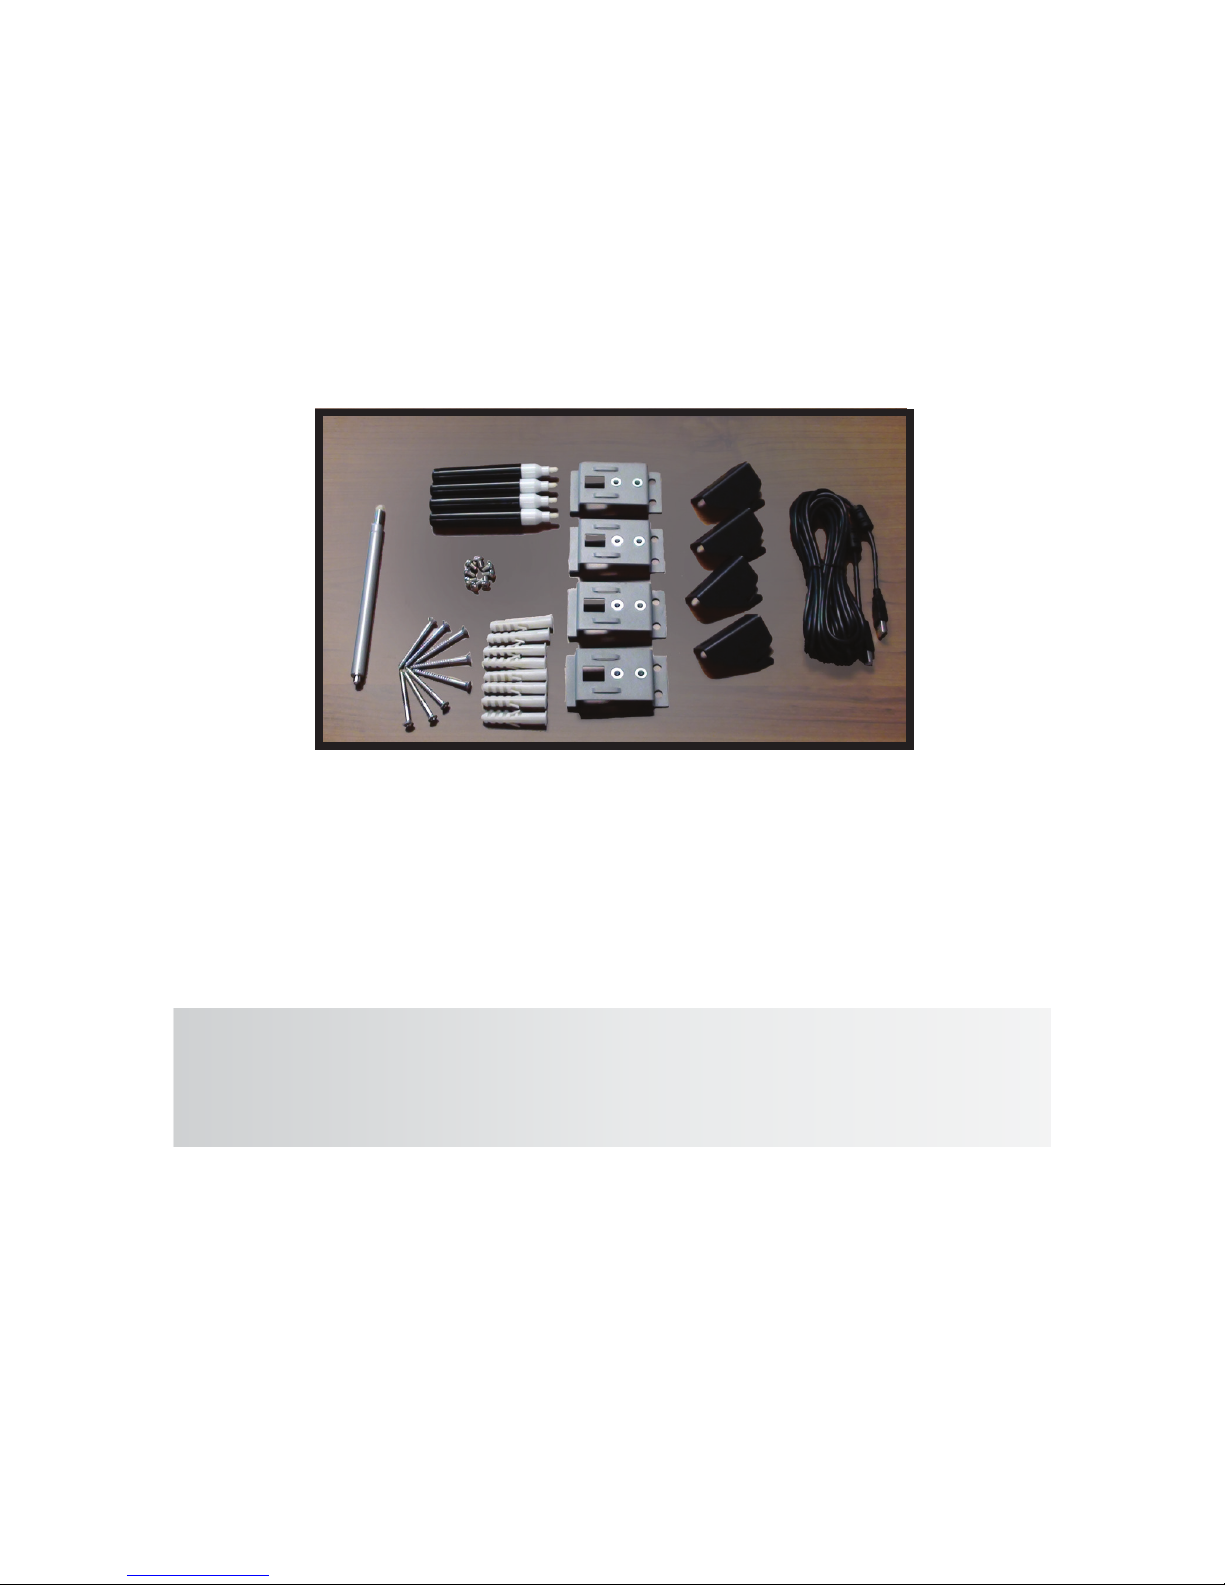
*Non-electronic pen
USB Cable
4 wall-clips
8 self-anchoring screws
4 mounting-brackets
8 bracket screws
Touch wand
Workspace DVD
Workspace Content DVD
4 eInstruction TouchBoard pens*
eInstruction TouchBoard Getting Started Guide
What is in the Box
TouchBoard is compatible with most Mac, Windows or Linux operating systems.
Please see page 13 for complete software and hardware requirements.
You will need an available USB port and DVD drive to install TouchBoard and
Workspace software.
Simply connect your computer to a digital projector and you will have an
interactive TouchBoard system ideal for an enhanced interactive system
classroom.
eInstruction has provided wall-clips and self-anchoring screws to mount the eInstruction
TouchBoard to the wall. However, we recommend that a skilled professional assess the
strength of the wall and determine the appropriate hardware required to securely attach
the board to the wall.
TIP
Page 7

6
Install the Software
Workspace Software and Workspace Content, Windows
1 In order to install the software, your logged-in computer prole should have
administrator rights.
2 Insert the Workspace DVD into your DVD drive. The DVD will autorun. If
the DVD does not autorun, navigate to your DVD drive and double click the
autorun.exe le.
3 Follow the on-screen instructions to proceed through the installation
process.
You will know Workspace has installed successfully by the appearance of
the eInstruction icon in the Windows notication area.*
4 Repeat steps 2 and 3 using the Workspace Content DVD to install the
Workspace Content.
Workspace Software and Workspace Content, Macintosh
1 Insert the Workspace DVD into your DVD drive. Double click on the
Workspace DVD icon that will now show on the desktop.
2 Follow the on-screen instructions to proceed through the installation
process.
You will know Workspace has installed successfully by the appearance of
the eInstruction icon
in the Menu Extras (Munulets) area.*
3 Repeat steps 1 and 2 using the Workspace Content DVD to install the
Workspace Content.
Workspace Software and Workspace Content, Linux
1 Login as “root” or use “sudo”.
2 Insert the Workspace DVD into your DVD drive. Double click on the
Workspace DVD icon that will now show on the desktop.
3 Under permissions: Select the Allow executing le as program.
4 Follow the on-screen instructions to proceed through the installation
process.
You will know Workspace has installed successfully by the appearance of
the eInstruction icon in the panel.*
5 Repeat steps 2, 3, and 4 using the Workspace Content DVD to install the
Workspace Content.
* If the eInstruction icon does not appear, reboot.
Page 8

7
Workspace User Guide
Workspace provides the tools to create and deliver presentations, enhance material
with special effects, annotate to highlight key points, add notes incorporating
additional information or audience comments, and much more.
Look for the provided Workspace Getting Started Guide or look on the included DVD,
for an in-depth view of Workspace’s functions, features and tools, and the basics
on how they can be used to prepare, present, save, and distribute presentations.
Connect the eInstruction TouchBoard
The eInstruction TouchBoard connects to your computer via a USB cable.
A separate power supply is not necessary since the eInstruction TouchBoard is
powered through the USB connection.
1 Plug the USB cable into the USB port on the back of the board.
2 Plug the other end of the USB cable into a USB port on your computer or a
USB hub connected to your computer.
A red light located at the bottom right corner of the board indicates that the board
is receiving power through the USB cable. A blue light indicates proximity of the
pen to the board. See picture below for indicator light location.
Workspace and its associated language text recognition tool is available in 48
languages. You can download language packs at
http://www.einstruction.com/downloads.
TIP
Page 9

8
Connect the Video Projector
When the computer and eInstruction TouchBoard are connected and
communicating, you can project the computers image onto the TouchBoard.
1 Power off your computer.
2 Connect your projector video cable from the computer to the video projector.
3 Power on your computer. The light at the bottom right corner of the
eInstruction TouchBoard will turn red.
4 Turn on the video projector.
5 With the video projector aimed at the eInstruction TouchBoard, align the
projected image onto the board so that it is within the board’s active area.
See picture below for the active area.
For optimal usage and viewing, the minimum required resolution of your computer
should be 1024 x 768.
TIP
Plastic Corners
Active Area
(15mm)
.59 in
(15mm)
.59 in
Page 10

9
Getting the most out of your eInstruction TouchBoard
TouchBoard Calibration; Windows 7
For the initial TouchBoard setup, your logged-in computer prole should
have administrator rights in order to perform a 16 pt. calibration. Any further
calibrations will be a 4 pt. calibration, able to be performed by a standard
user.
1 Manually align the projected image within the eInstruction TouchBoard’s active
area. Use the projector’s built-in correction utility to correct for picture distortion.
2 From your computer, right-click on the icon in your system tray, on your
computer desktop. Select the eInstruction device manager (the icon may
be hidden; click on the arrow to reveal the hidden icon) from the menu.
Right click on your device with the green check mark in the device manager
window. Choose Touch Settings.
.
Touch Settings will open up the operating system’s calibration window.
From your operating system’s settings window choose Calibrate. When
prompted, choose Touch Input. Follow the instructions on the
calibration screen.
You are now ready to use your eInstruction TouchBoard.
Page 11

10
Device Manager Calibration
Perform this function to use multiple eInstruction devices in Multi-User mode in
Workspace. Any time the eInstruction TouchBoard or video projector is moved,
the board should be re-calibrated so that the eInstruction TouchBoard pens, the
tip of your nger, or Touch wand are properly aligned with the cursor projected
onto the board.
1 Manually align the projected image within the eInstruction TouchBoard’s
active area. Use the projector’s built-in correction utility to correct for
keystone distortion.
2 From your computer, right-click on the icon in your system tray, on your
computer desktop. Select the eInstruction device manager (the icon may
be hidden; click on the arrow to reveal the hidden icon) from the menu.
Right click on your device with the green check mark in the device manager
window. Choose Calibrate.
The system will establish a connection with the eInstruction TouchBoard and
display calibration points.
3 Click on each calibration point on the screen as it appears. The calibration
points will disappear when the calibration process is completed.
If an error occurs during the calibration process, simply end the process and start over.
You must recalibrate any time the projector or the board is moved.
TIP
For optimal accuracy, only touch the board with an eInstruction TouchBoard pen during
the calibration process.
TIP
Page 12

11
Gestures; supported by Windows 7
GESTURE USAGE
GESTURE
ACTION
ACTION
Left click
Move items
across screen
Touch and
release to click
Double click
To open files
and folders
Right click
Hold your finger
on screen, release
after the animation.
Scale
Zoom in/out
on a picture
or a web page
Rotate
To rotate
content
Two quick taps
Use 2 fingers,
using a pinching
or pulling apart
motion
Scrolling
Drag up or down
on content or
scrollable window
Scrolling through
content or a
web page
Use two fingers
in a Clockwise
or Counterclockwise motion
To access
context-sensative
drop-down menu
Page 13

12
Mouse Actions
Gestures and/or mouse actions are dependent on the operating system features and
the software that the gestures and/or mouse actions are being used with.
TIP
Saving, exporting and printing your Workspace
presentation
When you are nished creating your presentation, Workspace has several
convenient options for saving and distributing les. Workspace also allows you to
print your presentation.
File formats for importing, exporting and saving your Workspace content.
Save or Save as: GWB - Content can be saved using the Workspace native
le format (GWB). The GWB le format stores all information and formatting
without loss of data. The advantage of saving in a GWB le format is that you can
easily open and edit the content with ease as many times as needed.
Save or Save as: IWB- Content can be saved as a Common File Format
(IWB). Saving in common le format allows you to share your content with any
interactive whiteboard and software if the board and software accepts the CFF
formatting. Some formatting and interactivity of content may be lost, due to the
ability to exchange information between the two softwares.
MOUSE
COMMAND
USAGE
MOUSE
ACTION
ACTION
Left click
Touch and
release to click
Double click
To open files
and folders
Two quick taps
Drag To drag items
Move one finger
left or right
Opens items;
highlights, ect.
Right click
Menu options.
Touch, Using
two fingers
Page 14

13
Auto Save: By default, the Auto save feature automatically saves the
presentation le every ve minutes. You can disable Auto save or change the
frequency of auto saving in Preferences >Options.
E-mail: Content can be e-mailed as a Workspace native le format (GWB).
Choose to e-mail as a GWB or a PDF.
Export as: Content can be exported into several convenient options such as;
PPT, BMP, JPG, GIF, TIFF, PNG, PDF, HTML(.png), HTML(.jpg). The exported
le is saved in the My Documents (or Documents)/Interwrite Workspace/Export
folder.
Export as PDF: Export the currently open presentation le to a PDF format.
By default, the PDF le is saved in the My Documents (or Documents)/Interwrite
Workspace/Export folder.
E-mail as PDF: Content can be e-mailed as a PDF. Content is rst saved as a
GWB le. The GWB le is converted and attached to a new e-mail, if there is an
e-mail client installed.
Print: Content can be printed from the menu bar. File>Print.
Caring for your eInstruction TouchBoard
Store your eInstruction TouchBoard
pens
Pens can be magnetically attached to the right side of the eInstruction
TouchBoard for storage.
Page 15

14
Mobile Solution of eInstruction TouchBoard
For a mobile solution of the eInstruction TouchBoard please visit us at
www.einstruction.com/contact-us and ll out our request for information form.
Our AdjustIt Pro stand can be moved from room to room with ease, even after
the eInstruction TouchBoard and projector have been mounted.
Support and Troubleshooting
For additional reference please refer to our on-line Knowledge Base at
http://kbnew.einstruction.com.
For additional support, please contact us at:
www.einstruction.com (USA)
www.einstruction.eu (EMEA)
+1 888.333.4988 (U.S. Toll Free)
+33 1.58.31.10.65 (EMEA)
+1 480.443.2214 (Outside of USA and Europe)
Hardware Requirements
eInstruction TouchBoard
See Software requirements.
Page 16

15
TouchBoard Gestures
eInstruction’s TouchBoard is Gestures-compatible when using a Windows 7
operating system.
Software Requirements
Workspace
Windows
Microsoft Windows Vista, or Windows 7
Intel Core2 Duo processor 2GHz equivalent or higher
2 GB RAM
650 MB hard disk space for installation (550MB additional for additional Content)
CD-ROM Drive for installation
Video Card and Monitor capable of XVGA (1024 x 768) or higher resolution with
minimum of 24-bit color
Video Card with support for DirectX 9 or greater
Sound Card with Speakers and microphone for audio/video record and playback
Adobe Flash Player version 9.0 or higher
Microsoft .NET Framework 3.0 or greater
Internet connection require for access to online content and tutorials
Mac
Mac OS X, 10.5.8, 10.6 or 10.7
PowerPC G4 1GHz or higher
32-bit Kernel and Extensions
512 MB RAM
500 MB hard disk space for installation
1024 x 768 or higher resolution video
One available USB Port
Java 1.5 or greater
“libUSB” (USB support)
Linux
Intel Pentium IV Processor 1GHz or higher (or equivalent)
512 MB RAM
500 MB hard disk space for installation
1024 x 768 or higher resolution video
One available USB Port
Linux with 2.6 Kernel or greater
“libusb-1.0” 32-bit (USB support)
Page 17

A
Limited Warranty for the eInstruction TouchBoard
eInstruction warrants these products to be free from defects in material and workmanship under the following terms.
Complete and return the enclosed warranty registration card to ensure that your products are covered by this warranty.
Coverage
Parts and labor are warranted for two (2) years from the date of the rst consumer purchase for the eInstruction TouchBoard,
TouchBoard Pens, TouchWand, USB cable and accessories. This warranty applies to the original consumer purchaser
only.
Contact your local dealer or distributor for additional warranty information.
Warranty is valid only if original consumer’s purchase or lease date is less than or equal to six months from the original
eInstruction sale date. This information will be captured by the system serial number and conrmed by the reseller’s
purchase order.
A nominal Warranty Handling Fee will be charged after the rst 90 days of use and calculated from the date of original
consumer purchase. This payment may be made by Visa, MasterCard, or American Express. A copy of the sales receipt or
invoice will be required for warranty verication.
Conditions
Except as specied below, this warranty covers all defects in material or workmanship in the products. The following are not
covered by the warranty:
1. Any product on which the serial number has been defaced, modied, or removed (if applicable).
2. Damage, deterioration, or malfunction resulting from:
a. Accident, misuse, abuse, neglect, re, water, lightening, or other acts of nature, unauthorized product
modication for any purpose, or failure to follow instructions supplied with the product.
b. Repair, or attempted repair, by anyone not authorized by eInstruction.
c. Any damage in shipment of the product (claims must be presented to the carrier).
d. Any other cause which does not relate to a manufacturing defect.
3. Any product not sold or leased to a consumer within six months of eInstruction’s original sale date.
eInstruction will pay all labor and material expenses for covered items, but will not pay for the following:
1. Removal or installation charges.
2. Costs for initial technical adjustments (set up), including adjustments of user controls.
3. Certain shipping charges. (Payment of shipping charges is discussed in the next section of this warranty.)
4. Packaging costs. (Customers should keep their boxes.)
Warranty Service Procedures
1. To obtain service on your eInstruction product, contact the Technical Support Department to receive a Return
Material Authorization Number (RMA#) and shipping instructions by calling:
In United States: (480) 443-2214 (MST) In EMEA: +33 1.58.31.10.65 (CET)
2. Ship the product to eInstruction with the RMA# marked clearly on the outside of the box. eInstruction reserves the
right to refuse the shipment, if not properly marked.
3. Although the consumer must pay any shipping charges to ship the product to eInstruction for warranty service after
90 days of the invoice date, eInstruction will pay the return shipping charges for ground shipment. Other shipping
options are available at an additional fee.
4. Whenever warranty service is required, the original dated sales invoice (or a copy) must be presented as proof
of warranty coverage, and should be included in shipment of the product. In addition, please include your name,
address, telephone number, fax number, email address, and a description of the problem.
5. If eInstruction determines that the unit is not defective within the terms of the warranty, the consumer shall pay the
cost of all freight charges, as well as any repair charges.
Technical Support
Web-based Technical Support is available free of charge at: www.einstruction.com and www.einstruction.eu, where current
driver releases, as well as comprehensive technical support, troubleshooting, Technical Bulletins and FAQs can be found.
Telephone Technical Support is available free of charge to the original consumer for a period of 90 days from the date of
purchase of the product. Please contact our Technical Support Department:
In United States: (480) 443-2214 (MST) In EMEA: +33 1.58.31.10.65 (CET)
You can also fax your request to:
In United States: (480) 948-5508 (MST) In EMEA: +33 1.58.31.10.69 (CET)
Our toll-free number in the U.S. is: 800-856-0732 (MST)
Disclaimer of Unstated Warranties
The warranty printed above is the only warranty applicable to this purchase. ALL OTHER WARRANTIES, EXPRESSED OR
IMPLIED, INCLUDING, BUT NOT LIMITED TO, THE IMPLIED WARRANTIES OF MERCHANTABILITY AND FITNESS FOR
A PARTICULAR PURPOSE ARE DISCLAIMED. Assuming the warranty above stated is otherwise applicable, it is expressly
understood and agreed that eInstruction’s sole liability, whether in contract, tort, under any warranty, in negligence, or
otherwise, shall be for the repair or replacement of the defective parts, and under no circumstances shall eInstruction be
liable for special, indirect, or consequential damages. The price stated and paid for the equipment is a consideration in
limiting eInstruction’s liability.
Notice
Some states and provinces do not allow the exclusion or limitation of incidental or consequential damages, so the above
exclusion may not apply to you. This warranty gives you specic legal rights, and you may have other rights, which vary
from state to state, or province to province.
To obtain service on your eInstruction product, call our Technical Support Department at (480) 443-2214 (MST), or fax us at
(480) 948-5508 (MST); in EMEA call +33 1.58.31.10.65 (CET), or fax us at +33 1.58.31.10.69 (CET).
We can also be contacted through our Web site at www.einstruction.com (in US) and www.einstruction.eu (EMEA), or at
emea.support@einstruction.com.
Important! All products returned to eInstruction for service must have prior approval in the form of a Return Merchandise
Authorization Number (RMA#), which can be obtained by calling the Technical Support Department.
Page 18

B
Declaration of Conformity
The “CE“ mark on this device indicates compliance according to 2004/108/EC
Declaration of conformity according to ISO/IEC guide 22 and en 45014
Manufacturer’s Name: eInstruction.
Manufacturer’s Address: 1330 Teasley Lane
Denton, TX 76205
declares, that the product
Product Name: TouchBoard
Model Numbers: EITB2078, EITB2088
Product Options: Board
conforms to the following specications:
EMC:
En 55022:2006+A1:2007
En 61000-3-2:2006
En 61000-3-3:2006
En 55024:1998+A2:2003
RoHS: These products are RoHS-compliant. 2002/95/EC
Supplementary Information
The product herewith complies with the requirements of the Low Voltage Direc-
tive 2006/95/EC and the EMC Directive 2004/108/EC and older Directives 92/31/
EEC, 89/336/EEC
Other - 90/270/EEC- Does not Apply.
Scottsdale, Arizona, U.S.A. April 4 2010 Mike Cargile
Location Date Dir of Engineering
European Headquarters
26/36 rue Alfred Nobel
93600 Aulnay Sous Bois, France
Phone +33 1 58 31 10 60
Fax +33 1 58 31 10 69
Page 19

C
FCC Compliance
Tested to 47 CFR PART 15 & ansi C63.4 for Class B of electromagnetic
compatibility.
This device complies with Part 15 of the FCC Rules Operation is subject to
the following two conditions: (1) this device may not cause interference and
(2) this device must accept any interference, including interference that may
cause undesired operation of the device. The user is cautioned that changes or
modications to the device that are not approved by the manufacturer could void
user’s authority to operate the device.
European Union WEEE Directive
The manufacture of this equipment required the extraction and use of natural
resources. It may contain hazardous substances that could impact health and the
environment.
• In order to avoid the dissemination of the hazardous substances into the envi-
ronment and to diminish the pressure on our natural resources, we encourage
you to return this product to the appropriate take-back system facility. These
facilities reuse or recycle most of the materials in this equipment in a responsible way.
• The crossed-out wheeled bin symbol below invites you to use these take-
back systems.
• If you need more information about the collection, reuse and recycling sys-
tems in your area, please contact your local or regional waste authority.
• Further information about the responsible end-of-life management of this
and other eInstruction Learning products is available on our Web site at www.
einstruction.com.
Page 20

D
Copyright© (2011-2012) eInstruction Corporation. All rights reserved.
eInstruction® and ExamView® are registered trademarks and Workspace™,
Response™, CPS™ and CPS PPT™ are trademarks of eInstruction
Corporation in the United States and other countries.
All other trademarks are the property of their respective owners.
The information contained in this document is subject to change without notice. eInstruction
assumes no responsibility for technical, or editorial errors, or omissions that may appear in this
document, or for the use of this material. Nor does eInstruction make any commitment to update
the information contained in this document. This document contains proprietary information which
is protected by copyright. All rights reserved. No part of this document can be photocopied or
reproduced in any form without the prior, written consent of eInstruction.
37-01500-01|36-01730 RevA
www.einstruction.com/support - www.einstruction.eu/support
eInstruction Ofce
14400 N 87
th
Street, # 250
Scottsdale, Arizona 85260
Tel: 480.948.6540
Support: 480.443.2214
Fax: 480.948.5508
Technical Support
eInstruction Techsupport
14400 N 87th Street, # 250
Scottsdale, Arizona 85260
Tel: 480.948.6540
Support: 480.443.2214
Fax: 480.948.5508
www.einstruction.com
EMEA Headquarters
eInstruction EMEA
Centre Education EMEA
26/36 rue Alfred Nobel
93600 Aulnay Sous Bois
France
Tel: +33 1.58.31.10.60
Support: +33 1.58.31.10.65
Fax: +33 1.58.31.10.69
www.einstruction.eu
Do not assemble or use this proDuct before reaDing the installation instructions.
assemble anD use this proDuct only in accorDance with the installation instructions.
Page 21

GETTING STARTED GUIDE
www.einstruction.com
ASY: 37-01498-01 37-01499-01 Rev. A| 36-01729-01
 Loading...