

Page 1
2-Line
LCD
Display
Power
Switch
Navigation Keys
InterWrite PRS
RF Clicker
User’s Guide
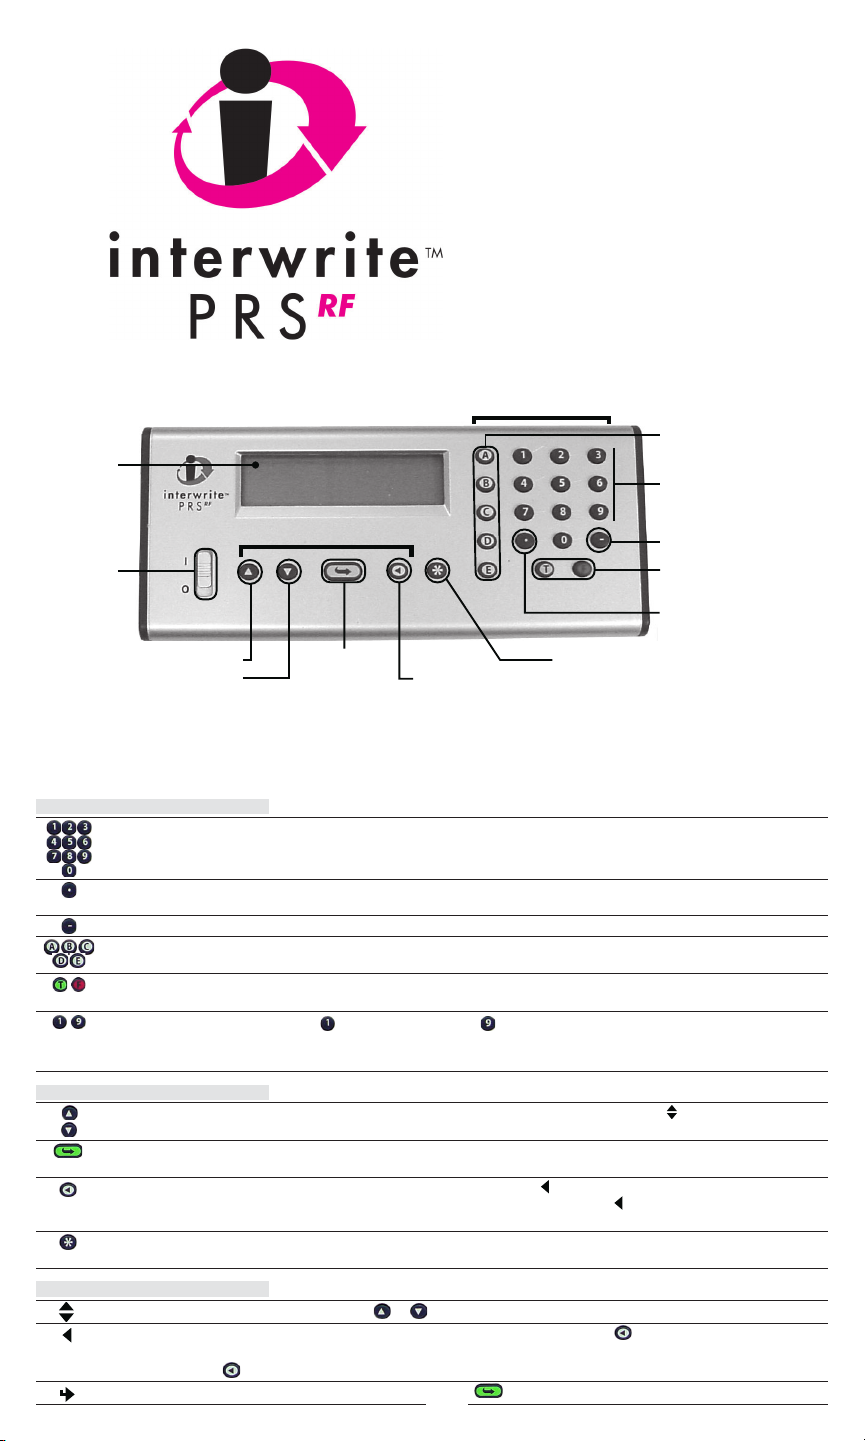
Input Keys
Multiple Choice
Option Keys
Numeric Keypad
Minus Sign
True/False
Response Keys
Decimal Point
Scroll Down Cycle/Backspace
INPUT KEYS
Numeric Keypad
Decimal Point Enter a decimal point in a numeric Response
Minus Sign Enter to indicate a negative number
Multiple Choice/
Alpha Character Keys
True/False
Response Keys
Confidence Level
Indicators
NAVIGATION KEYS
Scroll Up
Scroll Down
Enter/Send
Cycle/Backspace
Menu Key Display Setup Menu
LCD DISPLAY SYMBOLS
This symbol indicates you can press the
When this symbol appears in the upper left corner of the LCD screen, press the
Setup Menu. When the symbol appears on the second line of the LCD display in the right corner, it means you
can click on the
When you see this symbol on the LCD display, press the
Enter/SendScroll Up
Menu Key
Clicker Key Quick Reference
FUNCTION
Enter numeric Responses and Response Choices for numbered Multiple Choice
Questions
Enter numeric values, i.e., Student ID and Question numbers
Press twice to enter a forward slash (/) for fractions
Enter your Response Choice(s) to a Multiple Choice Question
Switch to Alpha Mode
Enter Response to True/False Questions
Switch to Alpha Mode
= Low Confidence and = High Confidence
Enter a Confidence Level after a single-choice Multiple Choice Response, or
after a True/False Response
FUNCTION
Scroll Up and Scroll Down in Setup Menu (watch for the
Scroll through the alphabet when in Alpha Mode
Save input values, e.g., Student ID
Send Responses
Cycle through setting options when
the LCD display, or go up a menu level when
Backspace to clear a character in an input field
Stop Autoscan
or key to scroll up or down through the Setup Menu options.
key to cycle through the possible settings for the Setup Menu option.
1
is displayed in the lower right corner of
is in the upper left corner
key to go up a level in the
key to display an input field, or a submenu.
symbol on the LCD)
Page 2
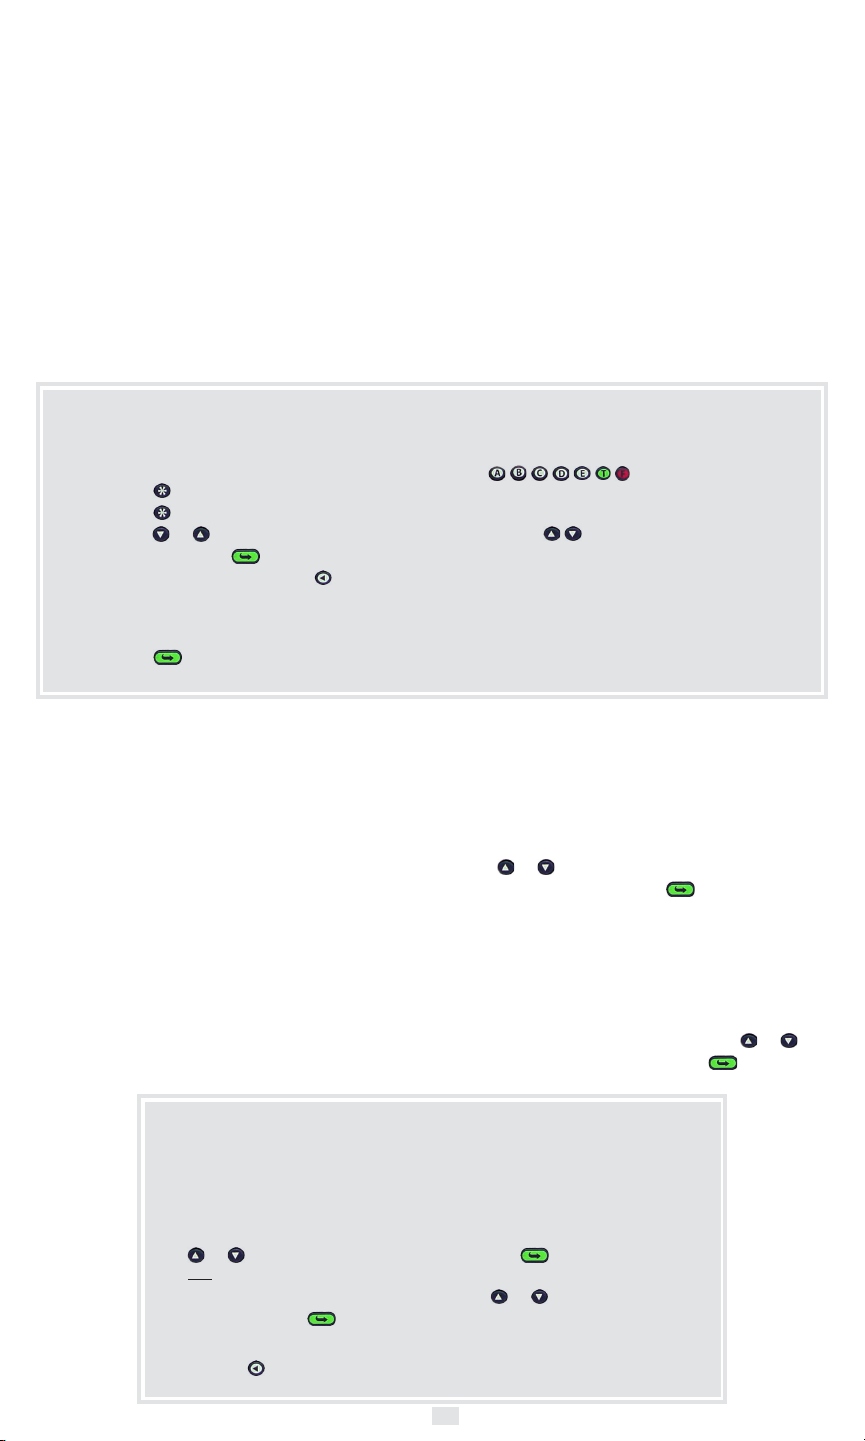
TABLE OF CONTENTS
Panel
First Time Users: Enter the Student ID 2
Entering Alpha Characters 2
PRS OVERVIEW 2
Joining a Class 2
Quick Jump 2
BASIC OPERATION 2
QUESTION TYPES 3
Responding to Questions 3
SELF PACED MODE 3
Responding to Questions 3
First Time Users: You must enter your
Student ID before you can use your PRS
Clicker to transmit Responses.
1 Press to stop Autoscan.
2 Press to display the Setup Menu.
3 Scroll or to display the ID: menu
option and press to select this option.
4 Input your Student ID. Press to
backspace. If your Student ID contains
alpha characters, refer to the instructions
on the right for entering alpha characters.
5 Press to save your Student ID.
Panel
SETUP MENU 3
New Class Scan 3
Enter Student ID 3
Sleep Mode 3
AutoOff Mode 3
Diagnostics 4
Language 4
Homework Mode 4
REPLACING THE BATTERIES 5
Specifications and
Regulatory Statements 6
Limited Warranty 6
Entering Alpha Characters:
1 Press one of the letter keys
( ) to switch to Alpha
Mode and display the selected alpha
character on the LCD screen.
2 Use the keys to scroll to the letter
you want to input.
For each letter you want to input, you must
press a letter key to go into Alpha Mode.
PRS OVERVIEW
Your PRS RF Clicker is part of the InterWrite PRS
student response system. You use this RF Clicker in
your classes to respond electronically to questions.
In the typical classroom scenario, you login to, or
join, a Class and send Responses.
During the join process, your Student ID, your
unique identifier, is transmitted to the PRS software
via the RF Receiver. Each time you send a
Response to a Question, your Student ID is
attached to your Response, ensuring each answer
you send is attributed to you. Your Responses are
recorded electronically, and can be scored and
stored in an electronic Gradebook.
BASIC OPERATION
1 Slide the Power Switch up to turn the RF Clicker on.
After the initial screen displays, where you will be reminded when it’s time to
replace your batteries, your Clicker will begin Autoscanning for a Class to join.
2a Press the Quick Jump number, displayed in angle brackets (< >) on the
Status Bar of the projected PRS screen, to quickly find your Class. Scroll
or , if necessary, to your Class and press to join,
OR
2b When Autoscanning has completed, scroll or , if necessary, to your
Class and press to join.
You are now ready to participate in a PRS Session.
3 Use the key to clear the ANS: field and prepare for the next Question.
Joining a Class
Most of the time you will be using your PRS Clicker
to respond to Questions in the classroom. When you
turn on your Clicker, it automatically begins scanning
for PRS Classes. Each Receiver is broadcasting for
its specific Class. When the Autoscan is completed,
press or to scroll the list of Classes. When you
have found your Class, press to join it.
Quick Jump
The Quick Jump feature allows you to bypass the
Autoscan process, which in a large PRS facility can
take a long time. The instructor will display the
Quick Jump Number on the board, along with the
name of the Class you are to join.
Press the Quick Jump Number, press or
to scroll to your Class, and press to join it.
2
Page 3

QUESTION TYPES
The Questions you will be asked during a typical
PRS Session will be projected at the front of the
classroom. Your instructor can choose from
among five types of Questions— Multiple
Choice, True/False, Numeric, Series, and Short
Answer.
• Multiple Choice Questions displays a list of
numbered or lettered Response options.
You will choose one or more of these
options, as instructed.
• True/False Questions use only the and
keys for your Responses.
• Numeric Questions expect numeric
Responses of up to 11 numeric characters
that can include the Decimal Point
Minus Sign
• Series Questions require you to put the Response
Choices in some sort of order.
• Short Answer Questions allow a Response of up to
11 alphanumeric characters. If the Short Answer is
a fraction or a date, press the Decimal Point
twice to display the slash (/).
Responding to Questions:
The process for responding to a Question is the same,
regardless of the Question Type:
• Press the key(s) that represent your Response,
press
message, then press the key to clear the field
and prepare for the next Question.
.
to send it, watch for the Received
and the
SELF PACED MODE
Your instructor has the option of presenting a
PRS Lesson in one of two ways during a PRS
Session. The most commonly used method
involves projecting each Question in the Lesson
for a specific length of time, during which each
student transmits a Response and receives a
receipt confirmation message. After a Question
has been answered, a chart showing the
distribution of Responses and, if the instructor
chooses, the correct Response. The next timed
Question is then displayed.
Self Paced Mode represents a different way of
presenting a PRS Lesson. The Session itself is
timed and students can respond to the
Questions at their own pace and in any order
they want within the time frame of the Self
SETUP MENU
Setup Menu options include:
• New Class Scan
•ID
• Sleep Mode
• AutoOff Mode
• Diagnostics
• Language
• Homework Mode
Press the key to display the Setup Menu.
Note the navigation cues on the Setup
Menu. You can find a description of each
symbol in the Clicker Key Quick Reference on
the first panel.
Paced Session. The instructor has the option of
distributing hard copies of all the Questions in the
Lesson, or projecting all them at the front of the room.
When you join a Class running a Self Paced Session,
the first thing you will be prompted to do is enter a Test
Number. Then you can begin answering the Questions.
You can scroll through the Response fields and answer
the Questions in any order you choose. The second line
on your LCD screen will display messages regarding the
status of the current Response field.
Responding to Questions
1 When the TST: field appears, enter the Test Number,
if indicated. Press .
2 Use the scroll keys to navigate from one
Response field to another.
3 Enter your Response and press to send it.
New Class Scan
Select this Setup Menu option when you want to scan
for a new Class and join it.
1 Press to begin Autoscan for a new Class.
2 Press the Quick Jump number, or wait until
Autoscan has finished. Scroll to the Class you
want to join and press .
You are now ready to participate in a PRS Session.
Enter Student ID
1 Press the key to display the Setup Menu.
2 Scroll to ID: and press .
3 Enter your Student ID. Use the Numeric Keypad to
enter numbers and the Letter Keys to enter alpha
charactersas described on panel 2.
4 Press to save your Student ID and return to the
main Setup Menu.
Sleep Mode
Both Sleep Mode and AutoOff Mode are
designed to extend battery life. Sleep Mode
describes the amount of time, measured in
minutes, your Clicker must be inactive (no keys
pressed) before it goes to sleep to conserve
battery power. Press any key to wake up your
Clicker and return it to full power.
1 Press the key to cycle through the Sleep
Mode options.
2 When your choice for the Sleep Mode
setting is displayed, press the or key
to view the next Setup Menu option.
AutoOff Mode
AutoOff describes the length of time, measured in
minutes, your Clicker will remain powered on. When the
time you have selected elapses, your Clicker will
automatically power down to conserve battery life.
1 Press the key to cycle through the AutoOff Mode
options.
2 Press the or key to view the next Setup Menu
option.
To cycle your Clicker to full power, press , or toggle
the Power Switch off and on.
HINT: Set the AutoOff time to a value greater than your
longest class, so your Clicker won’t power down before
the class is over.
3
Page 4

Diagnostics
It’s likely that the only diagnostic value that will be of
interest to you is the percent of Battery Life
remaining. Other diagnostic values displayed
include Radio ID, Firmware version, Data Channel,
Class Channel, Join ID, Clicker Type, and Class
Number.
1 Press the keys to scroll through the
Diagnostic options.
2 Press the
Setup Menu.
or key to return to the main
Homework Mode
Homework Mode is a type of Answer Mode. Normally, you will be in the classroom
sending Responses one at a time. Homework Mode allows you to use your Clicker
off site to respond to Questions and save your Responses in the Clicker’s memory.
When you are back in the classroom, you will send your saved Responses when
asked to do so. The PRS software provides the functionality necessary to score
and store your Responses in an electronic Gradebook.
Homework Mode features four different options:
• New
• Continue
• End
• Send
Language
This Setup Menu option refers to the language used
for the LCD display. At the present time, the LCD
display is English only.
Homework Mode – New
You will receive a handout for the homework assignment, which will include a
Homework Number.
1 Press to display the Setup Menu, scroll to Homework, press ,
scroll to New, and press .
2 Enter the Homework Number, if indicated, in the HMW: field. Press .
3 Press to display the H01: field where you will enter your Response to
Homework Question 1. Press to save your Response.
4 Press to view the next Response field. You do not have to answer the
Questions in order. Scroll through the Questions. Press to save
each Response.
5 When you have finished answering the homework questions, or you want to
take a break, turn off your Clicker.
Homework Mode – Continue
1 When you are ready to continue the Homework Session, scroll the
Setup Menu to Homework, press ,
and scroll to the Continue option. Press to continue the homework
assignment.
As you scroll through the Questions, you will see the Responses you
entered during the previous Homework Session. You can change any of these
Responses.
2 Change existing Responses and enter new Responses. Press each time
to save each Response.
3 When you are finished, turn off your Clicker.
4
Page 5

Homework Mode – End
End stops a Homework Session and ends
Homework Mode.
1 Press to return to the Homework Menu.
2 Scroll to the End option. Press .
Homework Mode – Send
When your Instructor asks you to turn in your homework assignment, you will Send it.
1 If you haven’t done it already, join the Class. Press
2 Press to display the Homework Menu options.
3 Press to send your Responses.
You will receive a confirmation message indicating the number of Responses received
out of the number sent (Received XX/XX). You are returned to Answer Mode.
If you are re-sending a homework assignment, only new Responses and the
Responses you changed will be sent. Responses that had been sent previously and
have not been changed in the meantime will not be re-sent.
to display the Setup Menu.
REPLACING THE BATTERIES
When you see the Low Battery message when you turn on
your Clicker, you have about 15% Battery Life remaining.
Replace the batteries as soon as possible.
1 On the back of the RF Clicker, remove the Screw
holding the Battery Cover in place.
2 Remove the Battery Cover by pushing down on the
Thumb Grip and sliding it toward the bottom of the
Clicker.
3 Remove the old batteries and discard them following the
proper disposal procedures.
4 Insert three AAA batteries, positioning them properly to
ensure the correct polarity.
5 Slide the Battery Cover back into place and replace the Screw.
GTCO CalComp, Inc.
14555 N. 82nd Street
Scottsdale, AZ 85260
USA
TEL: 800.856.0732
480.948.6540
FAX: 480.948.5508
GTCO CalComp, Inc.
7125 Riverwood Drive
Columbia, MD 21046
USA
TEL: 800.344.4723
410.381.6688
FAX: 410.290.9065
Back of RF Clicker
Screw Battery
Thumb
Grip
GTCO CalComp GmbH
European Headquarters
Kreiller Strasse 24
81673 Muenchen
TEL: +49 (0) 89 370012-0
FAX: +49 (0) 89 370012-12
Cover
Germany
www.gtcocalcomp.com
5
Page 6

SPECIFICATIONS
Dimensions: 6.0 x 2.56 x 0.7 inch
Weight:
With batteries
Power: Three AAA (1.5V) Batteries
Signal: 2.46 GHz ISM Band
Effective Distance: >50 meters
This device complies with part 15 of the FCC
Rules. Operation is subject to the following two
conditions:
1 This device may not cause harmful
interference, and
2 This device must accept any interference
received, including interference that may
cause undesired operation.
(152 x 65 x 18 mm)
4.0 ounces (138 grams)
Note: This equipment has been tested and found to comply with the limits of a Class B
digital device, pursuant to Part 15 of the FCC rules.
These limits are designed to provide reasonable protection against harmful interference
in a residential installation. This equipment generates, uses and can radiate radio
frequency energy and, if not installed and used in accordance with the instructions, may
cause harmful interference to radio communications. However, there is no guarantee the
interference will not occur in a particular installation.
If this equipment does cause harmful interference to radio or television reception, which
can be determined by turning the equipment off and on, the user is encouraged to try to
correct the interference by one or more of the following measures.
• Reorient or relocate the receiving antenna.
• Increase the separation between the equipment and the receiver.
• Connect the equipment into an outlet on a circuit different from that to which the
• Consult the dealer or an experienced Radio/TV technician for help.
This device complies with Part 15 of FCC rules and with RSS-210 of Industry Canada.
Operation is subject to the following two conditions: (1) This device may not cause
harmful interference, and (2) This device must accept any interference received, including
interference that may cause undesired operation.
The radiated output power is far below the FCC Radio Frequency exposure limits.
Nevertheless, this device should be used in such a manner that the potential for human
contact during normal operation is minimized.
Declaration of Conformity
The “CE“ mark on this device indicates compliance under the EMC
89//336/EEC Directive.
Declaration of conformity according to ISO/IEC Guide 22 and EN
45014
Manufacturer’s Name: GTCO CalComp,Inc.
Manufacturer’s Address: 7125 Riverwood Drive
declares, that the product
Product Name: InterWrite PRS RF Clicker Remote
Model Numbers: R1
Product Options: All
conforms to the following product specifications:
EMC: EMC Directive 89/336/EEC and amendment
92/31/EEC
Emissions Testing: EN 55022:1998 Class B
Columbia,MD 21046 U.S.A.
receiver is connected.
Immunity Testing: EN 55024:1998 including:
Supplementary Information
The product herewith complies with the requirements of the Low
Voltage Directive 73/23/EEC and the EMC Directive 89/336/EEC.
Scottsdale, Arizona, U.S.A. 1-1-2006 Dana Doubrava
EN 61000-4-2;ESD
EN 61000-4-3;Radiated Immunity
Location Date Engineering Mgr
European Contact:
GTCO CalComp GmbH
Kreiller Strasse 24
81673 Muenchen
Germany
Tel: +49 (0) 89 370012-0
Fax: +49 (0) 89 370012-12
European Union WEEE Directive
The manufacture of this equipment required the extraction and
use of natural resources. It may contain hazardous substances
that could impact health and the environment.
• In order to avoid the dissemination of the hazardous
substances into the environment and to diminish the
pressure on our natural resources, we encourage you to
return this product to the appropriate take-back system
facility. These facilities reuse or recycle most of the
materials in this equipment in a responsible way.
• The crossed-out wheeled bin symbol to the right invites
you to use these take-back systems.
• If you need more information about the collection, reuse
and recycling systems in your area, please contact your
local or regional waste authority.
• Further information about the responsible end-of-life
management of this and other GTCO CalComp products
is available on our Web site at
www.gtcocalcomp.com.
Limited Warranty for InterWrite PRS RF Clicker
GTCO CalComp Corporation warrants this product to be free from
defects in material and workmanship under the following terms.
Complete and return the enclosed warranty registration card to
ensure that your products are covered by this warranty.
Coverage
Parts and labor are warranted for one (1) year from the date of the
first consumer purchase for the InterWrite PRS RF Clicker.
Technical Support
Web-based Technical Support is available free of charge at:
www.gtcocalcomp.com, where current driver releases, as well as
comprehensive technical support, troubleshooting, Technical
Bulletins and FAQs can be found.
European Union Emission Directive
This product is in conformity with the protection requirements of EU Council
Directive 89/366/ECC on the approximation of the laws of the Member
States relating to electromagnetic compatibility.
This product has been tested and found to comply with the limits for Class
B Information Technology Equipment according to CISPR 22/European
Standard EN55022. The limits for Class B equipment were derived for
typical industrial environments to provide reasonable protection against
interference with licensed communication devices.
Canada
Industry Canada Class B emission compliance statement. This Class B
digital apparatus complies with Canadian ICES-003.
Avis de conformité á la réglementation d’Industrie Canada. Cet appareil
numérique de classe B est conforme á la norme NMB-003 du Canada.
Telephone Technical Support is available by contacting our
Service & Support Department at (410) 312-9221 (EST), or
(480) 443-2214 (MST). You can also fax your request to
(410) 290-9065 (EST), or (480) 948-5508 (MST). Our tollfree numbers in the U.S. are: 800-344-4723 for our East
Coast customers and 800-856-0732 for our West Coast
customers.
To view the terms and conditions of the Limited Warranty
for InterWrite PRS RF Clickers in their entirety, please visit
our Web site at:
www.gtcocalcomp.com
Copyright© 2006 GTCO CalComp Inc.
All other products and company names are the trademarks or registered
The information contained in this document is subject to change without notice. GTCO CalComp assumes no responsibility for technical, or
editorial errors, or omissions that may appear in this document, or for the use of this material. Nor does GTCO CalComp make any commitment
to update the information contained in this document. This document contains proprietary information which is protected by copyright. All rights
reserved. No part of this document can be photocopied or reproduced in any form without the prior, written consent of GTCO CalComp Inc.
InterWrite is a trademark of GTCO CalComp Inc.
trademarks of their respective owners.
6
37-00999-01 Rev. B
 Loading...