

Page 1

InterWrite PRS
Remote Clicker
User’s Guide
Page 2

We at GTCO CalComp are proud of our InterWriteTM family of products. We strive to
continue to bring you the best the technology has to offer. We urge you to visit our Web
site, where we will post the latest information regarding any updates and changes we
have made that would impact the instructions in this Getting Started document.
www.gtcocalcomp.com
Support/InterWrite/Software Downloads
Support/InterWrite/Documentation Library
Page 3

TABLE OF CONTENTS
Page 4

Page 5

OVERVIEW
Your PRS RF Clicker is part of the InterWrite PRS student response system. You will be using this RF Clicker
in your classes to respond electronically to questions.
Page 6
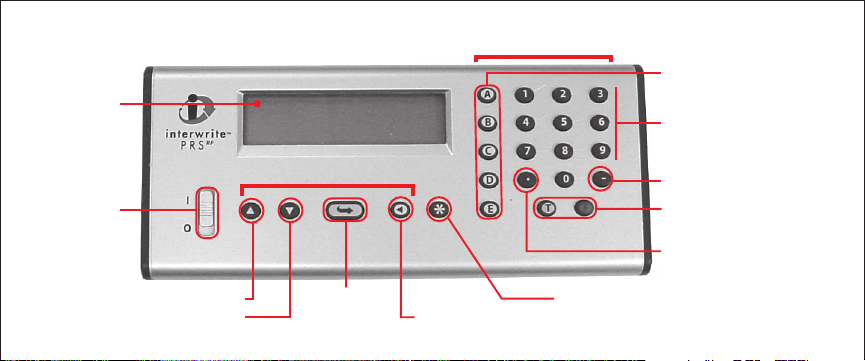
2-Line
LCD
Display
Power
Switch
Navigation Keys
Input Keys
Multiple Choice
Option Keys
Numeric Keypad
Minus Sign
True/False
Response Keys
Decimal Point
Scroll Down Cycle/Backspace
Enter/SendScroll Up
Menu Key
Page 7

INPUT KEYS FUNCTION
Clicker Key Quick Reference
Numeric Keypad
Enter numeric Responses and numbered Multiple Choice Questions
Enter numeric values, i.e., Student ID and Question numbers
Decimal Point Enter a decimal point in a numeric Response
Minus Sign Enter to indicate a negative number
Multiple Choice/
Alpha Character Keys
True/False Response Keys
Confidence Level Indicators When combined with a single-choice Multiple Choice Response,
Press twice to enter a forward slash (/) for fractions
Enter your Response Choice to a Multiple Choice Question
Switch to Alpha Mode
Enter Response to True/False Questions
Switch to Alpha Mode
or a True/False Response,
= Low Confidence and = High Confidence
Page 8

NAVIGATION KEYS FUNCTION
Scroll Up, Scroll Down
Enter/Send Saves input values, e.g., Student ID
Cycle/Backspace
Menu Key Stops Autoscan and displays Setup Menu
Scroll Up and Scroll Down in Setup Menu (watch for the
Scroll through the alphabet when in Alpha Mode
Sends Responses
Cycles through menu setting options when the is displayed in lower right
corner of LCD display, or
Goes up a Menu level when
symbol)
is in upper left corner of LCD display
Page 9

BASIC OPERATION
1 Slide the Power Switch up to turn the RF
Clicker on.
Note that the initial screen displays the current
battery level in the lower right corner of the LCD
display. Your Clicker will then begin automatically
scanning for a Class to join.
2 Scroll or , if necessary, to your Class and
press to join the Class.
You are now in Test Mode and ready to participate
in a PRS Session, or
2 Press the Quick Jump number displayed on
the board to quickly find your Class. Press
to join the Class.
First Time Users: You must enter your
Student ID before you can begin using your
PRS Clicker to transmit Responses.
1 Press to display the Setup Menu.
2 Scroll or to display the ID: menu
option and press .
3 Input your Student ID. (See Setup
Menu on page __ if your Student ID
contains alpha characters.)
4 Press to save your Student ID.
Page 10

2 Press to stop the Autoscan and display the
Setup Menu.
SETUP MENU
Use the Setup Menu to input your Student ID, set
operational modes and select a Test Mode. Note
the visual, navigation cues on the Setup Menu:
Scroll or to view additional Setup options
Press to view this Setup submenu
Cycle through settings, or cycle through menu
levels
Entering Alpha Characters:
1 Press one of the letter keys (A through E, T, or F)
to display that alpha character on the display.
2 Use the Keys to move to the letter you
want to input.
Page 11

Repeat these steps for each letter you want to
input.
Enter Student ID
1 If you are not in the Setup Menu, press .
Scroll to ID: and press .
2 Enter the numbers and letters of your
Student ID, using the Number and Letter
Keys on the keypad.
3 Press to save your Student ID and
return to the Main Setup Menu.
Sleep Mode and AutoOff
Both Sleep Mode and AutoOff are designed to
extend battery life.
Page 12

New Class Scan
Select this Setup Menu option when you want join a
Class. When Autoscan has finished, scroll to
the the Class you want to join and press .
Diagnostics
The Diagnostic information of most importance to
you will probably be Battery Life. Check this
Diagnostic option periodically, so you don’t end up
with a dead unit at a critical time. Instructions for
replacing the batteries can be found on page __.
Homework Mode
This operational mode was designed to allow you
to answer Questions offsite, save them and send
them to the PRS Receiver when asked to do so.
Press to display the Homework submenu,
where you will find four options—New, Continue,
End and Send.
• Select New to start a new Homework Session.
You will be prompted to enter a Test Number.
• Select Continue when you are ready to return
to the Homework assignment and answer
more Questions.
Page 13

• Select End when you are ready to take a
break, or when you have completed the
Homework assignment.
• Select Send when your Instructor asks the
class to turn in their Homework assignments.
Joining a Class
Most of the time you will be using your PRS Clicker
to electronically respond to Questions in the
classroom. When you turn on your Clicker, it
automatically begins scanning for active PRS RF
Receivers. Each Receiver is broadcasting for its
specific class. When the Autoscan is completed,
scroll the list of Classes and when you have
found your class, press to join it.
The Questions you will be asked during a PRS
Session will be projected at the front of the
classroom. Your instructor can choose from
among five types of Questions— Multiple Choice,
Page 14

True/False, Numeric, Series, and Short Answer.
Question Types:
• Multiple Choice Questions display a list of
numbered or lettered Response options.
• True/False Questions use the T and F buttons
only.
• Numeric Responses of up to 16 characters
can include the Decimal Point and the Minus
Sign.
• Series Questions require you to put the
Responses in some sort of order.
• Short Answer Questions allow a Response of
up to 16 characters.
Responding to Questions:
The process for responding to a Question is the
same, regardless of the Question type:
1 Press the button(s) that represent your
answer,
2 press , then
3 press to move to the next Question.
Page 15

Back of RF Clicker
Screw
Thumb Grip
Battery Cover
Page 16

REPLACING THE BATTERIES
1 On the back of the RF Clicker, remove the
Screw holding the Battery Cover in place.
2 Remove the Battery Cover by pushing down
on the Thumb Grip and sliding it toward the
bottom of the Clicker.
3 Remove the old batteries and discard them
following the proper disposal procedures.
4 Insert three alkaline AAA batteries, positioning
them properly to ensure the correct polarity.
5 Slide the Battery Cover back into place and
replace the Screw.
Page 17

SPECIFICATIONS
Dimensions: 2.25 x 4.25 x 1 inch
Weight:
(without batteries)
Power: Three AAA (1.5V)
Signal: Infrared
Effective Dis-
tance:
*Replace the batteries when ...
Dana, these are the specs from the IR transmitter. I’m just using them
as a ‘place holder’ for whatever specs pertain to the RF unit.
(56 x 107 x 25 mm)
2 ounces (55 grams)
Alkaline Batteries*
21 yards (20 meters)
minimum
Canada
Industry Canada Class B emission compliance statement.
This Class B digital apparatus complies with Canadian
ICES-003.
Avis de conformité á la réglementation d’Industrie Canada.
Cet appareil numérique de classe B est conforme á la
norme NMB-003 du Canada.
Page 18

This device complies with part 15 of the FCC Rules.
Operation is subject to the following two conditions:
1 This device may not cause harmful interference,
and
2 This device must accept any interference
received, including interference that may cause
undesired operation.
Note: This equipment has been tested and found to
comply with the limits of a Class B digital device, pursuant
to Part 15 of the FCC rules.
These limits are designed to provide reasonable protection
against harmful interference in a residential installation.
This equipment generates, uses and can radiate radio
frequency energy and, if not installed and used in
accordance with the instructions, may cause harmful
interference to radio communications. However, there
is no guarantee the interference will not occur in a
particular installation.
If this equipment does cause harmful interference to
radio or television reception, which can be determined
by turning the equipment off and on, the user is
encouraged to try to correct the interference by one or
more of the following measures.
• Reorient or relocate the receiving antenna.
• Increase the separation between the equipment
and the receiver.
• Connect the equipment into an outlet on a circuit
different from that to which the receiver is
connected.
• Consult the dealer or an experienced Radio/TV
technician for help.
Page 19

Declaration of Conformity
The “CE“ mark on this device indicates compliance under the EMC 89//
336/EEC Directive.
Declaration of conformity according to ISO/IEC Guide 22 and EN 45014
Manufacturer’s Name: GTCO CalComp,Inc.
Manufacturer’s Address: 7125 Riverwood Drive
declares, that the product
Product Name: InterWrite PRS Transmitter
Model Numbers: TX-01A, TX-02
Product Options: All
conforms to the following product specifications:
EMC: EMC Directive 89/336/EEC and amendment
92/31/EEC
Emissions Testing: EN 55022:1998 Class B
Columbia,MD 21046 U.S.A.
Immunity Testing: EN 55024:1998 including:
Supplementary Information
The product herewith complies with the requirements of the Low
Voltage Directive 73/23/EEC and the EMC Directive 89/336/EEC.
Scottsdale, Arizona, U.S.A. 4-30-2004 Dana Doubrava
Location Date Engineering Mgr
European Contact:
GTCO CalComp Ges.m.b.H.
Kreiller Strasse 24
81673 Muenchen
Germany
Tel: +49 (0) 89 370012-0
Fax: +49 (0) 89 370012-12
EN 61000-4-2;ESD
EN 61000-4-3;Radiated Immunity
Page 20

European Union Emission Directive
This product is in conformity with the protection
requirements of EU Council Directive 89/366/ECC on the
approximation of the laws of the Member States relating to
electromagnetic compatibility.
This product has been tested and found to comply with the
limits for Class B Information Technology Equipment
according to CISPR 22/European Standard EN55022. The
limits for Class B equipment were derived for typical
industrial environments to provide reasonable protection
against interference with licensed communication devices.
European Union WEEE Directive
As the producer of the InterWrite Model 400 Pads, GTCO
CalComp supports the objectives of the European Union
WEEE Directive and is committed to ensuring ongoing
compliance with the Directive. In an effort to help us meet
our objectives and obligations for responsible use and
management of our products, we ask that you return this
product at the end of its useful life to the appropriate local
collection facility. Further information about the responsible
end-of-life management of this and other GTCO CalComp
products is available on our Web site at
www.gtcocalcomp.com.
Page 21

Limited Warranty for InterWrite PRS Transmitter
GTCO CalComp Corporation warrants this product to be free from
defects in material and workmanship under the following terms.
Complete and return the enclosed warranty registration card to
ensure that your products are covered by this warranty.
Coverage
Parts and labor are warranted for one (1) year from the date of the
first consumer purchase for the InterWrite PRS Transmitter.
Technical Support
Web-based Technical Support is available free of charge at:
www.gtcocalcomp.com, where current driver releases, as well as
comprehensive technical support, troubleshooting, Technical
Bulletins and FAQs can be found.
Telephone Technical Support is available free of charge to the
original consumer for a period of 90 days from the date of
purchase of the product. Please contact our Service & Support
Department at (410) 312-9221 (EST), or (480) 443-2214 (MST).
You can also fax your request to (410) 290-9065 (EST), or (480) 9485508 (MST). Our toll-free numbers in the U.S. are: 800-344-4723 for
our East Coast customers and 800-856-0732 for our West Coast
customers.
To view the terms and conditions of the Limited Warranty
for InterWrite PRS Clickers in their entirety, please visit our
Web site at:
www.gtcocalcomp.com
Page 22

GTCO CalComp, Inc.
14555 N. 82nd Street
Scottsdale, AZ 85260
USA
TEL: 800.856.0732
480.948.6540
FAX: 480.948.5508
GTCO CalComp, Inc.
7125 Riverwood Drive
Columbia, MD 21046
USA
TEL: 800.344.4723
410.381.6688
FAX: 410.290.9065
www.gtcocalcomp.com
GTCO CalComp Ges.m.b.H.
European Headquarters
Kreiller Strasse 24
81673 Muenchen
Germany
TEL: +49 (0) 89 370012-0
FAX: +49 (0) 89 370012-12
Page 23

Copyright© 2005 GTCO CalComp Inc.
InterWrite is a trademark of GTCO CalComp Inc.
All other products and company names are the trademarks or
registered trademarks of their respective owners.
The information contained in this document is subject to change without notice. GTCO CalComp assumes no responsibility for technical, or
editorial errors, or omissions that may appear in this document, or for the use of this material. Nor does GTCO CalComp make any commitment
to update the information contained in this document. This document contains proprietary information which is protected by copyright. All
rights reserved. No part of this document can be photocopied or reproduced in any form without the prior, written consent of GTCO CalComp
Inc.
37-00999-01 Rev. A
 Loading...