

eInstruction Interwrite DualBoard, Interwrite Board, Interwrite Mobi, Interwrite Mobi Learner, Interwrite Pad Training Workbook
Page 1

Page 2

________________________________________ Workspace Level 1 Training Workbook
Workspace Level 1 Training Workbook
Contact Information
In addition to this training guide and the Workspace software help menu, following are other
resources available to support your implementation of Workspace.
Sales Support: 866.496.4949
Technical Support: 800.856.0732
Customer Support Home Page: www.interwritelearning.com/support/index
Software Downloads: www.interwritelearning.com/support/software
Online Training Information: www.interwritelearning.com/support/training
Online Training Videos: www.interwritelearning.com/support/wstutorials
User Community: www.eicommunity.com
Software Versions
This workbook is for the following software:
Workspace 5.0
PRS 4.42
2009 eInstruction Corporation
2
Page 3

________________________________________ Workspace Level 1 Training Workbook
Module 1:
Getting Started with Workspace
Overview
This session is designed for the beginner to be able to successfully install and connect the
Interwrite™ Board and Pad. Participants will learn how to connect the Board or Pad to their
computer, launch the software, and make a simple document.
Objectives
After completing this module, participants will be able to:
Set-up an Interwrite™ Board, DualBoard, Pad, or Mobi
Connect an Interwrite™ Board, DualBoard, Pad, or Mobi to a computer
Launch the Interwrite™ Workspace software
Use basic tools to create a Workspace document
3
Page 4

________________________________________ Workspace Level 1 Training Workbook
RFCOM
RFCOM Holster
Set Up the Hardware
The Interwrite Board
Your Interwrite Board has several pieces. Make sure all pieces are connected and the pens
are charged before connecting to your computer.
1. Attach the Bluetooth module to the board and then connect it to the
controller on the back of the board.
2. Attach the pen charger to the board and plug it into the controller on
the back of the board.Green lights should appear to show the pens are
charging.
3. Connect the power cord to the board and an electrical outlet; then turn the board on
using the rocker switch on the side of the board.
4. Turn on your projector, make sure to line up the image
within the four tick marks found within the corners of the board.
The Interwrite DualBoard
Your Interwrite DualBoard has several pieces. Make sure all pieces are connected and
the pens are charged before connecting to your computer.
1. Plug the RJ12 connector on the RFCOM cable into the RJ12 COM Port on the top of
the Interwrite DualBoard controller box on the back of the board.
2. Slide the RFCOM holster over the board’s frame at the top of the board.
3. Seat the RFCOM in the holster.
4. Plug the Workspace RF Hub into a USB port on your computer or USB hub.
You should be aware that the RF Hub works best when it is
into a computer that is under a podium or a desk. If necessary, use a USB
extension cable to get your RF Hub out from under furniture that may
shield the RF signal.
5. Turn on your projector, make sure to line up the image within the four
tick marks found within the corners of the board.
not
plugged
4
Page 5

________________________________________ Workspace Level 1 Training Workbook
Calibration Screen
Calibration Point
Check for Understanding
Describe what you should do with your board before connecting it to your computer.
_________________________________________________________________
_________________________________________________________________
_________________________________________________________________
_________________________________________________________________
Describe what you should do with your board after it is connected to your computer.
_________________________________________________________________
_________________________________________________________________
_________________________________________________________________
5
Page 6

________________________________________ Workspace Level 1 Training Workbook
PenBattery
Charging
Status Light
PadBatteryChar
ging
Status Light
Power
Connection
On/Off
Switch
The Interwrite Pad
The Interwrite Pad works like a mouse. Make sure your Pad and pen are charged before
connecting to your computer. The Pad and pen battery charging status lights will appear orange
when charging. The light will turn off when the device is finished charging.
Follow these steps to charge your Interwrite Pad.
1. Plug the AC adapter into a power source and then plug the other end into the back of
the pad.
2. Make sure the pen is securely placed in the holster.
3. You will see two orange lights appear. One is for the Pad’s battery and the other for
the pen. These lights will turn off once your Interwrite Pad or pen is fully charged.
Check for Understanding
Draw a line to where you would find these items on your Pad.
6
Page 7

________________________________________ Workspace Level 1 Training Workbook
Icon
Indicates
Used To
Mouse Mode
Mobi is being used as a
Mouse on the Computer
RF Connection
Mobi is paired with the
computer. Solid icon
indicates successful pairing
with computer. No icon
indicates Mobi is not paired
with computer.
USB Connection
Mobi is connected to
computer via USB port
In Prox
Pen is within proximity and
can be detected by Mobi
In Menu
Show button or Softkey is in
use
The Interwrite Mobi
The Interwrite Mobi works like a mouse. Before you use
your Interwrite Mobi and Interactive Pen for the first time,
they should be charged for about 12 hours. Whenever the
Tablet battery is low and needs to be recharged, the Tablet
Battery Status Icon will display as an empty battery.
1. Place the Interactive Pen in the Pen Slot.
2. Connect the Mini USB Cable to the Mini USB Port
at the top of the Tablet.
3. Plug the Cable into a USB port on your computer. The Interwrite Mobi can be used
while it is charging.
4. When the Tablet and Pen are charged and the Battery Status displays that it is
charged, unplug the Charger from the Interwrite Mobi.
5. Press the Power Button when the Interwrite Mobi is charged.
Note: The Mobi can also be charged using a cell phone charger featuring a mini-USB port, an
iPod wall charger adapter, or any stand-alone USB hub.
KWIK Screen
The KWIK Screen will display icons associated with the Mobi status when used in a general
setting. The KWIK Screen can be used to real-time reports when used with CPS for Response.
For more information, see Module 5.
7
Page 8

________________________________________ Workspace Level 1 Training Workbook
Battery Life Indicator
Indicates amount of battery
life left before charging is
required. Icon shows
battery is filling when
charging.
Pen Charge
Pen is charging in pen slot.
Interwrite Mobi Learner
The Interwrite Mobi works like a mouse. Before you
use your Interwrite Mobi and Interactive Pen for the
first time, they should be charged for about 12 hours.
Whenever the Tablet
battery is low and needs to be recharged, the Tablet
Battery Status Icon will display as an empty battery.
The Interwrite Mobi Learner communicates with the
computer using radio frequency technology. The RF
communications module is built into the Interwrite
Mobi. The Tablet communicates through its built-in RF
module with the USB module installed on the computer. The Interwrite Mobi runs on Liion batteries, which provide about 10 hours of wireless operation before they have to
be recharged.
The same steps for setting up the Interwrite Mobi should be followed for setting up the
Interwrite Mobi Learner.
Installing the Workspace Software
*You may need administrative privileges on your computer to install software. Please make sure
that you are logged in as administrator before installing the software.
When you open the box with your Interwrite device, you will see a variety of disks and
accessories. Do not connect the receiver to your computer before installing the
software.
1. Insert the Interwrite Workspace Software disk. Follow the prompts of the install
wizard.
8
Page 9

________________________________________ Workspace Level 1 Training Workbook
2. After the installation is complete, you will see the
Interwrite icon in your system tray. Click on the
eInstruction icon, then select WebUpdate.
3. Once your software is installed and updated, you can
connect the receiver to your computer.
Notes
_________________________________________________________________
_________________________________________________________________
_________________________________________________________________
_________________________________________________________________
_________________________________________________________________
_________________________________________________________________
_________________________________________________________________
_________________________________________________________________
_________________________________________________________________
9
Page 10

________________________________________ Workspace Level 1 Training Workbook
Connect an Interwrite Device
The eInstruction Device Manager allows you to connect your Interwrite
Board, DualBoard, Pad or Mobi to your computer. Make sure that the
“dongle”, or receiver, is connected and configured on your computer.
Next, turn on the device, after which you will hear a series of beeps.
Start Devices
1. Click on the eInstruction icon in your tool-tray, and
select eInstruction Device Manager.
2. To search for new devices, click the Options meny.
The Device Manager will search for connected devices,
then, then all possible devices will display in the Device
field.
* If you are using a Board, once your Board is connected, use the tip of the pen to tap on the
Calibrate icon on the side of the Board. Touch each of the nine calibration points with the
tip of the pen.
10
Page 11

________________________________________ Workspace Level 1 Training Workbook
Double Left Click
Right Click
Single Left
Click
Using the Interwrite Pen
The pen for the Board and the Pad are interchangeable and works just like your mouse. Using
the pen to tap the surface of the Pad is the same as a single left mouse click. The button on the
pen functions as a double left click and a right click.
Instructional Application
What are some classroom management strategies you would use when the students are using
the Board or Pad?
_________________________________________________________________
_________________________________________________________________
_________________________________________________________________
_________________________________________________________________
_________________________________________________________________
_________________________________________________________________
11
Page 12

________________________________________ Workspace Level 1 Training Workbook
_________________________________________________________________
Launch the Software
There are three ways to launch the Workspace software. Choose the method that best fits your
preference.
1. Launch from Softkeys
a. The first icon on the Board, Pad, and Mobi is set to load the software.
b. Tap on the Interwrite icon with the tip of the pen.
2. Launch from the System Tray
a. Click on the eInstruction icon in the system tray.
b. Select Workspace.
3. Launch from the applications folder
a. Go to the Finder > Applications.
b. Choose eInstruction and choose Interwrite Workspace.
c. Select IW (Interwrite Interactive mode).
12
Page 13

________________________________________ Workspace Level 1 Training Workbook
Properties Bar
Navigation
Tools
Main Toolbar
(Factory Default Setting)
Recycle Bin
Use Basic Tools
When you launch the Interwrite Workspace software you will see a toolbar appear on the right
of your screen. If you click on the icon that looks like a blank sheet of paper, you will notice
your screen changes. You are now on your way to creating a Workspace document.
Interactive Mode Window Tour
13
Page 14

________________________________________ Workspace Level 1 Training Workbook
Minimize Toolbar
Workspace Menus
Mouse Mode
Toolbox
Exit
Selection Arrow
Line Tool
Shapes Tool
Text Tool
Clear
Grid Page
Previous Page
Page Sorter
PRS Functions
Highlighter
Pen
Eraser
Undo
Blank Page
Next Page
Gallery
Save
Capture
Toolbar Orientation
The Advanced setting for the Workspace toolbar is shown below. There are also intermediate
and customized toolbars. Additional options for the Workspace toolbar are described below.
14
Page 15

________________________________________ Workspace Level 1 Training Workbook
Blank Page
Create a blank Workspace page.
Grid Page
Create a lined Workspace page.
Pen
Write or make notes on your screen or blank Workspace page.
Change the pen’s color, thickness, or shape by using the
Properties Bar at the bottom of the Workspace page.
Type Text
The Type Text tool places a text box on a blank Workspace
page so you can add text.
Highlighter
Works like an actual highlighter. Adjust the shape and
transparency of the highlighter from the Properties Bar.
Line
The line tool allows you to draw straight lines. Change the
line’s thickness, endpoints, and line style by using the
Properties Bar.
Shapes
Create a variety of shapes. Modify the line color and style, fill
color, and transparency using the Properties Bar.
Freehand Text
Instantly converts handwritten words to typed text.
(Note: Only available with an Interwrite Board or Pad
connected to your computer.)
Selection
Select, move, or modify the annotations or other objects on
your Workspace pages.
Eraser
Erase part of an annotation you have made.
Undo
Undo your previous actions.
Clear
Clear all annotations off a Workspace page unless they are
sent to the background by the Move to Background tool.
Tools and Functions at a Glance
Page Tools
Annotation Tools
Editing Tools
15
Page 16

________________________________________ Workspace Level 1 Training Workbook
The Gallery
Insert content from the built in Gallery on your document. The
resources are organized by subject area.
Capture
A capture is a
snapshot
of either the full screen, or a selected
portion of the screen.
Record and Playback
Create a video capturing your voice (microphone needed) and
any annotations being made on your computer.
Mouse Mode
The mouse button allows you to leave your Workspace page
and return back to your active desktop or application.
Minimize Toolbar
Minimize your Workspace toolbar so it does not block other
applications.
PRS
Turn a Workspace page into a PRS question.
Menu
Access the File, Edit, Tools, Preferences, and Help menus. For
opening, saving and exporting a Workspace document, the File
menu is the most useful.
Page Sorter
View thumbnails of all Workspace pages to select, rearrange,
or delete unwanted pages.
Navigation
Arrows
Navigate to different Workspace pages.
Save
Save a Workspace document.
Toolbox
The toolbox allows you access to the tools and options that are
not readily available on the toolbar.
Exit
Close the Workspace application.
Multimedia Tools
Presentation Tools
File Management Tools
16
Page 17

________________________________________ Workspace Level 1 Training Workbook
Color
Choices
Line
Transparency
Line
Endpoints
Preview Window
Line
Style
Line
Thickness
Color
Palette
Create a Workspace Document
There are a few basic tools you will want to be familiar with when using Workspace.These tools
include: blank page, pen, eraser, selection tool, and the mouse mode button.
Blank Page Tool
This tool allows you to create blank Workspace pages. Whenever you want a blank
page, just click on this icon. When you are done making notes and want to return to
your desktop, click the mouse icon on the toolbar. In the next module of this book, you
will learn how you can modify a blank page.
Pen
The pen allows you to write or make notes on your screen or on a blank Workspace
page. You can change your pen to be a different color, thickness or shape by using the
Pen Settings Properties Bar at the bottom of your Workspace pages.
Select
This tool allows you to select annotations or objects on your Workspace pages. To move
or modify the objects or annotations, click on this tool from the toolbar, then click or
drag a box around the object or annotation you want to move or modify.
17
Page 18

________________________________________ Workspace Level 1 Training Workbook
Eraser
This tool allows you to erase part of an annotation you have made. You can change the
width of the eraser by selecting the eraser and then using the Properties Bar at the
bottom of the screen.
using the eraser. You must delete them or use the select tool to drag them to the
recycle bin.
Previous / Next Page
This tool is the quickest way to get to a Workspace page you made while you were in
Mouse Mode. You can also use this tool to navigate to different Workspace pages. To
use this tool click on the green arrow from the toolbar or Properties Bar to navigate to
the pages you would like to access.
Mouse Mode
The mouse button allows you to leave your Workspace page and return back to your
active desktop or application. To return to your Workspace document you can either use
the Previous/Next page tool, or the page sorter tool.
Practice
Imagine you are teaching a lesson on trees. Through the next two modules you will be using
various Workspace tools to create a lesson on trees. You are now going to make the first two
pages of the lesson.
Note:
Some annotations, like the auto-shapes, cannot be erased
1. Create a blank page. Choose the pen tool, and change the color to your favorite color.
Write the word “Tree” in the middle of the page.
2. Change pen colors and draw a cloud around the word tree.
3. Create another blank page. Use the pen tool to print the word “Tree” again.
4. Use the selection tool to scramble the letters.
5. Click on the mouse icon to return to your desktop.
6. Use the navigation arrow that points to the left of your screen to return to the
Workspace page that you were just working on.
18
Page 19

________________________________________ Workspace Level 1 Training Workbook
Module 2:
Creating Interactive Content
Overview
This session is designed for the beginner who has only connected an Interwrite Device to the
computer, launched the software, and has made a basic Workspace document. The Interactive
mode of the software with the advanced toolbar will be used in this session. Participants will
learn how to create and save a basic Workspace lesson that incorporates a variety of pages,
text, drawings, and images.
Objectives
After completing this module, participants will be able to:
Access tools from the advanced toolbar
Create and modify page types to meet instructional needs
Add and modify text on Workspace pages
Enhance lessons by adding objects
Use editing tools
Use content from the Gallery
Manage a Workspace file
19
Page 20

________________________________________ Workspace Level 1 Training Workbook
Stamper
Multi-color Pen
Curtain
The Advanced Toolbar
The advanced toolbar will give you easy access to a variety of tools that are normally available
in the toolbox. For the activities in this module you will need to change to the advanced toolbar.
1. Click on the Menu button and choose Preferences.
2. Clickon the Customize Toolbar option.
3. Choose Advanced from the drop down menu.
4. Click OK when you are done.
20
Page 21

________________________________________ Workspace Level 1 Training Workbook
Multicolor Pen
Write with a rainbow or two-tone color pattern. Use the
Properties Bar to change the pen’s preferences.
Stamper
Puts a single small picture on a Workspace page. Different
stamp options will appear in the Properties Bar at the bottom
of the screen.
Curtain
The Reveal Curtain allows you to “hide” what you don’t want
students to see. The Reveal Curtain is resizable, movable, and
transparent.
Advanced Tools and Functions at a Glance
Annotation Tools
Presentation Tools
Instructional Application
What are some additional classroom applications of the advanced tools and functions?
_________________________________________________________________
_________________________________________________________________
_________________________________________________________________
_________________________________________________________________
_________________________________________________________________
_________________________________________________________________
_________________________________________________________________
_________________________________________________________________
_________________________________________________________________
_________________________________________________________________
_________________________________________________________________
21
Page 22

________________________________________ Workspace Level 1 Training Workbook
Create and Modify Pages
Blank pages are only one of the page options with Workspace. In Workspace you can also
create grid pages and calendar pages to meet your instructional needs.
Grid Page Tool
This tool allows you to create a lined page. The page can have vertical lines, horizontal lines, or
both. You can also customize your grid pages. If this tool is not on your toolbar, try looking in
your toolbox.
1. Navigate to Workspace Menu > Preferences > Grid Page.
2. Select your desired options and close the Preferences.
Calendar Page
This will create a background page that looks like a calendar. You can choose to display 1 week,
or 1 to 4 months, on a single page. You can use the toolbox to access the calendar page.
1. Click on the Toolbox and select Create Calendar Page.
2. Select your desired options.
3. Click OK.
22
Page 23

________________________________________ Workspace Level 1 Training Workbook
Add Text
When creating lessons, you may want to type text so it can be easily read by students. The
Type Text tool allows you to create a text box on a Workspace page.
1. Select the Type Text tool from the toolbar.
2. Click in the writing area of your Workspace page to produce a text box.
3. Set the font and formatting options of your preference.
4. Use your keyboard or on-screen keyboard to type text.
5. When you are done typing, click somewhere else on the page to create another text
box.
* To change or modify text, use the selection tool to double click on the text, using the
options below to make the changes.
Instructional Application
Brainstorm ways you could use the Type Text tool in your instructional activities.
____________________________________________________________________________
____________________________________________________________________________
____________________________________________________________________________
____________________________________________________________________________
____________________________________________________________________________
____________________________________________________________________________
____________________________________________________________________________
____________________________________________________________________________
____________________________________________________________________________
____________________________________________________________________________
____________________________________________________________________________
23
Page 24

________________________________________ Workspace Level 1 Training Workbook
Line
Option
Fill
Options
Add Objects
There may be times when you would like to create your own drawings, diagrams, labels, or
graphic organizers. You can use tools like the shapes, line tool, and stamper tool to create your
own content.
Stamper
The Stamper tool puts a single small picture on a Workspace page.
Click on the Stamp tool and the different stamp options will appear
in the Properties Bar at the bottom of the screen.
1. Select the Stamper tool from the toolbar or toolbox.
2. Select your desired stamp picture from the Properties Bar.
3. Click once on your Workspace page to create a stamp.
Shapes Tool
The Shapes tool allows you to create a variety of shapes
automatically. You can also change the exterior of the shape
(e.g., line color, thickness and style), as well as the fill color
and transparency.
1. Select the Shapes tool from the toolbar or
toolbox.
2. Select your desired color, line thickness, and fill color
options from the Properties Bar.
3. Draw the shape on your Workspace page.
24
Page 25

________________________________________ Workspace Level 1 Training Workbook
Line Tool
The line tool allows you to draw straight lines. You can also change the line thickness,
endpoints, and line style by using the Properties Bar.
1. Select the Line tool from the toolbar or toolbox.
2. Select your desired color and line thickness options from the Properties Bar.
3. Draw a line on your Workspace page.
*Once you’ve drawn a line, you can use the Selection tool to select
your arrow, and then use the crossed arrows to change the angle of
your line.
Instructional Application
Brainstorm ways you could use these tools in your instructional activities.
____________________________________________________________________________
____________________________________________________________________________
____________________________________________________________________________
____________________________________________________________________________
____________________________________________________________________________
____________________________________________________________________________
____________________________________________________________________________
____________________________________________________________________________
____________________________________________________________________________
____________________________________________________________________________
____________________________________________________________________________
____________________________________________________________________________
____________________________________________________________________________
25
Page 26

________________________________________ Workspace Level 1 Training Workbook
Cut
Remove or “cut” a selected entity.
Copy
Make a copy of a selected entity.
Paste
Place an entity that was cut or copied, on the Workspace page.
Select all
Select all entities on a Workspace page.
Order Selected
Entities
Select the position of an entity. You will be able to send an
entity in front or behind a different entity to create layers.
Rotate Selected
Entities
Rotate entities 90°, 180°, or flip the entity horizontally or
vertically.
Group
Take several separate entities and group them together to
create one entity.
Ungroup
Ungroup a grouped entity.
Move to Background
This function will allow you to permanently “glue” an entity to
a Workspace page.
Workspace Editing Tools
This group of tools is used to edit or change the annotations you create. These options will
appear when you have used the selection tools to select an annotation. Many of these tools use
the same keyboard shortcuts as Microsoft Office.
You can access these tools by using the Selection tool to choose an annotation you have
made. The editing options will then appear in the Properties Bar at the bottom of the screen.
Editing Tools
26
Page 27

________________________________________ Workspace Level 1 Training Workbook
Main Category
Sub-Categories/Descriptions
Arts and Recreation
Art, Games, Music, Sports
Language Arts
Handwriting, Grammar, Sight Words, Word Parts (Blends, Prefixes,
Roots, Word Families, etc.), Literature, Poetry
Math
Dice, Dominoes, Geometry, Manipulatives, Money, Numbers and
Symbols, Tools, Math Facts, Equations, Fractions, Algebra, Tables and
Graphs, Calculus, Various Graph Papers and Grid Backgrounds
Science
Anatomy, Animals, Biology, Chemistry, Environment, Food, Geology,
Physics, Space, Tools, Weather
Social Studies
Geography, Street Signs, Transportation, Emotions, Historical, Everyday
Things, Holidays
Special Needs
Sign Language
Image Page: This image
will take up the full
screen. The flap in the top
right-hand corner indicates
this is an image page.
Image: This is a single
image. You can resize
this image.
Sims: Many of these
files have sound
and/or animations.
Add Gallery Content
This tool allows you to insert content from the Gallery into your document. The pictures are
organized by subject area. There are three types of resources available from the Gallery.
Gallery at a Glance
27
Page 28

________________________________________ Workspace Level 1 Training Workbook
Add Objects from the Gallery
1. Click on the Gallery icon on your toolbar.
2. Browse to locate an image that you would like to use.
3. Use the Selection tool to drag the image over to the Workspace
page.
Add Interwrite Sims
1. Click on the Toolbox and click on your
Interwrite Sims. The Launch Interwrite
Sim window appears.
2. Browse to locate a sim that you would like to
use.
3. Double-click the sim for it to launch.
Practice
We are going to add a few more pages to the tree lesson you started creating in Module 1
1. Use the new page set-up tool to create new green page.
2. Create a grid page that looks like lined paper, and make sure to have a title box.
3. Use the type text tool to type “What do you know about trees?” in the title box.
4. Find a picture of a tree in the Gallery, and add it to the page.
5. Go to the first page of your lesson. Use the line tool to draw some from your “Tree”
cloud.
6. Scroll to the end of the document and add another grid page; however, use the page
set-up tool to create a page that also has vertical lines. The spacing should be 55 for
both vertical and horizontal. Make sure to have a title box.
7. Use the type text tool to type in the title box, “My Favorite Apple”.
8. Use the line tool to create three horizontal lines; these will later become labels for a
graph.
9. Make a calendar page for this month.
28
Page 29

________________________________________ Workspace Level 1 Training Workbook
Manage Your Workspace File
Organize a Workspace File
1. Click on the Page Sorter icon from the toolbar.
2. To delete pages, click on the ones you do not want, then click Delete.
3. To rearrange pages, use the cursor to select one page. Next, click Move Up or Move
Down.
4. When you are done, click on close to close the page sorter view.
Save a Workspace File
1. Use the Page Sorter to delete and arrange your Workspace pages.
2. Click on the Save button from the toolbar.
3. Close Workspace.
4. To open your Workspace file, either double click on the file or if you are in Workspace
click on the Workspace Menu > File > Open.
Export a Workspace File
1. Go to Menu > File and choose one of the three export
options.
2. Choose the format you wish to export, the location
you would like to export to, and then the page(s) you
wish to export.
3. Click Export when you are done.
Print a Workspace File
1. From the Workspace toolbar, go to Menu > File> Print.
29
Page 30

________________________________________ Workspace Level 1 Training Workbook
Workspace Tool
Function/Application
Instructional Application
Create a lesson to use with your class. Use these guiding questions to help plan your lesson.
1. What subject area(s) will your lesson cover?
_________________________________________________________________________
2. What is the grade level for your lesson?
_________________________________________________________________________
3. Which standards does your lesson cover (if applicable)?
_________________________________________________________________________
4. What are your learning objectives?
_________________________________________________________________________
5. What Workspace tools could you use in your lesson that would help you to achieve your
learning objectives?
30
Page 31

________________________________________ Workspace Level 1 Training Workbook
1 2 3
4
5 6 7
8
6. Use this space to create a storyboard for your lesson.
31
Page 32

________________________________________ Workspace Level 1 Training Workbook
Module 3:
Engaging Content with Learners
Overview
This session is designed for the beginner who has created a Workspace lesson and has
knowledge of using various annotation and presentation tools. Participants will learn how to use
various tools to engage students and enhance their teaching with a Workspace lesson.
Objectives
After completing this module, participants will be able to:
Identify and use Workspace tools to engage students and content
Review various instructional applications of Workspace Tools
32
Page 33

________________________________________ Workspace Level 1 Training Workbook
Using Workspace to Engage Students
Workspace has a variety of tools that are designed to increase interactivity with the content
being taught. Many of the tools used to create a lesson can also be used to engage a lesson.
Some of the common tools already showcased in modules one and two that are used to engage
a lesson are Highlighter, Multicolor Pen and Stamp. The tools showcased here are the Curtain,
Timer, and Spotlight, and layering.
Curtain
The Curtain allows you to “hide” what you don’t want students to see. The Curtain is resizable,
movable and can be made transparent.
1. Go to a document or page where you want to use the Reveal Curtain.
2. Click on the Curtain icon from your toolbar or toolbox. The Curtain’s properties
will appear in the Properties Bar.
3. Use the handles to resize your Reveal Curtain, or use the cursor to reposition the
Reveal Curtain anywhere on the screen.
4. When you are done with the Reveal Curtain, click on the Close button at the bottom of
the screen.
33
Page 34

________________________________________ Workspace Level 1 Training Workbook
Spotlight
The Spotlight allows you to view a small part of your screen. The Spotlight is similar to the
Curtain; however, you can change the Spotlight to be a different shape. The spotlight is
normally housed in the toolbox. You can use the Preferences option to add the spotlight to the
toolbar.
1. Go to a document or page where you want to use the Spotlight.
2. Click on the Spotlight icon from your toolbar or toolbox.
3. Use the cursor to drag the Spotlight anywhere on the screen.
4. When you are done with the Spotlight, click on the Close button at the bottom of the
screen.
Timer
The timer will beep and flash to indicate time is up or count time to
the second as a stopwatch.
1. Click on the Toolbox icon and choose the Timer icon.
2. Set the timer to either a timer or stopwatch by clicking in
the radio button before your choice.
3. Click on the Set Timer drop-down arrow to select the length
of time you need.
4. Press Start to begin.
34
Page 35

________________________________________ Workspace Level 1 Training Workbook
Select Layers
Show/Hide Layers
Move Layers Up or Down
Edit Selected Layer
Layers
Layers provide a way to manage all the items that make up your Workspace page. Layers can
be considered clear folders that contain annotations. If you reshuffle the folders, you change
the stacking order of the items in your annotations.
The structure of layers in your Workspace page can be as simple or complex as you want it to
be. By default, all items are organized in a single, parent layer. However, you can create new
layers and move items into them, or move elements from one layer to another at any time.
You use the Layers function to list, organize, and edit the objects in a document. By default,
every new page contains one layer, and each object you create is listed under that layer.
However, you can create new layers and rearrange items to best suit your needs.
To add layers to your Workspace document:
1. Locate the Layer Toolbar at the bottom left corner of the
Workspace document.
2. Click the Add Layer button to add a layer on top of your Workspace document.
3. You will then see the Layer Toolbar maximized with additional options:
35
Page 36

________________________________________ Workspace Level 1 Training Workbook
Workspace Tool
Function/Application
Modification Options
Practice
Explore the engage tools listed above and make notes on three tools of interest to you.
Check for Understanding
If you wanted students to create a graphic organizer, which tools would you recommend and
how would they use these tools?
_________________________________________________________________
_________________________________________________________________
_________________________________________________________________
_________________________________________________________________
_________________________________________________________________
_________________________________________________________________
36
Page 37

________________________________________ Workspace Level 1 Training Workbook
Tool
Instructional Application
Blank Page
Workspace lessons
Class or meeting note taking
Student portfolios
Grid Page
Notebook paper
Handwriting exercises
Custom graph paper for area, perimeter, picture graphs
Math arrays
100s chart
Mapping activities or scale
Reward charts
Attendance charts
Crossword puzzles
Word finds
Calendar Page
Document assignments
Project management
Morning calendar activities
Birthday chart
Math activities involving time
Reflection journal
Attendance graphing
Weather charting
Class jobs and responsibilities
Instructional Applications with Workspace Tools
Listed below are common tools and instructional applications for each of them. Try using some
of these tools with one of its corresponding instructional applications.
Page Tools
37
Page 38

________________________________________ Workspace Level 1 Training Workbook
Pen
Writing and drawing
Summarizing and note taking
Multicolor Pen
Tracing or handwriting practice
Use instead of a pen to add a little flair to your lessons
Customize with school or class colors to build school pride
Type Text
Use to type labels for a diagram
Use with the “Split Sentence into Words” function to create
Language Arts activities
Highlighter
Highlight vocabulary words and important concepts on
websites, PPT’s, and scanned documents
Main idea and supporting details
Fact vs. opinion statements
Line
Making lines, arrows
Connect ideas
Make game boards
Make custom handwriting paper
Labeling
Create custom angles/polygons
Make tables
Shapes
Make “hide” boxes or flash cards
Create graphics
Create flow charts
Make shapes for sorting activities
Make your own tessellations
Stamper
Accent what is on the screen
Use in checklists or graph activities
Use as reward stickers
Use for manipulatives for sorting, patterns, or counting
Customize with your own pictures to support a thematic
unit
Use in math arrays
Graphs
Annotation Tools
38
Page 39

________________________________________ Workspace Level 1 Training Workbook
Selection
Move objects to reveal answers underneath
Eraser
Erase ink to reveal object underneath
Copy
Paste
Copy and paste multiple objects on top of one another to
be used in learning activities (i.e. money)
Order Selected
Entities
Create layers with entities
Create flash cards
Move to Background
“Glue” items or answers to the page, then cover over the
items with ink, use the eraser to uncover the answer
The Gallery
Interactive simulations
Content-related images and diagrams
Story telling/retelling
Capture
Capture images from a Web site or your computer
Curtain
Use with text to help with reading/tracking
Reveal parts of a presentation, website or reading selection
Prediction activities “Guess what is behind the curtain
based on these clues?”
Spotlight
Prediction activities
Focus on parts of a diagram or text
Editing Tools
Multimedia Tools
Presentation Tools
39
Page 40

________________________________________ Workspace Level 1 Training Workbook
Category
Instructional Application
Page
Tools
Annotation
Tools
Editing
Tools
Multimedia
Tools
Presentation
Tools
Instructional Application
Now it is your turn to brainstorm ways to use the tools in instruction. Try and come up with one
new idea for each category.
40
Page 41

________________________________________ Workspace Level 1 Training Workbook
Page
Presentation Idea
1. Page with “Tree” in
mixed up order
Use the select tool to rearrange the letters to make the
word “Tree.”
2. “Tree” with the cloud
drawn around it.
Use the text type tool to brainstorm a list of tree types.
3. Lined paper, “What do
you know about trees?”
Use the pen tool to brainstorm what you know about trees
for a KWL chart
4. Tree page
Use the pen and shapes tool to create a tree with brown
trunk and a green top
Use the circle shape tool to create a yellow sun
Place a character from the Gallery under the tree.
Use the freehand text tool to label the parts of the tree
Use the spotlight tool to review the labels on the diagram
Use the select tool to select the tree that you have made
and use the copy function
Create a blank page and paste the tree on it
Use the stamp tool to place apples on the tree
5. “My Favorite Apple”
graph
Use the pen tool to write three types of apples on the lines
Place a random number of stamps for each of the
categories
6. Calendar Page
Use the pen tool write these events on the calendar, “Field
Trip”, Tree Group Project, and Unit Test”
Practice
Practice using various Workspace tools to deliver your tree lesson.
1. Use the page sorter to delete or move any pages not related your tree lesson.
2. In the table below, use the left-hand column to rearrange your pages in the correct
order. Then use the right-hand column for the tool and actions to use with your lesson.
41
Page 42

________________________________________ Workspace Level 1 Training Workbook
Module 4:
Integrating Multimedia Resources
Overview
This session is designed for the beginner who has created a Workspace lesson and understands
the: select tool, page tools, navigation tools, and toolbox. Participants will learn how to link
from a Workspace page to other resources/documents and add multimedia to a Workspace
page. They will also learn how to use various Workspace tools to create images.
Objectives
After completing this module, participants will be able to:
Incorporate existing multimedia into a Workspace lesson
Create multimedia using Workspace tools
42
Page 43

________________________________________ Workspace Level 1 Training Workbook
Add Existing Multimedia
Many instructors use various kinds of multimedia in their lessons including Flash objects, audio,
and video. The Workspace software comes with multimedia files but gives you various tools to
incorporate any existing resources you may have into the Workspace environment.
Interwrite Sims
Multimedia resources available in the Gallery consist of Interwrite Sims, which are flash
simulations. They can be identified by the flash symbol in the lower right-hand corner of
the thumbnail image. Sims can be found in the Toolbox. You can use your annotation tools with
the Sims.
Add Interwrite Sims
1. Click on the Toolbox and click on your
Interwrite Sims icon. The Launch
Interwrite Sim window appears.
2. Browse to locate a sim that you would like to
use.
3. Double-click the sim for it to launch.
Practice
Browse through the Sims folders and select a Sim that could be used in a lesson you are
creating. Try using some of the annotation tools with your Sim.
Which Sim(s) did you choose? ___________________________________________________
Where is the Sim located? _______________________________________________________
How does it work? _____________________________________________________________
____________________________________________________________________________
____________________________________________________________________________
____________________________________________________________________________
43
Page 44
________________________________________ Workspace Level 1 Training Workbook
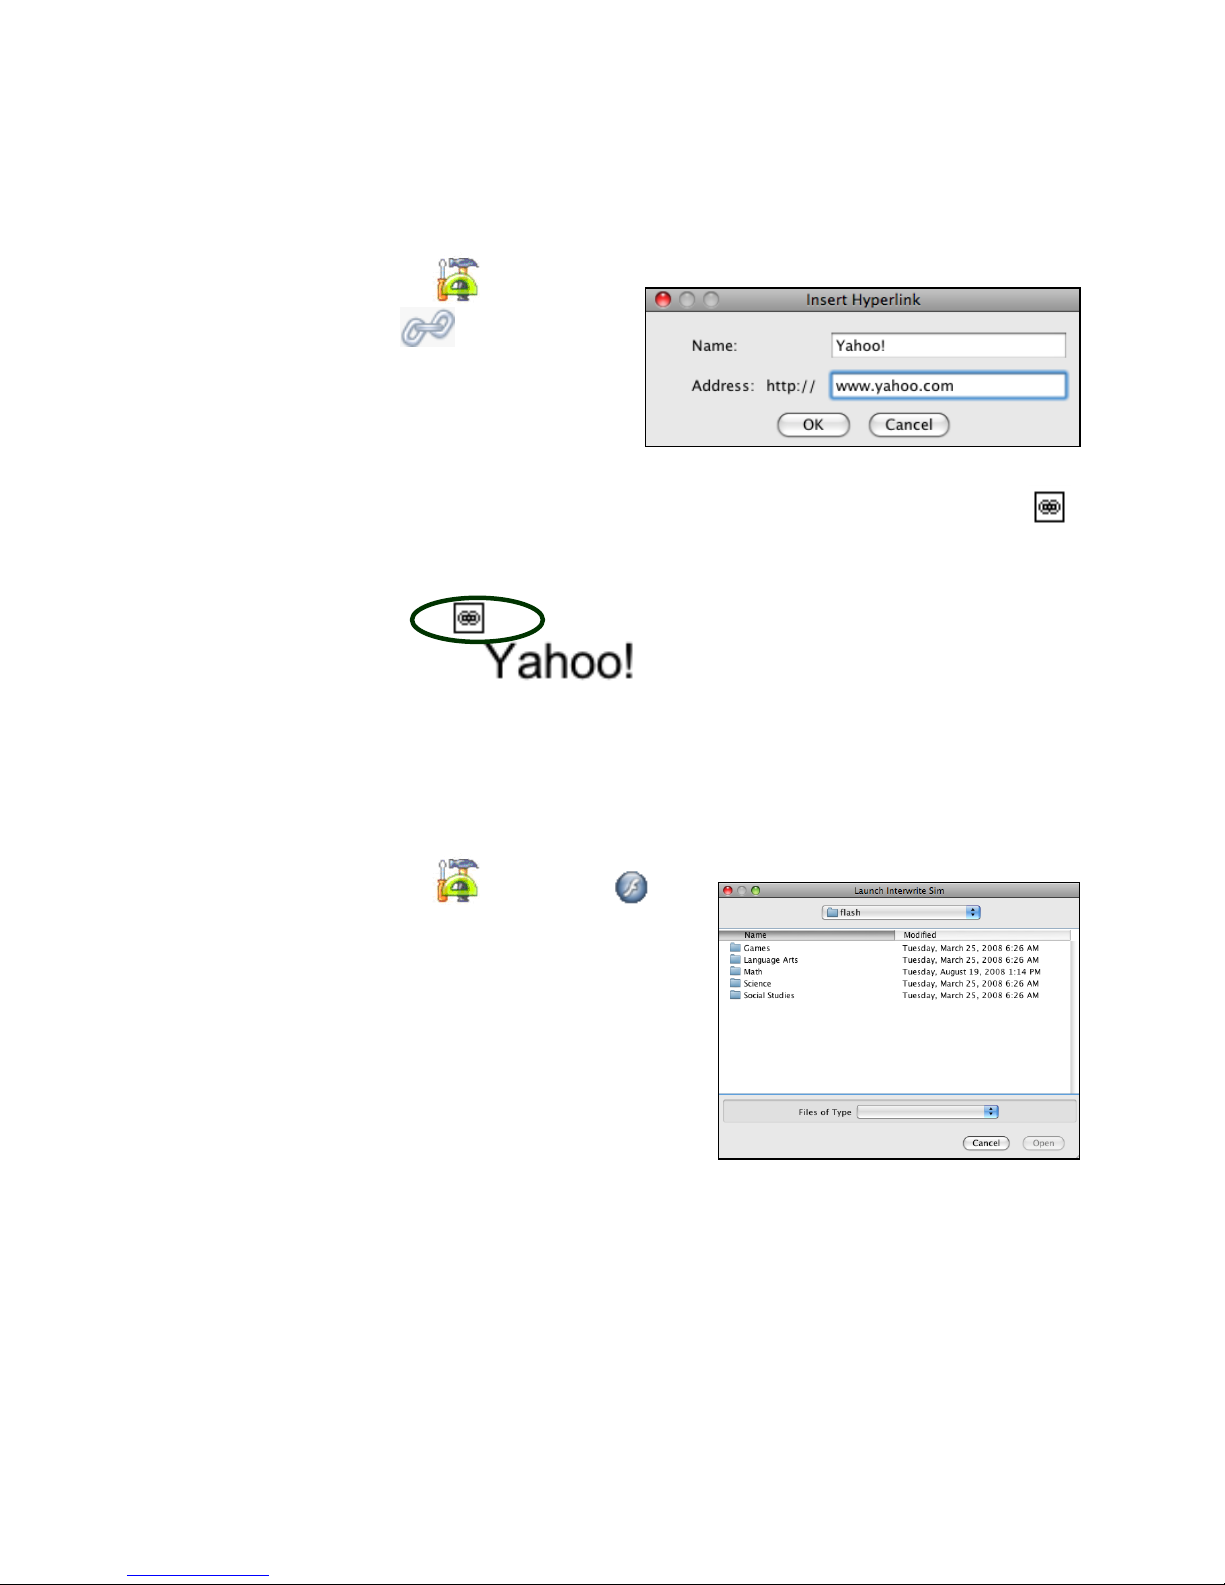
Hyperlinks
Create a hyperlink to a website inside a Workspace page.
1. Click on the Toolbox and click on
Insert Hyperlink . The Insert
Hyperlink window appears.
2. Type in the Name and Address and click
OK.
3. The hyperlink will be inserted into the Workspace page. Click on the hyperlink icon
to open the webpage.
Flash Player
Access your existing Flash files and put them on your Workspace page.
1. Click on the Toolbox and click on
Interwrite Sims. The Launch Interwrite
Sim window appears.
2. Use the top drop-down menu to browse your
Macintosh HD to locate a flash file (.swf) that you
would like to use.
3. Double-click the flash file for it to launch.
4. You can use your Workspace tools to make
notes or annotate over your Flash entity.
Practice
Create a blank page and then choose a favorite webpage or flash file you have. Use Workspace
tools with the media you have chosen.
44
Page 45

________________________________________ Workspace Level 1 Training Workbook
Create Multimedia Using Workspace Tools
Although there are many resources available in Workspace, there may be times when you need
to create your own customized content. There are several tools in Workspace to help you create
images or videos.
Create Images with Capture
The capture tool allows you to selectively capture a portion of your screen. This can be from
another application’s screen (i.e. Web page, PowerPoint, Word file, .pdf, etc.) or from a
Workspace page.
1. Access the media you wish to capture.
2. Click on the Capture tool from the toolbar or toolbox.
3. A window will appear asking which capture option you want to use:
Partial: Select a portion of the screen to capture. The output format will be in the
form of a square or rectangle. A window tool will appear. Drag over the selection
you wish to capture.
Screen: Capture what is displayed on the entire screen.
4. If you want your captured image to be placed into a blank Workspace page, make
sure you check the box labeled Place capture in new page.
45
Page 46

________________________________________ Workspace Level 1 Training Workbook
Create Videos
The Record and Playback tool allows you to record your voice (if you have a microphone on
your computer) as well as your annotations or programs you have running on your screen. It’s
a great tool to make your own tutorials for students.
1. Go to the toolbox and select the Record and Playback tool.
2. Click on the Record button to start recording.
3. Use programs on your computer or create notes and diagrams with the Workspace
software. When you are done, click on the Stop Recording button.
4. Save your file.
Note:
The Record and Playback files save as an .avi file. Once your file is saved, you can play
the video file back by pressing the green play button.
Add Files to Gallery
To add images you created to the Gallery by placing them in the pictures folder.
1. Locate the picture file on your computer.
2. Copy the picture to Macintosh HD > Interwrite Learning > Interwrite
Workspace > Pictures.
46
Page 47

________________________________________ Workspace Level 1 Training Workbook
3. The picture will appear in the Gallery.
Creating Audio Clips with Workspace
The Insert Audio Note tool allows you to record your voice (if you have a microphone on your
computer). It’s a great tool to make your own tutorials for students.
5. Go to the toolbox and select the Insert Audio Note tool. The Insert
Audio Note window appears.
6. Click on the Start button to start recording.
7. Talk about the slide in which the audio note will be inserted. If you wish to pause the
recording, click Pause. Click Done when you are finished.
8. Save your file.
Instructional Application
In using the various multimedia tools, which did you find to be the most useful and why?
____________________________________________________________________________
____________________________________________________________________________
____________________________________________________________________________
____________________________________________________________________________
47
Page 48

________________________________________ Workspace Level 1 Training Workbook
Module 5:
eInstruction Product Suite Integration
Overview
This session is designed for the beginner to utilize PRS with their Workspace lesson. Participants
will learn how to create preplanned and on the fly questions for PRS.
Objectives
After completing this module, participants will be able to:
Integrate PRS questions into your Workspace lesson
48
Page 49

________________________________________ Workspace Level 1 Training Workbook
Integrate PRS Questions
You can embed questions into your Workspace lesson and engage them with students using
student response pads.
Create SRS Questions
1. Create a new Workspace page.
2. Use various tools to create a question.
3. Click on the PRS button in the toolbar.
4. Click on Create Question.
PRS
5. Select the parameters for your question and then click OK.
49
Page 50

________________________________________ Workspace Level 1 Training Workbook
Engage PRS Questions
1. When you are ready to ask students a question, click on the PRS button from
the toolbar, then choose Start Interwrite PRS.
2. After completing the standard PRS session options, the Engage toolbar will appear so
you can ask your question. Click Start to collect responses.
PRS
3. The question ends when the timer runs out or you can click on the Stop button to end
the time.
4. When the question is over, a chart will appear showing student response data. Click
Close when you are done reviewing the chart.
PRS
5. Use the Workspace navigation tools to go onto another page. The PRS toolbar
will minimize until another question is polled.
6. When you are done with your lesson, click on the PRS button , and select End
Session.
7. You can view your session data in PRS.
50
Page 51

________________________________________ Workspace Level 1 Training Workbook
Create PRS Questions On-the-Fly
1. Create a new Workspace page.
2. Use various tools to create a question.
3. Click on the PRS button in the toolbar.
4. Click on Ask Question.
PRS
5. Select the parameters for your question and then click OK.
6. After completing the standard PRS session options, the Engage toolbar will appear so
you can ask your question. Click Start to collect responses.
7. The question ends when the timer runs out or you can click on the Stop button to end
the time.
8. When the question is over, a chart will appear showing student response data. Click
Close when you are done reviewing the chart.
51
Page 52

________________________________________ Workspace Level 1 Training Workbook
9. Use the Workspace navigation tools to go onto another page. The PRS toolbar
will minimize until another question is polled.
10. When you are done with your lesson, click on the PRS button , and select End
Session.
11. You can view your session data in PRS.
Instructional Application
Write down what type of questions you would ask during a lesson that could be answered using
PRS, whether they were premade or asked on-the-fly.
____________________________________________________________________________
____________________________________________________________________________
____________________________________________________________________________
____________________________________________________________________________
____________________________________________________________________________
____________________________________________________________________________
____________________________________________________________________________
____________________________________________________________________________
____________________________________________________________________________
____________________________________________________________________________
____________________________________________________________________________
____________________________________________________________________________
____________________________________________________________________________
____________________________________________________________________________
____________________________________________________________________________
52
Page 53

________________________________________ Workspace Level 1 Training Workbook
Module 6:
Customizing Workspace
Topics
Customize Workspace
Programming Softkeys
Classroom management features in a multi-device environment
Access Workspace lessons from Interwrite website
Whiteboard Mode
53
Page 54

________________________________________ Workspace Level 1 Training Workbook
Primary Toolbar
Workspace Customization Options
There are many options for you to customize what your Workspace environment looks like and
how it works. The next few pages outline some of the most popular customization features.
Toolbar Settings
Use these options to change the size of the toolbar.
1. Go to Menu>Preferences.
2. Select the Toolbar Settings tab.
3. Select the size in pixels you want your buttons.
4. Click OK.
Customize the Toolbar
There may be functions that you wish to add, remove, or
rearrange on the toolbar. You can also create multiple toolbars if
you teach various topics.
1. Go to Menu>Preferences.
2. Select the Customize Toolbar tab.
3. Drag and drop toolsfrom the Available Tools to your
toolbar or toolbox.
4. Rearrange tools by dragging them to a new location.
5. Click OK.
6. Save Changes when prompted.
Enable the Primary Toolbar
Workspace has a special simplified toolbar if you work with
younger students or Workspace beginners.
1. Go to Menu>Preferences.
2. Select the Toolbar Settings tab.
3. Check the Enable Primary Toolbar box.
4. Click OK.
54
Page 55

________________________________________ Workspace Level 1 Training Workbook
Customize the Gallery
There are many ways to add and organize content in the Gallery. This is especially helpful if you
have a bank of images that you have collected or acquired through resources like a companion
CD to your textbook.
Add a New Category to My Gallery
1. Open the Gallery folder by going to Macintosh HD > Applications > Interwrite
Learning >Interwrite Workspace > Pictures.
2. Add a folder to create a new category.
Add Files to the Gallery
1. Open the Gallery folder by going to Macintosh HD > Applications > Interwrite
Learning >Interwrite Workspace > Pictures.
2. Copy and paste files to these folders and the gallery will automatically be updated.
Instructional Application
List what type of digital resources you would like to add to your Gallery.
____________________________________________________________________________
____________________________________________________________________________
____________________________________________________________________________
____________________________________________________________________________
____________________________________________________________________________
____________________________________________________________________________
____________________________________________________________________________
____________________________________________________________________________
____________________________________________________________________________
____________________________________________________________________________
____________________________________________________________________________
____________________________________________________________________________
____________________________________________________________________________
55
Page 56

________________________________________ Workspace Level 1 Training Workbook
Programming Soft Keys
The Board and Pad have programmable SoftKeys, or “short-cut keys”. You can program these
keys to: be another Interwrite function, load a webpage, load a document, or even a keyboard
function like delete. The Board has three programmable SoftKeys and the Pad has 19.You can
also go to www.interwritelearning.comto get blank paper templates for your Interwrite Pad.
1. Click on the eInstruction icon in your system tray.
2. Choose Devices, and then select the device for which you wish to set the SoftKeys.
3. Click on Device Properties.
4. Click on the Softkeys tab.
5. Select the softkey you wish to change. 1-9 are
the keys along the right side of the Pad and 10-19
are on the left side.
6. Set the softkey to be another Workspace tool
, Workspace Application , a file, a website,
or a macro.
7. Click OK.
Brainstorming
What programs, keyboard commands or other functions do you use on a regular basis that you
may want to program as a hotkey?
____________________________________________________________________________
____________________________________________________________________________
____________________________________________________________________________
____________________________________________________________________________
____________________________________________________________________________
____________________________________________________________________________
____________________________________________________________________________
56
Page 57

________________________________________ Workspace Level 1 Training Workbook
Classroom Management in a Multi-device Environment
Setting the Master Device
In a multi-device environment you may want to set the Teacher’s Pad to have precedence over
the Student’s Pads. The “Teacher” or Presenter’s Pad can disable the other pads simply by the
presenter touching his or her pen to the pad while the Student Pad is being used.
1. Make sure the Pad you want to set as Presenter is
connected.
2. Go to Devices.
3. Highlight the device that will be the Master Device.
Click Properties.
4. Select the Basic tab and put a check in the
Master Device box.
5. Click Save, and exit the device manager when
you are done.
Lock Pads
Workspace gives you the ability to lock out any student’s Pads. This option is also
available on the Interwrite Board.
1. Go to the Interwrite Icon in the taskbar.
2. Select Lock Pads.
3. If using the Board, use the pen to tap on the Pad Lock or Unlock.
Multi-User Functionality
The Multi User feature allows for two or more people to interact with the Interwrite Products.
With the Interwrite DualBoard, two people can write on the board at the same time.
In addition, you can set up multiple Interwrite Mobis and Interwrite Pads to display on the
board at the same time. This function is also supported with Interwrite Pads. Make sure all
Interwrite Pads or Mobis that will be used are already connected via the eInstruction Device
Manager.
57
Page 58

________________________________________ Workspace Level 1 Training Workbook
Setting Up Multi User Functionality in Workspace
1. While in the
Annotation Window
, click the Multi User icon in the bottom right corner .
The Multi User
Page Setup
window opens.
2. The connected devices display in
the
Available Devices Area
.
3. Select the Multi User Page Setup
you want to use. Determine if you
want to use Collaborative or
Defined areas. The selected grid
displays in the
Multi User Area
.
4. Select the device and drag it to
the area needed.
5. The Device will be able to be
viewed within the area displayed
within the Multi User Page Setup
window.
58
Page 59

________________________________________ Workspace Level 1 Training Workbook
Accessing Workspace Lessons from eI Community
There are thousands of lessons available from the eI Community. You have a variety of ways to
search for a lesson that best meets your needs. You can even upload your own content to
share with other educators. Content requires points to download. You can purchase points or
earn them by contributing to the community forums. To find content:
1. Go to www.eicommunity.com. If you have not already created an account, create
one using the links in the upper right-hand corner.
2. Click on Resources.
3. You have three options when searching for lessons. Click on the link based on your
preference for selecting lessons.
Browse Resources: This will show only the most popular and newly added content
pieces.
Search Resources: All of our lessons are correlated and searchable by grade level
and content format. You also have the ability to select the subject list, Webb’s DOK
Level, Bloom's Taxonomy Level or keyword.
Upload Resource: This search option will allow you to search based on search terms
aligned with the lesson.
4. Once you have selected a lesson, you will be taken to the description and download
page. Here you will find a description of the lesson and a screen shot from one of the
lesson’s pages.
5. Click on the Download Now button. You will
then be given an option to open or save the
lesson. If you wish to save a lesson, you may want
to create a lesson folder on your computer to keep
all of your downloaded lessons.
6. Once your lesson is saved, you can open the
lesson by double clicking on it.
7. You can always add pages to the lesson if you
would like to supplement it with your own ideas or
content.
59
Page 60

________________________________________ Workspace Level 1 Training Workbook
Whiteboard Mode
Whiteboard mode is a special mode that uses the Interwrite Board and a special Interactive
pen, but not a projector. This mode is designed so you can write on the board with the
interactive pen (remove the cap to reveal the Expo marker hidden inside) and still save your
notes electronically.
To create notes in Whiteboard Mode
1. To launch Whiteboard Mode, use the Interactive pen (with the cap on) to tap
on the Whiteboard Mode icon located on the Interwrite Board.
2. Remove the cap from the pen and begin to write
your notes.
3. When are you done writing, replace the cap (or use a second pen), and tap on the
SoftKey labeled Save .This will save your notes as a page in a document.
4. Press the Clear SoftKey twice. You can then erase the markings off the board
with an eraser or tissue.
5. Continue to create notes pages. Remember when you are done writing, make sure to
press Save and then Clear twice.
6. When you are done, go back to your computer and click on the Page Sorter icon
to view all of your notes. You can move or delete unwanted pages.
7. When you are finished editing your document, go to File>Save.
60
 Loading...