

EINHELL Expert GE-TM 102 B&S Original Operating Instructions

GB
Original operating instructions
Ride - On Mower
GE-TM 102 B&S
7
Anl_GE_TM_102_BS_SPK7.indb 1 02.08.12 10:20
21011 :.rN-.I 12.600.43 :.rN-.trA
21 345
67
8
9
Anl_GE_TM_102_BS_SPK7.indb 2Anl_GE_TM_102_BS_SPK7.indb 2 02.08.12 10:2002.08.12 10:20
- 2 -

GB
Handling
1. Do not let the combustion engine run in enclosed areas, as dangerous carbon monoxide
gas can build up.
2. Only mow in broad daylight or in well-lit conditions. If possible, avoid using the equipment
on wet grass.
3. Disengage the auxiliary drive unit and set the
drive lever to the neutral position before you
start the mower.
4. Do not use the equipment on slopes with a
gradient of over 10°.
5. Remember that there is no such thing as a
“safe slope”. Driving on grassy slopes requires particular concentration. To protect yourself against overturning you should:
- Not stop or start off suddenly when you are
driving up or down a slope.
- Engage slowly, leave the engine engaged,
especially when driving downslope.
- Keep to a low speed on slopes and on tight
turns.
- Watch out carefully for mounds, hollows and
other unseen dangers.
- Never mow across the slope unless the
machine construction is designed for the
purpose.
6. Be careful when you tow any loads or if you
use any heavy equipment. Only use approved
tow hitches.
7. Only attach loads that you know you can control.
8. Do not attempt to drive tight turns. Exercise
caution when reversing.
9. Pay special attention to car traffi c if you cross
a street or if you are mowing close by one.
10. Stop the knife before crossing over any areas
other than grass.
11. If you use any attachments, make sure that
this does not cause grass to be thrown in the
direction of people and that no persons are
nearby.
12. Never use machines if protective equipment
is damaged or not fi tted.
13. Do not adjust or overclock the motor speed
settings. Operating the equipment at excessive speed may increase the risk of accidents.
14. Before you leave the driver’s seat:
- Disengage the drive unit for the attachment
and lower it.
- Engage idle mode and apply the locking
brake.
- Switch off the engine and pull out the igniti-
on key.
15. Disengage the drive unit for the attachments,
switch off the engine and pull out the spark
boot plug and the ignition key:
- Before you dislodge any blockages or clogs
in the chute.
- Before carrying out any checks, cleaning or
other work on the machine.
- If you have struck a foreign object. Examine
the machine for signs of damage and carry
out any necessary repairs before restarting
and continuing to work with the machine.
- If the machine begins to experience exceptionally strong vibrations, immediately check it.
16. Disengage the drive units for attachments
whenever you intend to transport the mower
or not use it for any length of time.
17. Switch off the engine and disengage the drive
unit for the attachments:
- Before you refuel.
- Before you remove any grass catching devices.
- Before you change the height setting if this
cannot be done from the user’s position.
18. Close the engine‘s throttle valve when the
machine has run down. When you have fi -
nished mowing with the machine, close the
petrol stopcock if it has one.
Maintenance and storage
1. Make sure that all nuts, bolts and screws are
tightened securely and that the machine is in
safe working condition.
2. Never store the mower (with petrol in the
tank) inside a building in which petrol fumes
could come into contact with open fl ames or
sparks.
3. Allow the engine to cool before you put the
lawn mower in an enclosed area.
4. In order to avoid fi re hazards, keep the engi-
ne, exhaust and the area around the fuel tank
free from grass, leaves and leaking grease
(oil).
5. Routinely check the grass basket for signs of
wear and impaired functionality.
6. For your own safety, replace worn or damaged parts without delay.
7. If the fuel tank needs to be emptied, ensure
that it is done out in the open with a petrol
suction pump (available from DIY stores).
8. Carry out adjustment work on the equipment
with care and avoid jamming your fi ngers bet-
ween the moving blades and rigid parts of the
equipment.
9. Please note that the rotation of one of the blades can cause the other one to rotate as well.
- ʺ -
Anl_GE_TM_102_BS_SPK7.indb 20Anl_GE_TM_102_BS_SPK7.indb 20 02.08.12 10:2002.08.12 10:20

GB
10. Lower the mower unit when you park the mower or put it into long-term storage.
1.2 Safety information for the charger
Wear safety goggles and gloves when char-
•
ging the battery. The caustic acid presents a
high risk of injury.
Do not wear any items of clothing made
•
of synthetic materials so as to avoid spark
formation caused by electrostatic discharge
when charging the battery.
CAUTION! Avoid explosive gases, flames and
•
sparks.
The charger contains components such as
•
the switch and fuses which may generate
arcs and sparks. It is essential to ensure that
there is good ventilation in the garage or
room.
The charger is suitable for maintenance-free
•
12V batteries only.
Do not charge any “non-rechargeable batte-
•
ries” or defective batteries.
Refer to the instructions supplied by the bat-
•
tery manufacturer.
Disconnect the equipment from the mains
•
supply before you connect or disconnect the
battery.
Important. Avoid flames and sparks.
•
Explosive gas is released during the charging
•
process.
Store the equipment in a dry indoor location
•
only.
Caution! Battery acid is aggressive.
•
Should any acid splash onto hands or
•
clothing, wash off immediately with soap solution. Should any acid splash into your eyes,
wash it out immediately with water (for 15 minutes) and seek the advice of a doctor.
Do not charge any non-rechargeable batte-
•
ries.
Refer to the information and instructions pro-
•
vided by the battery manufacturer relating to
charging the battery.
Do not charge more than one battery at any
•
one time.
The mains connection lead and the charging
•
cables must be in perfect condition.
Keep children away from the battery and
•
charger.
Important. If you smell an acrid odor of gas,
•
this indicates that there is an acute danger of
explosion. Do not switch off the equipment.
Do not disconnect the battery from the power
supply! Ventilate the room immediately. Have
the battery checked by customer service staff.
Do not use the cable for purposes other than
•
that for which it is designed.
Do not carry the charger by its cable and do
•
not use the cable to pull the plug out of the
socket. Protect the cable from heat, oil and
sharp edges.
Check the equipment for damage.
•
Unless otherwise stated in the operating inst-
•
ructions, defective or damaged parts must be
repaired or replaced by a customer service
workshop.
Only ever use the supply voltage specified.
•
Keep the connectors clean and protect them
•
from corrosion.
Disconnect the equipment from the mains
•
supply before starting any cleaning or maintenance work.
Wear acid-resistant gloves and safety gogg-
•
les when connecting and charging the battery.
Important. Do not exceed the charging time.
•
After the end of the charging time pull the
plug out of the socket and disconnect the
charger from the battery.
1.3 Safety precautions for batteries
1. Make sure at all times that the batteries are
fi tted with the + and – terminals on the batteries correctly positioned as shown on the
battery.
2. Do not short-circuit the batteries.
3. Do not recharge non-rechargeable batteries.
4. Do not exhaust the battery charge.
5. Do not heat batteries.
6. Do not do any welding or soldering directly on
batteries.
7. Do not disassemble batteries.
8. Do not deform batteries.
9. Do not throw batteries into a fi re.
10. Keep batteries out of the reach of children.
11. Do not allow children to change batteries without supervision.
12. Do not store batteries near fi re, stoves or
other sources of heat. Do not expose the battery to direct sunlight. Do not use or store it in
vehicles in hot weather.
13. Keep unused batteries away from metallic
objects. This could cause the battery to shortcircuit and may therefore cause damage to
the battery, burns and even the risk of fi re.
14. Take the batteries out of the equipment if the
equipment is not going to be used for some
time.
15. NEVER touch batteries which have leaked
unless you have taken suitable precautions
for protection. If the fl uid which has leaked
- ʻ -
Anl_GE_TM_102_BS_SPK7.indb 21Anl_GE_TM_102_BS_SPK7.indb 21 02.08.12 10:2002.08.12 10:20

GB
should come into contact with your skin, rinse
down the aff ected area of skin immediately
with running water. Make sure in any event
that your eyes and mouth do not come into
contact with the fl uid. If this should happen,
consult a doctor immediately.
16. Clean the contacts on both the batteries and
the equipment before inserting the batteries.
This equipment is not designed to be used by
people (including children) with limited physical, sensory or mental capacities or those
with no experience and/or knowledge unless
they are supervised by a person who is responsible for their safety or they have received
instructions from such a person in to how
to use the equipment safely. Children must
always be supervised in order to ensure that
they do not play with the equipment.
Waste disposal
Batteries: Only dispose of these items through
motor vehicle workshops, special collection
points or special waste collection points. Ask your
local council.
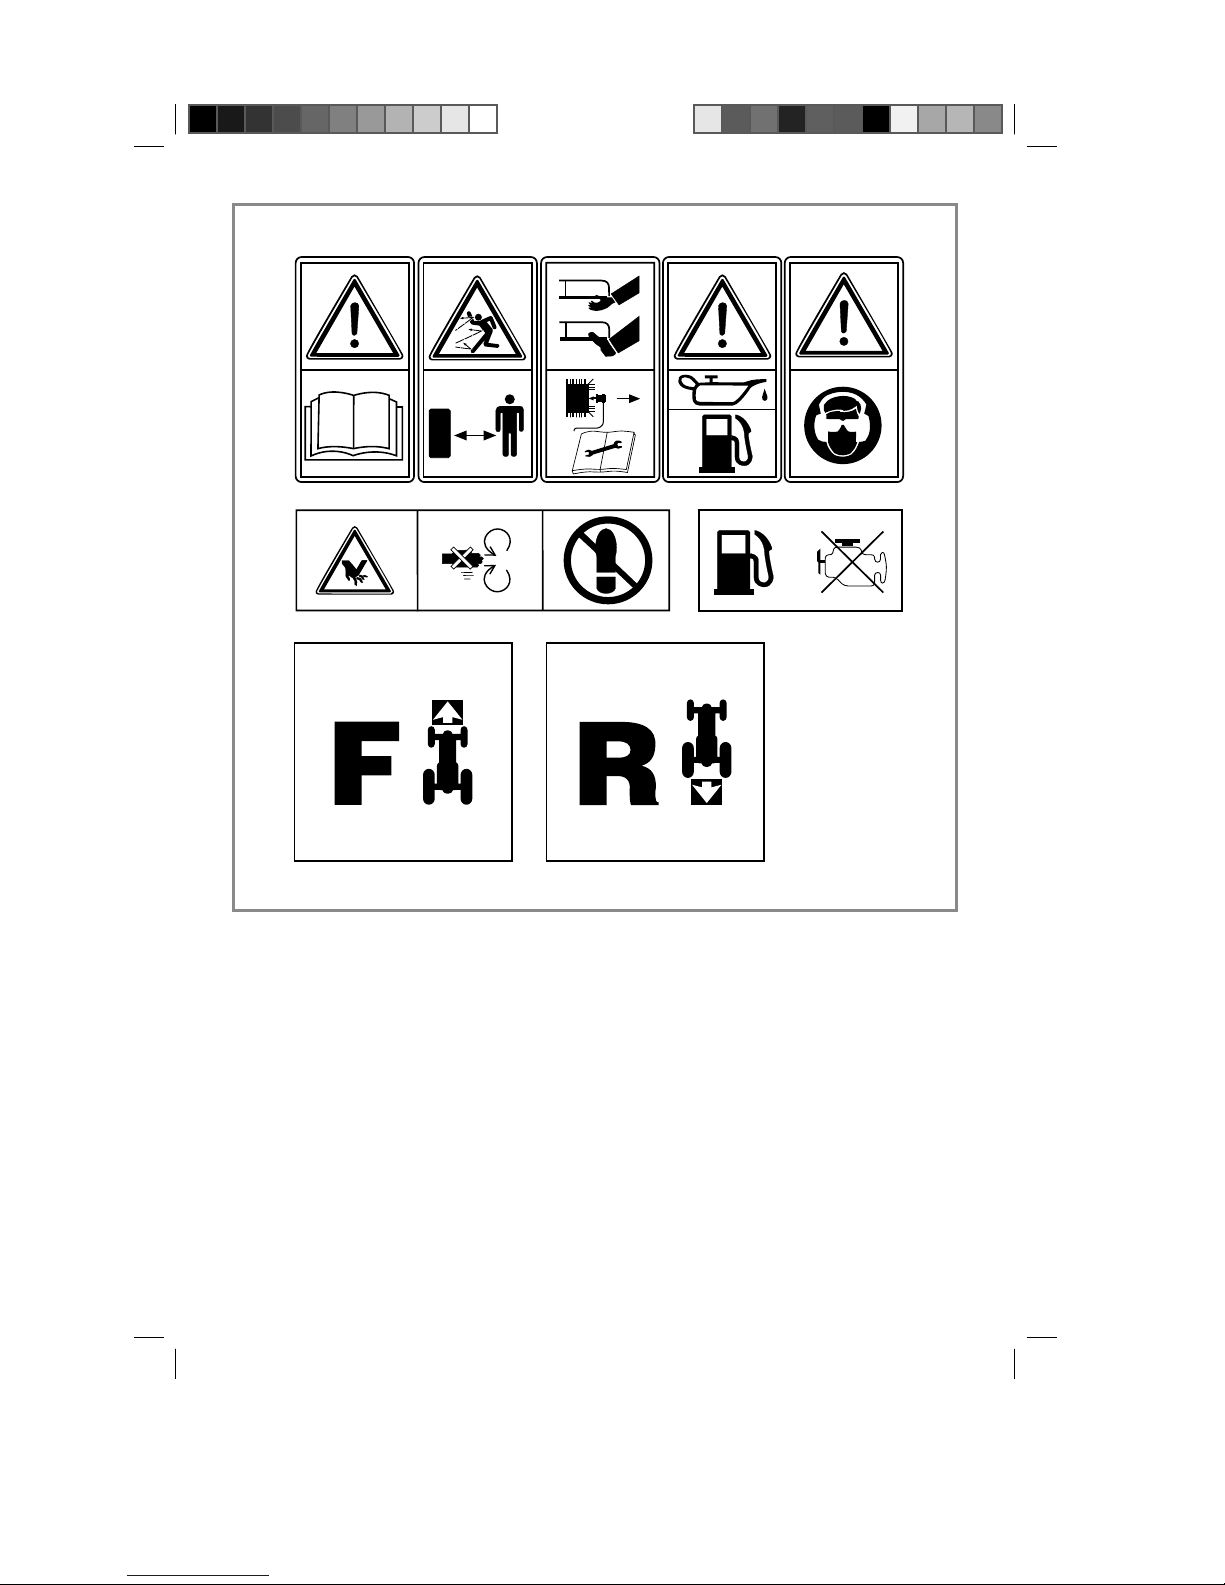
1.4 Explanation of the warning signs on the
equipment (see Fig. 2)
1) Read the operating instructions
2) Important. Danger from catapulted parts. Never use machines if protective equipment is
damaged or not fi tted. Important. Danger from
catapulted parts. Keep a safe distance.
3) Be careful of the sharp cutters. Switch off the
engine and pull the spark plug boot before
doing any maintenance, repair, cleaning or
adjustment work.
4) Fill with oil and fuel before starting.
5) Caution! Wear ear protection and safety goggles.
6) Risk of cut injuries. Caution: rotating cutters.
Never use the mower unit as a step.
7) Important. Switch off the engine for refueling.
8) Accelerator pedal (forward)
9) Accelerator pedal (reverse)
2. Layout and items supplied
Figures 1-57 can be found in the separate booklet
“Product illustrations for the Original Operating
Instructions”
2.1 Layout (Fig. 1-57)
1. Grass basket
2. Release lever for grass basket
3. Cutting height adjustor lever
4. Seat
5. Steering wheel
6. Accelerator pedal (reverse)
7. Accelerator pedal (forward)
8. Headlights
9. Front wheel
10. Mower unit
11. Rear wheel
12. Locking brake
13. Brake pedal
14. Throttle lever
15. Light switch
16. On/Off switch for the mower unit
17. Ignition lock
18. Ejector chute
19. Release lever for gears
20. Bar
21. 8-10mm open-ended wrench
22. 13-15 mm open-ended wrench
23. 10-12mm multi-functional wrench
24. 13-19 mm multi-functional wrench
25. 5 mm Allen key
26. Philips screwdriver
27. 2x ignition keys
28. Screw (cross recessed head)
29. Nut
30. Washer
31. Screw (internal hexagon)
32. Fuse (10 amps)
33. Petrol tank / fi lling cap
34. Viewing window for fuel level
35. 2x cleaning connection
36. Trailer hitch
37. Battery
38. Blade, right
39. Blade, left
40. Handle
41. Oil fi lter
42. Oil fi lling cap
43. Oil drainage screw
Anl_GE_TM_102_BS_SPK7.indb 22Anl_GE_TM_102_BS_SPK7.indb 22 02.08.12 10:2102.08.12 10:21
- ʼ -
 Loading...