

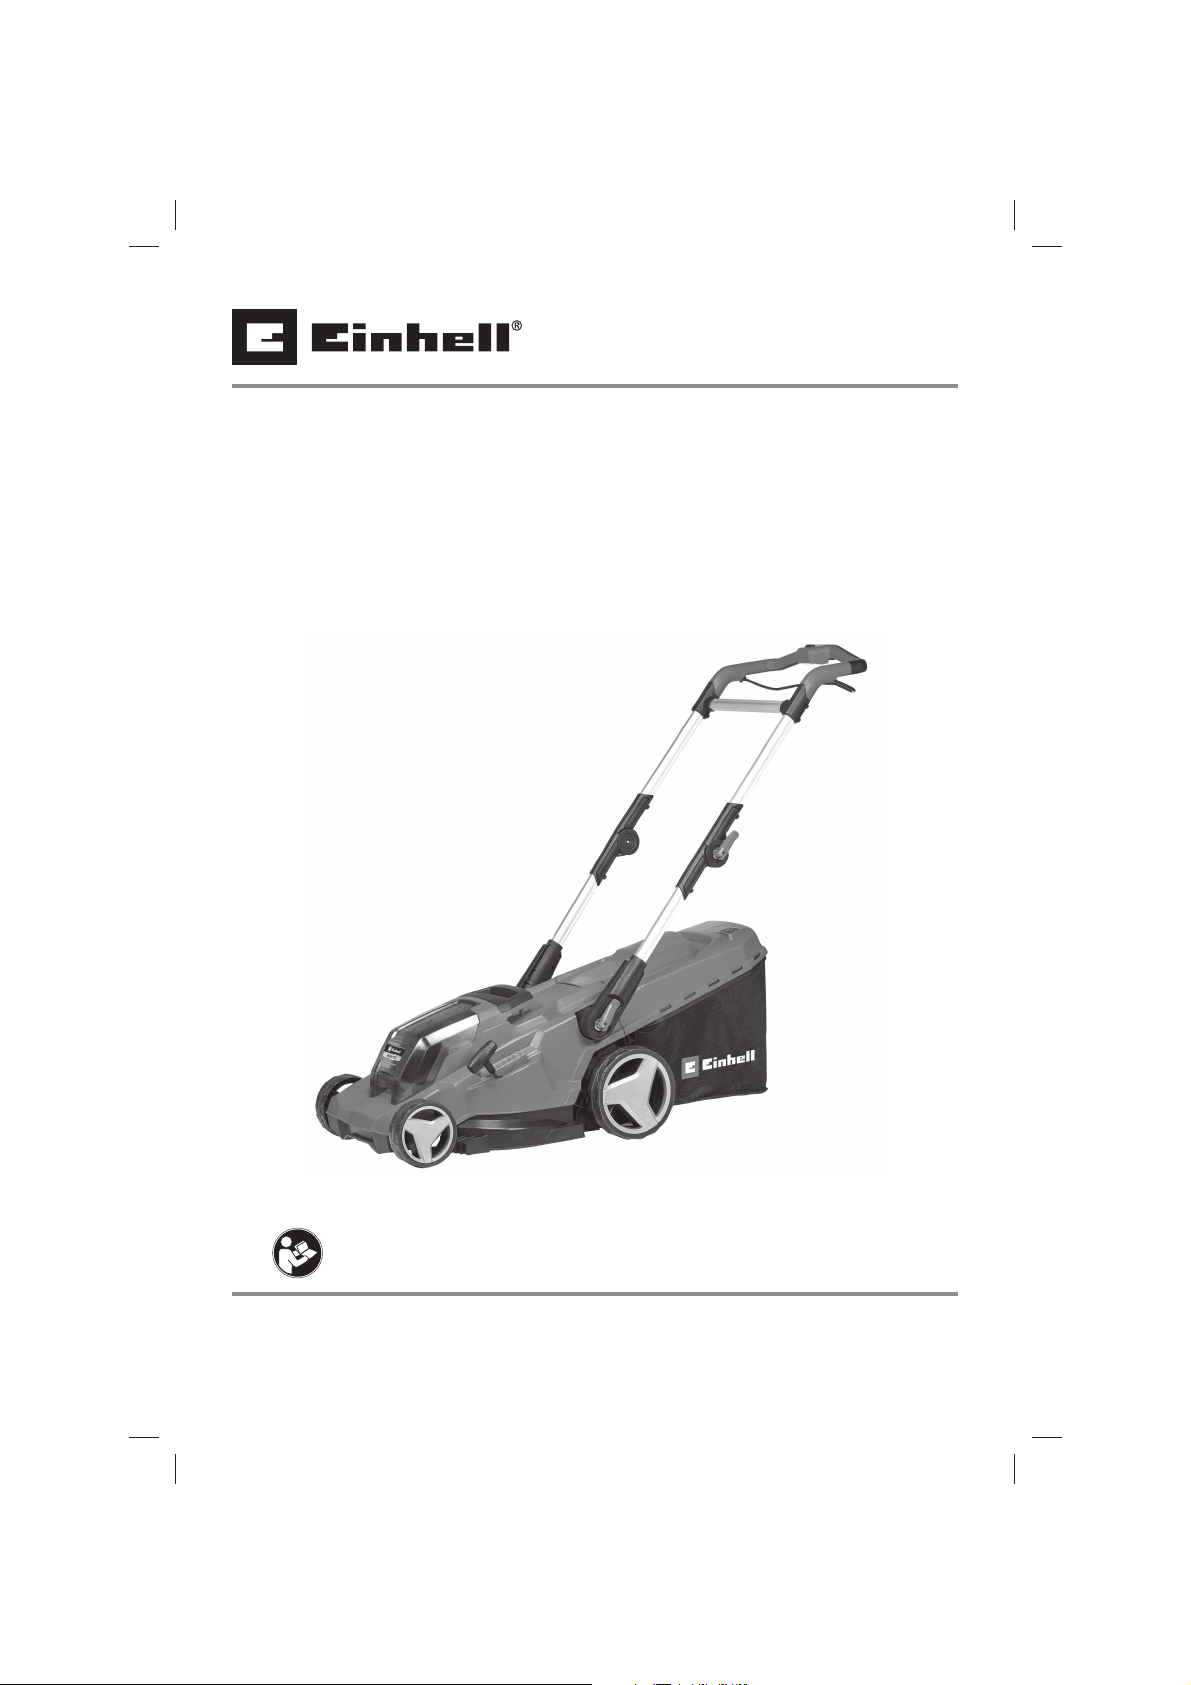
Einhell RASARRO 36/42 (2x4.0Ah) Manual
EN Operating instructions
Cordless Lawn Mower
FR Mode d’emploi
Tondeuse à gazon sans fi l
SP Manual de instrucciones
Cortacéspedes inalámbricos
RASARRO 36/42
7
Art.-Nr.: 3413274 I.-Nr.: 21012
Anl_Rasarro_36_42_SPK7_USA.indb 1Anl_Rasarro_36_42_SPK7_USA.indb 1 15.12.2022 08:52:0415.12.2022 08:52:04
1
9
10
21
3
4
5
811
2
Anl_Rasarro_36_42_SPK7_USA.indb 2Anl_Rasarro_36_42_SPK7_USA.indb 2 15.12.2022 08:52:0715.12.2022 08:52:07
14
13
6
12
7
1715 15
- 2 -
3 4
18
19
13
16
5
16
7
6
16
8
7
- 3 -
Anl_Rasarro_36_42_SPK7_USA.indb 3Anl_Rasarro_36_42_SPK7_USA.indb 3 15.12.2022 08:52:1015.12.2022 08:52:10

9
9
5
10
12
11
13
22
12
8
1.
2.
14
14
23
21
- 4 -
Anl_Rasarro_36_42_SPK7_USA.indb 4Anl_Rasarro_36_42_SPK7_USA.indb 4 15.12.2022 08:52:1515.12.2022 08:52:15
20 20
15 16
17
2.
1.
- 5 -
Anl_Rasarro_36_42_SPK7_USA.indb 5Anl_Rasarro_36_42_SPK7_USA.indb 5 15.12.2022 08:52:2015.12.2022 08:52:20
EN
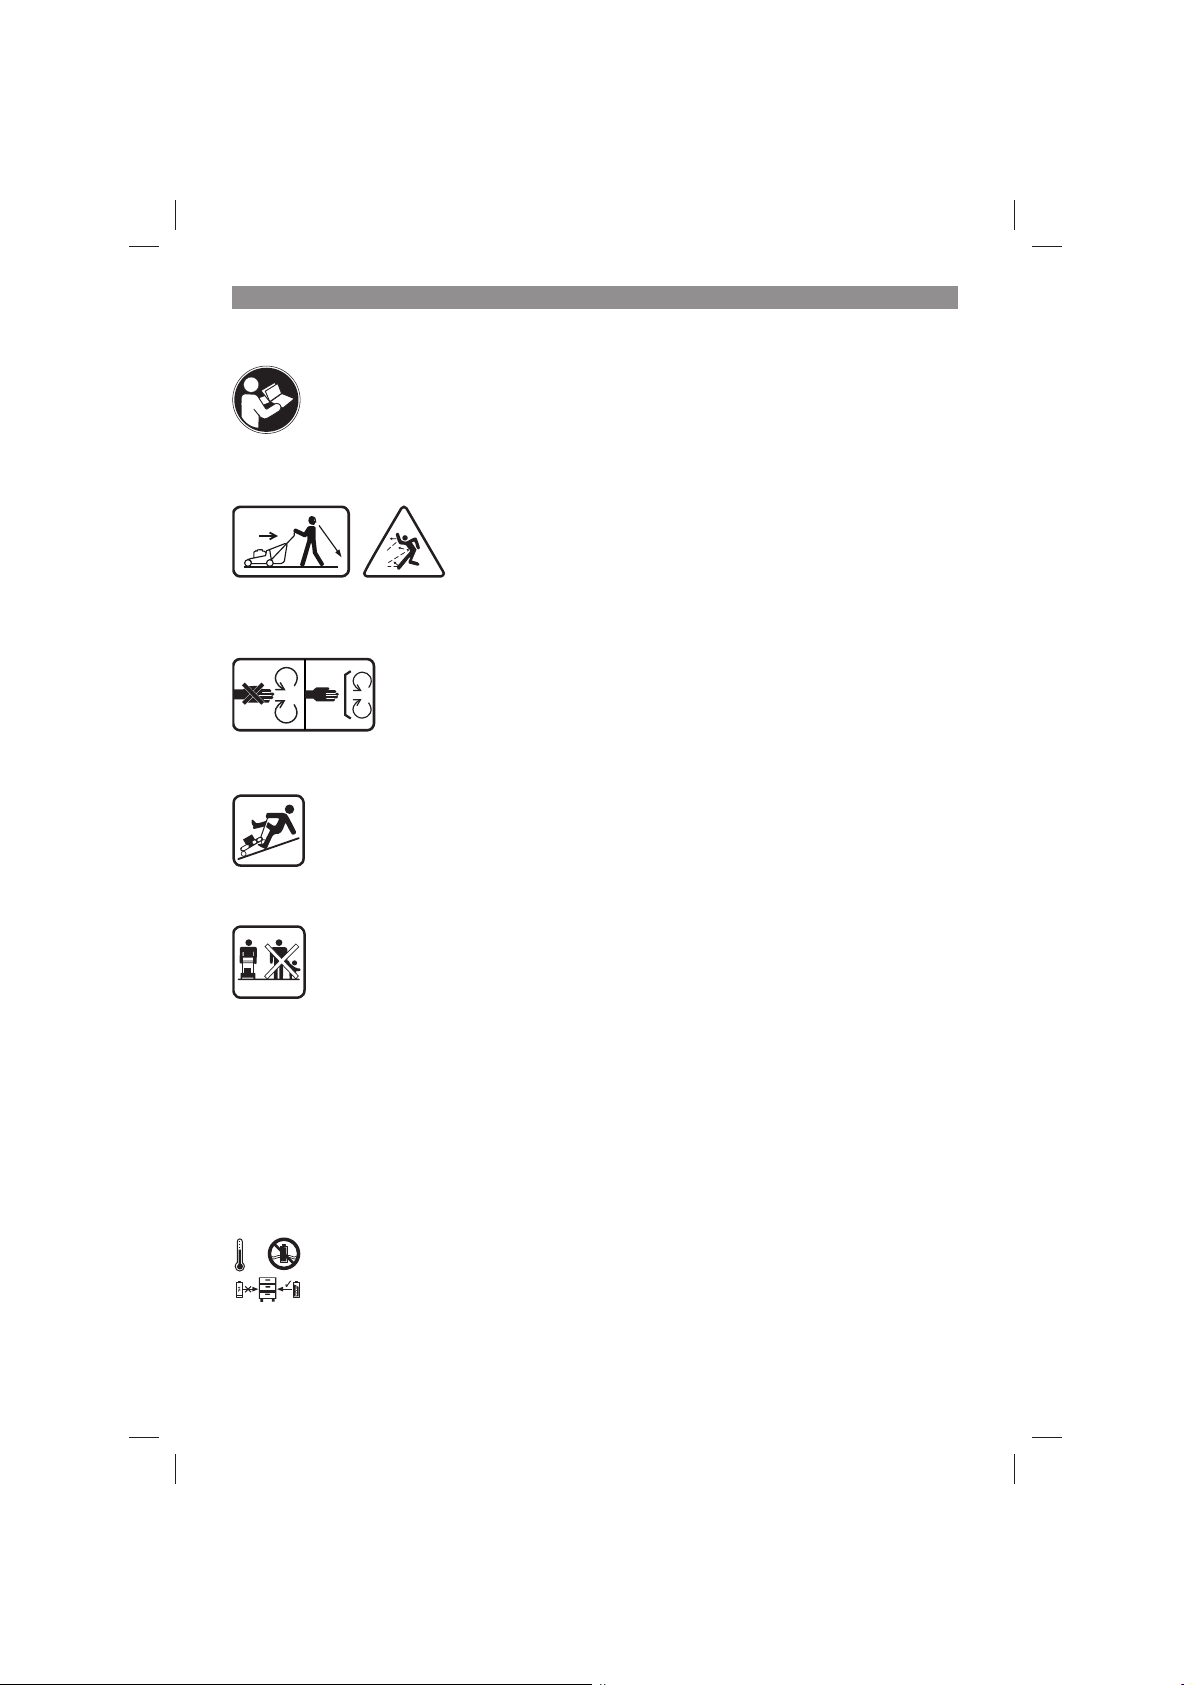
AVOID SERIES INJURY OR DEATH
Read the operator's manual. Go across slopes, not up and down. Do not mow when children or
others are around.
Look down and behind before and while moving backwards. Remove objects that could be
thrown by the blade.
Keep safety device (guards, shields, switches, etc.) in place and working.
Use extra caution on slopes. Do not mow slopes greater than 15°.
To reduce risk of electric shock, do not expose unit to water or operate unit on wet ground.
Disconnect from supply circuit before opening, cleaning or changing accessories.
•
To reduce the risk of injury, do not operate without guards in place.
•
To reduce the risk of injury, inspect catcher assembly frequently and replace with
•
recommended replacement if there are signs of wear or deterioration.
Risk of cutting toes and fingers from the rotating mower blade.
•
Keep by standers/children away.
•
Remove battery pack when not in use.
104°F
(+40°C)
50°F
(+10°C)
Store the batteries only in dry rooms with an ambient temperature of 50°F to 104°F (+10°C to +40°C).
Place only fully charged batteries in storage (charged at least 40%).
- 6 -
Anl_Rasarro_36_42_SPK7_USA.indb 6Anl_Rasarro_36_42_SPK7_USA.indb 6 15.12.2022 08:52:2115.12.2022 08:52:21
EN
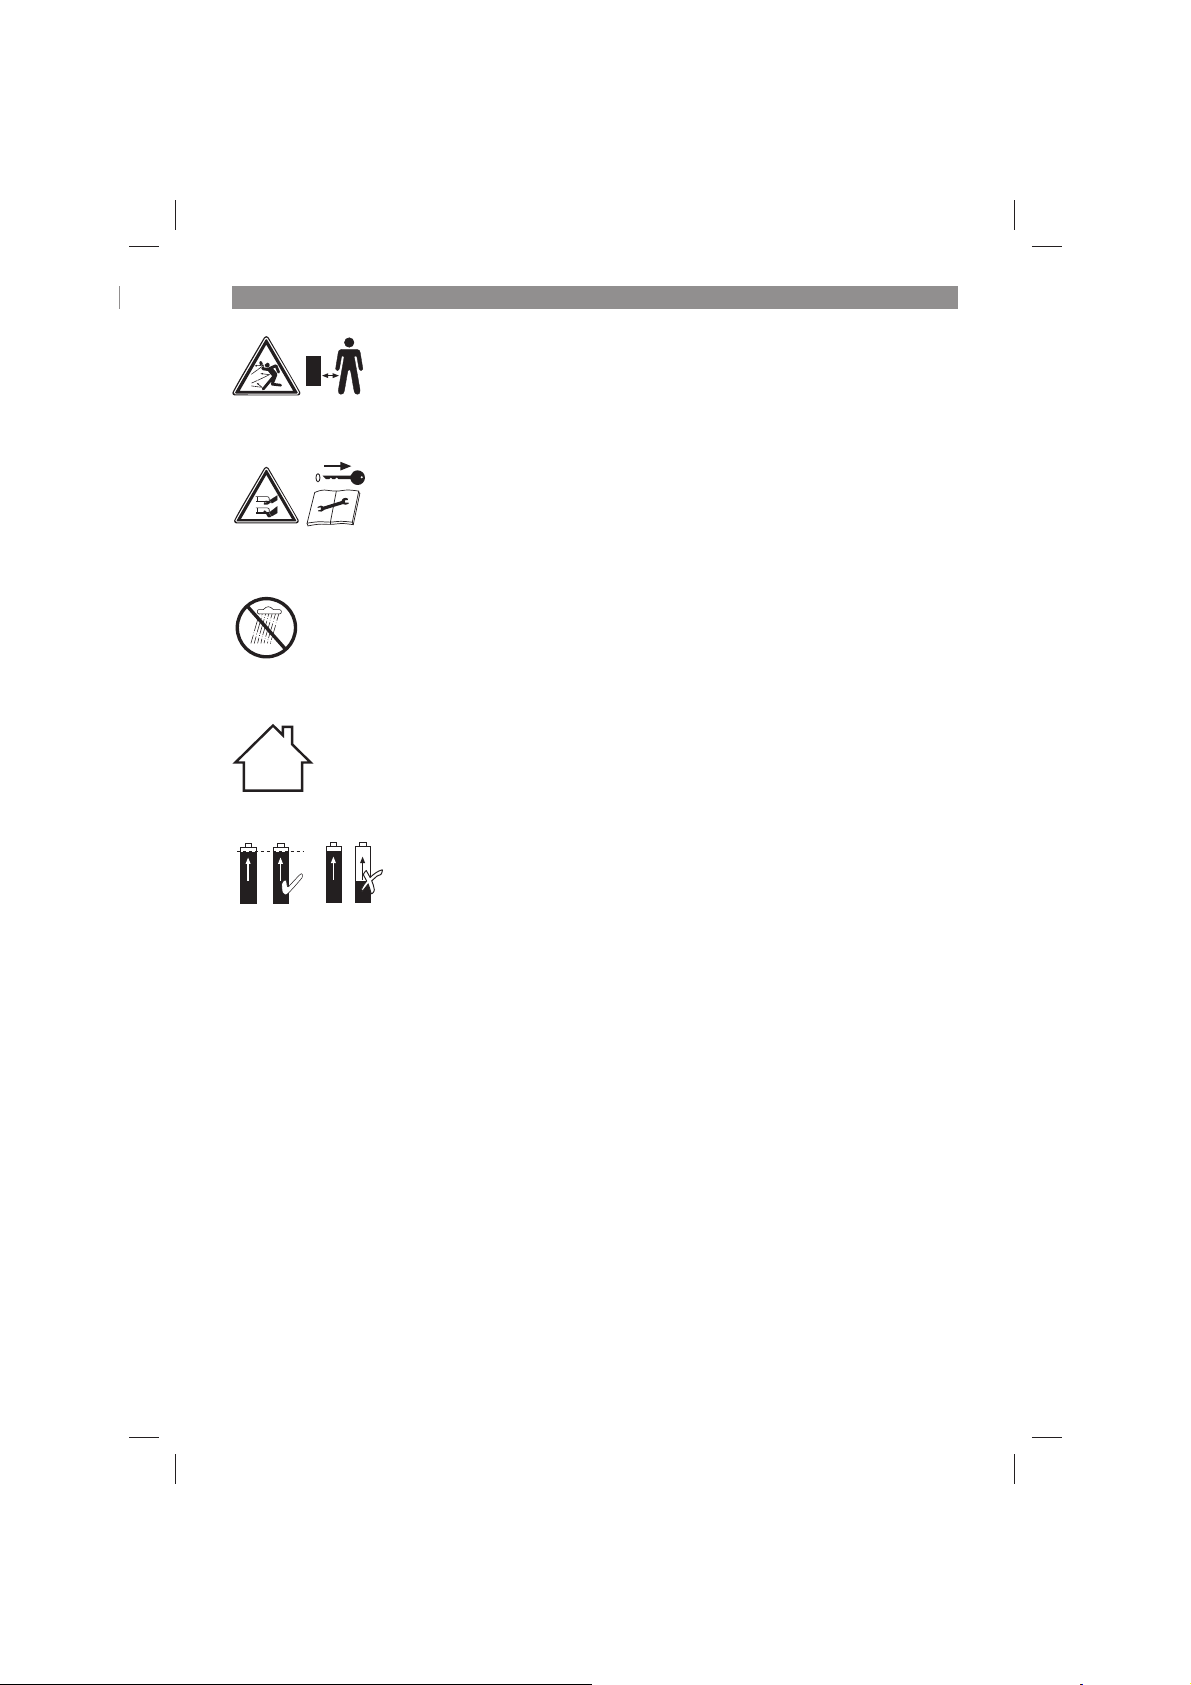
Keep your distance!
Caution: Sharp blades! Pull out the safety plug before carrying out any repair work or if the power
cable is damaged. The blades will continue to rotate after the motor is switched off .
Protect the equipment from rain and damp conditions.
For use in dry rooms only.
Use only batteries which are charged to the same level. Never combine full and half-full batteries.
- 7 -
Anl_Rasarro_36_42_SPK7_USA.indb 7Anl_Rasarro_36_42_SPK7_USA.indb 7 15.12.2022 08:52:2215.12.2022 08:52:22

EN
DANGER!
When using the equipment, a number of safety
precautions must be observed to avoid injuries
and damage. Please read the complete operating
instructions and safety information with due care.
Keep these operating instructions in a safe place
so that the information is available at all times. If
you give the equipment to any other person, hand
over these operating instructions and the safety
information as well. We cannot accept any liability
for damage or accidents which arise due to
failure to follow these instructions and the safety
information.
1. Safety information
Warning: When using electric lawn mowers basic
safety precautions should always be followed to
reduce the risk of fi re electric shock, including the
following:
Warning: Risk of injury could occur if the lawn
mower is operated without the catcher assembly
attached.
Warning: The use of any other accessory or
attachment might increase the risk of injury.
FOR ALL LAWN MOWERS
Avoid Dangerous Environment-Don’t use
•
lawn mowers in damp or wet locations.
Don’t Use In Rain.
•
Keep Children Away-All visitors should be
•
kept a safe distance from work area.
Dress Properly-Do not wear loose clothing.
•
They can be caught in moving parts. Use of
rubber gloves and footwear is recommended
when working outdoors.
Use Safety Glasses-Always use face or dust
•
mask if operation is dusty.
Use Right Appliance-Do not use lawn mower
•
for any job except that for which it is intended.
Don’t Force Lawn Mower-it will do the job
•
better and safer at the rate for which it was
designed.
Don’t Overreach -Keep proper footing and
•
balance at all times.
Stay Alert-Watch what you are doing. Use
•
common sense. Do not operate lawn mower
when you are tired.
Store Idle Lawn Mower Indoors-When not
•
in use. Lawn mower should be stored in an
indoor dry, out of reach of children.
Maintain Lawn Mower with Care-Keep
•
cutting edges sharp and clean for best and
safest performance. Follow instructions for
lubricating and changing accessories. Inspect
lawn mower cord periodically and if damaged,
have it repaired by an authorized service
facility. Inspect extension cords periodically
and replace if damaged. Keep handles dry,
clean, and free from oil and grease.
Keep guard in place and in working order.
•
Keep blades sharper.
•
Keep hands and feet away from cutting area.
•
Objects struck by the lawn mower blade can
•
cause severe injuries to persons. The lawn
should always be carefully examined and
cleared of all objects prior to each mowing.
If lawn mower strikes a foreign object, follow
•
these steps:
i) Stop lawn mower. Release the switch.
ii) Inspect for damage.
iii) Repair any damage before restarting and
operating the lawn mower.
Use identical replacement blades only.
•
Prevent unintentional starting. Ensure the
•
switch is in the off-position before connecting
to the battery pack, picking up or carrying the
appliance. Carrying the appliance with your
finger on the switch or energizing appliances
that have the switch on invites accidents.
Disconnect the battery pack from the
•
appliance before making any adjustments,
changing accessories, or storing appliance.
Such preventive safety measures reduce the
risk of starting the appliance accidentally.
Recharge only with the charger specified by
•
the manufacturer. A charger that is suitable
for one type of battery pack may create a risk
of fire when used with another battery pack.
Use appliances only with specifically
•
designated battery packs. Use of any other
battery packs may create a risk of injury and
fire.
When battery pack is not in use, keep it away
•
from other metal objects, like paper clips,
coins, keys, nails, screws or other small metal
objects, that can make a connection from
one terminal to another. Shorting the battery
terminals together may cause burns or a fire.
Under abusive conditions, liquid may be
•
ejected from the battery; avoid contact. If
contact accidentally occurs, flush with water.
If liquid contacts eyes, additionally seek
medical help. Liquid ejected from the battery
may cause irritation or burns. (This advice is
considered correct for conventional NiMh,
NiCd, lead acid and lithium-ion cell types. If
this advice is incorrect for a cell design that
- 8 -
Anl_Rasarro_36_42_SPK7_USA.indb 8Anl_Rasarro_36_42_SPK7_USA.indb 8 15.12.2022 08:52:2315.12.2022 08:52:23

EN
differs from these, then the correct advice
may be substituted.)
Do not use a battery pack or appliance that is
•
damaged or modified. Damaged or modified
batteries may exhibit unpredictable behavior
resulting in fire, explosion or risk of injury.
Do not expose a battery pack or appliance
•
to fire or excessive temperature. Exposure to
fire or temperature above 266°F (130 °C) may
cause explosion.
Follow all charging instructions and do
•
not charge the battery pack or appliance
outside of the temperature range specified
in the instructions. Charging improperly or at
temperatures outside of the specified range
may damage the battery and increase the risk
of fire.
Have servicing performed by a qualified
•
repair person using only identical
replacement parts. This will ensure that the
safety of the product is maintained.
Do not modify or attempt to repair the
•
appliance or the battery pack (as applicable)
except as indicated in the instructions for use
and care.
1.) FOR ALL BATTERY-OPERATED
APPLIANCES:
Do not charge appliance in rain, or in wet
•
locations.
Do not use battery-operated appliances in
•
the rain. Always remove or disconnect battery
pack before adjusting, cleaning, servicing or
transporting the garden appliances.
2.) FOR ALL BATTERY-OPERATED
PRODUCTS EMPLOYING A DETACHABLE
OR SEPARABLE
BATTERY:
Use only the following type and size battery:
•
18V 1.5Ah PXC Lithium-ion battery
18V 2.0Ah PXC Lithium-ion battery
18V 2.5Ah PXC Lithium-ion battery
18V 3.0Ah PXC Lithium-ion battery
18V 4.0Ah PXC Lithium-ion battery
18V 3.0Ah PXC Plus Lithium-ion battery
18V 4.0Ah PXC Plus Lithium-ion battery
18V 5.2Ah PXC Plus Lithium-ion battery
18V 4.0Ah/6.0Ah PXC Plus Lithium-ion
battery
18V 5.0Ah/8.0Ah PXC Plus Lithium-ion
battery
Do not dispose of the battery in a fire. The
•
cell may explode. Check with local codes for
possible special disposal instructions.
Do not open or mutilate the battery. Released
•
electrolyte is corrosive and may cause
damage to the eyes or skin. It may be toxic if
swallowed.
Exercise care in handling the battery in order
•
not to short it with conducting materials such
as rings, bracelets, and keys. The battery or
conductor may overheat and cause burns.
3.) SAFE PRACTICES FOR PEDESTRIANCONTROLLED MOWERS
This cutting machine is capable of amputating
hands and feet and throwing objects. Failure to
observe the following safety instructions could
result in serious injury or death.
I. GENERAL INFORMATION
1. Read, understand, and follow all instructions
on the machine and in the manual(s) before
starting.
2. Only allow operators, who are responsible,
trained, familiar with the instructions, and
physically capable to operate the machine.
3. Do not carry passengers and keep
bystanders away.
4. Do not operate the machine while under the
infl uence of alcohol or drugs.
5. Follow the manufacturer’s recommendation
for wheel weights or counterweights.
II. PREPARATION BEFORE OPERATING
1. Clear the operating area of any objects which
could be thrown by or interfere with operation
of the machine.
2. Keep the area of operation clear of all
bystanders, particularly small children. Stop
the machine and attachment(s) if anyone
enters the area.
3. Do not operate the machine without the
entire grass catcher, discharge chute, or
other safety devices in place and functioning
properly. Check frequently for signs of wear or
deterioration and replace as needed.
4. Wear appropriate personal protective
equipment such as safety glasses, hearing
protection, and footwear.
III. OPERATING
1. Only operate the machine in daylight or good
artifi cial light.
2. Avoid holes, ruts, bumps, rocks, or other
hidden hazards. Uneven terrain could
overturn the machine, or cause operator to
lose their balance or footing.
3. Do not put hands or feet near rotating parts
or under the machine. Keep clear of the
- 9 -
Anl_Rasarro_36_42_SPK7_USA.indb 9Anl_Rasarro_36_42_SPK7_USA.indb 9 15.12.2022 08:52:2315.12.2022 08:52:23

EN
discharge opening at all times.
4. Do not direct discharge material toward
anyone. Avoid discharging material against
a wall or obstruction. Material may ricochet
back toward the operator. Stop the blade(s)
when crossing gravel surfaces.
5. Do not mow in reverse unless absolutely
necessary. Always look down and behind
before and while backing.
IV. CHILDREN SPECIFIC
1. Tragic accidents can occur if the operator is
not alert to the presence of children. Children
are often attracted to the machine and the
mowing activity. Never assume that children
will remain where you last saw them.
2. Keep children out of the operating area and
under the watchful care of a responsible adult
other than the operator.
3. Be alert and turn mower off if a child enters
the area.
4. Never allow children to operate the machine.
V. SLOPE SPECIFIC
Slopes are a major factor related to accidents.
Operation on slopes requires extra caution.
1. Travel in the manufacturer recommended
direction on slopes. Use caution while
operating near dropoff s.
2. Avoid mowing wet grass. (Poor footing could
cause a slip and fall accident.)
3. Do not operate machine under any condition
where traction, steering, or stability is in
question. Tires could slide even if the wheels
are stopped.
4. Always keep the machine in gear when going
down slopes. Do not coast downhill.
5. Avoid starting and stopping on slopes.
Avoid making sudden changes in speed or
direction. Make turns slowly and gradually.
6. Use extra care while operating machine with
a grass catcher or other attachment(s). They
can aff ect the stability of the machine.
VI. SERVICE
1. Keep machine in good working order.
Replace worn or damaged parts.
2. Use caution when servicing blades. Wrap the
blade(s) or wear gloves. Replace damaged
blades. Do not repair or alter blade(s).
GENERAL SAFETY WARNINGS FOR THE
BATTERY PACK
Dispose of used battery promptly and
•
properly. When disposing of secondary cells
or batteries, keep cells or batteries of different
electrochemical systems separate from each
other.
Keep battery out of reach of children and in
•
original package until ready to use.
Never put batteries in one’s mouth. If
•
swallowed, contact local poison control
centre immediately.
CAUTION – The battery used in this device
•
may present a risk of fire or chemical burn
if mishandled. Replace battery with Einhell/
lawn master brand only. Use of another
battery may present a risk of fire or explosion.
WARNING: Do not use a visibly damaged
•
battery pack or appliance.
WARNING: Do not modify or attempt to repair
•
the appliance or the battery pack.
BATTERIES MUST BE RECYCLED.
•
Do not short-circuit a cell or battery. Do not
•
store cells or batteries haphazardly in a box
or drawer where they may shortcircuit each
other or be short-circuited by conductive
materials.
Do not subject cells or batteries to
•
mechanical shocks.
Keep cells and batteries clean and dry. Wipe
•
the cell or battery terminals with a clean dry
cloth if they become dirty.
Do not maintain secondary cells and batteries
•
on charge when not in use.
Retain the original cell and battery. Do not
•
use any charger other than that specifically
provided for use with the equipment.
Secondary cells and batteries need to be
charged before use. Always use the correct
charger and refer to the manufacturer’s
instructions or equipment manual for proper
charging instructions.
When possible, remove the battery from the
•
equipment when not in use.
Under abusive conditions, liquid may be
•
ejected from the battery; avoid contact. If
contact accidentally occurs, flush with water.
If liquid contacts eyes, additionally seek
medical help. Liquid ejected from the battery
may cause irritation or burns.
Have servicing performed by a qualified
•
repair person using only identical
replacement parts. This will ensure that the
safety of the product is maintained.
IMPORTANT SAFETY INSTRUCTIONS FOR
CHARGER
WARNING: This product may contain lead,
phthalate or other chemicals known to the State
of California to cause cancer, birth defects and
other reproductive harm. Please wash your hands
after use.
- 10 -
Anl_Rasarro_36_42_SPK7_USA.indb 10Anl_Rasarro_36_42_SPK7_USA.indb 10 15.12.2022 08:52:2315.12.2022 08:52:23

EN
Protection from environmental infl uences
1. Wear suitable work clothes. Wear safety
goggles.
2. Protect your cordless tool and the battery
charger from moisture and rain. Moisture
and rain can cause dangerous cell damage.
3. Do not use the cordless tool or the battery
charger near vapors and infl ammable liquids.
4. Use the battery charger and cordless tools
only in dry conditions and an ambient
temperature of 10-40°C.
5. Do not keep the battery charger in places
where the temperature is liable to reach over
40°C. In particular, do not leave the battery
charger in a car that is parked in the sunshine.
6. Protect batteries from overheating.
Overloads, over-charging and exposure to
direct sunlight will result in overheating and
cell damage. Never charge or work with
batteries which have been overheated –
replace them immediately if possible.
7. Storage of batteries, battery chargers
and cordless tools. Store the charger and
your cordless tool only in dry places with an
ambient temperature of 10-40°C. Store your
lithium-ion battery pack in a cool, dry place at
a temperature of 10-20°C. Protect them from
humidity and direct sunlight. Only place fully
charged batteries in storage (charged at least
40%).
8. Prevent the lithium-ion battery pack from
freezing. Battery packs which were stored
below 0°C for more than 60 minutes must be
disposed of.
9. When handling batteries beware of
electrostatic charge: Electrostatic discharges
cause damage of the electronic protection
system and the battery cells. Avoid
electrostatic charging and never touch the
battery poles.
Special safety information
Read the operating instructions carefully.
•
Familiarize yourself with the operator controls
and proper operation of the machine.
Never allow children or other persons who
•
are not familiar with the operating instructions
to use the equipment. Contact your local
governmental agency for information
regarding minimum age requirements for the
user.
Never work in the direct vicinity of persons -
•
especially children - or animals.
Always keep in mind that the machine
•
operator or user is responsible for accidents
involving other persons and/or their property.
Preliminary measures
Always wear sturdy, non-slip footwear and
•
long trousers when using the machine. Never
use the machine barefoot or in sandals.
Check all the ground on which the machine
•
will be used and remove all objects that could
be caught up and violently flung out by it.
Before using the machine, always visually
•
examine the tools for excessive wear or
damage. To prevent any imbalance, replace
worn out or damaged parts and mounting
bolts as a set only.
Make sure that all nuts, bolts and screws are
•
tightened securely and that the machine is in
safe working condition.
Safety instructions for hand mower
Always check the machine for signs of
•
damage before use. Repairs may only be
carried out by our service workshop. If
unusual vibrations occur during use, switch
the machine off immediately and pull the
safety plug. Check the cutters and clean them
if necessary. If the equipment continues to
vibrate, switch it off, pull the safety plug and
send it to our service workshop.
The machine must not be tipped whilst it is
•
being started. Both hands must be on the
handle when you start the machine.
Worn parts may only be replaced by a
•
qualified service center. If necessary contact
the nearest service center.
WARNINGS:
Do not touch the blade until the batteries have
•
been removed and the blade has reached a
complete standstill;
Break the connection with the rechargeable
•
batteries (in other words pull out the safety
plug):
- whenever you leave the equipment
unattended;
- before clearing a blocked blade;
- before carrying out any checks, cleaning or
other work on the equipment
- if a foreign body has been struck;
- whenever the machine starts to vibrate
oddly;
Carefully read the instructions for how to
•
operate the machine safely.
- 11 -
Anl_Rasarro_36_42_SPK7_USA.indb 11Anl_Rasarro_36_42_SPK7_USA.indb 11 15.12.2022 08:52:2315.12.2022 08:52:23

EN
Handling
a) Only mow in broad daylight or in well-lit
conditions.
b) Do not use the machine on wet grass.
c) Always maintain good footing on inclines.
d) Only operate the machine at a walking pace.
e) Always mow across slopes, i.e. never straight
up or straight down.
f) Be particularly careful when you change
direction on a slope.
g) Do not mow on overly steep inclines.
h) Always be extra careful when turning the
mower around and when pulling it towards
you.
i) Switch the mower off , pull the safety plug and
wait until the blade has reached a complete
standstill if you need to tip the mower over,
transport it over surfaces other than grass
and if the mower has to be moved from and to
the area you wish to mow.
j) Never use the lawn mower if the guards are
damaged or without the attached guards, e.g.
defl ectors and/or grass catching devices.
k) Use the ON/OFF switch carefully as
described in the manufacturer’s instructions.
Make sure that your feet are far enough away
from the mower blade!
l) The lawn mower should not be tilted when the
motor is switch on unless it has to be raised
for starting purposes. In this case, tilt it as little
as absolutely necessary and only raise the
side opposite to that of the user.
m) Do not switch on the mower if you are
positioned in front of the chute.
n) Never move your hands or feet toward or
under any rotating parts. Keep clear of the
chute opening at all times.
o) Never lift or carry a lawn mower with the
engine running.
p) Switch off the motor and pull out the safety
plug. Make sure that all moving parts have
reached a complete standstill.
- before you dislodge any blockages or clogs
in the chute.
- before you carry out any checks, cleaning,
maintenance or other work on the lawn
mower.
- If you have struck a foreign object.
Examine the mower for signs of damage
and carry out any necessary repairs before
restarting and continuing to work with the
mower.
- if the lawn mower begins to experience
exceptionally strong vibrations, immediately
switch it off and check it.
q) Switch the mower off , pull the safety plug and
make sure that all moving parts have reached
a complete standstill.
Maintenance and storage
a) Make sure that all nuts, bolts and screws are
tightened securely and that the machine is in
safe working condition.
b) Allow the mower to cool before you put it into
an enclosed area.
c) To avoid the risk of fi re, keep the motor
housing and ventilation slots clear of grass,
leaves, oil and grease.
d) Routinely check the collection bag for signs of
wear and impaired functionality.
e) For your own safety, have worn or damaged
parts replaced without delay.
f) Take care not to jam your fi ngers between
moving blades and stationary parts of the
equipment while you are adjusting the
equipment.
g) While you are carrying out maintenance work
on the blades, remember that the blades can
still be moved even if the power source has
been switched off .
SAVE THESE INSTRUCTIONS
2. Layout and items supplied
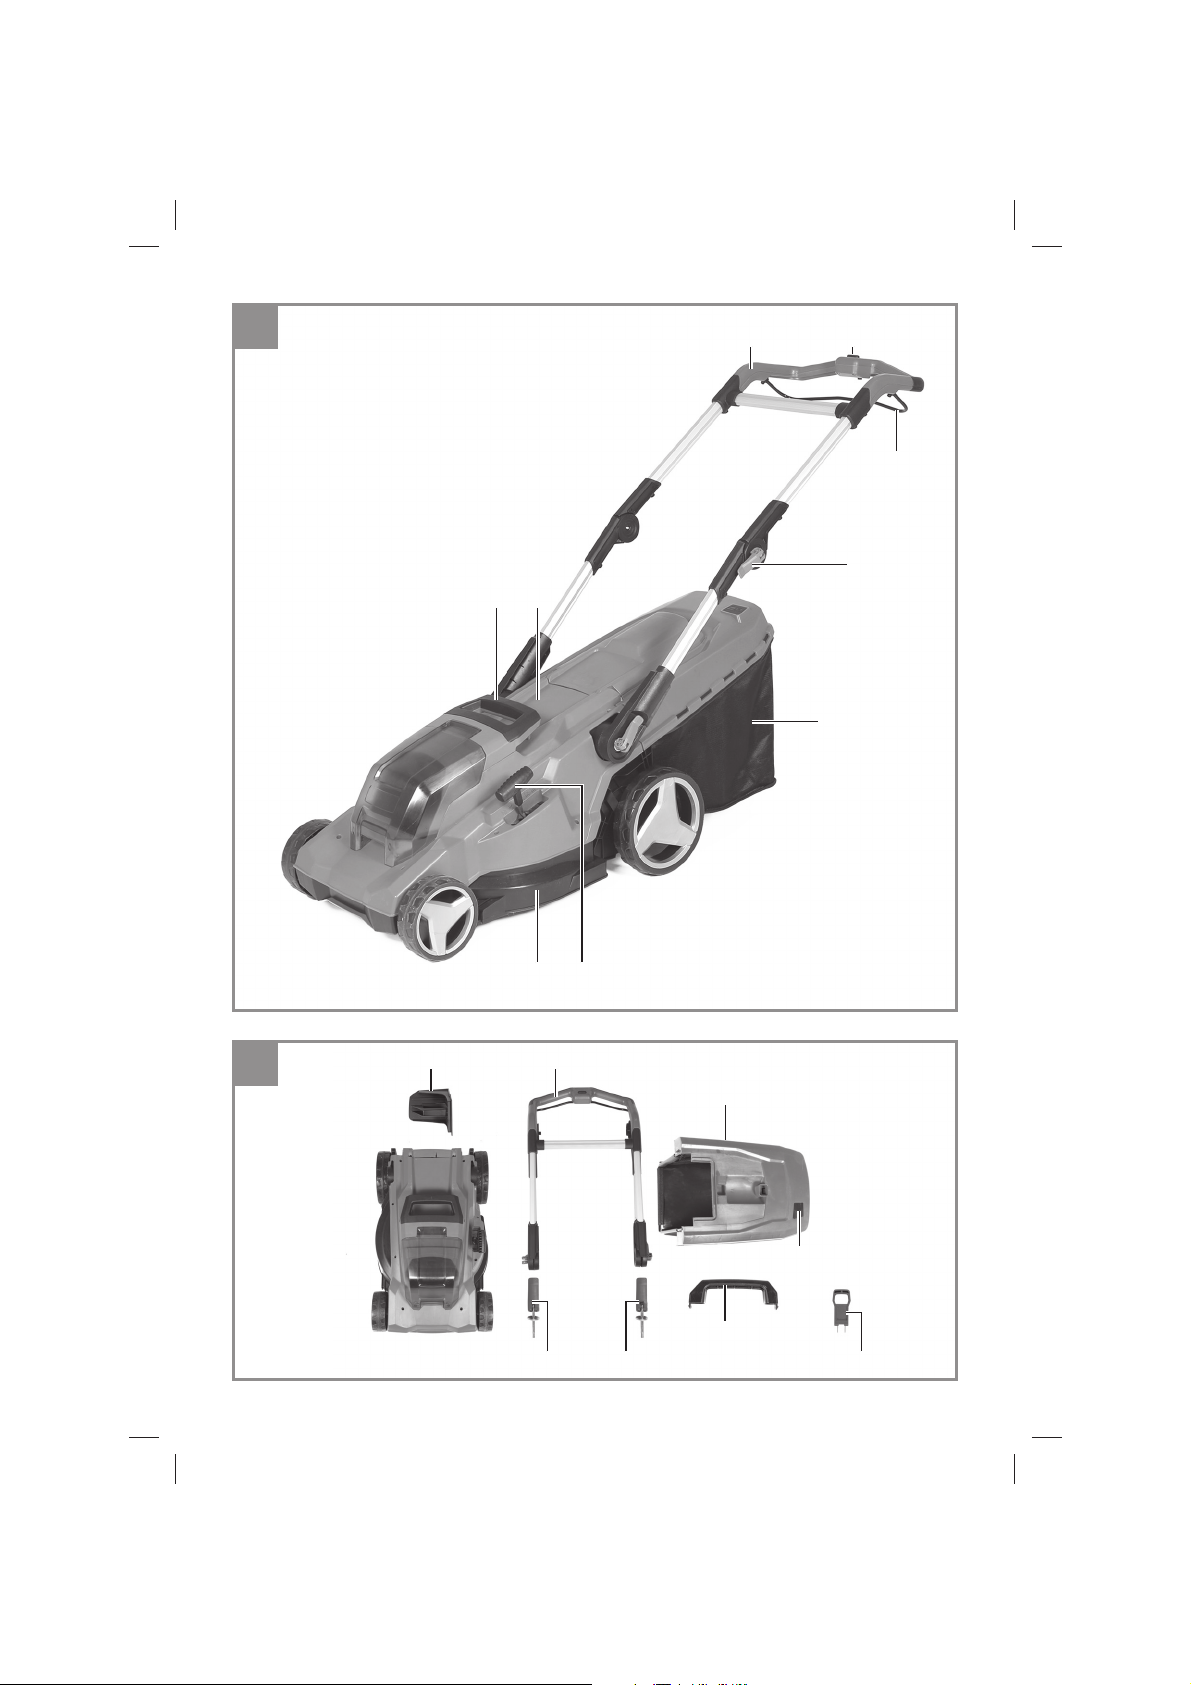
2.1 Layout
1. Upper push bar
2. Safety lock-off
3. Switching bar
4. Tube lock levers
5. Collection bag
6. Grass catch basket, without carry-handle
7. Grass catch basket, carry-handle
8. Central cutting height adjustment
9. Ejector fl ap
10. Carry-handle
11. Cutting tool cover
12. Fill level indicator
13. Complete push bar
14. Mulching adapter
15. Quick-tightening screws
16. Quick-release levers
17. Safety plug
18. Three contacts on right spar adjustment
19. Three contacts on the right push bar
20. Batteries
21. Push-lock button
22. Battery capacity indicator
23. Battery capacity indicator button
- 12 -
Anl_Rasarro_36_42_SPK7_USA.indb 12Anl_Rasarro_36_42_SPK7_USA.indb 12 15.12.2022 08:52:2315.12.2022 08:52:23

EN
2.2 Items supplied
Please check that the article is complete as
specifi ed in the scope of delivery. If parts are
missing, please contact our service center or the
store where you made your purchase at the latest
within 5 work days after purchasing the article and
upon presentation of a valid bill of purchase.
Open the packaging and take out the
•
equipment with care.
Remove the packaging material and any
•
packaging and/or transportation braces (if
present).
Check to see if all the items are supplied.
•
Inspect the equipment and accessories for
•
transport damage.
If possible, keep the packaging until the end
•
of the guarantee period.
Danger!
The equipment and packaging material are
not toys. Do not let children play with plastic
bags, plastic sheets and small parts. There is
a risk of choking and suff ocating!
Cordless Lawn Mower
•
Mulching adapter
•
Original operating instruction with safety
•
information
Separately available accessories
18V 1.5Ah PXC Lithium-Ion battery
18V 2.0Ah PXC Lithium-Ion battery
18V 2.5Ah PXC Lithium-Ion battery
18V 3.0Ah PXC Lithium-Ion battery
18V 4.0Ah PXC Lithium-Ion battery
18V 3.0Ah PXC Plus Lithium-Ion battery
18V 4.0Ah PXC Plus Lithium-Ion battery
18V 5.2Ah PXC Plus Lithium-Ion battery
18V 4.0Ah/6.0Ah PXC Plus Lithium-Ion battery
18V 5.0Ah/8.0Ah PXC Plus Lithium-Ion battery
18V PXC Dual Port Fast Charger
18V PXC Fast Charger
Contact your local retailer for more specifi c
models of batteries and charger available in your
area. You can also explore battery + charger
options at Einhell.com.
Private use of the lawn mower refers an annual
operating time generally not exceeding that of
50 hours, during which time the equipment is
primarily used to maintain small-scale, residential
lawns and home/hobby gardens. Public
facilities, sporting halls, and agricultural/forestry
applications are excluded.
Important. Due to the high risk of bodily injury
to the user, the lawn mower may not be used to
trim bushes, hedges or shrubs, to cut scaling
vegetation, planted roofs, or balcony-grown
grass, to clean (suck up) dirt and debris off
walkways, or to chop up tree or hedge clippings.
Moreover, the lawn mower may not be used as a
power cultivator to level out high areas such as
molehills.
For safety reasons, the lawn mower may not be
used as a drive unit for other work tools or toolkits
of any kind, unless they have been expressly
permitted by the manufacturer.
The equipment is allowed to be used only for its
prescribed purpose. Any other use is deemed to
be a case of misuse. The user/operator and not
the manufacturer will be liable for any damage or
injuries of any kind resulting from such misuse.
Please note that our equipment has not been
designed for use in commercial, trade or
industrial applications. Our warranty will be voided
if the equipment is used in commercial, trade or
industrial businesses or for equivalent purposes.
4. Technical data
Motor power supply: .............. 36V (2x18V)
Motor speed: ...................................... 3400 RPM
Protection type: ........................................... IPX1
Cutting width: ................................................ 17"
Grass basket volume: ............................ 13.2 Gal
Cutting height adjustment:
................................... 1"- 3" (25-75 mm); 6 levels
Weight (tool only): ..................................... 37 lbs
3. Intended use
The lawn mower is intended for private use i.e. for
use in home and gardening environments.
Anl_Rasarro_36_42_SPK7_USA.indb 13Anl_Rasarro_36_42_SPK7_USA.indb 13 15.12.2022 08:52:2315.12.2022 08:52:23
Wear ear-muff s.
The impact of noise can cause damage to
hearing.
- 13 -

EN
Reduce noise generation and vibration to a
minimum!
Use only equipment that is in perfect
•
condition.
Maintain and clean the equipment regularly.
•
Adapt your way of working to the equipment.
•
Do not overload the equipment.
•
Have the equipment checked if necessary.
•
Switch off the equipment when not in use.
•
Wear gloves.
•
CAUTION!
Residual risks
Even if you use this electric power tool in
accordance with the instructions, certain
residual risks cannot be eliminated. The
following hazards may arise in connection
with the equipment‘s construction and
layout:
1. Lung damage if no suitable protective dust
mask is used.
2. Damage to hearing if no suitable ear
protection is applied.
Warning!
This equipment generates an
electromagnetic fi eld during operation. Under
certain circumstances this fi eld may actively
or passively impede medical implants. To
reduce the risk of serious or fatal injuries, we
recommend persons with medical implants
to consult their doctor and the manufacturer
of the medical implant prior to using the
equipment.
5. Before starting the equipment
The lawn mower is delivered partly assembled.
The push bar and the grass basket must be
assembled before using the lawn mower. Follow
the instructions step by step and refer to the
pictures when assembling.
Important! Required assembly parts (screws,
cable guides, etc.) or functional parts (e.g. plugs,
wrenches, etc.) can be found in the molded parts
of the packaging or on the equipment.
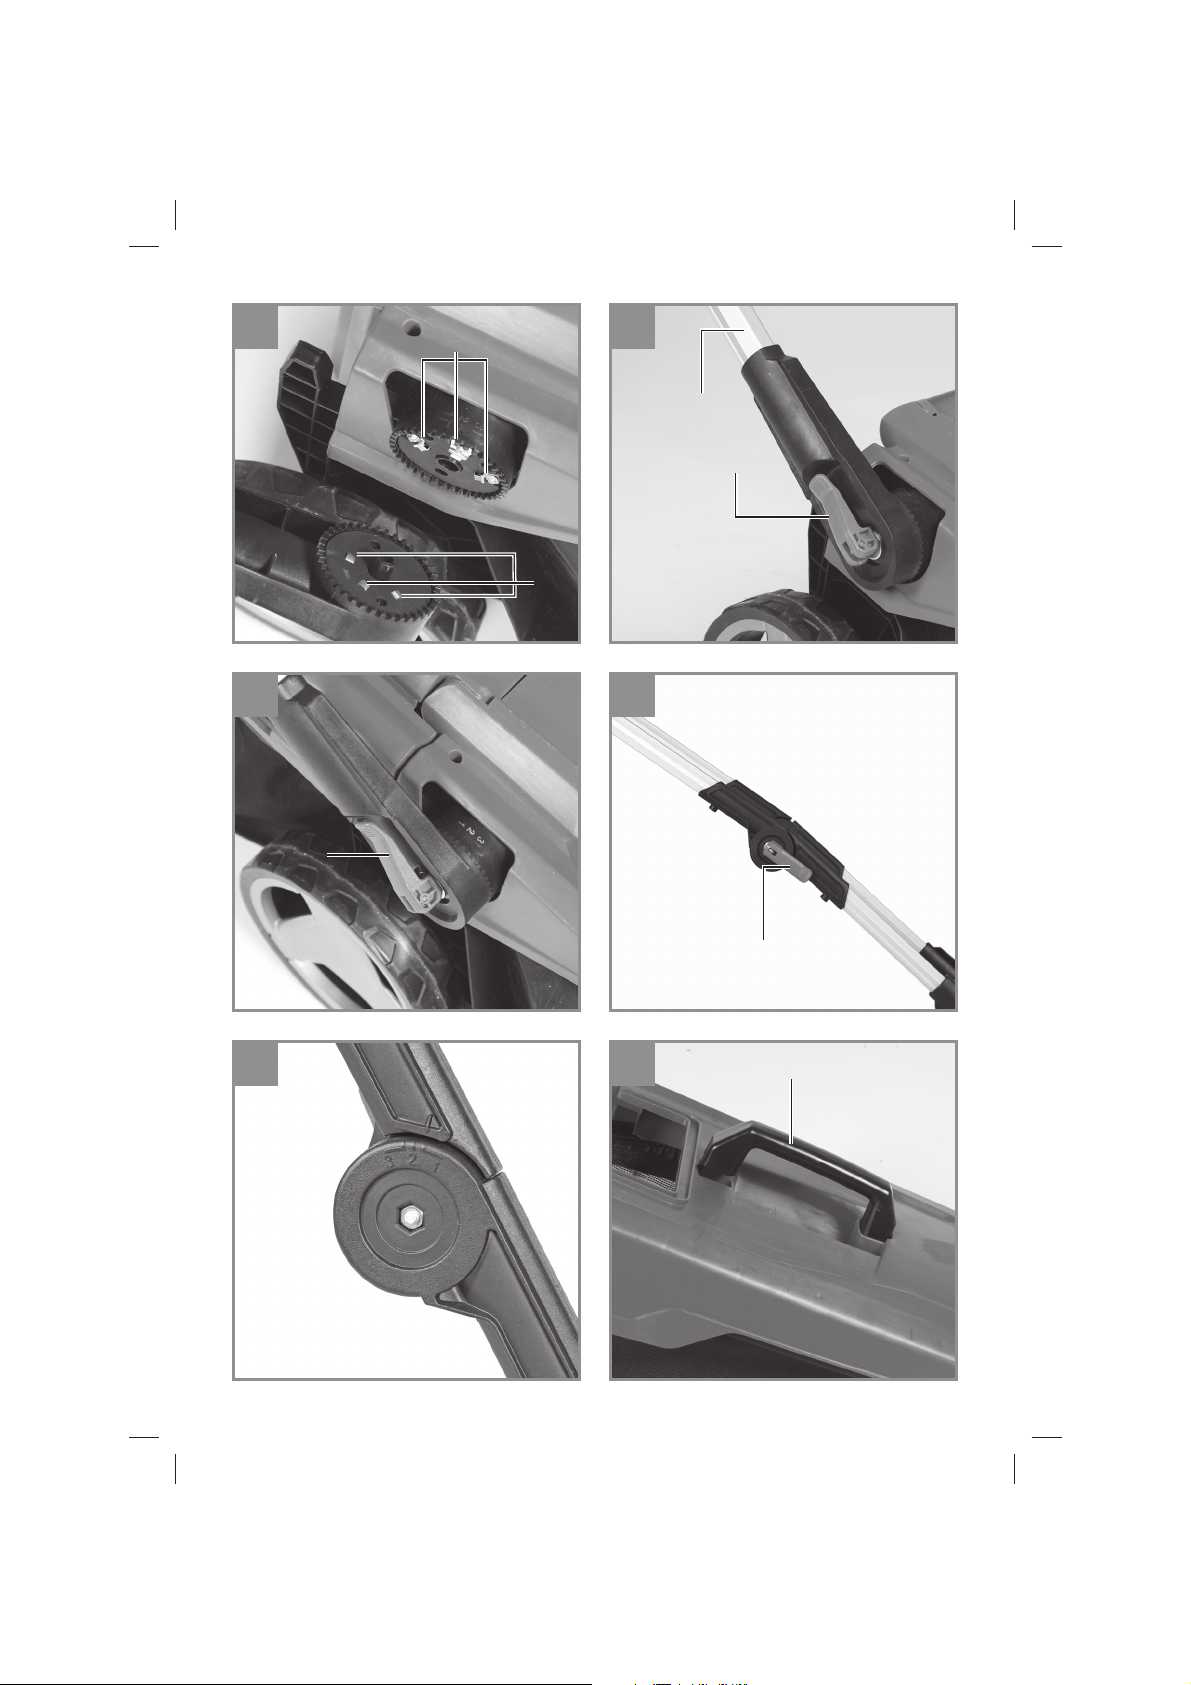
There are three contacts on the right-hand teeth
of the handlebar adjustment facility (Fig. 3/Item
18), as well as on the right-hand push bar (Fig.
3/Item 19). The contacts are for connecting the
electrical connections of the motor and switching
bar.
To avoid a loose connection while mowing, which
would cause the motor to stop, the contacts on
the handlebar adjustment and the push bar must
be pressed fi rmly together. If necessary, turn the
quick-release lever on the right-hand side in a
clockwise direction a little after fl ipping it back into
the closed position.
Fitting the push bar
Use the quick-tightening screws (Fig. 2/Item 15)
to fasten the push bar (Fig. 4/Item 13) to the teeth
of the handlebar adjustment. If necessary, turn
the quick-tightening screw back suffi ciently on
the thread so that the quick-release lever (Fig. 4/
Item 16) can then still be fl ipped down towards
the back.
You can adjust the angle of the long handle as a
whole by fl ipping up the two quick-release levers
(Fig. 5/Item 16), with three settings available for
the angle (Fig. 5). Only these three positions are
available. As you do this, make sure that both
sides are set to the same position. To secure the
push bar again, fl ip the two quick-release levers
back into the closed position.
You can adjust the angle of the upper push bar
by fl ipping up the two upper quick-release levers
(Fig. 6/Item 16), with three settings available for
the angle (Fig. 7). As you do this, make sure that
both sides are set to the same position. To secure
the push bar again, fl ip the two quick-release
levers back into the closed position.
Fitting the catch basket
Finally, press the carry-handle (Fig. 8/Item 7)
onto the top part of the housing of the catch
basket. During assembly, make sure that there
is an audible click when you fi t the individual
parts of the housing together. Before you fi t the
catch basket you must ensure that the motor is
switched off and the blade is not rotating. Lift the
ejector fl ap (Fig. 9/Item 9) with one hand. Using
the other hand, grab onto the basket by the
handle and hang it in from the top.
Filling level indicator of the catch basket
The catch basket is equipped with a fi lling level
indicator (Fig. 10/Item 12), which is opened by
the airfl ow that the lawn mower generates during
operation. If the fl ap closes during mowing, the
catch basket/collection bag is full and must be
emptied. To ensure the proper functioning of the
fi lling level indicator, the holes under the fl ap must
always be kept clean and passable.
- 14 -
Anl_Rasarro_36_42_SPK7_USA.indb 14Anl_Rasarro_36_42_SPK7_USA.indb 14 15.12.2022 08:52:2415.12.2022 08:52:24

EN
Using the mulching adapter (Fig. 11)
In mulching mode, the cuttings are shredded in
the enclosed mower housing and then spread
back onto the lawn. It is not necessary to gather
and dispose of the grass.
Important! Mulching is only possible if the lawn
is relatively short. Mow the lawn regularly in order
to obtain a thin layer of mulch.
Warning!
Insert the mulching adapter only when the motor
is switched off and the safety plug has been
pulled out.
To use the mulching function, disconnect the
collection bag, slide the mulching adapter (Fig.
11/Item 14) through the ejector opening and close
the ejector fl ap again.
Adjusting the cutting height
Caution!
Adjust the cutting height only when the machine
has been switched off and the safety plug has
been pulled out.
The cutting height is adjusted as follows (see Fig.
12):
1. Push the lever (8) outwards.
2. Set the lever (8) to the desired cutting height.
3. Release the lever (8) and check that it is
securely seated in the lock.
All 3 LEDs lit:
The battery is fully charged.
2 or 1 LED(s) lit:
The battery has an adequate remaining charge.
1 LED fl ashing:
The battery is empty, recharge the battery.
All LEDs fl ashing:
The temperature of the battery is too low. Remove
the battery from the device and leave it at room
temperature for a day. If the error occurs again,
this means that the battery has been completely
depthdischarged and is defective. Remove the
battery from the device. Never use or charge a
defective battery.
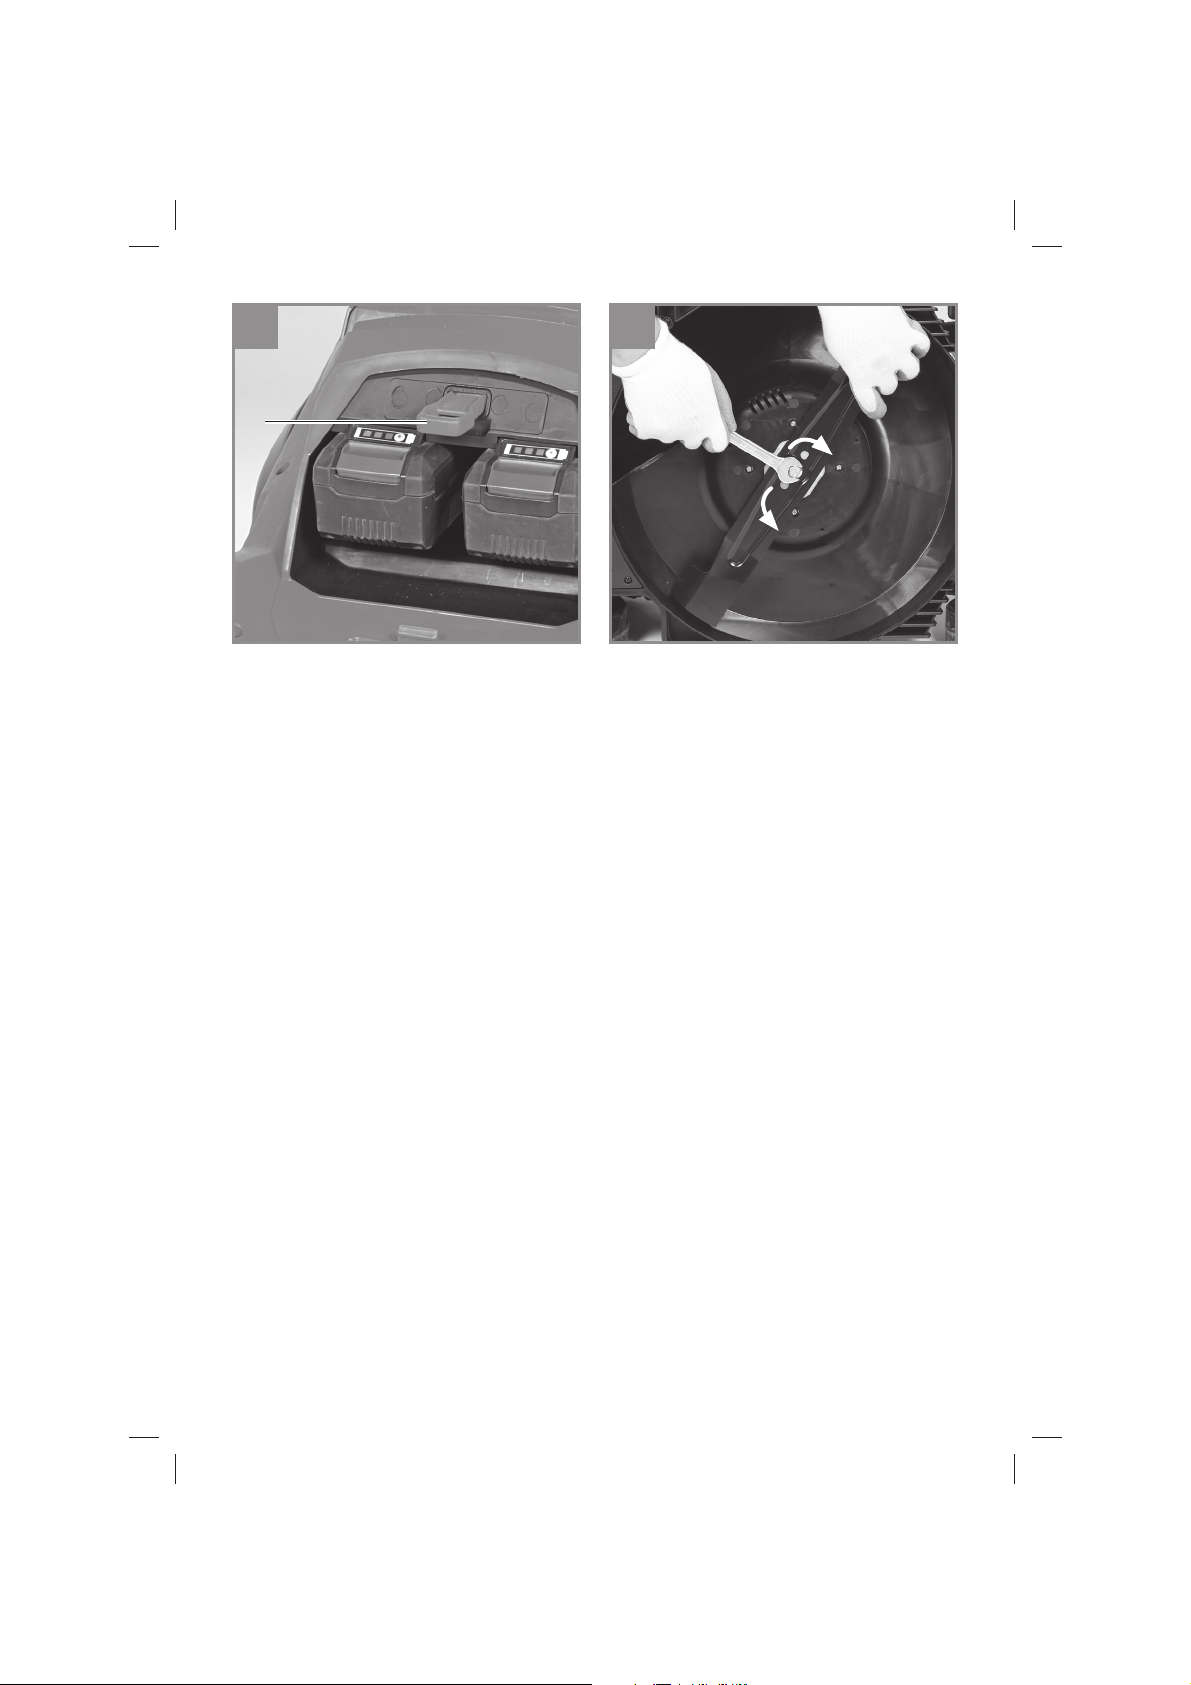
Installing the battery (Fig. 14)
Open the battery cover. Then insert the batteries
in the mounts as shown in Fig. 14.
Important!
Use only batteries which are charged to the same
level. Never combine full and half-full batteries.
Always charge the two batteries simultaneously.
The equipment's operating time depends on
the battery with the lower charge level. The two
batteries must always be fully charged before
use. Close the battery cover by fl ipping the cover
down.
Reading off the cutting height
The cutting height can be set between 1" - 3" in 6
intervals, and can be read off on the scale.
Before you begin to mow, check to ensure that the
blade is not blunt and that none of the fasteners
are damaged. To prevent any imbalance, replace
blunt and/or damaged blade. To carry out this
check, fi rst switch off the motor and pull out the
safety plug.
5.1 Charging the Lithium-Ion battery
The corresponding instructions can be found
in the original operating instructions for your
charger.
5.2 Battery capacity indicator
(Fig. 13)
Press the battery capacity indicator switch (23).
The battery capacity indicator (22) shows the
charge status of the battery using 3 LEDs.
Anl_Rasarro_36_42_SPK7_USA.indb 15Anl_Rasarro_36_42_SPK7_USA.indb 15 15.12.2022 08:52:2415.12.2022 08:52:24
6. Operation
Caution!
The lawn mower is equipped with a safety circuit
to prevent unauthorized use. Directly before
starting up the lawn mower insert the safety plug
(Fig. 15/Item 17) and remove the safety plug
again whenever you interrupt or terminate your
work.
Important!
To prevent the equipment switching on
accidentally, the lawn mower is equipped with
a safety switch (Fig. 1/Item 2) which must be
pressed before the switching bar (Fig. 1/Item 3)
can be activated. The lawn mower switches itself
off when the switching bar is released. The start
time can amount to several seconds. Repeat
this process several times so that you are sure
that the machine functions properly. Before you
perform any repair or maintenance work on the
equipment, ensure that the blade is not rotating
- 15 -

EN
and that the safety plug is disconnected.
Caution! Never open the chute fl ap when
the collection bag has been detached (to
be emptied) and the motor is still running. A
rotating blade can cause serious injuries!
Always carefully fasten the chute fl ap and catch
basket. Switch off the engine before emptying the
catch basket.
Always ensure that a safe distance (provided
by the length of the long handles) is maintained
between the user and the mower housing. Be
especially careful when mowing and changing
direction on slopes and inclines. Maintain a solid
footing and wear sturdy, non-slip footwear and
long trousers.
Always mow along the incline (not up and down).
For safety reasons, the lawn mower may not be
used to mow inclines whose gradient exceeds 15
degrees.
Use special caution when backing up and pulling
the lawn mower. Tripping hazard!
Tips for proper mowing
It is recommended that you overlap the mowing
swaths.
Only use a sharp blade that is in good condition.
This will prevent the grass blades from fraying
and the lawn from turning yellow.
Try to mow in straight lines for a nice, clean look.
The swaths should overlap each other by a few
centimeters in order to avoid stripes.
The operating time of the rechargeable batteries
and therefore the area in square meters that can
be covered with a single battery charge is largely
dependent on the state of the grass (e.g. density,
moisture, height, cutting height, etc.) and the
mowing speed (walking speed). To adjust the area
coverage to your individual requirements, it is
recommended that you mow the lawn more often,
with a higher cutting height and at an appropriate
speed. Frequently turning the equipment on and
off while mowing will also reduce the amount
of area that you can cover. If the operating time
of the rechargeable batteries (area coverage)
is still unsatisfactory in spite of the above
measures, you can remedy the problem by using
rechargeable batteries with a larger capacity (Ah).
How frequently you should mow your lawn is
determined primarily by the speed at which the
grass grows. In the main growing season (May
- June) you will probably need to mow the lawn
twice a week, otherwise just once a week. The
cutting height should be between 1-½" - 2-3⁄8"
and the amount of growth before mowing again
should be 1-½" - 2". If the grass is allowed to grow
somewhat longer for whatever reason, do not
make the mistake of cutting it back to the normal
height in one go. This will harm the lawn. Never
cut it back by more than half the height in one go.
Keep the underside of the mower housing clean
and remove grass build-up. Deposits not only
make it more diffi cult to start the mower; they
decrease the quality of the cut and make it harder
for the equipment to bag the grass.
Always mow along inclines (not up and down).
You can prevent the lawn mower from slipping
down by holding a position at an angle upwards.
Select the cutting height according to the length
of the grass. Make several passes so that no
more than 1-9/16" (4 cm) of grass are cut at one
time.
Switch off the motor before doing any checks on
the blade. Keep in mind that the blade continues
to rotate for a few seconds after the motor has
been switched off . Never attempt to manually
stop the blade. Regularly check to see if the
blade is securely attached, is in good condition
and is sharp. If the contrary is the case, sharpen
the blade or replace it. In the event that the blade
strikes an object, immediately switch off the
lawn mower and wait for the blade to come to a
complete stop. Then inspect the condition of the
blade and the blade mount. Replace any parts
that are damaged.
As soon as grass clippings start to trail the lawn
mower, it is time to empty the catch basket.
Important! Before taking off the catch basket,
switch off the motor and wait until the blade has
come to a stop.
To take off the catch basket, use one hand to lift
up the chute fl ap and the other to grab onto the
basket handle. Remove the basket. For safety
reasons, the chute fl ap automatically falls down
after removing the catch basket and closes off
the rear chute opening. If any grass remains in
the open-ing, it will be easier to restart the engine
if you pull the mower back approximately 39.3"
(1m).
- 16 -
Anl_Rasarro_36_42_SPK7_USA.indb 16Anl_Rasarro_36_42_SPK7_USA.indb 16 15.12.2022 08:52:2415.12.2022 08:52:24

EN
Do not use your hands or feet to remove clippings
in or on the mower housing, but instead use
suitable tools such as a brush or a hand broom.
In order to ensure that the majority of grass
clippings are picked up, the inside of the catch
basket must be cleaned after each use.
Reattach the catch basket only when the motor is
switched off and the blade has stopped.
Lift up the chute fl ap with one hand and, holding
the catch basket by its handle with the other
hand, hang in the basket from the top.
7. Cleaning and maintenance
Danger!
Pull the safety plug before carrying out any
cleaning work (Fig. 15).
7.1 Cleaning
Keep all safety devices, air vents and the
•
motor housing free of dirt and dust as far as
possible. Wipe the equipment with a clean
cloth or blow it down with compressed air at
low pressure.
Do not clean the lawn mower with running
•
water, particularly with high-pressure water.
We recommend cleaning the equipment
•
immediately each time after use.
Clean the equipment regularly with a damp
•
cloth and some soft soap. Do not use
cleaning agents or solvents; these may
be aggressive to the plastic parts in the
equipment. Ensure that no water can get into
the interior of the equipment. The ingress of
water into an electric power tool increases the
risk of an electric shock.
For best results, clean the lawn mower with a
•
brush or rag.
7.2 Maintenance
Worn out or damaged blade, blade mounts,
•
and bolts should be replaced as a set by an
authorized
Ensure that all mounting components (i.e.
•
screws, bolts, nuts etc.) are always tightened
so that the equipment can be safely operated
at all times.
Frequently check the grass catch assembly
•
for signs of wear.
Replace excessively worn or damaged parts
•
immediately.
In order to ensure that you enjoy the
•
equipment for many years to come, all
screwed parts, as well as the wheels and
axles, should be cleaned and lubricated.
Keeping your lawn mower in good condition
•
not only ensures a long lifespan and high
performance, but also enables the equipment
to thoroughly cut your grass with minimal
effort.
The blade is subjected to more wear and
•
tear than any other component. Therefore,
routinely check the condition of the blade
and make sure that it is tightly fastened. If
the blade is completely worn out, it must be
immediately replaced or ground sharp again.
An excessively vibrating mower means that
the blade is not properly balanced or has
become deformed from striking an object.
In this case, the blade must be repaired or
replaced.
There are no other parts inside the equipment
•
which require maintenance.
7.3 Replacing the blade
For safety reasons, we recommend having the
blade replaced by an authorized professional.
Important! Wear work gloves! Only replace the
blade with a genuine Einhell replacement blade,
as this will ensure top performance and safety
under all conditions.
Carry out the following steps to change the blade:
1. Undo the fastening screw SW13 (see Fig. 16).
2. Remove the blade and replace with a new
one.
3. When fi tting the blade, make sure it is
installed in the right direction. The blade
air vanes must project into the motor
compartment (see Fig. 16). The dome mounts
must be aligned with the punch holes in the
blade.
4. Then retighten the fastening screw with the
universal wrench (see Fig. 16). The tightening
torque should be approx. 25 Nm.
At the end of the season, perform a general
inspection of the lawn mower and remove any
grass and dirt which may have accumulated.
At the start of each season, ensure that you
check the condition of the blade. If repairs are
necessary, please contact our customer service
center. Use only genuine spare parts.
Spare blade art. no.: 3405457
- 17 -
Anl_Rasarro_36_42_SPK7_USA.indb 17Anl_Rasarro_36_42_SPK7_USA.indb 17 15.12.2022 08:52:2415.12.2022 08:52:24
 Loading...