

Page 1

D Originalbetriebsanleitung
Fremdstarter-Energiestation
GB Original operating instructions
Jump Start – Power Bank
F Instructions d’origine
Démarreur externe – station
d’énergie
I Istruzioni per l’uso originali
Avviatore di emergenza – Caricabatterie portatile
NL Originele handleiding
Externe starter – energiestation
E Manual de instrucciones original
Arrancador de batería - unidad
energética
P Manual de instruções original
Dispositivo de arranque auxiliar –
posto de energia
CC-JS 12
GR Πρωτότυπες Οδηγίες χρήσης
Βοηθητική εξωτερική εκκίνηση μονάδα ενέργειας
7
Art.-Nr.: 10.915.20 I.-Nr.: 11015
Anl_CC_JS_12_SPK7.indb 1Anl_CC_JS_12_SPK7.indb 1 08.01.16 11:4708.01.16 11:47
Page 2
1
2a
7
1
2
3
8
10
2b
4
11
5
6
12
Anl_CC_JS_12_SPK7.indb 2Anl_CC_JS_12_SPK7.indb 2 08.01.16 11:4708.01.16 11:47
2d2c
13
14
- 2 -
Page 3
3 4a
BOOST
reverse
correct
4b
4d
Beep,Beep
4c
Beep,Beep
- 3 -
Anl_CC_JS_12_SPK7.indb 3Anl_CC_JS_12_SPK7.indb 3 08.01.16 11:4708.01.16 11:47
Page 4

D
Gefahr!
Beim Benutzen von Geräten müssen einige Sicherheitsvorkehrungen eingehalten werden, um
Verletzungen und Schäden zu verhindern. Lesen
Sie diese Bedienungsanleitung / Sicherheitshinweise deshalb sorgfältig durch. Bewahren Sie diese gut auf, damit Ihnen die Informationen jederzeit
zur Verfügung stehen. Falls Sie das Gerät an andere Personen übergeben sollten, händigen Sie
diese Bedienungsanleitung / Sicherheitshinweise
bitte mit aus. Wir übernehmen keine Haftung für
Unfälle oder Schäden, die durch Nichtbeachten
dieser Anleitung und den Sicherheitshinweisen
entstehen.
1. Sicherheitshinweise
Die entsprechenden Sicherheitshinweise fi nden
Sie im beiliegenden Heftchen!
Gefahr!
Lesen Sie alle Sicherheitshinweise und Anweisungen. Versäumnisse bei der Einhaltung der
Sicherheitshinweise und Anweisungen können
elektrischen Schlag, Brand und/oder schwere
Verletzungen verursachen. Bewahren Sie alle
Sicherheitshinweise und Anweisungen für
die Zukunft auf.
Dieses Gerät darf nicht von Kindern benutzt werden. Kinder sollten beaufsichtigt werden, damit
sie nicht mit dem Gerät spielen. Reinigung und
Wartung darf nicht von Kindern durchgeführt
werden. Das Gerät darf nicht von Personen mit
verminderten physischen, sensorischen oder
geistigen Fähigkeiten oder Personen mit unzureichendem Wissen oder Erfahrung benutzt werden,
außer sie werden von einer für sie verantwortlichen Person beaufsichtigt oder angeleitet.
2. Gerätebeschreibung und
Lieferumfang
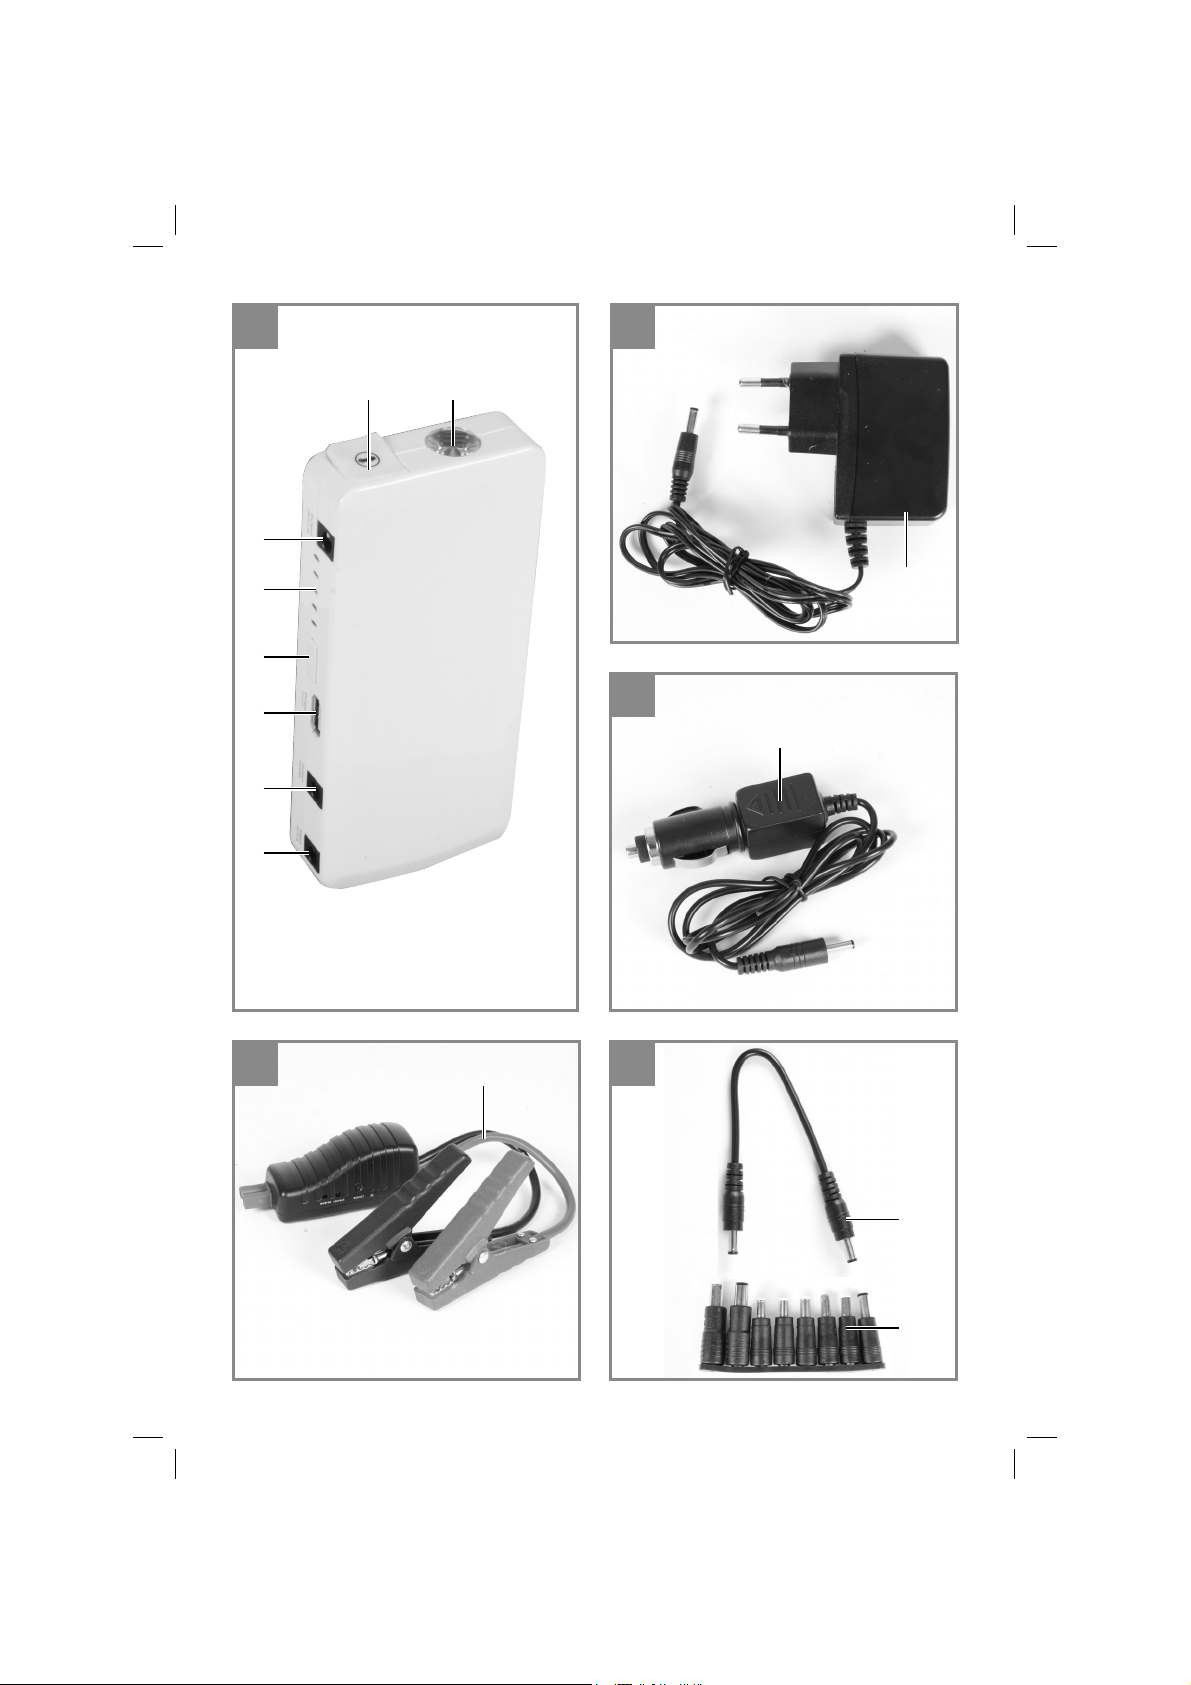
2.1 Gerätebeschreibung (Bild 1)
1 Gleichspannungsausgang 19V max. 3,5 A
2 LED Akkukapazitätsanzeige
3 Ein- Aus- Taster
4 USB Gleichspannungsausgang 5V max. 2 A
5 Gleichspannungsausgang 12V max. 10 A
6 Ladebuchse 15V d.c.
7 Anschluss Starthilfekabel
8 LED Licht
2.2 Lieferumfang
Bitte überprüfen Sie die Vollständigkeit des Artikels anhand des beschriebenen Lieferumfangs.
Bei Fehlteilen wenden Sie sich bitte spätestens
innerhalb von 5 Arbeitstagen nach Kauf des Artikels unter Vorlage eines gültigen Kaufbeleges an
unser Service Center oder an die Verkaufstelle,
bei der Sie das Gerät erworben haben. Bitte
beachten Sie hierzu die Gewährleistungstabelle
in den Service-Informationen am Ende der Anleitung.
Öffnen Sie die Verpackung und nehmen Sie
•
das Gerät vorsichtig aus der Verpackung.
Entfernen Sie das Verpackungsmaterial so-
•
wie Verpackungs-/ und Transportsicherungen
(falls vorhanden).
Überprüfen Sie, ob der Lieferumfang vollstän-
•
dig ist.
Kontrollieren Sie das Gerät und die Zubehör-
•
teile auf Transportschäden.
Bewahren Sie die Verpackung nach Möglich-
•
keit bis zum Ablauf der Garantiezeit auf.
Gefahr!
Gerät und Verpackungsmaterial sind kein
Kinderspielzeug! Kinder dürfen nicht mit
Kunststoff beuteln, Folien und Kleinteilen
spielen! Es besteht Verschluckungs- und Erstickungsgefahr!
Jump-Start Power Bank
•
Ladegerät
•
12V Zigarettenanzünderkabel
•
Starthilfekabel
•
USB Anschlusskabel
•
Verbindungskabel
•
Stecker Set
•
Aufbewahrungsmappe
•
Originalbetriebsanleitung
•
Sicherheitshinweise
•
- 4 -
Anl_CC_JS_12_SPK7.indb 4Anl_CC_JS_12_SPK7.indb 4 08.01.16 11:4708.01.16 11:47
Page 5

D
3. Bestimmungsgemäße
Verwendung
Das Gerät eignet sich unter Verwendung des beiliegenden Starthilfekabels für die Starthilfe von
12 V Starterbatterien (Bleisäureakkus) bei einer
maximalen Benzinmotor - Hubraumgröße von
2500 ccm. Das Gerät kann die Starterbatterie
nicht ersetzten. An den USB Anschlüssen können Geräte (z.B. Handys) mit 5V Versorgungsspannung und max. 2A Stromaufnahme angeschlossen werden. Der 19 V / 3,5A Anschluss
ist für die Spannungsversorgung von Notebooks
geeignet, der 12V / 10A Anschluss für sonstige
12V Gleichspannungsverbraucher.
Das Gerät darf nur nach dessen Bestimmung verwendet werden. Jede weitere darüber hinausgehende Verwendung ist nicht bestimmungsgemäß.
Für daraus hervorgerufene Schäden oder Verletzungen aller Art haftet der Benutzer/Bediener und
nicht der Hersteller.
Bitte beachten Sie, dass unsere Geräte bestimmungsgemäß nicht für den gewerblichen, handwerklichen oder industriellen Einsatz konstruiert
wurden. Wir übernehmen keine Gewährleistung,
wenn das Gerät in Gewerbe-, Handwerks- oder
Industriebetrieben sowie bei gleichzusetzenden
Tätigkeiten eingesetzt wird.
5. Vor Inbetriebnahme
5.1 Laden der Jump-Start Power Bank mit
dem mitgelieferten Ladegerät
Für das Ladegerät gilt:
Dieses Gerät kann von Kindern ab 8 Jahren und
darüber sowie von Personen mit verringerten physischen, sensorischen oder mentalen Fähigkeiten
oder Mangel an Erfahrung und Wissen benutzt
werden, wenn sie beaufsichtigt oder bezüglich
des sicheren Gebrauchs des Gerätes unterwiesen wurden und die daraus resultierenden Gefahren verstehen. Kinder dürfen nicht mit dem
Gerat spielen. Reinigung und Benutzer-Wartung
dürfen nicht von Kindern ohne Beaufsichtigung
durchgeführt werden.
Überzeugen Sie sich vor dem Anschließen, dass
die Daten auf dem Typenschild mit den Netzdaten
übereinstimmen.
Achtung! Ziehen Sie den Netzstecker bevor Sie
Einstellungen am Gerät vornehmen. Laden Sie
das Gerät ausschließlich mit dem mitgelieferten
Ladegerät.
Beachten Sie die beiliegenden Sicherheitshinweise mit ausführlichen Hinweisen zum Ladevorgang.
Die Ausgänge dürfen während des Ladevorgangs
nicht benutzt werden.
Verbinden Sie das mitgelieferte Ladegerät
4. Technische Daten
Jump-Start Power Bank
Li-Po-Akku: ............................................. 41,1 Wh
Ladezeit ca.:.................................................... 4 h
USB Gleichspannungsausgang: ......5 V max. 2 A
Gleichspannungsausgang: .........19 V max. 3,5 A
Gleichspannungsausgang: ..........12 V max. 10 A
Starthilfestrom: .......200 A (5 Sek.) / 400 A (max.)
Umgebungstemperatur bei Starthilfe: ..................
.................................................... - 15°C - + 40 °C
Ladegerät
Nenneingangsspannung: ...100-240 V ~50/60 Hz
Nennausgangsspannung: ......................15 V d.c.
Nennausgangsstrom: ..................................... 1 A
Anl_CC_JS_12_SPK7.indb 5Anl_CC_JS_12_SPK7.indb 5 08.01.16 11:4708.01.16 11:47
•
(Abb. 2a / Pos. 2) mit der „Input 15 V 1A“ Ladebuchse (Abb. 1 / Pos. 6) des Gerätes.
Stecken Sie das Ladegerät in die Netzsteck-
•
dose ein, wird der Akku geladen. Während
des Ladens leuchten (blinken) die LEDs (Abb.
1/ Pos. 2) und zeigen den Ladestatus an.
Ist das Laden abgeschlossen, leuchten alle
LEDs.
Die Ladezeit beträgt bei leerem Akku ca. 4
•
Stunden. Während des Ladevorgangs kann
sich der Akku im Gerät etwas erwärmen, dies
ist jedoch normal.
- 5 -
Page 6

D
5.2 Laden der Jump-Start Power Bank mit
dem 12V Zigarettenanzünderkabel
Der Ladevorgang sollte nur während der Fahrt
erfolgen, da die Autobatterie entladen wird.
Platzieren Sie das Gerät an einer geeigneten
Stelle, damit es bei plötzlichen Geschwindigkeitsund/oder Richtungsänderungen nicht in Bewegung geraten kann.
Verbinden Sie das mitgelieferte 12V Zigaret-
•
tenanzünderkabel (Abb. 2b / Pos. 11) mit der
„Input 15V 1A“ Ladebuchse (Abb. 1 / Pos. 6)
des Gerätes.
Stecken Sie den 12V Stecker in eine passen-
•
de 12V Zigarettenanzündersteckdose.
5.3 Akku- Kapazitätsanzeige
Drücken Sie den Ein- Aus-Taster (Abb. 1/Pos. 3)
kurz. Die LED der Akkukapazitätsanzeige (Abb. 1
/ Pos. 2) leuchten auf. Die Anzahl der leuchtenden
LED gibt Auskunft über den aktuellen Ladezustand des eingebauten Li-Po-Akkus.
100 % geladen = 5 LED Dauerlicht
<10 % geladen = keine LED
6. LED-Licht
Vorsicht! Nicht in den Lichtstrahl blicken.
Drücken Sie 3 Sekunden lang den Ein- Aus-
•
Taster – das LED-Licht (Abb. 1 / Pos. 8) leuchtet dauernd.
Drücken Sie den Ein- Aus-Taster nochmals
•
– das LED-Licht leuchtet als „Stroboskopblitzer“.
Drücken Sie den Ein- Aus-Taster nochmals –
•
das LED-Licht leuchtet als „SOS“-Morselicht.
Bei nochmaligem Drücken wird das LED-
•
Licht wieder ausgeschaltet.
7.1 Laden/Betreiben von Geräten mit USB
Anschluss
1. Verbinden Sie ein vorhandenes (oder das
mitgelieferte) USB Anschlusskabel mit dem
USB Anschluss (Abb. 1 / Pos. 4) der JumpStart Power Bank und anschließend mit dem
zu versorgenden Gerät.
2. Drücken Sie den Ein- Austaster (Abb. 1 / Pos.
3).
7.2 Betreiben von 12 V Gleichspannungsgeräten
1. Verbinden Sie das mitgelieferte Verbindungskabel (Abb. 2d/ Pos. 13) mit dem 12V Gleichspannungsausgang (Abb. 1 / Pos. 5) der
Jump-Start Power Bank und anschließend
gegebenenfalls unter Verwendung eines der
mitgelieferten Stecker (Abb. 2d / Pos. 14) mit
dem 12V Gleichspannungsgerät. Die maximale Stromaufnahme darf 10A nicht überschreiten.
2. Drücken Sie den Ein- Austaster (Abb. 1 / Pos.
3).
7.3 Betreiben von 19 V Gleichspannungsgeräten
1. Verbinden Sie das mitgelieferte Verbindungskabel (Abb. 2d / Pos. 13) mit dem 19V Gleichspannungsausgang (Abb. 1 / Pos. 1) der
Jump-Start Power Bank und anschließend
gegebenenfalls unter Verwendung eines der
mitgelieferten Stecker (Abb. 2d / Pos. 14) mit
dem 19V Gleichspannungsgerät. Die maximale Stromaufnahme darf 3,5A nicht überschreiten.
2. Drücken Sie den Ein- Austaster (Abb. 1 / Pos.
3).
8. Starthilfe für das Kfz
Die 12V Starthilfeeinrichtung bietet bei Start-
7. Ausgänge
Vorsicht! Achten Sie auf die Spannungs- und
Stromwerte des zu versorgenden Gerätes (z.B.
Handy, Notebook). Beachten Sie dessen Bedienungsanleitung.
Die Versorgungsdauer variiert je nach Ladestand
der Jump-Start Power Bank, Leistungsaufnahme
und Nutzungsintensität des Anschlussgerätes.
Bei Erreichen einer Restladung von 40-50% (2
LEDs leuchten) ist der Akku zu laden (s. Abschnitt 5.).
Anl_CC_JS_12_SPK7.indb 6Anl_CC_JS_12_SPK7.indb 6 08.01.16 11:4708.01.16 11:47
schwierigkeiten aufgrund fehlender Batteriekapazität eine willkommene Hilfe.
Warnung! Während eines Starthilfevorgangs darf
nur das Starthilfekabel angeschlossen sein. Die
Versorgung eines Anschlussgerätes, z.B. über
den USB-Anschluss, muss vorher unterbrochen
werden.
Wir weisen darauf hin, dass die Fahrzeuge mit
zahlreichen Elektronikbausteinen ausgerüstet
sind. Beachten Sie bitte die Hinweise in Bedienungsanleitungen für Auto, Radio usw.
- 6 -
Page 7

D
Warnung! Niemals mit der Fahrzeugkarosserie
verbinden!
Stellen Sie sicher, dass der Stecker vom
•
Starthilfekabel mit der Gerätesteckdose fest
verbunden ist. Ist die Verbindung während
des Starthilfevorgangs lose, kann die Steckverbindung aufgrund des hohen Stroms
schmelzen.
Die Pole der Kfz-Batterie müssen sauber sein
•
und die Klemmen des Starthilfekabels fest
auf den Batteriepolen sitzen.
Während des Starthilfevorganges die Klem-
•
men des Starthilfekabels nicht miteinander
verbinden – Kurzschluss.
Vergewissern Sie sich, dass mindestens 3 LED
der Akku-Kapazitätsanzeige leuchten. Die Gerätetemperatur muss im Bereich von + 10 °C - + 40
°C, die Umgebungstemperatur beim Starthilfevorgang im Bereich von – 15 °C - + 40 °C liegen.
Verwenden Sie ausschließlich das mitgelieferte
Starthilfekabel (Abb. 2c / Pos. 12).
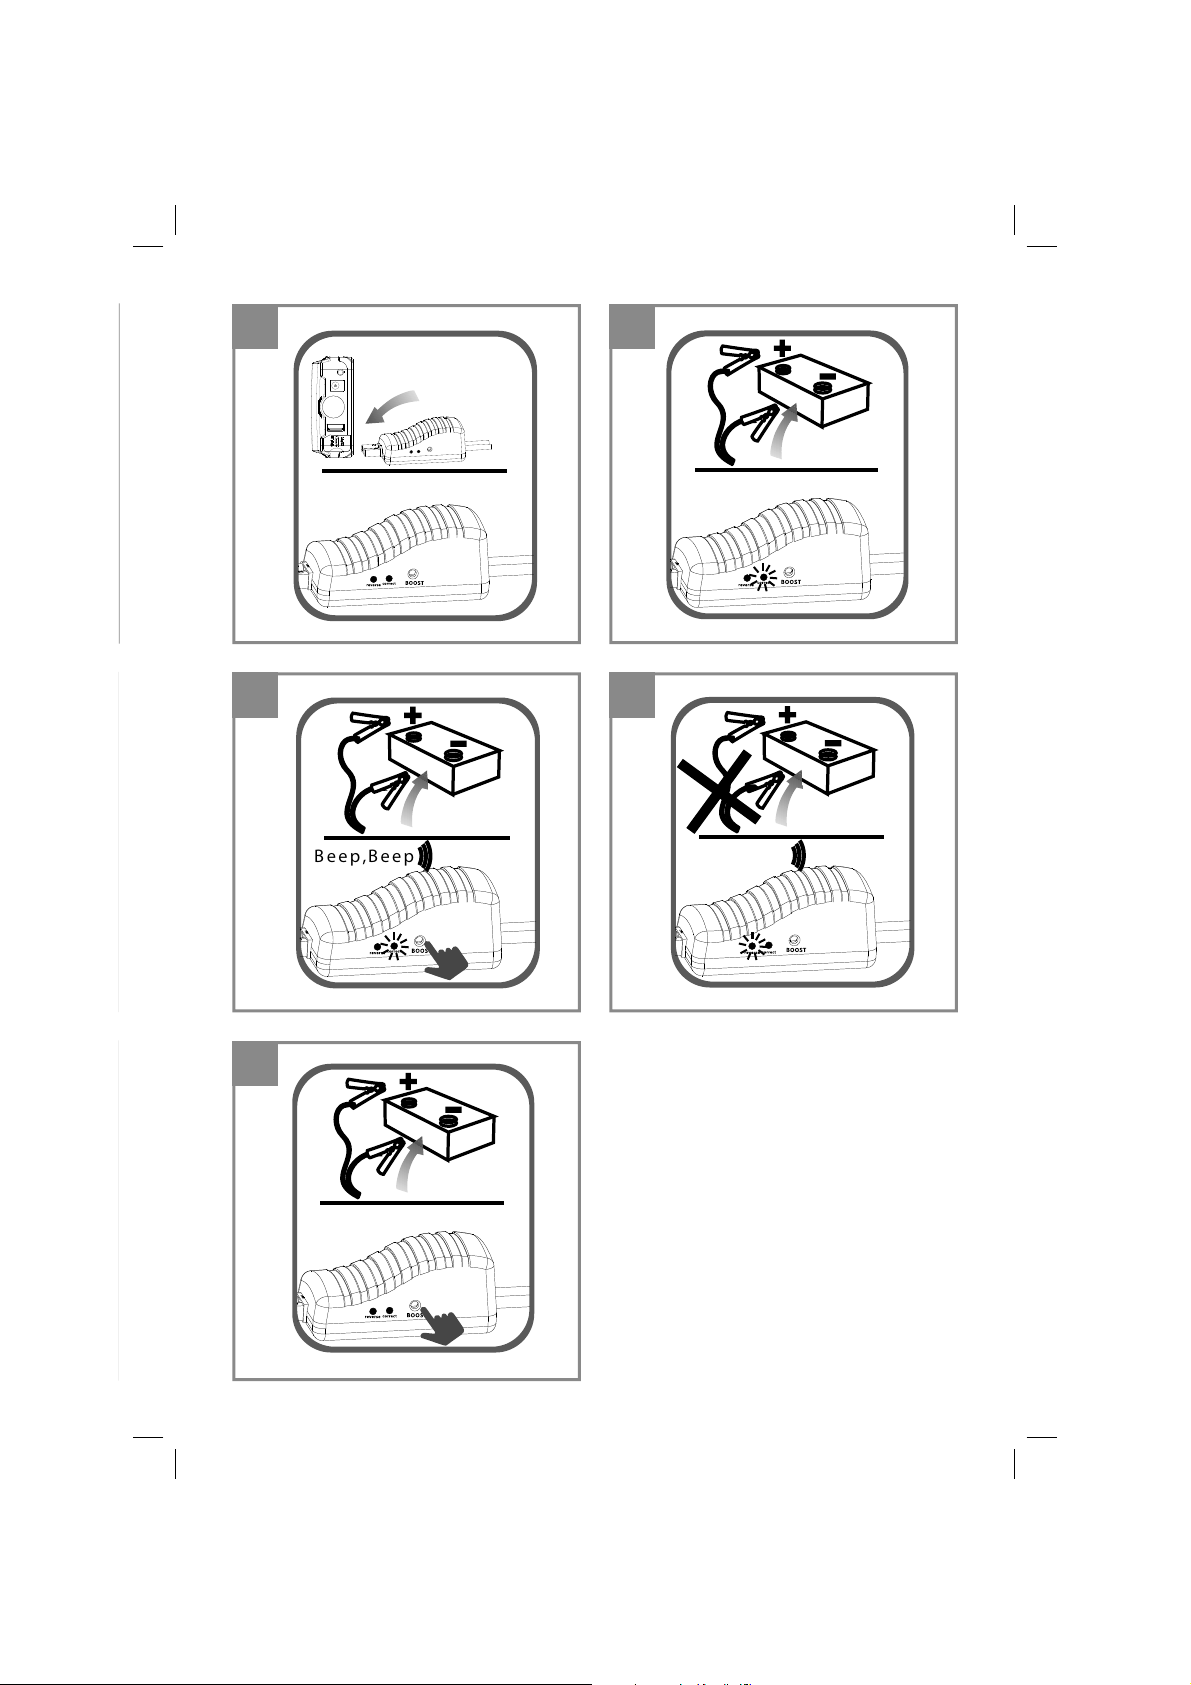
1. Abb. 3: Klappen Sie die Abdeckung vom
Starthilfekabelanschluss (Abb. 1 / Pos. 7) auf,
und stecken Sie das Starthilfekabel am Gerät
an.
2. Abb. 4a: Schließen Sie das rote Kabel am
Pluspol und das schwarze Kabel am Minuspol der Autobatterie an.
3. Abb. 4a: Die grüne LED „correct“ am Starthilfekabel leuchtet.
Hinweis: Sollte die grüne LED nicht leuch-
ten oder blinken, so drücken Sie die Taste
„Boost“ am Starthilfekabel.
4. Starten Sie das Fahrzeug innerhalb 30 Sekunden (Startversuchdauer max. 5 Sekunden, Wartezeit zwischen zwei Startversuchen
mindestens 30 Sekunden).
5. Sobald der Motor läuft entfernen Sie das
Starthilfekabel vom Gerät und anschließend
zuerst die rote Klemme und dann die schwarze Klemme von der Batterie.
6. Lassen Sie den Motor laufen. Die Lichtmaschine lädt die eingebaute Batterie.
LED - Statusmeldungen am Starthilfekabel
Abb. 4a: Grüne LED = Motor starten
•
Abb. 4b: Grüne LED blinkt + Warnton =
•
„Boost“ Taste drücken und Motor innerhalb
30 s starten.
Abb. 4c: Rote LED + Warnton = Batterie ver-
•
polt angeschlossen (siehe 2.)
Abb. 4d: Keine LED, kein Warnton = Steck-
•
verbindung zum Gerät prüfen, „Boost“ Taste
drücken und Motor innerhalb 30 s starten.
Die Anzahl der möglichen Starthilfeversuche
(max. 10) ist abhängig von der Umgebungstemperatur, dem Zustand der zu startenden Batterie
und dem Ladezustand des Jump-Start Power
Bank Akkus.
9. Reinigung, Wartung und
Ersatzteilbestellung
Gefahr!
Ziehen Sie vor allen Reinigungsarbeiten den
Netzstecker.
9.1 Reinigung
Halten Sie Schutzvorrichtungen, Luftschlitze
•
und Motorengehäuse so staub- und schmutzfrei wie möglich. Reiben Sie das Gerät mit
einem sauberen Tuch ab oder blasen Sie es
mit Druckluft bei niedrigem Druck aus.
Wir empfehlen, dass Sie das Gerät direkt
•
nach jeder Benutzung reinigen.
Reinigen Sie das Gerät regelmäßig mit einem
•
feuchten Tuch und etwas Schmierseife. Verwenden Sie keine Reinigungs- oder Lösungsmittel; diese könnten die Kunststoffteile des
Gerätes angreifen. Achten Sie darauf, dass
kein Wasser in das Geräteinnere gelangen
kann. Das Eindringen von Wasser in ein Elektrogerät erhöht das Risiko eines elektrischen
Schlages.
9.2 Wartung
Im Geräteinneren befi nden sich keine weiteren zu
wartenden Teile.
9.3 Ersatzteilbestellung:
Bei der Ersatzteilbestellung sollten folgende Angaben gemacht werden;
Typ des Gerätes
•
Artikelnummer des Gerätes
•
Ident-Nummer des Gerätes
•
Ersatzteilnummer des erforderlichen Ersatz-
•
teils
Aktuelle Preise und Infos fi nden Sie unter
www.isc-gmbh.info
- 7 -
Anl_CC_JS_12_SPK7.indb 7Anl_CC_JS_12_SPK7.indb 7 08.01.16 11:4708.01.16 11:47
Page 8

10. Reparatur
Bei eventuell auftretenden Störungen das Gerät
nur von einem autorisierten Fachmann bzw. von
einer Kundendienstwerkstatt überprüfen lassen.
11. Entsorgung und
Wiederverwertung
Das Gerät befi ndet sich in einer Verpackung um
Transportschäden zu verhindern. Diese Verpackung ist Rohstoff und ist somit wieder verwend-
bar oder kann dem Rohstoff kreislauf zurückge-
führt werden. Das Gerät und dessen Zubehör
bestehen aus verschiedenen Materialien, wie
z.B. Metall und Kunststoff e. Defekte Geräte ge-
hören nicht in den Hausmüll. Zur fachgerechten
Entsorgung sollte das Gerät an einer geeigneten
Sammelstellen abgegeben werden. Wenn Ihnen
keine Sammelstelle bekannt ist, sollten Sie bei
der Gemeindeverwaltung nachfragen.
12. Lagerung
Lagern Sie das Gerät und dessen Zubehör an
einem dunklen, trockenen und frostfreien Ort. Die
optimale Lagertemperatur liegt zwischen 5 und
30 ˚C.
Beachten Sie die beiliegenden Sicherheitshinweise mit ausführlichen Hinweisen zur Lagerung.
Da der Akku auf zu hohe (über +40 °C) bzw. auf
zu niedrige Temperaturen (unter 0°C) reagiert, lagern Sie das Gerät nicht dauerhaft in einem Kfz.
Zum Transport in einem Fahrzeug, platzieren Sie
es an einer geeigneten Stelle, damit es bei plötzlichen Geschwindigkeits- und/oder Richtungsänderungen nicht in Bewegung geraten kann.
Bewahren Sie das Gerät in der Originalverpackung auf.
D
- 8 -
Anl_CC_JS_12_SPK7.indb 8Anl_CC_JS_12_SPK7.indb 8 08.01.16 11:4708.01.16 11:47
Page 9

D
13. Fehlersuchplan
Störung Mögliche Ursache Behebung
Gerät lasst sich
nicht einschalten
Starthilfe funktioniert nicht
- Akkuspannung zu gering - Akku aufl aden
- Akkuspannung zu gering
- Anschlüsse am Fahrzeug vertauscht
- Akku aufl aden
- Auf Polarität achten und richtig anschließen
- Umgebungstemperatur außerhalb
des Temperaturbereiches
Alle LED‘s blinken - Überlastungsschutz hat angespro-
chen
- Gerät zu warm
- Umgebungstemperatur zu niedrig/
hoch
- Starthilfe innerhalb des Temperaturbereiches versuchen
- Gerät ausschalten, auf mögliche
Überlastung prüfen
- Gerätetemperatur +10°C - +40°C
einhalten
- Umgebungstemperaturbereich
-15°C - +40°C einhalten
- 9 -
Anl_CC_JS_12_SPK7.indb 9Anl_CC_JS_12_SPK7.indb 9 08.01.16 11:4708.01.16 11:47
Page 10

D
Nur für EU-Länder
Werfen Sie Elektrowerkzeuge nicht in den Hausmüll!
Gemäß europäischer Richtlinie 2012/19/EU über Elektro- und Elektronik-Altgeräte und Umsetzung in
nationales Recht müssen verbrauchte Elektrowerkzeuge getrennt gesammelt werden und einer umweltgerechten Wiederverwertung zugeführt werden.
Recycling-Alternative zur Rücksendeauff orderung:
Der Eigentümer des Elektrogerätes ist alternativ anstelle Rücksendung zur Mitwirkung bei der sachgerechten Verwertung im Falle der Eigentumsaufgabe verpfl ichtet. Das Altgerät kann hierfür auch einer
Rücknahmestelle überlassen werden, die eine Beseitigung im Sinne der nationalen Kreislaufwirtschafts- und Abfallgesetze durchführt. Nicht betroff en sind den Altgeräten beigefügte Zubehörteile und
Hilfsmittel ohne Elektrobestandteile.
Der Nachdruck oder sonstige Vervielfältigung von Dokumentation und Begleitpapieren der Produkte,
auch auszugsweise, ist nur mit ausdrücklicher Zustimmung der iSC GmbH zulässig.
Technische Änderungen vorbehalten
Diese Sendung enthält Lithium-Ionen-Batterien.
Gemäß Sondervorschrift 188 unterliegt diese Sendung nicht den Vorschriften des ADR. Sorgsam
behandeln. Entzündungsgefahr bei Beschädigung des Versandstücks. Bei Beschädigung des Versandstücks: Kontrolle und erforderlichenfalls erneutes Verpacken.
Für zusätzliche Informationen rufen Sie bitte: 0049 1807 10 20 20 66 (Festnetzpreis: 14 ct/min, Mobilfunkpreise maximal: 42 ct/min) Außerhalb Deutschlands fallen stattdessen Gebühren für ein reguläres
Gespräch ins dt. Festnetz an.
- 10 -
Anl_CC_JS_12_SPK7.indb 10Anl_CC_JS_12_SPK7.indb 10 08.01.16 11:4708.01.16 11:47
Page 11

D
Service-Informationen
Wir unterhalten in allen Ländern, welche in der Garantieurkunde benannt sind, kompetente ServicePartner, deren Kontakte Sie der Garantieurkunde entnehmen. Diese stehen Ihnen für alle ServiceBelange wie Reparatur, Ersatzteil- und Verschleißteil-Versorgung oder den Bezug von Verbrauchsmaterialien zur Verfügung.
Es ist zu beachten, dass bei diesem Produkt folgende Teile einem gebrauchsgemäßen oder natürlichen
Verschleiß unterliegen bzw. folgende Teile als Verbrauchsmaterialien benötigt werden.
Kategorie Beispiel
Verschleißteile* Akku
Verbrauchsmaterial/ Verbrauchsteile*
Fehlteile
* nicht zwingend im Lieferumfang enthalten!
Bei Mängel oder Fehlern bitten wir Sie, den Fehlerfall im Internet unter www.isc-gmbh.info anzumelden.
Bitte achten Sie auf eine genaue Fehlerbeschreibung und beantworten Sie dazu in jedem Fall folgende
Fragen:
Hat das Gerät bereits einmal funktioniert oder war es von Anfang an defekt?
•
Ist Ihnen vor dem Auftreten des Defektes etwas aufgefallen (Symptom vor Defekt)?
•
Welche Fehlfunktion weist das Gerät Ihrer Meinung nach auf (Hauptsymptom)?
•
Beschreiben Sie diese Fehlfunktion.
- 11 -
Anl_CC_JS_12_SPK7.indb 11Anl_CC_JS_12_SPK7.indb 11 08.01.16 11:4708.01.16 11:47
Page 12

D
Garantieurkunde
Sehr geehrte Kundin, sehr geehrter Kunde,
unsere Produkte unterliegen einer strengen Qualitätskontrolle. Sollte dieses Gerät dennoch einmal nicht
einwandfrei funktionieren, bedauern wir dies sehr und bitten Sie, sich an unseren Servicedienst unter
der auf dieser Garantiekarte angegebenen Adresse zu wenden. Gerne stehen wir Ihnen auch telefonisch über die angegebene Servicerufnummer zur Verfügung. Für die Geltendmachung von Garantieansprüchen gilt folgendes:
1. Diese Garantiebedingungen richten sich ausschließlich an Verbraucher, d. h. natürliche Personen,
die dieses Produkt weder im Rahmen ihrer gewerblichen noch anderen selbständigen Tätigkeit
nutzen wollen. Diese Garantiebedingungen regeln zusätzliche Garantieleistungen, die der u. g.
Hersteller zusätzlich zur gesetzlichen Gewährleistung Käufern seiner Neugeräte verspricht. Ihre
gesetzlichen Gewährleistungsansprüche werden von dieser Garantie nicht berührt. Unsere Garantieleistung ist für Sie kostenlos.
2. Die Garantieleistung erstreckt sich ausschließlich auf Mängel an einem von Ihnen erworbenen neuen Gerät des u. g. Herstellers, die auf einem Material- oder Herstellungsfehler beruhen und ist nach
unserer Wahl auf die Behebung solcher Mängel am Gerät oder den Austausch des Gerätes beschränkt. Bitte beachten Sie, dass unsere Geräte bestimmungsgemäß nicht für den gewerblichen,
handwerklichen oder berufl ichen Einsatz konstruiert wurden. Ein Garantievertrag kommt daher nicht
zustande, wenn das Gerät innerhalb der Garantiezeit in Gewerbe-, Handwerks- oder Industriebetrieben verwendet wurde oder einer gleichzusetzenden Beanspruchung ausgesetzt war.
3. Von unserer Garantie ausgenommen sind:
- Schäden am Gerät, die durch Nichtbeachtung der Montageanleitung oder aufgrund nicht fachgerechter Installation, Nichtbeachtung der Gebrauchsanleitung (wie durch z.B. Anschluss an eine
falsche Netzspannung oder Stromart) oder Nichtbeachtung der Wartungs- und Sicherheitsbestimmungen oder durch Aussetzen des Geräts an anomale Umweltbedingungen oder durch mangelnde
Pfl ege und Wartung entstanden sind.
- Schäden am Gerät, die durch missbräuchliche oder unsachgemäße Anwendungen (wie z.B. Überlastung des Gerätes oder Verwendung von nicht zugelassenen Einsatzwerkzeugen oder Zubehör),
Eindringen von Fremdkörpern in das Gerät (wie z.B. Sand, Steine oder Staub, Transportschäden),
Gewaltanwendung oder Fremdeinwirkungen (wie z. B. Schäden durch Herunterfallen) entstanden
sind.
- Schäden am Gerät oder an Teilen des Geräts, die auf einen gebrauchsgemäßen, üblichen oder
sonstigen natürlichen Verschleiß zurückzuführen sind.
4. Die Garantiezeit beträgt 24 Monate und beginnt mit dem Kaufdatum des Gerätes. Garantieansprüche sind vor Ablauf der Garantiezeit innerhalb von zwei Wochen, nachdem Sie den Defekt erkannt
haben, geltend zu machen. Die Geltendmachung von Garantieansprüchen nach Ablauf der Garantiezeit ist ausgeschlossen. Die Reparatur oder der Austausch des Gerätes führt weder zu einer
Verlängerung der Garantiezeit noch wird eine neue Garantiezeit durch diese Leistung für das Gerät
oder für etwaige eingebaute Ersatzteile in Gang gesetzt. Dies gilt auch bei Einsatz eines Vor-OrtServices.
5. Für die Geltendmachung Ihres Garantieanspruches melden Sie bitte das defekte Gerät an unter:
www.isc-gmbh.info. Halten Sie bitte den Kaufbeleg oder andere Nachweise Ihres Kaufs des Neugeräts bereit. Geräte, die ohne entsprechende Nachweise oder ohne Typenschild eingesendet werden, sind von der Garantieleistung aufgrund mangelnder Zuordnungsmöglichkeit ausgeschlossen.
Ist der Defekt des Gerätes von unserer Garantieleistung erfasst, erhalten Sie umgehend ein repariertes oder neues Gerät zurück.
Selbstverständlich beheben wir gegen Erstattung der Kosten auch gerne Defekte am Gerät, die vom
Garantieumfang nicht oder nicht mehr erfasst sind. Dazu senden Sie das Gerät bitte an unsere Serviceadresse.
Für Verschleiß-, Verbrauchs- und Fehlteile verweisen wir auf die Einschränkungen dieser Garantie gemäß den Service-Informationen dieser Bedienungsanleitung.
iSC GmbH · Eschenstraße 6 · 94405 Landau/Isar (Deutschland)
- 12 -
Anl_CC_JS_12_SPK7.indb 12Anl_CC_JS_12_SPK7.indb 12 08.01.16 11:4708.01.16 11:47
Page 13

D
Sehr geehrte Kundin, sehr geehrter Kunde,
um Ihnen noch mehr Service zu bieten, haben Sie die Möglichkeit auf unserem Onlineportal weitere
Informationen abzurufen.
Sollten einmal Probleme oder Fragen zu Ihrem Produkt auftreten, können Sie schnell und einfach unter
www.isc-gmbh.info viele Aktionen durchführen. Hier einige Beispiele:
Ersatzteile bestellen
•
Aktuelle Preisauskünfte
•
Verfügbarkeiten der Ersatzteile
•
Servicestellen Vorort für Benzingeräte
•
Defekte Geräte anmelden
•
Garantieverlängerungen (nur bei bestimmten Geräten)
•
Bestellverfolgung
•
Wir freuen uns auf Ihren Besuch online unter www.isc-gmbh.info!
Telefon: 09951 / 95 920 00 ·Telefax: 09951/95 917 00
E-Mail: info@einhell.de · Internet: www.isc-gmbh.info
iSC GmbH · Eschenstraße 6 · 94405 Landau/Isar (Deutschland)
- 13 -
Anl_CC_JS_12_SPK7.indb 13Anl_CC_JS_12_SPK7.indb 13 08.01.16 11:4708.01.16 11:47
Page 14

GB
Danger!
When using the equipment, a few safety precautions must be observed to avoid injuries and
damage. Please read the complete operating
instructions and safety regulations with due care.
Keep this manual in a safe place, so that the information is available at all times. If you give the
equipment to any other person, hand over these
operating instructions and safety regulations as
well. We cannot accept any liability for damage
or accidents which arise due to a failure to follow
these instructions and the safety instructions.
1. Safety regulations
The corresponding safety information can be
found in the enclosed booklet.
Danger!
Read all safety regulations and instructions.
Any errors made in following the safety regulations and instructions may result in an electric
shock, fi re and/or serious injury.
Keep all safety regulations and instructions
in a safe place for future use.
This equipment is not allowed to be used by
children. Children should be supervised so that
they do not play with the equipment. Children are
not allowed to carry out the cleaning or maintenance. This equipment is not allowed to be used
by people with limited physical, sensory or mental
capacities or by those with insuffi cient knowledge
or experience unless they are supervised or instructed by a person who is responsible for them.
2. Layout and items supplied
2.1 Layout (Fig. 1)
1. 19V max. 3.5A d.c. outlet
2. LED battery capacity indicator
3. On/Off button
4. 5V max. 2A d.c. USB outlet
5. 12V max. 10A d.c. outlet
6. 15V d.c. charging jack
7. Connection for jump start cable
8. LED lamp
2.2 Items supplied
Please check that the article is complete as
specifi ed in the scope of delivery. If parts are
missing, please contact our service center or the
store where you made your purchase at the latest
within 5 work days after purchasing the article and
upon presentation of a valid bill of purchase. Also,
refer to the warranty table in the service information at the end of the operating instructions.
Open the packaging and take out the equip-
•
ment with care.
Remove the packaging material and any
•
packaging and/or transportation braces (if
present).
Check to see if all the items are supplied.
•
Inspect the equipment and accessories for
•
transport damage.
If possible, keep the packaging until the end
•
of the guarantee period.
Danger!
The equipment and packaging material are not
toys. Do not let children play with plastic bags,
foils or small parts. There is a risk of choking and
suff ocating!
Jump start - power bank
•
Charger
•
12V cigarette lighter cable
•
Jump start cable
•
USB connection cable
•
Connection cable
•
Set of connectors
•
Storage case
•
Original operating instructions
•
Safety information
•
3. Intended use
The equipment is designed for the jump starting
of 12 V starter batteries (lead acid batteries)
for maximum petrol engine capacities of 2500
ccm, using the supplied jump start cable. The
equipment cannot be used as a substitute for the
starter battery. The USB connections can be used
for connecting devices (e.g. mobile phones) with
5 V supply voltage and max. 2 A power consumption. The 19 V / 3.5 A connection is designed for
supplying power to notebooks, and the 12 V /
10 A connection can be used for other 12 V d.c.
consumers.
The equipment may be used only for its intended
purpose. Any other use is deemed to be a case of
misuse. The user/operator and not the manufacturer will be liable for any damage or injuries of any
kind resulting from such misuse.
- 14 -
Anl_CC_JS_12_SPK7.indb 14Anl_CC_JS_12_SPK7.indb 14 08.01.16 11:4708.01.16 11:47
Page 15

GB
Please note that our equipment has not been designed for use in commercial, trade or industrial
applications. Our warranty will be voided if the
equipment is used in commercial, trade or industrial businesses or for equivalent purposes.
4. Technical data
Jump start power bank
Li-Po battery: ......................................... 41.1 Wh
Charging time approx. ................................... 4 hr
USB d.c. voltage outlet: ................... 5 V max. 2 A
d.c. voltage outlet: ...................... 19 V max. 3.5 A
d.c. voltage outlet: ....................... 12 V max. 10 A
Jump starting current: .........................................
................................. 200 A (5 sec) / 400 A (max.)
Ambient temperature for jump starting: ...............
.................................................... + 15°C - + 40°C
Charger
Nominal input voltage: ....... 100-240 V ~50/60 Hz
Nominal output voltage: ........................ 15 V DC
Nominal output current: .................................. 1 A
5. Before starting the equipment
5.1 Charging the jump start power bank with
the supplied charger
The following applies to the charger:
This equipment can be used by children of 8 years and older and by people with limited physical,
sensory or mental capacities or those with no experience and knowledge if they are supervised or
have received instruction in how to use the equipment safely and understand the dangers which
result from such use. Children are not allowed
to play with the equipment. Unless supervised,
children are not allowed to clean the equipment
and carry out user-level maintenance work.
Before you connect the equipment to the power
supply make sure that the data on the rating plate
are identical to the supply voltage.
Important! Pull out the power plug before making
adjustments to the equipment. Charge the equipment only with the charger supplied.
Observe the enclosed safety information with detailed information about charging.
The outlets must not be used while charging is in
progress.
Connect the supplied charger (Fig. 2a / Item
•
2) to the „15V 1A input“ charging jack (Fig. 1 /
Item 6) on the equipment.
Plug the charger into the socket outlet and
•
the battery will be charged. The LED (Fig. 1/
Item 2) shine (flash) during charging and indicate the charging status. When charging is
finished, all the LED shine.
The time it takes to fully recharge an empty
•
battery is approximately 4 hours. The temperature of the battery pack may rise slightly
during the charging operation. This is normal.
5.2 Charging the jump start power bank with
the 12 V cigarette lighter cable
Charging should be performed only while driving,
as the vehicle’s battery is discharged in the process. Place the equipment in a suitable location
where it cannot move in response to an abrupt
change in speed and/or direction.
Connect the supplied 12 V cigarette lighter
•
cable (Fig. 2b / Item 11) to the „15V 1A input“
charging jack (Fig. 1 / Item 6) on the equipment.
Plug the 12 V connector into a suitable 12 V
•
cigarette lighter socket.
5.3 Battery capacity indicator
Press the ON/OFF button (Fig. 1/Item 3) briefl y.
The LED for the battery capacity indicator (Fig. 1
/ Item 2) light up. The number of LED that are lit
indicate the current charge level of the integrated
Li-Po battery.
100% charged = 5 LED steady on
<10% charged = no LED
6. LED lamp
Caution! Do not look into the light beam.
Press the ON/OFF button for 3 seconds – the
•
LED lamp (Fig. 1 / Item 8) will be permanently
lit.
Press the ON/OFF button again – the LED
•
lamp will be lit as a „strobe light“.
Press the ON/OFF button again – the LED
•
lamp will be lit as an „SOS“ Morse code signal lamp.
Press the button again to switch the LED
•
lamp off again.
- 15 -
Anl_CC_JS_12_SPK7.indb 15Anl_CC_JS_12_SPK7.indb 15 08.01.16 11:4708.01.16 11:47
Page 16

GB
7. Outputs
Caution! Check the voltage and current ratings of
the device you want to connect (e.g. mobile phone, notebook). Observe the operating instructions
for the device.
The supply time varies according to the level
of the charge of the jump start power bank, the
level of power consumption and the intensity of
use of the connected device. The battery needs
charging when the remaining charge is 40-50% (2
LED shine) (see section 5).
7.1 Charging/operating devices with a USB
connection
1. Connect an available (or the supplied) USB
connection cable to the USB connection (Fig.
1 / Item 4) on the jump start power bank and
then to the device you want to connect.
2. Press the ON/OFF button (Fig. 1 / Item 3).
7.2 Operating 12 V d.c. devices
1. Connect the supplied connection cable (Fig.
2d / Item 13) to the 12 V d.c. outlet (Fig. 1 /
Item 5) on the jump start power bank and
then to the 12 V d.c. device, using the supplied connector (Fig. 2d / Item 14) if necessary. The maximum power consumption must
not exceed 10 A.
2. Press the ON/OFF button (Fig. 1 / Item 3).
7.3 Operating 19 V d.c. devices
1. Connect the supplied connection cable (Fig.
2d / Item 13) to the 19 V d.c. outlet (Fig. 1 /
Item 1) on the jump start power bank and
then to the 19 V d.c. device, using the supplied connector (Fig. 2d / Item 14) if necessary. The maximum power consumption must
not exceed 3.5 A.
2. Press the ON/OFF button (Fig. 1 / Item 3).
8. Jump starting for the vehicle
The 12 V jump starting function provides welcome
help with starting diffi culties due to too little batte-
ry capacity.
Warning! Only the jump start cable is allowed
to be connected during jump starting. Any power
supply to a connected device, e.g. via the USB
connection, must be disconnected fi rst.
We would like to point out that vehicles are fi tted
with a whole host of electronic equipment. Please
also refer to the instructions in the owner’s manu-
als for the car, radio, etc.
Warning! Never connect to the vehicle bodywork!
Make sure that the connector on the jump
•
start cable is securely connected to the device socket. If the connection is loose during
jump starting, the connector could melt as a
result of the high current.
The poles on the vehicle battery must be
•
clean and the clamps of the jump start cable
must be securely attached to the battery
poles.
Do not connect the clamps of the jump start
•
cable together during jump starting – shortcircuit.
Check that at least 3 LED of the battery capacity
indicator are lit. The equipment temperature must
be within the range of + 10°C - + 40°C and the
ambient temperature during jump starting within
the range of – 15°C - + 40°C. Use only the supplied jump start cable (Fig. 2c / Item 12).
1. Fig. 3: Pull open the cover on the jump start
cable connection (Fig. 1 / Item 7) and plug the
jump start cable into the equipment.
2. Fig. 4a: Connect the red cable to the positive
pole on the vehicle‘s battery and the black
cable to the negative pole on the vehicle‘s
battery.
3. Fig. 4a: The green „correct“ LED on the jump
start cable will light up.
Note: If the green LED does not light up or
fl ashes, press the „Boost“ button on the jump
start cable.
4. Start the vehicle within 30 seconds (no longer
than 5 seconds for each attempt to start the
engine, allowing at least 30 seconds waiting
time between each attempt).
5. As soon as the engine is running, remove the
jump start cable from the equipment and then
remove the red clamp from the battery fi rst,
followed by the black clamp.
6. Let the engine run. The generator will charge
up the built-in battery.
- 16 -
Anl_CC_JS_12_SPK7.indb 16Anl_CC_JS_12_SPK7.indb 16 08.01.16 11:4708.01.16 11:47
Page 17

GB
LED status signals on the jump start cable
Fig. 4a: Green LED = Start engine
•
Fig. 4b: Green LED flashing + acoustic war-
•
ning signal = Press the „Boost“ button and
start the engine within 30 seconds.
Fig. 4c: Red LED + acoustic warning signal =
•
Battery connected reverse polarity (see 2.)
Fig. 4d: No LED, no acoustic warning signal =
•
Check the connector to the equipment, press
the „Boost“ button and start the engine within
30 seconds.
The number of times that you can attempt to start
the engine (max. 10) varies according to the ambient temperature, the condition of the battery you
want to start and the charge level of the jump start
power bank battery.
9. Cleaning, maintenance and
ordering of spare parts
Hazard!
Always pull out the power plug before starting any
cleaning work.
9.1 Cleaning
Keep all safety devices, air vents and the
•
motor housing free of dirt and dust as far as
possible. Wipe the equipment with a clean
cloth or blow it down with compressed air at
low pressure.
We recommend cleaning the equipment im-
•
mediately each time after use.
Clean the equipment regularly with a damp
•
cloth and some soft soap. Do not use
cleaning agents or solvents; these may be aggressive to the plastic parts in the equipment.
Ensure that no water can get into the interior
of the equipment. The ingress of water into
an electric power tool increases the risk of an
electric shock.
9.2 Maintenance
There are no other parts inside the equipment
which require maintenance.
9.3 Ordering spare parts
Please provide the following information when
ordering spare parts:
Type of unit
•
Article number of the unit
•
ID number of the unit
•
Spare part number of the required spare part
•
For our latest prices and information please go to
www.isc-gmbh.info
10. Repair
Should the tool experience problems beyond
those mentioned above, let only an authorised
professional or a customer service shop perform
an inspection.
11. Disposal and recycling
The equipment is supplied in packaging to prevent it from being damaged in transit. The raw
materials in this packaging can be reused or
recycled. The equipment and its accessories are
made of various types of material, such as metal
and plastic. Never place defective equipment in
your household refuse. The equipment should
be taken to a suitable collection center for proper
disposal. If you do not know the whereabouts of
such a collection point, you should ask in your
local council offi ces.
12. Storage
Store the equipment and its accessories in a dark
and dry place at above freezing temperature. The
ideal storage temperature is between 5 and 30°C.
Observe the enclosed safety information with
detailed information about storage. Since the battery reacts if the temperature is too high (above
+40°C) or too low (below 0°C), do not keep the
battery permanently in a vehicle. For transporting
in a vehicle, place the equipment in a suitable
location where it cannot move in response to an
abrupt change in speed and/or direction. Keep
the equipment in its original packaging.
- 17 -
Anl_CC_JS_12_SPK7.indb 17Anl_CC_JS_12_SPK7.indb 17 08.01.16 11:4708.01.16 11:47
Page 18

GB
13. Troubleshooting guide
Fault Possible cause Remedy
The equipment cannot be switched on:
Jump starting does
not work
All LED fl ash - The overload cutout has responded
- Battery voltage too low - Charge battery
- Battery voltage too low
- Connections on the vehicle connected with reverse polarity
- Ambient temperature outside the
temperature range
- Equipment too hot
- Ambient temperature too low/high
- Charge battery
- Check the polarity and connect correctly
- Try jump starting within the temperature range
- Switch off the equipment, check for
possible overloading
- Observe equipment temperature of
+ 10°C - + 40°C.
- Observe ambient temperature range of – 15°C - + 40°C
- 18 -
Anl_CC_JS_12_SPK7.indb 18Anl_CC_JS_12_SPK7.indb 18 08.01.16 11:4708.01.16 11:47
Page 19

GB
For EU countries only
Never place any electric power tools in your household refuse.
To comply with European Directive 2012/19/EC concerning old electric and electronic equipment and
its implementation in national laws, old electric power tools have to be separated from other waste and
disposed of in an environment-friendly fashion, e.g. by taking to a recycling depot.
Recycling alternative to the return request:
As an alternative to returning the equipment to the manufacturer, the owner of the electrical equipment
must make sure that the equipment is properly disposed of if he no longer wants to keep the equipment.
The old equipment can be returned to a suitable collection point that will dispose of the equipment in
accordance with the national recycling and waste disposal regulations. This does not apply to any accessories or aids without electrical components supplied with the old equipment.
The reprinting or reproduction by any other means, in whole or in part, of documentation and papers
accompanying products is permitted only with the express consent of the iSC GmbH.
Subject to technical changes
This consignment contains lithium-ion batteries.
In accordance with special provision 188 this consignment is not subject to the ADR regulations. Handle
with care. Danger of ignition in case of damage to the consignment package. If the consignment package is damaged: Check and if necessary repackage. For further information contact: 0049 1807 10 20 20
66 (fi xed network 14 ct/min, mobile phone max. 42 ct/min) Outside Germany charges will apply instead
for a regular call to a landline number in Germany.
- 19 -
Anl_CC_JS_12_SPK7.indb 19Anl_CC_JS_12_SPK7.indb 19 08.01.16 11:4708.01.16 11:47
Page 20

GB
Service information
We have competent service partners in all countries named on the guarantee certifi cate whose contact
details can also be found on the guarantee certifi cate. These partners will help you with all service re-
quests such as repairs, spare and wearing part orders or the purchase of consumables.
Please note that the following parts of this product are subject to normal or natural wear and that the
following parts are therefore also required for use as consumables.
Category Example
Wear parts* Battery
Consumables*
Missing parts
* Not necessarily included in the scope of delivery!
In the eff ect of defects or faults, please register the problem on the internet at www.isc-gmbh.info. Ple-
ase ensure that you provide a precise description of the problem and answer the following questions in
all cases:
Did the equipment work at all or was it defective from the beginning?
•
Did you notice anything (symptom or defect) prior to the failure?
•
What malfunction does the equipment have in your opinion (main symptom)?
•
Describe this malfunction.
- 20 -
Anl_CC_JS_12_SPK7.indb 20Anl_CC_JS_12_SPK7.indb 20 08.01.16 11:4708.01.16 11:47
Page 21

GB
Warranty certifi cate
Dear Customer,
All of our products undergo strict quality checks to ensure that they reach you in perfect condition. In the
unlikely event that your device develops a fault, please contact our service department at the address
shown on this guarantee card. You can also contact us by telephone using the service number shown.
Please note the following terms under which guarantee claims can be made:
1. These guarantee terms apply to consumers only, i.e. natural persons intending to use this product
neither for their commercial activities nor for any other self-employed activities. These warranty
terms regulate additional warranty services, which the manufacturer mentioned below promises to
buyers of its new products in addition to their statutory rights of guarantee. Your statutory guarantee
claims are not aff ected by this guarantee. Our guarantee is free of charge to you.
2. The warranty services cover only defects due to material or manufacturing faults on a product which
you have bought from the manufacturer mentioned below and are limited to either the rectifi cation of
said defects on the product or the replacement of the product, whichever we prefer.
Please note that our devices are not designed for use in commercial, trade or professional applications. A guarantee contract will not be created if the device has been used by commercial, trade or
industrial business or has been exposed to similar stresses during the guarantee period.
3. The following are not covered by our guarantee:
- Damage to the device caused by a failure to follow the assembly instructions or due to incorrect
installation, a failure to follow the operating instructions (for example connecting it to an incorrect
mains voltage or current type) or a failure to follow the maintenance and safety instructions or by exposing the device to abnormal environmental conditions or by lack of care and maintenance.
- Damage to the device caused by abuse or incorrect use (for example overloading the device or the
use or unapproved tools or accessories), ingress of foreign bodies into the device (such as sand,
stones or dust, transport damage), the use of force or damage caused by external forces (for example by dropping it).
- Damage to the device or parts of the device caused by normal or natural wear or tear or by normal
use of the device.
4. The guarantee is valid for a period of 24 months starting from the purchase date of the device. Guarantee claims should be submitted before the end of the guarantee period within two weeks of the
defect being noticed. No guarantee claims will be accepted after the end of the guarantee period.
The original guarantee period remains applicable to the device even if repairs are carried out or
parts are replaced. In such cases, the work performed or parts fi tted will not result in an extension
of the guarantee period, and no new guarantee will become active for the work performed or parts
fi tted. This also applies if an on-site service is used.
5. To make a claim under the guarantee, please register the defective device at: www.isc-gmbh.info.
Please keep your bill of purchase or other proof of purchase for the new device. Devices that are
returned without proof of purchase or without a rating plate shall not be covered by the guarantee,
because appropriate identifi cation will not be possible. If the defect is covered by our guarantee,
then the item in question will either be repaired immediately and returned to you or we will send you
a new replacement.
Of course, we are also happy off er a chargeable repair service for any defects which are not covered by
the scope of this guarantee or for units which are no longer covered. To take advantage of this service,
please send the device to our service address.
Also refer to the restrictions of this warranty concerning wear parts, consumables and missing parts as
set out in the service information in these operating instructions.
- 21 -
Anl_CC_JS_12_SPK7.indb 21Anl_CC_JS_12_SPK7.indb 21 08.01.16 11:4708.01.16 11:47
Page 22

F
Danger !
Lors de l’utilisation d’appareils, il faut respecter
certaines mesures de sécurité afi n d’éviter des
blessures et dommages. Veuillez donc lire attentivement ce mode d’emploi/ces consignes de
sécurité. Veillez à le conserver en bon état pour
pouvoir accéder aux informations à tout moment.
Si l’appareil doit être remis à d’autres personnes,
veillez à leur remettre aussi ce mode d’emploi/
ces consignes de sécurité. Nous déclinons toute
responsabilité pour les accidents et dommages
dus au non-respect de ce mode d’emploi et des
consignes de sécurité.
1. Consignes de sécurité
Vous trouverez les consignes de sécurité correspondantes dans le cahier en annexe.
Danger !
Veuillez lire toutes les consignes de sécurité
et instructions. Tout non-respect des consignes
de sécurité et instructions peut provoquer une
décharge électrique, un incendie et/ou des blessures graves.
Conservez toutes les consignes de sécurité
et instructions pour une consultation ultérieure.
Cet appareil ne doit pas être utilisé par les enfants. Surveillez les enfants pour vous assurer
qu‘ils ne jouent pas avec l‘appareil. Le nettoyage
et l‘entretien ne doivent pas être eff ectués par
des enfants. Cet appareil ne doit pas être utilisé
par les personnes ayant des capacités physiques,
sensorielles ou intellectuelles diminuées ou manquant d‘expérience et/ou de connaissances, à
moins d‘être surveillées et de recevoir les instructions relatives à l‘utilisation de l‘appareil par une
personne responsable de leur sécurité.
2. Description de l‘appareil et
contenu de la livraison
2.1. Description de l‘appareil (fi gure 1)
1. Sortie de tension continue 19V 3,5 A max.
2. Indicateur de charge LED
3. Bouton poussoir marche/arrêt
4. Sortie de tension continue USB 5V raccorde-
ment 2A max.
5. Sortie de tension continue 12V 10 A max.
6. Connecteur femelle de chargement 15V d.c.
7. Raccordement câble d‘aide au démarrage
8. Lampe LED
2.2 Volume de livraison
Veuillez contrôler si l‘article est complet à l‘aide
de la description du volume de livraison. S‘il
manque des pièces, adressez-vous dans un délai
de 5 jours maximum après votre achat à notre
service après-vente ou au magasin où vous avez
acheté l‘appareil muni d‘une preuve d‘achat valable. Veuillez consulter pour cela le tableau des
garanties dans les informations service aprèsvente à la fi n du mode d‘emploi.
Ouvrez l’emballage et prenez l’appareil en le
•
sortant avec précaution de l’emballage.
Retirez le matériel d’emballage tout comme
•
les sécurités d’emballage et de transport (s’il
y en a).
Vérifiez si la livraison est bien complète.
•
Contrôlez si l’appareil et ses accessoires ne
•
sont pas endommagés par le transport.
Conservez l’emballage autant que possible
•
jusqu’à la fin de la période de garantie.
Danger !
L’appareil et le matériel d’emballage ne sont
pas des jouets ! Il est interdit de laisser des
enfants jouer avec des sacs et des fi lms en
plastique et avec des pièces de petite taille.
Ils risquent de les avaler et de s’étouff er !
Démarreur externe – station d’énergie
•
Chargeur
•
Câble d‘allume-cigare 12V
•
Câble d‘aide au démarrage
•
Câble de raccordement USB
•
Câble de raccordement
•
Kit de connecteurs
•
Housse
•
Mode d‘emploi d‘origine
•
Consignes de sécurité
•
- 22 -
Anl_CC_JS_12_SPK7.indb 22Anl_CC_JS_12_SPK7.indb 22 08.01.16 11:4708.01.16 11:47
Page 23

F
3. Utilisation conforme à
l’aff ectation
L‘appareil est destiné à l‘aide au démarrage de
batteries de démarrage de 12V (accumulateurs
à l‘acide de plomb) grâce à l‘utilisation du câble
d‘aide au démarrage ci-joint, pour une taille de
cylindrée maximale de 2500 cm3 pour un moteur
essence. L‘appareil ne peut pas remplacer la
batterie du démarreur. Les appareils (par ex. les
téléphones portables) de tension d‘alimentation
de 5V et de courant absorbé de max. 2A peuvent
être branchés sur les raccordements USB. Le raccordement 19V/3,5A convient pour l‘alimentation
en tension d‘ordinateurs portables, le raccordement 12V/10A pour d‘autres consommateurs de
tension continue 12V.
L‘appareil doit uniquement être utilisé conformément à son aff ectation. Toute utilisation allant au-
delà de cette aff ectation est considérée comme
non conforme. Pour les dommages en résultant
ou les blessures de tout genre, le fabricant décline toute responsabilité et l‘utilisateur/l‘opérateur
est responsable.
Veillez au fait que nos appareils, conformément
au règlement, n‘ont pas été conçus pour être
utilisés dans un environnement professionnel,
industriel ou artisanal. Nous déclinons toute
responsabilité si l‘appareil venait à être utilisé
professionnellement, artisanalement ou par des
sociétés industrielles, tout comme pour toute activité équivalente.
4. Données techniques
Chargeur
Tension d‘entrée nominale : ................................
............................................100-240 V ~50/60 Hz
Tension de sortie nominale : .................. 15 V d.c.
Courant nominal de sortie : ............................ 1 A
5. Avant la mise en service
5.1 Chargement du coff ret énergie de démar-
reur auxiliaire avec le chargeur joint à la
livraison
Pour le chargeur, les éléments suivants sont
valables :
Cet appareil peut être utilisé par les enfants à partir de 8 ans et les personnes avec des capacités
physiques, sensorielles ou intellectuelles diminuées ou possédant un manque d‘expérience
et/ou de connaissances à condition qu’elles
soient surveillées ou aient reçus les instructions
relatives à l‘utilisation de l‘appareil et qu‘elles
comprennent les risques résultant de cette utilisation. Les enfants ne doivent pas jouer avec
l‘appareil. Les enfants ne doivent pas eff ectuer le
nettoyage et la maintenance de l‘utilisateur sans
surveillance.
Assurez-vous, avant de brancher la machine, que
les données se trouvant sur la plaque signalétique correspondent bien aux données du réseau.
Attention ! Enlevez la fi che de contact avant de
paramétrer l‘appareil. Chargez l‘appareil uniquement avec le chargeur joint à la livraison.
Respectez les consignes de sécurité ci-jointes
qui comportent des informations détaillées sur le
processus de charge.
Coff ret énergie de démarreur auxiliaire
Accumulateur Li-Po : ............................. 41,1 Wh
Durée de charge env. ...................................... 4 h
Sortie de tension continue USB : .... 5 V 2 A max.
Sortie de tension continue : ........ 19 V 3,5 A max.
Sortie de tension continue : ......... 12 V 10 A max.
Courant d‘aide au démarrage : ............................
................................ 200 A (5 sec.) / 400 A (max.)
Température ambiante pour aide au ...................
démarrage : ................................- 15°C à + 40 °C
Anl_CC_JS_12_SPK7.indb 23Anl_CC_JS_12_SPK7.indb 23 08.01.16 11:4708.01.16 11:47
Les sorties ne doivent pas être utilisées pendant
le processus de charge.
Raccordez le chargeur joint à la livraison (fig.
•
2a/pos. 2) au connecteur de chargement «
sortie 15V 1A » (fig. 1/pos. 6) de l‘appareil.
Lorsque vous branchez le chargeur sur la pri-
•
se réseau, celui-ci se met en charge. Les voyants LED (fig. 1/pos. 2) s‘allument (clignotent)
pendant le chargement et indiquent l‘état de
charge. Lorsque le chargement est terminé,
tous les voyants LED s‘allument.
La durée de charge est d‘env. 4 heures pour
•
un accumulateur vide. Pendant la recharge,
l‘accumulateur peut un peu s‘échauffer dans
l‘appareil, ceci est cependant normal.
- 23 -
Page 24

F
5.2 Chargement du coff ret énergie de démar-
reur auxiliaire avec le câble allume-cigare
de 12V
Le processus de chargement devrait être uniquement eff ectué pendant le trajet car la batterie
de la voiture se décharge. Placez l‘appareil à un
endroit approprié afi n qu‘il ne puisse pas bouger
lors d‘un changement de vitesse et/ou de direction soudain.
Raccordez le câble allume-cigare de 12V
•
joint à la livraison (fig. 2b/pos. 11) au connecteur de charge « sortie 15V 1A » (fig. 1/
pos. 6) de l‘appareil.
Branchez le connecteur 12V sur une prise
•
allume-cigare adaptée de 12V.
5.3 Indicateur de charge de l‘accumulateur
Appuyez brièvement sur le bouton-poussoir
marche/arrêt (fi g. 1/pos. 3). Les voyants LED de
l‘indicateur de charge de l‘accumulateur (fi g. 1/
pos. 2) s‘allument. Le nombre des voyants LED
allumés renseigne sur l‘état de charge actuel de
l‘accumulateur intégré Li-Po.
100 % charge = 5 voyants LED allumés en continu
<10 % chargé = pas de voyant LED
6. Voyant LED
Attention ! Ne pas regarder en direction du
rayon lumineux.
Appuyez pendant 3 secondes sur le bouton-
•
poussoir marche/arrêt. Le voyant LED (fig. 1/
pos. 8) s‘allume en continu.
Appuyez encore sur le bouton-poussoir. Le
•
voyant LED s‘allume en tant que « radar stroboscopique ».
Appuyez encore sur le bouton-poussoir. Le
•
voyant LED s‘allume en tant que « lampe
morse SOS ».
Le voyant LED s‘éteint à nouveau lorsqu‘on
•
appuie de manière répétée.
7. Sorties
Attention ! Veillez aux valeurs de tension et de
courant de l‘appareil à alimenter (par ex. téléphone portable, ordinateur portable). Veuillez respecter leur mode d‘emploi.
La durée d‘alimentation varie selon l‘état de charge du coff ret énergie de démarreur auxiliaire, la
puissance absorbée et l‘intensité d‘utilisation de
l‘appareil de raccordement. Lorsqu‘on atteint une
charge résiduelle de 40 à 50 % (2 voyants LED
sont allumés), l‘accumulateur doit être chargé
(voir paragraphe 5.).
7.1 Chargement/Exploitation d‘appareils avec
raccordement USB
1. Raccordez un câble de raccordement USB
existant (ou le câble joint à la livraison) au
raccordement USB (fi g. 1/pos. 4) du coff ret
énergie de démarreur auxiliaire et ensuite à
l‘appareil devant être alimenté.
2. Appuyez sur le bouton-poussoir marche/arrêt
(fi g. 1/pos.3).
7.2 Exploitation d‘appareils de tension continue 12V
1. Raccordez le câble de raccordement joint
à la livraison (fi g. 2d/pos. 13) à la sortie de
tension continue 12V (fi g. 1/pos. 5) du coff ret
énergie de démarreur auxiliaire et ensuite le
cas échéant à l‘appareil de tension continue
de 12V en utilisant le connecteur joint à la
livraison (fi g. 2d/pos. 14). Le courant absorbé
maximum ne doit pas dépasser 10A.
2. Appuyez sur le bouton-poussoir marche/arrêt
(fi g. 1/pos. 3).
7.3 Exploitation d‘appareils de tension continue 19V
1. Raccordez le câble de raccordement joint
à la livraison (fi g. 2d/pos. 13) à la sortie de
tension continue 19V (fi g. 1/pos. 1) du coff ret
énergie de démarreur auxiliaire et ensuite le
cas échéant à l‘appareil de tension continue
de 19V en utilisant le connecteur joint à la
livraison (fi g. 2d/pos. 14). Le courant absorbé
maximum ne doit pas dépasser 3,5A.
2. Appuyez sur le bouton-poussoir marche/arrêt
(fi g. 1/pos.3).
- 24 -
Anl_CC_JS_12_SPK7.indb 24Anl_CC_JS_12_SPK7.indb 24 08.01.16 11:4708.01.16 11:47
Page 25

F
8. Aide au démarrage pour le
véhicule
Le dispositif d‘aide au démarrage 12V est une
aide bienvenue en cas de diffi cultés de démar-
rage en raison du manque de capacité de la
batterie.
Avertissement ! Pendant un processus d‘aide
au démarrage, seul le câble d‘aide au démarrage
doit être branché. L‘alimentation d‘un appareil de
raccordement par ex. par le raccordement USB
doit être interrompue au préalable.
Nous attirons votre attention sur le fait que les
véhicules sont équipés de nombreux composants
électroniques. Veuillez respecter les consignes
qui se trouvent dans les instructions d‘utilisation
des voitures, de la radio, etc.
Avertissement ! Ne jamais raccorder à la carrosserie du véhicule !
Assurez-vous que le connecteur du câble
•
d‘aide au démarrage est bien raccordé à la
prise électrique de l‘appareil. Si le raccordement est lâche pendant le processus d‘aide
au démarrage, le raccord enfichable peut
fondre en raison du courant élevé.
Les pôles de la batterie du véhicule doivent
•
être propres et les pinces du câble d‘aide
au démarrage bien fixées sur les pôles de la
batterie.
Ne pas relier les pinces du câble d‘aide au
•
démarrage l‘une avec l‘autre pendant le processus d‘aide au démarrage - Court-circuit.
Assurez-vous qu‘au moins 3 voyants LED de
l‘indicateur de charge sont allumés. La température de l‘appareil doit se situer entre + 10 °C et +
40 °C, la température ambiante lors du processus
d‘aide au démarrage dans une plage de – 15 °C
à + 40 °C. Utilisez uniquement le câble d‘aide au
démarrage joint à la livraison (fi g. 2c/pos. 12).
1. Fig. 3 : dépliez le recouvrement du raccorde-
ment du câble d‘aide au démarrage (fi g. 1/
pos. 7) et branchez le câble d‘aide au démarrage sur l‘appareil.
2. Fig. 4 a : branchez le câble rouge sur le pôle
positif et le câble noir sur le pôle négatif de la
batterie du véhicule.
3. Fig. 4 a : le voyant LED « correct » du câble
d‘aide au démarrage est allumé.
Remarque : si le voyant LED vert n‘est pas
allumé ou clignote, appuyez sur la touche «
Boost » du câble d‘aide au démarrage.
4. Démarrez le véhicule dans un délai de 30
secondes (durée de tentative de démarrage
max. 5 secondes, durée d‘attente entre deux
tentatives de démarrage au moins 30 secondes).
5. Dès que le moteur tourne, retirez le câble
d‘aide au démarrage de l‘appareil et ensuite
d‘abord la pince rouge puis la pince noire de
la batterie.
6. Laissez tourner le moteur. L‘alternateur charge la batterie intégrée.
Voyant LED - Messages d‘état sur le câble
d‘aide au démarrage
Fig. 4 a : voyant LED vert = Démarrer le mo-
•
teur
Fig. 4b : le voyant LED vert clignote + signal
•
sonore d‘avertissement = appuyez sur la touche « Boost » et démarrer le moteur dans un
délai de 30 s.
Fig. 4c : voyant LED rouge + signal sonore
•
d‘avertissement = batterie branchée avec les
pôles inversés (voir 2)
Fig. 4d : pas de voyant LED, pas de signal
•
d‘avertissement = vérifier le raccordement
enfichable vers l‘appareil, appuyez sur la touche « Boost » et démarrer le moteur dans un
délai de 30 s.
Le nombre des tentatives d‘aide au démarrage
possibles (max. 10) dépend de la température
ambiante, de l‘état de la batterie à démarrer et de
l‘état de charge de l‘accumulateur du coff ret éner-
gie de démarreur auxiliaire.
9. Nettoyage, maintenance et
commande de pièces de
rechange
Danger !
Retirez la fi che de contact avant tous travaux de
nettoyage.
9.1 Nettoyage
Maintenez les dispositifs de protection, les
•
fentes à air et le carter de moteur aussi propres et sans poussière que possible. Frottez
l‘appareil avec un chiffon propre ou soufflez
dessus avec de l‘air comprimé à basse pression.
Nous recommandons de nettoyer l‘appareil
•
tout de suite après chaque utilisation.
Nettoyez l‘appareil régulièrement à l‘aide
•
- 25 -
Anl_CC_JS_12_SPK7.indb 25Anl_CC_JS_12_SPK7.indb 25 08.01.16 11:4708.01.16 11:47
Page 26

F
d‘un chiffon humide et un peu de savon noir.
N‘utilisez aucun produit de nettoyage ni
détergent ; ils pourraient endommager les
pièces en matières plastiques de l‘appareil.
Veillez à ce qu‘aucune eau n‘entre à l‘intérieur
de l‘appareil. La pénétration de l‘eau dans
un appareil électrique augmente le risque de
décharge électrique.
9.2 Maintenance
Aucune autre pièce à l‘intérieur de l‘appareil n‘a
besoin de maintenance.
9.3 Commande de pièces de rechange :
Veuillez indiquer ce qui suit pour toute commande
de pièces de rechange ;
Type de l‘appareil
•
Référence de l‘appareil
•
Numéro d‘identification de l‘appareil
•
Numéro de la pièce de rechange requise
•
Vous trouverez les prix et informations actuelles à
l‘adresse www.isc-gmbh.info
10. Réparation
En cas de disfonctionnements éventuels, il convient de faire contrôler et remettre en état l‘appareil
uniquement par un spécialiste autorisé ou par un
service après-vente.
12. Stockage
Entreposez l‘appareil et ses accessoires dans un
endroit sombre, sec et à l’abri du gel. La température de stockage optimale est comprise entre 5
et 30 °C.
Respectez les consignes de sécurité ci-jointes
qui comportent des informations détaillées sur
le processus de charge. Comme l‘accumulateur
réagit à des températures trop élevées (plus de
+40 °C) ou à des températures trop basses (endessous de 0 °C), n‘entreposez pas l‘appareil en
permanence dans un véhicule. Pour le transporter
dans un véhicule, placez-le à un endroit approprié afi n qu‘il ne puisse pas bouger lors de change-
ments de vitesse ou de direction soudains. Conservez l‘appareil dans l‘emballage d‘origine.
11. Mise au rebut et recyclage
L‘appareil se trouve dans un emballage permettant d‘éviter les dommages dus au transport.
Cet emballage est une matière première et peut
donc être réutilisé ultérieurement ou être réintroduit dans le circuit des matières premières.
L‘appareil et ses accessoires sont en matériaux
divers, comme par ex. des métaux et matières
plastiques. Les appareils défectueux ne doivent
pas être jetés dans les poubelles domestiques.
Pour une mise au rebut conforme aux règles de
l‘art, l‘appareil doit être déposé dans un centre de
collecte approprié. Si vous ne connaissez pas de
centre de collecte, veuillez-vous renseigner auprès de l‘administration de votre commune.
- 26 -
Anl_CC_JS_12_SPK7.indb 26Anl_CC_JS_12_SPK7.indb 26 08.01.16 11:4708.01.16 11:47
Page 27

F
13. Plan de recherche des erreurs
Dérangement Cause probable Élimination
L'appareil ne
s'allume pas
L'aide au démarrage ne fonctionne
pas
Tous les voyants
LEDs clignotent
- tension de l‘accumulateur trop faib-le- charger l‘accumulateur
- tension de l‘accumulateur trop faib-
- charger l‘accumulateur
le
- raccordements du véhicule inversés
- température ambiante en-dehors
de la plage de température
- La protection contre la surcharge
s‘est déclenchée
- Appareil trop chaud
- veiller aux polarités et à raccorder
correctement
- tenter une aide au démarrage dans
la plage de température
- Éteindre l‘appareil, contrôler la
surcharge éventuelle
- Maintenir la température de
l‘appareil de + 10 °C à + 40 °C.
- Température ambiante trop basse/
haute
- Respecter la plage de température
ambiante de – 15 °C à + 40 °C
- 27 -
Anl_CC_JS_12_SPK7.indb 27Anl_CC_JS_12_SPK7.indb 27 08.01.16 11:4708.01.16 11:47
Page 28

F
Uniquement pour les pays de l’Union Européenne
Ne jetez pas les outils électriques dans les ordures ménagères!
Selon la norme européenne 2012/19/CE relative aux appareils électriques et systèmes électroniques
usés et selon son application dans le droit national, les outils électriques usés doivent être récoltés à
part et apportés à un recyclage respectueux de l’environnement.
Possibilité de recyclage en alternative à la demande de renvoi :
Le propriétaire de l’appareil électrique est obligé, en guise d’alternative à un envoi en retour, à contribuer à un recyclage eff ectué dans les règles de l’art en cas de cessation de la propriété. L’ancien appareil
peut être remis à un point de collecte dans ce but. Cet organisme devra l’éliminer dans le sens de la Loi
sur le cycle des matières et les déchets. Ne sont pas concernés les accessoires et ressources fournies
sans composants électroniques.
Toute réimpression ou autre reproduction de la documentation et des papiers joints aux produits, même
sous forme d’extraits, est uniquement permise une fois l’accord explicite de l’ISC GmbH obtenu.
Sous réserve de modifi cations techniques
- 28 -
Anl_CC_JS_12_SPK7.indb 28Anl_CC_JS_12_SPK7.indb 28 08.01.16 11:4708.01.16 11:47
Page 29

F
Informations service après-vente
Nous disposons dans tous les pays mentionnés dans le bon de garantie de partenaires de service
après-vente compétents dont vous trouverez les coordonnées dans le bon de garantie. Ceux-ci se
tiennent à votre disposition pour tout ce qui concerne le service après-vente comme les réparations,
l‘approvisionnement en pièces de rechange et d‘usure ou l‘achat de pièces de consommation.
Il faut tenir compte du fait que pour ce produit les pièces suivantes sont soumises à une usure liée à
l‘utilisation ou à une usure naturelle ou que les pièces suivantes sont nécessaires en tant que consommables.
Catégorie Exemple
Pièces d‘usure* Accumulateur
Matériel de consommation/
pièces de consommation*
Pièces manquantes
*Pas obligatoirement compris dans la livraison !
En cas de vices ou de défauts, nous vous prions d‘enregistrer le cas du défaut sur internet à l‘adresse
www.isc-gmbh.info. Veuillez donner une description précise du défaut et répondre dans tous les cas aux
questions suivantes :
est-ce que l‘appareil a fonctionné une fois ou était-il défectueux dés le départ ?
•
avez-vous remarqué quelque chose avant la panne (symptôme avant la panne) ?
•
quel est le défaut de fonctionnement de l‘appareil à votre avis (symptôme principal) ?
•
Décrivez ce défaut de fonctionnement.
- 29 -
Anl_CC_JS_12_SPK7.indb 29Anl_CC_JS_12_SPK7.indb 29 08.01.16 11:4708.01.16 11:47
Page 30

F
Bon de garantie
Chère cliente, cher client,
nos produits sont soumis à un contrôle de qualité très strict. Si toutefois, il arrivait que cet appareil ne
fonctionne pas parfaitement, nous en sommes désolés et nous vous prions de vous adresser à notre
service après-vente à l‘adresse indiquée sur le bon de garantie. Nous nous tenons également volontiers
à votre disposition par téléphone au numéro de service après-vente indiqué. La garantie est valable
dans les conditions suivantes :
1. Ces conditions de garantie s‘adressent uniquement à des consommateurs, c‘est à dire à des personnes physiques qui ne souhaitent ni utiliser ce produit dans le cadre de leur activité industrielle ou
artisanale, ni dans le cadre de toute autre activité indépendante. Les conditions de garantie réglementent les prestations de garantie supplémentaires que le fabricant mentionné ci-dessous promet
aux acheteurs de ses appareils en supplément de la prestation de garantie légale. Vos droits légaux
en matière de garantie restent inchangés. Notre prestation de garanti est gratuite pour vous.
2. La prestation de garantie s‘étend exclusivement aux défauts résultant d‘une erreur de fabrication ou
de matériau d‘un appareil neuf du fabricant mentionné ci-dessous et acheté par vos soins. La prestation de garantie se limite selon notre décision soit à la résolution de tels défauts sur l‘appareil, soit
à l‘échange de l‘appareil.
Veillez au fait que nos appareils, conformément au règlement, n‘ont pas été conçus pour être utilisés dans un environnement professionnel, industriel ou artisanal. Il n‘y a donc pas de contrat de
garantie quand l‘appareil a été utilisé professionnellement, artisanalement ou par des sociétés industrielles ou exposé à une sollicitation semblable pendant la durée de la garantie.
3. Sont exclus de notre garantie :
- les dommages liés au non-respect des instructions de montage ou en raison d‘une installation
incorrecte, au non-respect du mode d‘emploi (en raison par ex. du branchement de l‘appareil sur la
tension de réseau ou le type de courant incorrect), au non-respect des dispositions de maintenance
et de sécurité ou résultant d‘une exposition de l‘appareil à des conditions environnementales anormales ou d‘un manque d‘entretien et de maintenance.
- les dommages résultant d‘une utilisation abusive ou non conforme (comme par ex. une surcharge
de l‘appareil ou une utilisation d‘outils ou d‘accessoires non autorisés), de la pénétration d‘objets
étrangers dans l‘appareil (comme par ex. du sable, des pierres ou de la poussière), de l‘utilisation
de la force ou de la violence (comme par ex. les dommages liés aux chutes).
- les dommages sur l‘appareil ou des parties de l‘appareil résultant de l‘usure normale liée à
l‘utilisation de l‘appareil ou de toute autre usure naturelle.
4. La durée de garantie est de 24 mois et débute à la date d‘achat de l‘appareil. Les droits à la garantie
doivent être revendiqués avant l‘expiration de la durée de garantie dans un délai de deux semaines
après avoir constaté le défaut. La revendication de droits à la garantie après expiration de la durée
de garantie est exclue. La réparation ou l‘échange de l‘appareil n‘entraîne ni une extension de la durée de garantie ni le début d‘une nouvelle durée de garantie pour cet appareil ou toute autre pièce
de rechange installée sur l‘appareil. Cela est valable également dans le cas d‘une intervention du
service après-vente à domicile.
5. Pour faire valoir vos droits à la garantie, veuillez enregistrer l‘appareil défectueux à l‘adresse suivante : www.isc-gmbh.info. Veuillez garder à disposition la preuve d‘achat ou tout autre justifi catif
de l‘achat de votre nouvel appareil. Les appareils envoyés sans les justifi catifs correspondants ou
sans plaque signalétique sont exclus de la prestation de garantie en raison de l‘impossibilité de les
enregistrer. Si le défaut de l‘appareil est inclut dans la garantie, vous recevrez sans délai un appareil
réparé ou un nouvel appareil.
Bien entendu, nous réparons volontiers les défauts de votre appareil qui ne sont pas ou plus compris
dans l‘étendue de la garantie contre le remboursement des frais de réparation. Pour cela, veuillez envoyer l‘appareil à notre adresse de service après-vente.
Pour les pièces d‘usure, de consommation et manquantes, nous renvoyons aux restrictions de cette garantie conformément aux informations du service après-vente de ce mode d‘emploi.
- 30 -
Anl_CC_JS_12_SPK7.indb 30Anl_CC_JS_12_SPK7.indb 30 08.01.16 11:4708.01.16 11:47
Page 31

I
Pericolo!
Nell’usare gli apparecchi si devono rispettare
diverse avvertenze di sicurezza per evitare lesioni e danni. Quindi leggete attentamente queste
istruzioni per l’uso/le avvertenze di sicurezza.
Conservate bene le informazioni per averle a
disposizione in qualsiasi momento. Se date
l’apparecchio ad altre persone, consegnate queste istruzioni per l’uso/le avvertenze di sicurezza
insieme all’apparecchio. Non ci assumiamo alcuna responsabilità per incidenti o danni causati
dal mancato rispetto di queste istruzioni e delle
avvertenze di sicurezza.
1. Avvertenze sulla sicurezza
Le relative avvertenze di sicurezza si trovano
nell’opuscolo allegato.
Pericolo!
Leggete tutte le avvertenze di sicurezza e le
istruzioni. Dimenticanze nel rispetto delle avver-
tenze di sicurezza e delle istruzioni possono causare scosse elettriche, incendi e/o gravi lesioni.
Conservate tutte le avvertenze e le istruzioni
per eventuali necessità future.
Questo apparecchio non deve essere utilizzato
dai bambini. I bambini devono essere sorvegliati
in modo che non giochino con l‘apparecchio. La
pulizia e la manutenzione non devono essere
eseguite dai bambini. L‘apparecchio non deve
essere utilizzato da persone con capacità fi siche,
sensoriali o mentali ridotte o con esperienze e
conoscenze insuffi cienti, a meno che esse non
vengano sorvegliate o istruite da una persona per
loro responsabile.
2.2 Elementi forniti
Verifi cate che l‘articolo sia completo sulla base
degli elementi forniti descritti. In caso di parti
mancanti, rivolgetevi al nostro Centro Servizio Assistenza o al punto vendita in cui avete acquistato
l‘apparecchio presentando un documento di acquisto valido entro e non oltre i 5 giorni lavorativi
dall‘acquisto dell‘articolo. Al riguardo fate attenzione alla Tabella Garanzia nelle informazioni sul
Servizio Assistenza alla fi ne delle istruzioni.
Aprite l‘imballaggio e togliete con cautela
•
l‘apparecchio dalla confezione.
Togliete il materiale d‘imballaggio e anche i
•
fermi di trasporto/imballaggio (se presenti).
Controllate che siano presenti tutti gli elemen-
•
ti forniti.
Verificate che l’apparecchio e gli accessori
•
non presentino danni dovuti al trasporto.
Se possibile, conservate l‘imballaggio fino
•
alla scadenza della garanzia.
Pericolo!
L‘apparecchio e il materiale d‘imballaggio non
sono giocattoli! I bambini non devono giocare con
sacchetti di plastica, fi lm e piccoli pezzi! Sussiste
il pericolo di ingerimento e soff ocamento!
Avviatore di emergenza – Caricabatterie
•
portatile
Caricabatterie
•
Cavo accendisigari da 12V
•
Cavi per avviamento di soccorso
•
Cavo di alimentazione USB
•
Cavo di collegamento
•
Set di spine
•
Custodia
•
Istruzioni per l‘uso originali
•
Avvertenze di sicurezza
•
2. Descrizione dell‘apparecchio ed
elementi forniti
2.1 Descrizione dell‘apparecchio (Fig. 1)
1. Uscita tensione continua 19V, max. 3,5 A
2. LED di indicazione livello batteria
3. Tasto ON/OFF
4. Porta USB, uscita tensione continua 5V, max.
2A
5. Uscita tensione continua 12V, max. 10 A
6. Presa di ricarica 15V DC
7. Presa per cavo di avviamento di soccorso
8. Luce LED
Anl_CC_JS_12_SPK7.indb 31Anl_CC_JS_12_SPK7.indb 31 08.01.16 11:4708.01.16 11:47
3. Utilizzo proprio
L‘apparecchio è adatto per l‘avviamento di soccorso di batterie di avviamento da 12 V (accumulatori piombo-acido) di motori a benzina con
una cilindrata massima di 2500 cm3 utilizzando
il cavo per l‘avviamento di soccorso in dotazione.
L‘apparecchio non può sostituire la batteria di
avviamento. Alle porte USB si possono collegare
dispositivi (per es. cellulari) con una tensione
di alimentazione di 5V e una corrente assorbita
di max. 2A. La presa da 19 V / 3,5A è adatta
all‘alimentazione di tensione di notebook, la presa
da 12V / 10A per altre utenze a tensione continua
di 12V.
- 31 -
Page 32

I
L’apparecchio deve essere usato solamente per
lo scopo a cui è destinato. Ogni altro tipo di uso
che esuli da quello previsto non è conforme.
L‘utilizzatore/l‘operatore, e non il produttore, è
responsabile dei danni e delle lesioni di ogni tipo
che ne risultino.
Tenete presente che i nostri apparecchi non sono
stati progettati per l‘impiego professionale, artigianale o industriale. Non riconosciamo alcuna
garanzia se l‘apparecchio viene usato in imprese
commerciali, artigianali o industriali, o in attività
equivalenti.
4. Caratteristiche tecniche
Avviatore di emergenza – Caricabatterie
portatile
Accumulatore litio-polimero: ................... 41,1 Wh
Tempo di ricarica ca. ...................................... 4 h
Uscita tensione continua USB: .........5 V max. 2 A
Uscita tensione continua: ............19 V max. 3,5 A
Gleichspannungsausgang: ..........12 V max. 10 A
Corrente di avviamento
di soccorso: ............ 200 A (5 sec.) / 400 A (max.)
Temperatura ambiente con avviamento
di soccorso: ................................ - 15°C - + 40 °C
Caricabatterie
Tensione nominale in ingresso: ...........................
...........................................100-240 V ~ 50/60 Hz
Tensione nominale in uscita: .................. 15 V DC
Corrente nominale in uscita: ........................... 1 A
5. Prima della messa in esercizio
5.1 Ricarica dell‘avviatore di emergenza – caricabatterie portatile con il caricabatterie
accluso
Per il caricabatterie vale quanto segue
Questo apparecchio può essere usato da
bambini a partire dagli 8 anni e da persone con
capacità fi siche, sensoriali o mentali ridotte o
prive di esperienza e conoscenze solo se vengono sorvegliati o sono stati istruiti riguardo l‘uso
sicuro dell‘apparecchio e conoscono i rischi a
esso connessi. I bambini non devono giocare con
l‘apparecchio. Le operazioni di pulizia e di manutenzione a carico dell‘utilizzatore non devono venire eseguite dai bambini se non sono sorvegliati.
Prima di inserire la spina nella presa di corrente,
assicuratevi che i dati sulla targhetta di identifi ca-
zione corrispondano a quelli di rete.
Attenzione! Staccate la spina di alimentazione
prima di eff ettuare regolazioni all‘apparecchio.
Ricaricate l‘apparecchio esclusivamente con il
caricabatterie accluso.
Osservate le avvertenze di sicurezza allegate con
informazioni dettagliate sul processo di ricarica.
Le uscite non devono essere utilizzate durante la
ricarica.
Collegate il caricabatterie accluso (Fig. 2a /
•
Pos. 2) con la presa di ricarica „Input 15V 1A“
(Fig. 1 / Pos. 6) dell‘apparecchio.
Inserite il caricabatteria nella presa di cor-
•
rente, la batteria viene ricaricata. Durante la
ricarica i LED (Fig. 1/ Pos. 2) sono illuminati
(lampeggiano) indicando lo stato della ricarica. Al termine della ricarica tutti i LED sono
illuminati.
Con la batteria scarica il tempo di ricarica è
•
di ca. 4 ore. Durante il processo di ricarica la
batteria nell‘apparecchio si può riscaldare un
po‘, ma ciò è del tutto normale.
5.2 Ricarica dell‘avviatore di emergenza
– caricabatterie portatile con il cavo
dell‘accendisigari da 12 V
Il processo di ricarica dovrebbe avvenire soltanto mentre il veicolo è in marcia, dato che la
batteria della vettura viene scaricata. Posizionate
l‘apparecchio in un luogo adatto in modo che non
si muova in caso di improvvisi cambiamenti di
direzione e/o variazioni della velocità.
Collegate il cavo dell‘accendisigari da 12
•
V accluso (Fig. 2b / Pos. 11) con la presa
di ricarica „Input 15V 1A“ (Fig. 1 / Pos. 6)
dell‘apparecchio.
Inserite il connettore da 12V in una presa ac-
•
cendisigari da 12V adatta.
5.3 Indicazione di carica della batteria
Premete brevemente il tasto ON/OFF (Fig. 1/
Pos. 3). I LED dell‘indicazione di carica della
batteria (Fig. 1 / Pos. 2) si illuminano. Il numero
di LED illuminati indica lo stato di carica attuale
dell‘accumulatore litio-polimero integrato.
Carica al 100 % = 5 LED con luce continua
Carica <10 % = nessun LED
- 32 -
Anl_CC_JS_12_SPK7.indb 32Anl_CC_JS_12_SPK7.indb 32 08.01.16 11:4708.01.16 11:47
Page 33

I
6. Luce LED
Attenzione! Non rivolgete lo sguardo verso il
fascio di luce.
Premendo il tasto ON/OFF per 3 secondi, la
•
luce LED (Fig. 1 / Pos. 8) rimane illuminata.
Premendo un‘altra volta il tasto ON/OFF, la
•
luce LED si illumina come „faro stroboscopico“.
Premendo un‘altra volta il tasto ON/OFF, la
•
luce LED si illumina come „lampeggio codice
morse SOS“.
Premendo ancora una volta, la luce LED si
•
spegne.
7. Uscite
Attenzione! Fate attenzione ai valori di tensione
e corrente dell‘apparecchio da alimentare (per es.
cellulare, notebook). Osservate anche le relative
istruzioni per l‘uso.
La durata dell‘alimentazione varia in base al
livello di carica dell‘avviatore di emergenza – caricabatterie portatile, alla potenza assorbita e
all‘intensità di utilizzo dell‘apparecchio collegato.
Quando viene raggiunta una carica residua del
40-50% (2 LED sono illuminati) si deve ricaricare
la batteria (vedi punto 5.).
7.1 Ricarica/uso di apparecchi con porta USB
1. Collegate un cavo di collegamento USB esistente (o il cavo fornito) con la porta USB (Fig.
1 / Pos. 4) dell‘avviatore di emergenza – caricabatterie portatile e quindi con l‘apparecchio
da alimentare.
2. Premete il tasto ON/OFF (Fig. 1/Pos. 3).
7.2 Uso di apparecchi a tensione continua
da 12 V
1. Collegate il cavo di collegamento fornito (Fig.
2d/ Pos. 13) con l‘uscita a tensione continua da 12V (Fig. 1 / Pos. 5) dell‘avviatore di
emergenza – caricabatterie portatile e poi,
eventualmente impiegando uno dei connettori
forniti (Fig. 2d / Pos. 14), con l‘apparecchio a
tensione continua da 12V. La corrente assorbita massima non deve superare 10A.
2. Premete il tasto ON/OFF (Fig. 1/Pos. 1).
7.3 Uso di apparecchi a tensione continua
da 19 V
1. Collegate il cavo di collegamento fornito (Fig.
2d/ Pos. 13) con l‘uscita a tensione continua da 19V (Fig. 1 / Pos. 1) dell‘avviatore di
emergenza – caricabatterie portatile e poi,
eventualmente impiegando uno dei connettori
forniti (Fig. 2d / Pos. 14), con l‘apparecchio a
tensione continua da 19V. La corrente assorbita massima non deve superare 3.5A.
2. Premete il tasto ON/OFF (Fig. 1/Pos. 3).
8. Avviamento di soccorso per
autovettura
Il dispositivo per l‘avviamento di soccorso da 12V
rappresenta un ottimo aiuto in caso di diffi coltà di
avviamento per una capacità insuffi ciente della
batteria.
Avvertimento! Durante l‘avviamento di soccorso
deve essere collegato solo l‘apposito cavo. Si
deve quindi prima interrompere l‘alimentazione di
apparecchi collegati, per es. tramite la porta USB.
Ricordiamo che i veicoli sono dotati di numerosi
componenti elettronici. Tenete quindi presenti le
indicazioni nelle istruzioni per l‘uso dell‘auto, della
radio, ecc.
Avvertimento! Non eff ettuate mai un collega-
mento alla carrozzeria del veicolo!
Accertatevi che il connettore del cavo di
•
avviamento di soccorso sia saldamente collegato alla presa dell‘apparecchio. Se il collegamento è allentato durante l‘avviamento di
soccorso, il connettore può fondere a causa
della forte corrente.
I poli della batteria dell‘autovettura devo-
•
no essere puliti e i morsetti del cavo per
l‘avviamento di soccorso devono essere ben
fissati ai poli.
Durante l‘avviamento di soccorso non
•
collegate tra loro i morsetti del cavo per
l‘avviamento di soccorso – cortocircuito.
Accertatevi che almeno 3 LED di indicazione di
carica della batteria siano illuminati. La temperatura dell‘apparecchio deve rientrare nel range
+ 10 °C - + 40 °C e la temperatura ambiente
durante l‘avviamento di soccorso nel range – 15
°C - + 40 °C. Utilizzate esclusivamente il cavo per
l‘avviamento di soccorso fornito (Fig. 2c / Pos.
12).
- 33 -
Anl_CC_JS_12_SPK7.indb 33Anl_CC_JS_12_SPK7.indb 33 08.01.16 11:4708.01.16 11:47
Page 34

I
1. Fig. 3: aprite la copertura del collegamento
del cavo per l‘avviamento di soccorso (Fig. 1 /
Pos. 7) e inserite tale cavo nell‘apparecchio.
2. Fig. 4a: collegate il cavo rosso al polo positivo
e il cavo nero al polo negativo della batteria
della vettura.
3. Fig. 4a: il LED verde „correct“ del cavo per
l‘avviamento di soccorso è illuminato.
Avvertenza: se il LED verde non fosse illumi-
nato o lampeggiasse, premete il tasto „Boost“
del cavo per l‘avviamento di soccorso.
4. Avviate il veicolo entro 30 secondi (durata del
tentativo di avviamento max. 5 secondi, tra
due tentativi di avviamento si deve attendere
per almeno 30 secondi).
5. Non appena il motore funziona, togliete il cavo per l‘avviamento di soccorso
dall‘apparecchio e quindi prima il morsetto
rosso e poi il morsetto nero dalla batteria.
6. Lasciate acceso il motore. La dinamo carica
la batteria della vettura.
Indicazioni a LED sul cavo per l‘avviamento
di soccorso
Fig. 4a: LED verde = avviate il motore
•
Fig. 4b: LED verde lampeggiante + segnale
•
acustico = premete il tasto „Boost“ e avviate il
motore entro 30 s.
Fig. 4c: LED rosso + segnale acustico = la
•
batteria è collegata con polarità errata (vedi
2.)
Fig. 4d: nessun LED, nessun segnale
•
acustico = controllate la connessione
all‘apparecchio, premete il tasto „Boost“ e
avviate il motore entro 30 s.
Il numero dei tentativi di avviamento di soccorso
possibili (max. 10) dipende dalla temperatura ambiente, dalle condizioni della batteria da avviare e
dal livello di carica della batteria dell‘avviatore di
emergenza – caricabatterie portatile.
9. Pulizia, manutenzione e
ordinazione dei pezzi di ricambio
Pericolo!
Prima di qualsiasi lavoro di pulizia staccate la spina dalla presa di corrente.
9.1 Pulizia
Tenete il più possibile liberi da polvere e
•
sporco i dispositivi di protezione, le fessure di
aerazione e la carcassa del motore. Passate
un panno pulito sull‘apparecchio o pulitelo
con un getto di aria compressa a bassa pressione.
Consigliamo di pulire l‘apparecchio subito
•
dopo averlo usato.
Pulite l‘apparecchio regolarmente con un
•
panno umido e un po‘ di sapone. Non usate
detergenti o solventi, perché questi ultimi potrebbero danneggiare le parti in plastica del
dispositivo. Fate attenzione che non possa
penetrare acqua all‘interno dell‘apparecchio.
La penetrazione di acqua in un apparecchio
elettrico aumenta il rischio di una scossa
elettrica.
9.2 Manutenzione
All‘interno dell‘apparecchio non si trovano altre
parti che richiedano manutenzione.
9.3 Ordinazione dei pezzi di ricambio
In caso di ordinazione dei pezzi di ricambio è necessario indicare quanto segue:
Tipo di apparecchio
•
Numero di articolo dell‘apparecchio
•
Numero di identificazione dell‘apparecchio
•
Numero del pezzo di ricambio richiesto
•
Per i prezzi e le informazioni attuali si veda
www.isc-gmbh.info
10. Riparazione
In caso di anomalie fate controllare l‘apparecchio
soltanto da uno specialista autorizzato oppure da
un‘offi cina assistenza clienti.
- 34 -
Anl_CC_JS_12_SPK7.indb 34Anl_CC_JS_12_SPK7.indb 34 08.01.16 11:4708.01.16 11:47
Page 35

11. Smaltimento e riciclaggio
L‘apparecchio si trova in un imballaggio per evitare i danni dovuti al trasporto. Questo imballaggio
rappresenta una materia prima e può perciò
essere riutilizzato o riciclato. L‘apparecchio e i
suoi accessori sono fatti di materiali diversi, per
es. metallo e plastica. Gli apparecchi difettosi non
devono essere gettati nei rifi uti domestici. Per uno
smaltimento corretto l‘apparecchio va consegnato a un apposito centro di raccolta. Se non vi
è noto nessun centro di raccolta, rivolgetevi per
informazioni all‘amministrazione comunale.
12. Conservazione
Conservate l‘apparecchio e i suoi accessori in un
luogo buio, asciutto e al riparo dal gelo. La temperatura ottimale per la conservazione è compresa
tra i 5 e i 30 °C.
Osservate le avvertenze di sicurezza allegate con
informazioni dettagliate sulla conservazione. Dato
che la batteria reagisce a temperature troppo alte
(superiori a +40 °C) ovvero troppo basse (inferiori a 0°C), non tenete l‘apparecchio in auto per
periodi prolungati. Per il trasporto in un veicolo,
posizionatelo in un luogo adatto in modo che non
si muova in caso di improvvisi cambiamenti di
direzione e/o variazioni della velocità. Conservate
l‘apparecchio nella confezione originale.
I
- 35 -
Anl_CC_JS_12_SPK7.indb 35Anl_CC_JS_12_SPK7.indb 35 08.01.16 11:4708.01.16 11:47
Page 36

I
13. Tabella per l‘eliminazione delle anomalie
Anomalia Possibile causa Soluzione
Non è più possibile accendere
l'apparecchio
L'avviamento di
soccorso non funziona
- Tensione della batteria insuffi ciente - Ricaricate la batteria
- Tensione della batteria insuffi ciente
- Scambiati i collegamenti alla batteria del veicolo
- Ricaricate la batteria
- Controllate la polarità e collegate
correttamente
Tutti i LED lampeggiano
- Temperatura ambiente fuori range
- È intervenuta la protezione da sovraccarico
- Apparecchio troppo caldo
- Temperatura ambiente troppo alta/
bassa
- Tentate l‘avviamento di emergenza
entro il range di temperatura indicato
- Disinserite l‘apparecchio e controllate che non sia sottoposto a
sovraccarico
- Rispettate una temperatura
dell‘apparecchio di + 10 °C - + 40
°C.
- Rispettate una temperatura ambiente di – 15 °C - + 40 °C.
- 36 -
Anl_CC_JS_12_SPK7.indb 36Anl_CC_JS_12_SPK7.indb 36 08.01.16 11:4708.01.16 11:47
Page 37

I
Solo per paesi membri dell’UE
Non smaltite gli elettroutensili nei rifi uti domestici!
Secondo la direttiva europea 2012/19/CE sui rifi uti di apparecchiature elettriche ed elettroniche e il suo
recepimento nelle normative nazionali, gli elettroutensili usati devono venire raccolti separatamente e
venire smaltiti in modo ecocompatibile.
Alternativa di riciclaggio alla richiesta di restituzione:
il proprietario dell’apparecchio elettrico è tenuto in alternativa, invece della restituzione, a collaborare in
modo che lo smaltimento venga eseguito correttamente in caso ceda l’apparecchio. L’apparecchio vecchio può anche venire consegnato ad un centro di raccolta che provvede poi allo smaltimento secondo
le norme nazionali sul riciclaggio e sui rifi uti. Non ne sono interessati gli accessori e i mezzi ausiliari sen-
za elementi elettrici forniti insieme ai vecchi apparecchi.
La ristampa o l’ulteriore riproduzione, anche parziale, della documentazione o dei documenti
d’accompagnamento dei prodotti è consentita solo con l’esplicita autorizzazione da parte della
iSC GmbH.
Con riserva di apportare modifi che tecniche
- 37 -
Anl_CC_JS_12_SPK7.indb 37Anl_CC_JS_12_SPK7.indb 37 08.01.16 11:4708.01.16 11:47
Page 38

I
Informazioni sul Servizio Assistenza
In tutti i Paesi indicati nel certifi cato di garanzia disponiamo di competenti partner per il Servizio Assis-
tenza (per i relativi dati di contatto si veda il certifi cato di garanzia), che sono a vostra disposizione per
tutte le richieste di assistenza come riparazione, fornitura di pezzi di ricambio e parti di usura o vendita
di materiali di consumo.
Si deve tenere presente che le seguenti parti di questo prodotto sono soggette a un‘usura naturale o
dovuta all‘uso ovvero che le seguenti parti sono necessarie come materiali di consumo.
Categoria Esempio
Parti soggette ad usura * Batteria
Materiale di consumo/parti di consumo *
Parti mancanti
* non necessariamente compreso tra gli elementi forniti!
In presenza di difetti o errori vi preghiamo di denunciare il caso sul sito internet www.isc-gmbh.info. Vi
preghiamo di descrivere con precisione l‘anomalia e a tal riguardo di rispondere in ogni caso alle seguenti domande:
L‘apparecchio ha già funzionato una volta o era difettoso fin dall‘inizio?
•
Avete notato qualcosa prima che si manifestasse il difetto (sintomo prima del difetto)?
•
A vostro parere che cosa non funziona nell‘apparecchio (sintomo principale)?
•
Descrivete che cosa non funziona.
- 38 -
Anl_CC_JS_12_SPK7.indb 38Anl_CC_JS_12_SPK7.indb 38 08.01.16 11:4708.01.16 11:47
Page 39

I
Certifi cato di garanzia
Gentili clienti,
i nostri prodotti sono soggetti ad un rigido controllo di qualità. Se l‘apparecchio non dovesse tuttavia
funzionare correttamente, ci scusiamo e vi preghiamo di rivolgervi al nostro servizio di assistenza clienti
all‘indirizzo indicato in questa scheda di garanzia. Siamo a vostra disposizione anche telefonicamente al
numero del Servizio Assistenza indicato. Per la rivendicazione dei diritti di garanzia vale quanto segue:
1. Le presenti condizioni di garanzia si rivolgono esclusivamente a consumatori, vale a dire a persone
fi siche che non intendono utilizzare questo prodotto né in ambito professionale né per altre attività
di lavoro autonomo. Le presenti condizioni di garanzia regolano prestazioni di garanzia supplementari che il produttore su indicato concede in aggiunta alla garanzia legale agli acquirenti di nuovi
apparecchi. La presente garanzia non tocca i vostri diritti al ricorso in garanzia previsti dalla legge.
Le nostre prestazioni di garanzia sono per voi gratuite.
2. La prestazione di garanzia riguarda esclusivamente i difetti di un nuovo apparecchio da voi
acquistato del produttore di cui sopra, riconducibili a errori di materiale o di produzione, ed è limitata, a nostra discrezione, all‘eliminazione di questi difetti dell‘apparecchio o alla sostituzione
dell‘apparecchio stesso.
Tenete presente che i nostri apparecchi non sono stati costruiti per l‘impiego artigianale, professionale o imprenditoriale. Pertanto un contratto di garanzia non viene concluso se l‘apparecchio è stato
usato entro il periodo di garanzia in attività artigianali, imprenditoriali o industriali o se è stato sottoposto a sollecitazioni equivalenti.
3. Sono esclusi dalla nostra garanzia:
- Danni all‘apparecchio causati dalla mancata osservanza delle istruzioni di montaggio o per
un‘installazione non corretta, dalla mancata osservanza delle istruzioni per l‘uso (come ad es. collegamento a una tensione di rete o a un tipo di corrente non corretti), dalla mancata osservanza delle
norme relative alla manutenzione e alla sicurezza, dall‘esposizione dell‘apparecchio a condizioni
ambientali anomale o per la mancata esecuzione di pulizia e manutenzione.
- Danni all‘apparecchio dovuti a usi impropri o illeciti (come per es. sovraccarico dell‘apparecchio
o utilizzo di utensili di ricambio o accessori non consentiti), alla penetrazione di corpi estranei
nell‘apparecchio (come per es. sabbia, pietre o polvere, danni dovuti al trasporto), all‘impiego della
forza o a infl ussi esterni (come per es. danni causati da caduta).
- Danni all‘apparecchio o a parti di esso da ricondurre a un‘usura comune, dovuta all‘uso o di altro
tipo naturale.
4. Il periodo di garanzia è 24 mesi e inizia a partire dalla data di acquisto dell‘apparecchio. I diritti di
garanzia devono essere fatti valere prima della scadenza del periodo di garanzia, entro due settimane dopo avere accertato il difetto. È esclusa la rivendicazione di diritti di garanzia dopo la scadenza
del relativo periodo. La riparazione o la sostituzione dell‘apparecchio non comporta una proroga del
periodo di garanzia e con questa prestazione per l‘apparecchio o per pezzi di ricambio eventualmente installati non inizia un nuovo periodo di garanzia. Ciò vale anche nel caso in cui si ricorra a un
servizio sul posto.
5. Per rivendicare il diritto di garanzia vi preghiamo di comunicare che l‘apparecchio è difettoso tramite
sito internet: www.isc-gmbh.info. Tenete a portata di mano il documento di acquisto o altri documenti
come prova dell‘acquisto del vostro apparecchio nuovo. Apparecchi inviati senza i relativi documenti
o senza targhetta d‘identifi cazione sono esclusi dalla prestazione di garanzia perché non possono
essere classifi cati in modo corrispondente. Se il difetto dell‘apparecchio rientra nella nostra presta-
zione di garanzia, ricevete prontamente l‘apparecchio riparato o un apparecchio nuovo.
Naturalmente eff ettuiamo a pagamento anche riparazioni sull‘apparecchio che non rientrano o non rien-
trano più nella garanzia. A tale scopo inviate l‘apparecchio all‘indirizzo del nostro Centro Assistenza.
Per parti mancanti, di consumo e soggette a usura rimandiamo alle limitazioni di questa garanzia secondo le informazioni sul Servizio Assistenza di queste istruzioni per l‘uso.
- 39 -
Anl_CC_JS_12_SPK7.indb 39Anl_CC_JS_12_SPK7.indb 39 08.01.16 11:4708.01.16 11:47
Page 40

NL
Gevaar!
Bij het gebruik van toestellen dienen enkele
veiligheidsmaatregelen te worden nageleefd om
lichamelijk gevaar en schade te voorkomen. Lees
daarom deze handleiding / veiligheidsinstructies
zorgvuldig door. Bewaar deze goed zodat u de informatie op elk moment kunt terugvinden. Mocht
u dit toestel aan andere personen doorgeven,
gelieve dan deze handleiding / veiligheidsinstructies mee te geven. Wij zijn niet aansprakelijk
voor ongevallen of schade die te wijten zijn aan
niet-naleving van deze handleiding en van de veiligheidsinstructies.
1. Veiligheidsaanwijzingen
De overeenkomstige veiligheidsinstructies vindt u
in de bijgaande brochure.
Gevaar!
Lees alle veiligheidsinstructies en aanwijzingen. Nalatigheden bij de inachtneming van de
veiligheidsinstructies en aanwijzingen kunnen
elektrische schok, brand en/of zware letsels tot
gevolg hebben. Bewaar alle veiligheidsinstruc-
ties en aanwijzingen voor de toekomst.
Dit apparaat mag niet door kinderen worden
gebruikt. Op kinderen moet toezicht worden gehouden om te voorkomen dat ze met het apparaat
spelen. Reiniging en onderhoud mag niet door
kinderen worden uitgevoerd. Het apparaat mag
niet door personen met verminderde fysieke, sensorische of mentale capaciteiten of door personen met onvoldoende kennis of ervaring worden
gebruikt, tenzij een voor hen verantwoordelijke
persoon op hen toeziet of hen instrueert.
2.2 Omvang van de levering
Gelieve de volledigheid van het artikel te controleren aan de hand van de beschreven omvang van
de levering. Indien er onderdelen ontbreken, gelieve u dan binnen 5 werkdagen na aankoop van
het artikel te wenden tot ons servicecenter of tot
de dichtstbijzijnde bevoegde bouwmarkt, en leg
een geldig bewijs van aankoop voor. Gelieve hiervoor de garantietabel in de service-informatie aan
het einde van de handleiding in acht te nemen.
Open de verpakking en neem het apparaat
•
voorzichtig uit de verpakking.
Verwijder het verpakkingsmateriaal en ver-
•
pakkings-/transportbeveiligingen (indien
aanwezig).
Controleer of de levering volledig is.
•
Controleer het apparaat en het toebehoren
•
op transportschade.
Bewaar de verpakking indien mogelijk tot aan
•
het einde van de garantieperiode.
Gevaar!
Het apparaat en het verpakkingsmateriaal zijn
geen speelgoed voor kinderen! Kinderen mogen
niet met plastic zakken, folies en kleine stukken
spelen! Er bestaat inslik- en verstikkingsgevaar!
Externe starter – energiestation
•
Lader
•
12V kabel voor sigarettenaansteker
•
Startkabel
•
USB aansluitkabel
•
Verbindingskabel
•
Stekkerset
•
Bewaarmap
•
Originele handleiding
•
Veiligheidsinstructies
•
2. Beschrijving van het apparaat en
omvang van de levering
2.1 Beschrijving van het apparaat (fi g. 1)
1. Gelijkspanningsuitgang 19V max. 3,5 A
2. LED accucapaciteitsindicatie
3. Aan/Uit-knop
4. USB gelijkspanningsuitgang 5V max. 2A
aansluiting
5. Gelijkspanningsuitgang 12V max. 10 A
6. Laadbus 15V DC
7. Aansluiting starthulpkabel
8. LED-lamp
Anl_CC_JS_12_SPK7.indb 40Anl_CC_JS_12_SPK7.indb 40 08.01.16 11:4708.01.16 11:47
3. Doelmatig gebruik
Het apparaat is met gebruik van de meegeleverde
startkabel geschikt als hulp bij het starten van 12
V startaccu´s (loodzuuraccu´s) bij een maximaal
volume van de cilinderinhoud van de benzinemotor van 2500 ccm. Het apparaat kan de startaccu
niet vervangen. Aan de USB aansluitingen kunnen apparaten (bijv. GSMs) met een spanning
van 5V en max. 2A krachtontneming worden
aangesloten. De 19 V / 3,5A aansluiting is geschikt voor de spanningsvoeding van notebooks, de
12V / 10A aansluiting voor andere verbruikers van
12V gelijkspanning.
- 40 -
Page 41

NL
Het apparaat mag alleen doelmatig worden
gebruikt. Elk daarboven uitgaand gebruik is nietdoelmatig. Voor daaruit voortvloeiende schade
of verwondingen van welke aard dan ook is de
gebruiker/bediener aansprakelijk, en niet de fabrikant.
Wij wijzen erop dat onze apparaten overeenkomstig hun doelmatig gebruik niet zijn ontworpen voor commerciële, ambachtelijke of industriële inzet. Wij aanvaarden geen aansprakelijkheid,
indien het apparaat in ambachtelijke of industriële
bedrijven of voor daaraan gelijk te stellen activiteiten wordt ingezet.
4. Technische gegevens
Externe starter – energiestation
Li-Po-accu: ............................................. 41,1 Wh
Laadtijd ca. ..................................................... 4 h
USB gelijkspanningsuitgang: .......... 5 V max. 2 A
Gelijkspanningsuitgang: ............. 19 V max. 3,5 A
Gelijkspanningsuitgang: .............. 12 V max. 10 A
Starthulpstroom: .....200 A (5 sec.) / 400 A (max.)
Omgevingstemperatuur bij starthulp: ...................
................................................... - 15°C - + 40 °C
Lader
Nominale ingangsspanning: ................................
............................................100-240 V ~50/60 Hz
Nominale uitgangsspanning: ................. 15 V DC
Nominale uitgangsstroom: ............................. 1 A
5. Vóór inbedrijfstelling
5.1 Laden van het externe starter – energiestation met de meegeleverde lader
Voor de lader geldt:
Dit apparaat kan door kinderen vanaf 8 jaar en
ouder en ook door personen met verminderde
fysieke, sensorische of mentale vaardigheden
of een gebrek aan ervaring en kennis worden
gebruikt, mits deze onder toezicht staan of met
betrekking tot het veilige gebruik van het apparaat
geïnstrueerd werden en begrijpen welke gevaren
van het apparaat kunnen uitgaan. Kinderen mogen niet met het apparaat spelen. Reiniging en
onderhoud door de gebruiker mogen niet zonder
toezicht door kinderen worden uitgevoerd.
Controleer of de gegevens vermeld op het kenplaatje overeenkomen met de gegevens van het
stroomnet, alvorens het apparaat aan te sluiten.
Opgelet! Trek de netstekker uit het stopcontact
voordat u instellingen aan het apparaat uitvoert.
Laad het apparaat uitsluitend met de meegeleverde lader.
Neem de bijgevoegde veiligheidsinstructies met
uitvoerige aanwijzingen over het laadproces in
acht.
De uitgangen mogen tijdens het laadproces niet
worden gebruikt.
Verbind de meegeleverde lader (fig. 2a, pos.
•
2) met de „Input 15V 1A“ laadbus (fig. 1, pos.
6) van het apparaat.
Als u de lader in het stopcontact steekt, dan
•
wordt de accu geladen. Tijdens het laden
branden (knipperen) de LEDs (fig. 1, pos. 2)
en geven de laadstatus aan. Als het laden is
afgesloten, dan branden alle LEDs.
De laadtijd bedraagt ca. 4 uur als de accu
•
leeg is. Tijdens het laden kan de accu in het
apparaat iets warm worden, dat is echter
normaal.
5.2 Laden van het externe starter – energiestation met de 12V kabel voor sigarettenaansteker
Het laden mag alleen tijdens de rit gebeuren,
aangezien de accu van de auto ontladen wordt.
Plaats het apparaat op een geschikte plaats,
opdat het bij veranderingen van snelheid en/of
richting niet in beweging kan komen.
Verbind de meegeleverde 12V kabel voor
•
sigarettenaansteker (fig. 2b, pos. 11) met de
„Input 15V 1A“ laadbus (fig. 1, pos. 6) van het
apparaat.
Steek de 12V stekker in een passende 12V
•
contactdoos voor sigarettenaansteker.
5.3 Accu-capaciteitsindicatie
Druk kort op de Aan-/Uit-knop (fi g. 1, pos. 3). De
LEDs van de accu-capaciteitsindicatie (fi g. 1, pos.
2) lichten op. Het aantal brandende LEDs geeft
de huidige laadtoestand van de ingebouwde LiPo-accu aan.
100 % geladen = 5 LED continu licht
<10 % geladen = geen LED
- 41 -
Anl_CC_JS_12_SPK7.indb 41Anl_CC_JS_12_SPK7.indb 41 08.01.16 11:4708.01.16 11:47
Page 42

NL
6. LED-licht
Voorzichtig! Niet in de lichtstraal kijken
Druk 3 seconden lang op de Aan-/Uit-knop –
•
het LED-licht (fig. 1, pos. 8) brandt continu.
Druk nog eens op de Aan-/Uit-knop – het
•
LED-licht brandt als ‚stroboscoop flitser‘.
Druk nog eens op de Aan-/Uit-knop – het
•
LED-licht brandt als ‚SOS morse licht‘.
Als er nog eens op wordt gedrukt, dan wordt
•
het LED-licht weer uitgeschakeld.
7. Uitgangen
Voorzichtig! Houd rekening met de spannings-
en stroomwaarde van het te voeden apparaat
(bijv. GSM, notebook). Neem de handleiding van
het apparaat in acht.
De voedingsduur varieert al naargelang de laadtoestand van het externe starter – energiestation,
krachtontneming en gebruiksintensiteit van het
aangesloten apparaat. Als een restlading van 4050% (2 LEDs branden) wordt bereikt, dan moet
de accu worden geladen (z. hoofdstuk 5.).
7.1 Laden/Inzetten van apparaten met USB
aansluiting
1. Verbind een voorhanden (of de meegeleverde) USB aansluitkabel met de USB aansluiting (fi g. 1, pos. 4) van het externe starter
– energiestation en vervolgens met het te
voeden apparaat.
2. Druk op de Aan-/Uit-knop (fi g. 1, pos. 3).
7.2 Inzetten van apparaten die werken op 12
V gelijkspanning
1. Verbind de meegeleverde verbindingskabel
(fi g. 2d, pos. 13) met de 12V gelijkspanning-
suitgang (fi g. 1, pos. 5) van het externe starter
– energiestation en vervolgens eveneens met
behulp van de meegeleverde stekker (fi g. 2d,
pos. 14) met het apparaat dat werkt op 12V
gelijkspanning. De maximale krachtontneming mag 10A niet overschrijden.
2. Druk op de Aan-/Uit-knop (fi g. 1, pos. 3).
7.3 Inzetten van apparaten die werken op 19
V gelijkspanning
1. Verbind de meegeleverde verbindingskabel
(fi g. 2d, pos. 13) met de 19V gelijkspanning-
suitgang (fi g. 1, pos. 1) van het externe starter
– energiestation en vervolgens eveneens met
behulp van de meegeleverde stekker (fi g. 2d,
pos. 14) met het apparaat dat werkt op 19V
gelijkspanning. De maximale krachtontneming mag 3,5A niet overschrijden.
2. Druk op de Aan-/Uit-knop (fi g. 1, pos. 3).
8. Starthulp voor de auto
De 12V starthulpinrichting biedt een welkome
hulp in het geval van startproblemen op grond van
onvoldoende accucapaciteit.
Waarschuwing! Tijdens een starthulpproces
mag alleen de startkabel zijn aangesloten. De
voeding van een aangesloten apparaat, bijv. via
de USB-aansluiting, moet eerst worden onderbroken.
Wij wijzen erop dat de voertuigen zijn uitgerust
met tal van elektronische modules. Gelieve de instructies in de handleidingen voor auto, radio enz.
in acht te nemen.
Waarschuwing! Nooit verbinden met de carrosserie van het voertuig!
Controleer of de stekker van de startkabel
•
vast is verbonden met de contactdoos van
het apparaat. Als de verbinding tijdens het
starthulpproces los zit, dan kan de steekverbinding door de hoge stroom smelten.
De polen van de accu van het voertuig moe-
•
ten schoon zijn en de klemmen van de startkabel vast op de accupolen zitten.
Tijdens het starthulpproces de klemmen van
•
de startkabel niet met elkaar verbinden –
kortsluiting.
Vergewis u ervan dat minstens 3 LEDs van de
accu-capaciteitsindicatie branden. De temperatuur van het apparaat moet in het bereik van + 10
°C - + 40 °C, de omgevingstemperatuur bij het
starthulpproces in het bereik van – 15 °C - + 40
°C liggen. Gebruik uitsluitend de meegeleverde
startkabel (fi g. 2c, pos. 12).
1. Fig. 3: Klap de afdekking van de aansluiting
van de startkabel (fi g. 1, pos. 7) open en sluit
de startkabel aan op het apparaat.
2. Fig. 4a: Sluit de rode kabel aan op de
pluspool en de zwarte kabel op de minpool
van de accu van de auto.
3. Fig. 4a: De groene LED „correct“ aan de startkabel brandt.
Aanwijzing: Als de groene LED niet brandt of
knippert, druk dan op de toets „Boost“ aan de
- 42 -
Anl_CC_JS_12_SPK7.indb 42Anl_CC_JS_12_SPK7.indb 42 08.01.16 11:4708.01.16 11:47
Page 43

NL
startkabel.
4. Start het voertuig binnen 30 seconden (duur
van de startpoging max. 5 seconden, wachttijd tussen twee startpogingen minstens 30
seconden).
5. Zodra de motor loopt verwijdert u de startkabel van het apparaat en vervolgens eerst
de rode klem en dan de zwarte klem van de
accu.
6. Laat de motor lopen. De dynamo laadt de
ingebouwde accu.
LED - statusmeldingen aan de startkabel
Fig. 4a: Groene LED = motor starten
•
Fig. 4b: Groene LED knippert + waarschu-
•
wingssignaal = „Boost“ toets indrukken en
motor binnen 30 s starten.
Fig. 4c: Rode LED + waarschuwingssignaal
•
= accu met de verkeerde polen aangesloten
(zie 2.).
Fig. 4d: Geen LED, geen waarschuwingssi-
•
gnaal = steekverbinding met het apparaat
controleren, „Boost“ toets indrukken en motor
binnen 30 s starten.
Het aantal mogelijke starthulppogingen (max. 10)
is afhankelijk van de omgevingstemperatuur, de
toestand van de te starten accu en de laadtoestand van de accu van het externe starter – energiestation.
9. Reiniging, onderhoud en
bestelling van onderdelen
Gevaar!
Trek vóór alle reinigingswerkzaamheden de
netstekker uit het stopcontact.
9.1 Reiniging
Houd de veiligheidsinrichtingen, de ventila-
•
tiespleten en het motorhuis zo veel mogelijk
vrij van stof en vuil. Wrijf het apparaat met een
schone doek af of blaas het met perslucht bij
lage druk schoon.
Het valt aan te bevelen om het apparaat on-
•
middellijk na elk gebruik schoon te maken.
Maak het apparaat regelmatig met een voch-
•
tige doek en wat smeerzeep schoon. Gebruik
geen reinigings- of oplosmiddelen; die zouden de kunststof delen van het apparaat kunnen aantasten. Zorg ervoor dat geen water
binnenin het apparaat terecht kan komen. Het
binnendringen van water in een elektrische
apparaat verhoogt het risico van een elektrische schok.
9.2 Onderhoud
Binnenin het apparaat zijn er geen andere te onderhouden onderdelen.
9.3 Bestelling van onderdelen:
Gelieve bij de bestelling van onderdelen de volgende gegevens te vermelden:
Type van het apparaat
•
Artikelnummer van het apparaat
•
Ident.-nummer van het apparaat
•
Onderdeelnummer van het benodigde on-
•
derdeel
Actuele prijzen en info vindt u terug onder
www.isc-gmbh.info
10. Reparatie
Bij eventueel optredende storingen het apparaat
alleen laten controleren door een geautoriseerde
vakman resp. door een werkplaats van de klantendienst.
11. Verwerking en recyclage
Het apparaat bevindt zich in een verpakking om
transportschade te voorkomen. Deze verpakking
is een grondstof en bijgevolg herbruikbaar of kan
in de grondstofkringloop teruggebracht worden.
Het apparaat en het toebehoren bestaan uit
verschillende materialen, zoals bijv. metaal en
kunststof. Defecte apparaten horen niet thuis bij
het huisvuil. Voor deskundige verwerking moet
het apparaat bij een daarvoor bestemde inzamelplaats worden afgegeven. Als u geen inzamelplaats kent, gelieve u dan bij de gemeente te
informeren.
- 43 -
Anl_CC_JS_12_SPK7.indb 43Anl_CC_JS_12_SPK7.indb 43 08.01.16 11:4708.01.16 11:47
Page 44

12. Opslag
Bewaar het apparaat en het toebehoren op een
donkere, droge en vorstvrije plaats. De optimale
opslagtemperatuur ligt tussen 5 en 30 °C.
Neem de bijgevoegde veiligheidsinstructies met
uitvoerige aanwijzingen over de opslag in acht.
Aangezien de accu reageert op te hoge (boven
+40 °C) resp. op te lage temperaturen (onder
0°C), mag u het apparaat niet permanent opbergen in een voertuig. Voor het transport in een voertuig plaatst u het op een geschikte plaats, opdat
het bij veranderingen van snelheid en/of richting
niet in beweging kan komen. Bewaar het apparaat
in de originele verpakking.
NL
- 44 -
Anl_CC_JS_12_SPK7.indb 44Anl_CC_JS_12_SPK7.indb 44 08.01.16 11:4708.01.16 11:47
Page 45

NL
13. Schema voor foutopsporing
Storing Mogelijke oorzaak Oplossing
Apparaat kan niet
worden ingeschakeld
Starthulp werkt niet - Accuspanning te laag
- Accuspanning te laag - Accu laden
- Accu laden
Alle LEDs knipperen
- Aansluitingen aan het voertuig verwisseld
- Omgevingstemperatuur buiten het
temperatuurbereik
- Beveiliging tegen overbelasting
heeft gereageerd
- Apparaat te warm
- Omgevingstemperatuur te laag/
hoog
- Op polariteit letten en juist aansluiten
- Starthulp proberen binnen het temperatuurbereik
- Apparaat uitschakelen, controleren
op mogelijke overbelasting
- Temperatuur van het apparaat + 10
°C - + 40 °C aanhouden
- Omgevingstemperatuurbereik – 15
°C - + 40 °C aanhouden
- 45 -
Anl_CC_JS_12_SPK7.indb 45Anl_CC_JS_12_SPK7.indb 45 08.01.16 11:4708.01.16 11:47
Page 46

NL
Enkel voor EU-landen
Elektrisch gereedschap hoort niet bij het huisvuil thuis!
Volgens de Europese richtlijn 2012/19/EG op afgedankte elektrische en elektronische toestellen en
omzetting in nationaal recht dienen afgedankte elektrische gereedschappen afzonderlijk te worden verzameld en milieuvriendelijk te worden gerecycleerd.
Recyclagealternatief i.p.v. het toestel terug te sturen:
De eigenaar van het elektrische toestel is alternatief verplicht, i.p.v. het toestel terug te sturen, mede te
werken bij de behoorlijke recyclage in geval hij zich van het eigendom ontdoet. Het afgedankte toestel
kan hiervoor ook bij een verzamelplaats worden afgegeven die voor een verwijdering als bedoeld in de
wetgeving in zake recyclage en afvalverwerking zorgt. Hieronder vallen niet bij de afgedankte toestellen
gevoegde accessoires en hulpmiddelen zonder elektrische componenten.
Nadruk of andere reproductie van documentatie en geleidepapieren van de producten, geheel of gedeeltelijk, enkel toegestaan mits uitdrukkelijke toestemming van iSC GmbH.
Technische wijzigingen voorbehouden
- 46 -
Anl_CC_JS_12_SPK7.indb 46Anl_CC_JS_12_SPK7.indb 46 08.01.16 11:4708.01.16 11:47
Page 47

NL
Service-informatie
Wij werken in alle landen die in het garantiebewijs zijn genoemd, samen met competente servicepartners, wier contactgegevens u kunt afl eiden uit het garantiebewijs. Deze staan voor alle diensten zoals
reparatie, het verschaff en van wisselstukken of slijtdelen of voor de aankoop van verbruiksmaterialen te
uwer beschikking.
U moet er rekening mee houden dat bij dit product de volgende delen onderhevig zijn aan een slijtage
door gebruik of een natuurlijke slijtage, resp. dat de volgende delen nodig zijn als verbruiksmaterialen.
Categorie Voorbeeld
Slijtstukken* Accu
Verbruiksmateriaal/verbruiksstukken*
Ontbrekende onderdelen
* niet verplicht bij de leveringsomvang begrepen!
Bij gebreken of defecten verzoeken wij u om de fout te melden op het internet onder www.isc-gmbh.info.
Gelieve te zorgen voor een nauwkeurige beschrijving van de fout en daarbij in elk geval de volgende
vragen te beantwoorden:
Heeft het toestel reeds eenmaal gewerkt of was het vanaf het begin defect?
•
Is u iets opgevallen voordat het defect zich voordeed (symptoom vóór het defect)?
•
Welke foutieve werkwijze vertoont het toestel volgens u (hoofdsymptoom)?
•
Beschrijf deze foutieve werkwijze.
- 47 -
Anl_CC_JS_12_SPK7.indb 47Anl_CC_JS_12_SPK7.indb 47 08.01.16 11:4708.01.16 11:47
Page 48

NL
Garantiebewijs
Geachte klant,
onze producten worden onderworpen aan een strenge kwaliteitscontrole. Mocht dit apparaat echter ooit
niet naar behoren functioneren, spijt dit ons ten zeerste en vragen u zich te wenden tot onze servicedienst onder het adres vermeld op dit garantiebewijs. Wij staan ook graag telefonisch tot uw dienst via
het vermelde servicetelefoonnummer. Voor eisen in verband met het recht garantie geldt het volgende:
1. Deze garantievoorwaarden zijn uitsluitend gericht aan de gebruikers, d.w.z. natuurlijke personen die
dit product niet in het kader van hun ambachtelijke noch van een andere zelfstandige activiteit willen
gebruiken. Deze garantievoorwaarden regelen aanvullende garantieprestaties, die de hieronder genoemde fabrikant kopers van zijn nieuwe apparaten toezegt in aanvulling tot de wettelijke garantie.
Uw wettelijke garantieclaims blijven onaangetast door deze garantie. Onze garantieprestatie is voor
u gratis.
2. De garantieprestatie geldt uitsluitend voor gebreken aan een door u aangekocht nieuw apparaat
van de hieronder genoemde fabrikant die aantoonbaar berusten op een materiaal- of productiefout,
en is naar onze keuze beperkt tot het verhelpen van zulke gebreken aan het apparaat of de vervanging ervan.
Wij wijzen erop dat onze apparaten overeenkomstig hun bestemming niet ontworpen zijn voor commercieel, ambachtelijk of industrieel gebruik. Van een garantiecontract is derhalve geen sprake, als
het apparaat binnen de garantieperiode in commerciële, ambachtelijke of industriële bedrijven werd
ingezet of aan een daarmee gelijk te stellen belasting werd blootgesteld.
3. Van onze garantie zijn uitgesloten:
- Schade aan het apparaat als gevolg van niet-inachtneming van de montagehandleiding of op
grond van ondeskundige installatie, als gevolg van niet-inachtneming van de gebruiksaanwijzing
(zoals bijv. door aansluiting aan een verkeerde netspanning of stroomsoort) of niet-inachtneming
van de onderhouds- en veiligheidsvoorschriften, door blootstelling van het apparaat aan abnormale
omgevingsvoorwaarden of door nalatig onderhoud en verzorging.
- Schade aan het apparaat als gevolg van misbruik of ondeskundige toepassingen (zoals bijv. overbelasting van het apparaat of de inzet van niet toegelaten gereedschappen of toebehoren), binnendringen van vreemde voorwerpen in het apparaat (zoals bijv. zand, stenen of stof, transportschade),
gebruik van geweld of als gevolg van externe invloeden (zoals bijv. schade door vallen).
- Schade aan het apparaat of aan delen van het apparaat die valt te herleiden tot slijtage als gevolg
van gebruik, en als gevolg van normale of andere natuurlijke slijtage.
4. De garantieperiode bedraagt 24 maanden en gaat in op de datum van aankoop van het apparaat.
Garantieclaims dienen voor het verloop van de garantieperiode binnen de twee weken na het vaststellen van het defect geldend te worden gemaakt. Het indienen van garantieclaims na verloop van
de garantieperiode is uitgesloten. De herstelling of vervanging van het apparaat leidt niet tot een
verlenging van de garantieperiode noch wordt door deze prestatie een nieuwe garantieperiode voor
het apparaat of voor eventueel ingebouwde wisselstukken op gang gebracht. Dit geldt ook bij het ter
plaatse uitvoeren van een serviceactiviteit.
5. Gelieve om een garantieclaim in te dienen het defecte apparaat aan te melden onder: www.iscgmbh.info. Houd het aankoopbewijs of een ander bewijs van uw aankoop van het nieuwe apparaat
bij de hand. Apparaten die zonder bijhorende bewijzen of zonder typeplaatje worden teruggestuurd,
worden op grond van de ontbrekende mogelijkheid om het apparaat toe te kennen uitgesloten van
de garantieprestatie. Valt het defect van het apparaat binnen onze garantieprestatie, dan bezorgen
wij u per omgaande een gerepareerd of nieuw apparaat terug.
Uiteraard staan wij ook tot u dienst om, mits betaling van de kosten, defecten van het apparaat te verhelpen die buiten de garantieomvang vallen. Te dien einde stuurt u het apparaat aan ons serviceadres
op.
Voor slijtstukken, verbruiksmateriaal en ontbrekende onderdelen wordt verwezen naar de beperkingen
van deze garantie conform de service-informatie van deze handleiding.
- 48 -
Anl_CC_JS_12_SPK7.indb 48Anl_CC_JS_12_SPK7.indb 48 08.01.16 11:4708.01.16 11:47
Page 49

E
Peligro!
Al usar aparatos es preciso tener en cuenta una
serie de medidas de seguridad para evitar lesiones o daños. Por este motivo, es preciso leer
atentamente este manual de instrucciones/advertencias de seguridad. Guardar esta información
cuidadosamente para poder consultarla en cualquier momento. En caso de entregar el aparato
a terceras personas, será preciso entregarles,
asimismo, el manual de instrucciones/advertencias de seguridad. No nos hacemos responsables
de accidentes o daños provocados por no tener
en cuenta este manual y las instrucciones de
seguridad.
1. Instrucciones de seguridad
Encontrará las instrucciones de seguridad correspondientes en el prospecto adjunto
Peligro
Leer todas las instrucciones de seguridad e
indicaciones. El incumplimiento de dichas inst-
rucciones e indicaciones puede provocar descargas, incendios y/o daños graves. Guardar todas
las instrucciones de seguridad e indicaciones para posibles consultas posteriores.
Los niños no deben usar el aparato. Vigilar a
los niños para asegurarse de que no jueguen
con el aparato. Los niños no pueden limpiar ni
realizar trabajos de mantenimiento en el aparato.
El aparato no puede ser utilizado por personas
cuyas capacidades estén limitadas física, sensorial o psíquicamente, o que no dispongan de la
experiencia y/o los conocimientos necesarios a
no ser que estén vigiladas o hayan recibido instrucciones de una persona que se responsabilice
de ellos.
2.2 Volumen de entrega
Sirviéndose de la descripción del volumen de
entrega, comprobar que el artículo esté completo.
Si faltase alguna pieza, dirigirse a nuestro Service Center o a la tienda especializada más cercana en un plazo máximo de 5 días laborales tras
la compra del artículo presentando un recibo de
compra válido. A este respeto, observar la tabla
de garantía de las condiciones de garantía que se
encuentran al fi nal del manual.
Abrir el embalaje y extraer cuidadosamente
•
el aparato.
Retirar el material de embalaje, así como los
•
dispositivos de seguridad del embalaje y para
el transporte (si existen).
Comprobar que el volumen de entrega esté
•
completo.
Comprobar que el aparato y los accesorios
•
no presenten daños ocasionados durante el
transporte.
Si es posible, almacenar el embalaje hasta
•
que transcurra el periodo de garantía.
Peligro!
¡El aparato y el material de embalaje no son
un juguete! ¡No permitir que los niños jueguen con bolsas de plástico, láminas y piezas pequeñas! ¡Riesgo de ingestión y asfi xia!
Arrancador de batería - unidad energética
•
Cargador
•
Cable del encendedor 12V
•
Cable de ayuda de arranque
•
Cable de conexión USB
•
Cable de conexión
•
Juego de enchufes
•
Funda para piezas
•
Manual de instrucciones original
•
Instrucciones de seguridad
•
2. Descripción del aparato y
volumen de entrega
2.1 Descripción del aparato (fi g. 1)
1. Salida tensión continua 19V máx. 3,5 A
2. LED indicación de capacidad de la batería
3. Interruptor ON/OFF
4. Conexión USB salida tensión continua 5V
máx. 2A
5. Salida tensión continua 12V máx. 10 A
6. Hembrilla de carga 15V d.c.
7. Conexión cable de ayuda de arranque
8. Luz LED
Anl_CC_JS_12_SPK7.indb 49Anl_CC_JS_12_SPK7.indb 49 08.01.16 11:4708.01.16 11:47
3. Uso adecuado
Utilizando el cable de ayuda de arranque adjunto,
el aparato ha sido concebido para la ayuda de
arranque de baterías de arranque de 12V (baterías de plomo) para motores de gasolina con
una cilindrada máxima de 2500 cm3. El aparato
no puede sustituir la batería de arranque. A las
conexiones de USB se pueden conectar aparatos
(p. ej., móviles) con una tensión de suministro de
5V y un consumo máximo de corriente de 2A. La
conexión 19V/3,5A está indicada para el suministro de tensión de portátiles, la conexión 12V /
- 49 -
Page 50

E
10A para el restos de consumidores de tensión
continua de 12V.
El aparato sólo debe emplearse para aquellos
casos para los que se ha destinado su uso. Cualquier otro uso será inadecuado. En caso de uso
inadecuado, el fabricante no se hace responsable
de daños o lesiones de cualquier tipo; el responsable es el usuario u operario de la máquina.
Es preciso tener en consideración que nuestro
aparato no está indicado para un uso comercial,
industrial o en taller. No asumiremos ningún tipo
de garantía cuando se utilice el aparato en zonas
industriales, comerciales o talleres, así como actividades similares.
4. Características técnicas
Arrancador de batería - unidad energética
Batería Li-Po: ......................................... 41,1 Wh
Tiempo de carga aprox.: ................................. 4 h
USB salida de tensión continua: ....5 V / máx. 2 A
Salida de tensión continua: .......19 V / máx. 3,5 A
Salida de tensión continua: ........12 V / máx. 10 A
Corriente ayuda de arranque: ..............................
.....................................200 A (5 s) / 400 A (máx.)
Temperatura ambiente en ayuda de arranque: .....
................................................... - 15 °C - + 40 °C
Cargador
Tensión nominal de entrada: ...............................
............................................100-240 V ~50/60 Hz
Tensión de salida nominal: .....................15 V d.c.
Corriente nominal de salida: ...........................1 A
5. Antes de la puesta en marcha
5.1 Cómo cargar el arrancador de batería - la
unidad energética con el cargador suministrado
Información relativa al cargador:
Este aparato podrá ser utilizado por niños a partir
de 8 años y personas cuyas capacidades estén
limitadas física, sensorial o psíquicamente, o que
no dispongan de la experiencia y/o los conocimientos necesarios siempre y cuando estén vigiladas o hayan recibido formación o instrucciones
sobre el funcionamiento seguro del aparato y de
los posibles peligros. Está prohibido que los niños
jueguen con el aparato. Los niños no podrán realizar los trabajos de limpieza y mantenimiento a
no ser que estén vigilados por un adulto.
Antes de conectar la máquina, asegurarse de
que los datos de la placa de identifi cación coinci-
dan con los datos de la red eléctrica.
Atención: Desenchufar el aparato antes de realizar ajustes. Cargar el aparato exclusivamente con
el cargador suministrado.
Tener en cuenta las instrucciones de seguridad
adjuntas con advertencias detalladas sobre el
proceso de carga.
No utilizar las salidas durante el proceso de carga.
Conectar el cargador suministrado (fig. 2a/
•
pos. 2) con la hembrilla de carga „Input 15V
1A“ (fig. 1/pos. 6).
Enchufar el cargador en la toma de corriente
•
para cargar la batería. Durante la carga se
encienden (parpadean) los LED (fig. 1/pos. 2)
y muestran el estado de carga. Una vez finalizada la carga, se encienden todos los LED.
El tiempo de carga cuando la batería está
•
vacía es de aprox. 4 horas. Es posible que la
batería se caliente durante el proceso de carga. Esto es normal.
5.2 Cómo cargar el arrancador de batería - la
unidad energética con el cable del encendedor de 12 V
El proceso de carga solo debería efectuarse
durante la marcha, ya que, de lo contrario, se descarga la batería del automóvil. Poner el aparato
en un lugar adecuado par que no se pueda mover
en caso de que se produzcan cambios bruscos
de velocidad y/o dirección.
- 50 -
Anl_CC_JS_12_SPK7.indb 50Anl_CC_JS_12_SPK7.indb 50 08.01.16 11:4708.01.16 11:47
Page 51

E
Conectar el cable del encendedor de 12 V
•
suministrado (fig. 2b/pos. 11) con la hembrilla
de carga „Input 15V 1A“ (fig. 1/pos. 6).
Conectar el enchufe de 12V en una toma de
•
encendedor de 12V adecuada.
5.3. Indicador de capacidad de batería
Pulsar brevemente el interruptor ON/OFF (fi g. 1/
pos. 3). El LED de la indicación de capacidad de
la batería (fi g. 1/pos. 2) se enciende. El número
de LED encendidos indica el estado actual de
carga de la batería Li-Po integrada.
100 % cargada = 5 LED luz continua
<10 % cargada = ningún LED
6. Luz LED
Cuidado: No mirar directamente a la luz.
Pulsar durante 3 segundos el interruptor ON/
•
OFF - la luz LED se enciende de forma duradera (fig. 1/pos. 8).
Volver a pulsar el interruptor ON/OFF - la luz
•
LED se enciende como “flash estroboscópico”.
Volver a pulsar el interruptor ON/OFF - la luz
•
LED se enciende con la luz morse de „SOS“.
Si se vuelve a pulsar se apaga de nuevo la
•
luz LED.
7. Salidas
Cuidado: Tener en cuenta los valores de tensión
y corriente de los aparatos a alimentar (p. ej.,
móvil, portátil). Consultar sus manuales de instrucciones.
La duración de suministro varía en función del
estado de carga del arrancador de batería - de la
unidad energética, del consumo y de la intensidad de uso del aparato de conexión. Cuando se
alcance una carga restante del 40-50 % (2 LED
encendidos), cargar la batería (ver apartado 5.).
7.1 Cómo cargar/operar aparatos con conexión USB
1. Conectar el cable de conexión USB disponible (o suministrado) a la conexión USB (fi g. 1/
pos 4) del arrancador de batería - de la unidad energética y, a continuación, al aparato a
alimentar.
2. Pulsar el interruptor ON/OFF (fi g. 1/pos 3).
7.2 Cómo operar aparatos de tensión continua de 12V
1. Conectar el cable de conexión suministrado
(fi g. 2d/pos. 13) con la salida de tensión con-
tinua de 12 V (fi g. 1/pos. 5) del arrancador de
batería - de la unidad energética y, a continuación y si es necesario utilizando uno de
los enchufes suministrados (fi g. 2d/pos. 14)
con el aparato de tensión continua de 12V.
El consumo máximo de corriente no debe de
superar los 10 A.
2. Pulsar el interruptor ON/OFF (fi g. 1/pos 3).
7.3 Cómo operar aparatos de tensión continua de 19 V
1. Conectar el cable de conexión suministrado
(fi g. 2d/pos. 13) con la salida de tensión con-
tinua de 19 V (fi g. 1/pos. 1) del arrancador de
batería - de la unidad energética y, a continuación y si es necesario utilizando uno de
los enchufes suministrados (fi g. 2d/pos. 14)
con el aparato de tensión continua de 19 V.
El consumo máximo de corriente no debe de
superar los 3,5 A.
2. Pulsar el interruptor ON/OFF (fi g. 1/pos 3).
8. Ayuda de arranque para el
vehículo
El dispositivo de ayuda de arranque de 12 V
ofrece una gran ayuda en caso de difi cultades al
arrancar por falta de carga de la batería.
Aviso: Durante el proceso de ayuda de arranque
solo puede estar conectado el cable de ayuda de
arranque. Por este motivo, es preciso interrumpir
previamente el posible suministro de un aparato
de conexión, por ejemplo a través de una conexión de USB.
Advertimos de que los vehículos están dotados
de sufi cientes componentes eléctricos. Es pre-
ciso observar las advertencias que se hallan en
los manuales del vehículo, de la radio, etc.
Aviso: ¡No conectar nunca con la carrocería del
vehículo!
Asegurarse de que el enchufe con el cable de
•
ayuda de arranque esté bien introducido en
la toma de corriente del aparato. Si estuviese
suelta, el enchufe se podría fundir debido a la
elevada corriente.
Los polos de la batería de coche deben de
•
estar limpios y las pinzas del cable de ayuda
- 51 -
Anl_CC_JS_12_SPK7.indb 51Anl_CC_JS_12_SPK7.indb 51 08.01.16 11:4708.01.16 11:47
Page 52

E
de arranque estar bien sujetas a los polos de
la batería.
Durante el proceso de ayuda de arranque es
•
preciso no conectar las pinzas del cable entre
sí, se podría producir un cortocircuito.
Asegurarse de que al menos 3LED del indicado
de capacidad de la batería estén encendidos. La
temperatura del aparato se debe de encontrar
entre + 10 °C y + 40 °C, la temperatura ambiente
durante el proceso de ayuda de arranque entre –
15 °C - y 40 °C. Emplear exclusivamente el cable
de ayuda de arranque suministrado (fi g. 2c/pos.
12).
1. Fig. 3: Abrir la cubierta de la conexión del
cable de ayuda de arranque (fi g. 1/pos. 7) y
enchufar el cable al aparato.
2. Fig. 4a: Conectar el cable rojo al polo positivo
y el cable negro al polo negativo de la batería.
3. Fig. 4a: Se enciende el LED verde „correct“
en el cable de ayuda de arranque.
Aviso: si el LED verde no se enciende o par-
padea, pulsar la tecla „Boost“ en el cable de
ayuda de arranque.
4. Arrancar el coche en los siguientes 30
segundos (duración máx. del intento de arranque 5 segundos, tiempos de espera entre
dos intentos de arranque de al menos 30
segundos).
5. En cuanto se arranque el motor, quitar el
cable de ayuda de arranque del aparato y, a
continuación, primero la pinza roja y luego la
pinza negra de la batería.
6. Dejar el motor en marcha. El dínamo carga la
batería incorporada.
LED - mensajes de estado y cable de ayuda
de arranque
Fig. 4a: LED verde = arrancar el motor
•
Fig. 4b: LED verde parpadea + señal de aviso
•
= „pulsar la tecla „Boost“ y arrancar el motor
en los próximos 30 segundos.
Fig. 4c: LED rojo + señal de aviso = polaridad
•
de la batería incorrecta (ver 2.)
Fig. 4d: Ningún LED, ninguna señal de aviso
•
= comprobar la conexión al aparato, pulsar la
tecla „Boost“ y arrancar el motor en los próximos 30 segundos.
9. Mantenimiento, limpieza y pedido
de piezas de repuesto
Peligro!
Desenchufar siempre antes de realizar algún trabajo de limpieza.
9.1 Limpieza
Reducir al máximo posible la suciedad y
•
el polvo en los dispositivos de seguridad,
las rendijas de ventilación y la carcasa del
motor. Frotar el aparato con un paño limpio o
soplarlo con aire comprimido manteniendo la
presión baja.
Se recomienda limpiar el aparato tras cada
•
uso.
Limpiar el aparato con regularidad con un
•
paño húmedo y un poco de jabón blando. No
utilizar productos de limpieza o disolventes ya
que se podrían deteriorar las piezas de plástico del aparato. Es preciso tener en cuenta
que no entre agua en el interior del aparato.
Si entra agua en el aparato eléctrico existirá
mayor riesgo de una descarga eléctrica.
9.2 Mantenimiento
No hay que realizar el mantenimiento a más
piezas en el interior del aparato.
9.3 Pedido de piezas de recambio:
Al solicitar recambios se indicarán los datos siguientes:
Tipo de aparato
•
No. de artículo del aparato
•
No. de identidad del aparato
•
No. del recambio de la pieza necesitada.
•
Encontrará los precios y la información actual en
www.isc-gmbh.info
10. Reparación
En caso de que se produjeran averías, llevar el
aparato a un especialista autorizado o un taller de
servicio técnico.
El número de los posibles intentos de ayuda de
arranque (máx. 10) depende de la temperatura
ambiente, del estado de la batería a arrancar y
del estado de carga de la batería del arrancador
de batería - de la unidad energética.
- 52 -
Anl_CC_JS_12_SPK7.indb 52Anl_CC_JS_12_SPK7.indb 52 08.01.16 11:4708.01.16 11:47
Page 53

11. Eliminación y reciclaje
El aparato está protegido por un embalaje para
evitar daños producidos por el transporte. Este
embalaje es materia prima y, por eso, se puede
volver a utilizar o llevar a un punto de reciclaje. El
aparato y sus accesorios están compuestos de
diversos materiales, como, p. ej., metal y plástico.
Los aparatos defectuosos no deben tirarse a la
basura doméstica. Para su eliminación adecuada, el aparato debe entregarse a una entidad
recolectora prevista para ello. En caso de no
conocer ninguna, será preciso informarse en el
organismo responsable del municipio.
12. Almacenamiento
Guardar el aparato y sus accesorios en un lugar
oscuro, seco y protegido de las heladas. La temperatura de almacenamiento óptima se encuentra
entre los 5 y 30˚C.
Tener en cuenta las instrucciones de seguridad
adjuntas con advertencias detalladas sobre el
almacenamiento. La batería reacciona a temperaturas excesivas (por encima de los 40 °C),
así como a temperaturas demasiado bajas (por
debajo de los 0 °C), por lo que se recomienda no
guardar el aparato de manera permanente en un
coche. Para transportarlo en un vehículo, colocarlo en un lugar adecuado para que no se pueda
mover en caso de que se produzcan cambios
bruscos de velocidad y/o dirección. Guardar el
aparato en su embalaje original.
E
- 53 -
Anl_CC_JS_12_SPK7.indb 53Anl_CC_JS_12_SPK7.indb 53 08.01.16 11:4708.01.16 11:47
Page 54

E
13. Plan para localización de averías
Avería Posibles causas Solución
El aparato no se
puede conectar
La ayuda de arranque no funciona
- La tensión de la batería es demasiado baja
- La tensión de la batería es demasiado baja
- Cargar la batería
- Cargar la batería
Si todos los LED
parpadean
- Conexiones incorrectas en el coche
- Temperatura ambiente fuera del
margen de temperatura
- La protección contra sobrecarga ha
saltado
- El aparato está demasiado caliente
- La temperatura ambiente es demasiado baja/excesiva
- Comprobar la polaridad y conectar
correctamente
- Intentar la ayuda de arranque dentro del margen de temperatura
- Apagar el aparato, comprobar posibles sobrecargas
- Mantener la temperatura del aparato entre + 10 °C y + 40 °C.
- Mantener el margen de temperatura ambiente entre – 15 °C y + 40 °C
- 54 -
Anl_CC_JS_12_SPK7.indb 54Anl_CC_JS_12_SPK7.indb 54 08.01.16 11:4708.01.16 11:47
Page 55

E
Sólo para países miembros de la UE
No tirar herramientas eléctricas en la basura casera.
Según la directiva europea 2012/19/CE sobre aparatos usados electrónicos y eléctricos y su aplicación
en el derecho nacional, dichos aparatos deberán recojerse por separado y eliminarse de modo ecológico para facilitar su posterior reciclaje.
Alternativa de reciclaje en caso de devolución:
El propietario del aparato eléctrico, en caso de no optar por su devolución, está obligado a reciclar adecuadamente dicho aparato eléctrico. Para ello, también se puede entregar el aparato usado a un centro
de reciclaje que trate la eliminación de residuos respetando la legislación nacional sobre residuos y
su reciclaje. Esto no afecta a los medios auxiliares ni a los accesorios sin componentes eléctricos que
acompañan a los aparatos usados.
Sólo está permitido copiar la documentación y documentos anexos del producto, o extractos de los
mismos, con autorización expresa de iSC GmbH.
Nos reservamos el derecho a realizar modifi caciones técnicas
- 55 -
Anl_CC_JS_12_SPK7.indb 55Anl_CC_JS_12_SPK7.indb 55 08.01.16 11:4708.01.16 11:47
Page 56

E
Información de servicio
En todos los países mencionados en el certifi cado de garantía disponemos de distribuidores compe-
tentes cuyos datos de contacto podrán consultar en dicho certifi cado. Dichos distribuidores están a su
disposición para cualquier asunto relacionado con el servicio como reparación, suministro de piezas de
repuesto y desgaste, o con respecto a los materiales de consumo.
Es preciso tener en cuenta, que las siguientes piezas de este producto se someten a desgaste natural
o provocado por el uso o que se necesitan las siguientes piezas como materiales de consumo.
Categoría Ejemplo
Piezas de desgaste* Batería
Material de consumo/Piezas de consumo*
Falta de piezas
*¡no tiene por qué estar incluido en el volumen de entrega!
En caso de defi ciencia o fallo, rogamos que lo registre en la página web www.isc-gmbh.info. Describa
exactamente el fallo y responda siempre a las siguientes preguntas:
¿Ha funcionado el aparato en algún momento o estaba defectuoso desde el principio?
•
¿Le ha llamado algo la atención antes de surgir el fallo (indicio antes del fallo)?
•
¿Qué fallo de funcionamiento le parece que presenta el aparato (indicio principal)?
•
Describa ese fallo en el funcionamiento.
- 56 -
Anl_CC_JS_12_SPK7.indb 56Anl_CC_JS_12_SPK7.indb 56 08.01.16 11:4708.01.16 11:47
Page 57

E
Certifi cado de garantía
Estimado cliente:
Nuestros productos están sometidos a un estricto control de calidad. No obstante, lamentaríamos que
este aparato dejara de funcionar correctamente, en tal caso, le rogamos que se dirija a nuestro servicio
de atención al cliente en la dirección indicada en la parte inferior de la presente tarjeta de garantía. Con
mucho gusto le atenderemos también telefónicamente en el número de servicio indicado a continuación. Para hacer válido el derecho de garantía, proceda de la siguiente forma:
1. Estas condiciones de garantía van dirigidas exclusivamente a los consumidores, es decir, personas
naturales que no desean emplear este producto en el marco de su actividad comercial ni autónoma. Estas condiciones de garantía regulan prestaciones adicionales de garantía que el fabricante
abajo mencionado se compromete a otorgar, de manera adicional a la garantía legal, a los compradores de sus nuevos aparatos. Las prestaciones de garantía que le corresponden conforme a ley
no se ven afectadas por la presente. Nuestra prestación de garantía es gratuita para usted.
2. La garantía se extiende exclusivamente a defectos en un aparato nuevo adquirido por usted del
fabricante abajo mencionado, ocasionados por fallos de material o de producción, y está limitada,
según nuestra elección, a la reparación de los defectos o al cambio del aparato.
Es preciso tener en consideración que nuestro aparato no está indicado para un uso comercial,
industrial o en taller. Por lo tanto, no procederá un contrato de garantía cuando se utilice el aparato
dentro del periodo de garantía en zonas industriales, comerciales o talleres, así como actividades
similares.
3. Nuestra garantía no cubre:
- Daños en el aparato ocasionados por la no observancia de las instrucciones de montaje o por una
instalación no profesional, no observancia de las instrucciones de uso (como, p. ej., conexión a una
tensión de red o corriente no indicada) o la no observancia de las disposiciones de mantenimiento
y seguridad o por la exposición del aparato a condiciones anormales del entorno o por la falta de
cuidado o mantenimiento.
- Daños en el aparato ocasionados por aplicaciones impropias o indebidas (como, p. ej., sobrecarga del aparato o uso de herramientas o accesorios no homologados), introducción de cuerpos
extraños en el aparato (como, p. ej., arena, piedras o polvo, daños producidos por el transporte),
uso violento o infl uencias externa (como, p. ej., daños por caídas).
- Daños en el aparato o en piezas del aparato provocados por el desgaste natural, habitual o producido por el uso.
4. El periodo de garantía es de 24 meses y comienza en la fecha de la compra del aparato. El derecho
de garantía debe hacerse válido, antes de fi nalizado el plazo de garantía, dentro de un periodo de
dos semanas una vez detectado el defecto. El derecho de garantía vence una vez transcurrido el
plazo de garantía. La reparación o cambio del aparato no conllevará ni una prolongación del plazo
de garantía ni un nuevo plazo de garantía ni para el aparato ni para las piezas de repuesto montadas. Esto también se aplica en el caso de un servicio in situ.
5. Para hacer efectivo su derecho a garantía, registre su aparato defectuoso en: www.isc-gmbh.info.
Tenga a mano el recibo de compra o cualquier otro comprobante que acredite la compra del aparato nuevo. La garantía no cubre aquellos aparatos que se envíen sin el comprobante pertinente
o sin la placa de identifi cación puesto que resulta difícil clasifi carlos del modo correspondiente. Si
nuestra prestación de garantía incluye el defecto aparecido en el aparato, recibirá de inmediato un
aparato reparado o nuevo de vuelta.
Naturalmente, también solucionaremos los defectos del aparato que no se encuentren comprendidos
o ya no se encuentren comprendidos en la garantía, en este caso contra reembolso de los costes. Para
ello, envíe el aparato a nuestra dirección de servicio técnico.
Para piezas de desgaste, de repuesto y falta de piezas nos remitimos a las limitaciones de esta garantía
conforme a la información de servicio de este manual de instrucciones.
- 57 -
Anl_CC_JS_12_SPK7.indb 57Anl_CC_JS_12_SPK7.indb 57 08.01.16 11:4708.01.16 11:47
Page 58

P
Perigo!
Ao utilizar ferramentas, devem ser respeitadas
algumas medidas de segurança para prevenir ferimentos e danos. Por conseguinte, leia
atentamente este manual de instruções / estas
instruções de segurança. Guarde-o num local
seguro, para que o possa consultar sempre que
necessário. Caso passe o aparelho a outras
pessoas, entregue também este manual de instruções / estas instruções de segurança. Não
nos responsabilizamos pelos acidentes ou danos
causados pela não observância deste manual e
das instruções de segurança.
1. Instruções de segurança
As instruções de segurança correspondentes
encontram-se na brochura fornecida.
Perigo!
Leia todas as instruções de segurança e
indicações. O incumprimento das instruções de
segurança e indicações pode provocar choques
eléctricos, incêndios e/ou ferimentos graves.
Guarde todas as instruções de segurança e
indicações para mais tarde consultar.
Este aparelho não pode ser utilizado por crianças. As crianças devem ser mantidas sob
vigilância para que não brinquem com o aparelho.
A limpeza e a manutenção não podem ser efectuadas por crianças. Este aparelho não pode ser
utilizado por pessoas com capacidades físicas,
sensoriais ou mentais reduzidas ou por pessoas
com conhecimento ou experiência insufi cientes,
a não ser quando supervisionadas ou instruídas
pela pessoa por elas responsável.
2. Descrição do aparelho e material
a fornecer
2.1 Descrição do aparelho (fi gura 1)
1. Saída de tensão contínua 19 V máx. 3,5 A
2. Indicação LED da capacidade da bateria
3. Botão para ligar/desligar
4. USB saída de tensão contínua 5 V máx. ligação 2 A
5. Saída de tensão contínua 12 V máx. 10 A
6. Tomada de carga 15V d.c.
7. Ligação do cabo auxiliar de arranque
8. Luz LED
2.2 Material a fornecer
Com a ajuda da descrição do material a fornecer,
verifi que se o artigo se encontra completo. Caso
faltem peças, dirija-se num prazo máximo de 5
dias úteis após a compra do artigo a um dos nossos Service Centers ou ao ponto de venda onde
adquiriu o aparelho, fazendo-se acompanhar de
um talão de compra válido. Para o efeito, consulte
a tabela da garantia que se encontra nas informações do serviço de assistência técnica no fi m
do manual.
Abra a embalagem e retire cuidadosamente
•
o aparelho.
Remova o material da embalagem, assim
•
como os dispositivos de segurança da embalagem e de transporte (caso existam).
Verifique se o material a fornecer está com-
•
pleto.
Verifique se o aparelho e as peças acessóri-
•
as apresentam danos de transporte.
Se possível, guarde a embalagem até ao ter-
•
mo do período de garantia.
Perigo!
O aparelho e o material da embalagem não são
brinquedos! As crianças não devem brincar com
sacos de plástico, películas ou peças de pequena
dimensão! Existe o perigo de deglutição e asfi xia!
Dispositivo de arranque auxiliar – Posto de
•
energia
Carregador
•
Cabo do conector do isqueiro 12 V
•
Cabo auxiliar de arranque
•
Cabo de ligação USB
•
Cabo de ligação
•
Conjunto de fichas
•
Bolsa para acondicionamento
•
Manual de instruções original
•
Instruções de segurança
•
3. Utilização adequada
Mediante a utilização do cabo auxiliar de arranque fornecido, o aparelho destina-se ao arranque auxiliado de baterias de arranque de 12 V
(baterias de chumbo-ácido) para um motor a gasolina com uma cilindrada máxima de 2500 cm3.
O aparelho não substitui a bateria de arranque.
Podem ser ligados às portas USB os aparelhos
(p. ex. telemóveis) com uma tensão de alimentação de 5 V e um consumo de energia máx. de
2 A. A ligação de 19 V / 3,5 A é adequada para a
- 58 -
Anl_CC_JS_12_SPK7.indb 58Anl_CC_JS_12_SPK7.indb 58 08.01.16 11:4708.01.16 11:47
Page 59

P
alimentação de tensão de portáteis, a ligação de
12 V / 10 A é adequada para outros aparelhos de
tensão contínua de 12 V.
O aparelho só pode ser utilizado para os fi ns a
que se destina. Qualquer outro tipo de utilização
é considerado inadequado. Os danos ou ferimentos de qualquer tipo daí resultantes são da
responsabilidade do utilizador/operador e não do
fabricante.
Chamamos a atenção para o facto de os nossos
aparelhos não terem sido concebidos para uso
comercial, artesanal ou industrial. Não assumimos qualquer garantia se o aparelho for utilizado
no comércio, artesanato ou indústria ou em actividades equiparáveis.
4. Dados técnicos
Dispositivo de arranque auxiliar – Posto de
energia
Bateria Li-Po: ........................................ 41,1 Wh
Tempo de carregamento aprox. ...................... 4 h
USB saída de tensão contínua: ....... 5 V máx. 2 A
Saída de tensão contínua: .......... 19 V máx. 3,5 A
Saída de tensão contínua: ........... 12 V máx. 10 A
Corrente de arranque auxiliado: ..........................
.....................................200 A (5 s) / 400 A (máx.)
Temperatura ambiente durante o arranque .........
auxiliado: .................................... - 15°C - + 40 °C
Carregador
Tensão de entrada nominal: ................................
............................................100-240 V ~50/60 Hz
Tensão de saída nominal: ..................... 15 V d.c.
Corrente de saída nominal: ............................ 1 A
5. Antes da colocação em
funcionamento
5.1 Carregamento do dispositivo de arranque
auxiliar – posto de energia com o carregador fornecido
Para o carregador é válido o seguinte:
Este aparelho pode ser usado por crianças a partir dos 8 anos de idade, assim como por pessoas
com capacidades físicas, sensoriais ou mentais
reduzidas ou sem experiência nem conhecimentos, desde que sejam mantidas sob vigilância ou
tenham sido instruídas relativamente à utilização
segura do aparelho e tiverem entendido os perigos daí resultantes. As crianças não podem brincar com o aparelho. A limpeza e a manutenção a
cargo do utilizador não podem ser efectuadas por
crianças sem vigilância.
Antes de estabelecer a ligação, certifi que-se de
que os dados constantes da placa de características correspondem aos dados de rede.
Atenção! Retire a fi cha de alimentação da cor-
rente eléctrica antes de efectuar ajustes no aparelho. Carregue o aparelho exclusivamente com o
carregador fornecido.
Respeite as instruções de segurança fornecidas,
que contêm informações detalhadas relativamente ao carregamento.
As saídas não podem ser utilizadas durante o
carregamento.
Ligue o carregador fornecido (fig. 2a / pos. 2)
•
com a tomada de carga de „entrada 15V 1A“
(fig. 1 / pos. 6) do aparelho.
Insira o carregador na tomada, a bateria é
•
carregada. Durante o carregamento, os LEDs
(fig. 1/ pos. 2) acendem (piscam) e indicam
o estado de carga. Quando o carregamento
está concluído, acendem todos os LEDs.
Quando a bateria está descarregada o tempo
•
de carregamento é de aprox. 4 horas. Durante o carregamento, a bateria pode aquecer
um pouco no aparelho, o que é perfeitamente
normal.
5.2 Carregamento do dispositivo de arranque
auxiliar – posto de energia com o cabo do
conector do isqueiro de 12 V
O carregamento só deve ser efectuado durante a
viagem, caso contrário, poderá descarregar a bateria do automóvel. Coloque o aparelho num local
adequado, para que não possa ser colocado em
- 59 -
Anl_CC_JS_12_SPK7.indb 59Anl_CC_JS_12_SPK7.indb 59 08.01.16 11:4708.01.16 11:47
Page 60

P
movimento devido a uma alteração súbita da velocidade e/ou sentido.
Ligue o cabo do conector do isqueiro de 12V
•
fornecido (fig. 2b / pos. 11) com a tomada de
carga de „entrada 15V 1A“ (fig. 1 / pos. 6) do
aparelho.
Insira a ficha de 12 V numa tomada de isquei-
•
ro de 12 V adequada.
5.3. Indicação da capacidade da bateria
Prima brevemente o botão para ligar/desligar (fi g.
1/ pos. 3). Os LEDs de indicação da capacidade
da bateria (fi g. 1 / pos. 2) acendem. O número de
LEDs acesos fornece informação acerca do nível
de carga actual da bateria Li-Po montada.
100 % carga = 5 LEDs luz permanente
<10 % carga = nenhum LED
6. Luz LED
Cuidado! Não olhe para o raio de luz.
Prima o botão para ligar/desligar durante 3
•
segundos – a luz LED (fig. 1 / pos. 8) acende
permanentemente.
Prima novamente o botão para ligar/desligar
•
– a luz LED acende como „flash de repetição“.
Prima novamente o botão para ligar/desligar
•
– a luz LED acende como luz Morse „SOS“.
Se voltar a premir, a luz LED volta a desligar.
•
de energia e, em seguida, como o aparelho a
alimentar.
2. Prima o botão para ligar/desligar (fi g. 1 / pos.
3).
7.2 Operar aparelhos de tensão contínua de
12 V
1. Ligue o cabo de ligação fornecido (fi g. 2d
/ pos. 13) com a saída de tensão contínua
de 12 V (fi g. 1 / pos. 5) do dispositivo de
arranque auxiliar – posto de energia e, em
seguida, se necessário, mediante a utilização
de uma fi cha fornecida (fi g. 2d / pos. 14), com
o aparelho de tensão contínua de 12 V. O
consumo de energia máximo não deve ultrapassar 10 A.
2. Prima o botão para ligar/desligar (fi g. 1 / pos.
3).
7.3 Operar aparelhos de tensão contínua de
19 V
1. Ligue o cabo de ligação fornecido (fi g. 2d
/ pos. 13) com a saída de tensão contínua
de 19 V (fi g. 1 / pos. 1) do dispositivo de
arranque auxiliar – posto de energia e, em
seguida, se necessário, mediante a utilização
de uma fi cha fornecida (fi g. 2d / pos. 14) com
o aparelho de tensão contínua de 19 V. O
consumo de energia máximo não deve ultrapassar 3,5 A.
2. Prima o botão para ligar/desligar (fi g. 1 / pos.
3).
8. Arranque auxiliado para o
7. Saídas
Cuidado! Tenha em consideração os valores de
tensão e de corrente do aparelho a alimentar (p.
ex. telemóvel, portátil). Tenha em consideração o
seu manual de instruções.
A duração da alimentação varia segundo o nível
de carga do dispositivo de arranque auxiliar
– posto de energia, potência absorvida e intensidade de utilização do aparelho de ligação. Ao
atingir uma carga residual de 40-50% (2 LEDs
acendem), a bateria deve ser carregada (ver
Secção 5.).
7.1 Carregar/operar aparelhos com ligação
USB
1. Ligue um cabo de ligação USB existente (ou
o fornecido) com a ligação USB (fi g. 1 / pos.
4) do dispositivo de arranque auxiliar – posto
Anl_CC_JS_12_SPK7.indb 60Anl_CC_JS_12_SPK7.indb 60 08.01.16 11:4708.01.16 11:47
automóvel
O dispositivo auxiliar de arranque de 12 V representa uma ajuda preciosa em caso de difi culd-
ades de arranque que se devem à falta de capacidade da bateria.
Aviso! Durante um arranque auxiliado, só deve
estar ligado o cabo auxiliar de arranque. A
alimentação de um aparelho de ligação, p. ex.
através da ligação USB, tem de ser interrompida
antes.
Chamamos a atenção para o facto de os veículos
estarem equipados com inúmeros componentes
electrónicos. Tenha em atenção as indicações
presentes nos manuais de instruções do automóvel, rádio, etc.
Aviso! Nunca ligue à carroçaria do automóvel!
- 60 -
Page 61

P
Certifique-se de que a ficha do cabo auxiliar
•
de arranque está bem ligada à tomada do
aparelho. Se a ligação se soltou durante o arranque auxiliado, a ligação de encaixe pode
derreter devido à corrente elevada.
Os pólos da bateria do automóvel têm de
•
estar limpos e os bornes do cabo auxiliar de
arranque têm de estar bem fixos aos pólos
da bateria.
Durante o arranque auxiliado, não ligue os
•
bornes do cabo auxiliar de arranque uns com
os outros – curto-circuito.
Assegure-se de que pelo menos 3 LEDs da indicação da capacidade da bateria acendem. A
temperatura do aparelho tem de estar na faixa
de + 10 °C - + 40 °C e a temperatura ambiente
na faixa de – 15 °C - + 40 °C durante o arranque
auxiliado. Utilize exclusivamente o cabo auxiliar
de arranque fornecido (fi g. 2c / pos. 12).
1. Fig. 3: Abra a cobertura da ligação do cabo
auxiliar de arranque (fi g. 1 / pos. 7) e insira o
cabo auxiliar de arranque no aparelho.
2. Fig. 4a: Ligue o cabo vermelho ao pólo positivo e, de seguida, o cabo preto ao pólo negativo da bateria do automóvel.
3. Fig. 4a: Acende o LED verde „correcto“ do
cabo auxiliar de arranque.
Nota: Se o LED verde não acender ou piscar,
prima a tecla „Boost“ no cabo auxiliar de arranque.
4. Ligue o veículo no espaço de 30 segundos
(duração da tentativa de arranque máx. 5
segundos, tempo de espera entre duas tentativas de arranque no mínimo 30 segundos).
5. Assim que o motor estiver a funcionar, remova o cabo auxiliar de arranque do aparelho e,
em seguida, primeiro o borne vermelho e só
depois o borne preto da bateria.
6. Mantenha o motor em funcionamento. O
dínamo carrega a bateria montada.
LED - Mensagens de estado no cabo auxiliar
de arranque
Fig. 4a: LED verde = Ligar o motor
•
Fig. 4b: LED verde pisca + som de aviso =
•
premir a tecla „Boost“ e ligar o motor no espaço de 30 s.
Fig. 4c: LED vermelho + som de aviso = bate-
•
ria ligada com polaridade inversa (ver 2.)
Fig. 4d: Sem LED, sem som de aviso = verifi-
•
car a ligação de encaixe com o aparelho, premir a tecla „Boost“ e ligar o motor no espaço
de 30 s.
O número de possíveis tentativas de arranque
auxiliado (máx. 10) depende da temperatura ambiente, do nível da bateria a arrancar e do nível
de carga da bateria do dispositivo de arranque
auxiliar – posto de energia.
9. Limpeza, manutenção
e encomenda de peças
sobressalentes
Perigo!
Retire a fi cha de alimentação da tomada antes de
qualquer trabalho de limpeza.
9.1 Limpeza
Mantenha os dispositivos de segurança, as
•
ranhuras de ventilação e a carcaça do motor
tão livres de pó e sujidade quanto possível.
Esfregue o aparelho com um pano limpo ou
sopre com ar comprimido a baixa pressão.
Aconselhamos a limpeza do aparelho imedia-
•
tamente após cada utilização.
Limpe regularmente o aparelho com um pano
•
húmido e um pouco de sabonete líquido. Não
utilize detergentes ou solventes, pois estes
podem corroer as peças de plástico do aparelho. Certifique-se de que não entra água
para o interior do aparelho. A entrada de
água num aparelho eléctrico aumenta o risco
de choque eléctrico.
9.2 Manutenção
No interior do aparelho, não existem quaisquer
peças que necessitem de manutenção.
9.3 Encomenda de peças sobressalentes:
Para encomendar peças sobressalentes, deve
indicar os seguintes dados;
Modelo do aparelho
•
Número de referência do aparelho
•
N.º de identificação do aparelho
•
Número de peça sobressalente necessária
•
Pode consultar os preços e informações actuais
em www.isc-gmbh.info
10. Reparação
Na eventualidade de ocorrer alguma avaria no
aparelho, mande verifi car por um técnico autoriz-
ado ou por uma ofi cina de assistência técnica.
- 61 -
Anl_CC_JS_12_SPK7.indb 61Anl_CC_JS_12_SPK7.indb 61 08.01.16 11:4708.01.16 11:47
Page 62

11. Eliminação e reciclagem
O aparelho encontra-se dentro de uma embalagem para evitar danos de transporte. Esta embalagem é matéria-prima, podendo ser reutilizada
ou reciclada. O aparelho e respectivos acessórios
são compostos por diversos materiais, como p.
ex. metal e plásticos. Não deite os aparelhos com
defeito no lixo doméstico. Para uma eliminação
ecologicamente correcta, o aparelho deve ser
entregue num local de recolha adequado. Se não
tiver conhecimento de nenhum local de recolha,
informe-se junto da administração autárquica.
12. Armazenagem
Guarde o aparelho e os respectivos acessórios
em local escuro, seco e sem risco de formação
de gelo. A temperatura ideal de armazenamento
situa-se entre os 5 e os 30 °C.
Respeite as instruções de segurança fornecidas,
que contêm informações detalhadas relativamente à armazenagem. Uma vez que a bateria reage
a temperaturas demasiado elevadas (mais de
+40 °C) ou demasiado baixas (abaixo de 0°C),
não armazene o aparelho num automóvel de forma permanente. Para o transporte num veículo,
coloque-a num local adequado, para que não
possa ser colocada em movimento devido a uma
alteração súbita da velocidade e/ou sentido. Guarde o aparelho na embalagem original.
P
- 62 -
Anl_CC_JS_12_SPK7.indb 62Anl_CC_JS_12_SPK7.indb 62 08.01.16 11:4708.01.16 11:47
Page 63

P
13. Plano de localização de falhas
Avaria Possível causa Solução
Não é possível ligar
o aparelho
O arranque auxiliado não funciona
- Tensão da bateria demasiado baixa - Carregar bateria
- Tensão da bateria demasiado baixa
- Ligações trocadas no veículo
- Carregar bateria
- Tenha em conta a polaridade e faça
a ligação correctamente
Todos os LEDs
piscam
- Temperatura ambiente fora da
gama de temperaturas
- A protecção contra sobrecarga foi
activada
- Aparelho demasiado quente
- Temperatura ambiente demasiado
baixa/elevada
- Tente o arranque auxiliado dentro
da gama de temperaturas
- Desligar aparelho, verifi car possível
sobrecarga
- Observar temperatura do aparelho
+ 10 °C - + 40 °C
- Observar temperatura ambiente –
15 °C - + 40 °C
- 63 -
Anl_CC_JS_12_SPK7.indb 63Anl_CC_JS_12_SPK7.indb 63 08.01.16 11:4708.01.16 11:47
Page 64

P
Só para países da UE
Não deite as ferramentas eléctricas para o lixo doméstico!
Segundo a directiva europeia 2012/19/CE relativa aos resíduos de equipamentos eléctricos e electrónicos e a respectiva transposição para o direito interno, as ferramentas eléctricas usadas têm de ser
recolhidas separadamente e entregues nos locais de recolha previstos para o efeito.
Alternativa de reciclagem relativa à solicitação de devolução:
O proprietário do aparelho eléctrico, no caso de não optar pela devolução, é obrigado a reciclar adequadamente o aparelho eléctrico. Para tal, o aparelho usado também pode ser entregue a um ponto
de recolha que trate da eliminação de resíduos, respeitando a legislação nacional sobre resíduos e
respectiva reciclagem. Não estão abrangidos os meios auxiliares e os acessórios sem componentes
electrónicos, que acompanham os aparelhos usados.
A reprodução ou duplicação, mesmo que parcial, da documentação e dos anexos dos produtos carece
da autorização expressa da iSC GmbH.
Reservado o direito a alterações técnicas
- 64 -
Anl_CC_JS_12_SPK7.indb 64Anl_CC_JS_12_SPK7.indb 64 08.01.16 11:4708.01.16 11:47
Page 65

P
Informações do serviço de assistência técnica
Estamos representados em todos os países mencionados no certifi cado de garantia por agentes auto-
rizados competentes, cujos contactos poderá encontrar no certifi cado de garantia. Estes encontram-se
ao seu dispor para todos os serviços de que necessita, tais como reparações, fornecimento de peças
sobressalentes e peças desgastadas ou a aquisição de consumíveis.
Deve-se ter em atenção que, neste produto, as seguintes peças estão sujeitas a um desgaste natural
ou decorrente da sua utilização, ou então são necessárias como consumíveis.
Categoria Exemplo
Peças de desgaste* Acumulador
Consumíveis/peças consumíveis*
Peças em falta
* não incluído obrigatoriamente no material a fornecer!
Em caso de defi ciências ou erros, pedimos-lhe que comunique o problema através da página de In-
ternet www.isc-gmbh.info. Certifi que-se de que faz uma descrição exacta do problema, respondendo
sempre às seguintes questões:
O aparelho já funcionou alguma vez ou possui o defeito desde o início?
•
Antes do surgimento do defeito, apercebeu-se de algo estranho (sintoma antes do defeito)?
•
Na sua opinião, que erro de funcionamento apresenta o aparelho (sintoma principal)?
•
Descreva este erro de funcionamento.
- 65 -
Anl_CC_JS_12_SPK7.indb 65Anl_CC_JS_12_SPK7.indb 65 08.01.16 11:4708.01.16 11:47
Page 66

P
Certifi cado de garantia
Estimado(a) cliente,
os nossos produtos são submetidos a um rigoroso controlo de qualidade. Se, ainda assim, o aparelho
não funcionar nas devidas condições, lamentamos esse facto e pedimos-lhe que se dirija ao nosso serviço de assistência técnica na morada indicada no presente certifi cado de garantia. Se preferir, também
pode contactar-nos telefonicamente através do número de assistência técnica indicado. O exercício
dos direitos de garantia está sujeito às seguintes condições:
1. As presentes condições de garantia dirigem-se exclusivamente aos consumidores, ou seja, pessoas naturais, que não desejam utilizar este produto quer no âmbito da sua actividade comercial
quer de outra actividade independente. As presentes condições de garantia regem as prestações
de garantia adicionais com que o fabricante abaixo designado se compromete, além dos termos
legais de garantia, para com os compradores dos seus novos aparelhos e não afectam os seus
direitos legais de garantia. O nosso serviço de garantia é prestado gratuitamente.
2. O serviço de garantia cobre exclusivamente as defi ciências num novo aparelho adquirido do fabri-
cante abaixo designado, e que sejam decorrentes de erros de material ou de fabrico comprovados,
e está, por nossa opção, limitado à eliminação de tal falta no aparelho ou à substituição do mesmo.
Chamamos a atenção para o facto de os nossos aparelhos não terem sido concebidos para uso
comercial, artesanal ou profi ssional. Não haverá, por isso, lugar a um contrato de garantia no caso
de o aparelho ter sido utilizado, dentro do período de garantia, em empresas do sector comercial,
artesanal ou industrial ou actividades equiparáveis.
3. Excluídos pela nossa garantia estão:
- Danos no aparelho resultantes da inobservância das instruções de montagem ou de uma instalação incorrecta, da inobservância do manual de instruções (como p. ex. a ligação a uma tensão
de rede ou tipo de corrente errada) ou da inobservância das disposições de segurança ou da
exposição do aparelho a condições ambientais anormais ou de uma conservação e manutenção
insufi cientes.
- Danos no aparelho resultantes de utilizações abusivas ou indevidas (como p. ex. uma sobrecarga
do aparelho ou utilização de ferramentas de trabalho ou acessórios não autorizados), a penetração
de corpos estranhos no aparelho (como p. ex. areia, pedras ou pó, danos de transporte), o uso de
força ou impactos externos (como p. ex. danos resultantes de quedas).
- Danos no aparelho ou nas peças do aparelho associados a um desgaste decorrente do uso, um
desgaste natural habitual ou de outro tipo.
4. O período de garantia é de 24 meses a contar da data de compra do aparelho. Os direitos de garantia devem ser reclamados dentro do período de garantia, no prazo de duas semanas após ter
sido detectado o defeito. Está excluída a reclamação de direitos de garantia após o termo do período de garantia. A reparação ou a substituição do aparelho não implica o prolongamento do período
de garantia nem dá origem à contagem de um novo período de garantia para o aparelho ou para
eventuais peças sobressalentes montadas no mesmo. O mesmo se aplica no caso de a assistência
técnica ter sido prestada no local.
5. Para activar a garantia, denuncie o aparelho defeituoso em: www.isc-gmbh.info. Tenha à disposição
o talão ou outro comprovativo de compra do aparelho novo. Os aparelhos enviados sem o respectivo comprovativo ou sem a placa de características, serão excluídos pelo serviço de garantia devido
à falta de atribuição. Se o defeito do aparelho estiver abrangido pelo nosso serviço de garantia, serlhe-á imediatamente enviado um aparelho novo ou reparado.
Naturalmente, também teremos todo o gosto em efectuar reparações que não estão, ou deixaram de
estar, abrangidas pelo serviço de garantia. Nesse caso, terá de suportar os custos da reparação. Para
este efeito, deverá enviar o aparelho para a morada do nosso serviço de assistência técnica.
Para peças de desgaste, consumíveis e em falta, consulte as restrições desta garantia, de acordo com
as informações do serviço de assistência técnica deste manual de instruções.
- 66 -
Anl_CC_JS_12_SPK7.indb 66Anl_CC_JS_12_SPK7.indb 66 08.01.16 11:4708.01.16 11:47
Page 67

GR
Κίνδυνος!
Κατά τη χρήση των συσκευών πρέπει, προς
αποφυγή τραυματισμών, να τηρούνται και
να λαμβάνονται ορισμένα μέτρα ασφαλείας.
Διαβάστε για το λόγο αυτό προσεκτικά τις
Οδηγίες χρήσης / Υποδείξεις ασφαλείας.
Φυλάξτε τις καλά για να έχετε τις πληροφορίες
πάντα στη διάθεσή σας. Εάν παραδώσετε τη
συσκευή σε άλλα άτομα, δώστε μαζί και αυτές
τις Οδηγίες χρήσης / Υποδείξεις ασφαλείας. Δεν
αναλαμβάνουμε καμία ευθύνη για ατυχήματα
ή βλάβες που οφείλονται σε μη τήρηση αυτών
των Οδηγιών χρήσης και των Υποδείξεων
ασφαλείας.
1. Υποδείξεις ασφαλείας
Θα βρείτε τις ανάλογες υποδείξεις ασφαλείας
στο επισυναπτόμενο βιβλιάριο!
Κίνδυνος!
Διαβάστε όλες τις Υποδείξεις ασφαλείας
και τις Οδηγίες. Εάν δεν ακολουθήσετε
τις Υποδείξεις ασφαλεία και τις Οδηγίες δεν
αποκλείονται ηλεκτροπληξία, πυρκαγιά και/ή
σοβαροί τραυματισμοί. Φυλάξτε προσεκτικά
όλες τις Υποδείξεις ασφαλεάις και τις
Οδηγίες για το μέλλον.
Η συσκευή να μη χρησιμοποιείται από παιδιά. Τα
παιδιά να επιβλέπονται για να είναι σίγουρο πως
δεν παίζουν με τη συσκευή. Δεν επιτρέπεται ο
καθαρισμός και η συντήρηση να εκτελούνται
από παιδιά. Η συσκευή δεν επιτρέπεται να
χρησιμοποιείται από άτομα με περιορισμένες
σωματικές, αισθητικές ή πνευματικές
ικανότητες ή ελλείψει γνώσεων ή πείρας εκτός
εάν επιτηρούνται ή καθοδηγούνται από αρμόδιο
άτομο.
2. Περιγραφή της συσκευής και
συμπαραδιδόμενα
2.1 Περιγραφή της συσκευής (εικ. 1)
1. Έξοδος τάσης συνεχούς ρεύματος 19V μέγ.
3,5 A
2. LED ένδειξη δυναμικότητας μπαταρίας
3. Διακόπτης ΟΝ-OFF
4. USB έξοδος τάσης συνεχούς ρεύματος 5V
μέγ. 2A
5. Έξοδος τάσης συνεχούς ρεύματος 12V μέγ.
10 A
6. Βύσμα φόρτισης 15V d.c.
7. Σύνδεση καλωδίου βοηθητικής εκκίνησης
8. Φως LED
2.2 Συμπαραδιδόμενα
Βάσει της περιγραφής των συμπαραδιδόμενων
παρακαλούμε να ελέγξετε την πληρότητα
του προϊόντος. Σε περίπτωση ελλείψεων
τμημάτων παρακαλούμε να αποτανθείτε εντός
5 εργάσιμων ημερών από την ημερομηνία
αγοράς στο Κέντρο Σέρβις (Service Center) της
εταιρείας μας ή στο κατάστημα από το οποίο
αγοράσατε τη συσκευή, προσκομίζοντας την
ισχύουσα απόδειξη αγοράς. Παρακαλούμε να
προσέξετε τον πίνακα εγγύησης στους όρους
εγγύησης στο τέλος των οδηγιών.
Ανοίξτε τη συσκευασία και βγάλτε
•
προσεκτικά τη συσκευή.
Απομακρύνετε τα υλικά συσκευασίας
•
καθώς και τα συστήματα προστασίας της
συσκευασίας / μεταφοράς (εάν υπάρχουν).
Ελέγξτε εάν είναι πλήρες το περιεχόμενο.
•
Ελέγξτε τη συσκευή και τα αξεσουάρ για
•
ενδεχόμενες βλάβες μεταφοράς.
Φυλάξτε τη συσκευασία αν γίνεται μέχρι την
•
πάροδο της προθεσμίας της εγγύησης.
Κίνδυνος!
H συσκευή και τα υλικά συσκευασίας δεν είναι
παιχνίδια! Τα παιδιά δεν επιτρέπεται να παίζουν
με πλαστικές σακούλες, πλαστικές μεμβράνες
και μικροαντικείμενα! Υφίσταται κίνδυνος
κατάποσης και ασφυξίας!
Βοηθητική εξωτερική εκκίνηση - μονάδα
•
ενέργειας
Φορτιστής
•
12V καλώδιο αναπτήρα τσιγάρων
•
Καλώδιο εκκίνησης
•
USB καλώδιο επέκτασης
•
Καλώδιο σύνδεσης
•
Σετ για φις
•
Θήκη φύλαξης
•
Πρωτότυπες οδηγίες χρήσης
•
Υποδείξεις ασφαλείας
•
- 67 -
Anl_CC_JS_12_SPK7.indb 67Anl_CC_JS_12_SPK7.indb 67 08.01.16 11:4708.01.16 11:47
Page 68

GR
3. Ενδεδειγμένη χρήση
Η συσκευή είναι κατάλληλη με τη βοήθεια
του συμπαραδιδόμενου βοηθητικού καλωδίου
εκκίνησης για την βοηθητική εξωτερική
εκκίνηση μπαταριών εκκίνησης 12 V (μπαταρίες
υδροκυανικού οξέως) για μέγιστο μέγεθος
βενζινοκινητήρων 2500 κυβικών. Η συσκευή
δεν μπορεί να αντικαταστήσει την μπαταρία
βοηθητικής εκκίνησης. Στι ς υποδοχές USB
μπορούν να συνδεθούν συσκευές (π.x.
κινητά τηλέφωνα) με τάση 5 V και μέγ. 2A. Η
σύνδεση 19 V / 3,5A είναι κατάλληλη για την
τροφοδότηση τάσης προς notebooks, η σύνδεση
των 12V / 10A για άλλους καταναλωτές τάσης
συνεχούς ρεύματος 12V.
Η συσκευή επιτρέπεται να χρησιμοποιείται μόνο
για τον σκοπό για τον οποίο προορίζεται. Κάθε
πέραν τούτου χρήση δεν είναι ενδεδειγμένη.
Γι α ζημιές ή τραυματισμούς παντός είδους που
οφείλονται σε μη ενδεδειγμένη χρήση ευθύνεται
ο χρήστης / χειριστής και όχι ο κατασκευαστής.
Παρακαλούμε να προσέξετε, πως οι
συσκευές μας δεν έχουν κατασκευαστεί για
επαγγελματική, βιοτεχνική και βιομηχανική
χρήση. Δεν αναλαμβάνουμε καμία εγγύηση,
εάν η συσκευή χρησιμοποιηθεί σε βιοτεχνίες ή
βιομηχανίες ή σε παρόμοιες εργασίες.
4. Τεχνικά χαρακτηριστικά
Βοηθητική εξωτερική εκκίνηση – Μονάδα
ενέργειας
Li-Po-Akku: ........................................... 41,1 Wh
Διάρκεια φόρτισης περ. .................................. 4 h
Έξοδος USB συνεχούς τάσης ρεύματος: ...........
...........................................................5 V μέγ. 2 A
Έξοδος συνεχούς τάσης ρεύματος: ...................
......................................................19 V μέγ. 3,5 A
Έξοδος συνεχούς τάσης ρεύματος: ...................
.......................................................12 V μέγ. 10 A
Ρεύμα βοήθειας εκκίνησης: ................................
.............................. 200 A (5 δευτ.) / 400 A (max.)
Θερμοκρασία περιβάλλοντος σε βοηθητική
εκκίνηση: ................................... - 15°C - + 40 °C
5. Πριν τη θέση σε λειτουργία
5.1 Φορτίστε τη βοηθητική εκκίνηση
– μονάδα ενέργειας με το
συμπαραδιδόμενο φορτιστή.
Για το φορτιστή ισχύουν τα εξής:
Αυτή η συσκευή μπορεί να χρησιμοποιηθεί από
παιδιά άνω των 8 ετών καθώς και από άτομα
με περιορισμένες σωματικές, αισθητικές ή
πνευματικές ικανότητες ή με έλλειψη πείρας
και γνώσεων, εφόσον επιτηρούνται από άτομο
αρμόδιο για
για την ασφαλή χρήση της συσκευής. Τα παιδιά
δεν επιτρέπεται να παίζουν με τη συσκευή.
Καθαρισμός και συντήρηση εκ μέρους του
χρήστη δεν επιτρέπεται να εκτελούνται από μη
επιτηρούμενα παιδιά.
Πριν τη σύνδεση σιγουρευτείτε πως τα στοιχεία
στην ετικέτα της συσκευής συμφωνούν με τα
στοιχεία του δικτύου.
Προσοχή! Βγάλτε πρώτα το βύσμα από την
πρίζα πριν κάνετε τις ρυθμίσεις στη συσκευή.
Γι α τη φόρτιση της μπαταρίας να χρησιμοποιείτε
μόνο τον συμπαραδιδόμενο φορτιστή.
Να ακολουθείτετε τις επισυναπτόμενες
υποδείξεις ασφαλείας και τις αναλυτικές
οδηγίες για τη φόρτιση.
Οι έξοδοι δεν επιτρέπεται να χρησιμοποιούνται
κατά τη διάρκεια της φόρτισης.
•
•
•
την ασφάλεια ή εάν έλαβαν οδηγίες
Συνδέστε τον συμπαραδιδόμενο φορτιστή
(εικ. 2a / αρ. 2) με την υποδοχή „Input 15V
1A“ φόρτισης (εικ. 1 / αρ. 6) της συσκευής.
Συνδέστε το φορτιστή με την πρίζα, η
μπαταρία φορτίζεται. Κατά τη διάρκεια της
φόρτισης ανάβουν (αναβοσβήνουν) τα LED
(εικ. 1/ αρ. 2) και δείχνουν την εξέλιξη της
φόρτισης. Μόλις λήξει η διαδικασία της
φόρτισης, ανάβουν όλα τα LED.
Η διάρκεια φόρτισης σε άδειο συσσωρευτή
ανέρχεται σε περίπου 4 ώρες. Κατά τη
διάρκεια της φόρτισης μπορεί να ζεσταθεί
λίγο ο συσσωρευτής, πράγμα φυσιολογικό.
Φορτιστής
Ονομαστική τάση εισόδου: 100-240 V ~50/60 Hz
Ονομαστική τάση εξόδου: .................... 15 V d.c.
Ονομαστικό ρεύμα εξόδου: ...........................1 A
- 68 -
Anl_CC_JS_12_SPK7.indb 68Anl_CC_JS_12_SPK7.indb 68 08.01.16 11:4708.01.16 11:47
Page 69

GR
5.2 Φόρτιση της βοηθητικής εκκίνησης –
μονάδας ενέργειας με το καλώδιο του
αναπτήρα τσιγάρων 12V
Η διαδικασία φόρτισης να γίνεται μόνο κατά τη
διάρκεια της δθιαδρομής, διότι εκφορτίζεται
η μπαταρία του οχήματος. Τοποθετήστε τη
συσκευή σε κατάλληλη θέση, έτσι ώστε να μην
κουνηθεί σε περίπτωση αλλαγής της ταχύτητας
ή της κατεύθυνσης.
Συνδέστε το συμπαραδιδόμενο καλώδιο του
•
αναπτήρα τσιγάρων 12V (εικ. 2b / αρ. 11) με
την υποδοχή „Input 15V 1A“ φόρτισης (εικ. 1
/ αρ. 6) της συσκευής.
Βάλτε το φις των 12V σε κατάλληλη πρίζα
•
για αναπτήρα τσιγάρων 12V.
5.3 Ένδειξη χωρητικότητας μπαταρίας:
Πιέστε τώρα τον διακόπτη ON-OFF (εικ. 1/αρ.
3) σύντομα. Ανάβει η ένδειξη χωρητικότητας
της μπαταρίας (εικ. 1 / αρ. 2). Ο αριθμός των
LED που αάβουν ενημερώνει για την κατάσταση
φόρτισης της χρησιμοποιούμενης μπαταρίας
Li-Po.
100 % φόρτιση = 5 LED με συνεχές φως
<10 % φόρτιση = κανένα LED
6. Φως LED
Προσοχή! Μη κοιτάζετε στην ακτίνα.
Πιέστε επί 3 δευτερόλεπτα τον διακόπτη
•
ON-OFF – το φως LED (εικ. 1 / αρ. 8) είναι
συνεχώς αναμμένο.
Πιέστε άλλη μία φορά τον διακόπτη ON-OFF
•
– το φως LED ανάβει σαν στροβοσκόπιο.
Πιέστε άλλη μία φορά τον διακόπτη ON-OFF
•
– το φως LED ανάβει σαν σήμα μορς SOS.
Εάν πιέσετε άλλη μία φορά, το φως LED
•
σβήνει.
υπόλοιπη φόρτιση 40-50% (2 LED αναμμένες)
πρέπει να φορτιστεί η μπαταρία (βλ. εδάφιο 5.)
7.1 Φόρτιση/λειτουργία συσκευών με
σύνδεση USB.
1. Συνδέστε ένα καλώδιο (ή το
συμπαραδιδόμενο καλώδιο) USB με τη
σύνδεση USB (εικ. 1 / αρ. 4) της βοηθητικής
εκκίνησης – μονάδας ενέργειας και
κατόπιν με την συσκευή που θέλετε να
τροφοδοτήσετε.
2. Πιέστε τώρα τον διακόπτη ON-OFF (εικ. 1 /
αρ. 3).
7.2 Λειτουργία συσκευών συνεχούς τάσης
12V
1. Συνδέστε το συμπαραδιδόμενο καλώδιο
σύνδεσης (εικ. 2d/ αρ. 13) με την έξοδο
12V συνεχούς τάσης (εικ. 1 / αρ. 5) της
βοηθητικής εκκίνησης – μονάδας ενέργειας
και κατόπιν ενδεχομένως με τη χρήση ένός
των συμπαραδιδόμενων βυσμάτων (εικ.
2d / αρ. 14) με τη συσκευή συνεχούς τάσης
12V. Η μέγισητ απορρόφηση ρεύματος δεν
επιτρέπεται να υπερβαίνει τα 10Α.
2. Πιέστε τώρα τον διακόπτη ON-OFF (εικ. 1 /
αρ. 3).
7.3 Λειτουργία συσκευών συνεχούς τάσης
19V
1. Συνδέστε το συμπαραδιδόμενο καλώδιο
σύνδεσης (εικ. 2d / αρ. 13) με την έξοδο
19V συνεχούς τάσης (εικ. 1 / αρ. 1) της
βοηθητικής εκκίνησης – μονάδας ενέργειας
και κατόπιν ενδεχομένως με τη χρήση ενός
των συμπαραδιδόμενων βυσμάτων (εικ.
2d / αρ. 14) με τη συσκευή συνεχούς τάσης
19V. Η μέγιστη απορρόφηση ρεύματος δεν
επιτρέπεται να υπερβαίνει τα 3,5Α.
2. Πιέστε τώρα τον διακόπτη ON-OFF (εικ. 1 /
αρ. 3).
7. Έξοδοι
8. Βοηθητική εκκίνηση για το
όχημα
Προσοχή! Προσέξτε τις τιμές τάσης και
ρεύματος των τροφοδοτούμενων συσκευών
(π.χ. κινητό, άπτοπ). Προσέξτε τις Οδηγίες
χρήσης.
Η διάρκεια τροφοδότησης διαφέρει ανάλογα
με την κατάσταση φόρτισης της βοηθητικής
εκκίνησης- της μονάδας ενέργειας, και ανάλογα
με την απορρόφηση ισχύος και την χρήση
της συνδεδεμένης συσκευής. Όταν φτάσει σε
Anl_CC_JS_12_SPK7.indb 69Anl_CC_JS_12_SPK7.indb 69 08.01.16 11:4708.01.16 11:47
Το σύστημα βοήθειας της εκκίνησης 12V
προσφέρει ευχάριστη βοήθεια σε περίπτωση
που δεν παίρνει μπροστά η μηχανή λόγω
έλλειψης δυναμικότητας της μπαταρίας.
Προειδοποίηση! Κατά τη διάρκεια της
βοηθητικής εκκίνησης επιτρέπεται να είναι
συνδεδεμένο μόνο το καλώδιο βοηθητικής
εκκίνησης. Η τροφοδότηση μίας συνδεδεμένης
- 69 -
Page 70

GR
συσκευής, π.χ. μέσω της σύνδεσης USB πρέπει
πρώτα να διακοπεί.
Υπενθυμίζουμε πως τα αυτοκίνητα είναι
εξοπλισμένα με πολλά μεμονωμένα ηλεκτρονικά
συστήματα. Να ακολουθείτε τις υποδείξεις στις
Οδηγίες χρήσης για το αυτοκίνητο, ραδιόφωνο,
υ κλπ.
Προειδοποίηση! Ποτέ μη συνδέετε με το
αμάξωμα του οχήματος!
Σιγουρευτείτε πως το φις του καλωδίου
•
βοηθητικής εκκίνησης είναι καλά
συνδεδεμένο με την πρίζα της συσκευής.
Εάν η σύνδεση είναι χαλαρή κατά τη
διάρκεια της βοηθητικής εκκίνησης, μπορεί
να λιώσει η σύνδεση λόγω του υψηλού
ρεύματος.
Οι πόλοι της μπαταρίας του οχήματος
•
πρέπει να είναι καθαροί και οι κλέμες
του καλωδίου βοηθητικής εκκίνησης να
εφαρμόζουν καλά στους πόλους της
μπαταρίας.
Κατά τη διάρκεια της βοηθητικής εκκίνησης
•
δεν επιτρέπεται να είναι συνδεδεμένες
μεταξύ τους οι κλέμες του καλωδίου
βοηθητικής εκκίνησης – βραχυκύκλωμα.
Σιγουρευτείτε πως είναι αναμμένα τουλάχιστον
3 LED της ένδειξης χωρητικότητας της
μπαταρίας. Η θερμοκρασία της συσκευής
πρέπει να κυμαίνεται μεταξύ + 10 °C - + 40 °C,
η θερμοκρασία περιβάλλοντος πρέπει κατά την
βοηθητική εκκίνηση να κυμαίνεται σε – 15 °C
- + 40 °C liegen. Για τη φόρτιση της μπαταρίας
να χρησιμοποιείτε μόνο το συμπαραδιδόμενο
καλώδιο φόρτισης (εικ. 2c / αρ. 12).
1. Εικ. 3: Ανοίξτε το κάλυμμα της σύνδεσης
καλωδίου βοηθητικής εκκίνησης (εικ. 1 /
αρ. 7) και συνδέστε το καλώδιο βοηθητικής
εκκίνησης με τη συσκευή.
2. Εικ. 4a: Συνδέστε το κόκκινο καλώδιο με τον
θετικό πόλο και το μαύρο καλώδιο με τον
αρνητικό πόλο της μπαταρίας του οχήματος.
3. Εικ. 4a: Ανάβει το πράσινο LED „correct“ στο
καλώδιο βοηθητικής εκκίνησης.
Υπόδειξη: Εάν δεν ανάβει ή δεν
αναβοσβήνει το πράσινο LED, πιέστε το
πλήκτρο „Boost“ στο καλώδιο βοηθητικής
εκκίνησης.
4. Εκκινήστε το όχημα εντός 30
δευτερολέπτων (διάρκεια προσπάθειας
εκκίνησης μέγ. 5 δευτερόλεπτα, χρόνος
αναμονής μεταξύ δύο προσπαθειών
τουλάχιστον 30 δευτερόλεπτα).
5. Μόλις αρχίζει να λειτουργεί ο κινητήρας,
αφαιρέστε το καλώδιο βοηθητικής
εκκίνησης από τη συσκευή και κατόπιν
αφαιρέστε πρώτα την κόκκινη κλέμα και
μετά τη μαύρη κλέμα από τη μπαταρία.
6. Βάλτε μπροστά τον κινητήρα. Η γεννήτρια
φορτίζει τη ματαρία.
LED – μηνύματα κατάστασης στο καλώδιο
βοηθητικής εκκίνησης
Εικ. 4a: πράσινο LED = εκκίνηση κινητήρα
•
Εικ. 4b: Το πράσινο LED αναβοσβήνει +
•
προειδοποιητικός ήχος = πιέστε το πλήκτρο
„Boost“ και εκκινήστε τον κινητήρα εντός 30
δευτερολέπτων.
Εικ. 4c: Κόκκινο LED + προειδοποιητικός
•
ήχος = η μπααρία συνδέθηκε στους λάθος
πόλους (βλέπε εδάφιο 2)
Εικ. 4d: Κανένα LED, χωρίς προειδοποιητικό
•
ήχο = πρέπει να γίνει έλεγχος της σύνδεσης
προς τη συσκευή, πιέστε το πλήκτρο
„Boost“ και εκκινήστε τον κινητήρα εντός 30
δευτερολέπτων.
Ο αριθμός των δυνατών προσπαθειών
εκκίνησης (το ανώτερο 10) εξαρτάται από τη
θερμοκρασία περιβάλλοντος, την κατάσταση
της μπαταρίας που πρέπει να υποβοηθηθεί και
την κατάσταση φόρτισης της μπαταρίας της
βοηθητικής εκκίνησης – μονάδας ενέργειας.
9. Καθαρισμός, συντήρηση και
παραγγελία ανταλλακτικών
Κίνδυνος!
Πριν από όλες τις εργασίες τοποθέτησης να
βγάζετε το φις από την πρίζα.
9.1 Καθαρισμός
Να κρατάτε όσο πιο ελεύθερα από σκόνη
•
και ακαθαρσίες γίνεται τα συστήματα
προστασίας, τις σχισμές εξαερισμού και το
κέλυφος του μοτέρ. Σκουπίζετε τη συσκευή
με ένα καθαρό πανί, ή καθαρίστε το με
πεπεισμένο αέρα σε χαμηλή πίεση.
Συνιστούμε να καθαρίζετε τη συσκευή
•
αμέσως μετά από κάθε χρήση.
Να καθαρίζετε τη συσκευή τακτικά με ένα
•
νωπό πανί και λίγο μαλακό σαπούνι. Μη
χρησιμοποιείτε καθαριστικά ή διαλύτες,
γιατί δεν αποκλείεται να καταστρέψουν την
επιφάνεια της συσκευής. Προσέξτε να μην
- 70 -
Anl_CC_JS_12_SPK7.indb 70Anl_CC_JS_12_SPK7.indb 70 08.01.16 11:4708.01.16 11:47
Page 71

GR
περάσει νερό στο εσωτερικό της συσκευής.
Η διείσδυση νερού σε ηλεκτρική συσκευή
αυξάνει τον κίνδυνο ηλεκτροπληξίας.
9.2 Συντήρηση
Στο εσωτερικό της συσκευής δεν υπάρχουν
εξαρτήματα που χρειάζονται συντήρηση.
9.3 Παραγγελία ανταλλακτικών:
Κατά την παραγγελία ανταλλακτικών να
αναφέρετε τα εξής:
Τύπος της συσκευής
•
Αριθμός είδους της συσκευής
•
Αριθμός ταύτισης της συσκευής
•
Αριθμός ανταλλακτικού
•
Θα βρείτε τις ισχύουσες τιμές και πληροφορίες
στην ιστοσελίδα www.isc-gmbh.info
10. Επισκευή
Εάν παρουσιαστούν βλάβες, δώστε τη συσκευή
να ελεγχθεί από εντεταλμένο εξειδικευμένο
τεχνικό ή συνεργείο.
11. Διάθεση στα απορρίμματα και
επαναχρησιμοποίηση
Η συσκευή βρίσκεται σε μία συσκευασία προς
αποφυγή ζημιών κατά τη μεταφορά Αυτή η
συσκευασία αποτελείται από πρώτες ύλες
και έτσι μπορεί να επαναχρησιμοποιηθεί ή να
ανακυκλωθεί. Η συσκευή και τα εξαρτήματά της
αποτελούνται από διάφορα υλικά, όπως π.χ.
μέταλλο και πλαστικά υλικά. Δεν επιτρέπεται
η απόρριψη ελαττωματικών συσκευών στα
οικιακά απορρίμματα. Σωστή απόρριψη είναι
η παράδοση σε κατάλληλα κέντρα συλλογής
μεταχειρισμένων συσκευών. Εάν δεν γνωρίζετε
πού βρίσκεται παρόμοιο κέντρο συλλογής
μεταχειρισμένων συσκευών, ρωτήστε στη
διοίκηση της κοινότητάς σας.
12. Φύλαξη
Nα διατηρείτε τη συσκευή και τα αξεσουάρ της
σε σκοτεινό, στεγνό χώρο, χωρίς παγετό. Η
ιδανική θερμοκρασία είναι μεταξύ 5 και 30 °C.
Να ακολουθείτε τις επισυναπτόμενες υποδείξεις
ασφαλείας και τις αναλυτικές οδηγίες για τη
φόρτιση. Επειδή η μπαταρία αντιδρά σε πολύ
ψηλές θερμοκρασίες (πάνω από +40 °C) ή σε
πολύ χαμηλές θερμοκρασίες (κάτω από 0°C),
μην αφήνετε τη συσκευή συνεχώς μέσα στο
όχημα. Γι α τη μεταφορά σε όχημα τοποθετήστε
τη συσκευή σε κατάλληλη θέση, έτσι ώστε
να μην κουνηθεί σε περίπτωση αλλαγής της
ταχύτητας ή της κατεύθυνσης. Να φυλάξετε τη
συσκευή στην πρωτότυπη συσκευασία της.
- 71 -
Anl_CC_JS_12_SPK7.indb 71Anl_CC_JS_12_SPK7.indb 71 08.01.16 11:4708.01.16 11:47
Page 72

GR
13. Plan para localización de averías
Βλάβη Ενδεχόμενη αιτία Αποκατάσταση
Δεν παίρνει
μπροστά η συσκευή
Δεν λειτουργεί
το σύστημα
βοηθητικής
εκκίνησης
- Πολύ χαμηλή τάση της μπαταρίας - Φόρτιση μπαταρίας
- Πολύ χαμηλή τάση της μπαταρίας
- Μπρεδεύτηκαν οι συνδέσεις στο
όχημα
- Φόρτιση μπαταρίας
- Προσέξτε τη σωστή θέση των
πόλων και συνδέστε σωστά
Αναβοσβήνουν όλα
τα LED
- Η θερμοκρασία περιβάλλοντος
κυμαίνεται εκτός του πεδίου
θερμοκρασίας
- Αποκρίθηκε το σύστημα
προστασίας υπερφόρτωσης
- Ζεστάθηκε πολύ η συσκευή
- Πολύ χαμηλή/ψηλή η θερμοκρασία
περιβάλλοντος
- Δοκιμάστε την βοηθητική εκκίνηση
εντός του πεδίου θερμοκρασίας
- Απενεργοποιήστε τη συσκευή,
ελέγξτε την για ενδεχόμενη
υπερφόρτωση
- Να τηρείτε τη θερμοκρασία της
συσκευής σε + 10 °C - + 40 °C.
- Να τηρείτε ένα πεδίο
θερμοκρασίας περιβάλλοντος – 15
°C - + 40 °C
- 72 -
Anl_CC_JS_12_SPK7.indb 72Anl_CC_JS_12_SPK7.indb 72 08.01.16 11:4708.01.16 11:47
Page 73

GR
Μόνο για κράτη-μέλη της Ε.Ε.
Μη πετάτε τις ηλεκτρικές συσκευές στα οικιακάαπορρίμματα!
Σύμφωνα με την ευρωπαϊκή Οδηγία 2012/19/ΕΚ για απόβλητα ειδών ηλεκτρικού και ηλεκτρονικού
εξοπλισμού και την ενσωμάτωσή της σε εθνικό δίκαιο, πρέπει η παλιές ηλεκτρικές συσκευές να
συγκεντρώνονται και να παραδίδονται για ανακύκλωση φιλική για το περιβάλλον.
Εναλλακτική λύση ανακύκλωσης αντί για επιστροφή
Ο ιδιοκτήτης της ηλεκτρικής συσκευής υποχρεούται αντί της επιστροφής να συμβάλει στη σωστή
ανακύκλωση σε περίπτωση που δεν συνεχίζει να χρησιμοποιεί τη συσκευή. Η παλιά συσκευή μπορεί
να παραχωρηθεί σε κέντρο επιστροφής ηλεκτρικών συσκευών με την έννοια των εθνικών νόμων
ανακύκλωσης και διαχείρισης αποβλήτων. Δεν συμπεριλαμβάνονται τα τμήματα παλιών συσκευών
και τα βοηθητικά στοιχεία χωρίς ηλεκτρικά εξαρτήματα.
Η ανατύπωση ή οποιασδήποτε άλλης μορφής αναπαραγωγή της τεκμηρίωσης ή άλλων
δικαιολογητικών που αναφέρονται στα προϊόντα, ακόμη και αποσπασματικά, επιτρέπεται μόνο με
ρητή συγκατάθεση της iSC GmbH.
M ε επιφύλαξη τεχνικών τροποποιήσεων
- 73 -
Anl_CC_JS_12_SPK7.indb 73Anl_CC_JS_12_SPK7.indb 73 08.01.16 11:4708.01.16 11:47
Page 74

GR
Ενημέρωση για το σέρβις
Σε όλες τις χώρες που αναφέρονται στην εγγύηση έχουμε αρμόδια συνεργεία που συνεργάζονται
μαζί μας, η διεύθυνση των οποίων προκύπτει από την εγγύηση. Τα συνεργεία αυτά βρίσκονται στη
διάθεσή σας για επισκευές, ανταλλακτικά ή αξεσουάρ ή για την αγορά αναλώσιμων.
Προσέξτε ότι στη συσκευή αυτή τα ακόλουθα εξαρτήματα υπόκεινται σε κοινή
χρειάζονται τα ακόλουθα αναλώσιμα.
Κατηγορία Παράδειγμα
Φθειρόμενα εξαρτήματα* Συσσωρευτής
Αναλώσιμα υλικά/αναλώσιμα τμήματα*
Ελλείψεις
* δεν συμπεριλαμβάνονται υποχρεωτικά στο περιεχόμενο της συσκευασίας!
Σε περίπτωση ελαττωμάτων ή σφαλμάτων σας παρακαλούμε να δηλώστε την περίπτωση στο
ίντερνετ στο www.isc-gmbh.info. Προσέξτε να περιγράψετε με ακρίβεια το σφάλμα και απαντήστε
στις ακόλουθες ερωτήσεις:
Λειτούργησε σωστά η συσκευή ή είχε από την αρχή κάποιο ελάττωμα?
•
Μήπως προσέξατε κάτι περίεργο προτού παρουσιαστεί το ελάττωμα (σύμπτωμα ή βλάβη)?
•
Ποια δυσλειτουργία παρατηρείται στη συσκευή (κύριο σύμπτωμα)?
•
Περιγράψετε αυτή τη δυσλειτουργία.
φθροά ή ότι
- 74 -
Anl_CC_JS_12_SPK7.indb 74Anl_CC_JS_12_SPK7.indb 74 08.01.16 11:4708.01.16 11:47
Page 75

GR
Εγγύηση
Αξιότιμη πελάτισα, αξιότιμε πελάτη,
τα προϊόντα μας υπόκεινται σε αυστηρό έλεγχο ποιότητας. Εάν η συσκευή αυτή παρ΄όλα αυτά
κάποτε δεν λειτουργήσει άψογα, λυπούμαστε πολύ και σας παρακαλούμε να αποτανθείτε προς το
τμήμα μας εξυπηρέτησης πελατών στην διεύθυνση που αναφέρεται στην κάρτα αυτή. Ευχαρίστως
είμαστε και τηλεφωνικά στη διάθεσή σας στον αριθμό
Γι α την αξίωση της εγγύησης ισχύουν τα εξής:
1. Αυτοί οι όροι εγγύησης ισχύουν μόνο για καταναλωτές, δηλ. για φυσικά πρόσωπα που δεν
χρησιμοποιούν το προϊόν αυτό ούτε για επαγγελματικούς σκοπούς ούτε για άλλη ανεξάρτητη
απασχόληση. Αυτοί οι όροι εγγύησης ρυθμίζουν πρόσθετες παροχές εγγύησης που
πιο κάτω κατασκευαστής πέραν της νόμιμης εγγύησης στους αγοραστές των νέων συσκευών
του. Δεν θίγονται από την εγγύηση αυτή οι νόμιμες αξιώσεις σας εγγύησης. Η εγγύησή μας σας
παρέχεται δωρεάν.
2. Η εγγύηση επεκτείνεται αποκλειστικά και μόνο σε ελαττώματα σε μία συσκευή του πιο κάτω
κατασκευαστή και που αφορούν
ελαττώματα υλικού ή κατασκευής και περιορίζεται ατά την κρίση
μας στην αποκατάσταση αυτών των ελαττωμάτων της συσκευής ή στην αντικατάστασή της.
Παρακαλούμε να προσέξετε πως οι συσκευές μας δεν προορίζονται για επαγγελματική,
βιοτεχνική ή βιομηχανική χρήση. Γι α το λόγο αυτό δεν συνάπτεται σύμβαση εγγύησης σε
περίπτωση κατά την οποία η συσκευή χρησιμοποιήθηκε κατά τη διάρκεια της εγγύησης σε
βιομηχανικές ή βιοτεχνικές επιχειρήσεις ή εάν εκτέθηκε σε παρόμοια εντατική χρήση.
3. Από την εγγύησή μας εξαιρούνται τα εξής:
- Βλάβες της συσκευής που οφείλονται σε μη τήρηση των οδηγιών συναρμολόγησης ή σε
όχι σωστή εγκατάσταση, μη τήρηση των οδηγιών χρήσης (όπως π.χ. σύνδεση σε εσφαλμένη
τάση ή σε λάθος είδος ρεύματος) ή σε μη τήρηση των όρων συντήρησης και ασφαλείας ή σε
περίπτωση έκθεσης της συσκευής σε ασυνήθιστες καιρικές συνθήκες ή σε έλλειψη φροντίδας
και συντήρησης.
- Βλάβες της συσκευής που οφείλονται σε καταχρηστική ή εσφαλμένη χρήση (όπως π.χ.
υπερφόρτωση της συσκευής ή χρήση μη εγκεκριμένων εργαλείων ή αξεσουάρ), σε είσοδο ξένων
αντικειμένων στη συσκευή (όπως π.χ. άμμος, πέτρες ή σκόνη, βλάβες μεταφοράς), άσκηση βίας
ή ξένη επέμβαση (όπως π. χ. βλάβη από πτώση).
- Βλάβες της συσκευής ή τμημάτων της συσκευής που οφείλονται σε συνήθη ή φυσική φθορά.
4. Η διάρκεια της εγγύησης ανέρχεται σε 24 μήνες και αρχίζει από την ημερομηνία της αγοράς της
συσκευής. Οι αξιώσεις εγγύησης πρέπει να εγερθούν πριν τη λήξη της διάρκειας της εγγύησης
εντός δύο εβδομάδων από την διαπίστωση του ελαττώματος. Αποκλείονται αξιώσεις εγγύησης
μετά την πάροδο της διάρκειας της εγγύησης. Η επισκευή ή η αντικατάσταση δεν συνεπάγεται
την επέκταση της διάρκειας της εγγύησης ούτε την νέα έναρξη της διάρκειας της εγγύησης
για τη συσκευή ή για ενδεχομένως χρησιμοποιηθέντα νέα ανταλλακτικά. Αυτό ισχύει και στην
περίπτωση σέρβις επί τόπου.
5. Για την αξίωση της εγγύησης παρακαλούμε να δηλώσετε την ελαττωματική σας συσκευή στο:
www.isc-gmbh.info. Να έχετε μαζί σας την απόδειξη της νέας συσκευής. Οι συσκευές που
αποστέλλονται χωρίς αποδείξεις και χωρίς πινακίδα στοιχείων, αποκλείονται από την εγγύηση
λόγω μη δυνατότητας ταξινόμησης. Εάν το ελάττωμα καλύπτεται από την εγγύηση, θα σας
επιστραφεί αμέσως είτε η επισκευασμένη συσκευή είτε μία καινούργια συσκευή.
σέρβις που αναφέρεται στην κάρτα εγγύησης.
υπόσχεται ο
Ευχαρίστως επισκευάζουμε ελαττώματα της συσκευής έναντι πληρωμής, εάν τα
ελαττώματα αυτά
δεν καλύπτονται από την εγγύηση. Γι α το σκοπό αυτό παρακαλούμε να στείλετε τη συσκευή στη
διεύθυνση του σέρβις μας.
Γι α αναλώσιμα και σε περίπτωση που λείπουν εξαρτήματα παραπέμπουμε στους περιορισμούς αυτής
της εγγύησης σύμφωνα με τους πληροφορίες σέρβις αυτών των οδηγιών χρήσης.
- 75 -
Anl_CC_JS_12_SPK7.indb 75Anl_CC_JS_12_SPK7.indb 75 08.01.16 11:4708.01.16 11:47
Page 76

EH 01/2016 (01)
Anl_CC_JS_12_SPK7.indb 76Anl_CC_JS_12_SPK7.indb 76 08.01.16 11:4708.01.16 11:47
 Loading...