

Page 1
®
Art.-Nr.: 44.192.50 I.-Nr.: 01025
BTS 400/150-1
Bedienungsanleitung
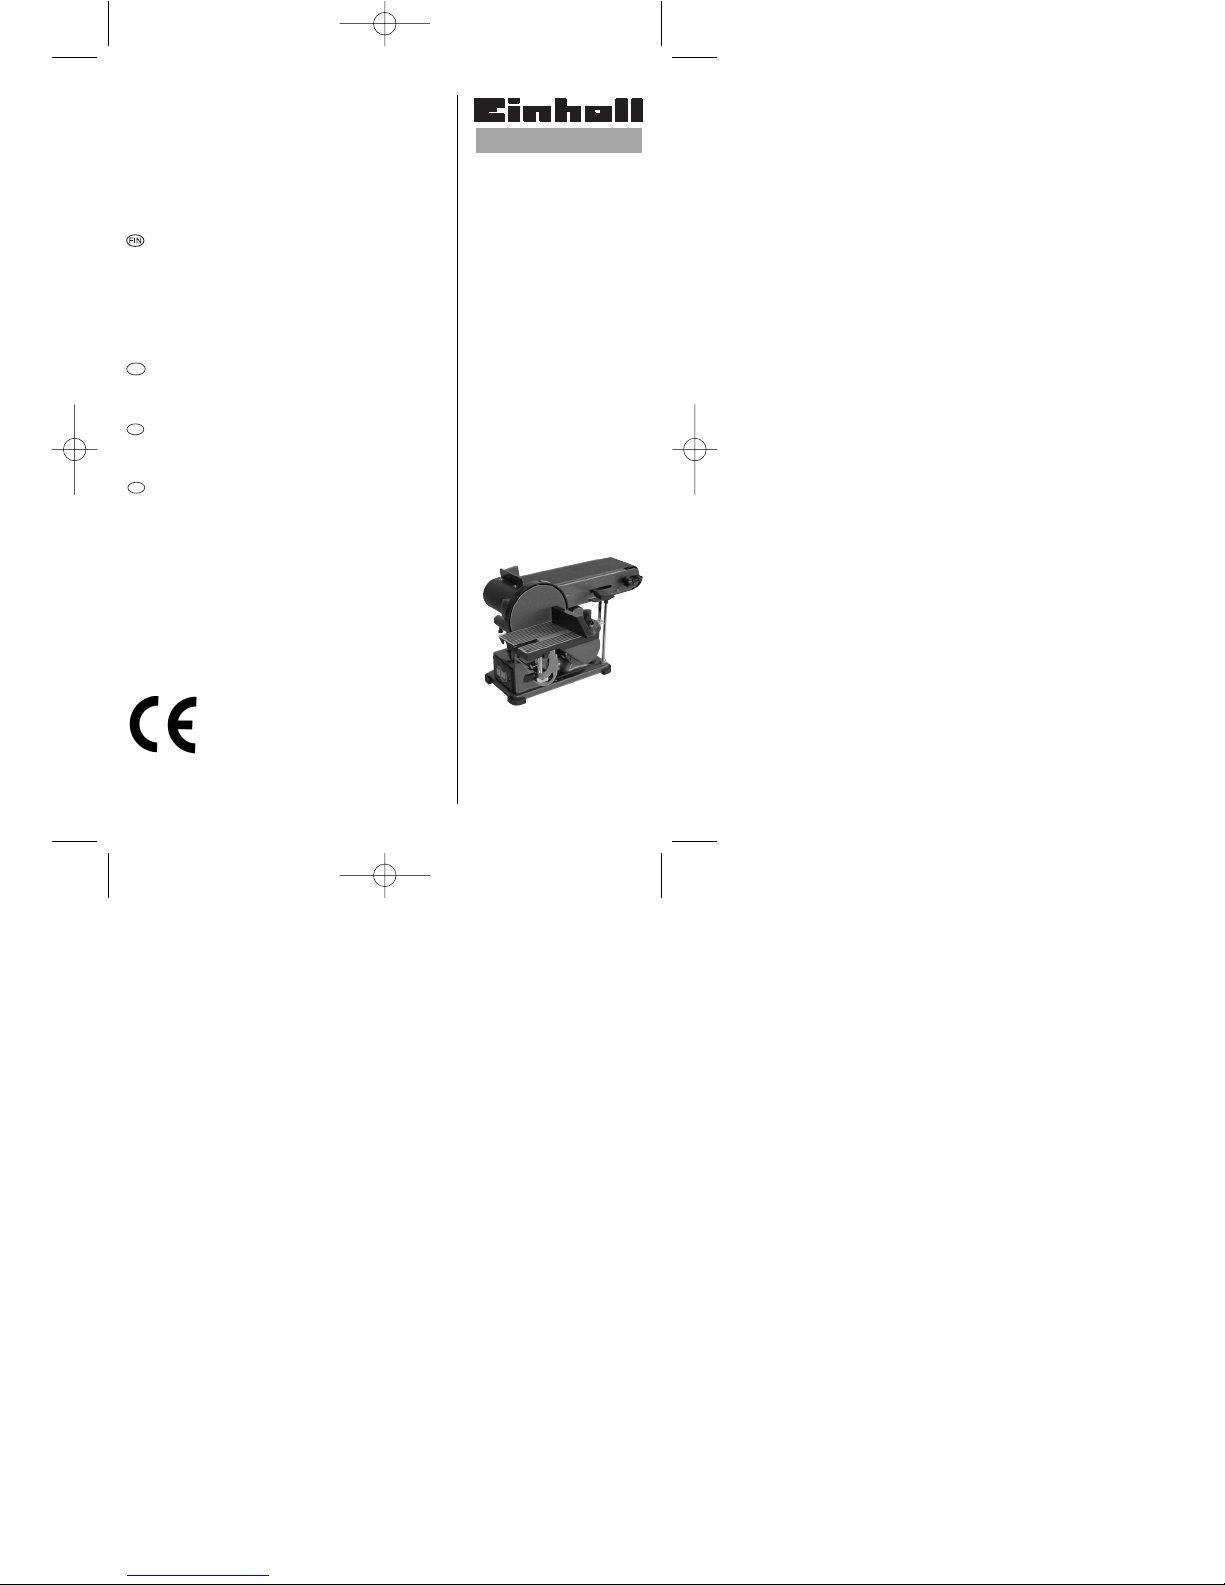
Band- und Tellerschleifer
Operating Instructions
Belt and Disk Sander/Grinder
Mode d’emploi
de la ponceuse à bande et plateau
Käyttöohje
Nauha- ja tasohiomakone
Istruzioni per l’uso della
Levigatrice a nastro e a disco
Használati utasítás a szalag- és
tányércsiszolóhoz
Návod k použití
Pásová bruska a bruska s talířovým
kotoučem
Navodila za uporabo
Tračni in krožnični brusilnik
Naputak za uporabu
Tračna i tanjurasta brusilica
CZ
SLO
HR
Anleitung BTS 400-150-1 30.08.2005 9:27 Uhr Seite 1
Page 2
2
Bitte Seite 2-3 ausklappen
Fold out page 2-3
Veuillez déplier les pages 2-3
Käännä sivut 2-3 auki
Aprire le pagine dalle 2 alla 3
Kérjük a 2 - 3 - ig levő oldalakat
szétnyitni.
Prosím nalistujte stranu 2-3
Prosimo, razgrnite strani 2 - 3.
Molimo da raširite stranice 2-3
Bitte vor Montage und
Inbetriebnahme die Betriebsanleitung aufmerksam lesen
Please read the operating instructions
carefully before assembling and using.
Veuillez lire attentivement le mode
d’emploi avant le montage et la mise en
service.
Lue käyttöohje huolellisesti läpi ennen
laitteen asennusta ja käyttöönottoa.
Prima del montaggio e della messa in
esercizio si prega di leggere
attentamente le istruzioni per l’uso.
Az összeszerelés és használatba vétel
előtt kérjük a használati utasítást
figyelmesen átolvasni.
Před montáží a uvedením do
provozu si prosím pečlivě přečtěte
návod k použití
Pred montažo in uporabo stroja
dobro preberite navodila za
uporabo!
Molimo da prije montaže i puštanja
u funkciju pažljivo pročitate
naputak za uporabu
Seite 6 - 8
Page 9 - 11
Page 12- 14
Sivu 15 - 17
Pagine 18 - 20
Oldal 21 - 23
Strana 24 -26
Strani 27 -29
Stranice 30 -32
CZ
CZ
SLO
SLO
HR
HR
Anleitung BTS 400-150-1 30.08.2005 9:27 Uhr Seite 2
Page 3
3
2
3
1
햶
햷
햸
햹
햺
햻
햽
햾
햿
헁
헂
헀
헃
헂
햿
헄
4
쎻
21
햵
햴
햳
햲
헄
헆
헅
Anleitung BTS 400-150-1 30.08.2005 9:27 Uhr Seite 3
Page 4
4
5
6
햿
쎻
23
7
8
쎻
25
햸
헀
햳
쎻
22
햾
쎻
24
햽
쎻
25
쎻
26
쎻
26
쎻
26
Anleitung BTS 400-150-1 30.08.2005 9:27 Uhr Seite 4
Page 5
5
109
햽
햺
쎻
28
³
³
쎻
29
쎻
29
11
햽
헀
쎻
30
쎻
31
Anleitung BTS 400-150-1 30.08.2005 9:27 Uhr Seite 5
Page 6

D
6
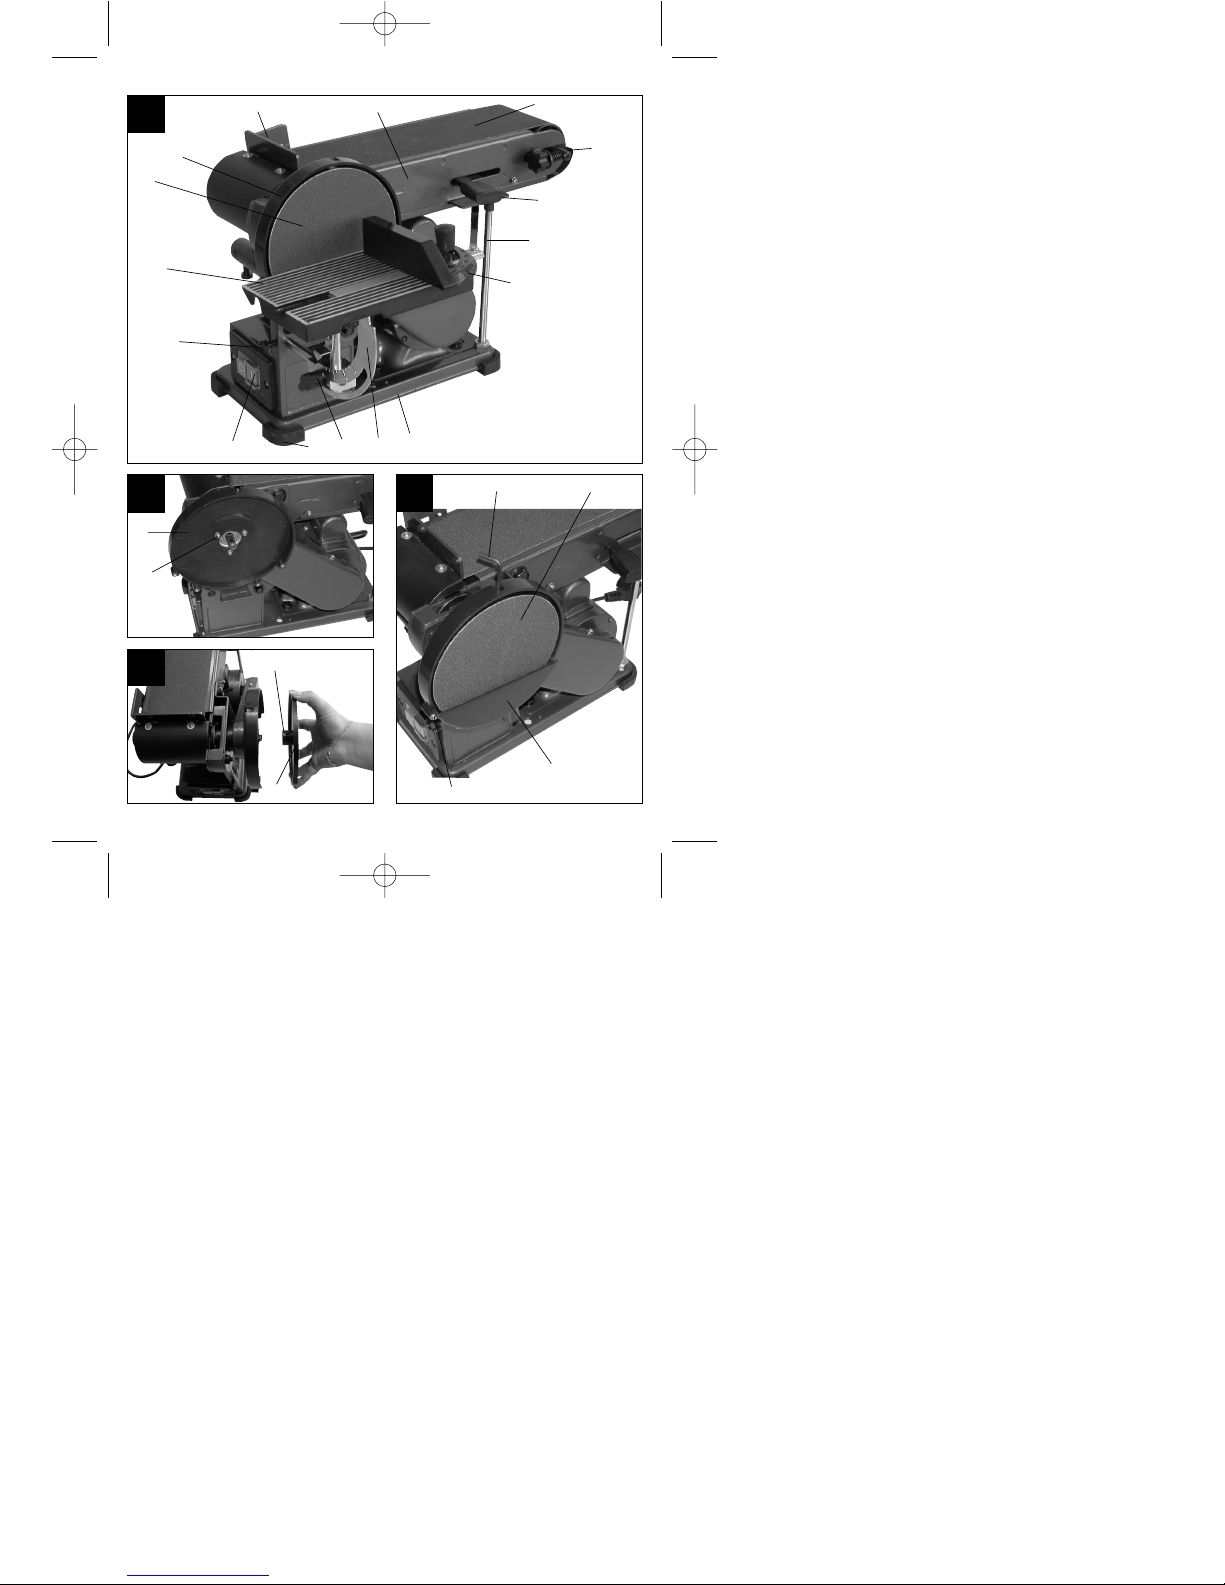
1. Gerätebeschreibung
11. Ein- Ausschalter
12. Gummi Füße
13. Flügelschraube
14. Winkelskala
15. Grundplatte
16. Schleiffläche
17. Queranschlag
18. Stützfuß
19. Schleifbandspanner
10. Rändelschraube für Schleifbandeinstellung
11. Schleifband
12. Anschlagschiene
13. Schleifteller
14. Schleiftisch
15. Feststellschraube für Schleiftisch
16. Kunststoffschutz
2. Lieferumfang
앬 Band- und Tellerschleifer
앬 Schleifteller
앬 Haftschleifscheiben
앬 Schleifband
앬 Inbusschlüssel
3. Bestimmungsgemäße Verwendung
Der Band- und Tellerschleifer dient zum Schleifen
von Hölzern aller Art, entsprechend der
Maschinengröße.
Die Maschine darf nur nach ihrer Bestimmung
verwendet werden.
Jede weitere darüber hinausgehende Verwendung
ist nicht bestimmungsgemäß. Für daraus hervorgehende Schäden oder Verletzungen aller Art haftet
der Benutzer/Bediener und nicht der Hersteller.
Es dürfen nur für die Maschine geeignete Schleifbänder, die den Kenndaten in dieser Anleitung
entsprechen, verwendet werden.
Bestandteil der bestimmungsgemäßen Verwendung
ist auch die Beachtung der Sicherheitshinweise,
sowie die Montageanleitung und Betriebshinweise in
der Bedienungsanleitung.
Personen, die die Maschine bedienen und warten,
müssen mit dieser vertraut und über mögliche
Gefahren unterrichtet sein.
Darüber hinaus sind die geltenden Unfallverhütungsvorschriften genauestens einzuhalten.
Sonstige allgemeine Regeln in arbeitsmedizinischen
und sicherheitstechnischen Bereichen sind zu
beachten.
Veränderungen an der Maschine schließen eine
Haftung des Herstellers und daraus entstehende
Schäden gänzlich aus.
Trotz bestimmungsmäßiger Verwendung können
bestimmte Restrisikofaktoren nicht vollständig
ausgeräumt werden. Bedingt durch Konstruktion und
Aufbau der Maschine können folgende Punkte
auftreten:
앬 Gesundheitsschädliche Emissionen von Holz-
stäuben bei Verwendung in geschlossenen
Räumen.
앬 Die rotierenden Teile des Gerätes können aus
funktionellen Gründen nicht abgedeckt werden.
Gehen Sie daher mit bedacht vor und halten Sie
das Werkstück gut fest, um ein Verrutschen zu
vermeiden, wodurch Ihre Hände mit dem
Schleifband in Berührung kommen könnten.
4. Wichtige Hinweise
Bitte lesen Sie die Gebrauchsanweisung sorgfältig
durch und beachten Sie deren Hinweise. Machen Sie
sich anhand dieser Gebrauchsanweisung mit dem
Gerät, dem richtigen Gebrauch sowie den Sicherheitshinweisen vertraut.
Sicherheitshinweise
앬 Warnung: Wenn Elektrowerkzeuge eingesetzt
werden, müssen die grundlegenden Sicherheitsvorkehrungen befolgt werden, um die Risiken
von Feuer, elektrischem Schlag und Verletzungen von Personen auszuschließen,
einschließlich der folgenden:
앬 Beachten Sie alle diese Hinweise, vor und
während Sie mit dem Band- und Tellerschleifer
arbeiten.
앬 Bewahren Sie diese Sicherheitshinweise gut auf.
앬 Verwenden Sie im Freien nur dafür zugelassene
entsprechend gekennzeichnete Verlängerungskabel.
앬 Achten Sie darauf, was Sie tun. Gehen Sie mit
Vernunft an die Arbeit. Benutzen Sie das Werkzeug nicht, wenn Sie müde sind.
앬 Benutzen Sie keine Werkzeuge, bei denen sich
der Schalter nicht ein- und ausschalten läßt.
앬 Warnung! Der Gebrauch anderer Einsatzwerk-
zeuge und anderen Zubehörs kann eine
Verletzungsgefahr für Sie bedeuten.
앬 Ziehen Sie bei jeglichen Einstell- und Wartungs-
arbeiten den Netzstecker.
앬 Geben Sie die Sicherheitshinweise an alle
Personen, die an der Maschine arbeiten, weiter.
blatt.
앬 Verwenden Sie keine leistungsschwachen
Maschinen für schwere Arbeiten.
앬 Verwenden Sie das Kabel nicht für Zwecke, für
die es nicht bestimmt ist!
앬 Sorgen Sie für sicheren Stand und halten Sie
jederzeit das Gleichgewicht.
Anleitung BTS 400-150-1 30.08.2005 9:27 Uhr Seite 6
Page 7
D
7
앬 Überprüfen Sie das Werkzeug auf eventuelle
Beschädigungen!
앬 Vor weiterem Gebrauch des Werkzeugs müssen
Schutzvorrichtungen oder leicht beschädigte
Teile sorgfältig auf ihre einwandfreie und
bestimmungsgemäße Funktion untersucht
werden.
앬 Überprüfen Sie, ob die beweglichen Teile
einwandfrei funktionieren und nicht klemmen
oder ob Teile beschädigt sind. Sämtliche Teile
müssen richtig montiert sein und alle
Bedingungen erfüllen, um den einwandfreien
Betrieb des Werkzeugs sicherstellen.
앬 Beschädigte Schutzvorrichtungen und Teile
müssen sachgemäß durch eine anerkannte
Fachwerkstatt repariert oder ausgewechselt
werden, soweit nichts anderes in der
Gebrauchsanweisung angegeben ist.
앬 Lassen Sie beschädigte Schalter durch eine
Kundendienstwerkstatt auswechseln.
앬 Dieses Werkzeug entspricht den einschlägigen
Sicherheitsbestimmungen.
앬 Der Abstand zwischen Schleifteller (13) und
Schleiftisch (14) darf max. 1,6 mm betragen.
앬 Arbeiten Sie immer mit Anschlagschiene (12)
oder Schleiftisch (14).
Bitte beachten Sie auch die allg.
Sicherheitshinweise auf dem Beiblatt!
Warnung
Vor Inbetriebnahme
Bedienungsanleitung lesen
Vor Regen und Nässe schützen
Handschuhe tragen
Augenschutz tragen
Staubschutz tragen
5. Technische Daten
Spannung: 230V ~ 50Hz
Leistung: 375 Watt S2 30 min
Schleifteller:
n
0:
1400 min
-1
Ø: 150 mm
schwenkbar: 0°-45°
Queranschlag: -60° bis + 60°
Bandschleifeinrichtung:
v
0:
4,6 m/s
Abmessung: 915 x 100 mm
Schalldruckpegel LPA: 78,6 db(A)
Schallleistungspegel 91,6 dB (A)
앬 Einschaltdauer:
Die Einschaltdauer S2 30 min (Kurzzeitbetrieb)
sagt aus, dass der Motor mit der Nennleistung
(375 W) nur für die auf dem Datenschild
angegebene Zeit (30 min) dauernd belastet
werden darf.
Andernfalls würde er sich unzulässig erwärmen.
Während der Pause kühlt sich der Motor wieder
auf seine Ausgangstemperatur ab.
6. Vor Inbetriebnahme
앬 Die Maschine muß standsicher aufgestellt
werden, d.h. auf einer Werkbank, oder festem
Untergestell festgeschraubt werden.
앬 Vor Inbetriebnahme müssen alle Abdeckungen
und Sicherheitsvorrichtungen ordnungsgemäß
montiert sein.
앬 Schleifband und Schleifteller müssen frei laufen
können.
앬 Bei bereits bearbeitetem Holz auf Fremdkörper
wie z.B. Nägel oder Schrauben usw. achten.
앬 Bevor Sie den Ein- / Ausschalter betätigen,
vergewissern Sie sich, ob das Schleifpapier
richtig montiert ist und bewegliche Teile
leichtgängig sind.
앬 Überzeugen Sie sich vor dem Anschließen der
Maschine, daß die Daten auf dem Typenschild
mit den Netzdaten übereinstimmen.
7. Montage
Achtung! Vor allen Wartungs- und
Umrüstarbeiten an der Gerät ist der Netzstecker
zu ziehen.
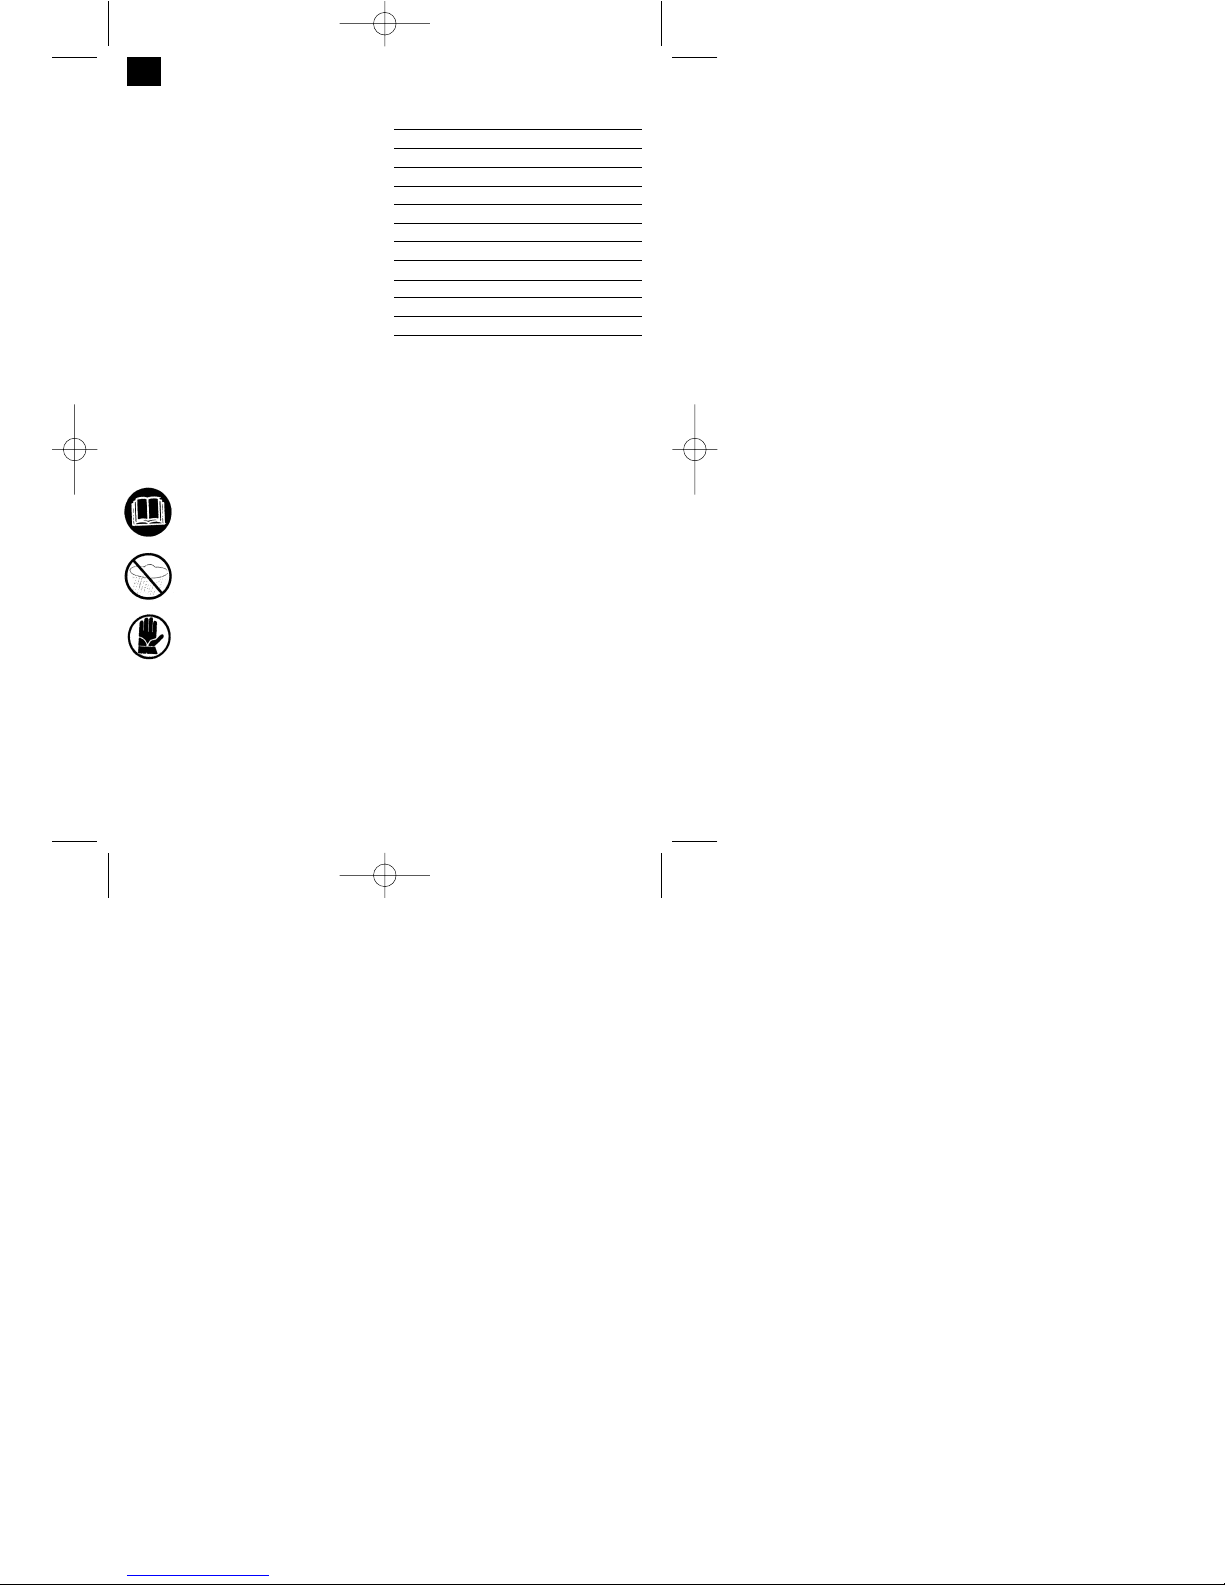
7.1 Maschine zusammenstellen. (Abb. 1 - 6)
앬 Gummi Füße (2) auf die Grundplatte (5)
Anleitung BTS 400-150-1 30.08.2005 9:27 Uhr Seite 7
Page 8

D
8
aufstecken.
앬 Kunststoffschutz (16) mit den Schrauben (17)
befestigen. (Abb. 2)
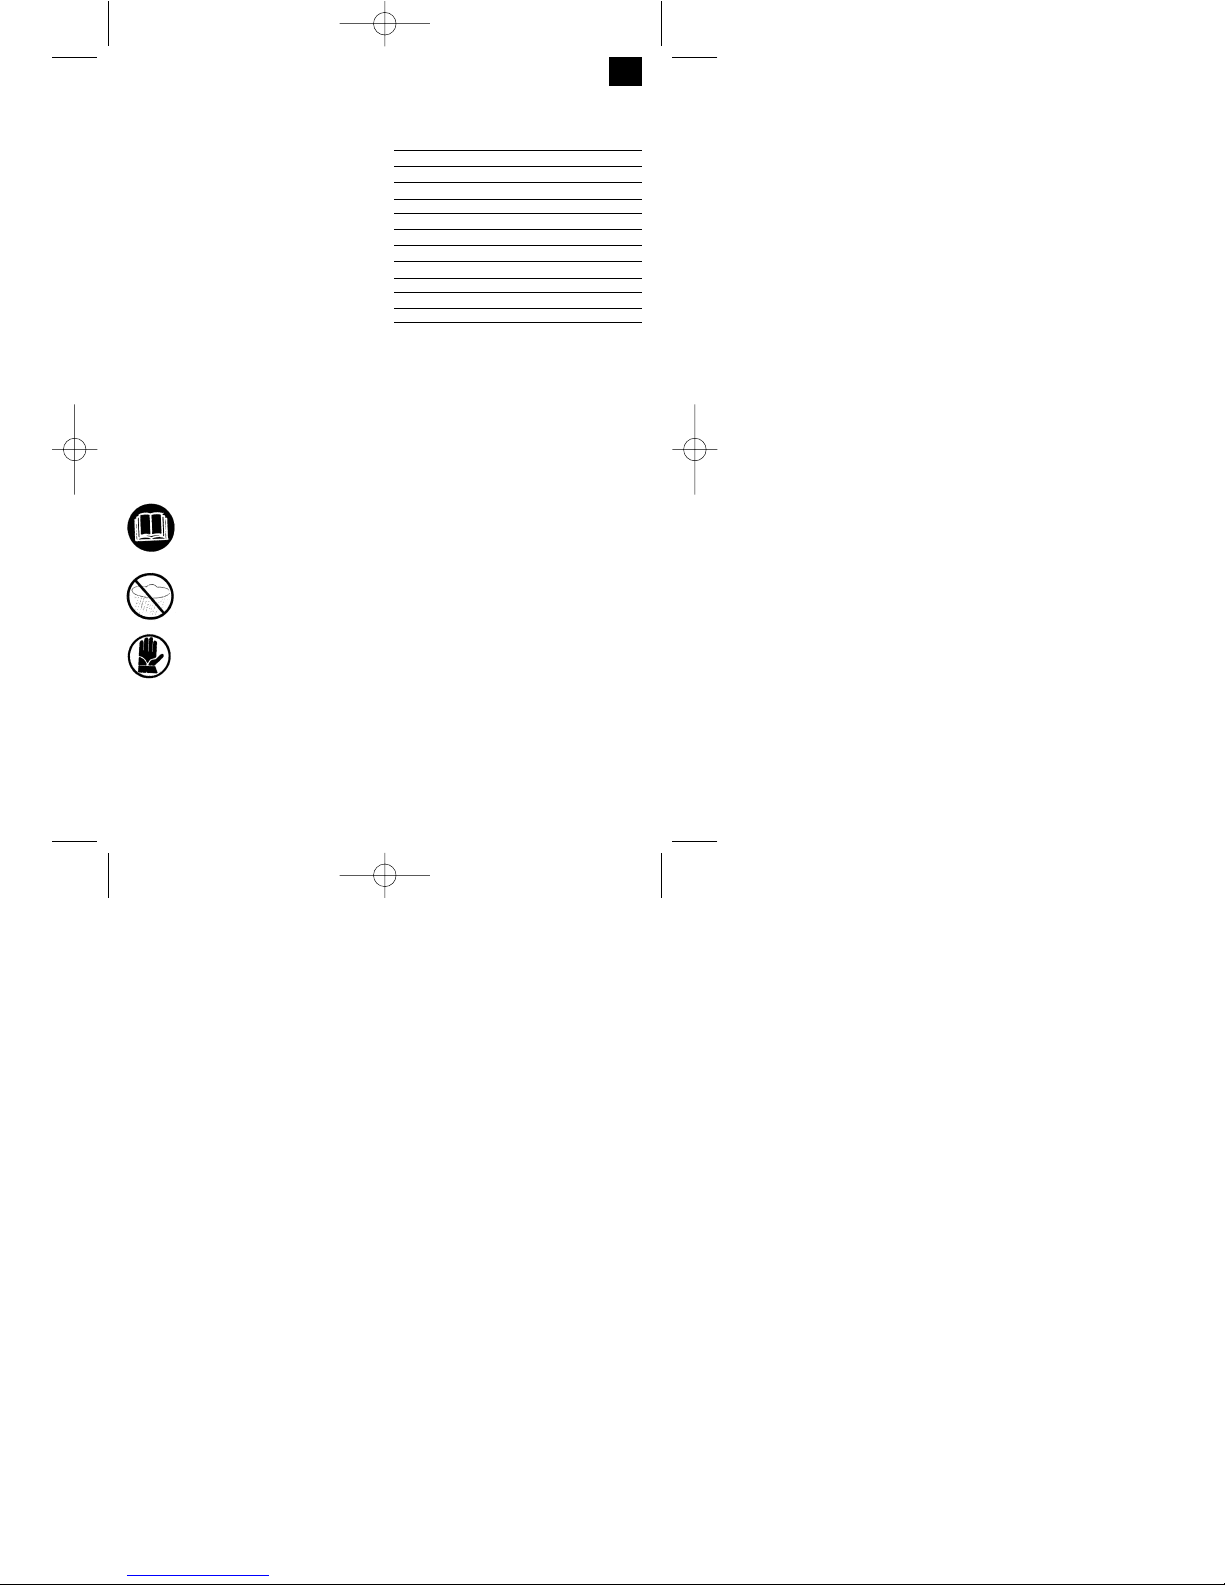
앬 Schleifteller (13) auf die Welle aufstecken.
(Abb. 3)
앬 Schraube (18) mit dem Inbusschlüssel (19)
festziehen, um den Schleifteller (13)
zu sichern. (Abb. 3/4)
앬 Unteren Scheibenschutz (20) mit den Schrauben
(21) montieren. (Abb. 4)
앬 Schleiftisch (14) montieren und mit der
Schraube (22) sichern. (Abb. 5)
Der Schleiftisch (14) kann mittels der
Gehrungsskala (23) und der Flügelschraube (2)
stufenlos von 0 ° bis 45° verstellt werden.
Der verstellbare Queranschlag (7) gewährleistet
eine sichere Werkstückführung.
Achtung! Schleifteller (13) muss frei laufen
können, der Abstand zwischen Schleiftisch (14)
und Schleifteller (13) darf aber nicht größer als
1,6 mm sein.
앬 Anschlagschiene (12) aufsetzen und mit den
Schrauben (24) und (25) befestigen. (Abb. 6)
Achtung! Schleifband (11) muss frei laufen
können.
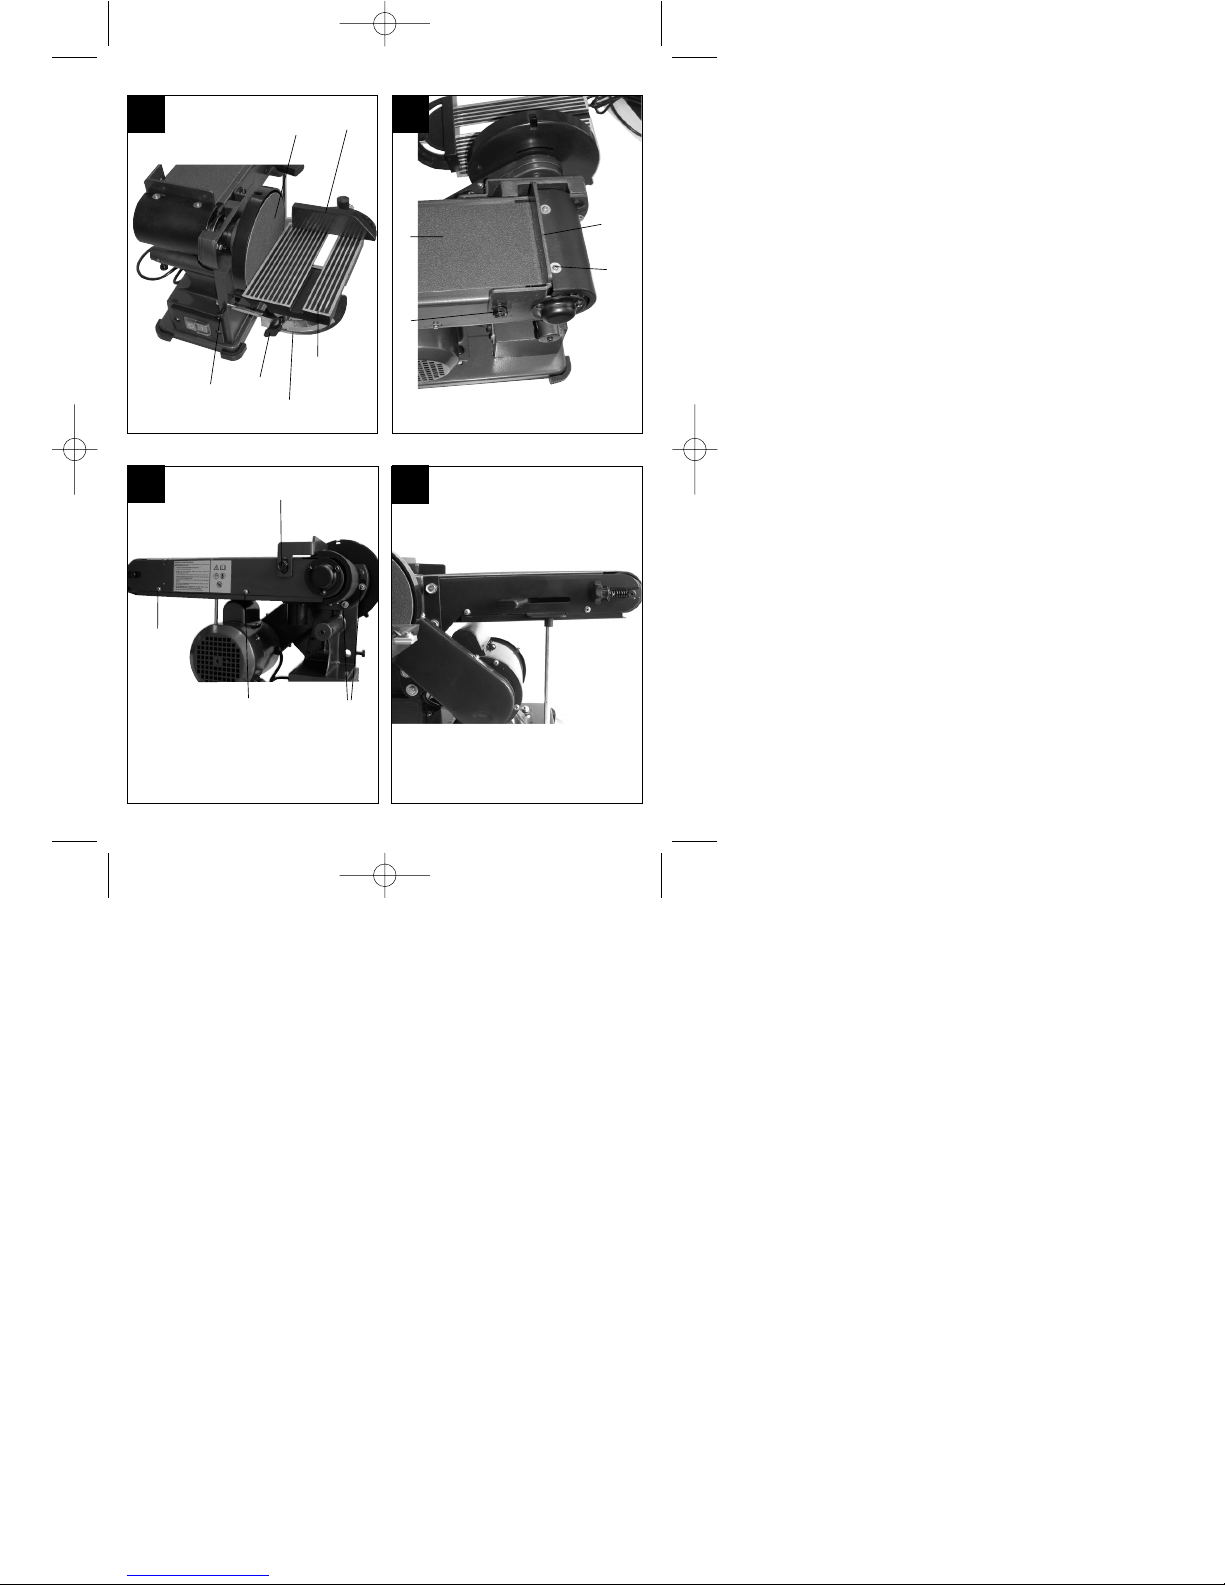
7.2. Schleifband (11) wechseln (Abb. 7 - 9)
앬 Netzstecker ziehen.
앬 Schrauben (25) und (26) entfernen.
앬 Schleifbandschutz (27) abnehmen.
앬 Schleifbandspanner (9) nach links bewegen, um
das Schleifband (11) zu entspannen.
앬 Schleifband (11) nach hinten abnehmen.
앬 Das neue Schleifband in umgekehrter
Reihenfolge wieder montieren.
Achtung! Laufrichtung beachten: auf Gehäuse
(28), und auf der Innenseite des Schleifbandes!
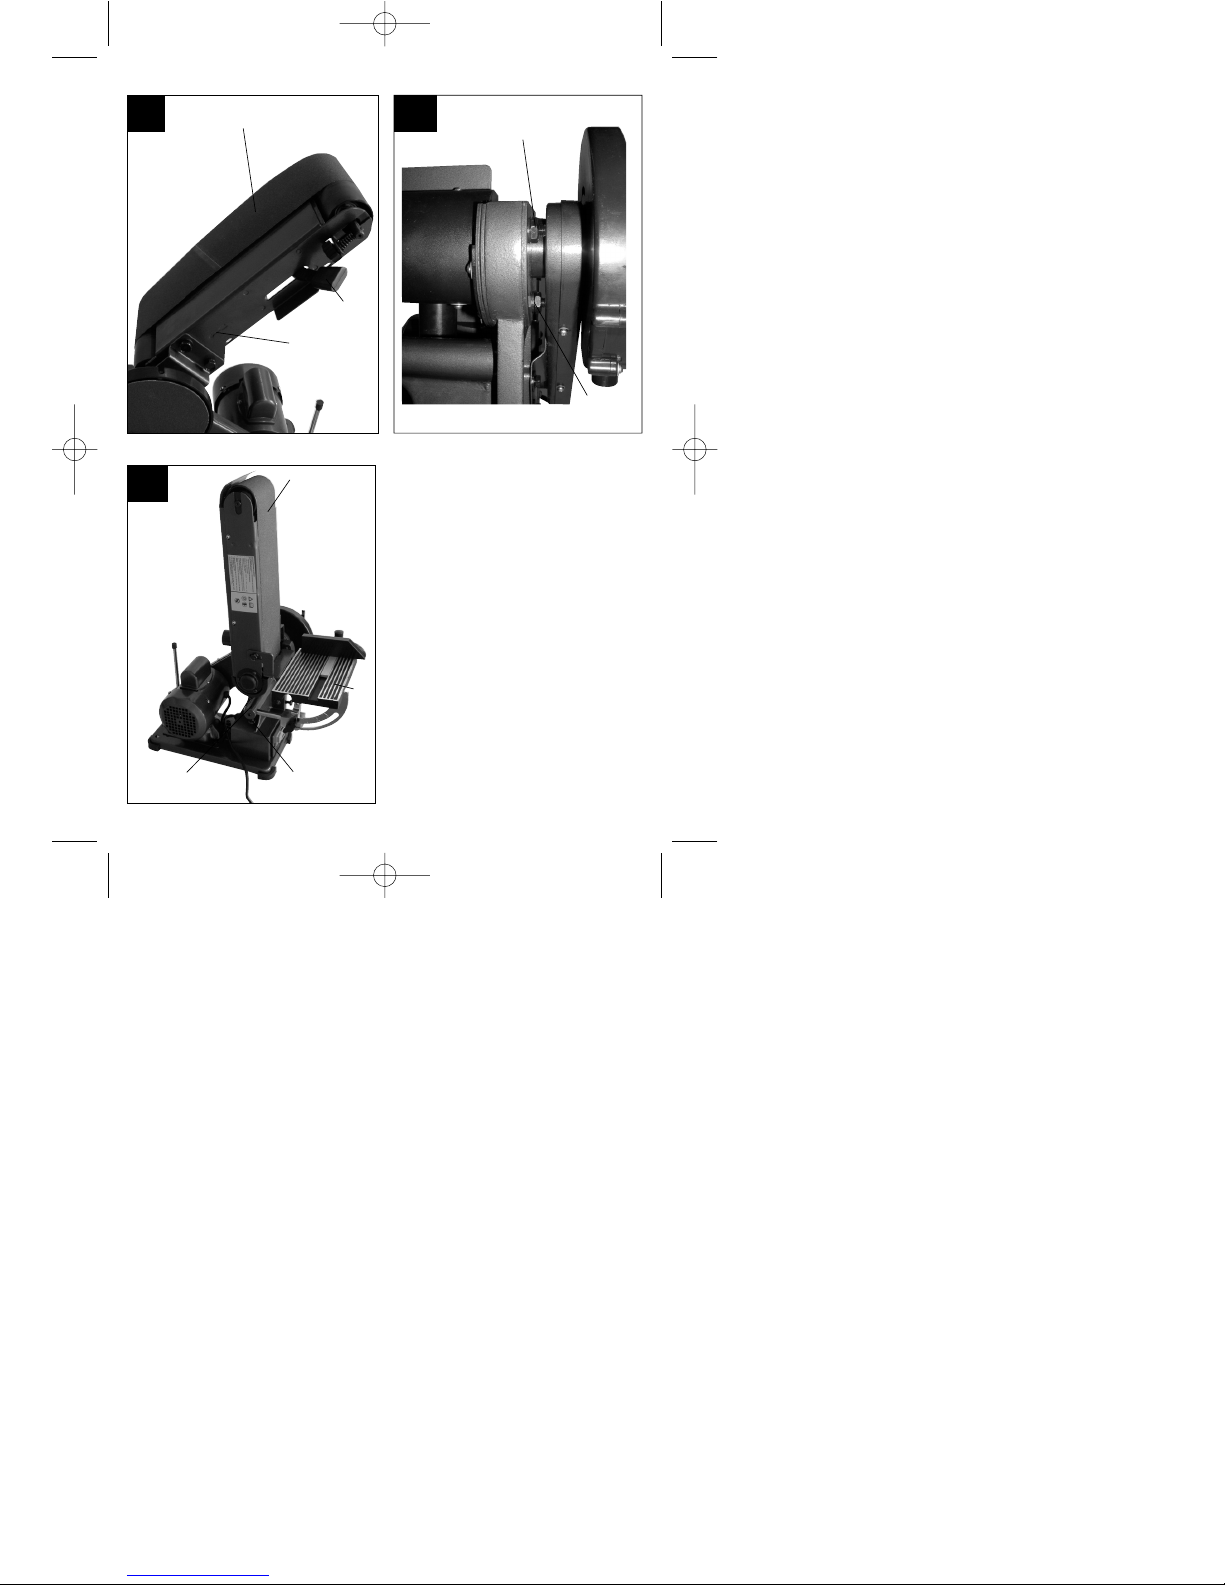
7.3. Schleifband (11) einstellen (Abb. 1)
앬 Schleifband (11) von Hand langsam in
Laufrichtung schieben.
앬 Das Schleifband (11) muss mittig auf der
Schleiffläche (6) laufen, ist dies nicht der Fall, so
kann dies über die Rändelschraube (10)
nachjustiert werden.
7.4. Schleifposition des Schleifbandes (11)
verstellen (Abb. 10/11)
앬 Die beiden Muttern (29) lockern
앬 Schleifband (11) nach oben in die gewünschte
Position bewegen.
앬 Muttern (29) wieder festziehen, um diese
Position zu fixieren.
앬 Zur Werkstückauflage kann in dieser Position
der Schleiftisch eingesetzt werden, hierzu muss
dieser in das Loch des Halterohr (31) geschoben
und mit der Schraube (30) fixiert werden.
7.5. Schleifpapier auf Schleifteller (13) ersetzen
앬 Das Schleifpapier für den Tellerschleifer (13) ist
selbstklebend, d.h. es wird nur auf den
Schleifteller (13) geklebt, bzw. abgezogen.
8. Betrieb
8.1. Ein-, Ausschalter (1)
앬 Durch drücken des grünen Tasters „1“ kann der
Schleifer eingeschaltet werden.
앬 Um den Schleifer wieder auszuschalten, muß
der rot Taster „0“ gedrückt werden.
8.2. Schleifen
앬 Halten Sie das Werkstück während des
Schleifens immer gut fest.
앬 Üben Sie keinen großen Druck aus.
앬 Das Werkstück sollte beim Schleifen auf dem
Schleifband, bzw. auf der Schleifplatte hin und
her bewegt werden, um zu verhindern daß das
Schleifpapier einseitig verschleißt!
앬 Wichtig! Holzstücke sollten immer in Richtung
der Holzmaserung geschliffen werden, um
ein Absplittern zu verhindern.
9. Wartung
앬 Staub und Verschmutzungen sind regelmäßig
von der Maschine zu entfernen. Die Reinigung
ist am besten mit Druckluft oder einem Lappen
durchzuführen.
앬 Benutzen Sie zur Reinigung des Kunststoffes
keine ätzenden Mittel.
10. Ersatzteilbestellung
Ersatzteile können bei der Fa. ISC GmbH bestellt
werden (Adresse siehe Garantieurkunde), hierbei
sollten folgende Angaben gemacht werden:
앬 Typ des Gerätes
앬 Artikelnummer des Gerätes
앬 Ident-Nummer des Gerätes
앬 Ersatzteil-Nummer des erforderlichen Ersatzteils
Aktuelle Preise und Infos finden Sie unter
www.isc-gmbh.info
Anleitung BTS 400-150-1 30.08.2005 9:27 Uhr Seite 8
Page 9

1. Layout
1. On/Off switch
2. Rubber feet
3. Thumb screw
4. Angle scale
5. Base
6. Sanding/grinding section
7. Cross stop
8. Leg support
9. Sanding/grinding belt clamp
10. Knurled screw for sanding/grinding belt
adjustment
11. Sanding/grinding belt
12. Stop rail
13. Sanding/grinding disk
14. Sanding/grinding table
15. Lock screw for sanding/grinding table
16. Plastic guard
2. Items supplied
앬 Belt and disk sander/grinder
앬 Sanding/grinding disk
앬 Adhesive sanding/grinding disks
앬 Sanding/grinding belt
앬 Socket-wrench
3. Proper use
The belt and disk sander/grinder is designed for
sanding/grinding all types of timber, commensurate
with the size of the machine.
The machine is to be used only for its prescribed
purpose.
Any use other than that mentioned is considered to
be a case of misuse. The user/operator and not the
manufacturer shall be liable for any damage or injury
resulting such cases of misuse.
The machine is to be operated only with suitable
sanding/grinding belts which comply with the
specifications contained in these operating
instructions.
To use the machine properly you must also observe
the safety regulations, the assembly instructions and
the operating instructions to be found in this manual.
All persons who use and service the machine have
to be acquainted with this manual and must be
informed about its potential hazards.
It is also imperative to observe the accident
prevention regulations in force in your area.
The same applies for the general rules of
occupational health and safety.
The manufacturer shall not be liable for any changes
made to the machine nor for any damage resulting
from such changes.
Even when the machine is used as prescribed it is
still impossible to eliminate certain residual risk
factors. The following hazards may arise in
connection with the machine’s construction and
design:
앬 Harmful emissions of wood dust when the
machine is used in closed rooms.
앬 For functional reasons the rotating parts in the
device cannot be covered. It is therefore
imperative that you proceed with caution and
hold the workpiece firmly to prevent slippage, as
this may result in your hands coming into contact
with the sanding/grinding belt.
4. Important notes
Please read this manual carefully and pay attention
to the information provided. Use this manual to
familiarize yourself with the machine, its correct use
and safety regulations.
Safety regulations
앬 Caution! When using electric tools it is
imperative to take the following basic safety
precautions in order to reduce the risk of electric
shock, injury and fire. Read and take note of
these instructions before you use this tool.
앬 Follow all these safety regulations before and
while working with the belt and disk
sander/grinder.
앬 Do not lose these safety regulations.
앬 When working outdoors, use only extension
cables that are approved for outdoor use and
which are marked accordingly.
앬 Concentrate on what you are doing. Take a
sensible attitude to your work. Never use the tool
when you are tired.
앬 Never use a tool with a switch that cannot be
turned on and off.
앬 Caution! The use of plug-in tools and
accessories other than those intended may put
you at risk of injury.
앬 Always pull the plug out of the power socket
before adjusting or servicing the machine.
앬 Give these safety regulations to all persons who
work on the machine.
앬 Never use tools or attachments with insufficient
power for the job in hand.
앬 Never use tools on jobs for which they were not
intended!
앬 Make sure you stand squarely and keep your
balance at all times.
앬 Check the tool for possible damage!
9
GB
Anleitung BTS 400-150-1 30.08.2005 9:27 Uhr Seite 9
Page 10
앬 Each time before re-using the tool, carefully
check that the guards or any slightly damaged
parts are working as intended.
앬 Check that the moving parts are in good working
order, that they do not jam, and that no parts are
damaged. Make sure that all parts are fitted
correctly and that all other operating conditions
are properly fulfilled.
앬 Unless otherwise stated in the operating
instructions, damaged guards and parts have to
be repaired or replaced by an authorized service
center.
앬 Have damaged switches replaced by a customer
service workshop.
앬 This tool complies with the pertinent safety
regulations.
앬 The maximum gap between the sanding/grinding
disk (13) and the sanding/grinding table (14)
must not be allowed to exceed 1.6 mm.
앬 Always use the stop rail (12) or sanding/grinding
table (14) when working.
Please also comply with the general safety
instructions contained in the supplementary
sheet!
Caution!
Read the operating instructions
before using for the first time
Protect from the rain and damp
or wet conditions
Wear work gloves
Wear goggles
Wear a breathing mask
5. Technical data
Voltage: 230V ~ 50Hz
Power rating: 375 W S2 30 min
Sanding/grinding disk:
n0: 1400 min
-1
Diameter: 150 mm
Swivel range: 0°-45°
Cross stop: -60° to + 60°
Belt sanding/grinding unit:
v0: 4.6 m/s
Size: 915 x 100 mm
Sound pressure level LPA: 78 dB(A)
Sound power level LWA: 91,6 dB(A)
앬 Load factor:
A load factor of S2 30 min (intermittent periodic
duty) means that you may operate the motor
continuously at its nominal power level (375 W)
for no longer than the time stipulated on the
specifications label (30 minutes ON period).
If you fail to observe this time limit the motor will
overheat. During the OFF period the motor will
cool again to its starting temperature.
6. Before putting the machine into
operation
앬 The machine has to be set up where it can stand
firmly, e.g. on a work bench, or it must be bolted
to a strong stand.
앬 All the covers and safety devices have to be
properly fitted before the machine is switched
on.
앬 The sanding/grinding belt and sanding/grinding
disk must be able to run freely.
앬 When working with wood that has been
processed before, watch out for foreign bodies
such as nails or screws etc.
앬 Before you actuate the On/Off switch, make sure
that the sanding/grinding paper is correctly fitted
and that the machine’s moving parts run
smoothly.
앬 Before you connect the machine to the power
supply, make sure the data on the rating plate is
the same as that for your mains.
7. Assembly
Caution! Always pull out the power plug before
carrying out any maintenance or conversion
10
GB
Anleitung BTS 400-150-1 30.08.2005 9:27 Uhr Seite 10
Page 11

work.
7.1 Assembling the machine (Fig. 1 - 6)
앬 Fit the rubber feet (2) to the base (5).
앬 Fasten the plastic guard (16) using the screws
(17) (Fig. 2).
앬 Mount the sanding/grinding disk (13) on the
shaft (Fig. 3).
앬 Tighten the screw (18) with the socket-wrench
(19) to fasten the sanding/grinding disk (13) (Fig.
3/4).
앬 Mount the bottom disk guard (20) using the
screws (21) (Fig. 4).
앬 Mount the sanding/grinding table (14) and fasten
using the screw (22) (Fig. 5).
The sanding/grinding table (14) can be infinitely
adjusted to any angle between 0° and 45° using
the mitre scale (23) and the knurled screw (2).
The adjustable cross stop (7) is for ensuring that
the workpiece is guided properly.
Caution! The sanding/grinding disk (13) must be
able to run freely. However, the gap between the
sanding/grinding table (14) and the
sanding/grinding disk (13) must not exceed
1.6 mm.
앬 Mount the stop rail (12) and fasten with the
screws (24) and (25) (Fig. 6).
Caution! The sanding/grinding belt (11) must be
able to run freely.
7.2. Changing the sanding/grinding belt (11)
(Fig. 7 - 9)
앬 Pull out the power plug.
앬 Remove the screws (25) and (26).
앬 Remove the sanding/grinding belt guard (27).
앬 Turn the sanding/grinding belt clamp to the left
(9) to unclamp the sanding/grinding belt (11).
앬 Remove the sanding/grinding belt (11) by lifting
out towards the back.
앬 Mount the new sanding/grinding belt by
proceeding in reverse order.
Caution! Check the running direction: On the
casing (28) and on the inside of the
sanding/grinding belt!
7.3. Adjust the sanding/grinding belt (11) (Fig. 1)
앬 Move the sanding/grinding belt (11) slowly by
hand in the direction of running.
앬 The sanding/grinding belt (11) must run dead-
center on the sanding/grinding section (6). If it
does not do so, readjust it using the knurled
screw (10).
7.4. Adjusting the sanding/grinding position of
the sanding/grinding belt (11) (Fig. 10/11)
앬 Slacken the two nuts (29).
앬 Push the sanding/grinding belt (11) upwards to
the desired position.
앬 Re-tighten the nuts (29) to fix the belt in this
position.
앬 In this position the sanding/grinding table can be
used to support the workpiece. To do this, insert
the table in the hole in the stay tube (31) and
fasten using the screw (30).
7.5. Replacing the sanding/grinding paper on the
sanding/grinding disk (13)
앬 The sanding/grinding paper for the disk
sander/grinder (13) is self-adhesive, i.e. it is only
for sticking to/removing from the
sanding/grinding disk (13).
8. Using the machine
8.1. On/Off switch (1)
앬 The machine can be switched on by pressing
the green pushbutton „1“.
앬 The red pushbutton „0“ has to be pushed to
switch off the machine again.
8.2. Sanding/Grinding
앬 Always hold the workpiece very firmly while
sanding/grinding.
앬 Do not apply excessive pressure.
앬 To prevent the sanding paper becoming worn on
just one side, move the workpiece backwards
and forwards during sanding/grinding on the
sanding/grinding belt or sanding/grinding plate!
앬 Important! To prevent pieces coming off in
splinters, timber workpieces should always be
sanded along the direction of the grain.
9. Maintenance
앬 Remove dust and dirt regularly from the
machine. Cleaning is best done with
compressed air or a rag.
앬 Never use caustic agents to clean plastic parts.
10. Ordering replacement parts
You can order replacement parts from ISC GmbH
(see the guarantee certificate for the address). When
doing so, please provide the following information:
앬 Device type
앬 Article number of the device
앬 Identification number of the device
앬 Replacement part number of the required
replacement part
For our latest prices and information please go to
www.isc-gmbh.info
11
GB
Anleitung BTS 400-150-1 30.08.2005 9:27 Uhr Seite 11
Page 12

1. Description de l’appareil
1. Interrupteur Marche Arrêt
2. Pieds en caoutchouc
3. Vis à oreilles
4. Echelle d’angle
5. Plaque de base
6. Surface de meulage
7. Butée transversale
8. Pied de support
9. Tendeur de bande abrasive
10. Vis moletée pour le réglage de la bande abrasive
11. Bande abrasive
12. Rail de butée
13. Plateau de meulage
14. Table de meulage
15. Vis de fixation pour la table
16. Protection en matière plastique
2. Volume de livraison
앬 Ponceuse à bande et plateau
앬 Plateau
앬 Disques abrasifs adhérents
앬 Bande abrasive
앬 Clé à six pans creux
3. Emploi conforme à l’affectation
La ponceuse à bande et plateau sert à poncer les
bois de tous genres, conformément à la taille de la
machine.
La machine doit exclusivement être employée
conformément à son affectation.
Chaque utilisation allant au-delà de cette affectation
est considérée comme non conforme. Pour les
dommages en résultant ou les blessures de tout
genre, le producteur décline toute responsabilité et
l’opérateur/l’exploitant est responsable.
Seules les bandes abrasives convenant à la machine
et dont les caractéristiques sont conformes à celles
indiquées dans ce mode d’emploi doivent être
employées.
Le respect des consignes de sécurité, le mode
d’emploi et les remarques de service dans le mode
d’emploi sont aussi partie intégrante de l’utilisation
conforme à l’affectation. Les personnes commandant
la machine et en effectuant la maintenance doivent
la connaître et avoir été instruits sur les différents
risques possibles en découlant.
En outre, il faut strictement respecter les réglements
de prévoyance contre les accidents.
Il faut respecter toutes les autres règles des
domaines de la médecine du travail et de la
technique de sécurité.
Toute modification de la machine entraîne
l’annulation de la responsabilité du producteur, aussi
pour les dommages en découlant.
Malgré l’emploi conforme à l’affectation, certains
facteurs de risque restant ne peuvent être
complètement supprimés. En raison de la
construction et de la conception de la machine, les
points suivants peuvent avoir lieu:
앬 Emissions nocives de poussière de bois en cas
d’emploi de la scie dans des pièces fermées.
앬 Les pièces en rotation de l’appareil ne peuvent
pas être recouvertes pour des raisons
fonctionnelles. Veuillez donc procéder avec
précaution et bien tenir la pièce à usiner pour
éviter qu’elle ne glisse, ce qui pourrait entraîner
un contact de vos mains avec la bande abrasive.
4. Remarques importantes
Veuillez lire consciencieusement ce mode d’emploi
jusqu’au bout et en respecter les consignes.
Familiarisez-vous avec l’appareil, son emploi correct
ainsi qu’avec les consignes de sécurité en vous
servant de ce mode d’emploi.
Consignes de sécurité
앬 Attention: Lorsque des outils électriques sont
employés, il faut suivre les mesures de sécurité
de base, afin d’exclure tout risque d’incendie, de
décharge électrique et de blessures de
personnes, y compris les mesures suivantes:
앬 Respectez toutes ces consignes avant et
pendant que vous travaillez avec la ponceuse à
bande et plateau.
앬 Conservez bien ces consignes de sécurité.
앬 Utilisez en plein air seulement des rallonges
admises pour cela et dûment caractérisées.
앬 Faites attention à ce que vous faites. Mettez-
vous raisonnablement au travail. N’utilisez pas
l’outil si vous êtes fatigué(e).
앬 N’utilisez aucun outil dont l’interrupteur ne peut
pas être mis en ou hors circuit.
앬 Avertissement! L’utilisation d’autres outillages et
accessoires peut signifier pour vous un risque
de blessure.
앬 Retirez la prise du réseau pour chaque travail de
réglage et de maintenance.
앬 Transmettez les consignes de sécurité à toute
personne travaillant sur la machine.
앬 N’utilisez aucun outil trop faible pour des travaux
difficiles.
앬 N’utilisez pas le câble à des fins pour lesquelles
il n’est pas conçu!
앬 Veillez à vous tenir de façon sûre, et gardez à
tout moment l’équilibre.
12
F
Anleitung BTS 400-150-1 30.08.2005 9:27 Uhr Seite 12
Page 13

앬 Vérifiez si l’outil est éventuellement
endommagé!
앬 Contrôlez soigneusement le bon fonctionnement
conforme à l’affectation des dispositifs de
protection ou des pièces légèrement abîmées
avant de continuer à utiliser l’outil .
앬 Contrôlez si la fonction des pièces mobiles est
correcte, si elles ne sont pas grippées ou si
certaines pièces sont abîmées. Toutes les
pièces doivent être correctement montées et
toutes les conditions remplies pour assurer un
fonctionnement impeccable de l’outil.
앬 Les dispositifs de protection et les pièces
abîmés doivent être réparés dans les règles de
l’art par un atelier de service après-vente
dûment homologué ou être échangés si rien
d’autre n’est indiqué dans le mode d’emploi.
앬 Faites remplacer les interrupteurs abîmés par un
atelier de service après-vente.
앬 Cet outil correspond aux règlements de sécurité
en vigueur.
앬 L’écart entre le plateau (13) et la table (14) doit
s’élever à max. 1,6 mm.
앬 Travaillez toujours avec un rail de butée (12) ou
une table de meulage (14).
Veuillez aussi respecter les consignes de
sécurité générales sur la fiche en annexe!
Avertissement
Avant la mise en service, lisez
le mode d’emploi.
Protéger de la pluie et de
l’humidité
Portez des gants
Porter une protection des yeux
Porter une protection de l’ouïe
5. Caractéristiques techniques
Tension: 230V ~ 50Hz
Puissance: 375 Watt S2 30 min
Plateau:
n0: 1400 tr/min
Ø: 150 mm
Orientable: 0°-45°
Butée transversale: -60° à + 60°
Dispositif de ponçage à bande:
v0: 4,6 m/s
Dimensions: 915 x 100 mm
Niveau de pression acoustique LPA : 78 dB(A)
Niveau de puissance acoustique LWA: 91,6 dB (A)
앬 Duré de mise en circuit:
La durée de mise en circuit S2 30 min. (service
bref) indique que le moteur de cette puissance
nominale (375 W) ne doit être chargé en continu
que pour le temps (30 min.) indiqué sur la
plaque signalétique.
Sinon, il se réchaufferait de façon inadmissible.
Pendant la pause, le moteur refroidit jusqu’à sa
température de départ.
6. Avant la mise en service
앬 La machine doit être placée de façon à être bien
stable, autrement dit vissée à fond sur un établi
ou un support fixe.
앬 Avant la mise en service, les recouvrements et
dispositifs de sécurité doivent être montés dans
les règles de l’art.
앬 La bande abrasive et le plateau ne doivent pas
rencontrer d’obstacle.
앬 Dans le cas de bois ayant déjá été traité, veillez
aux corps étrangers, comme par ex. les clous ou
vis, etc.
앬 Avant d’actionner l’interrupteur Marche/Arrêt,
assurez-vous que le papier abrasif soit
correctement monté et que les pièces amovibles
le soient sans obstacle.
앬 Assurez-vous avant de connecter la machine
que les données se trouvant sur la plaque de
signalisation correspondent bien aux données
du réseau.
7. Montage
Attention! Retirez la fiche secteur avant tout
travail de maintenance et de changement
13
F
Anleitung BTS 400-150-1 30.08.2005 9:27 Uhr Seite 13
Page 14

14
F
d’équipement de l’appareil.
7.1 Assemblage de la machine. (fig. 1 - 6)
앬 Enfichez les pieds en caoutchouc (2) sur la
plaque de base (5).
앬 Fixez la protection en matière plastique (16) à
l’aide des vis (17) (fig. 2).
앬 Enfichez le plateau (13) sur l’arbre (fig. 3).
앬 Serrez à fond la vis (18) avec la clé à six pans
creux (19) pour bloquer le plateau (13) (fig. 3/4).
앬 Montez la protection inférieure du disque (20)
avec les vis (21) (fig. 4).
앬 Montez la table (14) et bloquer à l’aide de la vis
(22) (fig. 5).
La table (14) peut être réglée en continu de 0° à
45° à l’aide de l’échelle d’onglet (23) et de la vis
à oreilles (2).
La butée transversale réglable (7) garantit un
guidage sûr de la pièce à usiner.
Attention! Le plateau (13) doit fonctionner sans
obstacle, la distance entre la table (14) et le
plateau (13) ne doit cependant pas dépasser
1,6 mm.
앬 Placez le rail de butée (12) et fixez-le à l’aide
des vis (24) et (25) (fig. 6).
Attention! La bande abrasive (11) doit pouvoir
tourner sans obstacle.
7.2. Changer de bande abrasive (11) (fig. 7 - 9)
앬 Tirez la fiche de contact.
앬 Retirez les vis (25) et (26).
앬 Retirez la protection de la bande abrasive (27).
앬 Déplacez le tendeur de bande abrasive (9) vers
la gauche pour détendre la bande abrasive (11).
앬 Retirez la bande abrasive (11) vers l’arrière.
앬 Placez la nouvelle bande abrasive en procédant
dans l’ordre inverse.
Attention! Respectez le sens de la course: sur le
boîtier (28) et à l’intérieur de la bande abrasive!
7.3. Régler la bande abrasive (11) (fig. 1)
앬 Poussez à la main la bande abrasive (11) dans
le sens de la course.
앬 La bande abrasive (11) doit passer centralement
sur la surface de meulage (6); si tel n’est pas le
cas, il est possible de l’ajuster par la vis moletée
(10).
7.4. Régler la position de meulage de la
bande abrasive (11) fig. 10/11)
앬 Desserrez les deux écrous (29)
앬 Déplacez la bande abrasive (11) vers le haut,
dans la position désirée.
앬 Resserrez à fond les écrous (29) pour fixer cette
position.
앬 La table peut être employée dans cette position
comme support de pièce à usiner; pour ce faire,
poussez la table dans le trou du tube de fixation
(31) et fixez-la à l’aide de la vis (30).
7.5. Remplacer le papier abrasif sur le plateau
(13)
앬 Le papier abrasif de la ponceuse à plateau (13)
est auto-adhésif, autrement dit, il est simplement
collé sur le plateau (13), et/ou retiré.
8. Fonctionnement
8.1. Interrupteur Marche Arrêt (1)
앬 En appuyant sur le bouton-poussoir vert „1“, la
ponceuse peut être mise en circuit.
앬 Pour remettre la ponceuse hors circuit, le
bouton-poussoir rouge „0“ doit être appuyé.
8.2. Meuler
앬 Tenez toujours bien la pièce à usiner pendant le
meulage.
앬 Ne faites pas de grande pression.
앬 La pièce à usiner doit être déplacée en va et
vient sur la bande abrasive pendant le meulage,
et/ou sur le plateau pour éviter que le papier
abrasif ne s’use d’un seul côté!
앬 Important! Les pièces de bois doivent toujours
être poncées dans le sens du fil du bois pour
éviter qu’il ne se détache par éclats.
9. Maintenance
앬 Il faut éliminer régulièrement la poussière et les
encrassements de la machine. Le nettoyage doit
être réalisé de préférence avec de l’air comprimé
ou à l’aide d’un chiffon.
앬 N’utilisez pas de produit corrosif pour nettoyer
les matières plastiques.
10. Commande de pièces de rechange
Les pièces de rechange peuvent être commandées à
l’entr. ISC GmbH (adresse: cf. bon de garantie),
veuillez alors indiquer ce qui suit:
앬 Type de l’appareil
앬 Numéro d’article de l’appareil
앬 Numéro d’identification de l’appareil
앬 Numéro de la pièce de rechange nécessaire
Vous trouverez les prix et informations actuelles à
l’adresse www.isc-gmbh.info
Anleitung BTS 400-150-1 30.08.2005 9:27 Uhr Seite 14
Page 15

1. Laitteen kuvaus
1. Päälle-/pois-katkaisin
2. Kumijalat
3. Siipiruuvi
4. Kulma-asteikko
5. Pohjalevy
6. Hiomapinta
7. Poikittaisvaste
8. Tukijalka
9. Hiomanauhan kiristin
10. Hiomanauhan säätöruuvi
11. Hiomanauha
12. Vastekisko
13. Hiomalevy
14. Hiomapöytä
15. Hiomapöydän lukitusruuvi
16. Muovisuojus
2. Toimitukseen kuuluu
앬 Nauha- ja tasohiomakone
앬 Hiomalevy
앬 Tarrahiomalaikat
앬 Hiomanauha
앬 Koloavain
3. Määräysten mukainen käyttö
Nauha- ja tasohiomakone soveltuu kaikenlaatuisten
puumateriaalien hiomiseen riippuen koneen koosta.
Konetta saa käyttää vain sille määrättyyn
käyttötarkoitukseen.
Kaikkinainen tämän ylittävä käyttö katsotaan
määräysten vastaiseksi. Siitä aiheutuvista
vahingoista tai tapaturmista vastaa ainoastaan
omistaja/käyttäjä, ei missään tapauksessa
valmistaja.
Koneessa saa käyttää vain siihen sopivia
hiomanauhoja, joiden tunnustiedot vastaavat tässä
käyttöohjeessa annettuja tietoja.
Määräysten mukaisen käytön olennainen osa on
myös turvallisuusmääräysten sekä käyttöohjeessa
annettujen asennusohjeiden ja käyttöselitysten
noudattaminen. Konetta käyttävien ja huoltavien
henkilöiden tulee tutustua siihen, ja heille tulee
selvittää mahdolliset vaaratilanteet.
Tämän lisäksi on voimassaolevia
tapaturmanehkäisymääräyksiä noudatettava mitä
tarkimmin.
Myös muita työlääketieteen ja työsuojelualan yleisiä
sääntöjä on noudatettava.
Koneeseen tehdyt muutokset aiheuttavat sen, että
valmistajan vastuullisuus sen käytöstä aiheutuviin
vahinkoihin raukeaa.
Myöskään määräysten mukaisessa käytössä ei
tiettyjä jäämäriskitekijöitä voida sulkea täysin pois.
Koneen kokoonpanosta ja rakenteesta johtuen
saattavat seuraavat vaarakohdat vielä esiintyä:
앬 Terveydelle vaaralliset puupölypäästöt, kun
konetta käytetään suljetuissa tiloissa.
앬 Laitteen pyöriviä osia ei toiminnallisista syistä voi
peittää suojuksin. Työskentele tämän vuoksi
erittäin varovasti ja pidä työkappaleesta tiukasti
kiinni, jotta se ei pääse luiskahtamaan
paikaltaan, jolloin kätesi saattavat sattua
hiomanauhaan.
4. Tärkeitä ohjeita
앬 Lue käyttöohje huolellisesti läpi ja noudata siinä
annettuja määräyksiä. Tutustu tämän käyttöohjeen
avulla laitteeseen, sen oikeaan käyttöön sekä sitä
koskeviin turvallisuusmääräyksiin.
Turvallisuusmääräykset
앬 Huomio: Kun käytetään sähkötyökaluja, on
noudatettava peruslaatuisia
turvallisuusmääräyksiä palovaaran,
sähköiskuvaaran tai henkilövahinkojen
ehkäisemiseksi. Näihin kuuluvat myös seuraavat
määräykset:
앬 Noudata kaikkia näitä määräyksiä ennen työhön
ryhtymistä sekä nauha- ja tasohiomakoneella
työskennellessäsi.
앬 Säilytä nämä turvallisuusohjeet hyvin.
앬 Käytä ulkona vain tähän soveltuvia, vastaavasti
merkittyjä jatkojohtoja.
앬 Ole tarkkana työskennellessäsi. Käytä järkeäsi.
Älä käytä pyörösahaa, jos olet väsynyt.
앬 Älä käytä sellaisia työkaluja, joiden päälle-pois-
katkaisimet eivät toimi.
앬 Varoitus! Vieraiden osien ja muiden tarvikkeitten
käyttö saattaa aiheuttaa vaaratilanteita.
앬 Irroita pistoke pistorasiasta aina ennen kaikkia
säätö- ja huoltotoimia.
앬 Selvitä turvallisuusmääräykset kaikille laitetta
käyttäville henkilöille.
앬 Älä käytä pienitehoista konetta raskaisiin töihin.
앬 Älä käytä johtoa mihinkään sellaiseen
tarkoitukseen, jota varten sitä ei ole tehty!
앬 Huolehdi tukevasta asennosta ja säilytä aina
tasapainosi.
앬 Tarkasta, ettei työkalu ole vahingoittunut!
앬 Ennen käytön jatkamista on työkalun
turvalaitteiden tai hieman vahingoittuneiden
osien toiminnan moitteettomuus ja soveltuvuus
15
FIN
Anleitung BTS 400-150-1 30.08.2005 9:27 Uhr Seite 15
Page 16
tarkastettava
앬 Tarkasta, että liikkuvat osat toimivat
moitteettomasti eivätkä juutu kiinni tai ole
vahingoittuneet. Kaikkien osien tulee olla
asennettu oikein ja täyttää niille asetetut
vaatimukset, jotta työkalun turvallinen käyttö on
taattu.
앬 Vahingoittuneet turvalaitteet ja osat saa korjata
tai vaihtaa vain valtuutettu ammattikorjaamo,
ellei käyttöohjeessa ole toisin määrätty.
앬 Vahingoittuneet katkaisimet tulee korjata
ammattikorjaamossa.
앬 Tämä työkalu vastaa sitä koskevia
turvallisuusmääräyksiä.
앬 Hiomalevyn (13) ja hiomapöydän (14) välimatka
saa olla kork. 1,6 mm.
앬 Käytä työskennellessäsi aina joko vastekiskoa
(12) tai hiomapöytää (14).
Noudata myös eri lehdellä annettuja yleisiä
turvallisuusmääräyksiä!
Varoitus
Ennen käyttöönottoa lue
käyttöohje huolella
Suojaa sateelta ja kosteudelta
Käytä käsineitä
Käytä suojalaseja
Käytä pölyävissä töissä
suodatinnaamaria
5. Tekniset tiedot
Jännite: 230V ~ 50Hz
Teho: 375 Watt S2 30 min
Hiomalevy:
n0: 1400 min
-1
Ø: 150 mm
Kallistuvuus: 0°-45°
Poikittaisvaste: -60° - + 60°
Nauhahiomalaite:
v0: 4,6 m/s
Mitat: 915 x 100 mm
Äänenpaineen taso LPA: 78,6 dB(A)
Äänitehotaso LWA: 91,6 dB (A)
앬 Käyttöaika:
Käyttöaika S2 30 min. (lyhytaikainen käyttö)
tarkoittaa, että moottoria saa kuormittaa sen
nimellisteholla (375 W) ainoastaan
tyyppikilvessä ilmoitetun ajanjakson (30
minuuttia ) mukaisesti.
Jos tämä arvo ylitetään, niin moottori kuumenee
liikaa. Tauon aikana moottori jäähtyy jälleen
lähtölämpötilaansa takaisin.
6. Ennen käyttöönottoa
앬 Kone on asennettava paikalleen tukevasti, ts.
ruuvattava kiinni työpenkkiin tai tukevaan
alustaan.
앬 Ennen käyttöönottoa tulee kaikki suojukset ja
muut turvavarusteet asentaa paikoilleen
määräysten mukaisesti.
앬 Hiomanauhan ja hiomalevyn tulee voida liikkua
esteettä.
앬 Käsitellessäsi jo käytettyä puutavaraa varo siinä
olevia vieraita esineitä, kuten esim. nauloja tai
ruuveja.
앬 Ennen päälle-/pois-katkaisimen toimentamista
varmista, että hiomapaperi on asennettu oikein
paikalleen ja että kaikki liikkuvat osat kulkevat
kevyesti.
앬 Tarkasta ennen koneen liittämistä
sähköverkkoon, että käytetty verkkojännite
vastaa koneen tyyppikilven tietoja.
16
FIN
Anleitung BTS 400-150-1 30.08.2005 9:27 Uhr Seite 16
Page 17

7. Asennus
Huomio! Ennen kaikkia huolto- ja varustelutoimia
tulee laitteen verkkopistoke irroittaa verkosta.
7.1 Koneen kokoaminen (kuvat 1 - 6)
앬 Työnnä kumijalat (2) pohjalevyyn (5).
앬 Kiinnitä muovisuojus (16) ruuveilla (17)
paikalleen. (kuva 2)
앬 Työnnä hiomalevy (13) akseliin (kuva 3).
앬 Kiristä ruuvi koloavaimella (19) hiomalevyn (13)
lukitsemiseksi paikalleen. (kuvat 3/4)
앬 Asenna alempi laikansuoja (20) ruuvien (21)
kera (kuva 4).
앬 Asenna hiomapöytä (14) ja lukitse se paikalleen
ruuvilla (22) (kuva 5).
Hiomapöytää (14) voi kallistaa kiiriasteikon (23)
ja siipiruuvin (2) avulla portaattomasti välillä 0 ° 45°.
Siirrettävä poikittaisvaste (7) takaa
työstökappaleen turvallisen kuljetuksen.
Huomio! Hiomalevyn (13) täytyy voida liikkua
esteettä, hiomapöydän (14) ja hiomalevyn (13)
välinen välimatka ei kuitenkaan saa olla
suurempi kuin 1,6 mm.
앬 Aseta vastekisko (12) paikalleen ja kiinnitä se
ruuveilla (24) ja (25) (kuva 6).
Huomio! Hiomanauhan (11) tulee voida liikkua
esteettä.
7.2. Hiomanauhan (11) vaihtaminen (kuvat 7-9)
앬 Irroita verkkopistoke.
앬 Ota ruuvit (25) ja (26) pois.
앬 Irroita hiomanauhan suojus (27).
앬 Käännä hiomanauhan kiristintä (9) vasemmalle,
jotta hiomanauha (11) löysentyy.
앬 Ota hiomanauha (11) taaksepäin pois.
앬 Aseta uusi hiomanauha paikalleen
päinvastaisessa järjestyksessä.
Huomio! Ota kulkusuunta huomioon: merkitty
kuoreen (28) ja hiomanauhan sisäpuolelle!
7.3. Hiomanauhan (11) säätö (kuva 1)
앬 Työnnä hiomanauhaa (11) käsin hitaasti sen
kulkusuuntaan.
앬 Hiomanauhan (11) tulee kulkea hiomapinnan (6)
keskikohdalla, jos näin ei ole, niin sen säätöä voi
korjata säätöruuvilla (10).
7.4. Hiomanauhan (11) hioma-asennon säätö
(kuvat 10/11)
앬 Löysennä molempia muttereita (29)
앬 Työnnä hiomanauha (11) ylöspäin haluttuun
asemaan.
앬 Kiristä mutterit (29) jälleen tämän aseman
lukitsemiseksi.
앬 Työstökappaleen alustana voidaan tässä
asennossa käyttää hiomapöytää (14). Tätä
varten se tulee työntää kannatinputken (31)
reikään ja lukita paikalleen ruuvilla (30).
7.5. Hiomapaperin vaihto hiomalevyllä (13)
앬 Tasohiomakoneen (13) hiomapaperi on
itseliimautuvaa, ts. se painetaan vain paikalleen
hiomalevyyn (13) tai vedetään siitä irti.
8. Käyttö
8.1. Päälle-/pois-katkaisin (1)
앬 Käynnistä hiomakone painamalla vihreää
näppäintä „1“.
앬 Sammuta hiomakone painamalla punaista
näppäintä „0“.
8.2. Hiominen
앬 Pidä työkappaleesta aina tiukasti kiinni hiomisen
aikana.
앬 Älä paina laitetta työstökappaleeseen liian
voimakkaasti.
앬 Työstökappaletta tulee liikuttaa hiomisen aikana
hiomanauhalla tai hiomalevyllä edestakaisin,
jotta estetään hiomapaperin yksipuolinen
kuluminen!
앬 Tärkeää! Puukappaleita tulee aina hioa puun
syiden suuntaan, jotta estetään puun halkeilu.
9. Huolto
앬 Koneesta tulee poistaa siihen kertynyt pöly ja
lika säännöllisin väliajoin. Puhdistus on parasta
tehdä paineilmalla tai rievulla.
앬 Älä käytä muoviosien puhdistukseen syövyttäviä
aineita.
10. Varaosatilaus
Varaosia voit tilata liikkeestä ISC GmbH (osoite
löytyy takuutodistuksesta), tällöin tulee antaa
seuraavat tiedot:
앬 laitteen tyyppi
앬 laitteen tuotenumero
앬 laitteen tunnusnumero
앬 tarvittavan varaosan varaosanumero
Ajankohtaiset hinnat ja muut tiedot löydät osoitteesta
www.isc-gmbh.info
17
FIN
Anleitung BTS 400-150-1 30.08.2005 9:27 Uhr Seite 17
Page 18

1. Descrizione dell’apparecchio
1. Interruttore ON/OFF
2. Appoggi di gomma
3. Vite ad alette
4. Scala per l’inclinazione
5. Piastra di base
6. Superficie di levigatura
7. Guida trasversale
8. Piede di appoggio
9. Tendinastro
10. Vite zigrinata per regolazione del nastro abrasivo
11. Nastro abrasivo
12. Battuta
13. Piastra di levigatura
14. Piano di levigatura
15. Vite di serraggio per piano di levigatura
16. Protezione di plastica
2. Elementi forniti
앬 Levigatrice a nastro e a disco
앬 Piastra di levigatura
앬 Dischi abrasivi adesivi
앬 Nastro abrasivo
앬 Brugola
3. Uso corretto
La levigatrice a nastro e a disco serve a levigare
legname di qualsiasi tipo in conformità alle
dimensioni dell’utensile.
La macchina deve venire usata solo per lo scopo per
il quale è stata realizzata.
Ogni altro uso viene considerato scorretto. La
responsabilità per eventuali danni o lesioni di ogni
tipo che ne derivino è quindi
dell’utilizzatore/operatore e non del produttore.
Si devono utilizzare esclusivamente nastri abrasivi
adatti all’utensile che corrispondano ai dati
caratteristici descritti in queste istruzioni.
Parte integrante dell’uso corretto è anche il rispetto
delle avvertenze di sicurezza nonché delle istruzioni
per il montaggio e per la messa in esercizio
contenute nelle istruzioni per l’uso. Le persone che
usano la macchina e che ne eseguono la
manutenzione devono conoscerla ed essere
informati sui possibili pericoli.
Inoltre devono essere osservate con la massima
esattezza le norme antinfortunistiche vigenti.
Ulteriori regole generali nei campi della medicina del
lavoro e delle tecniche di sicurezza devono essere
osservate.
Le modifiche apportate alla macchina e i danni che
ne derivano escludono del tutto qualsiasi
responsabilità da parte del produttore.
Nonostante l’uso corretto, non possono venire
eliminati completamente determinati fattori di rischio
rimanenti. In base alla realizzazione e alla struttura
della macchina ne possono derivare:
앬 emissioni di polveri di legno dannose alla salute
derivanti dall’uso in ambienti chiusi
앬 Per motivi funzionali gli elementi rotanti
dell’apparecchio non possono venire coperti.
Nell’utilizzare l’utensile procedete con attenzione
e tenete ben saldo il pezzo da lavorare onde
evitare che, spostandosi, le vostre mani possano
venire a contatto con il nastro abrasivo.
4. Avvertenze importanti
Leggete attentamente le istruzioni per l’uso e
attenetevi alle avvertenze. Usatele per conoscere
bene l’utensile, il suo uso corretto nonché le
avvertenze di sicurezza.
Avvertenze di sicurezza
앬 Attenzione: usando gli elettroutensili si devono
osservare le regole basilari di sicurezza per
evitare rischi di incendio, di scosse elettriche e di
lesioni alle persone, e le regole seguenti.
앬 Osservate tutte le seguenti avvertenze, prima e
durante l’utilizzo della levigatrice a nastro e a
disco.
앬 Tenete le istruzioni di sicurezza in luogo sicuro.
앬 All’aperto usate solamente cavi di prolunga
mologati per questo e contrassegnati in modo
corrispondente.
앬 Fate attenzione a quello che fate. Eseguite il
lavoro in modo consapevole. Non usate l’utensile
se siete stanchi.
앬 Non usate l’apparecchio se non è possibile
accendere e spegnere l’interruttore.
앬 Avvertenza! L’uso di altri utensili e accessori può
rappresentare un fattore di rischio per
l’utilizzatore.
앬 Staccate la spina per ogni lavoro di impostazione
o di manutenzione.
앬 Consegnate le avvertenze di sicurezza a tutte le
persone che lavorano alla macchina
앬 Non usate apparecchi troppo deboli per lavori
difficili.
앬 Non usate il cavo per scopi per i quali non è
stato concepito!
앬 Assicuratevi di essere in posizione sicura e
sempre in equilibrio.
앬 Controllate che l’apparecchio non presenti
eventuali danni!
앬 Prima di usare di nuovo l’elettroutensile
controllate con cura che i dispositivi di protezione
18
I
Anleitung BTS 400-150-1 30.08.2005 9:27 Uhr Seite 18
Page 19

oppure le parti leggermente danneggiate siano in
ordine ed in grado di funzionare correttamente.
앬 Controllate che le parti mobili possano
funzionare perfettamente, che non siano
bloccate o che non siano danneggiate. Tutte le
parti devono essere montate correttamente e
rispondere a tutti i requisiti per garantire un
corretto funzionamento dell’apparecchio.
앬 Fate riparare o sostituire subito a regola d’arte
da un’officina specializzata le parti ed i dispositivi
di protezione danneggiati, salvo sia indicato
diversamente nelle istruzioni per l’uso.
앬 Fate sostituire l’interruttore danneggiato da
un’officina del servizio assistenza.
앬 Questo utensile corrisponde alle relative norme
di sicurezza.
앬 La distanza tra la piastra di levigatura (13) e il
piano di levigatura (14) deve essere al massimo
di 1,6 mm.
앬 Lavorate sempre con la barra di guida (12) o con
il piano di levigatura (14).
Si prega di osservare anche le avvertenze
generali di sicurezza in allegato!
Avvertimento!
Leggere le istruzioni per l’uso
prima della messa in esercizio
Proteggere dalla pioggia e
dall’umidità
Indossare guanti
Portate gli occhiali protettivi
Portate una protezione dalla
polvere
5. Caratteristiche tecniche
Tensione: 230V ~ 50Hz
Potenza: 375 Watt S2 30 min
Piastra di levigatura
n0: 1400 min
-1
Ø: 150 mm
orientabile: 0°-45°
Guida trasversale: da -60° a + 60°
Gruppo nastro abrasivo:
v0: 4,6 m/s
Dimensioni: 915 x 100 mm
Livello di pressione acustica LPA: 78,6 dB(A)
Livello di potenza sonora LWA: 91,6 dB (A)
앬 Durata di accensione
La durata di accensione S2 30 min (servizio di
breve durata) indica che il motore con la potenza
nominale (375 W) deve venire sottoposto ad un
carico continuo solo per il periodo indicato sulla
targhetta (30 min).
Altrimenti si riscalderà eccessivamente. Durante
la pausa il motore si raffredda per tornare alla
temperatura di partenza.
6. Prima della messa in esercizio
앬 L´apparecchio deve venire installato in modo
stabile, cioè deve venire avvitato su un banco di
lavoro o su un basamento solido.
앬 Prima della messa in esercizio tutte le coperture
ed i dispositivi di sicurezza devono essere
montati regolarmente.
앬 Il nastro abrasivo ed il piano di levigatura devono
potersi muovere liberamente.
앬 Se si tratta di pezzi di legno già lavorati fate
attenzione ai corpi estranei come ad es. chiodi o
viti ecc.
앬 Prima di azionare l’interruttore di ON/OFF
accertatevi che la carta abrasiva sia montata
correttamente e che le parti mobili possano
muoversi liberamente.
앬 Prima di inserire la spina nella presa di corrente
assicuratevi che i dati sulla targhetta
corrispondano a quelli della fonte di
alimentazione.
7. Montaggio
Attenzione! Staccare sempre la spina dalla presa
di corrente prima di eseguire qualsiasi
19
I
Anleitung BTS 400-150-1 30.08.2005 9:27 Uhr Seite 19
Page 20

20
operazione di manutenzione o di riallestimento
dell’utensile.
7.1 Assemblaggio dell’utensile. (Fig. 1 - 6 )
앬 Applicare gli appoggi di gomma (2) alla piastra di
base (5).
앬 Fissare la protezione di plastica (16) con le viti
(17). (Fig. 2)
앬 Inserire la piastra di levigatura (13) sull’albero.
(Fig. 3)
앬 Serrare la vite (18) con la brugola (19) per
bloccare la piastra di levigatura (13). (Fig. 3/4 )
앬 Montare la protezione inferiore della piastra (20)
con le viti (21). (Fig. 4)
앬 Montare il piano di levigatura (14) e bloccarlo
con la vite (22). (Fig. 5)
Il piano di levigatura (14) può venire regolato in
continuo da 0° a 45° per mezzo della scala per i
tagli obliqui (23) e la vite ad alette (2).
La guida trasversale regolabile (7) garantisce
una guida sicura del pezzo da lavorare.
Attenzione! La piastra di levigatura (13) deve
potersi muovere liberamente, la distanza tra il
piano di levigatura (14) e la piastra di levigatura
(13) non deve però essere maggiore di 1,6 mm.
앬 Montare la barra di guida (12) e bloccarla con le
viti (24) e (25). (Fig. 6)
Attenzione! Il nastro abrasivo (11) deve potersi
muovere liberamente.
7.2. Sostituire il nastro abrasivo (Fig. 7 - 9)
앬 Staccate la spina dalla presa di corrente.
앬 Togliere le viti (25) e (26).
앬 Togliere la protezione del nastro abrasivo (27).
앬 Muovere verso sinistra il tendinastro (9) per
allentare il nastro abrasivo (11).
앬 Sfilare il nastro abrasivo da dietro (11).
앬 Rimontare il nuovo nastro nell’ordine contrario.
Attenzione! Fare attenzione al senso di
scorrimento: sul rivestimento esterno (28) e sul
lato interno del nastro abrasivo!
7.3. Regolare il nastro abrasivo (Fig. 1)
앬 Spingere piano a mano il nastro abrasivo (11)
nel senso di scorrimento.
앬 Il nastro abrasivo (11) deve scorrere al centro
della superficie di levigatura (6), in caso contrario
può venire regolato ulteriormente tramite la vite
zigrinata (10).
7.4.Modificare la posizione di levigatura del
nastro (11) (Fig. 10/11)
앬 Allentare i due dadi (29).
앬 Spostare verso l’alto il nastro di levigatura (11)
nella posizione desiderata.
앬 Serrare di nuovo i dadi (29) per fissare questa
posizione.
앬 In questa posizione il piano di levigatura può
essere inserito verso l’appoggio per il pezzo; a
questo scopo deve venire spinto nel foro del tubo
di supporto (31) e fissato con la vite (30).
7.5.Sostituire il foglio abrasivo sulla piastra di
levigatura (13)
앬 Il foglio abrasivo per la piastra è autoadesivo
(13), cioè viene solamente incollato o staccato
dalla piastra di levigatura (13).
8. Esercizio
8.1. Interruttore ON/OFF (1)
앬 L’utensile viene inserito premendo il pulsante
verde „1“.
앬 Per disinserire l’utensile si deve premere il
pulsante rosso „0“.
8.2. Levigare
앬 Durante la levigatura tenete sempre saldamente
il pezzo da lavorare.
앬 Non esercitate troppa pressione.
앬 Il pezzo da levigare dovrebbe venire mosso con
leggere oscillazioni verso sinistra e verso destra,
rispettivamente sul nastro o sulla piastra di
levigatura, per evitare che la superficie abrasiva
si consumi solo da un lato!
앬 Importante! I pezzi di legno devono essere
levigati sempre nel senso della venatura per
evitare che si formino schegge.
9. Manutenzione
앬 Togliete regolarmente la polvere e lo sporco
dall’elettroutensile. Il modo migliore di eseguire
la pulizia è con un getto di aria compressa o con
uno straccio.
앬 Non usate sostanze corrosive per pulire le parti
in plastica.
10. Ordinazione dei pezzi di ricambio
I pezzi di ricambio possono venire ordinati presso la
ditta ISC GmbH (per l’indirizzo si veda il certificato di
garanzia), indicando i seguenti dati:
앬 Tipo dell’apparecchio
앬 Numero di articolo dell’apparecchio
앬 Numero di identificazione dell’apparecchio
앬 Numero del pezzo di ricambio richiesto
Per i prezzi e le informazioni attuali si veda www.iscgmbh.info
I
Anleitung BTS 400-150-1 30.08.2005 9:27 Uhr Seite 20
Page 21

1. A készülék leírása
1. Ki- bekapcsoló
2. Gumilábak
3. Szárnyas csavar
4. Szögskála
5. Alaplemez
6. Csiszolófelület
7. Harántütköző
8. Támasztó láb
9. Csiszolószalag feszítő
10. Recézett fejő csavar a csiszolószalag
beállításához
11. Csiszolószalag
12. Ütköző sín
13. Csiszolótányér
14. Csiszolóasztal
15. Rögzítőcsavar a csiszoló asztalhoz
16. Műanyag védőburkolat
2. A szállítás terjedelme
앬 Szalag- és tányércsiszoló
앬 Csiszolótányér
앬 Tapadó csiszolókorongok
앬 Csiszolószalag
앬 Inbuszkulcs
3. Rendeltetésszerû használat
A szalag- és tányércsiszoló a gép nagyságának
megfelelő, mindenféle fa csiszolására alkalmazható.
A gépet csak a rendeltetése szerint szabad
alkalmazni.
Ezt túlhaladó használat, nem számít
rendeltetésszerőnek. Ebből adódó bármilyen kárért
vagy bármilyen fajta sérülésért a használó/kezelő
felelős és nem a gyártó.
Csak a géphez alkalmas, ebben az utasításban
megadott jellemző adatoknak megfelelő,
csiszolószalagokat szabad használni.
A rendeltetésszer ői alkalmazás része a biztonsági
utasítások figyelembe vétele is, valamint az
összeszerelési és a használati utasításban levő
üzemeltetési utasítások. A gépet kezelő és
karbantartó személyeknek a gép használatában
jártasnak és a lehetséges veszélyekkel kapcsolatban
kioktatottnak muszáj lenniük.
Ezen kívül pontosan be kell tartani az érvényes
balesetvédelmi előírásokat.
Figyelembe kell venni a munkaegészségügy és
biztonságtechnika terén fennálló egyébb általános
szabályokat.
A gépen történő változtatások, a gyártó szavatolását,
és az ebből adódó károk megtérítését, teljesen
kizárják.
Bizonyos fennmaradt rizikótényezőket
rendeltetésszerő használat esetén sem lehet teljes
mértékben kizárni. A gép konstrukciója és felépítése
által a következő pontok következhetnek be:
앬 Zárt termekben levő használatkor az egészségre
káros faporok kibocsátása.
앬 A készülék forgó részeit mőködésbelüli okoból
nem lehet lefedni. Ezért gondosan kell eljárni és
a munkadarabot jó feszesen kell tartani, azért
hogy elkerülje ennek az elcsúszását, ami által a
kezei megérinthetnék a csiszolószalagot.
4. Fontos utasítások
Kérjük olvassa el figyelmesen a használati utasítást
és vegye figyelembe az abban foglalt utasításokat.
Ismerkedjen meg a használati utasítás alapján a
készülékkel, a helyes használtával, valamint a
biztonsági utasításokkal.
Biztonsági utasítások
앬 Figyelem: elektromos szerszámok
használatánál, a t őzveszély, az áram ütés és a
személyi sérülések rizikójának a kizárása
szempontjából, beleértve a következ őket is, be
kell tartani az alapvető biztonsági
intézkedéseket, beleértve a következőket is:
앬 Vegye figyelembe mindezeket az utasításokat,
mielőtt és mialatt a szalag- és tányércsiszolóval
dolgozik.
앬 Ôrizze jól meg ezeket a biztonsági utasításokat.
앬 A szabadban, csak arra engedélyezett és
megfelelően megjelölt hosszabbítókábelt
használjon.
앬 Figyeljen arra, hogy mit csinál. Okosan kezdjen a
munkához. Ne használja a szerszámot, ha
fáradt.
앬 Ne használjon szerszámokat amelyeknél a
kapcsolót nem lehet ki - és bekapcsolni.
앬 Figyelmeztetés! Más használati szerszámok
vagy kellékek használata személysérülési
veszélyt jelenthet az ön számára.
앬 Mindenféle beállítási és karbantartási
munkálatnál húzza ki a hálózati csatlakozót.
앬 Adja tovább a gépen dolgozó személyeknek a
biztonsági utasításokat.
앬 Ne használjon nehéz munkákra gyenge
teljesítményő gépeket.
앬 Ne használja fel a kábelt olyan célokra
amelyekre nincs el őlátva!
앬 Gondoskodjon egy stabil testhelyzetről, és tartsa
minden id őben az egyensúlyt.
앬 Vizsgálja meg a szerszámot esetleges
sérülésekre!
21
H
Anleitung BTS 400-150-1 30.08.2005 9:27 Uhr Seite 21
Page 22

앬 A szerszám további használata előtt a
védőberendezéseket vagy az enyhén sérült
részeket gondosan meg kell vizsgálni,
kifogástalan és meghatározásuknak megfelelő
mőködésükre.
앬 Vizsgálja meg, hogy a mozgatható részek
kifogástalanul mőködnek-e és nem szorulnak-e,
vagy esetleg sérültek-e a részei. Kell, hogy
minden rész rendesen fel legyen szerelve, és a
szerszám kifogástalan üzemeltetésének a
biztosítsához minden feltétel teljesítve legyen.
앬 A károsult védőberendezéseket és részeket,
szakszerően egy elismert szakmőhely által kell
megjavítatni, vagy kicseréltetni, ha a használti
utasításban nincs más megadva.
앬 A károsult kapcsolókat egy vevőszolgálati
mőhelyben kell kicseréltetni.
앬 Ez a szerszám megfelel a rá vonatkozó
biztonsági előírásoknak.
앬 A csiszolótányér (13) és a csiszolósztal (14)
közötti távolságnak max. 1,6 mm-nek szabad
lennie.
앬 Dolgozzon mindig egy ütközősínnel (12) vagy
csiszolóasztallal (14).
Kérjük vegye a mellékletben tartalmazott
általános biztonsági utasításokat is figyelembe!
Figyelmeztetés
Olvassa el az üzembe helyezés
elôtt a használati utasítást
Óvja az esôtöl és a
nedvességtöl
Viseljen kesztyût
Szemvédôt hordani.
Porvédômaszkot hordani.
5. Technikai adatok
Feszültség: 230V ~ 50Hz
Teljesítmény: 375 Watt S2 30 perc
Csiszolótányér:
n0: 1400 perc
-1
Ø: 150 mm
elfordítható: 0°-45°
Harántütköző: -60° -tól + 60°-ig
Szalagcsiszoló berendezés:
v0: 4,6 m/mp
Méretek: 915 x 100 mm
Hangnyomásmérték LPA: 78,6 dB(A)
Hangtelyesítménymérték LWA: 91,6 dB (A)
앬 Bekapcsolási idő:
Az S2 30 perc (rövid ideig tartó üzem) viszonylagos
bekapcsolási idő, azt jelenti, hogy a motort csak az
adattáblán megadott időre (30 perc) szabad a (375
W-os) névleges teljesítménnyel folyamatosan
megterhelni.
Mert különben megengedhetetlenül felmelegedne. A
szünet ideje alatt a motor ismét lehül a kiindulási
hőmérsékletre.
6. Üzembe helyezés elôtt
앬 A gépet stabilan kell felállítani, ez annyit jelent,
hogy egy munkapadra, vagy egy szilárd
állványra rá kell feszesen csavarozni.
앬 A üzembe helyezés előtt minden fedőnek és
biztonsági berendezésnek szabályszerően kell
felszerelve lennie.
앬 A csiszolószalagnak és a csiszolótányérnak
szabadon kell futnia.
앬 A már megmunkált fán ügyeljen az idegen
alkatrészekre, mint például a szögekre vagy
csavarokra stb.
앬 Mielőtt a ki- / bekapcsolót üzemeltetné,
bizonyosodjon meg arról, hogy a csiszolópapír
helyesen van e felszerelve és hogy a
mozgatható részek könnyen mozgathatóak e.
앬 A gép hozzákapcsolása előtt ellenőrizze le, hogy
a gép típustábláján levő adatok a hálózati
adatokkal megegyeznek-e.
22
H
Anleitung BTS 400-150-1 30.08.2005 9:27 Uhr Seite 22
Page 23

7. Összeszerelés
Figyelem! Húzza ki a készüléken történô minden
karbantartási és átépítési munka elôtt a hálózati
csatlakozót.
7.1 Összeállítani a gépet. (1-tôl - 6-ig levô ábrák)
앬 Dugja rá a gumi lábakat (2) az alaplemezre (5).
앬 Rögzítse fel a csavarokkal (17) a mőanyag
védőburkolatot (16). (2-es ábra)
앬 Dugja fel a tengelyre a csiszolótányért (13). (3-as
ábra)
앬 Húzza a csavart (18) az inbuszkulccsal (19)
feszesre, hogy ezáltal biztosítsa a
csiszolótányért (13). (3/4-es ábra)
앬 Szerelje fel a csavarokkal (21) az alulsó
tárcsavédőt (20). (4-es ábra)
앬 Szerelje fel a csiszolóasztalt (14) és biztosítsa
ezt a csavarokkal (22). (5-ös ábra)
A csiszolóasztalt (14) a sarokskála (23) és a
szárnyascsavarok (2) által fokozatmentesen 0°tól 45°-ig lehet elállítani. Az elállítható
harántütköző (7) a munkadarab biztos vezetését
garantálja.
Figyelem! A csiszolótányérnak (13) szabadon
kell futnia, de a csiszolósztal (14) és a
csiszolótányér (13) közötti távolságnak nem
szabad 1,6 mm-nél töbnek lennie.
앬 Felrakni az ütközősínt (12) és a csavarokkal,
(24) és (25), rögzíteni. (6-os ábra)
Figyelem! A csiszolószalagnak (11) szabadon
muszáj futnia.
7.2.Csiszolószalagot (11) cserélni
(7-tôl - 9-igi ábrák)
앬 Kihúzni a hálózati csatlakozót.
앬 Eltávolítani a csavarokat (25) és (26).
앬 Levenni a csiszolószalagvédőt (27).
앬 A csiszolószalagfeszítőt (9) balra mozdítani,
azért hogy a csiszolószalag (11) meglazuljon.
앬 A csiszolószalagot (11) hátrafelé levenni.
앬 Az új csiszolószalagot az ellenkező sorrendben
újra felszerelni.
Figyelem! Vegye figyelembe a forgásirányt: a
gépházon (28), és a csiszolószalag belső
oldalán!
7.3. Csiszolószalagot (11) beállítani (1-es ábra)
앬 Tolja kézzel a csiszolószalagot (11) lassan a
forgásirányba.
앬 A csiszolószalagnak (11) a csiszolófelületen (6)
központosan kell futnia, ha ez nem lenne az
eset, akkor ezt a recézett fejő csavar (10)
segítségével utánna lehet állítani.
7.4. A csiszolószalag (11) csiszolóhelyének az
elállítása (10/11-es ábra)
앬 Mind a két anyát (29) megereszteni
앬 Tegye a csiszolószalagot (11) felfelé a kívánt
helyzetbe.
앬 Az anyákat (29) újra feszesre húzni, azért hogy
rögzítse ezt a helyzetet.
앬 Ebben a helyzetben fel lehet rakni a
csiszolósztalt, a munkadarab ráfektetéséhez,
ehhez a csiszolósztalt a tartócső (31) lyukába
kell tolni és a csavarral (30) rögzíteni.
7.5.A csiszolótányéron (13) levô csiszolópapír
kicserélése
앬 A tányércsiszolóhoz (13) tartozó csiszolópapír
öntapadó, ez annyit jelent, hogy csak rá kell
ragasztani a csiszolótányérra (13), illetve le kell
húzni.
8. Üzem
8.1. Ki-, bekapcsoló (1)
앬 A csiszolót a zöld taszter „1“ nyomása által lehet
bekapcsolni.
앬 A csiszoló újra kikapcsolásához a piros tasztert
„0“ kell megnyomni.
8.2. Csiszolni
앬 A csiszolás közben a munkadarabot mindig
feszesen tartani.
앬 Ne gyakoroljon nagy nyomást.
앬 A csiszolásnál a munkadarabot a
csiszolószalagon illetve a csiszolólemezen ideoda kellene mozgatni, azért hogy elkerülje a
csiszolópapír egyoldalú elkopását!
앬 Fontos! A fadarobokat mindig a fatextúra
irányába kell csiszolni, azért hogy a
leforgácsolósodását megakadályozza.
9. Karbantartás
앬 A port és a szennyeződéseket a gépről
rendszeresen el kell távolítani. A tisztítást
legjobban sőrített levegővel vagy egy ronggyal
lehet elvégezni.
앬 A műanyag tisztítására ne használjon maró
hatású szereket.
10. Pótalkatrészek megrendelése
A pótalkatrészeket az ISC kft cégnél lehet
megrendelni (a címhez lásd a garanciaokmányt),
ennél a következő adatokat kellene megadni:
앬 A készülék típusát
앬 A készülék cikk-számát
앬 A készülék ident- számát
앬 A szükséges pótalkatrész, pótalkatrész- számát
Aktuális árak és inforációk a www.isc-gmbh.info
alatt találhatóak.
23
H
Anleitung BTS 400-150-1 30.08.2005 9:27 Uhr Seite 23
Page 24

CZ
24
1. Popis přístroje
1. Za-/vypínač
2. Pryžové nožky
3. Křídlový šroub
4. Úhlová stupnice
5. Základová deska
6. Brusná plocha
7. Příčný doraz
8. Podpěrná noha
9. Napínák brusného pásu
10. Rýhovaný šroub k nastavení brusného pásu
11. Brusný pás
12. Dorazová kolejnička
13. Brusný talíř
14. Stůl brusky
15. Zajišt’ovací šroub brusného stolu
16. Plastová ochrana
2. Rozsah dodávky
앬 Pásová bruska a bruska s talířovým kotoučem
앬 Brusný talíř
앬 Samolepicí brusné kotouče
앬 Brusný pás
앬 Imbusový klíč
3. Použití podle způsobu určení
Pásová bruska a bruska s talířovým kotoučem slouží
k broušení dřev všeho druhu, odpovídajíc velikosti
stroje.
Stroj smí být používán pouze podle způsobu
svého určení.
Každé další toto překračující použití neodpovídá
účelu určení. Za z toho vyplývající škody a zranění
ručí provozovatel/obsluha a ne výrobce.
Používat se smí pouze pro stroj vhodné brusné
pásy, které odpovídají parametrům v tomto návodu
k provozu.
Součástí použití podle účelu určení je také dbát
bezpečnostních pokynů, tak jako návodu k montáži
a provozních pokynů v návodu k použití.
Osoby, které stroj obsluhují a udržují, musí být s
tímto seznámeny a být poučeny o možných
nebezpečích.
Kromě toho musí být co nejpřísněji dodržovány
platné předpisy k předcházení úrazům.
Dále je třeba dodržovat ostatní všeobecná pravidla v
pracovnělékařských a bezpečnostně technických
oblastech.
Změny na stroji zcela vylučují ručení výrobce a z
toho vzniklé škody.
I přes použití podle účelu určení nelze zcela vyloučit
určité rizikové faktory. Podmíněno konstrukcí a
uspořádáním stroje se mohou vyskytnout následující
rizika:
앬 Zdraví škodlivé emise dřevných prachů při
používání v uzavřených prostorech.
앬 Rotující části přístroje nemohou být z funkčních
důvodů zakryty. Pracujte proto s rozmyslem a
pevně držte obrobek, aby se zabránilo
sklouznutí, čímž by se mohly Vaše ruce dostat
do styku s brusným pásem.
4. Důležité pokyny
Prosím přečtěte si pečlivě návod k použití a dbejte
jeho pokynů. Na základě tohoto návodu k použití se
obeznamte s přístrojem, jeho správným použitím a
také s bezpečnostními pokyny.
Bezpečnostní pokyny
앬 Varování: při použití elektrického nářadí musí být
dodržována základní bezpečnostní opatření, aby
se vyloučila rizika ohně, úderu elektrickým
proudem a zranění osob, včetně následujících:
앬 Dbejte všech pokynů - než začnete s pásovou
bruskou a bruskou s talířovým kotoučem
pracovat a také při práci s ní.
앬 Tyto bezpečnostní pokyny si dobře uložte.
앬 Na volném prostranství používejte pouze pro to
schválené, příslušně označené prodlužovací
kabely.
앬 Dbejte na to, co děláte. Pracujte rozumně.
Nepoužívejte nástroj, pokud jste unaveni.
앬 Nepoužívejte nástroje, u kterých se vypínač
nenechá za- a vypnout.
앬 Varování! Použití jiných vložných nástrojů a
jiného příslušenství může znamenat nebezpečí
zranění.
앬 Při všech nastavovacích a údržbářských pracích
vytáhněte sít’ovou zástrčku.
앬 Informujte o bezpečnostních pokynech všechny
další osoby, které na stroji pracují.
앬 Nepoužívejte stroje se slabým výkonem pro
těžké práce.
앬 Nepoužívejte kabel k účelům, ke kterým není
určen!
앬 Postarejte se o bezpečný postoj a udržujte vždy
rovnováhu.
앬 Překontrolujte nástroj jestli nevykazuje
Anleitung BTS 400-150-1 30.08.2005 9:27 Uhr Seite 24
Page 25

CZ
25
eventuální poškození!
앬 Před dalším použitím nástroje musí být
ochranná zařízení nebo lehce poškozené části
pečlivě překontrolovány, jestli bezvadně a podle
způsobu určení fungují.
앬 Překontrolujte, jestli pohyblivé části bezvadně
fungují a neváznou nebo jestli nejsou některé
části poškozeny. Veškeré součásti musí být
správně namontovány a splňovat všechny
podmínky, aby byl zajištěn bezvadný provoz
nástroje.
앬 Poškozená ochranná zařízení a části musí být
odborně opraveny nebo vyměněny uznanou
odbornou dílnou, pokud není v návodu k použití
uvedeno jinak.
앬 Poškozené vypínače nechejte vyměnit servisní
dílnou.
앬 Toto nářadí odpovídá příslušným
bezpečnostním ustanovením.
앬 Vzdálenost mezi brusným talířem (13) a stolem
brusky (14) smí činit max. 1,6 mm.
앬 Pracujte vždy s dorazovou kolejničkou (12) nebo
stolem brusky (14).
Prosím dodržujte také přiložené všeobecné
bezpečnostní pokyny!
Varování
Před uvedením do provozu
přečíst návod k použití
Chránit před deštěm a vlhkem
Nosit rukavice
Nosit ochranu zraku
Nosit ochranu proti prachu
5. Technická data
Napětí: 230 V ~ 50 Hz
Výkon: 375 W S2 30 min
Brusný talíř:
n0: 1400 min
-1
ø
: 150 mm
výkyvný: 0°-45°
Příčný doraz: -60° až +60°
Zařízení brusného pásu:
v0: 4,6 m/s
Rozměry: 915 x 100 mm
Hladina akustického tlaku LPA: 78,6 dB(A)
Hladina akustického výkonu LWA: 91,6 dB (A)
앬 Doba zapnutí:
Doba zapnutí S2 30 min (krátkodobý provoz)
říká, že motor se jmenovitým výkonem (375 W)
smí být trvale zatížen pouze po dobu udanou na
štítku s daty (30 min).
V jiném případě by se nepřípustně ohřál. Během
přestávky se motor opět ochladí na svoji
výchozí teplotu.
6. Před uvedením do provozu
앬 Stroj musí být stabilně postaven, tzn.
přišroubován na pracovním stole nebo pevném
univerzálním podstavci.
앬 Před uvedením do provozu musí být všechny
kryty a bezpečnostní zařízení správně
namontovány.
앬 Brusný pás a brusný kotouč musí být volně
otočné.
앬 U již opracovaného dřeva dbát na cizí tělesa,
jako např. hřebíky nebo šrouby atd.
앬 Před zapnutím za-/vypínače se ujistěte, zda je
brusný papír správně namontován a zkontrolujte
volný chod pohyblivých částí.
앬 Před připojením stroje se ujistěte, zda údaje na
typovém štítku souhlasí s údaji sítě.
Anleitung BTS 400-150-1 30.08.2005 9:27 Uhr Seite 25
Page 26

CZ
26
7. Montáž
Pozor! Před všemi údržbovými a přezbrojovacími
pracemi na přístroji vytáhnout sít’ovou zástrčku.
7.1. Sestavení stroje (obr. 1 - 6)
앬 Pryžové nožky (2) nastrčit na základovou desku
(5).
앬 Plastovou ochranu (16) upevnit šrouby (17)
(obr. 2).
앬 Brusný talíř (13) nastrčit na hřídel (obr. 3).
앬 Šroub (18) utáhnout imbusovým klíčem (19), aby
byl zajištěn brusný talíř (13) (obr. 3/4).
앬 Spodní ochranu kotouče (20) namontovat
pomocí šroubů (21) (obr. 4).
앬 Stůl brusky (14) namontovat a zajistit šroubem
(22) (obr. 5).
Stůl brusky (14) může být pomocí pokosové
stupnice (23) a křídlového šroubu (2) plynule
nastaven v rozmezí 0° až 45°.
Přestavitelný příčný doraz (7) zajišt’uje
bezpečné vedení obrobku.
Pozor! Musí být zajištěn volný chod brusného
talíře (13), vzdálenost mezi stolem brusky (14) a
brusným talířem (13) ale nesmí být větší než 1,6
mm.
앬 Dorazovou kolejničku (12) nasadit a pomocí
šroubů (24) a (25) upevnit (obr. 6).
Pozor! Musí být zajištěn volný chod brusného
pásu (11).
7.2. Výměna brusného pásu (11) (obr. 7 - 9)
앬 Vytáhnout sít’ovou zástrčku.
앬 Šrouby (25) a (26) odstranit.
앬 Ochranu brusného pásu (27) sejmout.
앬 Napínák brusného pásu (9) posunout doleva,
aby se brusný pás (11) uvolnil.
앬 Brusný pás (11) směrem dozadu sejmout.
앬 Nový brusný pás v opačném pořadí opět
namontovat.
Pozor! Dbát na směr chodu: na krytu (28) a na
vnitřní straně brusného pásu!
7.3. Nastavení brusného pásu (11) (obr. 1)
앬 Brusný pás (11) rukou pomalu posouvat ve
směru chodu.
앬 Brusný pás (11) musí běžet centricky na brusné
ploše (6), pokud tomu tak není, je možné ho
pomocí rýhovaného šroubu (10) dojustovat.
7.4.Přestavení brusné polohy brusného pásu (11)
(obr. 10/11)
앬 Obě matice (29) uvolnit.
앬 Brusný pás (11) posunout směrem nahoru do
požadované polohy.
앬 Matice (29) opět utáhnout, aby byla tato poloha
fixována.
앬 Jako podložka obrobku může v této poloze
sloužit stůl brusky, k tomu musí být nasunut do
otvoru přídržné trubky (31) a pomocí šroubu (30)
fixován.
7.5. Výměna brusného papíru na brusném talíři
(13)
앬 Brusný papír pro brusku s talířovým kotoučem
(13) je samolepicí, tzn. že se na brusný talíř (13)
pouze přilepí, popř. stáhne.
8. Provoz
8.1. Za-/vypínač (1)
앬 Stisknutím zeleného tlačítka „1“ je možné
brusku zapnout.
앬 Na zastavení brusky musí být stisknuto červené
tlačítko „0“.
8.2. Broušení
앬 Během broušení brusku vždy pevně držte.
앬 Nevykonávejte žádný velký tlak.
앬 Obrobkem by se mělo při broušení na brusném
pásu popř. na brusném kotouči pohybovat sem
a tam, aby se zabránilo jednostrannému
opotřebení brusného papíru!
앬 Důležité! Dřevo by mělo být broušeno vždy ve
směru fládrování dřeva, aby se zabránilo
odštěpování.
9. Údržba
앬 Prach a nečistoty ze stroje pravidelně
odstraňovat. Čištění provádět nejlépe stlačeným
vzduchem nebo hadrem.
앬 K čištění plastu nepoužívejte žíravé prostředky.
10. Objednání náhradních dílů
Při objednávce náhradních dílů je třeba uvést
následující údaje:
앬 Typ přístroje
앬 Číslo artiklu přístroje
앬 Identifikační číslo přístroje
앬 Číslo požadovaného náhradního dílu
Aktuální ceny a informace naleznete na www.iscgmbh.info
Anleitung BTS 400-150-1 30.08.2005 9:27 Uhr Seite 26
Page 27

SLO
27
1. Opis naprave
1. Stikalo za vklop/izklop
2. Gumijaste noge
3. Krilnati vijak
4. Kotna skala
5. Osnovna plošča
6. Brusilna površina
7. Prečni prislon
8. Podporna palica
9. Napenjalnik brusilnega traku
10. Narebričeni vijak za nastavitev brusilnega
traku
11. Brusilni trak
12. Prislonska opornica
13. Brusilna krožnična plošča
14. Brusilna miza
15. Nastavitveni vijak za brusilno ploščo
16. Plastična zaščita
2. Obseg dobave
앬 Tračni in krožnični brusilnik
앬 Brusilna krožnična plošča
앬 Oprijemne brusilne plošče
앬 Brusilni trak
앬 Inbus ključ
3. Namenska Uporaba stroja
Tračni in krožnični brusilnik se uporablja za brušenje
lasa vseh vrst glede na velikost stroja
Stroj se lahko uporablja samo v namen, za
katerega je bil izdelani.
Vsaka drugačna uporaba šteje kot nenamenska
uporaba in v primeru nenamenske uporabe
proizvajalec ne nosi odgovornosti za kakršnokoli
škodo in poškodbe temveč je za to odgovoren
uporabnik/upravljalec stroja.
Sestavni del namenske uporabe je tudi upoštevanje
varnostnih napotkov ter navodil za montažo in
obratovanje v dokumentaciji o navodilih za uporabo.
Psebe, ki upravljajo in vzdržujejo stroj, morajo biti
seznanjene s temi navodili in poučene o možnih
nevarnostih.
Na tej osnovi je treba najnatančneje upoštevati
veljavne predpise o preprečevanju nezgod.
Upoštevati je treba druga splošna pravila na
delvno-medicinskem in varnostno-tehničnem
področju.
Izvajanje sprememb na stroju v celoti izključuje
jamstvo proizvajalca in odgovornost proizvajalca za
nastalo škodo zaradi takšnih sprememb.
Kljub zajamčeni namenski uporabi stroja ni možno v
celoti izključiti določenih faktorjev tveganja.
Pogojeno s konstrukcijo in sestavo stroja lahko
nastopijo sledeče okoliščine:
앬 Zdravju škodljive emisije lesnega prahu pri
uporabi stroja v zaprtih prostorih.
앬 Rotirajoče dele stroja ni možno zakriti iz
funkcionalnih razlogov. Zato postopajte s
premislekom in dobro držite obdelovanca, da
preprečite zdrs obdelovanca in kontakt Vaših
rok z brusilnim trakom.
4. Važni napotki
Prosimo, če skrbno preberete navodila za uporabo
in upoštevate pri delu napotke v navodilih. S
pomočjo teh navodil za uporabo se seznanite s
strojem, s pravilno uporabo stroja in z varnostnimi
napotki.
Varnostni napotki
앬 Opozorilo! Ko se uporablja električno orodje, je
potrebno slediti osnovnim varnostno-zaščitnim
ukrepom, da se izključi tveganje požara,
električnega udara in poškodb oseb vključno
sledeče:
앬 Upoštevajte te napotke pred in med delom s
tračnim in krožničnim brusilnikom.
앬 Dobro shranite ta navodila z varnostnimi
napotki.
앬 Na prostem uporabljajte samo v ta namen
dovoljene in odgovarjajoče označene kabelske
podaljške.
앬 Pazite na to kar počnete. Z delom začnite
premišljeno. Stroja ne uporabljajte, če ste
utrujeni.
앬 Ne uporabljajte orodij, pri katerih ni možno
vklapljati ali izklapljati stikal.
앬 Opozorilo! Uporabljanje druge opreme in delov
skupaj s tem strojem lahko za Vas predstavlja
nevarnost poškodb.
앬 Pri izvajanju kakršnihkoli nastavitvenih ali
vzdrževalnih del na stroju potegnite električni
omrežni vtikač iz električne vtičnice.
앬 List z varnostnimi napotki posredujte naprej
vsem osebam, ki delajo s strojem.
앬 Ne uporabljajte brusilnikov majhne moči za
težka brusilna opravila.
앬 Kabla ne uporabljajte v namene, v katere kabel
ni namenjeni.
앬 Poskrbite za varno držo telesa in vzdržujte ob
vsakem času ravnotežje telesa.
앬 Preverite eventuelne poškodbe na orodju.!
앬 Pred nadalnjo uporabo orodja morate skrbno
preveriti zaščitno-varnostno opremo stroja ali
rahlo poškodovane dele stroja ter brezhibno in
namensko funkcionalnost stroja.
Anleitung BTS 400-150-1 30.08.2005 9:27 Uhr Seite 27
Page 28

SLO
28
앬 Preverite, če gibljivi deli stroja brezhibno
delujejo, se ne zatikajo in ali so deli stroja
poškodovani. Vsi deli stroja morajo biti pravilno
ontirani in vsi pogoji izpolnjeni, da bo
zagotovljeno brezhibno delovanje stroja.
앬 Poškodovano varnostno-zaščitno opremo in
njene dele mora popraviti ali zamenjati
strokovno pooblaščena servisna delavnica, če ni
drugače navedeno v navodilih.
앬 Poškodovana stikala dajte zamenjati v servisni
službi.
앬 To orodje je izdelano v skladu z veljavnimi
varnostnimi predpisi.
앬 Razmak med brusilno ploščo (13) in brusilno
mizo (14) sme znašati največ 1,6 mm.
앬 Zmeraj delajte s prislonsko opornico (12) ali z
brusilno mizo (14).
UUppoošštteevvaajjttee ttuuddii ssppllooššnnee vvaarrnnoossttnnee nnaappoottkkee nnaa
pprriilloožžeenneemm lliissttuu!!
Opozorilo
Pred uporabo preberite
navodila za uporabo
Zaščitite pred dežjem in vlago
Uporabljajte zaščitne rokavice
Uporabljajte zaščito za oči
Uporabljajte protiprašno
zaščito
5. Tehnični podatki
Napetost 230 V ~ 50 Hz
Moč 375 Watt S2 30 min.
Brusilna krožnična plošča:
n
0
1400 min
-1
Ø
: 150 mm
Nagib: 0° - 45°
Prečni naslon - 60° + 60°
Tračna brusilna oprema:
v0 4,6 m/s
Dimenzije 915 x 100 mm
Nivo hrupnosti LPA 78,6 dB(A)
Moč hrupa LWA: 91,6 dB(A)
앬 Trajanje vključenosti obratovanja stroja:
Trajanje vljučenosti vključenosti obratovanja S2
30 min (kratko obratovanje) nam pove, da sme
biti motor z nazivno močjo (375 W) trajno
obremenjeni za čas, ki je navedeni na tablici (30
min).
V nasprotnem bi se nedopustno segrel. V času
prekinitve obratovanja se motor ponovno ohladi
na svojo izhodiščno temperaturo.
6. Pred zagonom
앬 Stroj je treba postaviti v stabilni položaj, t.p. na
delovno mizo ali pa ga priviti na čvrsto podlago.
앬 Pred začetkom uporabe je treba provilno
montirati vse pokrove in vso varnostno-zaščitno
opremo.
앬 Brusilni trak in brusilna krožnična plošča se
morata dati prosto obračati.
앬 Pri že obdelovanem lesu je treba paziti na
prisotnost tujih deleov, kot n. pr. žeblji ali vijaki.
앬 Preden uporabite stikalo za vklop/izklop, se
prepričajte , če je brusilni papir pravilno
montirani in, če so gibljivi deli prosto gibljivi.
앬 Pred vklopom stroja se prepričajte, če podatki
na tipski tablici ustrezajo podatkom o
električnem omrežju.
7. Montaža
Pozor! Pred izvajanjem kakršnihkoli vzdrževalnih del
ali preureditev na stroju morate potegniti omrežni
vtikač iz električne omrežne vtičnice.
7.1 Sestavljanje stroja (Slika 1 - 6)
앬 Gumijaste nosilne podstavke (2) namestite na
osnovno ploščo (5).
Anleitung BTS 400-150-1 30.08.2005 9:27 Uhr Seite 28
Page 29

SLO
29
앬 Pritrdite plastično zaščito (16) z vijaki (17)
(Slika 2).
앬 Brusilno krožnično ploščo (13) namestite na
gred (Slika 3).
앬 Vijak (18) zategnite z imbus ključem (19), za
zagotovite čvrsti položaj brusilne plošče (13)
(Slika 3/4).
앬 Montirajte spodnjo zaščito brusilne plošče (20) z
vijaki (21) (Slika 4).
앬 Montirajte brusilno mizo (14) in zavarujte z
vijakom (22) (Slika 5).
Brusilno mizo (14) se lahko nastavlja
brezstopenjsko od 0° do 45° s pomočjo
zarezne skale (23) in krilnatega vijaka (2).
Nastavljivi prečni prislon (7) zagotavlja varno
vodenje obdelovanca.
Pozor! Brusilna krožnična plošča (13) se mora
dati prosto obračati, razmak med brusilno mizo
(14) in brusilno krožnično ploščo (13) pa ne sme
biti večji od 1,6 mm.
앬 Namestite prislonsko opornico (12) in jo pritrdite
s vijaki (24) in (25) (Slika 6).
Pozor! Brusilni trak (11) se mora dati prosto
obračati.
7.2. Zamenjava brusilnega traku (11) (Slika 7-9)
앬 Potegnite omrežni vtikač iz vtičnice.
앬 Odstranite vijake (25) in (26).
앬 Snemite zaščito brusilnega traku (27).
앬 Pomaknite napenjalnik brusilnega traku (9) v
levo, da lahko sprostite brusilni trak (11).
앬 Odstranite brusilni trak (11) v smeri nazaj.
앬 Ponovno montirajte novi brusilni trak v
obratnem vrstnem redu montažnih korakov.
Pozor! Pazite na smer vrtenja, ki je označena na
ohišju (28) in nanotranji strani brusilnega traku!
7.3 Nastavitev brusilnega traku (11) (Slika 1 )
앬 Brusilni trak (11) z roko počasi pomaknite v
smeri vrtenja.
앬 Brusilni trak (11) mora teči po sredini brusilne
površine (6). Če temu ni tako, potem lahko
izvršite naknadno nastavitev traku s pomočjo
narebričenega vijaka za nastavljanje brusilnega
traku (10).
7.4. Nastavitev brusilnega položaja brusilnega
traku (11) (Slika 10/11).
앬 Odvijte obe matici (29).
앬 Pomaknite brusilni trak (11) navzgor v željeni
položaj.
앬 Ponovno zategnite matice (29), da fiksirate ta
položaj brusilnega traku.
앬 Za podlago za obdelovanec lahko v tem
položaju uporabite brusilno mizo, ki jo je pri tem
treba potisniti v luknjo držalne cevi (31) in jo
fiksirati z vijakom (30).
7.5. Namestitev brusilnega papirja na brusilno
krožnično ploščo (13)
앬 Brusilni papir za krožnični ploščni brusilnik (13)
je samolepljivi, t. p. potrebno ga je samo
prilepiti na brusilno krožnično ploščo (13) oz. ga
sneti .
8. Obratovanje
8.1. Stikalo za vklop/izklop (1)
앬 S pritiskom na zeleno tipko „1“ lahko vklopite
brusilnik.
앬 Da bi brusilnik izklopili, je treba pritisniti rdečo
tipko „0“.
8.2. Brušenje
앬 Zmeraj dobro držite obdelovanec med
postopkom brušenja.
앬 Ne izvajajte prevelikega pritiska obdelovanca na
brusilni papir.
앬 Obdelovanec je treba med brušenjem pomikati
sem ter tja po brusilnem traku oz. po brusilni
krožnični plošči, da se prepreči , da bi se
brusilni papir obrabljal samo na enem mestu.
앬 Pomembno! Lesene obdelovance je treba
zmeraj brusiti v smeri lesne žile, da preprečite
odtrganje lesnih iveri.
9. Vzdrževanje
앬 Prah in umazanijo je treba redno odstranjevati iz
stroja. Čisščenje boste najbolje izvedli s
komprimiranim zrakom ali s krpo.
앬 Pri čiščenju plastičnih delov ne uporabljajte
agresivnih čistilnih sredstev.
10. Naročanje nadomestnih delov
Nadomestne dele lahko naročite pri firmi ISC GmbH
(naslov v garancijski izjavi) in pri tem navedite
sledeče podatke :
앬 tip stroja
앬 številko artikla stroja
앬 identifikacijsko številko stroja
앬 številko nadomestnega dela za dotični del
Aktualne cene in informacije najdete na spletni strani
www.isc-gmbh.info
Anleitung BTS 400-150-1 30.08.2005 9:27 Uhr Seite 29
Page 30

1. Opis uredjaja
1. Prekidač
2. Gumene nožice
3. Krilni vijak
4. Kutna ljestvica
5. Temeljna ploča
6. Brusna površina
7. Poprečni graničnik
8. Podupirač
9. Zatezač brusne trake
10. Nazubljeni vijak za podešavanje brusne trake
11. Brusna traka
12. Vodilica
13. Brusni tanjur
14. Stol brusilice
15. Vijak za fiksiranje stola brusilice
16. Plastični štitnik
2. Opseg isporuke
앬 tračna i tanjurasta brusilica
앬 brusni tanjur
앬 samoljepljivi brusni diskovi
앬 brusna traka
앬 imbusni ključ
3. Namjenska upotreba
Tračna i tanjurasta brusilica je namijenjena za
brušenje drva svake vrste, u skladu s veličinom
stroja.
Stroj se smije koristiti samo shodno namjeni.
Svaka druga i dodatna upotreba nije namjenska. Za
štete ili svakojake ozljede koje nastaju usljed takve
nenamjenske upotrebe odgovara korisnik/radnik, a
ne proizvodjač.
Smiju se koristiti samo brusne trake koje su
prikladne za stroj, a koje odgovaraju tehničkim
podacima u ovom naputku.
Sastavni dio namjenske upotrebe je takodjer
poštivanje sigurnosnih uputa, te naputak za montažu
i upute za rad u naputku za uporabu.
Osobe koje rade na stroju i koje ga održavaju moraju
biti upoznati s njim i poučeni o mogućim
opasnostima.
Osim toga, važeći propisi za sprečavanje nesreća se
najstrože moraju uvažiti.
Treba poštivati ostala pravila iz radne medicine i
sigurnosne tehnike.
Izmjene na stroju u cijelosti isključuju odgovornost
proizvodjača, i za štete koje nastaju usljed toga.
I u slučaju namjenske upotrebe se ne mogu u
potpunosti otkloniti odredjeni rizici. Uvjetovano
konstrukcijom i sastavom stroja se mogu pojaviti
sljedeći rizici:
앬 Oslobadjanje drvene prašine, opasno po
zdravlje, pri upotrebi u zatvorenim prostorijama
앬 Rotirajući dijelovi stroja se iz funkcionalnih
razloga ne mogu pokrivati. Zato postupajte
oprezno i čvrsto držite obradak da spriječite
isklizanje, usljed čega bi Vaše ruke mogle doći u
dodir s brusnom trakom.
4. Važne upute
Molimo da pažljivo pročitate naputak za upotrebu i
da se držite uputa iz njega. Na osnovu ovoga
naputka za upotrebu upoznajte se s uredjajem,
ispravnom upotrebom, te sigurnosnim uputama.
Sigurnosne upute
앬 Upozorenje: Kada se koristi električni alat,
moraju se poduzeti načelne sigurnosne mjere
kako bi se isključili rizici od požara, električnog
udara i ozljeda, uključivo sljedeće:
앬 Uzmite u obzir sve ove upute prije i za vrijeme
rada s tračnom i tanjurastom brusilicom.
앬 Dobro čuvajte ove sigurnosne upute.
앬 Na otvorenom prostoru koristite samo za to
dopuštene i označene produžne kablove.
앬 Pazite što radite. Radite razumno. Ne koristite
alat kada ste umorni.
앬 Ne koristite alat u kojega se prekidač ne da
uklopiti i isklopiti.
앬 Upozorenje! Upotreba drugog ugradnog alata ili
drugog pribora može predstaviti opasnost od
ozljeda za Vas.
앬 Prilikom svih radova podešavanja i održavanja
izvadite utikač iz utičnice.
앬 Predajte sigurnosne upute svim osobama koje
rade sa strojem.
앬 Ne koristite strojeve male snage za teške
poslove.
앬 Ne koristite kabel u neke svrhe za koje nije
predvidjen!
앬 Osigurajte da sigurno stojite i uvijek održite
ravnotežu.
앬 Kontrolirajte alat obzirom na morebitna
oštećenja!
앬 Prije daljnje upotrebe alata treba brižljivo ispitati
da li zaštitne naprave ili malo oštećeni dijelovi
rade besprijekorno i shodno svojoj namjeni.
앬 Provjerite da li pokretni dijelovi rade ispravno i
nisu zaglavili, ili su neki dijelovi oštećeni. Svi
dijelovi moraju biti ispravno montirani i ispuniti
sve uvjete da bi alat radio besprijekorno.
앬 Oštećene zaštitne naprave i dijelove stručno
HR
30
Anleitung BTS 400-150-1 30.08.2005 9:27 Uhr Seite 30
Page 31

HR
31
mora popraviti ili zamijeniti ovlaštena stručna
radionica, ukoliko nije drukčije navedeno u
naputku za upotrebu.
앬 Oštećene sklopke dajte da zamijeni servisna
radionica.
앬 Ovaj alat odgovara dotičnim sigurnosnim
propisima.
앬 Razmak izmedju brusnog tanjura (13) i stola
brusilice (14) smije iznositi najviše 1,6 mm.
앬 Uvijek radite s vodilicom (12) ili sa stolom
brusilice (14).
Molimo da uzmite u obzir i opće sigurnosne
upute na priloženom listu!
Upozorenje
Prije puštanja u funkciju
pročitajte naputak za uporabu
Čuvati od kiše i vlage
Nosite rukavice
Nosite zaštitne naočale
Nosite masku protiv prašine
5. Tehnički podaci
Napajanje: 230 V 50 Hz
Snaga: 375 Watt S2 30 min
Brusni tanjur:
n
0
1400 min
-1
ø
150 mm
zakretan 0° - 45°
Poprečni graničnik -60° do +60°
Tračna brusilica:
v
0
4,6 m/s
dimenzije: 915 x 100 mm
Razina zvučnog tlaka LPA 78,6 dB (A)
Razina zvučne snage LWA: 91,6 dB(A)
앬 Trajanje uključenosti:
Vrsta pogona S2 30 min (kratkotrajni pogon)
znači da se motor smije trajno opterećivati
nazivnom snagom (375 W) samo za vrijeme
navedeno na označnoj pločici (30 min).
Inače bi se previše zagrijavao. Za vrijeme stanke
motor se opet hladi na svoju početnu
temperaturu.
6. Prije puštanja u funkciju
앬 Stroj se mora postaviti tako da sigurno stoji, tj.
mora se vijcima pričvrstiti na radnom stolu ili na
stabilnom postolju.
앬 Prije puštanja u funkciju svi poklopci i
sigurnosne naprave moraju biti uredno
montirani.
앬 Brusna traka i brusni tanjur se moraju moći
slobodno okretati.
앬 Kada želite obradjivati prethodno već obradjeno
drvo pazite na strana tijela kao što su čavli ili
vijci itd.
앬 Prije nego što uključite stroj, uvjerite se da je
brusni papir ispravno montiran i da se pokretni
dijelovi neometano kreću.
앬 Prije priključivanja stroja uvjerite se da su podaci
na označnoj pločici u skladu s podacima
prisutne mreže.
Anleitung BTS 400-150-1 30.08.2005 9:27 Uhr Seite 31
Page 32

HR
32
7. Montaža
Pažnja! Prije svih radova održavanja,
zamjenjivanja dijelova i montaže na uredjaju
izvadite utikač iz utičnice.
7.1. Sastavljanje stroja (slike 1 - 6)
앬 Nataknite gumene nožice (2) na temeljnu ploču
(5).
앬 Pričvrstite plastični štitnik (16) pomoću vijaka
(17) (slika 2).
앬 Stavite brusni tanjur (13) na vratilo (slika 3).
앬 Zategnite vijak (18) pomoću imbusnog ključa
(19), radi osiguravanja brusnog tanjura (13) (slike
3/4).
앬 Montirajte donji štitnik ploče (20) pomoću vijaka
(21) (slika 4).
앬 Montirajte stol brusilice (14) i osigurajte ga
vijkom (22) (slika 5).
Stol brusilice (14) se pomoću kutne ljestvice (23)
i leptirastog vijka (2) može kontinuirano
namjestiti od 0° do 45°.
Namjestiv poprečni graničnik (7) osigurava
sigurno vodjenje obratka.
Pažnja: Brusni tanjur (13) se mora slobodno
okretati, a razmak izmedju stola brusilice (14) i
brusnog tanjura (13) ipak ne smije biti veći od
1,6 mm.
앬 Postavite vodilicu (12) i pričvrstite je vijcima (24)
i (25) (slika 6).
Pažnja: Brusna traka (11) se mora moći
slobodno okretati.
7.2 Zamjenjivanje brusne trake (11) (slike 7 - 9)
앬 Izvadite utikač iz utičnice.
앬 Izvadite vijke (25) i (26).
앬 Skinite štitnik brusne trake (27).
앬 Pomaknite zatezač brusne trake (9) ulijevo radi
popuštanja brusne trake (11).
앬 Skinite brusnu traku (11) unatrag.
앬 Montirajte novu brusnu traku u obrnutom
redosledu.
Pažnja! Pazite na smjer okretanja: na kućištu
(28) i na nutarnjoj strani brusne trake!
7.3. Podešavanje brusne trake (11) (slika 1)
앬 Gurnite brusnu traku (11) rukom polako u smjeru
okretanja.
앬 Brusna traka se mora kretati u sredini brusne
površine (6), ako to nije slučaj, to se može
podešavati pomoću nazubljenog vijka (10).
7.4 Namještanje položaja brusne trake (11) za
brušenje (slike 10/11)
앬 Popustite obje matice (29).
앬 Podignite brusnu traku (11) u željenu poziciju.
앬 Opet zategnite matice (29) radi fiksiranja te
pozicije.
앬 Za oslanjanje obratka se u toj poziciji moće
ugraditi stol brusilice, u tu svrhu se isti gura u
otvor pridržne cijevi (31) i fiksira vijkom (30).
7.5. Zamjenjivanje brusnog papira na brusnom
tanjuru (13)
앬 Brusni papir za tanjurastu brusilicu je
samoljepljiv, tj. samo se lijepi na brusni tanjur
odn. skine se sa istoga.
8. Rad
8.1. Prekidač (1)
앬 Pritiskanjem zelene tipke „1“ brusilica se
uključuje.
앬 Za isključivanje brusilice se pritišće crvena tipka
„0“.
8.2. Brušenje
앬 Za vrijeme brušenja uvijek čvrsto držite obradak.
앬 Ne vršite veliki pritisak.
앬 Obradak za vrijeme brušenje treba micati amo-
tamo na brusnoj traci ili na brusnoj ploči kako bi
se spriječilo da se brusni papir troši samo na
jednom mjestu!
앬 Važno! Komade drva treba brusiti uvijek u
pravcu prirodne šare kako bi se spriječilo
cijepanje.
9. Održavanje
앬 Stroj se redovno mora očistiti od prašine i
onečišćenja. Čišćenje se najbolje obavlja
komprimiranim zrakom ili krpom.
앬 Za čišćenje plastike ne rabite nagrizajuća
sredstva.
10. Naručivanje rezervnih dijelova
Rezervne dijelove možete naručiti kod firme ISC
GmbH (za adresu vidi certifikat o garanciji), pri tome
su potrebni sljedeći podaci:
앬 Tip uredjaja
앬 Broj artikla uredjaja
앬 Ident. broj uredjaja
앬 Kataloški broj potrebnog rezervnog dijela
Aktualne cijene i informacije potražite na web-adresi
www.isc-gmbh.info
Anleitung BTS 400-150-1 30.08.2005 9:27 Uhr Seite 32
Page 33
33
D
erklärt folgende Konformität gemäß EU-Richtlinie
und Normen für Artikel
declares conformity with the EU Directive
and standards marked below for the article
F
déclare la conformité suivante selon la
directive CE et les normes concernant l’article
verklaart de volgende conformiteit in overeenstemming met de EU-richtlijn en normen voor
het artikel
E
declara la siguiente conformidad a tenor de la
directiva y normas de la UE para el artículo
P
declara a seguinte conformidade de acordo
com a directiva CE e normas para o artigo
S
förklarar följande överensstämmelse enl. EUdirektiv och standarder för artikeln
ilmoittaa seuraavaa Euroopan unionin direktiivien ja normien mukaista yhdenmukaisuutta
tuotteelle
erklærer herved følgende samsvar med EUdirektiv og standarder for artikkel
заявляет о соответствии товара
следующим директивам и нормам EC
izjavljuje sljedeću uskladjenost s odredbama i
normama EU za artikl.
declarå urmåtoarea conformitate cu linia directoare CE μi normele valabile pentru articolul.
ürün ile ilgili olarak AB Yönetmelikleri ve
Normlar∂ gere©ince aμa©∂daki uygunluk aç∂kla
mas∂n∂ sunar.
‰ЛПТУВИ ЩЛУ ·ОfiПФ˘ıЛ Ы˘МКˆУ›· Ы‡МКˆУ· МВ
ЩЛУ √‰ЛБ›· ∂∂ О·И Щ· ЪfiЩ˘Ф БИ· ЩФ ЪФ˚fiУ
I
dichiara la seguente conformità secondo la
direttiva UE e le norme per l’articolo
attesterer følgende overensstemmelse i
henhold til EU-direktiv og standarder for
produkt
prohlašuje následující shodu podle směrnice
EU a norem pro výrobek.
H
a következő konformitást jelenti ki a termékekre vonatkozó EU-irányvonalak és normák
szerint
pojasnjuje sledečo skladnost po smernici EU
in normah za artikel.
deklaruje zgodność wymienionego poniżej
artykułu z następującymi normami na
podstawie dyrektywy WE.
vydáva nasledujúce prehlásenie o zhode podľa
smernice EÚ a noriem pre výrobok.
деклаpиpа следното съответствие съгласно
диpективите и ноpмите на ЕС за пpодукта.
заявляє про відповідність згідно з Директивою
ЄС та стандартами, чинними для даного товару
Landau/Isar, den 19.07.2005
Pfister
Techn. Supervisor
Band- und Tellerschleifer BTS 400/150-1
Weichselgartner
Leiter QS Konzern
ISC GmbH
Eschenstraße 6
D-94405 Landau/Isar
Konformitätserklärung
98/37/EG
73/23/EWG_93/68/EEC
97/23/EG
89/336/EWG_93/68/EEC
90/396/EWG
89/686/EWG
87/404/EWG
R&TTED 1999/5/EG
2000/14/EG:
95/54/EG:
97/68/EG:
x
x
x
Art.-Nr.: 44.192.50 I.-Nr.: 01025 Archivierung: 4419250-40-4155050
Subject to change without notice
EN 61029-1/A12: 2003; EN 55014-1/A2: 2002;
EN 55014-2/A1: 2001; EN 61000-3-2: 2000;
EN 61000-3-3/A1: 2001
Anleitung BTS 400-150-1 30.08.2005 9:27 Uhr Seite 33
Page 34
34
GARANTIEURKUNDE
Auf das in der Anleitung bezeichnete Gerät geben wir 2 Jahre
Garantie, für den Fall, dass unser Produkt mangelhaft sein sollte.
Die 2-Jahres-Frist beginnt mit dem Gefahrenübergang oder der
Übernahme des Gerätes durch den Kunden. Voraussetzung für
die Geltendmachung der Garantie ist eine ordnungsgemäße
Wartung entsprechend der Bedienungsanleitung sowie die bestimmungsgemäße Benutzung unseres Gerätes.
Selbstverständlich bleiben Ihnen die gesetzlichen Gewährleistungsrechte innerhalb dieser 2 Jahre erhalten. Die Garan-
tie gilt für den Bereich der Bundesrepublik Deutschland oder der
jeweiligen Länder des regionalen Hauptvertriebspartners als Ergänzung der lokal gültigen gesetzlichen Vorschriften. Bitte beachten Sie Ihren Ansprechpartner des regional zuständigen Kundendienstes oder die unten aufgeführte Serviceadresse.
ISC GmbH · International Service Center
Eschenstraße 6 · D-94405 Landau/Isar (Germany)
Info-Tel. 0180-5 120 509 • Telefax 0180-5 835 830
Service- und Infoserver: http://www.isc-gmbh.info
CERTIFICATO DI GARANZIA
Per l’apparecchio indicato nelle istruzioni concediamo una garanzia di 2 anni,
nel caso il nostro prodotto dovesse risultare difettoso. Questo periodo di 2 anni
inizia con il trapasso del rischio o la presa in consegna dell’apparecchio da parte
del cliente. Le condizioni per la validità della garanzia sono una corretta
manutenzione secondo le istruzioni per l’uso così come un utilizzo appropriato
del nostro apparecchio.
Naturalmente in questo periodo di 2 anni continuiamo ad assumerci gli
obblighi di responsabilità previsti dalla legge.
La garanzia vale per il territorio della Repubblica Federale Tedesca o dei
rispettivi paesi del principale partner di distribuzione di zona a completamento
delle norme di legge in vigore sul posto. Rivolgersi all’addetto del servizio
assistenza clienti incaricato della rispettiva zona o all’indirizzo di assistenza
clienti riportato in basso.
WARRANTY CERTIFICATE
The product described in these instructions comes with a 2 year warranty
covering defects. This 2-year warranty period begins with the passing of risk or
when the customer receives the product.
For warranty claims to be accepted, the product has to receive the correct
maintenance and be put to the proper use as described in the operating
instructions.
Your statutory rights of warranty are naturally unaffected during these 2
years.
This warranty applies in Germany, or in the respective country of the
manufacturer’s main regional sales partner, as a supplement to local
regulations. Please note the details for contacting the customer service center
responsible for your region or the service address listed below.
Garanciaokmány
Ebben az utasitásban megnevezett készülékre 2 év jótállást nyujtunk, arra az
esetre, ha a termékünk hiányos lenne. A 2-éves-határidô a kárveszély
átszállása vagy a készülék vevô általi átvétele által kezdôdik.
A jótállás érvényesítésének a feltétele a készülékünknek a használati
utasításnak megfelelô szabályszerě karbantartása úgymint rendeltetészerěi
használata.
Magától értetôdô, hogy ez a 2 év alatt a törvény szerinti szavatossági jogai
fennmaradnak.
A jótállás a Németországi Szövetségi Köztársaság területére érvényes vagy a
regionális fô forgalmazó partner országaiban kiegészítésként a helyi érvényes
törvényi elôírásokhoz. Kérjük vegye figyelembe a regionálisan illetékes
vevôszolgáltatásnál levô kontaktszemélyt vagy az alul megadott servízcímet.
GARANCIJSKI LIST
Za uredjaj opisan u uputama dajemo 2 godine jamstva u slučaju eventulanog
nedostatka na našem proizvodu. Rok od 2 godine započinje s prijelazom rizika
ili s preuzimanjem uredjaja od strane kupca.
Pretpostavka za ostvarivanje prava jamstva je pravilno održavanje u skladu s
uputama za uporabu, kao i svrsishodno korištenje našeg uredjaja.
Razumljivo je da zadržavate zakonsko pravo jamstva unutar te 2 godine.
Jamstvo važi za područje Savezne Republike Njemačke ili dotičnih zemalja
regionalnog glavnog trgovačkog partnera kao dopuna lokalno važećih
zakonskih propisa. Molimo Vas da obratite pažnju na Vašu kontakt osobu
nadležne servisne službe u regiji ili na dolje navedenu adresu servisa.
GARANTIE
Nous fournissons une garantie de 2 ans pour l’appareil décrit dans le mode
d’emploi, en cas de vice de notre produit. Le délai de 2 ans commence avec la
transmission du risque ou la prise en charge de l’appareil par le client.
La condition de base pour le faire valoir de la garantie est un entretien en bonne
et due forme, conformément au mode d’emploi, tout comme une utilisation de
notre appareil selon l’application prévue.
Vous conservez bien entendu les droits de garantie légaux pendant ces 2
ans.
La garantie est valable pour l’ensemble de la République Fédérale d’Allemagne
ou des pays respectifs du partenaire commercial principal en complément des
prescriptions légales locales. Veuillez noter l’interlocuteur du service aprèsvente compétent pour votre région ou l’adresse mentionnée ci-dessous.
TAKUUTODISTUS
Käyttöohjeessa kuvatulle laitteelle myönnämme 2 vuoden takuun siinä
tapauksessa, että valmistamamme tuote on puutteellinen. 2 vuoden määräaika
alkaa joko vaaransiirtymishetkestä tai siitä hetkestä, jolloin asiakas on ottanut
laitteen haltuunsa. Takuuvaateiden edellytyksenä on laitteen käyttöohjeessa
annettujen määräysten mukainen asiantunteva huolto sekä laitteemme
määräystenmukainen käyttö.
On itsestään selvää, että asiakkaan lakimääräiset takuukorvausoikeudet
säilyvät näiden 2 vuoden aikana.
Takuu on voimassa Saksan Liittotasavallan alueella tai kunkin
päämyyntiedustajan alueen maissa paikallisesti voimassaolevien
lakimääräysten täydennyksenä. Asiakkaan tulee kääntyä takuuasioissa alueesta
vastuussa olevan asiakaspalvelun tai alla mainitun huoltopalvelun puoleen.
Anleitung BTS 400-150-1 30.08.2005 9:27 Uhr Seite 34
Page 35

35
ZÁRUČNÍ LIST
Na přístroj označený v návodu poskytujeme záruku 2 let, pro ten případ, že by
byl náš výrobek vadný. Tato 2letá lhůta začíná přechodem rizika nebo
převzetím přístroje zákazníkem.
Předpokladem pro uplatňování záruky je řádná údržba příslušně podle návodu
k obsluze a používání našeho přístroje k určenému účelu.
Samozřejmě Vám během těchto 2 let zůstanou zachována zákonná
záruční práva.
Záruka platí na území Spolkové republiky Německo nebo příslušné země
regionálního hlavního distribučního partnera jako doplněk lokálně platných
zákonných předpisů. V případě potřeby se prosím obrat’te na Vašeho
kontaktního partnera regionálního příslušného zákaznického servisu nebo na
dole uvedenou servisní adresu.
GARANCIJSKI LIST
Za napravo, ki je navedena v navodilih, dajemo 2 leti garancije v primeru, če bi
bil naš proizvod pomanjkljiv. 2-letni rok začne teči s prenosom jamstva ali s
prevzemom naprave s strani kupca. Predpogoj za uveljavljanje garancije je
redno pravilno vzdrževanje v skladu z navodili za uporabo ter namenska
predpisana uporaba naše naprave.
Samoumevno je, da v roku teh 2 let ostanejo za Vas v veljavi Vaše zakonite
pravice glede jamstva za proizvod.
Garancija velja za območje Zvezne Republike Nemčije ali posameznih dežel
regionalnega glavnega prodajnega partnerja kot dopolnilo k lokalnim veljavnim
zakonskim predpisom. Prosimo, če upoštevate Vašo kontaktno osebo v
pristojni servisni službi ali na spodaj navedenem naslovu servisne službe.
Anleitung BTS 400-150-1 30.08.2005 9:27 Uhr Seite 35
Page 36

36
D Nur für EU-Länder
Werfen Sie Elektrowerkzeuge nicht in den Hausmüll!
Gemäß europäischer Richtlinie 2002/96/EG über Elektro- und Elektronik-Altgeräte und Umsetzung in
nationales Recht müssen verbrauchte Elektrowerkzeuge getrennt gesammelt werden und einer
umweltgerechten Wiederverwertung zugeführt werden.
Recycling-Alternative zur Rücksendeaufforderung:
Der Eigentümer des Elektrogerätes ist alternativ anstelle Rücksendung zur Mitwirkung bei der sachgerechten Verwertung im Falle der Eigentumsaufgabe verpflichtet. Das Altgerät kann hierfür auch einer
Rücknahmestelle überlassen werden, die eine Beseitigung im Sinne der nationalen Kreislaufwirtschaftsund Abfallgesetzes durchführt. Nicht betroffen sind den Altgeräten beigefügte Zubehörteile und Hilfsmittel
ohne Elektrobestandteile.
For EU countries only
Never place any electric tools in your household refuse.
To comply with European Directive 2002/96/EC concerning old electric and electronic equipment and its
implementation in national laws, old electric tools have to be separated from other waste and disposed of
in an environment-friendly fashion, e.g. by taking to a recycling depot.
Recycling alternative to the demand to return electrical devices:
As an alternative to returning the electrical device, the owner is obliged to cooperate in ensuring that the
device is properly recycled if ownership is relinquished. This can also be done by handing over the used
device to a returns center, which will dispose of it in accordance with national commercial and industrial
waste management legislation. This does not apply to the accessories and auxiliary equipment without
any electrical components which are included with the used device.
F Uniquement pour les pays de l'Union Européenne
Ne jetez pas les outils électriques dans les ordures ménagères.
Selon la norme européenne 2002/96/CE relative aux appareils électriques et systèmes électroniques
usés et selon son application dans le droit national, les outils électriques usés doivent être récoltés à
part et apportés à un recyclage respectueux de l'environnement.
Possibilité de recyclage en alternative à la demande de renvoi :
Le propriétaire de l’appareil électrique est obligé, en guise d’alternative à un envoi en retour, à contribuer
à un recyclage effectué dans les règles de l’art en cas de cessation de la propriété. L’ancien appareil
peut être remis à un point de collecte dans ce but. Cet organisme devra l’éliminer dans le sens de la Loi
sur le cycle des matières et les déchets. Ne sont pas concernés les accessoires et ressources fournies
sans composants électroniques.
Anleitung BTS 400-150-1 30.08.2005 9:27 Uhr Seite 36
Page 37

37
I Solo per paesi membri dell'UE
Non gettate gli utensili elettrici nei rifiuti domestici.
Secondo la Direttiva europea 2002/96/CE sui rifiuti di apparecchiature elettriche ed elettroniche e
l'applicazione nel diritto nazionale gli elettroutensili usati devono venire raccolti separatamente e smaltiti
in modo ecologico.
Alternativa di riciclaggio alla richiesta di restituzione
Il proprietario dell’apparecchio elettrico è tenuto in alternativa, invece della restituzione, a collaborare in
modo che lo smaltimento venga eseguito correttamente in caso ceda l’apparecchio. L’apparecchio
vecchio può anche venire consegnato ad un centro di raccolta che provvede poi allo smaltimento
secondo le norme nazionali sul riciclaggio e sui rifiuti. Non ne sono interessati gli accessori e i mezzi
ausiliari senza elementi elettrici forniti insieme ai vecchi apparecchi.
H Csak EU-országok
Ne dobja az elektromos szerszámokat a házi hulladék közé.
A villamos készülékekkel és elektromos-öregkészülékekkel kapcsolatos 2002/96/EG-i europai
irányvonalaknak valamint ezeknek a nemzeti jogban történő realizálásának megfelően az elhasznált
villamos szerszámokat külön kell gyüjteni és egy környezetbaráti újraértékesítéshez juttatni.
Újrahasznosítás-alternatíva a viszzaküldési felhíváshoz:
Az elektromos készülék tulajdonosa kötelezve van, a tulajdon feladása esetében, a visszaküldés helyett
alternatív egy szakszerű értékesítésre. Ehhez az öreg készüléket egy visszavevő helynek lehet
átengedni, amely a nemzetközi iparkörfolyamat és hulladéktörvény értelmében elvégzi a
megsemmisítést. Ez nem érrinti az öreg készülékekhez mellékelt villamosalkatrészek nélküli
tartozékrészeket és segítőeszközöket.
Samo za zemlje Europske zajednice
Elektroalate ne bacajte u kućno smeće.
U skladu s europskom odredbom 2002/96/EG o starim električnim i elektroničkim uredjajima i njezinom
primjenom u okviru državnog prava, istrošeni elektroalati moraju se odvojeno sakupiti i zbrinuti na
ekološki način u svrhu recikliranja.
Alternativa s recikliranjem u odnosu na zahtjev za povrat uredjaja:
Vlasnik elektrouredjaja alternativno je obvezan da umjesto povrata robe u slučaju odricanja vlasništva
sudjeluje u stručnom zbrinjavanju elektrouredjaja. Stari uredjaj može se u tu svrhu prepustiti i stanici za
preuzimanje rabljenih uredjaja koja će provesti uklanjanje u smislu državnog zakona o recikliranju i
otpadu. Zakonom nisu obuhvaćeni dijelovi pribora ugradjeni u stare uredjaje i pomoćni materijali bez
električnih elemenata.
Anleitung BTS 400-150-1 30.08.2005 9:27 Uhr Seite 37
Page 38

38
Pouze pro členské země EU
Nedávejte elektrické nářadí do domácího odpadu.
Podle Evropské směrnice 2002/96/EG o starých elektrických a elektronických přístrojích (WEEE) a podle
národního práva musí být použité elektrické nářadí odděleně skladováno a odevzdáno k ekologické
recyklaci.
Alternativa recyklace k zaslání zpět:
Vlastník elektrického přístroje je alternativně namísto zaslání zpět povinen ke spolupráci při odborné
recyklaci v případě, že se rozhodne přístroj zlikvidovat. Starý přístroj může být v tomto případě také
odevzdán do sběrny, která provede likvidaci ve smyslu národního zákona o hospodářském koloběhu a
zákona o odpadech. Toto neplatí pro ke starým přístrojům přiložené části příslušenství a pomocné
prostředky bez elektrických součástí.
Samo za dežele članice EU:
Ne mečite električnega orodja med hišne odpadke.
V skladu z evropsko smernico 2002/96/EG o starih električnih in elektronskih aparatih in uporabo
državnih zakonov je potrebno električna orodja zbirati ločeno in odstranjevati v namen reciklaže v skla
du s predpisi o varovanju okolja.
Reciklažna alternativa za poziv za vračanje:
Lastnik električnega aparata je namesto vračanja aparata dolžan sodelovati pri pravilnem recikliranju v
primeru odpovedi lastništvu aparata. Stari aparat se lahko v ta namen preda tudi na prevzemnem
mestu, katero izvaja odstranjevanje v smislu državnega zakona o ravnanju z odpaki. To se ne nanaša na
starim aparatom priloženih delov pribora in pripomočkov brez električnih sestavnih delov.
Koskee ainoastaan EU-jäsenmaita
Älä heitä sähkötyökaluja kotitalousjätteisiin.
Sähkökäyttöisiä ja elektronisia vanhoja laitteita koskevan Euroopan direktiivin 2002/96/EY mukaan, joka
on sisällytetty kansallisiin lakeihin, tulee loppuun käytetyt sähkökäyttöiset työkalut kerätä erikseen ja
toimittaa ympäristöystävälliseen kierrätykseen uusiokäyttöä varten.
Kierrätys vaihtoehtona takaisinlähettämiselle:
Sähkölaitteen omistajan velvollisuus on takaisinlähettämisen vaihtoehtona avustaa laitteen asianmukai
sta hävittämistä kierrätyksen kautta, kun laite poistetaan käytöstä. Laitteen voi toimittaa myös
kierrätyspisteeseen, joka suorittaa laitteen hävittämisen paikallisten kierrätys- ja jätteenpoistomääräysten
mukaisesti hyödyntäen käyttökelpoiset raaka-aineet. Tämä ei koske käytöstä poistettaviin laitteisiin
kuuluvia lisävarusteita tai apulaitteita, joissa ei ole sähköosia.
Anleitung BTS 400-150-1 30.08.2005 9:27 Uhr Seite 38
Page 39

39
Technische Änderungen vorbehalten
Technical changes subject to change
Sous réserve de modifications
Oikeus teknisiin muutoksiin pidätetään
Con riserva di apportare modifiche tecniche
Technikai változások jogát fenntartva
Technické změny vyhrazeny
Tehnične spremembe pridržane.
Zadržavamo pravo na tehnične izmjene.
Anleitung BTS 400-150-1 30.08.2005 9:27 Uhr Seite 39
Page 40

EH 08/2005
Der Nachdruck oder sonstige Vervielfältigung von Dokumentation und
Begleitpapieren der Produkte, auch auszugsweise ist nur mit ausdrücklicher Zustimmung der ISC GmbH zulässig.
The reprinting or reproduction by any other means, in whole or in part,
of documentation and papers accompanying products is permitted
only with the express consent of ISC GmbH.
La réimpression ou une autre reproduction de la documentation et des
documents d’accompagnement des produits, même incomplète, n’est
autorisée qu’avec l’agrément exprès de l’entreprise ISC GmbH.
La ristampa o l’ulteriore riproduzione, anche parziale, della
documentazione o dei documenti d’accompagnamento dei prodotti è
consentita solo con l’esplicita autorizzazione da parte della ISC
GmbH.
Tuotteiden dokumentaatioiden ja muiden mukaanliitettyjen asiakirjojen
vain osittainenkin kopiointi tai muunlainen monistaminen on sallittu
ainoastaan ISC GmbH:n nimenomaisella luvalla.
Az termékek dokumentációjának és kisérô okmányainak az
utánnyomása és sokszorosítása, kivonatosan is csak az ISC GmbH
kifejezett beleegyezésével engedélyezett.
Dotisk nebo jiné rozmnožování dokumentace a průvodních
dokumentů výrobků, také pouze výňatků, je přípustné výhradně se
souhlasem firmy ISC GmbH.
Ponatis ali druge vrste razmnoževanje dokumentacije in spremljajočih
dokumentov proizvodov proizvajalca, tudi v izvlečkih, je dovoljeno
samo z izrecnim soglasjem firme ISC GmbH.
Naknadno tiskanje ili slična umnožavanja dokumentacije i pratećih
papira ovih proizvoda, čak i djelomično kopiranje, moguće je samo uz
izričito dopuštenje tvrtke ISC GmbH.
Anleitung BTS 400-150-1 30.08.2005 9:27 Uhr Seite 40
 Loading...