

EIM Guide: Network Master User Guide for Allen Bradley Series PLC-5 Programmable Controller Manuals & Guides

User’s Guide
AB1771-C
Network Master
(Version 5.21)
For
Allen-Bradley Series PLC-5 Programmable Controllers
(Date: 2004-11-18)

Controlinc 1771-C (Version 5.21) Network Master Users Guide (2004-11-18)
User’s Guide
Controlinc Network Master … AB1771-C (Version 5.21)
For
Allen-Bradley Series PLC-5 Programmable Controllers
Table of Contents
0. Quick Start Information...............................................................................1
1. Introduction...................................................................................................2
1.1. Overview of 1771-C System ................................................................................... 2
1.2. Overview of Changes in Version 5.21 ................................................................... 4
1.3. Reference Manuals ................................................................................................. 6
1.4. EIM Equipment Compatibility .............................................................................7
1.5. Firmware ................................................................................................................. 7
2. 1771-C Hardware..........................................................................................8
2.1. Hardware Setup ...................................................................................................... 8
2.2. LED Utilization ....................................................................................................... 9
2.2.1. Green (PTX & PTR) and Yellow (LED1 & LED2) LED Usage ...............................9
2.2.2. Red “BTL” LED Usage.........................................................................................11
3. Network Setup and Connecting to the NIU ..............................................12
3.1. Field Connections at the Actuator....................................................................... 14
3.1.1. Step 1. Plan the Network Topology ................................................................... 14
3.1.2. Step 2. Select Network Cable............................................................................14
3.1.3. Step 3. Route Cable away from Electrical Interference ..................................... 15
3.1.4. Step 4. Observe Polarity and Network Grounding ............................................. 15
3.1.5. Step 5. Wire Preparation and Connections........................................................ 15
3.1.6. Step 6. Test Network ......................................................................................... 15
3.2. Field Network Cable Connection to the NIU ..................................................... 16
3.3. Cable Connection Between the NIU and the Network Master ........................ 16
4. 1771-C General Theory of Operation .......................................................17
4.1. Operational Overview ..........................................................................................17
4.1.1. Diagram Describing Relationship Between Process Time Slices ........................ 17
Copyright © 2004 EIM COMPANY, INC. • 13840 PIKE ROAD • MISSOURI CITY, TX. 77489
Page i

Controlinc 1771-C (Version 5.21) Network Master Users Guide (2004-11-18)
4.1.2. Diagram Describing Network Scanning & Actuator Writing Logic........................18
4.1.3. Diagram Demonstrating Adding Additional Valves in Valve Scan Time-Slice...... 19
4.1.4. Diagram Describing Relationship Between Scan Period & Diagnostic Scan....... 20
4.1.5. 1771-C System Operations at Power Up.............................................................21
4.2. Network Interface (Scan) Time-Slice (1771-C ↔ Network Communication) 22
4.2.1. Operation: Network Scanning to Gather Valve Actuator Data ............................ 22
4.2.2. Operation: The Network Communication Diagnostic Scan................................. 23
4.3. PLC Interface Time-Slice (1771-C ↔ PLC Communication)..........................25
4.3.1. Operation: PLC (Write Data Tables To) or (Read Tables From) the 1771-C...... 27
4.3.2. Operation: PLC Commands to Write Data to the Actuators................................ 30
4.3.3. RLL Example … Manually Send New Table … Auto Read Response ................ 32
5. System Tables..............................................................................................33
5.1. Table Arrangement............................................................................................... 35
5.2. Standard Header Format (All Tables) … Words [0 3] ................................37
5.2.1. Word [0]: Table ID............................................................................................. 37
5.2.2. Word [1]: Read / Write Command Indicator ......................................................37
5.2.3. Word [2]: Reserved / Firmware ID..................................................................... 37
5.2.4. Word [3]: Emergency Shut Down (ESD) Command Word & Indication ............ 38
5.3. Table [0] … System Information Table.............................................................. 39
5.3.1. Table [0] Overview............................................................................................... 39
5.3.2. Table [0] Configuration Words … Words [4 17]................................................ 42
5.3.3. Table [0] Run-Time Information Words … Words [47 63] ................................47
5.3.4. Table [0] … RSLOGIX-5 Examples ..................................................................... 48
5.3.4.1. Example RSLOGIX-5 Screen: ..............................................................................48
5.3.4.2. Table [0] … The Configuration Values (RSLOGIX-5). ......................................... 49
5.3.4.3. Table [0] … The Configuration Values – Writing Table [0] (RSLOGIX-5) ............50
5.3.4.4. Table [0] … The Run-Time Feedback Values From 1771-C (RSLOGIX-5).........51
5.4. Tables [1 20] … Actuator Information Tables..............................................52
5.4.1. Table [1]: Communication Error Status............................................................... 52
5.4.2. Table [2]: Actuator Operational Status................................................................ 54
5.4.3. Table [3]: Discrete Control Mode (Open/Close/Stop) .........................................56
5.4.4. Table [4]: Valve Position Indication … 0 – 100.0% ............................................. 58
5.4.5. Table [5]: Valve Position Setpoint … 0 – 4095 ...................................................59
5.4.6. Tables [6 & 7]: User Analog Inputs #1 & 2.......................................................... 61
5.4.7. Table [8]: Analog Output #1................................................................................62
5.4.8. Tables [9 & 10]: Digital Input Accumulators (Totalizers) #1 & 2..........................64
5.4.9. Table [11]: Valve Position Indication … 0 – 4095 ............................................... 66
5.4.10. Table [12]: Discrete Input Statuses................................................................... 67
5.4.11. Table [13]: Solid State Relay (SSR) Configuration Table .................................69
Copyright © 2004 EIM COMPANY, INC. • 13840 PIKE ROAD • MISSOURI CITY, TX. 77489
Page ii

Controlinc 1771-C (Version 5.21) Network Master Users Guide (2004-11-18)
5.4.12. Table [14]: Additional Register Being Polled From Entire Network...................71
5.4.13. Table [15]: Additional Block of Registers Being Polled From 1 Actuator........... 73
5.4.14. Tables [16 & 17]: Monitor & Control Discrete Digital Outputs ........................... 76
5.4.15. Table [18]: Actuator System Type ID................................................................ 80
5.4.16. Table [19]: Actuator Firmware Version ID.........................................................82
5.4.17. Table [20]: Modbus Exception Message Response.......................................... 83
5.4.18. Tables [21-24]: TEC2000 Status Inputs............................................................ 85
6. Application Notes ........................................................................................87
6.1. App Note: Performance Tuning ......................................................................... 87
6.1.1. General Practices to Ensure Better Performance................................................87
6.1.2. Reading Run-Time Information from Table [0]..................................................... 87
6.1.3. Loading Table [0] with Configuration Information ................................................88
6.1.4. Behavior if a Delay in Loading Table [0] Configuration Information ..................... 89
6.1.5. Using the “Scan Period” Value ............................................................................90
6.2. App Note: 1771-C Operation – Additional Detailed Information .................. 91
6.2.1. Determining & Exiting “Network Down” Condition ...............................................91
6.2.2. Detailed Description of 1771-C Operation ........................................................... 92
6.2.3. Time Allocated Process Control (Allocated Time Slices)..................................... 93
6.2.4. Preferred Communication Port Operation............................................................ 95
6.2.5. Communication Failure Indications (Low-Level & High-Level)............................. 96
6.2.6. Bringing Units On-Line After a Power Cycle ........................................................ 99
6.2.7. Toggling the Preferred Port to Assist Diagnostics ............................................. 100
6.3. App Note: For Diagnostics - Know the Physical Network Wiring ...............101
6.4. App Note: Memory Maps ................................................................................. 102
6.4.1. Specific Holding Registers Referenced by the Network Master......................... 102
6.4.2. Specific Coils & Inputs Referenced by the Network Master............................... 103
6.4.3. 320A Memory Map … Table for Coils & Inputs (Version 2.0) ............................104
6.4.4. 320A Memory Map … Addressable Holding Registers (Version 2.0) ................ 105
6.4.5. 320B Memory Map … Table for Coils & Inputs.................................................. 107
6.4.6. 320B Memory Map … Addressable Holding Registers...................................... 108
6.4.7. TEC2000 Memory Map … Table for Coils & Inputs........................................... 110
6.4.8. TEC2000 Memory Map … Table for Holding Registers..................................... 111
6.5. App Note: Modbus Message Formats..............................................................116
6.5.1. Modbus RTU Functions (Command Codes) Implemented ................................ 116
6.5.2. Modbus Function (Command) Code Descriptions ............................................. 117
6.5.2.1. Modbus Function Code 01 … Read Coil Status .................................................117
6.5.2.2. Modbus Function Code 03 … Read Holding Register........................................118
6.5.2.3. Modbus Function Code 05 … Set (Force) Single Coil........................................119
6.5.2.4. Modbus Function Code 06 … Set Single Register .............................................120
6.5.2.5. Modbus Function Code 15 (0x0F) … Set (Force) Multiple Coils ........................121
Copyright © 2004 EIM COMPANY, INC. • 13840 PIKE ROAD • MISSOURI CITY, TX. 77489
Page iii

Controlinc 1771-C (Version 5.21) Network Master Users Guide (2004-11-18)
6.5.3. Modbus Exception Messages Supported .......................................................... 122
6.6. App Note: Install the 1771-C Network Master Firmware............................. 123
6.6.1. Configure the Module for a Firmware Upload .................................................... 124
6.6.2. Upload the 1771-C Firmware............................................................................. 125
6.6.3. Reset the 1771-C Module for Normal Operations.............................................. 126
Copyright © 2004 EIM COMPANY, INC. • 13840 PIKE ROAD • MISSOURI CITY, TX. 77489
Page iv

Controlinc 1771-C (Version 5.21) Network Master Users Guide (2004-11-18)
0. Quick Start Information
1. As a minimum, you should have access to the following reference documents:
• This manual (1771-C User’s Guide)
• Allen-Bradley 1771-DB, Series B Basic Module User's Manual
Catalog No. 1771-DB, Series B, Publication No. 1771-6.5.113
• EIM Controlinc 320A Quick Startup Guide, Rev. F or later
• EIM Controlinc 320B Quick Startup Guide, Rev. A or later
2. Refer to Section 2 of this manual on how the jumpers should be set on the DB module.
3. The 1771-C module comes from EIM pre-programmed with the network master program in it. However, if
for some reason the module needs to be flashed again (ex: a field upgrade) then refer to Section 5 on
installing the firmware in the module.
Note: Remember, you will need to connect a serial cable between the 1771-C and the computer. The
correct cable is a Null Modem Cable
connector on the module) and the serial communications port on the computer used for the
upload.
4. Ensure the PLC rack power is turned off.
Install the module in the correct slot in the PLC rack. Connect all cables and power the system up.
5. The PLC-RLL will start interfacing with the 1771-C after the 1771-C performs initial scans of the network
on power up.
NOTES: To ensure optimal performance, some things the PLC should do …
1. Ensure table [0] is set correctly and repeated in a timely manner. Allow for frequent table [0] read backs.
2. Restrict the rate of data writes to the actuators … only write as fast as required to adequately control the
valve.
(cuts down on the interruptions to scanning the network … gathering data)
3. Expedite responses to BTW/BTR requests made by the 1771-C. Delaying them can slow 1771-C
operations.
4. Only activate writing to or reading from tables if actually in use (or when needed).
(ex: do not write to the analog output table if analog outputs are not used)
(ex: do not read totalizer data if its not being used)
(ex: only poll for “static” [non-changing] data one time and stop)
(prevents unnecessary delays to gathering the more important data from the network)
Remember:
The 1771-C uses explicit read/write commanding of the tables such that if word [1] in any table is
zero (0) then it is a table read request by the PLC. Otherwise, the command is a table write
command.
connected between the PRT1 port (bottom DB25
Copyright © 2004 EIM COMPANY, INC. • 13840 PIKE ROAD • MISSOURI CITY, TX. 77489
Page 1
Controlinc 1771-C (Version 5.21) Network Master Users Guide (2004-11-18)
1. Introduction
1.1. Overview of 1771-C System
This document is intended for end users as a Guide in applying an EIM AB
1771-C Network Master.
The software that enables network operation is called a communication
driver. It is used in conjunction with an Allen-Bradley 1771-DB Series B
module thereby creating the 1771-C network master module. The 1771-C
allows an AB PLC-5 controller to acquire data from and send information to
an EIM Controlinc Actuator Network.
Other than changes to tables [11 & 12], version 5.21 is fully backwards
compatible with version 5.03.
GENERAL SYSTEM PURPOSE:
The EIM 1771-C network master serves as a
data concentrator for applications that use an
AB PLC-5 Programmable Logic Controller
(PLC).
In general, the network master off-loads network
communication and management tasks from the
actual controlling equipment. The main function
of the 1771-C is to provide the interface
between a PLC and its network of valve
actuators. Acting as a Host, the PLC controls
the network by sending data to the 1771-C for
routing to a particular actuator. The 1771-C
network master polls the individual actuators for
information and makes it available to the PLC
when requested.
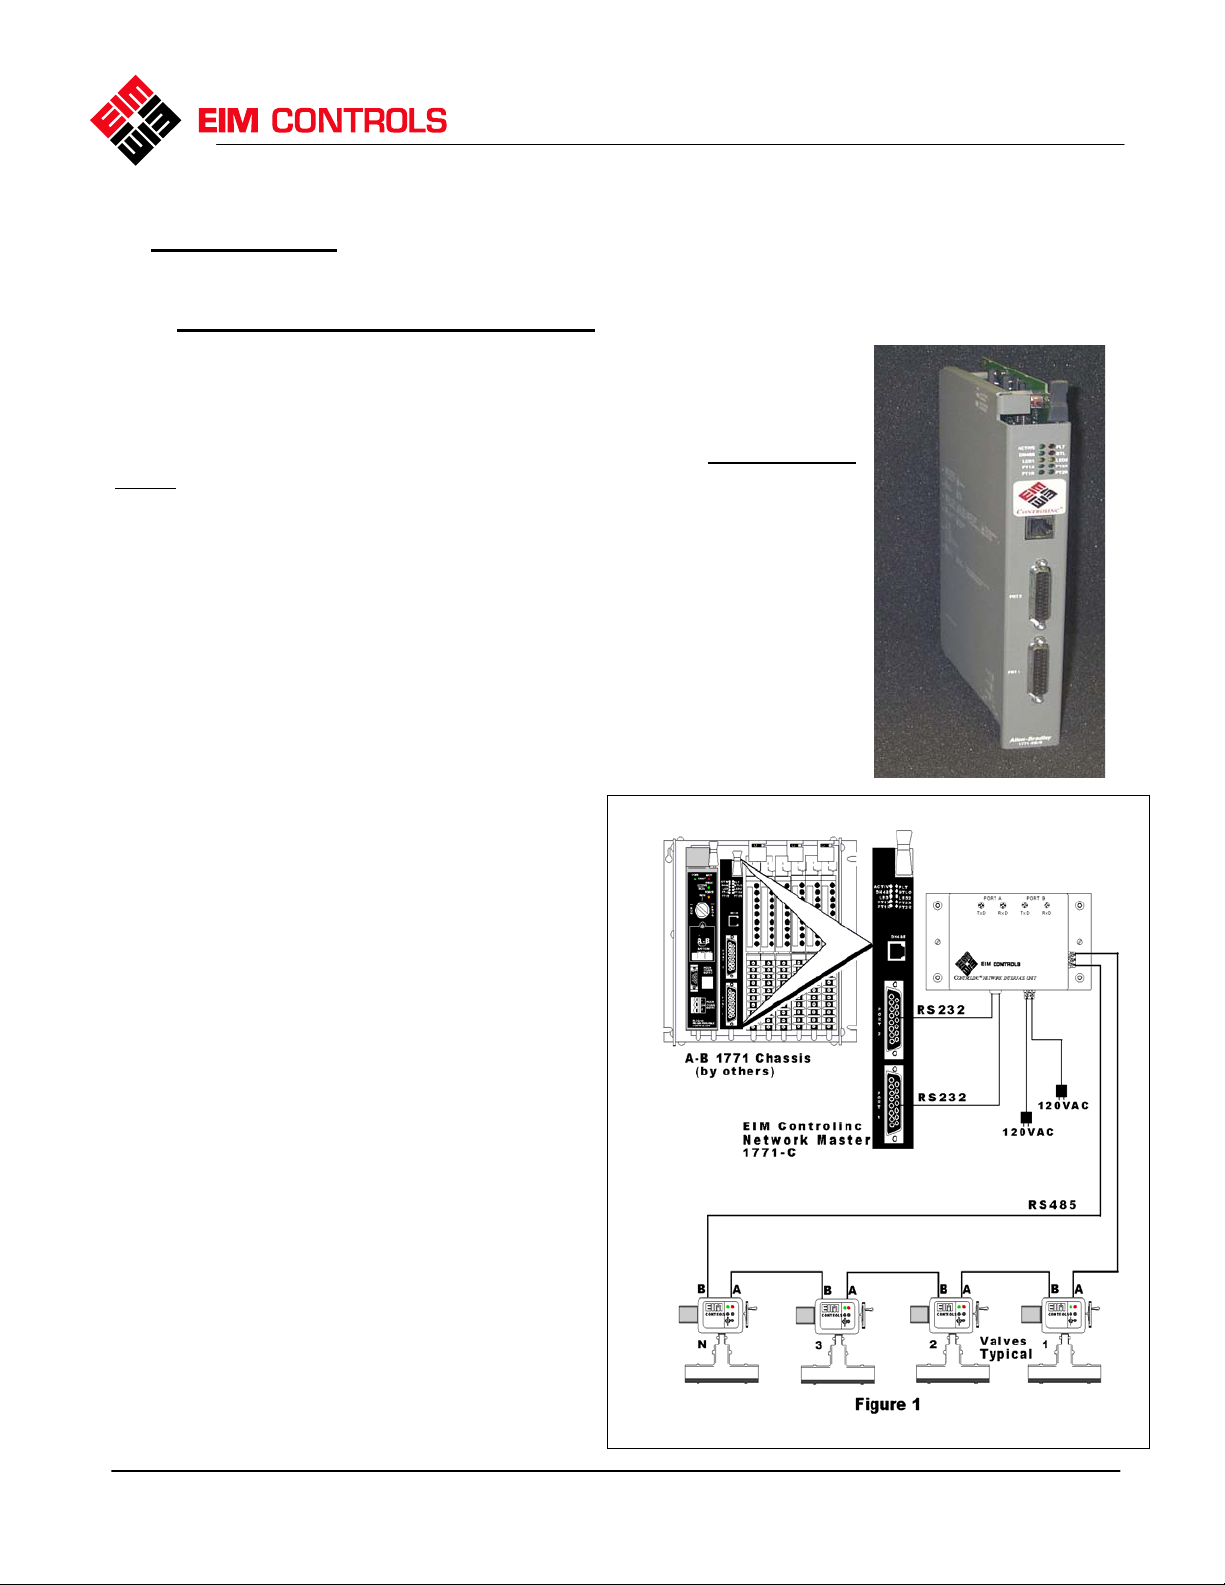
A typical ring topology network and network
master are illustrated in Figure 1. The 1771-C
module serves as a master within this Modbus
(Modbus RTU) master/slave network. The
module will manage network operation by
keeping an orderly cycle of data transfers
between itself and each slave (valve actuator).
Copyright © 2004 EIM COMPANY, INC. • 13840 PIKE ROAD • MISSOURI CITY, TX. 77489
Page 2

Controlinc 1771-C (Version 5.21) Network Master Users Guide (2004-11-18)
The 1771-C master will handle network communication, error detection, alarming, and network
recovery.
Other features include:
• Reporting of inaccessible actuators
• Reporting of network faults
• Emergency shutdown broadcasting
• Minimal Interfacing with the Relay Ladder Logic (RLL) program in the PLC CPU module
Each 1771-C module can support a single network of up to 60 valve actuators. Multiple modules can
be installed in a PLC-5 system rack to provide support for multiple networks (up to 60 actuators each).
Note 1: It is important to note that the 1771-C Network Master may be used in any slot in the 1771
rack, not just slot 0 next to the PLC-5 CPU.
It may also be located in remote 1771 racks.
Copyright © 2004 EIM COMPANY, INC. • 13840 PIKE ROAD • MISSOURI CITY, TX. 77489
Page 3

Controlinc 1771-C (Version 5.21) Network Master Users Guide (2004-11-18)
1.2. Overview of Changes in Version 5.21
Any later releases of this document for this version of the product (5.21) are to only correct entries in
this document … primarily grammatical or “typos” that are discovered in the future. Major ideas will be
documented with a separate “line entry”.
Major document changes:
1. This document: 2004-11-18
Previous document: 2004-08-17
Major Change: Memory Maps adjusted.
2. New document: 2004-08-17
Previous document: 2004-08-06
Major Changes: Memory Maps adjusted and this section added.
5.20 5.21
The following list identifies the most significant functional changes between version 5.20 and 5.21.
1. Table [17] was changed from read-only to read-write to allow an end user to clear it.
5.03 5.20
The following list identifies most significant functional changes between version 5.03 and 5.20.
1. The previous firmware release: version 5.03.
2. The number of tables increased …
• Version 5.03 … tables [0 - 13]
• Version 5.20 … tables [0 - 24]
3. Table [11] has a different function …
• Version 5.03 … indicate the status of digital input #1.
• Version 5.20 … indicate the valve’s current position in 0-4095 increments … register
[14].
4. Table [12] has a different function …
• Version 5.03 … indicate the status of digital input #2.
• Version 5.20 … indicate the status of all the actuator’s discrete inputs … register [05].
5. Additional system configuration words in table [0] …
• Version 5.03 … words [4 - 7]
• Version 5.20 … words [4 – 17]
Copyright © 2004 EIM COMPANY, INC. • 13840 PIKE ROAD • MISSOURI CITY, TX. 77489
Page 4

Controlinc 1771-C (Version 5.21) Network Master Users Guide (2004-11-18)
6. Run-Time data words in table [0] …
• Version 5.03 … words [49 – 63]
• Version 5.20 … words [47 – 63]
7. System Diagnostic Scan …
• Tests both ports … Identifies node system type … Table [18]
• Only one port … Identifies firmware Version ID … Table [19]
Gathers standard scan data.
8. Faster “full network response on power up” if power cycled on entire network.
9. Implemented Scan Period Counter (Accumulator) in table [0] … words [47 & 48] and the ability
for the operator to reset the counter using table [0] … words [15 & 16].
10. Separated communication errors such that if the error is due to the actuator (slave) responding
with a Modbus exception code (the low level communication was ok … however, the actuator
rejected it with an exception), the 1771-C now …
- does NOT report this as a communication error … table [1].
- records the exception code and error code sent by the actuator … table [20].
- clears the exception code on the next diagnostic scan.
11. Compatibility with multiple EIM equipment types (320A, 320B, TEC2000).
• Types are identified in table [18]
• 320A & 320B Firmware version ID is identified in table [19]
• 1771-C will check & test for SSR bit only if a 320A node.
12. User Configurable “Additional Message Response Delay Time
” …
• Configure … table [0] … word [8]
13. User Configurable “Poll Specific Register From All Nodes on Network
” …
• Configure … table [0] … words [9 & 10]
• The response is in table [14].
14. User Configurable “Poll Block of Registers From a Specific Node on the Network
” …
• Configure … table [0] … words [11 - 14]
• The response is in table [15].
15. User Configurable “Control Discrete Digital Outputs
…
• Configure … table [16]
• Monitoring the status of the outputs is in table [17].
16. User Configurable “Poll TEC2000 Inputs … registers [1000-1003]
” …
• Configure … table [0] … word [17]
• Response … tables [21-24]
Copyright © 2004 EIM COMPANY, INC. • 13840 PIKE ROAD • MISSOURI CITY, TX. 77489
Page 5

Controlinc 1771-C (Version 5.21) Network Master Users Guide (2004-11-18)
1.3. Reference Manuals
• Allen-Bradley 1771-DB, Series B Basic Module User's Manual
Catalog No. 1771-DB, Series B, Publication No. 1771-6.5.113
This manual is required for proper uploading of this driver into the hardware. It includes
specific information on Call Routines and handling block transfers instructions from the Basic
Module to the PLC-5 back plane.
• EIM … Controlinc 320A Quick Startup Guide, Rev. F or later
Publication No. ECL-4004-0102
This manual is used for specific information on the Controlinc 320A Controller card located in
the valve actuator. This includes networking, setup and available options.
• EIM … Controlinc 320B Quick Startup Guide
Publication No. ECL-4005-0404
This manual is used for specific information on the Controlinc 320B Controller card located in
the valve actuator. This includes networking, setup and available options.
• EIM … TEC2000 “Document … TBD”
Publication No. ?????????
At the time of this printing, this TEC2000 publication had not been made available.
• Other Allen-Bradley manuals specific to the PLC-5 being applied. These may be required to
implement the necessary Relay Ladder Logic (RLL) for application of the driver. For instance,
this may include:
o Allen Bradley PLC-5 Programmable Controllers Instruction Set Reference,
Publication 1785-6.1
This reference includes information in Chapter 15 on the AB Block Transfer
Instructions, Block Transfer Write and Block Transfer Read.
Copyright © 2004 EIM COMPANY, INC. • 13840 PIKE ROAD • MISSOURI CITY, TX. 77489
Page 6

Controlinc 1771-C (Version 5.21) Network Master Users Guide (2004-11-18)
1.4. EIM Equipment Compatibility
The 1771-C is compatible with the following EIM equipment:
• 320A … version 1.17 and later.
• 320B … all
• TEC2000 … all
Other points:
• The 1771-C derives the system type of each actuator during the diagnostic scan and stores the
results in table [18].
• The 1771-C derives the firmware Version ID for the 320A & 320B systems during the diagnostic
scan and stores the results in table [19].
• Since the TEC2000 system has several micro-controllers with firmware, a special request must
be made to them to derive the firmware version ID for each controller in the unit.
• The SSR bit is only checked and set on 320A actuators.
Note: For maximum compatibility with the TEC2000 systems, you should enable monitoring the
TEC2000 Status Inputs (tables [21-24]). This way, you can ensure you have all critical status
information for any TEC2000 system on the network. For more information, refer to the
section on Tables [21-24].
Note: This document references the addressable memory ranges (“Memory Maps”) of several EIM
actuators (ex: M2CP–320B, TEC2000). This is only for the reader’s convenience. The
specific details in the memory maps are only correct as of the date this manual was published.
Therefore, to ensure you have the most current memory information, please refer to the
technical information for that particular actuator.
1.5. Firmware
The firmware is a “driver program” which is a compiled application program (not an interpreted one). It
is loaded and stored in the module's 32K EEPROM (A-B P/N 1771-DBMEM2). The user is required to
provide configuration information from the PLC Relay Ladder Logic (RLL) for each specific application
(the RLL must load table [0] with appropriate configuration information).
Copyright © 2004 EIM COMPANY, INC. • 13840 PIKE ROAD • MISSOURI CITY, TX. 77489
Page 7

Controlinc 1771-C (Version 5.21) Network Master Users Guide (2004-11-18)
2. 1771-C Hardware
2.1. Hardware Setup
Refer to Chapter 1 of the 1771-DB manual. The following hardware jumper settings are required. If the
1771-DB module was supplied by EIM, jumpers are already set and no other settings are required.
For the 1771-C to run, the jumper
settings on the DB module should be set
as follows:
• JW1 - enable watchdog timer
• JW2 - 32K EEPROM
• JW3 - turbo
• JW4 - PRT1 = ASCII
- PRT2 = ASCII
- DH485 = PGM
• JW5 - 8-point mode
• JW6 - 9600 bit/s
• JW7 - enable battery
• JW8 - RS232
• JW9 - RS232
This jumper configuration is normally
performed by EIM before shipping the
1771-C.
(Jumper settings are screened on the
side of the 1771-DB module)
Figure 2-1 – Hardware jumpers of the 1771-DB
Copyright © 2004 EIM COMPANY, INC. • 13840 PIKE ROAD • MISSOURI CITY, TX. 77489
Page 8
Controlinc 1771-C (Version 5.21) Network Master Users Guide (2004-11-18)
2.2. LED Utilization
2.2.1. Green (PTX & PTR) and Yellow (LED1 & LED2) LED Usage
There are 2 “Yellow” LED lights on the front of the 1771-C module
• LED1.
• LED2.
There are currently 3 general functions operating these LEDs:
1. After CPU restart (power up or pressing the <RESET> button), both LED1 & LED2 are ON until
the 1771-C finishes initialization and starts polling the network.
2. After initialization, LED1 is used as a “starting a new scan” indicator by toggling on/off at the
start of each scan. Ex: Starting scan 1: LED1 is ON.
Starting scan 2: LED1 toggles to the OFF state.
Starting scan 3: LED1 toggles to the ON state.
3. After initialization, LED2 is used as an “entire network is down” indicator. If the 1771-C ever
detects zero (0) actuators on the network, it will turn LED2 on and immediately enter a
diagnostic scan and remain there until an actuator is found to be on-line and communicating.
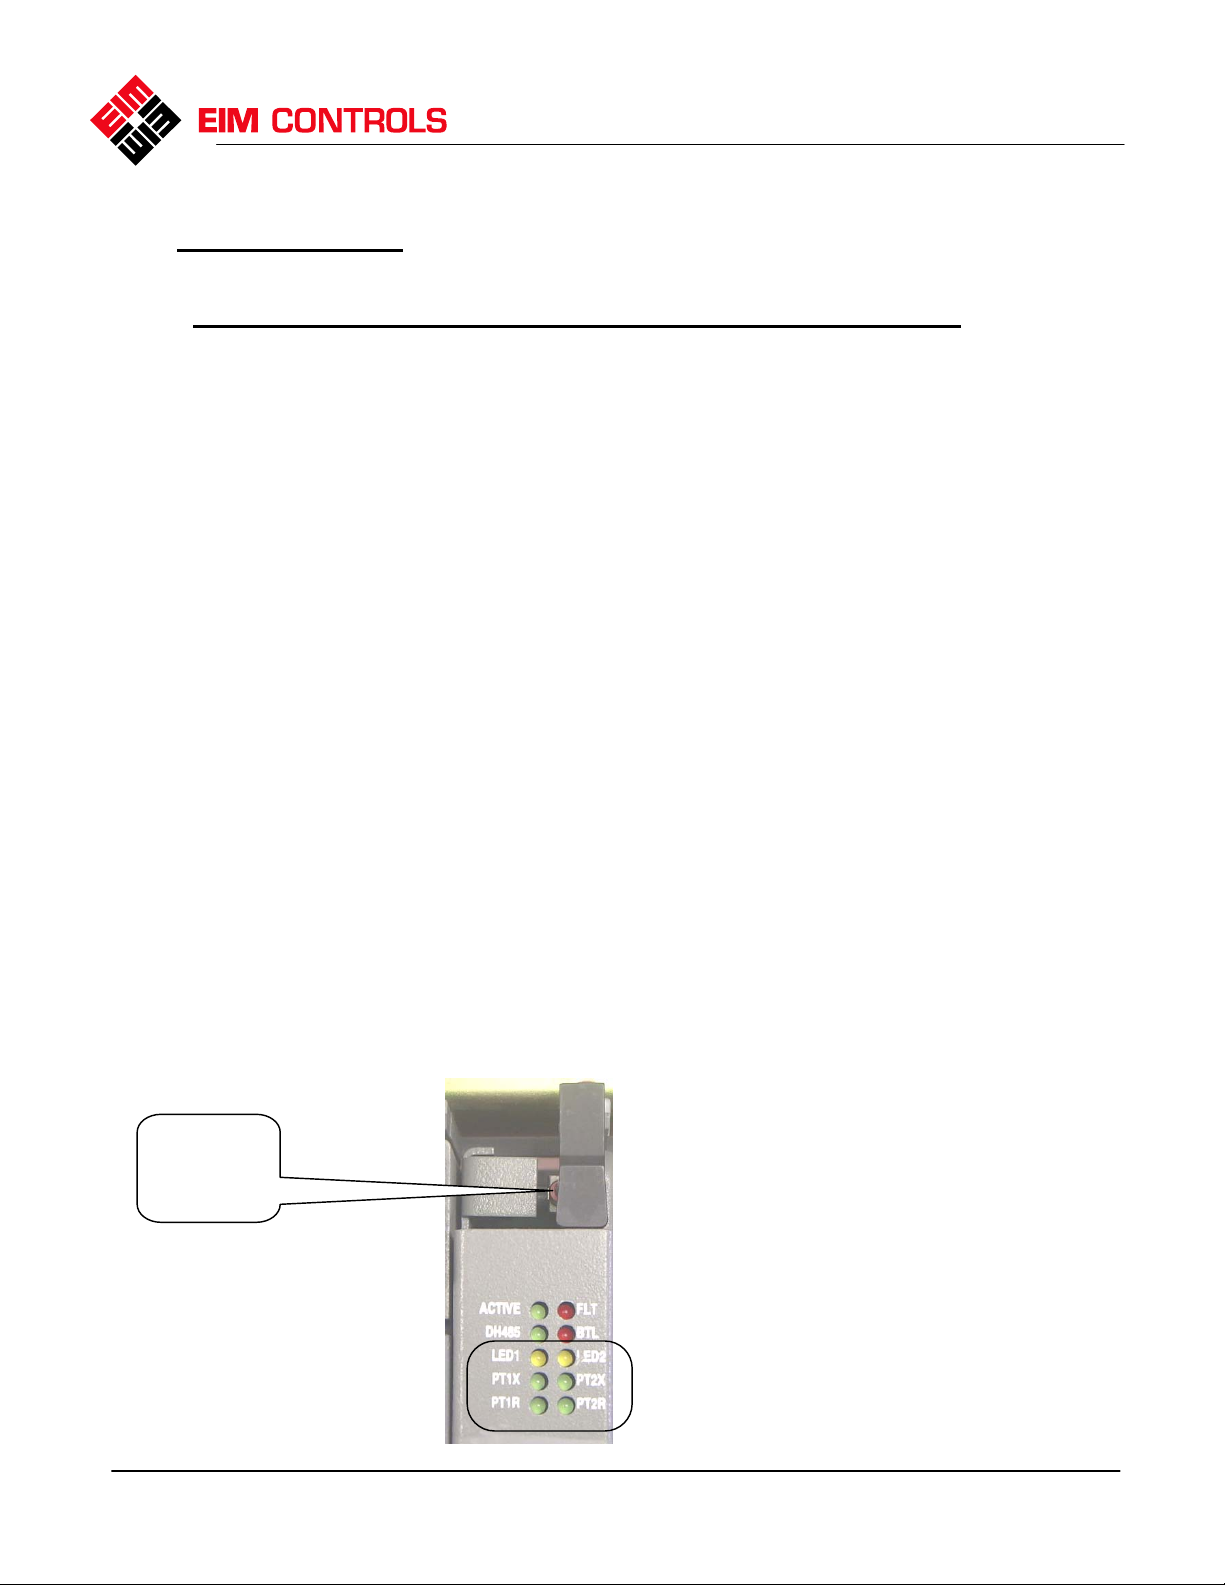
There are 4 communication LED lights (green LED lights) on the 1771-C module:
• PT1X: Port 1 Transmit … lights up when transmissions are going out port 1.
• PT2X: Port 2 Transmit … lights up when transmissions are going out port 2.
• PT1R: Port 1 Receive … lights up when characters are being received on port 1.
• PT2R: Port 2 Receive … lights up when characters are being received on port 2.
If the network is in a valid ring configuration, then a transmission on either port will generate a receive
indication on BOTH receive LEDs (PT1R & PT2R). Observing this is a sign that the ring topology is
correct.
Manual
Reset
button/switch
Copyright © 2004 EIM COMPANY, INC. • 13840 PIKE ROAD • MISSOURI CITY, TX. 77489
Page 9

Green LED App Note:
After startup, if table [0] is not initialized shortly after the 1771-C finishes its initial diagnostic
scan, the program starts running with factory default settings. This means that unless the
network actually has 60 actuators on it, the 1771-C will believe the “other valves” are just off
line.
Plus, an operator can often determine when the PLC-RLL actually writes to table [0] (configures
the system) by watching the green LED lights.
For instance …
• On a network that actually has 25 valves on it (addressed 1-25), until table [0] – word [4]
gets initialized with 25, the program thinks that there are still supposed to be 60
actuators on the network … only the last 35 happen to be “off line”.
• Then (if viewing the green LED lights) when a scan starts (LED1 changes state), you will
see the green LEDs “flash” while the 1771-C communicates with valves 1-25.
Then you will observe a “dead space” in time when the program is trying to determine if
any of the final 35 valves “it believes to be connected” are available (and of course none
are because the network only has 25 valves on it).
• As soon as a new scan starts (all “60” valves have been checked and ready to scan the
network again … LED1 changes state) then the green LEDs will start flickering again
while the 1771-C communicates with valves 1-25.
Then the “dead space” time will be observed again.
This sequence will repeat until the PLC program initializes the 1771-C by writing to table
[0].
Controlinc 1771-C (Version 5.21) Network Master Users Guide (2004-11-18)
Green LED Lights & System Initialization with Table [0]
Copyright © 2004 EIM COMPANY, INC. • 13840 PIKE ROAD • MISSOURI CITY, TX. 77489
Page 10
Controlinc 1771-C (Version 5.21) Network Master Users Guide (2004-11-18)
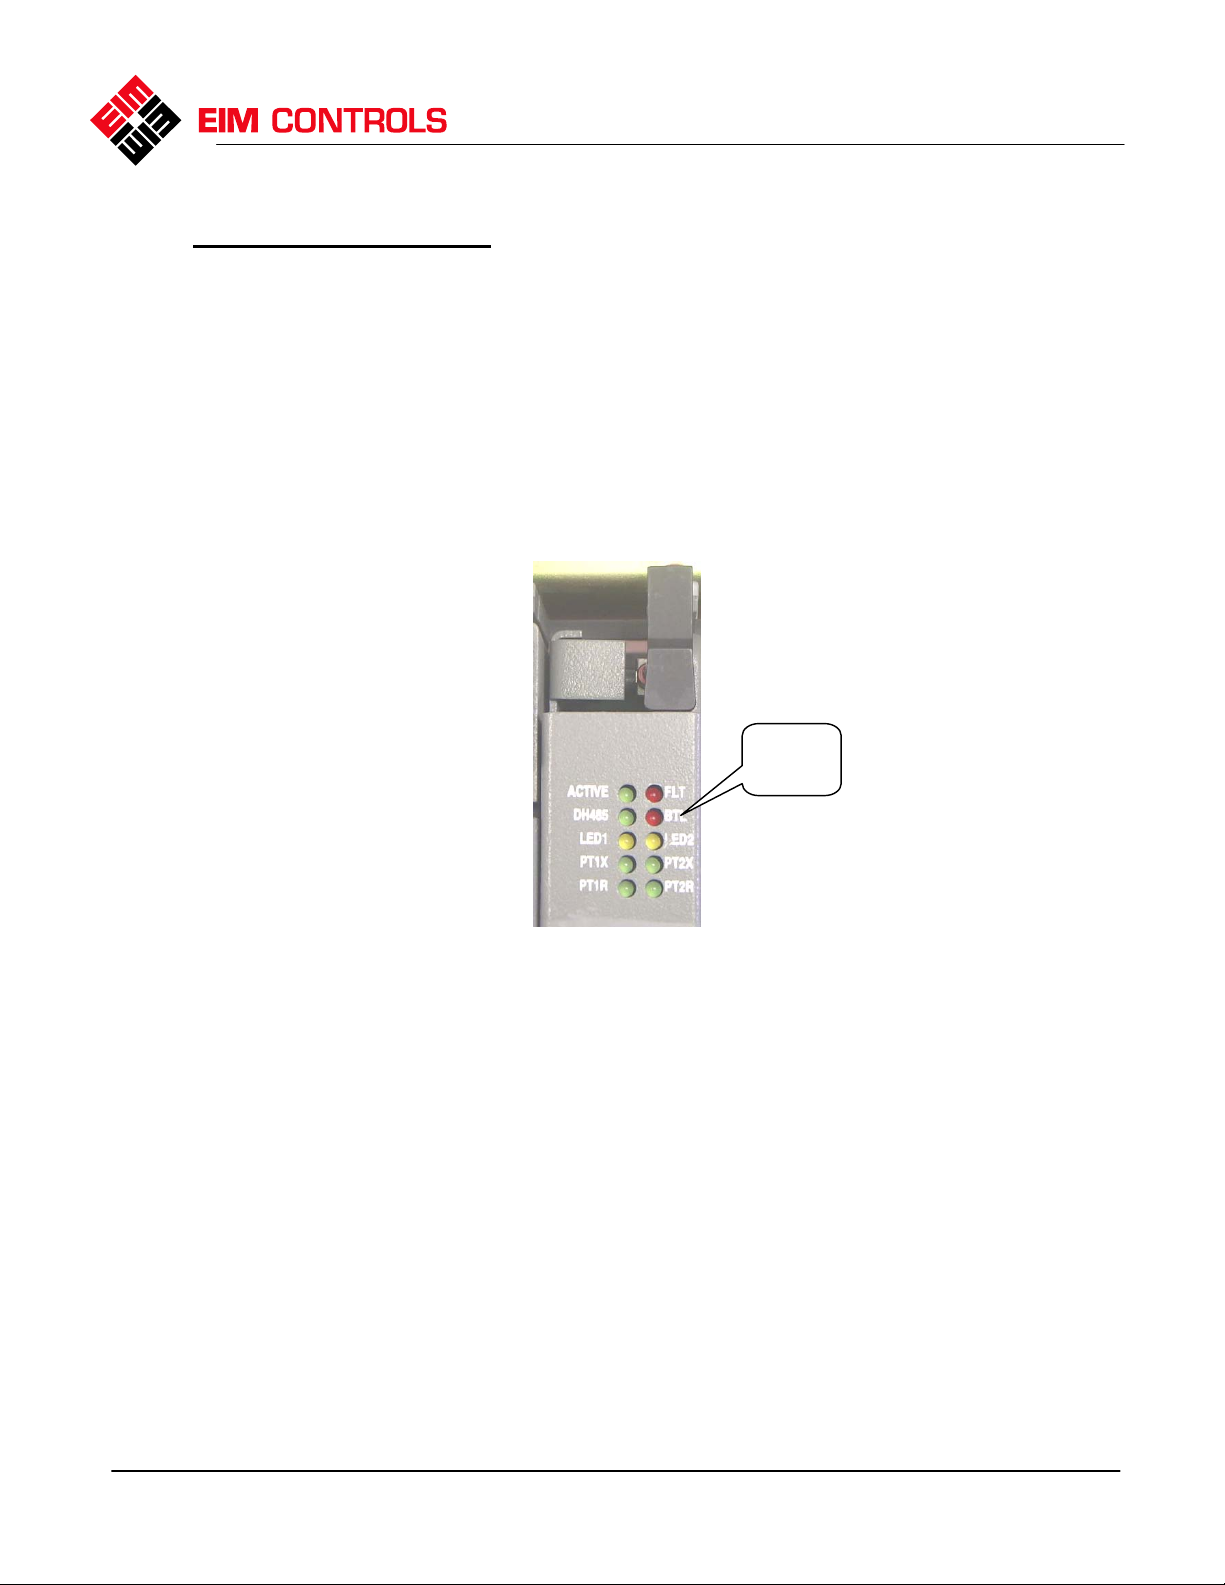
2.2.2. Red “BTL” LED Usage
The red “BTL” LED indicates low battery status. The purpose of the battery in the DB module is to
back up portions of RAM and other resources. For guaranteed long-term repeatability of operations,
the EIM 1771-C program does not utilize any of these resources. Therefore, it doesn’t matter what
state the battery is in (installed and fully charged, inline and dead or totally removed from the unit), the
EIM network master program will always run the same.
This also means that a new 1771-C module might run with the BTL LED off for a while and then turn on
when the battery dies. This is normal and has NO effect on the system. However, if for some
reason you want to replace the battery, you can order it directly from Allen-Bradley.
“BTL”
LED
Copyright © 2004 EIM COMPANY, INC. • 13840 PIKE ROAD • MISSOURI CITY, TX. 77489
Page 11

Controlinc 1771-C (Version 5.21) Network Master Users Guide (2004-11-18)
3. Network Setup and Connecting to the NIU
In general, the EIM NIU (“Network Interface Unit”) is a “beefed up” and configurable RS232 RS485
converter.
The ports on the 1771-C, Port1 (PRT1)
and Port 2 (PRT2), are configured for
serial communication using RS-232.
The network communication parameters
are pre-configured and fixed at 9600 baud
– 8 bit – no parity – 1 stop bit.
The NIU isolates and protects the 1771-C
and the PLC from the network and is
powered by its own 120 AC circuit. Its
primary function is to convert RS232
communications to RS485
communications. The RS485 connection
then communicates to a ring or ring
network.
Note: To help with isolation, there are
two (2) entirely separate boards in the
NIU. However, because of this, there are
two (2) 120 VAC connections to the NIU.
Ensure that both are connected (you can
jumper the circuits together).
The Controlinc network is connected to
the 1771-C module via the Network
Interface Unit (NIU). It doesn’t matter if
you connect:
• Port 2 (PRT2) (top DB25 connector): connects to the NIU at the port labeled “HOST A”.
• Port 1 (PRT1) (bottom DB25 connector): connects to the NIU at the port labeled “HOST B”.
or
• Port 1 (PRT1) (bottom DB25 connector): connects to the NIU at the port labeled “HOST A”.
• Port 2 (PRT2) (top DB25 connector): connects to the NIU at the port labeled “HOST B”.
However, it is recommended that you remain consistent.
NOTE: You can always connect a PC to the network at the NIU if you …
• Disconnect the cable connecting the 1771-C and NIU.
• Connect the PC using a (serial cable + NULL modem) to the DB9 connector on the NIU.
Copyright © 2004 EIM COMPANY, INC. • 13840 PIKE ROAD • MISSOURI CITY, TX. 77489
Page 12

Controlinc 1771-C (Version 5.21) Network Master Users Guide (2004-11-18)
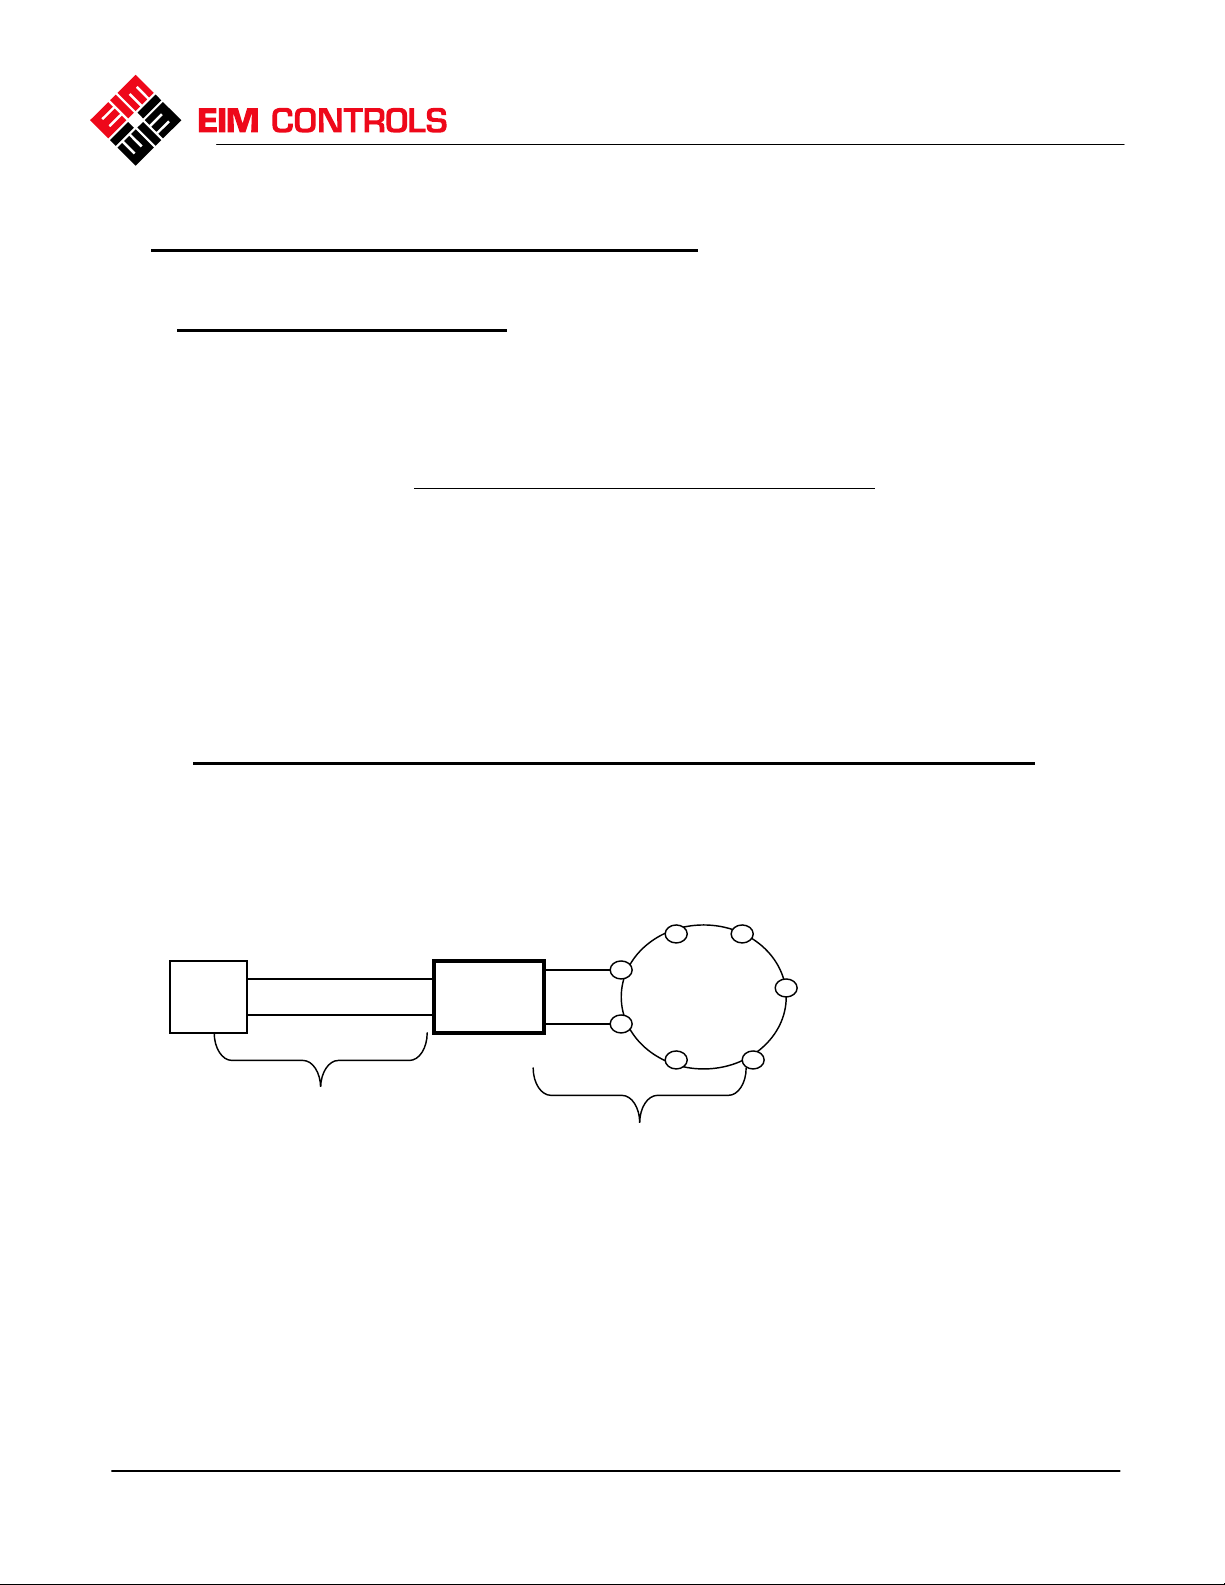
A typical E>Net network connection format is in a ring …
• It starts from Port 1 (PRT1) (the top DB25 connector) on the 1771-C as RS232 and connects to
the NIU at the port labeled “Host A”.
• It exits the NIU at the port labeled “Port A” as an RS485 circuit and proceeds to the first valve
actuator, normally addressed as #1, in port A.
• It exits the actuator from Port B and proceeds to the port A next actuator (address #2) and on
until the last actuator on the network is connected.
• The RS485 network then exits port B on the last actuator returns to the NIU at the port labeled
“Port B”.
• The network connection is then transformed back to an RS232 format and exits the NIU via the
port labeled “Host B”
• It connects to the 1771-C via port2 (PRT2) (the bottom DB25 connector).
Copyright © 2004 EIM COMPANY, INC. • 13840 PIKE ROAD • MISSOURI CITY, TX. 77489
Page 13

Controlinc 1771-C (Version 5.21) Network Master Users Guide (2004-11-18)
3.1. Field Connections at the Actuator
Communication connections and wiring are important for the network and the master.
(The following information was primarily derived from the Controlinc Quick Startup Guide)
3.1.1. Step 1. Plan the Network Topology
Before connecting actuators, the entire network layout should be planned. Topologies may be bus,
redundant bus, E>Net, redundant E>Net, E>Net ring, and redundant E>Net rings. Planning should
include node addressing, wire routing, terminations, and grounding.
3.1.2. Step 2. Select Network Cable
Ensure correct cable is being used.
• Networks require twisted pair and shielded cable with characteristic impedance between 50 and
120 Ohms.
• Capacitance between conductors must be less that 30 pF/Ft (98 pF/M); 10-15pF/Ft is ideal.
• Shielding maybe aluminum foil with drain wire.
• If cable has multiple pairs, then individual pair shielding is required.
• Only cables with stranded conductors are recommended.
• Insulating and outer jacket materials must be selected for the application environment.
The following are acceptable Belden or equivalent cables for most network applications.
AWG 20 18 16 14
Beldon # 8762 8760 8719 8720
Rating 12.8 Pf/fT 12.8 Pf/fT 12.8 Pf/fT 12.8 Pf/fT
Copyright © 2004 EIM COMPANY, INC. • 13840 PIKE ROAD • MISSOURI CITY, TX. 77489
Page 14
Controlinc 1771-C (Version 5.21) Network Master Users Guide (2004-11-18)
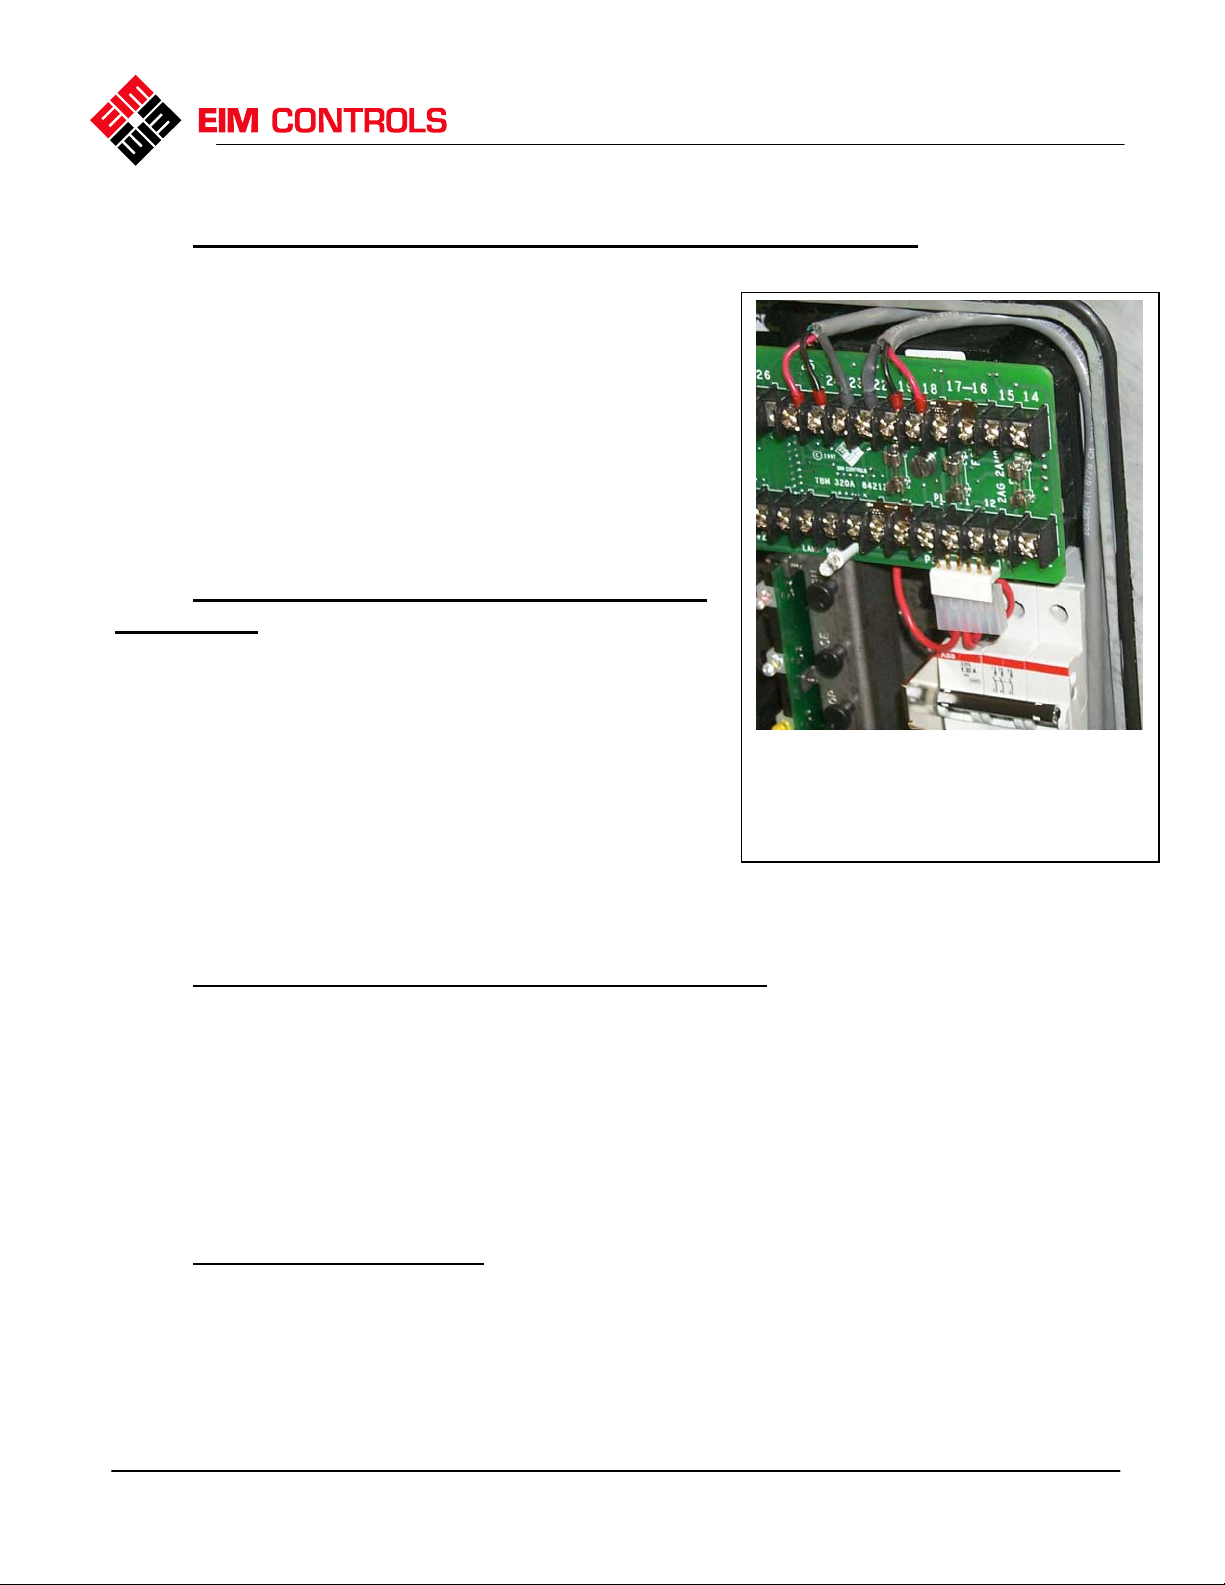
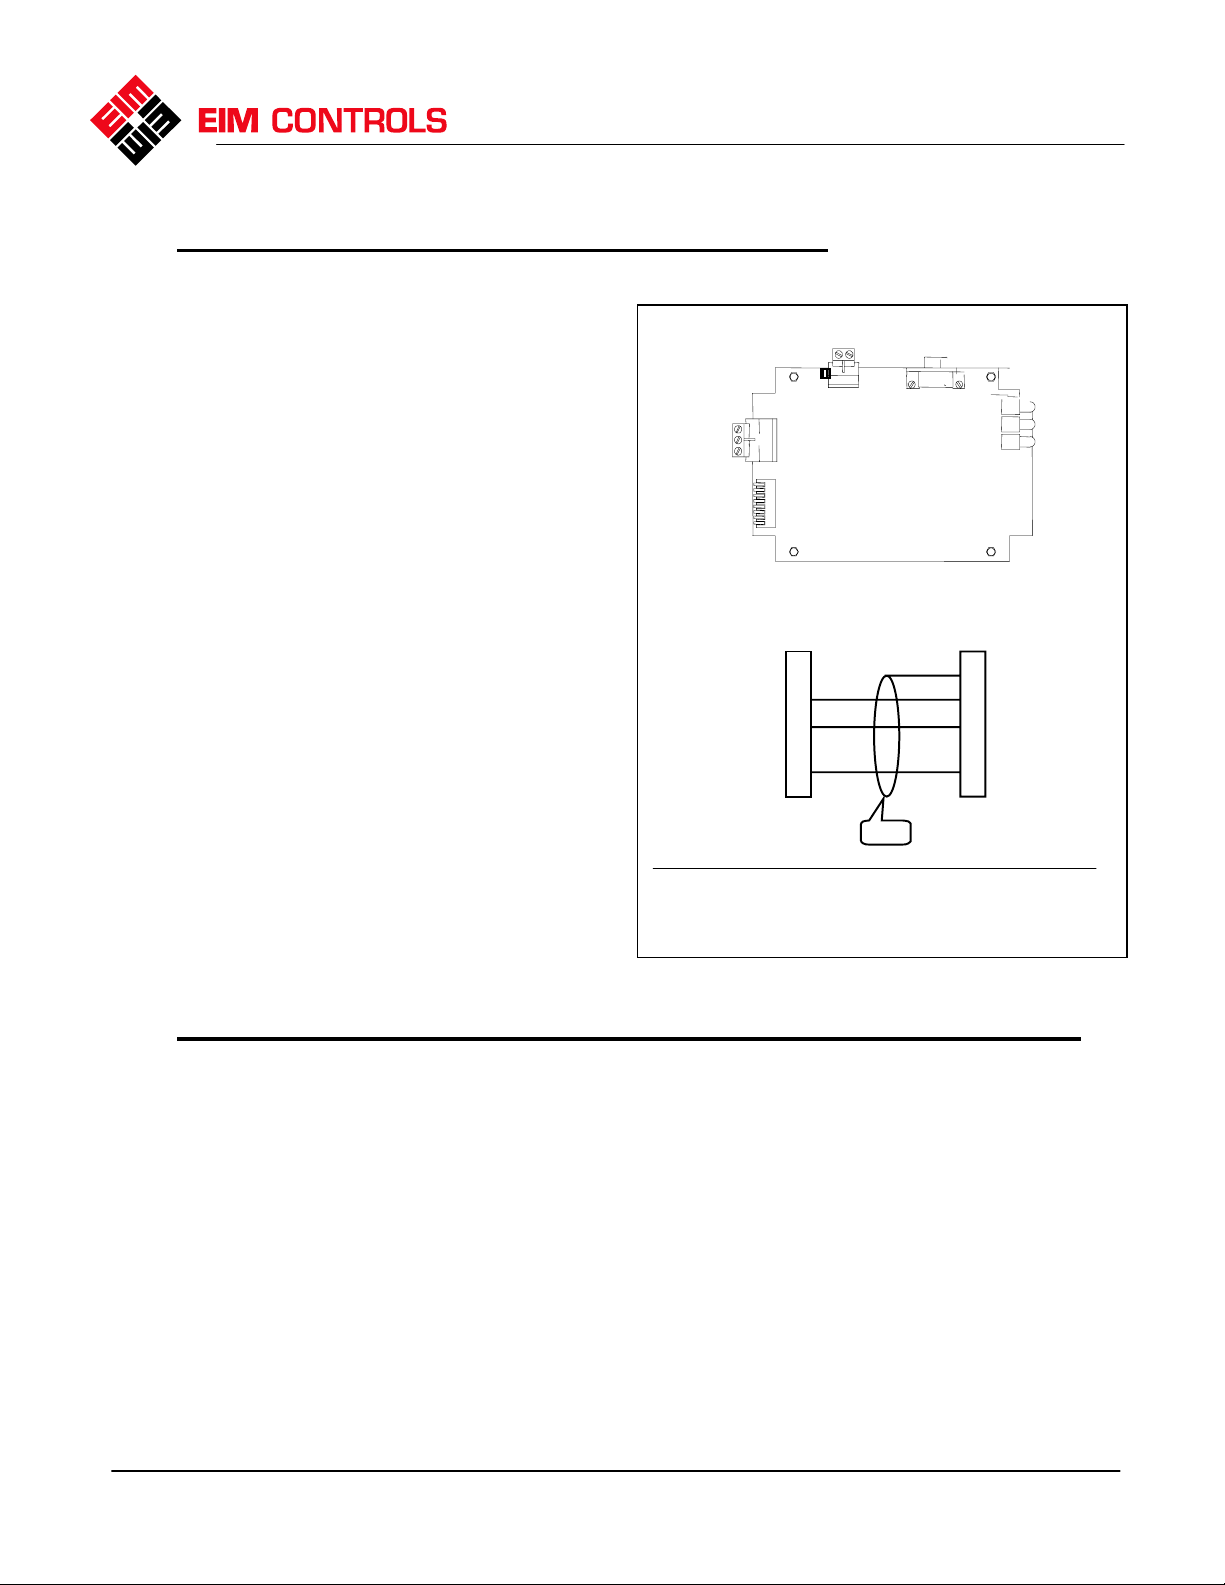
3.1.3. Step 3. Route Cable away from Electrical Interference
Network cables should enter the electrical enclosures and the
bottom or lowest point (on 320A systems, this is near the
transformer end and normally in a counter clockwise direction
to the topside of the TBM). Never install network cable in the
same conduit with power conductors. Never route the network
cable through the high voltage contactor area. On 320A
systems, the cable should never lie across the TBM or hinder
the protective cover of the TBM. Always use the shortest
distance and keep access cable to a minimum.
See Figure 3-1
3.1.4. Step 4. Observe Polarity and Network
Grounding
Each network connection is polarized + and - on wiring
diagrams. Always use consistency in wiring and the use of
wire colors to track polarity. The cable shield (or “drain wire”)
must be connected to the designated “shield” terminal at each
port of each actuator. The shield must be connected to earth
ground at only one point. Some networks require a jumper
between the shield connections on ports A & B of the actuator
to carry the shielding through the network. The shield
connection of each actuator is isolated from earth ground.
Do not allow the shield to touch other circuits or the metal enclosure.
Figure 3-1
Figure 4-1
Correct termination of the Network
Correct termination of the Network
to a Controlinc 320A Actuator
to a Controlinc 320A Actuator
3.1.5. Step 5. Wire Preparation and Connections
Screw terminal connections on the TBM and in the TEC2000 terminal chamber have wire clamps,
which will accept conductors with out terminals. Wire terminals may be applied if desired but are not
required. Strip conductor insulation back 3/8” when connecting directly to the TBM screw terminals. Do
not allow wire clippings to fall on the TBM or into the enclosure.
Protect the conductors and shield to prevent them from contacting any other circuits or earth ground.
Use plastic electrical tape or heat shrink tubing to prevent bare conductors from contacting other
circuits or earth ground. See Figure 3-1
3.1.6. Step 6. Test Network
Use EIM’s Configuration and Control Utility (CCU) to test the network prior to connecting to the host or
network master. The CCU is a Windows application, which will run on a laptop. Use a RS232 to RS485
adapter or EIM’s Network Interface Unit (NIU) to connect the laptop to the network. Test each actuator,
one at a time, to determine that all network connections are good and each actuator is functional via the
network in remote.
Copyright © 2004 EIM COMPANY, INC. • 13840 PIKE ROAD • MISSOURI CITY, TX. 77489
Page 15
W
Controlinc 1771-C (Version 5.21) Network Master Users Guide (2004-11-18)
3.2. Field Network Cable Connection to the NIU
Refer to Figure 3-2 for terminals on the EIM
Network Interface Unit (NIU). The NIU is a dual port
RS232 to RS485 converter specifically designed for
ring networks.
Connect the twisted shielded pair cable of the field
network to NIU Terminals 1 (-), 2 (Shield), 3 (+) of
J1 of Port A.
The network shield must be connected to a good
earth ground at only one shield terminal point on the
NIU.
The network cabling should use recommended
cabling for an RS-485 network able to handle the
distance desired.
There should be little, if any, electrical noise on the
network for the entire length of the network.
Ne twor k
Por t
J1
+
+
Shield
sh
-
-
1
SW1
RXD
TXD
Ground
DB-25 Male
Connector
(1771-C Side)
2
3
7
R S - 2 3 2
R
P
P o r t
2 V A C / D C
1
J3
1
RS232 Cable
J 2
P W R
N I U 8 4 3 2 0
(#37122)
Shield
Figure 3-2
DB-9 Male
Connector
(NIU Side)
Chassis
1
RXD
2
TXD
3
Ground
7
PWR
TxD
RxD
3.3. Cable Connection Between the NIU and the Network Master
Refer to the “Allen-Bradley 1771-DB, Series B Basic Module User's Manual” for additional
information on the pin-out of the DB-25 female connections used for network ports one and two.
The module must be set up for RS-232 when connecting with EIM's Network Interface Unit (NIU) P/N
84320 or a user-supplied modem.
Refer to Figure 3-2 for the pin-out of the DB-9 female connector.
Copyright © 2004 EIM COMPANY, INC. • 13840 PIKE ROAD • MISSOURI CITY, TX. 77489
Page 16
Controlinc 1771-C (Version 5.21) Network Master Users Guide (2004-11-18)
4. 1771-C General Theory of Operation
4.1. Operational Overview
The interface for the PLC with the actuators (through the 1771-C module) is with an array of 25 tables
… 64 words per table with the table number (command) in Word # [0] of each. This is based on the
64-word BTR/BTW interface protocol established by Allen-Bradley for the PLC-5 systems.
The 1771-C operates using a “Non-Interruptible Time-Slice Process Allocation
methodology. This means that it must finish executing the process that is executing in its allocated
time-slice before another process can operate. The two processes being scheduled are:
• Scanning the network for data.
• Interfacing with the PLC.
This means that the 1771-C will ignore any new commands from the PLC while scanning the network
(during the network scan time-slice) and no network scanning will take place while processing a
command from the PLC (during the PLC interface time-slice).
” communication
4.1.1. Diagram Describing Relationship Between Process Time Slices
Process time slicing is how the 1771-C divides its time when performing its 2 primary communication
tasks … communicating with the PLC and communicating with the actuator network.
This diagram helps demonstrate the relationship between the two communication processes.
PLC
PLC 1771-C
Communications
(PLC Interface Time Slice)
1771-C
1771-C Actuators on
Network Communications
(Network Scan Time Slice)
Copyright © 2004 EIM COMPANY, INC. • 13840 PIKE ROAD • MISSOURI CITY, TX. 77489
Page 17
Controlinc 1771-C (Version 5.21) Network Master Users Guide (2004-11-18)
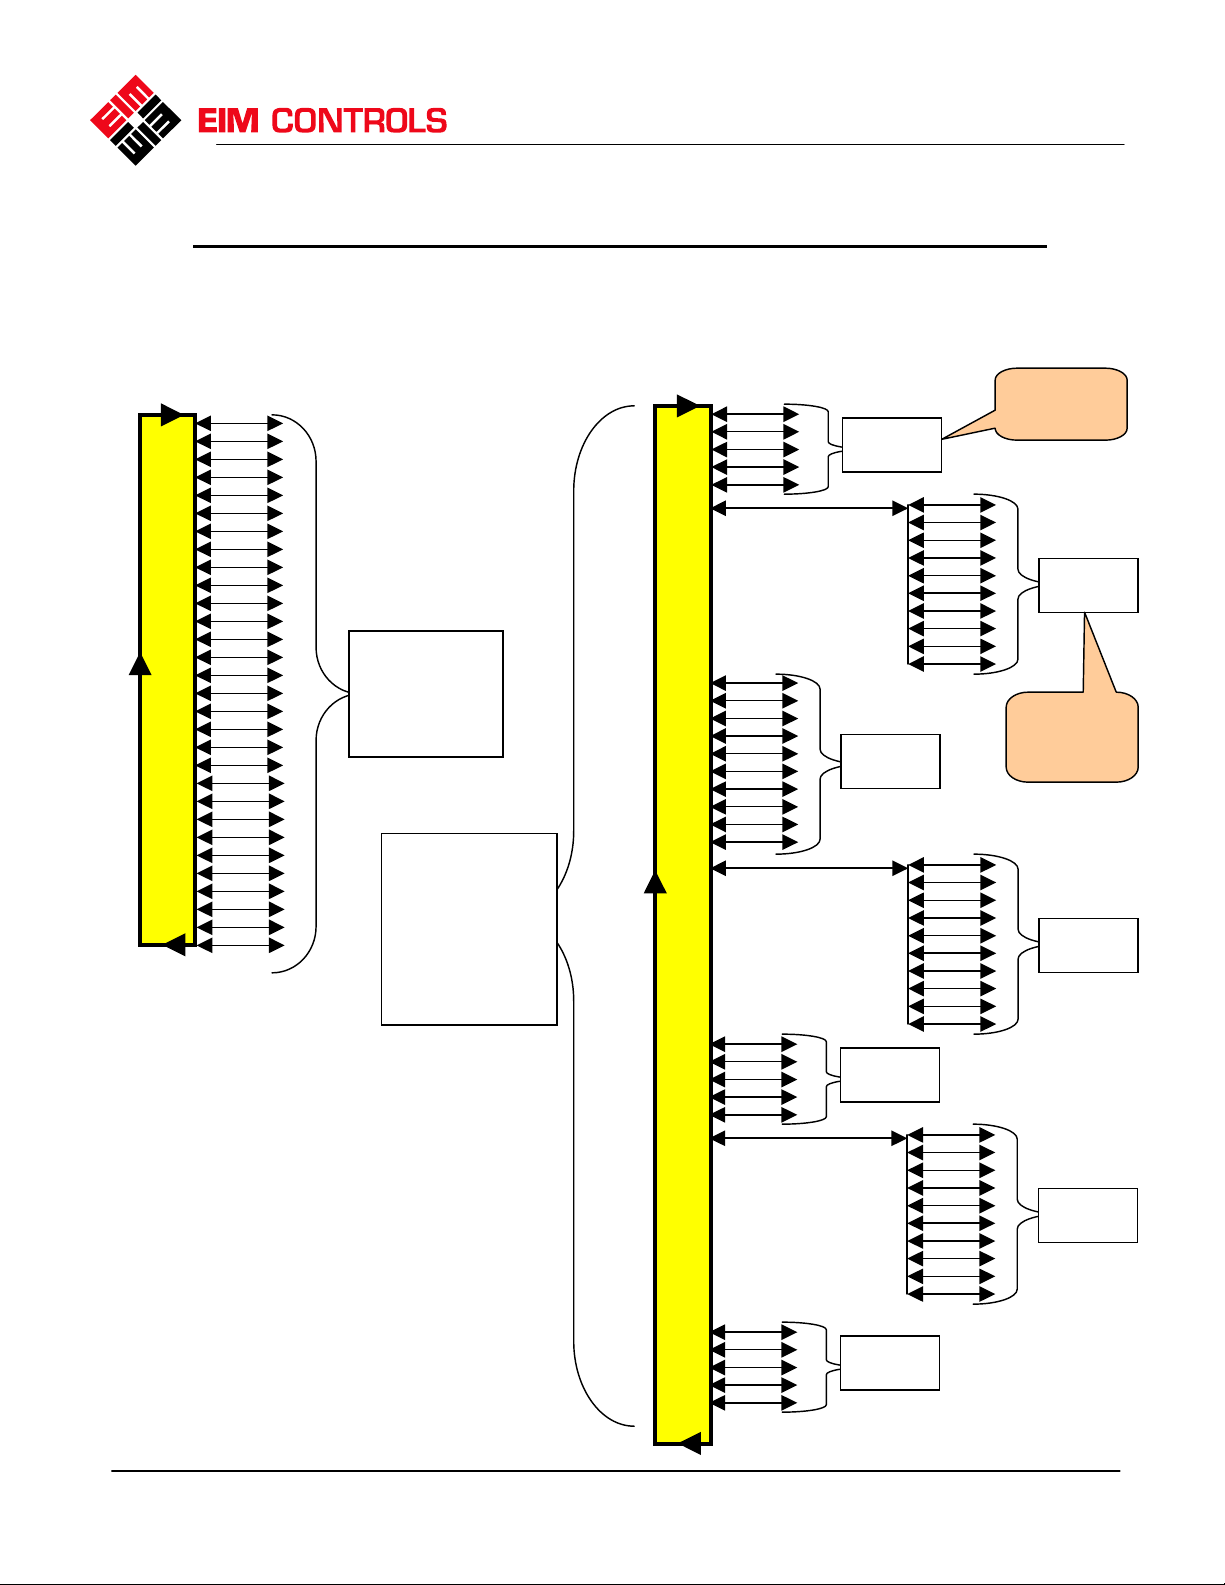
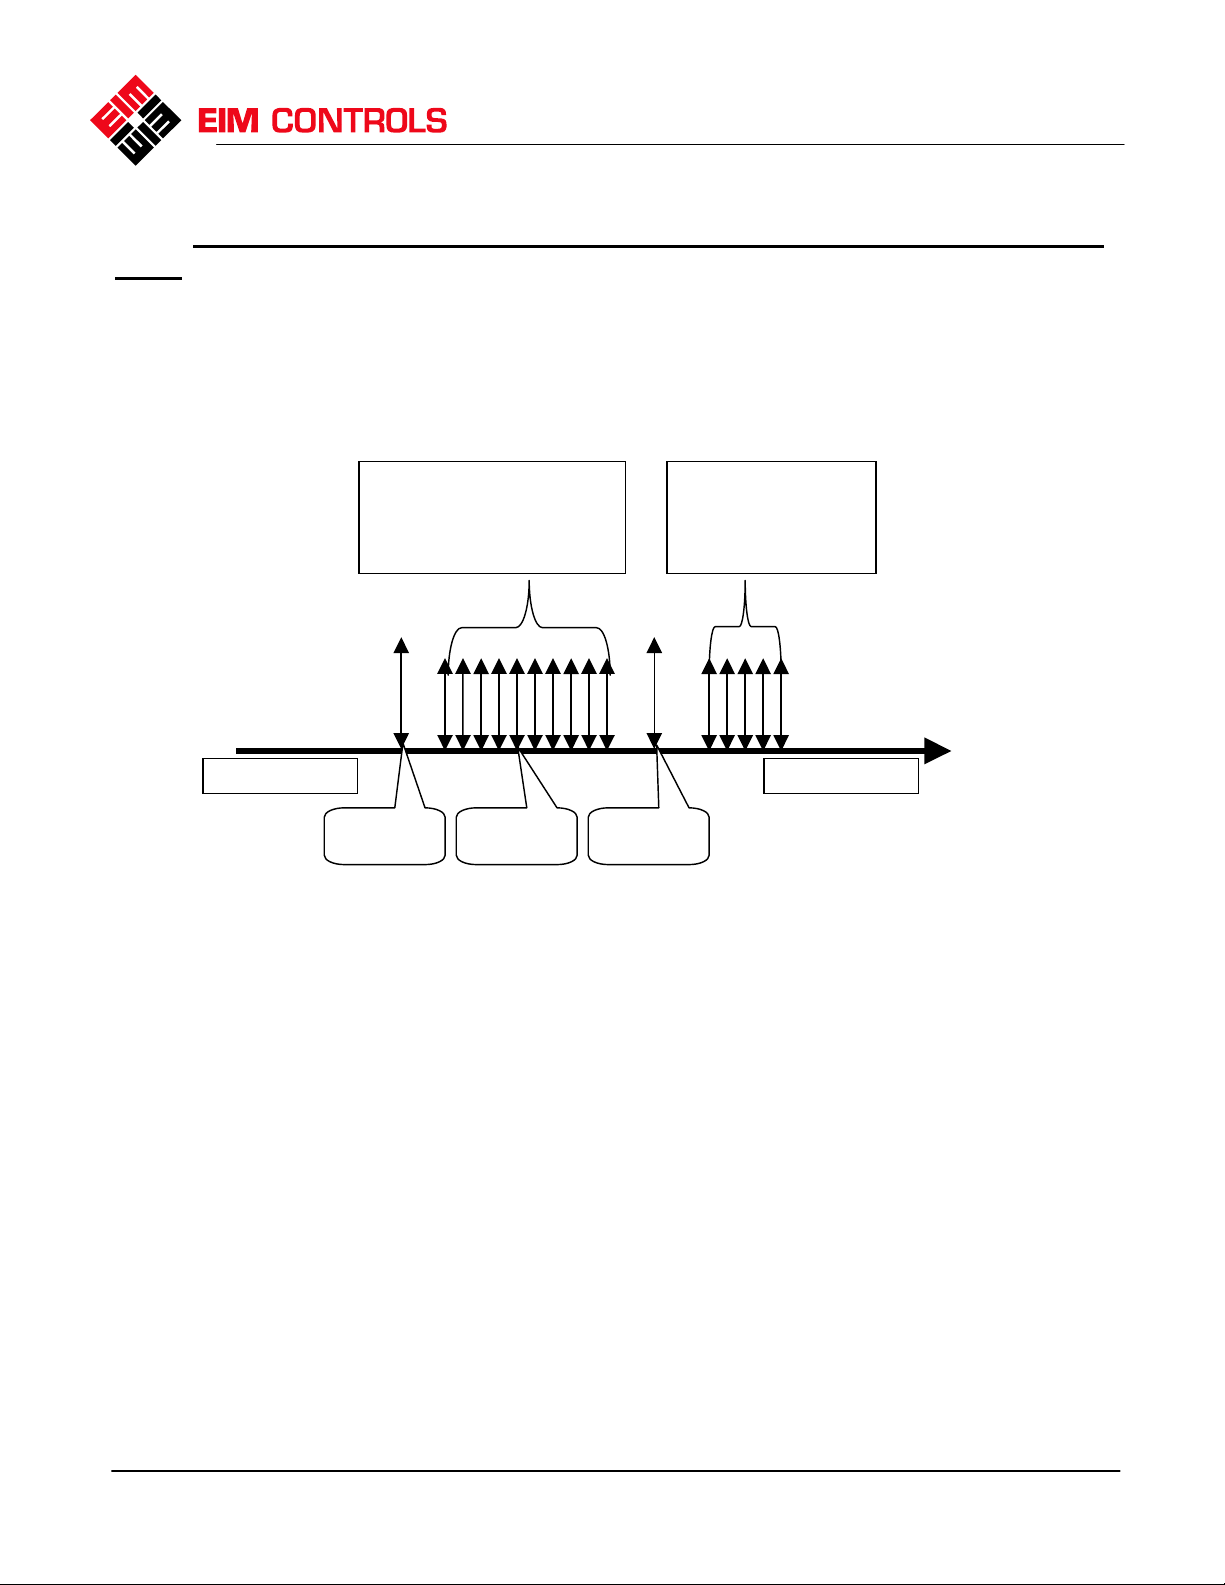
4.1.2. Diagram Describing Network Scanning & Actuator Writing Logic
This example demonstrates how a normal scan cycle gets elongated with data writes to the actuators.
The more writes being performed the longer it will take to complete data scans. This is where the
PLC/HMI must make a value decision for the best fit for their application:
• Fast enough repetitive writes to control the system
• Slow enough repetitive to ensure effective feedback to control the system.
Polling
for data
Time to poll 30
actuators for
data … without
any writing to
actuators
Polling
for data
actuators for data …
Performing 3 sets of
interspaced within
the single scan loop
Time to poll 25
data writes
Polling
for data
Polling
for data
Polling data …
“Network Scan
Time-Slice”
Writing
data
Writing data to
the network …
“PLC Interface
Time-Slice”
Writing
data
Writing
data
Copyright © 2004 EIM COMPANY, INC. • 13840 PIKE ROAD • MISSOURI CITY, TX. 77489
Page 18
Controlinc 1771-C (Version 5.21) Network Master Users Guide (2004-11-18)
4.1.3. Diagram Demonstrating Adding Additional Valves in Valve Scan
Time-Slice
This example demonstrates how increasing the additional number of valves to be scanned before
servicing the PLC communication task decreases the total network scan time.
This is where the PLC/HMI must make a value decision for the best fit for their application:
• Increasing the number: Speeds up data collection Lowers PLC control capabilities.
• Decreasing the number: Slows down data collection Increases PLC control capabilities.
Example of scale for time to scan network … different values for Additional valves in scan time slice:
Network size: 8 Network size: 8
Additional valves: 0 Additional valves: 3
(Note the relative time differences are for illustration purposes only … not to any exact scale.)
Poll 1 valve for data
Service PLC cmd
Poll 1 valve for data
Service PLC cmd
Poll 1 valve for data
Service PLC cmd
Poll 1 valve for data
Service PLC cmd
Poll 1 valve for data
Service PLC cmd
Poll 1 valve for data
Service PLC cmd
Poll 1 valve for data
Service PLC cmd
Poll 1 valve for data
Service PLC cmd
Poll 4 valves for data
Service PLC cmd
Poll 4 valves for data
Service PLC cmd
Copyright © 2004 EIM COMPANY, INC. • 13840 PIKE ROAD • MISSOURI CITY, TX. 77489
Page 19
Controlinc 1771-C (Version 5.21) Network Master Users Guide (2004-11-18)
4.1.4. Diagram Describing Relationship Between Scan Period & Diagnostic
Scan
This example demonstrates the relationship between the diagnostic scans, scan periods, the current
scan period, the previous scan period.
This example: a scan period value of 10 and 25 valves on the network. This means that all the valves
on the network will be scanned 10 times before the scan period is over … and before the next
diagnostic scan is performed.
(all 10 network scans of 25
Previous
Scan Period
valves completed)
Diagnostic
scan
Individual
network scans
Diagnostic
scan
Current
Scan Period
(so far, 5 network scans
completed)
Current time History
Copyright © 2004 EIM COMPANY, INC. • 13840 PIKE ROAD • MISSOURI CITY, TX. 77489
Page 20

Controlinc 1771-C (Version 5.21) Network Master Users Guide (2004-11-18)
4.1.5. 1771-C System Operations at Power Up
The 1771-C software boots up on a power up or a reset from depressing switch S1 on the 1771-C
module. In general, on boot, the software will:
1. Illuminate LED1 & LED2 as an indication that the software is initializing itself and the network.
2. Perform basic internal initializations.
3. Perform the initial diagnostic scan of the network and identify all actuators on the network.
4. Finish internal initializations.
5. Turn off LED1 & LED2.
6. Start standard scanning of the network. Initialization is finished. Normal operations
(scanning) have commenced and are allowing PLC communications.
(LED1 toggles ON during the start of this first scan)
Note 1: Remember that the PLC cannot perform any block transfers until after the network master has
finished polling the network for status information and LED2 has been turned off and the
1771-C starts indicating that it is ready for data (after scanning starts).
Note 2: Even though LED1 turns off immediately after the initial scan after power up and then toggles
back on after normal operations start, the user will not normally see this … at the most it
would be a small flicker. Therefore, to the user that is observing the LED behavior after
restart on a system that has actuators communicating, it will appear that …
During the initial scan when the PLC cannot talk to the 1771-C …
LED1 == ON
LED2 == ON.
Immediately after the initial scan when normal operations start (start of 1
LED1 == ON
LED2 == OFF.
st
normal scan):
Copyright © 2004 EIM COMPANY, INC. • 13840 PIKE ROAD • MISSOURI CITY, TX. 77489
Page 21

Controlinc 1771-C (Version 5.21) Network Master Users Guide (2004-11-18)
4.2. Network Interface (Scan) Time-Slice (1771-C ↔ Network
Communication)
4.2.1. Operation: Network Scanning to Gather Valve Actuator Data
The Network Master polls and controls up to 60 valves on the network by sequentially polling
(scanning) each device in sequence from slave actuator address #1 to the last slave address (#n) on its
network.
This polling gathers information from the actuators (including alarms, discrete information and actuator
position) and places it in tables that can be transmitted to the PLC.
The scan operation cannot stop in the middle of a request for data from a particular actuator.
Therefore, the 1771-C can only interface with the PLC once it has finished all required communications
with the actuator it is currently getting data from. Network scanning resumes with the next actuator
after interfacing with the PLC and processing any requests made by the PLC (writes to tables, writes to
actuators, table reads, …).
For example, if the 1771-C is currently scanning actuator [5] and the PLC wants to write a new valve
position setpoint to 22 actuators then the 1771-C will …
1. Finish getting data from actuator [5]
2. Get the new command table from the PLC.
3. Write the new valve position setpoint to all 22 actuators.
4. Restart network scanning where it left off … the next actuator [6] after the last one polled [5].
Standard data is gathered from the actuators by a single Modbus 03 command.
However, a 2
• If requesting totalizer data
• If requesting a specific holding register
• If requesting a block of holding registers from this actuator
• If requesting to monitor the discrete outputs on this actuator
• If requesting TEC2000 input data.
This is one reason why additional data should only be requested when needed … it will slow the entire
scan time of the system (by a minimum of 30-50 ms each time an actuator is polled for this data).
For instance, if all 5 of the above are requested for each actuator, an extra 30-50 ms is required for
EACH … meaning that the scan time could be increased by almost a factor of 5! … dramatically
slowing down the system!
A typical scan time (time to scan all the actuators on the network) to gather “standard” information on
60 actuators is less than 10 seconds … depending upon the 1771-C configuration.
When gathering data, the data is stored in the appropriate tables in the 1771-C. Values in the table
for a particular actuator will not be overwritten if there is an error communicating (on both ports) with the
actuator.
nd
Modbus 03 command is generated if any of the following are true …
Copyright © 2004 EIM COMPANY, INC. • 13840 PIKE ROAD • MISSOURI CITY, TX. 77489
Page 22

Controlinc 1771-C (Version 5.21) Network Master Users Guide (2004-11-18)
4.2.2. Operation: The Network Communication Diagnostic Scan
After a predetermined number of loops through the network scanning the actuators (the “scan period”),
the 1771-C performs a communication diagnostic scan to determine if any “off-line” actuators can come
back on line. If there are any that are ready, the 1771-C will bring them back on line without human
intervention. This is the only time an off-line system can come back on-line.
The number of loops around the network is determined by the “scan period
this value to accommodate site requirements and current operating environments.
Unlike the other operations that access the actuators on the network, the diagnostic scan checks both
ports when communicating with the actuators. Because of this, it also always takes longer to execute
than standard data gathering scans. However, normal data is still gathered during a diagnostic scan.
The only major difference in data gathering between a standard scan and a diagnostic scan is
• In the diagnostic scan, the 1771-C determines actuator system type and actuator firmware
version ID (tables [18 & 19]).
• Both ports are explicitly tested when getting the system type information.
• The diagnostic scan ensures that the hardware ports are set correctly … 9600 - 8N1.
Otherwise, all other data gathering activities are the same as in a normal network scan.
Communication error indications may only be cleared during this scan.
The “scan loop counter
” is always zero (0) during a diagnostic scan … the diagnostic scan does not
count as part of the scans in the scan period. This is the only time the loop counter is zero … during
the diagnostic scan.
The diagnostic scan time increases as you increase the discrepancy between the
(number of valves actually on line and talking
) VS (the number of valves configured to be on line)
Below shows a sample of diagnostic scan times empirically taken on a network when there was no
network “writes to the actuators” (Table [0] was configured for 60 valves). As you can see, as you
increase the number of “off line” units, you increase the diagnostic scan time.
# Nodes “Talking” … On-Line
60 of 60 (#1 – 60) 10
54 of 60 (#7 – 60) 11
48 of 60 (#13 – 60) 12
42 of 60 (#19 – 60) 13
36 of 60 (#25 – 60) 15
30 of 60 (#31 – 60) 16
24 of 60 (#37 – 60) 17
12 of 60 (#49 – 60) 19
6 of 60 (#55 – 60) 20
3 of 60 (#58 – 60) 21
2 of 60 (#59 – 60) 22
1 of 60 (#60) 22
Diagnostic Scan Times (secs)
Version 5.21
” value. The PLC adjusts
The values in this table
“rounded values” and
have a precision of (+/-) 1
second.
Because of this, these
numbers are only
appropriate for estimates
and trend analysis.
Copyright © 2004 EIM COMPANY, INC. • 13840 PIKE ROAD • MISSOURI CITY, TX. 77489
Page 23

Controlinc 1771-C (Version 5.21) Network Master Users Guide (2004-11-18)
Notes:
• Though not much, the diagnostic scan time can also vary with the number of valves in the valve
scan time slice.
• The greater the number of valves configured to be on line, the longer the diagnostic scan time
… more valves to check.
• During normal operations, an operator can use the HMI to force the system into a diagnostic
scan by temporarily changing the “scan period” value in table [0] to a value lower than the
current scan loop counter. This will cause the program to enter a diagnostic scan as soon as
this scan loop has finished.
• Because the diagnostic scan detects faulty communication ports and flags them, there can be a
perceived increased performance in the normal network scans because “off-line” actuators have
already been flagged and will be skipped.
Copyright © 2004 EIM COMPANY, INC. • 13840 PIKE ROAD • MISSOURI CITY, TX. 77489
Page 24

Controlinc 1771-C (Version 5.21) Network Master Users Guide (2004-11-18)
4.3. PLC Interface Time-Slice (1771-C ↔ PLC Communication)
The primary interface for the PLC with the 1771-C module is with an array of 25 tables (labeled 0 24)
stored in the 1771-C RAM. Each table is 64-words long and each word is 16-bits. From the
perspective of the PLC interfacing with the network, some of the tables are “read only” and some are
“read/write” (depending upon a command word).
The Relay Ladder Logic (RLL) in the PLC CPU interfaces with the 1771-C module by using BTR/BTW
block transfers to transfer fixed blocks of 64 words with the table number (command) in Word # [0] of
each transfer.
Relative to BTW/BTR commands, from the 1771-C perspective, there is no difference in handling “table
reads” or “table writes”. They both require a BTW/BTR set of block transfer commands.
During the PLC interface time-slice, the 1771-C uses 2 functions to request BTW/BTR operations.
These function calls are “time locked” in that the 1771-C must remain in the function waiting for a
response from the PLC before it can resume network monitoring activities.
If the timer expires before the PLC sends the BTW/BTR command:
• The function terminates.
• If a request for a BTW, the PLC interface time-slice terminates.
• If a request for a BTR, the 1771-C
o The 1771-C sends the table anyhow.
o The 1771-C performs any other required actions like writing values to the actuators.
o The PLC time-slice terminates.
Once the PLC interface time-slice terminates, the PLC must wait until the next PLC interface time-slice
starts before there is another chance at a BTW/BTR command.
A side effect of this is that it is possible for the entire network scan time to slow down if the 1771-C has
to wait to get data from the PLC before it can continue with collecting data from the valves.
Control is based on bits 13 (DN) & 15 (EN) in control word [0] in the BT data structure. These are the
standard block transfer control bits and the PLC and back plane is normally control setting and clearing
these bits.
Note
: If a BTW command is never issued by the PLC (or received by the 1771-C), the PLC interface
time-slice terminates and the 1771-C will never request a BTR to send a table back to the PLC.
Note
: Refer to the following Allen Bradley Documents:
• Allen Bradley PLC-5 Programmable Controllers Instruction Set Reference,
Publication 1785-6.1
• Allen-Bradley 1771-DB, Series B Basic Module User's Manual
Catalog No. 1771-DB, Series B, Publication No. 1771-6.5.113
Copyright © 2004 EIM COMPANY, INC. • 13840 PIKE ROAD • MISSOURI CITY, TX. 77489
Page 25

)
p
Controlinc 1771-C (Version 5.21) Network Master Users Guide (2004-11-18)
Conceptually, the interfacing between the PLC and the 1771-C is performed in the 1771-C module in a
section of RAM that is used as an exchange buffer area. To prevent potential overwriting problems
when performing BTWs & BTRs, there are two actual 64-word buffers in this exchange area:
• Basic Input Buffer (BIB): PLC fills to send 64 words to the 1771-C.
• Basic Output Buffer (BOB): 1771-C fills to send 64 words to the PLC.
This is the only address accessed by the PLC when executing the BTW & BTR commands (meaning
that all reads & writes by the PLC are to and from these buffers).
BTR & BTW
commands
executed by the
PLC
1771-C
1771-C driver
erations
o
MODBUS RTU
commands
executed by the
1771-C and
actuators
64-Word Exchange Buffers
Standard RAM (Tables
ACTUATOR PLC
Figure 3-1 Concept Diagram of Command Operations
Copyright © 2004 EIM COMPANY, INC. • 13840 PIKE ROAD • MISSOURI CITY, TX. 77489
Page 26

Controlinc 1771-C (Version 5.21) Network Master Users Guide (2004-11-18)
4.3.1. Operation: PLC (Write Data Tables To) or (Read Tables From) the
1771-C
Relative to BTW/BTR commands, from the 1771-C perspective, there is no difference in handling
• Writing a value to any table in the 1771-C memory.
• Writing a value to a table in the 1771-C memory that is also passed on to the specified actuator
on the network.
They both require a BTW block transfer command. The only difference is in the 2
being transferred (word [1]).
• If word [1] == 0, then this a BTW command to read a table from the 1771-C.
• If word [1] =/= 0, then this a BTW command to write a data table to the 1771-C.
To perform a block transfer of table data:
1. The PLC interface time-slice has now started.
2. The 1771-C requests a BTW command from the PLC. The 1771-C will wait for up to 2 seconds
for the PLC to respond. If it doesn’t, then this operation terminates and must be restarted on
the next PLC time slice. Otherwise, continue.
3. The PLC executes a BTW command and copies the data from its own memory to the exchange
buffer area in the 1771-C
4. The 1771-C then copies the table into its own memory.
5. If word [3] indicates an ESD command sequence (start or stop the ESD condition) then that is
outputted to the entire network of actuators on both ports.
6. If word [1] == 0, then a read-only request command was made and the appropriate table is
copied into the exchange buffer.
If word [1] =/= 0, then this was a write command and this table is copied into 1771-C memory.
A final “resultant” table (what will be stored in the 1771-C and potentially sent out onto the
network) is then copied into the exchange buffer to be fed back to the PLC.
7. The 1771-C requests a BTR command from the PLC such that
• If a read command – read the data the PLC requested
• If a write command – read immediate feedback of the command structure the 1771-C is
about to execute.
8. After the BTR is acknowledged (or timed out), if the command was to write data to the
actuators, the 1771-C will now loop through and write to all “appropriate” actuators on the
network.
9. The PLC interface time-slice is now finished.
nd
word in the block
Copyright © 2004 EIM COMPANY, INC. • 13840 PIKE ROAD • MISSOURI CITY, TX. 77489
Page 27

Controlinc 1771-C (Version 5.21) Network Master Users Guide (2004-11-18)
As per affecting network performance, unless the command is to write data to the actuators
, the
PLC does not have to limit the rate in which these commands are sent to the 1771-C because the
1771-C only sends back the table information it already has stored in memory. Conceptually, these
do delay the overall scan time. However, the amount of delay is very minor from a global perspective.
(Obviously, the PLC must still ensure all appropriate BTR/BTW handshaking is performed)
As per writes that send data to the actuators, the rate should be limited. Please refer to the section
that discusses writing data to the actuators on the network.
Note 1: All tables can be read by the PLC. To ensure you only read from a read/write table, access it
with the command word set to “0” (zero).
Note 2: An invalid table ID sent to the 1771-C will default to a read request for table [0] data.
Note 3: On write commands from the PLC, reading the immediate feedback is optional for the PLC. In
other words, if the PLC has no need to inspect this table, then it can read it back but just throw
it out. However, servicing the BTR request is important to overall system throughput.
For instance, the PLC program might be architected such that it treats an output pipe
(“command”) as just that … a one-way pipe that has no feedback. In this case, the PLC would
use other mechanisms for feedback (ex: other tables) and does not require the redundant
feedback on write commands.
Note 4: When any request for a BTW/BTR is made by the 1771-C, the 1771-C program waits (in the
respective request function) until either the transfer completes or until a timeout is triggered
(currently set at 2 seconds).
This extended timeout time is to assist a PLC program that is having other (hopefully
temporary) difficulties and might take a while to return to normal behavior.
This operation does not allow for “exiting the function early – keep processing – and returning
later to check results”. It cannot exit/check the function with an “activated but not finished”
indication.
Therefore, to not slow down 1771-C network scanning activities, the PLC-RLL needs to service
these requests as soon as possible … even if it is to only throw away the table read back.
Servicing the request for a BTW/BTR made by the 1771-C is critical for overall timing efficiency.
Note 5: One main point to remember on BTW/BTR timing is that once the 1771-C responds to a BTW
command, the 1771-C will not return to process (setup for) another BTW command from the
PLC until it:
• responds with an immediate feedback BTR request for the table being addressed.
• finishes writing the entire table of values to the valves (if a write command)
• completes the set of scans in the next network scan time slice
Copyright © 2004 EIM COMPANY, INC. • 13840 PIKE ROAD • MISSOURI CITY, TX. 77489
Page 28

Controlinc 1771-C (Version 5.21) Network Master Users Guide (2004-11-18)
Note 6: Once the 1771-C reads in a table from the PLC’s BTW, the 1771-C will always deliver the
feedback table almost immediately (for BTR handling) … whether or not it was a read or write
table command.
Therefore, the best practice to maintain synchronization between the PLC and 1771-C is for the
PLC to “conceptually” wait for a feedback response from the 1771-C before continuing … even
if only to throw away the table.
This will also increase the 1771-C overall speed because it waits for an acknowledgement of
the feedback before continuing with command execution.
REMEMBER … Speed in servicing of the BTW/BTR requests expedites system throughput.
Copyright © 2004 EIM COMPANY, INC. • 13840 PIKE ROAD • MISSOURI CITY, TX. 77489
Page 29

Controlinc 1771-C (Version 5.21) Network Master Users Guide (2004-11-18)
4.3.2. Operation: PLC Commands to Write Data to the Actuators
When valve control commands (change setpoint, open, stop or close) are generated by the PLC, the
Network Master sends the appropriate command(s) over the network to the addressed slave device
(actuator).
However, if the command for a particular valve has not changed (value in the table is the same as
before), then nothing is sent to the particular valve (it is skipped). Basically, when the 1771-C starts
acting on a command to write data to the actuators, it compares the current value in the table with the
new one. If the values are different, then the actuator is flagged as one to write information to.
When writing discrete output control commands (directly controlling coils [3-5] or [100-1011]),
the 1771-C does NOT compare the value to the last one. When commanded to write to the
coils, it is performed ONE TIME and then turned off for that actuator (however, monitoring the
status of those outputs is left on for that actuator).
When the 1771-C starts writing data to the actuators, is starts with the lowest address number and
proceeds through to the highest address number. This write operation is completed after all
“appropriate” actuators have been written to.
In general, there is one Modbus command/response set issued for EACH PLC command to write data
to a particular actuator (ex: writing analog output data).
However, as per the specification, when a position control command is issued, the 1771-C is required
to ensure that a “SSR” contactor configuration bit is set on any 320A system prior to receiving a control
command. Therefore, there are up to 3 Modbus command/response sets issued for EACH PLC
command to write position data in any particular 320A actuator:
If the actuator is configured to have an SSR in it (table [13]):
1. A Modbus command is sent to the actuator requesting status information to verify the SSR
configuration coil is set.
2. If the coil is not set, a Modbus command is sent to set it.
3. The Modbus command is sent to indicate the new setpoint.
Note 1: Discrete OPEN / CLOSE / STOP commands.
The discrete OPEN / CLOSE / STOP commands (in table 3) are handled exactly the same as if
a setpoint was sent.
• OPEN (send a 100% open setpoint)
• CLOSE (send a 0% open setpoint)
• STOP (send a setpoint matching the last position read)
(For more information on how this works, refer to the actuator’s operation manual)
Copyright © 2004 EIM COMPANY, INC. • 13840 PIKE ROAD • MISSOURI CITY, TX. 77489
Page 30

Controlinc 1771-C (Version 5.21) Network Master Users Guide (2004-11-18)
Note 2: If writing to a valve and the write fails, then the internal flag to write the value REMAINS
ACTIVE. This means that even though the communication process will prevent the program
from trying to transmit when there is an error, the program will keep this value identified as one
to send out until it is actually sent out or cleared by the PLC.
This also means that the write to this particular actuator will be attempted the next time the PLC
sends this table in with a “write table” command associated with it.
For example … If this was a value in table [5], the 1771-C will retry writing the value to the
actuator the next time the PLC sends table [5] in as a write command.
The 1771-C cannot “cancel” this command because it is not in its scope of responsibility to
directly change process control commands.
Therefore, it is the PLC’s responsibility to write whatever “safe” value is appropriate for the
particular actuator/application at any time in case the actuator “comes back online”.
Note 3: The PLC should limit the rate in which these commands are sent to the 1771-C … only write
as fast as required to adequately control the valve. The faster the PLC requests changes to
valve setpoint positions in the valves, the longer it takes the 1771-C to complete the write
operation and continue scanning the network for data … decreasing the overall performance
concerning updating status information for all actuators on the network.
For example
: Sending write commands once per second might still afford good control and still
update all status information. However, sending write commands 4 times a second might write
the information out faster but delay the response (status) information for the entire network to a
point where it is too difficult to control.
Warning: If the valve has been moved while the PLC is down or the valve was moved while in local
mode, then as soon as the valve is communicating and accepting remote commands, it will
move according to values in tables [3] and [5]. Please adjust the PLC RLL accordingly.
Copyright © 2004 EIM COMPANY, INC. • 13840 PIKE ROAD • MISSOURI CITY, TX. 77489
Page 31

r
Controlinc 1771-C (Version 5.21) Network Master Users Guide (2004-11-18)
4.3.3. RLL Example … Manually Send New Table … Auto Read Response
Below is a simple example of an RLL that will manually send a table in a BTW and read back the
resulting feedback table using a BTR.
Control & Feedback via the N8 file … (table [19] requested … only 3 actuators on network)
Table Number
Sent in
Table
sent in
with a
BTW
Table
READ
BACK
with a
BTR
4-word
heade
3 Nodes on
Network
Copyright © 2004 EIM COMPANY, INC. • 13840 PIKE ROAD • MISSOURI CITY, TX. 77489
Page 32

Controlinc 1771-C (Version 5.21) Network Master Users Guide (2004-11-18)
5. System Tables
From the perspective of the PLC, all tables can be read but only some can be written to. If the PLC
attempts to perform a write to a “read-only” table, the 1771-C ignores it and treats it as a read
command/request.
In general, when writing data to be transmitted to the actuators over the network, the Network Master
will differentiate which values change in tables being received from the PLC and will only send new
command information to the actuators that require a change.
The tables have the following PLC (“user”) access:
• Table [0]: read / write
• Table [1]: read only
• Table [2]: read only
• Table [3]: read / write
• Table [4]: read only
• Table [5]: read / write
• Table [6]: read only
• Table [7]: read only
• Table [8]: read / write
• Table [9]: read / write
• Table [10]: read / write
• Table [11]: read only
• Table [12]: read only
• Table [13]: read / write
• Table [14]: read / write
• Table [15]: read / write
• Table [16]: read / write
• Table [17]: read / write
• Table [18]: read only
• Table [19]: read only
• Table [20]: read / write
• Table [21]: read / write
• Table [22]: read / write
• Table [23]: read / write
• Table [24]: read / write
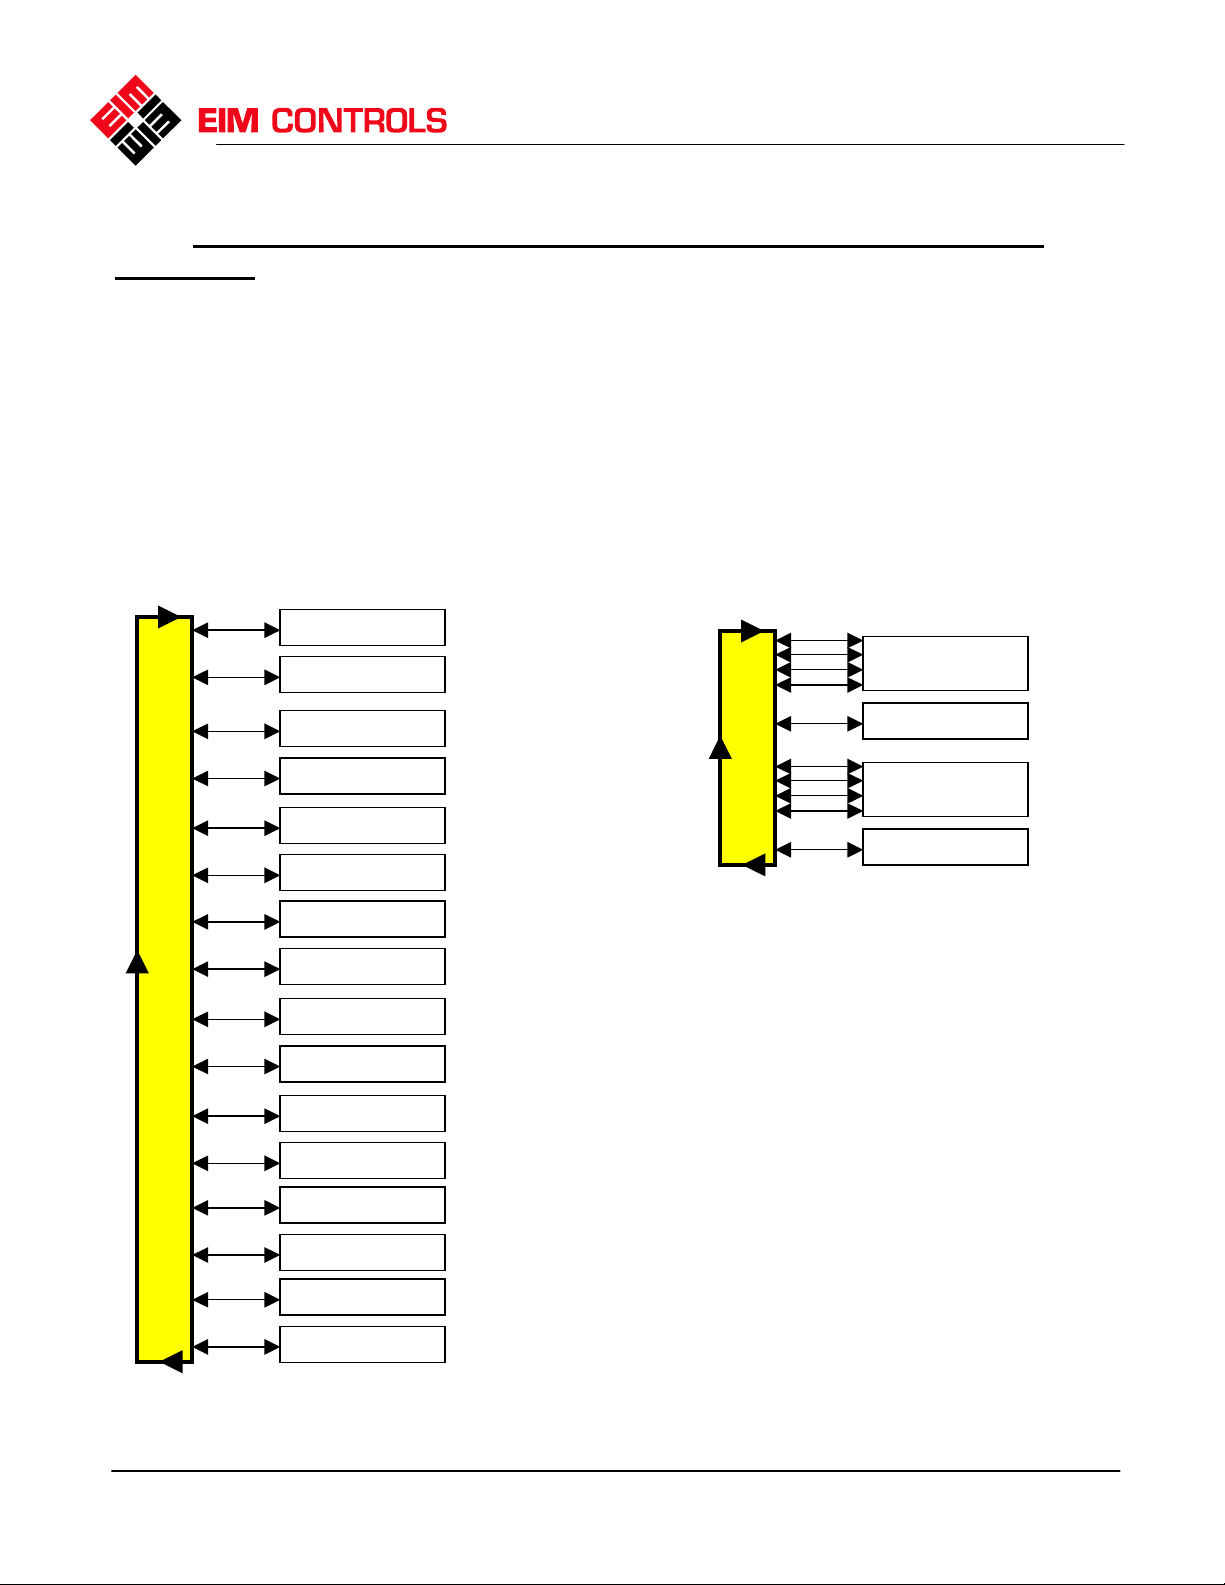
Table [0] is a “system focused” table. It is focused on information about the network system and
network master. All the rest of the tables are focused on information about individual actuator “units”.
NOTE:
In tables [1 24 … except 15], the last 60 words hold information for particular actuators.
Words [4 63] are in sequence with valve actuator network node addresses. A particular
actuator is represented by its POSITION in the table as an offset starting from word [3] (the
end of the header). For instance, Word [7] in all tables will always have valve #4
information.
Copyright © 2004 EIM COMPANY, INC. • 13840 PIKE ROAD • MISSOURI CITY, TX. 77489
Page 33

Controlinc 1771-C (Version 5.21) Network Master Users Guide (2004-11-18)
There are two parts to a table:
• General Header Information: Words [0 3]
• Table Specific Information: Words [4 63]
In table [0], words [4 63] are divided into three parts:
• Words [4 17]: System Configuration Information
• Words [18 46]: -reserved- … currently not used.
• Words [47 63]: Run-time information inserted by the 1771-C.
Copyright © 2004 EIM COMPANY, INC. • 13840 PIKE ROAD • MISSOURI CITY, TX. 77489
Page 34

Controlinc 1771-C (Version 5.21) Network Master Users Guide (2004-11-18)
5.1. Table Arrangement
Table [0]
System
Info Table
Word
offset
into
table
Read /
Table #
0
1
Command
Reserved
2
(F/W ID
3 ESD ESD ESD ESD ESD ESD ESD ESD ESD ESD ESD ESD ESD ESD ESD ESD
# Valves
4
Network
5
Period
6
Totalizers
7
~ ~ ~ ~ ~ ~ ~ ~ ~ ~ ~ ~ ~ ~ ~
63
Command to Monitor
Word
offset into
&/or Control Discrete
table
0
1 R / W 0 0 0 R / W R / W R / W R / W R / W
2
3 ESD ESD ESD ESD ESD ESD ESD ESD ESD
4
Discrete Output Cmd
5
Discrete Output Cmd
6
Discrete Output Cmd
7
Discrete Output Cmd
~ ~ ~ ~ ~ ~ ~ ~ ~ ~
63
Discrete Output Cmd
Table [1]
---Comm.
----
Status
Write
0x00
R / W
Scan
See table [0]
Table #
Reserved
(F/W ID)
Valve #1
on
Comm
Status
Valve #2
Size
Poll
Comm
Status
Valve #3
Comm
Status
Valve #4
Comm
Status
Run-Time
Valve #60
Information
Comm
Configuration &
Status
Table [16]
----
Digital Outputs
Read / Write
Table #
0x10
Reserved
(F/W ID)
Valve #1
Valve #2
Valve #3
Valve #4
Valve #60
Table [2]
---Interpreted
Error
Status Bits
---Reg [06]
Read
Only
Table #
0x01
0 0 R / W 0 R / W 0 0 R / W R / W R / W 0 0 R / W R / W R / W
Reserved
(F/W ID)
Valve #1
Valve #2
Valve #3
Valve #4
Status of Discrete
Discrete Out Status
Discrete Out Status
Discrete Out Status
Discrete Out Status
Discrete Out Status
Table [3]
----
Valve
Read
Status
Status
Status
Status
Valve
Status
Digital Outputs
Discrete
---(O / C / S)
Only
0x02
Reserved
(F/W ID)
Valve #1
Valve #2
Valve #3
Valve #4
#60
Table [17]
----
…
Read / Write
Table #
0x11
Reserved
(F/W ID)
Valve #1
Valve #2
Valve #3
Valve #4
Valve #60
Control
Control
Read /
Table #
AOCS
AOCS
AOCS
AOCS
AOCS
----
Valve
----
----
----
Write
0x03
Valve
#60
Table [4]
----
Valve
Position
Feedback
----
0 – 100%
in 0.1%
increments
----
Read
Only
Table #
0x04
Reserved
(F/W ID)
Valve #1
POS
0 – 100.0%
Valve #2
POS
0 – 100.0%
Valve #3
POS
0 – 100.0%
Valve #4
POS
0 – 100.0%
Valve
#60
POS
0 – 100.0%
Table [18]
----
System Type
Read Only
Table #
0x12
Reserved
(F/W ID)
Valve #1
System Type
Valve #2
System Type
Valve #3
System Type
Valve #4
System Type
Valve #60
System Type
Table [5]
----
Valve
Control
----
Valve
Setpoint
----
0 - 4095
----
Read /
Write
Table #
0x05
Reserved
(F/W ID)
Valve #1
STPT
Valve #2
STPT
Valve #3
STPT
Valve #7
STPT
Valve
#60
STPT
Firmware ID
Firmware ID
Firmware ID
Firmware ID
Firmware ID
Table
[6]
----
Analog
Input #1
----
Read
Only
Table #
0x06
Reserved
(F/W ID)
Valve #1
AIN-1
Valve #2
AIN-1
Valve #3
AIN-1
Valve #4
AIN-1
Valve
#60
AIN-1
Table [19]
----
Firmware
Version ID
Read Only
Table #
0x13
Reserved
(F/W ID)
Valve #1
Valve #2
Valve #3
Valve #4
Valve #60
Table
----
Analog
Input #2
----
Read
Only
Table #
0x07
Reserved
(F/W ID)
Valve #1
AIN-2
Valve #2
AIN-2
Valve #3
AIN-2
Valve #4
AIN-2
Valve
#60
AIN-2
Table [20]
Modbus Exception
Response
Indications
Read / Write
Reserved
Exception Code
Exception Code
Exception Code
Exception Code
Valve #60
Exception Code
[7]
----
Table #
0x14
(F/W ID)
Valve #1
Valve #2
Valve #3
Valve #4
Table [8]
----
Analog
Output #1
----
Read /
Write
Table #
0x08
Reserved
(F/W ID)
Valve #1
AOUT
Valve #2
AOUT
Valve #3
AOUT
Valve #4
AOUT
Valve
#60
AOUT
Table [9]
Table [10]
----
Totalizer
Reserved
(F/W ID)
Valve #1
Valve #2
Valve #3
Valve #4
TEC2000 Inputs
[1000 – 1015]
Inputs [1000-1015]
Inputs [1000-1015]
Inputs [1000-1015]
Inputs [1000-1015]
Inputs [1000-1015]
Totalizer
#1
----
Read /
Write
Table #
0x09
Reserved
(F/W ID)
Valve #1
TTL - 1
Valve #2
TTL - 1
Valve #3
TTL – 1
Valve #4
TTL - 1
Valve
#60
TTL - 1
Table [21]
----
Reg [1000]
…
Read / Write
Table #
0x15
Reserved
(F/W ID)
Valve #1
Valve #2
Valve #3
Valve #4
Valve #60
Read /
Write
Table #
0x0A
TTL - 2
TTL - 2
TTL - 2
TTL - 2
Valve
#60
TTL - 2
Table [11]
---Valve
#2
Position
----
0 – 4095
reg [14]
Read
Table #
0x0B
Reserved
(F/W ID)
Valve #1
POS
0 – 4095
Valve #2
POS
0 – 4095
Valve #3
POS
0 – 4095
Valve #4
POS
0 – 4095
Valve
POS
0 – 4095
TEC2000 Inputs
[1016 – 1031]
Reg [1001]
Read / Write
Inputs [1016-1031]
Inputs [1016-1031]
Inputs [1016-1031]
Inputs [1016-1031]
Inputs [1016-1031]
----
----
Only
#60
Table [22]
----
…
Table #
0x16
Reserved
(F/W ID)
Valve #1
Valve #2
Valve #3
Valve #4
Valve #60
Table [12]
----
Status Bits
for
Discrete
Digital
Input s
reg [05]
----
Read
Only
Table #
0x0C
Reserved
(F/W ID)
Valve #1
Status
Valve #2
Status
Valve #3
Status
Valve #4
Status
Valve
#60
Status
Table [13]
Reserved
(F/W ID)
Valve #1
Valve #2
Valve #3
Valve #4
TEC2000 Inputs
[1032 – 1047]
Reg [1002]
Read / Write
Inputs [1032-1047]
Inputs [1032-1047]
Inputs [1032-1047]
Inputs [1032-1047]
Inputs [1032-1047]
----
SSR
Config
----
Read /
Write
Table #
0x0D
SSR
SSR
SSR
SSR
Valve
#60
SSR
Table [23]
----
…
Table #
0x17
Reserved
(F/W ID)
Valve #1
Valve #2
Valve #3
Valve #4
Valve #60
Table [14]
Additional
Register to
Poll from
All Valves
on Network
Reserved
(F/W ID)
Valve #1
Add Reg
Valve #2
Add Reg
Valve #3
Add Reg
Valve #4
Add Reg
Add Reg
----
polled from a
Read /
Write
Table #
0x0E
Value
Value
Value
Value
Valve
#60
Value
Table [24]
TEC2000 Inputs
[1048 – 1063]
Reg [1003]
Read / Write
Table #
Reserved
(F/W ID)
Valve #1
Inputs [1048-1063]
Valve #2
Inputs [1048-1063]
Valve #3
Inputs [1048-1063]
Valve #4
Inputs [1048-1063]
Valve #60
Inputs [1048-1063]
Table [15]
----
Block of
Registers
particular
valve.
Read /
Write
Table #
0x0F
Reserved
(F/W ID)
Valve #
Valve
(Actuator)
Type
Starting
Register
Number
Number of
Registers
See
Table [15]
Description
----
…
0x18
Figure 5-1 Table Arrangement
Copyright © 2004 EIM COMPANY, INC. • 13840 PIKE ROAD • MISSOURI CITY, TX. 77489
Page 35

t
t
Controlinc 1771-C (Version 5.21) Network Master Users Guide (2004-11-18)
EXAMPLE OF GENERAL TABLE FORMAT …
Characteristics:
• 48 node network
• Table [1] feedback from the 1771-C (what is given to the PLC)
Shaded area …
Standard 4-word
header in front of
any table
s
1
word in
buffer …
Table ID
Last data word
used in this data-
table …
for valve #48
s
1
actual data
word in table
… for valve #1
Shaded area … Unused
part of 60-word data-table
because only 48 nodes on
network
(unused network locations
marked with a “-99”)
Last data word
possible in any
data-table …
for valve #60 …
not used here.
Copyright © 2004 EIM COMPANY, INC. • 13840 PIKE ROAD • MISSOURI CITY, TX. 77489
Page 36

Controlinc 1771-C (Version 5.21) Network Master Users Guide (2004-11-18)
5.2. Standard Header Format (All Tables) … Words [0 3]
The header is the first four (4) words in the data block.
Please refer to the list of tables in Figure 3-2.
5.2.1. Word [0]: Table ID
As in the first word in the block data transfers, this first word is the Table ID. This can also be
considered the “Command ID”.
5.2.2. Word [1]: Read / Write Command Indicator
(If a Read/Write Table):
If word [1] == 0 this is a command from the PLC to the 1771-C to read the specified table
from 1771-C memory and place it into the exchange buffer so the PLC can read it out
… words [0 63].
If this is table [0], then this read back will include all current configuration information
(at the front of the table) and current system run-time information (at the back of the
table).
If word [1] =/= 0 (any non-zero value) … this is a command from the PLC to the 1771-C to
remove the supplied table of data from the exchange buffer and place it into the 1771C standard memory (tables).
- If this is table [0], then the configuration information is written.
- Otherwise, the table information is written to the 1771-C.
- If this is the type of table that actually writes data to the actuators, then that data
is outputted to the actuators.
(If a Read Only Table):
This word is ignored and the table is only read.
5.2.3. Word [2]: Reserved / Firmware ID
When received by the 1771-C from the PLC, this word is ignored (reserved for future use).
When transmitted from the 1771-C to the PLC, this word contains the firmware ID. This is a decimal
number representing the 1771-C firmware ID. For instance, if the value in table [0] … word [2] is 400,
the firmware version number is 4.00
Copyright © 2004 EIM COMPANY, INC. • 13840 PIKE ROAD • MISSOURI CITY, TX. 77489
Page 37

Controlinc 1771-C (Version 5.21) Network Master Users Guide (2004-11-18)
5.2.4. Word [3]: Emergency Shut Down (ESD) Command Word & Indication
The ESD command is a command broadcasted to all actuators connected to the network that an
emergency is in effect and the actuator should start performing the ESD actions its pre-configured for.
The 1771-C broadcasts an ESD on both channels with a 200-millisecond delay between them.
If the PLC wishes to engage the ESD for the network, it writes a 255 (0x00FF) to this word location
(Word [3]) using a write to any table. The Network Master then broadcasts the appropriate ESD
command to all valves on the network (on both channels with about a 200ms delay between each).
When the PLC wants to end the ESD, it writes a 170 (0x00AA) into this word into any table. The
Network Master will then broadcast the appropriate “Stand-Down from ESD” command to all valves on
the network on both channels with about a 200ms delay between each.
Later, after the PLC is satisfied that the ESD is over and normal operations have resumed (stand down
from ESD has completed), it is recommended that the PLC clear this stand-down value (and all aspects
of ESD) by resetting it to zero (again, in any table).
Summary: The appropriate values for the ESD command word from the PLC are:
• 255 (0x00FF) = Engage ESD
• 170 (0x00AA) = Stand down from ESD
• 0 = Emergency shut-down (ESD) control is not active
Once any ESD command is written to any table, the value is propagated throughout all tables.
Therefore, the RLL does not have to remember which one it wrote to.
Warning: Since the ESD is actually a function of the actuator control cards; if an actuator is reset then
that actuator will probably not be in ESD. This also means that if the 1771-C loses power or is
reset, it has no prior knowledge of any valves in ESD. It can turn off ESD once initialization of
the software has occurred. It is the responsibility of the RLL to repeat the ESD broadcast
under the possibility of these circumstances.
Warning: If any or some of the actuators are configured to move on ESD, consider the electrical
power required in performing a network ESD. A large electrical power drop can possibly create a
reset in the actuator by affecting the control voltage.
Note 1: Remember, an ESD command from the PLC will inform the actuators to do what ever they
were configured to do during an ESD condition. Therefore, this could easily override any other
control commands already sent to them or about to be sent (ex: commands placed in any write
Tables [3, 5, 8,] might be rejected by the actuator because of the ESD condition).
Note 2: If monitoring the network, the values of 0xAA & 0xFF are not the values transmitted to the
actuators. The program actually uses a Modbus command 05 to set/clear a bit (coil) in the
register map in the actuators. From then on, the actuators do what ever they are configured to
do when ESD is either started or ended.
Copyright © 2004 EIM COMPANY, INC. • 13840 PIKE ROAD • MISSOURI CITY, TX. 77489
Page 38

Controlinc 1771-C (Version 5.21) Network Master Users Guide (2004-11-18)
5.3. Table [0] … System Information Table
5.3.1. Table [0] Overview
This table is a read/write table in that is used for “system level” configuration and run-time
status/diagnostic information. Basically, it is not “actuator” focused but more focused on the entire
network of actuators.
When told to write this table, the information is not sent out onto the network. Also, only the
configuration words are written into the table. The run-time status information is supplied by the 1771C.
Table [0] has 4 parts to it:
1. Words [0 3]: Standard header information … common in all tables.
2. Words [4 17]: System Configuration/Control words (set by the PLC)
3. Words [18 46]: Not currently used … Reserved for future use … zeroed out.
4. Words [47 63]: Run-time feedback of real-time values (set by the 1771-C).
Copyright © 2004 EIM COMPANY, INC. • 13840 PIKE ROAD • MISSOURI CITY, TX. 77489
Page 39

Controlinc 1771-C (Version 5.21) Network Master Users Guide (2004-11-18)
Words [4 17] (control/configuration parameters set by the PLC)
1. Word [4]: Set the Number of Valves on the Network.
2. Word [5]: Set the Scan Period value (# scans before a communication diagnostic scan)
3. Word [6]: Set the T/F control flag whether or not to poll for totalizers on network scans.
4. Word [7]: Set the additional number of valves to poll in the network-scan time slice.
5. Word [8]: Set the Additional Message response delay to expect from actuators
(10ms increments)
(FUNCTION: Poll specified additional register from all actuators on network)
6. Word [9]: Set the specified additional register to poll from all actuators on the network.
7. Word [10]: Set the T/F control flag whether or not to start polling all actuators for the additional
register.
(FUNCTION: Poll block of registers from one specific actuator on the network)
8. Word [11]: Set the specific actuator to get the block of holding registers from
9. Word [12]: Set the starting register number in the block of holding registers to be requested
10. Word [13]: Set the total number of holding registers being requested
11. Word [14]: Set the T/F control flag whether or not to start polling the specific actuator for the
block of registers.
(FUNCTION: Reset Scan Period Counter/Accumulator)
12. Word [15]: Set the T/F control flag whether or not to manually reset the Scan Period Counter.
13. Word [16]: Value that will always reset the scan period counter.
(FUNCTION: Poll TEC2000 Input Registers 1000 – 1003)
14. Word [17]: Set the T/F control flag whether or not to poll the input registers if the system is
determined to be a TEC2000 system.
Remember …
Currently, Words [18 46] in table [0] are unused and
should be considered “reserved” for future use.
Copyright © 2004 EIM COMPANY, INC. • 13840 PIKE ROAD • MISSOURI CITY, TX. 77489
Page 40

Controlinc 1771-C (Version 5.21) Network Master Users Guide (2004-11-18)
Words [47 63] (Run-time feedback of real-time values set by the 1771-C)
1. Word [47]: Rollover Counter for Scan Period Counter (Accumulator).
2. Word [48]: Scan Period Counter (Accumulator).
-------------------------------------------
3. Word [49]: The port number for the currently “preferred port”.
4. Word [50]: Total number of valves polled during last network-scan time slice
(before servicing the PLC communications).
-------------------------------------------
5. Word [51]: This scan period: Last Network Scan Time (0.1 sec increments).
6. Word [52]: This scan period: Total elapsed time (0.1 sec increments).
7. Word [53]: This scan period: Average scan time (0.1 sec increments).
8. Word [54]: This scan period: Shortest scan time (0.1 sec increments).
9. Word [55]: This scan period: Longest scan time (0.1 sec increments).
-------------------------------------------
10. Word [56]: Last scan period: Average scan time last period (0.1 sec increments).
11. Word [57]: Last scan period: Total scan time last period (0.1 sec increments).
12. Word [58]: Last scan period: Shortest scan time last period (0.1 sec increments).
13. Word [59]: Last scan period: Longest scan time last period (0.1 sec increments).
-------------------------------------------
14. Word [60]: Duration of last diagnostic scan. (0.1 sec increments).
15. Word [61]: Duration of previous diagnostic scan (0.1 sec increments).
-------------------------------------------
16. Word [62]: Current period scan loop counter.
17. Word [63]: Current number of actuators “online” and communicating.
Note: All real-time timing information reported (reported back by the 1771-C module) has an accuracy
of (+/-) 50ms.
Copyright © 2004 EIM COMPANY, INC. • 13840 PIKE ROAD • MISSOURI CITY, TX. 77489
Page 41

Controlinc 1771-C (Version 5.21) Network Master Users Guide (2004-11-18)
5.3.2. Table [0] Configuration Words … Words [4 17]
The following words in table [0] are a configuration and control parameters set by the PLC for the 1771C to run as expected.
Word [4]: Number of Actuators on the network.
This is value indicates of the number of actuators on the network. If this number ever changes,
all tables [1-20 … except for 15] are reset to ensure valid values get filled for each valve on the
network.
The minimum number of actuators is one (1).
The maximum is 60 (which is also the default).
Note to Remember with PLC Interfacing:
The 1771-C only fills in tables with data from the actuators during the “network scan time
slice”.
If the PLC changes the Number of Actuators on the Network
after initial power up, the 1771-C will only be filling in the new data “X” actuators at a time
(where “X” is the number of valves scanned per network scan time slide … see word [7]
for more information on this). This means that it can take several network scan time
slices for the 1771-C to fill in new data for all actuators on the network.
The 1771-C will not attempt to fill in all data before interfacing with the PLC again
because of the time it takes to poll the entire network … this could lead to “starving the
PLC” with a lack of communication.
The PLC RLL needs to be constructed to take this into consideration.
Word [5]: Number of Scans in Scan Period … Scan Period “Size”.
The scan period is the number of network scans before the network is retested for network
failures (before the next diagnostic scan).
The default is 50 scans. If there is a communication error, such as a broken communication
cable, then the system will look for a change (such as a repair to the cable) every 50 scans.
The diagnostic scan resets all communication error indicators so that both ports can be checked
The minimum scan period number is five (5). The maximum number is 200.
Note: If your system requires highest performance and speed, then you may want to raise this
value (200 is max). If the system does not require performance but requires high
reliability and early communication fault detection, you might want to lower this number (5
is minimum).
Note: For more information on using the scan period value and the diagnostic scan; refer to
the Application Note at the end of this document.
at some point in time
Copyright © 2004 EIM COMPANY, INC. • 13840 PIKE ROAD • MISSOURI CITY, TX. 77489
Page 42

Controlinc 1771-C (Version 5.21) Network Master Users Guide (2004-11-18)
Word [6]: FUNCTION: Poll for Accumulator (Totalizer) Data
This is a flag that indicates whether or not the 1771-C should request accumulator (totalizer)
data from the actuators when scanning. The totalizer values are stored in tables [9 & 10].
This data is retrieved with a separate Modbus read command when the particular actuator is
being polled (scanned).
If word [6] == 0 do not poll for totalizer data.
If word [6] =/= 0 (any non-zero value) … poll for totalizer data.
By default, word [6] == 0 … do not poll for totalizer data.
Word [7]: Additional Valves to Poll in the scan time-slice.
The process scheduler has 2 primary processes to monitor:
1. Scanning the network (polling valves)
2. PLC communication & service.
Each process is given a particular time slice to operate in/with.
By program architecture, it is guaranteed that after servicing a PLC request, one valve (the next
on the network after the previous one polled) will be polled for data. The number in word [7]
allows the operator to allocate additional valves to be polled before servicing the PLC again.
The larger this number is, the shorter the network scan time but the fewer interactions with the
PLC. The lower the number, the more service given to the PLC (for control and feedback) but
the slower the network scan time (because we are servicing the PLC commands to read/write
tables).
This number should be adjusted for the most optimal fit for the application.
The default value is 2.
The minimum value is zero (0).
The maximum value is the lesser of
• 9
• 1 less than the number of valves on the network.
Word [8]: Additional Message Response Delay
Word [8] offers the operator the chance to enter a desired ADDITIONAL expected delay when
receiving messages from the network. The value is in 10 ms increments and can have a range
of 0-30 (0 – 300 ms).
The default value is 0.
Copyright © 2004 EIM COMPANY, INC. • 13840 PIKE ROAD • MISSOURI CITY, TX. 77489
Page 43

Controlinc 1771-C (Version 5.21) Network Master Users Guide (2004-11-18)
Words [9 & 10]: FUNCTION: Poll Additional Holding Register From Entire Network
This operation allows the operator the chance to poll the entire network for any particular
holding register. The register values polled are stored in table [14]. This data is retrieved with
a separate Modbus read command when the particular actuator is being polled (scanned).
This data is retrieved with a separate Modbus read command each time an actuator is polled
(scanned).
FORMAT:
Word [9] … The holding register desired.
Word [10] … This is a flag that indicates whether or not to start requesting that register
from the actuators when scanning.
• If Word [10] == 0 do not poll for the register.
• If Word [10] =/= 0 (any non-zero value) … poll for the register specified in word [9].
By default, Words [9 & 10] == 0 … do not poll.
Words [11 14]: FUNCTION: Poll Additional Block of Registers From Single (Specified) Actuator
This operation allows the operator the chance to poll a single actuator for a block of registers.
The register values returned are stored in table [15] such that …
• Table [15] – words [4-7] … header information about information returned.
• Table [15] – words [8-13] … not used … reserved.
• Table [15] – words [14 - 63] … register information returned.
This data is retrieved with a separate Modbus read command when the particular actuator is
being polled (scanned).
FORMAT:
Word [11] … The actuator address to get the block of registers from.
Word [12] … The register number for the 1
st
holding register in the block to retrieve.
Word [13] … The total number of registers to retrieve.
Word [14] … This is a flag that indicates whether or not to start requesting that block
of registers from that actuator when polling it.
• If Word [14] == 0 do not poll for the block of registers.
• If Word [14] =/= 0 (any non-zero value) … poll for the block of registers.
By default, Words [11 14] == 0 … do not poll.
Copyright © 2004 EIM COMPANY, INC. • 13840 PIKE ROAD • MISSOURI CITY, TX. 77489
Page 44

Controlinc 1771-C (Version 5.21) Network Master Users Guide (2004-11-18)
Words [15 16]: FUNCTION: Reset Scan Period Counter (Accumulator)
This operation allows the operator the chance to reset the scan period counter/accumulator
• When desired … word [15] =/= 0.
• With the value desired … word [16] value.
The scan period counter is located in table [0] – words [47 & 48] such that
• Word [47] … Rollover counter for the Scan Period Counter.
• Word [48] … Scan Period Counter
Both have a high end max value of 32,000.
Word [48] is incremented at the start of scan #1(after the previous diagnostic scan).
Whenever word [48] rolls over,
• Word [48] is automatically filled with the value in word [16].
• Word [47] is incremented
If the counter is reset in the middle of a scan period (which is most likely), it must wait until after
that scan period is finished (and the accompanying diagnostic scan) before it starts counting
again.
Note: that to determine the time for the rollover counter to rollover one time …
Rollover increment time = (time for the scan period) + (diagnostic scan time)
FORMAT:
Word [15] … This is a flag that indicates whether or not to reset the Scan Period Counter.
Word [16] … The value used to reset the Scan Period Counter.
• If Word [15] == 0 do not reset the counter.
• If Word [15] =/= 0 (any non-zero value) …
• Word [47] = 0
• Word [48] Word [16]
By default, Words [15 & 16] == 0 … do not reset the counter.
Copyright © 2004 EIM COMPANY, INC. • 13840 PIKE ROAD • MISSOURI CITY, TX. 77489
Page 45

Controlinc 1771-C (Version 5.21) Network Master Users Guide (2004-11-18)
Word [17]: FUNCTION: Poll for Input Registers [1000-1003] on TEC2000 Systems
This is a flag that indicates whether or not the 1771-C should request the input registers on any
TEC2000 system detected when scanning. The input register values are stored in tables [21 24] such that …
• Table [21] contains register [1000] status bits.
• Table [22] contains register [1001] status bits.
• Table [23] contains register [1002] status bits.
• Table [24] contains register [1003] status bits.
This data is retrieved with a separate Modbus read command when the particular actuator is
being polled (scanned).
If word [17] == 0 do not poll for input registers.
If word [17] =/= 0 (any non-zero value) … poll for input registers.
By default, word [17] == 0 … do not poll.
Copyright © 2004 EIM COMPANY, INC. • 13840 PIKE ROAD • MISSOURI CITY, TX. 77489
Page 46

Controlinc 1771-C (Version 5.21) Network Master Users Guide (2004-11-18)
5.3.3. Table [0] Run-Time Information Words … Words [47 63]
The following words in table [0] are a run-time feedback of real-time values set by the 1771-C.
1. Word [47]: Rollover Counter for Scan Period Counter (Accumulator).
2. Word [48]: Scan Period Counter (Accumulator).
-------------------------------------------
3. Word [49]: The port number for the currently “preferred port”.
4. Word [50]: Total number of valves polled during last network-scan time slice
(before servicing the PLC communications).
-------------------------------------------
5. Word [51]: This scan period: Last Network Scan Time (0.1 sec increments).
6. Word [52]: This scan period: Total elapsed time (0.1 sec increments).
7. Word [53]: This scan period: Average scan time (0.1 sec increments).
8. Word [54]: This scan period: Shortest scan time (0.1 sec increments).
9. Word [55]: This scan period: Longest scan time (0.1 sec increments).
-------------------------------------------
10. Word [56]: Last scan period: Average scan time last period (0.1 sec increments).
11. Word [57]: Last scan period: Total scan time last period (0.1 sec increments).
12. Word [58]: Last scan period: Shortest scan time last period (0.1 sec increments).
13. Word [59]: Last scan period: Longest scan time last period (0.1 sec increments).
-------------------------------------------
14. Word [60]: Duration of last diagnostic scan. (0.1 sec increments).
15. Word [61]: Duration of previous diagnostic scan (0.1 sec increments).
-------------------------------------------
16. Word [62]: Current period scan loop counter.
17. Word [63]: Current number of actuators “online” and communicating.
This information is updated at the end of each scan. If the information is scan-period based, then the
information is updated only at the end of the last scan for the particular scan period.
Note: All real-time timing information reported (reported back by the 1771-C module) has an accuracy
of (+/-) 50ms.
Copyright © 2004 EIM COMPANY, INC. • 13840 PIKE ROAD • MISSOURI CITY, TX. 77489
Page 47

Controlinc 1771-C (Version 5.21) Network Master Users Guide (2004-11-18)
5.3.4. Table [0] … RSLOGIX-5 Examples
5.3.4.1. Example RSLOGIX-5 Screen:
This example memory location (N8) shows the entire data exchange area for BTW/BTR commands …
Copyright © 2004 EIM COMPANY, INC. • 13840 PIKE ROAD • MISSOURI CITY, TX. 77489
Page 48

r
Controlinc 1771-C (Version 5.21) Network Master Users Guide (2004-11-18)
5.3.4.2. Table [0] … The Configuration Values (RSLOGIX-5).
In this example, the memory areas:
• N8:0 N8:63: Indicates the 64-word table the PLC sends to the 1771-C.
• N8:70 N8:133: Indicates the 64-word table the 1771-C sends back to the PLC.
Interesting & Important Note in this example:
In this example, the configuration the PLC would like to have (N8:0 N8:16) does NOT agree
with the configuration information the 1771-C actually has and is being read back (N8:70
N8:86). Also notice the configuration values being reflected back by the 1771-C … they are
all factory default values.
This screen reflects a state in which the PLC has not sent a “write table [0]” command to the
1771-C to set configuration values. Therefore, this 1771-C is currently running and “thinking”
that
• There are 60 actuators on the network.
• The scan period should be 50 scans long
• 2 more valves should be added to the network scan time-slice (total of 3).
However, the PLC actually “wants”
• 50 actuators on the network.
• A scan period 5 scans long
• 3 more valves should be added to the network scan time-slice (total of 4).
To remedy this disparity of operation … the PLC needs to send the “write table [0]” command to
the 1771-C to set configuration values (word [1] =/= 0).
Memory
Area to
write
table to
1771-C
Memory
Area to
read
table
from
-
Table
ID
Flag to Start
Additional
Register from
all Network
Table ID
Read/Write
Command
Polling
Devices
Address to
Poll Block of
Read/Write
Command
Reserved
Actuator
Registers
Firmware
ID (5.02)
ESD
Command
Starting
Register in
Block of
Registers
Current ESD
Command
Specified #
actuators on
Total Number
of Registers in
Block of
Registers
actuators on
Specified #
Scan Period
Flag to Start
Polling for
Block of
Registers
Value
Flag to
Reset the
Scan
Period
Counter
Scan
Period
Value
Reset the
Flag to Poll
Totalizers
Flag to Poll
Totalizers
Value to
Scan
Period
Counte
Additional
Valves in
Network Scan
time-slice
Flag to
Poll
TEC2000
Inputs
Additional
Valves in
Network Scan
-
Additional
Message
Response
Delay from
Actuators
Additional
Message
Response
Delay from
Actuators
Additional
Register to Poll
from All Network
Devices
Additional
Register to Poll
from All Network
Devices
Copyright © 2004 EIM COMPANY, INC. • 13840 PIKE ROAD • MISSOURI CITY, TX. 77489
Page 49

Controlinc 1771-C (Version 5.21) Network Master Users Guide (2004-11-18)
5.3.4.3. Table [0] … The Configuration Values – Writing Table [0] (RSLOGIX-5)
State prior to writing table [0] configuration values …
Memory
Area to
write
table to
1771-C
Memory
Area to
read
table
from
-
State after writing table [0] configuration values …
Memory
Area to
write
table to
1771-C
Memory
Area to
read
table
from
1771-C
Copyright © 2004 EIM COMPANY, INC. • 13840 PIKE ROAD • MISSOURI CITY, TX. 77489
Page 50

r
f
Controlinc 1771-C (Version 5.21) Network Master Users Guide (2004-11-18)
5.3.4.4. Table [0] … The Run-Time Feedback Values From 1771-C (RSLOGIX-5)
This screen demonstrates examples of the run-time information that the 1771-C reports back to the
PLC.
Memory
Area to
write
table to
1771-C
Memory
Area to
read
table
from
-C
1771
Last Network
Scan:
Total number o
valves polled
during
Valve Scan
time slice (3)
Duration of
Last
Diagnostic
Scan
(9.2 sec)
Last Network
Scan:
Time
(5.1 sec)
Duration of
Previous
Diagnostic
Scan
(9.1 sec)
This Scan
Period:
Total Elapsed
time
(10.2 sec)
Current
scan loop
counte
This Scan
Period:
Average
Scan Time
(5.1 sec)
Current
Number of
Valves
Online
This Scan
Period:
Shortest
Scan Time
(5.0 sec)
Last Scan
Period:
Average
Scan Time
(5.1 sec)
This Scan
Period:
Longest
Scan Time
(5.1 sec)
Last Scan
Period:
Total Elapsed
time
(259.0 sec)
Rollover
Counter
for Scan
Period
Counter
Last Scan
Period:
Shortest
Scan Time
(4.9 sec)
Scan
Period
Counter
This Scan
Period:
Current
“Preferred”
Port
Last Scan
Period:
Longest Scan
Time
(5.2 sec)
Copyright © 2004 EIM COMPANY, INC. • 13840 PIKE ROAD • MISSOURI CITY, TX. 77489
Page 51

Controlinc 1771-C (Version 5.21) Network Master Users Guide (2004-11-18)
5.4. Tables [1 20] … Actuator Information Tables
5.4.1. Table [1]: Communication Error Status
Words [4 63] PLC access: Read Only.
The “Communication Error Status Table” is used by the network master to track communication faults
with each actuator. This data is totally derived by the 1771-C. These are considered “Low-Level”
communication errors.
The value of the word gives the following status:
• 0 = good communication through both ports
• 1 = error communicating through Port 1 … but success on Port 2
• 2 = error communicating through Port 2 … but success on Port 1
• 3 = No communication to the valve actuator at all. In this case, bit-14 in Table [2] will also
be set.
This table can be used by the PLC system to diagnose valve actuators that are not communicating. If
a network requires maintenance, then information in this table can help trace the problem. During a
network fault, this information can help point to the section that’s in fault.
During communication with the actuators, a time-out value is implemented to flag network errors. The
network master will try to communicate with the valve from the currently “preferred port” three (3) times.
If the valve does not respond within those three times, the valve is flagged to communicate on the
current “backup port” and the 1
The backup port immediately tries to communicate with the valve three more times. If the valve still
fails to respond, the particular actuator is flagged as having a general communication error by having
• Its table [1] entry set = “3”.
• Its bit-14 in table [2] set = “1”.
The data in this table is always updated … any time the 1771-C tries to communicate with the network.
However, this table is only reset (errors cleared) during a diagnostic scan.
st
port is identified as having a problem with that valve (in table [1]).
Copyright © 2004 EIM COMPANY, INC. • 13840 PIKE ROAD • MISSOURI CITY, TX. 77489
Page 52
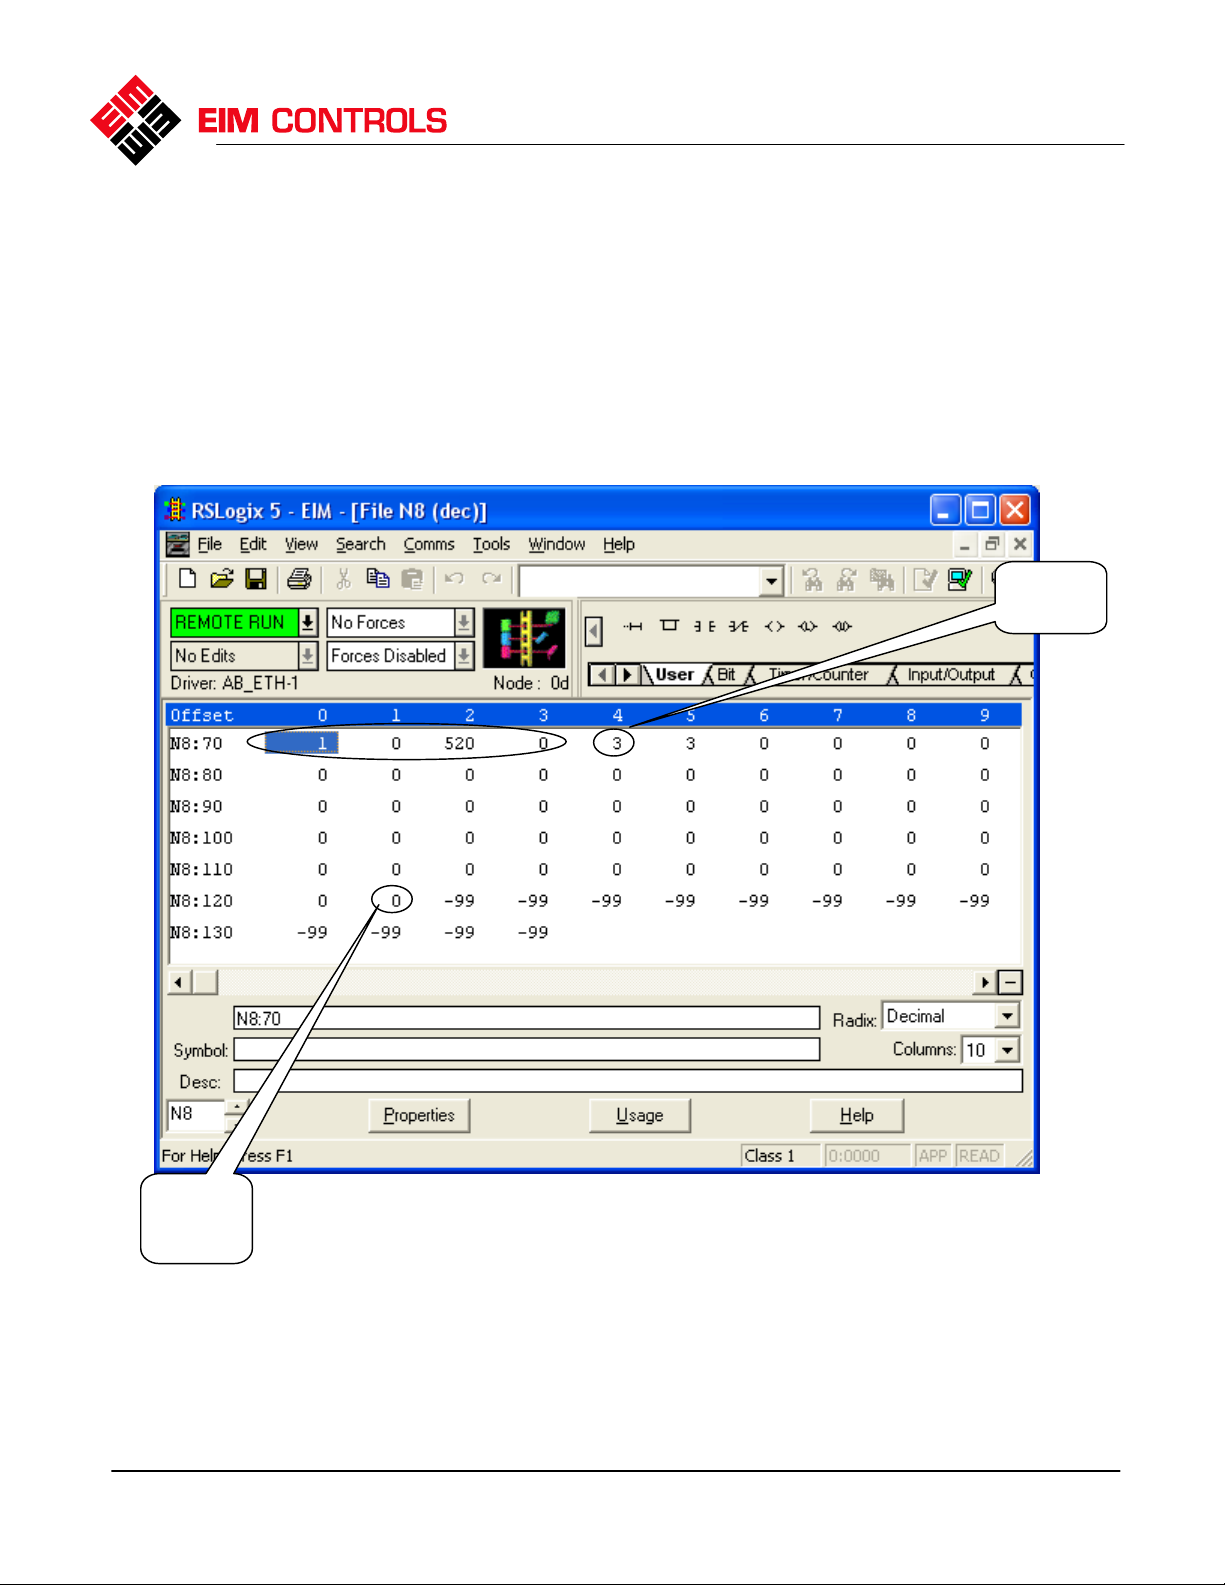
Controlinc 1771-C (Version 5.21) Network Master Users Guide (2004-11-18)
Example Table [1] Feedback (48-node network) …
Characteristics:
• Total COM faults on units [1 & 2] … they have a value of 3 … an error communicating on both
ports.
• No COM faults on any other units (3 – 48 have a value of 0 … no problems communicating).
• Note that this would happen if units [1 & 2] were turned off.
First Node
on Network
Last Node
on 48 Node
Network
Copyright © 2004 EIM COMPANY, INC. • 13840 PIKE ROAD • MISSOURI CITY, TX. 77489
Page 53

Controlinc 1771-C (Version 5.21) Network Master Users Guide (2004-11-18)
5.4.2. Table [2]: Actuator Operational Status
Words [4 63] PLC access: Read Only.
This data is primarily derived from holding register [6] in the actuator. It is retrieved with the “standard
data request” - Modbus read command when the particular actuator is being polled (scanned).
However, bit-14 is adjusted by the 1771-C.
This status word can be “bit parsed” to give:
• Bit-0: LSO is tripped (valve is at the end of its OPEN travel limits)
• Bit-1: LSC is tripped (valve is at the end of its CLOSE travel limits)
• Bit-2: Valve is moving in the OPENING direction
• Bit-3: Valve is moving in the CLOSING direction
• Bit-4: Selector Switch is in the Local position
• Bit-5: Selector Switch is in the Remote position
• Bit-6: Open Torque ALARM is active.
• Bit-7: Close Torque ALARM is active.
• Bit-8: Valve Stall Alarm is active (valve not moving on command)
• Bit-9: Power Monitor Alarm is active (loss of control voltage alarm)
• Bit-10: Motor Overload Alarm is active
• Bit-11: Phase Monitor Alarm is active (only if Phase Sentry is Installed)
• Bit-12: Local (Hardwired) Alarm is active.
• Bit-13: Fail Alarm Self-diagnostics Alarm is active.
• Bit-14: Comm Alarm … Valve not communicating with the network
(Same as the value “3” in Table [1])
• Bit-15: Unit Alarm … Set when any actuator alarm is set.
Note: Bit-0 is the LSB in the word. Bit-15 is the MSB in the word.
Some of these bit indications are repeats of those in table [12]. However, not all.
Copyright © 2004 EIM COMPANY, INC. • 13840 PIKE ROAD • MISSOURI CITY, TX. 77489
Page 54

Controlinc 1771-C (Version 5.21) Network Master Users Guide (2004-11-18)
Example Table [2] Feedback (48-node network) …
Characteristics:
• The format is displayed in HEX because HEX is easier to interpret “bit indicator” data.
• Units [1 & 2] …
o Selector switch in REMOTE … bit [4] = 1
o Communication Alarm exists … bit [14] = 1
• The rest of the network is all the same …
o Selector switch in OFF … bits [4 & 5] = 00
o Open Torque Alarm is active … bit [6] = 1
o Unit Alarm is active … bit [15] = 1.
First Node
on Network
Table [2] in HEX
because this
table represents
bit indications
HEX!
Last Node
on 48 Node
Network
Copyright © 2004 EIM COMPANY, INC. • 13840 PIKE ROAD • MISSOURI CITY, TX. 77489
Page 55

Controlinc 1771-C (Version 5.21) Network Master Users Guide (2004-11-18)
5.4.3. Table [3]: Discrete Control Mode (Open/Close/Stop)
Words [4 63] PLC access: Read / Write
This table commands the actuator to move the valve either OPEN / CLOSED / STOP.
There are three discrete valve control commands available:
1. 1 (0x0001) for Open
2. 2 (0x0002) for Close
3. 3 (0x0003) for Stop now at the current location.
The 1771-C will only react to these values.
The mechanism used to execute these commands is:
• If (OPEN) command: a setpoint of 4095 is transmitted to the actuator.
• If (CLOSE) command: a setpoint of 0 is transmitted to the actuator.
• If (STOP) command:
o A Modbus command is sent to the actuator to read the current position.
o That “current” position is sent to the actuator as the setpoint to go to.
A read back of Table [3] will
• If a write
• If a read
a new table [5] entry).
Note 1: While the table will accept any value, any illegal data will be ignored.
Note 2: Any NEW discrete control command in this table will change the corresponding setpoint
control value in Table [5] to either 0 / 4095 / or “current position”.
Note 3: If a NEW change setpoint command is issued in Table [5] for a particular valve, then the
corresponding discrete control command in this table (Table [3]) will be zeroed out.
command issued: reflect the write command accepted by the 1771-C
command issued: reflect the last status of the discrete commands (unless changed by
Copyright © 2004 EIM COMPANY, INC. • 13840 PIKE ROAD • MISSOURI CITY, TX. 77489
Page 56

Controlinc 1771-C (Version 5.21) Network Master Users Guide (2004-11-18)
Example Table [3] Feedback (48-node network) …
Characteristics:
• There are no discrete commands waiting for execution.
Last Node
on 48 Node
Network
First Node
on Network
Copyright © 2004 EIM COMPANY, INC. • 13840 PIKE ROAD • MISSOURI CITY, TX. 77489
Page 57

Controlinc 1771-C (Version 5.21) Network Master Users Guide (2004-11-18)
5.4.4. Table [4]: Valve Position Indication … 0 – 100.0%
Words [4 63] PLC access: Read Only.
The Network Master receives the valve position from the actuator as an integer representing 0 100%
open in 0.1% increments. In other words, it receives a value from 0 – 1000 and each increment
indicates a 0.1%
• 0 Full Closed ( 0.0% open)
• 1000 Full Open (100.0 % open)
This data is derived from holding register [13] in the actuator. It is retrieved with the “standard data
request” - Modbus read command when the particular actuator is being polled (scanned).
Example Table [4] Feedback (48-node network) …
Characteristics:
• Unit [1] indicated position is 22.9% open
• Unit [2] indicated position is 12.2% open
• The rest of the network’s indicated position is fully open at 100.0% open
Last Node
on 48 Node
Network
First Node
on Network
Copyright © 2004 EIM COMPANY, INC. • 13840 PIKE ROAD • MISSOURI CITY, TX. 77489
Page 58

Controlinc 1771-C (Version 5.21) Network Master Users Guide (2004-11-18)
5.4.5. Table [5]: Valve Position Setpoint … 0 – 4095
Words [4 63] PLC access: Read / Write
This table commands the actuators to move to a setpoint position designated by the PLC. When the
1771-C sends the new value to the actuators (telling them to move), it uses the Modbus function 6
command to write to holding register [11] in the actuator.
By sending a numeric value from 0 4095, the actuator will be commanded to move to a position
based on:
• 0 (0x0000) = 0% Open (closed)
• 4095 (0x0FFF) = 100% Open
A read back of Table [5] will
• If a write
• If a read
Notes:
• Only values 0
• Any EIM actuator may use position control via setpoint values. For the tightest position
possible with minimal overshoot or undershoot, the actuator must have the solid-state or VFD
control option. Please read the Controlinc Quick Startup Guide for more information.
• If the actuator position has been moved while the PLC is down or the valve was moved while in
local control, then as soon as the PLC and actuators are communicating and accepting remote
commands, it will move according to the existing value in this Table.
• Issuing a command in Table [5] will “zero out” any discrete (block) mode command issued on
Table [3] for the particular valve.
• Any NEW discrete control command in table [3] will change the corresponding setpoint control
value in Table [5] to either 0 / 4095 / or “current position”.
• If the 1771-C ever returns a value of 0xFFFF for a setpoint indication in this table, it means that
the particular actuator is returning the standard “invalid setpoin
waiting for a new command to move the valve.
command issued: reflect the write command accepted by the 1771-C
command issued: reflect the current value of the setpoint register in the actuators.
4095 are allowed to be written by the PLC … all others are ignored.
t” and is currently stopped and
Copyright © 2004 EIM COMPANY, INC. • 13840 PIKE ROAD • MISSOURI CITY, TX. 77489
Page 59

Controlinc 1771-C (Version 5.21) Network Master Users Guide (2004-11-18)
Example Table [5] Feedback (48-node network) …
Characteristics:
• Unit [1] setpoint position is 940 (out of 4095) … ~~ 22.9% open
• Unit [2] setpoint position is 555 (out of 4095) … ~~ 13.5% open
• The rest of the network’s setpoint position is fully open … 4095 out of 4095
First Node
on Network
Last Node
on 48 Node
Network
Copyright © 2004 EIM COMPANY, INC. • 13840 PIKE ROAD • MISSOURI CITY, TX. 77489
Page 60

Controlinc 1771-C (Version 5.21) Network Master Users Guide (2004-11-18)
5.4.6. Tables [6 & 7]: User Analog Inputs #1 & 2
Words [4 63] PLC access: Read Only.
These tables contain 12-bit numbers (0 4095) representing the current value for analog input
channels. This data is derived from holding registers [16 & 17] in the actuators and is retrieved with the
“standard data request
(scanned).
• Table [6]: Value for User Analog Input #1 (holding register [16] in the actuators)
• Table [7]: Value for User Analog Input #2 (holding register [17] in the actuators)
Example Table [6] Feedback (48-node network) …
Characteristics:
• There are no values on User Analog Input #1 on any unit on the network … all zero.
” - Modbus read command when the particular actuator is being polled
First Node
on Network
Last Node
on 48 Node
Network
Copyright © 2004 EIM COMPANY, INC. • 13840 PIKE ROAD • MISSOURI CITY, TX. 77489
Page 61

Controlinc 1771-C (Version 5.21) Network Master Users Guide (2004-11-18)
5.4.7. Table [8]: Analog Output #1
Words [4 63] PLC access: Read / Write
This table/command tells the actuator to place an appropriate 4-20 mA signal on its analog output
channel. This data is derived from holding register [10] in the actuators and is retrieved with the
“standard data request
(scanned).
When the 1771-C sends a new value to the actuators, it uses the Modbus function 6 command to write
to holding register [10] in the actuators.
The output is a linear scaling based on:
• 0 (0x0000) = 4 mA
• 4095 (0x0FFF) = 20 mA
Note: Only values 0
A read back of Table [8] will
• If a write
• If a read
command issued: reflect the write command accepted by the 1771-C
command issued: reflect the current value of the analog output register in the
actuators.
Note: Please read the Operators Manual the particular actuator for more information.
Note: This is an option that must be installed on the actuator.
” - Modbus read command when the particular actuator is being polled
4095 are allowed … all others are ignored.
Copyright © 2004 EIM COMPANY, INC. • 13840 PIKE ROAD • MISSOURI CITY, TX. 77489
Page 62

Controlinc 1771-C (Version 5.21) Network Master Users Guide (2004-11-18)
Example Table [8] Feedback (48-node network) …
Characteristics:
• On this network, none of the analog output values have been activated … a “-1” value recorded
there (valid values are 0 – 4095).
First Node
on Network
Last Node
on 48 Node
Network
Copyright © 2004 EIM COMPANY, INC. • 13840 PIKE ROAD • MISSOURI CITY, TX. 77489
Page 63

Controlinc 1771-C (Version 5.21) Network Master Users Guide (2004-11-18)
5.4.8. Tables [9 & 10]: Digital Input Accumulators (Totalizers) #1 & 2
Words [4 63] PLC access: Read / Write
These tables contain 16-bit accumulator (totalizer) numbers stored in holding registers [66 & 67] in the
actuators. This data is retrieved with a separate Modbus read command when the particular actuator
is being polled (scanned).
• Table [9]: Value for Accumulator (Totalizer) #1
• Table [10]: Value for Accumulator (Totalizer) #2
These tables are not polled for unless the 1771-C is configured to allow it …
• if Table [0] – Word [7] == 0: The accumulator/totalizer information is NOT requested when
actuators are polled (the default).
• if Table [0] – Word [7] =/= 0: The accumulator/totalizer information is requested when
actuators are polled.
The PLC may reset these tables (and the counters in the actuators) with any value is prefers. All it
needs to do is insert the new value in the table and send it to the 1771-C as a write command. The
1771-C will then send the value to the actuator.
A read back of Tables [9 & 10] will
• If a write
• If a read
actuators.
command issued: reflect the write command accepted by the 1771-C
command issued: reflect the last known values of the totalizer registers in the
Copyright © 2004 EIM COMPANY, INC. • 13840 PIKE ROAD • MISSOURI CITY, TX. 77489
Page 64

Controlinc 1771-C (Version 5.21) Network Master Users Guide (2004-11-18)
Example Table [9] Feedback (48-node network) …
Characteristics:
• Totalizer #1 has not engaged for any unit on the network. This means that the digital input(s)
assigned to this totalizer/accumulator have not toggled low/high since the last power up on any
unit on the network.
o On 320A/B systems … user input #1.
o On TEC2000 systems … it depends upon the configuration.
• This also means that the feature is probably not implemented on the actuators.
First Node
on Network
Last Node
on 48 Node
Network
Copyright © 2004 EIM COMPANY, INC. • 13840 PIKE ROAD • MISSOURI CITY, TX. 77489
Page 65

Controlinc 1771-C (Version 5.21) Network Master Users Guide (2004-11-18)
5.4.9. Table [11]: Valve Position Indication … 0 – 4095
Words [4 63] PLC access: Read Only.
This table contains the 0-4095 representation of the valve position for the actuators. This data is
derived from holding register [14] in the actuators and is retrieved with the “standard data request
Modbus read command when the particular actuator is being polled (scanned).
Example Table [11] Feedback (48-node network) …
Characteristics:
• Unit [1] position indication is 2331 (out of 4095) … ~~ 56.9% open
• Unit [2] position indication is 1457 (out of 4095) … ~~ 35.5% open
• Unit [3] position indication is 592 (out of 4095) … ~~ 14.4% open
• The rest of the network’s position indication is fully open … 4095 out of 4095
Last Node
on 48 Node
Network
First Node
on Network
” -
Copyright © 2004 EIM COMPANY, INC. • 13840 PIKE ROAD • MISSOURI CITY, TX. 77489
Page 66

Controlinc 1771-C (Version 5.21) Network Master Users Guide (2004-11-18)
5.4.10. Table [12]: Discrete Input Statuses
Words [4 63] PLC access: Read Only.
This table contains the status indications of the discrete inputs on 320A/B systems. Each bit in each
word in the table indicates the status of a particular discrete (hardwired) digital input for a particular
actuator. This data is derived from holding register [05] in the actuators and is retrieved with the
“standard data request
(scanned).
If a TEC2000 was polled, the TEC2000 system correlates appropriate values to the bits being returned.
This status word can be “bit parsed” to give:
• Bit-0: LSO (Limit Switch – Open) switch input is active (is tripped)
• Bit-1: LSC (Limit Switch – Close) switch input is active (is tripped)
• Bit-2: AUX Open Contactor input is active (is engaged)
• Bit-3: AUX Close Contactor input is active (is engaged)
• Bit-4: SS in Local Position input is active (is tripped)
• Bit-5: SS in Remote Position input is active (is tripped)
• Bit-6: TSO (Torque Switch – Open) input is active (is tripped) … not the alarm!
• Bit-7: TSC (Torque Switch – Close) input is active (is tripped) … not the alarm!
• Bit-8: Power Monitor Alarm input is active.
• Bit-9: Thermal Overload Alarm input is active
• Bit-10: Phase Monitor Alarm input is active (only if Phase Sentry is Installed)
• Bit-11: Local (Hardwired) Alarm input is active
• Bit-12: AUX Alarm input is active
• Bit-13: User Input #1 is active
• Bit-14: User Input #2 is active
• Bit-15: Reserved … no operation.
Note: Bit-0 is the LSB in the word. Bit-15 is the MSB in the word.
Some of these bit indications are repeats of those in table [2]. However, not all.
” - Modbus read command when the particular actuator is being polled
Copyright © 2004 EIM COMPANY, INC. • 13840 PIKE ROAD • MISSOURI CITY, TX. 77489
Page 67

Controlinc 1771-C (Version 5.21) Network Master Users Guide (2004-11-18)
Example Table [12] Feedback (48-node network) …
“C” HEX …
12 Decimal
Last Node
on 48 Node
Network
First Node
on Network
Table [12] in
HEX because
table represents
bit indications
Copyright © 2004 EIM COMPANY, INC. • 13840 PIKE ROAD • MISSOURI CITY, TX. 77489
Page 68

Controlinc 1771-C (Version 5.21) Network Master Users Guide (2004-11-18)
5.4.11. Table [13]: Solid State Relay (SSR) Configuration Table
Words [4 63] PLC access: Read / Write
This is a read/write table that is used to help configure the actuators on the network. It is intended to
work with actuators that are setup for modulating control mode. If a 320A actuator has an OPTIONAL
SSR installed the network master must ensure the actuator knows it is configured with an SSR.
By writing a non-zero POSITIVE value to these positions in table [13], tells the network master to tell
the particular 320A actuator to configure itself to use an SSR … set coil [37] = 1 on the actuator. If not
a 320A actuator, this table value has no purpose.
SUMMARY:
• If word [n] == 0 (where “n” is 4 63) … this actuator does not have a SSR.
• If word [n] > 0 (any non-zero POSITIVE value) … this actuator has a SSR.
An example would be a network of actuators in which 3 are 320A systems that have SSCs … lets say
on valves 2, 4 and 10 by Modbus address. The corresponding words for these actuators are:
• Valve 2: Word [5] … ( 2 + 3)
• Valve 4: Word [7] … ( 4 + 3)
• Valve 10: Word [13] … (10 + 3)
A read back of Table [13] will verify the write command being accepted by the 1771-C.
Note: If an actuator
• has an SSR installed AND
• it is NOT configured for SSR control AND
• it is placed in modulating mode
then the remote host will be unable to control the valve via setpoint control. The actuator will read the
desired setpoint positions but will not be able to send the valve to the position and effectively stop it
there.
Note: Remember, setting this configuration bit is only necessary if the unit is a 320A system … 320B
and TEC2000 systems do not need this configuration assistance.
Copyright © 2004 EIM COMPANY, INC. • 13840 PIKE ROAD • MISSOURI CITY, TX. 77489
Page 69
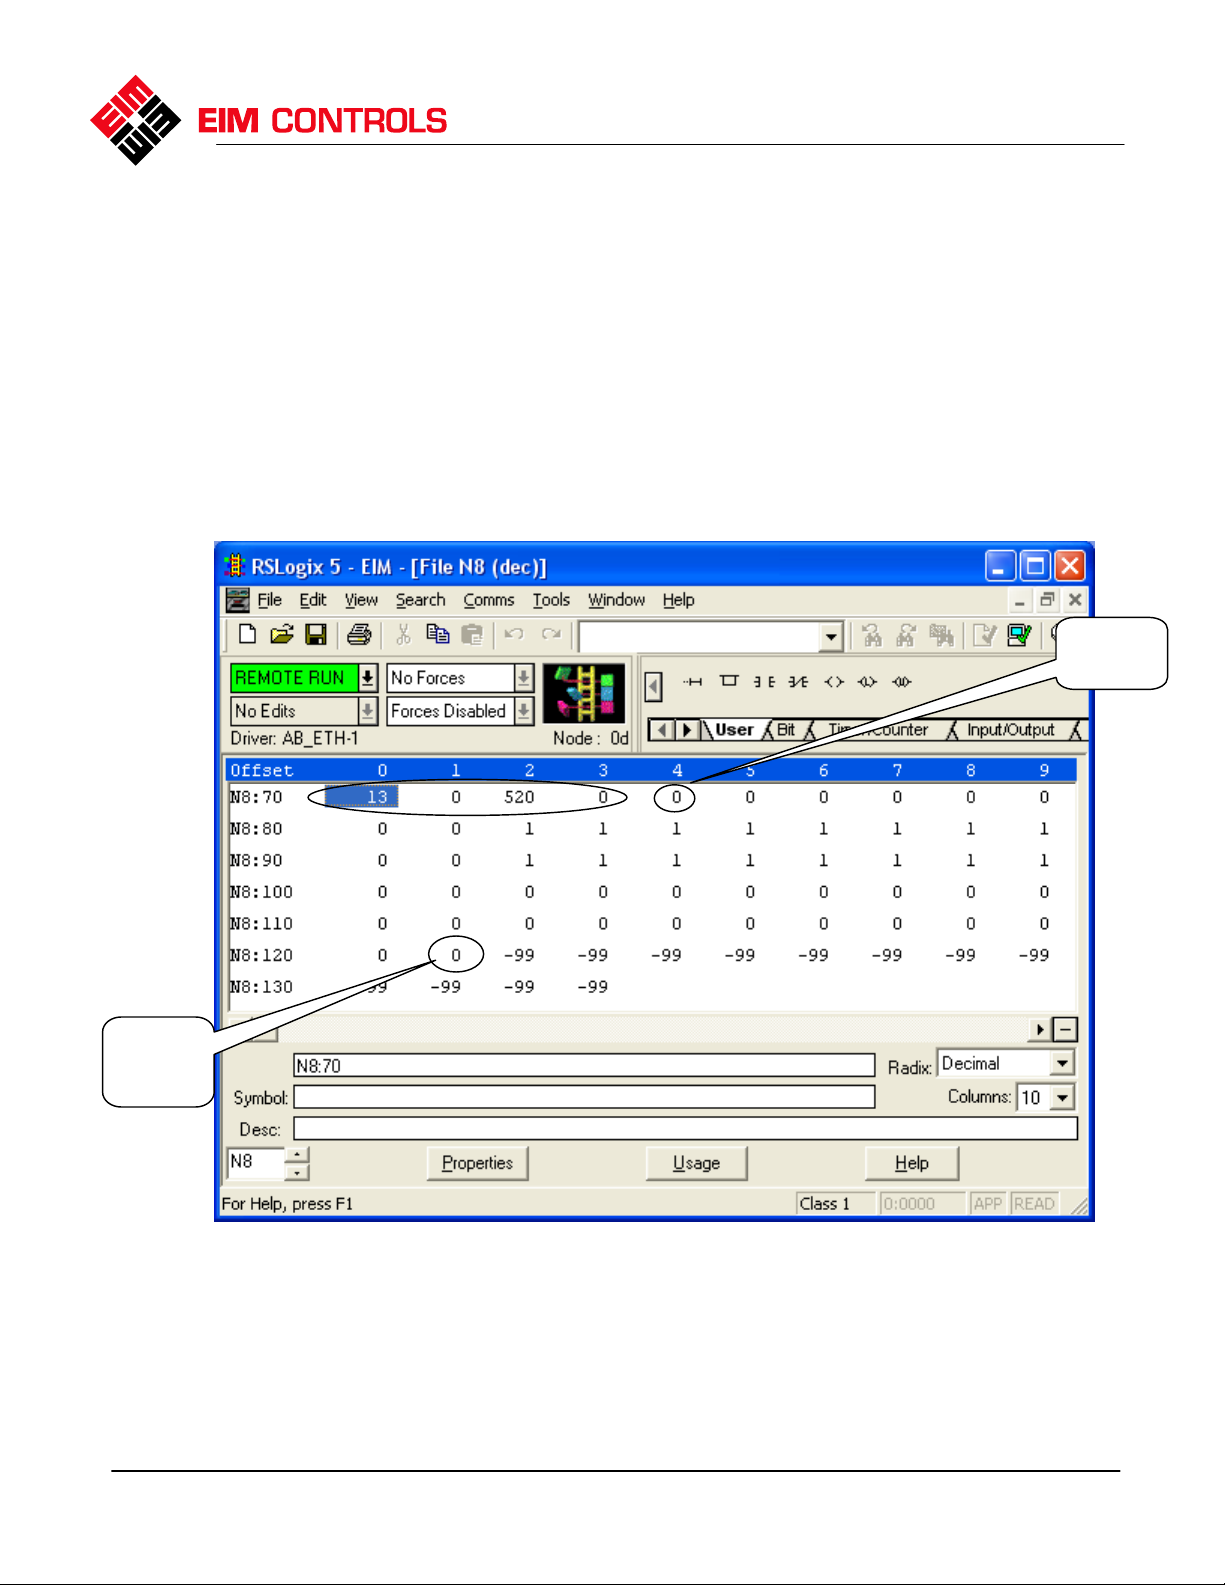
Controlinc 1771-C (Version 5.21) Network Master Users Guide (2004-11-18)
Example Table [13] Feedback (48-node network) …
Characteristics:
• Units [1 - 8] are NOT configured to support an SSR.
• Units [9 - 16] are configured to support an SSR.
• Units [17 - 18] are NOT configured to support an SSR.
• Units [19 - 26] are configured to support an SSR.
• Units [27 - 48] are NOT configured to support an SSR.
• Note that the units that are not configured to support an SSR either just don’t have one in the
system or the units are not 320A systems.
Last Node
on 48 Node
Network
First Node
on Network
Copyright © 2004 EIM COMPANY, INC. • 13840 PIKE ROAD • MISSOURI CITY, TX. 77489
Page 70

Controlinc 1771-C (Version 5.21) Network Master Users Guide (2004-11-18)
5.4.12. Table [14]: Additional Register Being Polled From Entire Network
Words [4 63] PLC access: Read / Write
This operation allows the operator the chance to poll the entire network for any particular holding
register. The register values polled are stored in this table. This data is retrieved with a separate
Modbus read command when the particular actuator is being polled (scanned).
This table is not polled for unless the 1771-C is configured to allow it …
• Table [0] – Word [10] … contains the register number to poll for.
• Table [0] – Word [10] … is a flag that indicates whether or not to start requesting that register
from the actuators when scanning such that …
o if Table [0] – Word [11] == 0: The register is not polled (the default).
o if Table [0] – Word [11] =/= 0: The register information is requested when actuators are
polled.
The PLC may reset this table with any value is prefers. To do this, the PLC must insert the new value
into the table and send it to the 1771-C as a write command. The values in this table are not sent out
to the actuators on the network.
A read back of Table [14] will
• If a write
• If a read
actuators.
If the PLC is utilizing table [14], it is recommended that the PLC also poll table [20]. If an exception
message is returned, then the value won’t be inserted into table [14] but the exception message
indicator will be inserted into table [20].
If detected, and the PLC wants to try again, it should initialize table [14] to some known value and either
explicitly clear table [20] or wait until after the next diagnostic scan (which automatically clears table
[20]) before trying again.
Example Scenario
command requests data from an actuator that is “not supported by that type of actuator” (but is on the
others), the actuator will return a Modbus Exception for that message and the values will NOT be
loaded into tables [14 or 15]. However, the exception codes will be loaded into table [20].
For example, if requesting register [1010] from a
• 320A system … an exception code is returned.
• TEC2000 system … the register containing coils [1069 – 1111] is returned.
command issued: reflect the write command accepted by the 1771-C
command issued: reflect the last known values of the specified register polled in the
: If there are multiple types of EIM equipment on the network and the table [14]
Copyright © 2004 EIM COMPANY, INC. • 13840 PIKE ROAD • MISSOURI CITY, TX. 77489
Page 71

Controlinc 1771-C (Version 5.21) Network Master Users Guide (2004-11-18)
Example Table [14] Feedback (48-node network) …
Characteristics:
• (register [00] read back from the entire network … cannot tell from here … in table [0])
• To make it more meaningful, table [14] is in hex because register [00] is bit indications.
• Unit [1] has a value of 0x10C4 … Coils set: [12, 7, 6, 2]
• Unit [2] has a value of 0x10C0 … Coils set: [12, 7, 6]
• Units [3-48] have a value of 0x10C4 … Coils set: [12, 7, 6, 2]
“E” HEX …
14 Decimal
Last Node
on 48 Node
Network
First Node
on Network
Table [14] in
HEX because
register
requested (00) is
in bit indications
Copyright © 2004 EIM COMPANY, INC. • 13840 PIKE ROAD • MISSOURI CITY, TX. 77489
Page 72

Controlinc 1771-C (Version 5.21) Network Master Users Guide (2004-11-18)
5.4.13. Table [15]: Additional Block of Registers Being Polled From 1
Actuator
Words [4 63] PLC access: Read / Write
TABLE FORMAT:
This operation allows the operator the chance to poll a single actuator for a block of registers.
The register values returned are stored in table [15] such that …
• Words [4 - 7] … header information about information returned …
Word [4] … Valve address where block of data came from.
Word [5] … Valve (actuator) type id.
Word [6] … Starting holding register number.
Word [7] … Total Number of registers in block.
• Words [8 - 13] … not used … reserved.
• Words [14 - 63] … register information returned.
TABLE CONTROL:
Control of this operation is via 4 words in table [0] such that …
• Table [0] – Word [11] … The actuator address to get the block of registers from.
• Table [0] – Word [12] … The register number for the 1
• Table [0] – Word [13] … The total number of registers to retrieve.
• Table [0] – Word [14] … This is a flag that indicates whether or not to start requesting that block
of registers from that actuator when polling it.
If Table [0] – Word [14] == 0 do not poll for the block of registers.
If Table [0] – Word [14] =/= 0 (any non-zero value) … poll for the block of registers.
By default, Table [0] – Words [11 14] == 0 … do not poll.
OPERATIONAL OVERVIEW:
This data is retrieved with a separate Modbus read command when the particular actuator is being
polled (scanned).
The PLC may reset this table with any value is prefers. To do this, the PLC must insert the new value
into the table and send it to the 1771-C as a write command. The values in this table are not sent out
to the actuators on the network.
A read back of Table [15] will
• If a write
command issued: reflect the write command accepted by the 1771-C except words [4
– 13] are zeroed out.
• If a read
command issued: reflect the last known values in the table.
st
holding register in the block to retrieve.
Copyright © 2004 EIM COMPANY, INC. • 13840 PIKE ROAD • MISSOURI CITY, TX. 77489
Page 73

Controlinc 1771-C (Version 5.21) Network Master Users Guide (2004-11-18)
Words [4 – 7] are only filled with non-zero values if the block of data in words [14 – 63] table are
actually values retrieved from the actuator at the address specified in word [4].
Therefore, if a read of table [15] indicates that
• Word [4] == 0, then the data is not valid (there are not valves with address 0 that can respond
with data).
• Word [4] =/= 0, then the data in the table came from a valve.
If the PLC is utilizing table [15], it is recommended that the PLC also poll table [20]. If an exception
message is returned, then the block of data won’t be inserted into table [15] but the exception message
indicator will be inserted into table [20].
If detected, and the PLC wants to try again, it should initialize table [15] to some known value and either
explicitly clear table [20] or wait until after the next diagnostic scan (which automatically clears table
[20]) before trying again.
Example Scenario
: If there are multiple types of EIM equipment on the network and the table [15]
command requests a block of data from an actuator that is “not supported by that type of actuator” (but
is on the others), the particular actuator will return a Modbus Exception for that message and the block
of data will NOT be loaded into tables [15]. However, the exception codes will be loaded into table
[20].
For example, if requesting a block of registers [15 - 30] from unit #5 and it is a
• 320A system … the block of registers is returned.
• TEC2000 system … an exception code is returned.
Notes on table [15] use:
• It is recommended that the PLC only keep this operation active until the data is received and
then deactivate it (setting table [0] – word [14] = 0).
• When the PLC writes data to this table, the 1771-C only overwrites the last 50 words with the
data sent in. The rest of the table is zeroed out.
Copyright © 2004 EIM COMPANY, INC. • 13840 PIKE ROAD • MISSOURI CITY, TX. 77489
Page 74

t
[00]
[49]
Controlinc 1771-C (Version 5.21) Network Master Users Guide (2004-11-18)
Example Table [15] Feedback (48-node network) …
Characteristics …
• From actuator node #33
• Which happens to be 320B EIM equipment … type 2
• Starting from register [00] and
• 50 registers were read back.
From
actuator
node #33
Which happens
to be 320B EIM
equipment …
type 2
Starting
from
register
[00]
50
registers
were read
back
s
1
data
byte read
back …
register
Last data
byte read
back …
register
Copyright © 2004 EIM COMPANY, INC. • 13840 PIKE ROAD • MISSOURI CITY, TX. 77489
Page 75

Controlinc 1771-C (Version 5.21) Network Master Users Guide (2004-11-18)
5.4.14. Tables [16 & 17]: Monitor & Control Discrete Digital Outputs
Words [4 63] PLC access: Read / Write
The entire operation to monitor and control the discrete outputs requires 2 tables ...
• Table [16] ... CONTROL --- store commands (desired states) for discrete outputs (coils).
• Table [17] ... MONITORING --- feedback (actual states) of discrete outputs (coils).
Table [16] allows the operator the ability to monitor (poll) and control the discrete outputs on an
actuator. All discrete output control is performed via this table (no table [0] entries are required).
Table [17] is the feedback information for polling the discrete outputs.
• This data is retrieved with a separate Modbus read command when the particular actuator is
being polled (scanned).
• This data is only polled for when the matching valve entry in table [16] indicates that the 1771-C
should start monitoring these coils. Once polling (monitoring) has started, it must be explicitly
turned off.
• This table will only reflect the status of bits representing coils. All others are either ignored or
zeroed out.
• The PLC may reset this table with any value is prefers. All it needs to do is insert the new
value in the table and send it to the 1771-C as a write command. The table will be reset even
though nothing will be sent out to any actuator.
TEC2000 DISCRETE OUTPUTS (COILS)
On a TEC2000 system, there are 12 outputs and they are addressed as coils [1000 - 1011] in register
[1004] such that …
• Coil [1000] … RO1 … Relay Output # 1
• Coil [1001] … RO2 … Relay Output # 2
• Coil [1002] … RO3 … Relay Output # 3
• Coil [1003] … RO4 … Relay Output # 4
• Coil [1004] … RO9 … Relay Output # 9
• Coil [1005] … RO10 … Relay Output # 10.
• Coil [1006] … RO11 … Relay Output # 11
• Coil [1007] … RO12 … Relay Output # 12.
• Coil [1008] … SO6 … Solid State Output # 6
• Coil [1009] … SO7 … Solid State Output # 7
• Coil [1010] … SO8 … Solid State Output # 8
• Coil [1011] … RO9 … Relay Output # 9
Ordering is such that
• Coil [1000] is the LSB and located in the “bit-0” position … the right most position.
• Coil [1011] is the MSB and located in the “bit-11” position.
Copyright © 2004 EIM COMPANY, INC. • 13840 PIKE ROAD • MISSOURI CITY, TX. 77489
Page 76

Controlinc 1771-C (Version 5.21) Network Master Users Guide (2004-11-18)
320A/B DISCRETE OUTPUTS (COILS)
On a the other system types (320A and 320B), there are 3 outputs and they are addressed as coils [35] in register [00] such that …
• Coil [3] … ESD / monitor relay.
• Coil [4] … User Output Relay #1
• Coil [5] … User Output Relay #2
Ordering is such that
• Coil [3] is the “bit-3” position … the 4
• Coil [4] is the “bit-4” position … the 5
• Coil [5] is the “bit-5” position … the 6
th
position in from the right.
th
position in from the right.
th
position in from the right.
FORMAT
There are 2 distinct areas in each word in table [16] …
• Command / Control bits … bits [15-13] in the upper most nibble.
• Desired coil (output) states …
o Bits [11 – 0] for TEC2000 systems
o Bits [5-3] in other systems.
Only these bits are set in this table. All others are zeroed out.
COMMAND / CONTROL
There are only 3 valid control values (upper nibble in the word) the PLC can send to the 1771-C
concerning this operation …
1. 1000 (binary)
: Setting the upper nibble = 1000 … (top 1 bit set) tells the 1771-C to start
monitoring the status of the output coils and recording them in table [17]. The 1771-C will also
clear the desired state bits … set table [16] – bits [3-5] = 000.
2. 1110 (binary)
: Setting the upper nibble = 1110 … (top 3 bits set) tells the 1771-C to
• Start monitoring the status of the output coils and recording their states in table [17].
• ONE TIME … write the desired states of the output coils to the particular actuator.
Once successful, bit [13] is set = 0 to prevent further (excess) writes.
3. 0xxx (binary)
: Setting the bit = 0 … (bit [15] = 0 and don’t care about the others) tells
the 1771-C to terminate monitoring and writing. Essentially, clear the command. The 1771-C
will also clear the bits representing the desired state of all output coils in table [16].
The 1771-C will only react to these values from the PLC in the upper nibble. All others are ignored.
Copyright © 2004 EIM COMPANY, INC. • 13840 PIKE ROAD • MISSOURI CITY, TX. 77489
Page 77

Controlinc 1771-C (Version 5.21) Network Master Users Guide (2004-11-18)
DESIRED STATES
The desired states of the digital outputs are directly reflected in the bits in the table … which directly
reflect the coils (bits) in the holding registers in the actuator. This means that the bits still maintain
their original position in all the registers …
For example,
• Coil [3] … is in register [00] – bit [3] … and in tables [16 & 17] in bit position [3]
• Coil [4] … is in register [00] – bit [4] … and in tables [16 & 17] in bit position [4]
• Coil [5] … is in register [00] – bit [5] … and in tables [16 & 17] in bit position [5]
Therefore, the PLC must set/clear bits [3-5] to control the outputs.
For example,
• Coil [1000] … is in register [1004] – bit [0] … and in tables [16 & 17] in bit position [0]
• Coil [1005] … is in register [1004] – bit [5] … and in tables [16 & 17] in bit position [5]
Therefore, the PLC must set/clear bits [0,1,5] to control these outputs.
Since a single command is sent to the actuator that affects all discrete outputs on a
system at one time, it is important that the PLC be aware of the “state” of all coils on
the particular valve before sending a command because ALL OUTPUTS ON THE
VALVE will be affected EVERYTIME one of these commands is sent. This is why
• Monitoring can be activated without writing values.
• Monitoring remains active after a write until explicitly turned off.
By monitoring table [17], the PLC can ensure correct behavior.
IMPORTANT NOTE
A read back of Table [16] will
• If a write
command issued: reflect the status of the network write & network monitor commands
accepted by the 1771-C.
• If a read
command issued: reflect the last status of the network write & network monitor
commands issued out to the network.
Notes on table [16] use:
1. The PLC can monitor when a write happened by viewing the upper nibble of the word for the
particular valve. When it changes from (1110 … 0xE) (1100 … 0xC) the write has
happened and the system is still monitoring the states of the relays.
2. The PLC can activate/deactivate monitoring these relays any time by setting/clearing bit [15]
(see the “Command / Control” section above).
However, anytime the PLC writes a value to the coils in an actuator, monitoring is automatically
started … and will not terminate until the PLC terminates it.
Therefore, the PLC needs to monitor this and deactivate the operation when not needed
anymore … otherwise, the additional polling will slow (lengthen) network scan times.
3. The 1771-C uses a Modbus Command 05 to write multiple coils when writing values to the
actuators.
Copyright © 2004 EIM COMPANY, INC. • 13840 PIKE ROAD • MISSOURI CITY, TX. 77489
Page 78

Controlinc 1771-C (Version 5.21) Network Master Users Guide (2004-11-18)
Example Tables [16 & 17] Feedback (48-node network) …
Characteristics:
• To make it more meaningful, tables [16 & 17] are in hex because of bit indications.
• Monitoring is being performed on units [1 – 6]
(bit [15] = 1 in table [16])
• The PLC commanded the 1771-C to set all the coils on units [3 – 6]
(bits [15-13] = 111 … 0xE0xx in table [16] … the value prior to the 1771-C acting upon
the command)
(bits [5-3] = 111 in table [16])
• The 1771-C processed the command and wrote the new coil states to actuators [3-6].
(bits [15-13] = 110 … 0xC0xx in table [16])
• Units [3-6] all have all 3 discrete outputs on.
(bits [5-3] = 111 … 0x0038 in table [17])
10 HEX …
16 decimal
11 HEX …
17 decimal
Last Node
on 48 Node
Network
Last Node
on 48 Node
Network
Copyright © 2004 EIM COMPANY, INC. • 13840 PIKE ROAD • MISSOURI CITY, TX. 77489
Page 79

Controlinc 1771-C (Version 5.21) Network Master Users Guide (2004-11-18)
5.4.15. Table [18]: Actuator System Type ID
Words [4 63] PLC access: Read Only.
This data is primarily derived from holding registers [44] & [100] in the actuator. These registers are
retrieved with 2 separate Modbus read commands when the particular actuator is being polled
(scanned) during a diagnostic scan.
There are currently 4 types of EIM equipment identified. There are 6 system type values that can be
entered into table [18]:
• If EIM equipment type = 320A … value in table [18] = “1”
• If EIM equipment type = 320B … value in table [18] = “2”
• If EIM equipment type = TEC2000 … value in table [18] = “3”
• If non-EIM equipment type … value in table [18] = “0” or “255”
NOTE
: There are 2 possible values if the unit is identified as non-EIM:
• 0 … If failed identification … method 1.
• 255 … If failed identification … method 2.
The 1771-C uses these values internally.
Copyright © 2004 EIM COMPANY, INC. • 13840 PIKE ROAD • MISSOURI CITY, TX. 77489
Page 80
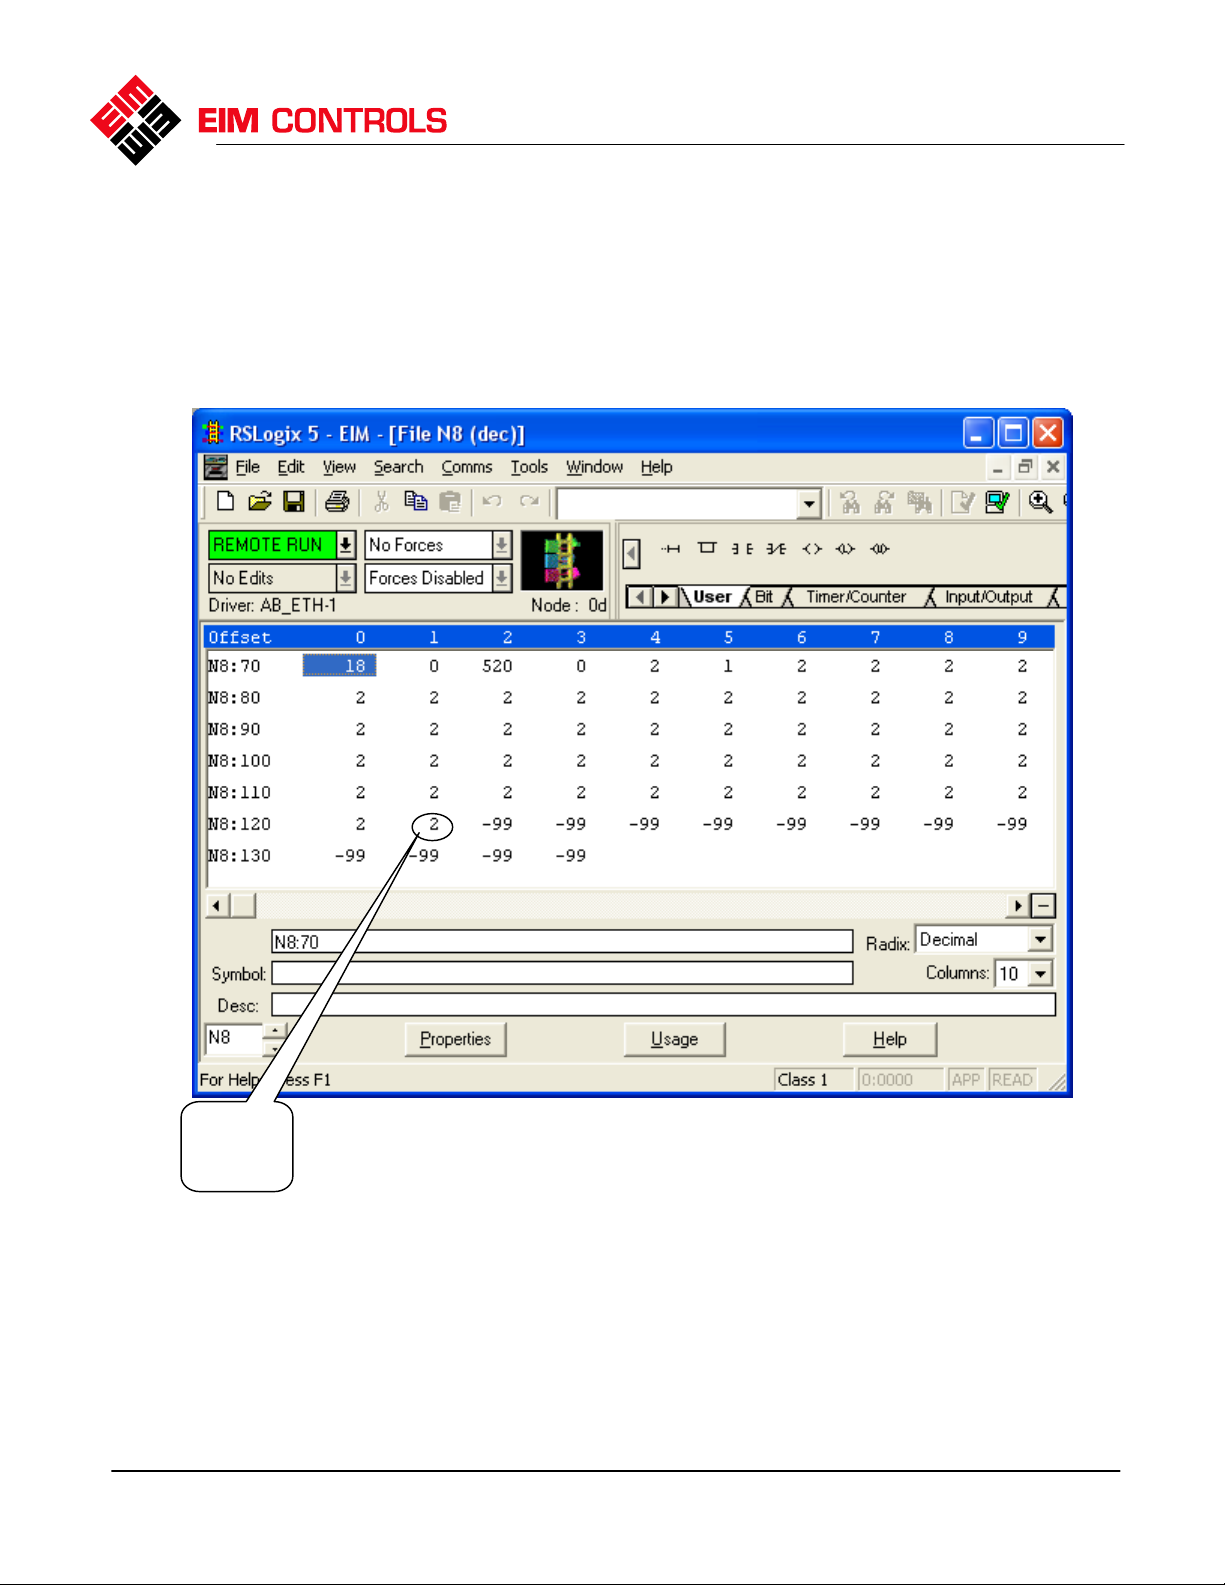
Controlinc 1771-C (Version 5.21) Network Master Users Guide (2004-11-18)
Example Table [18] Feedback (48-node network) …
Characteristics:
• Unit [1] is an EIM 320B system … type 2
• Unit [2] is an EIM 320A system … type 1
• Units [3 – 48] are EIM 320B systems ... type 2
Last Node
on 48 Node
Network
Copyright © 2004 EIM COMPANY, INC. • 13840 PIKE ROAD • MISSOURI CITY, TX. 77489
Page 81

Controlinc 1771-C (Version 5.21) Network Master Users Guide (2004-11-18)
5.4.16. Table [19]: Actuator Firmware Version ID
Words [4 63] PLC access: Read Only.
This data is derived from holding register [44] in the actuator. It is retrieved during a diagnostic scan
when the system type ID is being determined. This table is filled the same time table [18] is filled. For
more information, see table [18].
Example Table [19] Feedback (48-node network) …
Characteristics:
• Unit [1] is an EIM 320B system … firmware version: 3.02
• Unit [2] is an EIM 320A system … firmware version: 2.00
• Units [3 – 48] are EIM 320B systems … firmware version: 3.02
Last Node on
48 Node
Network
Note
: TEC2000 systems do not store their version ID in register [44]. What you will see from a
TEC2000 system is the upper bit set to “1” and the rest zero … 0x8000 hex (-32768 decimal).
For more information relating to TEC2000 version identification, see the TEC2000 manual.
First Node
on
Network
Copyright © 2004 EIM COMPANY, INC. • 13840 PIKE ROAD • MISSOURI CITY, TX. 77489
Page 82

Controlinc 1771-C (Version 5.21) Network Master Users Guide (2004-11-18)
5.4.17. Table [20]: Modbus Exception Message Response
Words [4 63] PLC access: Read / Write
This data is filled anytime a communication error is detected due to the remote system sending a 5-byte
Modbus Exception Response message. These are “High-Level” Communication Errors … Application
Level. This table is cleared at the start of a diagnostic scan.
Format:
• Table [20] - Hi-byte: Error’d function code as returned by the remote system.
• Table [20] - Lo-byte: Modbus Exception Type (1 3)
The PLC may reset this table with any value is prefers. To do this, the PLC must insert the new value
into the table and send it to the 1771-C as a write command. The values in this table are not sent out
to the actuators on the network.
A read back of Table [20] will
• If a write
• If a read
If the PLC is utilizing tables [14 or 15], it should also poll this table. There are many reasons for this.
For example … if there are multiple types of EIM equipment on the network and the PLC requests data
from an actuator that is “not supported by that type of actuator” (but is on the others), the actuator will
return a Modbus Exception for that message and the values will NOT be loaded into tables [14 or 15].
However, the exception codes will be loaded into table [20].
Note: The intention of this table is not to identify (and maintain) this status in “real-time”. It is to only
serve as a general flag to the PLC/operator that an exception has occurred with this actuator
and that the PLC/operator might want to investigate more thoroughly later.
command issued: reflect the write command accepted by the 1771-C
command issued: reflect the current values in the table.
Copyright © 2004 EIM COMPANY, INC. • 13840 PIKE ROAD • MISSOURI CITY, TX. 77489
Page 83

Controlinc 1771-C (Version 5.21) Network Master Users Guide (2004-11-18)
Example Table [20] Feedback (48-node network) …
Characteristics:
• Table [20] is displayed hex to make it easier to interpret Modbus Exception messages returned
from the actuators.
• No actuators have responded with a Modbus Exception message so far this scan period.
“14” HEX …
20 Decimal
First Node
on Network
Table [20] in HEX
because it is easier
to read exception
messages returned
by the actuators
Last Node
on 48 Node
Network
Copyright © 2004 EIM COMPANY, INC. • 13840 PIKE ROAD • MISSOURI CITY, TX. 77489
Page 84

Controlinc 1771-C (Version 5.21) Network Master Users Guide (2004-11-18)
5.4.18. Tables [21-24]: TEC2000 Status Inputs
Words [4 63] PLC access: Read / Write
The purpose of these tables is to afford the end user all critical status information from TEC2000
systems. TEC2000 systems are backwards compatible with the 320A/B systems. However, there
are more “things that can be checked” in the TEC2000. For instance, in the TEC2000, the Unit Alarm
is also tripped by a “Valve Drift” Alarm. The “Valve Drift” alarm is not available in the 320A/B systems.
Therefore: For maximum compatibility with the TEC2000 systems, it is recommended that you
enable monitoring the TEC2000 Status Inputs (tables [21-24]). This way, you can ensure you
have all critical status information for any TEC2000 system on the network.
This data is derived from holding registers [1000 - 1003] in the TEC2000 actuator. These table
entries are only filled in if
• The particular valve is a TEC2000 system.
• The 1771-C is configured to poll these additional registers.
This data is retrieved with a separate Modbus read command when the particular actuator is being
polled (scanned).
These tables are not polled for unless the 1771-C is configured to allow it …
• if Table [0] – Word [17] == 0: The TEC2000 status input information is NOT requested when
actuators are polled (the default).
• if Table [0] – Word [17] =/= 0: The TEC2000 status input information is requested when
actuators are polled.
The PLC may reset these tables with any value is prefers. All it needs to do is insert the new value in
the table and send it to the 1771-C as a write command. The table will be reset even though nothing
will be sent out to any actuator.
A read back of Tables [21 - 24] will
• If a write
• If a read
TED2000 actuators.
command issued: reflect the table write command accepted by the 1771-C
command issued: reflect the last known values of the status input registers in the
Copyright © 2004 EIM COMPANY, INC. • 13840 PIKE ROAD • MISSOURI CITY, TX. 77489
Page 85

g
]
Controlinc 1771-C (Version 5.21) Network Master Users Guide (2004-11-18)
Example Tables [21-24] Feedback (48-node network) …
Characteristics:
• Only 1 TEC2000 system on the network … unit address #1
• Tables [21 - 24] are displayed hex because they represent bit indications … easier to read.
Table ID is
15 hex …
21 Decimal
Node #1 is only TEC2000 …
This is re
ister [1000
Table ID is
16 hex …
22 Decimal
Last node on
48-node
Register [1002] Register [1003]
Register [1001]
Copyright © 2004 EIM COMPANY, INC. • 13840 PIKE ROAD • MISSOURI CITY, TX. 77489
Page 86

Controlinc 1771-C (Version 5.21) Network Master Users Guide (2004-11-18)
6. Application Notes
6.1. App Note: Performance Tuning
6.1.1. General Practices to Ensure Better Performance
To ensure optimal performance, the PLC should at least:
1. Ensure quick responses to the 1771-C requests for a BTW/BTR.
(cuts down 1771-C delaying other operations while waiting for the PLC)
2. Ensure table [0] is set correctly and repeated in a timely manner. Allow for frequent table [0]
reads.
3. Only control & monitor discrete outputs (tables [16 & 17]) if and when needed.
(cuts down on the time to gather data from each actuator)
4. Only read additional registers if and when the application program requires them.
(cuts down on the time to gather data from each actuator)
5. Restrict the rate of data writes to the actuators … only write as fast as required to adequately
control the valve.
(cuts down on the interruptions to scanning the network … gathering data)
6. Only write to or read tables if actually in use.
(ex: do not write to the analog output table if analog outputs are not used)
(prevents unnecessary delays to gathering the more important data from the network)
6.1.2. Reading Run-Time Information from Table [0]
The PLC should perform a read of table [0] in a timely enough manner so that an operator can “view”
the run-time changes in a manner that makes sense. For example, the operator should be able to
watch the scan counter increment by 1 or 2 … if it appears to “jump” by 15 or so (because the PLC is
not reading table [0] enough) then it is a lot more difficult to use the information.
Copyright © 2004 EIM COMPANY, INC. • 13840 PIKE ROAD • MISSOURI CITY, TX. 77489
Page 87

Controlinc 1771-C (Version 5.21) Network Master Users Guide (2004-11-18)
6.1.3. Loading Table [0] with Configuration Information
To maximize system performance, the RLL must load configuration information that includes:
• The Number of Actuators on the network
• The Scan Period (number of network scans before a diagnostic scan).
• Whether or not to poll actuator totalizers.
• The number of additional valves to scan in the scan time-slice (before servicing the PLC).
• Table [13] … Which 320A actuators have Solid State Contactors for modulating control
• Any additional response delay for messages returning from actuators.
• Any specific register to poll from all nodes on the network.
• Any block of registers to get from a specified actuator (node) on the network.
• The value to reset the scan period counter.
• Any direct monitoring and control of discrete outputs on specific actuators on the network …
- coils [1000 – 1011] on TEC2000 systems.
- coils [3-5] on the other systems.
• Whether or not to poll input registers on TEC2000 systems.
The RLL is responsible for all configuration each time the system is reset. Except for 2 circumstances,
all configuration is performed in table [0]. Exceptions:
1. The RLL must identify which 320A actuators require SSR control and load table [13] with the
data. The optional “Solid State Relay” (SSR) is required to be in an actuator if the actuator is
to receive modulating control commands from any controller. If an actuator is supposed to
have an SSR installed, the network master will check, and if necessary, set the actuator internal
configuration bit (indicating an SSR is installed) before sending it a modulation command.
2. The RLL must identify which actuators (if any) the network master will poll and control the
discrete outputs on the actuator. This configuration information is loaded into table [16].
Upon reset, the 1771-C default configuration will assume:
• That there are 60 actuators on the network
• A Scan Period of 50 scans before a diagnostic scan.
• Do not poll the actuator totalizers.
• 2 additional valves to scan (making a total of 3 valves scanned) in the scan time-slice before
servicing the PLC.
• No 320A solid-state relays contactors installed in any actuators.
• No additional response delay for messages returning from actuators.
• No specific register to poll from all nodes on the network.
• No block of registers to get from a specified actuator (node) on the network.
• The scan period reset value is zero but do not reset the counter now.
• No direct monitoring or control of discrete outputs on specific actuators on the network.
• Do not poll TEC2000 input registers.
Copyright © 2004 EIM COMPANY, INC. • 13840 PIKE ROAD • MISSOURI CITY, TX. 77489
Page 88

Controlinc 1771-C (Version 5.21) Network Master Users Guide (2004-11-18)
6.1.4. Behavior if a Delay in Loading Table [0] Configuration Information
The 1771-C does not store configuration information if power is cycled. When the 1771-C restarts, it
reverts to factory default values (60 actuators, 50-Scan Period, …).
It is the responsibility of the PLC to ensure that system configuration information is written to the 1771C. The PLC should periodically read the configuration back to ensure that the 1771-C still has the
correct configuration in it (the DB module was not reset).
Example:
Assume a network of 25 actuators.
If power is cycled on the PLC, the 1771-C will revert to factory default values (60 actuators, …).
The sooner the PLC can reload the correct Table [0] configuration, the sooner the 1771-C will
start polling the correct number of units.
Until this happens, the operator will see what appears to be a “dead space” in the transmitting
and receiving of data when watching the tx/rx LEDs on the DB module. What happens is that:
1. A diagnostic scan has determined that only 25 of 60 actuators are on line.
2. A new scan starts.
3. 25 actuators are communicated with.
4. The 1771-C steps through the next 35 actuators … preventing communication to them
because they are “off line”. This is the “dead space” when watching the LEDs.
5. The scan ends … go back to step #2 if not at the end of the scan period.
In this situation, the operator will see a very regular pattern of “dead space” on each scan (each
time LED1 changes state).
Solution: Ensure the PLC writes the configuration information and periodically ensures it stays correct.
Copyright © 2004 EIM COMPANY, INC. • 13840 PIKE ROAD • MISSOURI CITY, TX. 77489
Page 89

Controlinc 1771-C (Version 5.21) Network Master Users Guide (2004-11-18)
6.1.5. Using the “Scan Period” Value
The “Scan Period
behavior to the needs of the application. This value indicates the size of the “Scan Period” … the
number of network scans before the 1771-C performs a diagnostic scan to try and “bring back on-line"
any units that had stopped communicating.
During normal operations, the 1771-C will skip any actuator that it has already determined is "off line"
(this is to save time when trying to gather data from the other actuators that are running). The only
time it will bring any "off line" systems back on-line is
• During the diagnostic scan
• After reset.
If the end-user (application, HMI, ...) believes that allowing off-line units to come back on-line it is less
important than normal data gathering (or just not something to be concerned with), then it should
increase the scan period size (200 is the maximum ... indicating that a diagnostic scan will happen after
every 200 network scans for data).
If however, the speed of units coming back on line is more critical than the increased interruption due to
increasing the rate of diagnostic scans, then the HMI should lower the scan period number (5 is the
minimum ... indicating that a diagnostic scan will happen after every 5 network scans for data).
In other words, recovery time to get an actuator back on line increases as the scan period value
increases. Therefore, to speed up the recovery time, make the scan period value low. To lengthen
the recovery time, make the scan period value high.
RECOMMENDATIONS:
Typically, EIM will not recommend any particular value for the scan period value … EIM cannot make
that type of decision for any end user. However, EIM will work with a user to explain what happens if a
value is chosen. The user must then make the choice of value that best suits their application.
Basically, they need to evaluate the priority levels (and effects of) the time period of having an actuator
off-line vs. the interruptions in the normal data gathering to perform system diagnostics (allowing off-line
systems the chance of coming back on-line).
” value is placed in table [0] for the end user (HMI) to dynamically adjust the network
Copyright © 2004 EIM COMPANY, INC. • 13840 PIKE ROAD • MISSOURI CITY, TX. 77489
Page 90

Controlinc 1771-C (Version 5.21) Network Master Users Guide (2004-11-18)
6.2. App Note: 1771-C Operation – Additional Detailed
Information
6.2.1. Determining & Exiting “Network Down” Condition
If the 1771-C ever detects “network down” (no actuators communicating) then LED2 will come on and
the program enters the diagnostic scan mode and remains there until at least one actuator responds.
After scanning the “down” network, if any actuator responds and the number of actuators that
responded is not the same as the number configured in table [0], then the 1771-C will perform one
more network scan in the diagnostic mode to afford the opportunity to “simultaneously” bring as many
actuators on line as possible – as soon as possible – within the same scan and not have to wait an
entire scan period.
This scenario happens when “total power on a network is restored at once and the network master
happened to be in the middle of a scan period when power was restored” … which is the most common
scenario. In this case, the repeat diagnostic scan allows the network master the opportunity to bring
“as many systems as possible on line at one time as soon as possible” and not have to wait until the
end of the scan period for the next diagnostic scan.
In other words, without this feature of repeating the diagnostic scan, if the network went down and
came back up in the middle of a diagnostic scan (which was most probable), then the program would
usually detect only a portion of the network and would wait until the end of the scan period to check for
the rest. This is a relatively long time if we are considering the network "going up/down" due network
wiring and not actual powering of actuators (which was most common).
Therefore, to speed up getting most of the network on-line early, if the entire network goes down, the
program repeats the diagnostic scan one more time in an attempt to get more units "on-line".
LED2 will remain on until the diagnostic scan finishes and normal scan operations resume.
Copyright © 2004 EIM COMPANY, INC. • 13840 PIKE ROAD • MISSOURI CITY, TX. 77489
Page 91

Controlinc 1771-C (Version 5.21) Network Master Users Guide (2004-11-18)
6.2.2. Detailed Description of 1771-C Operation
1. Power up and self-initialization … LED1 & LED2 both on.
2. Perform the initial diagnostic scan to determine which actuators are actually on the network.
3. Turn LED1 & LED2 off.
4. Stay in a loop performing the following activities:
I. Setup to start new scan of network.
• If diagnostic scan:
- Ensure the communication ports are setup correctly.
- The previous scan period (group of scans) has finished.
- Toggle the preferred communication port.
• Toggle the state of LED1 … on or off.
II. Perform the Network Scan: Using a time-slice time sharing methodology, loop through all the
actuators on the network (starting from #1 and going through #n [the highest number on the
network]) such that:
--- (the valve scan time-slice) -----------
a. If a diagnostic scan …
- Clear any communication failure indications for the particular valve to be polled.
- Get system type ID … try on both ports.
- If an EIM system, get the firmware version ID.
b. If supposed to get data for the valve, do it.
c. If supposed to request a specific holding register, do it. If supposed to request a block of
holding registers from this actuator, do it.
d. If supposed to monitor or control the discrete user relay outputs on this actuator, do it.
e. If supposed to get TEC2000 input data, do it.
f. Get the rest of the “standard data” from the valve.
Note: If the 1771-C can’t communicate with this particular actuator that is supposed to be
on-line, it marks that actuator as “off-line” … to skip on the next scan cycle. If there are
problems communicating on any particular channel to the actuator, this is also recorded.
--- (the PLC interface time-slice) -----------
g. If ready to interface with the PLC (ready for the PLC time-slice) then do it. When
finished with this PLC interface time-slice, if the number of valves changed in table [0],
end this loop, reset the rest of the tables and setup to enter a diagnostic scan … restart
with new data.
Otherwise still in the valve scan time-slice … If not at the last valve on the network, loop
back (to step “a” above) and get data from the next actuator.
III. Network Scan cleanup
• Label Non-Used Actuator Operation. Mark all “non-used” actuator entries in the tables with
an invalid value (“-99”).
• Determine if the network is “down” by counting the number of actuators that did not
communicate with the 1771-C.
If the network is down, then turn LED2 on and force the next scan to be a diagnostic scan.
Otherwise ensure LED2 is off.
• Account for network scan timings to be displayed in table [0].
IV. Loop back to the top and start another network scan.
Copyright © 2004 EIM COMPANY, INC. • 13840 PIKE ROAD • MISSOURI CITY, TX. 77489
Page 92

Controlinc 1771-C (Version 5.21) Network Master Users Guide (2004-11-18)
6.2.3. Time Allocated Process Control (Allocated Time Slices)
The “Time Allocation Process Control
processes (scanning the network and servicing the PLC) and each one gets a dedicated “time slice
The 1771-C uses this to ensure the primary processes are serviced in a deterministic and controllable
manner.
The user adjustable configuration parameter in table [0] – word [7] determines the number of
”Additional Valves to Scan in the Network Scan Time-Slice
(before interfacing with the PLC … servicing the PLC interface process).
Values for the parameter …
• The default value is 2.
This means 2 additional valves (3 total) will be scanned in the scan time slice before the
PLC process is serviced in its time slice (when a BTW/BTR command sequence from
the PLC can be handled).
• The minimum number is 0 (maximize the amount of PLC interfacing time).
• The maximum number is the lesser of
o 9
o 1 less than the max number of valves on the network
(can’t scan more valves than are on the network)
The larger the number, the faster the scan period but the fewer interfaces with the PLC.
The smaller the number, the scan period is slower but there are more frequent interfaces with the PLC.
If the number is too large, it will take too long to service the PLC and control capabilities by the HMI
may fall off (ex: they could generate a “control/placement” error in which the process control can’t
move a modulating valve to a specified position within a specified time frame).
In other words, if too much time is allocated for scanning valves before servicing the PLC, then the PLC
might not be serviced often enough for adequate control. However, servicing the PLC too often is a
waste of time if it can’t adequately process any differences between the services. That waste of time
could be better spent polling more valves for data.
This parameter is end-user adjustable in Table [0] and is 100% dependent upon the application.
Therefore, the operator must adjust (tune) this parameter to the specific application to get the best fit of
• best scan rate
• best service rate for the PLC block transfers
• control via the PLC
• the PLC getting table information (not skipping tables … a potential byproduct if performing
asynchronous transmission)
NOTE
: To help prevent accidental delays to servicing the PLC due to taking too long to scan the
desired number of valves in the valve-scan time slice, a 650ms timer is in place. This timer is
reset every time the 1771-C finishes servicing the PLC process. In between polling individual
actuators during the valve scan time slice, if the 650ms timer ever expires then the PLC
process will get serviced. In other words, there is a time-based limit to how long the network
can be scanned before servicing the PLC.
” operation acts as a process scheduler. There are two primary
”.
” before starting the PLC process time slice
Copyright © 2004 EIM COMPANY, INC. • 13840 PIKE ROAD • MISSOURI CITY, TX. 77489
Page 93

Controlinc 1771-C (Version 5.21) Network Master Users Guide (2004-11-18)
Below is a table of empirical values demonstrating the difference in network performance when
changing the number of additional valves to scan in the scan time slice.
This network scan scenario is for base readings with
• No Network Writes – Only Polling
• Zero BTR/BTW delays waiting for the RLL to interface with the 1771-C.
• 60 … Number of nodes configured to be on network
• 25 … Scan Period
• Polling base scan data … no additional registers.
• No additional delay time for Modbus response messages from the actuators.
Average Network Scan Time (seconds) after changing the
# Nodes “Talking”
… On-Line
“Additional Valves to Scan in the Network Scan Time Slice”
0 1 2 3 5 7 9
1 of 60 (#60) 1.1 0.6 0.4 0.3 0.2 0.2 0.2
2 of 60 (#59 – 60) 1.2 0.6 0.4 0.3 0.3 0.2 0.2
3 of 60 (#58 – 60) 1.2 0.7 0.5 0.4 0.3 0.3 0.2
6 of 60 (#55 – 60) 1.4 0.9 0.7 0.6 0.5 0.4 0.4
12 of 60 (#49 – 60) 1.7 1.2 1.0 0.9 0.9 0.8 0.8
24 of 60 (#37 – 60) 2.4 1.9 1.7 1.6 1.6 1.5 1.5
30 of 60 (#31 – 60) 2.6 2.3 2.1 2.0 1.9 1.9 1.9
36 of 60 (#25 – 60) 3.1 2.6 2.4 2.4 2.3 2.2 2.2
42 of 60 (#19 – 60) 3.4 3.0 2.8 2.7 2.6 2.6 2.6
48 of 60 (#13 – 60) 3.8 3.3 3.1 3.1 3.0 3.0 3.0
54 of 60 (#7 – 60) 4.1 3.7 3.5 3.4 3.3 3.3 3.3
60 of 60 (#1 – 60) 4.5 4.0 3.9 3.8 3.7 3.7 3.7
number of
The values in this table
“rounded values” and
have a precision of
(+/-) 0.2 seconds.
Because of this, these
numbers are only
appropriate for estimates
and trend analysis.
Note: For the most accurate scan period timing, do not use the 1
environment change) … wait until the 2
nd
scan period or beyond.
st
scan period after a power cycle (or
Copyright © 2004 EIM COMPANY, INC. • 13840 PIKE ROAD • MISSOURI CITY, TX. 77489
Page 94

Controlinc 1771-C (Version 5.21) Network Master Users Guide (2004-11-18)
6.2.4. Preferred Communication Port Operation
The 1771-C operates on both communication ports. In a standard E>Net Ring topology, the
• Port 2 (top port) on the 1771-C goes to Port A on the EIM NIU.
• Port 1 (bottom port) on the 1771-C goes to Port B on the EIM NIU.
The implementation of this communication scheme works in conjunction with the aspect of
“Communication Failure Indications
actuator, it will remain “actively announced” to assist in the diagnostics and troubleshooting required by
a service technician.
The 1771-C tries to utilize both communication ports evenly. It has a “preferred port
“backup port
” such that the program will try to communicate over the preferred port to a particular
actuator. However, if there is a problem communicating with the preferred port, the program will
automatically try the backup port.
The 1771-C alternates port 1 & 2 as being the preferred port after every scan period. That is, at the
start of every diagnostic scan, the preferred port is changed. Example scenario:
1. Scan period n:
• Preferred Port: Port 1
• Backup Port: Port 2
2. Scan period n+1:
• Preferred Port: Port 2
• Backup Port: Port 1
3. Scan period n+2:
• Preferred Port: Port 1
• Backup Port: Port 2
4. ………..
If a problem is detected on the preferred port for an actuator, it will remain using the backup port until
the next diagnostic scan is made to retest the port.
During restart, after the initial diagnostic scan completes, Port 2 is initially the preferred port.
” such that if a failure is detected on a particular port for a particular
” and a
Copyright © 2004 EIM COMPANY, INC. • 13840 PIKE ROAD • MISSOURI CITY, TX. 77489
Page 95
 Loading...