

Page 1

Owner's Manual
USB Memory
MODEL WL-10
Memory Viewer
Slide Converter
EnglishFrançaisEspañol
This is the manual for the Memory Viewer function.
Read this manual thoroughly to operate the Memory Viewer
function.
First, read the owner's manual of the projector to understand
the basic operation of the projector and the safety
instructions.
The safety instructions in the owner's manuals should be
followed strictly.
Deutsch
Italiano
日本語
Page 2

2
Page 3

Introduction
Memory Viewer function
The Memory Viewer function is to make a presentation or project an image without using
computers or some other external equipment. You do not have to carry a computer or other
equipment to project.
Store presentation data or images on a dedicated USB memory and insert it into the USB
terminal of the projector, then you can project these images.
This projector is also equipped with dedicated Slide Converter software to edit the presentation
images to project with the Memory Viewer function. With this function, you can edit images,
photo data, or PowerPoint data into a more effective presentation data.
Which images can project with the Memory Viewer function?
With the Memory Viewer function, you can project images in these formats below.
Edited data with Slide Converter (Index data)
•
Bitmap data
•
JPEG data
•
*Some data may not be projected even with these format.
USB memory for the Memory Viewer function
Use the optionally available USB memory (WL-10). If you use other product, the projector may
not work properly.
The USB memory is dedicated for our company's projectors. We cannot guarantee for using
with other projectors.
Back up the data
It is recommended that important data to edit with Slide Converter and store in USB memory is
to be stored in other media in advance. We will not hold any responsibility for data loss or
damage resulting from using the Memory Viewer function.
English
Trademarks
Microsoft, Windows, and PowerPoint are either registered trademarks or trademarks of Microsoft Corporation
in the United States and/or other countries. Each name of corporation or product in this owner's manual is
either a registered trademark or a trademark of its respective corporation.
• The On-Screen Menu and figures in this manual may differ slightly from the product.
• The contents of this manual are subject to change without notice.
3
Page 4

Index
Introduction . . . . . . . . . . . . . . . . . . . . . . . . . . . . . . . . . . . . . . . 3
Index . . . . . . . . . . . . . . . . . . . . . . . . . . . . . . . . . . . . . . . . . . . . . 4
1. Preparation . . . . . . . . . . . . . . . . . . . . . . . . . . . . . . . . . . . . . . 5
Installing the USB Memory. . . . . . . . . . . . . . . . . . . . . . . . . . . . . . . . . . . . . . . . . . . . . . . . . 6
2. Memory Viewer . . . . . . . . . . . . . . . . . . . . . . . . . . . . . . . . . . 7
How to Use the Memory Viewer Function. . . . . . . . . . . . . . . . . . . . . . . . . . . . . . . . . . . . . 8
Edit Image Data for Display. . . . . . . . . . . . . . . . . . . . . . . . . . . . . . . . . . . . . . . . . . . . . . . . . 9
Rotation.........................................................................................................................10
Delete............................................................................................................................11
Reorder .........................................................................................................................12
Auto Play Setting . . . . . . . . . . . . . . . . . . . . . . . . . . . . . . . . . . . . . . . . . . . . . . . . . . . . . . . . 13
3. Slide Converter. . . . . . . . . . . . . . . . . . . . . . . . . . . . . . . . . . 15
About Slide Converter . . . . . . . . . . . . . . . . . . . . . . . . . . . . . . . . . . . . . . . . . . . . . . . . . . . . 16
Installing Slide Converter . . . . . . . . . . . . . . . . . . . . . . . . . . . . . . . . . . . . . . . . . . . . . . . . . 17
Operating Slide Converter. . . . . . . . . . . . . . . . . . . . . . . . . . . . . . . . . . . . . . . . . . . . . . . . . 17
Import Image Files ........................................................................................................17
Edit Image files .............................................................................................................20
Save / Delete Data ........................................................................................................23
Other Functions ............................................................................................................25
4
Page 5

Chapter
1
1. Preparation
Read this chapter before use.
English
5
Page 6
1. Preparation
Installing the USB Memory
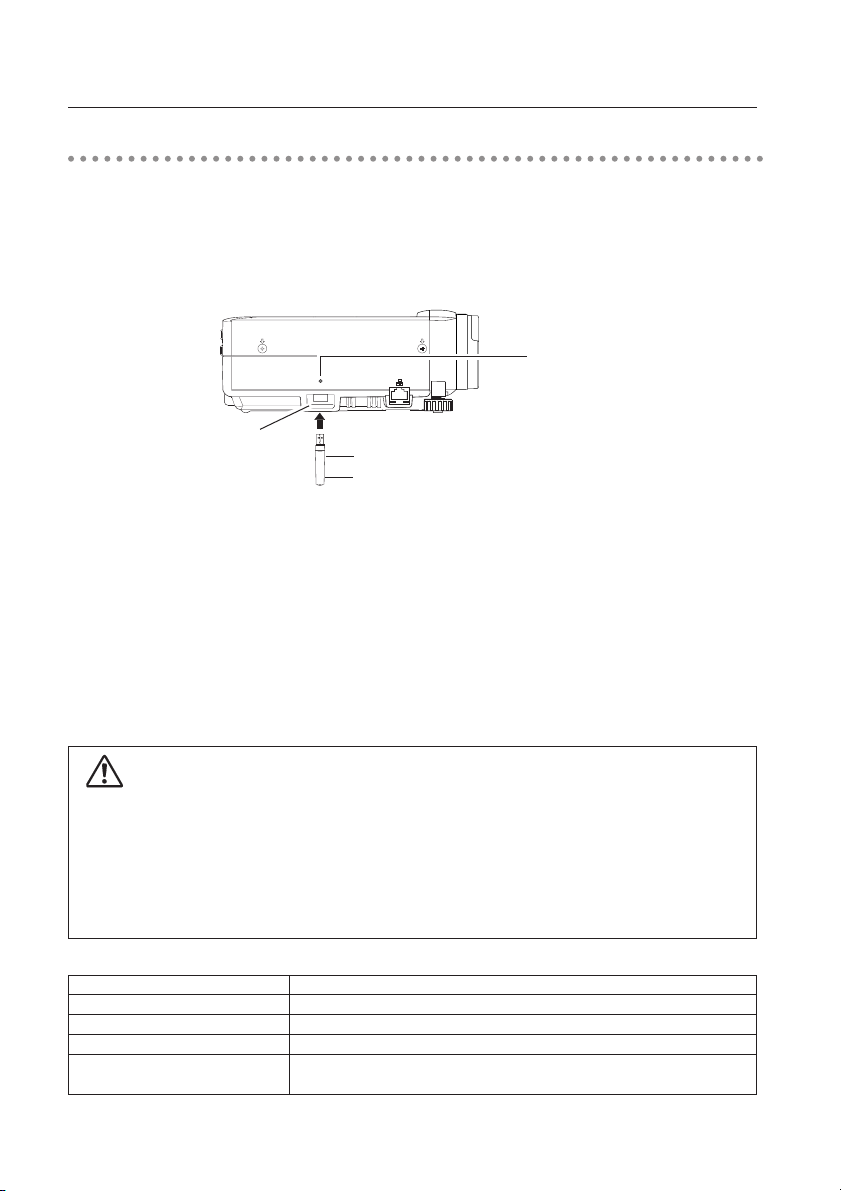
Install the optionally available USB memory to the USB terminal on the right side of the projector.
When installing, confirm the direction of the plug not to damage the terminal.
Use optionally available our USB memory (WL-10). If you use other product, the projector may
not work properly.
The USB terminal is compatible with USB memory formatted with FAT16 or FAT32.
It is not compatible with other formats. Please note that when you format the USB memory
USB lamp*
USBUSB
USB terminal
USB memory*
Blink during access
Caution on Installation and Removal of the USB Memory
Please note following points to install and remove the USB memory.
The USB memory will be blinking when it is installed to the projector or while the projector is
reading out the data. Do not remove the USB memory while it is blinking.
Do not install and remove the USB memory frequently. Remove the USB memory at least 5
seconds after installation. And install at least 5 seconds after removal. While installing or
removing the USB memory, the projector is in switching period for those operation.
* The lamp blinks during access
to the USB memory. While
the lamp is blinking, do not
pull out the USB memory. It
may cause data corruption in
the USB memory.
Back up your important data
Back up your important USB memory data to the other media (Disk, memory, or tape.) We will
not hold any responsibility for the data loss or data corruption.
Caution on Handling and Storing the USB Memory
- Do not put USB memory or its cap within close reach of children. Swallowing them may cause
suffocation. - If the smoke or questionable odor rise, turn off the peripheral equipment and contact your
dealer. - Do not put water, chemical or oil to the USB memory. It may cause short out or fire. - Do not
put foreign objects or put metal objects to the USB terminal. Static electricity may cause data loss or data
corruption. - Do not remove the USB memory from the computer or the projector while the USB memory
is reading out or writing the data. It may cause data loss or data corruption. - Do not store the USB
memory where high temperature, humid or dusty place or magnetized items are around.
Specifications of USB memory (WL-10) *Opetionally available
Interface / Capacity USB2.0/1.1 / 256MB
Operating Voltage
Operating Temperature / Humidity
Dimension(Including the cap)
Compatible OS
DC5V
0-40˚C/0-85%
71.5(Length)/17(Width)/10(Height)mm
Windows XP/Windows2000 Professional
Windows Me
6
Page 7

Chapter
2
2. Memory Viewer
English
7
Page 8
2. Memory Viewer
Cautions in Projecting Images
The projector supports only JPEG, Bitmap and index data (.idx) which is edited with Slide
Converter. Other data formats are not compatible.
Use an optionally available USB memory. When using undesignated product, the projector may
not work properly.
When storing both the JPEG, Bitmap images and the index file which is edited with Slide
Converter on the same USB memory, JPEG/Bitmap data will not be projected.
How to Use the Memory Viewer Function
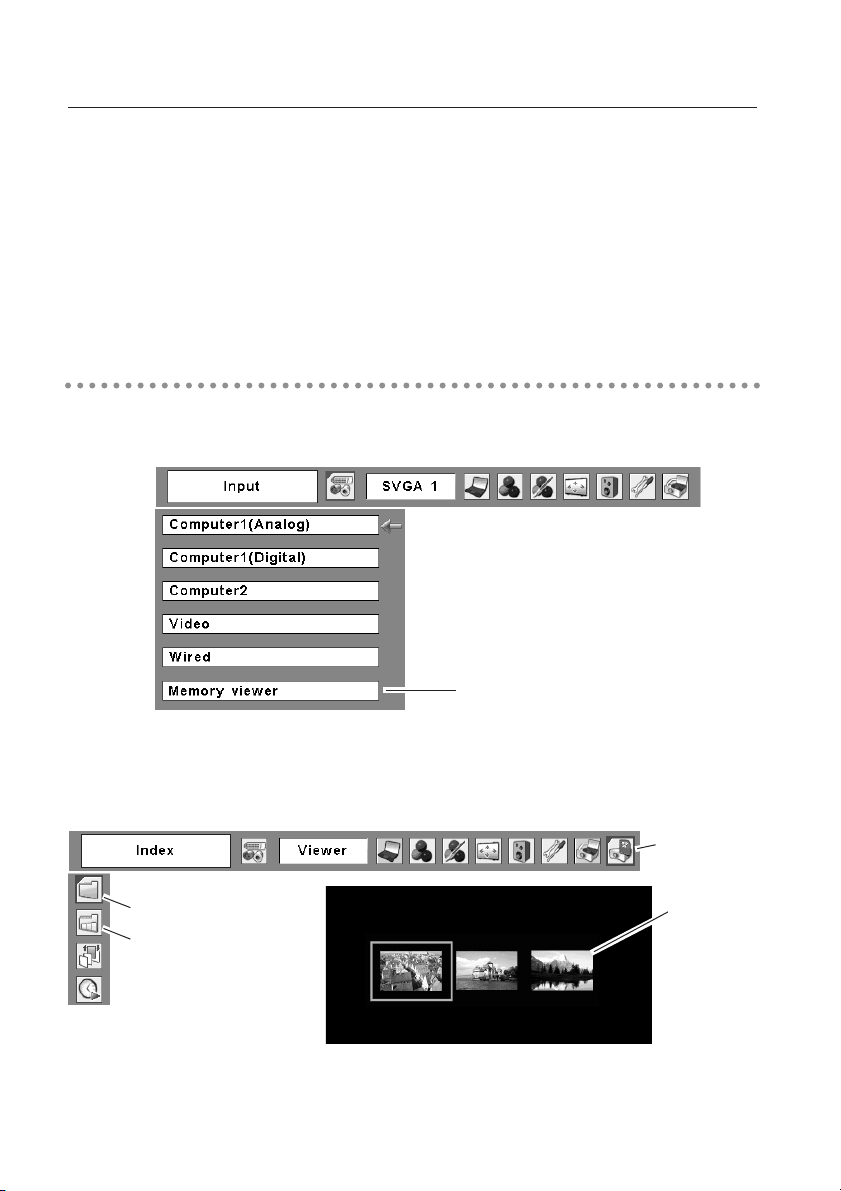
1. Select Input Source
The first image of the first index file stored in the USB memory is displayed on the screen.
Select "Memory viewer"
from the Input Menu.
2. Selecting an Index File in the Viewer Menu
Move the red framed pointer to "Index" and press the SELECT button. Thumbnail of the
index files will appear. Press the MENU button to hide the On-Screen Menu.
* Index file cannot be selected while the On-Screen Menu is displayed.
Index
Page
8
Viewer
Thumbnail of
index files
Page 9

2. Memory Viewer
3. Select an Image to be displayed.
Press the Point buttons on the remote control or the top control of the projector to move the
blue framed pointer to the index file to be displayed and then press the SELECT button.
Images will be displayed following their configurations.
A file not set as Auto Play
Press the Point e button to project the next page and d to the previous page.
Press the SELECT button to display thumbnails of all the images in the index file. Press the
Point button to move the blue framed pointer to the image you wish to display and press the
SELECT button. Then the selected image will appear on a screen.
A file set as Auto Play
Images in the index file will be projected automatically one after another.
This Auto Play function can be paused by pressing the Point d button and restarted by the
Point e button. Press the SELECT button to display thumbnails of all the images in the
index file. Press the Point button to move the yellow framed pointer to an image and then
press the SELECT button. Auto Play will restart from the image.
Press the SELECT button to display
thumbnails of all the images in the
index file
Move the flame to an image and
press the SELECT button. Auto
Play will restart from the image.
English
Note: Selecting the Page icon displays thumbnail of all the images in the selected index file. Select an
image by pressing the Point 7 8ed buttons and press the SELECT button to start Auto Play from
the image.
Edit Image Data for Display
The projector has quick editing functions. You can edit images and project them with the
projector. The following editing functions are available with the projector.
Rotation ........................Rotate images to the specified direction
Delete ..........................Hide images you do not want to display
Reorder ........................Reorder images to be displayed.
Reset ............................Cancel all the settings made with the projector.
9
Page 10

2. Memory Viewer
1. Select an Index file you wish to project.
Select "Index" in the Viewer menu. Press the MENU button to hide the On-Screen Menu.
Select the index file to edit by pressing the Point 78buttons.
Index
Select the index file
to edit.
2. Display the Edit Menu
Select "Edit" from the Viewer menu and press the SELECT button. Sub-menu will appear.
Move the red arrow pointer to the item you wish to select and press the SELECT button.
Viewer
Edit
Rotation
q Move the red arrow pointer to "Rotation" and press the SELECT button.
w Move the red framed pointer to the image you wish to rotate.
e Press the SELECT button. Rotation menu will appear. Press the Point ed
r Select "Reset" to reset all the editing. Select "Quit" to close the menu.
Move the pointer to the item
you wish to select and press
the SELECT button.
Reset
Quit
buttons to select the direction to rotate the image. Then press the SELECT button
to execute the rotation. The image rotates by 90 degrees as you press the
SELECT button once.
Rotation Menu
Rotate 90 degrees
to the right.
Rotate 90 degrees
to the left.
Reset
Quit
10
Page 11

Delete
2. Memory Viewer
q Move the red arrow pointer with the Point button to "Delete" and press the SELECT
button.
Move the pointer to
"Delete" and press
the SELECT button.
Reset
Quit
w Move the red framed pointer to the image you want to delete.
English
e Press the SELECT button. Confirmation dialog box will appear. Select "Yes" to
delete the image. X mark will be put over the deleted image.
Note: To cancel the delete action, select "Reset" in the Edit menu. In that case, all the other
editing operations will be canceled.
r Select "Reset" in the Edit menu to undo all the editing operations. Select "Quit" to
close the Edit menu.
11
Page 12
2. Memory Viewer
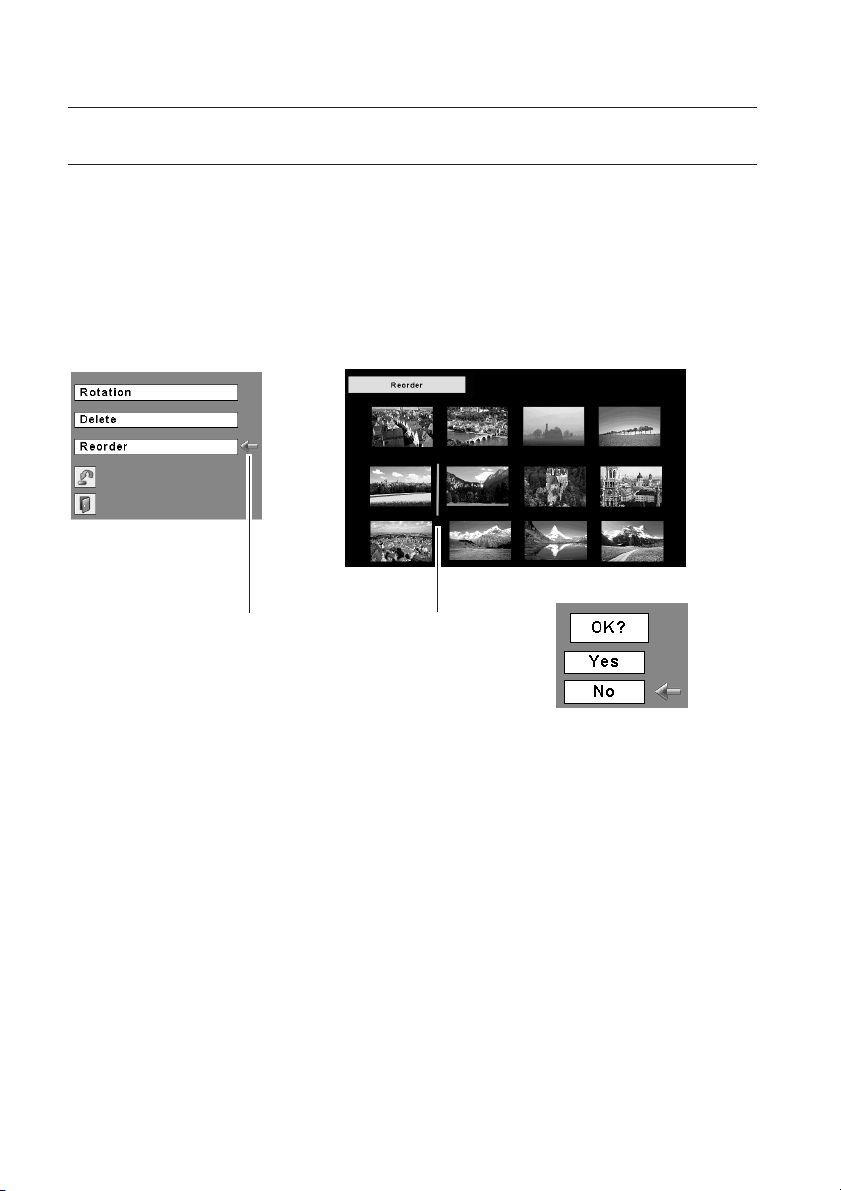
Reorder
q Move the red arrow pointer to "Reorder" and press the SELECT button.
w Move the red framed pointer to the image you wish to move.
e Press the SELECT button. A red bar appears at the left side of the selected
image. Move the red bar to the position where the image to be placed and press
the SELECT button. Confirmation dialog will appear and then select "Yes" to
move the image.
Note: To cancel the reorder action, select "Reset" in the Edit menu. In that case, all the other
editing operations will be canceled.
Move the pointer to
"Reorder " and press
the SELECT button.
r Select "Reset" in the Edit menu to undo all the editing operations. Select "Quit" to
close the Edit menu.
3. Project the edited images
Press the MENU button to show the On-Screen Menu. Select "Index" with the Point button.
Then press the MENU button to hide the On-Screen Menu. Select the edited Index file and
press the SELECT button to project them.
About Edited Images
Editing operation here is to edit images to be temporarily displayed. The editing does not
affect the original data stored on the USB memory. The edited images cannot be saved if
you turn off or unplug the projector, or remove the USB memory from the projector.
12
Move the red bar to the
position you wish to
move it and press the
SELECT button
Page 13

2. Memory Viewer
Auto Play Setting
Images in the Index file can be projected automatically. Select "Auto Play" in the projector menu
and set the interval time between the images.
Note: Interval time between images which is set in "Image Switch Timing Settings" (p22) is prior to this
Auto Play setting.
Auto Play
Move the pointer to "On"
and set the time with the
Point 7 8 buttons.
English
13
Page 14

14
Page 15

Chapter
3
3. Slide Converter
English
15
Page 16

3. Slide Converter
About Slide Converter
Slide Converter is the software to edit and convert Bitmap, JPEG or PowerPoint files into image
data to be projected with Memory Viewer function. This software has various unique edit
functions to allow you to make effective presentations.
Operating Environment
This software requires the following computer environment.
Required Operation System Windows 98SE / Me / NT4.0 / 2000 / XP
Requirements when using Over RAM 64MB main memory. (More memory will be required
Windows 98 / Me / NT4.0 / 2000 depending on applications running at the same time.)
Requirements when using Over RAM 128MB main memory. (More memory will be
Windows XP Home Edition / Professional
Recommended CPU Pentium III 300MHz or higher
HDD Disk Drive More than 100MB free space
Display Setting Supports the following resolutions. VGA (640 x 480)
required depending on applications running at the same time.)
SVGA(800 X 600), XGA (1024 X 768)
Number of colors : Either of 16 bit (65536 colors) or 24/32 bit
(16.77 million colors)
Memory Viewer supports FAT16 / FAT32
Use USB memory formatted by FAT16/FAT32. Memory Viewer does not support NTFS
formats.
16
Page 17

3. Slide Converter
Installing Slide Converter
Install Slide Converter on your computer.
The software (Slide Converter) is included in the CD ROM provided with the projector.
Refer to the owner's manual (Adittional Vol.) of the projector ➔ "2. Setup Procedures" ➔
"Installing the Software" ➔ step 3 to install the Slide converter.
Operating Slide Converter
Activate Slide Converter. The Edit window as shown below will appear.
Import, edit, and save image data by selecting items from the tool bar at the top of the window.
Edit Screen
Import Image Files
- Import JPEG/BMP files
[Image] -> [Add Image file]
Import JPEG/Bitmap files stored in Hard Drive on your computer to the Edit screen of
Slide Converter.
English
Note: You can import image files to the Edit screen simply by drag and drop operation. You can also
move images on the Edit Screen by drag and drop .
17
Page 18

3. Slide Converter
- Capture images on your computer screen
[Image] -> [Screen Capture]
Capture images on your computer screen and load it to the Edit screen of Slide
Converter. If you select "Screen Capture", the following dialog box will appear.
Parameter Description
Capture..................Capture whole viewing area of
the image on your computer
screen and imports it to the
Edit screen.
Set up.....................Set up Display Capture (Refer
to the chart below)
Exit ..................Close the Screen Capture
dialog box
Screen Capture
Parameter Description
Size ....................................Sel ect screen size of the image to be captured among the
following resolutions.
640x480 pixels, 800x600 pixels, and 1024x768 pixels or Desktop screen
size (No Expansion/reduction*)
Format ..............................Select file format of the image to be captured among the following
formats.
Windows Bitmap(*.bmp), JPEG File(*.jpg)(Default)
Palettes..............................Select number of colors of the image to be captured among those
described below if the file format is Windows Bitmap (*.bmp).
2 colors, 256 colors and full color(default)
Quality ..............................Quality of the image to be captured is adjustable if the file format is
JPEG (*.jpg).
Capture Wait ....................Set time from "Screen Capture" to capture the computer screen
between 1 and 10 seconds.
Note: If display resolution of your computer is larger than 1024x768 pixels, the projector may compress
images to be projected and which may affect the projected image quality.
18
Page 19

3. Slide Converter
- Import PowerPoint data
[Image] -> [Import PowerPoint File]
Convert PowerPoint data to JPEG or Bitmap image and import it to the Edit screen of
Slide Converter.
*The computer needs to be installed PowerPoint software.
Parameter Description
Output...................Import the image displayed
on the screen.
Output All..............Import all the images on the
PowerPoint File.
Next ......................Display the next image.
Back ......................Display the previous image.
Exit ........................Close the screen.
Configuration of outputting PowerPoint data
To make settings for PowerPoint data to be imported, select Output Settings from
Option menu.
English
Parameter Description
Size.......................Select screen size of the PowerPoint file to be imported among resolutions
described below;
640x480 pixels, 800x600 pixels or 1024x768 pixels (default)
Format ................Select file format of the PowerPoint file to be imported among the formats
shown below;
Windows Bitmap(*.bmp), JPEG File(*.jpg) (default)
Palettes................ Select number of colors of the image to be captured among those
described below if the file format is Windows Bitmap (*.bmp).
2 colors, 256 colors and full color(default)
Quality..................Quality of the image of the PowerPoint data to be imported is adjustable if
the file format is JPEG (*.jpg).
19
Page 20

3. Slide Converter
- Open or add existing Index files
[File] -> [Open Index]
Select "Open Index" from File menu to open stored index files on Slide Converter.
[File] -> [Add Index]
Select "Add Index" from File menu to add another index file to the opened index file.
Edit Image files
- Cut / Copy / Paste / Delete
Select an item from Edit menu.
Details for each item is as follows:
Parameter Description
Cut ........................ Cut the selected image.
Copy......................Copy the selected image.
Paste ....................Paste the copied or cut image on Slide Converter.
Delete....................Delete the selected image.
Select All ..............Select all the opened images.
20
Page 21

3. Slide Converter
- Convert image size and file format
Select an image then [Image] -> [Arrange Image File] -> [Convert Image]
The following dialog box will appear.
Parameter Description
Image Size Conversion ......Convert the size of the image selected to the size input in Width
(1-1024) and Height (1-768) boxes.
Image Format Conversion.....Convert the file format, number of colors and image quality of the
file selected following to those input in Format, Palettes, and
Quality boxes.
File Format ........................Select file format of the image to be captured among the following
formats;
Windows Bitmap(*.bmp), JPEG File(*.jpg)(Default)
Palettes..............................Selects number of colors of the image to be captured among those
described below if the file format is Windows Bitmap (*.bmp);
2 colors, 256 colors and full color(default)
Quality ..............................Quality of the image is adjustable if you select the file format as
JPEG (*.jpg).
English
- Flip Image Vertically/Horizontally or Rotate
[Image] -> [Arrange Image File] -> [Flip Image Vertically] / [Flip Image Horizontally] /
[Rotate Image]
Details for each item is as follows:
Parameter Description
Flip Image Vertically ..........Flip the selected image vertically.
Flip Image Horizontally ......Flip the selected image horizontally.
Rotate Image ....................Rotate the selected image 90 degree clockwise.
21
Page 22

3. Slide Converter
- Set the image switch timing
Select an image then [Option] -> [Image Switch Timing Settings]
Set the timing of switching images.
Parameter Description
Manual Advance..............Switch images when pressing the Point ed buttons on the
remote control or the top control of the projector.
Automatic Timer ................Switch images at the interval time set on Timer Value*
Timer Value........................Set an interval time for Automatic Timer.
Note1: At the factory, "Manual Advance" is selected.
Note2: When projecting images automatically with the projector, interval time between images set on
"Image Switch Timing Settings" is prior to that on "Auto Play". (p13)
- Execute a slide show
[Image] -> [Slide Show]
Select "Slide Show" from Image menu to simulate a slide show on your computer
display.
The slide show will be executed in order of the numbers shown at the left top of each
image.
Switch images by using Page ed keys on your PC keyboard if no setting on the Image
Switch Timing. To exit the slide show, press the Esc key.
22
Page 23

3. Slide Converter
Save / Delete Data
Select "Save as" from File menu.
Image data is saved in Index format.
- Save
[File] -> [Save As]
Name the opened index file and save it on a USB memory drive.
Save Index File screen will appear.
Parameter Description
USB Memory Drive............Specify a USB memory drive as the output destination to save the
index file data on a USB memory.
Index Name ......................Name the edited index file. (Up to 8 characters)
Index File List ....................List all the index files stored.
Delete ................................Delete the index file selected from the Index File List.
Execute..............................Save the index file.
Exit ....................................Close the Index File Output dialog box.
English
Caution: When saving image files, specify a drive which recognizes a USB memory drive as the output
destination. Do not drag and drop the image files to save them. The image files saved by drag
and drop operation cannot be projected.
23
Page 24
3. Slide Converter
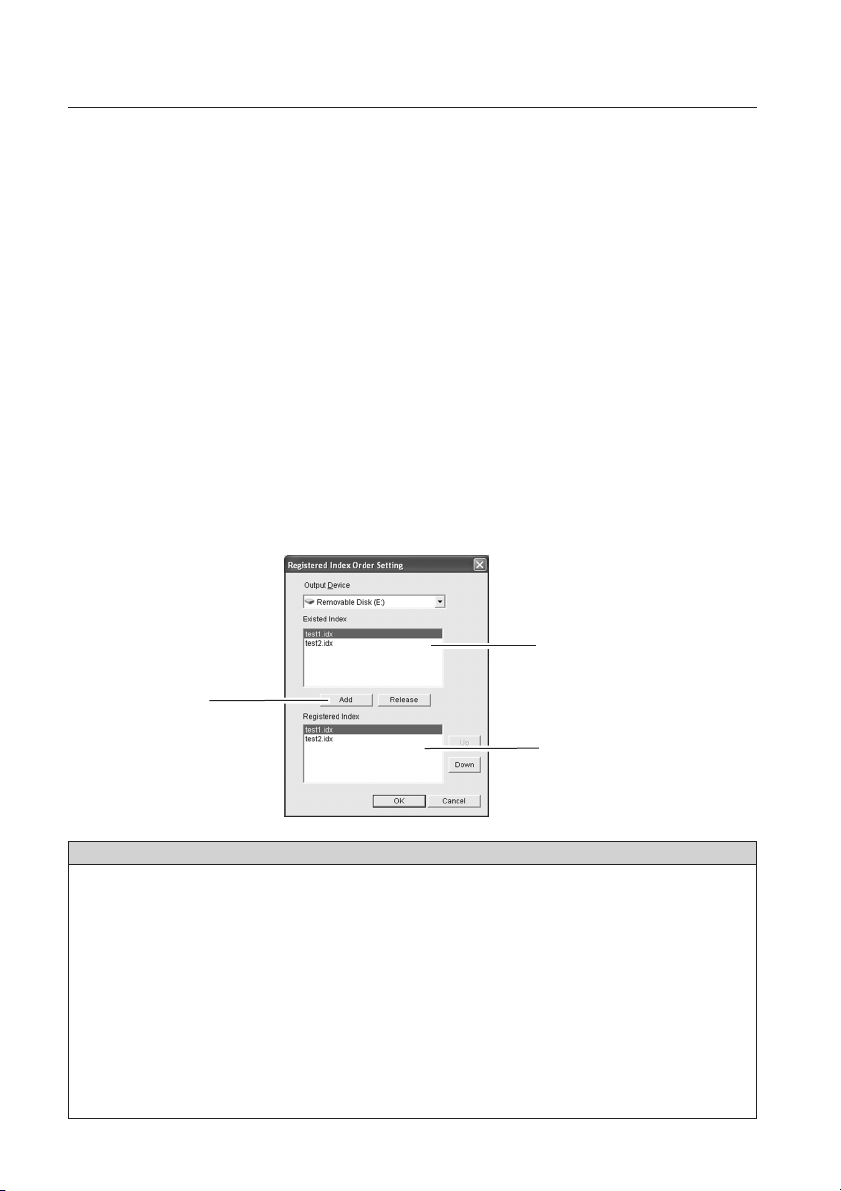
- Select image files to be projected and arrange them in order
[File] -> [Registered Index Order Setting]
Select Index files you wish to display with the projector from those stored in the USB
memory. Also arrange the files in the order to be displayed.
Note: "The order to be displayed" means here is that the order of the thumbnails to be shown on the
screen when you select "Index" from the projector menu(See P10). Since Index files are not
linked each other, the files cannot be auto-played successively.
All the index files stored on the USB memory are shown at the top of the window of the
"Registered Index Order Setting" screen. Selected files will be shown at the bottom of
the window.
Select a file to be projected and click "Add". The selected file will appear at the bottom
of the window. To delete the registered files, select a file to be deleted and then click
"Release".
Caution: If not registered, the Index files cannot be projected with Memory Viewer function even if
they are stored on a USB memory. When selecting "Index " from the Viewer menu of the
projector, its thumbnail does not appear on the screen.
All the files stored in the USB
memory.
Add button
The files to be projected with the
projector.
(Shown as thumbnails on the
screen)
Parameter Description
Output Device....................Specify a USB memory drive
Existed Index ....................Show stored index files.
Add ................................Add an index file selected from "Existed Index" to "Registered
Index". You can add up to 12 index files to " Registered Index". If
you add 13th file, the error message will appear.
Release ..............................Release the selected index file from the "Registered Index".
Registered Index................Place index files in the order to be projected.
Up ......................................Switch the order of the selected index file with the previous file.
Down ................................Switch the order of the selected index file with the next file.
OK......................................Save the setting of the registered index files.
Cancel ................................Close the dialog box without saving the setting.
24
Page 25

Other Functions
- See information of the image file
[Image] -> [Image File Information]
See the information of the selected image.
- See Help
[Help] -> [Slide Converter Help]
See "Slide Converter Help".
3. Slide Converter
Parameter Description
File Name..............Show the file name.
Address ................Show where the file is.
File Size ................Show the data size.
Format ..................Show the file format.
Image Size ............Show the image size.
Palette ..................Show the number of colors.
Timer ....................Show the image switching
time in a slide show
function.
English
[Help] -> [About Slide Converter]
See the version information of the software.
25
Page 26

Printed in Japan
1AA6PIP5073-- (IFBV)
© 2006 Eiki International, Inc.
 Loading...