

Page 1
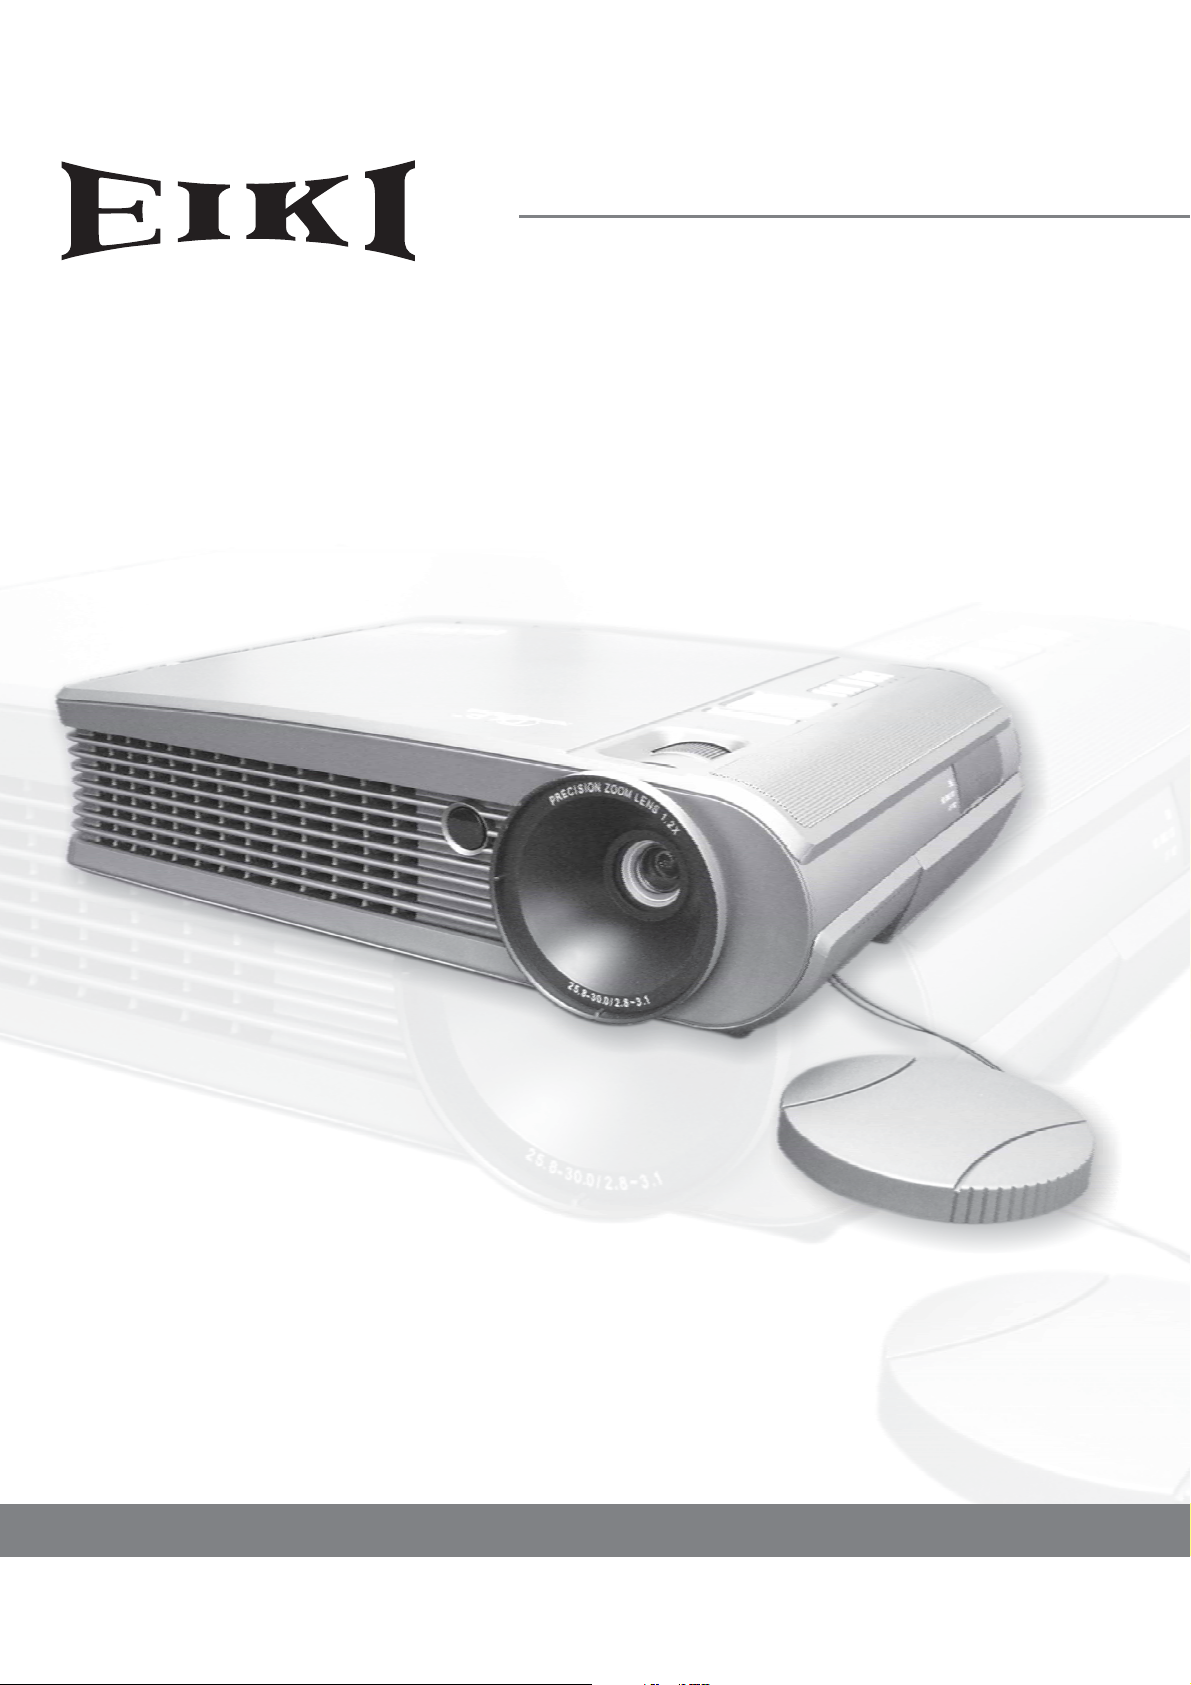
ALL-IN-ONE PROJECTOR
MODEL EIP-10V
OWNER'S MANUAL
EIKI INDUSTRIAL CO., LTD.
Page 2

IMPORTANT SAFETY INSTRUCTIONS
1. Read these instructions.
2. Keep these instructions.
3. Heed all warnings.
4. Follow all instructions.
5. Do not use this apparatus near water.
6. Clean only with a dry cloth.
7. Do not block any of the ventilation openings. Install in accordance with the
manufacturer's instructions
8. Do not install near any heat sources such as radiators, heat registers, stoves, or other
apparatus (including amplifiers) that produce heat.
9. Do not defeat the safety purpose of the polarized power plug. The plug has two blades,
one wider than the other. The wide blade or third prong is provided for your safety. When
the provided plug does not fit into your power outlet, consult an electrician for
replacement of the obsolete outlet.
10. Protect the power cord from being walked on, or pinched, particularly at the plug, and at
the point where the cord exits from the projector.
11. Only use attachments/accessories specified by the manufacturer.
12. Use only with a cart, stand, tripod, or bracket specified by the manufacturer, or sold with
the apparatus. When a cart is used, use caution when moving the cart/apparatus
combination to avoid injury from tip-over.
13. Unplug this apparatus during lightning storms or when unused for long periods of time.
14. Refer all servicing to qualified service personnel. Servicing is required when the
apparatus has been damaged in any way, such as if the power cord or plug is damaged,
liquid has been spilled or objects have fallen into the apparatus, the apparatus has been
exposed to rain or moisture, does not operate normally, or has been dropped.
1
Page 3
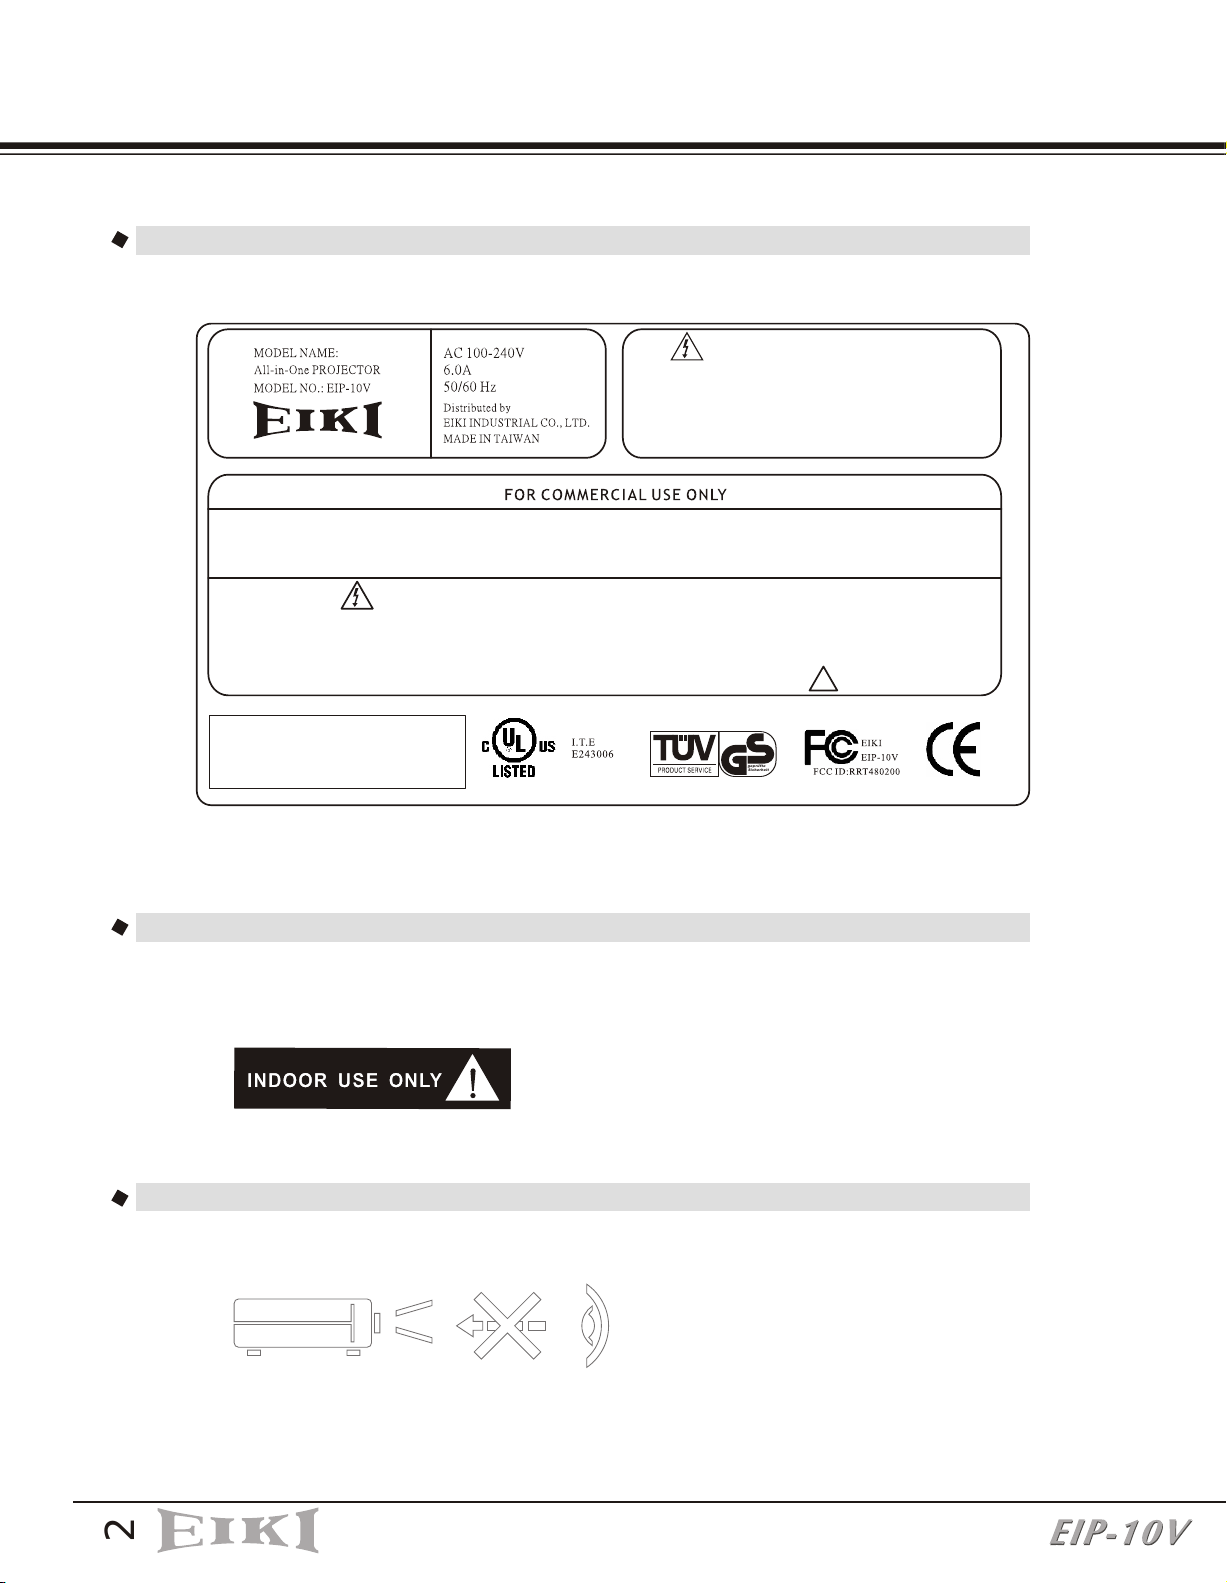
CAUTION LABELS
SAFETY CAUTION LABEL
THIS DEVICE COMPLIES WITH PART 15 OF THE FCC RULES. OPERATION IS SUBJECT THE FOLLOWING TWO
CONDITIONS:(1) THIS DEVICE MAY NOT CAUSE HARMFUL INTERFERENCE AND (2) THIS DEVICE MUST ACCEPT
ANY INTERFERENCE RECEIVED. INCLUDING ANY INTERFERENCE THAT MAY CAUSE UNDESIRED OPERATION.
WARNING!
NO USER SERVICEABLE PARTS INSIDE. THE PROJECTOR IS OPERATING AT HIGH VOLTAGE SO NEVER OPEN THE CABINET BY
YOURSELF. PLEASE REFER SERVICING TO QUALIFIED PERSONAL.
EYE DAMAGE MAY RESULT FROM DIRECTLY VIEWING THE LIGHT PRODUCED BY THE LAMP USED IN THIS EQUIPMENT.
ULTRAVIOLET RADIATION EYE PROTECTION REQUIRED DURING SERVICING.
WARNING!
TO AVOID BURNS AND BULB EXPLOSION WHILE
REPLACING THE LAMP, TURN THE PROJECTOR
OFF AND UNPLUG THE POWER CORD, WAIT OVER
45 MINUTES BEFORE OPENING THE LAMP DOOR.
PLEASE FOLLOW THE INSTRUCTION IN THE
USER'S MANUAL TO REPLACE THE LAMP.
!
geprufte
Sicherheit
INDOOR USE CAUTION LABEL
The projector is for indoor use only.
EYE INJURY CAUTION LABEL
To avoid damage to eyes ,do not look into the projector's lens when the lamp is on.
2
Page 4

COMPLIANCE
FCC WARNING STATEMENT
This device complies with Part 15 of the FCC Rules. Operation is subject to the
following two conditions: (1) this device may not cause harmful interference and
(2) this device must accept any interference received, including interference that
may cause undesired operation.
a.15.105 Federal Communications Commission (FCC) Requirements, Part 15
This equipment has been tested and found to comply with the limits for a class B
digital device, pursuant to part 15 of the FCC Rules. These limits are designed to
provide reasonable protection against harmful interference in a residential
installation.
This equipment generates, uses and can radiate radio frequency energy and, if
not installed and used in accordance with the instructions, may cause harmful
interference to radio communications. However, there is no guarantee that
interference will not occur in a particular installation. If this equipment does
cause harmful interference to radio or television reception, which can be
determined by turning the equipment off and on, the user is encouraged to try to
correct the interference by one or more of the following measures:
---Consult the dealer or an experienced radio/TV technician for help.
---Reorient or relocate the receiving antenna.
---Increase the separation between the equipment and receiver.
---Connect the equipment into an outlet on a circuit different from that to which
the receiver is connected.
b. Regulatory information / Disclaimers
Installation and use of this DLP Projector must be in strict accordance with the
instructions included in the user documentation provided with the product. Any
changes or modifications (including the antennas) made to this device that are
not expressly approved by the manufacturer may void the user's authority to
operate the equipment. The manufacturer is not responsible for any radio or
television interference caused by unauthorized modification of this device, or the
substitution of the connecting cables and equipment other than manufacturer
specified. It is the responsibility of the user to correct any interference caused
by such unauthorized modification, substitution or attachment. Manufacturer and
its authorized resellers or distributors will assume no liability for any damage or
violation of government regulations arising from failing to comply with these
guidelines.
3
Page 5
c. MPE Statement (Safety Information)
Your device contains a low power transmitter. When the device is transmitting it
sends out Radio Frequency (RF) signal.
Safety Information
In order to maintain compliance with the FCC RF exposure guidelines, this
equipment should be installed and operated with a minimum distance 20cm
between the radiator and your body. Use only with the supplied antenna.
Unauthorized antenna, modification, or attachments could damage the
transmitter and may violate FCC regulations.
CE WARNING STATEMENT
CE Declaration of Conformity
For the following equipment:
Is herewith confirmed to comply with the requirements set out in the Council
Directive on the Approximation of the Laws of the Member States relating to
Electromagnetic Compatibility (89/336/EEC), Low-voltage Directive
(73/23/EEC) and the Amendment Directive (93/68/EEC), the procedures given
in European Council Directive 99/5/EC and 89/3360EEC.
The equipment was passed. The test was performed according to the following
European standards:
EN 300 440-2 V.1.1.1 (2001-09)
EN 301 489-1 V.1.3.1 (2001-09) / EN 301 489-17 V.1.1.1 (2000-09)
EN 60950: 2000
DGT WARNING STATEMENT
根據交通 低功率管理辦規定:
第十四條:經型式認證合格之低功率射頻電機,非經許可,公司、商號或
使用者均不得擅自變更頻率、加大功率或變更原設計之特性及
功能。
第十七條: 低功率射頻電機之使用不得影響飛航安全及干擾合法通信;
經發現有干擾 現象時,應立即停用,並改善至無干擾時方得
繼續使用。
前項合法通信,指依電信規定作業之無線電信。低功率射頻電機須忍受
合法通信或工業、科學及醫療用電波輻射性電機
設備之干擾。
4
Page 6

TABLE OF CONTENTS
Precautions
1. Product Overview
1-1 Features
1-2 Package Contents
1-3 Main Unit
1-4 Control Panel
1-5 Rear Terminals
2. Installation
2-1 Powering On/Off the Projector
2-1-1 Powering On the Projector
2-1-2 Powering Off the Projector
2-1-3 LED Indication Status
2-2 Adjusting the Projector Image
2-2-1 Adjusting the Projector Height
2-2-2 Adjusting the Projector Zoom/Focus
2-2-3 Adjusting the Projection Image Size
2-3 Operation
2-3-1 Connecting to a Personal Computer
2-3-2 Operating the Media Player
2-3-3 Operating the DVD Player
2-3-4 Operating the Wireless Speaker
6
7
7
8
9
10
10
11
11
11
11
12
13
13
13
14
14
14
15
19
20
3. Control Panel and Remote Control
3-1 Control Panel and Remote Control
3-1-1 Using the Control Panel
3-1-2 Using the Remote Control
3-2 On-Screen Display Menus
3-2-1 How to Operate
3-2-2 Projector's OSD (On-Screen-Display)
3-2-3 Media Player's OSD (On-Screen-Display)
3-2-4 DVD Player's OSD (On-Screen-Display)
4. Appendices
4-1 Troubleshooting
4-2 Maintenance
4-2-1 Replacing the Lamp
4-2-2 Cleaning the Projector
4-3 Specifications
21
21
21
22
25
25
25
30
34
38
38
40
40
42
43
5
Page 7

PRECAUTIONS
These precautions are intended to ensure the long life of your projector and to prevent
personal injury. Please read the following instructions carefully before using the
projector.
1. Do not look into the projector's lens when the lamp is on.
2. Clean the lens carefully by using a blower or lens paper, to avoid creating any
scratches on the lens.
3. In order to avoid risk of electrical shock, do not expose the projector to rain or
moisture.
4. Do not push anything inside the projector through the ventilation holes or the slots
of the DVD player or Media player.
5. Do not allow the ventilation holes to become covered by things such as tablecloths,
newspapers, curtains, etc. Place the projector in a well-ventilated area because it
generates high temperatures.
6. Do not place objects on the top of this unit, such as:
- Other components, as they may cause damage and /or discoloration to the
surface of this unit.
- Burning objects (ex. candles), as they may cause fire, damage to this unit,
and /or personal injury.
7. Only use the supplied power cord and accessory cables. Do not attempt to modify
or fix the unit. The cabinet should never be opened for any reason. Contact a
qualified service person if any service is needed.
8. When the lamp's accumulated working time exceeds 1850hrs, the On Screen Display
will deliver a message recommending that the lamp be replaced. Before replacing
the lamp, be sure to turn the projector off, disconnect the power cord, and allow the
unit to cool off for at least one hour.
9. Do not operate the projector immediately after exposing it to a sudden change in
temperature, from cold to hot . Do not locate the projector in an environment with
high humidity. These measures are intended to prevent the formation of
condensation inside this unit, which could cause fire, damage to this unit, and/or
personal injury.
10. Be sure that the projector completes its cooling cycle (90sec) before disconnecting
the power cord.
6
Page 8
PRODUCT OVERVIEW
1.
1-1 FEATURES
One panel 0.7" DDR DMD projection system with 1024 x 768 (XGA) native
resolution.
Uses Zeiss Optical Engine to provide light output of 1800 ANSI lumens.
High contrast ratio of 2000:1(FOFO) to meet home theater requirements.
250 W P-VIP lamp. Life 2000hrs at Normal mode, 3500hrs in Eco mode (200W).
High efficiency cooling system with low system acoustic noise level: under 32dBA.
Lamp is easily replaceable by user.
Manual zoom and focus lens with a 1:1.2 zoom ratio and 100% lens offset.
35 to 300 inch diagonal image size.
16.7million true colors.
Aspect ratio: standard 4:3 and wide screen 16:9.
PC compatibility: VGA/SVGA/XGA/SXGA/MAC.
Video compatibility: NTSC/PAL/SECAM/Composite/S-video/Component
(YPbPr/YCbCr)/SDTV (480i)/EDTV (480p)/HDTV (576i, 576p, 720p, 1035i, 1080i).
Auto Image synchronization. (Auto-tracking /frequency /position adjustment /
source detect)
Automatically saves adjustments for future use.
On-screen menu with a choice of 7 languages.
Built-in 2W x 1 speaker.
Self protection timer prevents hot re-strike of compact P-VIP lamp.
Built-in DVD Player with intelligent progressive scan for a film-like image.
Integrated Stereo Wireless Amplified Speakers.
Built-in wireless Transmitter module (for Stereo Wireless Amplified Speakers).
Media Player (card compatibility: CF, IBM Microdrive, MS, SD, MMC, SM).
Five in one Wireless remote control .(Projector, Wireless Speakers, Media player,
TV tuner, DVD Player)
Security feature: Kensington Lock.
Optional TV tuner.
7
Page 9
PRODUCT OVERVIEW
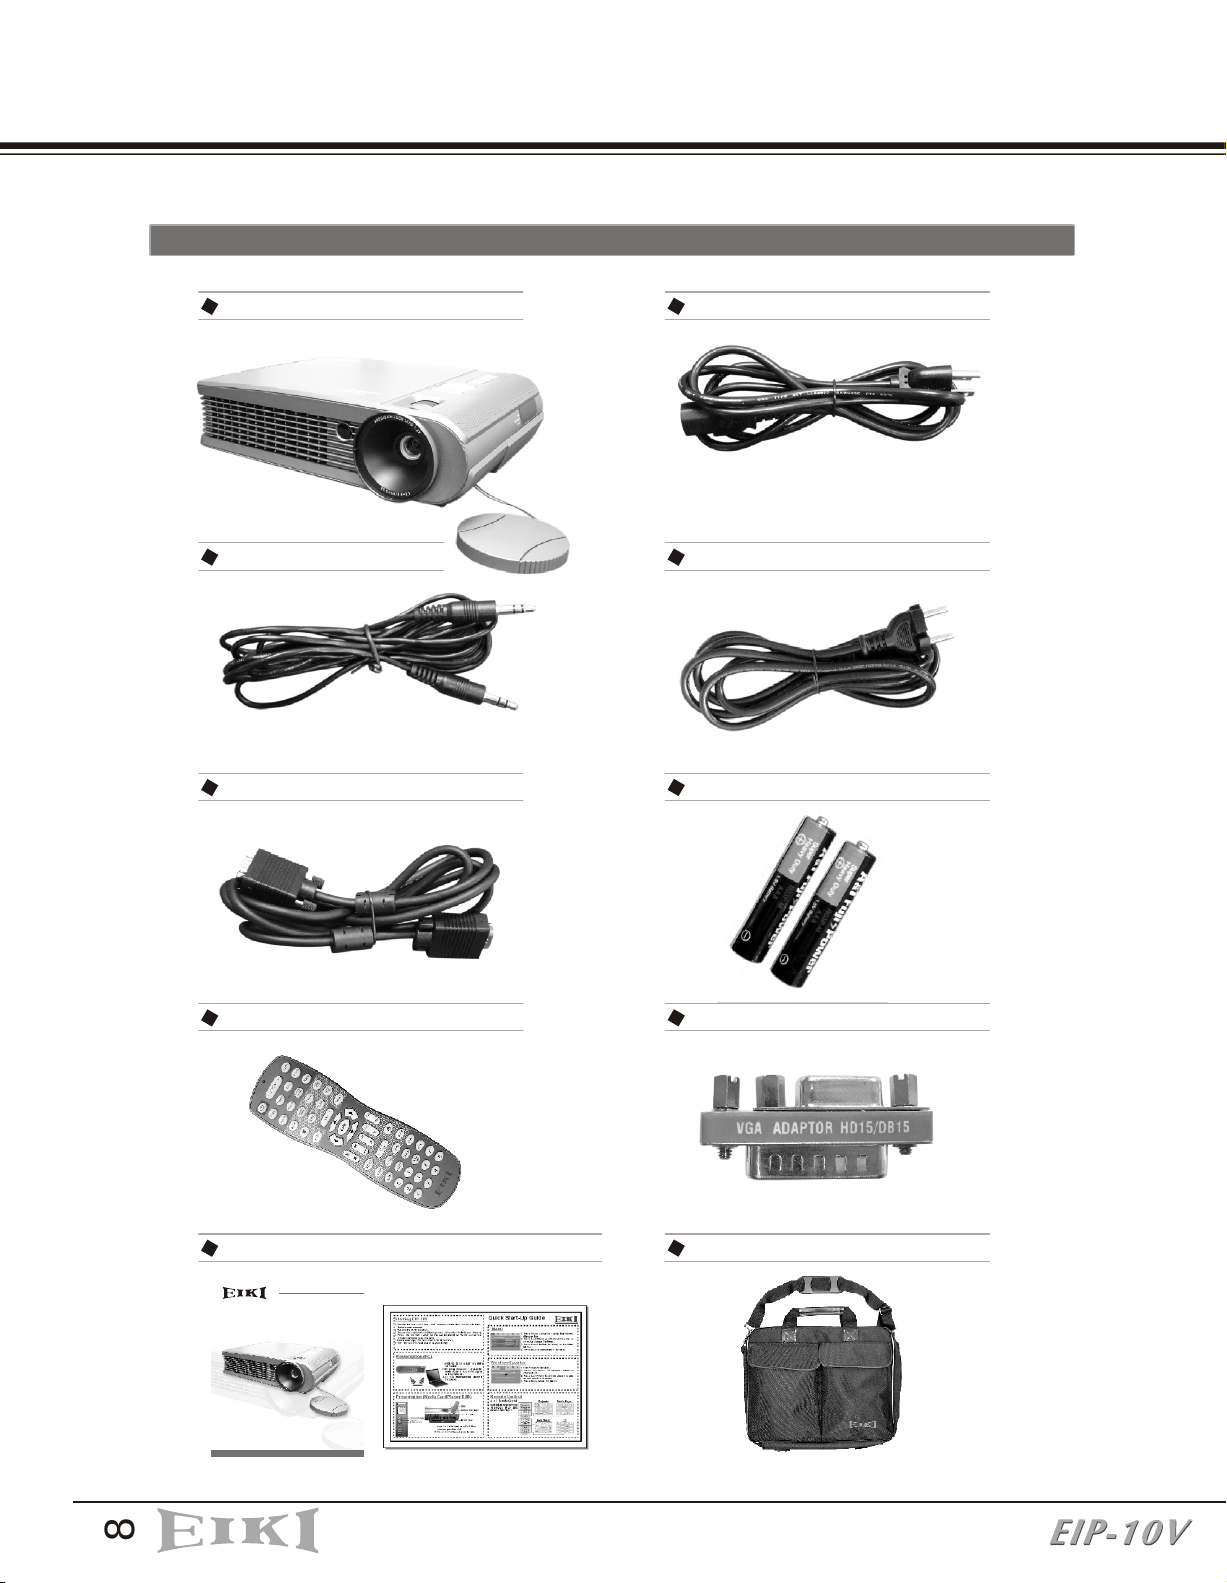
1-2 PACKAGE CONTENTS
EIP-10V projector x 1
PC audio cable x 1
VGA cable x 1
Power cord(US) x 1
Power cord(EU) x 1
AAA Batteries x 2
Remote Control x 1
Owner's manual&Quick Start Up card x 1
ALL-IN-ONE PROJECTOR
MODEL EIP-10V
OWNER'S MANUAL
EIKI INDUSTRIAL CO., LTD.
Mac adapter x 1
Soft carry bag x 1
8
Page 10
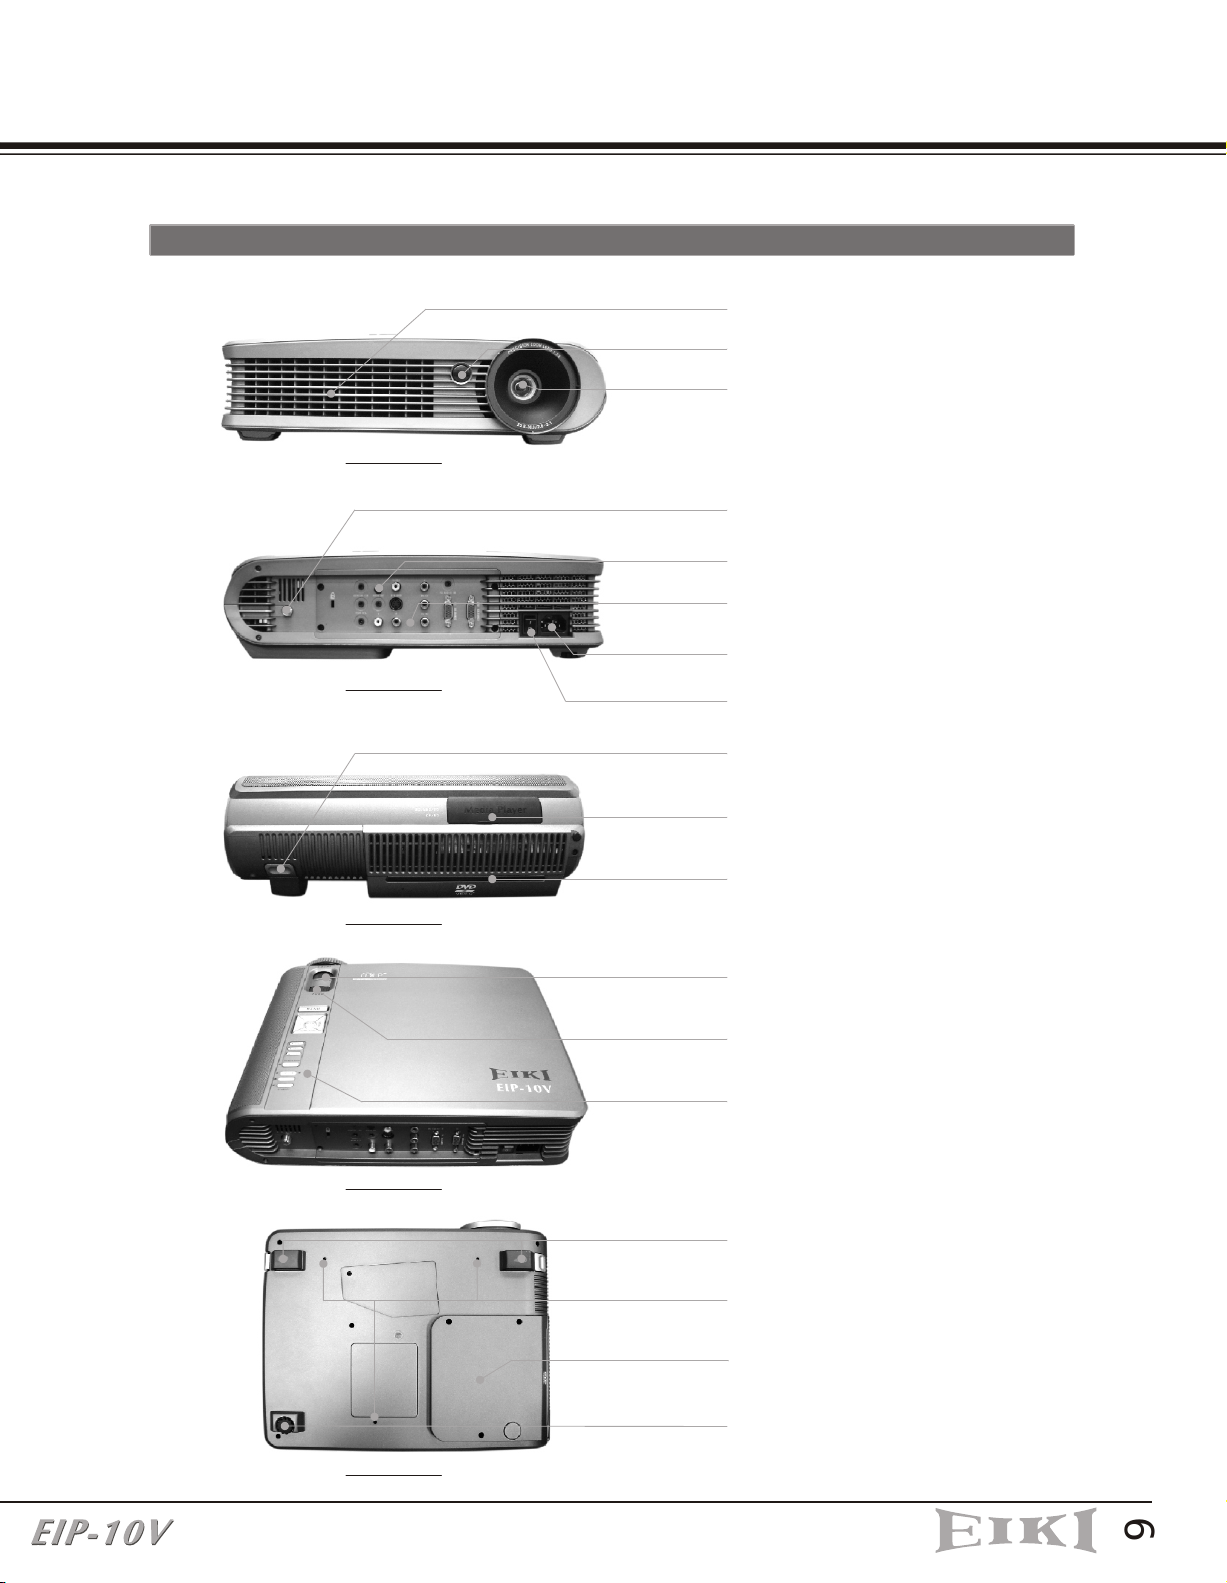
1-3 MAIN UNIT
PRODUCT OVERVIEW
Hot air Exhaust
IR receiver(Front)
Projection lens
DRAWING 1
TV tuner module (Optional)
IR receiver (Back)
I/O connection panel
AC power inlet
DRAWING 2
Power switch
DRAWING 3
DRAWING 4
Elevator button
Media player cover
DVD insert slot
Focus ring
Zoom ring
Control panel
Elevator feet
Ceiling mount screw holes
DRAWING 5
DVD player module
Adjustable foot
9
Page 11
PRODUCT OVERVIEW
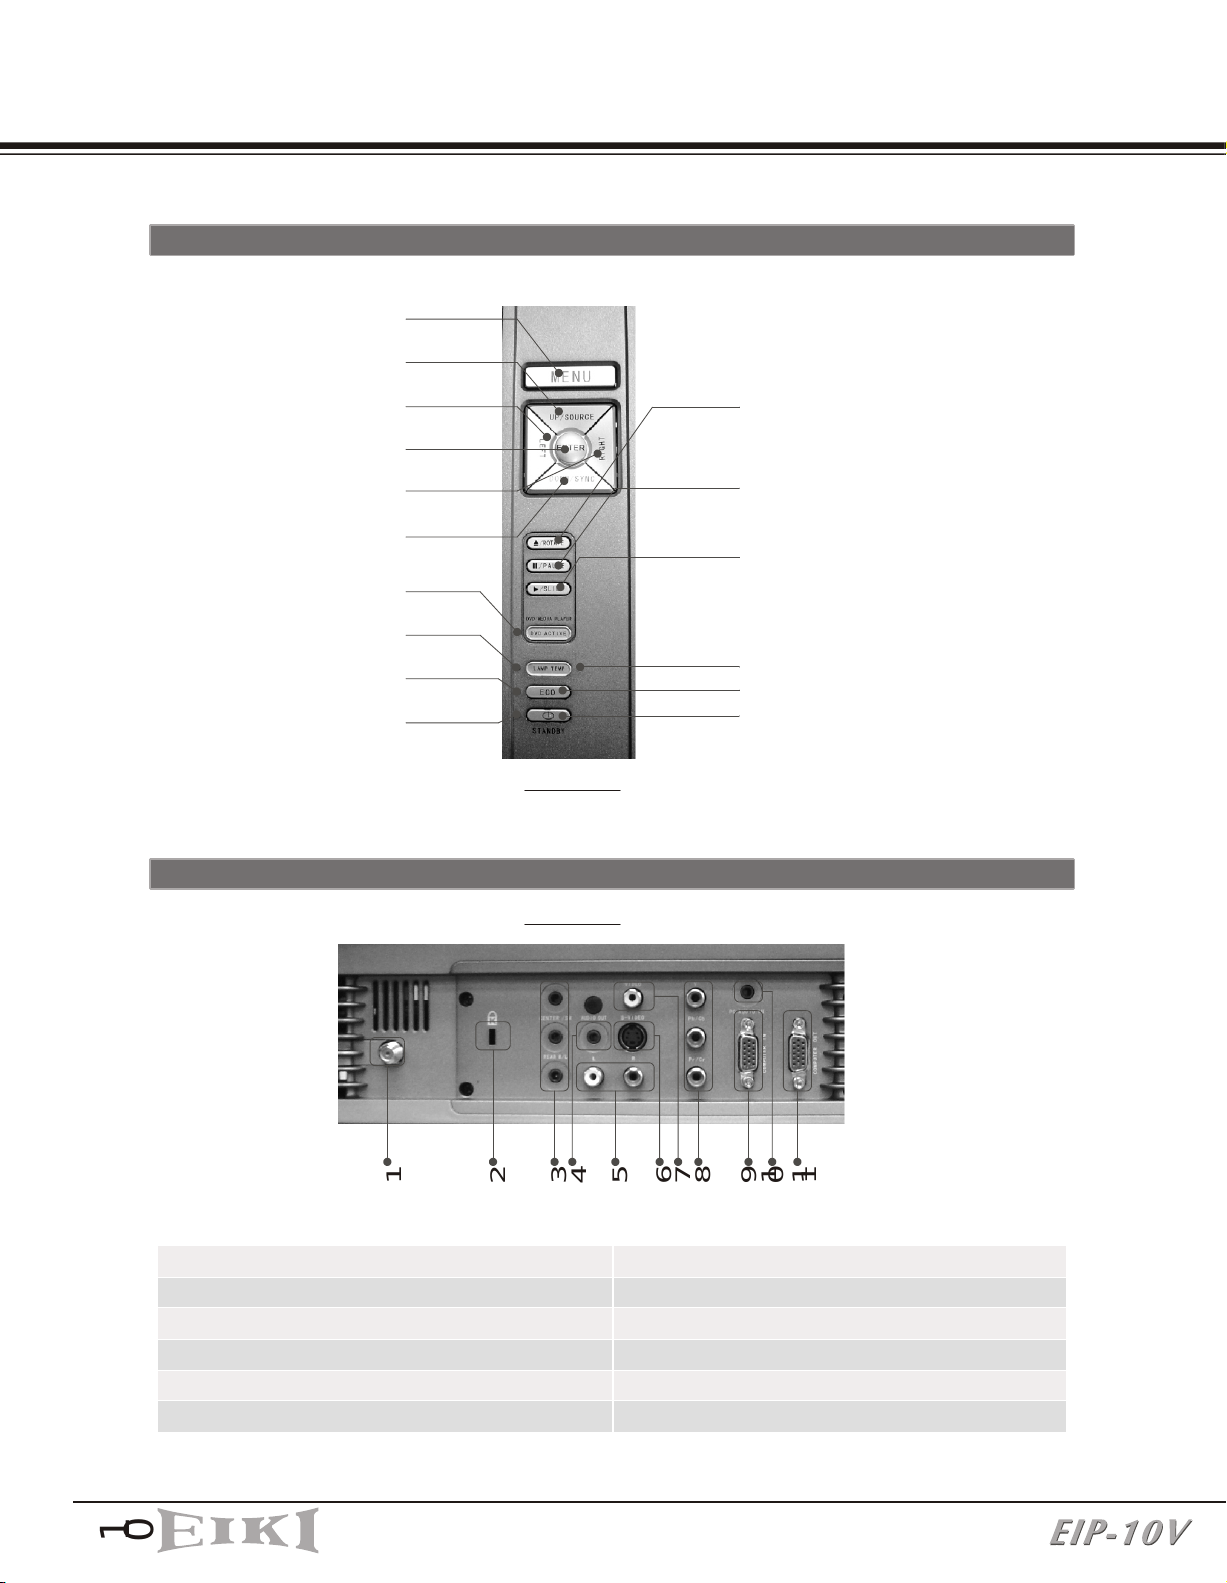
1-4 CONTROL PANEL
Menu
Up/Source
Left
Enter
Right
Down/Sync
DVD indicator
Lamp indicator
Eco mode indicator
Stand by/On indicator
Eject for DVD player
Photo Rotate for Media Player
Pause for DVD player
and Media Player
Play for DVD player
Slide Show for Media Player
Temp indicator
Eco
Stand by/On
1-5 REAR TERMINALS
1
1. TV input (Optional)
2. Kensington Lock
3. Audio output (5.1 channels)
4. Audio output
5. Audio input (R/L)
6. S-Video input
DRAWING 6
DRAWING 7
2
9
7
6
3
4
5
11
8
10
7. Composite Video input
8. Component Video input (YPbPr/YCbCr)
9. VGA input
10. PC audio in
11. VGA output
1
0
Page 12
INSTALLATION
2.
2-1 POWERING ON/OFF THE PROJECTOR
2-1-1 POWERING ON THE PROJECTOR
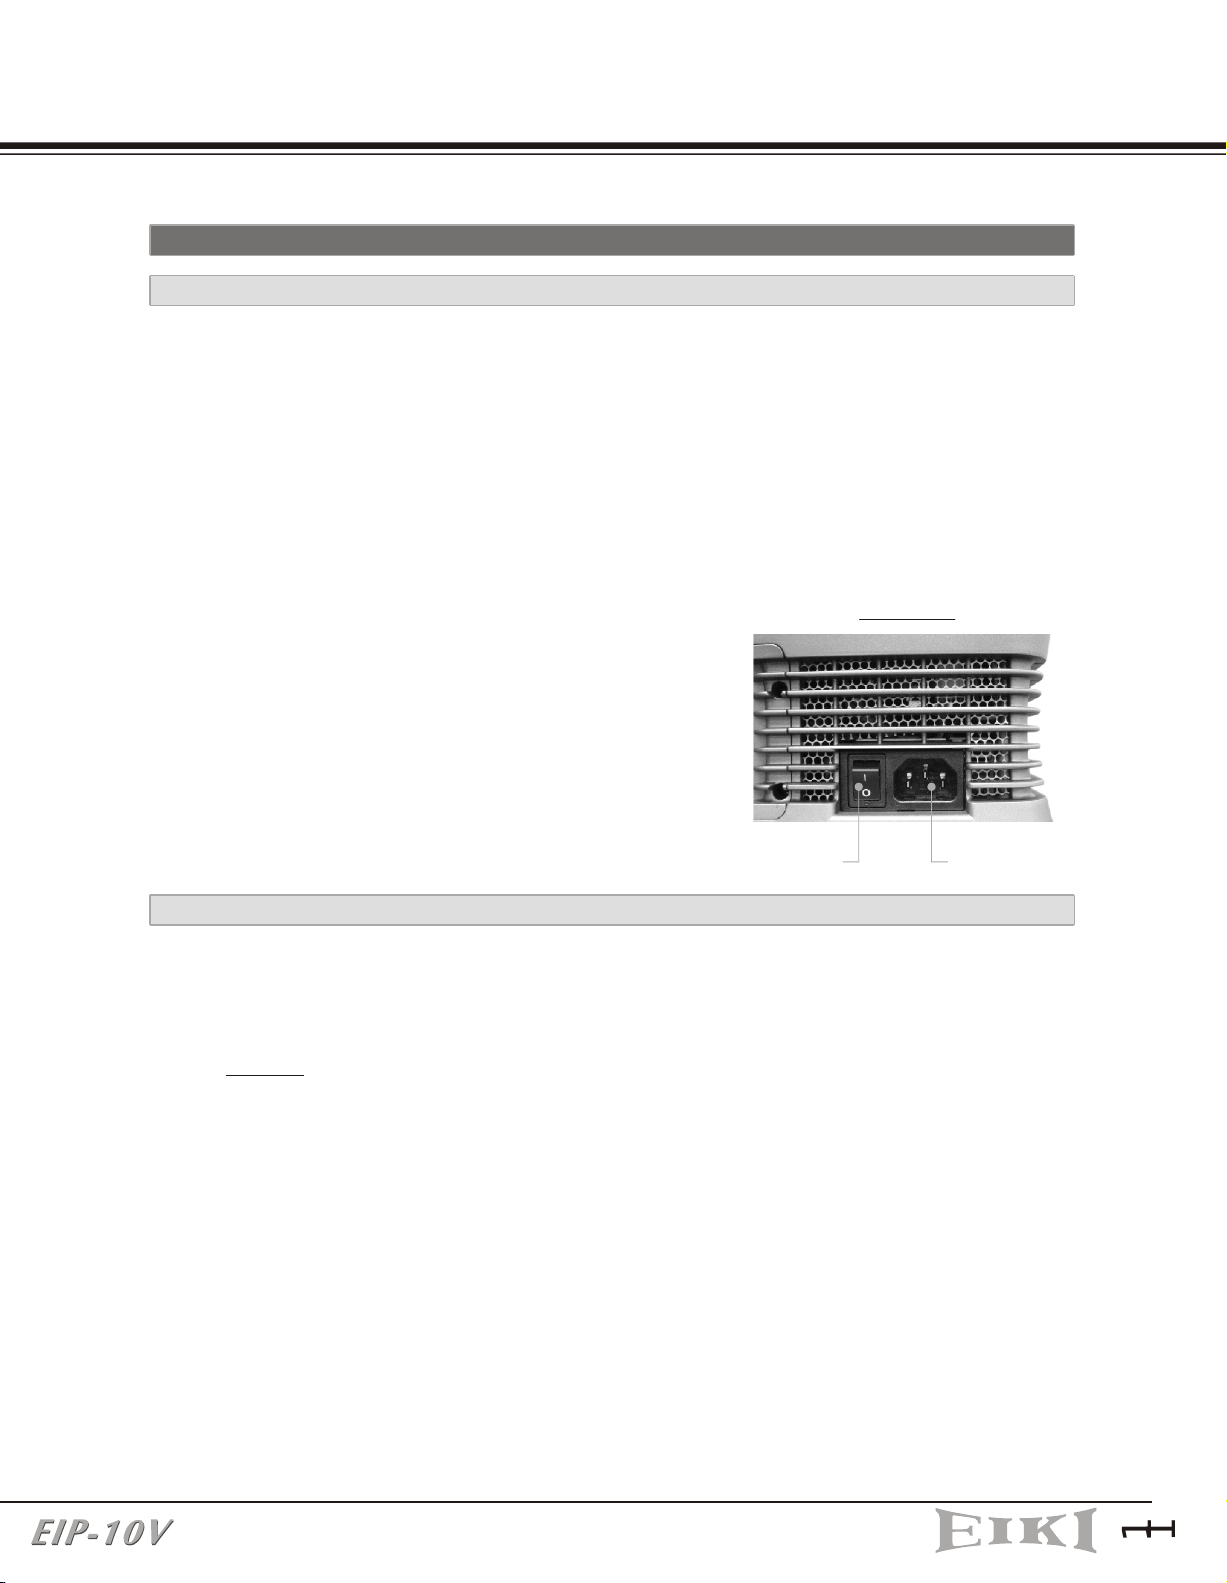
1. Ensure that the supplied power cord is securely connected at the AC inlet of
the projector (Drawing 8) and power outlet.
2. Remove the lens cap.
3. Turn on the power switch. Ensure the "Standby/On" button on the Control
Panel is flashing green, indicating the projector is in Standby mode.
4. Turn on the Lamp by pressing the "Standby/On" button on the Control Panel or
the "Power" button on the Remote Control. Ensure that the "Standby/On"
button is continuous green, indicating the projector is on.
DRAWING 8
5. The start-up screen appears on the screen and
starts to count down for 30 seconds.
6. The projector will detect the input source
automatically.
7. Play your source device
AC inletPower switch
2-1-2 POWERING OFF THE PROJECTOR
1. Turn off your source device first.
2. Press the "Standby/On" button on the Control Panel or press the "Power"
button on remote control, and a message "If no disk in the DVD slot push again
standby button to turn off." will show on the screen.
3. Promptly press the "Standby/On" button or the "Power" button again to
confirm turning off the projector. Otherwise the message will disappear after 5
seconds
4. The projector will begin a 90 second cooling down phase.
Note: Please don't turn off the power switch or disconnect the power cord
during the cooling down period.
5. When the projector has cooled down, the "Standby/On" button on the Control
Panel will be flashing green, indicating the projector is in Standby mode.
6. Turn off the power switch. Replace the lens cap.
7. Disconnect the power cord from the AC inlet of the projector and power outlet.
1
1
Page 13
INSTALLATION
2-1-3 LED INDICATION STATUS
Condition
1. Standby
2. Operating
3. Cooling
4. Eco mode in
use
5. DVD in use
6. Fan
failure
Standby/On
Indicator
Flashing
Green
(1sec interval)
Green
Green
Green
Green
Green
Lamp
Status
Indicator
Flashing
Green
(0.5 sec
Interval)
Temperature
Status
Indicator
- - - -
-
-
-
-
-
-
-
-
-
Eco
mode
indicator
-
-
Green
-
-
DVD
active
indicator
-
-
-
Green
-
Note
Waiting for power on
Normal operation
Cool lamp down for
90 sec
Eco mode is being
used
DVD player is being
used.
Fan failure.
There is a warning
message displayed
on screen then the
projector will power
itself off.
7. Overheating
8. Overheating
while starting
1
2
Green
Green
-
-
Red
Red
(1 sec
interval)
-
-
-
-
Overheating
in the projector:
There is a warning
message displayed
on screen then the
projector will power
itself off.
The system will cool
itself down for 8 sec
automatically.
Page 14
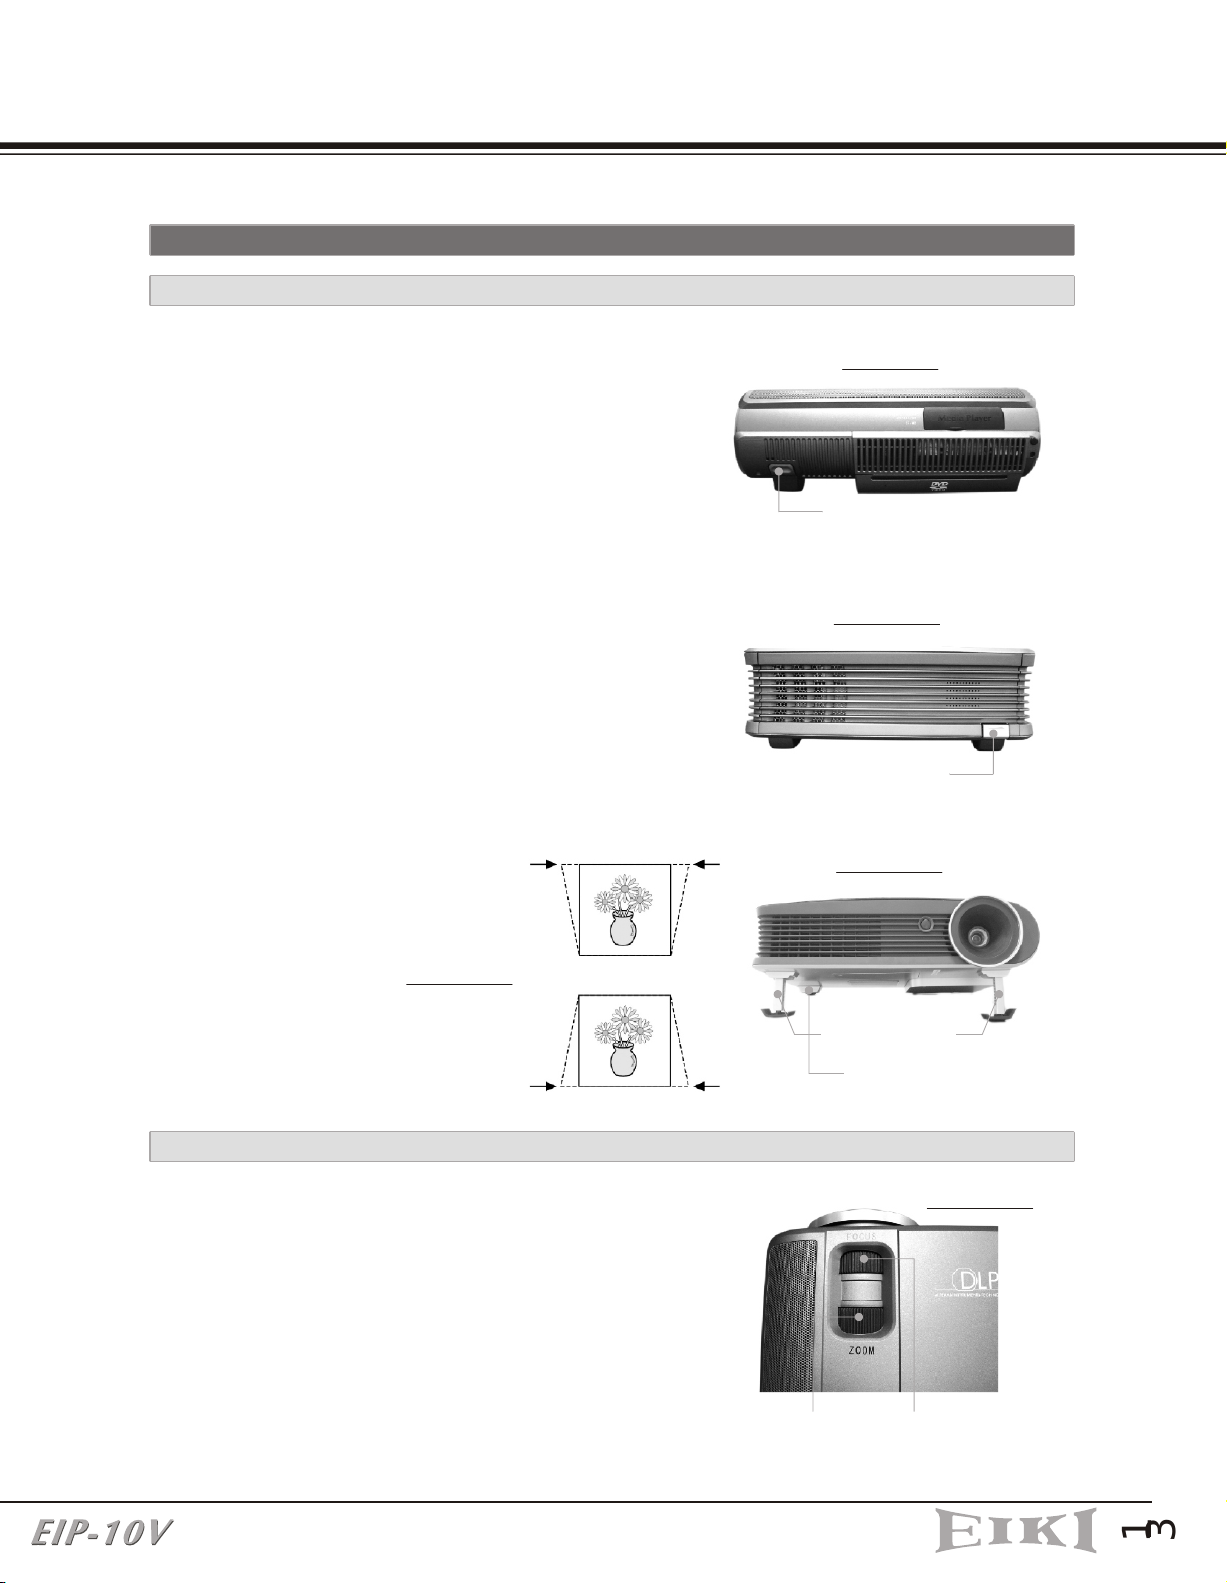
2-2 ADJUSTING THE PROJECTOR IMAGE
2-2-1 ADJUSTING THE PROJECTOR HEIGHT
INSTALLATION
1. Press the Elevator buttons. (Drawing 9 and
10)
2. Raise the projector to the desired display
angle, allowing the legs to extend, and then
release the buttons to lock them in position.
3. Use the Adjustable foot (Drawing11) at the
rear of the unit to fine-tune the display
angle.
4. Use the Keystone key on the Remote
Control or in the OSD to correct any
distortion caused by tilting the projector.
(Drawing12)
Increase (+) Keystone value
DRAWING 9
Elevator Button
DRAWING 10
Elevator Button
DRAWING 11
DRAWING 12
Decrease (-) Keystone value
2-2-2 ADJUSTING THE PROJECTOR ZOOM/FOCUS
Adjust the Zoom ring to adjust image size.
Rotate the Focus ring to focus the image. The
projector will focus at distances from 1.5m
(60in. / 5 ft.) to 10m (394 in. / 32.9 ft.). The
optimum distance is from 1.5 m to 5 m (197 in.
/ 16.5 ft.).
Elevator foot
Adjustable foot
DRAWING 13
Focus RingZoom Ring
1
3
Page 15

INSTALLATION
2-2-3 ADJUSTING THE PROJECTION IMAGE SIZE
DRAWING 14
60"
40"
35"
80"
53"
100"
70"
150"
88"
200"
130"
300"
175"
263"
0
Distance To Screen (Meter/Inch)
Max. Screen Diagonal (Meter/Inch)
Min. Screen Diagonal (Meter/Inch)
1.5m
2.3m
3m
1.5/60
1.02/40
0.88/35
3.8m 5.6m
2.3/91
1.52/60
1.35/53
3.0/119
2.03/80
1.78/70
3.8/150
2.54/100
2.24/88
7.5m
5.6/220
3.81/150
3.30/130
7.5/295
5.08/200
4.45/175
11m
11/434
7.62/300
6.68/263
2-3 OPERATION
2-3-1 CONNECTING TO A PERSONAL COMPUTER
Connecting to a Notebook
1. Use the VGA cable to connect your Notebook to the projector. (Drawing 15)
2. Press the "Monitor Output" function key of your Notebook.
3. The projector will automatically detect the source. If not, please press the
"Source" button on the Control Panel of the projector or on the Remote Control
to select the computer source.
DRAWING 15
DRAWING 16
PC Audio in
(From computer)
PC Audio in
(From computer)
1
4
VGA in
(From computer)
VGA in
(From computer)
VGA out
(To Monitor)
Page 16

INSTALLATION
Connecting to a Desktop Computer
1. Use the VGA cable to connect your Desktop Computer to the projector. (Drawing
16)
2. Connect the monitor's VGA cable to the projector.
3. The projector will automatically detect the source. If not, please press
the"Source" button on the Control Panel of the projector or on the Remote
Control to select computer source.
2-3-2 OPERATING THE MEDIA PLAYER
The Media Player can support many types of memory cards. See the chart below.
Slot on
Projector
(Drawing 17)
Type
Slot #1
SM
Smart
Media
MMC
Multi Media
Card
Slot #2 Slot #3
SD
Secure
Digital
MS
(Memory
Stick)
MD
IBM
Micro Drive
Flash Type I
CF
Compact
/ Ty pe II
Length x
Width x
Thickness
(mm)
Reference
Picture
37x45x0.76
32x 24x1.4
DRAWING 17
32x 24x2.1
50x21.5x2.8
Media Player
Slot 1 (SM)
Slot 2 (SD/MS/MMC)
43x36.4x5
Ty pe I :
43x36.4x3.3
Type II:
43x36.4x5.0
DRAWING 18
Slot 3 (CF(I/II)/MD
1
5
Page 17

INSTALLATION
2-3-2-1 INSERTING AND REMOVING MEMORY CARDS
There is no need to turn off the power to insert or remove a memory card. As long as
you are not viewing files on the card being removed, memory cards can be inserted and
removed from the Media Player anytime.
1. Open the "Media Player" Cover smoothly.(Drawing 17)
2. Insert cards into the slots. (Drawing 18) (Different cards can be inserted
simultaneously.)
3. Push cards gently until they stop. If a card does not insert easily, please check its
orientation.
4. The projector will automatically detect the source when a card is inserted. If not,
please press the "Source" button on the Control Panel of the projector or on the
Remote Control to cause the projector to select the Media Player source.
5. To remove a card, pull it out from the slot.
2-3-2-2 CONTROL PANEL ON THE PROJECTOR
Please refer to the section 3-1-1.
2-3-2-3 REMOTE CONTROL
Please refer to the section 3-1-2
2-3-2-4 START-UP SCREEN OF THE MEDIA PLAYER
When memory cards are inserted simultaneously, the card selection screen is displayed
as shown in Drawing 19.
1. Card selection
Press the "Up" or "Down" buttons on
the Control Panel or Remote Control to
choose the card you want to play.
Press "Enter" to select.
Once a card is selected, or if only one
card is inserted, the file selection
screen is displayed as shown in
Drawing 20.
DRAWING 19
1
6
Page 18

INSTALLATION
2. MUSIC, PHOTO, MOVIE, FILE are shown on screen (Drawing 20)
Playing MP3 Music Files
MP3 (MPEG Audio Layer 3) is an audio compression technology that compresses
CD-quality sound to a fraction of its size. The resulting MP3 files lose a little of the
original sound quality, but the smaller file size means songs can easily fit even on
smaller memory cards.
1. Press the "Right" or "Left" button to choose the "MUSIC" folder.(Drawing 20)
2. Open the MUSIC LIBRARY by pressing the "Enter" button. (Drawing 21)
3. Press the "Up" or "Down" button to choose the song you want. Press the "Play"
button to start.
4. Press the "Select" button on the Remote Control to return to the start-up
screen.
DRAWING 20 DRAWING 21
Viewing Photos and Playing Slideshow
The trend for storing photos in digital format is ongoing. Images are usually stored in
JPEG (*.jpg) format. The JPEG (Joint Photographic Experts Group) standard for
compressing still images is very popular due to its high compression capability.
Viewing Photos
1. Press the "Right" or "Left" button to select the "PHOTO" folder. (Drawing 22)
2. Open the PHOTO ALBUM by pressing the "Enter" button.
3. It will take 2 to 3 sec to display the thumbnail on the screen. (Drawing 23)
4. Use the "Cursor" buttons to select the photo you want and press the "Play"
button to display it full size.
1
7
Page 19

INSTALLATION
DRAWING 22 DRAWING 23
Playing Slideshow (Refer to the Slideshow setup in section 3-2-3-4 for a detailed
explanation of slideshow settings)
Press the "Slide" button on the Control Panel or the "Music slide" button on the
Remote Control to start the slideshow with music (MP3 music if available in your
memory card) when the Photo thumbnail screen is shown. (Drawing 23)
Viewing Movies
The Media Player supports playback of MPEG-1 and MPEG-2 movie clips.
MPEG (Moving Pictures Experts Group) is a standard for compressing video. MPEG-1 is
used in CD-ROMs and Video CDs, and provides 24-bit color and CD-quality sound.
MPEG-2 supports a variety of audio/video formats, including legacy TV, HDTV and
five-channel surround sound. It provides the broadcast-quality image of 720x480
resolution that is used in DVD movies.
1. Press the "Right" or "Left" button to select the "MOVIE" folder. (Drawing 24)
2. Use the "Cursor" button to select the clip you want and press the "Play" button to
start. (Drawing 25)
DRAWING 24
1
8
DRAWING 25
Page 20

INSTALLATION
Viewing All Files
1. Press the "Right" or "Left" button to select the "FILE" folder. (Drawing 26)
2. Press the "Enter" button to open the FILE LIBRARY folder. (Drawing 27)
3. Use the "Cursor" buttons to choose the desired folder, and press the "Enter"
button to select it, then use the "Cursor" buttons to choose the file you want to
view, and press the "Enter" button to start.
DRAWING 26 DRAWING 27
2-3-3 OPERATING THE DVD PLAYER
Insert your disc into the DVD Player's slot on the Projector. (Drawing 28)
The projector will automatically detect the source. If not, please press the "Source"
button on the Control Panel or on the Remote Control to select the DVD Player source.
Press the "Play" button on the Control Panel or on the Remote Control to play a DVD.
DVD slot
DRAWING 28
2-3-3-1 PANEL CONTROL ON THE PROJECTOR
Please refer to the section 3-1-1.
2-3-3-2 REMOTE CONTROL
Please refer to the section 3-1-2
1
9
Page 21

INSTALLATION
2-3-4 OPERATING THE WIRELESS SPEAKER
2-3-4-1 CONNECTING THE SPEAKERS
DRAWING 29
2-3-4-2 OPERATING THE SPEAKERS
A. Make sure the AC voltage selector (115V or 230V) is selected for your local voltage
(Factory preset is on 230V).
B. Connect the power cord into a wall outlet.
C. Turn on the power switch on the rear panel of the speaker.
D. Make sure the wireless channel of the speaker that is selected is the same as the
wireless channel of the transmitter that is selected in the projector. (Please check
the OSD, it will be described in the section of "3-2-2-4 Audio")
E. Adjust the volume with volume knob on the rear panel of the speaker.
LINE
VOLUME
Signal Input
Signal Output
AC Voltage Selector
~
RISK OF ELECTRIC SHOCK
DO NOT OPEN
WARNING: SHOCK HAZARD-DO NOT OPEN
AVIS: RISQUE DE CHOC ELECTRIQUE-NE PAS OUVRIR.
CAUTION
To reduce the risk of fire, replace
with only the same type and rating of fuse.
SPEAKER
OUTPUT
SPEAKER
MODEL NO. : WSP10
INPUT100-120V/220-240V 50/60Hz 100W
:
SERIAL NO.: XXXXXXX
MADE IN CHINA
P.L.
0
X
EIKI
WSP100
FCC ID:RRT480200
AUDIO SYSTEM
86AC
E241996
Bar-code
(45x13mm)
INPUT
L
R
CHANNEL
SELECTOR
EIKI INDUSTRIAL CO., LTD.
R33803
AC VOLTAGE
SELECTOR
230V~
115V~
POWER CONSUMPTION: 100W
DOUBLE INSULATION
When servicing only
use identical parts
POWER
FUSE: T 1A L/250V
Volume Knob
Channel Selector
Power Switch
AC Power Inlet
DRAWING 30
2
0
Page 22

Control Panel and Remote Control
3.
3-1 CONTRO PANELL AND REMOTE CONTROL
You can control the projector's functions through the Control Panel and Remote Control.
3-1-1 USING THE CONTROL PANEL
1. MENU: Press once to display the OSD.Press again to exit the
OSD.
2. UP/SOURCE: This button is dual function.
UP: Cursor function or make an adjustment based on your
selection of a function.
SOURCE: Selects "Composite Video", "S-Video",
"Component-I Video (YCbCr)", "Analog YPbPr", "DVD
Player", "Media player", "Computer", "TV" sources.
3. DOWN/SYNC: This button is dual function.
DOWN: Cursor function or make an adjustment based on
your selection of a function.
SYNC: Optimizes the signal from PC
DRAWING 31
1
2
3
4
5
6
7
4. LEFT: Cursor function or make an adjustment based on your
selection of a function.
5. RIGHT: Cursor function or make an adjustment based on
your selection of a function.
6. ENTER: Confirms your selection item.
7. EJECT/ROTATE: This button is dual function.
EJECT: Eject a DVD
ROTATE: Rotates the photo 90 degrees clockwise on screen,
but this function can't be accessed when Slideshow is
playing.
8. II/PAUSE: This button is dual function.
II: Pauses when playing the DVD disc.
PAUSE: Pauses when playing photos.
9. PLAY/SLIDE: This button is dual function.
PLAY: Plays a DVD.
SLIDE: Displays the photos on your memory card as a slide show, with (MP3)
music if available on your memory card.
8
9
10
11
10. ECO: Using the projector in this mode will save lamp life and reduce fan noise. You
can use this mode for watching video in a room with reduced ambient lighting.
2
1
Page 23

Control Panel and Remote Control
3-1-2 USING THE REMOTE CONTROL
30
10m
O
30
LED indicator
Section A
O
Section B
Section C
Section D
O
O
30
30
Section E
10m
DRAWING 32
2
2
DRAWING 33
Page 24

Control Panel and Remote Control
There are five sections on the Remote Control as described below.
LED indicator: The LED will light when the Remote Control is functioning. If not, please check
your batteries.
Section A: BLUE characters, for PROJECTOR use
1. POWER: Powers On/Off the projector
2. ZOOM-: Reduces the image size (For projecto r use)
3. ZOOM+: Increases the image size (For projector use)
4. MUTE: Mutes the audio output. Press once for Mute on ,press again for mute off.
5. SLEEP: Turns off the projector after a period. (So the time you need---0ff, 15min, 30min, 45min,
60min)
6. FREEZE: Freezes the image.
7. SYNC: Optimizes the signal from PC
8. SOURCE: Selects "Composite Video", "S-Video", "Component-I Video (YCbCr)", "Analog
YPbPr", "DVD Player", "Media player", "Computer", "TV" sources.
9. KEYSTONE: Adjusts image distortion caused by tilting the projector (+/- 12 degree)
10. ASPECT: Selects the aspect ratio.(4:3,16:9,1:1)
11. IMAGE MODE: Three modes can be selected. (Theater/Computer, Standard, User)
12. MENU: Displays the MENU of your playing device. Press once to display, twice to disappear.
Section B: RED characters, for MEDIA PLAYER use
13. PLAY and PAUSE:
PLAY: Plays program
PAUSE: Pauses the program.
When playing slideshow with music, press once to pause the slideshow, press again to pause the
MP3 music.
14. MUSIC SLIDE: Plays slideshow with music
15. PHOTO: Plays the photos
16. PREV/RW
PREV: Selects the previous photo
RW: Rewinds the program
17. STOP: Stops the program
18. SETUP: Enters the OSD of the Media player. (If you are playing a program, please stop it first).
19. ROTATE: Rotates the photo (This function can't be executed when playing a slideshow)
20. NEXT and FW:
NEXT: Selects the previous photo
FW: Forward the program
21. INFORMATION : Shows the information (resolution) of the displaying photo.
22. SELECT: a. Selects the card you want when different cards are inserted simultaneously.
b. Return to start-up screen.
2
3
Page 25

Control Panel and Remote Control
Section C: BLACK Characters, for ANY SOURCE use
These are "Common Keys". They can be used with any source.
23. VOL -: Decreases the volume of either the internal speaker or the external speaker.
24. VOL +: Increases the volume of either the internal speaker or the external speaker.
25. UP: Moves up when selecting item.
26. LEFT: Moves left when selecting item.
27. RIGHT: Moves right when selecting item.
28. DOWN: Moves down when selecting item.
29. ENTER: Confirms your selection.
Section D: GREEN characters, for DVD PLAYER use
30. PLAY: Plays the program.
31. STOP: Stops the program.
32. FF: Fast-forwards the program.
33. FR: Fast-rewinds the program.
34. SF: Slow-forwards the program.
35. SR: Slow-rewinds the program.
36. NEXT: Selects the next song or chapter.
37. PREV: Selects the previous song or chapter.
38. YCbCr : This key can't be used on this model.
39. YPbPr: This key can't be used on this model.
40. PAUSE/STEP:
PAUSE: Pauses the program.
STEP: Plays the disc step by step.
41. VCD AUDIO: Selects a VCD language. (if the VCD is recorded in two languages) This function
can't work while playing a DVD.
42. EJECT: Ejects the disc from the DVD player.
43. SUBTITLE: Selects the language of the subtitle.
44. LANGUAGE: Selects the language of the dub. (If the disc is recorded with multi-language)
45. MENU: Enters the menu of the DVD disc.
46. SETUP: Stops the program, press this button to enter the OSD of the DVD player, and then set
the function you need.
Section E: BROWN characters, for TV TUNER use
47. SAP: Second audio program.
48. AV/TV: Changes the mode between AV and TV
49. CH JUMP: Channel jump.
50. CH +: Next channel
51. CH -: Previous channel
52. Fine tune: Fine tune the TV signal
53. 0-9 KEYS: Selects the TV channel.
2
4
Page 26

Control Panel and Remote Control
3-2 ON-SCREEN DISPLAY MENUS
3-2-1 HOW TO OPERATE
1. To Open the ON-Screen Display (OSD) menu, press the "Menu" button on the
Remote Control or Control Panel .
2. When the OSD is displayed, use "Cursor" buttons on the Control Panel or on the
Remote Control to choose the item you need.
3. Press the "Menu" button again to exit.
3-2-2 PROJECTOR'S OSD
Auto Search Channel
NTSC sys. setting
PAL sys. setting
SYSTEM
OSD Location
Projection
Lamp Hours
Lamp Reset
Int/Ext Speaker
Auto Source
Factory Reset
LANGUAGE
English
Deutsch
Francais
Espanol
繁體中文
簡體中文
TV
Add/Del Channel
Fine Tune
Volume Mode
TV System
IMAGE
DISPLAY
AUDIO
SYSTEM
LANGUAGE
TV
COMPUTER IMAGE
Brightness
Contrast
Frequency
Tracking
Hor. Position
Ver. Position
Image Mode
VIDEO IMAGE
Brightness
Contrast
Color Satur.
Sharpness
Tint
Image Mode
DISPLAY
Aspect Ratio
Zoom
Keystone
Color Temperature
AUDIO
Volume
Treble
Bass
Mute
Int/Ext Speaker
Wireless Channel set
High Brightness
Gamma
High Brightness
Gamma
Red Color
Temperature
Green Color
Temperature
Blue Color
Temperature
Wireless Channel
setting
2
5
Page 27

Control Panel and Remote Control
3-2-2-1 MAIN MENU
Press the “Enter" button to enter the submenu,
press it again to return to the main menu.
Main Menu includes:
Image
Display
Audio
System
Language
TV
3-2-2-2 IMAGE
Computer Image
Brightness: Adjusts the brightness of the
image.
DRAWING 34
Contrast: Adjusts the contrast of the image
Frequency: Adjusts the frequency to match
the frequency of your computer's graphic
card.
Tracking: Synchronizes the signal timing with
your computer's graphic card.
Hor. Position: Moves the image's horizontal
position.
Ver. Position: Moves the image's vertical
position.
Image Mode: Choose a mode
Computer: This mode is good for computer
signals.
Standard: This mode is good for movie
pictures.
User: This mode allows you to adjust High
Brightness and/or Gamma. Press the "Right"
button to enter the submenu.
High Brightness: Sets the white peaking level
of the DMD chip. If you prefer a stronger
image, press the "Right" button to increase
the value. If you want a more natural image,
press the" Left" button to decrease the value.
DRAWING 35
DRAWING 36
Gamma: Adjusts the Gamma (mid-tone
brightness) curve.
2
6
Page 28

Video Image
Brightness: Adjusts the brightness of the image.
Contrast: Adjusts the contrast of the image
Color Satur. : Adjusts color saturation of the
image.
Sharpness: Adjusts the sharpness of the image.
Tint: Adjusts the color balance of red and green .
Control Panel and Remote Control
Image Mode: See "Image Mode" in the "Computer
Image" section.
3-2-2-3 DISPLAY
Aspect Ratio: Selects your desired aspect ratio.
Zoom: Increases or reduces the size of the image.
Keystone: Adjusts image distortion caused by tilting
the projection.
Color Temperature: Adjusts the color temperature
of the image. A higher color temperature looks
colder. A lower color temperature looks warmer.
When the color temperature is set to User mode,
press "Down" button to select Red, Green, or Blue
adjustment.
Red, Green, Blue: Increases or decreases the value
to find the desired color temperature.
DRAWING 37
DRAWING 38
2
7
Page 29

Control Panel and Remote Control
3-2-2-4 AUDIO
Volume: Adjusts the volume of the internal or wireless speaker.
Treble: Adjusts the treble audio of the internal or wireless speaker
Bass: Adjusts the Bass audio of the internal or wireless speaker.
Mute: Mutes the internal or wireless speaker.
Int/Ext Speaker: Selects the internal or wireless speaker. If you select wireless speaker, press
the "Down" button to get the wireless channel selection. Set the wireless speaker channel to
match the wireless speaker channel set on the projector. Press the "Enter" button to return to
the main menu.
Wireless CH.: Sets the wireless channel.
DRAWING 39
3-2-2-5 SYSTEM
OSD Location:Chooses the OSD location on the
display screen.
Projection: Selects the projector's orientation.
Front: The factory default setting. For "tabletop"
projection.
Front Ceiling: Inverts the image. For "ceiling
mounted" projection.
Rear: Reverses the image. For "tabletop"rear
projection
Rear Ceiling: Reverses and inverts the image. For
"ceiling mounted" rear projection.
Lamp Hours: Displays the cumulative lamp operation time.
Lamp Reset: Resets the lamp operation time after changing lamps..
Auto Source: Detects the input source automatically.
Factory Reset: Resets all items in all menus to their default settings.
DRAWING 40
DRAWING 41
2
8
Page 30

3-2-2-6 LANGUAGE
Selects the Language you need.
3-2-2-7 TV
Auto Search: Searches channels automatically.
Control Panel and Remote Control
DRAWING 42
Add Channel: Adds the channel you need.
Del Channel: Deletes the channel you don't need.
Fine Tune: Mutes the internal speaker of projector
or wireless speaker.
Volume Mode:
Mono: Outputs the mono sound.
Stereo: Outputs the stereo sound.
Sub-Language: Changes the main language to the
sub-language.
TV System: Selects the NTSC or PAL system.
NTSC: Selects Country.
PAL: Selects region and volume system
DRAWING 43
DRAWING 45DRAWING 44
2
9
Page 31

Control Panel and Remote Control
3-2-3 MEDIA PLAYER'S OSD
Press the "Setup"(red) button on the Remote Control to enter the Media Player's OSD.
PHOTO SETUP
MUSIC SETUP
SLIDESHOW SETUP
MOVIE SETUP
PHOTO SETUP
Thumbnail digest
MUSIC SETUP
Repeat mode
SLIDESHOW SETUP
Slideshow mode
Folder repeat
Interval time
Transition
Auto start
On, Off
One, All, Off
Auto, Manual
One, All, Off
One, Three, Five, Ten seconds
Full Screen
TOP -> BOTTOM
BOTTOM -> TOP
TB -> CENTER
CENTER -> TB
BLIND: T -> B
LEFT -> RIGHT
RIGHT -> LEFT
L/R -> CENTER
On, Off
MOVIE SETUP
PREFERENCE
3
0
Interval time
Repeat mode
PREFERENCE
OSD Language
Defaults
Firmware
Fast, Normal
Off, One, All
English
Chinese
Chinese F
French
German
Japanese
Spanish
Reset
Edition
Update
Page 32

Control Panel and Remote Control
3-2-3-1 MAIN MENU
The Menu can only be accessed from the Remote Control.
1. Press "Setup" button to show the main menu
on screen
2. Press "Up" / "Down" button to select the
item.
3. Press "Enter" button to enter the sub-menu.
4. Press "Right" button to set the function.
5. Press "Enter" button to confirm the setting
6. Press "Left" button to return the function
item.
7. Select "EXIT SETUP" to exit the setup main.
Main Menu includes:
PHOTO SETUP
MUSIC SETUP
SLIDESHOW SETUP
MOVIE SETUP
PREFERENCES
DRAWING 46
3-2-3-2 PHOTO SETUP
Digital cameras automatically store a thumbnail of each picture taken. These thumbnails load
faster and allow you to browse photos more easily.
The Media Player can detect and display these thumbnails. The PHOTO SETUP function lets
you turn the THUMBNAIL DIGEST on or off. If you select on, you can view your photos more
quickly.
Submenu
DRAWING 47
DRAWING 48
3
1
Page 33

Control Panel and Remote Control
3-2-3-3 MUSIC SETUP
Submenu
DRAWING 49
Repeat Mode
ONE—Repeats the selected song.
ALL— Repeats all the songs in the memory card.
OFF— Does not repeat any songs.
3-2-3-4 SLIDESHOW SETUP
DISPLAY MODE — Set to cause the slideshow to
start automatically.
REPEAT MODE —Set to cause all photos in a folder
to display consecutively and continuously (in a loop).
INTERVAL TIME —Set the show time of each photo.
(One, Three, Five, or Ten sec).
TRANSITION — Set the transition mode between
slides.
FULL SCREEN — Image appears full screen
TOP -> BOTTOM —Image rolls in from top to bottom
BOTTOM -> TOP —Image rolls in from bottom to top
TB -> CENTER —Image rolls in from top and bottom
to center
CENTER -> TB —Image rolls from center to top and
bottom
BLIND: T -> B— Image rolls in blinds from top to
bottom
LEFT -> RIGHT— Image rolls in from left to right
RIGHT -> LEFT— Image rolls in from right to left
L/R -> CENTER— Image rolls in from left and right to
center
DRAWING 50
DRAWING 51
Submenu
DRAWING 52
3
2
Page 34

Control Panel and Remote Control
AUTO START —When turned on, any media in the memory card plays automatically when the
card is inserted.
3-2-3-5 MOVIE SETUP
INTERVAL TIME
FAST: A short preview of movie plays in Thumbnail view.
NORMAL: The whole movie plays in Thumbnail view.
REPEAT MODE
OFF: REPEAT MODE is turned off.
ONE: Plays the selected movie continuously (loop).
ALL: Plays all movies on the memory card continuously(loop).
Submenu
DRAWING 53
3-2-3-6 PREFERENCE
OSD LANG: Selects the OSD language.
DEFAULTS: Returns to the default value.
FIRMWARE: Updates the firmware. (For service person use only)
DRAWING 55 DRAWING 56
DRAWING 54
3
3
Page 35

Control Panel and Remote Control
3-2-4 DVD PLAYER'S OSD
Press the "Setup"(green) button on the Remote Control to enter the DVD player's OSD.
LANGUAGE
VIDEO
AUDIO 1
AUDIO 2
LANGUAGE
OSD Menu
Subtitle
Audio
DVD menu
VIDEO
TV Shape
TV System
AUDIO
AC3
DTS
MP3/WMA
Others
English, 簡體中文, 繁體中文, Francais
日本語, Deutsch, Spanish
English, 簡體中文, 繁體中文, Francais
日本語, Auto, Off
English, 簡體中文, 繁體中文, Francais
Japanese, German, Spanish
English, 簡體中文, 繁體中文, Francais
Japanese, German, Spanish
4:3, 16:9
NTSC, PAL, PAL60, AUTO
Analog Out - 2 Channels, 6 Channels
Digital Out - PCM, RAW, OFF
Analog Out - 2 Channels, 6 Channels
Digital Out - PCM, RAW, OFF
Analog Out - 2 Channels, 6 Channels
Digital Out - PCM, RAW, OFF
Analog Out - 2 Channels, 6 Channels
Digital Out - PCM, RAW, OFF
MORE AUDIO
Prologic
Subwoofer
Factory Set
3
4
Auto, On, Off
On, Off
On, Off
Page 36

Control Panel and Remote Control
3-2-4-1 MAIN MENU
The Menu can only be accessed from the Remote
Control.
1. Press "Setup" button to show the main menu on
screen.
2. Press "Right" or "Left" button to select the item
you want.
3. Press "Enter" button to enter the sub-menu.
4. Press "Up" button to return the main menu.
5. Press "Setup" button to exit the menu.
3-2-4-2 LANGUAGE
OSDMenu
SelectstheLanguageofOSDMenu.
(English,簡體中文 , 繁體中文, Francais,日本語, Deutsch,
Spanish)
Subtitle
SelectstheLanguageofsubtitle.
(English,簡體中文 ,繁體中文,Francais,日本語,Auto,Off)
Audio
SelectstheLanguageofdub.
(English,簡體中文 ,繁體中文,Francais,日本語,Deutsch,
Spanish)
DVDMenu
SelectstheLanguageofDVDMenu.
(English,簡體中文 ,繁體中文,Francais,日本語,Deutsch,
Spanish)
DRAWING 57
DRAWING 58
3
5
Page 37

Control Panel and Remote Control
3-2-4-3 VIDEO
TV Shape
There are two aspect ratios to choose from:
4:3: The image will be displayed in 4:3 aspect.
16:9: The image will be displayed in 16:9 wide screen.
TV System
Selects system you need.
DRAWING 59
3-2-4-4 AUDIO 1
AC3, DTS, MP3/WMA, Others:
Analog Out:Selects the channels you need (2 or 6
channels)
Digital Out: PCM, RAW, OFF
RAW: Digital output
PCM: Analog output
Please set 2 channels and PCM when playing wireless
stereo speaker.
DRAWING 60
3
6
Page 38

Control Panel and Remote Control
3-2-4-5 AUDIO 2
Prologic:
Auto: Default setting. The DVD player will automatically
change the output from 2 channels to 6 channels.
On: Sets the function always on.
Off: Sets the function off.
Subwoofer:
On: Sets the subwoofer on.
Off: Sets the subwoofer off.
Factory Set:
On: Restores the default setting.
Off: Keeps the user's setting.
DRAWING 61
3
7
Page 39

APPENDICES
4.
4-1 TROUBLESHOOTING
1. No Images appears
Check the power cable connection at the power inlet of the projector and at the
wall outlet.
Confirm that the main power switch at the rear of the projector is in the on
position.
Check the Standby/on button indicator. (Section 3-1)
Confirm that the lens cap has been removed.
Make sure the source device is properly connected to the projector, and is
outputing a signal.
Press "Source" button on either the projector or the Remote Control to ensure
that correct source is selected.
2. Image is blurred
Ensure the distance between the projector and the screen is within the focus
range of the lens. (Section 2-2)
Adjust the focus ring.
3. Image is too dark
Adjust the contrast or brightness in the image menu of projector properly.
Adjust the brightness in the setup menu of DVD player.
Has the lamp reached the end of its life? If so replace the lamp.
4. Computer Image is unstable or the projector isn't projecting the whole image.
Press "SYNC" button either on the projector or the Remote Control to
synchronize the computer output signal.
Use "Image" menu to adjust the tracking or frequency.
Verify that the computer's output resolution to the projector is less than or
equal to 1024 x 768.
5. Image is stretched when displaying 16:9 DVD.
Adjust the "Aspect Ratio" in the OSD of projector.
Adjust the "TV Shape" in the OSD of DVD player.
3
8
Page 40

6. No sound
Make sure the Mute option in Audio menu is off.
Make sure the Audio menu in DVD player's OSD is set properly.
Make sure the Internal/External speaker option in audio menu is set as required.
Make sure the channel of wireless transmitter selected in projector is the same
as the channel of wireless receiver selected in the wireless speaker.
7. Wireless speaker noisy
Change the channels on the projector and wireless speaker simultaneously.
There are 8 channels selectable.(refer to the Section 3-2-2-4)
8. Remote control does not work
Install new batteries.
Make sure there are no obstacles between you and the projector's receivers.
APPENDICES APPENDICES
Make sure you are attempting to operate it within its usable range.
9. Can't read the memory card
Make sure the Media Player's LED indicator (beside the card slot) is lighting..
Check the compatibility of memory card (refer to section 2-3-2)
Re-insert the memory card.
10. Can't play DVD
Make sure the DVD player's LED indicator (on the control panel of the projector)
is lighting
Confirm that the disc is an original edition.
Eject the disc and play again.
11. The disc can't play or is automatically ejected after loading
Make sure the disc is free from dirt and dust and is not damaged.
Make sure the disc is loaded with the label side face-up and aligned properly in
the disc tray guide.
Make sure the disc format is compatible with the DVD player of the projector.
Please refer to the specification.
12. The color of Image is not correct
Please reset all settings.
3
9
Page 41

4-2 MAINTENANCE
4-2-1 REPLACING THE LAMP
When the lamp's total working time accumulates to over 1850 hours, the on-screen
display (OSD) will deliver a message recommending that you replace the lamp. Please
contact a service center to replace the lamp as soon as possible, or refer to the
following instructions to replace it yourself.
TO REPLACE THE LAMP
1. Turn off the projector by pressing the "Power" button
2. Allow the projector to cool down for at least one hour.
3. Switch off the power and disconnect the power cord.
4. Loosen the screw on the lamp cover and remove the lamp cover. (Drawing 62)
5. Loosen two screws on the lamp module (Drawing 63) remove the lamp module by
pulling on the handle (Drawing 64)
6. Insert a new lamp module (Drawing 65) into the socket: make sure it is in position.
7. Reverse steps 4 and 5
8. Ensure that the lamp cover is securely attached and flush with the bottom of the unit.
The unit will not operate with the cover incorrectly installed.
9. Reset the lamp timer
DRAWING 63DRAWING 62
DRAWING65DRAWING 64
4
0
Page 42

APPENDICES
To reset the lamp timer
1. Press the Menu button on control panel
or remote controller.
2. Go into the system menu and move the
cursor to the lamp reset item.
3. Select "Yes" to execute the lamp reset
and the lamp hours will reset to 0 hour.
DRAWING 66
Important
* Do not touch the lamp immediately after it has been used: it will be extremely hot.
Allow the fan to finish its cooling process, then turn the projector off, and disconnect
the power cord. Then allow at least one hour for the lamp to cool down before handling.
* Do not remove any screws other than the lamp cover screw and the lamp housing
screws. Removing other screws could result in electric shock.
* Although the mercury content of the lamp is minuscule, spent lamps should be
treated as hazardous waste. Consult federal, state/provincial or local regulations for
proper disposal.
CAUTION
Continuing to use the lamp after the replace the lamp message has been displayed on
the screen may result in the lamp exploding. If this occurs, pieces of glass may scatter
inside the projector, and out into the room. If this occurs, do not touch them, as the
pieces of glass may cause injury. The bulb contains a small amount of mercury:
ventilate the area well. Contact your dealer for servicing: do not attempt to service the
projector yourself.
4
1
Page 43

APPENDICES
4-2-2 CLEANING THE PROJECTOR
Cleaning the cabinet
Wipe lightly with a soft, dry cloth. If the cabinet is very dirty, clean it with a soft,
dampened cloth using mild commercial cleaner and finish with a dry cloth. Do not use
liquid or aerosol cleaners.
Cleaning the lens
Clean the lens carefully by using a blower or lens paper to prevent creating any
scratches on lens.
4
2
Page 44

4-3 SPECIFICATION
APPENDICES
Color system
Computer compatibility
Screen size (diagonal)
Throw distance
Brightness
Contrast ratio
DMD panel
Color wheel
Number of pixels
Horizontal resolution
Projection lens
Lens shift (U/D ratio)
Projection lamp
Digital Zoom
Digital Keystone
Picture Reverse Scan
Front Elevation /
Maximum tilt angle
Scanning frequency
Operating temperature
Fan noise
Computer Input
Computer Output Dsub 15 x1
Video
Audio Out
Built-in Speaker
Wireless Speaker
Power Supply
Power consumption
Dimensions (WxDxH)
Net weight
Regulations
Standard Accessories
Optional Accessories
NTSC/PAL/SECAM/NTSC4.43
SXGA (Compression) /XGA/SVGA/VGA/Mac
Adjustable from 35” to 300”
1.5m – 10m
1800 ANSI lumens
2000 : 1
Single 0.7” DDR XGA DMD
4 segmentations
786,432 (1024 x 768)
480 TV Lines (S-Video)
F2.8~ 3.1, f = 25.8 ~ 30 mm, Zoom ratio: 1.2:1
10 : 0
250 W, Lamp life: 2000 hours (Normal mode) / 3500 hours (Eco mode)
Max. X32 for XGA mode
+/- 12 degrees (Vertical)
Left/Right and Top/Bottom
Up to 15 degrees / 45 degrees up and down
Automatic frequency control
H sync. 15kHz~82kHz, V sync. 50Hz~85Hz
5°C to + 35°C
32dBA
Dsub 15 x1
Component (HDTV, EDTV) input: RCA Jack x3, RCA x1 (Composite),
Mini DIN 4-pin x1, RCA x2 (R, L-mono)
3.5mm mini Jack x 1: Audio Out
3.5mm mini Jack x 3: Audio 5.1 channel output
2W x 1
Stereo 25W x 2
Dimension (WxDxH): 170x180x270 mm(6.7" x 7.1" x 10.6")
Weight: 8.35 Kg
100 - 240V, 50 - 60Hz
330W
374 x 290 x 92mm (14.7" x 11.4" x 3.6")
4.5 kg (10 lb)
1. EMC - FCC Class B, CE Class B, CCC
2. Safety - cUL, TUV, CB
Power cord
VGA Cable
Audio Cable
Mac Adapter
Remote Control
Soft Carry Bag for projector
25W x 2 Wireless speakers
TV tuner
Deluxe speaker
Satellite speaker
Soft Carry Case for Wireless Speakers
4
3
Page 45

 Loading...