

Page 1
Movement sensor
Instruction Manual
Eiki A-3
Package contents
Item Qty.
Movement sensor 1
Manual 1
Page 2
r
V:E1.01
To the InstallerR
Thank you for choosing Eiki A-3.
The A-3 uses passive infra-red technology
to detect movement in a room. It is
intended to be used with the Eiki range of
control systems to automatically shut
down equipment in the room after a period
of time when no movement is detected, so
saving energy and maximising projector
lamp life.
Before commencing installation, please
read these instructions carefully to get the
best results from your A-3.
For your safety
Please ensure that any wiring used to
connect A-3 to other equipment is kept
clear of mains wiring and follows
applicable local wiring codes. Under no
circumstances may an A-3 be connected
directly to power mains wiring.
Make sure that the power supply you are
using meets your local safety regulations
and that its voltage does not exceed 15
volts DC. Unregulated power supplies can
output voltages that are well above what is
shown on their label.
The A-3 is intended for indoor use only.
This product
conforms to the
EMC directive
89/336 CCE
NOTE: This symbol and recycle system apply to EU
countries only and do not apply to countries in othe
areas of the world.
Please dispose of this equipment at your local
community waste collection/recycling centre. In the
European Union there are separate collection systems
for used electrical and electronic products.
Your EIKI product is designed
and manufactured with high
quality materials and
components which can be
recycled and reused.
This symbol means that
electrical and electronic
equipment, at their end-of-life,
should be disposed of
separately from your
household waste.
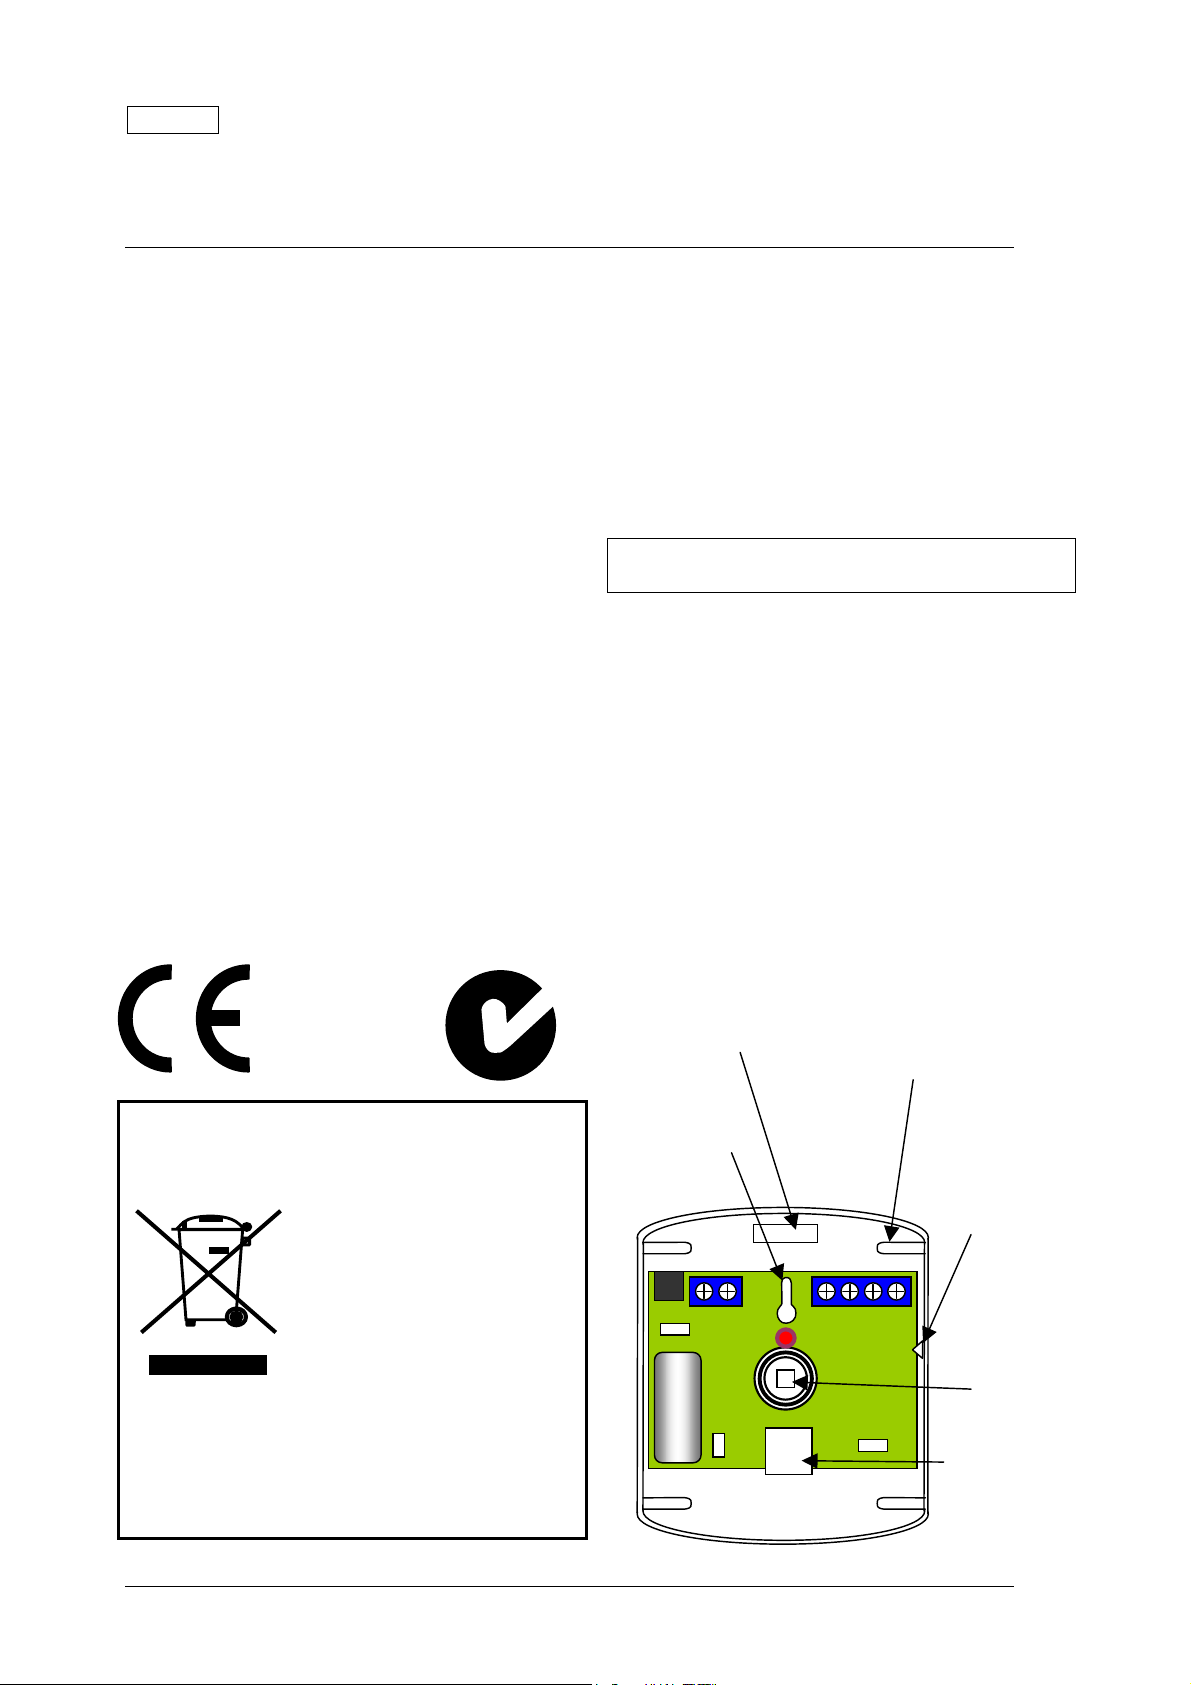
Mounting
Choose a location on a wall that is
preferably 3 to 4 metres from the floor, not
adjacent to heating or air conditioning
outlets or opposite windows and where
people moving in the room can be “seen”
by the A-3.
Remove the cover by placing a small flatbladed screwdriver in the bottom of the
case and gently prise the cover off.
DO NOT TOUCH THE PYRO SENSOR
INSIDE WITH YOUR FINGERS!
You may remove the circuit board to
facilitate mounting the base to the wall. To
do this, lift the white plastic tab at the
lower side and push the board up until it
clears the keyhole slot at the top. At this
point the board may be lifted out of the
base.
When replacing the board, to achieve
optimum coverage, adjust the position of
the board in the base to match the height
of the A-3 above the floor. Moving the
board higher will lower the beam angle.
Please refer to the Mounting Height scale
on the right-hand side of the board.
After wiring, refit the cover with its lens.
The cover must be in place in order to test
the A-3.
Cable
access
knockout
Keyhole
slot
Mounting
hole
knockout
Mounting
height
pointer
Pyro
sensor
White plastic
tab
Eiki A-3 Movement Sensor manual. Page 2
Page 3

Wiring
Connect the terminals as shown in the
diagram to the control panel or access
port.
You do not need to connect the tamper
switch terminals.
GND
+12v
Sensor
Tamper switch
Alarm + N/C 12v
Testing
With the cover fitted, apply power and wait at
least 30 seconds. After this time, if there is
no movement, the LED should go out. Once
this has happened, any movement should
cause a couple of rapid flickers and the LED
should lock on for about 5 seconds.
Walk around the room and check that your
movement can be reliably detected. If range
seems to be inadequate, check the position of
the PCB in the base. A higher position lowers
the angle of the detection beam.
Programming your control panel
to recognise the A-3 and perform
actions
In Eiki Control System editor, select Device
Options under the Handset menu.
Option links
Option Links
For the purpose of detecting room
occupancy, we are not as concerned
about false alarms as we would be if
this were a security system. In fact,
not detecting room movement (when
people are in the room) would be more
of a problem.
For this reason, Long Range and
Short Pulse Count links should be
fitted. Similarly, having the LED
activate is a benefit.
So for our application, fit all 3 links.
Eiki A-3 Movement Sensor manual. Page 3
The Inactivity Timeout option allows you to
choose the number of seconds (up to 14400
seconds which is 240 minutes) after either
the last key is pressed or the A-3 sensor
detects movement. When that time expires
with no movement detected or key pressed,
the actions you choose under Edit Actions will
occur.
After you have selected the time, click Edit
Actions. You can treat this just like the
programming of any other key.
For more information
Please refer to the control panel’s manual for
more information.
Page 4

U.S.A.
EIKI International, Inc.
30251 Esperanza
Rancho Santa Margarita
CA 92688-2132
U.S.A.
Tel : 800-242-3454 (949)-457-0200
Fax : 800-457-3454 (949)-457-7878
E-Mail : usa@eiki.com
Deutschland & Österreich
EIKI Deutschland GmbH
Am Frauwald 12
65510 Idstein
Deutschland
Tel : 06126-9371-0
Fax : 06126-9371-14
E-Mail : info@eiki.de
Eiki (Shanghai) Co., LTD
1. Dapu Road,
Golden Magnolia Plaza
#2109 Shanghai,
200023 China
Tel : 86-21-5396-0088
Fax : 86-21-5396-0318
E-mail : info@eikichina.com.cn
Canada
EIKI CANADA - Eiki International, Inc.
P.O. Box 156, 310 First St. - Unit 2,
Midland, ON, L4R 4K8, Canada
Tel : 800-563-3454 (705)-527-4084
Fax : 800-567-4069 (705)-527-4087
E-Mail : canada@eiki.com
Eastern Europe
EIKI CZECH spol. s.r.o.
Umělecká 15
170 00 Praha 7
Czech Republic
Tel : +42 02 20570024
+42 02 20571413
Fax : +42 02 20571411
E-Mail : easterneurope@eiki.de
Japan & Worldwide
EIKI Industrial Company Limited.
4-12 Banzai-Cho, Kita-Ku, Osaka,
530-0028 Japan
Tel : +81-6-6311-9479
Fax : +81-6-6311-8486
E-Mail : japan@eiki.com
For the latest software and information go to:
WorldWide Website http://www.eiki.com
Eiki A-3 Movement Sensor manual. Page 4
 Loading...