

Page 1
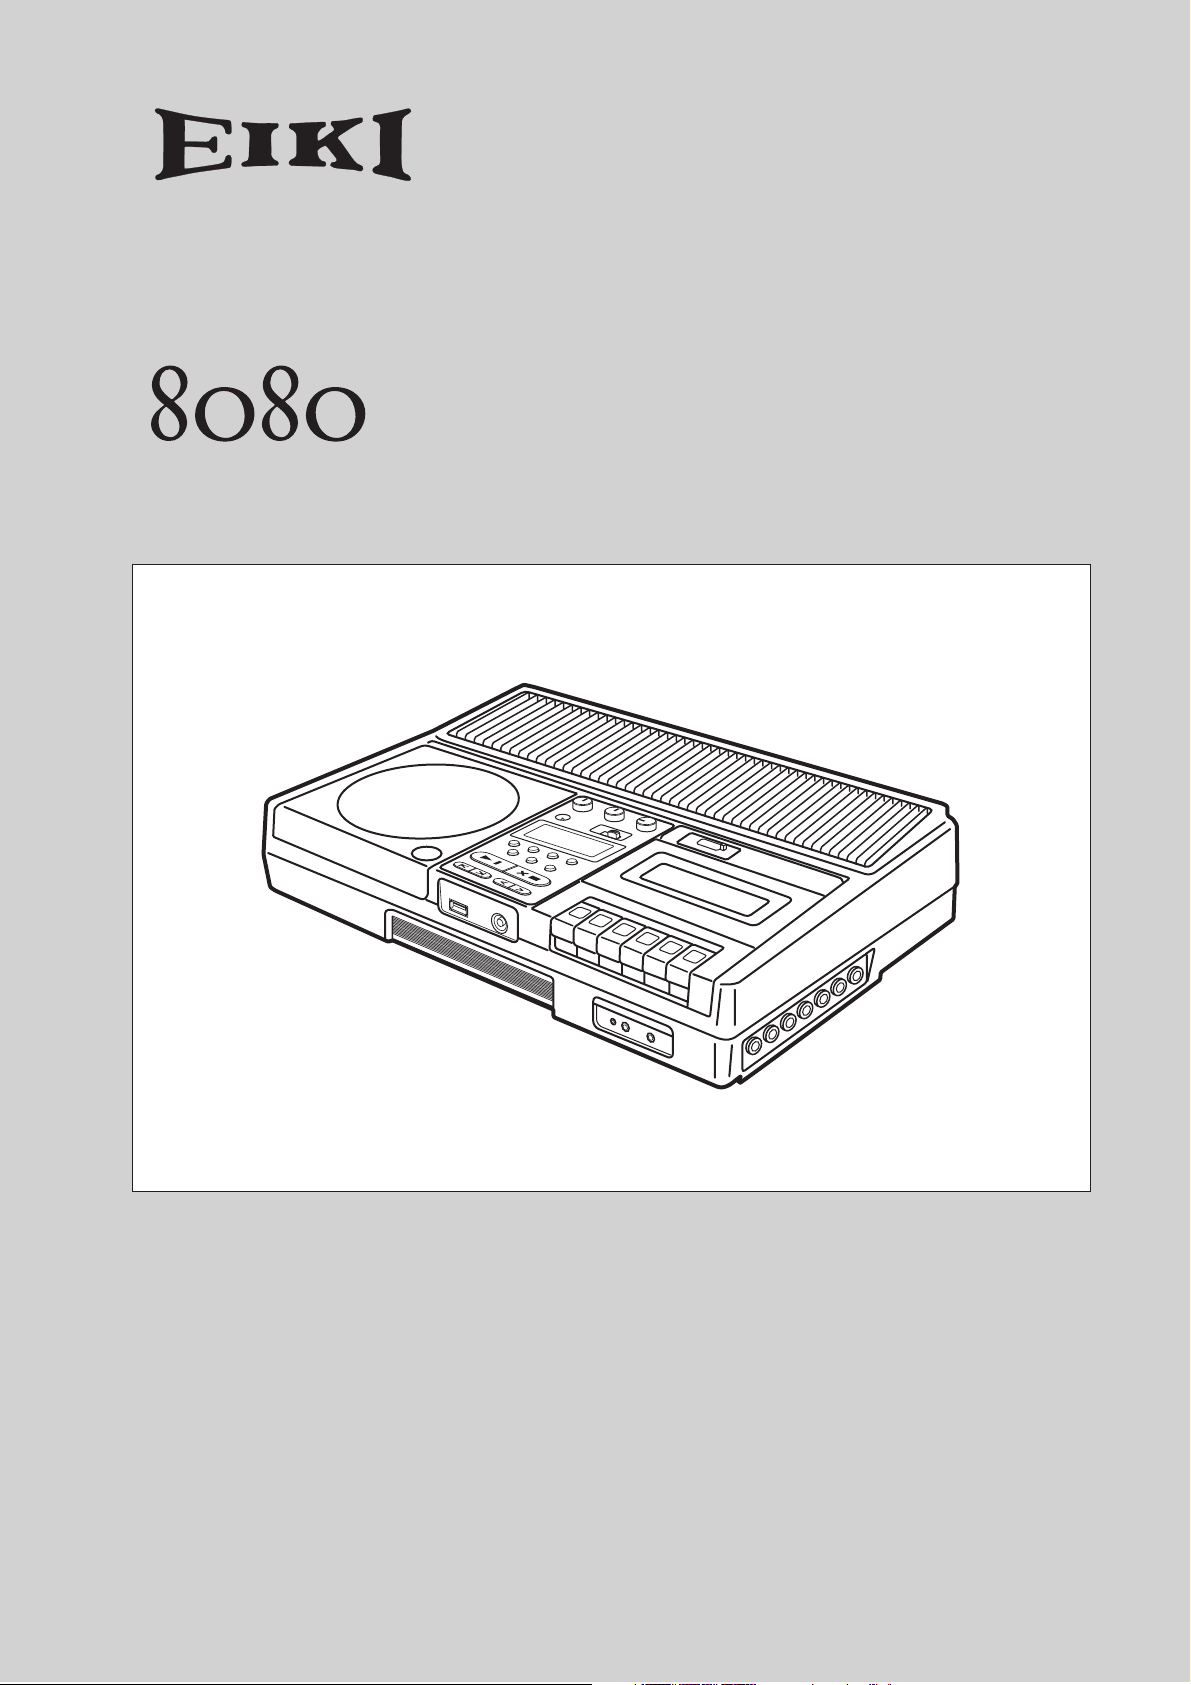
USB Recorder
CD Player
Cassette Tape Recorder
Owner’s Manual
Thank you very much for purchasing an EIKI 8080.
Please read this manual thoroughly for information
on how to use the 8080 properly, and keep the
manual along with the warranty card in a safe place
for future reference.
Page 2
WARNING:
TO REDUCE THE RISK OF FIRE OR ELECTRIC
SHOCK, DO NOT EXPOSE THIS APPARATUS
TO RAIN OR MOISTURE.
CAUTION:
TO REDUCE THE RISK OF ELECTRIC SHOCK,
DO NOT REMOVE COVER (OR BACK). NO
USER-SERVICEABLE PARTS INSIDE. REFER
SERVICING TO QUALIFIED SERVICE
PERSONNEL.
Important Safety Instructions
1. Read these instructions.
2. Keep these instructions.
3. Heed all warnings.
4. Follow all instructions.
5. Do not use this apparatus near water.
6. Clean only with dry cloth.
7. Do not block any ventilation openings. Install in accordance with the manufacturer’s instructions.
8. Do not install near any heat sources such as radiators, heat
registers, stoves, or other apparatus (including amplifiers)
that produce heat.
9. Do not defeat the safety purpose of the polarized or
grounding-type plug. A polarized plug has two blades with
one wider than the other. A grounding type plug has two
blades and a third grounding prong. The wide blade or the
third prong are provided for your safety. If the provided
plug does not fit into your outlet, consult an electrician for
replacement of the obsolete outlet.
10. Protect the power cord from being walked on or pinched
particularly at plugs, convenience receptacles, and the
point where they exit from the apparatus.
11. Only use attachments/accessories specified by the manufacturer.
12.
Use only with the cart, stand, tripod,
bracket, or table specified by the
manufacturer, or sold with the apparatus. When a cart is used, use caution when moving the cart/apparatus
combination to avoid injury from
tip-over.
13. Unplug this apparatus during lightning storms or when unused for long periods of time.
14. Refer all servicing to qualified service personnel. Servicing is required when the apparatus has been damaged in
any way, such as power-supply cord or plug is damaged,
liquid has been spilled or objects have fallen into the apparatus, the apparatus has been exposed to rain or moisture,
does not operate normally, or has been dropped.
PORTABLE CART WARNING
S3125A
WARNING
RISK OF ELECTRIC SHOCK
DO NOT OPEN
The lightning flash with arrowhead symbol, within an
equilateral triangle, is intended to alert the user to the
presence of uninsulated “dangerous voltage” within
the product’s enclosure that may be of sufficient
magnitude to constitute a risk of electric shock to
persons.
The exclamation point within an equilateral triangle is
intended to alert the user to the presence of important
operating and maintenance (servicing) instructions in
the literature accompanying the appliance.
15. Damage Requiring Service
Unplug the apparatus from the wall outlet and refer servicing to qualified service personnel under the following conditions:
A. When the power-supply cord or plug is damaged,
B. If liquid has been spilled, or objects have fallen into the
apparatus,
C. If the apparatus has been exposed to rain or water,
D. If the apparatus does not operate normally by following
the operating instructions. Adjust only those controls
that are covered by the operating instructions as an
improper adjustment of other controls may result in
damage and will often require extensive work by a
qualified technician to restore the apparatus to its nor-
mal operation,
E. If the apparatus has been dropped or damaged in any
way, and
F. When the apparatus exhibits a distinct change in perfor-
mance this indicates a need for service.
16. Object and Liquid Entry
Never push objects of any kind into the apparatus through
openings as they may touch dangerous voltage points or
short-out parts that could result in a fire or electric shock.
The apparatus shall not be exposed to dripping or splashing and no objects filled with liquids, such as vases shall
be placed on the apparatus.
Don’t put candles or other burning objects on top of this
unit.
17. If you install the apparatus in a built-in installation, such as
a bookcase or rack, ensure that there is adequate ventilation.
Leave 20 cm (8") of free space at the top and sides and 10
cm (4") at the rear. The rear edge of the shelf or board
above the apparatus shall be set 10 cm (4") away from the
rear panel or wall, creating a flue-like gap for warm air to
escape.
AVIS
RISQUE DE CHOC ELECTRIQUE
NE PAS
OUVRIR
2
Page 3

Precautions
1. Recording Copyright —Unless it’s for personal use only,
recording copyrighted material is illegal without the permission of the copyright holder.
2. AC Fuse
able. If you cannot turn on the unit, contact your dealer.
3. Care
a soft cloth. For stubborn stains, use a soft cloth dampened
with a weak solution of mild detergent and water. Dry the
unit immediately afterwards with a clean cloth. Don’t use
abrasive cloths, thinners, alcohol, or other chemical solvents, because they may damage the finish or remove the
panel lettering.
4. Power
WARNING
BEFORE PLUGGING IN THE UNIT FOR THE FIRST
TIME, READ THE FOLLOWING SECTION CAREFULLY.
AC outlet voltages vary from country to country. Make
sure that the voltage in your area meets the voltage
requirements printed on the unit’s rear panel (e.g., AC 230
V, 50 Hz or AC 120 V, 60 Hz).
The power cord plug is used to disconnect this unit from
the AC power source. Make sure that the plug is readily
operable (easily accessible) at all times.
Plug Cord into a properly ground wall outlet. The threeprong plug should be used without a two-prong adapter
whenever possible.
5. Preventing Hearing Loss
Caution
Excessive sound pressure from earphones and headphones
can cause hearing loss.
6. Never Touch this Unit with Wet Hands
this unit or its power cord while your hands are wet or
damp. If water or any other liquid gets inside this unit,
have it checked by your dealer.
7. Handling Notes
• If you need to transport this unit, use the original pack-
• Do not leave rubber or plastic items on this unit for a
• This unit’s top and rear panels may get warm after pro-
• If you do not use this unit for a long time, it may not
• When you’ve finished using this unit, remove CD, cas-
8. Installing this Unit
• Install this unit in a well-ventilated location.
• Ensure that there’s adequate ventilation all around this
• Do not expose this unit to direct sunlight or heat
•Avoid damp and dusty places, and places subject to
• Install this unit horizontally. Never use it on its side or on
—The AC fuse inside the unit is not user-service-
—Occasionally you should dust the unit all over with
—Never handle
aging to pack it how it was when you originally bought
it.
long time, because they may leave marks on the case.
longed use. This is normal.
work properly the next time you turn it on, so be sure to
use it occasionally.
sette tape, USB flash drive and turn off the power.
unit, especially if it’s installed in an audio rack. If the
ventilation is inadequate, the unit may overheat, leading
to malfunction.
sources, because its internal temperature may rise, shortening the life of the optical pickup.
vibrations from loudspeakers. Never put the unit on top
of, or directly above a loudspeaker.
a sloping surface, because it may cause a malfunction.
9. Moisture Condensation
Moisture condensation may damage this unit.
Read the following carefully:
Moisture may condense on the lens of the optical pickup,
one of the most important parts inside this unit.
• Moisture condensation can occur in the following situa-
tions:
– The unit is moved from a cold place to a warm place.
–A heater is turned on, or cold air from an air condi-
tioner is hitting the unit.
– In the summer, when this unit is moved from an air
conditioned room to a hot and humid place.
– The unit is used in a humid place.
• Do not use this unit when there’s the possibility of mois-
ture condensation occurring. Doing so may damage
your discs and certain parts inside this unit.
If condensation does occur, remove CD, cassette tape,
USB flash drive and leave this unit turned on for two to
three hours. By this time, the unit will have warmed up and
any condensation will have evaporated.
10. Rated label
Rated label and caution marking are located on the bottom
of this unit.
For U.S. models
FCC Information for User
CAUTION:
The user changes or modifications not expressly approved by
the party responsible for compliance could void the user’s
authority to operate the equipment.
NOTE:
This equipment has been tested and found to comply with the
limits for a Class B digital device, pursuant to Part 15 of the
FCC Rules. These limits are designed to provide reasonable
protection against harmful interference in a residential installation.
This equipment generates, uses and can radiate radio frequency energy and, if not installed and used in accordance
with the instructions, may cause harmful interference to radio
communications. However, there is no guarantee that interference will not occur in a particular installation. If this equipment does cause harmful interference to radio or television
reception, which can be determined by turning the equipment
off and on, the user is encouraged to try to correct the interference by one or more of the following measures:
• Reorient or relocate the receiving antenna.
• Increase the separation between the equipment and
receiver.
• Connect the equipment into an outlet on a circuit different
from that to which the receiver is connected.
• Consult the dealer or an experienced radio/TV technician
for help.
For Canadian Models
NOTE:
PLIES WITH CANADIAN ICES-003.
For models having a power cord with a polarized plug:
CAUTION:
WIDE BLADE OF PLUG TO WIDE SLOT, FULLY INSERT.
THIS CLASS B DIGITAL APPARATUS COM-
TO PREVENT ELECTRIC SHOCK, MATCH
3
Page 4
Modèle pour les Canadien
REMARQUE:
CLASSE B EST CONFORME À LA NORME NMB-003 DU
CANADA.
Sur les modèles dont la fiche est polarisée:
ATTENTION:
TRIQUES, INTRODUIRE LA LAME LA PLUS LARGE DE
LA FICHE DANS LA BORNE CORRESPONDANTE DE
LA PRISE ET POUSSER JUSQU’AU FOND.
CET APPAREIL NUMÉRIQUE DE LA
POUR ÉVITER LES CHOCS ÉLEC-
For British models
Replacement and mounting of an AC plug on the power supply
cord of this unit should be performed only by qualified service
personnel.
IMPORTANT
The wires in the mains lead are coloured in accordance with
the following code:
Blue: Neutral
Brown: Live
As the colours of the wires in the mains lead of this apparatus
may not correspond with the coloured markings identifying
the terminals in your plug, proceed as follows:
The wire which is coloured blue must be connected to the terminal which is marked with the letter N or coloured black.
The wire which is coloured brown must be connected to the
terminal which is marked with the letter L or coloured red.
IMPORTANT
The plug is fitted with an appropriate fuse. If the fuse needs to
be replaced, the replacement fuse must approved by ASTA or
BSI to BS1362 and have the same ampere rating as that indicated on the plug. Check for the ASTA mark or the BSI mark
on the body of the fuse.
If the power cord’s plug is not suitable for your socket outlets,
cut it off and fit a suitable plug. Fit a suitable fuse in the plug.
CLASS 1 LASER PRODUCT
Product complies with DHHS rules 21
CFR subchapter J part 1040: 10 at date of
manufacture.
DANGER – invisible laser radiation when
open and interlock failed or defeated. Avoid direct exposure to
the beam.
CAUTION – use of all controls, adjustments or performance of
procedures other than those specified herein may result in hazardous radiation exposure.
The CE Mark is a Directive conformity mark of the
European Community (EC).
CLASS 1
LASER PRODUCT
Supplied Accessory
Owner’s manual (this book)
4
Page 5

Contents
Precautions ................................................................ 3
Supplied Accessory .................................................... 4
Features...................................................................... 6
Orientation ........................................7
Controls and Connections........................................... 7
Top panel ................................................................7
Display .................................................................... 8
Front panel .............................................................. 8
Right side panel ......................................................8
Basic Operation ..................................9
Turning the Power On................................................. 9
Turning the Power Off ................................................9
Basic Operation and Connection............................... 10
Adjusting the tone .................................................... 10
Adjusting the left and right level balance ..................10
Adjusting the volume................................................ 10
Selecting the input.................................................... 10
Connecting a microphone......................................... 11
Connecting an external device .................................. 11
Listening through the headphones ...........................11
Connecting external speakers................................... 11
Listening to Tracks on a CD or USB Flash
Drive.............................................. 12
Changing the display indication................................ 12
Disconnecting the USB flash drive............................ 12
Stopping playback .................................................... 12
Pausing playback...................................................... 12
Skipping tracks (Locating the beginning of a track).. 13
Fast forward/fast rewind (Searching)........................ 13
Selecting a folder...................................................... 13
Recording to a USB Flash Drive.............. 17
Recording from a CD to a USB Flash Drive............... 17
2X Recording from a CD to a USB Flash Drive ......... 18
Recording from a Cassette Tape to a USB Flash
Drive......................................................................... 19
Recording to a Cassette Tape ............... 20
Recording from a CD to a Cassette Tape.................. 20
Recording from a USB Flash Drive to a Cassette
Tape ......................................................................... 21
Using a Microphone or External Device .... 22
Mic Mixing Recording .............................................. 22
Mic Mixing Playback (Microphone Amplification) .... 22
Using an External Device.......................................... 23
Supported Discs, USB Devices, and Files.. 24
Supported Discs....................................................... 24
Supported USB Devices ........................................... 24
Supported Files on a CD and USB Flash Drive.......... 24
About Folders and Files....................... 25
File Playback Sequence ............................................ 25
Folders and Files Created during Recording ............. 25
About CD and Cassette Tape ................. 26
Handling CDs............................................................ 26
Handling Cassette Tapes .......................................... 27
Appendix ........................................ 28
Maintenance............................................................. 28
Troubleshooting ....................................................... 29
Specifications........................................................... 31
OrientationBasic OperationPlaybackRecordingSupported MediaAppendix
Advanced Playback from a CD or USB Flash
Drive.............................................. 14
Playback Pitch Control.............................................. 14
Repeat Playback .......................................................14
Random Playback..................................................... 14
Program Playback ....................................................14
Listening to a Tape ............................ 16
Stopping the tape playback....................................... 16
Pausing the tape playback ........................................ 16
Rewinding or fast forwarding the tape...................... 16
5
Page 6

❏
❏
❏
❏
❏
❏
❏
❏
❏
❏
❏
❏
❏
Features
CD player compatible with MP3 and WMA files
The 8080’s built-in CD player can play not only music CDs but MP3 and WMA files.
It is also compatible with CD-R and CD-RW discs.
USB recorder
The built-in USB recorder can play MP3 and WMA files on the connected USB flash drive.
It also converts audio data on a CD or cassette tape into the MP3 format and records it to the connected USB flash
drive.
Cassette tape recorder
The 8080’s built-in cassette recorder not only plays audio on a tape, but records tracks from the CD or the connected
USB flash drive to a cassette tape.
Playback pitch (speed) control
You can change the playback pitch (speed) of tracks on the CD or USB flash drive in the range of -50% to +100%
without transposing the tune.
Repeat, Program and Random Playback functions
Repeat, Program and Random Playback functions are available during playback of tracks on a CD or USB flash
drive.
7W+7W high-output amplifier
The internal high-output amplifier can drive not only the built-in stereo speakers, but external speakers (optional) as
well.
Five headphone jacks
Up to five headphone jacks can be used simultaneously.
Microphone and AUX input connectors
These connectors can be used for mic mixing or mic sound amplification.
Playback, pause and resume recording can be controlled via the remote switch on a connected microphone
(optional).
The AUX input (monaural) enables you to connect the device to an external device.
Robust design scheme
A very robust product design facilitates years of reliable use in even demanding environments.
6
Page 7
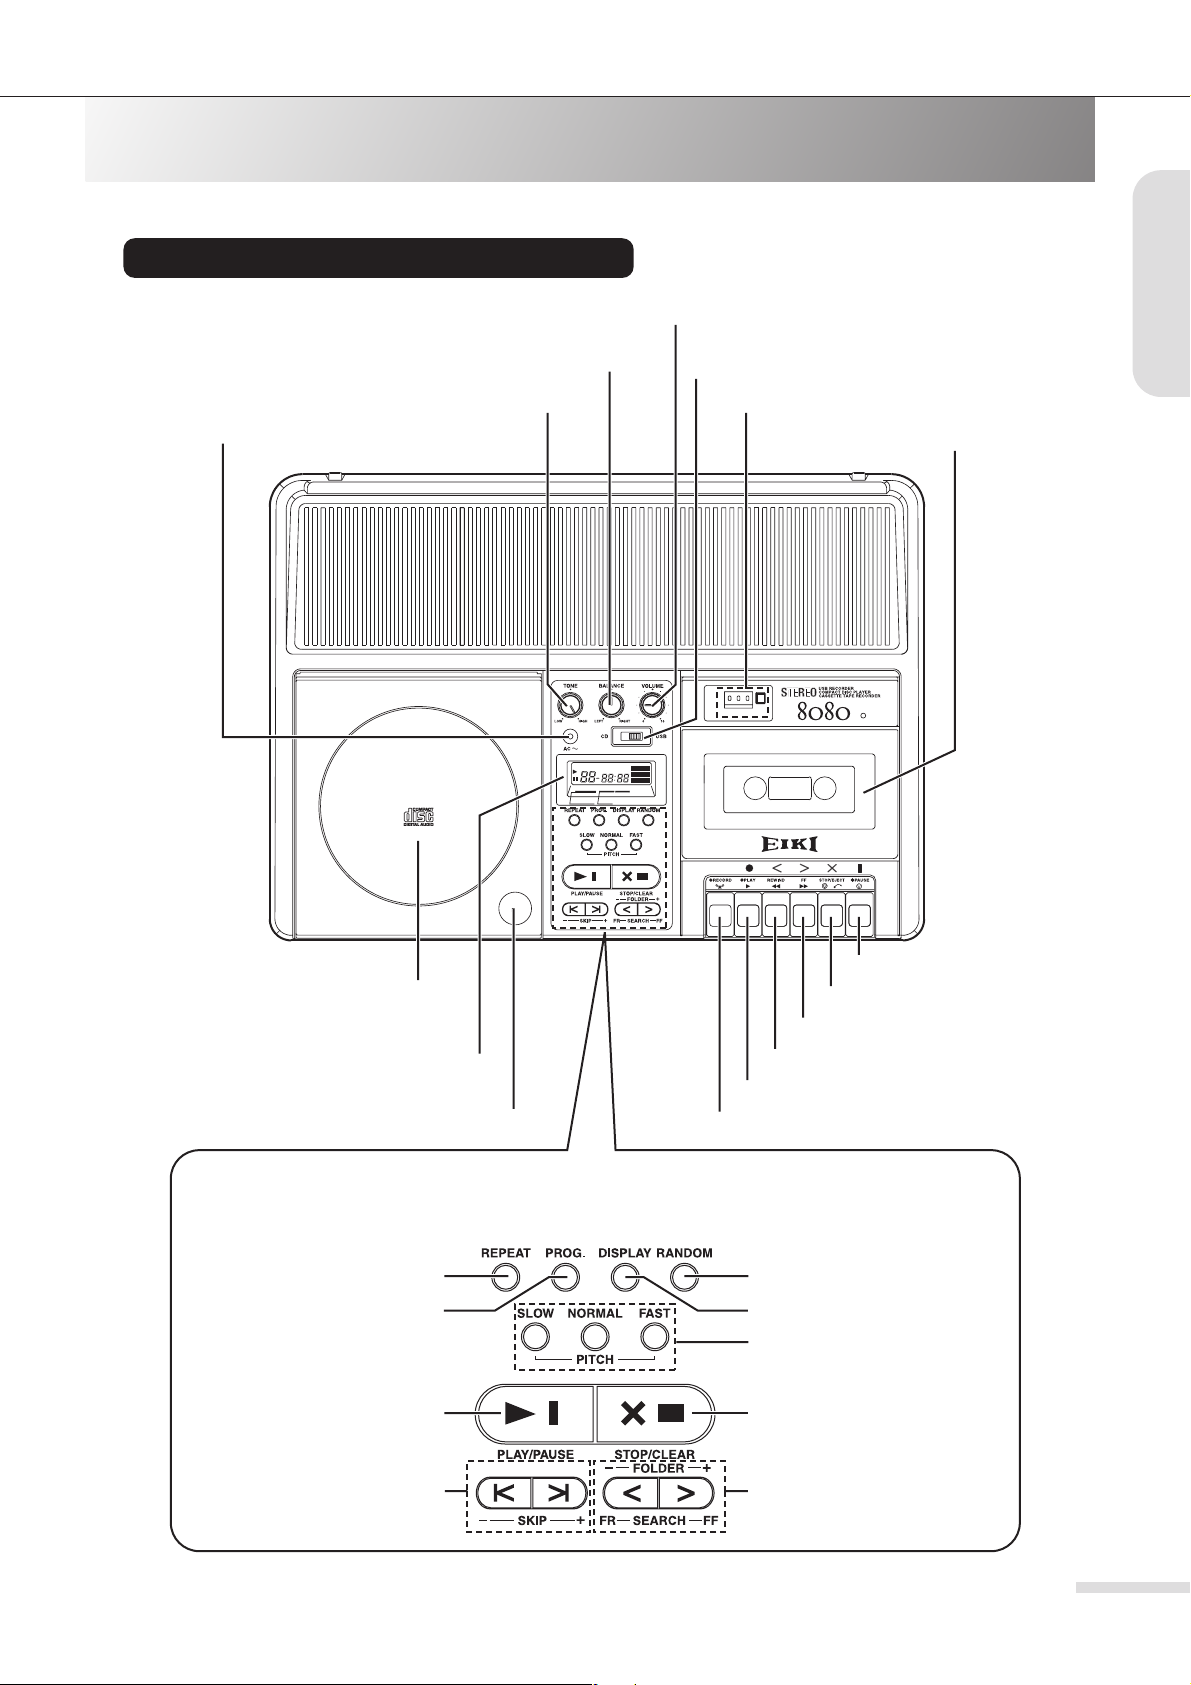
Orientation
Controls and Connections
Please refer to the bracketed page number for a detailed explanation of the corresponding control.
Top panel
[VOLUME] knob [10]
[BALANCE] knob [10]
[CD/USB] Input Select switch [10]
Orientation
[AC] indicator [9]
Disc cover [PUSH OPEN] button [13]
VARIABLE PITCH CONTROL
25 RANDOM ACCESS PROGRAM
Disc cover [13]
LCD display [8]
[TONE] knob [10]
PUSH
OPEN
DIGITAL DISPLAY
REPEAT 1ALL REMAIN
TRACK NO. TIME
MIN. SEC.
RANDOM
PROGRAM
MEMORY
Tape Counter & Counter Reset button [16]
Cassette holder [16]
2 x COUNTER
AUTOMATIC STOP
[PAUSE] button [16]
[STOP/EJECT] button [16]
[FF (Fast Forward)] button [16]
[REWIND] button [16]
[PLAY] button [16]
[RECORD] button [20, 21]
■ CD/USB transport section
[REPEAT] button [14]
[PROG.] button [15]
[PLAY/PAUSE] button [12, 15]
[SKIP] buttons [13, 14]
[RANDOM] button [14]
[DISPLAY] button [12]
[PITCH] button [14]
[STOP/CLEAR] button [12, 15]
[SEARCH/FOLDER] button [13]
7
Page 8
Orientation
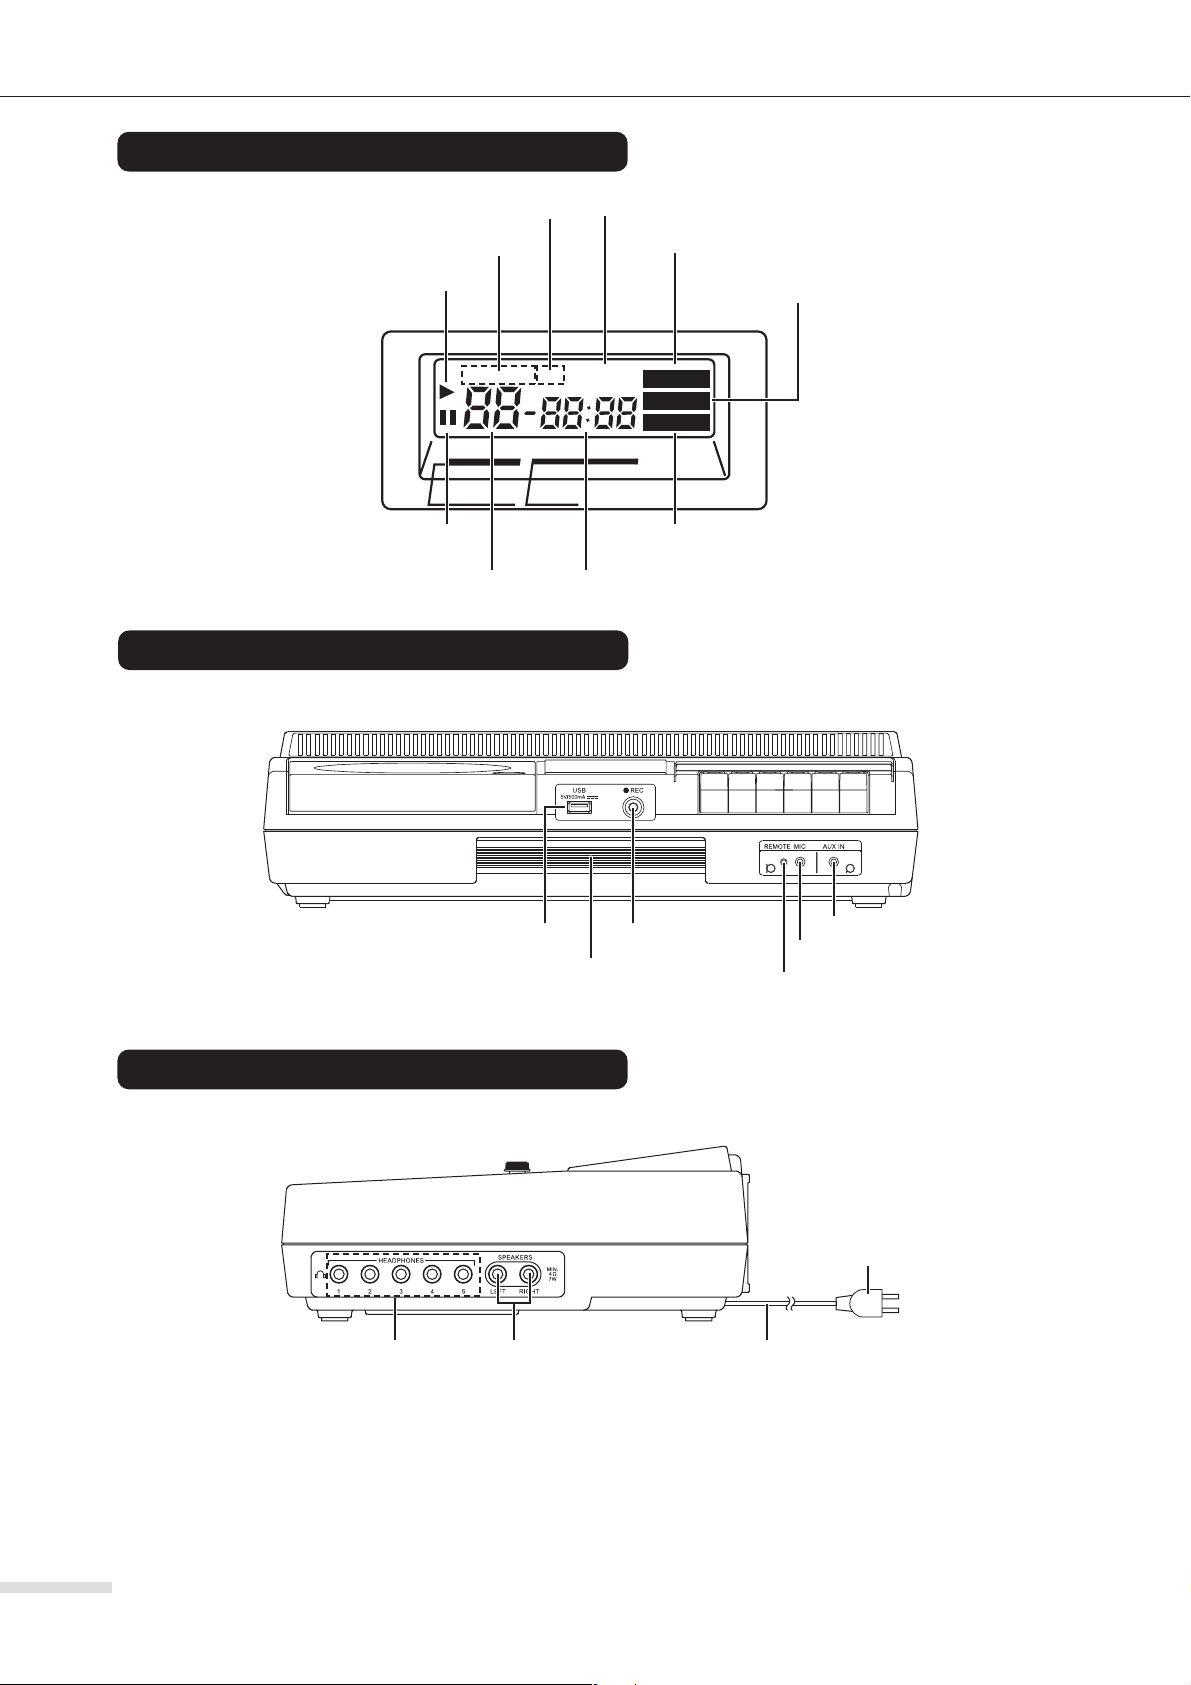
Display
Front panel
[ALL] indicator [14]
[REPEAT] indicator [14]
Playback indicator [13]
TRACK NO. TIME
Pause indicator [12]
[REMAIN] indicator [12]
DIGITAL DISPLAY
REPEAT 1ALL REMAIN
MIN. SEC.
Time/Folder indicator [12]Tr ack Number indicator [12]
[RANDOM] indicator [14]
[PROGRAM] indicator [15]
RANDOM
PROGRAM
MEMORY
[MEMORY] indicator [14]
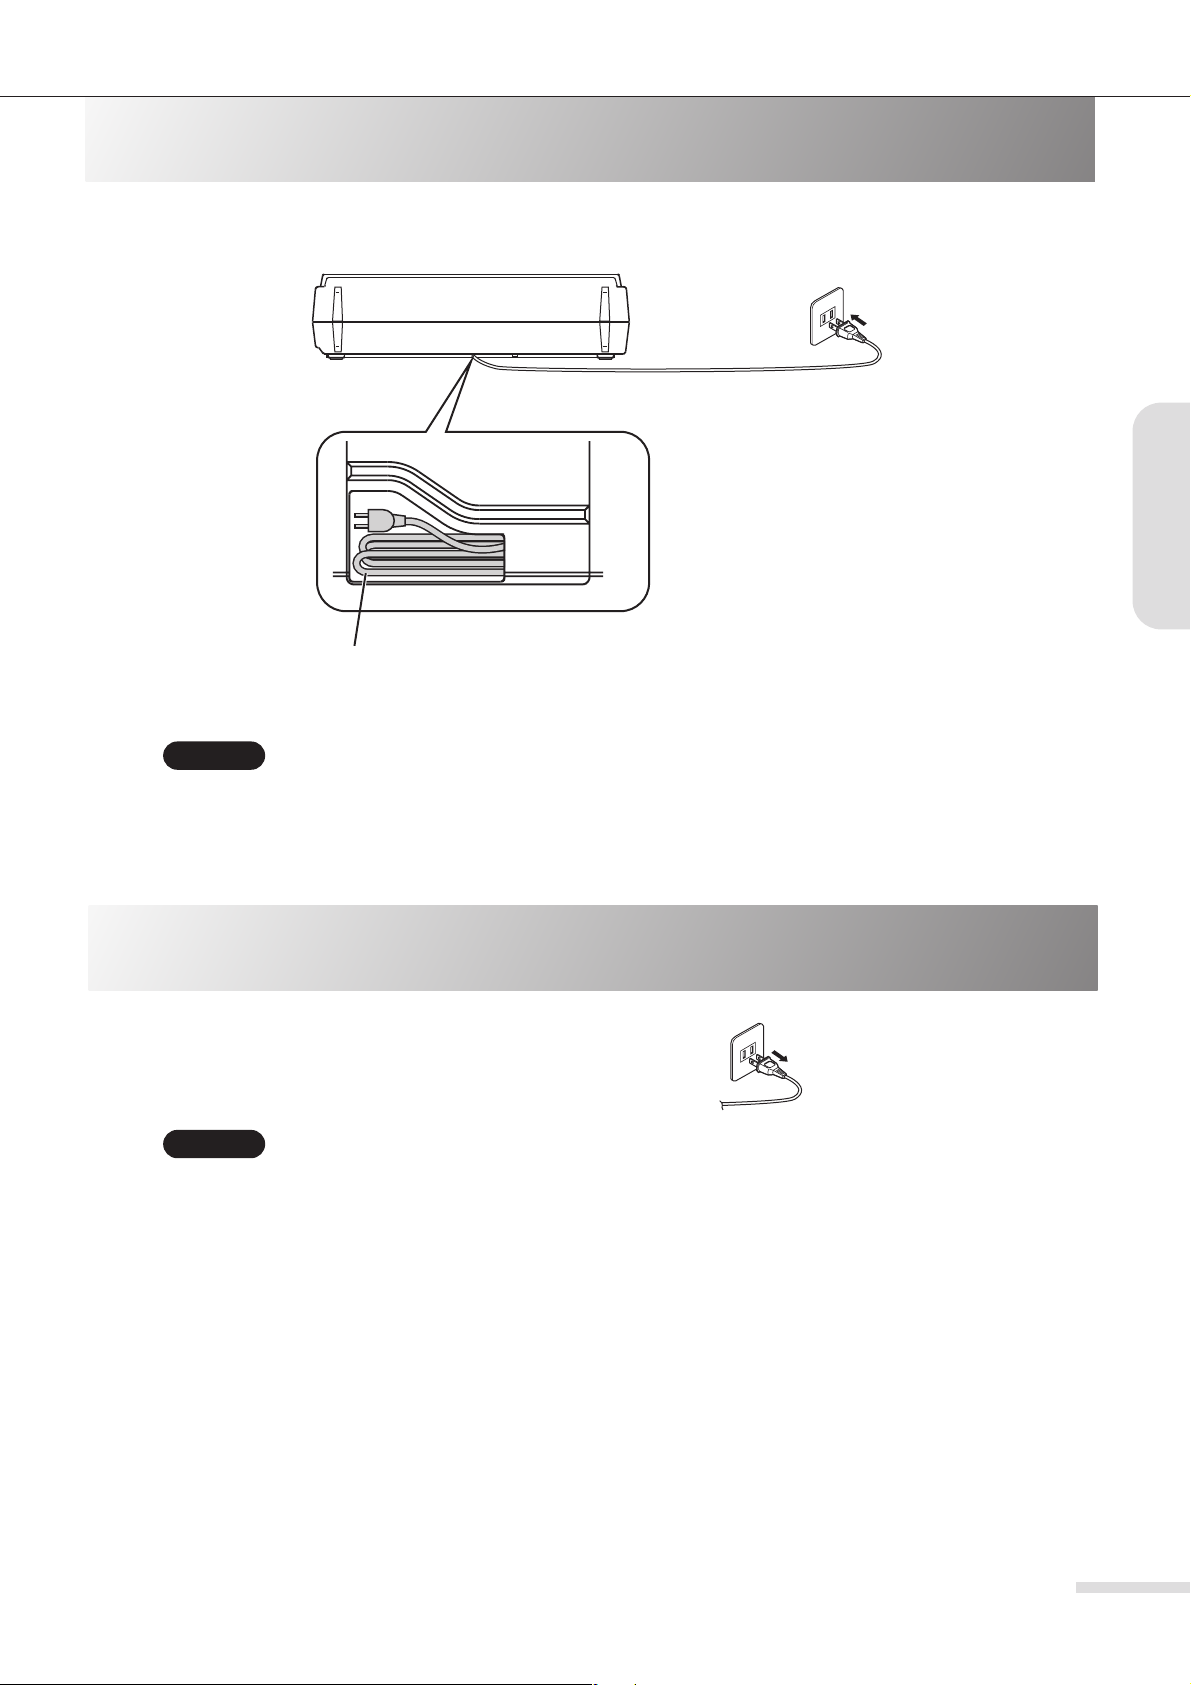
Right side panel
[HEADPHONES] jacks [11]
[USB] port [13]
Carrying handle
[SPEAKERS] connectors [11]
USB [REC] button
[17–19]
[AUX IN] connector [11]
[MIC] connector [11]
[REMOTE] connector [11]
Power cord plug [9]
Plug type varies from country to
country.
Power cord [9]
The power cord is tucked into the compartment
on the bottom of the device.
8
Page 9
Basic Operation
Turning the Power On
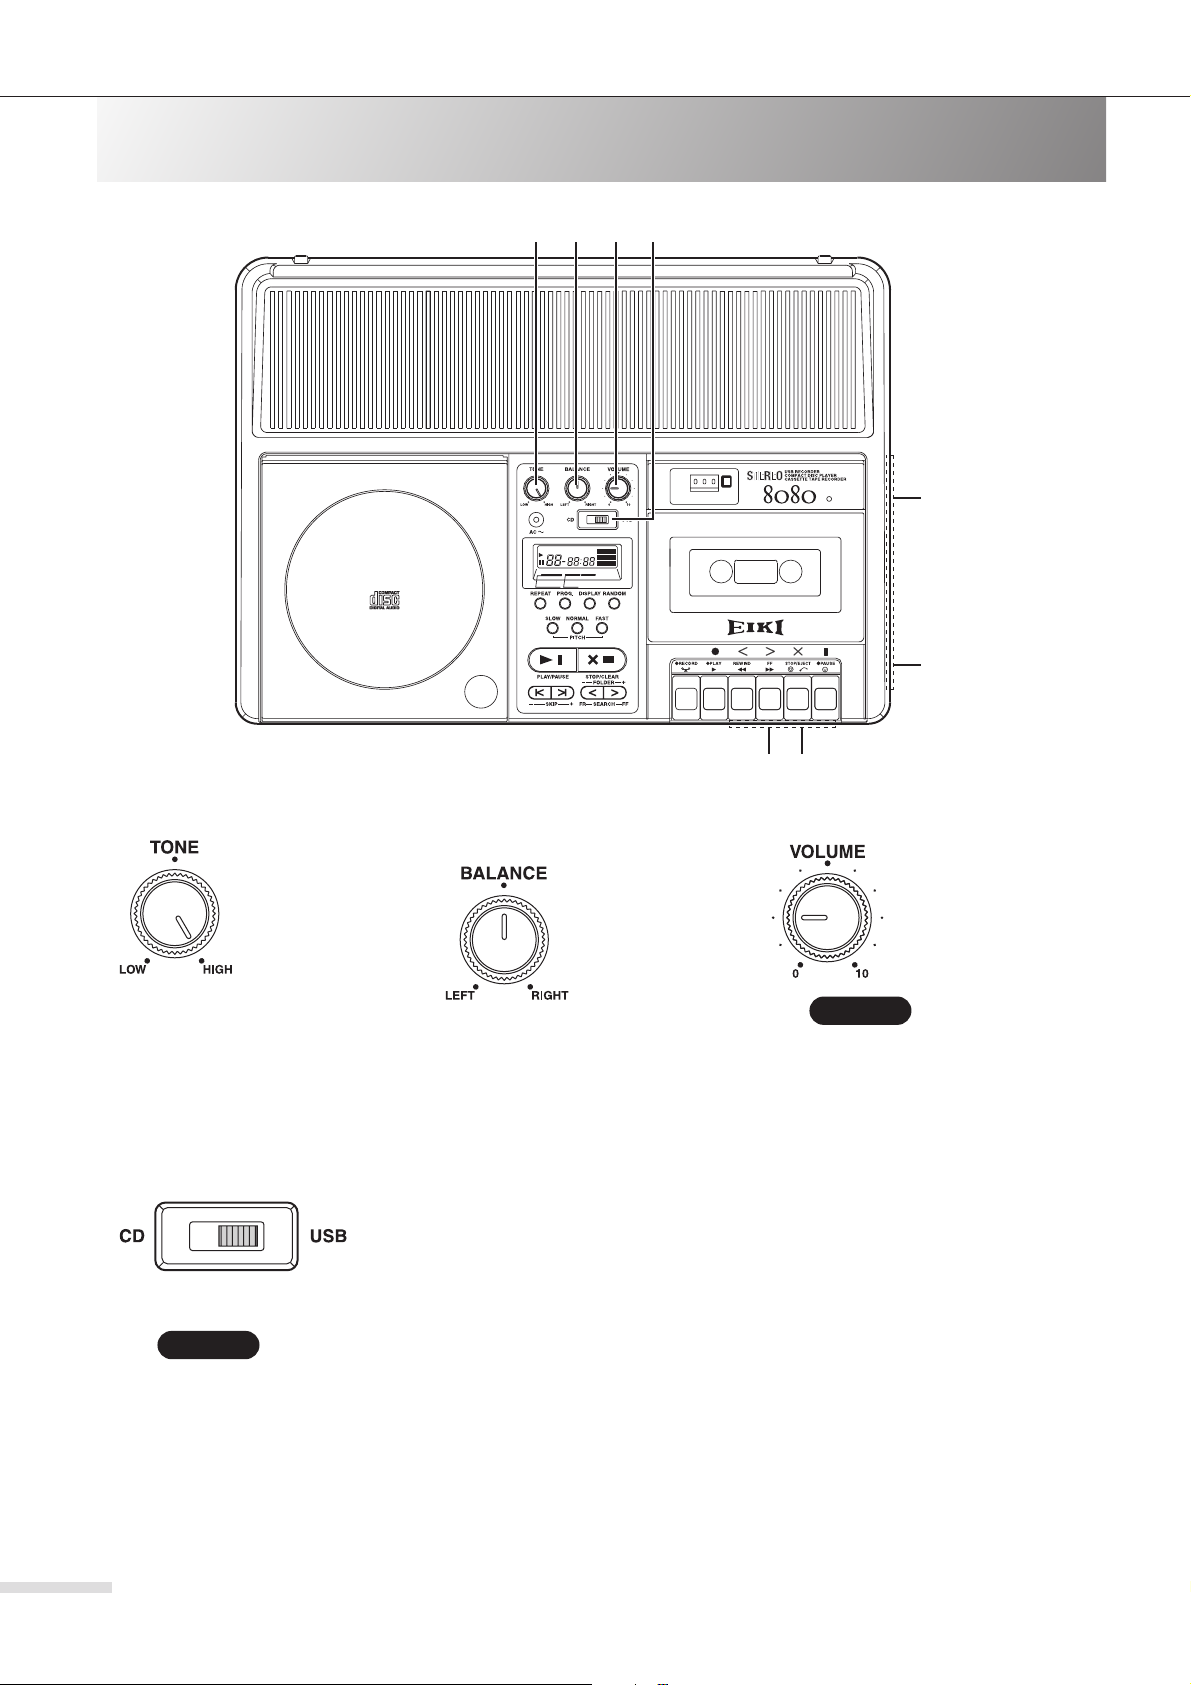
Connect the power cord of the 8080 to an AC outlet of appropriate voltage.
The [AC] indicator lights up.
AC outlet
Power plug
The power cord is tucked inside the compartment on the bottom of the unit. Before you use
the unit, extract the power cord from the compartment. If you plan not to use the unit for a
long period of time, or if you plan to carry or transport the unit, store the power cord in the
compartment.
CAUTION:
• The 8080 does not have a power switch. When you connect the power cord to the AC outlet, the power to the unit is
turned on.
Turning the Power Off
Stop the CD and cassette tape, and remove the USB flash drive.
Then remove the power cord plug from the AC outlet.
The [AC] indicator turns off.
CAUTION:
• The 8080 does not have a power switch. Remove the power cord plug from the AC outlet when you are not using the
unit.
• If a USB flash drive has been connected to the [USB] port, first remove the USB flash drive by following the correct
procedure (see page 12), then remove the power cord plug from the AC outlet.
Basic Operation
Power plug
9
Page 10
Basic Operation
Basic Operation and Connection
1234
VARIABLE PITCH CONTROL
25 RANDOM ACCESS PROGRAM
1
Adjusting the tone
In most cases, set
the [TONE] knob to
“HIGH,” which is the
standard setting.
If you want to cut
some high fre-
quency range or
reduce hiss, rotate the knob counterclockwise.
* “Hiss” is high frequency noise that is often
present on analogue magnetic tape recordings.
2 x COUNTER
DIGITAL DISPLAY
REPEAT 1ALL REMAIN
RANDOM
PROGRAM
MEMORY
MIN. SEC.
TRACK NO. TIME
PUSH
OPEN
2
Adjusting the left and right
level balance
In most cases, set
the [BALANCE]
knob to the center.
Tu r ning the knob
counter-clockwise
pans the sound to
the left in the stereo image, and turning it clockwise
pans the sound to the right.
AUTOMATIC STOP
56
8
7
3
Adjusting the volume
Rotate the [VOLUME] knob clockwise to raise the
volume, or counterclockwise to lower
the volume.
CAUTION:
• If the volume level is too high,
the sound may be distorted or
the speakers may be damaged. Adjust the volume carefully.
10
Selecting the input
4
To listen to a CD, set the [CD/USB] Input Select switch to “CD.” To listen to an audio file
on the USB flash drive, set the [CD/USB] Input Select switch to “USB.”
The corresponding (CD or USB) transport controls (see page 13) become active.
To record audio from a cassette tape to a connected USB flash drive, set this switch to
“USB.”
CAUTION:
• The cassette tape transport controls have the highest priority. consequently, during playback of a cassette tape, you
cannot play a CD or an audio file on the connected USB flash drive.
Page 11

Basic Operation
5Connecting a microphone
Connect a monaural dynamic microphone to the
[MIC] connector on the front panel. The connector
accepts a monaural mini plug (ø3.5mm).
If you are connecting a microphone with a built-in
remote switch, connect it to the [MIC] and [REMOTE]
connectors.
CAUTION:
• The [MIC] connector is not compatible with a condenser-type microphone. Be sure to use a dynamic
microphone.
7Listening through the headphones
Stereo headphones
8080 right side panel
6Connecting an external device
8080 front panel
To [AUX IN]
Mini plug
Connect the audio output of an external device to the
[AUX IN] connector on the front panel of the 8080.
The [AUX IN] connector accepts monaural signals
via a monaural mini plug (ø3.5mm).
Use an appropriate commercially available cable.
CAUTION:
•You cannot use the [AUX IN] connector and the
[MIC] connector simultaneously. If you are using the
[AUX IN] connector, remove the microphone from
the [MIC] connector.
External device
To audio
output
8Connecting external speakers
Although the 8080 features a built-in speaker, you
can also connect external speakers if desired.
Speaker
(left)
8080 right side panel
Speaker
(right)
Basic Operation
Standard stereo plug
Connect the standard stereo plug (ø6.3mm) of the
headphones to one of the [HEADPHONES] connectors on right side.
If your headphones use a stereo mini plug
(ø3.5mm), use a commercially available adapter
plug.
When you connect headphones, the internal speaker
output will be muted.
CAUTION:
•You can connect up to five sets of headphones to
the 8080 simultaneously. If you are using multiple
headphones, use the same type so that the volume
level will be consistent among all headphones.
Use the SPEAKERS [LEFT]/[RIGHT] connectors
(which accept monaural ø6.3mm standard plugs) on
the right side.
When you connect external speakers, the built-in
speaker output will be muted.
CAUTION:
• Be sure to use speakers with an impedance of 4Ω
or higher.
11
Page 12

Listening to Tracks on a CD or USB Flash Drive
DIGITAL DISPLAY
REPEAT 1ALL REMAIN
TRACK NO. TIME
MIN. SEC.
RANDOM
PROGRAM
MEMORY
AUTOMATIC STOP
2 x COUNTER
PUSH
OPEN
VARIABLE PITCH CONTROL
25 RANDOM ACCESS PROGRAM
NOTE:
1
When you change the [CD/USB] Input Select
switch setting during playback of a CD or USB
flash drive, playback will stop.
23
CAUTION:
Opening the disc cover during playback or while the CD is paused may cause the spinning disc to fly
out, resulting in personal injury or damage to the disc. Be sure to press the [STOP/CLEAR] button to
cancel playback or pause, wait for more than five seconds, then open the disc cover.
If the CD is still spinning when you open the cover, be careful not to touch the disc.
Changing the display indication
Pressing the [DISPLAY] button repeatedly cycles through the following
indicators on the display.
■ While playback is stopped:
Music CD
Total number
of tracks
* If the stop position is memorized, the position will be displayed.
Total playback
time
■ During playback or pause
Music CD
MP3/WMA (CD/USB)
Total number of files * Total number of folders
* If the total number of files exceeds 99,
“--” will be displayed.
MP3/WMA (CD/USB)
(CD) (USB)
2
Disconnecting the USB flash drive
Set the [CD/USB] Input Select switch to
“USB,” then press the [STOP/CLEAR] button repeatedly until the unit displays the
following indication.
After the dotted line indicator “-- --” stops
flashing and lights up steadily, make sure
that the USB flash drive’s indicator is
turned off. Then remove the USB flash
drive.
CAUTION:
• When the dotted line indicator “-- --” lights
Tr ac k
number
Elapsed track
playback time
REMAIN
Tr ac k
number
Elapsed track
playback time*
up, you cannot play or record audio using
the USB flash drive. If you wish to do so,
disconnect the USB flash drive, then connect it again.
-- --
Remaining track
playback time
REMAIN
Total remaining playback
time on the disc
* The time indicator may not display the correct
value for some MP3/WMA files in the following
cases:
- When you play back a VBR (Variable Bit Rate) file.
- When you fast rewind or fast forward a file.
- When you change the pitch (playback speed).
Folder number
Resume function
While the CD player is playing a CD, if you press the [STOP/CLEAR] button, change
the Input Select switch setting, or play back a cassette tape, the CD player will stop
playing and memorize the stopped position. The next time you play the CD, playback
will start from the stopped position. This is called Resume function.
Instead, if you want to play back the CD from the first track, press the [STOP/CLEAR]
button again to cancel the Resume function, then press the [PLAY/PAUSE] button.
The Resume function will also be cancelled when you open the disc cover, remove the
USB flash drive, or turn off the power to the unit.
12
Stopping playback
Press the [STOP/CLEAR] button.
To cancel the Resume function, press the
button again.
Pausing playback
Press the [PLAY/PAUSE] button.
The D indicator lights up.
Press the button again to resume playback.
Page 13

Listening to Tracks on a CD or USB Flash Drive
CD USB flash drive
Set the Input Select switch to “CD.” Set the Input Select switch to “USB.”
1
Insert a CD.
2
1 Open the disc cover.
2 Place a CD on the turntable with its label
side facing up.
Disc turntable
3 Close the disc cover.
CAUTION:
• Press the [PUSH OPEN] button to open or
close the disc cover.
•Follow the same steps for playing an 8cm CD.
Do not use an adapter. Otherwise, the CD
player or the CD may be damaged.
Connect the USB flash drive.
Connect the USB flash drive to the [USB] port on the
front panel.
CAUTION:
• The [USB] port does not support a USB hub.
Connect the USB flash drive directly to the
[USB] port.
• The [USB] port does not support connection
with a computer.
•To disconnect the USB flash drive, be sure to
follow the instructions in the section “Disconnecting the USB flash drive” on page 12.
Playback
Press the [PLAY/PAUSE] button.
3
The W indicator lights up and playback starts.
Adjust the volume as desired.
Skipping tracks (Locating the beginning of a track)
Use the [SKIP] ( / ) buttons to select the desired track
number.
Pressing the [ ] button once will locate the top of the
current track. To go back to the previous tracks, press the
[] button repeatedly.
Fast forward/fast rewind (Searching)
During playback or pause, press and hold the [SEARCH
<] or [SEARCH >] button, then release the button at the
desired position.
You can fast forward or rewind an MP3 or WMA file only
while the unit displays the time indicators. When the
beginning of a track is reached after fast rewind or fast forward during playback, the track will automatically start to
play.
CAUTION:
•You cannot play a CD or USB flash drive during
cassette tape playback.
Selecting a folder
For MP3/WMA files, press the [DISPLAY] button to switch
the display indication to the folder number, then press the
[FOLDER] (</>) buttons to select the desired folder number. The Track Number indicator displays “1.”
Tips:
• Select the desired track or folder number while the
unit is stopped so that playback will start with the
desired track.
•For more information on the MP3/WMA folders and
files, refer to page 25.
13
Page 14

Advanced Playback from a CD or USB Flash Drive
Playback Pitch Control
You can change the playback pitch (speed) by pressing the PITCH [SLOW] or PITCH [FAST] buttons. To restore
the normal pitch (speed), press the PITCH [NORMAL] button.
When you press the PITCH [SLOW] or [FAST] button, the indicator will change to the pitch
indicator. (A minus symbol (–) appears if the speed is slower than the original.)
You can adjust the pitch in the range of –50% to +100%, in 5% steps for the range of –50%
Pitch indicator
CAUTION:
• If you open the disc cover, disconnect the USB flash drive, or turn of the power to the unit, the pitch returns to normal.
• During recording the pitch (speed) returns to normal and the Pitch Control function is disabled.
• If you change the pitch (playback speed) of an MP3/WMA file that uses a high bit rate to a very high positive number,
the playback may sometimes skip. If you plan to change the playback speed to a value close to +100%, we recom
mend that you use files that feature a relatively low bit rate (for example, 128kbps).
Repeat Playback
to 0%, and 10% steps for the range of 0% to +100%.
-
You can set Repeat Playback using the [REPEAT] button.
REPEAT 1ALL
“REPEAT 1” plays only the current track repeatedly. “REPEAT” plays tracks in the current folder repeatedly.
“REPEAT ALL” plays all tracks repeatedly.
You can combine Repeat Playback (excluding “REPEAT 1”) with Random Playback.
Pressing the [REPEAT] button repeatedly cycles through the following options:
REPEAT 1 REPEAT* REPEAT ALL
Indicator off (Repeat Playback canceled)
You cannot select “REPEAT” for music CD playback.
*
Random Playback
You can set Random Playback using the [RANDOM] button.
ALL
“RANDOM” plays tracks in the current folder randomly. “RANDOM ALL” plays all tracks randomly.
Random Playback will stop after all tracks are played. However, you can combine Random Playback with Repeat Playback to play tracks repeatedly and randomly.
RANDOM
Pressing the [RANDOM] button repeatedly cycles through the following options:
RANDOM* RANDOM ALL
Indicator off (Random Playback canceled)
You cannot select “RANDOM” for music CD playback.
*
CAUTION:
• If you programmed the unit to play tracks, you cannot use the Random Playback function.
Program Playback
You can program the unit to play up to 25 tracks in
unit is stopped and the Resume function is canceled. Also, cancel the Random Playback function if it has been set.
Press the [PROG.] button.
1
MEMORY
The indicator lights up. If no track is programmed, the unit displays “P-00.” If
MEMORY
some tracks have already been programmed, the unit displays an indicator that prompts
you to check the programmed tracks. Refer to the “Checking, deleting and adding programmed tracks” on the lower half of next page.
14
programmed order. Programming should be performed when the
the
Page 15

Advanced Playback from a CD or USB Flash Drive
Music CD
2
Use the [SKIP] buttons to select a
track to program.
MP3/WMA (CD/USB)
Use the [SEARCH/FOLDER] buttons to select a
folder, then use the [SKIP] buttons to select a track
to program.
MEMORY
The selected track number and playback time
appear.
Press the [PROG.] button.
3
MEMORY
The selected track is programmed to P-01.
The selected track number and folder number appear.
4 Continue programming, if necessary.
Repeat steps 2 and 3. You can program up to 25 tracks (up to P-25).
5 Press the [PLAY/PAUSE] button.
Playback starts from the track programmed as P-01.
MEMORY
PROGRAM
Checking, deleting and adding programmed tracks
The indicator turns off and the indicator turns on.
PROGRAM
The indicator turns on if any track has been programmed.
MEMORY
PROGRAM
1 Stop playback to cancel the resume function, then press the [PROG.] button.
PROGRAM
The indicator flashes. The track number and
PROGRAM PROGRAM
the program number appear. Then the playback time or
the folder number appears.
2 Press the [SEARCH] buttons.
Check the programmed tracks by pressing the [SEARCH] buttons repeatedly to increase or decrease the program
number.
When you finish checking the tracks, press the [PROG.] button or wait five seconds without operating the unit.
3 To add or delete programmed tracks, press the [STOP/CLEAR] button while checking the pro-
grammed tracks.
MEMORY
The indicator turns on, and the unit enters programming/deleting mode.
MEMORY
The last programmed track number and its P (Program) number appear.
4 To delete programmed tracks, press the [STOP/CLEAR] button.
Repeatedly pressing the [STOP/CLEAR] button will delete the last programmed track one by one, and the previous
program number will appear on the display. When all programmed tracks are deleted, the indicator turns
off.
PROGRAM
To add a track, repeat the steps described in Steps 2 and 3 in the “Program Playback” section.
5 Press the [PLAY/PAUSE] button.
Program Playback starts from track P-01.
Playback
CAUTION:
• All programmed data will be cleared when you open the disc cover, disconnect the USB flash drive, or turn off the
power to the unit.
•To play back tracks normally, delete all programmed tracks so that the indicator will turn off.
PROGRAM
15
Page 16

Listening to a Tape
2 x COUNTER
■ About the tape counter
The tape counter indicates the
approximate amount of tape
transport.
Press the counter reset button to
reset the counter to “000.”
tape counter/counter reset button
VARIABLE PITCH CONTROL
25 RANDOM ACCESS PROGRAM
PUSH
OPEN
1Load a cassette tape.
1 Press the [STOP/EJECT]
button to pop open the cassette holder.
2Press the [PLAY] button.
Adjust the volume level.
DIGITAL DISPLAY
REPEAT 1ALL REMAIN
RANDOM
PROGRAM
MEMORY
MIN. SEC.
TRACK NO. TIME
AUTOMATIC STOP
2 1
2 Insert a tape so that the
side you want to record will
face up and the exposed
tape will face toward you.
Place the tape
on top of the
guides.
CAUTION:
• The [CD/USB] Input Select switch can be set to either [CD] or [USB].
• When tape playback starts, CD or USB playback will stop.
• During tape playback, you cannot play a CD or files on the USB flash drive.
2 x COUNTER
3 Close the cassette holder.
Stopping the tape playback
Press the [STOP/EJECT] button.
Press the [STOP/EJECT] button again to eject the cassette tape.
Pausing the tape playback
Press the [PAUSE] button.
Press the [PAUSE] button again to resume playback.
16
Rewinding or fast forwarding the tape
Press the [REWIND] or [FF] button respectively.
Press the [STOP/EJECT] button at the
desired position.
CAUTION:
• Before you press any tape transport button, press
the [STOP/EJECT] button to stop the tape.
• When the tape reaches the end, the automatic stop
mechanism will stop the transport operation and the
button that has been depressed will return to its original position. Do not press the button again.
Page 17

Recording to a USB Flash Drive
Recording from a CD to a USB Flash Drive
1
2 x COUNTER
DIGITAL DISPLAY
REPEAT 1ALL REMAIN
VARIABLE PITCH CONTROL
25 RANDOM ACCESS PROGRAM
RANDOM
PROGRAM
MEMORY
MIN. SEC.
TRACK NO. TIME
AUTOMATIC STOP
PUSH
OPEN
NOTE:
Tr acks will automatically be
recorded to available space on
the drive.
You do not have to locate the
appropriate position to record
(as you would with a cassette
tape).
24
3
1Set the Input Select switch to [CD].
2Insert a music CD.
See page 13.
CAUTION:
• MP3/WMA files on a CD cannot be recorded to the USB flash drive.
3Connect the USB flash drive to the [USB] port.
See page 13.
4Press the USB [REC] button.
The button lights up red, the CD automatically starts playing, and recording starts.
Tips:
• Recording tracks from a CD will create a separate file for each track.
Stopping recording Starting recording from the desired track
Press the [STOP/CLEAR] button.
Select or start playing back the desired track on the CD, then press the USB
[REC] button. Recording will start from the selected track. If you pressed the
USB [REC] button during playback, the beginning of that track will be
located, then recording will start.
Recording
CAUTION:
• During recording from a CD to a USB flash drive, the transport controls, such as pause, skip, fast rewind and fast forward, are disabled.
•Tracks will be recorded to the USB flash drive in MP3 format with a bit rate of 128kbps. You cannot change this setting.
• Please refer to page 25 for information on the folders and files that are created during USB recording.
• Changing the volume, tone, or balance during recording will not affect the recording.
17
Page 18

Recording to a USB Flash Drive
2X Recording from a CD to a USB Flash Drive
The 8080 enables you to record tracks from a music CD to a USB flash drive at 2X speed. At this time, Mic Mixing
recording (see page 22) is disabled.
1
2 x COUNTER
DIGITAL DISPLAY
REPEAT 1ALL REMAIN
VARIABLE PITCH CONTROL
25 RANDOM ACCESS PROGRAM
RANDOM
PROGRAM
MEMORY
MIN. SEC.
TRACK NO. TIME
AUTOMATIC STOP
PUSH
OPEN
NOTE:
Tr acks will automatically be
recorded to available space on
the drive.
You do not have to locate the
appropriate position to record
(as you would with a cassette
tape).
24
1Set the Input Select switch to [CD].
3
3
Connect the USB flash drive to the [USB] port.
See page 13.
4Press the USB [REC] button twice within one
(1) second.
2Insert a music CD.
See page 13.
CAUTION:
• MP3/WMA files on a CD cannot be recorded to the
USB flash drive.
Stopping recording Start recording from the desired track
Press the [STOP/CLEAR] button.
If you press the [STOP/CLEAR] button while a track is
playing, that track will be deleted and will not be
recorded on the USB flash drive.
The button lights up red, the CD automatically starts
playing, and recording starts.
The playback sound will be muted during 2X recording.
CAUTION:
• Recording tracks from a CD will create a separate
file for each track.
Select or start playing back the desired track on the CD,
then press the USB [REC] button twice within one (1) second. Recording will start from the selected track. If you
pressed the USB [REC] button during playback, the
beginning of that track will be located, then recording will
start.
18
CAUTION:
• The transport controls, such as pause, skip, fast rewind and fast forward, are disabled during 2X-speed recording from
a CD to a USB flash drive.
•Tracks will be recorded to the USB flash drive in MP3 format with a bit rate of 128kbps. You cannot change this setting.
• Please refer to page 25 for information on the folders and files that are created during USB recording.
• Changing the volume, tone, or balance during recording will not affect the recording.
Page 19

Recording to a USB Flash Drive
Recording from a Cassette Tape to a USB Flash Drive
1
2 x COUNTER
DIGITAL DISPLAY
REPEAT 1ALL REMAIN
VARIABLE PITCH CONTROL
25 RANDOM ACCESS PROGRAM
RANDOM
PROGRAM
MEMORY
MIN. SEC.
TRACK NO. TIME
AUTOMATIC STOP
PUSH
OPEN
NOTE:
Tr acks will automatically be
recorded to available space on
the drive.
You do not have to locate the
appropriate position to record
(as you would with a cassette
tape).
3
1Set the Input Select switch to [USB].
4Press the USB [REC] button.
254
The button blinks red, and the unit enters record
ready mode.
5Press the [PLAY] button in the tape transport
2Insert a cassette tape.
See page 16.
section.
The tape starts playing, and the USB flash drive automatically starts to record (the USB [REC] button
lights up red).
3Connect the USB flash drive to the [USB] port.
See page 13.
Stopping recording
Press the [STOP/EJECT] button in the tape transport section. Alternatively, press the [STOP/CLEAR] button, then press
the [STOP/EJECT] button in the tape transport section.
Tips:
• Pressing the [PLAY/PAUSE] button during record
ready mode will also start recording.
• Pressing the USB [REC] button while recording will
place a track mark (track divider) in the position
where you pressed the button.
Recording
CAUTION:
• If you press the USB [REC] button while the tape is playing, recording will start immediately.
•Audio will be recorded to the USB flash drive in MP3 format with a bit rate of 128kbps. You cannot change this setting.
• Please refer to page 25 for information on the folders and files that are created during USB recording.
• Changing the volume, tone, or balance during recording will not affect the recording.
19
Page 20

Recording to a Cassette Tape
Recording from a CD to a Cassette Tape
Use a TYPE I (Normal) cassette tape for recording.
1
2 x COUNTER
DIGITAL DISPLAY
REPEAT 1ALL REMAIN
RANDOM
PROGRAM
VARIABLE PITCH CONTROL
25 RANDOM ACCESS PROGRAM
TRACK NO. TIME
MIN. SEC.
MEMORY
AUTOMATIC STOP
PUSH
OPEN
2 4 3
1Set the Input Select switch to [CD].
2Insert a CD.
See page 13.
3Insert a cassette tape.
See page 16.
4Press the [RECORD] button in the tape transport section. (The [PLAY] button will also be pushed in
automatically.)
The CD will start playing in a few seconds and the tracks will be recorded to the tape.
20
Stopping recording Starting recording from the desired track
Press the [STOP/EJECT] button in the tape transport section.
Tips:
• If you record something on a previously-recorded tape, the existing recordings will be deleted. If you want to delete recordings on a tape without recording new audio, place the tape transport section into record mode without loading a CD.
• Changing the volume, tone, or balance during recording will not affect the recording.
Select or start playing back the desired track on the CD,
then press the [RECORD] button in the tape transport
section. Recording will start from the selected track.
During playback, the beginning of that track will be
located, then recording will start.
Page 21

Recording to a Cassette Tape
Recording from a USB Flash Drive to a Cassette Tape
Use a TYPE I (Normal) cassette tape for recording.
1
2 x COUNTER
DIGITAL DISPLAY
REPEAT 1ALL REMAIN
RANDOM
PROGRAM
VARIABLE PITCH CONTROL
25 RANDOM ACCESS PROGRAM
TRACK NO. TIME
MIN. SEC.
MEMORY
AUTOMATIC STOP
PUSH
OPEN
4 32
1Set the Input Select switch to [USB].
2Connect a USB flash drive.
See page 13.
3Insert a cassette tape.
See page 16.
4Press the [RECORD] button in the tape transport section. (The [PLAY] button will also be pushed in
automatically.)
The tracks on the USB flash drive will start playing in a few seconds and will be recorded to tape.
Recording
Stopping recording Starting recording from the desired track
Press the [STOP/EJECT] button in the tape transport section.
Tips:
• If you record something on a previously-recorded tape, the existing recordings will be deleted. If you want to delete
recordings on a tape without recording new audio, place the tape transport section into record mode without connecting the USB flash drive to the unit.
• Changing the volume, tone, or balance during recording will not affect the recording.
Select or start playing back the tracks on the USB flash
drive, then press the [RECORD] button in the tape transport section. Recording will start from the selected track.
During playback, the beginning of that track will be
located, then recording will start.
21
Page 22

Using a Microphone or External Device
Mic Mixing Recording
Mic Mixing Recording function enables you to mix audio signals from a connected microphone with the audio playback
signals from the CD, USB flash drive or tape. (This function is not available during 2X-speed recording from a CD to a
USB flash drive.)
1 Connect a microphone to the [MIC] connector. (See page 11.)
2 Set up and start recording.
3 Input the sound you want to mix from a connected microphone.
Tips:
•To record only the mic sound to a cassette tape, perform the CD to tape recording procedure without loading a CD. You
could also perform the USB to tape recording procedure without connecting a USB flash drive.
•To record only the mic sound to a USB flash drive, prepare a cassette tape to USB flash drive recording, press the
USB [REC] button to place the unit in record ready mode, then press the [PLAY/PAUSE] button to start recording.
• If you are using a microphone with a built-in remote switch, first turn the switch on, then start recording. Once recording starts, you can pause and resume recording by turning the remote switch off and on. (This function does not apply
to a CD to USB flash drive recording or to a 2X-speed recording.)
CAUTION:
• If the volume level is too high, feedback may occur. In this case, locate the microphone away from the speakers or
lower the volume level.
• In general, turn the remote switch on. If the switch remains turned off, you will be unable to control recording or playback.
Mic Mixing Playback (Microphone Amplification)
You can amplify the microphone input volume. At this time, the mic input will be mixed with the playback of the CD, USB
flash drive or cassette tape.
1 Connect a microphone to the [MIC] connector. (See page 11.)
2 Set up and start playback.
3 Input the sound you want to mix from a connected microphone.
Tips:
•To amplify only the mic sound, pause the tape playback after playback starts. If you are playing a CD or a file from a
USB flash drive, turn the remote switch on the microphone off.
• If you are using a microphone with a built-in remote switch, first turn the switch on, then start playback. Once playback
starts, you can pause and resume playback by turning the remote switch off and on.
CAUTION:
•You must play or pause the playback source to amplify the microphone input volume.
• If the volume level is too high, feedback may occur. In this case, locate the microphone away from the speakers or
lower the volume level.
• In general, leave the remote switch turned on. If the switch remains turned off, you will be unable to control playback.
22
Page 23

Using a Microphone or External Device
Using an External Device
You can play back or record sound input from a connected external device in the same way as Mic Mixing Recording
and Playback.
1 Connect a device to the [AUX IN] connector. (See page 11.)
2 Set up and start playback or recording.
3 Play the external device.
Tips:
• The sound from an external device will be mixed with the playback sound of the 8080. If you want to play or record only the
sound of the external device, refer to the Tips in the “Mic Mixing Playback (Microphone Amplification)” and “Mic Mixing
Recording” sections.
CAUTION:
•You cannot use the [MIC] connector and the [AUX IN] connector at the same time. Remove the microphone from the
[MIC] connector if you plan to use the [AUX IN] connector.
• The [AUX IN] connector accepts a monaural signal. Signals from a connected external device will be mixed with the
playback sound of the 8080 in monaural.
Recording
23
Page 24

Supported Discs, USB Devices, and Files
Supported Discs
The 8080 supports playback of 8 cm and 12 cm CDs with the following logo.
• Eiki does not guarantee the operation of the unit if you use discs that do
not comply with the compact disc standards.
• Do not use discs that feature a non-standard shape, such as a heart
shape. Otherwise, the unit may malfunction.
■ About CD-R and CD-RW discs
• CD-R and CD-RW discs must be finalized before they can be used in the unit.
• The 8080 supports CD-R and CD-RW discs formatted as a music CD (CD-DA) or in MP3/WMA format. However, certain CD characteristics, recording conditions, or dirt on the optical pickup lens can also affect playback.
Supported USB Devices
The 8080 supports USB flash drives that comply with USB Mass Storage Class standards.
The USB flash drive format supports FAT and FAT32.
CAUTION:
• Do NOT remove the USB flash drive or unplug the unit while the unit is accessing the USB flash drive.
• Eiki does not guarantee the operation and power supply of all types of USB flash drives.
• Eiki will not be liable for the damage or loss of any data that is stored on a USB flash drive that is caused by connection
of such drive to the 8080.
Supported Files on a CD and USB Flash Drive
The 8080 supports the following file formats:
Format Bit Rate Sampling Frequency File Extension
MP3 8kbps – 320kbps, VBR
WMA 48kbps – 192kbps, VBR 32kHz, 44.1kHz, 48kHz .WMA .wma
VBR: Variable Bit Rate
16kHz, 22.05 kHz, 24 kHz
32kHz, 44.1kHz, 48kHz
.MP3 .mp3
24
CAUTION:
•You cannot play WMA files that are protected by copyright.
• Some files may not play correctly, depending on the combination of the bit rate and sampling frequency.
• If you cancel a 2X-speed CD to USB flash drive recording in the middle of the first track, no track file will be recorded.
Only an empty folder will be created.
• MP3/WMA tag information is not supported.
•WAV format is not supported.
• MP3i and mp3PRO formats are not supported.
• WMA9 Pro, WMA9 Lossless and WMA9 voice formats are not supported.
• The format of files recorded to a USB flash drive is MP3 (128kbps, 44.1kHz) and cannot be changed.
Page 25

About Folders and Files
File Playback Sequence
The 8080 loads the folders (that contain MP3/WMA files) starting with the highest level of the folder hierarchy. Within the
same level of the hierarchy, the 8080 loads folders in the numerical order.
The folder numbering format is “ ” (where “ ” is a two-digit number), as shown in the example diagram below.
Folders that do not contain any MP3/WMA files will not be numbered.
The 8080 reads and plays back files in a folder in numerical order.
F-
FolderARoot
F-01 F-02 F-05
FolderB FolderD
F-03 F-04
Tr ack1.wma
Tr ack2.wma
Tr ack3.wma
FolderC FolderE Track1.wma
Tr ack2.wma
Tr ack1.mp3
Tr ack2.mp3
Tr ack1.wma
Tr ack2.wma
Tr ack1.mp3
Tr ack2.mp3
Tr ack3.wma
CAUTION:
•Folders and files will be read in the numerical order. However, the playback sequence will not necessarily be the same
as the recording sequence.
• If no folders exist (that is, only the root exists) the root will be numbered as “ .”
• The unit recognizes up to 99 MP3/WMA files at the root level or in each folder, and ignores any additional files.
F-01
Folders and Files Created during Recording
Each time you make a recording after the unit is stopped, the 8080 will create a new folder.
During recording from a CD to a USB flash drive, a file will be created for each track. On the other hand, during recording from a tape to a USB flash drive, one recording session will create one file, unless you place track marks or pause
the recording.
CD ➝ USB flash drive
CD0001Root TR00001.MP3
TR00002.MP3
TR00003.MP3
CD0002 TR00001.MP3
TR00002.MP3
TR00003.MP3
Tape ➝ USB flash drive
TP0001Root TR00001.MP3
TP0002 TR00001.MP3
TP0003 TR00001.MP3
CAUTION:
• The folder number or track number on the CD or tape does not necessarily correspond to the folder name or file name
on the USB flash drive. (Please refer to the “File Playback Sequence” above.)
•You cannot change the folder or file names, or delete or move the files using the 8080. Connect the USB flash drive to
your computer and use the computer to change the folder or file names, or delete unnecessary files.
Supported Media
25
Page 26

About CD and Cassette Tape
Handling CDs
■ Holding a disc
Handle the disc carefully by holding it by its
edges. Do not touch the playback side (non-label,
shiny side).
*** ***** ***
****** ***** ****
***** ***** ***** *** **
*** ***** ***
****** ***** ****
*** ***** ***
Do not touch the playback side.
****** ***** ****
***** ***** ***** *** **
*** ***** ***
****** ***** ****
■ Cleaning a disc
Use a soft, dry cloth to wipe dust and fingerprints
Playback side (shiny side)
off the surface of a CD. Wipe from the center
toward the perimeter.
Don’t use vinyl record cleaners or antistatic
agents. Do not use volatile agents, such as thinner or benzene.
From inside to outside
■ Removing condensation
Moisture condensation may form inside the 8080, affecting the performance of the unit, if:
• The unit is moved from a cold place to a warm place.
•A heater is turned on, or cold air from an air conditioner is hitting the unit.
If condensation does form, remove the disc and leave the unit turned on for an hour before using.
■ Other precautions for handling discs
• Do not use a pencil or ball point pen to write on the surface of a disc.
• Do not use discs that have a residue of adhesives or rental discs with peeling labels.
• Do not leave a CD in direct sunlight or in locations subject to heat, such as near a heater.
26
Page 27

About CD and Cassette Tape
Handling Cassette Tapes
■ Recommended cassette tapes
• Use a TYPE I (Normal) tape. Using other types of tape may cause the unit to record or delete audio incorrectly.
• Do not use tapes that are longer than 90 minutes in duration. These tapes are thin and can easily get caught on the
pinch rollers or capstans.
■ Loose tape
Loose tape can easily be damaged or cut. Remove any tape slack with a pencil or similar device as shown in the figure.
■ Preventing important recordings from being erased accidentally
A-side tab
A
A-side
B-side tab
Break off the erasure prevention tab(s)
using a small flat-head screw driver or
similar tool.
If at some later date you wish to record the
cassette, simply cover the hole(s) with small
pieces of cellophane tape.
■ Other precautions for handling cassette tapes
• Do not apply labels in locations not specified on the tape.
• Do not place tapes near magnetic sources (speakers, TVs, etc.) Otherwise, important recordings might be erased or
damaged.
• Do not expose cassette tapes to direct sunlight, high temperature or high humidity.
NOTE:
Recording copyrighted material is illegal without the permission of the copyright holder, although you may copy purchased or broadcast recordings if the duplicate is exclusively for your personal use.
27
Supported Media
Page 28

Appendix
Maintenance
■ Cleaning the unit
Dust the unit with a soft cloth. For stubborn dirt, use a soft cloth dampened with a weak solution of mild detergent and
water. Dry the unit immediately afterwards with a clean, dry cloth.
• Do not use thinners, alcohol, or other chemical solvents.
• If you are using chemical cleaning cloth, follow the instructions for using the cloth carefully.
■ Cleaning the optical pickup lens of the CD player
A dirty optical pickup lens on the CD player may cause the player to skip or become
unable to play back. In this case, remove the power cord from the AC outlet, then use a
cotton swab to lightly wipe the dirt off the lens or use a blower to blow the dust off.
• Do not apply too much force when you clean the lens. Otherwise, the CD player may
malfunction.
■ Cleaning the head of the cassette tape recorder
CapstanRec./Playback head
Pinch rollerErase head
As you use the cassette tape recorder, magnetic particles accumulate on the
recording/playback head, leading to a greatly diminished sound quality, decreased
volume, or incomplete recording. Use a commercially available cleaning kit to clean
the erase head, record/playback head, pinch rollers and capstans every 10 hours
of operation.
28
Page 29

Troubleshooting
If you have any trouble using the 8080, look for a solution here before you contact your Eiki dealer for repair.
Symptoms Causes Actions See page:
The power indicator does
not light up.
• The power cord plug is disconnected from the AC outlet.
• Inser t the power cord plug into the
AC outlet securely.
Appendix
9
The sound is barely heard.
No sound is heard from
the built-in speaker.
Common section
Noise is heard.
Playback does not start.
“NO DISC” appears on the
display even tough a disc
is inserted.
Playback skipping or
CD player section
noise
The CD player takes a
while to read the inserted
CD.
Some files cannot be
played.
Playback sequence does
not correspond to the
track order.
• The volume setting is too low. • Raise the [VOLUME] knob setting
to an appropriate level.
• The headphones or external speak-
ers are connected.
•A device that is emitting electronic
waves (such as a cell phone) is
being used in the vicinity.
•A cassette tape is still playing.
• There is no file to play back on the
CD.
• The CD is inser ted upside down.
• The CD is very dirty.
• The CD player’s optical pickup lens
is very dirty.
• Condensation has formed on the
optical pickup lens.
• No recordings on the CD-R/CD-RW.
• The CD-R/CD-RW has not been
finalized.
• Depending on the disc characteris-
tics or recording conditions, some
CD-R/CD-RW discs might not play.
• The CD is very dirty.
• The CD surface has scratches.
• The CD player’s optical pickup lens
is very dirty.
• Depending on the disc characteris-
tics or recording conditions, skipping or noise may occur.
• The MP3 or WMA files are in an
unsupported format.
• It may take a while to read a disc
that contains a larger number of
files.
• WMA files that are protected by
copyright cannot be played.
• The unit does not support WAV for-
mat.
• The MP3 or WMA files are in an
unsupported format.
• The root level or the folder contains
100 or more MP3/WMA files.
• The unit is in Repeat, Random, or
Program Play mode.
• Disconnect all the headphones and
external speakers.
•Move such a device away from the
unit. –
• The tape recorder section has the
higher priority for playback. Stop the
tape playback, then play the CD.
• Inser t a CD that contains supported
MP3 or WMA files.
• Inser t the CD with its label side facing up.
• Wipe the dir t off the CD surface.
• Clean the CD player’s optical pickup
lens.
• Leave the unit with the power
turned on for an hour to remove
condensation.
• Inser t a CD-R/CD-RW that contains
recordings.
• Finalize the CD-R/CD-RW.
• Change the disc.
• Wipe the dir t off the CD surface.
• Change the disc.
• Clean the CD player’s optical pickup
lens.
• Change the disc.
• Play a CD that contains files in the
supported format.
•Wait until the disc is completely
read. –
• Play WMA files that are not protected by copyright.
• Play files that use the MP3 or WMA
format.
• Play only files that use the supported format.
• The unit recognizes up to 99 files at
the root level or in each folder.
• Cancel Repeat, Random, or Program Play mode. 14, 15
10
11
13
24
13
26
28
26
24
24
26
28
24
24
24
24
24
25
29
Appendix
Page 30

Appendix
Symptoms Causes Actions See page:
Playback does not start.
“NO USB” appears on the
display even when a USB
flash drive is connected.
Some files cannot be
played.
Playback skipping or
noise
Playback sequence does
not correspond to track
USB recorder section
order.
Playback sequence does
not correspond to the
recording order.
Tracks cannot be recorded
from CD to USB flash
drive.
Tracks cannot be
recorded.
The cassette tape cannot
be inserted.
Low sound quality or
noise
Tape is damaged or tangled.
Tape recorder section
The [REC] button cannot
be depressed.
The previous recording is
not deleted completely.
• The cassette tape is still playing.
• There is no file to play back on the
USB flash drive.
• The unit does not recognize the
USB flash drive.
• The unit does not suppor t the USB
flash drive.
• WMA files that are protected by
copyright cannot be played.
• The unit does not suppor t WAV format.
• The MP3 or WMA files are in an
unsupported format.
• The root level or the folder contains
100 or more MP3/WMA files.
• The MP3 or WMA files are in an
unsupported format.
• The unit is in Repeat, Random, or
Program Play mode.
•You have edited the file or folder on
the computer.
•You attempted to record tracks from
an MP3 or WMA disc.
• The free space on the flash drive is
less than 256KB.
• The root level contains a folder
named “CD9999” or “TP9999.”
• The orientation of the cassette tape
is wrong.
• The record/playback head is dirty. • Clean the head.
• The tape has too much slack.
•You did not press the [STOP/
EJECT] button before pressing
another transport control button.
•You are using a long tape that
exceeds 90 minutes.
• The erase prevention tab on the
tape has been removed.
• The erase head is dirty.
•You are using a TYPE II (high-position) or TYPE IV (metal) tape.
• The tape recorder section has the
higher priority for playback. Stop the
tape playback, then play the files on
the USB flash drive.
• Connect a USB flash drive that contains supported MP3 or WMA files.
• Remove the USB flash drive, then
connect it again.
• Use a different USB flash drive. 24
• Play WMA files that are not protected by copyright.
• Play files that use the MP3 or WMA
format.
• Play only files that use the supported format.
• The unit recognizes up to 99 files at
the root level or in each folder.
• Play only files that use the supported format.
• Cancel Repeat, Random, or Program Play mode. 14, 15
•Tracks are played in the order of
entry, not in the order in which they
were recorded.
• Only music CDs are supported for
recording to a USB flash drive. 17, 18
• Due to the limitations of the system,
recording is unavailable if the free
space on the drive is less than
256KB.
• Due to the limitations of the system,
recording is unavailable if the root
level contains a folder with a name
that includes number 9999.
• Inser t the tape so that the exposed
tape is facing toward the front of the
unit.
• Remove the tape slack, then insert
the tape.
• Before switching the transport control, press the [STOP/EJECT] button.
(e.g.,) [REWIND] ➝ [STOP] ➝
[PLAY]
•A long tape is thin and may easily
become tangled with the capstans
and rollers. Use a 90 minutes or
shorter tape.
• Check to see if the tab is broken. If
you want to overwrite the tape,
cover the erasure prevention hole
with a piece of cellophane tape.
• Clean the erase head.
• Use a TYPE I (normal) tape.
13
24
24
24
24
25
24
24
–
16
28
27
16
27
27
28
27
30
Page 31

Specifications
■ CD player section
Frequency response 127 Hz – 20 kHz
Number of channels 2 channel stereo
D/A converter 1 bit (8fs digital filter)
Playback format CD-DA, MP3, WMA
■ USB recorder section
Compliance USB Mass Storage Class
Interface USB 2.0 Full Speed
File system FAT, FAT32
Playback format MP3, WMA
Recording format MP3 (128kbps)
Current supply Max. 500mA
■ Cassette tape recorder section
Appendix
Frequency response 125 Hz – 8 kHz
Tr ack format Compact cassette, stereo
Tape Normal (TYPE I)
■ Common section
Maximum output 7W+7W (JEITA 4 Ω)
Speakers 10cm, round type x 2
Input connectors USB x 1
Mic ø3.5 monaural x 1
Remote ø2.5 x 1
AUX ø3.5 monaural x 1
Output connectors Headphones ø6.3 stereo x 5
External speakers ø6.3 monaural Left x 1, Right x 1
Power supply North American: AC120V, 60 Hz
European: 230V, 50 Hz
Australian: 240V, 50 Hz
Power consumption North American: 28 W
European: 33W
Australian: 33W
Dimensions 400 (w) x 100 (h) x 285 (d) mm
Weight 3.7 kg
• Specifications and features are subject to change without notice.
Appendix
31
Page 32

EIKI International, Inc.
30251 Esperanza
Rancho Santa Margarita
CA 92688-2132
U.S.A.
Tel : 800-242-3454 (949)-457-0200
Fax : 800-457-3454 (949)-457-7878
E-Mail : usa@eiki.com
EIKI CANADA - Eiki International, Inc.
P. O. Box 156, 310 First St. - Unit 2,
Midland, ON, L4R 4K8, Canada
Tel : 800-563-3454 (705)-527-4084
Fax : 800-567-4069 (705)-527-4087
E-Mail : canada@eiki.com
EIKI Deutschland GmbH
Am Frauwald 12
65510 Idstein
Deutschland
Tel : 06126-9371-0
Fax : 06126-9371-14
E-Mail : info@eiki.de
EIKI (Shanghai) Co., Ltd.
1. Dapu Road,
Golden Magnolia Plaza
#2109 Shanghai,
200023 China
Tel : 86-21-5396-0088
Fax : 86-21-5396-0318
E-mail : info@eiki-china.com
EIKI CZECH SPOL. s.r.o.
Nad Cementárnou 1163/4a
Paraha 4, Podolí
147 00
Czech Republic
Tel : +42 02 4141 0928
+42 02 4140 3095
Fax: +42 02 4140 9435
E-Mail : easterneurope@eiki.de
EIKI Industrial (M) Sdn Bhd
No. 3A-2C, 4th Floor, Jalan PJU 8/3A,
Perdana Business Centre,
Bandar Damansara Perdana,
47820 Petaling Jaya, Selangor
Malaysia
Tel : +603-7722-4362
Fax : +603-7722-4392
E-Mail : sales@eiki.my
EIKI Industrial Company Limited.
4-12 Banzai-Cho, Kita-Ku, Osaka,
530-0028 Japan
Tel : +81-6-6311-9479
Fax : +81-6-6311-8486
SN 29344778A
 Loading...