

Page 1
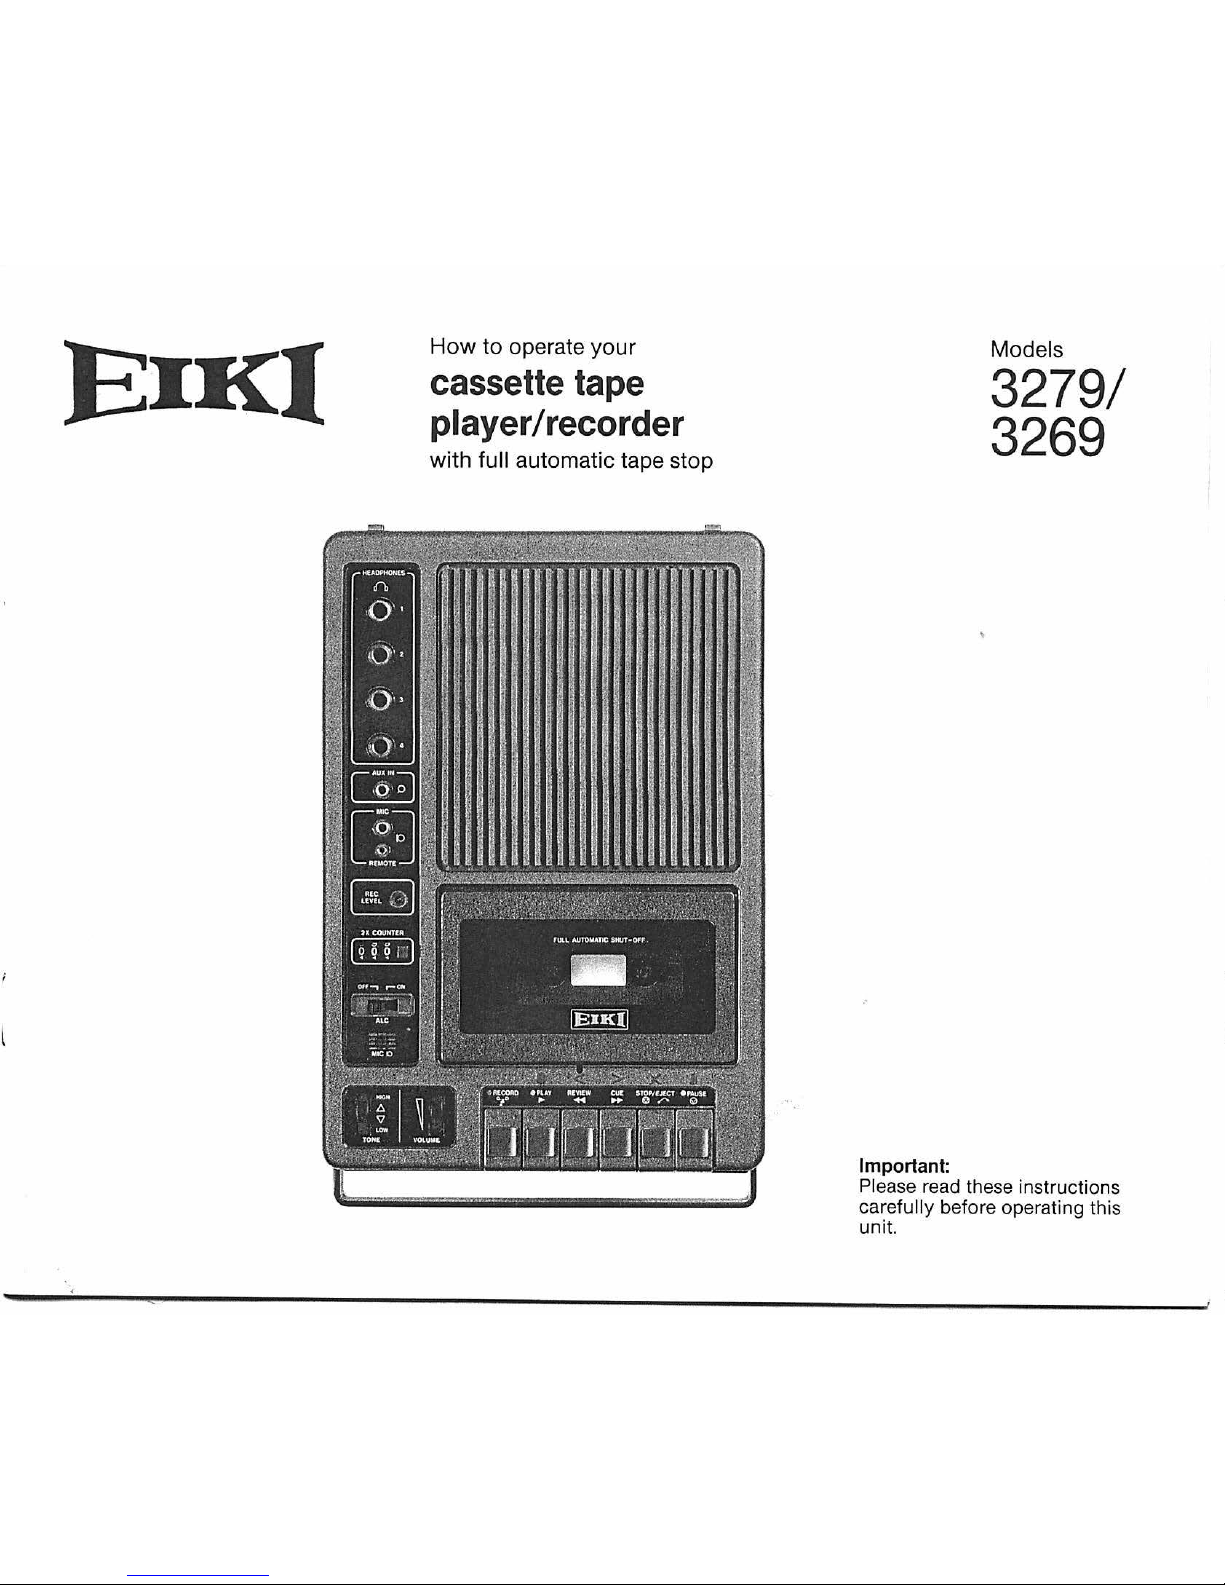
How to operate yo
ur
cassette tape
player/recorder
with full automatic tape stop
Important:
Models
3279/
3269
Please read these inst ructions
carefully before operating this
uni
t.
Page 2
1
IMPORTANT SAFEGUARDS
WHEN USING THIS EQUIPMENT, BASIC
SAFETY
PRECAUTIONS SHOULD ALWAYS
BE FOLLOWED, INCLUDING THE FOLLOWING:
1.
READ
AND UNDERSTAND ALL INSTRUCTIONS BEFORE USING EQUIPMENT.
2.
DO
NOT
OPERATE EQUIPMENT WITH A DAMAGED CORD OR, IF THE
EQUIPMENT HAS BEEN DROPPED
OR
DAMAGED-UNTIL
IT
HAS BEEN
EXAMINED BY A QUALIFIED SERVICEMAN.
3.
IF AN EXTENSION CORD IS NECESSARY CARE SHOULD BE TAKEN TO
ARRANGE THE CORD
SO
THAT IT WILL NOT BE TRIPPED OVER
OR
PULLED.
4.
ALWAYS UNPLUG EQUIPMENT
FROM
ELECTRICAL OUTLET WHEN NOT IN
USE.
NEVER YANK CORD TO PULL PLUG FROM OUTLET. GRASP PLUG AND
PULL TO DISCONNECT.
5.
TO PROTECT AGAINST ELECTRICAL SHOCK HAZARDS, DO
NOT
EXPOSE
THIS EQUIPMENT TO RAIN, MOISTURE,
OR
OTHER LIQUIDS.
6.
TO
AVOID ELECTRIC SHOCK HAZARD, DO NOT DISASSEMBLE THIS EQUIP-
MENT, BUT TAKE IT TO A QUALIFIED SERVICEMAN WHEN SOME SERVICE
OR
REPAIR WORK IS REQUIRED. INCORRECT REASSEMBLY CAN CAUSE ELECTRIC SHOCK HAZARD WHEN THE EQUIPMENT IS USED SUBSEQUENTLY.
SAVE THESE INSTRUCTIONS
CAUTION:
TO
REDUCE
THE
RISK OF ELECTRIC
SHOCK. DO
NOT
REMOVE COVER (OR BACK).
NO
USER-SERVICEABLE PARTS INSIDE.
REFER
SERVICING
TO
QUALIFIED SERVICE PERSON-
NEL.
The lightning flash
with
arrowhead symbol,
within
an
equilateral triangle, is intended to alert
the user to the presence
of
uninsulated "dangerous voltage" within the product's enclosure that
may
be
of
sufficient magnitude to constitute a
risk of
electric shocl{to persons.
The
exclamation point within an equilateral tri-
angle
is
intended
to
alert the user to the presence
of important operating and maintenance (servicing) instructions in the
literature accompanying
the
appliance.
Page 3
Cassette tape
player I recorder
2
The
controls and
their functions
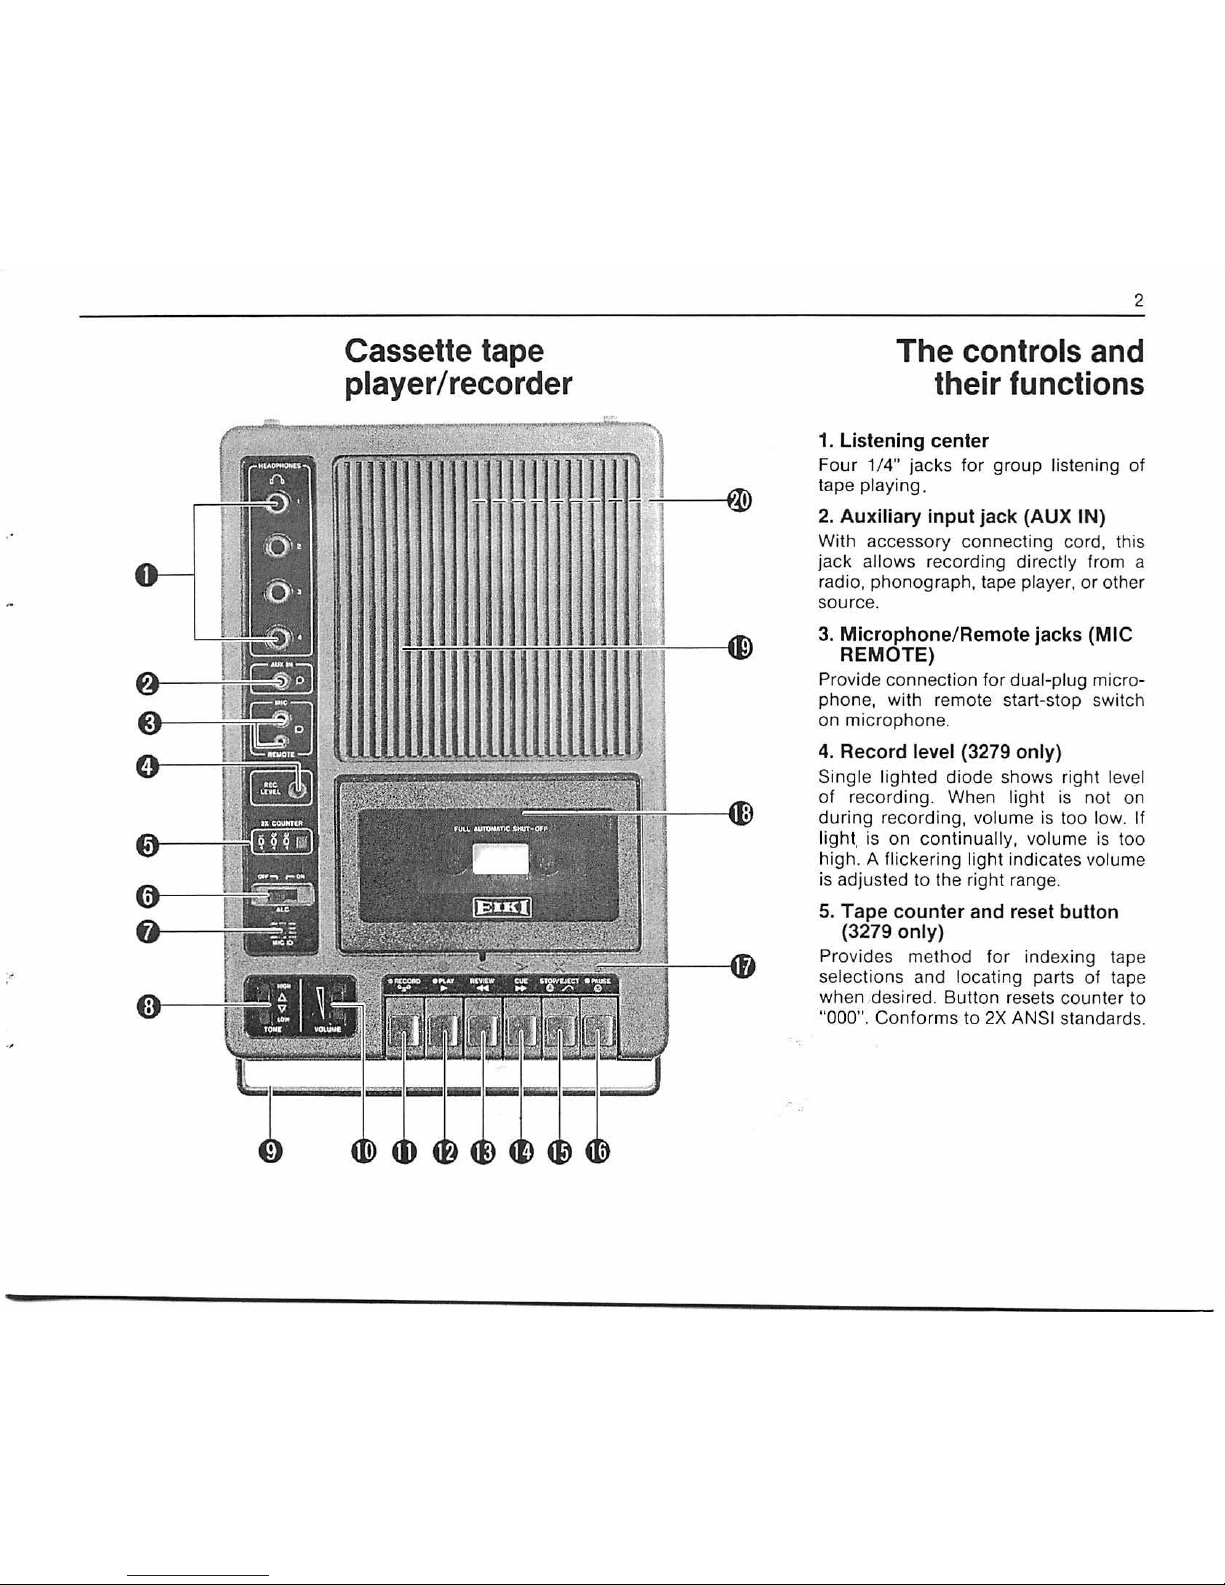
1.
Listening center
Four 1/4" jacks for group listening of
tape
playing.
2. Auxiliary input jack (AUX IN)
With accessory con necting cord, this
jack
a
llo
ws recordi ng directly from a
radio, phonograph, tape
player, or other
source.
3. Microphone/Remote jacks
(MIC
REMOTE)
Provide connection for dual-plug microphon
e,
with remote start-stop switch
on microphone.
4. Record level (3279 only)
Single lighted diode shows right level
of recording. When light
is
not on
during recording,
volume is too low. If
light. is
on continually, volume is too
high. A
fli cker ing light indicates volume
is adju sted to the right range.
5. Tape counter and reset button
(3279
only)
Provides method for indexing tape
se
lections and locating parts
of
tape
when desired. Button r
ese
ts counter to
"0
00". Conforms to
2X
ANSI standards.
Page 4
3
The
controls
and
their
functions
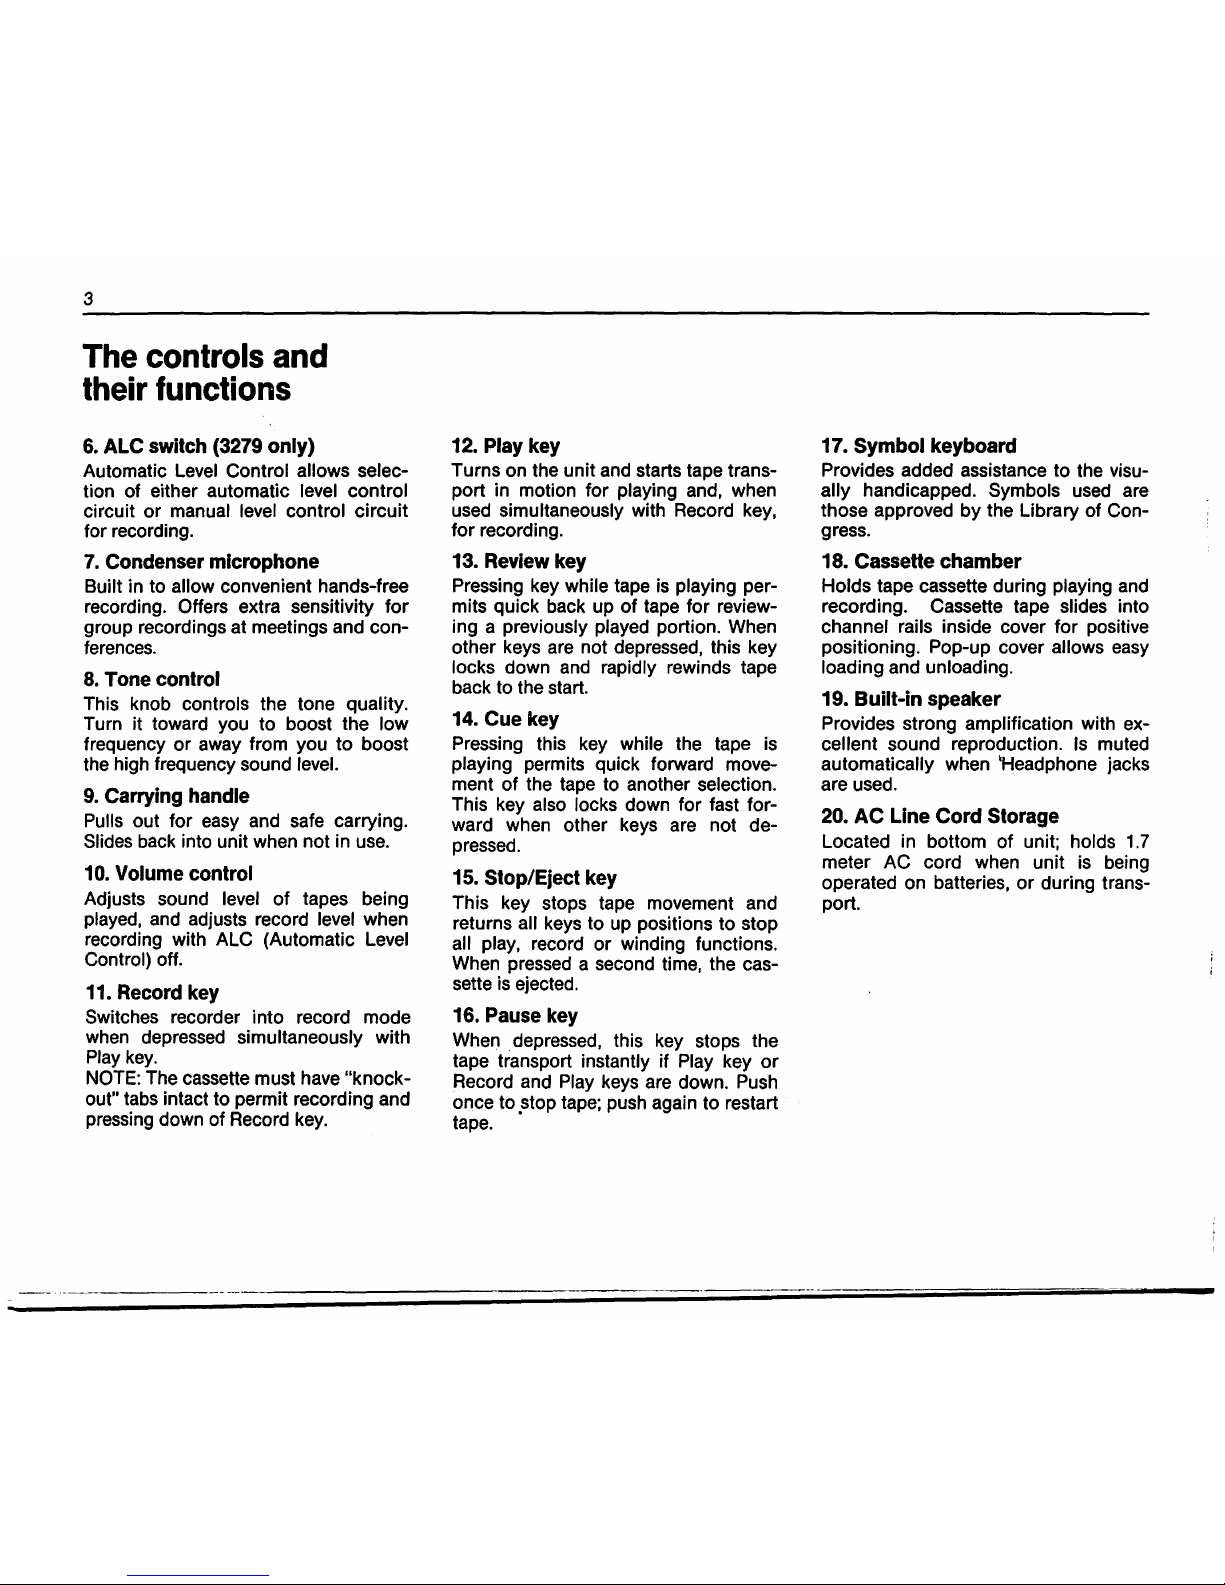
6.
ALC
switch
(3279
only}
Automatic
Level
Control allows selec-
tion of either automatic
level control
circuit or manual level control circuit
for recording.
7.
Condenser
microphone
Built in to allow convenient hands-free
recording.
Offers extra sensitivity for
group recordings at meetings and conferences.
8.
Tone
control
This knob controls the tone quality.
Turn it toward you to boost the
low
frequency or away from you to boost
the high frequency sound level.
9.
Carrying
handle
Pulls out for
easy
and
safe
carrying.
Slides
back
into unit when not
in
use.
10.
Volume
control
Adjusts sound level of tapes being
played,
and
adjusts record level when
recording with
ALC (Automatic Level
Control) off.
11.
Record
key
Switches recorder into record mode
when
depressed simultaneously with
Play
key.
NOTE:
The cassette must have "knockout" tabs intact to permit recording and
pressing down of Record
key.
12.
Play
key
Turns on the unit
and
starts tape transport in motion for playing and, when
used simultaneously with Record
key,
for recording.
13.
Review
key
Pressing key while tape
is
playing per-
mits quick back up
of
tape for reviewing a previously played portion. When
other keys
are
not depressed, this key
locks down
and
rapidly rewinds tape
back to the start.
14.
Cue
key
Pressing this
key
while the tape
is
playing permits quick forward movement of the tape to another selection.
This key
also locks down for fast forward when other keys are not depressed.
15.
Stop/Eject
key
This key stops tape movement and
returns
all
keys
to up positions to stop
all play, record or winding functions.
When
pressed a second time, the cas-
sette
is
ejected.
16.
Pause
key
When
. depressed, this key stops the
tape transport instantly if
Play key
or
Record and Play
keys
are
down.
Push
once to .stop tape; push again to restart
tape.
17.
Symbol
keyboard
Provides added assistance to the visually handicapped. Symbols
used
are
those approved by the Library of Congress.
18.
Cassette
chamber
Holds tape cassette during playing
and
recording. Cassette tape slides into
channel rails inside cover for positive
positioning.
Pop-up cover allows
easy
loading and unloading.
19. Built-in
speaker
Provides strong amplification with excellent sound reproduction.
Is
muted
automatically when
~eadphone
jacks
are used.
20.
AC
Line
Cord
Storage
Located in bottom of unit; holds
1.7
meter AC cord when unit
is
being
operated on batteries, or during transport.
Page 5

Installing batteries
Remove battery compartment cover
(located on bottom of unit)
as
shown in
photo at right. Insert six
"C"
size bat-
teries in compartment;
alkaline type
batteri
es
are recommended for longer
life and maximum power output. Carefully follow
polarity (+ and - symbols)
diagram inside
case.
After batteries are installed and
seated correctl
y,
replace compartment
cover.
NOTE: Always
rem
ove old
or
weak
batteries 'immediately to prevent damage due to leakage. Batteries
shoulc;l
be
removed
if
player/recorder is not
to
be
used
for
an
extended period
of
time.
Operating on AC current
This player/recorder may
be
operat
ed
on reg
ular 120-volt
60
Hz AC current.
1.7
meter AC cord fits snu
gly
within
open storage compartment on bottom
of unit.
Plug
cord into a properly ground-
ed
wall outlet. T
his
automatically disconnects battery circuit. The three-prong
plug should
be
used without a tw
o-
prong adapter whenever possible.
If
an
adapter
is
used,
be
certain the green
wire
or
grounding tab on the adapter is
a
tt
ached to the screw on the wall outlet
plate for proper grounding.
CAUTION: If it
is
necessary
to
use a
power cord adapter, have a trained
electrician install the adapter to the
outlet and check wiring
to
be
sure
there
is
no shock hazard.
Fau
lty wiring
can cause damage to the unit and
possible
in
jury to the operator.
4
Setting up your
player
I recorder
Connecting remote
microphone'
Jacks ·
for
two-plug external microphone (microphone not provided with
the unit) are
located on the top of uni
t.
These are marked "MIC REMOTE
".
When inserting into jacks, push plugs
in firmly until they are seated.
With microphone installed, remote
on/
off
switch will start and stop re-
corder in eith
er
play
or
record mode.
Page 6

5
Using your
player/recorder
Playing a recorded
cassette
After setting up your player/recorder
by installing batteries or by plugg ing in
the AC pow er cord (See
Pag
e 4), you
can
play recorded cassettes by follow-
ing these
thr
ee
easy steps.
1.
Open Cassette Chamber cover by
pressing down Stop/eject key. Insert
cassette into channel rail inside cham ber cover
as
shown with exposed edge
of tape facing you and full reel
to
your
lef
t.
If you
are
playing a commercially
re
corded cassette, selections listed on
label on top side are the ones that will
be
played.
2.
With cassette seated
so
that spindles
engage the hubs, close cover
of
Cas-
sette Chamber, and press
Pl
ay key to
listen
to
the tap
e.
If yo u are using a
remote
control microphon
e,
be sure
that the on/off switch is turned to
"on".
3.
Adjust Volume Control and Tone
Control for a comfortable listening
level.
Most tape cassettes have two sides,
just the same as records.
Pre
recorded
cassettes are recorded on both sides.
You can also make your own recordings on both sides of a
blank cassette
when the
"k
nock-out" tabs on the cas-
sette are intact.
Your
player/recorder has a Full
Automatic Shut-off feature which turns
the unit
"off" when all of th e tape on
one side has
bee
n played. To hear
selections on the other side, just turn
cassette over and
reload as explained
above. The full reel
of
the cassette
should always
be
on your left when
loading.
Page 7

Using review and
c
ue
keys
After playing a tape and with the tape
stopped, pressing
Rev
iew key
or
Cue
key
will lock the key down
for_
fast
rewind
or
fast forward, respect ivel
y.
Pressing Stop key returns Review or
Cue
key
to up position.
For a quick
rev
iew, back up the tape
by pressing Review key
(leaving
~
lay
key down) and ho ld it for the desire?
time. When Review key is released,
unit
returns to play mode.
To advance tape to another section,
press Cue key
(leaving Play key down)
and
hold
it
for desired ti
me.
When Cue
key is
released, unit returns to play
mode.
When using Review key and Cue
ke~,
you soon learn to estimate approxima
tely how long to hold the key de-
pressed to reach a desired tape
loca-
tion.
Using pause key
The Pause key is used
to
instantly stop
the tape t
ra
nsport without releasing the
Play key. Push this key once to stop
tape movement; push it again to restart
tape.
The Pause key
also is useful in re-
cording since it
instantly stops the
tape.
See
information on pages 7 and
8.
6
Using
your
player/recorder
(continued)
Using tape counter
(3279 only)
The counter provides a means of
numerically indexing selections on tape
cassettes and
allows fast return to
specific parts of the tape.
To
reset
co
unter
to
"000" at the start of tape,
press reset butt on. The counter conforms
to
2X
ANSI standards.
The Tape Counter is helpful when
recording and re-recording a tape in
segments.
Page 8

7
Using
your
player/recorder
(continued)
Recording with
automatic
level
control
This unit is equipped with Automatic
Level Control which adjusts the recording
level automatically. Combined
with
the built-in Condenser Microphone,
you have the advantages
of
"hands
free"
recording. Move the
ALC
switch
to the
"on"
position. Insert a blank tape
cassette with
"knock-out"
tabs intact
and depress the Record and
Play key.
On the 3279 the Record Level indicator
Light
will flicker
as
you record
which
shows you that a signal is being recorded on the tape.
You can also record with Automatic
Level Control when using a Remote
Control Microphone. Just plug the
microphone cord into the
"REMOTE
MIC"
jacks, move the
ALC
switch to
"on", insert a blank cassette with
"knock-out" tabs intact and press Record and
Play keys. Holding the
micro-
phone about 6 to 8 inches away from
your mouth, turn microphone switch
"on" and begin speaking.
To
pause
during recording, move
microphone
switch to "off", then back
to
"on"
when
you wish to resume.
The unit's
Pause key also may be
used to stop the recording
without
disturbing the position
of
the Record
and
Play keys.
When the recording is
complete,
press Stop/Eject key to release all other
keys.
To
play what you have recorded,
press Review key to back
up
tape, then
press the
Play key. If microphone is
still plugged in, leave the switch "on''.
The counter on the model 3279 can
also be used to indicate position
of
the
tape. With a
little practice you soon will
be using the key most effectively.
Page 9

Recording with
manual
level control
(3279
only)
There
are
times
when
it is desirable to
record with
manual level control.
Music for example, usually can
be
recorded with better results in the
manual
method; the
same
is true when
you
are
recording with a relatively high
level
of background noise. This unit
is
sensitive to background noise in the
ALC
mode
and
will tend to emphasize
background sounds in noisy rooms.
To record with
manual
level
control,
follow
these
steps:
1.
Load
unit with a blank tape cassette
with
"knock-out" tabs intact.
2.
Set
the
ALC switch to "off" position.
3.
Use
the built-in Condenser Micro-
phone,
Remote
Control Microphone, or
Auxiliary input.
4.
Press
Pause
key
down, then both
Record
and
Play
keys.
Turn switch on
remote microphone to
"on".
5.
Start the voice or source to
be
re-
corded.
Sounds will
be
picked up by
the microphone, but
because
the
Pause
key is down, they will not
be
recorded.
To set the
level
correctly, watch the
Record
Level
Indicator Light
and
set
the Volume
Control
so
that the
red
light
flickers.
When
the light
is
riot on,
volume
is
set too low.
When
the light
is
on
continuously, volume
is
set too
high.
6.
When
the
level
is
right, press the
Pause
key to
release
it. Tape transport
will start instantly.
8
Using
your
player/recorder
(continued)
To record from sound sources such
as
a radio, tape player
or
other device
through the
AUX input jack, obtain a
suitable connecting cord to hook-up
the source with the
AUX
jack. If using
the
ALC recording system, turn the
sound source to a
normal listening
level. Follow
regular recording procedures. If using the manual recording
system,
follow the procedure
as
when
using a microphone.
Page 10

9
Optional Equipment
Using Listening Center
Located on the top of the uni
t.
this
center consists of
four
standard 1 /4"
headphone jacks. From
one
to
four
headphone sets may be
plugged
into
this center at one t
ime
for
gro
up
list
en-
ing
of
tape cassette being
played.
NOTE: Wh
en
using more than
one
headphon
e.
be sure that all head-
phones are of the same type
or
im-
pedance so that they
will all r
eproduce
at the same volume level.
NOTE:
The 1/4" jacks are not designed
to operate extension
loudspeakers.
Eiki optional accessories
allow
even
more
flexibility and convenience in the
use and performance
of your
new
qual
ity cassette player/recorde r. The se
recommended accessories are
available
from
your Eiki dealer.
Headphones #715735
Make the most of
your
Listening Cen t
er
feature.
Fu
ll
range sound r
eproduction
·large, comfortable ear muffs are washable
and
replaceable
·speaker-like
sound elements ·protected headsize
adjustment band.
Remote Control Microphone #707253
When you're reco rding where there is
high backgrou
nd
noise levels. this
ac-
cesso ry greatly
impro
ves recordin g
qualit
y.
Page 11

Hints
on
using
your
player/recorder
Listen
in
privacy
by
connecting
headphones to a
listening Center jack.
When
you play back a tape with head-
phones
plugged
in,
the unit's built-in
speaker
is
automatically turned off.
On
the 3279 recorded tapes can be
erased
by running them through the
unit with
controls
in
the Record mode.
Be
sure
to turn off the ALC switch and
have
the
Volumn
Control turned
all
the
way
down. A bulk tape eraser is the
fastest, easiest and best way
to
erase
recorded tape cassettes. These are
available form your dealer.
Dimensions
Weight
Frequency Response
Wow
& Flutter
Signal
to Noise Ratio
Power
Output
Distortion in your recordings can
be
caused by having the manual recording
level
set
too high when using the
manual system with ALC off on the
3279,
or
by having the sound source
or
background nqise much too high when
using the
ALC system.
Caring for your
player/recorder
.
Clean the heads periodically for con-
tinued high
fidelity performance.
Use
a
cotton swab
and
any commercial mag-
netic head
cleaning agent. Follow
instructions on the cleaner container.
The magnetic head which
is
used for
recording and
playback can become
magnetized from continued
use.
A
magnetized
head
will cause distortion
in
playback
or
recording.
Demagnetize the
head
periodically
with a commercially available head
demagnetizing unit.
Complete instruc-
tions are provided with these
specially
designed units.
10
Specifications
Model
3279
Model
3269
7%"x111h''x23.4"
4 lbs. 8
oz.
4
lbs. 6 oz.
125
Hz
to 8 kHz
125
Hz
to 8
kHz
S0.30% S0.30%
S40db
S40db
>1W@5%T.H.D. >1W@5%T.H.D.
Protecting your cassettes
Keep in mind that unless tabs on back
of cassette have been removed, any
sound
already on tape will
be
erased
automatically if that cassette
is
used
in
Record mode of player/recorder.
You
can protect cassette from accidental
erasure by removing the two small tabs
on back of each cassette.
With
Side 1 of cassette facing
up,
tab
on
left may
be
used to protect Side
1,
and tab on right to protect Side
2.
Tabs can
be
removed merely by
breaking them outward with a
small
screwdriver, penpoint or other suitable
tool.
If
at a future date. you no longer want
to preserve a protected cassette, merely cover the openings (where tabs
were
removed) with small pieces of cellonphane tape. That cassette then
can
be
used for re-recording.
Page 12

CASSETTE TAPE RECORDER
WARRANTY
LIMITED 1 YEAR WARRANTY
EIKI International Corporation warrants this product when sold to the
original purchaser from
an
authorized EIKI dealer, to be free from defective
materials and workmanship for a period
of
1 year. (Batteries and tape
excluded).
EIKI agrees to repair any defect
or
furnish a new
or
equal part through
an
authorized EIKI Service Dealer
or
Station.
It
shall
be
the obligation
of
the purchaser
to
provide proof
of
purchase and
cover
all transportation charges
to
and from the service facility. Damage or·
loss to the product during transit is not covered by this warranty.
This warranty does not apply to appearance items
nor
to any product
subjected to misuse, abnormal service
or
handling, nor to any product
altered
or
repaired by other than an Authorized EIKI Service Dealer
or
Station. The provisions
of
this warranty does not apply to any products
purchased
or
serviced outside the United States. its territories or posses-
sions, except Canada.
Elki International Inc.
26794 Vista Terrace Drive
Lake Forest,
California 92630-S113,
U.S.A.
Tel: 949-457-0200 Fax: 949-457-7878
THIS SHALL BE THE EXCLUSIVE WRITTEN WARRANTY TO THE
ORIGINAL PURCHASER ANO NEITHER THIS WARRANTY NOR ANY
OTHER WARRANTY EXPRESSED OR IMPLIED SHALL EXTEND BEYOND
THE PERIOD OF THE TIME LISTED.
l~~.NO
EVENT SHALL EIKI
BE
LIABLE FOR CONSEQUENTIAL ECONOMIC DAMAGE TO PRO-
PERTY.
SOME STATES DO
NOT
ALLOW A LIMITATION
OR
EXCLUSION
MAY NOT APPLY
TO
YOU. THIS WARRANTY GIVES YOU SPECIFIC
LEGAL RIGHTS
AND
YOU MAY HAVE OTHER RIGHTS WHICH
VARY
FROM STATE TO STATE.
For questions concerning this warranty
or
to obtain the name and address
of
the nearest authorized EIKI Service Dealer
or
Station call
or
write, EIKI
International, Inc.
at one
of
the following locations.
Eiki Canada
17036Highway12
P.O.Box 156 Midland,
Ontario
L4R 4K8, Canada
Tel: 705-527-4084
Fax: 705-527-4087
Specifications subject to change without notice.
1111-M70400
9808-2
Printed
In
Malaysia
 Loading...