

Page 1

Ei650 Series
SmokeAlarm
Operating Instructions
Page 2

2
Congratulations on
buying an Ei650
smoke alarm
from Ei Electronics!
Achtung – Attention – Attenzione
Dieses Produkt ist ausschließlich für den Verkauf im deutschsprachigen Raum bestimmt. Rechtliche
Ansprüche in anderen Ländern entfallen. Sollten Sie das Produkt anderswo erworben haben,
returnieren Sie es bitte an den Händler, bei dem Sie es gekauft haben.
This product is intended exclusively for sale in German-speaking countries. Legal claims in any other
countries shall be excluded. If you acquired the product elsewhere, please return it to the dealer
where you purchased it.
Ce produit est en vente exclusivement dans l’espace germanophone. Personne ne pourra donc faire
valoir un droit dans d’autres pays. Si vous avez acheté le produit ailleurs, veuillez le retourner au
détaillant auprès duquel vous l’avez acheté.
Questo prodotto è destinato esclusivamente per la vendita nei paesi di lingua tedesca. Non è possibile
far valere pretese legali in altri paesi. Se avete acquistato il prodotto altrove, si prega di ritornarlo al
rivenditore presso il quale è stato acquistato.
Page 3

3
Model
Can be
wire-linked
Wireless
compatibility
Optional radio
module
Ei650
No No No
Ei650W
No Yes Ei650M/Ei600MRF
Ei650C
Yes Yes Ei650M/Ei600MRF
Ei650RF
No Yes Included
Ei650i
No No No
Ei650iW
No Yes Ei650M/Ei600MRF
Ei650iC
Yes Yes Ei650M/Ei600MRF
Ei650iRF
No Yes Included
For an early warning in the event of a fire, install this smoke alarm on every floor in your building and in
escape routes, hallways and enclosed rooms to make sure you are protected against fire. Heat detectors
can be installed in kitchens and other areas where smoke alarms are not suitable (if these rooms are not
going to be used as escape routes).
The i series has been specially developed as a high-end, sophisticated product range. An integrated
microprocessor and the extra yellow diagnosis LED allow potential faults to be minimised during regular
maintenance, which means unscheduled servicing can be avoided.
The Ei650C and Ei650iC models can be wire-linked or interlinked wirelessly to form a network, ensuring
the alarm can be heard throughout the building in an emergency. Wireless interlinking requires special
radio models (Ei650M/Ei600MRF). The modules must be purchased separately. The Ei650W and Ei650iW
models can only be interlinked using radio modules.
The Ei650 and Ei650i models are stand-alone smoke alarms that cannot be interlinked using wires or
wirelessly (see table).
Page 4

Contents
1. Quick guide 7
2. Choosing a location 8
2.1 How smoke alarms and heat detectors work 9
2.2 Location 10
2.3 Positioning 13
3. Installation 18
4. Interlinking 24
4.1 Radio-linking 25
4.2 Wire-linking 25
5. Testing, maintenance and readiness for use 28
5.1 Manually testing the alarm 29
5.2 Test/silencer button for controlling false alarms 30
5.3 Power supply – monitoring 32
5.4 Cleaning the alarm 33
5.5 Automatic self-test 33
5.6 Dust and contamination from insects 34
5.7 Replacing an alarm 35
Page 5

6. Interpreting signals 36
6.1 Normal mode 37
6.2 Fault indicators 38
6.3 Diagnosis for i series 44
7. Troubleshooting 48
8. Fire safety information 50
9. Customer service and warranty 54
9.1 Customer service 55
9.2 Warranty 56
Page 6

6
2. Choosing a location
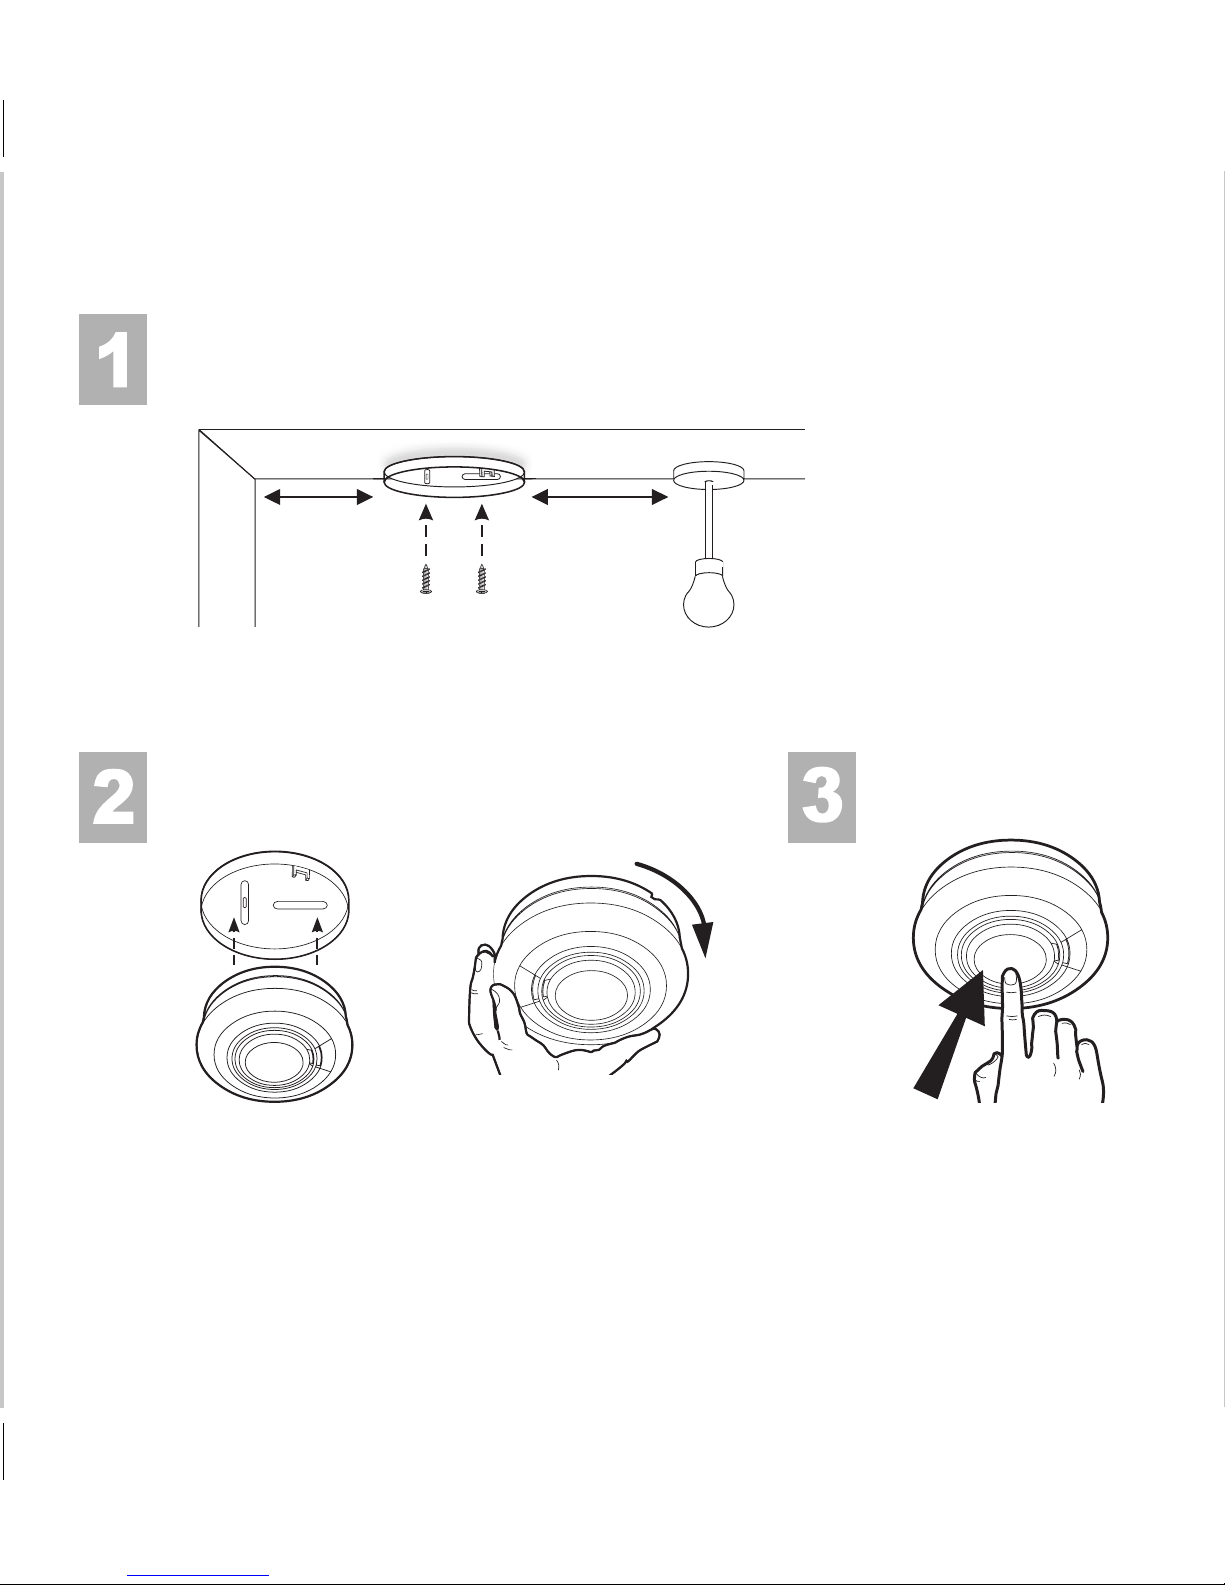
1
Quick guide
Page 7
7
Test alarm
Place the alarm onto the base and
turn it.
Look for the right place to install the alarm.
Fix the mounting plate onto the ceiling.
The smoke alarm should be
installed on the ceiling, at
least 50 cm away from walls
and obstructions and ideally
in the centre of the room.
50 cm
(min.)
50 cm
(min.)
The battery is automatically
activated by twisting the
device onto the base.
Press the test button.
Test the alarm at regular
intervals, at least once per
year, in accordance with
DIN 14676.
Page 8

8
2. Choosing a location
2
Choosing
alocation
Page 9

9
2.1 How smoke alarms and heat detectors work
Before a smoke alarm goes off, a sufficient amount of smoke must have entered the
smoke chamber. The smoke alarm should be located less than 7.5 m from the source of
the fire in order to respond quickly. The devices must be installed in locations where
they can be heard throughout the building, so that all inhabitants can wake up and
get out quickly in an emergency. A single smoke alarm can offer limited protection if
it is installed properly, but two or more alarms (preferably interlinked) are needed in
most houses to ensure that a warning is given quickly enough. For optimum protection,
a smoke alarm should be installed in every room in which a fire could break out (except
the kitchen and bathroom).
The first smoke alarm to be installed should be placed between the bedroom and the
most likely source of a fire (for example, the living room). It should be located no more
than 7.5 m from the door of a room in which a fire could break out and block the
escape route.
Heat detectors sound when the temperature on the heat detector reaches 58 °C.
They are recommended for use in kitchens, garages, boiler rooms and other areas in
which there is often a large amount of steam or dust. Smoke alarms cannot be installed
in these locations without the risk of repeated false alarms. A heat detector should only
be used in rooms that adjoin escape routes in which smoke alarms are installed.
Page 10

10
2. Choosing a location
2.2 Location
First check what legal requirements there are in your federal state for installing smoke
alarms. Please refer to local building regulations for the exact requirements*. Fire
prevention experts recommend that smoke alarms should be installed at least in every
bedroom and every child’s room, as well as in the escape routes for these rooms (except
in unsuitable rooms such as the kitchen and bathroom).
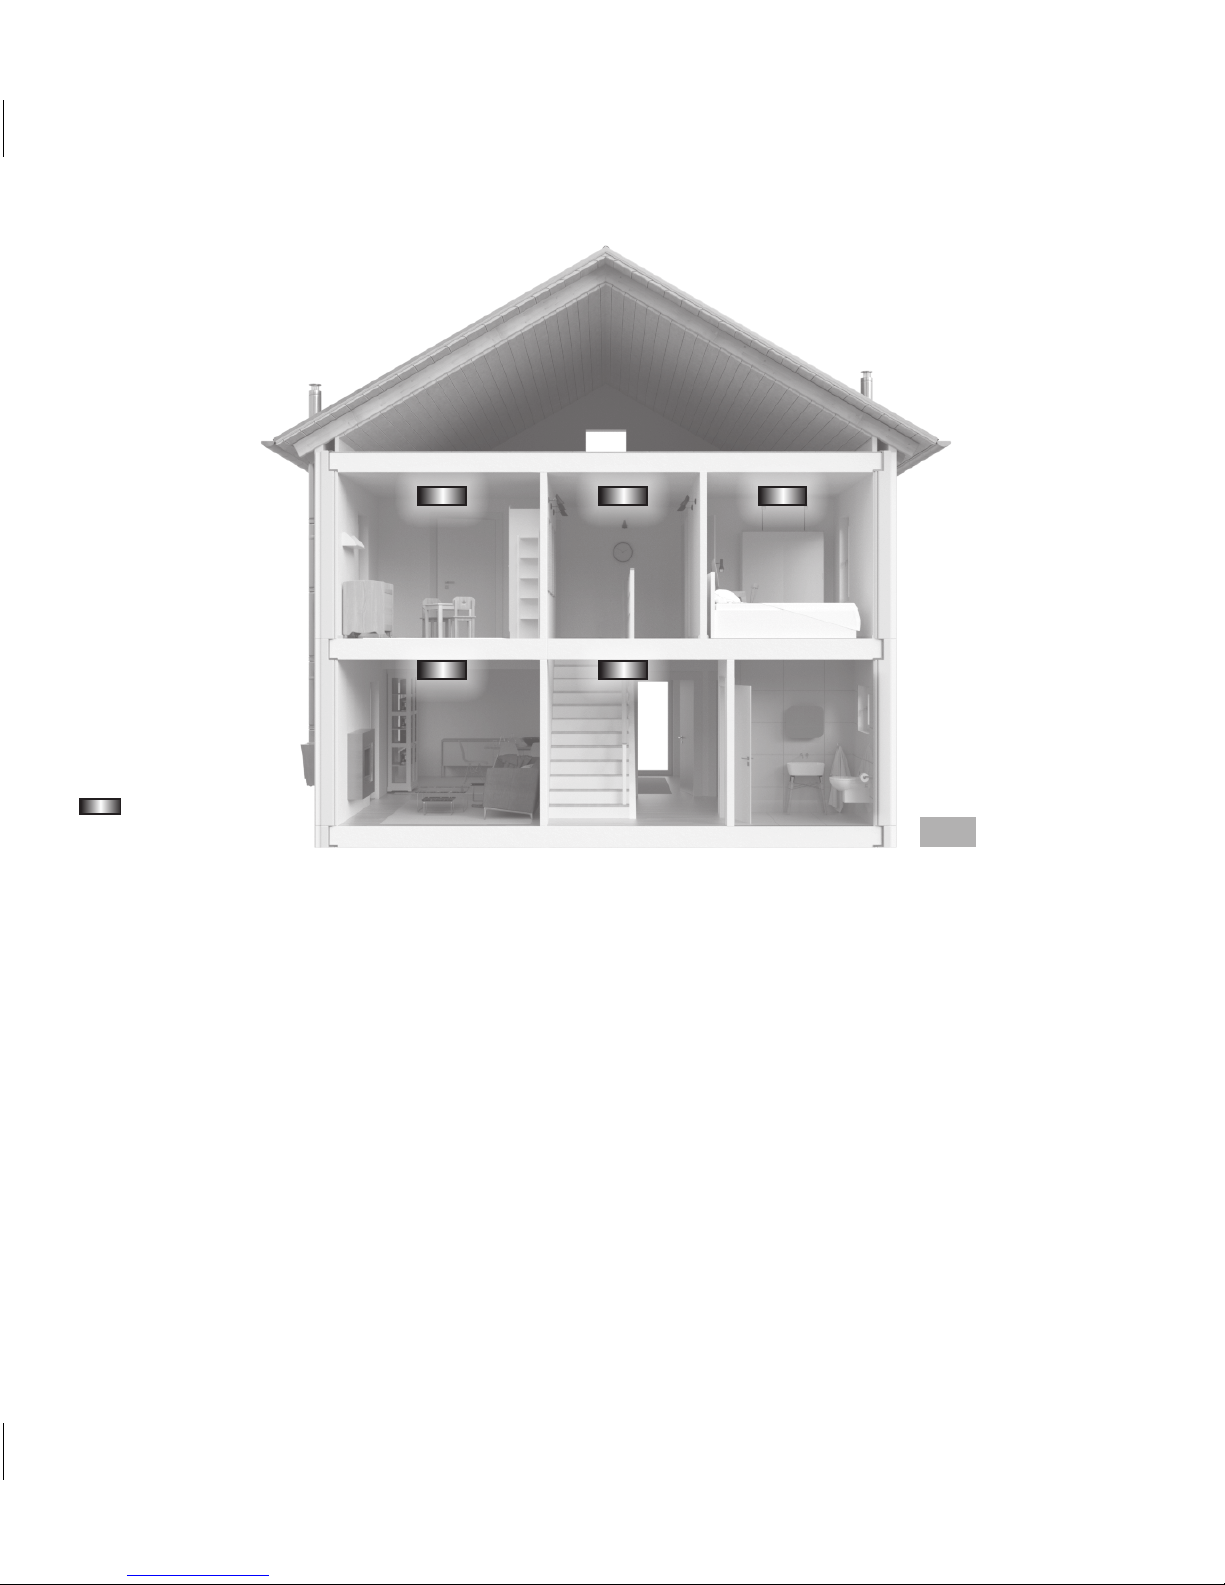
Multi-storey homes
If there is more than one storey in your home (see Figure 1), at least one alarm should
be installed on every floor. Preferably, the alarms should be interlinked (if this function
is available on your device) so that the alarm sounds throughout the building. Radio
modules, which are easy to install, are ideal for this, as the alarms can be interlinked by
radio – no wires are needed.
For even better protection, you should install heat detectors in kitchens, garages, boiler
rooms, etc. Smoke alarms are not suitable for these rooms.
Heat detectors should be interlinked to the Smoke Alarms.
* Visit www.rauchmelder-lebensretter.de/rauchmelderpflicht for further information
Page 11
11
Minimum protection
■ Smoke alarm on every storey, in every
bedroom and children's room and in
the escape routes for these rooms
Optimum protection
(in addition to the measures already
mentioned):
■ Smoke alarm in every room
(except the kitchen and bathroom)
■ Heat detectors in kitchens,
garages, etc.
■ All devices interlinked
(if this function is available)
Fig . 1
Smoke alarm
Page 12
12
2. Choosing a location
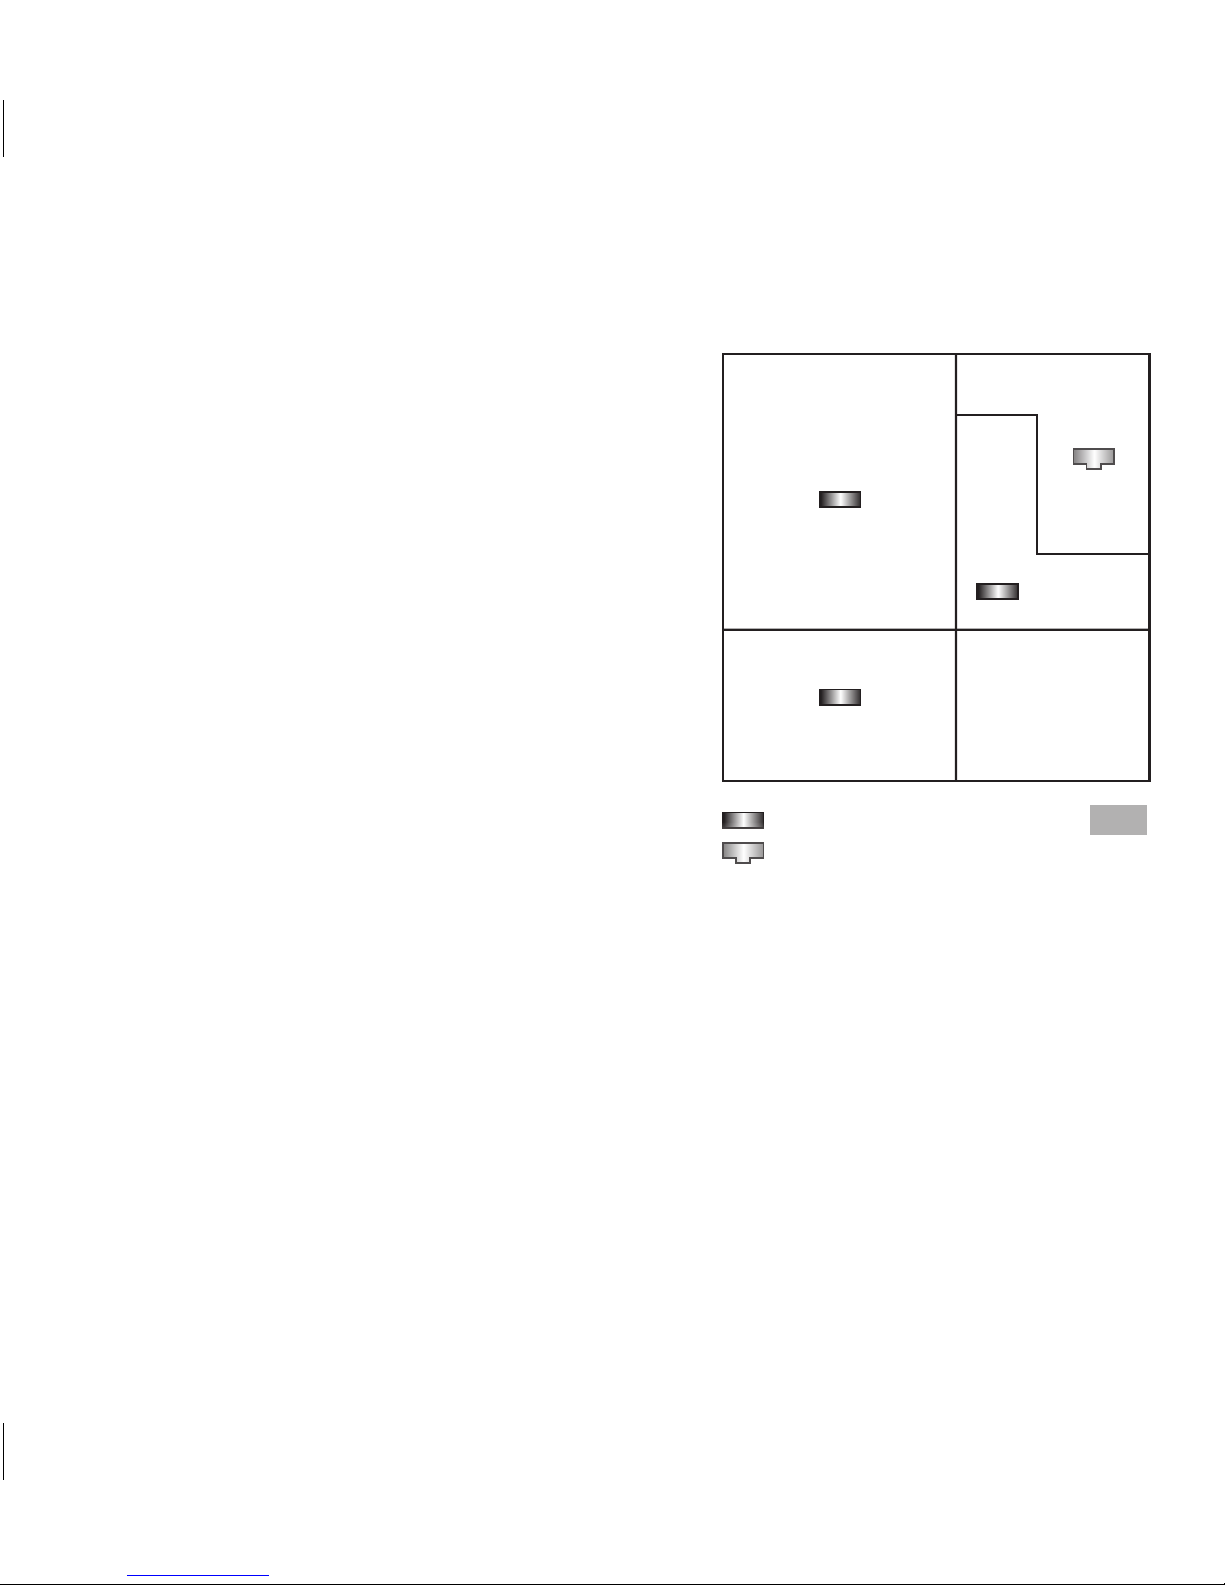
Single-storey homes
If the building has just one storey (see
Figure 2), place one smoke detector in
every bedroom and every children's room
at least, as well as in the escape routes for
these rooms. Please refer to local building
regulations for the exact requirements*.
In buildings with more than one bedroom,
smoke alarms should also be placed
between the bedrooms and the living room.
Heat detectors should be placed in the
kitchen and garage.
Check if you can hear the alarm
Use activated alarms in the designated locations to check whether the alarm can be
heard when the door is closed in each bedroom – including when there is music playing
or noise from the TV. The TV/audio systems should be set to a normal volume. If you
cannot hear the alarm due to other noise, there is a risk that you would not wake up
in a real emergency. Interlinking alarms using wires or wirelessly (if this function is
available) ensures that an alarm can be heard in the entire building.
Fig . 2
Smoke alarm
Heat detector
Living room
Kitchen
Hallway
Bathroom
Bedroom/
children's room
* Visit www.rauchmelder-lebensretter.de/rauchmelderpflicht for further information
Page 13

13
2.3 Positioning
Installation on the ceiling
Hot smoke rises and spreads across the ceiling of a room. Because of this, it is
recommended that you choose a central position on the ceiling for installing smoke
alarms. The air “stands still” in corners and does not circulate, therefore smoke alarms
should never be installed in corners. Place the alarm at least 0.5 m away from walls and
corners. Place the alarm at least 0.5 m away from lights or other decorative objects that
could obstruct the smoke's penetration into the smoke alarm. In rooms and hallways less
than 1 m wide, the smoke alarm should be installed in the centre of the ceiling between
the walls (see Figure 3).
Fig . 3
> 0.5 m
> 0.5 m
Installation in
the centre of
the ceiling
Fig . 4
< 6 m
Maximum room
height 6 m
Page 14
14
2. Choosing a location
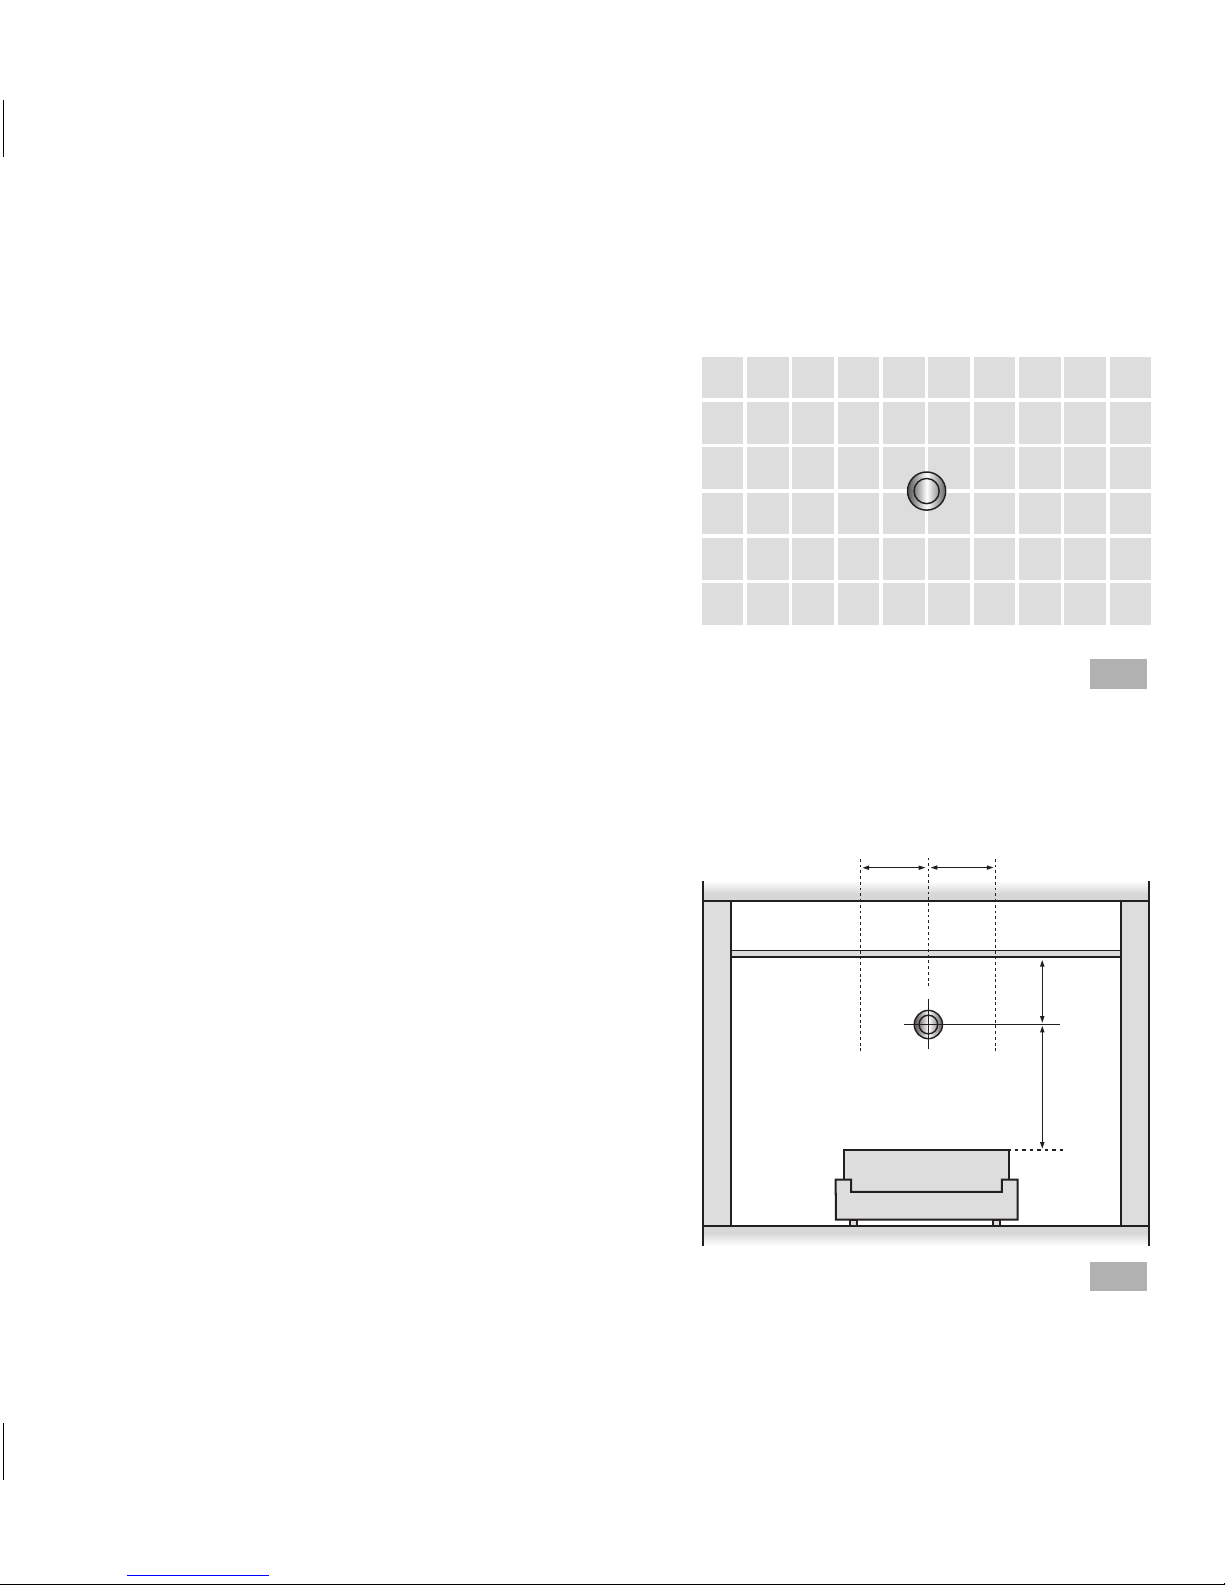
Under the applicable standard, a smoke
alarm can monitor an area of up to 60 m²
(see Figure 5).
Information on wall installation
In the following circumstances, smoke
alarms can be installed on a wall, in the
middle third of the longer side of a room
(see Figure 6):
■ Insufficient ceiling strength
■ In hallways ≤ 6 m² (if a high number
of false alarms are likely)
■ In kitchens that are used as
escape routes
The following distances from walls, ceilings
and fixtures must be observed:
0.3 m-0.5 m from the ceiling
1 m below the smoke alarm
0.5 m to the side of the smoke alarm
> 0.5 m > 0.5 m
0.3 to
0.5 m
1 m
Fig . 6
Fig . 5
Maximum area 60 m²
Page 15
15
Sloped ceilings
In rooms with inclined ceilings where
the slope is more than 20° from the
horizontal, pockets of heat can form
in the ceiling apex which can prevent
smoke from entering the smoke alarm.
Therefore, smoke alarms must be installed
at least 0.5 m and at most 1 m from the
ceiling apex in these rooms (see Figure 8).
✓
0.5 to 1 m
Gable
Fig . 8
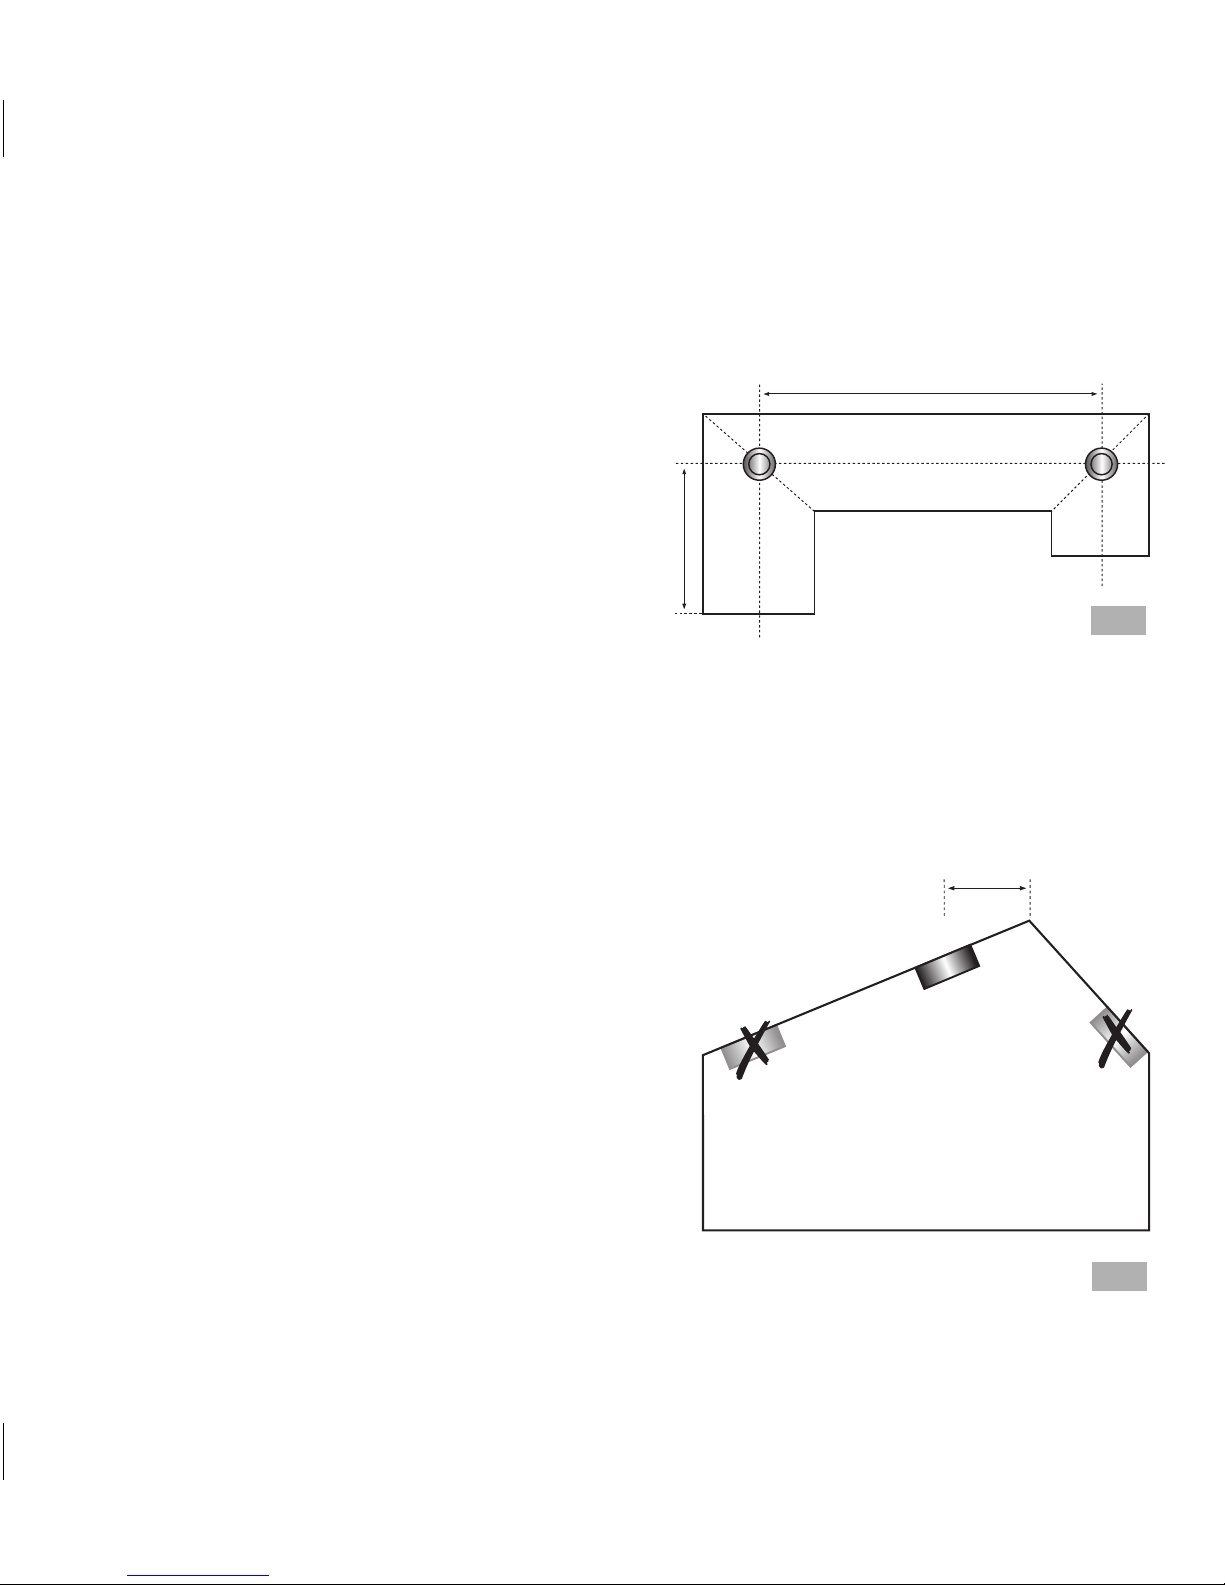
Hallways
The distance from the front face of the
hallway (hallway = max. 3 m wide) to the
first alarm must not be more than 7.5 m.
An alarm should be installed in corner areas
(cornice joints), junctions and crossings in
hallways. The maximum distance between
two smoke alarms in hallways should be
15 m (see Figure 7).
Max. 15 m
Max.
7.5 m
Fig . 7
Page 16

16
2. Choosing a location
Unsuitable installation locations
Do NOT install smoke alarms in the following areas:
■ Bathrooms, kitchens, shower rooms, garages or other rooms where steam,
condensation or dust could set off the alarm.
■ Do not place smoke alarms in dusty or dirty areas, because dust particles can gather
in the smoke chamber and impair the performance of the alarm. This can also block
the insect screen, which may stop the smoke from entering the smoke chamber.
Avoid areas where there are a lot of insects. Small insects that can get into the smoke
chamber may set off a false alarm.
■ Locations where the normal temperature may rise above 40 °C or drop below 0 °C
(e.g. uninsulated lofts, boiler rooms, directly above ovens or boilers, etc.). Heat or
steam may set off a false alarm.
■ Next to decorative objects, doors, light fittings, window surrounds, etc., which may
obstruct the smoke or heat from entering the alarm.
Page 17

17
■ On surfaces that are usually warmer or colder than the rest of the room. Due to the
temperature differences, smoke or heat may not reach the alarm.
■ Next to or directly over heating devices or air-conditioners, windows, wall vents, etc.,
which change the direction of air flow.
■ In very high or inconvenient areas (e.g. above staircases) where the alarms are hard
to reach (for testing and silencing purposes).
■ Position the alarm at least 1 m away from dimmable lights and their wiring, as some
dimmers can cause faults.
■ Position wire-linked alarms at least 1.5 m away from fluorescent tubes and lay the
cables at least 1 m away, as the
device may be impaired by electrical “interference”
and/or flickering.
Page 18

18
2. Choosing a location
3
Installation
Page 19
19
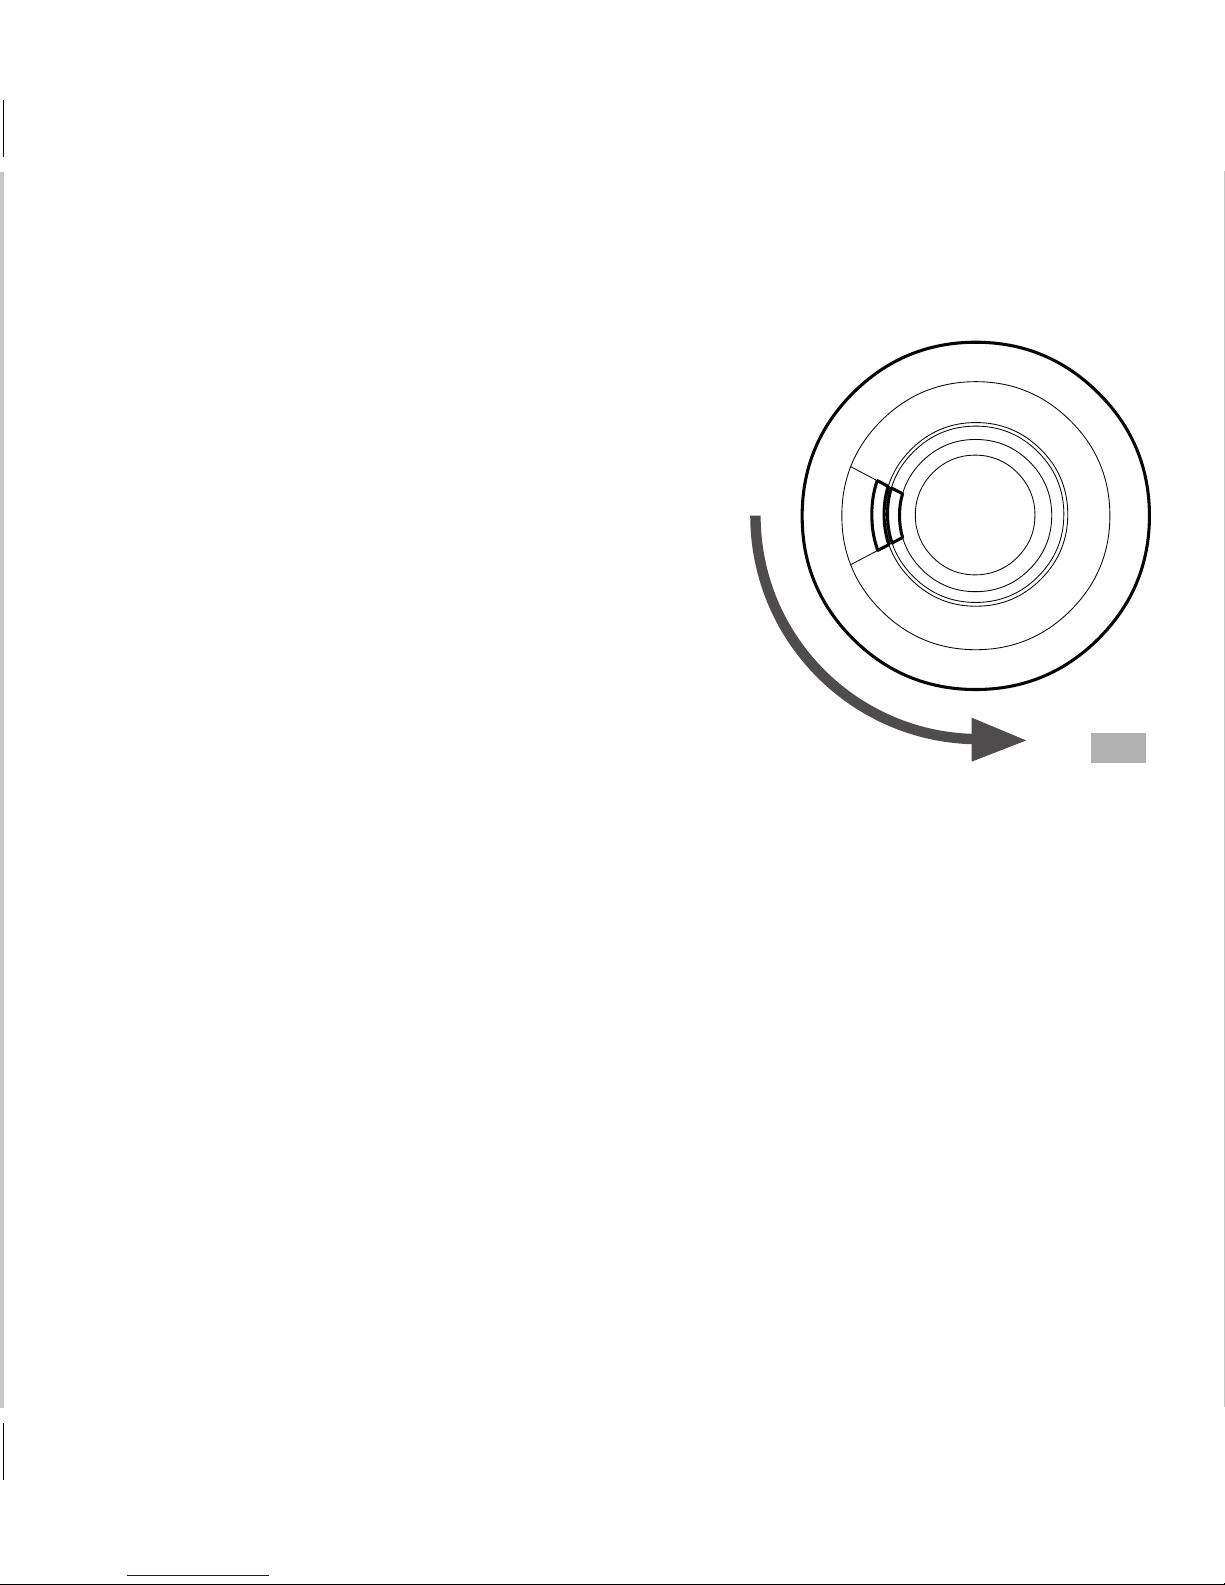
How to install the alarm
1. Choose an installation location in line with the
recommendations in section 2.
2. Remove the mounting plate from the smoke
alarm by turning it anticlockwise (see Fig. 9).
3. Place the mounting plate on the ceiling in the
exact location where you want to install the
alarm. Mark the position of the two screw holes
using a pencil.
4. For wire-linked alarms, use a suitable
two-core cable at the marked positions of
the individual alarms. Make the connections
to the alarm (see section 4.2).
5. Ensure that there are no electric cables in this area of the ceiling and use a 5.0 mm drill bit
to drill a hole in the centre of the marked positions. Insert the plastic dowels into the drill
holes. Screw the mounting plate onto the ceiling. If you decide to install the alarm in
adifferent way, you must ensure the alarm is fixed to the ceiling permanently.
Smoke alarms with a radio module should be installed with the antennae in the same
direction (i.e. largely parallel). To do so, choose part of the building – e.g. the front wall of
the house – and then install the mounting plates so that they all face it (see Figure 10).
Turn the device anticlockwise.
If the device does not detach, it
may have been installed with
tamper proofing (see Figure 12c).
Fig . 9
Page 20

20
3. Installation
For optimum antenna performance, make sure all mounting plates are
facing in the same direction.
Large opening
closest to the
front wall
Mounting plateMounting plate
Mounting plate Mounting plate
Front wall
Front wall
Fig. 10
Page 21

21
6. Carefully align the alarm with the base, push it home and twist it gently on. Install all
of the other alarms in the same way.
7. Press the test button on each alarm to make sure
that the device is working (Figure 11).
8. If you are fitting wired smoke alarms, read
section 4.2.
9. If you are fitting radio-linked alarms,
please follow the instructions for your
radio module.
Install all of the other alarms in the same way.
F ig . 11
Page 22

22
3. Installation
Protecting the alarms from tampering (if required)
The alarm can be protected against tampering to stop it from being removed
without permission.
Remove the small bar from the base as shown in Figure 12a.
To remove the alarm from the ceiling, the catch must be released using a small
screwdriver (press the catch towards the ceiling) and the alarm must then be twisted
off (see Figure 12b).
F ig. 12a
Break out
small bar
F ig. 12b
Push the catch up and turn the alarm
anticlockwise to remove it
Page 23

23
If necessary, the alarm can also be secured using a number 2 or 4 thread-cutting screw
(diameter of 2-3 mm – not included) with a length of 6-8 mm (see Figure 12d). This
will fix the alarm to the mounting plate (see Figure 12c). First attach the alarm to the
mounting plate.
Insert the screw (not included) into the “U”-shaped recess shown in Figure 12c and
screw it down firmly.
To remove the alarm from the ceiling, first remove the screw and then turn the
alarm anticlockwise.
F ig. 12c
Tamper-proof screwing
2 to 3 mm
6 to
8 mm
F ig. 12d
Thread-cutting screw
Page 24

24
2. Choosing a location
4
Interlinking
Page 25

25
4.1 Radio-interlinking
The Ei650W, Ei650C, Ei650iW and Ei650iC models can be interlinked wirelessly using radio.
The Ei650M or Ei600MRF radio module is required for this. You simply insert it into the
back of the smoke alarm. This ensures that if one alarm detects a fire, all interlinked alarms
go off too and the alarm can be heard throughout the house.*
4.2 Wire-linking
We recommend interlinking up to 12 smoke alarms and/or heat detectors so that
all devices will sound if one device detects a fire – (see Table 1 for alarms with
wire-linking). This ensures that the alarm will be heard throughout the building.
Do not connect any other kind of device, as this may damage the alarm or impair its
performance. A maximum of 250 m of dual-core 0.5 mm–0.75 mm stranded signal wire
may be used (maximum resistance between two alarm units: 50 Ohm). The alarms are
connected up by wiring together all terminals marked “1” and all terminals marked “2”
(see Figure 13 a). Note: Draughts from cable openings, cable ducts or installation
boxes/holes can draw smoke out of the smoke chamber, reducing the sensitivity of the
smoke chamber. It is extremely important to seal all openings in the ceiling with silicone
or a comparable sealant.
* Visit http://www.eielectronics.de/funkrauchmelder/funk-system for more information
Page 26

26
4. Interlinking
1. Run the dual-core cable to the alarm locations.
2. Pull the cable through the openings in the mounting plate (before you screw the
mounting plate onto the ceiling), see Figure 13b.
3. When you are laying the cable along the surface, simply break open the two recesses
(see Figure 14a).
4. Lift out the terminal block vertically using a small screwdriver (see Figure 14b). Fit the
cables in the terminal block.
5. Screw the two cable cores firmly into the terminal block (see Figure 14b). Then
carefully push the terminal block back onto the two base pins.
6. Twist the alarm onto the mounting plate clockwise until it clicks into position.
Install and connect all of the other alarms in the same way.
12 12
Fig . 13a
Opening in
mounting plate
Fig . 13b
Page 27

27
7. Now test the first alarm by pressing and holding down the test button (this may
take up to five seconds). The red LED will flash every 0.5 seconds and all alarms
should sound (note: After the test button has been released, this alarm unit will stop
sounding but the interlinked alarms will keep sounding for a few more seconds. This
allows you to check whether the connection between the alarms is working). Test all
of the other alarms in the same way.
Note: The alarms should only be interlinked in an enclosed living space belonging to one
family or group. If they are interlinked with other, neighbouring living spaces, there may
be false alarms. This is because not every resident will know, for example, that someone
else is currently testing the devices, or whether steam from cooking in another flat has
triggered a false alarm.
Break through
the side walls
Rear side of the
mounting plate
Fig . 14a
Use a screwdriver to carefully take
out the terminal block
Fit the
cables in the
terminal block
Fig . 14b
Page 28

28
2. Choosing a location
5
Testing, maintenance
and readiness for use
Page 29

29
5.1 Manually testing the smoke alarm
To ensure the alarm works, we recommend testing the alarm immediately after
installation. After that, it should be tested regularly, and at least once per year.
This will allow you and your family to become familiar with the sound of the alarm.
■ Hold the test button down until the alarm sounds and the red LED flashes
(see Fig. 11 on page 21). To protect your hearing, the alarm slowly gets louder.
The alarm will stop sounding shortly after you release the test button.
■ If the alarms are interlinked using radio modules, hold the test button down until
the green LED (Ei650M radio module) or blue LED (Ei600MRF radio module) on the
alarm unit cover lights up and all the alarms sound. Check whether all of the other
alarms have sounded.
■ Release the test button. The alarm and all devices interlinked with it should
stop sounding.
■ Repeat this procedure with all other alarms in the system.
WARNING: Do not test your alarm using an open flame. The alarm unit could catch
fire and damage fixtures. We recommend that you do not use smoke to test the alarm,
because the results could be misleading unless special equipment is used.
Page 30

30
5. Testing, maintenance and readiness for use
Pressing the test button simulates the effect of smoke in the smoke alarm. Therefore it
is not necessary to test the alarm with real smoke.
Specialist alarm companies: If you use a specialist alarm company to maintain your
alarm, it must be tested at least yearly (+/- 3 months) in accordance with DIN 14676.
5.2 Test/silencer button for controlling false alarms
The smoke alarm has a combined test/silencer button to help you control false alarms.
If the alarm goes off but there is no sign of smoke or other hazards, you should still
firstly assume that the alarm was triggered by a fire. The building must be evacuated
immediately.
Check whether smoke or steam from another source, for example from cooking, has
been blown past the alarm by a vent or a flue.
If false alarms occur frequently, you may need to move the alarm to a different location
a sufficient distance away from these sources of error.
Page 31

31
If you have installed alarms with radio modules and have not interlinked them using
house coding, the radio modules may be picking up alarm signals from neighbouring
systems. This can be rectified easily using house coding – refer to the operating
instructions for your radio module.
1. To stop the smoke alarm from sounding when there is a false alarm (the red LED
flashes quickly), press the test/silencer button. The smoke alarm will be switched to
silent mode for approximately 10 minutes. During this time, the red LED on the cover
of the smoke alarm will flash every 8 seconds, indicating that the device is in silent
mode.
2. At the end of the silent mode period (10 minutes), the smoke alarm will reset itself.
3. If your kitchen is used or located in such a way that an unacceptable number of false
alarms occur, position your smoke alarm further away so that it is less exposed to
steam from cooking. We recommend using a heat detector in the kitchen to avoid
this sort of false alarm.
Page 32

32
5. Testing, maintenance and readiness for use
5.3 Power supply – monitoring
5.3.1 What to do if an alarm beeps
1. If the smoke alarm beeps approx. every 32 seconds and the red or yellow LED flashes
at the same intervals, it means that the lithium battery is almost flat and the smoke
alarm needs to be replaced.
2. In models with a 10-year lithium battery and radio modules (installed), if the green
LED (Ei650M radio module) or blue LED (Ei600MRF radio module) flashes every
10 seconds, this indicates that the radio module battery is flat and the radio module
must be replaced.
5.3.2 Radio module alarm
If all radio alarms sound for 2 seconds every 4 hours, it means that at least one of the
batteries in the system is flat.
Page 33

33
5.4 Cleaning the alarm
Clean the smoke alarm regularly. Use a soft brush or the brush attachment of your
vacuum cleaner to remove dust and cobwebs from the side vents where smoke would
penetrate. To clean the alarm cover, wipe it with a damp cloth and dry it thoroughly.
WARNING: Do not paint the alarm!
Do not carry out any other servicing work on this product apart from the maintenance
and repair work described in this booklet. If repairs are required, they must be carried
out by the manufacturer.
5.5 Smoke alarm – automatic self-test
The smoke alarm will carry out an automatic self-test at regular intervals, with
three possible results:
■ Test OK: No signal
■ Weak power supply:
Acoustic signal emitted and LED flashes every 32 seconds
■ Defective component in Ei650, Ei650C and Ei650W:
2 x acoustic signals emitted and red LED flashes every 32 seconds
■ Defective component in Ei650i, Ei650iC and Ei650iW:
2 x acoustic signals emitted and yellow LED flashes every 32 seconds
(see signal overview in section 6)
Page 34

34
5. Testing, maintenance and readiness for use
5.6 Dust and contamination from insects
Smoke alarms are sensitive to the penetration of dust and insects, which can trigger
false alarms.
Ei Electronics alarms are made using state-of-the-art design expertise, materials and
production methods to minimise the effects of contamination. However, it is impossible
to eliminate the effects of dust and insects completely.
To ensure your alarm has a long service life, you should make sure it is kept clean and
that dust does not accumulate. All insects or cobwebs in the immediate vicinity of the
alarm should be removed immediately.
In certain circumstances, dirt may still collect in the smoke chamber and set off
the alarm even if it is cleaned regularly. If this happens, the smoke alarm must be
serviced or replaced. Ei Electronics has no control over contamination as it cannot be
predicted and comes under normal wear and tear. Therefore the warranty does not
cover contamination.
Page 35

35
5.7 Replacing an alarm
The entire alarm must be replaced if ...
... the alarm is at the end of its 10-year service life or has reached its expiry date
(check the replacement date on the device).
... the alarm does not emit a loud warning sound when the test button is pressed.
... the alarm indicates the battery is low, i.e. it emits a short beep every 32 seconds and
the red or yellow LED flashes at the same time.
Before disposing of the alarm safely, remove it from the mounting plate (to interrupt the
power supply and to prevent it from beeping due to the battery being low).
i series only: If you are not able to replace the device straight away, you can press the
test button to silence the beep and turn off the yellow LED for 12 hours. This step can
be repeated until the battery goes flat.
The alarm should be disposed of safely, in a way that does not harm the environment, at
your local recycling centre. You can obtain more information about this from the local
authorities. Never burn the alarm unit.
Page 36

36
2. Choosing a location
6
Interpreting signals
Page 37

37
6.1 Normal mode
6.1.1 How to switch on the alarm
Twist the alarm onto the base to switch it on.
Ei650 series: The red LED flashes 1 x;
Ei650i series: The red and yellow LEDs each flash 1 x.
This shows that the alarm has been switched on properly and is now in operating mode.
6.1.2 Operating mode
In the normal operating mode, there are no active visual or acoustic signals that may
disturb residents. Test the alarm at regular intervals, at least once per year, to ensure it
is working properly.
6.1.3 Regular testing using the test button
Press and hold down the test button and make sure the red LED flashes quickly and the
alarm sounds and rises up to full volume.
6.1.4 Smoke detection
As soon as the alarm detects smoke, it goes off (as do all interlinked alarms). The red LED
on the alarm that detected the smoke flashes quickly.
Page 38

38
6. Interpreting signals
6.1.5 Silencing false alarms
Occasionally, smoke alarms can be activated by other triggers, such as dust, insects or
cooking fumes. If you are certain that it is a false alarm, press the large test/silencer
button (e.g. with a broom handle) to silence the alarm for 10 minutes – the red LED will
then flash every 8 seconds for 10 minutes.
6.1.6 Interlinked system sets off the alarm
You can tell which alarm has been set off by the red LED on it, which will be flashing
quickly. In an interlinked system, a remote control can make it easier to localise the
alarm. Once you have localised the device, follow the steps in section 6.1.5.
6.2 Fault indicators
6.2.1 Low battery
The battery will usually last for 10 years before it starts going flat. Check the date
on the side of the device to see when the alarm should be replaced. If the automatic
self-monitoring function identifies that the battery is going flat, the alarm beeps and
the red LED flashes (approx. every 32 seconds) at the same time to warn the user
(the yellow LED flashes on i series models). This indicates that the alarm must
be replaced.
Page 39

39
i series only: If you are not able to replace the alarm straight away, you can press the
test/silencer button to switch off the beep and the yellow LED for 12 hours. This step
can be repeated until the battery goes completely flat, but the alarm should be replaced
as quickly as possible.
6.2.2 Contaminated smoke chamber
If the alarm goes off when there is no smoke, press the test button to silence the alarm
for 10 minutes (as described in section 6.1.5). If the alarm goes off again despite this,
it may be contaminated.
i series only: Press the test/silencer button within four minutes after the alarm goes
off again and this will enable the alarm to compensate for the contamination in the
smoke chamber. This normally solves the problem.
If the alarm goes off for a third time, it is contaminated excessively and must be
replaced. If you are not able to replace the alarm straight away, press the test button
within four minutes after the alarm goes off (for the third time) to silence the alarm
for eight hours – it will emit two short beeps (one second apart) every 10 minutes to
indicate that it has been deactivated.
Page 40

40
6. Interpreting signals
(Note: This does not reduce the protection against fire, as an alarm that goes off
constantly due to a fault is useless anyway and must be replaced. The steps described
offer some additional benefits: The user is reminded every 10 minutes, by the two short
beeps, that the alarm must be replaced.) If you press the test button again, you can
silence the alarm for another eight hours.
6.2.3 Damage to the smoke chamber
If the sensors in the smoke chamber are damaged, the alarm gives two short beeps
every 32 seconds and the red LED flashes at the same time. The alarm must be replaced
if this happens.
i series only: If you are not able to replace the device straight away, you can press the
test button to silence the beep and turn off the yellow LED for 12 hours. The red LED
will continue to flash every 8 seconds. This step can be repeated until the battery goes
completely flat, but the alarm should be replaced as quickly as possible.
Page 41

41
Signal overview for Ei650 Red LED Acoustic signal
Normal mode
Alarm is operating Off Off
Starting up 1 x flashing Off
Function test
(press and hold down test button)
Fast flashing (0.5 sec.)
Gets louder until full volume
is reached
Fire/smoke is present
Alarm detects smoke and goes off Fast flashing (0.5 sec.) Full volume
Alarm goes off via interlinked alarm Off Full volume
False alarm
False alarm caused by steam etc. Fast flashing (0.5 sec.) Full volume
Silencer (press and release button)
1 x flashing every 8 sec.
(for 10 min.)
Off
Fault
Flat battery 1 x flashing every 32 sec. 1 x beeping simultaneously
Fault in smoke chamber 2 x flashing every 32 sec. 2 x beeping simultaneously
Page 42

42
6. Interpreting signals
Signal overview for Ei650i Action Red LED
Normal mode
Starting up Twist onto alarm base 1 x flashing
Alarm is operating Off
Function test Press and hold down button Fast flashing (0.5 sec.)
Alarm detects smoke Fast flashing (0.5 sec.)
Silencer Press and release button 1 x flashing every 8 sec.
Alarm via interlinked alarm Off
Fault
Flat battery
Off
Silence the signal Press and release button Off
Dirty smoke chamber
Fast flashing (0.5 sec.)
Silence the signal Press and release button 1 x flashing every 8 sec.
Silence (2nd time)
Press and release button
within 4 min.
1 x flashing every 8 sec.
Silence (3rd time)
Press and release button
within 4 min.
2 x flashing every 8 sec.
Defective smoke chamber
Off
Silence the signal Press and release button 1 x flashing every 8 sec.
* Note: We recommend vacuuming the device carefully using a vacuum cleaner and then waiting for five minutes
before testing the device again using the test button. If there are repeated false alarms, the device must be replaced.
Page 43

43
Yellow LED Acoustic signal Replace alarm
1 x flashing Off
Off Off
Off
Gets louder until full volume is
reached
If it does not work
Off Full volume
Off Off (for 10 min.) If it does not work
Off Full volume
1 x flashing every 32 sec. 1 x beeping simultaneously Yes
Off for 12 hours Off for 12 hours Yes
Off Full volume See below*
Off Off (for 10 min.)
Off Off (for another 10 min.) Yes
Off
2 x fast beeping every 10 min.
for 8 hrs.
Yes
2 x flashing every 32 sec. 2 x beeping simultaneously Yes
Off Off for 12 hours Yes
Page 44

44
6. Interpreting signals
6.3 Diagnosis for i series
During the annual maintenance and service check, you can use the i series' diagnosis
mode to find out whether alarms have been set off, identify if the device is faulty or
predict fault conditions that are likely to arise before the next annual service. Diagnosis
modes are an extra feature and are only available for models in the i series.
6.3.1 Predicting faults
By pressing and holding down the test button, you can find out whether the battery
is likely to go flat before the next annual service or whether the smoke chamber might
soon become contaminated. If there is a potential fault due to a low battery, the yellow
LED flashes quickly and the warning sound is emitted, slowly rising to full volume. If
there is a potential fault due to contamination in the smoke chamber, the yellow and
red LEDs flash alternately and the warning sound is emitted, slowly rising to full volume.
To avoid having to take additional action before the next annual service, we recommend
replacing the alarm.
6.3.2 Alarm memory function
The red LED flashes twice every 16 seconds if the alarm has gone off in the last 24 hours.
If the red LED flashes every 0.5 seconds and the buzzer “chirps” quickly when you press
and hold the test button, it means that the alarm has gone off more than 24 hours ago.
Page 45

45
6.3.3 Identifying faulty devices
To identify why an alarm is beeping, press and hold down the test button. A yellow LED
that is flashing quickly indicates there is a fault in the smoke chamber. If the battery
power is too low, the yellow LED flashes quickly and the alarm sounds, slowly rising to
full volume. In both cases, the alarm should be replaced.
6.3.4 AudioLINK
AudioLINK is an extra function in the i series which makes it possible to read alarm
information using a smartphone (max. 100 times per year). This function can only be
used by technicians. Visit www.ei-audiolink.de for more information
Page 46

46
6. Interpreting signals
Diagnosis Action Red LED
Predicting faults
Low battery Press and hold down button Off
Dirty smoke chamber Press and hold down button
Fast flashing (0.5 sec.)
alternating with yellow LED
Test for end of service life Press and hold down button
Fast flashing (0.5 sec.)
alternating with yellow LED
Alarm memory
24-hour memory 2 x flashing every 16 sec.
Long-term memory Press and hold down button Fast flashing (0.5 sec.)
Identify beeping alarms
Flat battery Press and hold down button Off
Fault in smoke chamber Press and hold down button Off
* Note: We recommend vacuuming the device carefully using a vacuum cleaner and then waiting for five minutes
before testing the device again using the test button. If there are repeated false alarms, the device must be replaced.
Page 47

47
Yellow LED Acoustic signal Replace alarm
Fast flashing (0.5 sec.)
Gets louder until full volume
is reached
Recommended
Fast flashing (0.5 sec.)
alternating with red LED
Gets louder until full volume
is reached
See below*
Fast flashing (0.5 sec.)
alternating with red LED
Off
Yes
Off Off
Off Fast “chirping”
Fast flashing (0.5 sec.)
Gets louder until full volume
is reached
Yes
Fast flashing (0.5 sec.) Off Yes
Page 48

48
8. Fire safety information
7
Troubleshooting
Page 49

49
The alarm goes off for no obvious reason
■ Look for steam, cooking fumes, etc. which may be coming from the kitchen or
bathroom. Paints and other vapours can also trigger false alarms.
■ Check for any possible contamination from cobwebs or dust. If necessary, clean the
alarm as described in section 5.4.
■ Press the test/silencer button on the smoke alarm to stop the alarm (the red LED
on the alarm flashes quickly) – this will silence the smoke alarm for 10 minutes
(and all other alarms that are interlinked in the system).
■ Smoke alarms with radio modules beep for two seconds every four hours to indicate
that the battery of one device in the system is going flat. Check all alarms as described
in section 5.3.
■ Use house coding for radio alarms – refer to your radio module's operating
instructions. If the alarms are using the default factory settings, they may be
triggered by neighbouring alarms.
The alarm does not emit a warning sound when the test button is pressed
■ Check the age of the alarm – see the “Replacement Date” label on the side of
the device.
■ Ensure that the alarm is fully turned onto the mounting plate, i.e. that the battery is
connected. Note: If the smoke alarm still does not emit a warning sound, it must be
replaced as soon as possible.
Page 50

50
2. Choosing a location
8
Fire safety information
Page 51

51
When devices are used for fire prevention purposes, basic safety measures should always
be taken, including those listed below. Please read all instructions carefully:
■ Test your emergency escape plans regularly, so that everyone in the house knows what
to do if the alarm goes off.
■ Use the alarm's test button to familiarise your family with the sound of the alarm. Carry
out a drill regularly with all members of your family. Draw a floor plan indicating at least
two escape routes for each room. Children tend to hide when they do not know what
to do. Show your children how to get out, open windows and use fire escapes without
help from an adult. Make sure your children know what to do if the alarm goes off.
■ The battery life may be reduced by long periods of high temperatures or temperatures
below freezing, high humidity or a large number of false alarms.
■ False alarms can be switched off quickly by fanning air towards the device
using a newspaper or the like in order to remove the smoke, or by pressing the
test/silencer button.
■ Do not attempt to remove or recharge the battery, and do not burn it as it may explode.
■ Do not paint the alarm, and ensure you remove cobwebs and accumulations of dust and
grease so that the alarm's sensitivity to smoke is not impaired.
Page 52

52
8. Fire safety information
■ Do not attempt to repair damage to the alarm or malfunctions yourself. Return the
device (see section 9).
■ This device is intended SOLELY for use in domestic buildings.
■ It is not portable. It must be installed as specified in these instructions.
■ Smoke alarms do not replace insurance. The supplier or manufacturer is not
an insurance company.
Fire safety information
■ Store petrol and other flammable materials in suitable containers.
■ Dispose of oily or flammable cloths carefully.
■ Always use a metal guard in front of an open fire and have chimneys cleaned regularly.
■ Replace old or damaged sockets, switches and cables as well as cracked or frayed
electric cables and plugs.
■ Avoid overloading electric circuits.
■ Keep matches out of the reach of children.
■ Do not smoke in bed. Always check whether there are any glowing cigarettes or ashes
under cushions in the rooms where someone has been smoking. Have your central
heating system serviced regularly.
Page 53

53
■ Make sure that all electrical equipment and tools have a recognised approval mark
on them.
■ This device cannot offer unlimited protection; in particular, it cannot protect against
the most common causes of death by fire, such as smoking in bed, unattended
candles, etc.
Planning your escape route if the alarm goes off:
1. Check the doors to rooms for heat or smoke. Do not open doors that feel hot. Use
another escape route. When you leave, close all doors behind you.
2. If the smoke is thick, stay close to the floor and crawl out. Take short breaths
(if possible through a damp towel) or hold your breath. More people die from smoke
inhalation than from flames.
3. Leave the building as quickly as possible. Do not stop to gather belongings. Fix
a meeting point outside the building beforehand for all family members. Check
whether everyone is there.
4. Call the fire service from a neighbour's home or your mobile phone. Remember to
give your name and address, including the floor you live on.
5. NEVER go back into a burning building.
Page 54

54
2. Choosing a location
9
Customer service
and warranty
Page 55

55
9.1 Customer service
If your alarm is not working and you have read the “Installation”, “Testing, maintenance
and readiness for use” and “Troubleshooting” sections, please contact customer service
or your retailer. If the device needs to be returned for repair or a replacement, remove
it from the mounting plate by twisting it anti-clockwise and put it in a padded box.
Send the device back to the retailer you bought it from. Describe the fault and enclose
proof of purchase.
Page 56

56
9. Customer service and warranty
9.2 Warranty
Ei Electronics warrants that this alarm will be free from defects in materials or
workmanship for five years from the date of purchase. This warranty only applies under
normal conditions of use and maintenance and does not cover damage resulting from
accidents, negligence, misuse, unauthorised disassembly or contamination of any kind.
This warranty does not cover any accidental damage or consequential damages. If this
alarm is defective within the warranty period, it must be returned to your retailer with
proof of purchase, carefully packaged and with a clear description of the problem. The
defective alarm will then be repaired or replaced at our discretion.
Do not damage the alarm or attempt to open it. This will invalidate the warranty. More
importantly, it may put you at risk of fire. This warranty does not affect your statutory
consumer rights.
Page 57

57
Page 58

58
2. Choosing a location
Page 59

59
Ei Electronics, Shannon, Co. Clare, Ireland
Nominal activation conditions/sensitivity, response
delay (response time) and performance
parameters under fire conditions
Pass
Operational reliability
Pass
Tolerance to supply voltage
Pass
Response delay and temperature resistance
Pass
Vibration resistance
Pass
Humidity resistance
Pass
Corrosion resistance
Pass
Electrical stability
Pass
11
DoP no 13-0002
DIN EN14604:2009
Optical smoke alarm:
Ei650, Ei650C, Ei650W, Ei650RF, Ei650i, Ei650iC, Ei650iW, Ei650iRF
Fire protection
0786-CPR-21052
The Declaration of Conformity, number 13-0002, can be viewed here: www.eielectronics.com/compliance
The smoke alarms are tested and approved by the VdS certification
authority in accordance with standard EN14604:2009. They also
meet additional requirements under VdS 3131 (vfdb 14-01).
Visit http://www.eielectronics.de/normen for more information
Ei Electronics GmbH
Franz-Rennefeld-Weg 5
40472 Düsseldorf, Germany
Telephone: +49 (0) 211 98436500
Fax: +49 (0) 211 98436528
kundendienst@eielectronics.de
www.eielectronics.de
Ei Electronics
Shannon Industrial Estate,
Shannon, Co. Clare, Ireland.
Telephone: +353 (0) 61 471277
www.eielectronics.com
Page 60

60
Your notes
Page 61

61
Page 62

www.eielectronics.de
Telephone +49 (0) 211 98436500
Fax +49 (0) 211 98436528
vertrieb@eielectronics.de
Ei Electronics GmbH
Franz-Rennefeld-Weg 5
40472 Düsseldorf, Germany
© Ei Electronics 2017 P/N B17629 Rev9
 Loading...