

Ei Electronics EI 100B STANDARD, EI 100C INTERCONNECT, EI 100L EMERGENCY LIGHT, EI 100S SILENCER Instruction Leaflet
Page 1
A SmokeAlarm is anearly warning device. Used correctlyit can
give you and your family valuable extra time to escape.
Note:-
·
When the battery is first connectedthe Alarm may sound for
2-3 seconds - this is normal.
·
A Smoke Alarm does not prevent fires.
·
Install correctly, in the center of the ceiling if possible.
·
Test weekly.
·
Replace battery yearly or when it beeps once a minute.
·
Plan your escape route.
·
Proper protectionmay requiremore than oneSmoke Alarm.
·
If you have any doubt or queryabout Smoke Alarms consult
the supplier or your local Fire Brigade.
·
Nuisance alarms can be quickly silenced by fanning with a
newspaper or similar to help remove smoke from the unit.
Locating your Smoke Alarm
Sufficient smoke must enteryour Smoke Alarm before it will respond. YourSmoke Alarm needs tobe within 10paces (23 feet)
of the fire to respond quickly. It also needs to be in a position
where its alarm can be heard throughout your home, so it can
wake you andyour family in time for youall to escape. A single
Smoke Alarm will givesome protection if it is properly installed,
but mosthomes will requiretwo
or moreto ensure thata reliable
early warning is given. Formaximum protection you should put
individual SmokeAlarms inall the roomswhere fire ismost likely
to break out.
Your firstSmoke Alarm should belocated between the sleeping
area andthe most likelysources of fire(living room orkitchen for
example). But it should not be more than 10 paces (sevenme
tres) fromthe door toany roomwhere a firemight start andblock
your escape from the house.
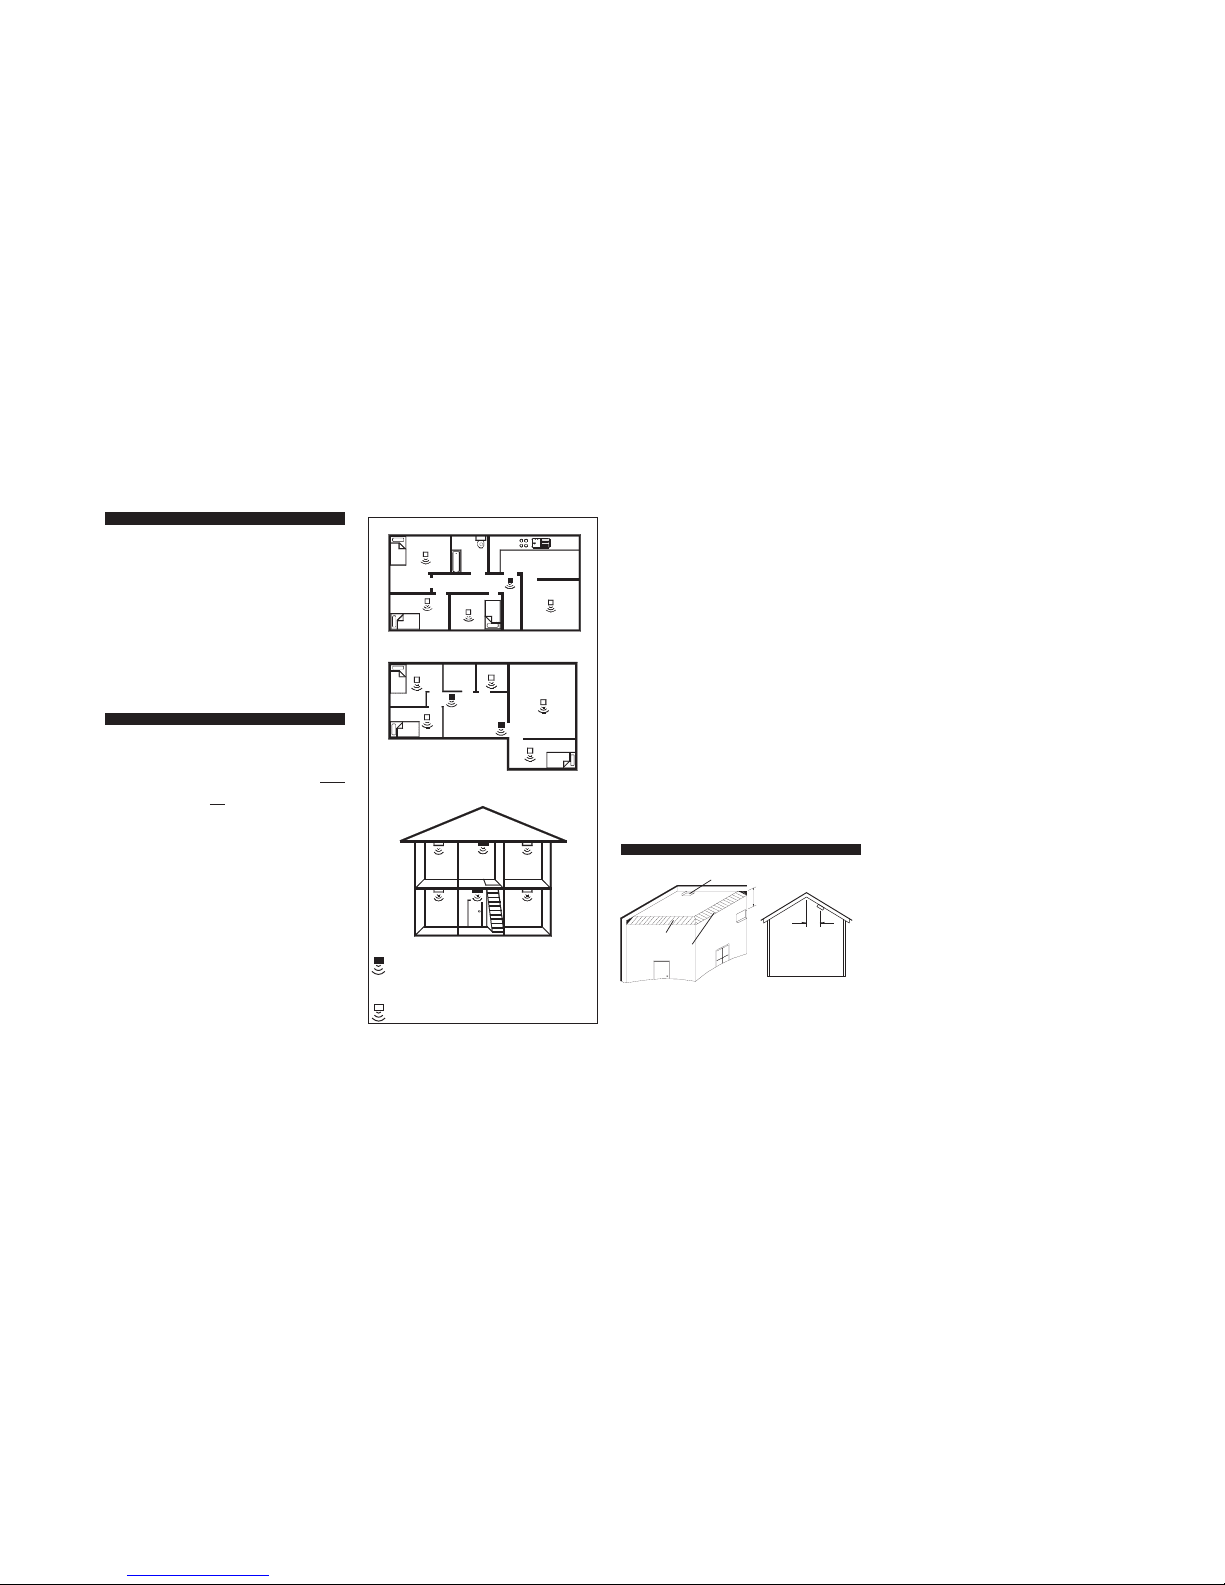
(a) Single Storey Dwelling.
If yourHome is on onelevel (a bungalow ormobile home for ex
ample) you should put your first Smoke Alarm in a corridor or
hallway between the sleepingand living areas. Place it as near
to the living area as possible, but make sure you can hear it
loudly enough to wake you in the bedroom. (for example, see
figure 1)
If yourbungalow is verylarge and thecorridor or hallwayis more
than say 22 paces (15 metres) long, one Smoke Alarm will not
be sufficient. Thisis because no matter where itis located it will
be more than 7.5 metres from potential fires.
In houses with more than one sleeping area, Smoke Alarms
should be placed between each sleeping area and the living
area (for example, see figure 2).
(b) Multi Storey Dwellings.
If your home ison more than one level youwill require a smoke
alarm on each storey (see figure 3).
This is because an upstairs smoke alarm isunlikely to detect a
fire on lower floors in sufficient time to ensure an adequate es
-
cape.
(c) Maximum Protection.
For maximum protection you should put individual Smoke
Alarms in all the rooms where fire is most likely to break out
(apart fromthe locationsto avoid, mentionedon page5). The liv
-
ing room is the most likely place for a fire to start at night, fol
lowed by thekitchen and then the diningroom. You should also
consider putting Smoke Alarms in any bedrooms where fires
might occur, forinstance, where there is an electricalappliance
such asan electric blanket orheater, or where theoccupant is a
smoker. You could also consider putting Smoke Alarms in any
rooms where the occupant is unable to respond very well to a
fire starting in the room, such as an elderly or sick person or a
very young child.
(d) Checking you can hear your Smoke Alarm.
With the Smoke Alarm sounding in its intendedlocation, check
you are able to hear it in each bedroom with the door closed,
above the soundof your radio. Theradio should be set toa reasonably loudconversation level. If youcan’t hear it overyour radio the chances are that it wouldn’t wake you.
If aSmoke Alarmis too faraway forit to wakeyou, itis best tolink
it to another SmokeAlarm near the bedroom. The Interconnect
Smoke Alarm
EI 100C isdesigned for this- when onealarm senses smoke, all
connected alarms respond. (see page 9 for further details).
Positioning your Smoke Alarm
(a) Ceiling Mounting.
Hot smokerises and spreads out, soa central ceiling positionis
the preferred location. The air is “dead” and does not move in
corners, therefore Smoke Alarms must be mounted away from
corners. Place the unit at least 30cm (12inches) from any light
fitting ordecorative objectwhich might obstructsmoke entering
the Smoke Alarm. Keep at least 15 cm (6 inches) away from
walls and corners. See figure 4.
(b) Wall Mounting.
When a ceilingposition is not practical(for example on a ceiling
having exposed beams or joists, or built-in radiant heating) put
the topedge of yourSmoke Alarm between15 and 30cm (6 and
12 inches)below the ceiling. Keepat least 15cm(6 inches) from
corners. (see figure 4).
(c) On a sloping Ceiling.
In areas with sloping or peaked ceilings install your Smoke
Alarm 90 cm (3 feet) from the highest point measured horizon
tally (see figure 5),because “dead air” at the apex may prevent
smoke from reaching the unit.
(d) Locations to Avoid.
Don’t place your Smoke Alarm in any of the following areas:
·
Bathrooms, kitchens,shower rooms, garages orother rooms
where the smoke alarmmay be triggered by steam, conden
-
sation, normal smoke or fumes. Keep at least 6 metres (20
feet) away from sources of smoke - wall mounting if necessary.
·
Attics or other places where extremes of temperature may
occur (below 4° C/34° F or above 40° C/104° F).
·
Near a decorative object, door, light fitting, window molding
etc., thatmay preventsmoke from enteringthe SmokeAlarm.
·
Surfaces that are normally warmer or colder than the rest of
the room (for example attic hatches, uninsulated exterior
walls etc). Temperature differences might stop smoke from
reaching the unit.
·
Next to or directly above heaters or air conditioning vents,
windows, wall vents etc.that can change the direction of air
-
flow.
·
In very high or awkward areas where it may be difficult to
reach the alarm (for testing, battery replacement etc).
(e) Nuisance/False Alarms.
If, when the alarm goes off, there is no sign of smoke heat or
noise to indicate that there is a fire, you should get your family
into a safe place, before you start investigating.
Check the house carefully incase there is a small fire smolder
ing somewhere.
Check whether thereis some source of smokeor fumes, for ex
ample cooking fumesbeing drawn past the SmokeAlarm by an
extractor.
If there arefrequent nuisance/false alarms it may benecessary
to re- locate the device away from the source of the fumes.
The SilencerSmoke Alarm
EI 100S isdesigned formore difficult
areas, as you can silence the alarm for 8 minutes. This gives
time forsmoke orfumes to clear,(see page10 for moredetails).
Figure 4
Figure 5
90cm
(3 FEET)
DEAD AIR SURFACES
NEVER WITHIN 15cm
OF ANY CORNER
15 TO 30cm
(6 to 12")
IDEAL IN CENTRE
OF CEILING
Figure 2: Single Storey Dwelling with seperate sleeping areas
BEDROOM
BEDROOM
LIVING
BEDROOM
RECREATION
DININGKITCHEN
Figure 3: Two Storey Dwelling
BEDROOM
BEDROOM BEDROOM
KITCHEN
DINING
Figure 1: Single Storey Dwelling
Recommended protection, Figures 1,2 & 3
Minimum protection
·
each storey
·
each sleeping area
·
every 7.5 metres (25ft) of hallways and rooms
Maximum protection
All rooms (except bathrooms & kitchens)
2
345
P/N B10277 - Pages 2 to 5 - Rev 7
Basic Information about your Smoke Alarm
Page 2
Installing your Smoke Alarm
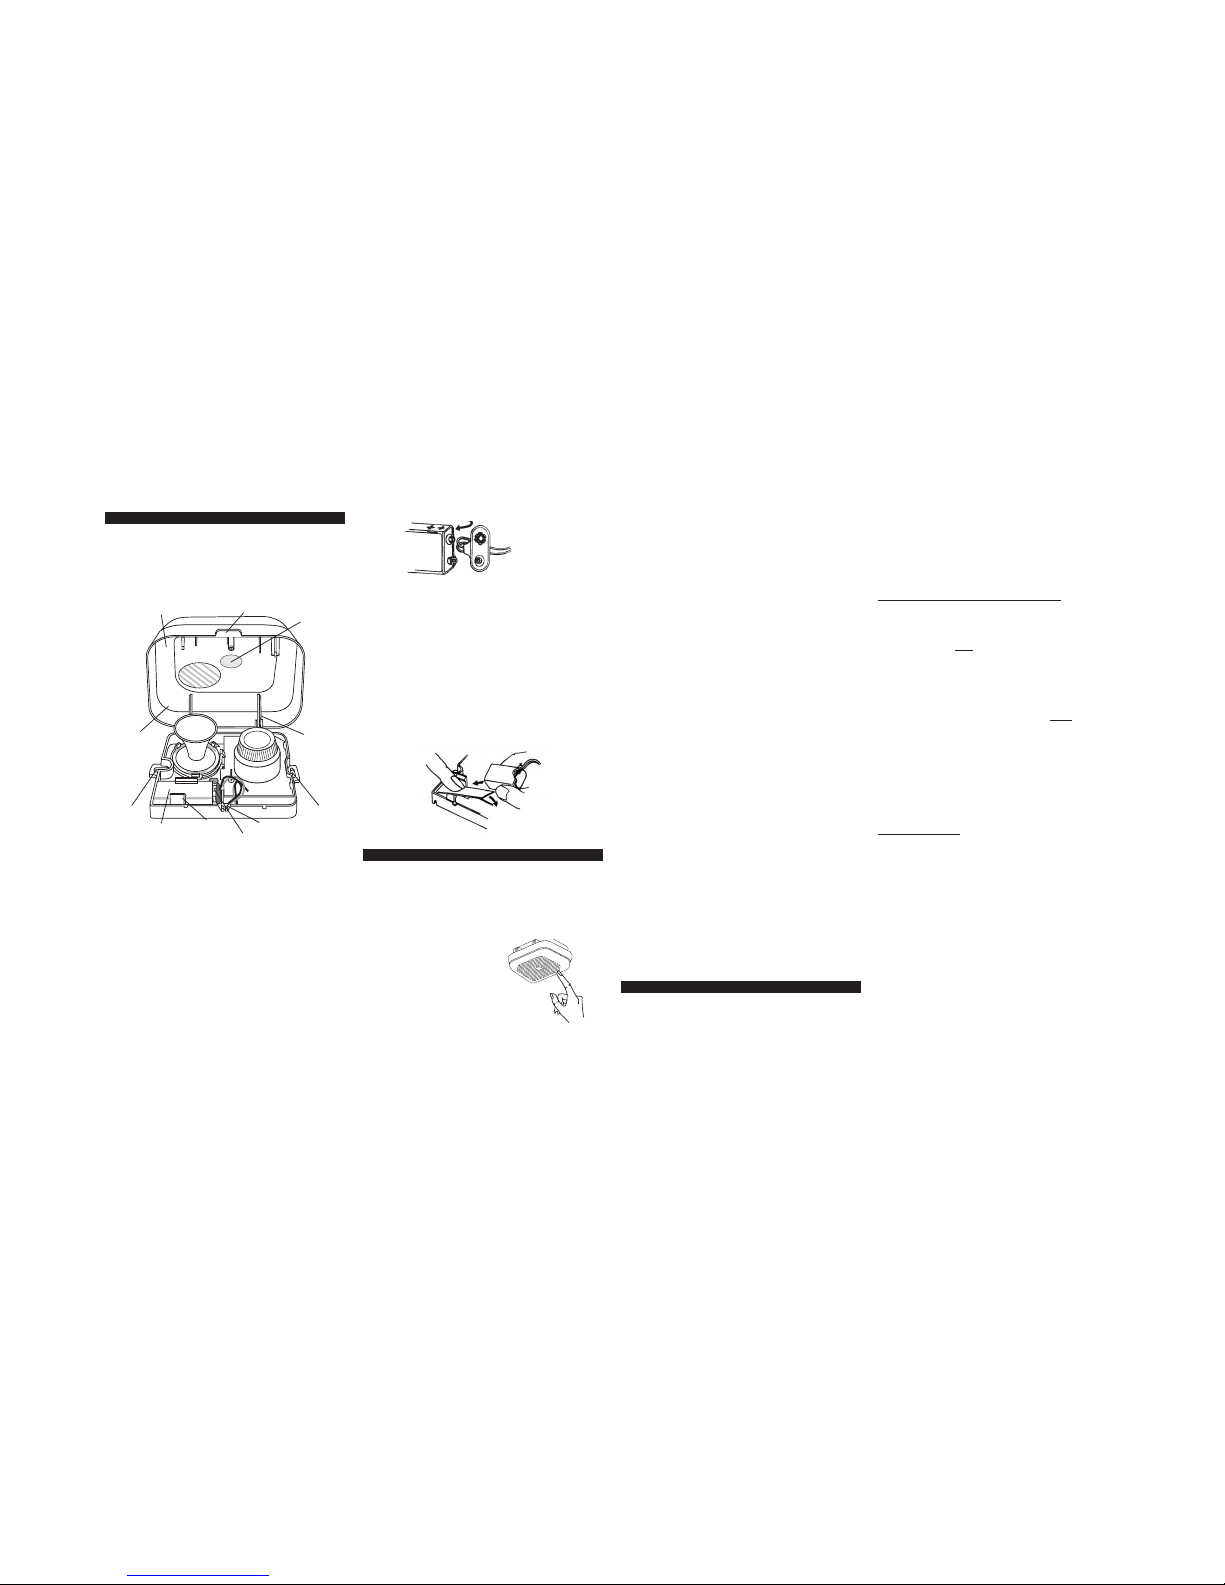
(a) Attaching to Ceiling or Wall.
(NB: for wiring the EI 100C Interconnect model see page 9 )
The Smoke Alarm is battery operated andneeds no wiring, (
EI
100C excepted). Use figure 6 below, as a help in mounting.
1. Pull Cover open at Tab (2). Remove Cover from Base by
separating at rear Snap-in Hinges (5).
2. Place the Base on ceiling or wall exactly where you want to
mount the unit. With a pencil, mark the location of the Screw
Holes (6)
3. Takingcare to avoid anyelectrical wiring inthe ceiling or wall,
drill a hole through the centers of the marked locations. Push
the plasticScrew Anchors providedinto-the drilled holes.Screw
in firmly.
(b) Connecting the battery.
With a pencil, write thedate of Battery installation on the inside
of the Cover to remind you when to replace the battery (4).
Lift Batteryfrom Battery holder, andsnap Battery Connectorsto
Battery. They fit together only one way (Figure 7).
Gently push Battery into Battery Holder (9)
To close the cover match up Snap-in Hinges (5) and gently
press together until Base and Cover snap together.
NOTE: You may hear a loud chirp whenattaching the Battery
Connectors to the Battery. N.B. The emergency light Smoke
Alarm needs 2 batteries (see page 9 for details). Test the in
-
stalled Smoke Alarm - see section 5(a) below.
(c) Battery Missing Indicator
Some models will be fitted with a warning flag which pops up
when the battery is removed. This prevents the cover from
closing whenthere is no batteryin the unit. Whenthe battery is
being installed or changed, this flag must be held down while
gently pushingthe Batteryinto the BatteryHolder. (Figure8).
Looking after your Smoke Alarm
(a) Testing your Smoke Alarm
It isrecommended that you testyour Smoke Alarmonce a week
to besure theunit is working. It willalso help youand yourfamily
to become familiar with the sound of the Alarm.
When youpress the TestButton it
simulates theeffect of smokedur
ing areal fire. So, thereis noneed
to test the Alarm with smoke.
Press and hold the Test Button
until the Alarm sounds (it may
take upto 10seconds), (Figure 9).
The alarm will stop sounding
shortly after the Button is re
leased. If thealarm fails to sound,
follow this checklist.
1. Check Battery Connectorsto be surethey are firmlysnapped
to the Battery.
2. Replace the Battery. (Check the date marked on the Cover
when you last replaced the Battery).
3. Refer to “Cleaning Your Smoke Alarm” 5 (c) below.
WARNING: DO NOT TEST WITH FLAME.
This can set fire to the Alarm and damage the house.
We donot recommend testing withsmoke or heat as theresults
can be misleading unless special apparatus is used.
(b) Replacing the Battery(ies)
Test the alarm forcorrect operation using the test buttonwhen
-
ever the battery(ies) is/are replaced.
A freshBattery should last aboutone year. When Batterypower
is lowand replacementis necessary, theAlarm will “beep”about
once per minute for at least 30 days. The battery must then be
replaced. Replace batteryif the alarm doesnot sound when the
Test Button ispressed. For maximum reliability,replace battery
at least once a year.
On Smoke Alarms with a Power Indicator flashing light, if the
light ceases flashingreplace the battery. Be sure to replacethe
Battery as soon as possible to ensure proper operation and to
avoid a leaking Battery. Leakage could cause damage to the
Alarm, furniture, and carpeting.
For replacementbatteries, referto the informationinside Smoke
Alarm Cover.
WARNING: Use of anyother battery may be detrimental tothe
operation of the Smoke Alarm.
(c) Cleaning your Smoke Alarm.
Clean your Smoke Alarm regularly. Use a soft bristle brush or
the brush attachment of your vacuum cleaner to remove dust
from the sides and cover slots where the smoke enters. Keep
Cover closedwhile cleaning. Do notvacuum or brush insidethe
Smoke Alarm.To cleanthe Cover, removeit completelyand use
only mildsoap and water.Dry cover thoroughlybefore replacing
it. WARNING: Do not paint your Smoke Alarm.
Other thanthe maintenance and cleaning describedin this leaf
-
let, no other customerservicing of this product is required. Re
-
pairs, when needed, must be performed by the manufacturer.
Smoke Alarms with Additional Features
A rangeof Smoke Alarms are producedwhich are optimized for
different locations and/or uses.
(a) Power Indicator Light.
A number ofSmoke Alarms have a PowerIndicator Light which
flashes once a minute through the test button to show the
Smoke Alarm is powered. Replace the battery if the flashing
stops.
(b) Emergency Light Smoke Alarm EI 100L
When the smoke alarm senses smoke, the bright emergency
light turns on to help identify and light the escape route. The
Smoke Alarm should therefore be located where it willlight the
escape route - in a hallway, above a stairs or near the exit.
Connection and Replacement of Batteries.
The smokealarm uses twodifferent types ofstandard 9 voltbat
-
teries, an alkaline battery and a general purpose battery.
1. Connectan alkalinebattery (use onlyDuracell MN1604 orEv
-
eready 522) to the blue
battery connector to power the light.
This battery when fresh willnormally last 1 year in the stand by
mode and provide over 15 minutes of light when in alarm. The
Smoke Alarm is normallyshipped with the alkaline battery con
-
nected to facilitate thecustomer - this does not deplete thebat
-
tery.
2. Connectthe generalpurpose battery tothe black
battery con
nector to power the smoke alarm. This battery when fresh will
normally last over one year before it needs replacement.
Replace both batteries when the smoke alarm gives a short
chirp every minute or when the light looks dim during a button
test.
Use only batteries specified on the Smoke Alarm, the use of
other batteries could have a detrimentaleffect on smoke alarm
operation or light output.
Bulb Replacement.
The bulb isdesigned to operate for 15 hours continuousopera
tion andshould not needreplacement during the lifeof the prod
uct. If, when thebutton is pressed with twofresh batteries, only
the horn sounds, the bulb must be replaced.
The bulb canbe removed by pulling itstraight out (do not twist).
Replace with a bulb type GE 149.
If you have difficulty in finding a suitable replacement contact
“Consumer Assistance” at the nearest address given in this
booklet, or on the Smoke Alarm.
Use onlythe bulb specified.Use of anydifferent bulb couldhave
a detrimental effect on light or Smoke Alarm performance.
(c) Interconnect Model EI 100C
A maximum of 12 interconnect EI 100C or EI 105C Smoke
Alarms may be wired together such that when one unit
senses smoke all other units sound a warning. This helps en
sure smoke alarms will be heard.
Figure 8
(4) WRITE IN
DATE BATTERY
IS INSTALLED
(6) SCREW
HOLE
(7) PLASTIC
CLIP
(6) SCREW
HOLE
(5) SNAP-IN
HINGES
(1) COVER
(2) “OPEN HERE”
TAB
(3) TEST BUTTON
Figure 6
(8) BATTERY
CONNECTORS
(9) BATTERY
HOLDER
(10) 9 VOLT
BATTERY
9 Volt
Battery
Battery
Connectors
Figure 7
Figure 9
6
789
P/N B10277 - Pages 6 to 9 - Rev 7
Page 3

A maximumof 250 metres(820ft) of18 AWG (0.82mm)wire can
be used,(maximum resistancebetween detectors 50ohm). The
units are interconnectedby wiring all theterminals marked 1 to
-
gether, andall the terminalsmarked 2together, as shownin Fig
ure 10. An opening should be made in the label covering the
wiring hole in the base, and the wires routed into the unit as
shown. Note thatthe wiring inside the unit mustbe kept clear of
the testbutton contacts, but mustnot impede the airflow. Drafts
from wiring openings, conduit, or mounting boxes/holes, may
blow smoke awayfrom the sensing chamber,making it insensi
tive. It is essential that all such openings be closed by silicone
sealant or similar.
You mustpress in and holdthe test button forat least 4to 5 sec
onds, as there is a time delay on some units.
After wiring together the Interconnect Smoke Alarms, test the
first unit by pressing the button. All the detectors should alarm
and the test buttonon the first unit will flash about onceevery 2
seconds. Check all the other units similarly.
These Smoke Alarms should be interconnected onlywithin the
confines of a single family living unit. If they are connected be
tween different units there may be excessive nuisance alarms.
Everybody maynot be aware thatthey are beingtested or that it
is a nuisance alarm caused by cooking etc.
(d) Silencer Smoke Alarm EI 100S
This modelhas a specialfalse alarm silencerfeature to helpyou
control nuisance false alarms.
1. To cancela false alarm, press theSilencer Button located on
the lower right-handcorner. The Alarm willautomatically switch
to a reduced sensitivity condition. This condition allows un
wanted alarms to be silenced for a period of approximately 8
minutes. Theunit willcontinue to “chirp”about every 40seconds
during this time to let you know the unit has been silenced.
2. The unit will reset to normal sensitivity at the end of the si
lenced period. If additional silenced time is required, simply
push the Silencer Button again.
3. To quickly return to normal non-silenced operation, simply
push theTest Button;the alarm willsound brieflyand return toits
normal, sensitive alarm mode.
4. Afterinstallation, your Smoke Alarmmay chirp approximately
every 40 seconds. This indicates it is in the Silencer mode. To
put itinto normal operatingmode, pushand hold TestButton un
til alarm sounds.
5. If the cause of the alarm is not clear, it should be assumed
that it is dueto an actual fire and the dwelling should beevacu
ated immediately.
If usage/layout is such that there are an unacceptable level of
nuisance alarms,even withthe Silencer SmokeAlarm, re-locate
the Smoke Alarm farther away from the kitchenwhere it will be
less affected by cooking fumes.
The Silencer Smoke Alarmmodel number
EI 100S is also suit
able for use in touring caravans.
Important Safeguards
When usinghousehold protective devices, basicsafety precautions should always be followed, including those listed below:
·
Please read all instructions.
·
Rehearse emergency escape plans so everyone at home
knows what to do in case the alarm sounds.
·
For replacement batteries, refer to the information inside
smoke alarm.
·
NOTE: Constant exposure to high or freezing temperatures
or high humidity may reduce the life of the batteries.
·
Do not disconnect battery to stop alarm sounding. (Fanning
vigorously with a newspaper or similar willremove nuisance
smoke from the Smoke Alarm and stop it sounding.)
·
Do notattempt to recharge orburn batteries, as theymay ex
-
plode. Wrap in paper and discard normally.
·
When removing battery, handle carefully to avoid possible
eye damage or skin irritation if battery has leaked or cor
-
roded.
·
To maintainsensitivity to smoke, donot paint or coversmoke
alarm in anymanner; do not permitany accumulation of cob
-
webs, dust or grease.
·
The chamber located in the center of the SmokeAlarm con
-
tains a small amount of radioactive material. Do not tamper
with the chamber. You may safely change the battery and
clean the Smoke Alarm following instructions in this leaflet.
·
In the United Kingdom Ionisation Smoke Alarms can be dis
-
posed of in normal household refuse, but due to the tiny
amount of radioactivematerial contained in theunit, no more
than one alarm per dustbin.
·
In the Republicof Ireland Ionisation smoke alarmsshould be
returned fordisposal to the nearest addressat the end ofthis
leaflet.
·
If unit has been damaged in any way or does not function
properly,do not attempt arepair. Return Smoke Alarm (see Getting your Smoke Alarm Serviced page 14.)
·
This appliance is intended for household use ONLY and not
for commercial or industrial use.
·
This is not a portable product. It must be mounted following
the instructions in this Use & Care leaflet.
·
Smoke Alarms are not a substitute for insurance. The sup
-
plier or manufacturer is not your insurer.
(b) Limitations of Smoke Alarms.
Smoke Alarms have significantly helped to reduce the number
of fire fatalities in countries where they are widely installed.
However independent authorities havestated that they may be
ineffective in up to 35% of all fires. There are a number of rea
-
sons for this:
·
Smoke Alarms will not work ifthe batteries are depleted or if
they arenot connected, orif the wrongtype of batteryis used.
Test regularly and replace batteries at least yearly or when
depleted.
·
Smoke Alarms willnot detect fire if sufficientsmoke does not
reach thealarm. Smoke maybe prevented fromreaching the
Alarm ifthe fire istoo far away,for example, ifthe fire ison another floor, behinda closed door, in a chimney,in a wall cavity, or if the prevailing air drafts carry the smoke away.
Installing smokealarms on bothsides of closed doors andinstalling more thanone smoke alarm as recommended inthis
leaflet very significantly improve the probability of early detection.
·
The Smoke Alarm may not be heard.
·
A smoke alarmmay not wake a person who hastaken drugs
or alcohol.
·
Smoke Alarms may notdetect every type of fire to give suffi
cient early warning. They are particularly ineffective with:
fires caused by smokingin bed, escaping gas, violent explo
sions. poor storage offlammable rags and/or liquids, (for ex
ample petrol, paint,spirits etc), overloaded electricalcircuits,
arson, children playing with matches.
·
Smoke Alarms don’t last indefinitely. The manufacturer rec
ommends replacement after 10 years as a precaution.
Planning your Escape for when the Alarm goes off
Use theSmoke Alarm Test Buttonto familiarize your familywith
the Alarmsound and topractice fire drillsregularly with allfamily
members. Draw up a floor plan that will show each member at
least 2 escape routes from each room in the house. Children
tend to hide when they don’t know what to do. Teach children
how to escape, open windows, and use roll up fireladders and
stools without adulthelp. Make sure they know what todo if the
alarm goes off - see next page.
1. Check room doors for heat or smoke.
Do notopen a hot door. Usean alternate
escape route.Close doors behindyou as
you leave.
2. If smoke is heavy, crawl out, staying
close to floor. Takeshort breaths, if pos
sible, through a wet cloth or hold your
breath. More people die from smoke in
halation than from flames.
3. Getout as fast asyou can. Donot stop
for packing. Have a prearranged meet
ing place outside forall family members.
Check everybody is there.
4. Call the Fire Brigade from a neigh
bour’s house. Remember to give your
name and address.
5. NEVER re-enter a burning house.
(b) FIRE SAFETY HINTS.
Store petroland otherflammable materials inproper containers.
Discard oily or flammable rags.
Always use a metal fireplace screen and have chimneys
cleaned regularly.
Replace worn receptacles, switches, home wiring and cracked
or frayed electrical cords and plugs.
Do not overload electrical circuits.
Keep matches away from children.
Never smoke in bed. In rooms where you do smoke, always
check under cushions for smoldering cigarettes and ashes.
Service furnaces and heating systems regularly.
Be sureall electricalappliances and toolshave a recognizedap
-
proval label.
This device cannot protect all persons at all times. It may not
protect against the three most common causes of fatal fires:
1. Smoking in bed.
2. Leaving children at home alone.
3. Cleaning with flammable liquids, such as petrol.
Further informationcan beobtained from theHome OfficePubli
cation entitled “Smoke Detectors in the Home” (FB2) or from
your local fire prevention officer.
Figure 10
WIRING HOLE
TEST BUTTON
CONTACTS
TERMINAL 1
TERMINAL 2
INTERCONNECT
WIRES
10
11 12 13
P/N B10277 - Pages 10 to 13 - Rev 7
Warning: Do not interconnect to any other Smoke Alarms.
Page 4

Getting your Smoke Alarm Serviced
If your Smoke Alarm fails to work after you have read the sec
tions on“Connecting thebattery” and “Lookingafter yourSmoke
Alarm” contact Customer Assistance at the nearest address
given atthe end ofthis leaflet. Ifit needs to bereturned for repair
or replacement put it in a padded box (battery disconnected)
and send it to “Customer Assistance and Information” at the
nearest address given on the Smoke Alarm or in this leaflet.
State the nature of the fault, where the Smoke Alarm was pur
chased and the date of purchase.
Five Year Product Guarantee (excluding battery)
EI Co. Ltd. guarantees this product (excluding battery) against
any defects thatare due to faulty material or workmanshipfor a
five year period afterthe original date of consumer purchase or
receipt asa gift. This guarantee doesnot include damage tothe
product resulting from accidentor misuse. It also excludes inci
dental and consequential damages. If the product should be
come defectivewithin the warranty period,we will replace itfree
of charge. (see “Getting Your Smoke Alarm Serviced”)
Do notinterfere withthe product orattempt totamper with it.This
will invalidate the guarantee.
EI Electronics
9 Grundy Street, Liverpool L5-9SG, U.K.
or Shannon, Co. Clare, Ireland.
INSTRUCTION LEAFLET (for all Models)
Contains vital information on unit operation and installation.
Read and retain carefully. If you are just installing this unit this
leaflet MUST be given to the householder.
MODELS: EI 100B STANDARD
EI 100C INTERCONNECT
EI 100L EMERGENCY LIGHT
EI 100S SILENCER
9 VOLT IONISATION
IMPORTANT NOTICE
WHEN THE BATTERY IS
FIRST CONNECTED THE
ALARM MAY SOUND FOR
2-3 SECONDS.
THIS IS NORMAL.
IT MEANS THE BATTERY
IS CONNECTED CORRECTLY.
HUSH
© Ei Electronics. 2001
P/N B10277-7
14
P/N B10277 - Pages 14&1-Rev 7
 Loading...