

Ei Electronics Easichange Series, Easichange Ei151EK, Easichange Ei154EK, Easichange Ei156EK User Manual
Page 1
Use r Ma n ual for the eas i cha n ge
Rep l ace m ent Ser i es:
Ei1 51 EK - Ioni sati on Ei1 54 EK - Heat
Ei1 56 EK - Opti cal
Insert the removal tool
3
Inse r t the s uppl i e d re m o val t o ol i n t o th e left h and
side o f th e tamp e r cat c h and l ever i t do w n gen t l y.
2. Connecting the New A l a r m
Connect the terminal block
1
Cong r a tula t i ons! Yo u hav e purc h ased a genu i ne Ei
Elec t r onic s repl a c emen t smok e / heat a larm k it.
This r epla c e ment k it c o n tain s ever y t hing y ou n e e d to
easi l y, q uick l y and s afel y repl a c e yo u r mai n s pow e r ed,
Ei E l e ctro n i cs s m o ke o r heat a larm .
1. Removing the Existing A l a r m
Disconnect the mains power
1
War n ing! B e fore t he ex i sting alarm is re m oved
the m a ins p o wer m u st b e disc o n nect e d .
Look o n yo u r mai n s dis t r ibut i o n bo a r d fo r a
swit c h mar k e d “S m o ke Alarm s ” or s imila r and
swit c h thi s off . I f th e r e is n ’ t a s w itch m arke d
with a rec o g nisa b l e la b e l, s w i tch t h e ma i n s
powe r off .
Note : Thi s w ill c u t po w e r to e very t h ing i n the
hous e incl u d ing t h e li g h ts.
Slide the alarm off the mounting plate
4
With t he r e m oval t ool s t ill i n sert e d , sl i d e th e lowe r
half o f th e alar m away f rom t h e re m o val t o ol, t h e
alar m will d etac h from t he b a s e.
Remove the alarm
5
Gent l y mov e the a l arm v e rtic a l ly t o w ards t he f l o or.
It i s impo r t ant t o do t h is s l o wly a s the a larm i s st i l l
atta c h ed w i t h it s powe r and i n terc o n nect i o n ca b l e.
Plug t he p o w er a n d int e r conn e c tion t ermi n a l bl o c k
into t he b a c k of t he n e w ala r m .
Note : The b l ock w i ll o n l y co n n ect o n e wa y.
Attach the alarm
2
Plac e the a l arm o n the b ase p l ate a n d sl i d e it
towa r d s th e tamp e r cat c h unt i l it “ c lick s ” int o plac e .
Reconnect the mains power
3
Afte r the n e w al a r m ha s been a ttac h e d to t he
base p late , reco n n ect t h e ma i n s po w e r su p p ly.
3. Checking the new A l a r m
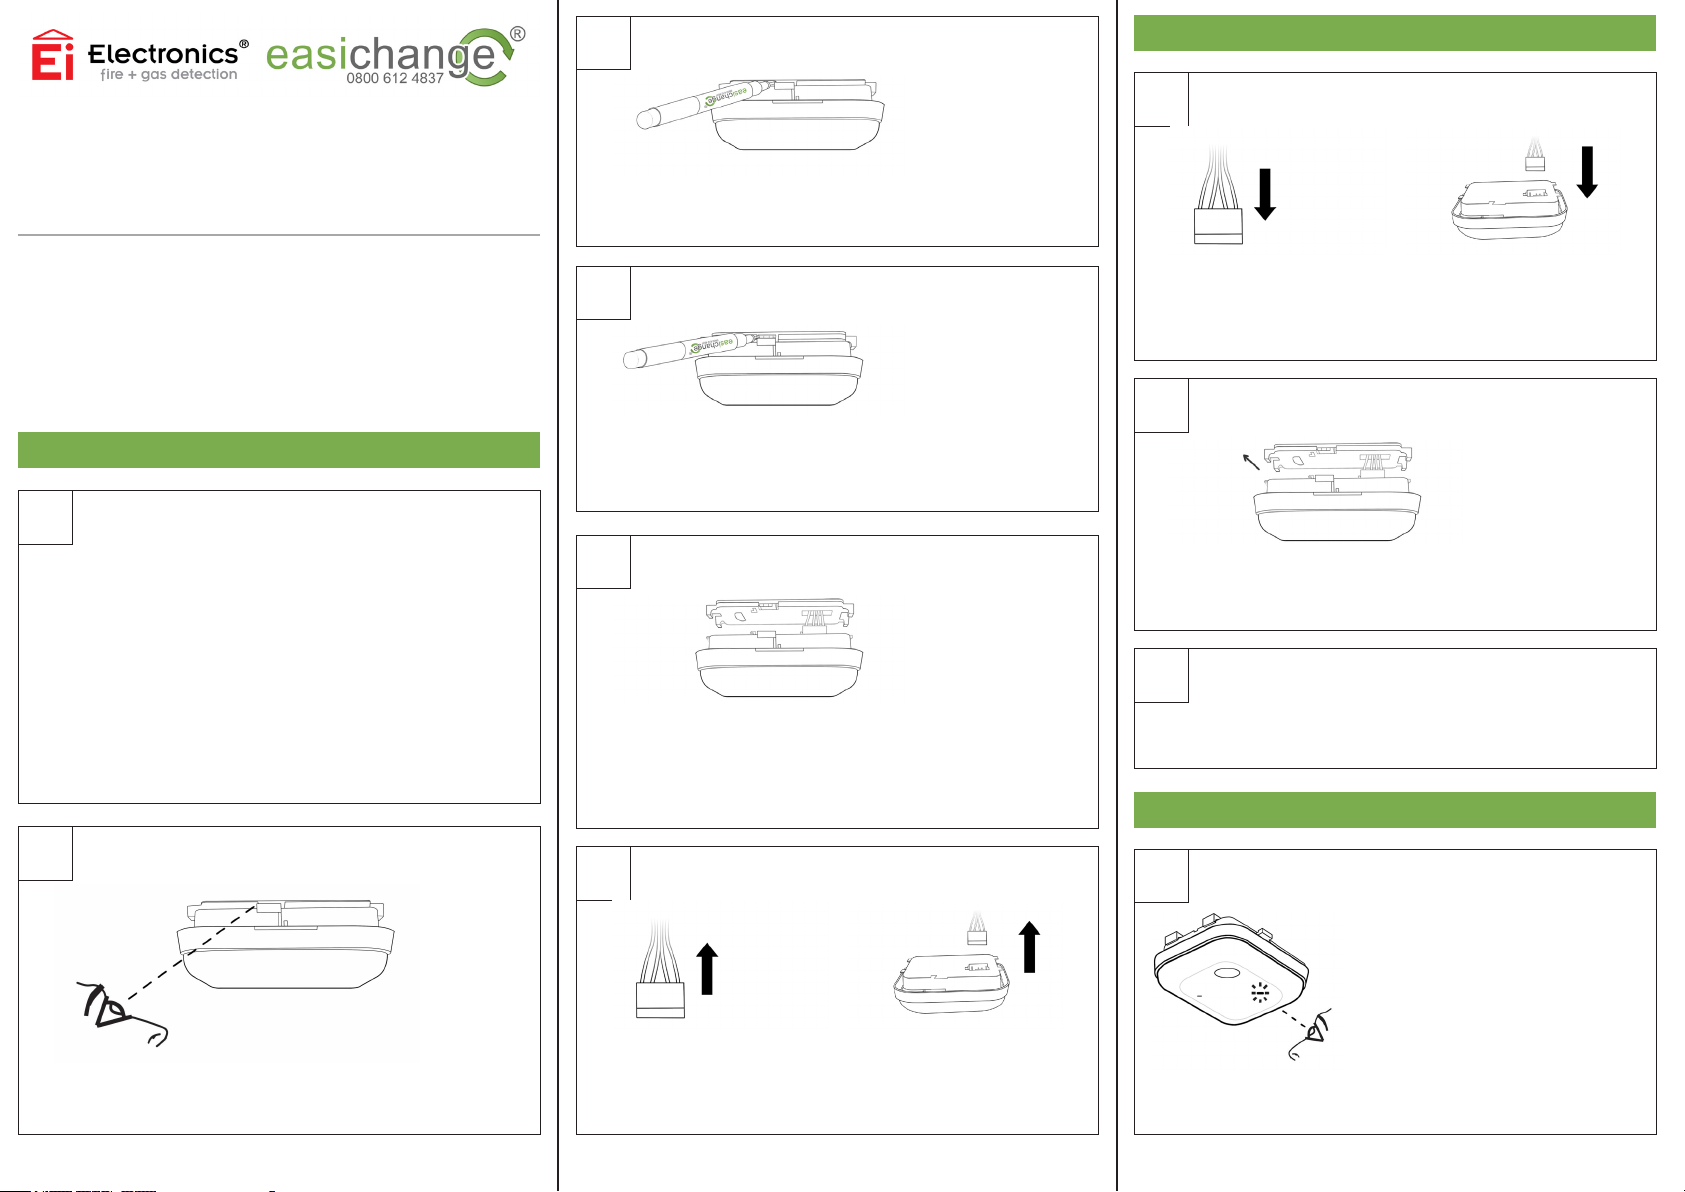
Locate the tamper catch
2
The t a mper c atch i s lo c a ted o n the o ppos i t e si d e to
the a l arm h i nges ( as s h o wn i n the a b ove i m age) .
Pag e 1 Pag e 2 Pag e 3
Unplug the terminal block
6
Unpl u g the p ower a nd i n t erco n n ecti o n ter m i nal b l ock
from t he b a c k of t he a l a rm.
Care s houl d be t a k en t o pull t he t e r mina l bloc k and
not t h e ca b l es.
Checking the indicating lights
1
Onc e the n ew a larm has bee n
con ne cte d and the main s po wer
has b een r esto red it i s im port ant
to ch eck t he i ndic atin g li ghts .
If th e a la rm i s wo rkin g
cor re ctl y the GREE N LI GHT
(ma in s i nd icat ing ligh t) s houl d be
on co nst an tly a nd th e R ED LI GH T
sho ul d f la sh o nce ever y 40 sec .
Page 2
Testing the Alarms
2
Pres s and h o ld t h e tes t
butt o n for 1 0 se c o nds, t he
alar m shou l d sou n d lou d l y an d
the R ED L IGHT shou l d fla s h
whil e the a l arm i s sou n d ing.
If t h e re a r e oth e r ala r m s in t he
hous e thes e shou l d als o soun d
with i n 5 s e c onds o f th e test
butt o n bei n g pre s s ed.
Any Problems?
If you have any problems fitting your new
alarm please give us a call on: 0800 612 4837
or email support@easichange.co.uk
4. Keeping a Record
Now t h at y o u hav e inst a l led a n d te s t ed y o u r ne w alar m ,
it i s esse n t ial t o kee p a re c o rd o f the d a te w h e n it w as
fitt e d . We have i n clud e d a h a n dy r e p lace m e nt r e c ord
stic k e r in t his p a ck.
Fill i n th e date a nd s t i ck i t near y our d i stri b u tion b oard
for f u ture r efer e n ce.
5. Important Information
Regu l a rly c h eck t h at t h e gre e n mai n s
Indi c a tor l i ght o n the c over i s li t .
Test w e ekly - pres s and h old t h e tes t butt o n
on t h e ala r m for 1 0 se c o nds. The al a rm w i l l
soun d loud l y and t he r e d lig h t sho u l d fl a s h
rapi d l y. Al l othe r inte r conne c ted a l arms
shou l d als o soun d .
Remo v e or c o mple t e ly c o v er y o u r al a r m
when d ecor a t ing t o pre v e nt d u s t an d
cont a m inat i o n da m a ging t he u n i t.
Do n o t all o w pai n t , wa t e r or d ust t o
cont a m inat e your a larm .
Yo ur a la rm is a mai n s 230 V AC elect r ical
appl i a nce. D o no t open o r in s e rt a n y thin g
into t he a l a rm.
Do n o t pai n t you r alar m - It m ay a l a rm o r
ceas e to o p e rate .
If y o u r al a r m so u n ds f o r no r e ason a nd w i l l
not r e set, i t ca n be r e m oved b y re l e asin g
the c l ip o n the b a se. ( S ee “ R e movi n g the
Exis t i ng Alarm ” sect i on on page 1 )
7. Testing & Maintaining Your Alarm
Chec k i ng y o u r A l arms
Chec k all y o ur a l a rms a t lea s t wee k l y, and a l so a f t er
re-o c c upat i o n fo l l owin g a ho l i day e t c.
1. Chec k that t he g r e en m a i ns i n d icat o r lig h t is o n , If
it i s off c h eck c i rcui t brea k e rs, f u ses a n d wi r i ng e t c .
Chec k that t he r e d lig h t beh i n d th e butt o n or o n the
cove r flas h e s ev e r y 40 s econ d s .
2. Pres s the t e st b u t ton f o r up t o 10 s econ d s to e n sure
the s e nsor c hamb e r, e lectr o nics a nd so u nder a re
work i n g. A r e d lig h t beh i nd th e test butto n or o n the
cove r, w i ll fl a sh wh i le ho r n is s oundi n g. T h e ala r m
will s top w h en t h e but t o n is r elea s e d. P r e ssin g the
test b utto n simu l a tes t h e ef f ect of smok e or h e a t
duri n g a r e a l fi r e and i s th e best w ay t o ensu r e the
alar m is o p e rati n g cor r e ctly.
WAR N ING: D O NOT TES T WITH F LAME
The c a n da m a ge t h e ala r m and c an b e a fi r e ris k
We do not r e comm e n d te s t ing t h e al a r ms w i t h sm o k e or
heat a s th e resu l t s ca n be m i s lead i n g un l e ss s p e cial
appa r a tus i s use d .
3. Chec k for a n y si g n of c o ntam i n atio n such a s
cobw e b s or d ust a n d cl e a n th e alar m as d e s crib e d
belo w if n e c essa r y.
Inte r c onne c t ed A larms
Test t h e fir s t uni t by p r essin g the t est b u tton f or 10
seco n d s. All t h e det e ctors shoul d alar m with i n abo u t 5
seco n d s of t he f i r st h o r n so u n ding a nd t h e red l ight o n
the f i rst u n it o n l y wi l l fla s h abo u t onc e a se c o nd. C h eck
all t h e ot h e r un i t s si m i larl y.
If a n uisa n c e al a r m oc c u rs, f a n th e alar m
vigo r o usly w ith a news p a per t o hel p clea r
the s e nsor ( on t h e Ei1 5 1 EH p r e ss t h e hus h
butt o n in t h e co r n er o f the c o ver) .
Clea n your a larm r egul a r ly. Th is will r educ e
the r i sk o f fals e alar m s .
Pag e 4
The r e char g e able c ells m ay r e q uire a few
days t o ch a r ge a f t er f i r st b e i ng c o n nect e d
to t h e mai n s .
It m a y giv e a sh o r t be e p eve r y 40 s e cond s
for u p to 2 hour s whil e it i s char g i ng.
Pag e 5
Note : Ioni s a tion a nd h e a t al a r ms s i g nal t o oth e r
inte r c onne c t ed a l a rms w i thin a bout 4 sec o n ds o f thei r
own s o unde r bein g acti v a ted, o ptic a l ala r m s si g n al
with i n app r o xima t e ly 1 s econ d .
Chec k i ng t h e Rec h a rgea b l e Ce l l s
When t he Alarm is Be e ping
The Alar m auto m atica l ly mo n itors the c e lls e v ery 4 0
seco n d s to e nsur e they a re s a t isfa c t ory. If a pro b l em i s
iden t i fied i t wi l l giv e a sh o r t be e p eve r y 40 s e cond s . If
the u n it i s givi n g bee p s the n chec k the f o llow i n g:
Pag e 6
Page 3

1. Chec k that t he g r e en m a i ns p o w er l i g ht i s on. I f it i s
off t h e al a r m ha s been p ower e d fro m the c e lls a n d
the b e eps i n dica t e the y are d e plet e d . Re c o nnec t the
main s , che c k fus e , cir c u it b r e aker s and w i ring . If
in d o u bt c o n tact a qua l i fied e lect r i cian . The b e eps
shou l d cea s e wit h i n 2 h o urs a s the c ells c harg e up.
2. Chec k that t he h u s h bu t t on h a s not b een p r esse d
inad v e rten t l y (E i 1 51EH o nly) . Thi s a lso c a uses
beep s ever y 40 s e c onds f or u p to 1 5 minu t e s. P r e ss
the t e st b u t ton t o can c e l hu s h mod e beep s .
3. The c e lls m a y be d eple t e d. T h e be ep s sho u l d ce a s e
with i n 2 h o u rs a s they c harg e up. F u lly c h arge d , the
cell s will p rovi d e up t o 6 m o n ths b a ck-u p with o u t
main s powe r.
4. On t h e Opt i c al S m o ke Alarm s only (Ei15 6 EH) i f the
unit b eeps a nd t h e red l ight d oes n o t fl a s h at t he
same t ime i t ind i c ates a pro b l em w i t h th e smok e
cham b e r - s e e Cl e a ning t he S m o ke Alarm .
If a l l of t h e ab o v e po s s ible c ause s of b e e ps h a v e be e n
rule d out b u t th e beep i n g ha s stil l pers i s ted f o r ov e r 2
hour s with t he g r e en l i g ht o n - th e rech a r geab l e cel l s
are p r obab l y def e c tive . The s m oke a l arm m u st b e
retu r n ed t o us a t one o f the a ddre s s es o n the b a ck p a g e
for e x amin a t ion a n d an a l ysis .
Manu a l Test i ng
We re c omme n d tha t the f u ncti o n ing o f the r echa r g eabl e
cell s is c h e cked p erio d i call y (at l e ast y e arly ) as f o l lows :
1. Ensu r e tha t the a l arm h a s be e n con n e cted t o th e
main s , wit h gree n ligh t on, f o r a l e ast 2 days f or t h e
cell s to c h a rge.
2. Tur n off the m a ins p o wer a t the d istri b ution board
and c h eck t h at t h e gre e n ind i c ator l ight i s ex t i nguis h e d. D o not r e move t he p l u g fr o m the r ear a s
this w ill d i scon n e ct t h e cel l s .
3. Pres s the t e st b u t ton a n d en s u re t h e hor n soun d s
loud l y for 1 0 se c o nds.
4. Rele a s e th e test b utto n and w a tch i t car e f ully f or
one m i nute :
The r e d li g h t be h i nd t h e tes t butt o n or o n the
-
cove r will f lash a t le a s t on c e .
The u n it m u s t no t give a bee p whic h indi c a tes
-
the b a tter y is l o w.
5. Tur n on t h e mai n s sup p ly at the d i strib u tion b oard
only i f th e unit p asse s all t h e ab o v e te s t s.
Note : If t h e mai n s is d i scon n e cted a nd t h e bat t e ry i s
almo s t dep l e ted t h e un i t wil l beep e very 4 0 se c o nds f o r
at l e a st 7 2 hour s . Th is is t o remi n d you t o re - c onne c t
the m a ins s u pply. T h e un it will o pera t e fro m the m a ins
alon e , eve n with a ful l y dep l e ted o r a d e f ecti v e bat t e ry,
thou g h it m a y no t give s uff ic i ent w a rnin g of f i r e if t he
main s supp l y is d i scon n e cted f or a n y rea s o n.
If t h e re a r e any p robl e m s ge t a qu a l ifie d elec t r icia n to
insp e c t th e hous e wiri n g and c onne c t ions t o th e alar m s .
If t h e re a r e sti l l pro b l ems t h e sm o k e al a r m mu s t be
retu r n ed t o us a t one o f the a ddre s s es o n the b a ck p a g e
for e x amin a t ion a n d an a l ysis .
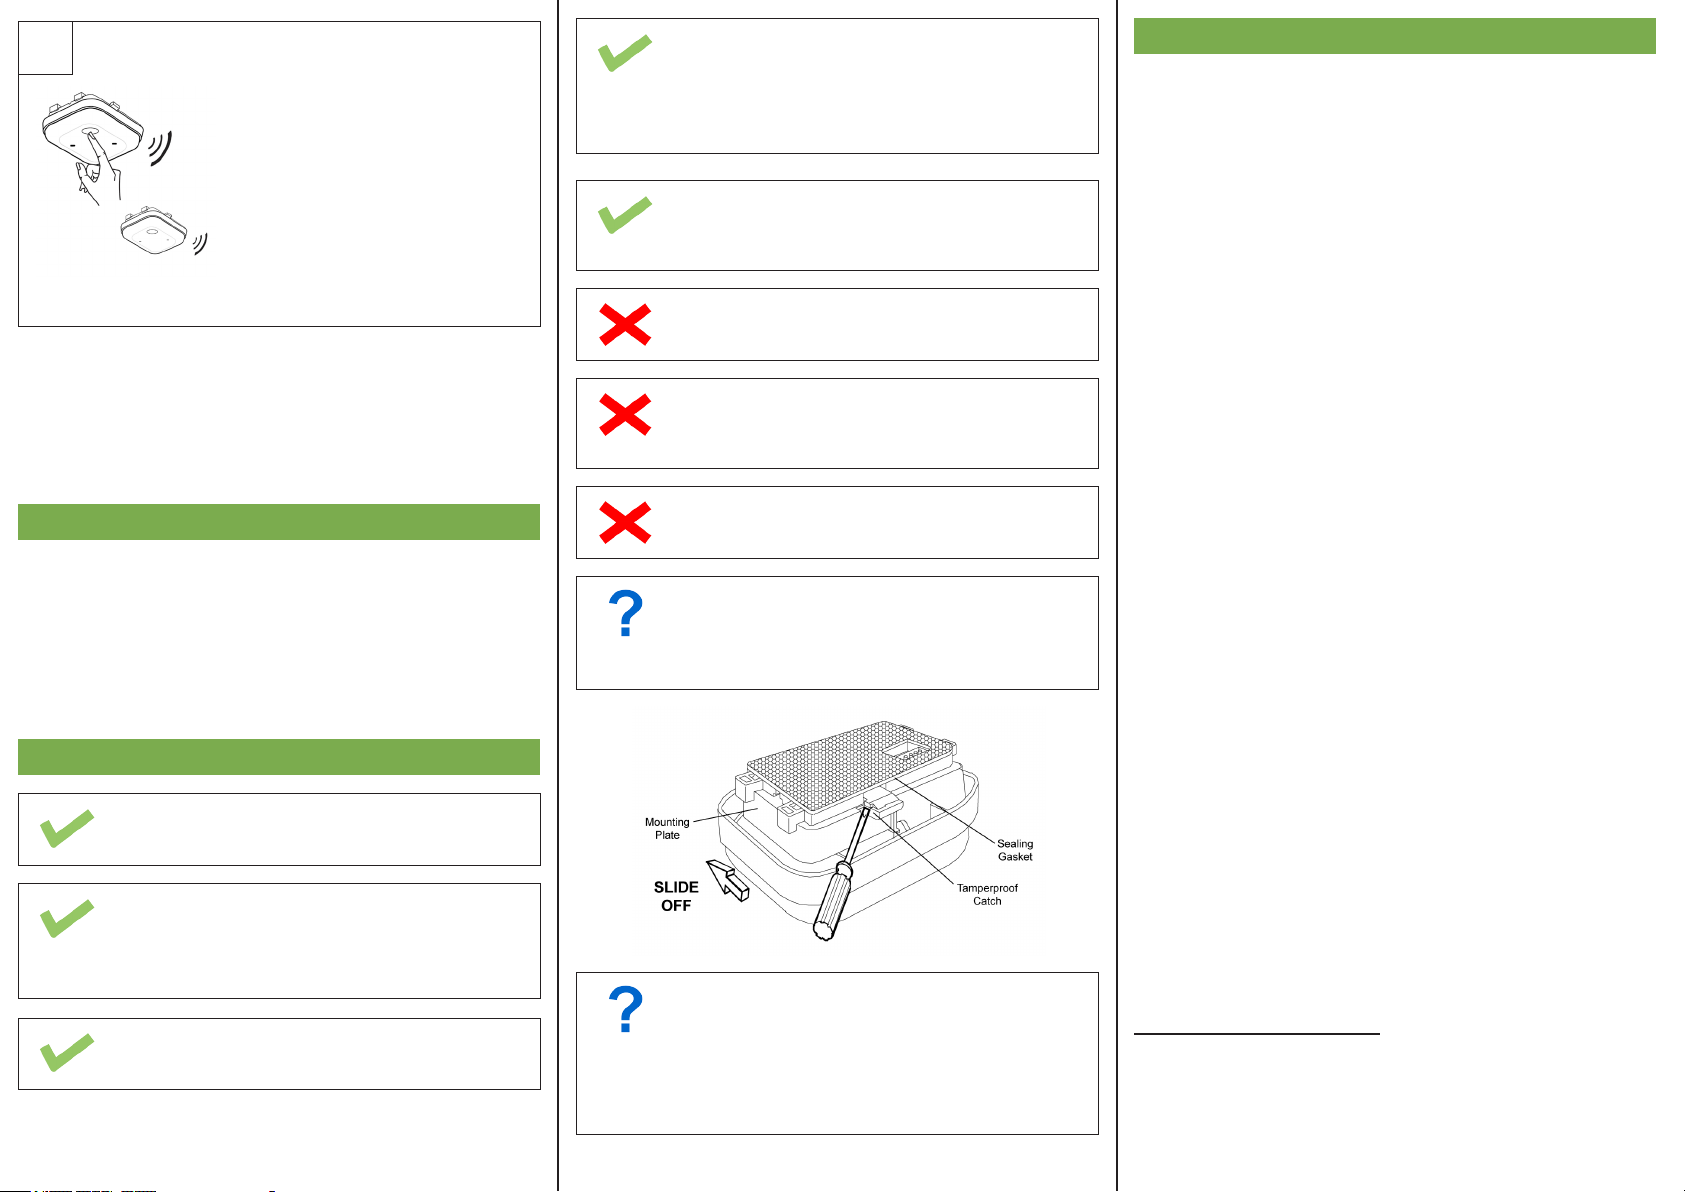
9. Cleaning Your Alarm
WA R NING: Elect r ical s hock h azard . Disc o nnect the AC
main s at t h e fus e box o r cir c u it b r e aker p ower i n g th e
alar m befo r e fol l o wing t he c l e anin g inst r u ctio n s .
Clea n your Ala r m reg u larly, p a rticu l arly i n dus t y areas. U se t h e nar r o w no z z le a t t achm e n t of y our v a cuum
clea n e r to r emov e dust , inse c t s an d cobw e b s fr o m the
side s and c o ver s l ots w h ere t h e sm o k e or h eat e n ters .
To cle a n the cover, w ip e wit h a da m p clo t h. Dr y cove r
thor o u ghly w ith a lint f ree c l oth. I f th e cont a m inat i o n
arou n d the o uter c ase i n dica t e s th a t the a rea i s
part i c ular l y dir t y, r emov e the a l arm f r om t h e cei l i ng ( S e e
“Rem o v ing t h e Ex i s ting Ala r m” se c tion o n pag e 1).
1. Chec k that t he o p e ning s in t h e bla c k smo k e sen s i ng
cham b e r ar e not c l ogge d by v i s uall y insp e c ting t hem
thro u g h th e larg e open i n gs a r o und t h e ed g e s of t he
smok e alar m s . If t hey a r e cl o g ged ( a n ex t r emel y rare
occu r a nce) t he S m o ke a l a rm m u s t be r epla c e d.
WA R NING: Do no t pain t your Ala rm .
Othe r than t he c l e anin g desc r i bed a b ove, n o ot h e r
cust o m er s e r vici n g of t h is p r o duct i s re q u ired . Repa i r s,
when n eede d , mus t be p e r form e d by t h e ma n u fact u r er.
All a l arms a re p r o ne t o dust a nd i n s ect i n gres s whic h
can c a use f a lse a l arms o r fa i l ure t o ala r m .
The l at es t d esi gn, ma ter ial s a nd man ufa ctu rin g t ech niq ues ha ve bee n
use d in t he con str uct ion of th e a lar m t o m ini mis e t he eff ec ts o f
con ta mi na tio n. How eve r i t i s i mpo ssi ble to co mpl ete ly eli min ate th e
eff ect of du st and in sec t c ont ami nat ion , a nd the ref ore , t o p rol ong th e
lif e of t he ala rm you mu st ens ure th at it is kep t c lea n s o t hat ex ces s
dus t do es no t b uil d u p. An y in se cts or co bwe bs in the vi cin ity of th e
ala rm s ho uld be pr omp tly re mov ed.
In ce rt ai n c irc ums tan ces ev en wit h r egu lar cl ean ing , c ont ami nat ion ca n
bui ld u p in the sm oke se nsi ng cha mbe r c aus ing th e a lar m t o s oun d o r
fai l. I f thi s h app ens th e a lar m m ust be re tur ned to us fo r
ser vi ci ng or re pla cem ent . C ont ami nat ion is be yon d o ur con tro l, it is
tot al ly u npr edi cta ble an d i s c ons ide red no rma l w ear an d t ear. Fo r th is
rea so n, c ont ami nat ion is no t c ove red by th e g uar ant ee and a cha rge is
mad e fo r ser vic ing su ch ala rms .
If y o u exp e r ienc e pers i s tent f alse a larm s , in p a rtic u l ar
loca t i ons, d ue t o cont a m inat i o n of t he s m o ke c h a mber
you c o uld c o nsid e r rep l a cing o ptic a l smo k e ala r m s wi t h
ioni s a tion s moke a larm s . Ion i s atio n type a larm s are l e ss
susc e p tibl e to d u s t th a n opt i c al t y p e al a r ms.
10. Nuisance A l a r m s
Alar m s cau s e d by c ooki n g fum e s etc . can b e rea d i ly
sile n c ed b y fann i n g th e unit w ith a news p a per o r sim i l ar.
On t h e Ei1 5 1 EH u n i ts, s i mply p ress t he h u s h bu t t on.
If, w h en t h e ala r m goe s off , t here i s no s ign o f smo k e ,
heat o r no i s e to i ndic a t e th a t the r e is a fire , you s h ould
get y o ur f a m ily i n to a s afe p l ace b e fore y ou s t a rt
inve s t igat i n g.
Chec k the h o use c a refu l l y in c ase t h ere i s a s m a ll f i r e
smou l d erin g some w h ere.
Chec k whet h e r th e r e is s ome s o urce o f sm o k e or f umes ,
for e x ampl e cook i n g fu m e s be i n g dr a w n pa s t the s moke
alar m by a n extr a c tor.
If t h e re a r e fre q u ent n u isan c e /fal s e ala r m s it m ay b e
nece s s ary t o re- l o cate t he d e v ice a w ay f r o m th e sour c e
of t h e fum e s .
If f o r som e reas o n the a larm c onti n u es t o soun d with o u t
smok e or h e a t be i n g pr e s ent ( d ue t o inse c t inf e s tati o n
or c o n tami n a tion b uild - u p fo r exam p l e) s w i tchi n g off the
main s powe r alon e will n ot s i l ence t he a l a rm a s it w i l l
stil l be p o w ered b y th e cell s . Swi t c h of f the m a ins a n d
remo v e the p lug f r om t h e rea r of t h e ala r m to d i scon n e ct
the c e lls. I f cl e a ning t he s m o ke a l a rm d o e s no t corr e c t
the p r oble m it c a n be r e turn e d to o n e of t he a d d ress e s
on t h e bac k page f or e x a mina t i on a n d ana l y sis.
Hush F eatu r e
The s m oke a l arms ( Ei15 1 E H on l y ) ha v e a h u s h bu t t on t o
help y ou c o n trol n uisa n c e fa l s e al a r ms.
Pag e 7 Pag e 8 Pag e 9
Page 4

1. To can c el a f alse a larm, press the H u sh Bu t ton l o cate d on t h e low e r rig h t -han d corn e r. T he Alarm will
auto m a tica l l y sw i t ch t o a re d u ced s e nsit i v ity c o ndition ( very l arge l evel s of s m o ke f r o m a n e arby f ire
will o verr i d e th e Hush ) . Th is cond i t ion a l lows
unwa n t ed a l a rms t o be s i lenc e d for a per i o d of
appr o x imat e l y 10 m inut e s . T he unit w ill g i ve a s hort
beep e very 4 0 se c o nds d u ring t his t i me t o let y o u
know t he u n i t ha s been s ilen c e d.
On i n t erco n n ecte d Smok e Al a rms, p ressi n g the Hush
Butt o n on t h e on e sens i n g sm o k e (i . e . th e one w i th t h e
red l i ght f l ashi n g eve r y sec o n d) w i l l si l e nce a l l al a r ms.
Pres s i ng t h e Hus h Butt o n on a n y ot h e r sm o k e al a r m wi l l
not c a ncel t he a l a rm.
2. The u n it w i l l re s e t to n orma l sens i t ivit y at t h e end
of t h e sil e n ced p e riod . If a d d itio n a l si l e nced t ime i s
requ i r ed, s i mply p ush t h e Hu s h But t o n ag a i n.
3. To qui c kly r e turn t o nor m al no n -sile n ced o p erati o n,
simp l y pus h the Te st Bu t ton; t he al a rm wi l l sou n d
brie f l y an d retu r n to i t s no r m al s e n siti v i ty a n d
oper a t ion.
3. Afte r inst a l lati o n , yo u r Smo k e A l arm m a y bee p approx i m atel y ever y 40 s e c onds f or 1 5 minu t e s. T h is
indi c a tes i t is i n the H ush m o de. To put i t int o normal o p erat i n g mo d e , pu s h and h old t h e Tes t Butt o n
unti l the a l arm s o unds .
11 . Troubleshooting
Alar m Soun d s for n o A p paren t Reas o n:
1. Iden t i fy t h e ala r m sou r c e. O n inte r c onne c t ed u n i ts
the r e d li g h t un d e r th e test b utto n or o n the c o ver
will f lash r apid l y onl y on t h e uni t whic h is t h e sou r c e
of t h e ala r m .
2. Chec k for f u mes, s team e tc. f r om t h e kit c h en o r
bath r o om. P aint a nd ot h er fu m es c an caus e nuis a nce
alar m s .
3. Fan t h e un i t vig o u rous l y wit h a ne w s pape r to
disp e r se f u m es.
4. If a l a rm d o e s no t stop , swit c h off the ma i ns p o w er
and r e move u nit ( S ee “ R e movi n g the E xist i n g A larm”
sect i o n on p age 1 ) .
Alar m s Bee p Cont i n uous l y :
1. Alar m s may b e in ‘ hush m ode’ . Pres s the t e st b u t ton
for 1 0 sec o n ds t o rese t the u n it ( E i 151 E H onl y ) .
2. Cell s may b e fla t due t o mai n s fai l u re. C h eck t h e
gree n main s indi c a tor l i ght i s on.
1. If t h e abo v e fai l s to t u rn o n the g r een l i ght, a fau l t
may e x ist. S witc h off t h e ma i n s po w e r a n d rem o v e
the u n it ( S e e “R e m ovin g the E x isti n g A l arm” s ectio n
on p a g e 1) .
2. If t h e gre e n mai n s lig h t is o n and t he a c t ion i n (1)
abov e has n o t si l e nced t he b e e ping , a fa u l t ma y
exis t . Swi t c h of f the m a ins p o wer a nd r e m ove t h e
unit ( See “ R emov i n g th e Exis t i ng Alarm ” sect i on on
page 1 ).
Inte r c onne c t ed A larms do no t all S ound:
1. Hold t est b u tton f or 1 0 seco n d s af t e r fi r s t al a r m ha s
soun d e d to e nsur e sign a l is t r ansm i t ted t o all u nits .
2. Swit c h off main s a nd c h e ck t h a t li v e , ne u t ral a n d
inte r c onne c t cab l e s ha v e bee n corr e c tly c o nnec t e d
and t h at t h e con n e ctio n s are t ight .
If F r e quen t Nuis a n ce A larms Occur :
1. Clos e kitc h e n/ba t h room d oor w h en i n use.
2. Ensu r e tha t the a l arm i s sit e d at l e ast 6 m awa y from
sour c e s of f umes .
3. Cont a m inat i o n fr o m ins e c ts, p a int o r pai n t fum e s
may h a ve o c c ured . Clea n the a l arm.
4. If t h e pro b l em p e r sist s , res i t ing o f the u nit s h ould
be c o n side r e d. Alter n ative l y, repla c e the unit w ith
an o p t ical u nit, a ssum i n g th a t the p robl e m is w i th a n
Ioni s a tion t ype a l arm.
Con st ru ct ion Pr odu ct Ty pe: Sm oke A lar m D evi ces
Eur op ea n Sta nda rd: EN 146 04: 200 5
Cer ti fi ca te of Con for mit y: 008 6-C PD- 537 430
Model Type
Ei141 Ionisation 230V Smoke Alarm
Ei146 Optical 230V Smoke Alarm
Ei161 Ionisation 230V Smoke Alarm
Ei166 Optical 230V Smoke Alarm
008 6
08
12. Five Year Guarantee
Ei E l e ctro n i cs g u a rant e e s th i s ala r m for f ive y e ars f r om
date o f pu r c hase a gain s t any d efec t s tha t are d u e to
faul t y mat e r ials o r wo r k mans h i p. T h is g ua r ante e only
appl i e s to n orma l cond i t ions o f us e and s e rvic e , and
does n ot i n c lude d amag e resu l t ing f r om a c c iden t ,
negl e c t, m i s use, u naut h o rise d dism a n tlin g , or
cont a m inat i o n ho w s oeve r caus e d . T hi s gua r a ntee
excl u d es i n c iden t a l an d cons e q uent i a l da m a ge. I f thi s
alar m shou l d bec o m e de f e ctiv e with i n the g uara n t ee
peri o d , it m ust b e ret u r ned, w ith p r oof o f pur c h ase,
care f u lly p a ckag e d , wi t h the p robl e m cle a r ly s t a ted. We
shal l at o u r dis c r etio n repa i r or r e plac e the f a ulty u nit.
Do n o t int e r fere w ith t h e al a r m or t ampe r with i t. T h is
will i nval i d ate t h e gu a r ante e , but m ore i m port a n tly m a y
expo s e the u ser t o sho c k or f i re h a z ards .
This g uara n t ee i s in a d d itio n to y o u r st a t utor y righ t s as
a co n s umer.
Dist r i bute d By:
easi c h ange . c/o S a feli n c s Lt d , Uni t 1 Fa r l esth o r pe
Road , Linc o l nshi r e , LN 1 3 9PS U .K.
Tel: 0 8 00 61 2 4837
Manu f a ctur e d By:
Ei E l e ctro n i cs. S h anno n , Co C l are, I rela n d
Tel: + 3 53 (0 ) 61 47 1 377
Aico L td. M i le E n d Bus i n ess P a rk, M a esbu r y Rd,
Oswe s t ry, Shr o p shir e , SY1 0 8NN, U .K.
Tel: 0 8 70 75 8 4000
The c ro ss ed out wh eel ie bin sy mbo l t hat is on
you r pr od uct in dic ate s t hat th is pro duc t s hou ld
not b e di spo sed of vi a t he nor mal ho use hol d
was te s tr eam . P rop er dis pos al wil l p rev ent
pos si bl e har m t o t he env iro nme nt or to hum an
hea lt h. W hen di spo sin g o f t his pr odu ct ple ase
sep ar at e it fro m o the r w ast e s tre ams to en sur e
tha t it c an be rec ycl ed in an env iro nme nta lly
sou nd m an ner. Fo r mo re det ail s o n c oll ect ion
and p ro pe r d isp osa l, ple ase co nta ct you r l oca l
gov er nm en t o ff ic e or t he r et ail er whe re you
pur ch as ed th is pro duc t.
www. easic h ange. c o.uk
www. eiele c troni c s.co. u k
www. aico. c o.uk
Pag e 10 Pag e 11 Pa ge 12
 Loading...