

EHEIM eXperience 350 Important Safety Instructions Manual

2426
Außenfilter
External filter
Filtre extérieur
Buitenfilter
Ytterfilter
Udvendig filter
Ulkosuodattimet
Utvendigt filter
Filtro esterno
350
(Typ 2426)
Filtro exterior
Внешний фильтр
Filtermedien
Filter media
Masses filtrantes
Filtermassa’s
Filtermedia
Filtermedier
Suodatusmassat
Filtermasserne
Materiali filtranti
Masas filtrantes
Massas filtrantes
Фильтрчющий массы
2426
1 x 2616260
oder / or / ou
1 x 2616265
SUBSTRAT
2.2 ltr.
2 x 2509051 1.0 ltr.
oder / or / ou
1 x 2509101 2.0 ltr.
1 x 2616261
2426
햸
햲
햳
햴
햵
햶
햷
햾
햽
햿
헃
헀
햹
헃
햺
햻
헂
헁
헄
헅
2426
Für Süß- und Meerwasser / for fresh and marine water /
pour eau douce et eau de mer / voor zoet- en zeewater
7344050
2426
30 V 120 V 240 V 240 V 220 V
2
0 Hz 60 Hz 50 Hz 50 Hz 60 Hz
5
228019 1228099 1228119 1228129 1228189
No.1
No.
2226020 –– 2226510 –– ––
GB AUS
7344100
7444100
7343100
7444550
7444200
7344100
1228
7343400
7343150
7342200
7343390
2616265
7480650
2616260
7480650
7444450
7676000 (2426)
4014150
7447150
7343858
4005710
7275800
4015150
7471800
7656200 (50 Hz)
7656210 (60 Hz)
7444400
7255050
7656300
7342350
7271950
4005940
7342500 (2426)
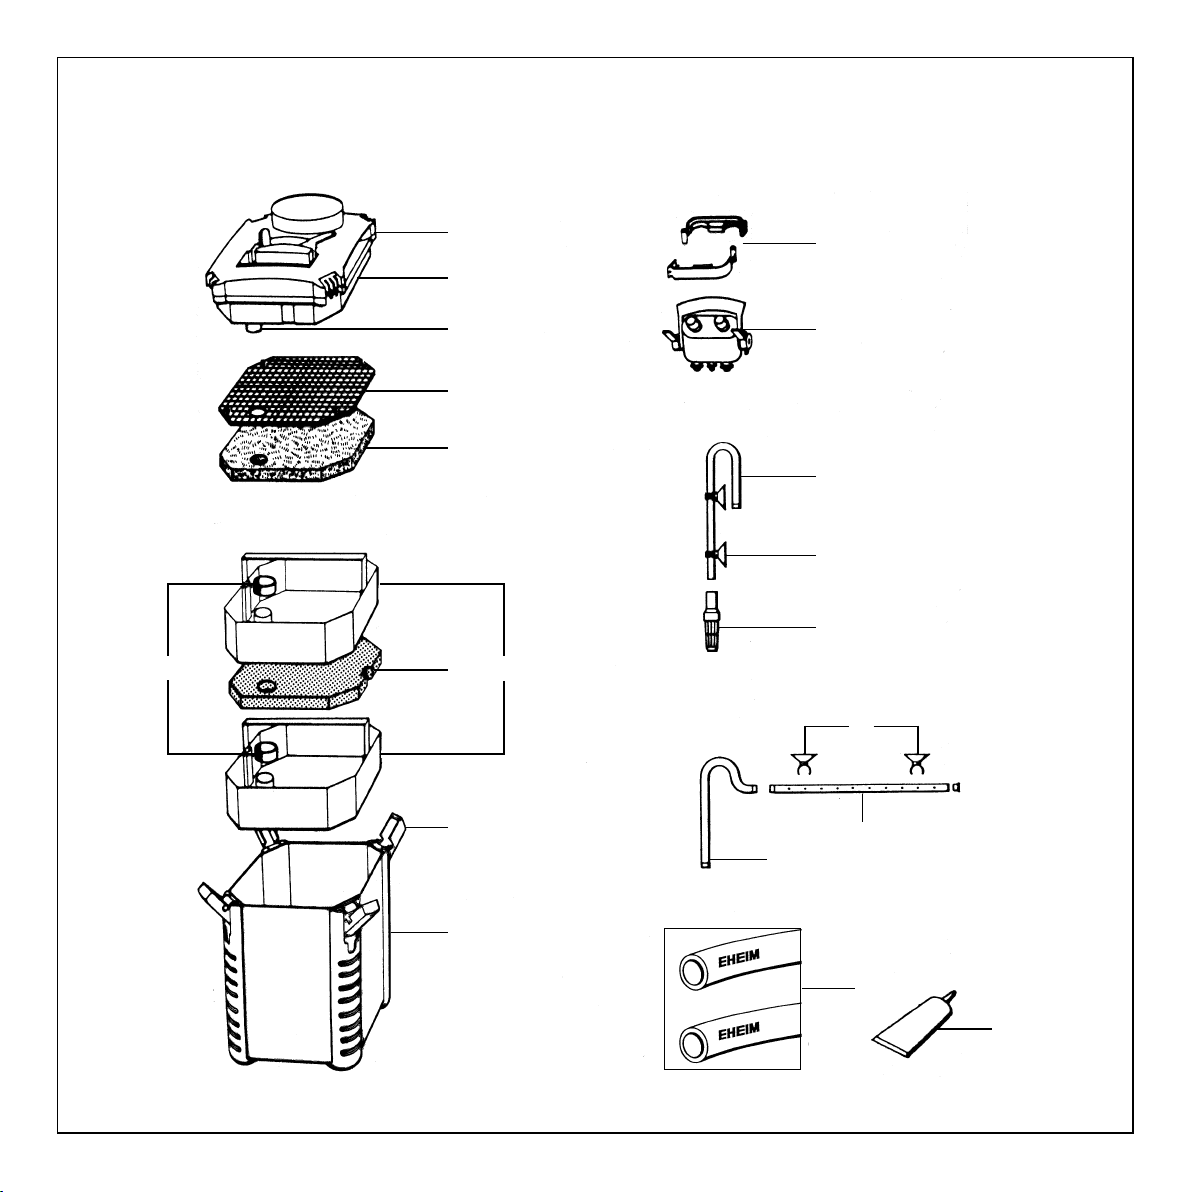
Außenfilter 2426
햲
Filteroberteil햳Profildichtung햴Rohrstutzen햵Abdeck-
햶
gitter
len
햽
rohr
schluss-Stopfen
헅
Filtervlies /weiß햷Filtermatte /blau햸Gummitül-
햹
Filtereinsätze햺Verschluss-Klipp햻Filterbehälter
Adapter mit Absperrhähnen햾Schlauchhalter 햿Ansaug-
헀
Filterkorb헁Auslaufbogen헂Düsenrohr mit Ver-
헃
Klemmbügel mit Sauger헄Schläuche
Vaseline.
Bitte beim auspacken prüfen, ob alle Teile vorhanden sind.
Montage
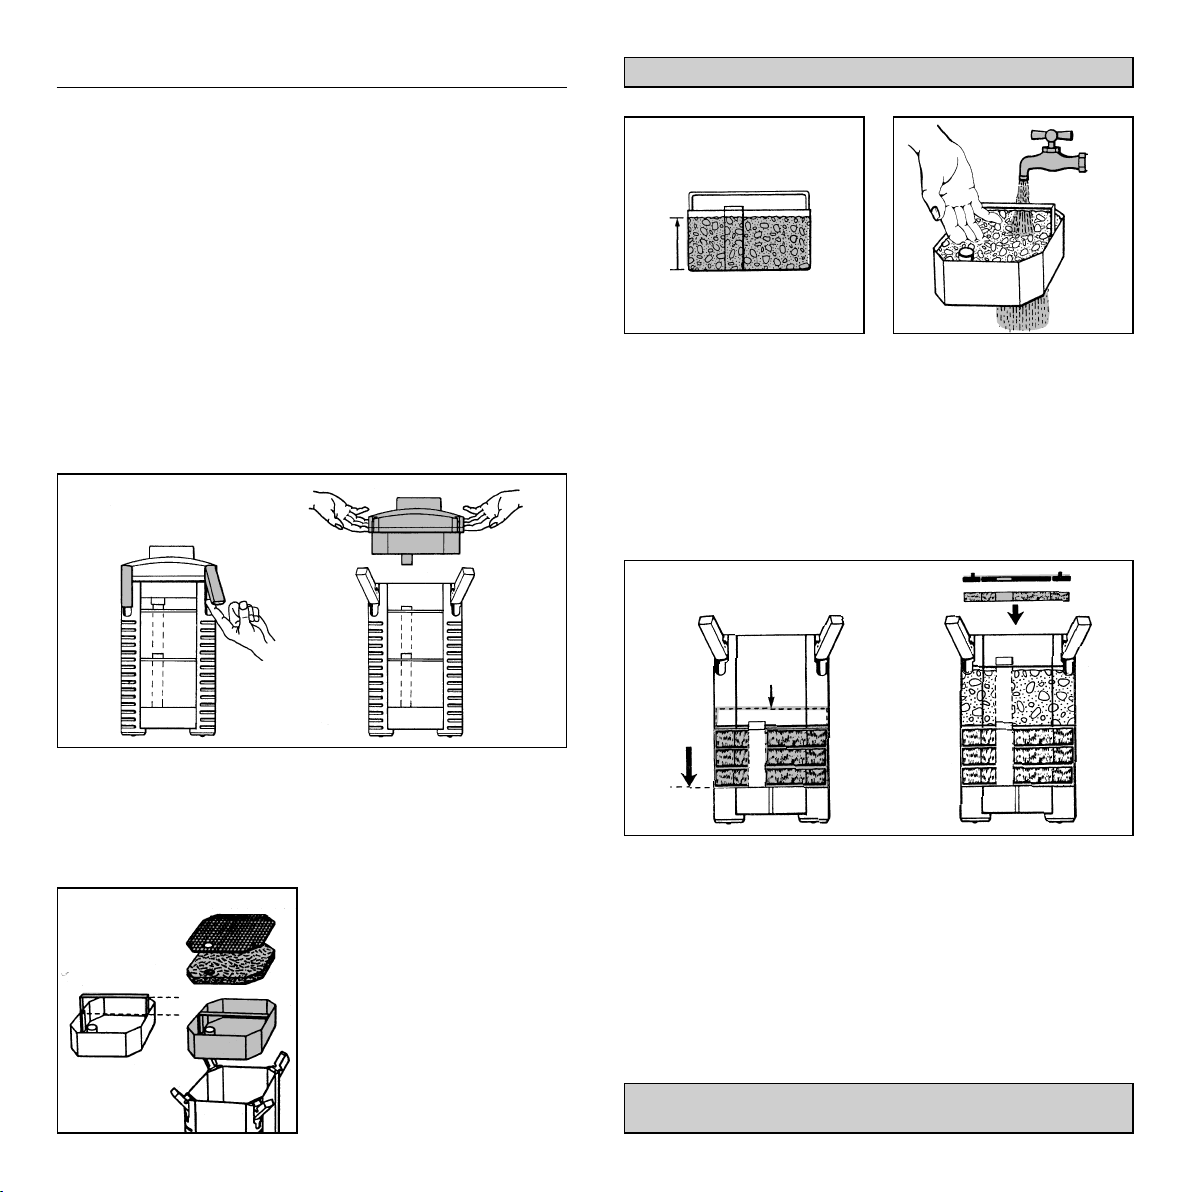
Alle vier Verschluss-Klipps am Filterbehälter herauskippen
und nach oben schieben. Mit Hilfe der beiden Griffmulden
läßt sich das Filteroberteil bequem abheben.
D
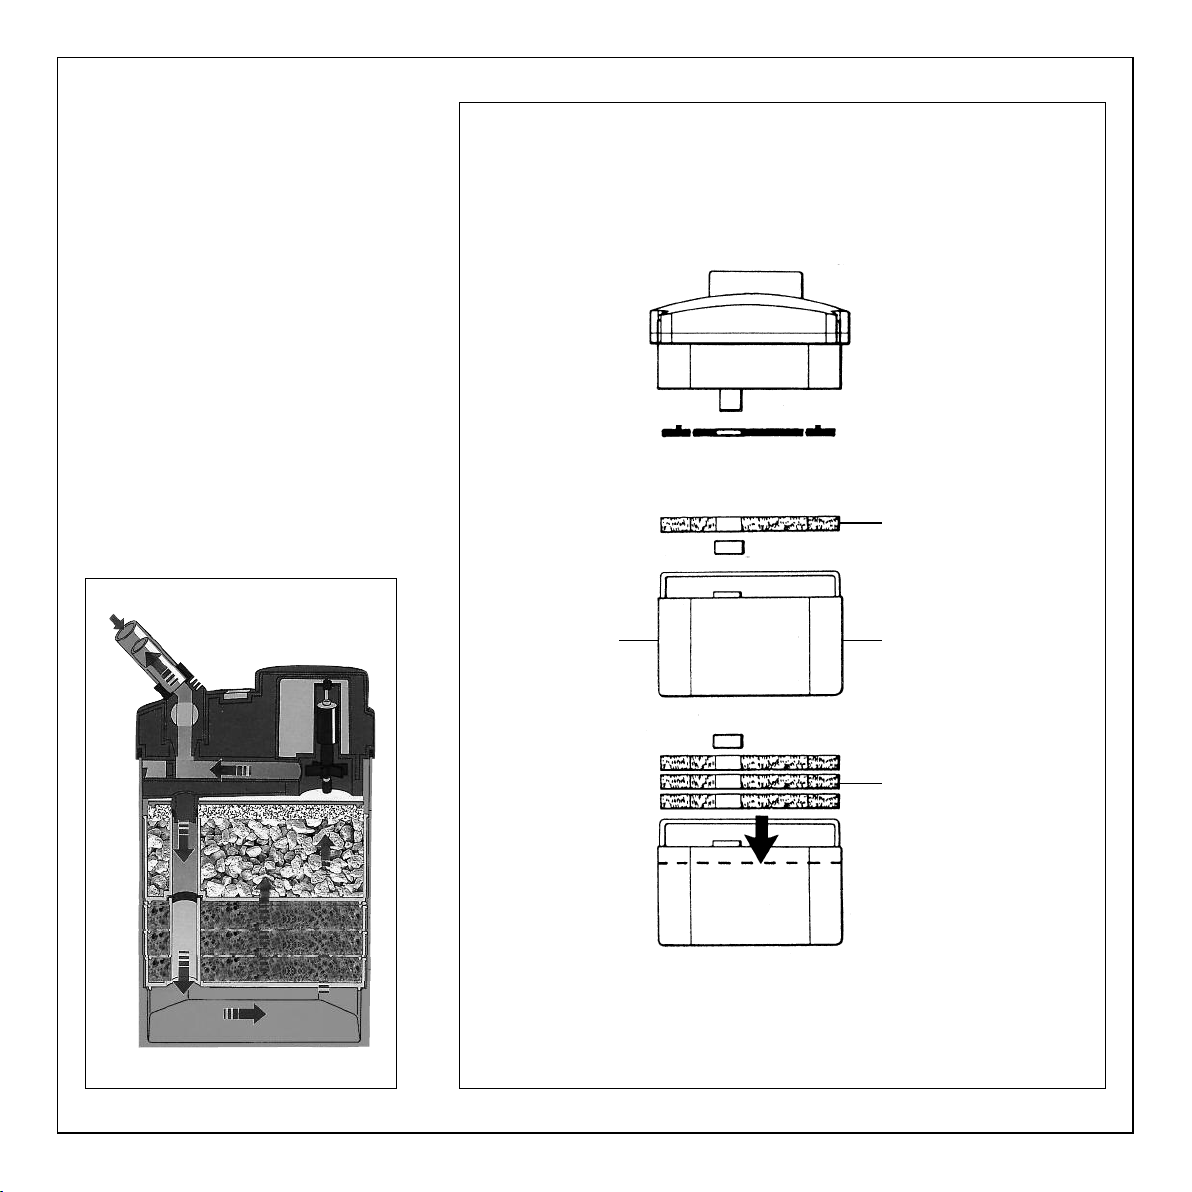
Nicht überfüllen, Rohrdurchführung nicht ver stopfen.
Anschließend Filtermasse im Korb unter fließendem Wasser
gründlich durchspülen bis keine Wassertrübung mehr sichtbar ist.
Setzen Sie den Filtereinsatz mit der blauen Filtermatte wieder in den Filterbehälter ein und drücken Sie ihn kräftig
nach unten bis er auf den Auflagestegen sitzt. Damit ist
eine sichere Abdichtung zwischen Filtereinsatz und Behälter gewährleistet.
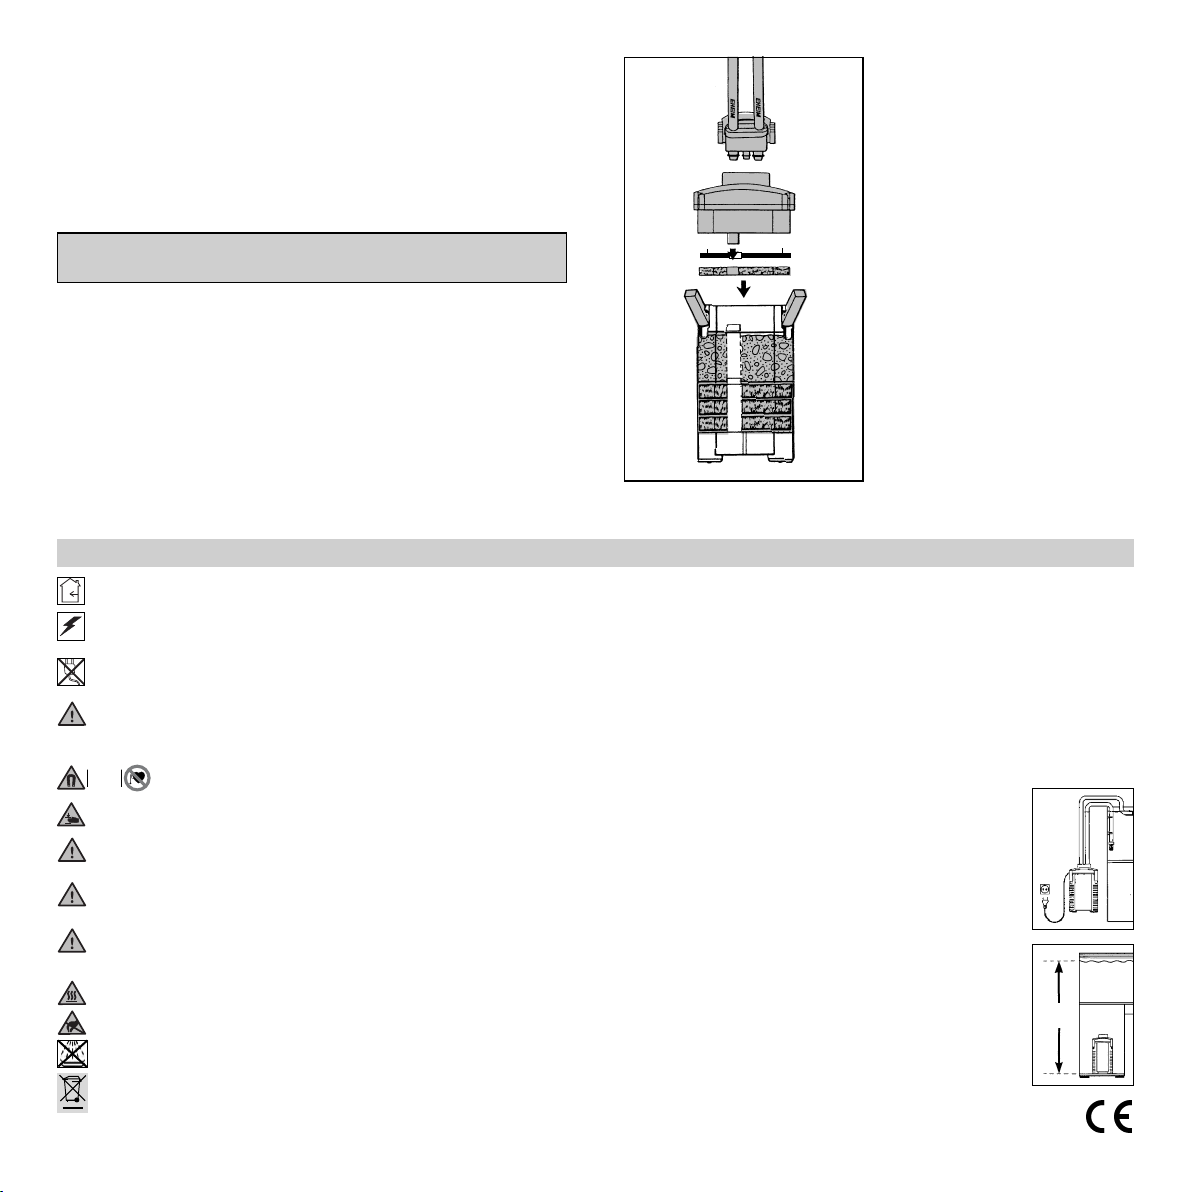
Abdeckgitter und Filtervlies entnehmen und die einzelnen Filtereinsätze nacheinander herausnehmen. Die versenkten
Griffbügel der Filtereinsätze lassen sich nach oben ausziehen. Anschließend Einsätze mit Filtermassen befüllen.
Den unteren Filterbehälter
mit EHEIM Filtermatten befüllen.
Zweiten Einsatz bis knapp
↕
unter den Rand mit der biologischen Filtermasse SUBSTRAT füllen.
Den zweiten Filtereinsatz ebenfalls einschieben, wobei die
Rohröffnungen übereinander liegen müssen und mit den
Gummitüllen eine sichere Verbindung bilden. Griffbügel jeweils wieder versenken und darauf achten, dass alle Filtereinsätze bündig aufeinanderliegen. Zweite Gummitülle auf
oberen Filtereinsatz aufstecken.
Anschließend weißes Filtervlies und Abdeckgitter so auflegen, dass die Bohrung über der Rohröffnung liegt.
ACHTUNG: Weißes Filtervlies darf nicht unter dem Bügel
des Filtermassenkorbes eingelegt werden!
1
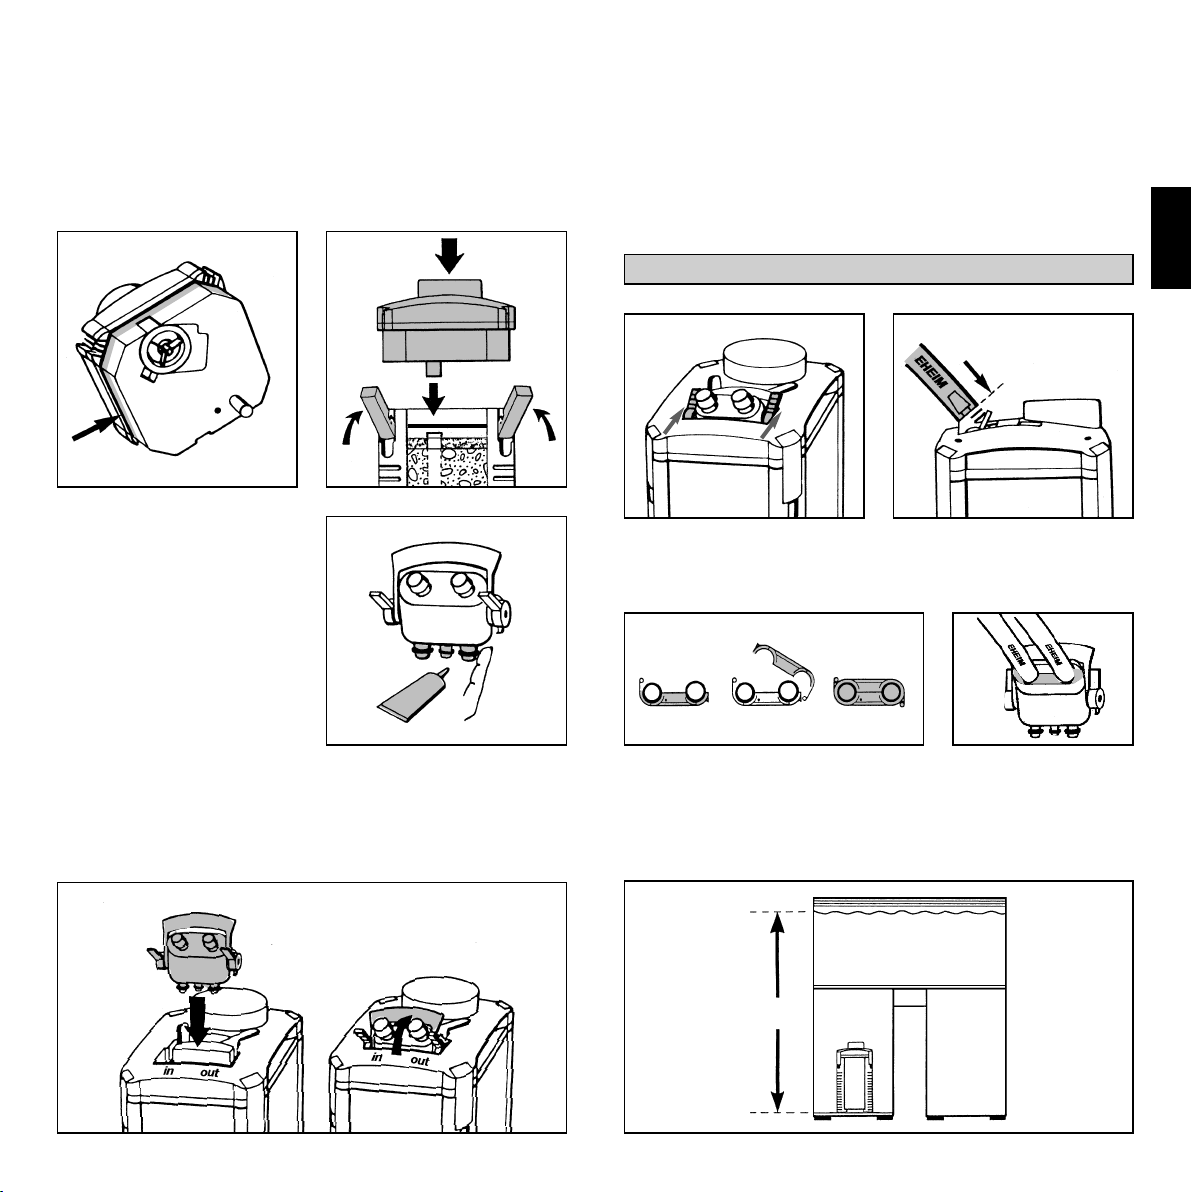
Prüfen Sie, ob die Profildichtung am Filteroberteil nicht verschmutzt ist und passgenau in ihrer Nut sitzt.
Oberteil auf den Filterbehälter setzen, wobei der Rohrstutzen des Filteroberteils in die Rohrführung der Filtereinsätze eingesteckt werden muss. Alle vier Verschluss-Klipps
schließen.
ACHTUNG:
Bevor der Adapter für die
Schlauchanschlüsse im Filteroberteil eingesetzt wird,
alle drei Dichtungsringe auf
Beschädigungen und richtigen Sitz prüfen. Die Dichtringe zur Montageerleichterung mit etwas Vaseline
leicht einfetten.
Schlauchinstallation
Um die Absperrhähne zu schließen, werden die beiden
Hebelgriffe des Adapters auf Stellung OFF umgelegt.
Die beiliegenden Schläuche bis zum Anschlag auf die
Schlauchstutzen am Adapter aufschieben. Vorher Schläuche
mit warmem Wasser geschmeidig machen.
Grundsätzlich nur EHEIM-Originalschläucheverwenden.
o
f
f
on
o
f
f
o
n
Der zweiteilige Schlauchhalter wird um die montierten Schläuche gelegt, seitlich eingehängt und zusammengeklippst.
Adapter mit hochstehendem Verriegelungsbügel in die vorgesehene Öffnung am Filteroberteil satt einstecken und unter
gleichzeitigem Druck auf den Adapter-Verriegelungsbügel
bis zum Einrasten schließen.
Stellen Sie den komplett vorbereiteten Filter im Unterschrank
auf. Achten Sie auf den vorgeschriebenen Höhenabstand:
Zwischen Wasseroberfläche und Filterboden dürfen maximal
180 cm liegen, um eine optimale Arbeitsweise zu erzielen.
max. 180 cm
2
Stecken Sie den Filterkorb
auf das Ansaugrohr und
befestigen Sie es mit zwei
Klemmbügeln und Saugern
an der Innenwand des Aquariums.
Hinweis: Bei Verwendung
der EHEIM professionel Außenfilter-Schnittstelle (Best.Nr. 7656450) wird das Ansaugrohr nur eingeklippst.
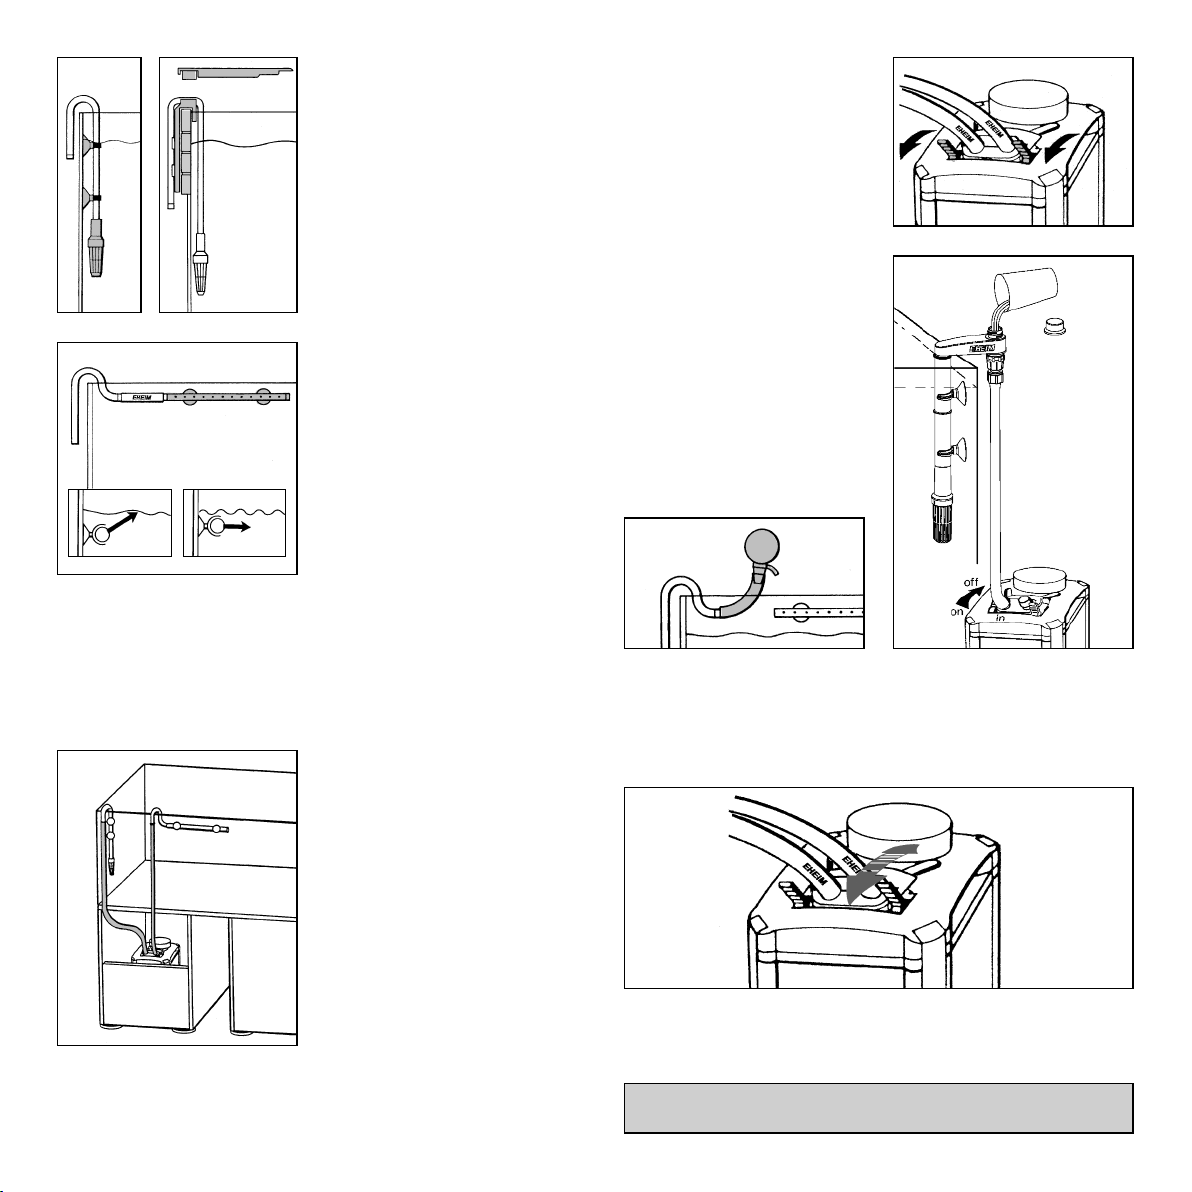
Auslaufbogen und das Düsenrohr mit einem kurzen
Schlauchstück verbinden
und mit Hilfe der Klemmbügel und Sauger im Aquarium
montieren.
Je nach maßlichen Gegebenheiten erfolgt die Anbringung an der Rückwand oder
an einer der Seitenwände.
Die offene Seite des Düsenrohres mit dem beiliegenden Verschluss-Stopfen schließen.
Inbetriebnahme
Öffnen Sie nun die Absperrhähne am Adapter des Filters, indem Sie beide Hebelgriffe in Richtung der
Schlauchführung (Stellung
) umlegen.
ON
Danach den Druckschlauch
am Düsenrohr lösen und den
Wasserkreislauf wieder herstellen. Dazu eignet sich vor
allem das praktische EHEIM
InstallationsSET 1 (Best.-Nr.
4005300, 16 mm ø) oder der
EHEIM Ansauger (Best.-Nr.
4003540). Der Außenfilter
füllt sich selbsttätig mit Wasser. Dann die Schlauchverbindung wieder herstellen.
Nr. 4003540
D
o
f
o
n
IN
OU
T
Nr. 4005300
f
o
n
TIPP: Je nach der gewünschten Intensität der Oberflächen-
bewegung kann das Düsenrohr entweder unterhalb oder auf
Niveau des Wasserspiegels installiert werden.
Führen Sie die Schläuche
vom Filter aus durch die Öffnung der Schrankrückwand.
Verbinden Sie das montierte
Ansaugrohr mit der Saugseite und den Auslaufbogen mit
der Druckseite des Filters.
Achten Sie darauf, dass die
Schläuche glatt verlegt werden und keine Knicke haben. Eventuell kürzen.
TIPP:
Die Schläuche im warmem Wasser geschmeidig machen.
So lassen sich eventuelle Knicke leicht herausdrücken.
Nachdem alle Schlauchverbindungen nochmals auf Dichtheit und der Schlauchhalter auf richtigen Sitz überprüft worden ist, wird der Filter über den Netzstecker in Betrieb
genommen.
OFF
OUT
ON
IN
TIPP: Über den integriertern Absperrhahn (OUT) ist die Fil-
terleistung druckseitig stufenlos regulierbar.
ACHTUNG: Pumpenleistung darf niemals auf der Saugseite (IN) reduziert werden.
3
Wartung und Pflege
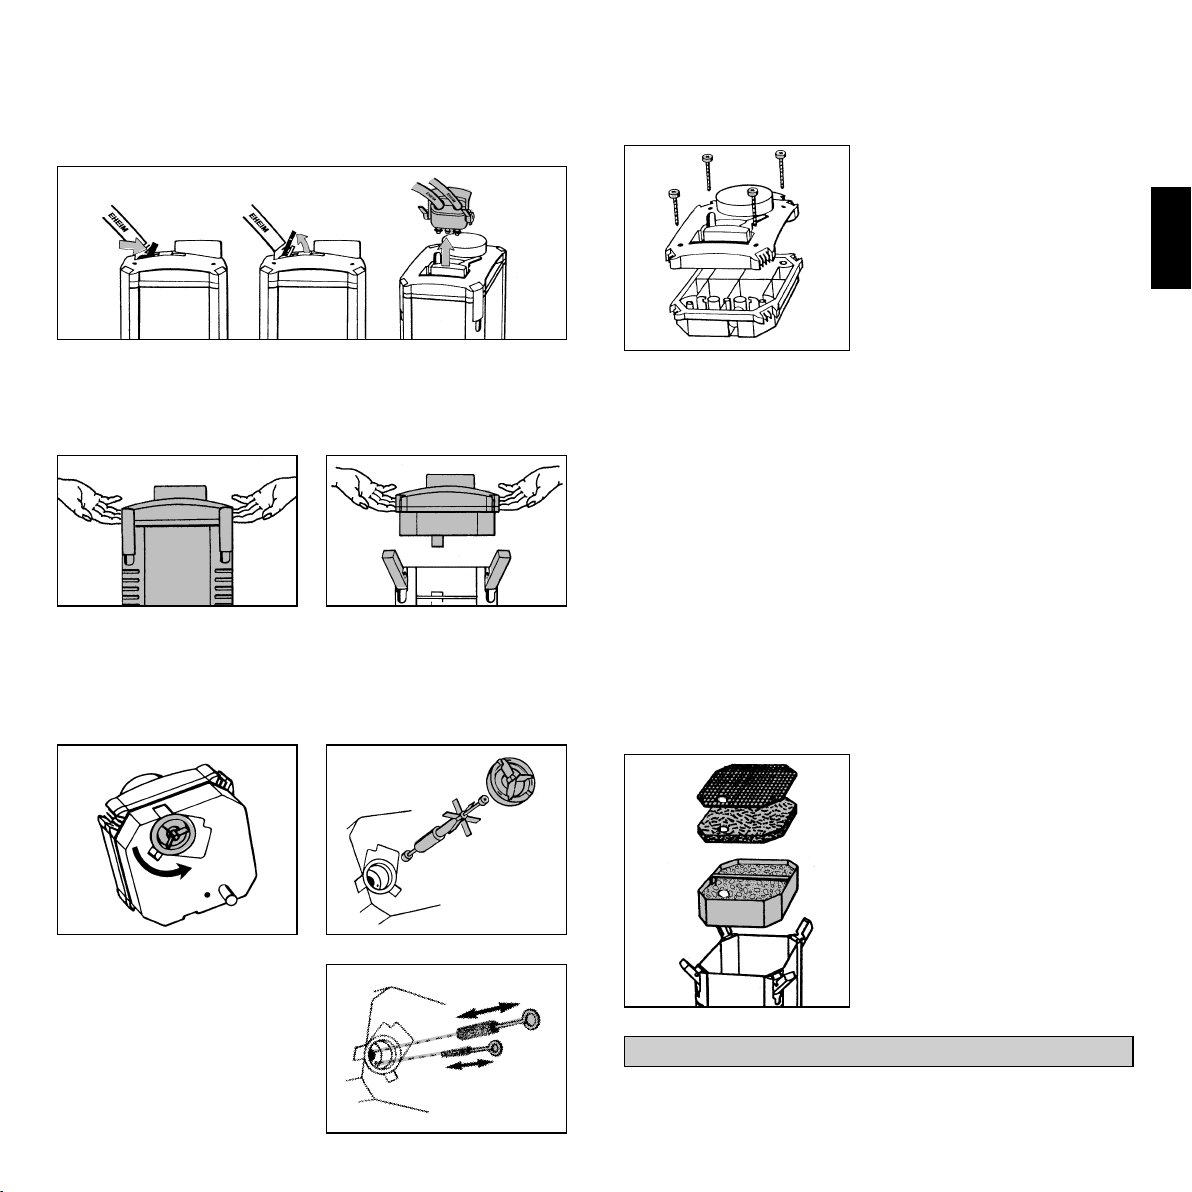
Netzstecker ziehen. Beide Absperrhebel am Adapter auf
Stellung OFF schließen. Verriegelungsbügel nach oben
schwenken und den Adapter aus dem Filteroberteil lösen.
Bei der Montage auf richtigen Sitz von Achstüllen, Pumpendeckel und Dichtring achten. Anschließend Pumpendeckel
mit Verschlussring wieder arretieren.
TIPP:
Sollte bei der Reinigung
Wasser in die Abdeckhaube
des Filteroberteils gelangt
sein, lässt sich die Haube
abschrauben und mit einem
Lappen trockenwischen.
Außenfilter an den beiden Griffmulden aus dem Schrank
nehmen. Danach alle Verschluss-Klipps öffnen und Filteroberteil abnehmen.
Zur Reinigung des Pumpenraums öffnen Sie den Verschlussring am Boden des Filteroberteils durch eine Linksdrehung.
Entnehmen Sie dann Pumpendeckel, Läufer mit Flügelrad
und Achse.
Pumpenteile und Schmierkanal mit dem EHEIM Reinigungsset Best.-Nr. 4009560
gründlich säubern. Achse
vorsichtig abspülen (Bruchgefahr!) und anschließend
Läufer wieder zusammenstecken und einsetzen.
Filtermassen:
Entnehmen Sie Abdeckgitter, Vlies und Filtereinsätze aus
dem Filterbehälter.
Spülen Sie die Filtermasse mit lauwarmem Wasser gründlich
aus – so lange, bis keine Trübung mehr erkennbar ist.
Das weiße Filtervlies dient zur mechanischen Feinfilterung
und darf nur einmal verwendet werden, da die anhaftenden Schmutzpartikel sich nicht vollständig auswaschen lassen. Neues Vlies (Best.-Nr. 2616265) verwenden.
Die blaue Filtermatte (ist im Set 1 x enthalten, Best.-Nr.
2616260) kann 2 - 3 mal wiederverwendet werden.
Vor dem Einsatz gründlich auswaschen.
TIPP:
Bei Neueinsatz von SUBSTRAT jeweils ca. 1/3 der
gebrauchten Filtermasse
mit dem neuen Material
mischen, damit sich die
Bakterienkulturen schneller vermehren.
Filter grundsätzlich nur aufrecht stehend betreiben.
Filterbehälter auswaschen und anschließend die Filtereinsätze wieder einschieben.
4
Den untersten Einsatz bis auf die Auflagestege andrücken
und auf bündigen Sitz der nachfolgenden Filtereinsätze
achten. Die Rohröffnungen der Filtereinsätze müssen dabei
übereinander liegen und mit den Gummitüllen abgedichtet
sein.
Alle 3 Dichtringe am Adapter auf Beschädigungen und
richtigen Sitz prüfen und
mit Vaseline leicht einfetten.
Adapter einsetzen und verriegeln.
Neues Filtervlies und Abdeckgitter auflegen.
Nachdem beide Absperr-
ACHTUNG: Weißes Filtervlies darf nicht unter dem Bügel
des Filtermassenkorbes eingelegt werden!
Profildichtung am Filteroberteil auf richtigen Sitz und Sauberkeit überprüfen.
Anschließend Dichtring am Filteroberteil leicht mit Vaseline einfetten. Filteroberteil auf den Filterbehälter aufsetzen.
hebel am Adapter geöffnet
sind (Stellung ON), füllt sich
der Filter wieder selbsttätig
mit Wasser und ist dann
betriebsbereit.
Anschließend Filter über den
Netzstecker wieder in Betrieb nehmen.
Die Verschluss-Klipps schließen und den Filter im Unterschrank aufstellen.
Sicherheitshinweise
Nur in geschlossenen Räumen für aquaristische Einsatzbereiche verwenden. Aquarienfilter nur für den häuslichen Gebrauch.
Bevor man mit der Hand ins Aquarienwasser eintaucht, alle im Wasser befindlichen Elektrogeräte vom Netz trennen. Vor dem Öffnen des Filters, diesen generell vom
Stromnetz trennen.
Die Anschlussleitung des Gerätes kann nicht ersetzt werden. Bei Beschädigung der Netzanschlussleitung ist das Gerät zu verschrotten. Pumpe niemals am Kabel tragen;
Kabel nicht knicken.
Dieses Gerät ist nicht dafür bestimmt, durch Personen (einschließlich Kinder) mit eingeschränkten physischen, sensorischen oder geistigen Fähigkeiten oder mangels
Erfahrung und /oder mangels Wissen benutzt zu werden, es sei denn, sie werden durch eine für Sicherheit zuständige Person beaufsichtigt oder erhielten von ihr Anweisungen, wie das Gerät zu benutzen ist. Kinder sollten beaufsichtigt werden, um sicherzustellen, dass sie nicht mit dem Gerät spielen.
20 cm
Achtung: Bei Wartungsarbeiten besteht Quetschgefahr für die Finger durch hohe Magnetkräfte.
Zu Ihrer eigenen Sicherheit empfiehlt es sich, mit dem Netzkabel eine Tropfschlaufe zu bilden, die verhindert, dass evtl. am Kabel entlang laufendes
Wasser in die Steckdose gelangt. Bei Verwendung einer Verteiler-Steckdose muss die Platzierung oberhalb des Filter-Netzanschlusses erfolgen.
Da eine Vielfalt von Lacken und Polituren bei der Holzverarbeitung verwendet werden, können die Gerätefüße, hervorgerufen durch eine chemische
Reaktion, sichtbare Rückstände auf Möbeln oder Parkettböden hinterlassen. Das Gerät sollte deshalb nicht ohne Schutz auf Holzoberflächen gestellt
werden.
Bei der Wahl des Gerätestandortes auf die Aufstellhöhe achten. Um eine optimale Funktionssicherheit zu erzielen, dürfen zwischen Wasseroberfläche
und Filterboden max. 180 cm liegen.
Achtung: Filter grundsätzlich nur aufrecht stehend betreiben.
Verbrennungsgefahr: Bei Geräten mit Heizung Vorsicht beim Berühren der Heizspirale.
Vorsichtsmaßnahmen bei Handhabung elektrostatisch entladungsgefährdeter Bauelemente beachten.
Gerät – oder Teile davon – nicht in der Spülmaschine reinigen. Nicht spülmaschinenbeständig!
Dieses Produkt nicht mit dem normalen Hausmüll entsorgen. Führen Sie es Ihrer örtlichen Entsorgungsstelle zu.
Das Produkt ist nach den jeweiligen nationalen Vorschriften und Richtlinien approbiert und entspricht den EU-Normen.
Bei diesen Geräten können Magnetfelder elektronische oder mechanische Störungen oder Beschädigungen hervorrufen. Dies gilt auch für Herzschrittmacher.
Die erforderlichen Sicherheitsabstände sind den Handbüchern dieser medizinischen Geräte zu entnehmen.
5
max.
180 cm
D
IMPORTANT SAFETY INSTRUCTIONS
WARNING – To guard against injury, basic safety precautions
should be observed, including the following.
a)
READ AND FOLLOW ALL
SAFETY INSTRUCTIONS.
b) DANGER – To avoid possible electric shock, special care
should be taken since water is employed in the use of aquarium equipment. For each of the following situations, do not
attempt repairs by yourself; return the appliance to an authorized service facility for service or discard the appliance.
SA
U
1) If the appliance falls into the water,
First unplug it and then retrieve it. If electrical components
of the appliance get wet, unplug the appliance immediately.
(Non-immersible equipment only)
2) If the appliance shows any sign of abnormal water leakage,
immediately unplug it from the power source. (Immersible
equipment only).
3) Carefully examine the appliance after installation. It should
not be plugged in if there is water on parts not intended to
be wet.
4) Do not operate any appliance if it has a damaged cord or
plug, or if it is malfunctioning or has been dropped or damag e d
in any manner.
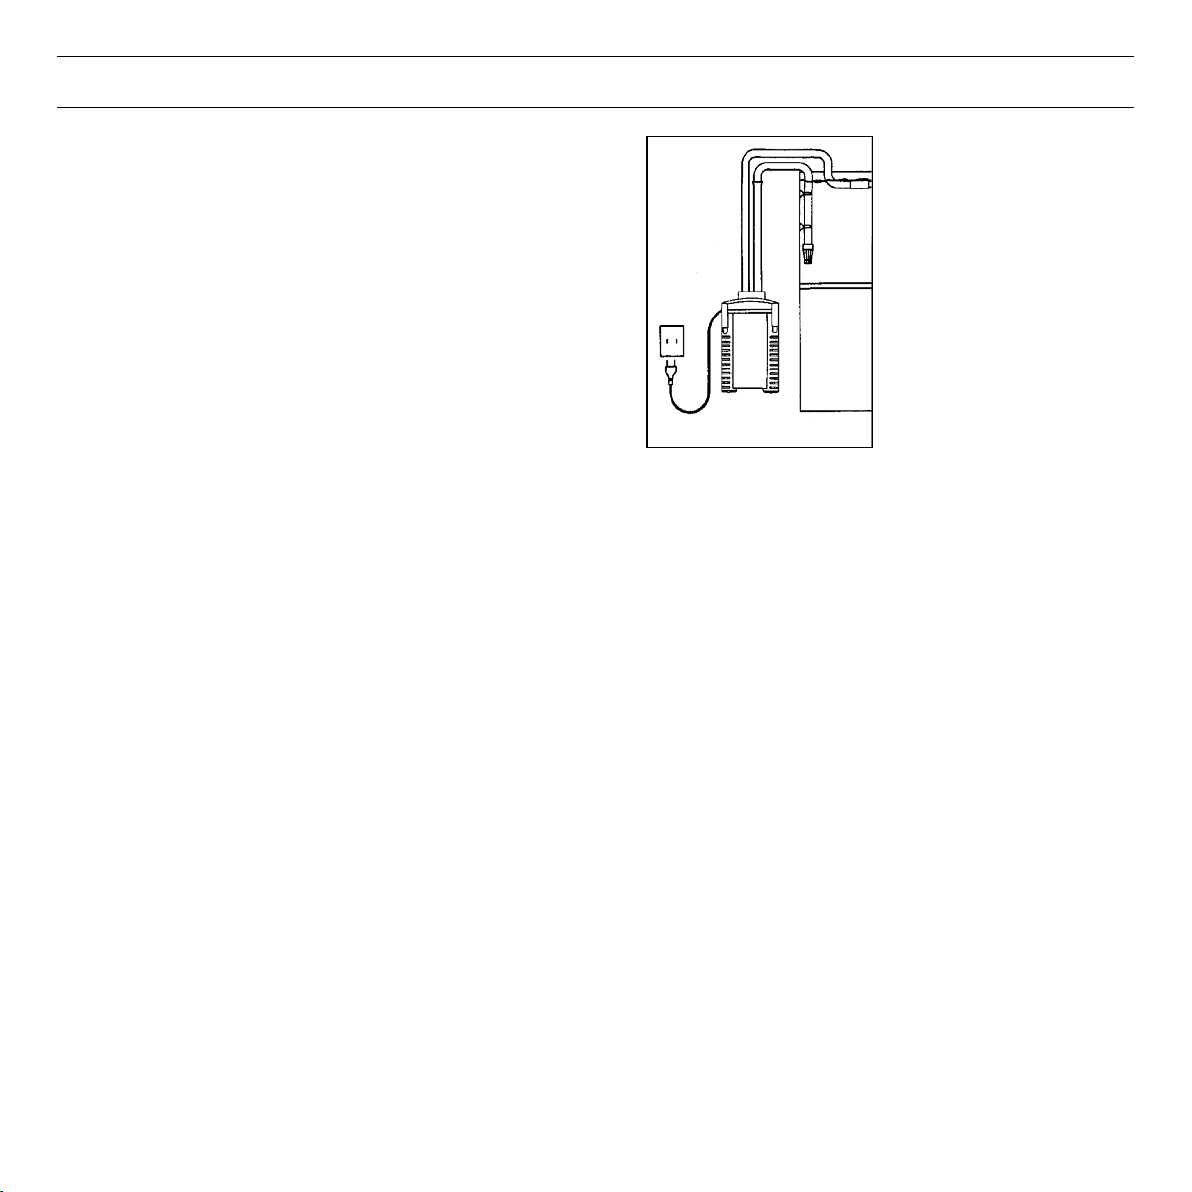
5) To avoid the possibility of the appliance plug or receptacle
getting wet, position aquarium stand and tank to one side of
a wall-mounted receptacle to prevent water from dripping onto the receptacle or plug.
A ”drip-loop”, shown in the figure below, should be arranged
by the user for each cord connecting an aquarium appliance
to a receptacle. The ”drip-loop” is that part of the cord below
the level of the receptacle, or the connector if an extension
cord is used, to prevents water traveling along the cord and
coming in contact with the receptacle.
If the plug or socket does get wet,
Disconnect the fuse or circuit breaker that supplies power
to the appliance. Then unplug and examine for presence of
water in the receptacle.
c) Close supervision is necessary when any appliance is used by
or near children.
DON’T reach for it!
DON’T unplug the cord.
DRIP LOOP
e) Always unplug an appliance from an outlet when not in use,
f) Do not use an appliance for other than intended use. The use
g) Do not install or store the appliances where it will be exposed
h) Make sure an appliance mounted on a tank is securely in -
i) Read and observe all the important notices on the appliance.
j) If an extension cord is necessary, a cord with a proper rating
k) This appliance has a polarized plug (one blade is wider than
before putting on or taking off parts, and before cleaning.
Never yank cord to pull plug from outlet. Grasp the plug and
pull to disconnect.
of attachments not recommended or sold by the appliance
manufacturer may cause an unsafe condition.
to the weather or to temperatures below freezing.
stalled before operating it.
should be used. A cord rated for less amperes or watts than
the appliance rating may overheat. Care should be taken to
arrange the cord so that it will not be tripped over or pulled.
the other). As a safety feature, this plug will fit in a polarized
outlet only one way. If the plug does not fit fully in the outlet,
reverse the plug. If it still does not fit, contact a qualified electrician. Never use with an extension cord unless plug can be
fully inserted. Do not attempt to defeat this safety feature.
Exception: This instruction may be omitted for an appliance
that is not provided with a polarized attachment plug.
d) To avoid injury, do not contact moving parts or hot parts such
as heaters, reflectors, lamp bulbs, and the like.
l)
”SAVE THESE INSTRUCTIONS”.
6
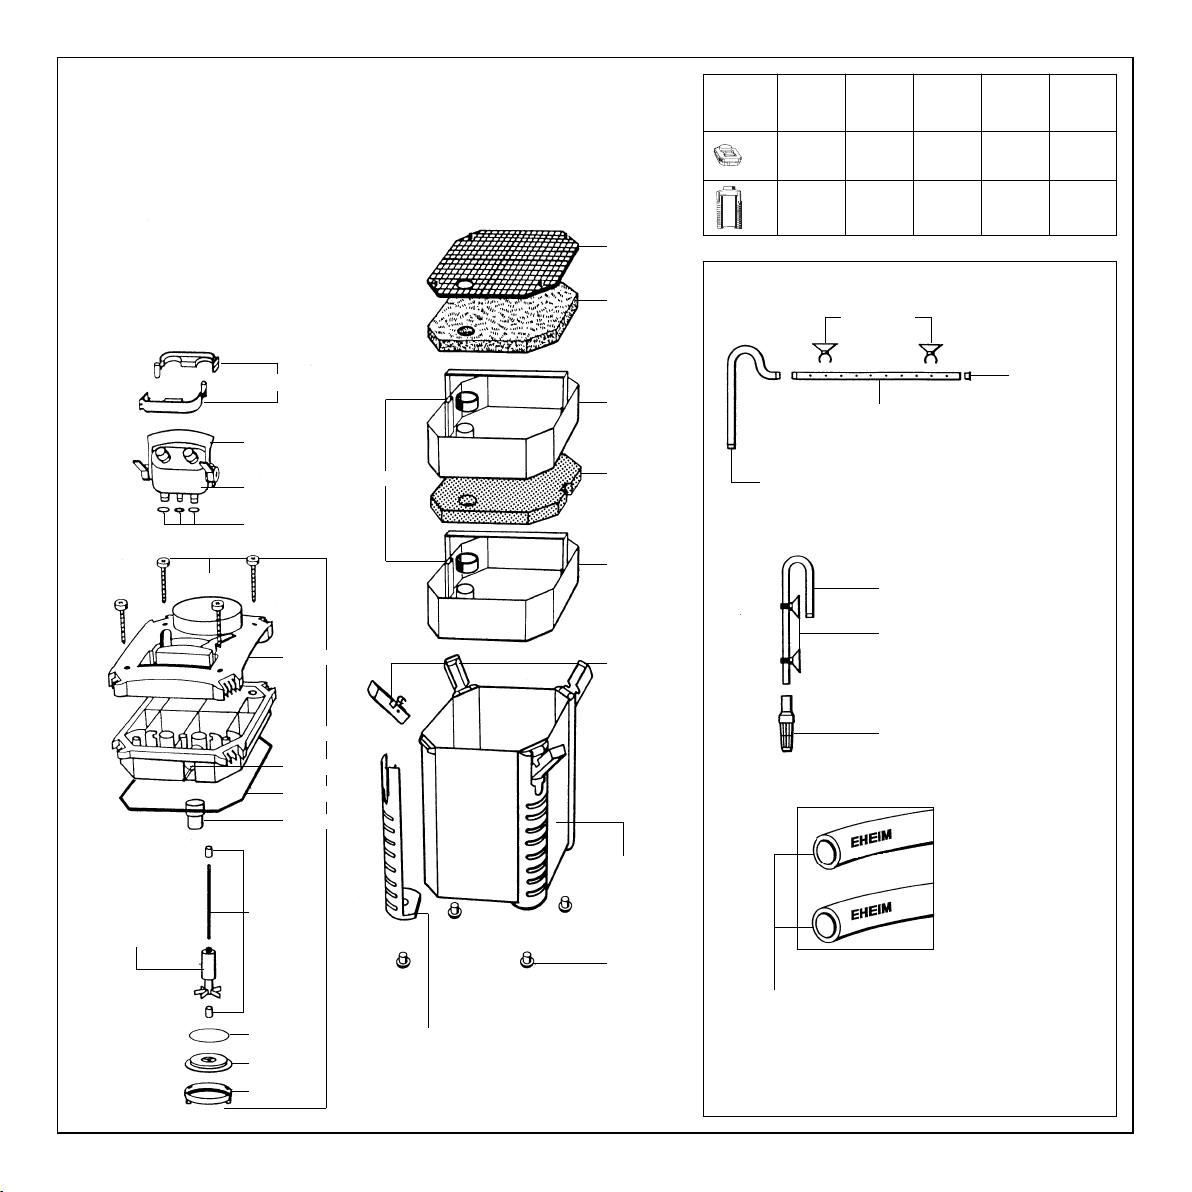
External filter 2426
Do not overfill. Do not clog flow-through pipe.
햲
Pump head
햳
Sealing gasket
햴
Input connector
햵
Lattice screen 햶Fine filter pad (white) 햷Coarse foam filter
햸
pad (blue)
tainers
tap connector
strainer
헃
Suction cups with clips 헄Tubing 헅Vaseline.
Rubber hermetic seals 햹Filter media con-
햺
EZ clips 햻Filter canister 햽Integrated double
햾
헁
Security outlet pipe 헂Spray bar and end cap
Hose clamp 햿Intake pipe 헀Intake
When unpacking, please check to ensure that all parts have
been included.
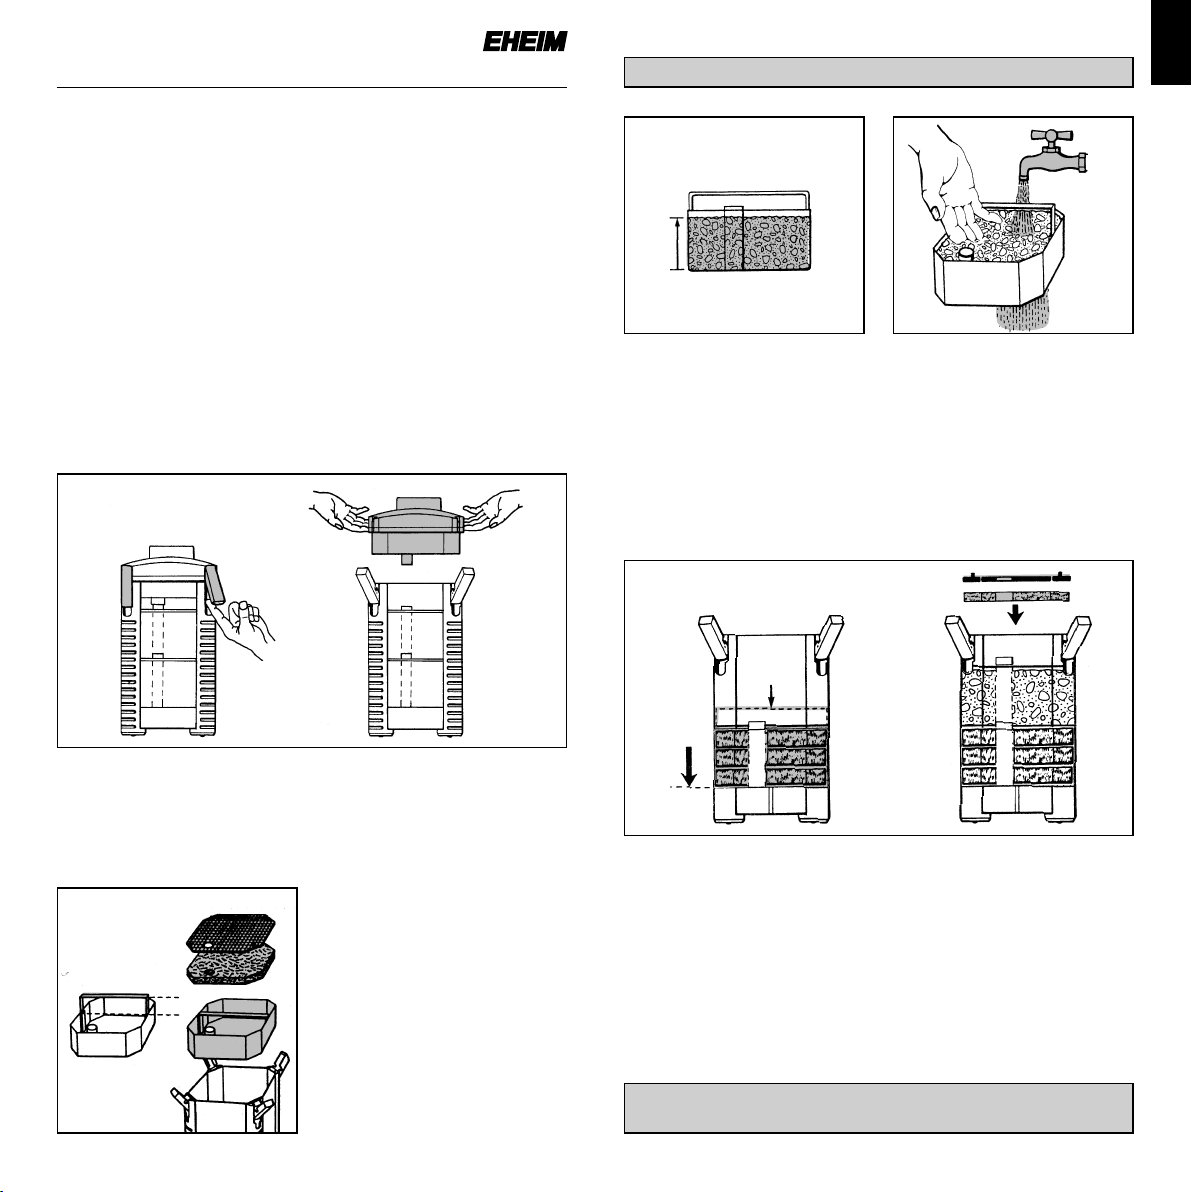
Assembly
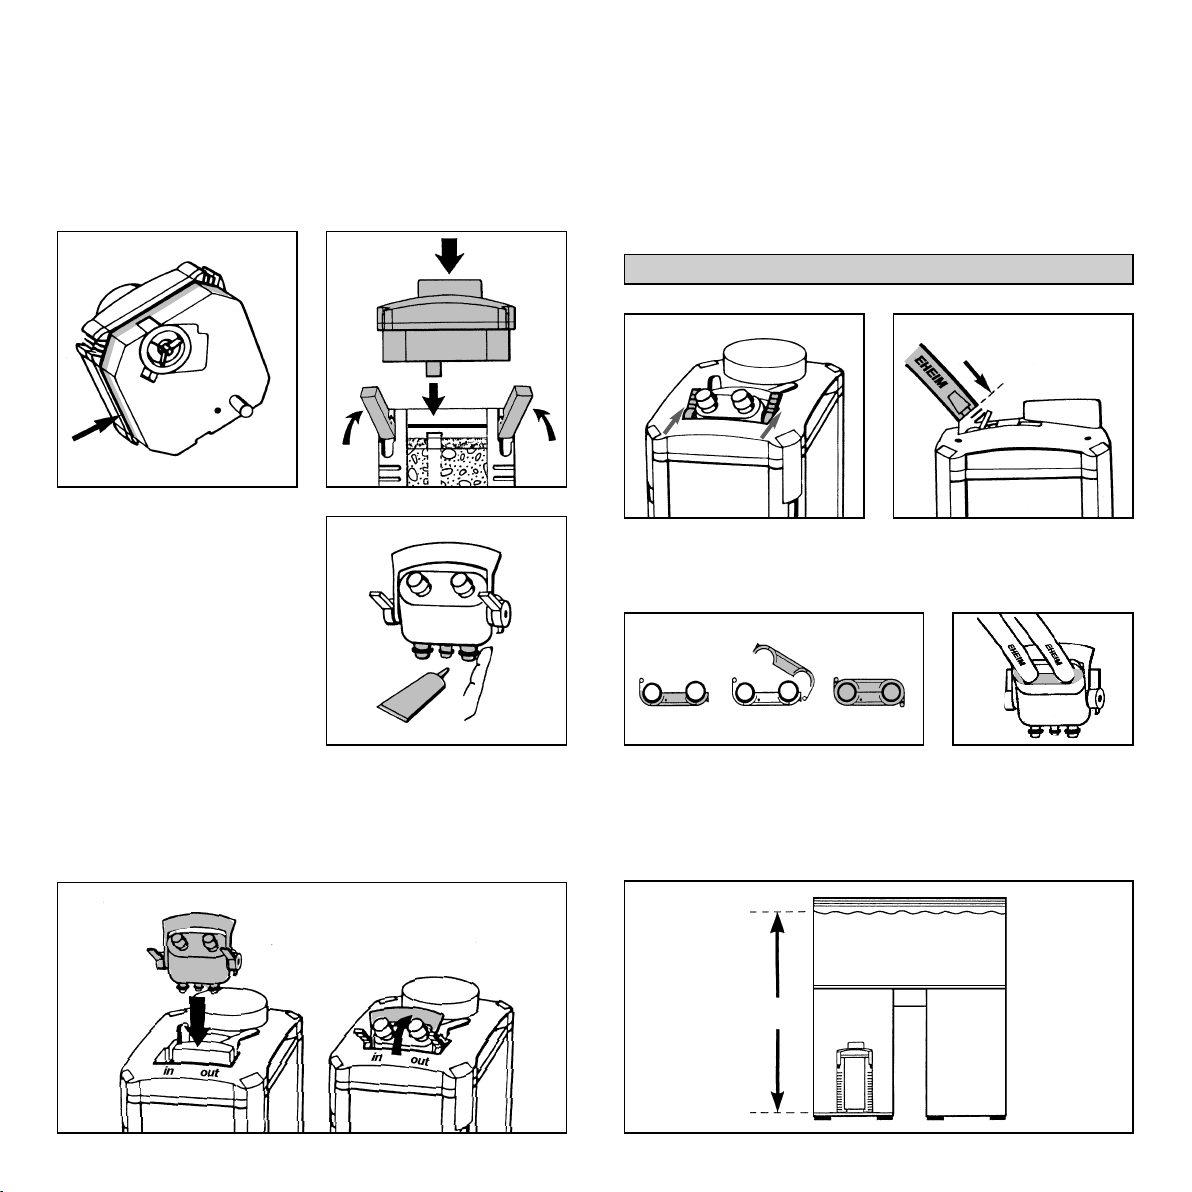
Flip all four EZ clips open and push upwards. With the help
of the two recessed lid handles, the pump head of the filter
can be easily lifted off.
GB
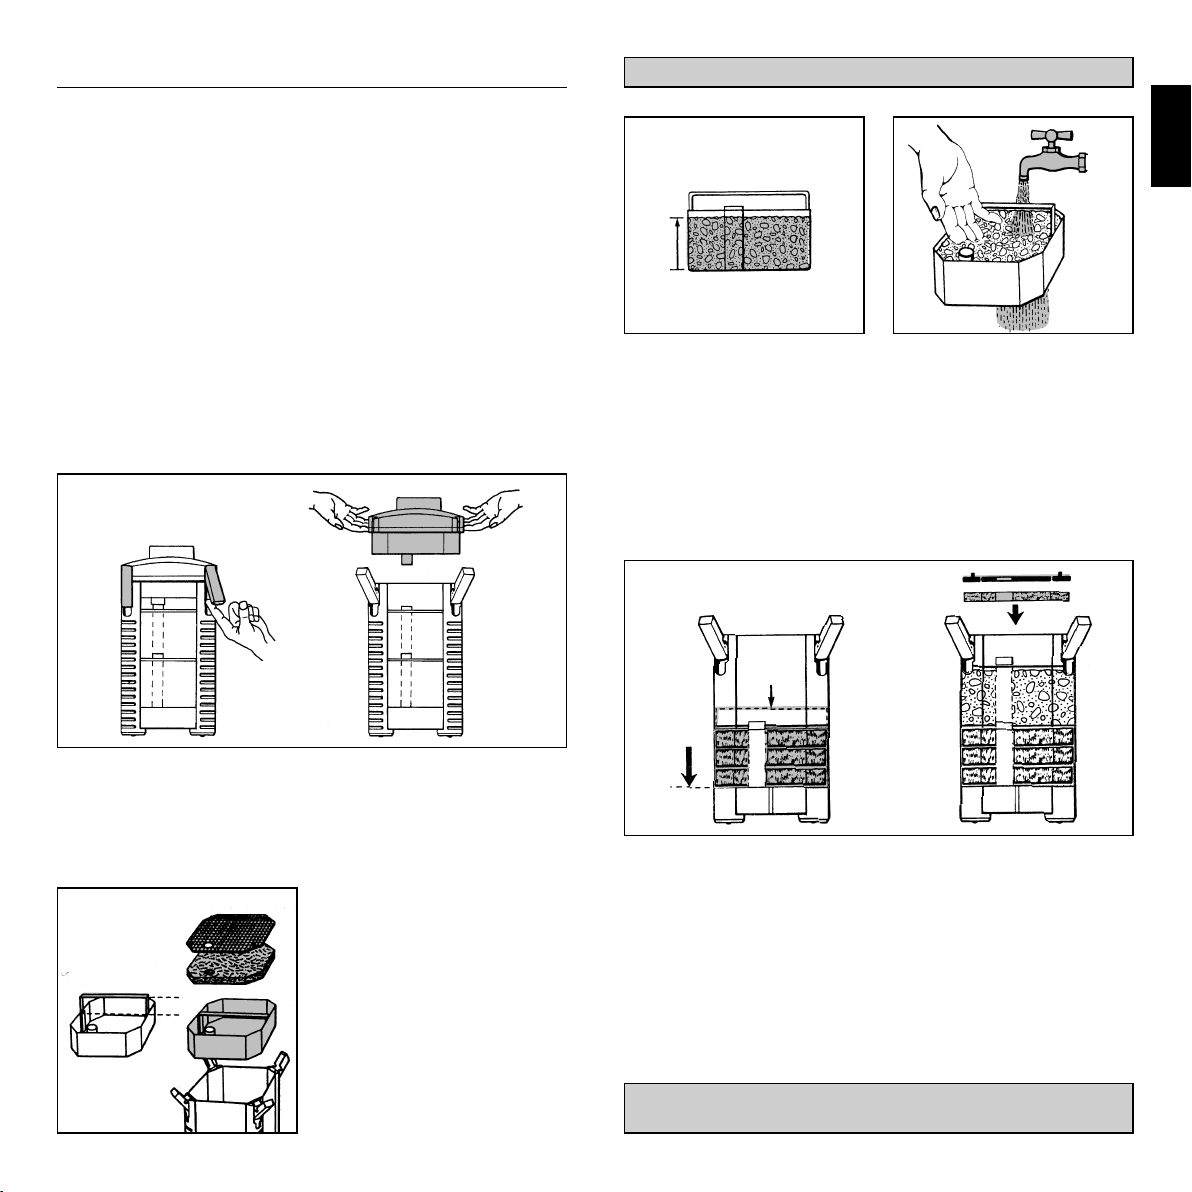
Fill the first container with EHEIM filter pads, but leave just
enough space so that the blue filter pad can be placed in
the container under the retractable handle. Fill the second
container with the biological media SUBSTRAT to just below
the edge.
Then thoroughly rinse the filter media in the containers
under running water until all cloudiness has disappeared.
Remove lattice screen and fine filter pad and take out each
media container by grabbing the retractable handles and
pulling upwards. Fill the containers with EHEIM filter media
to achieve best results.
The lower filter tank is to
be filled with EHEIM filter
pads.
Fill the second container
↕
with the biological media
SUBSTRAT to just below
the edge.
Insert the second media container in the same manner.
Make sure the flow-through pipe openings line up on top of
each other. Put second rubber hermetic seals on the upper
media container. Lower each retractable handle and ensure
that all media containers lie flush on top of each other.
Then insert the fine filter pad (white) and the lattice screen in
such a manner that the round cut-out lines up with the respective flow-through pipe opening.
ATTENTION: Fine filter pad (white) should not be placed
under the retractable handle of the media container.
7

Check to ensure that the sealing gasket on the pump head
of the filter is not soiled and that it is properly placed into
its groove.
Place the pump head onto the filter canister so that the input connector of the pump head is lined up with the input
guide of the media containers. Close all four EZ clips.
ATTENTION:
Before the integrated double tap connector is inserted into the pump head of
the filter, examine all three
o-rings for damage and correct fitting. Lightly grease
the o-rings with Vaseline to
help installation.
Tubing installation
Shut off the integrated double tap connector by shifting the
two levers to the OFF position. Push the enclosed tubing
onto the intake and output openings of the integrated double tap connector as far as they will go. Since this can be a
relatively difficult task, soak the hoses in warm water beforehand to make them softer.
It is very important to use original EHEIM hoses only.
of
f
o
n
o
f
f
o
n
Place the two-part hose clamp around the installed hoses,
hang into the proper position and clip into place.
Insert the integrated double tap connector with the locking
clamp in an upright position into the opening on the pump
head. To fasten the locking clamp into its sealed position
push the handle downwards.
Place the now ready-to-use filter into the lower cabinet of your
aquarium stand and observe the prescribed installation
height: between water surface and base of filter there should
be max. 180 cm (5’11’’) in order to attain optimum functioning.
max. 180 cm
8
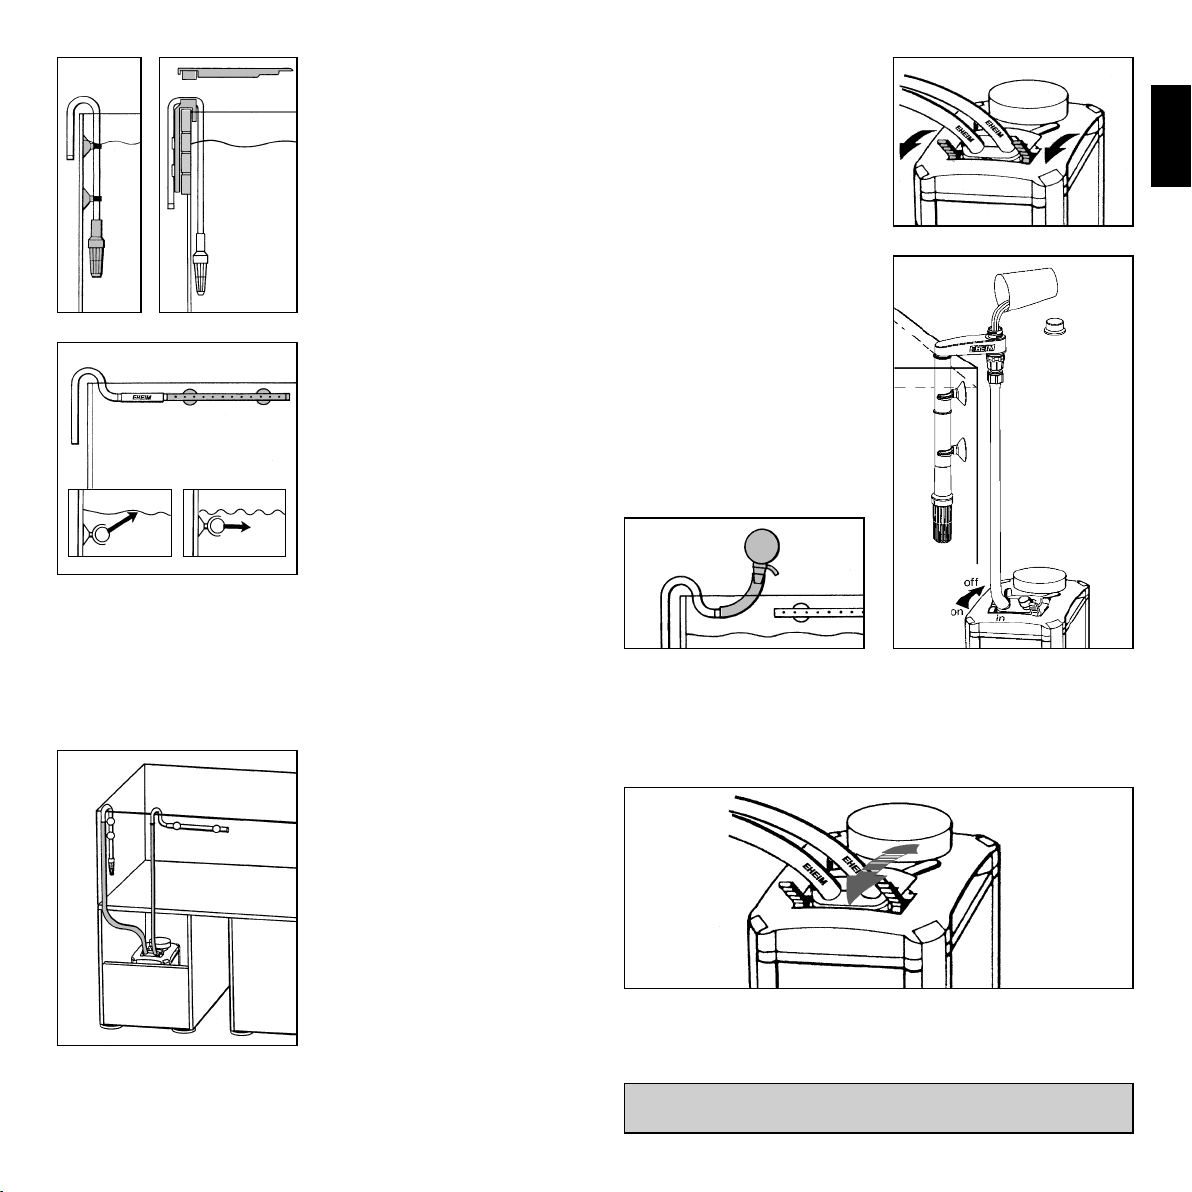
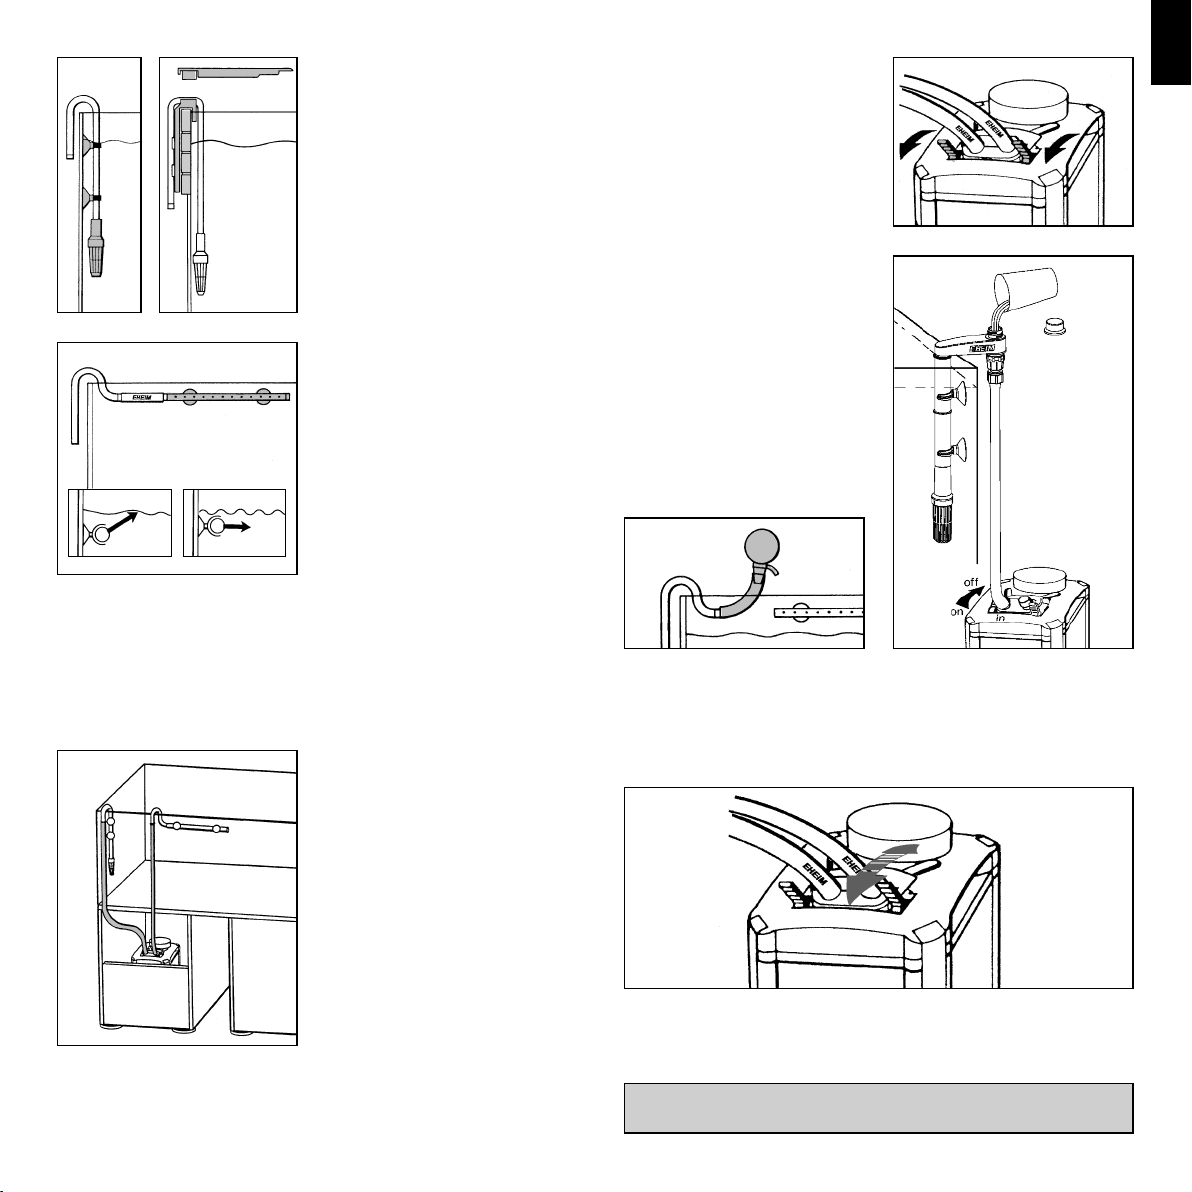
Attach the intake strainer to
the intake tube and fasten it
onto the interior glass of the
tank with two clips and suction cups.
Note: When using with an
EHEIM professio nel hood,
the intake pipe is simply
clipped into place and you
don’t need the suction cups.
Connect the security outlet
pipe and spray bar with a
short piece of tubing and
install in the aquarium with
the clips and suction cups.
Place on the rear or on one
of the sides of the tank,
depending on available dimensions.
Close the open side of the spray bar with the enclosed
end cap.
Setting into operation
Open the taps of the integrated double tap connector by shifting both levers
to position ON. Separate
the output hose from the
spray bar and suck strongly
on the hose, to establish the
sy-phon.
Alternatively use the EHEIM
Universal Installation Kit 1
(diam. 16 mm, order no.
4005300) or the suction device (order no. 4003540).
The canister will then automatically fill up with water.
Reconnect the hose to the
spray bar.
No. 4003540
o
f
o
n
N
I
OU
o
T
No. 4005300
f
n
GB
TIP: The spray bar can either be installed below water level
or just above the surface, depending on whether you wish
to have oxygen-rich surface movement or not.
Guide the hoses from the
filter outwards, through the
opening in the aquarium cabinet, and connect the installed intake pipe and output pipe according to the
respective tubing diameters.
To achieve an even flow, be
sure that the tubing is laid
out smoothly and has no
kinks; if necessary, shorten
them.
TIP: If you lay the tubing into warm water for some time
beforehand, they will become soft and possible kinks can
be easily squeezed out.
Once again check all the connections for watertightness.
Then set the filter into operation by connecting the
mains plug of the pump head.
OFF
OUT
ON
IN
Note: The water flow from the pump can be controlled by
using the tap only on the pressure side (OUT).
ATTENTION: Never reduce the pump output by closing
the tap on the suction side (IN).
9

Maintenance and Servicing
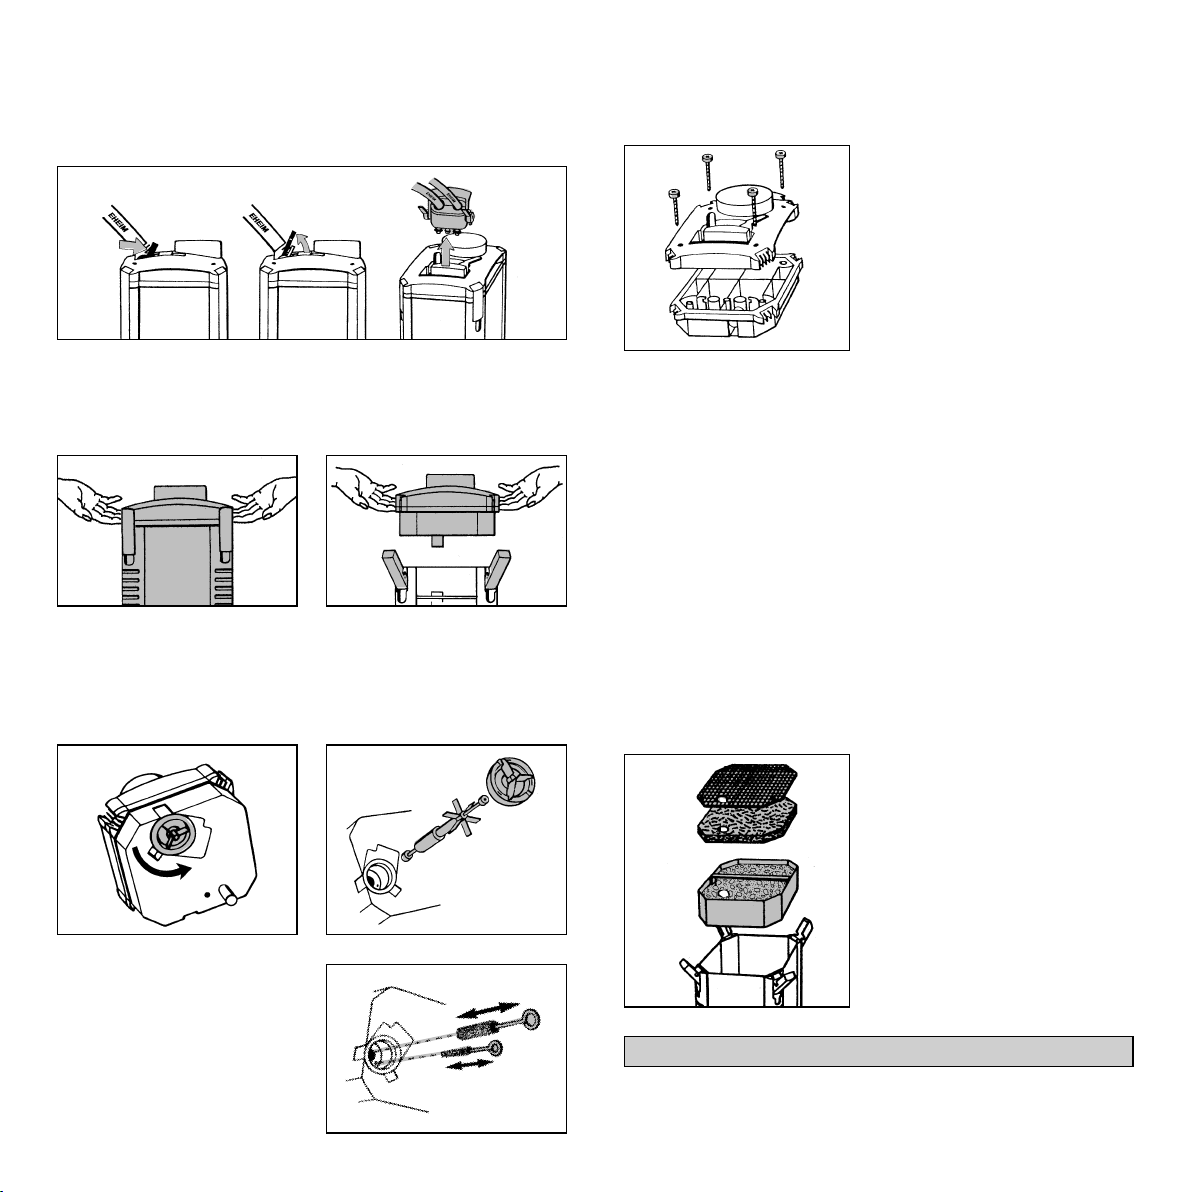
Remove mains plug. Close both tap levers (position OFF).
Swing the locking clamp upwards and then remove the integrated double tap connector from the pump head of the filter.
Pay attention to the proper fit of the shaft bushings, lid and
sealing ring.
Lock pump cover by turning clockwise.
TIP:
If cleaning water should get
into the cover element of the
pump head of the filter, the
cover can be unscrewed
and wiped dry with a cloth.
Take the filter out of the cabinet by using the two recessed
lid handles. Open all EZ clips and remove the pump head
from the canister.
In order to clean the pump chamber, turn the pump head
upside down and open the sealing ring by turning it anticlockwise. Then remove the pump cover, impeller and
shaft.
Clean all pump parts, impeller chamber and lubrication
channel with EHEIM cleaning
set (no. 4009560). Carefully
rinse off shaft (risk of breakage!), then put impeller back
together again and insert into proper position.
Filter media:
Remove the lattice screen, filter pads and media containers
from the filter canister.
Thoroughly wash out the filter media with used aquarium
water – until no more clouding can be seen.
The fine filter pad (white) serves as mechanical fine filtration
and should only be used once since adhering dirt particles
cannot be washed out completely.
Use new pad, order no. 2616265!
The blue filter pad (1 x included in set, order no. 2616260)
can be reused up to 2-3 times.
TIP:
When renewing the SUBSTRAT media (the fine
pores get clogged up with
time), retain 1/3 of used filter medium and mix with
new material to speed-up
bacteria recolonization.
Filter must always be operated in an upright position only.
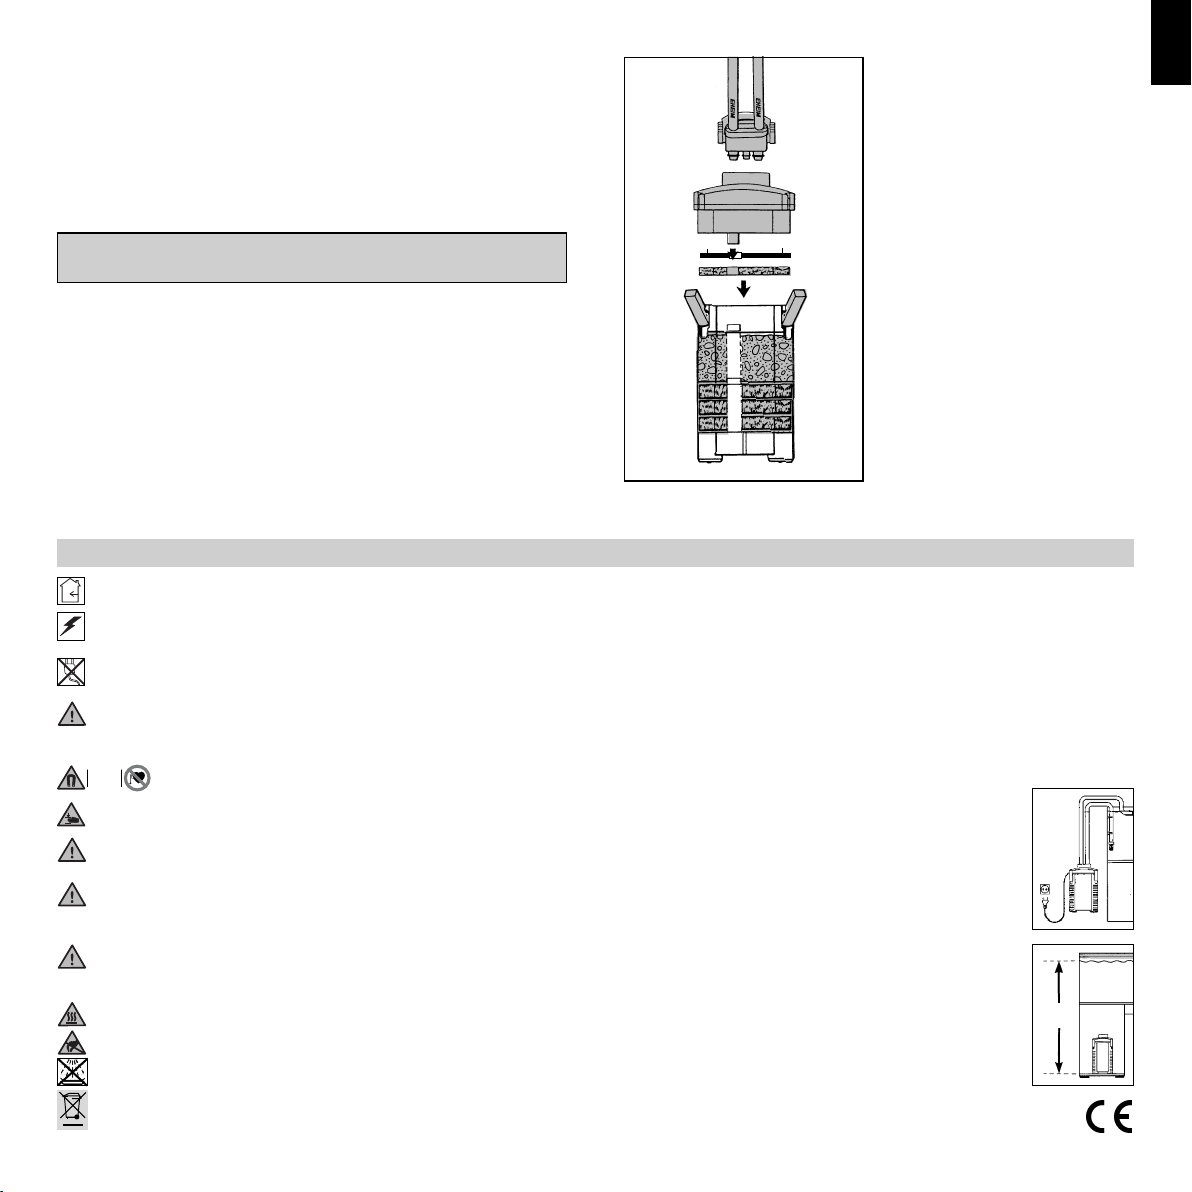
Wash out the filter canister. Then place the media containers
back in position.
10
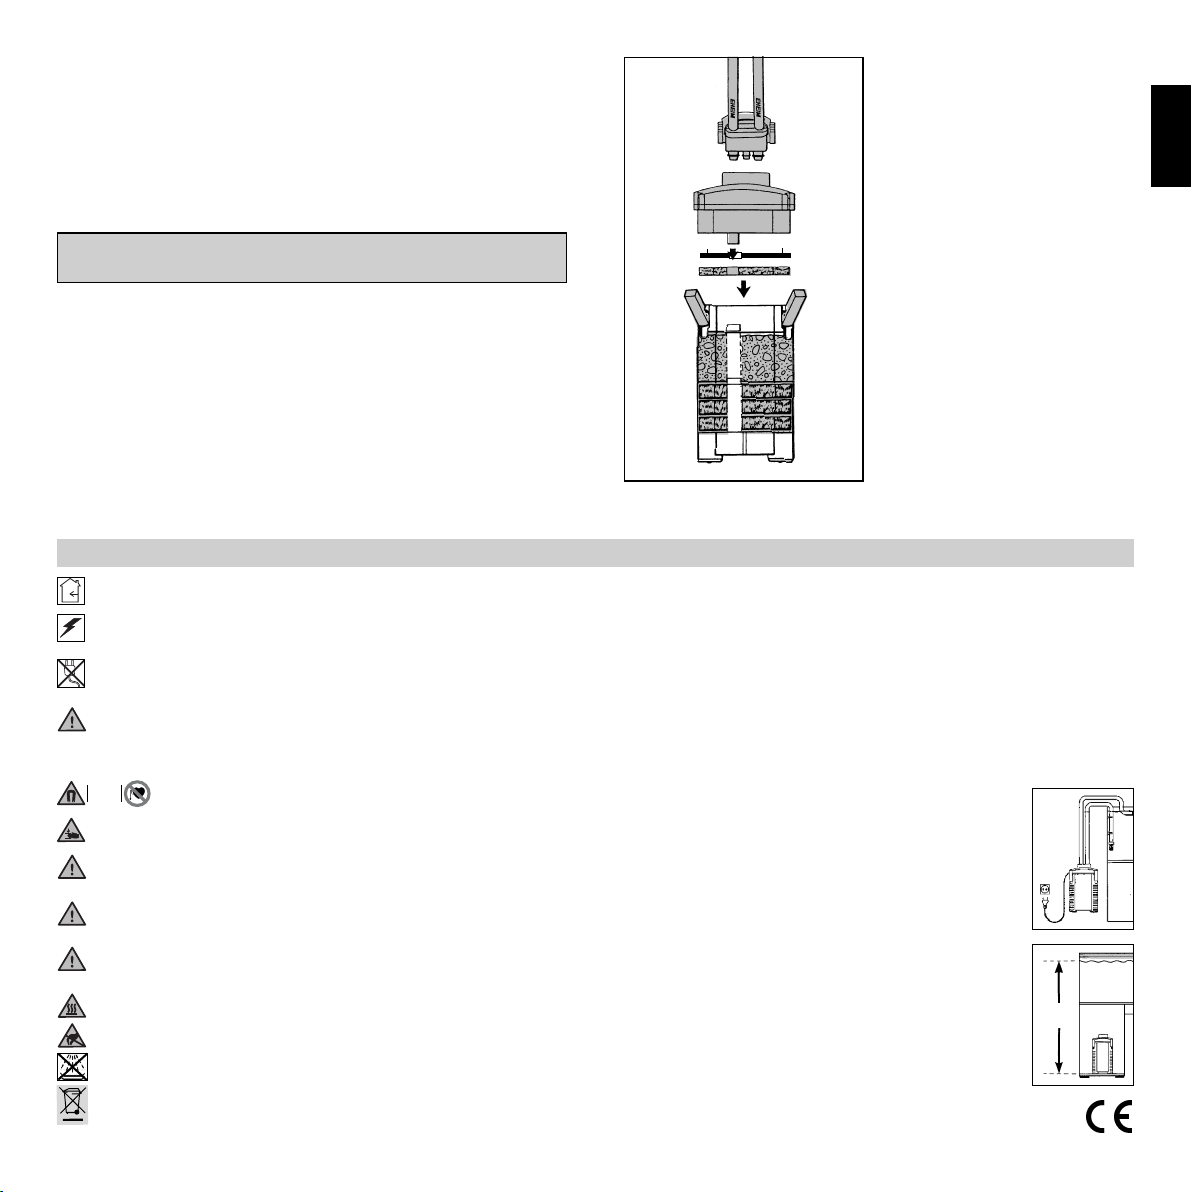
Press the first one down to the support frame and be sure
that the following media containers have a flush fit. In the
process, the pipe openings of the media containers must lie
on top of each other and the rubber seals must be correctly fitted on the openings so as to achieve a hermetic seal.
Insert a new filter pad and cover it with the lattice screen.
ATTENTION: Fine filter pad (white) should not be placed
under the retractable handle of the media container.
Check to ensure that the sealing gasket of the pump head
fits properly and is clean.
Examine all three o-rings on
the double tap connector for
damage and correct fitting
and lightly grease them with
Vaseline; insert and lock in
place.
After both of the tap levers
on the integrated double tap
connector have been opened (position ON), the filter
will automatically fill up
again with water and will be
ready for operation.
GB
Then lightly lubricate the sealing gasket of the pump head
with Vaseline. Place the pump head on the filter canister,
close the EZ clips and place the filter into the cabinet.
Set the filter into operation
by connecting the mains
plug.
Safety instructions
For indoor use only. For use with aquariums. The aquarium filter is for domestic use only.
All electrical equipment in the water must be disconnected from the mains during care and maintenance work. It is imperative to disconnect the filter from the mains prior to
opening it.
The connecting line of this device can not be replaced. In case of damage to the power cord, the device is to be scrapped. Never carry the pump by the cable; do not bend the
cable.
This equipment is not intended for use by persons (including children) with limited physical, sensory or mental abilities or for persons with no experience or knowledge unless
they are supervised by a person responsible for safety or unless they have received from such a person instructions on how to use the equipment.
Children should be supervised to ensure that they do not play with the equipment.
20 cm
Attention: Maintenance work presents the risk of crushing th fingers due to high magnetic forces.
For your own safety, we recommend to form a drip loop with the connection cable to prevent any water running along the cable from intruding into the
socket. When using a multiple socket or an external power supply unit, position them atop the filter’s power connection.
Since a wide variety of varnishes and polishes are used when processing timer, the appliance feet can leave visible traces on furniture or parquet floors
as a result of chemical reactions. Therefore the device should not be placed on unprotected wooden surfaces.
To achieve optimal operational safety there must be a maximum of 180 cm between the surface of the water and the bottom of the filter.
Attention: Filter must always be operated in an upright position only.
Burning danger! Be careful when touching the heating coil of devices with integrated heater.
Take the necessary precautions when handling components that can discharge static electricity.
Do not clean the unit – or parts of it – in the dishwater. Not dishwater resistant!
Do not dispose of this product as normal household waste. Take it to your local refuse collection side.
The product is qualified in accordance with the respective national regulations and guidelines and meets EC standards.
Notice: These devices produce magnetic fields which might cause electronic and mechanical disturbances or damages. This also refers to pacemakers. Please consult the manuals of medical equipment for the required safety margins.
11
max.
180 cm
Filtre extérieur 2426
햲
Partie supérieure du filtre 햳Logement du joint 햴Tubu-
햵
lure
(bleu)
de ferme ture
d’arrêt
pine
chets
Grille 햶Ouate filtrante (blanche) 햷Mousse filtrante
햸
Joints en caoutchouc 햹Paniers de filtration 햺Clip
햻
햾
헁
Embout coudé 헂Tube de rejet 헃Ventouses à cro-
헄
Tuyaux 헅Vaseline.
Cuve du filtre 햽Connexion avec robinets
Fixation pour tuyau 햿Canne d’aspiration 헀Cré-
En déballant, prière de contrôler si aucune pièce ne manque.
Montage
Faire basculer les quatre clips de fermeture vers l’extérieur et les
pousser vers le haut. A l’aide des deux poignées intégrées, soulever la tête motrice du filtre.
Ne pas trop remplir, ne pas obstruer le conduit tubulaire.
Positionner ce premier panier dans la cuve du filtre en l’enfonçant fortement jusqu’à ce qu’il repose sur les barrettes d’appui.
Le fait que le panier rentre en force garanti le passage de l’eau
par les masses filtrantes et non le long des parois de la cuve.
Rabattre la poignée escamotable. Remplir le deuxième panier de
SUBSTRAT pratiquement jusqu’au bord puis le placer dans
Enlever la grille et la ouate filtrante.
Retirer les paniers de filtration les uns après les autres, vers le
haut, grâce aux poignées escamotables.
Remplir les compartiments
inférieurs du filtre avec les
tapis de filtration EHEIM.
Remplissez le deuxième
↕
panier avec la masse filtrante SUBSTRAT.
la cuve en faisant bien attention d’aligner les orifices des tubes
des différents paniers, n’oubliez pas de mettre les joints au
sommet de chacun d’entre eux afin d’assurer l’étanchéité du
conduit ainsi formé.
Rabattre la poignée escamotable. Positionner la ouate filtrante
blanche au dessus du dernier panier en veillant à ce que l’orifice soit bien placé au dessus du tube. Terminez par la grille,
ergots dirigés vers la tête motrice.
Attention: Ne jamais placer la ouate filtrante blanche au
dessous de la poignée rétractable du panier de filtration.
12
Contrôler que le joint de la partie supérieure du filtre ne soit
pas sale et que ce dernier soit parfaitement en place dans sa
rainure.
Poser la partie supérieure sur la cuve du filtre, la tubulure de la
tête motricedevant impérativement être enfoncée dans le guidetube des paniers filtrants. Fermer les quatre clips de fermeture.
Attention:
Avant d’insérer la connexion
avec robinets doubles intégrés dans la tête motrice,
examinez les trois joints à la
base de la pièce et assurezvous qu’ils soient bien en
place et en bon état, graissez
les légèrement avec de la
vaseline pour faciliter l’installation.
Installation des tuyaux
Pour fermer les robinets d’arrêt, pousser les deux manettes
de la connexion (position OFF). Introduire les tuyaux joints sur
les tubulures de la connexion jusqu’à la butée.
Pour faciliter cette opération assouplir auparavant les tuyaux
dans de l’eau chaude.
N’utiliser que les tuyaux d’origine EHEIM.
of
f
o
n
o
f
f
o
n
Placer la fixation de tuyau, constituée de deux parties, autour
des tuyaux et la clipser. Veiller à ce que la dimension du diamètre du tuyau soit exacte.
F
Enfoncer complètement la connexion, l’étrier de verrouillage vers
le haut, dans l’orifice prévu à cet effet dans la partie supérieure
du filtre et fermer l’étrier de verrouillage en appuyant simultanément sur la con nexion jusqu’à enclenchement de l’ensemble.
Une fois cette opération effectuée, placer le filtre dans le meuble
et respecter la hauteur de mise en place prescrite: il faut qu’il
y ait au max. 180 cm entre la surface de l’eau et le fond de la
cuve du filtre afin d’obtenir un fonctionnement normal.
max. 180 cm
13
Fixer la crépine et la canne
d’aspiration et les mettre en
place avec les deux ventouses à crochets contre la paroi
in-térieure de l’aquarium.
Remarque: Lorsqu’on utilise le
module pour aquarium EHEIM
professionel 7656450 destiné
aux filtres extérieurs, on se
contente de fixer la canne d’aspiration avec des clips.
Raccorder l’embout coudé et
le tube de rejet par un petit
morceau de tuyau et les positionner dans l’aquarium à
l’aide des ventouses à crochets.
SeIon les dimensions de l’aquarium, on les place, soit sur
la paroi arrière, soit sur l’une
des parois latérales.
Fermer l’extrémité du tube de rejet avec le bouchon joint.
Mise en marche
Ouvrir les robinets d’arrêt de
la connexion du filtre en poussant les deux manettes en
direction des tuyaux. (Position
ON).
Séparer ensuite le tuyau de
refoulement du tube de rejet et
amorcer la circulation d’eau,
de préférence à l’accessoire
universel d’installation 1 pour
la zone d’aspiration (EHEIM –
réf. 4005300, diamètre 16
mm) ou à l’aide de la poire
d’aspiration (réf. 4003540).
La cuve se remplit automatiquement, reconnecter le tuyau au tube de rejet.
No. 4003540
o
f
o
n
N
I
OU
o
T
No. 4005300
f
n
Conseil:
Selon l’intensité du mouvement que l’on souhaite avoir à la
surface, le rejet peut être installé, soit au dessous, soit au dessus du niveau d’eau.
Faire passer les tuyaux en
partant du filtre par l’ouverture arrière du meuble et raccordez les en fonction des
diamètres des tuyaux cor respondants, à la canne d’aspiration et à l’embout coudé du
rejet.
Veiller à ce que les tuyaux
soient posés bien droit et qu’ils
ne forment pas de coudes; les
raccourcir le cas échéant.
Conseil: Si vous faites tremper auparavant les tuyaux quelque temps dans l’eau chaude, ils deviennent plus souples et
d’éventuels coudes peuvent se redresser facilement.
Après avoir contrôlé une nouvelle fois l’étanchéité de tous
les raccords de tuyau, mettre le filtre en marche à l’aide
de la prise, au secteur.
OFF
OUT
ON
IN
Conseil: Le débit d’eau de la pompe peut être contrôlé en utilisant le robinet de sortie (OUT).
Attention: Ne jamais réduire le débit en utilisant le robinet
d’entrée (IN).
14
Entretien et soin
Retirer la prise. Fermer les deux robinets d’arrêt de la connexion (position OFF). Faire basculer l’étrier de verrouillage vers le
haut et dégager la connexion de la partie supérieure du filtre.
Au cours du montage, veiller à ce que les coussinets de l’axe, le
couvercle de la pompe et le joint d’étanchéité soient en place
correctement.
Ensuite, verrouiller à nouveau
la chambre de la pompe avec
la bague de fermeture.
Retirer du meuble le filtre extérieur en le prenant par les deux
poignées intégrées. Ouvrir tous les clips de fermeture et retirer
la partie supérieure du filtre.
Pour nettoyer la chambre de la pompe, déverrouiller la bague
de fermeture située sur la partie interne de la tête motrice en la
faisant tourner vers la gauche. Enlever ensuite le couvercle de
la pompe, la turbine et l’axe.
Nettoyer soigneusement les
pièces de la pompe et le canal
de refroidissement à l’aide du
jeu de nettoyage EHEIM (réf.
4009560). Rincer l’axe avec
précaution (fragile: céra mique!)
et enfin, réassembler et remettre en place l’ensemble.
Conseil:
Si, au cours du nettoyage, de
l’eau pénétrait dans le couvercle de la partie su pé rieure
du filtre, on peut le dévisser
et le sécher avec un chiffon.
Masses filtrantes
Enlever de la cuve du filtre la grille, la ouate et les paniers filtrants.
Rincer soigneusement la masse filtrante à l’eau courante – jusqu’à ce que l’on ne voit plus du tout d’eau trouble.
La ouate filtrante blanche sert à la filtration mécanique et ne doit
être utilisée qu’une seule fois; en effet, les particules de saleté
qui se sont collées ne peuvent pas être éliminées complètement
au nettoyage.
Utiliser une ouate neuve, réf. 2616265! La mousse filtrante
bleu (1x dans le set, réf. 2616260) peut être utilisée 2 à 3
fois. La laver soigneusement avant l’utilisation.
Conseil:
Lorsqu’on remet de le SUBSTRAT neuf, mélanger environ 1/3 d’ancienne masse
filtrante au matériau neuf ainsi que les cultures de bactéries se développeront plus
rapidement à l’intérieur du
nouveau matériau filtrant.
Ne faire marcher le filtre qu’en position verticale.
Nettoyer la cuve du filtre et, ensuite, réintroduire les paniers
filtrants.
15
F
Veiller à ce que les paniers soient bien enfoncés, emboités
les uns sur les autres et que les orifices des paniers soient
bien les uns sur les autres, sans oublier les joints de caoutchouc qui permettent l’étanchéité.
Attention de ne pas trop remplir les paniers. Poser la ouate
filtrante neuve et la grille.
Examinez les trois joints à la
base de la pièce et assurezvous qu’ils soient bien en
place et en bon état, graissez
les légèrement avec de la
vaseline; mettre en place et
verrouiller la connexion.
Attention: Ne jamais placer la ouate filtrante blanche au
dessous de la poignée rétractable du panier de filtration.
Contrôler si le joint de la partie supérieure du filtre est propre
et correctement mis en place.
Graisser légèrement le joint d’étanchéité avec de la vaseline.
Poser la partie supérieure du filtre sur la cuve, fer mer avec les
clips de fermeture et mettre en place le filtre dans le meuble.
Une fois que les deux manettes de fermeture de l’adaptateur sont ouvertes (position ON), le filtre se remplit de
nouveau automatiquement
d’eau et est prêt à fonctionner.
Remettre le filtre en marche à
l’aide de la prise, au secteur.
Consignes de sécurité
Usage intérieur exclusivement. Destiné à être utilisé uniquement en aquariophilie. Filtre aquarium pour usage domestique.
Avant de plonger la main dans l’eau de l’aquarium, retirer les prises électriques de tous les appareils installés dans l’eau. Avant d’ouvrir le filtre, le débrancher entièrement
du secteur.
La ligne de raccordement de l’appareil ne peut pas être remplacée. En cas d’endommagement du cordon d’alimentation, mettez l’appareil à la feraille. Ne portez jamais la
pompe par le cable; ne pliez pas le cable.
Cet appareil n’est pas destiné à être utilisé par des personnes (enfants y compris) aux capacités physiques, sensorielles ou intellectuelles limitées ou dépourvues d’expérience ou de connaissance, à moins qu’elles ne se trouvent sous la surveillance d’une personne responsable de la sécurité ou obéissent à ses recommendations sur la manière d’utiliser l’appareil. Veillez surveiller les enfants afin de pouvoir être certain qu’ils ne jouent pas avec l’appareil.
20 cm
Attention: en cas de travaux de maintenance, risque de coincement en raison de forces magnétiques élevées.
Pour votre propre sécurité, nous vous recommandons de former un col de cygne avec le câble pour éviter que l’eau s’écoulant éventuellement de long du
câble ne pénètre dans la prise. En utilisant par exemple une multiprise, celle-ci doit être placée plus haut que la prise de secteur du filtre.
Vu que le traitement du bois fait appel à un grand nombre de laques et vernis, les pieds de l’appareil, sous l’effet d’une réaction chimique, peuvent laisser des résidus visibles sur les meubles ou des parquets. Il ne faudra pas poser l’appareil sur des surfaces en bois sans intercaler une protection entremise.
Au moment de choisir l’emplacement de votre appareil, tenez compte de la hauteur d’installation. Afin d’obtenir une sécurité de fonctionnement optimale, une distance maximale de 180 cm entre la surface de l’eau et le fond du filtre doit être respectée. Attention: Faire systématiquement marcher le
filtre en position verticale.
Risque de brûlure! Usez de prudence au toucher du serpentin de chauffage des appareils chauffants.
Respecter les indications de sûreté en manipulant des éléments de construction qui risquent des décharges électrostatiques.
Ne nettoyez pas cet appareil – ou les pièces qui le composent – au lave-vaisselle. Ne résiste pas au lave-vaisselle.
Ne pas jeter le présent produit à la poubelle. Ramenez-le à votre lieu de décharge locale.
Le produit est autorisé à l’emploi conformément aux réglementations et directives nationales respectivement en vigueur. Il respecte les normes adoptées par l’Union européenne.
Remarque: avec ces appareils, des champs magnétiques peuvent provoquer des troubles ou des détériorations électroniques et mécaniques. Ceci est également
valable pour les stimulateurs cardiaques. Les distances nécessaires de sécurité doivent être relevées dans les manuels de ces appareils médicaux.
16
max.
180 cm
 Loading...