

Page 1
1
EHEAR E2
SHENZHEN EHEAR TECHNOLOGIES CO., LTD
www.EHEAR.com.cn
User Menual For
Model E2
APP
Page 2

2
EHEAR E2
Visit www.EHEAR.com.cn for more info
Notice:The User manual was according to VIDO V1.0, Guests are advised
to check our website for updates.
Page 3
3
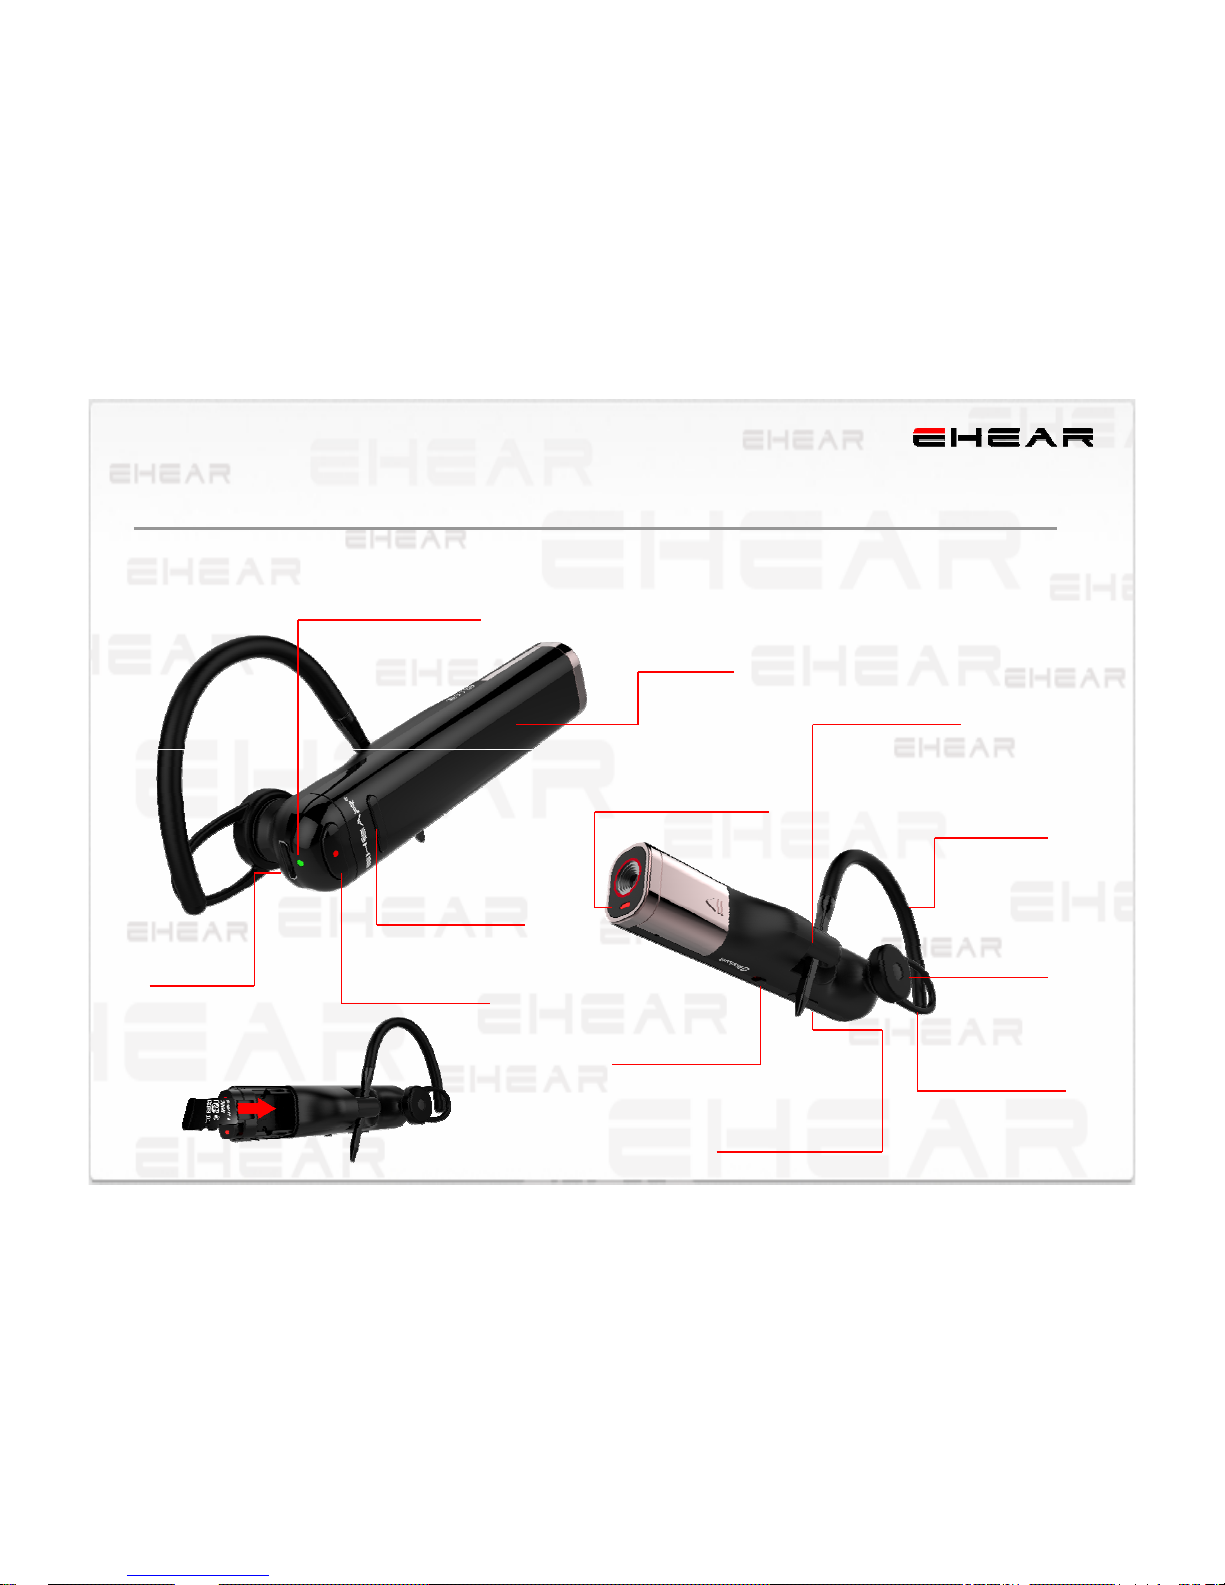
E2 Controls Overview
BOOM
Status Light (Green)
USB Port
Record Button
Call Button
Record Light (Red)
Power switch
Earloop
Loop of Earbud
Earloop Base
Earbud
Instant Clip button
Page 4
4
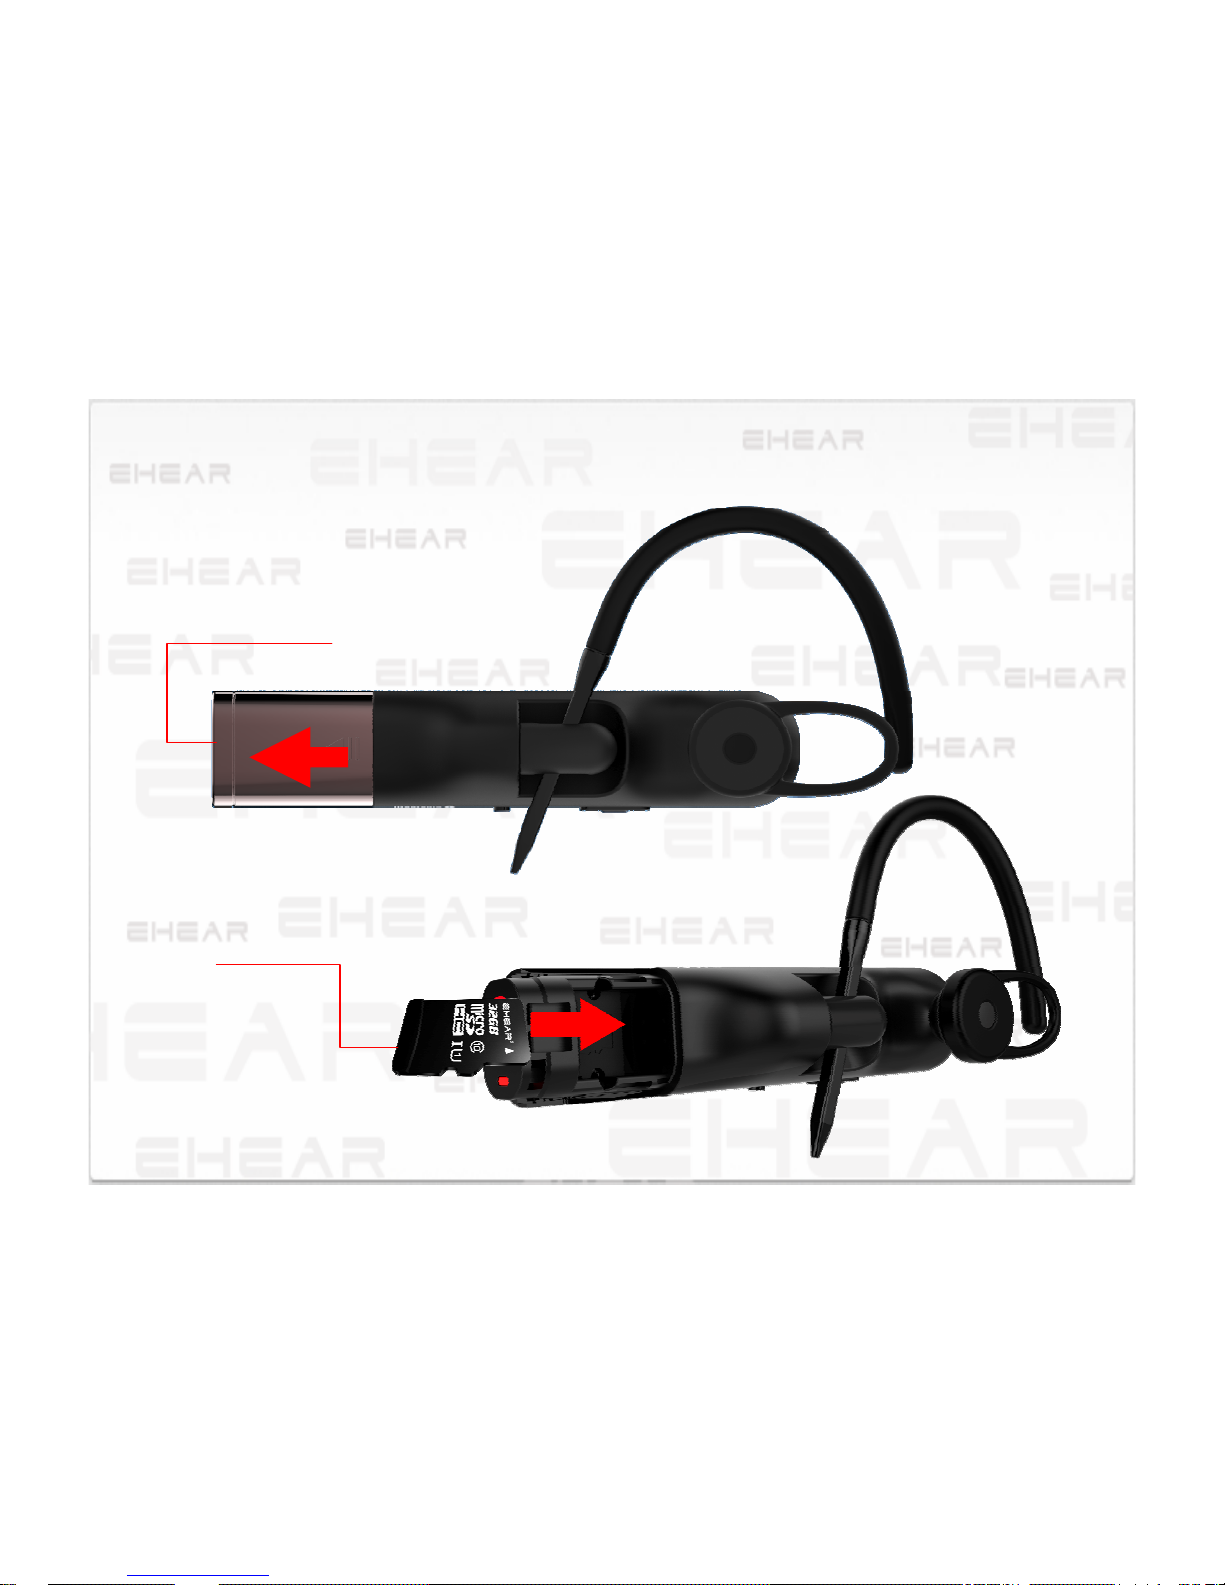
TF card cover
SLIDE
TF card
Using T-Flash Card
Maximum 64GB
Page 5
5
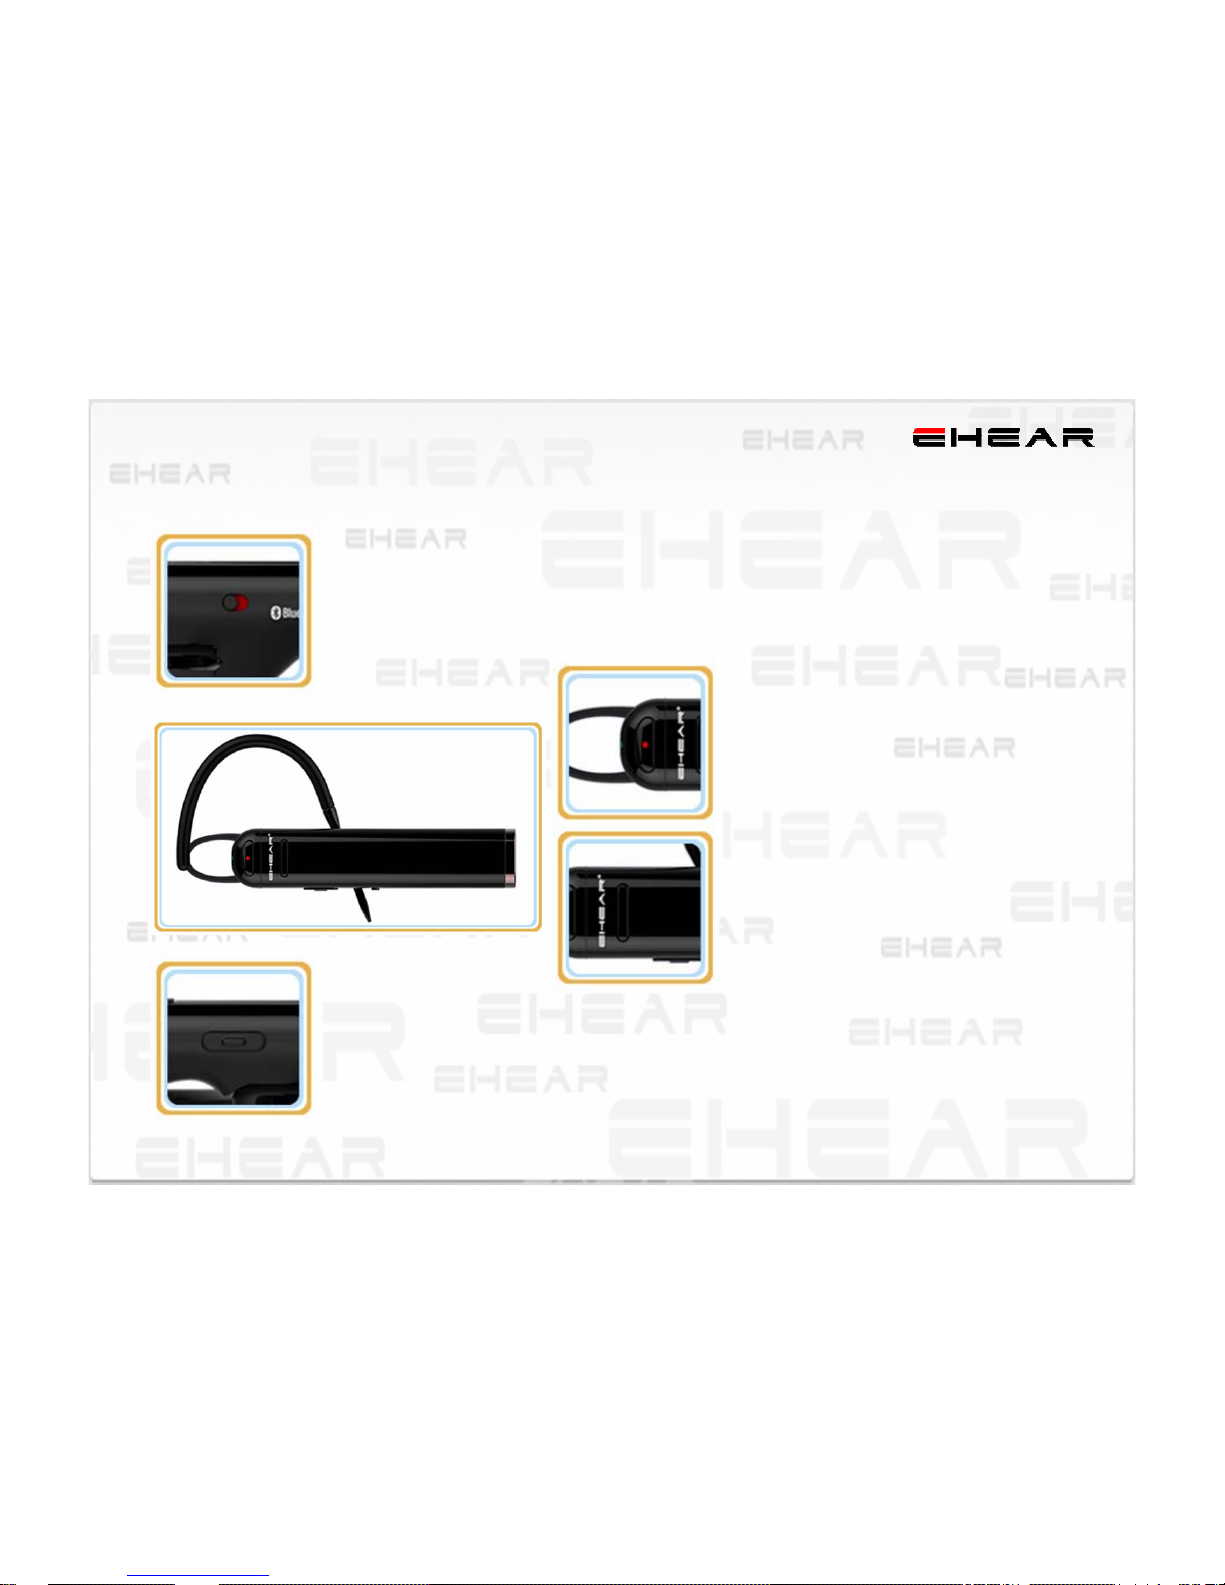
Basic E2 Controls
Power switch
Slide to power on\/off .(Shows green when switched on.)
Record button
Press to start/stop recording.
Instant Clip button
¾ Press and release to create an Instant Clip.
¾ Press and hold for approximately 2 seconds to create an Instant
Clip to your instant share favorite.
Go to Settings in the EHEAR app to set up instant sharing.
Call button
¾ Press to answer/end a phone call.
Page 6
6
Getting Started
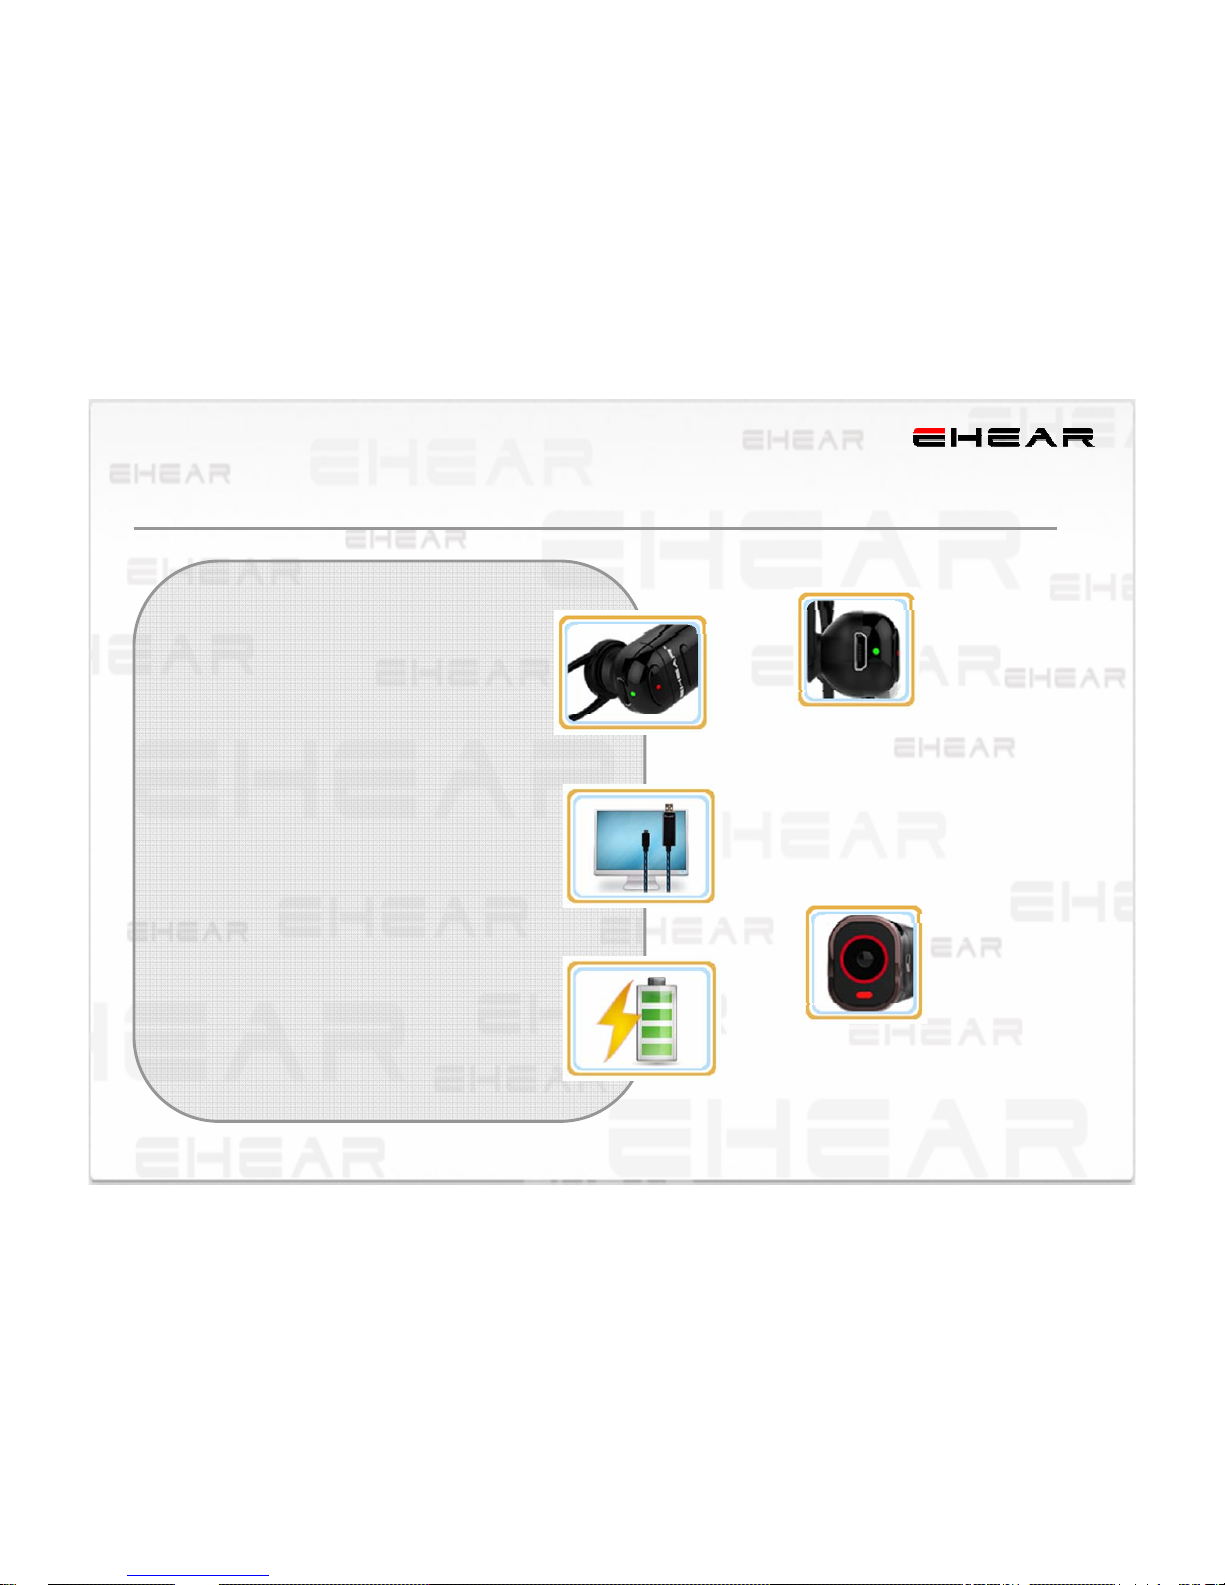
Charging Your E2
Charge your E2 for 2 hours before using it
the first time.
Using a Computer or Power Adapter or
Power Back
¾ Power ON E2 prior to charging.
¾ Plug one end of the USB Cable into
the USB Port on E2, and the other
end into a computer USB Port or a
power adapter or a power back.
Note: Average charging time is around 3 -
4 hours.
Power adapter sold separately on
www.EHEAR.com.cn
Status light (green)
¾ Flashes green while
charging.
¾ Stays green once the
battery is fully charged.
¾ Blinks green when EHEAR
is powered on.
Record light (red)
Glows red while recording.per 3s
Page 7
7
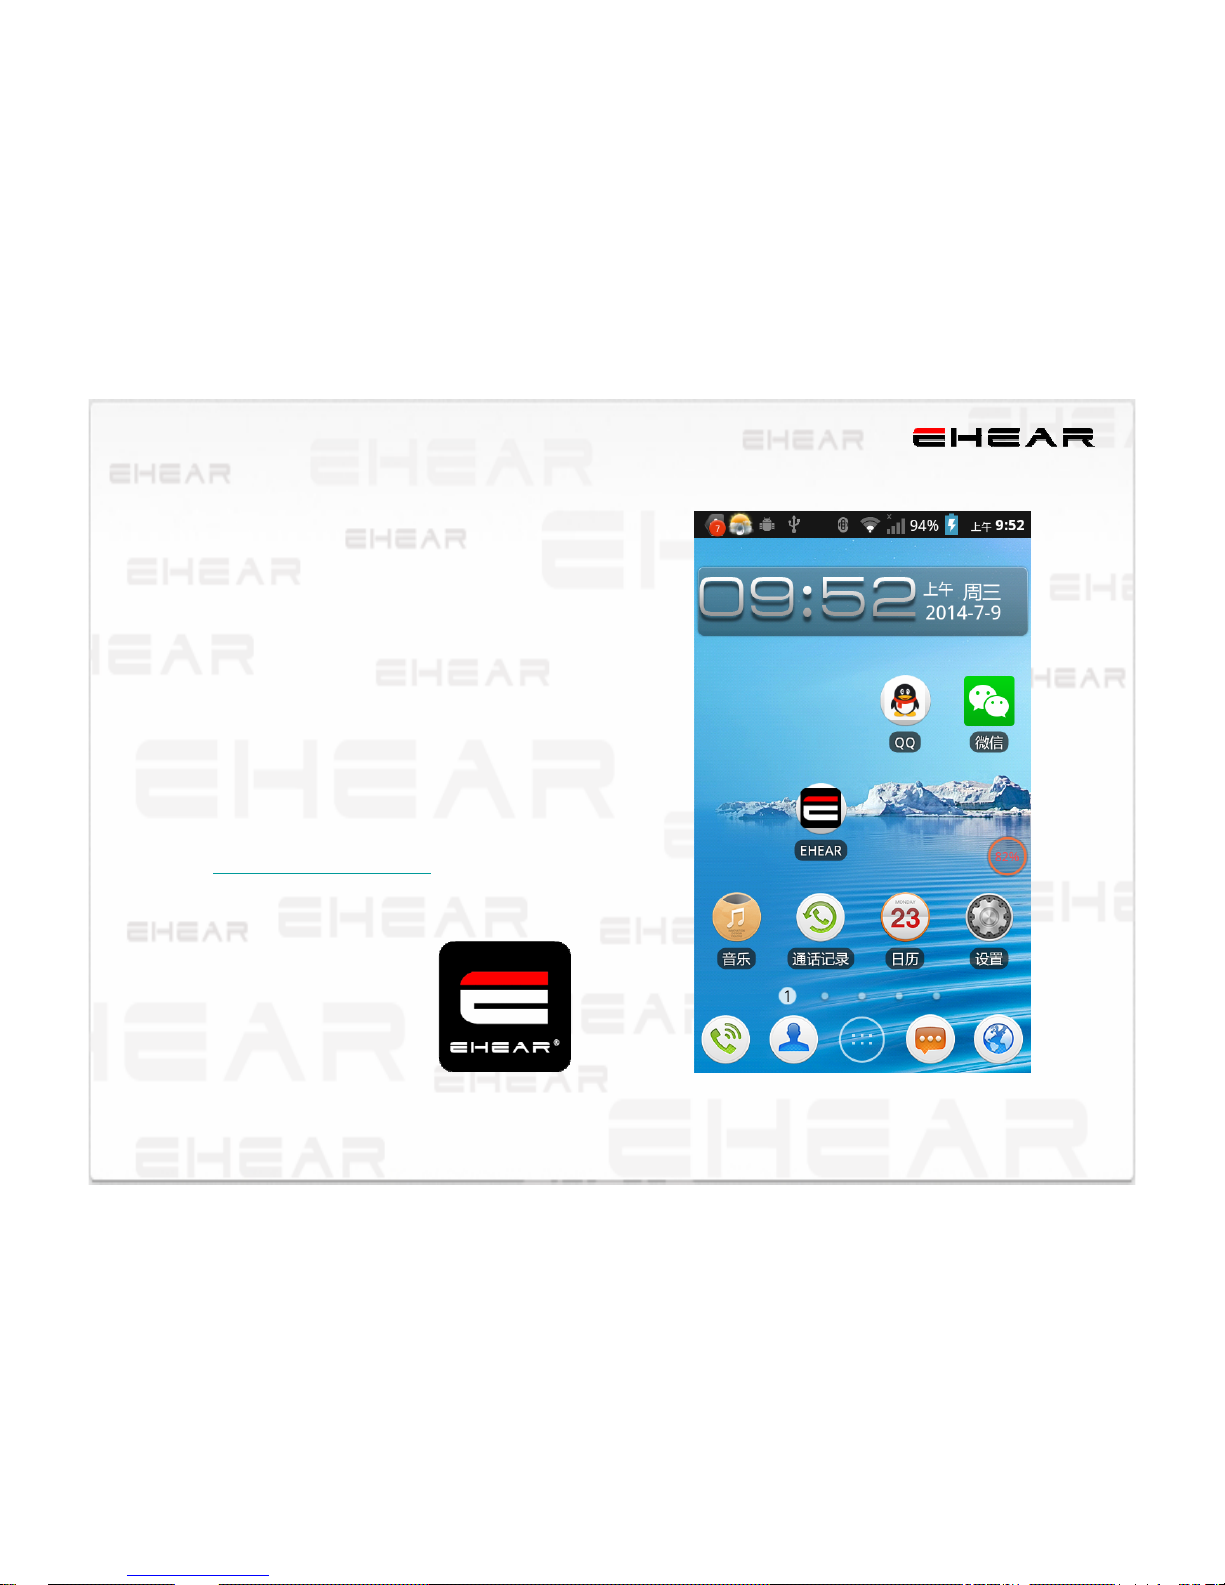
Downloading the VIDO
Apps
Use the EHEAR apps to preview, edit, and
share your video clips.
Where to Download
¾ Android Market
¾ www.EHEAR.com.cn
¾ Your Distributor
Page 8
8
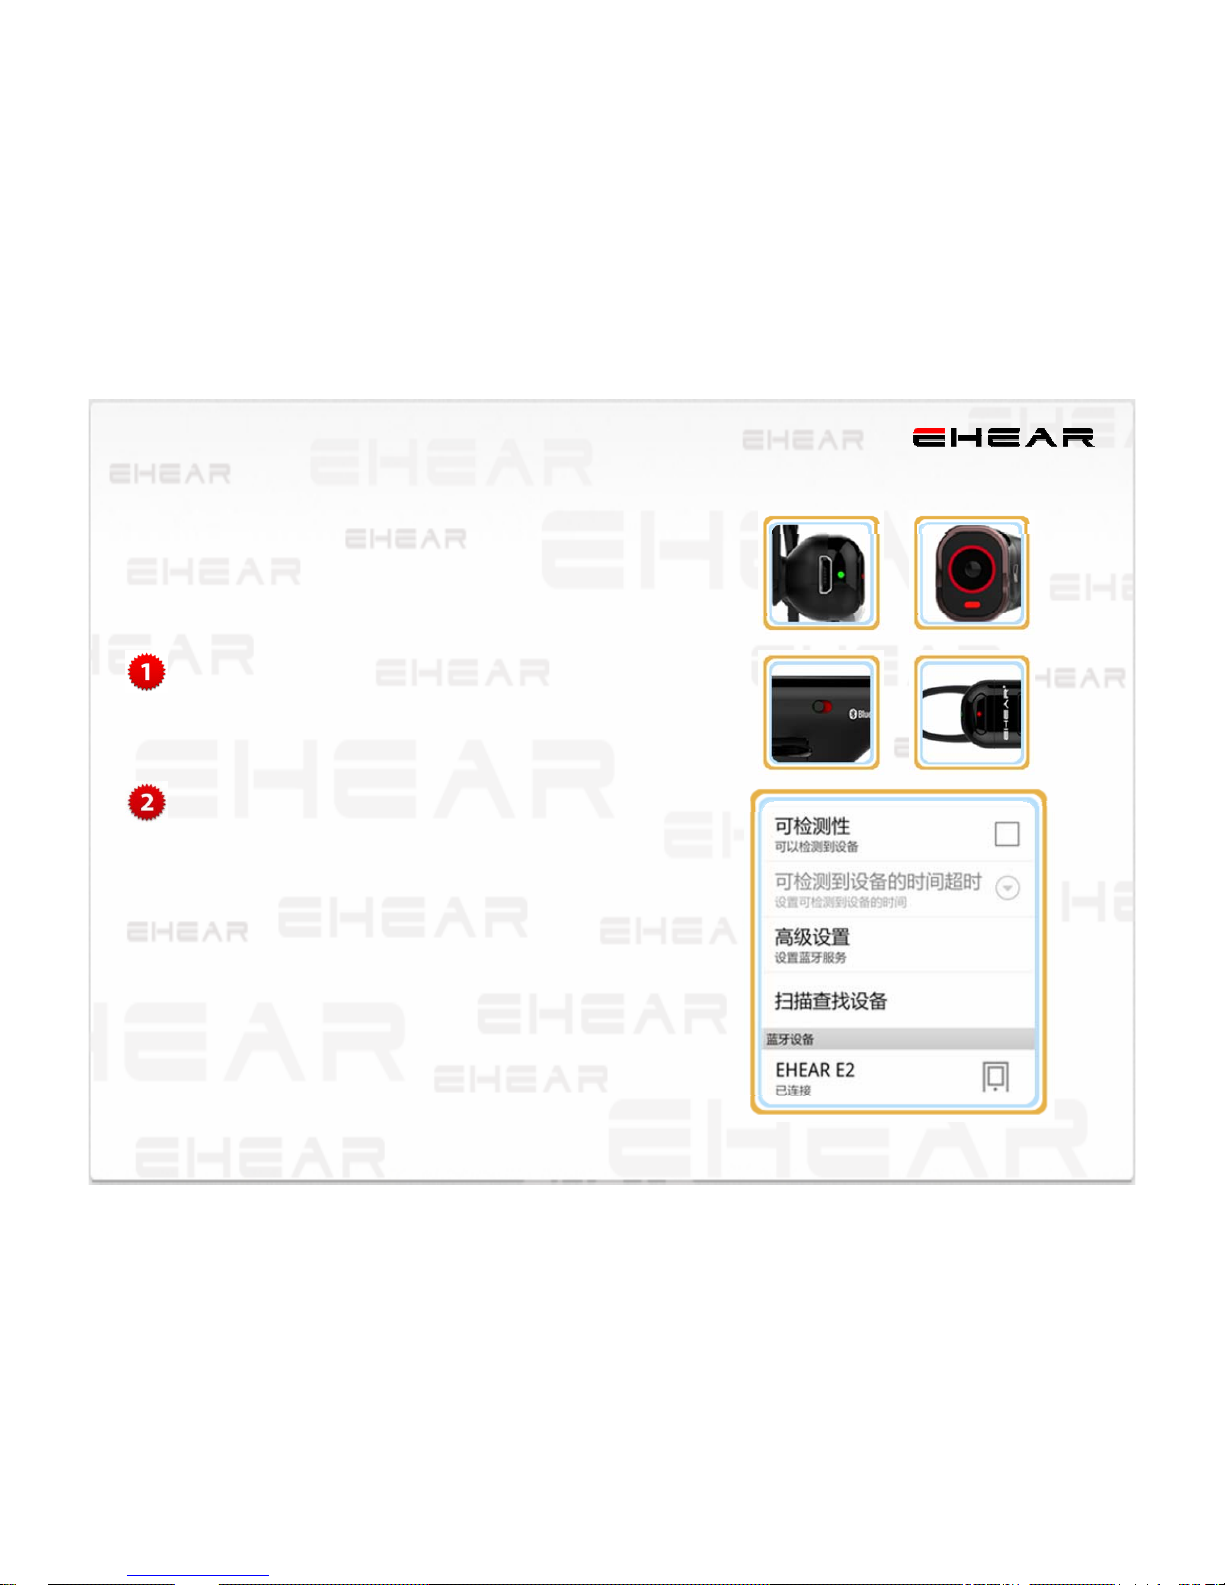
Pairing E2 to Your Mobile
Device
Before pairing, make sure E2 is fully charged. Pairing VIDO to your
mobile device connects the companion apps with your VIDO.
Turn on Bluetooth (on your mobile device)
¾ Turn on your mobile device’s Bluetooth
(under your mobile device’s Settings).
Activate pairing mode (on your E2)
¾ Power on E2 by sliding the Power switch on.
(The green Status light turns on.)
¾ if the green Status light and red Record light
are both flashing, pairing mode is active. (Go
to step 3 on next page.)
¾ If the green Status light and red Record light
are not both flashing, activate pairing mode
manually: Slide the Power switch off. Then
press and hold the Call button as you slide
the Power switch on. (Both lights will flash.)
Page 9
9
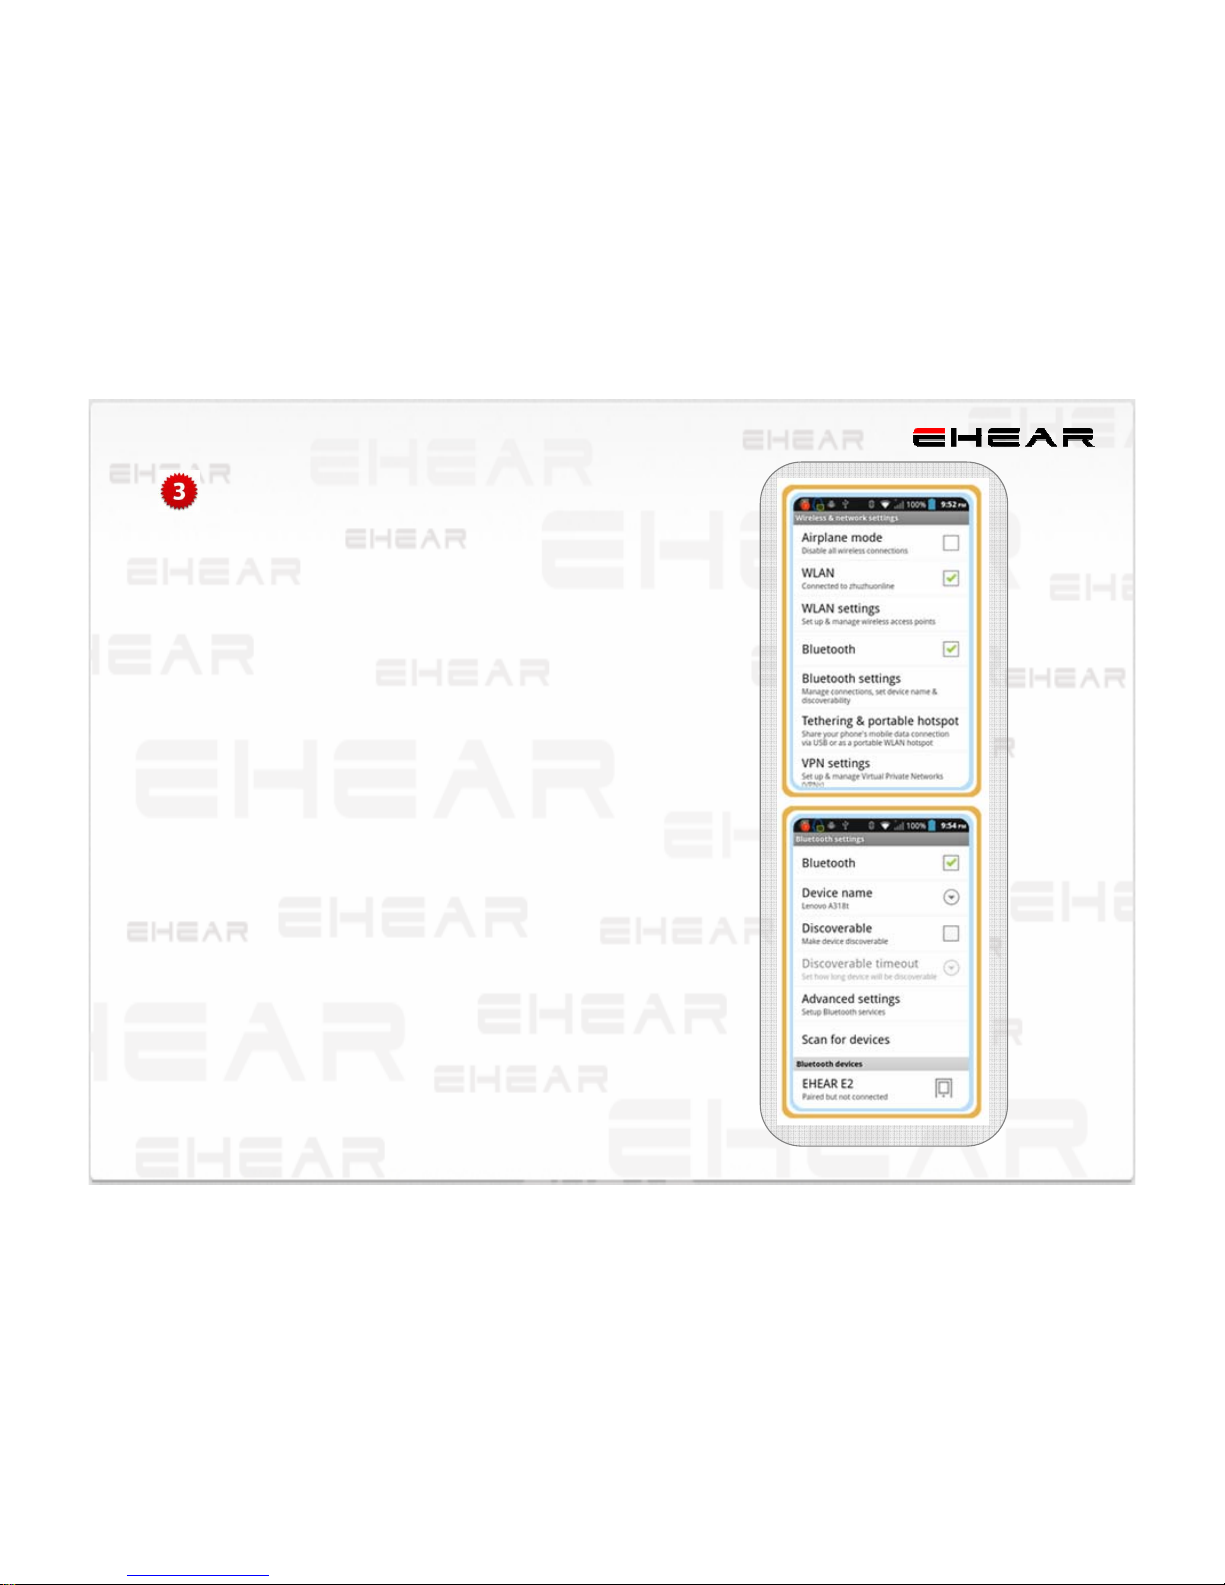
Select EHEAR E2 from the Bluetooth device list
¾ When paired successfully, EHEAR E2
appears in your mobile device’s Bluetooth
device list as Connected. (The red Record
light will turn off and the green Status light
will blink.)
Tip: Check your mobile device’s user manual for
more information on pairing Bluetooth
devices.
Help Me Pair
When the VIDO app are launched, the Help
Me Pair screen will appear if E2 is not paired
to your mobile device. If you want help
pairing:
¾ Tap Help Me Pair.
¾ Follow the three steps on the next two
screens to pair E2 to your mobile device.
¾ Tap Done to exit the screen.
Page 10
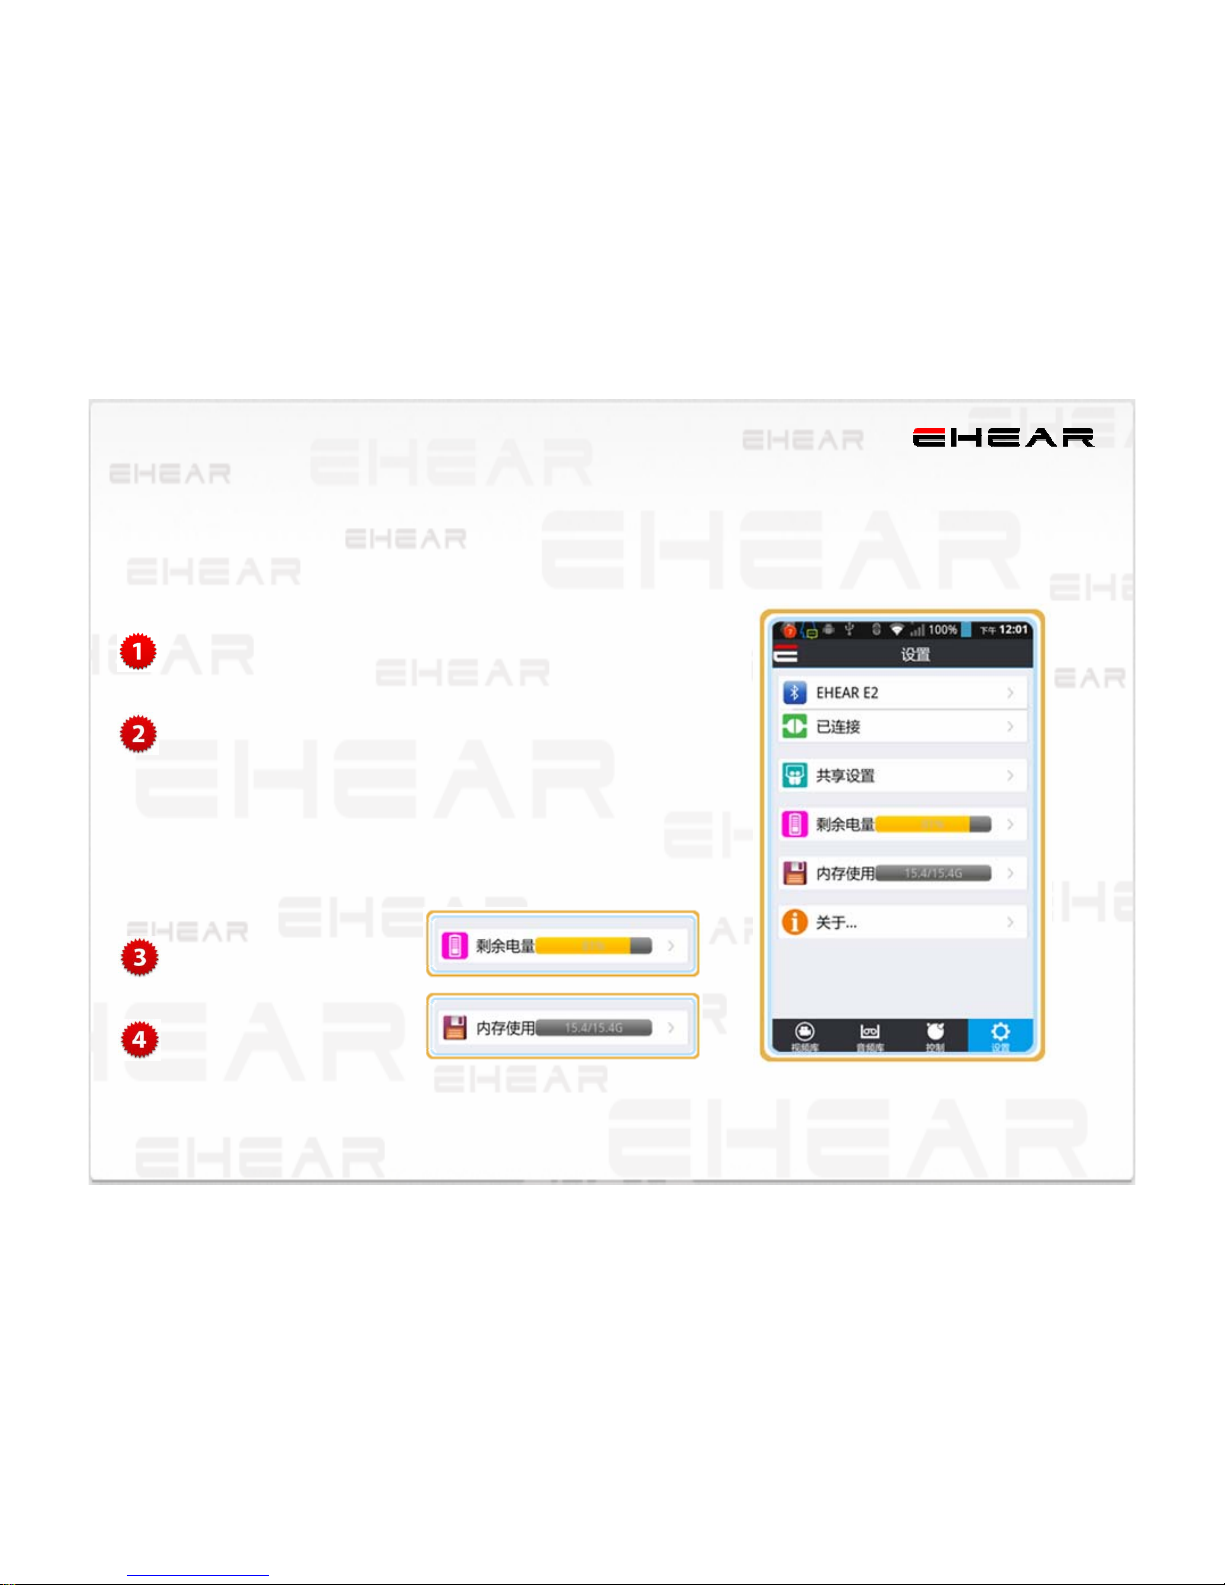
10
Pairing E2 By VIDO App
You can pair E2 to you phone by VIDO app.
To control, download, edit, clips…
Let us rock
Push the button of power on
Use the VIDO app
Go to the settings
Touch the“searching”
Select the“EHEAR E2”from the menu
Touch the “connect”(System“Connecting
Complete”)
Check the battery life
Check the memory
Page 11
11
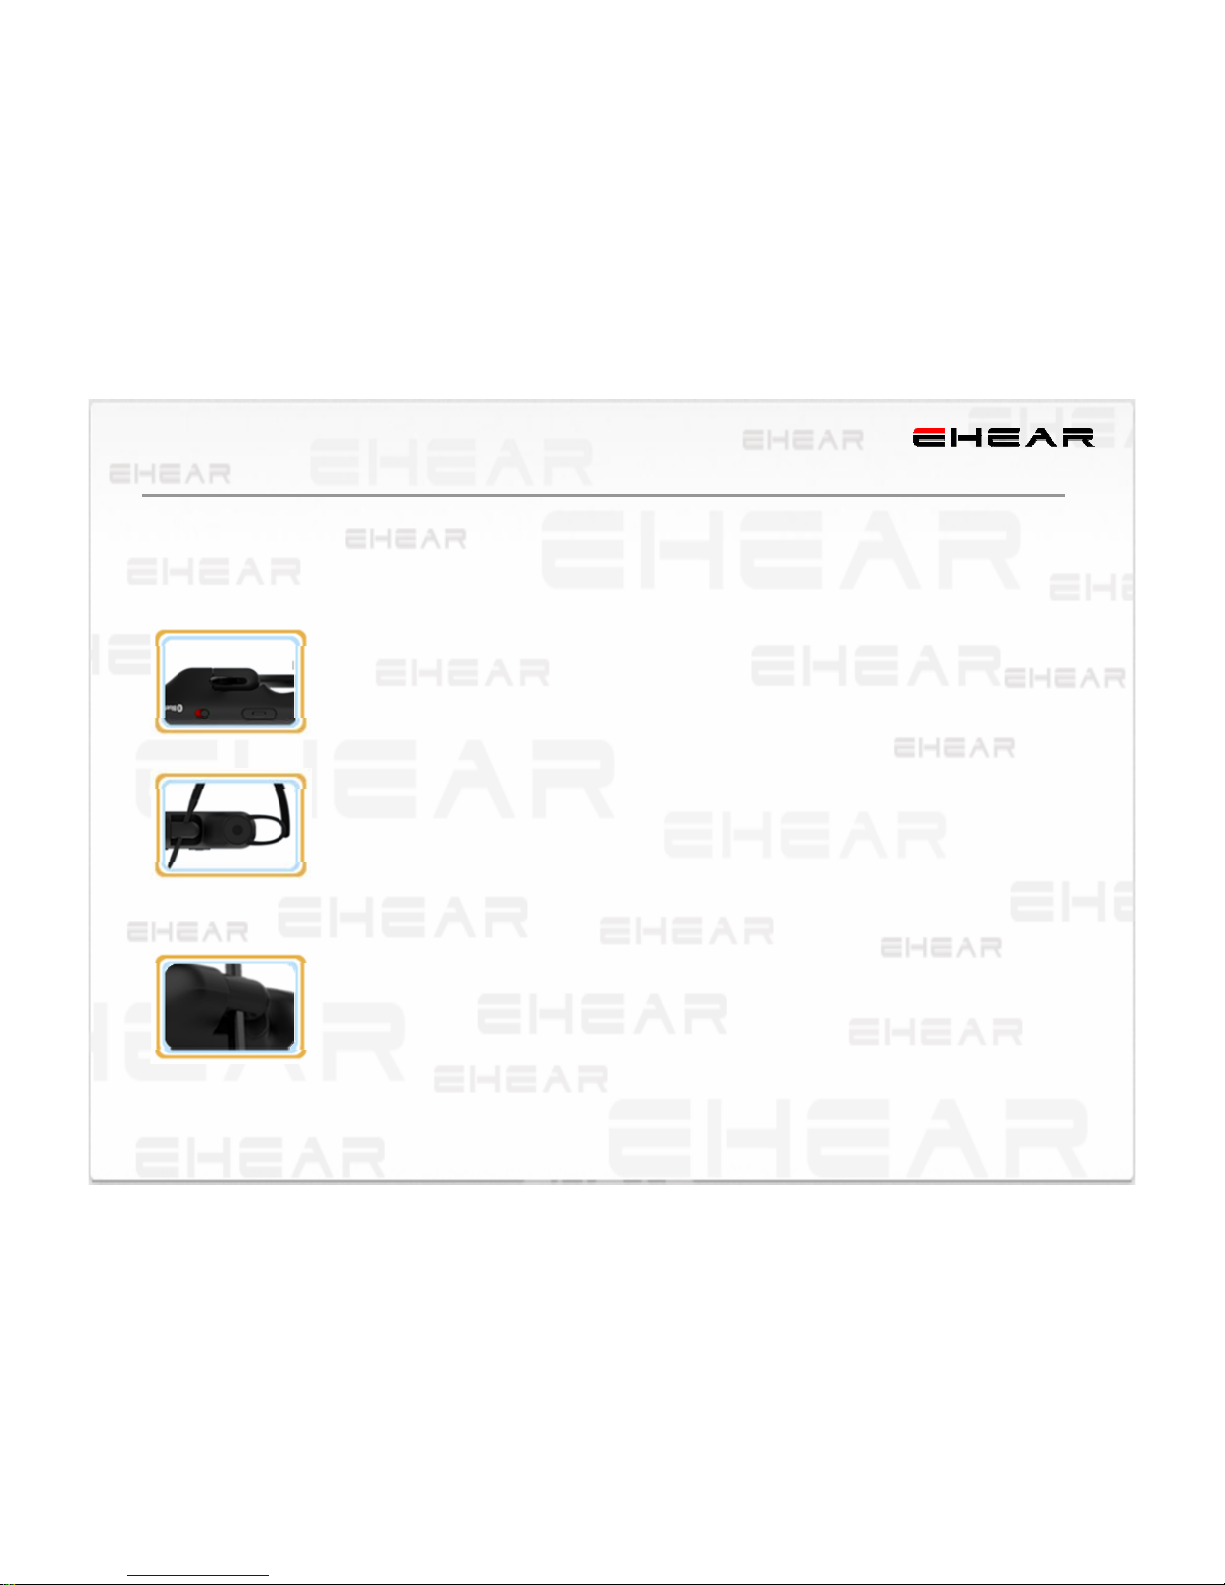
Adjusting Your E2 Fit
Personalize the fit of your E2 so that it is stable and level on your ear
Personalizing Your E2 Fit
Find the correct fit for your ear
¾ Select the best earbud and earloop size for
your ear (try various combinations).
¾ Insert the end of the earloop into the
earloop base to fit on left/right ear.
Place E2 on your ear
¾ Rotate the earloop away from the earbud
and toward your face to slip over your ear.
¾ Make sure the loop of the earbud is
angled upward slightly.
¾ Fit the earbud in your ear with the loop of
the earbud resting on your outer ear.
Secure the fit and level the video image
¾ Hold and slide the Boom along the
earloop to secure the fit on your ear and
level the video image.
Tip: Use the EHEAR to help level and rotate
the boom to level the video image.
Why Fit Matters
¾ Every ear is different in shape and size –
when E2 fits correctly, it should should
point in the direction of where you’re
looking.
¾ For more help adjusting your E2 fit, see
the Fit Video online at:
www.EHEAR.com.cn.
Page 12
12
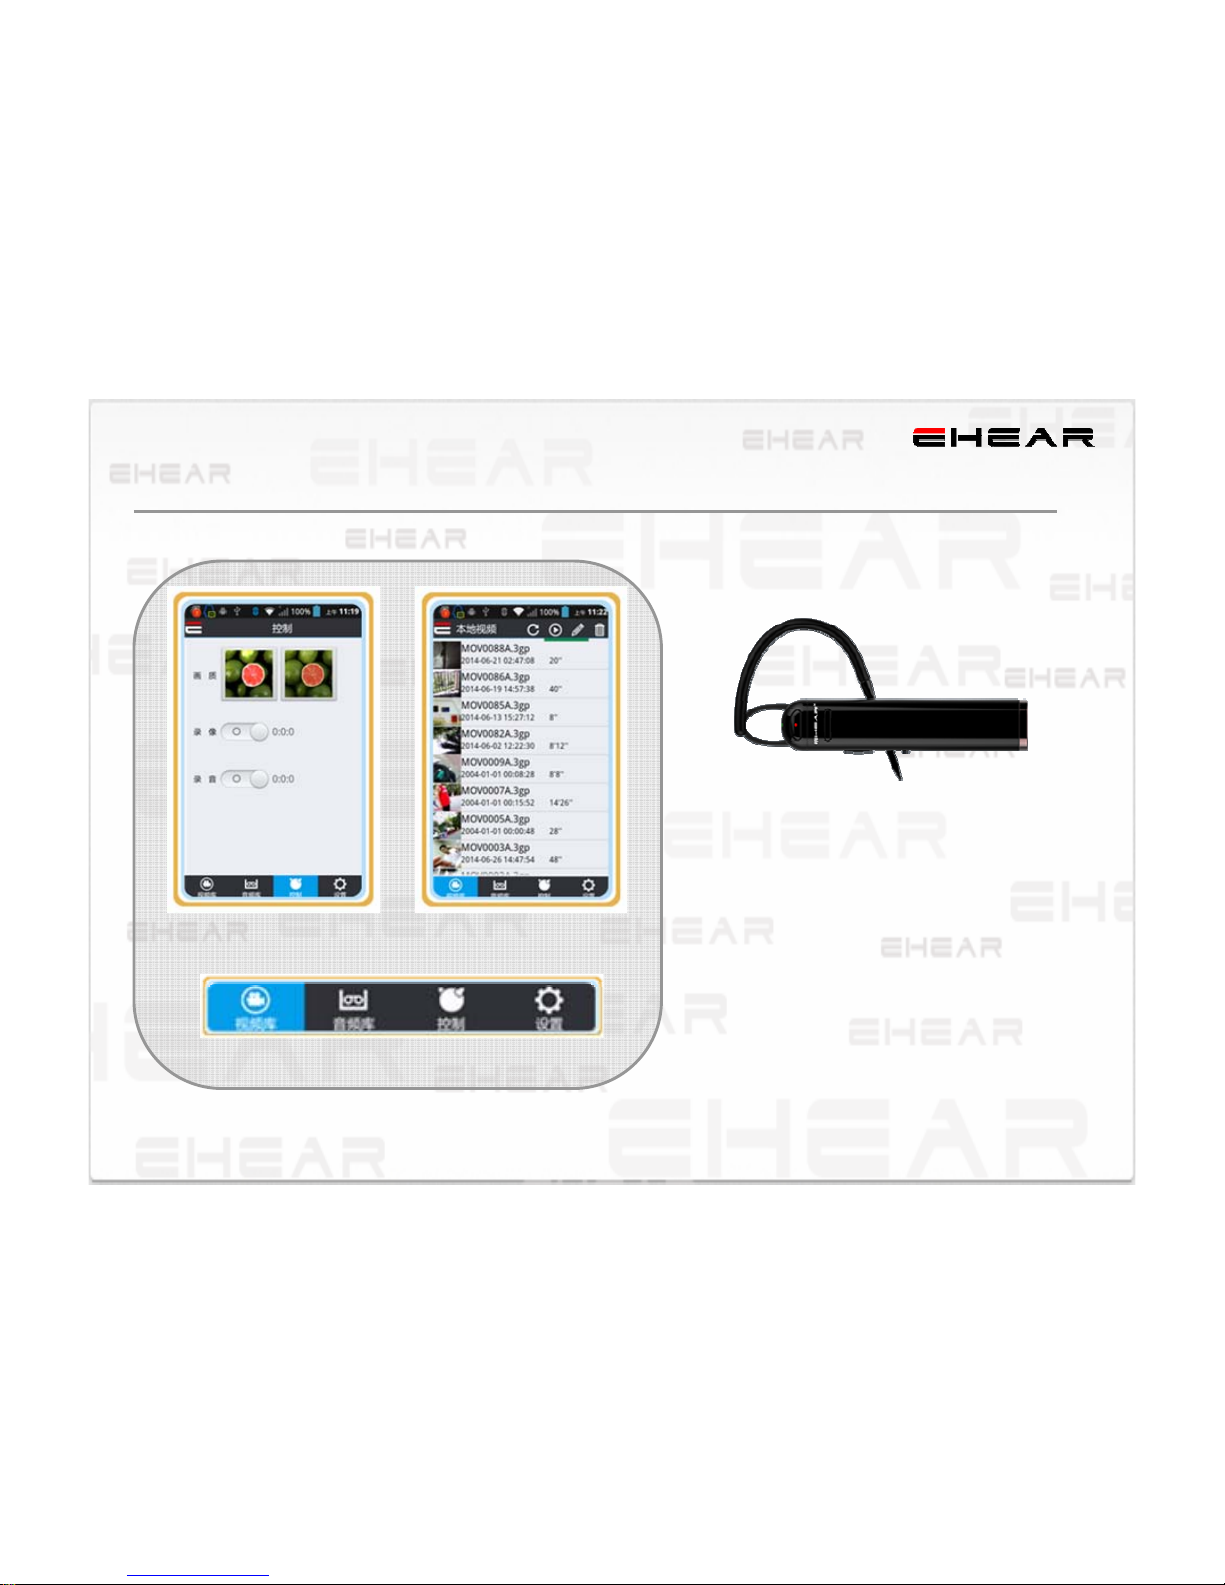
Recording With The VIDO APP
EHEAR turns your E2 into a basic camcorder that record video
VIDO Control VIDO Videos
Bar
Control the E2 with the VIDO Apps
¾ Record video for 1.5 hours in 320P
¾ Record video for 1 hour in 480P
¾ Never miss the big
¾ Download, edit, clip
¾ Share the clips onto web
Slide to change the E2 window or local window
Page 13
13
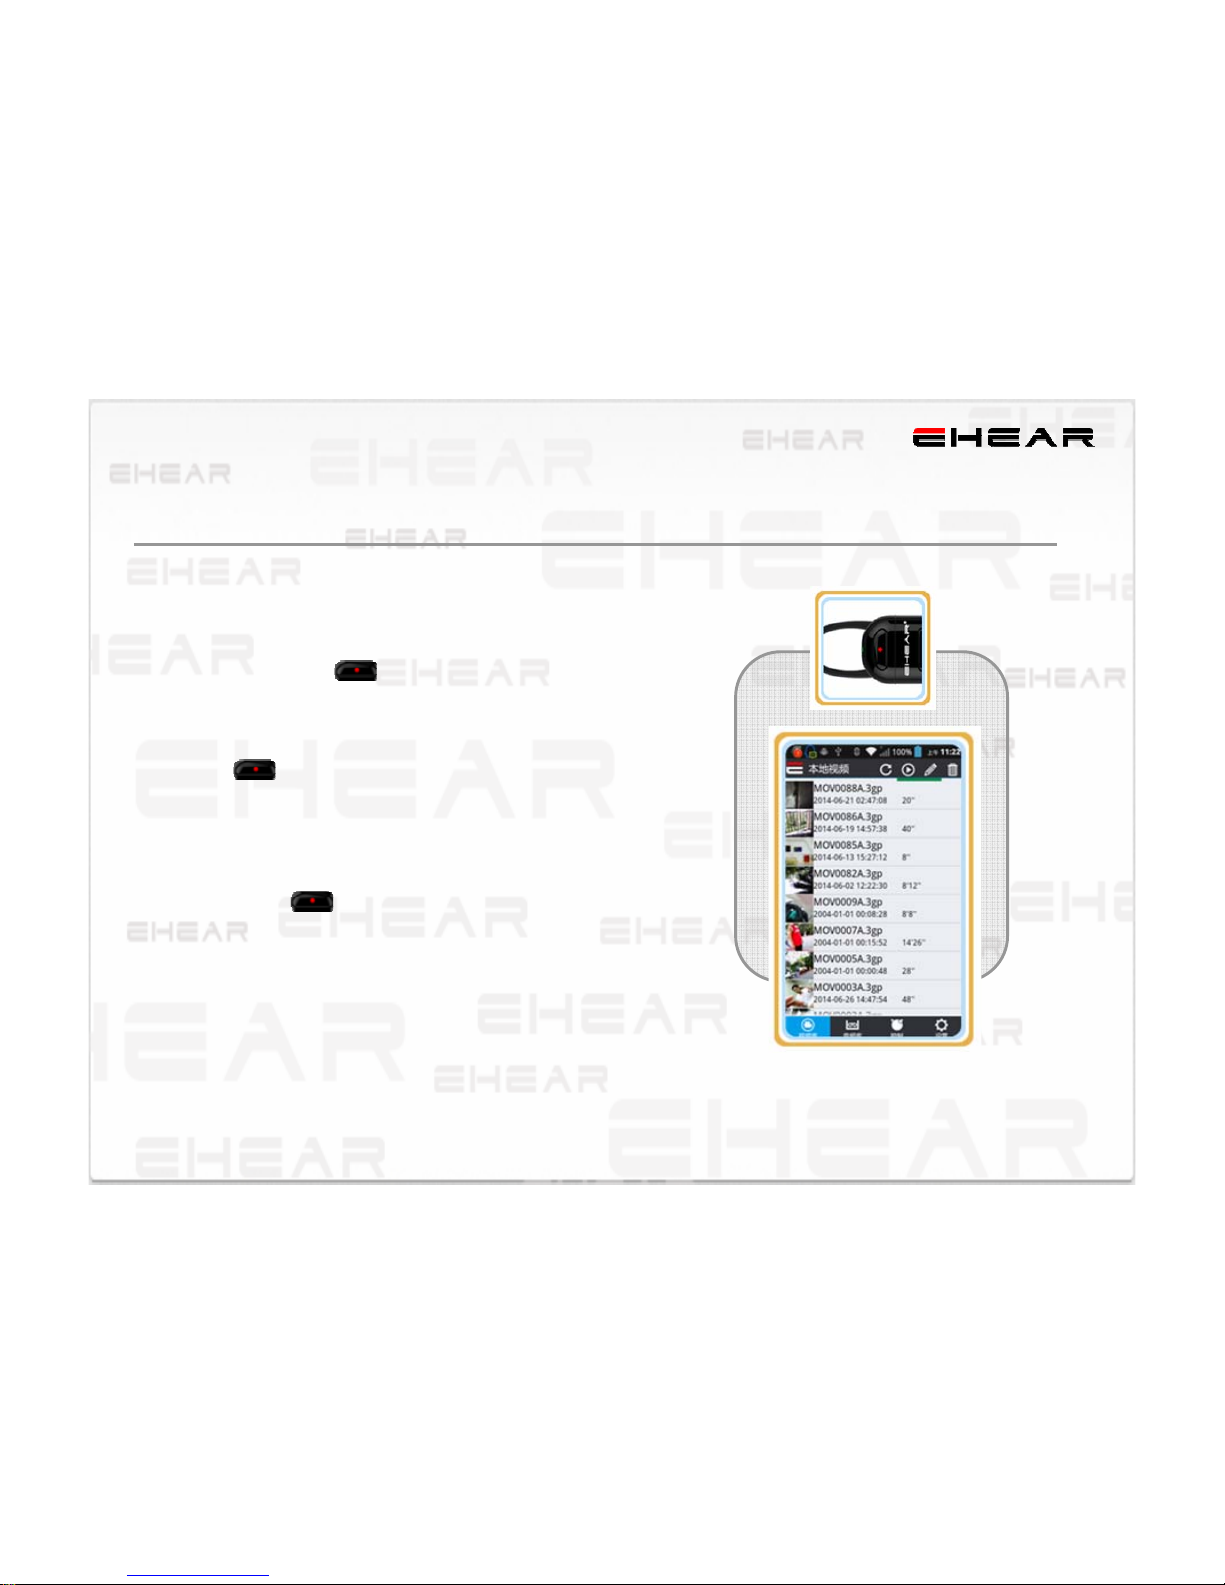
To stop recording:
¾ Press and release either the physical Record button on E2 or
tap the button on the Camcorder screen.
Note: When E2 starts recording, you will see the solid red
button and a flashing red “Rec” symbol appear on
the Camcorder screen.
Using E2 as a Standalone
Video Cam
To start recording:
¾Launch the VIDO app on your mobile device.
¾Press and release either the physical Record button on
E2 or tap the button on the Camcorder screen.
Note: When E2 stops recording, it automatically saves
your video as a clip.
Tip: The timer on the Camcorder screen shows the number
of recordable minutes left.
Page 14
14
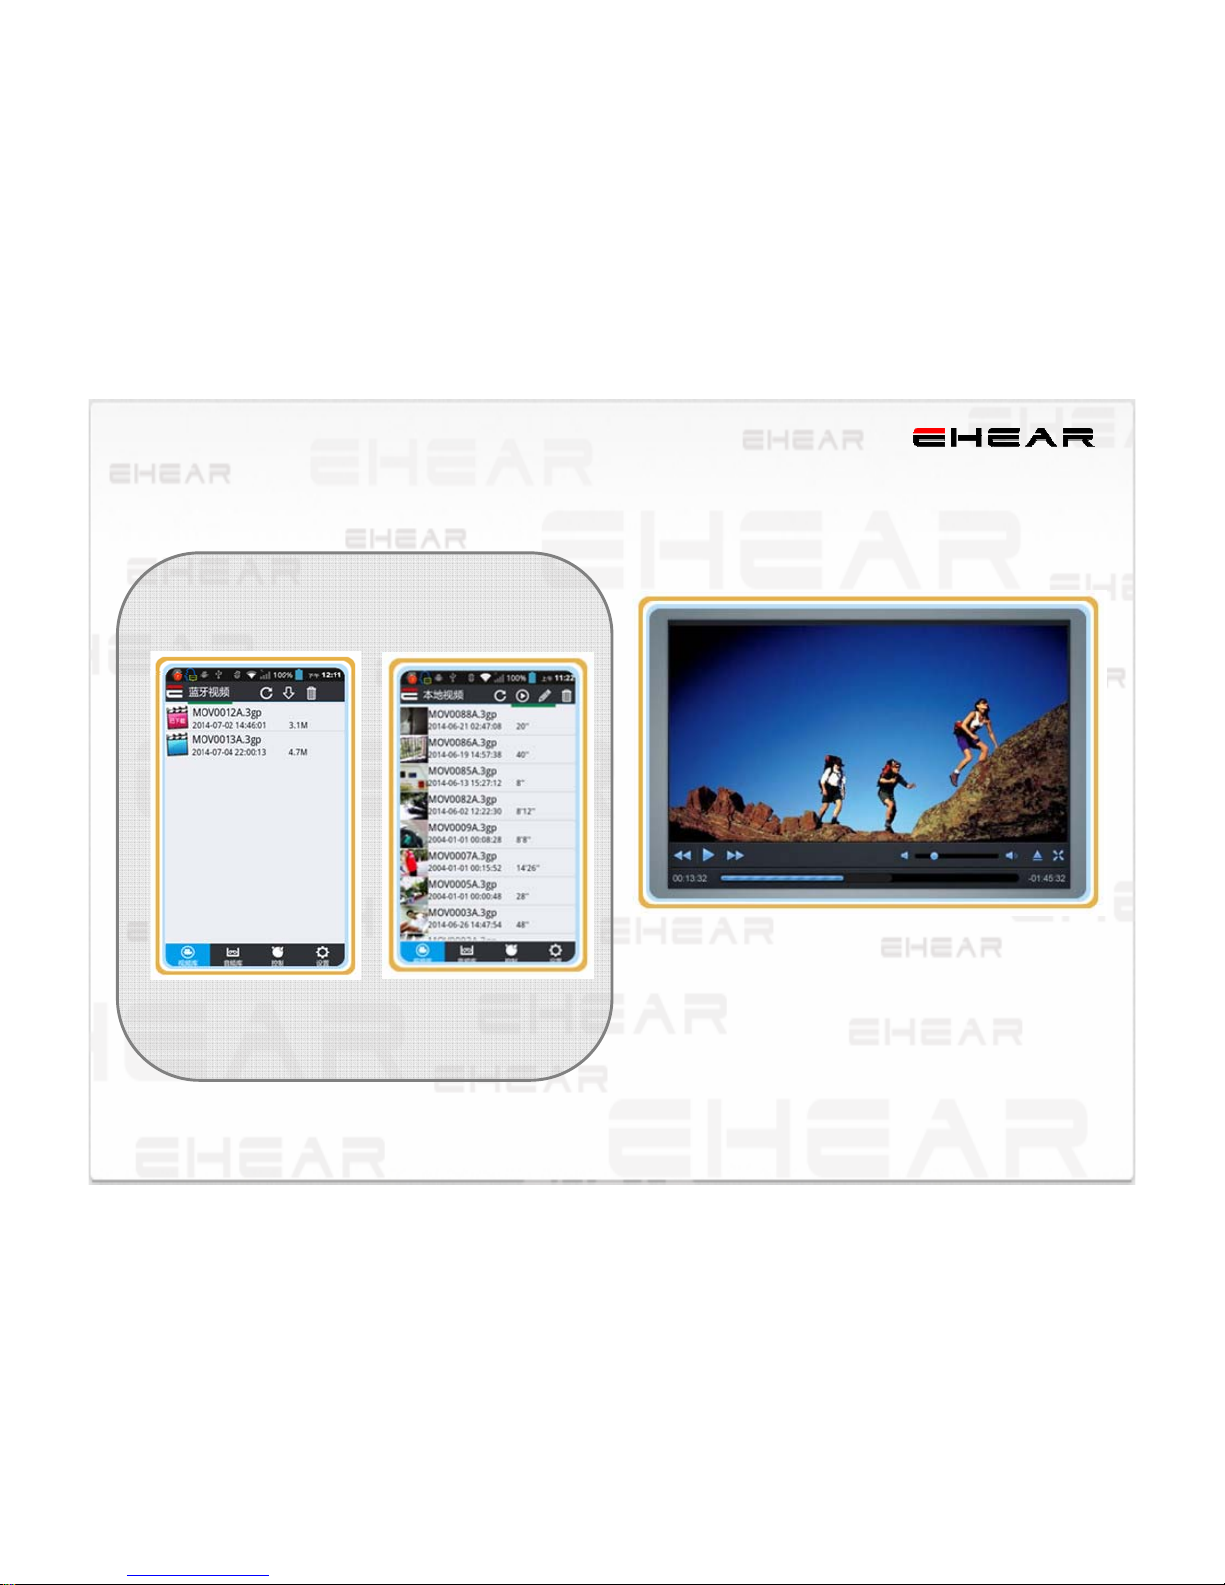
Previewing Your Clips
There are 2 page in video bar
E2 Video
Local video
¾ Play the clip by VIDO Player
¾ You can check the detail about the clip
Page 15
15
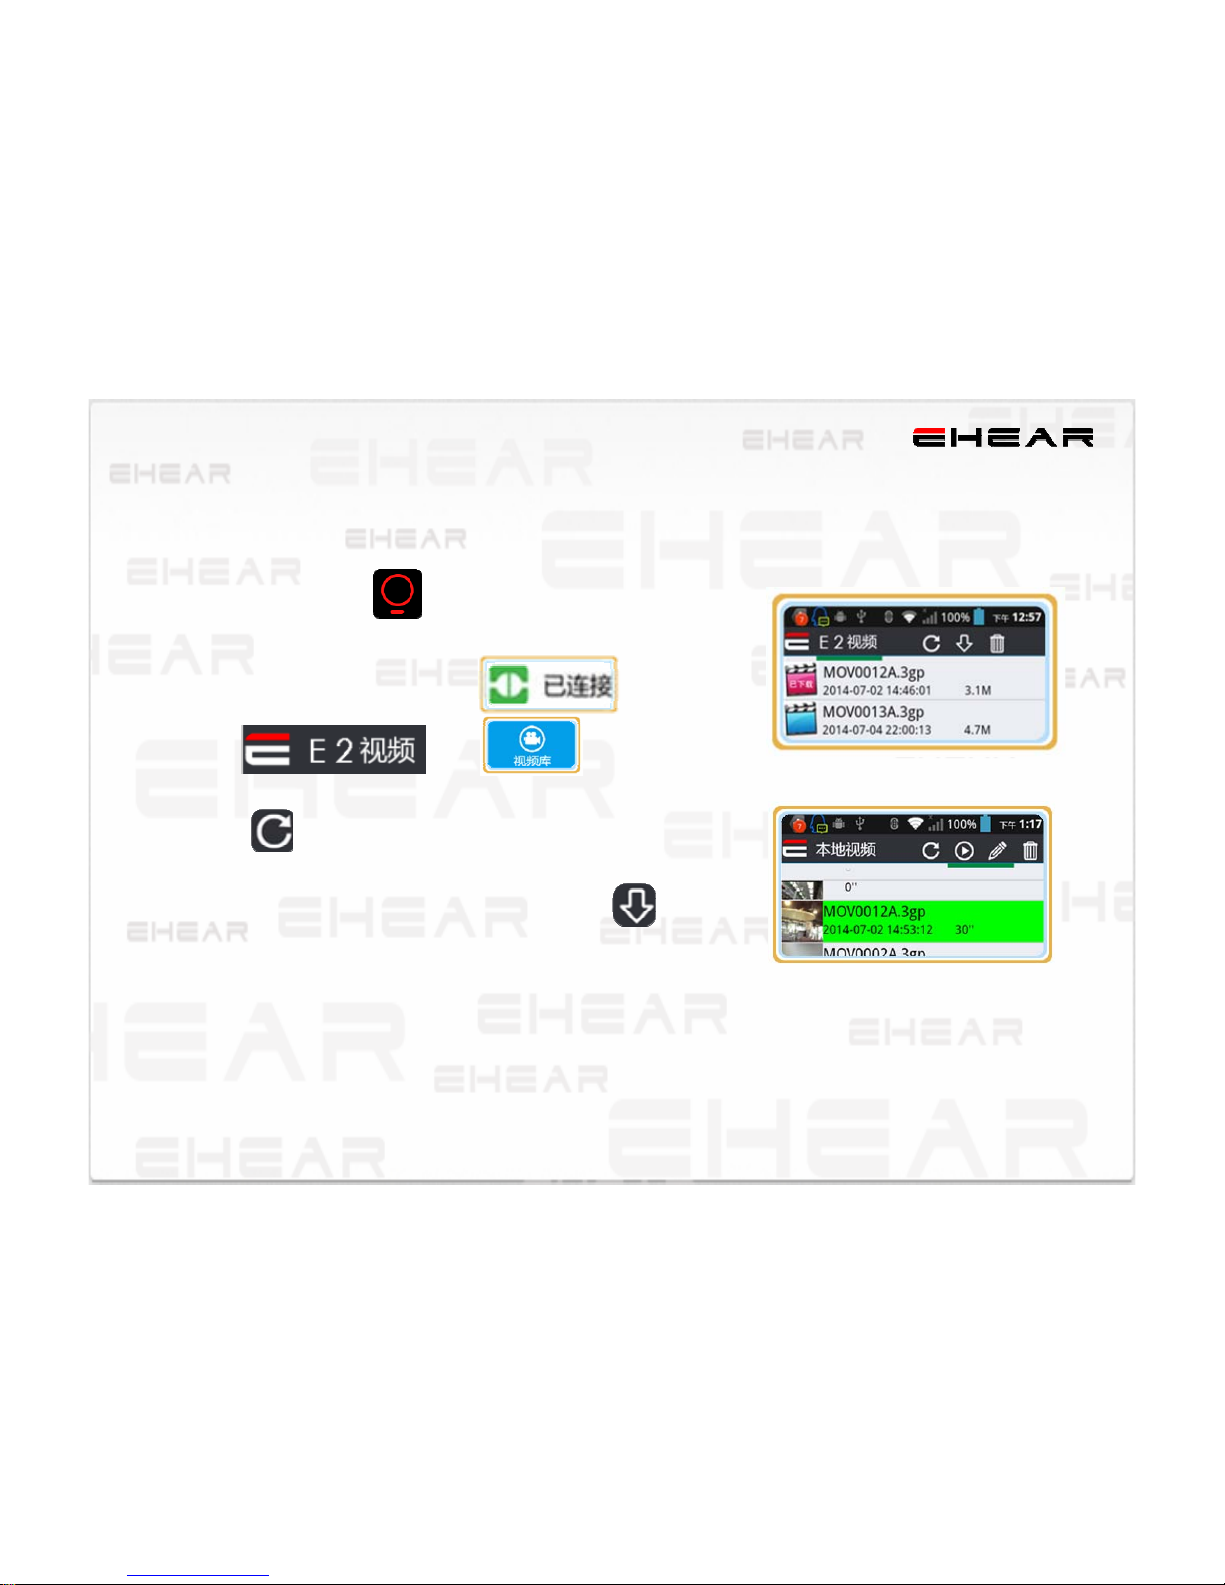
Saving Clips to Your Mobile Device
¾ Run VIDO APP
¾ Setting,Paring with E2
¾ Visit in
¾ Click to refresh
¾ Touch your wanted clip and Click to
save it
Before Save
Saved
Page 16
16
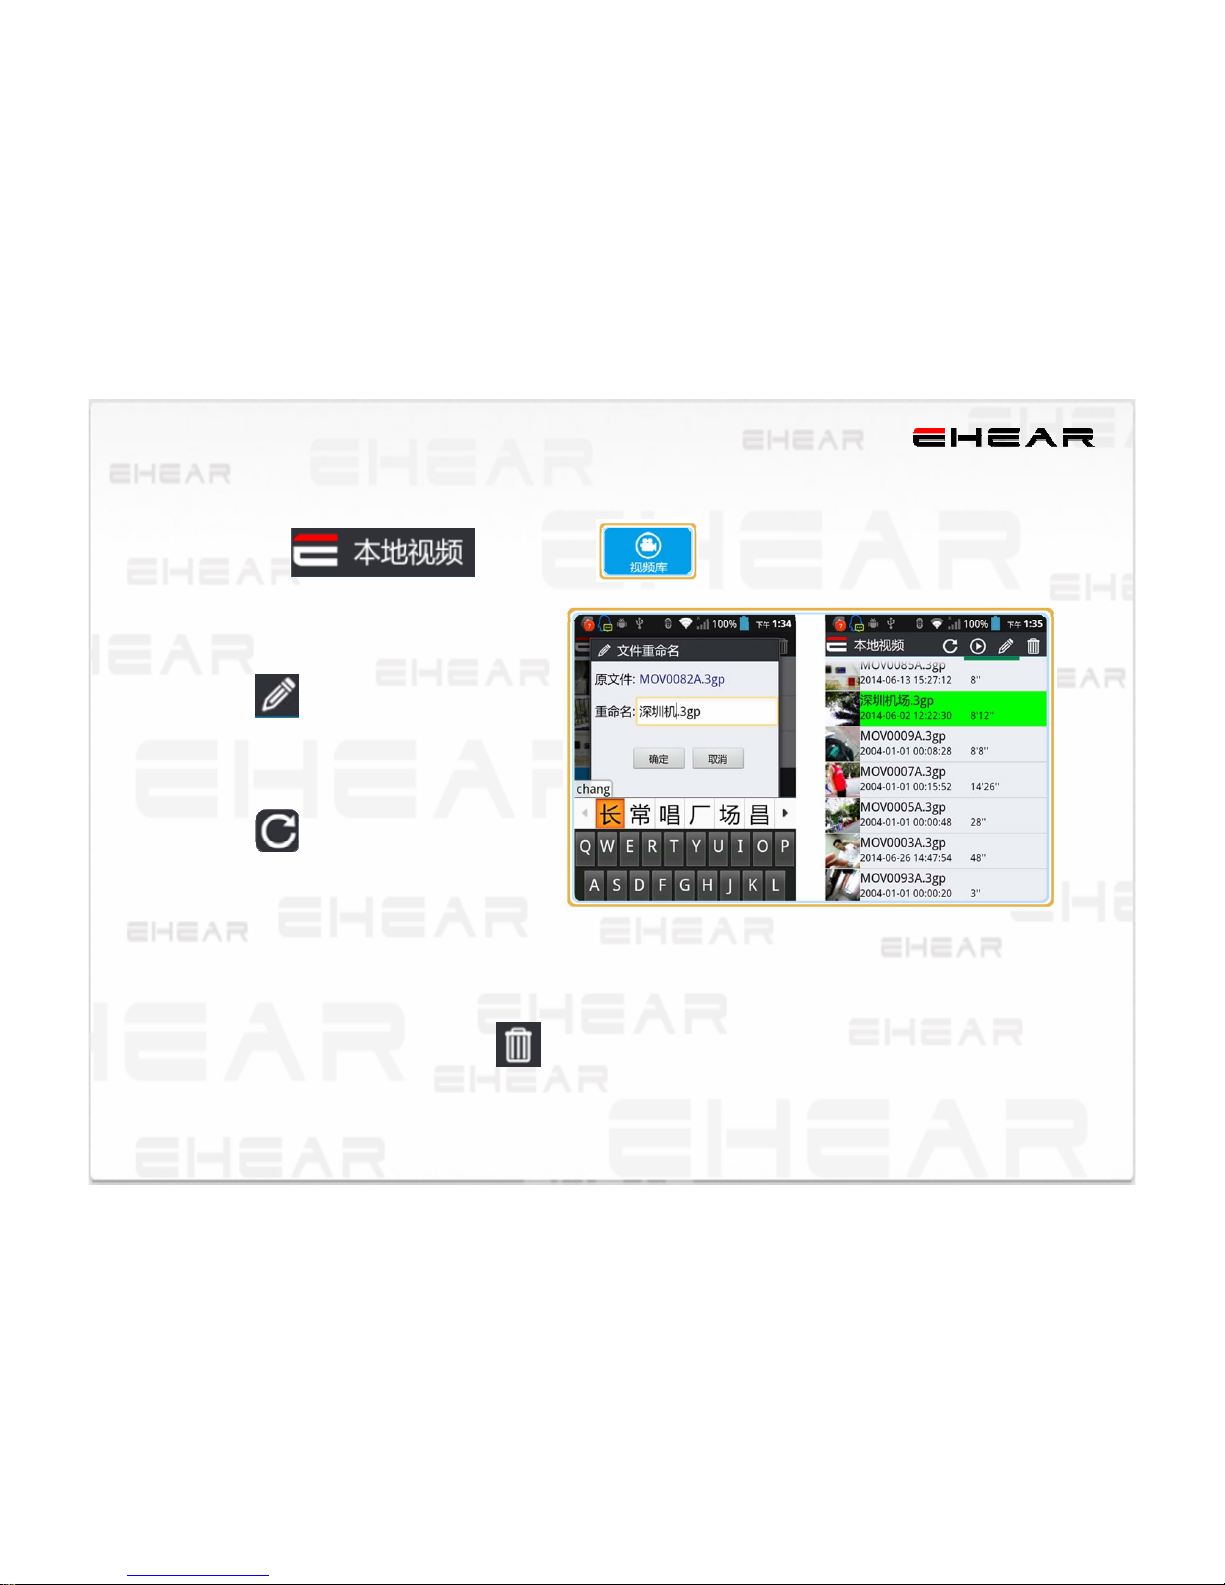
Editing Clip Titles
¾ Visit the which in
¾ Touch you wanted clip
¾ Click to edit the title
¾ Click“Yes”to complete
¾ Click to refresh the menu
Deleting Clips
¾ Visit the local video
¾ Touche you wanted clip
¾ Click the delete button
Page 17
17
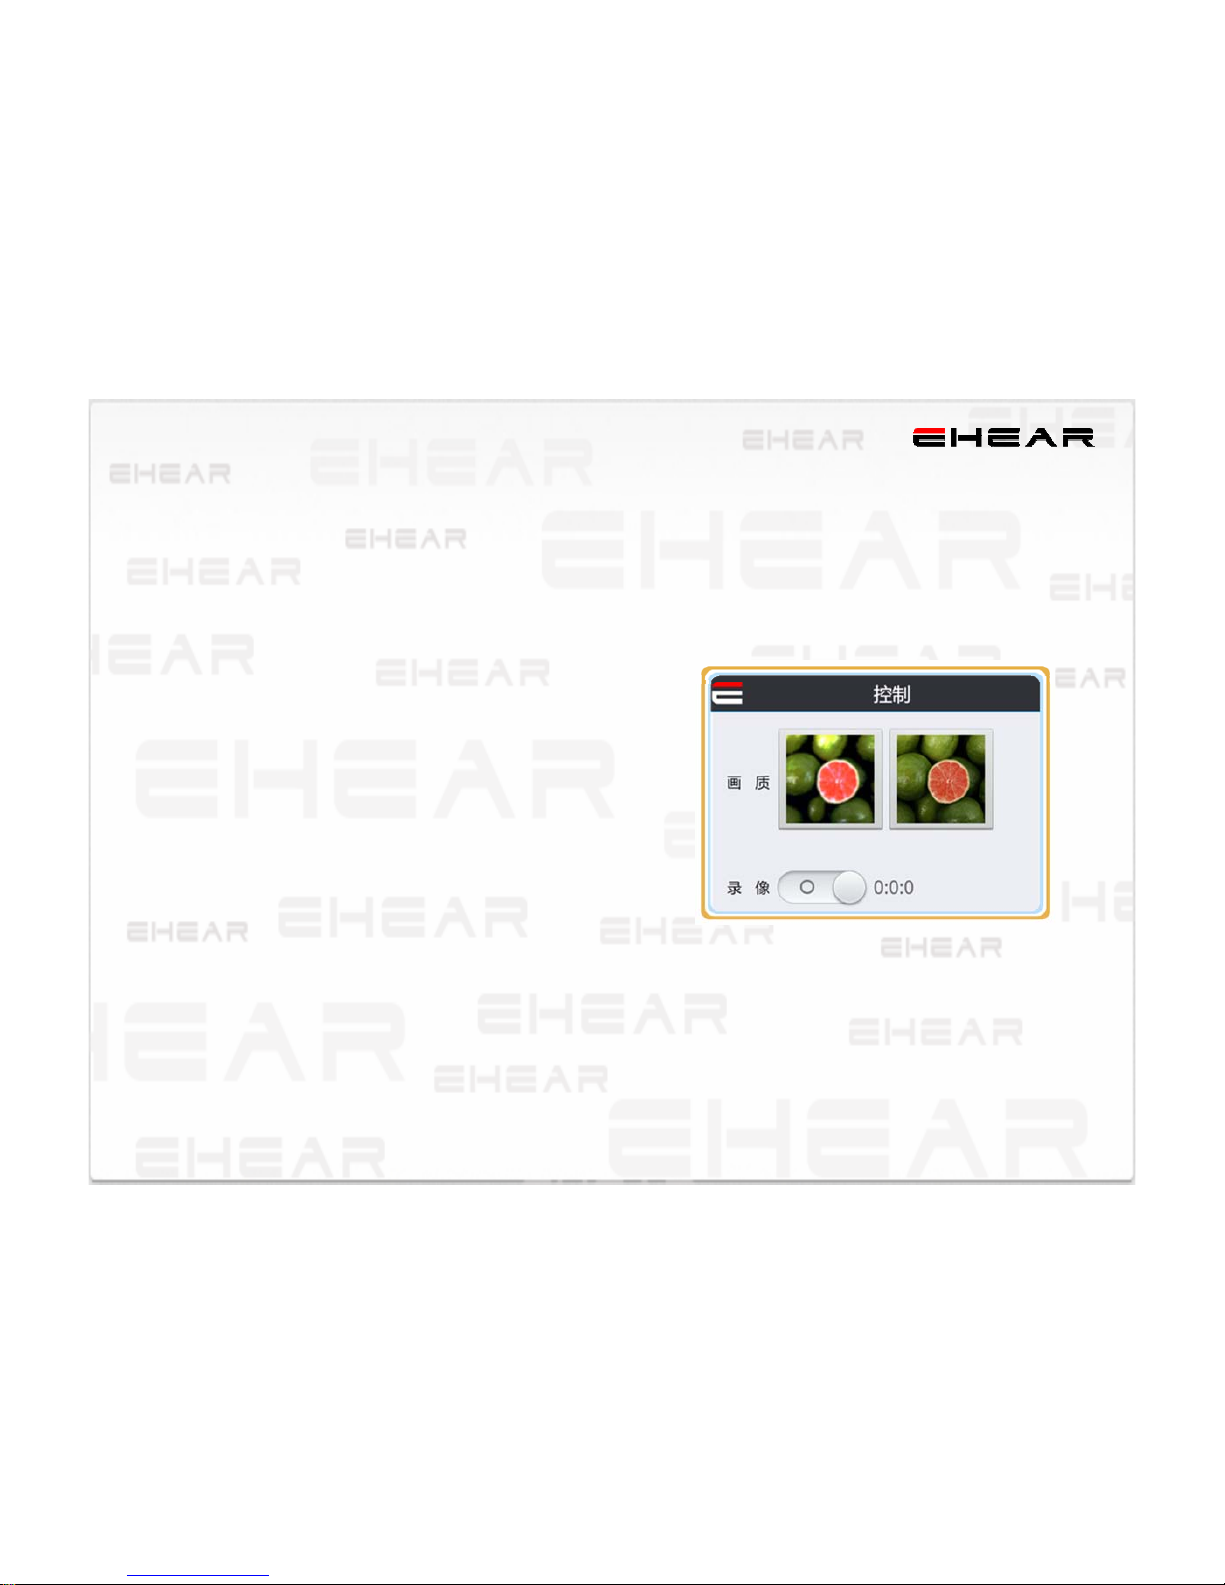
Recording Quality
Record with VIDO in either Mobile Sharing (320p) or Highest Quality (480p).
¾ Use Mobile Sharing (320p) for faster uploading to social networks.
¾ Use Highest Quality (480p) for higher resolution recording.
Highest Quality (480p)
¾ Record up to 1.5 or up to
3 hours* of continuous
looping capture in 480p
¾ Save 100+ clips from
captured video
¾ Share clips via computer
with social networks
Mobile Sharing (320p)
¾ Record up to 5 or up to 10
hours* of continuous
looping capture in 320p
¾ Save 500+ clips from
captured video
¾ Instantly share clips via
mobile device with social
networks
Changing recording quality
¾ Tap Control on the EHEAR app menu.
¾ Tap the left pic for 320P.
¾ Tap the right pic for 480P
Page 18
18
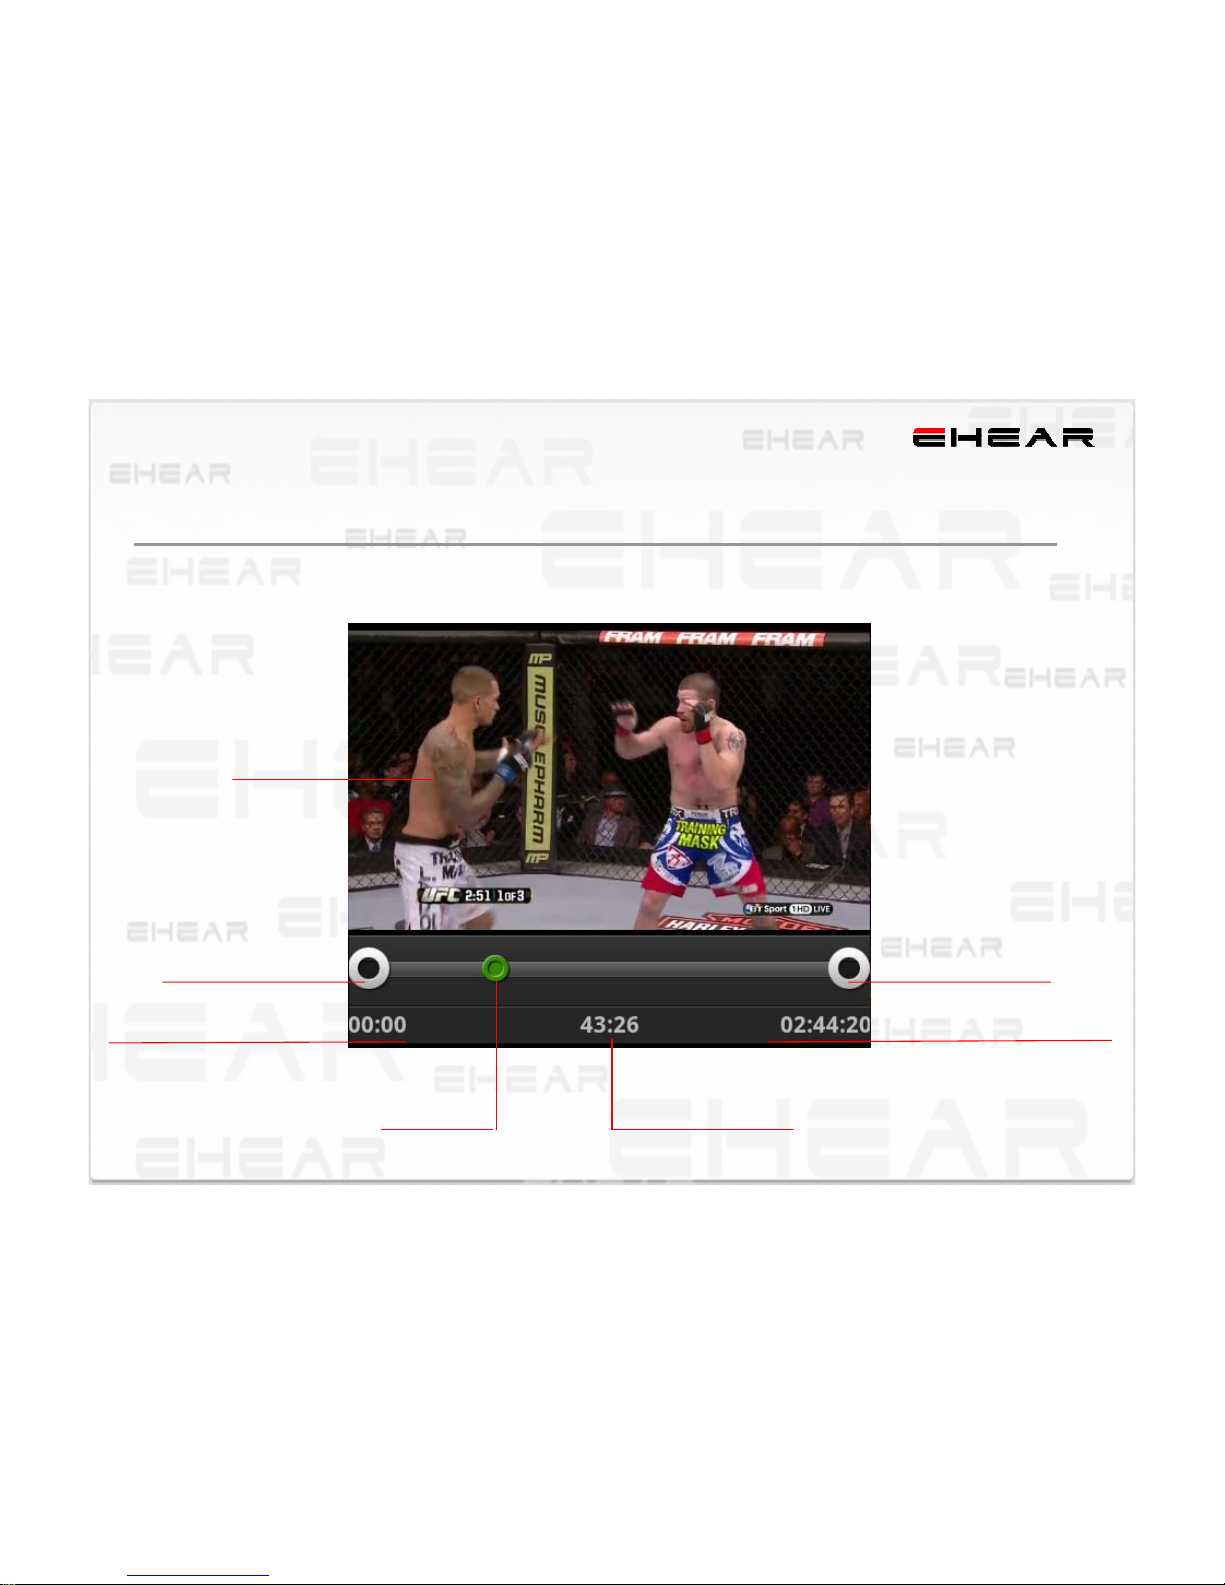
Video Clips
The Player
Clip - Star Clip - End
The time of Star
The time of End
The Player
Preview The time of Preview
Page 19
19
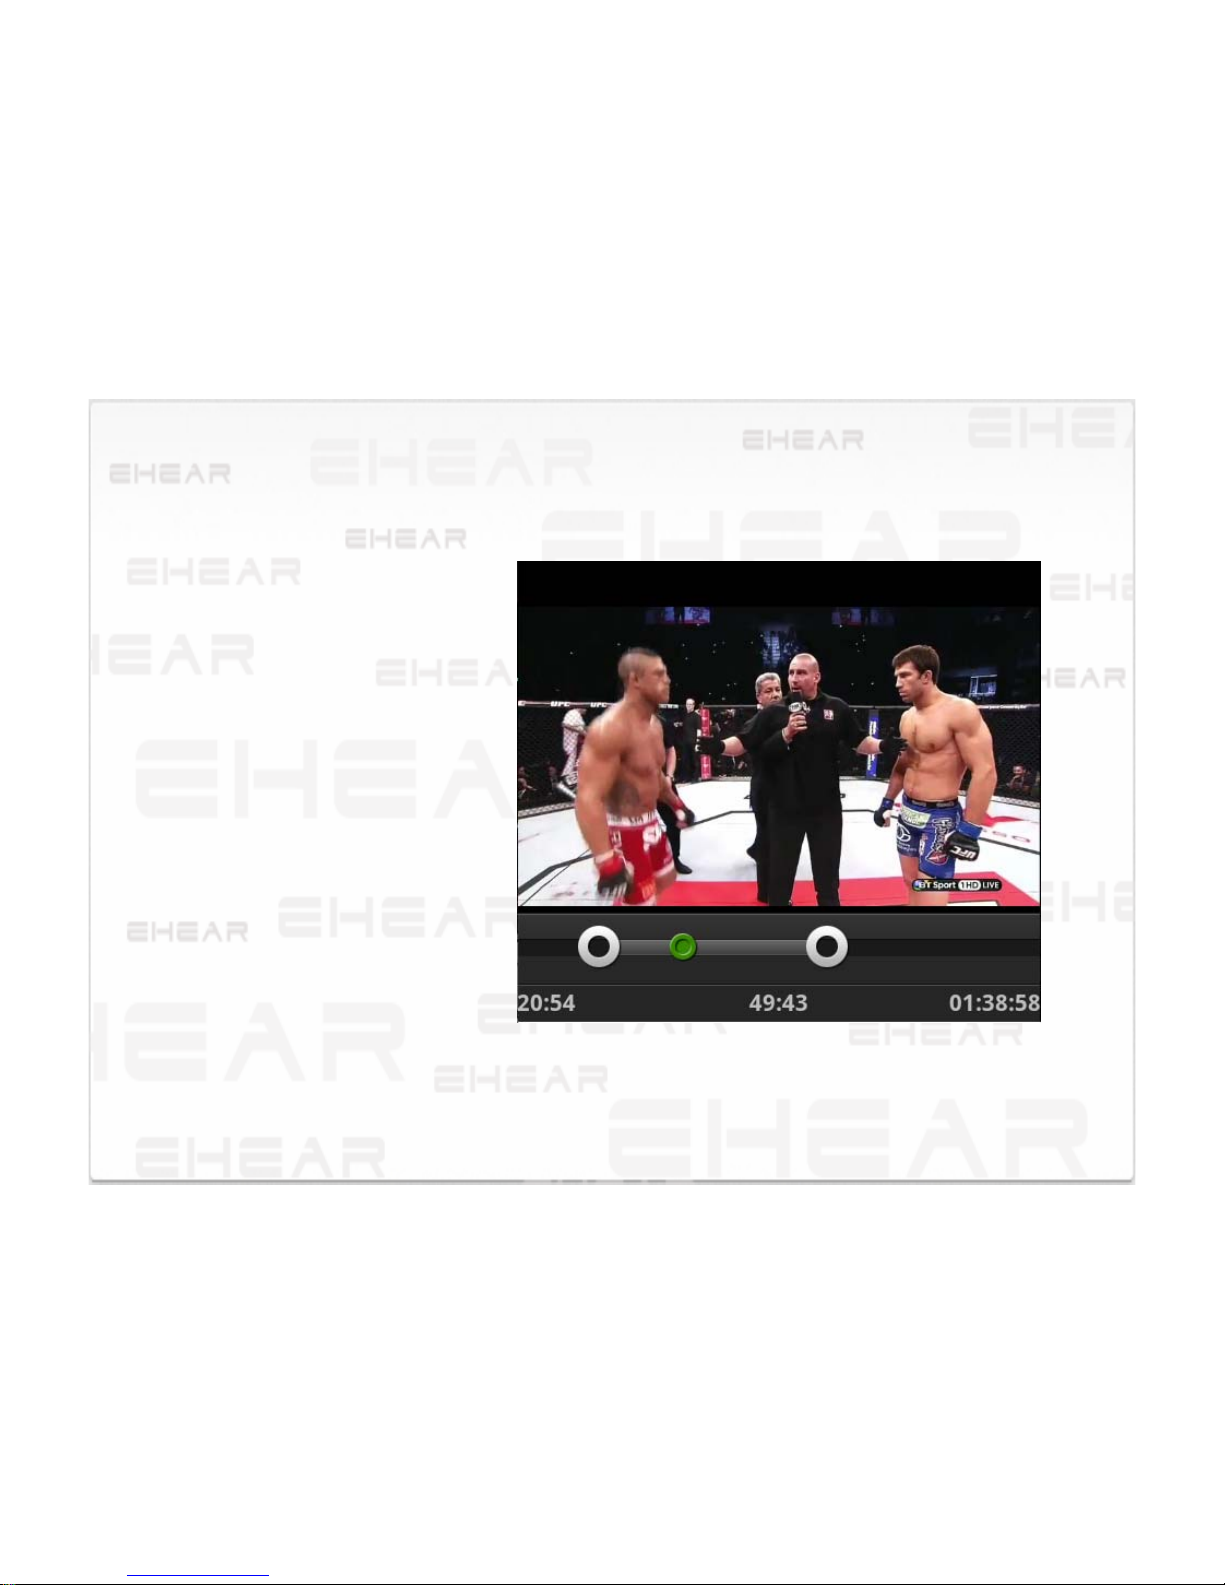
Clips Complete
When you complete the Video
Clips
¾Touch the back button
¾Change the title of the video
¾Save it
Create a new video.
Page 20
20
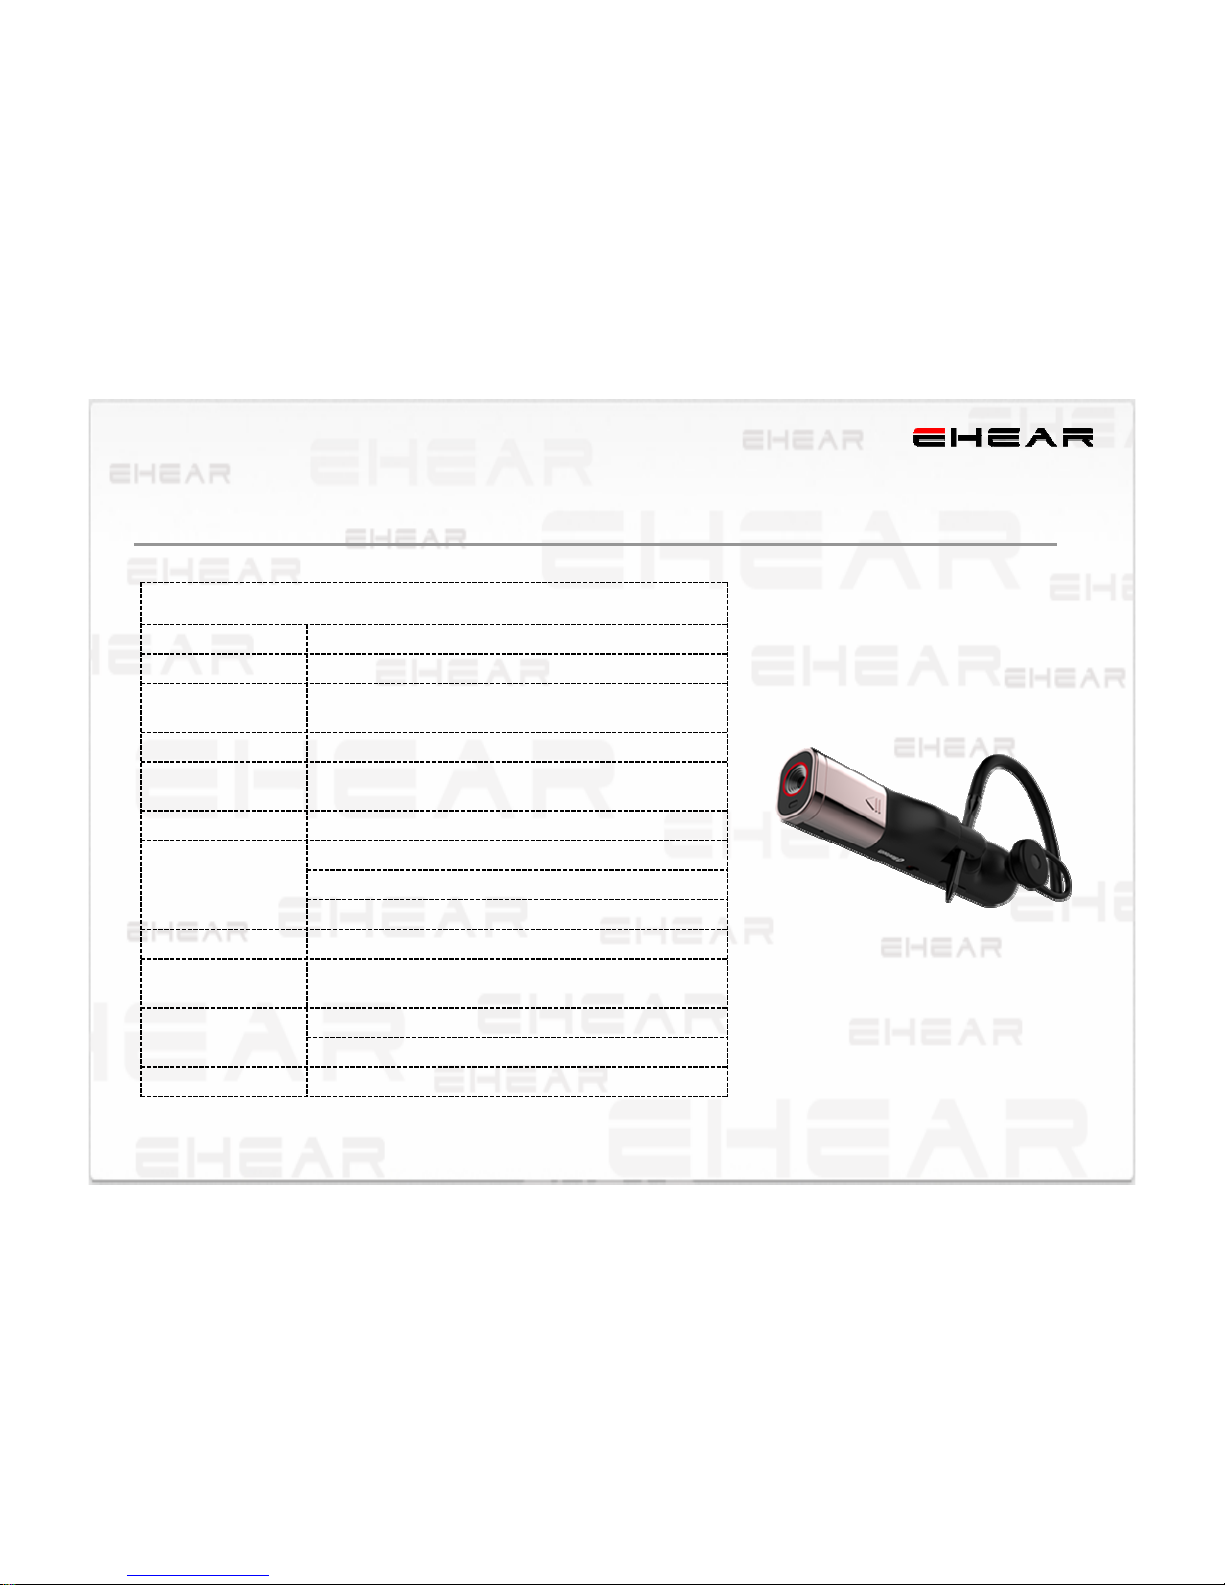
SPECIFICATIONS
Clips saved in 3gpVideo Format
1.2 hours in 480p
1.5 hours in 320p
Battery Life
Fast-charging 200mAh lithium polymer battery (not
user replaceable)
Battery
Lightweight design of only 17g (less than 1 oz.)Weight
W at lens = .53 in. (1.35cm)
(2.28cm x 1.65cm x 8.38cm)
.9 in. x .65 in. x 3.3 in. (W x H x D)
Dimensions
Intended for dry activities onlyEnclosure
Automatic light correction for indoor/outdoor
operation
Light Metering
6.0 V/lux-secLow-light sensor
75°
Diagonal Field of
View (FOV)
2″ to infinityDepth of Focus
f 3 lens (zoom and wide angle lenses available)Aperture
Camera
Page 21
21
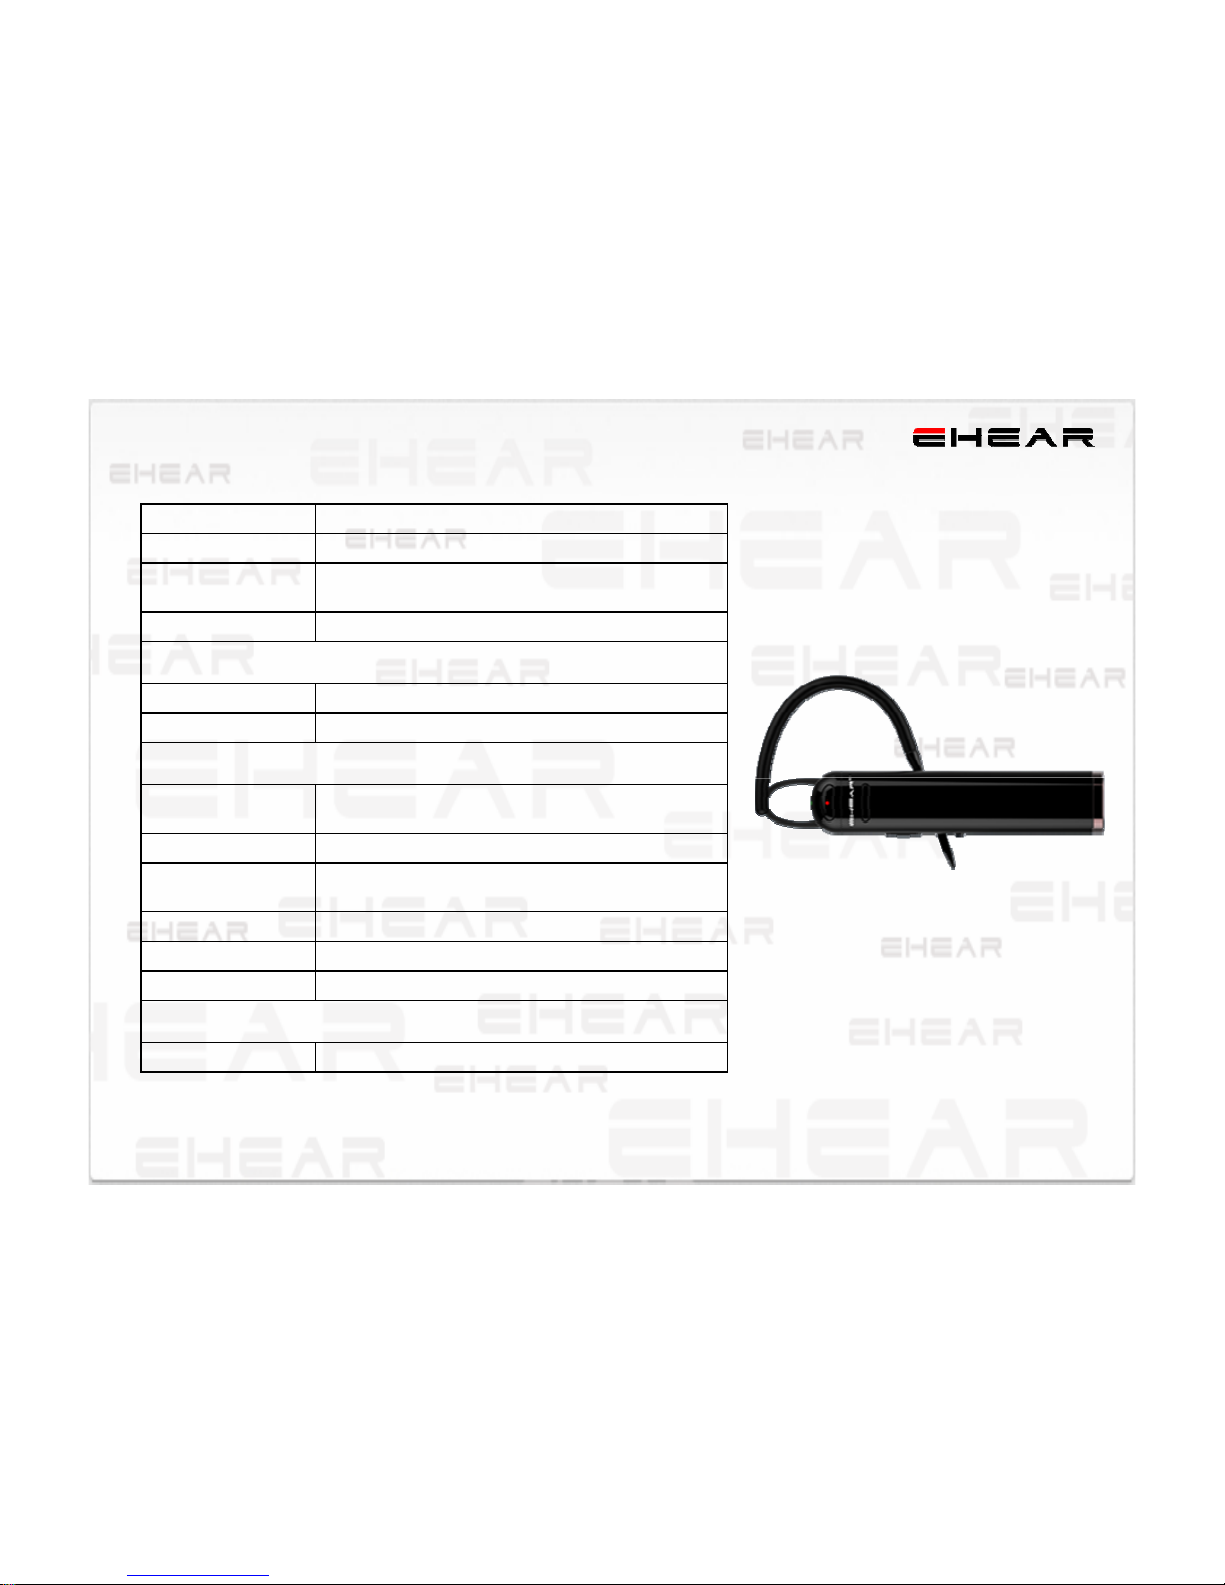
Wi-Fi or 3G/4G, group streamingMobile to Mobile
Live Video Streaming
Maximum distance from phone 33 feetRange
5+ hours talk timeTalk Time
DSP-based noise cancellation (CSR Clear Voice)Noise Cancellation
High quality audio (frequency response 80Hz to
4000Hz)
Audio Quality
Silicon MEMS microphoneMicrophone
Bluetooth Class 3, V3.1+EDR and eSCO (up to 10m
range), Hands Free Profile (HFP 1.5)
Bluetooth
Connectivity
Headset
Quick Reference GuideMicro USB cable
EHEAR Smart Headset
What’s Included
EHEARApps
Micro-USB 3.0 port for charging battery &
computer connection
USB
BluetoothMobile Connection
Support T-Flash Card, 64G MaxmiumMemory
Page 22
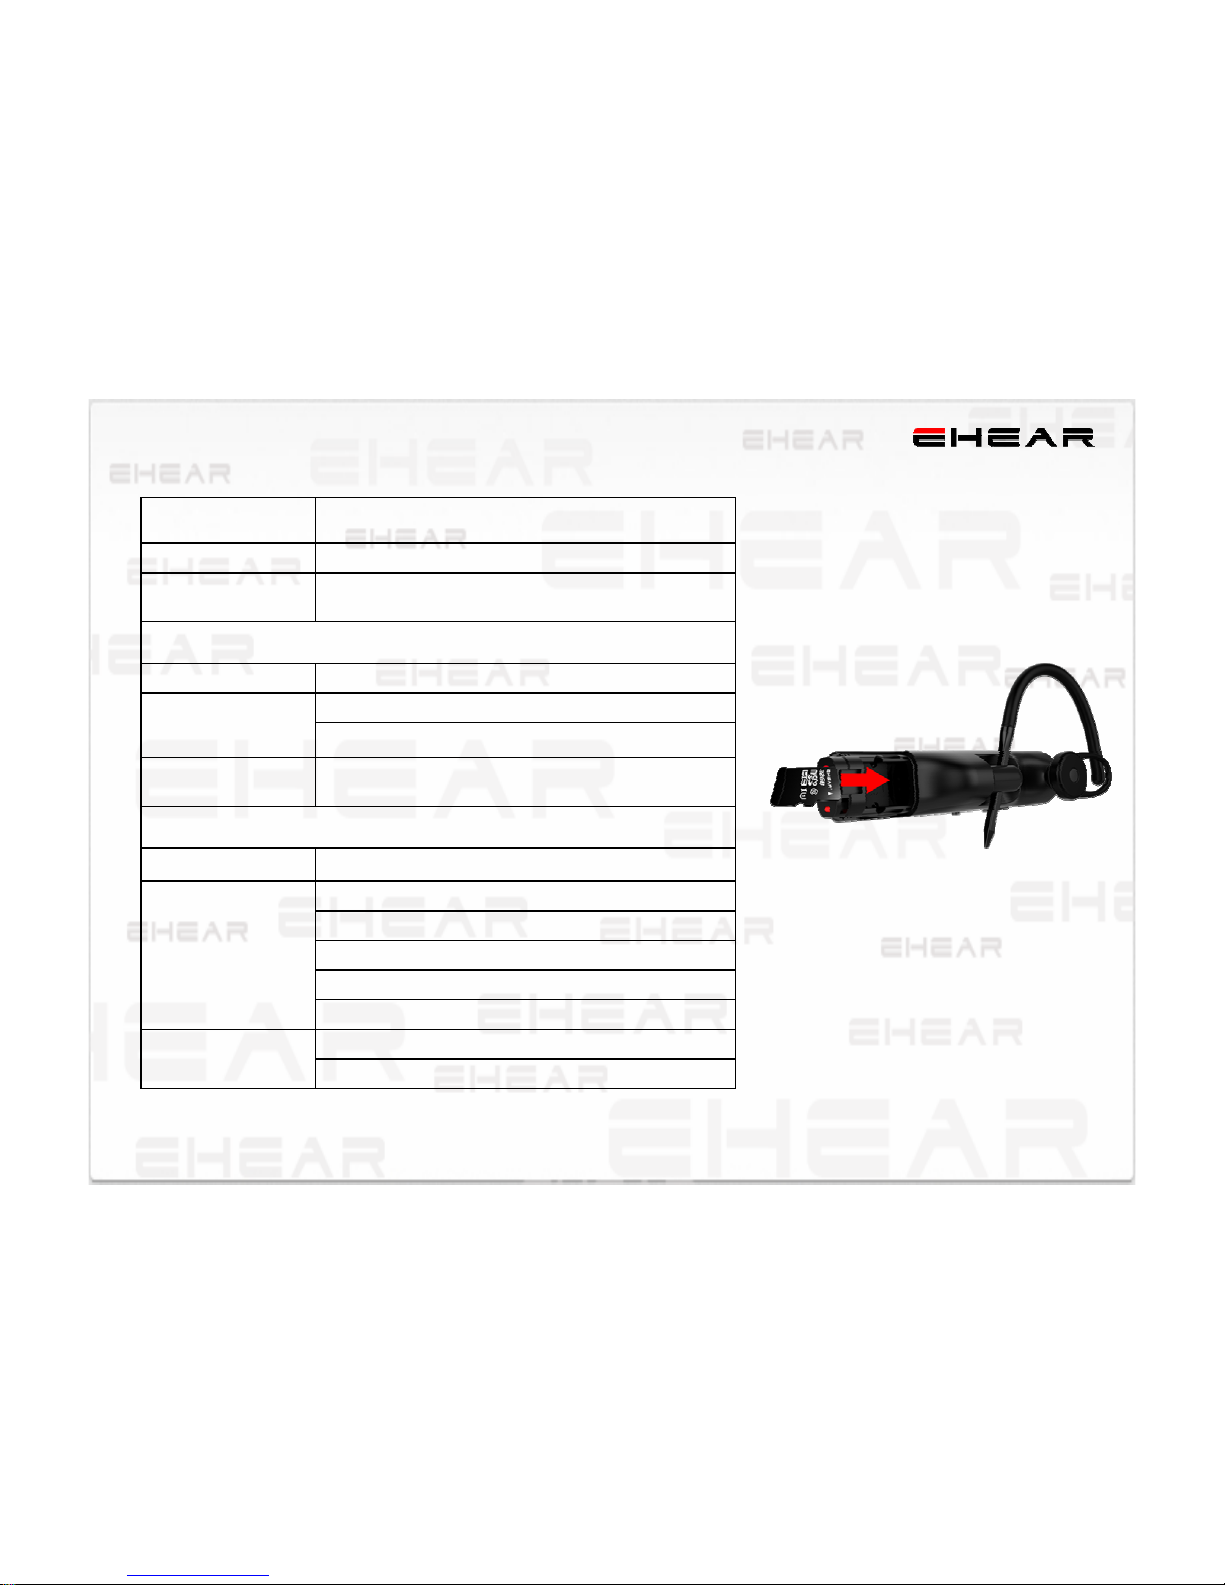
22
Creat your own Vedio Blog on live
Edit the topic to each Video by yourself
Sharing on Live
Download video from EHEAR to Smart phone
Voice recording / Stop
Vdeio Shooting / Stop
Answer Call / Hung up
Power ON/OFF
Control
EHEAR Live
EHEAR Mobile APP
320p @ 20fps
Instant Replay
(buffer)
320p @ 20fps
480p @ 15fps
Recording Clips
VGA with adaptive streamingLive Streaming
Video Capabilities
Automatic broadcast notification (via push
messages)
Broadcast
Notification
Adaptive resolution for Wi-Fi and 3G/4G streamingAdaptive Resolution
Live streaming to Facebook (via free EHEAR app)Facebook
Page 23
23
Copyright©2014SHENZHENEHEARTECHNOLOGIESCO.,LTD
Allrightsreserved.EHEARandtheEHEARlogoaretrademarksorregisteredtrademarksofEHEARTECHCO.,PRCandinternationalpatentspending.
For more information, visit www.EHEAR.com.cn
EHEAR Model: E2
o Reorient or relocate the receiving antenna.
o Increase the separation between the equipment and receiver.
o Connect the equipment into an outlet on a circuit different from that to which the receiver is connected.
o Consult the dealer or an experienced radio/TV technician for help.
Caution: Any changes or modifications to this device not explicitly approved by manufacturer could void your authority to operate this equipment.
This equipment has been tested and found to comply with the limits for a Class B digital device, pursuant to part 15 of the FCC Rules. These limits are
designed to provide reasonable protection against harmful interference in a residential installation. This equipment generates, uses and can radiate radio
frequency energy and, if not installed and used in accordance with the instructions, may cause harmful interference to radio communications. However,
there is no guarantee that interference will not occur in a particular installation. If this equipment does cause harmful interference to radio or television
reception, which can be determined by turning the equipment off and on, the user is encouraged to try to correct the interference by one or more of the
following measures:
This device complies with part 15 of the FCC Rules. Operation is subject to the following two conditions: (1) This device may not cause harmful interference,
and (2) this device must accept any interference received, including interference that may cause undesired operation.
Warning
 Loading...