

EHC VISI200.750.450, VIS1000.750.450, VISGB1000.750.450, VISGW1000.750.450, VISGBI200.750.450 Installation & Operating Instructions Manual
...
The Visage & Elegance Range of
EHC
1
Electric Radiators
INSTALLATION
&
OPERATING INSTRUCTIONS
The Electric Heating Company Limited
Unit 40, Block5 Third Road
Blantyre Industrial Estate,
Glasgow
G72 0UP
Tel: 01698 820 533 Fax: 01698 825 697
info@electric-heatingcompany.co.uk www.electric-heatingcompany.co.uk

CONTENTS
EHC
2
1. General information
2. Safety information
3. Installation
4. Electrical Zones
5. Operating Instructions
6. Technical Dimensions

1. General Information;
EHC
3
This appliance is not intended for use by persons (including children) with reduced physical, sensory or
mental capabilities, or lack of experience and knowledge, unless they have been given supervision or
instruction concerning use of the appliance by a person responsible for their safety. Young children
should be supervised to ensure that they do not play with the appliance;
EHC Visage, Elegance and Visage Glass Electric Radiators have been designed using the latest
technology to create an elegant solution for all hard to heat situations.
They can be installed in almost any location apart from the safety restrictions noted in this manual.
The range has been developed to provide a flexible solution for electric heating in Domestic Properties,
Conservatories, Holiday homes, Offices and any other heating situation.
Our unique EHC Visage, Elegance and Visage Glass Electric Radiators all have a high quality
aluminium heating element providing the heat source for your new radiator. This high quality heating
element has a large surface area that warms up quickly and distributes the heat in an effective and
efficient way.
As safety is of paramount importance to EHC, all Electric Radiators have an in-built automatic twin
overheat protection safety function.
The EHC Visage and Visage Glass Radiators also come with a patented ’Magmatic’ heating tablet
providing partial heat retention. Whilst the radiator is classed as a 100% efficient Direct Acting appliance,
the heating tablets provide partial storage to prolong your heating comfort and to help reduce running
costs.
The EHC Visage Glass Electric Radiators have the same internal components as the EHC Visage
Radiator but have an ultra-modern streamlined toughened glass front. This clean, minimal contemporary
styling allows these slimline heaters to blend into any room in your home.
The EHC Visage, Elegance and Visage Glass radiators can be simply plugged in to a Standard Socket
or Hard Wired to an existing spur connection. The Visage and Elegance has the flexibility of being wall
mounted or free standing on Castors or Feet.
All Visage heaters are supplied as standard with an in-built TDI digital time and temperature thermostat.
This type of control allows you to set Comfort, Night Setback & Frost temperatures 24 hours a day / 7
days a week.
The EHC Visage Glass range of Electric Radiators are operated by Radio Signals and come supplied
with a TPod programmer.
All EHC Electric Radiators are manufactured to the highest safety and quality Standards. Each radiator
is CE Marked and carries all the necessary European Approvals. Each radiator is fully checked and
tested prior to leaving the factory and as such is packed with full Quality Certification.
Please read all instructions before using this appliance and ensure these are
stored in safe place for future reference.
2. Safety Information;
EHC
4
Electrical Connections.
IMPORTANT
The wires within the mains cable supplied with this heater are coloured
as follows:
GREEN-YELLOW: EARTH
BLUE: NEUTRAL
BROWN: LIVE
WARNING – THIS APPLIANCE MUST BE EARTHED
The radiator is fitted with a standard UK 3 pin plug that can be directly connected to an electrical
socket. Care must be taken when connecting radiators in this way not to overload the ring main
circuit. If you are unsure contact a qualified electrician.
Alternatively, the mains cable can be cut to length by a Qualified Electrician and connected to a
suitable 13A DP Switched Fuse Connection unit adjacent to the radiator. This connection unit
should comply with BS 1364-4 having a contact separation of at least 3mm . Please ensure that
the electricity supply is disconnected prior to using this installation method.
The installation of this appliance in this way must be carried out by a competent electrician in
accordance with I.E.E. Regulations for Electrical Equipment.
Please read all instructions before using this appliance and ensure these are
stored in safe place for future reference.

2.1. Safety Information
EHC
4
EHC
5
• WARNING: In order to avoid overheating, do not cover this appliance.
• The appliance must not be located immediately below a socket"outlet.
• To avoid burns, do not touch the hot surface of the appliance when it is in use.
• Do not run the power cord under carpets, rugs or runners and ensure it is away
from a traffic area to avoid slips trips and falls.
• Connect the appliance to a properly grounded power outlets only.
• Use the appliance only as described in this manual as any other use which is not
covered in this manual may cause fire, electric shock, injury to persons.
• If the supply cord is damaged it must be replaced by an authorised service agent, or an
approved competent person in order to avoid an electric shock hazard.
• Please do not place clothes or towels on the radiator as this will result in the radiator over
heating.
• Always use the appliance in an upright position, make sure the appliance is on a dry even surface.
• Do not insert or allow foreign objects to enter any ventilation openings as this may cause an
electric shock, fire and/or damage to the appliance.
• Do not use the appliance for any other purpose than its intended use.
• Do not position the appliances in close proximity to curtains other combustible materials or
explosive objects, or objects which can be easily deformed or damaged
• Keep combustible material such as furniture, cushions, soft furnishing, paper, clothes at least
1.0m away from the appliance.
• Do not operate in areas where paints or flammable liquids are used or stored.
• The appliance is not suitable for outside use
• Do not use this heater in the immediate surroundings of a bath,shower or swimming pool.
• If this heater is to be installed in a room containing a bath or shower, it must be installed in such a
•
way that any that none of the controls or switches can be touched when using the bath or shower.
3. Installation;
EHC
6
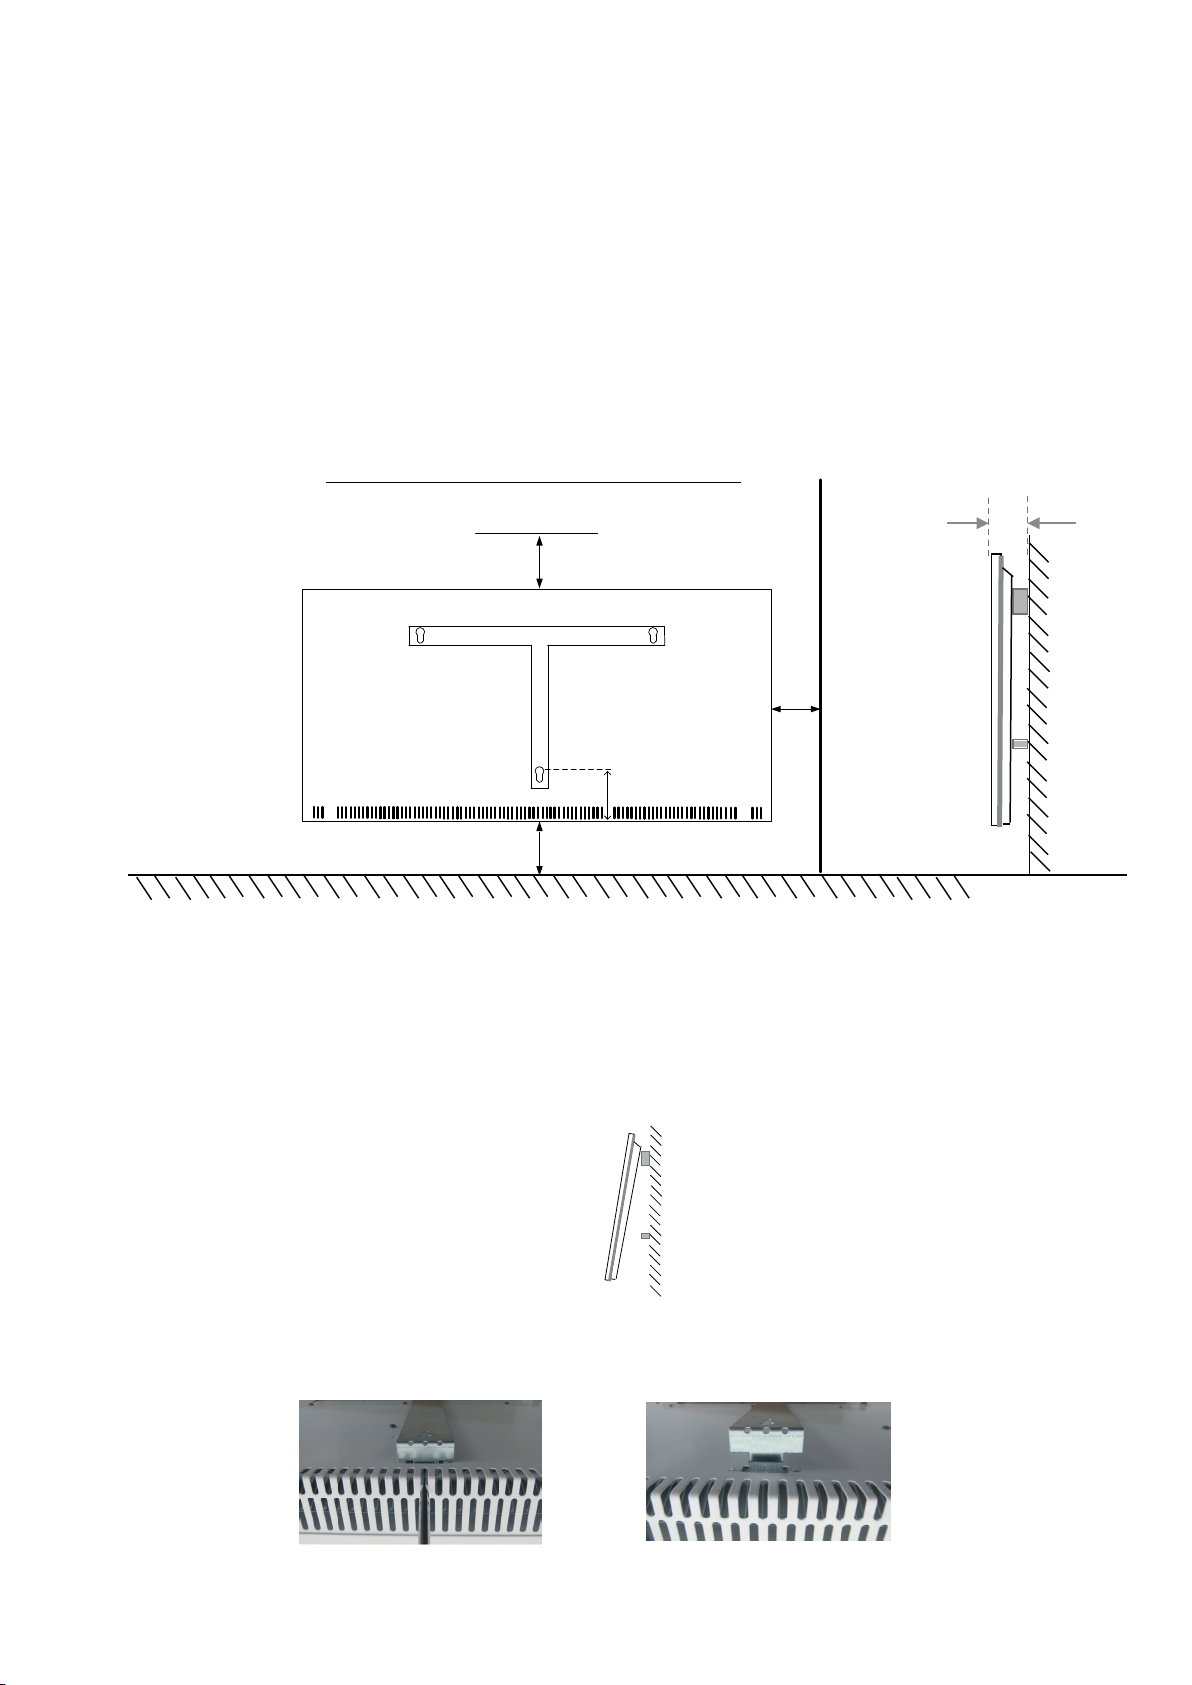
Wall fixing information.
When installing the appliance, the minimum safety distances detailed below must be maintained to ensure
combustible objects cannot catch fire. Secure the heater to an upright wall that is resistant to a minimum
temperature of 90°C.
Ensure there is a minimum distance of 150mm to the floor and a minimum space of 100 mm between the appliance
and any other objects. Any window sills, roof slopes, brackets etc. must be located at least 300mm away from the
hot air vents of the heater,
If this heater is to be installed in a room containing a bath or shower, it must be installed in such a way that none of
the controls or switches can be touched when using the bath or shower.
85mm
Floor
RADIATOR - REAR PANEL FIXING DIMENSIONS:
Min 300mm from shelf
Min
100 mm
35mm
Min 150 mm
Wall fixing information;
1. Measure 185 mm (min) from the floor to the bottom of the wall bracket, level the bracket and mark your
drilling positions.
2. Drill 3 x holes using a 5.5mm bit fixing the bracket to the wall using the screws and plugs supplied.
clip into the bottom bracket, You will hear it click 3. Now hang the heater onto the brackets as shown
into place.
4. To remove the heater insert a small screwdriver through the slots at the bottom of the unit, push upwards to
release the clip.
3. Installation;
EHC
7
Wall Types;
Note: The appropriate fixings must be used depending on the wall types the heaters are to be fixed onto.
Solid brick/High density block walls:
Use the rawlplugs and screws provided with the heater. The correct size of drill (5.5mm) should be used and the hole
should be drilled to a depth of 8mm greater than the length of the Rawlplug so that the fixing is made below the plaster
layer.
Low density block walls:
A special fixing, such as Unifix LB70 should be employed, following closely the manufacturers instructions.
Panelled internal walls:
It is preferable to locate the timber studding and use the screws provided. Where it is not possible to locate the
studding use a recommended plasterboard fixing that is capable of withstanding the full weight of the heater.
Note: The wall fixing manufacturer should be consulted to make sure the correct fittings are used for the wall
type.
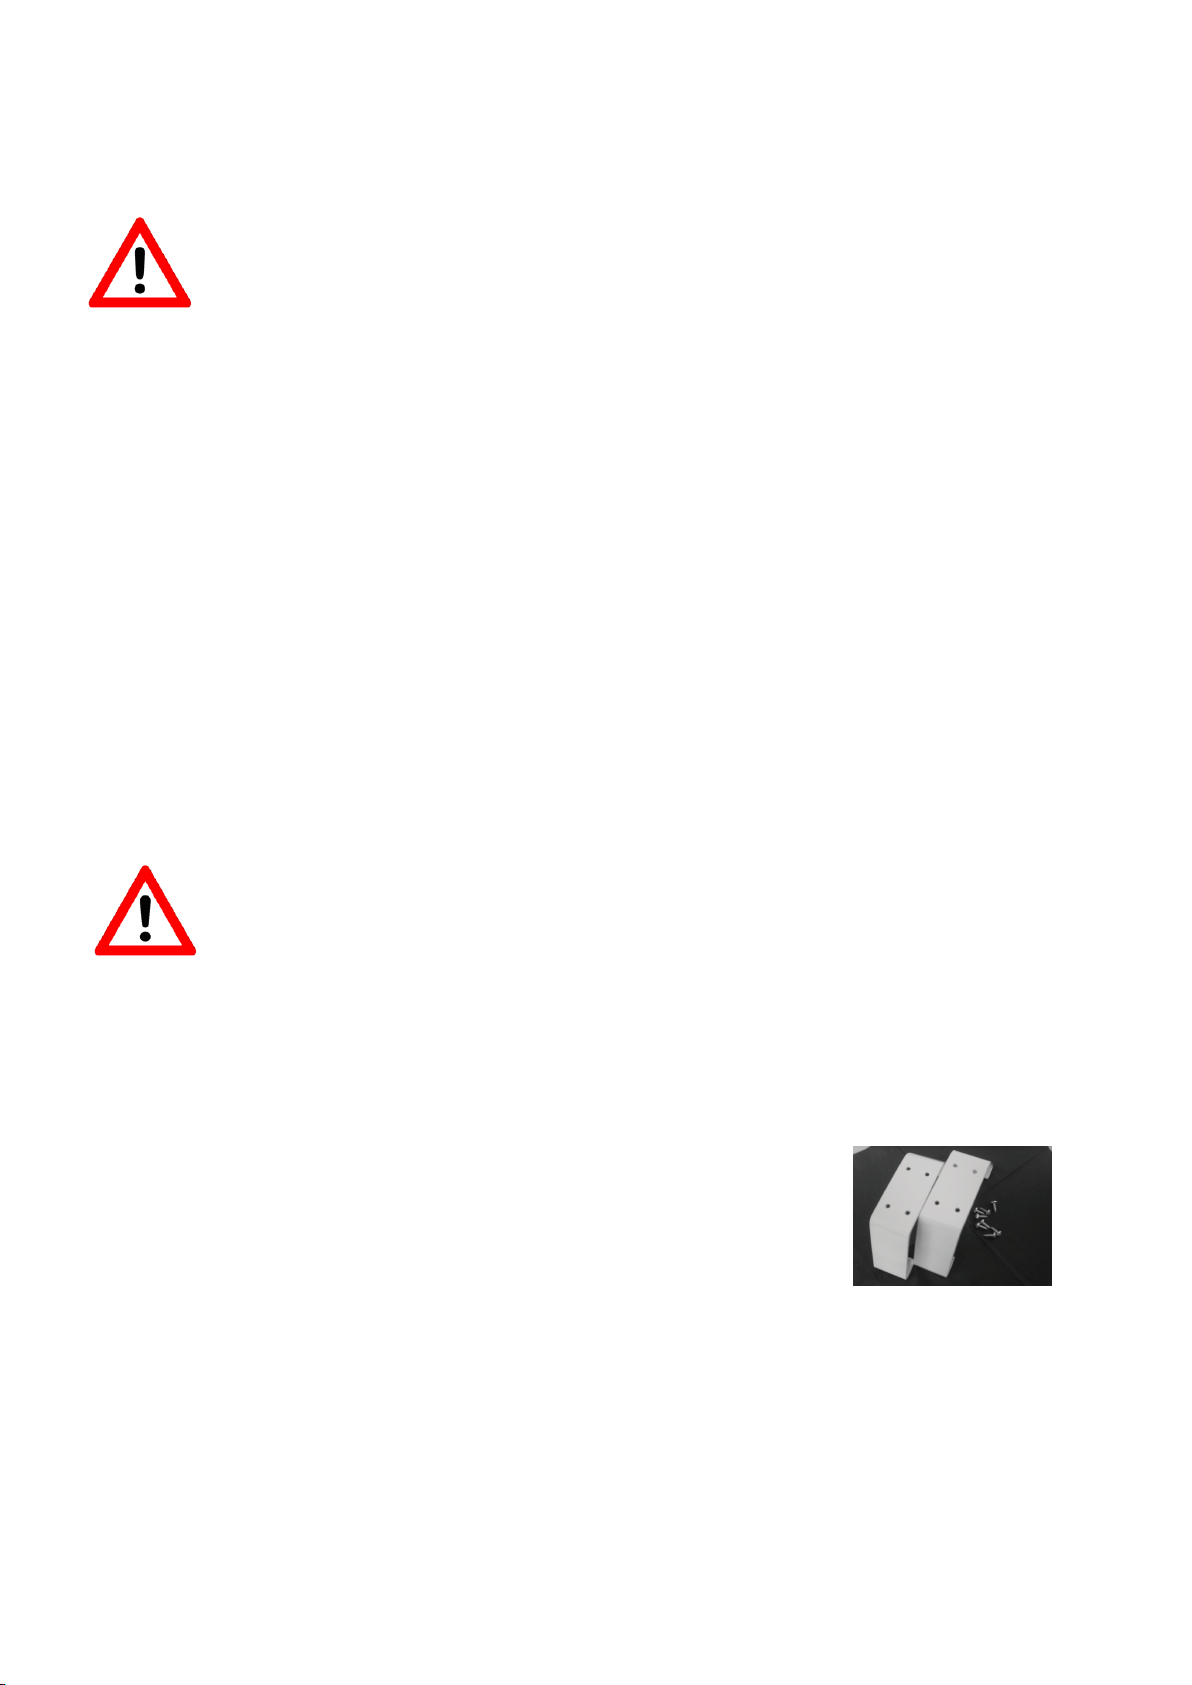
Optional Radiator Feet;
Visage & Eligance heaters (Excluding Glass) can be mounted with free standing
feet.
The appliance must be located in such way that any potentially combustible
objects or materials do not come in contact with the heater to prevent damage or
fire.
How to install the feet;
(fig. 1)
1. Place the heater on a flat desk or work surface.
2.
Match the holes on the bottom of the unit to the 4 holes on both feet (fig. 1)
3. Fasten the feet to the unit by fixing with the screws provided.
 Loading...