

GAS FIRED WALL MOUNTED CONDENSING
COMBINATION BOILER
FOR SEALED CENTRAL HEATING SYSTEMS AND MAINS FED DOMESTIC HOTWATER
THE APPLIANCE IS FOR
USE WITH NATURAL GAS OR
L.P.G
EHC ECOSAVE 21K
EHC ECOSAVE 25K
EHC ECOSAVE 32K
EHC ECOSAVE 37K
GB
USER INTRODUCTION MANUAL
OPERATING AND IMPORTANT WARRANTY
IMFORMATION

EHC
Preface
The following information is intended to help you operate the
appliance correctly and to ensure the clarity of the instructions,
British Standards references are adopted.
However we are not responsible for any damage to the boiler
If you have any operational questions about the appliance,
please contact either the approved installer or EHC Technical
Department on Tel No : 01698 820533
Storage of the Documents
Please ensure you store the instructions and all other related
documents in a safe and dry area. If you move house please
pass on this documen are left for the new owner.
Identification Plate
The Identification Plate for the Eco Save Series is attached on
the right side of the appliance and contains the main
specifications for the appliance. Please contact your installer
if you need explanations on what this information means.
Abbreviations Used in the Instructions
CH: Central Heating
DHW: Domestic Hot Water
LPG: Liquid Petroleum Gas
Introduction
as a result of users not following these operating instructions

1
EHC
1. Product Overview 2
2. Safety 2
2.1 Safety Denitions
2.2 Safety Precautions
2.3 CE Marking Information
2.4 Set-up and Adjustment s
2.5 Emergency Actions
2.6 Modications
2.7 Water Le aks
3. Overview of the Appliance 5
3.1 Ex ternal View
3.2 Contr ol Panel
4. Turning the Appliance ON/OFF
8
4.1 Turning On the Appliance
4.2 Turning O the Appliance
5. Switching Operating Status Display
9
6. Using the Central Heating
10
6.1 Setting the CH Temperature
6.2 Turning off the Central Heating
7. Using the Hot Water
11
7.1 Setting the Hot Water Temperature
7.2 DHW Pre-heating
8. Resetting the Appliance
13
9. Using the Service Menu
14
10. Frost Protection
16
11. When Not Using the Appliance for Long Periods of Time 16
12. Maintenance and Customer Service
16
13. Troubleshooting
16
14. Specications
18
15. Terms and Conditions
19
15.1 Warranty
15.2 Warranty Registration
15.3 Immediate Help
15.4 Intende d Use
15. 5 Ca r e
15.6 Recycling and Disposal
Contents
2
EHC
Safety 2. Product Overview1.
Overview
The appliance has the following modes of operation:
Central Heating (CH) •
Supplies hot water to radiators and allows adjustment of
room temperatures via optional Room thermostat. If an
outside sensor is fitted it will automatically adjust the room
temperature in accordance with outside temperatures.
Domestic Hot Water (DHW) •
Supplies hot water when the hot water tap is turned on.
When power is turned on the appliance will go into the CH mode.
When the hot water tap is turned ON, it automatically switches to
the DHW mode and supplies hot water. While in the DHW mode
of operation, the CH mode is disabled.
Models
EHC provides the following four types of models.
Eco save 21K•
Eco save 25K•
Eco save 32K•
Eco save 37K•
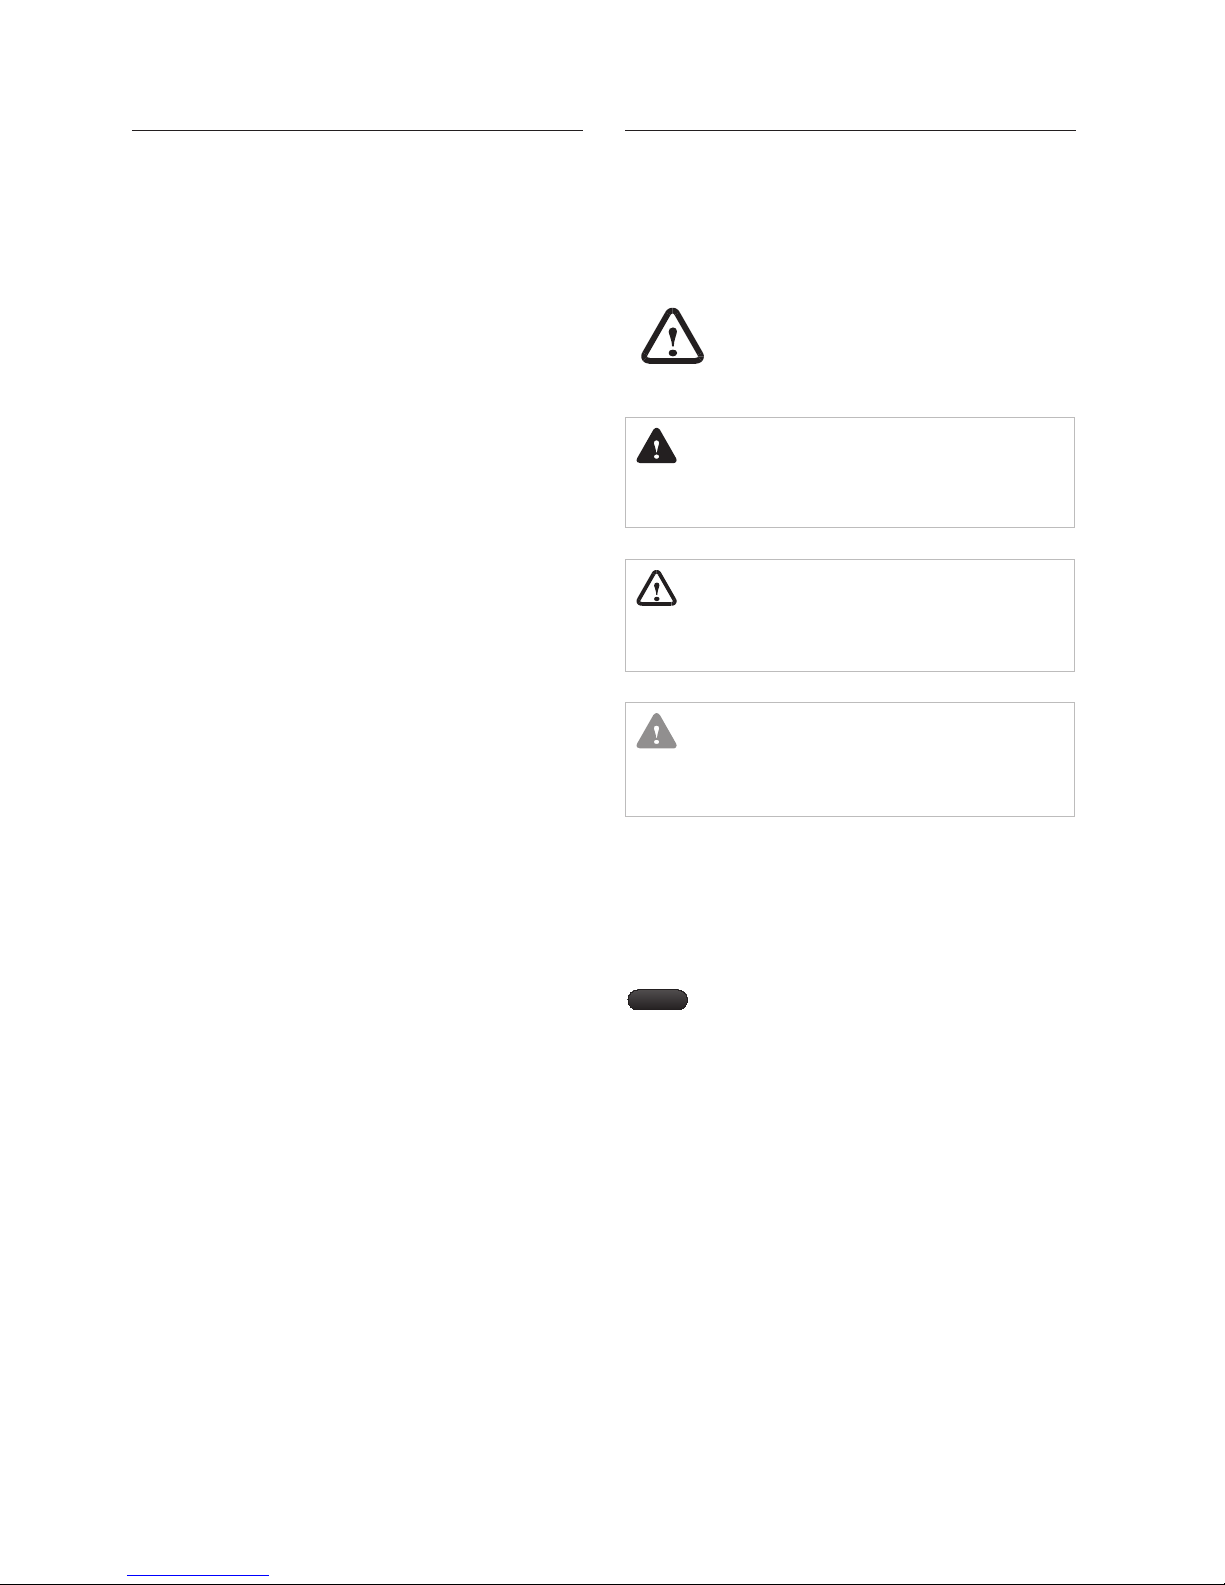
Safety Definitions2.1
All safety messages will refer to potential hazards. Follow the
instructions exactly to avoid the risk of injury.
This is the safety alert symbol. It is used to alert
you of the potential personal injury hazards.
Obey all safety messages that have this symbol
to avoid possible injury or death.
DANGER
Indicates an imminently hazardous situation which, if not
avoided, could result in severe injury or death.
WARNING
Indicates a potentially hazardous situation which, if not
avoided, could result in severe injury or death.
CAUTION
Indicates an imminently hazardous situation which, if not
avoided, could result in minor or moderate injury.
Symbols Used in the Instructions
The following symbols are used throughout the instructions
to call attention to important information concerning the
appliance.
Note
Indicates useful information and instructions.

3
EHC
WARNING
Have your installer show you the location of the gas •
shuto valve and how to close it. Close the shuto valve
if the appliance becomes subjected to overheating, re,
flood, physical damage or any other hazardous situation.
operate the appliance until it has been checked
by an authorised installer.
turn ON the appliance unless water and gas •
supplies are fully opened.
turn ON the appliance if the cold water supply •
shuto valve is closed.
use this appliance for any other usage than its •
intended purpose as described in the instructions.
attempt to repair or replace any part of •
the appliance by yourself. All service should be performed
by an authorised Installer
Ensure that the power is OFF before removing the front •
cover for any reason.
To prevent scalding, always check the water temperature •
while the appliance is being used.
attempt to change the water temperature while •
the appliance is being used.
use replacement parts other than those specified•
for this appliance.
operate the system if you feel the appliance is•
allow children to operate or touch the appliance.•
CE Marking Information2.3
0051
The purpose of CE marking is to confirm that the appliance
complies with the requirements of the regulations concerning
gas-red appliances, electromagnetic compatibility, and
operating eciency.
Safety Precautions2.2
Read and follow these safety precautions. however If you do not
understand what the insrturctions mean, then contact the
approved Installer or the EHC Technical Department on Tel
DANGER
DO NOT•
near the appliance.
place combustibles such as newspapers near the •
appliance or the exhaust system.
place or use hair spray, spray paint or any other •
type of spray can near the appliance or the exhaust
system (including the outlet).
place anything in or around the outlet since the •
intake/exhaust air ow may be obstructed.
operate the appliance when the front cover is •
removed. Operations under such conditions may cause
re or Carbon Monoxide (CO) Intoxication, which may
result in property damage, personal injury or death.
DANGER
Keep ammable objects and combustibles
No : 01698 820533
place flammable products such as oil or gasoline
DO NOT
DO NOT
DO NOT
DO NOT
well away from the appliance.
DO NOT
DO NOT
DO NOT
DO NOT
DO NOT
DO NOT
DO NOT
DO NOT
DO NOT
not functioning correctly

DO NOT
4
Set-up and Adjustments2.4
WARNING
Installation, adjustment, service, repair and maintenance of
the appliance should only be carried out by a approved
installer, and should comply with Gas Safety(Installation and
Use) Regulations 1998.
If the appliance is installed in a small room,
obstruct any intake/exhaust fue and ensure there is sufficient
clean air circulation around the boiler.
Emergency Actions2.5
DANGER
Boiler malfunction may result in gas leakage and the risk of
fire, explosion and/or asphyxiation from carbon monoxide.
If you can smell gas,
smoke.•
operate light switches or electrical equipment •
switches.
Open the windows and doors.•
Close the gas shuto valve.•
Shut down the heating system.•
Keep people away from the danger zone.•
Observe the safety regulations of your local gas supplier, •
found on the gas meter.
•
DANGER
Compromised Flue System
Failure to follow the ue section of the installation •
instructions may result in the unsafe operation of
this appliance. To avoid the risk of re, explosion or
asphyxiation from carbon monoxide, never operate the
appliance unless it is properly vented to the outside and
also has an adequate air supply.
Inspect the vent terminal and the air intake pipe annually•
to ensure safe operation of the appliance.
Immediately turn of and use the appliance if any •
of the vent pipes, flue elbows and/or the air intake pipe
are :
damaged in any way; have separated at a joint; are cracked or show evidence of corrosion, rusting or melting.
WARNING
A faulty flue may cause a a build-up of carbon monoxide•
(CO). Breathing carbon monoxide can cause serious injury
or death. Carefully read and follow the instructions
described in the previous pages.
Protect against snow accumulation around the ue •
terminations. Ensure that the exhaust ue pipe and the
intake air pipe remain clear from obstructions at all times.
Modifications2.6
make any modifcations to the following:
The appliance •
The gas, water and electrical supply•
The ue system•
The safety valve for heatin• g water
make any structural changes around the appliance that
could aect the operational safety of the appliance.
damage or remove any seals on components. Only
authorized technicians or our customer service technicians may
remove sealed components.
Water Leaks2.7
Water leaks may cause the water pressure to be below the normal
operating range.
If there are leaks in the water pipes between the appliance and
the taps, immediately turn o the cold water supply and ask
your central heating installer to repair the leaks as soon as
DO NOT
DO NOT
Extinguish any open flames and sparks.•
Contact the 'National Grid Emergencies' phone
number 0800 111 999 immediately
DO NOT
DO NOT
DO NOT
DO NOT
Regularly check the operating pressure of
the appliance.
possible.
EHC
5
EHC
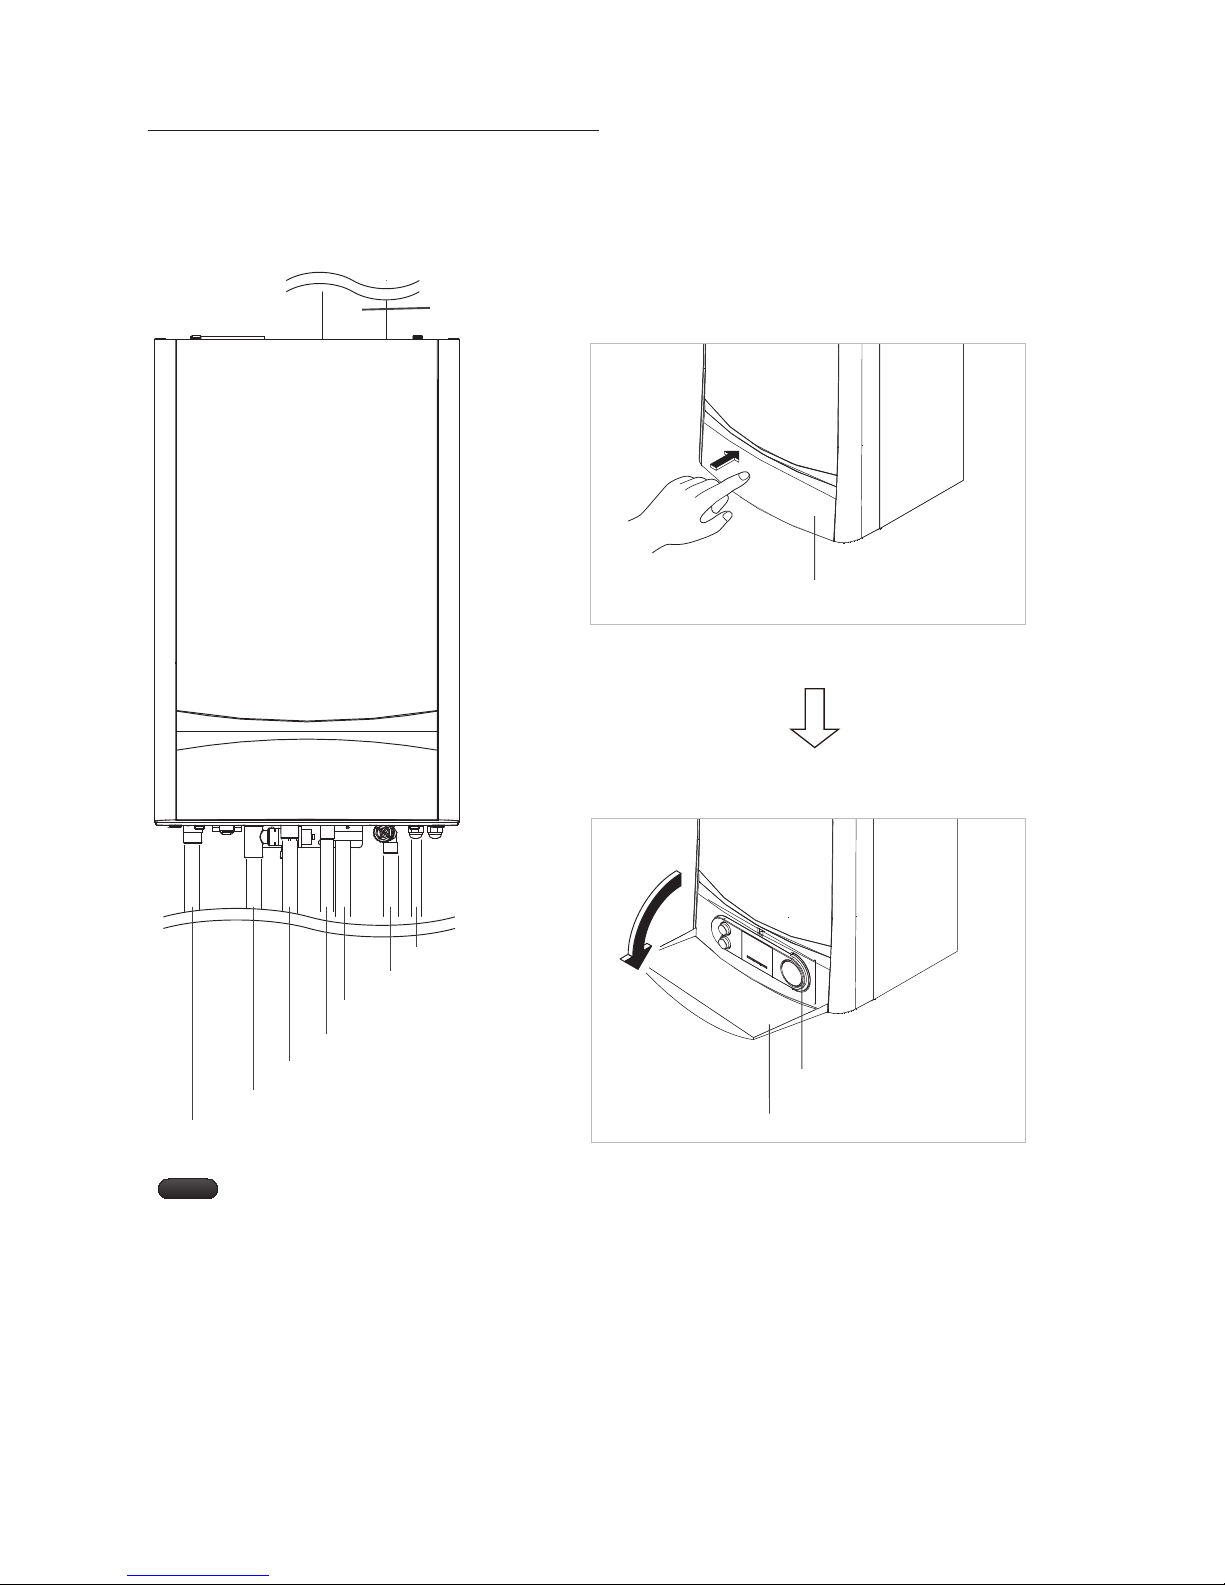
Overview of the Appliance3.
External View3.1
Front flap
Control Panel
Flue
Front flap
Push
Gas inlet pipe
Power cable
Water inlet pipe
DHW outlet pipe
Condensate pipe
Heating return pipe
Heating supply pipe
Note
Before using, make sure that:
all valves are fully opened;•
the power is switched on at the Isolating switch.•

6
Control Panel3.2
1. Display
Indicates current heating ow temperature, pressure in the
heating system, operating mode and additional information.
2. CH temperature control
Used to set the temperature for the Central Heating. It can also
be used with the parameter setting in the Service Menu.
3. DHW temperature control
Used to set the temperature for the Domestic Hot Water
temperature.
4. [MODE] Button
Used to switch the display for the operating status of the
appliance. It can also be used with the parameter settings in the
Service Menu.
5. [Main ON/OFF] Button
Used to turn the appliance ON / OFF.
6. [RESET] Button
Used when the appliance does not operate normally. It can also
be used in the Service Menu.
3
654
12
This appliance is tted with a digital information and
analysis system. This system provides information on
the operating status of your appliance. During normal
operation, the display shows the current heating ow
temperature. When a malfunction occurs, an error code
appears instead of the temperature.
EHC

7
EHC
c
i
j
h
g
f
e
d
a
b
a
Central Heating Icon
f
Burner lock-out Icon
ON : The appliance is in CH mode
Flashing :The numerals indicate the CH temperature
or CH set-point.
ON : The numerals indicate a lock-out condition.
b
Domestic Hot Water Icon
g
External temperature Icon
ON : The appliance is in DHW mode.
Flashing : The digits show the DHW temperature or DHW
set-point.
ON : The outdoor temperature sensor is connected.
Missing : The outdoor temperature sensor is not connected or is
damaged.
c
Burner Icon
h
Water pressure Icon
ON : The burner is operating. ON : The numerals indicate the water pressure.
d
Domestic Hot Water operation Icon
i
Temperature Icon
Flashing : The numerals indicate that the DHW Pre-heating
is functioning.
In standby, CH mode, and DHW mode, the numerals
indicate the primary temperature.
ON : The numerals indicate the temperature (unit : °C).
e
Central Heating operation Icon
ON : The numerals indicate that the central heating is
functioning.
j
Parameter digits

8
Turning the Appliance ON/OFF4.
Turning ON the Appliance4.1
Press the [main ON/OFF] button.
When you turn on the appliance, the current operating status
appears on the display.
To change the settings for the appliance, read the following
sections that describe the setting options for the hot water
supply and central heating.
Turning OFF the Appliance4.2
Hold the [main ON/OFF] button for more than
1 second.
The power is turned o .
Note
If the appliance is not operated for 24 hours, the fan
and the pump automatically operate for 30 seconds
to prevent seizing.
EHC
9
EHC
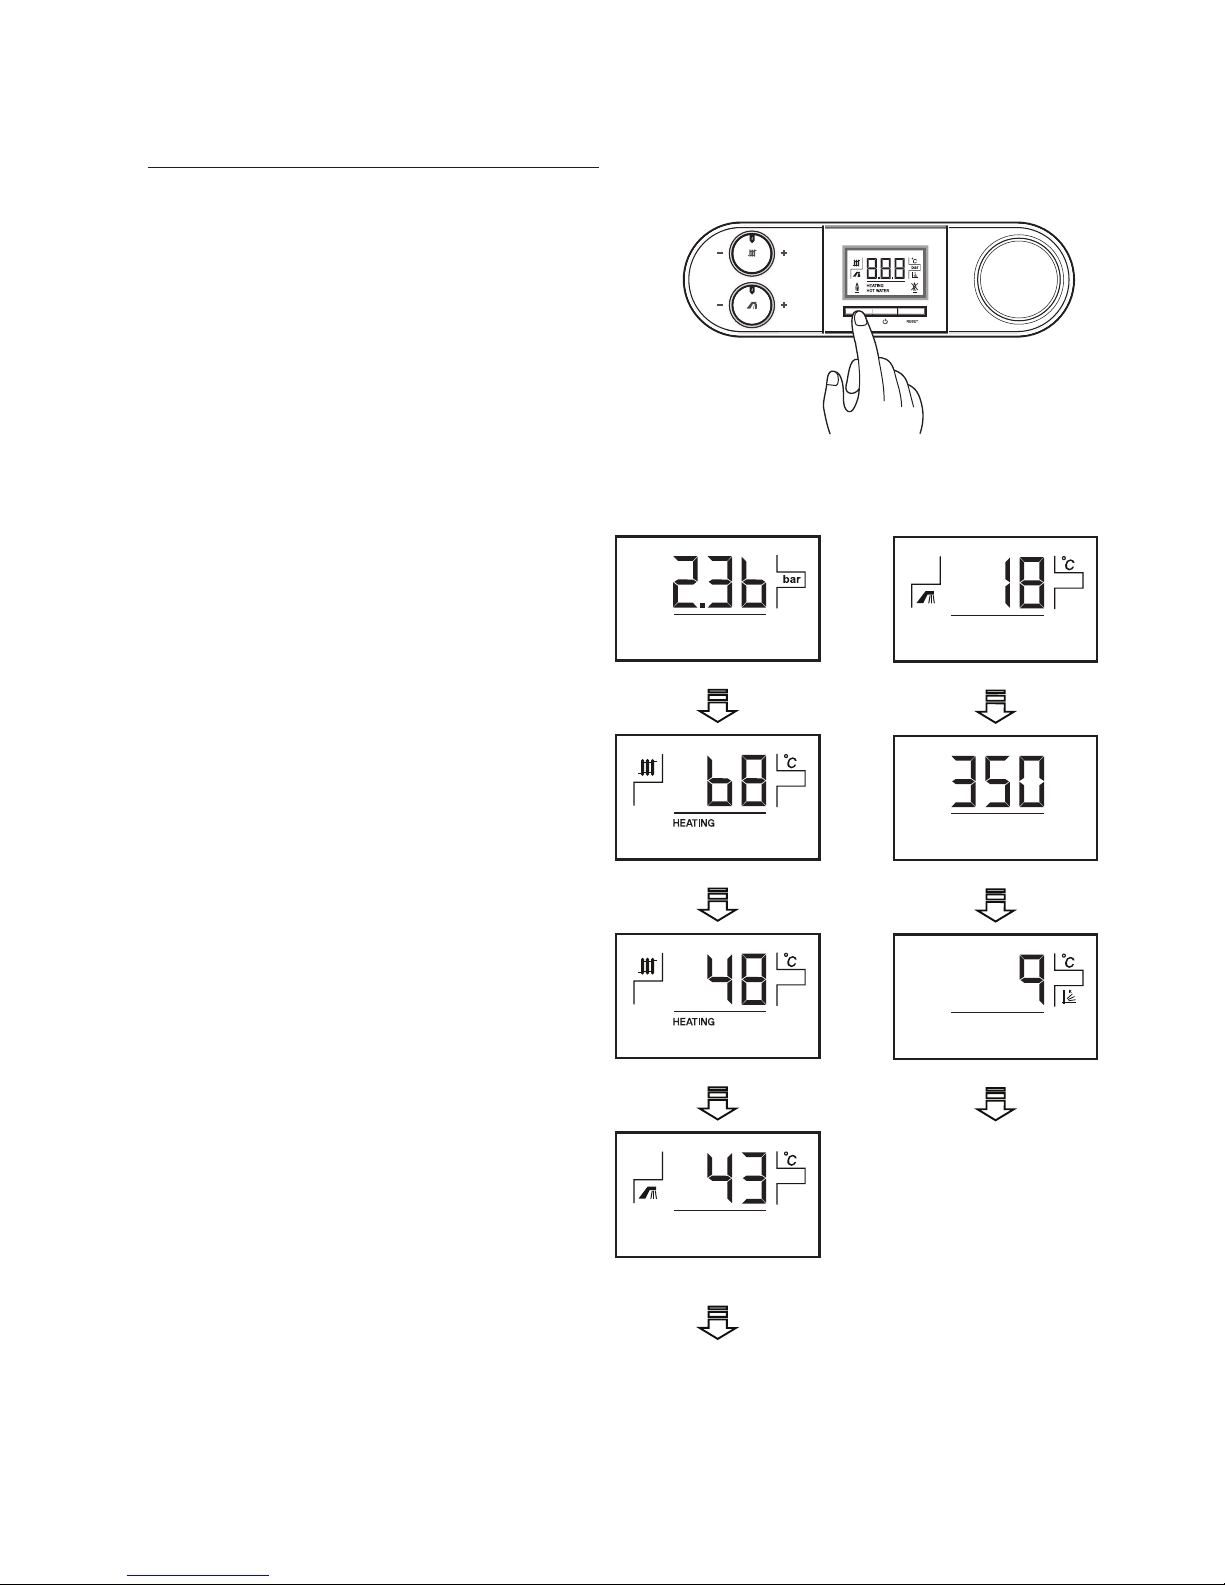
Switching Operating Status 5.
Display
1.
System pressure
2.
Supply water temperature
3.
Return water temperature
4.
Domestic hot water
temperature
5.
Inlet water temperature
6.
FAN speed (rpm x 10)
7.
Outdoor temperature
8.
Returns to the normal display.
The status display provides information on the operating status
of the appliance.
Press the [MODE] button to switch to the
desired mode display.

10
Using the Central Heating6.
The following instructions will show you how to use the Central
Heating when the appliance is connected with an external
system (e.g., under floor heating).
Setting the CH Temperature6.1
Adjust the temperature with the CH
temperature control.
Turn the CH temperature control clockwise to increase the
temperature and anti-clockwise to decrease the temperature.
This corresponds to:
Left limit : appro• ximately 30°C
Right limit : appr• oximately 85°C
Depending on the season, we recommend the following
settings:
Turn to the left during spri• ng and autumn
Turn to the middle during a mild winter•
Turn to the right during a c• old winter
When you adjust the temperature, the set temperature is shown
in the display. After ve seconds, the display returns to normal
mode (the current heating ow temperature).
Weather Compensation
If an outdoor temperature sensor is connected, the weather
compensation function can be used. With this function, the
target primary temperature is automatically set according to the
outdoor temperature (K-factor).
If the weather compensation is functioning, you can adjust the
K-factor instead of CH temperature.
The K-factor can be adjusted from 0.5 to 6.0 in tenths.
See the following table for the relationship between primary
and outdoor temperature: K-factor
Turning off the Central Heating6.2
You can turn o the central heating in summer without
switching o the hot water supply.
Turn the CH temperature control all the way
to the left.
The CH mode is turned OFF, but DHW can be used.
K=0.5
K=1
K=1.5K=6 K=4 K=3 K=2
20
20.0
30.0
40.0
50.0
60.0
70.0
80.0
15 10 5 0 -5 -10 -15 -20 -25
Outdoor Temperature (°C)
Target primary temperature
EHC

11
EHC
Using the Hot Water7.
When a hot water tap is turned on at a supply point (sink,
shower, bath, etc.), the appliance will automatically operate to
deliver instantaneous hot water.
When the tap is turned o , the appliance is turned OFF (or it
continues the CH operation if required).
Setting the Hot Water Temperature7.1
The domestic hot water temperature can be adjusted with the
DHW temperature control.
Adjust the temperature with the DHW
temperature control.
Turn the DHW temperature control clockwise to increase the
temperature and anti-clockwise to decrease the temperature.
This corresponds to :
Left limit : approximately 30 °C•
Right limit : approximately 65 °C•
When you adjust the temperature, the set temperature is shown
in the display. After ve seconds, the display returns to normal
mode (the current heating ow temperature).
12
DHW Pre-heating7.2
The appliance will pre-heat the water inside the appliance to
deliver instantaneous hot water. This function is active
when DHW Pre-heating mode is ON and a set temperature has
been set by the user.
How to activate the DHW pre-heating mode and how to set the
DHW pre-heating temperature.
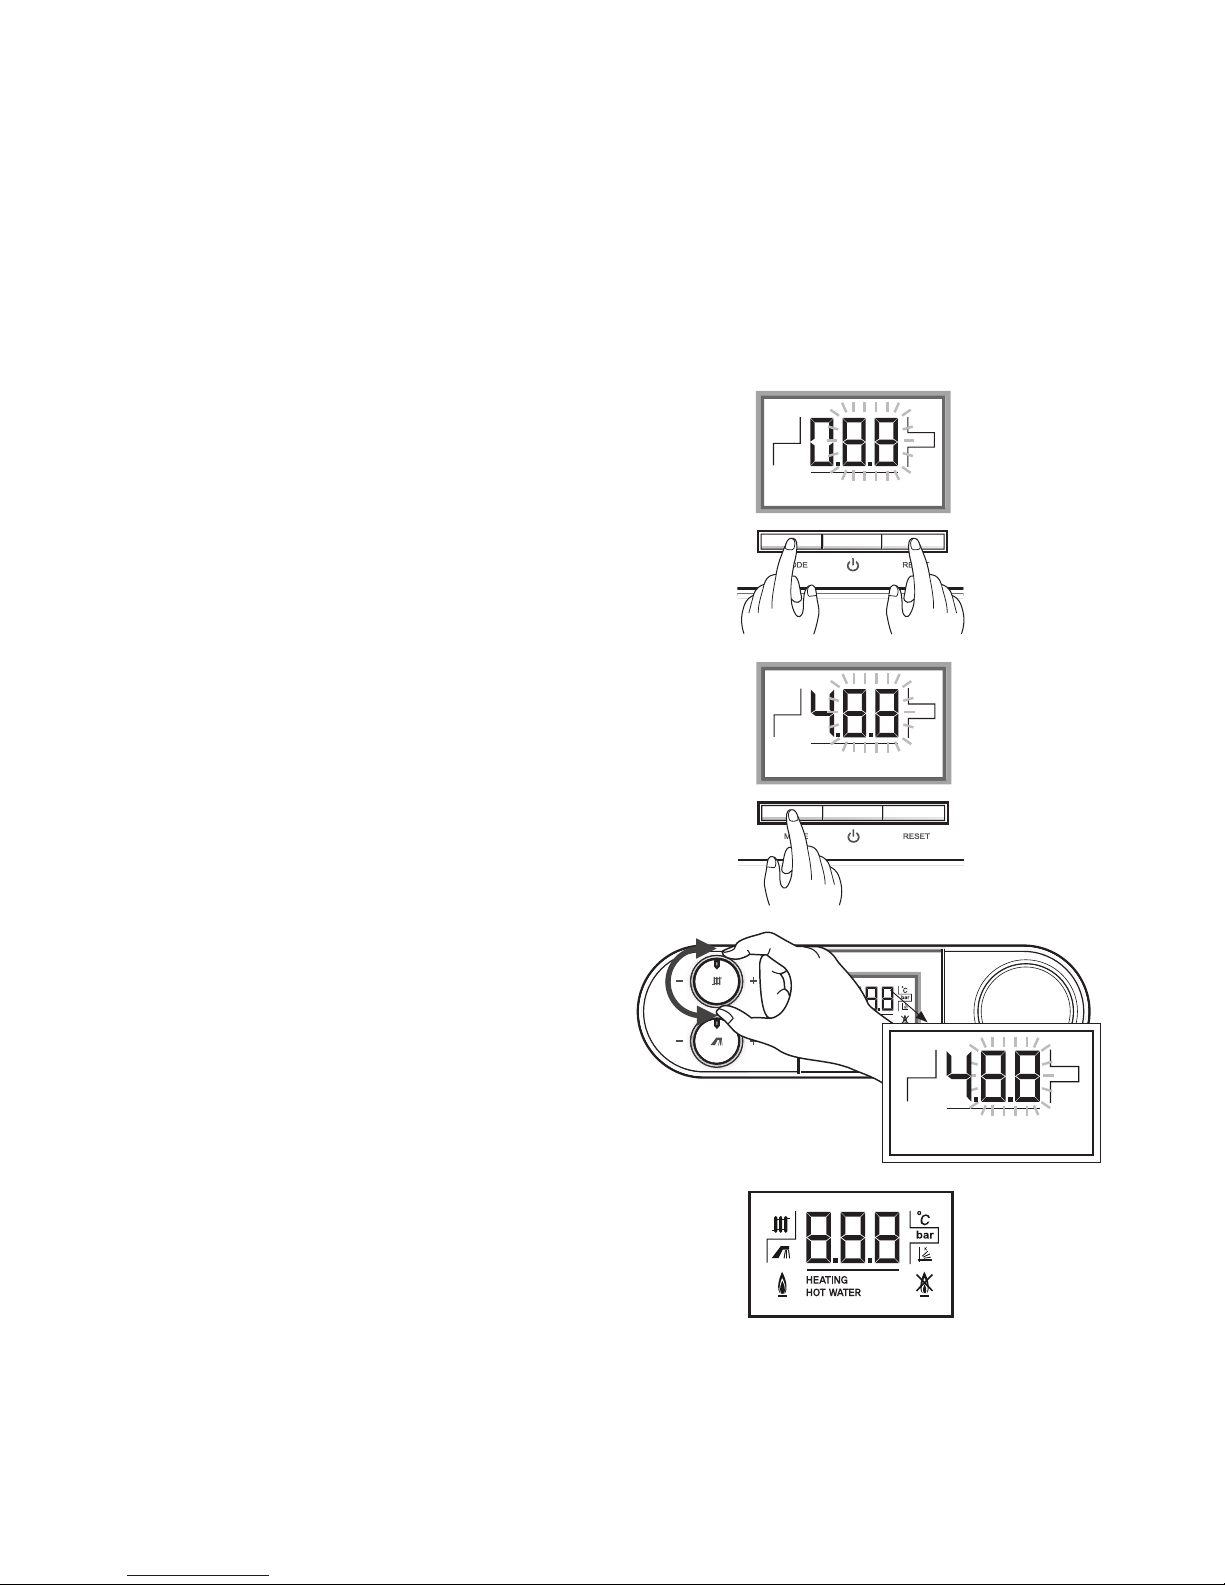
1. Press the [MODE] button and the [RESET]
button simultaneously for 5 seconds.
Three digits are shown.
The f rst digit, which is not flashing, represents a
parameter number. The next two digits, which are
flashing, represent the value of the parameter.
2. Press the [MODE] button 4 times to select
the DHW pre-heating mode.
Parameter number 4 is displayed.
3. Set the value of the parameter to turn ON
or OFF by turning the CH temperature
control.
The display switches between ON and OFF.
4. Wait for 10 seconds until the display goes
back to the normal display.
Returns to the normal display.
While the appliance is in the DHW pre-heating mode, the burner
is turned ON or OFF depending on the return temperature so
that the set temperature is maintained.
EHC

13
EHC
Resetting the Appliance8.
You may have to reset the appliance when a problem occurs,
(e.g., hot water does not come out even when the tap is
open.) If an error code is displayed, reset and conf rm whether
the problem is resolved. If the problem cannot be resolved by
resetting, contact an approved installer or EHC Techinical
Press the [RESET] button.
The appliance is reset.
Ensure that the current operating status is displayed.
Department on Tel No: 01698 820533.

14
Using the Service Menu9.
1. Press the [MODE] button and the [RESET]
button simultaneously for 5 seconds.
Three digits are shown.
The f rst digit, which is not flashing, represents a
parameter number. The next two digits, which are
flashing, represent the value of the parameter.
2. Press the [MODE] button until the desired
parameter code is displayed.
The selected parameter number is displayed.
3. Turn the CH temperature control knob to
change the value of the parameter.
The value of the parameter can be increased or
decreased by rotating the CH temperature control.
4. Wait for 10 seconds until the display goes
back to the normal display.
Returns to the normal display.
EHC

15
EHC
Note
Select a desired parameter number by pressing
the [MODE] button for the number of times shown
in the table above. Before changing the setting
value, ensure that you are selecting the intended
parameter number.
A B
Parameter
Number
Parameter Range Default
0 Rated range heat capacity (F0) 20 - 99, FH* FH*
1 Pump over run time (F1) 3 - 40 minute 3 minute
2 DHW post delay time (F2) 0 - 20 minute 5 minute
3 Anti-cycling timer (F3) 0 - 10 minute 0 minute
4 DHW Pre-heating (F4) ON/OFF OFF
5 Rated range water pressure (F5) 0.5 - 2.0 bar 1.0 bar
6 Minimum/Maximum operation setting (F6) OFF/MIN/MAX OFF
FH* = Full (Maximum) Heat Capacity = 100%
A B

16
Frost Protection10.
In CH, DHW, and Weather Compensation modes, frost protection
is an integral function for protecting the appliance. This function
is the highest priority among the operation modes and this
function works even if the system is switched o.
There are two kinds of processes depending on the primary
water temperature.
6 -10°C •
If the primary water temperature falls below 10°C, the control
system runs the pump for 10 minutes and stops the pump
for 1 minute. This process is continued while the primary
water temperature is in the above mentioned range.
Below 6°C •
The appliance ignites the burner in the CH mode until the
primary water temperature reaches 21°C.
On extremely cold days it is good practice to keep the CH mode
ON to prevent the pipe work to the appliance from freezing.
When Not Using the Appliance 11.
for Long Periods of Time
When not using the appliance for long periods of time, especially
during the winter or when stopping the gas and power supply,
water needs to be drained.
Procedures are shown below.
Turn o the power.1.
Close all the valves.2.
Drain the water with the drain cock.3.
After draining the water, close the drain cock.4.
Maintenance and Customer 12.
Service
For permanent operational readiness, reliability, and a long
service life, the appliance needs to be inspected and serviced
annually by a Gas Safe Registered Engineer.
Regular service ensures maximum eciency and economical
operation of the appliance.
Troubleshooting13.
Problem Possible Cause(s)
Nothing is displayed
on the control panel.
Is there a power blackout?
Is the power isolating switch OFF?
Water is not supplied.
Is there a water blockage?
Is the water tap suciently turned
on?
Is the appliance frozen?
Is any error code displayed on the
control panel?
Hot water is not
supplied.
Is the gas shutoff valve fully opened?
If using LPG, is the gas running out?
Is the temperature properly set on
the control panel?
Desired water
temperature cannot
be obtained.
Is the gas shutoff valve fully opened?
Is the temperature properly set on
the control panel?
EHC

17
EHC
Error code
Errors are indicated by a flashing error code with/without the
fault symbol. For details of the error codes, refer to the following
table. If the problem cannot be solved, please contact the
installer.
Error
Code
Reason Action required
E02 Low water-level Contact Engineer.
E03 Ignition Failure Reset the appliance.
E04 Flame simulation
E05 Supply water thermistor: Open
E06 Supply water thermistor: Short
E07 Hot water thermistor: Open
E08 Hot water thermistor: Short
E09 Abnormal Fan Reset the appliance.
E10 Abnormal Air Pressure Reset the appliance.
E11 Water Pressure Sensor fault
E12 Flame failure Reset the appliance.
E15 Abnormal BMC Reset the appliance.
E16 Over Heat: Heat Exchanger Reset the appliance.
E17 Dip Switch Setting Fault Reset the appliance.
E18 Return water thermistor: Open
E19 Return water thermistor: Short
E21 Inlet water thermistor: Open
E22 Inlet water thermistor: Short
E27 Abnormal Air Pressure Sensor Reset the appliance.
E30 Over Heat: Exhaust Reset the appliance.
E40 Outdoor thermistor :short
E93 Key button failure
Contact Engineer.
Contact Engineer.
Contact Engineer.
Contact Engineer.
Contact Engineer.
Contact Engineer.
Contact Engineer.
Contact Engineer.
Contact Engineer.
Contact Engineer.
Contact Engineer.
Contact Engineer.

18
Specications14.
The following table shows the dierences in models.
Specication Items Unit
EHC
Ecosave-21K
EHC EHC EHC
Heat Input (Max/Min) kW 19.6/4.9 23.5/4.9 30.0/7.0 34.9/7.0
DHW Input (Max/Min) kW 23.5/4.9 34.9/7.0
Heating Output (Max/Min) - Flow/Return
(80/60°C)
kW 19.3/4.8 23.1/4.8 29.5/6.8 34.2/6.8
DHW Output (Max/Min) kW 23.1/4.8 34.2/6.8
Condensing Heating Output (Max/Min) Flow/Return (50/30°C)
kW 21.1/5.2 25.2/5.2 32.6/7.5 37.6/7.5
Useful Eciency at Max / Min Heating Output
- Flow/Return (80/60°C)
% 98.3/97.4 98.1/97.4 98.4/97.6 98.0/97.6
Useful Eciency at Max / Min Heating Output
- Flow/Return (50/30°C)
% 107.9/106.9 107.2/106.9 108.6/106.9 107.7/106.9
Useful Eciency at 30% Max Heating Output
- (Return 47°C)
% 100.7 101.6 101.8 101.9
Useful Eciency at 30% Max Heating Output
- (Return 30°C)
% 109.6 108.4 108.4 108.3
Heat Loss through the Case with Burner On % 0.1 0.1 0.1 0.1
Heat Loss through the Chimney with Burner
On
% 1.6 1.8 1.5 1.9
Ecosave-25K Ecosave-32K Ecosave-37K
EHC

19
EHC
Terms and Conditions15.
Warranty Registration15.2
Registration is simple. Just complete the Warrnaty Registration
Card and return to EHC Ltd within 30 days of installation. Your
details will be automatically registered within the EHC Warranty
Registration Scheme.
Immediate Help15.3
If the appliance malfunctions when it is initially operated,
contact your installers. Their professional assessment is needed
under the terms of our Warranty.
If you are unable to contact your installer, call the EHC Technical
Department on Tel No: 01698 820533
Intended Use15.4
The appliance is a state-of-the-art appliance which has been
constructed in accordance with recognized safety regulations.
Nevertheless, if the appliance is misused or used for applications
for which it is not intended for, the user or others may incur
the risk of injury or death, or incur damage to the appliance or
property.
The appliances are designed to generate heat for domestic
hot water and to be connected to hot water central heating
systems. Any other usage shall be considered to be usage
other than what was originally intended. The manufacturer/
supplier is not liable for any resulting damage. The user alone
bears the risk. Intended usage includes the observance of the
instructions for use and installation instructions and all other
applicable documents, as well as adherence to maintenance
and inspection conditions.
Care15.5
Clean the exterior of your appliance with a damp cloth.
DO NOT use any abrasive products to clean the appliance.
Recycling and Disposal15.6
Please observe the applicable national legal regulations.
The Appliance
Do not dispose of the appliance or any of its accessories with
household waste. Make sure that the old appliance and any
existing accessories are disposed of properly.
Packaging
Leave the disposal of the transport packaging to the installer
that installed the appliance.
Warranty15.1
Standard Terms & Warranty Conditions
To receive your 2 years parts + labour warranty, please complete
WarrantyRegistraiton Card supplied with the appliance or simply
Our Promise
If you experience any malfunctions with your new appliance, we
aim to provide safe and high quality repair services supported
by our dedicated national network of highly skilled engineers. If
your installer cannot solve the problem for you, we will arrange
for an engineer to service your appliance as soon as possible.
Nothing in this warranty will aect your statutory consumer
rights.
What this Warranty Covers
Free repairs or the replacement of components found to be •
faulty from manufacture.
If the appliance fails due to manufacturing related issues, •
the entire appliance will be replaced free of charge if it is
determined that the appliance cannot be repaired, or it is not
economically feasible to repair it.
The 2 year warranty cover takes effect from the date of •
installation.
What this Warranty Does NOT Cover
Repairs of the appliance which have not been detailed in the•
installation manual (this includes the need to flush the
system eectively and add a suitable corrosion inhibitor).
Any damage caused by hard water scale deposits and/or •
aggressive water resulting from corrosion.
Any other defects or failures, either in the connected heating •
system or outside of the appliance itself.
Faults caused by inadequate supplies of electricity, gas or •
water to the property.
Installations not suited to the original design of the boiler.•
Reimbursement of any third party repair or replacement •
costs that were not approved by EHC Ltd Prior to the repair
taking place.
Compensation for consequential losses (e.g., loss of earnings, •
business losses, stress and inconveniences) arising from a
production breakdown, including repair delays caused by
factors beyond our reasonable control.
call EHC Ltd on Tel No:01698 820533
2 Years Warranty - register today

20
All details within this document are correct at the time of printing however the may be subject to change.
EHC


EHC Ltd.
ISO 9001:2008
 Loading...