

Page 1
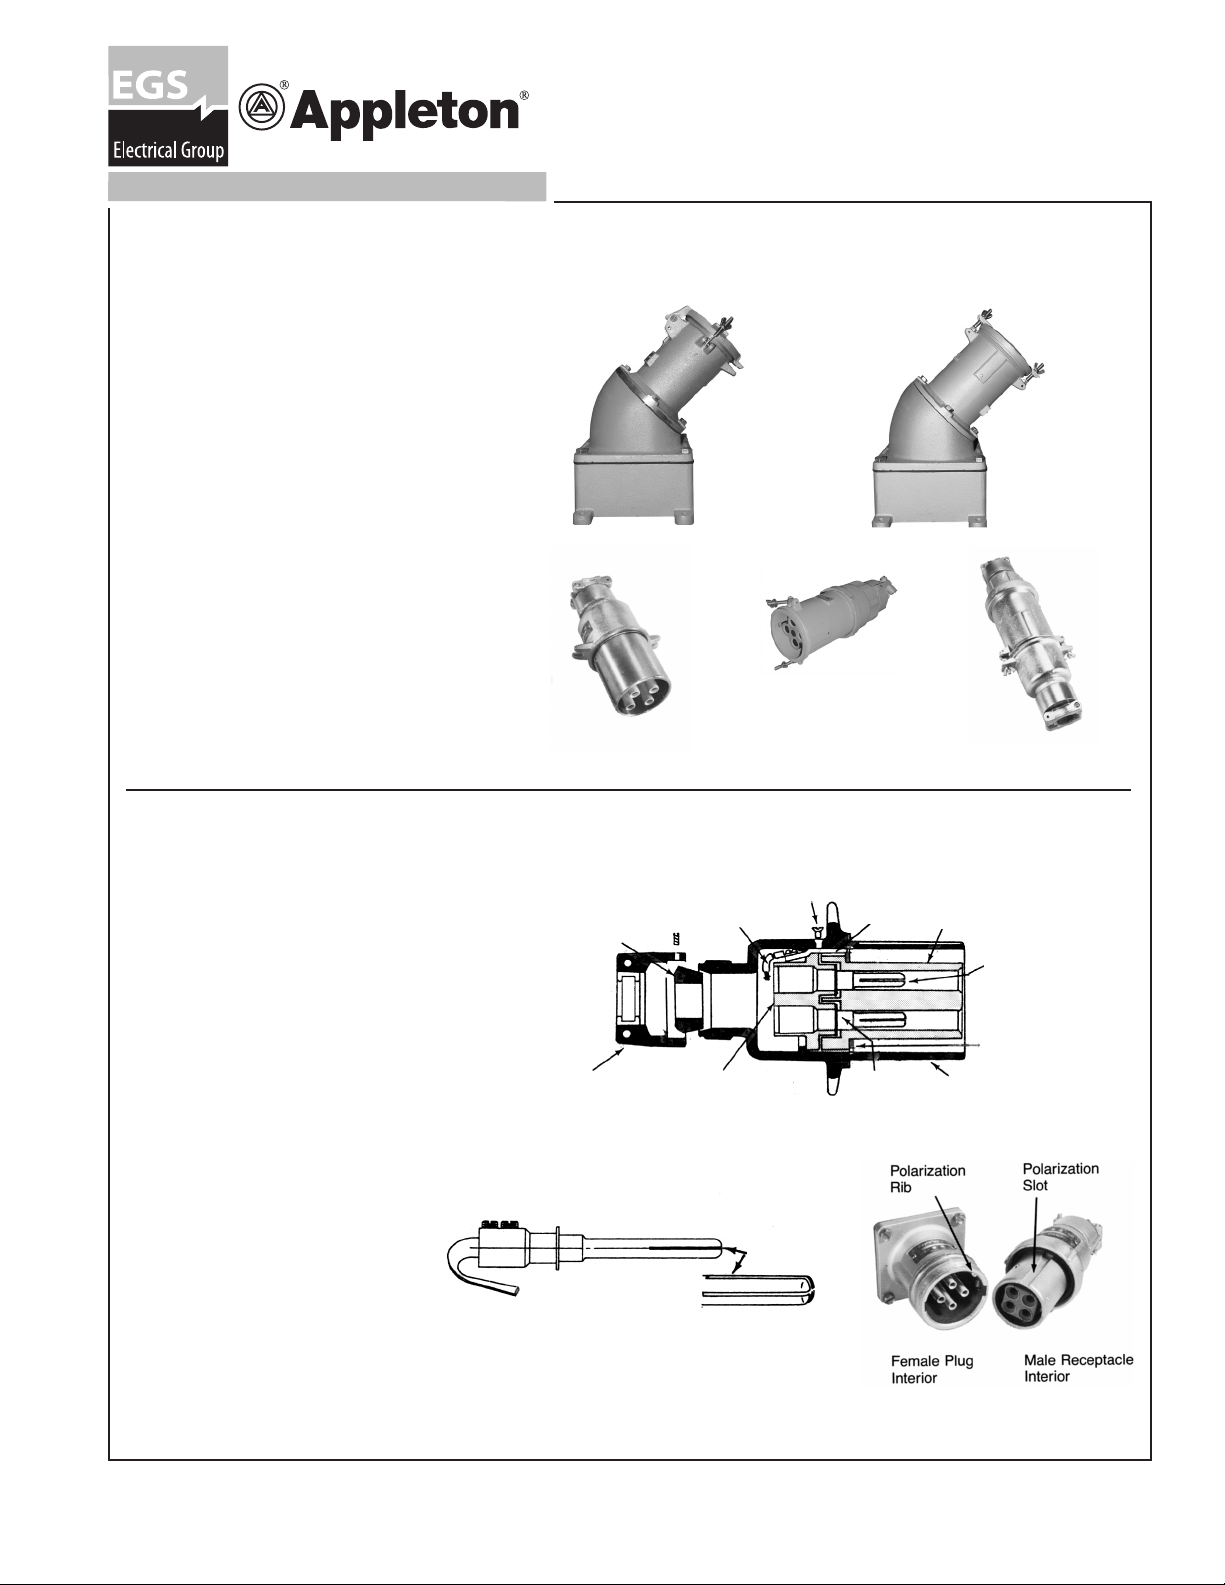
Powertite® 200 AmP Pin & Sleeve recePtAcleS,
cAble connectorS And PlugS: nemA 4X.
600 volt Ac, 250 volt dc. wire receSS diAmeter: .687”. wire Size rAnge: 250mcm - 4/0 And 3/0 - #4.
Applications
• Designed to supply power to portable or xed
electrical equipment such as motor generator
units, welders, pumps, compressors and similar
apparatus.
• Ideal for use on shipping docks, ports, and
other “ship to shore” applications.
• Suitable for use in locations where a NEMA 4X
enclosure is required.
• Rough usage construction
• Available in two grounding styles:
Style 1 (3W, 3P and 4W, 4P) shell grounding only.
Style 2 (2W, 3P and 3W, 4P) Shell and extra pole
grounding.
Compliances
• UL Standards 1682.
• CSA Specications C22.2 No 42.
330087
Instruction Sheet for Powertite
Plug, Connector and Receptacle
AJA Mounting Box
with Spring Cover
Receptacle
Body Only*
Connector
AJA Mounting Box
with Clamp Door
Receptacle
®
* Plug is NEMA 4X when clamp is fully tightened.
reverSe Service, PolArizAtion, Pin And Sleeve deSign.
Applications
• Designed to supply power to portable or
xed electrical equipment such as motor
generators units, welders, pumps, compressors
and similar apparatus.
• Ideal for use on shipping docks, ports,
and other “ship to shore” applications.
• Suitable for use in locations where a
weatherproof enclosure is required.
• Rough usage construction
• Available in two grounding styles:
Style 1 (3W, 3P and 4W, 4P) shell grounding only.
Style 2 (2W, 3P and 3W, 4P) Shell and extra pole
grounding.
Compliances
• UL Standards 1682.
• CSA Specications C22.2 No 42.
Plug Only*
Powertite® technicAl dAtA:
Style 1 (Only)
Ground Wire
Bushing
Crown
Ground Male
Terminal Assembly
Assembly
Rear Terminal
Block
Ground
Screw
(Style 1)
Split Type
Contacts
Ground Bar
Retaining
Ring
Complete
Connector*
Front Terminal
Block
Male Terminal
Plug Retaining
Ring
Plug HousingHousing Cap
Note: When ordering Reverse Service add - RS after catalog number.
EGS Electrical Group • www.appletonelec.com • 800-621-1506 Rev. F 09/18/09 Page 1
330087 Rev. G 10/16
Page 2
Cable
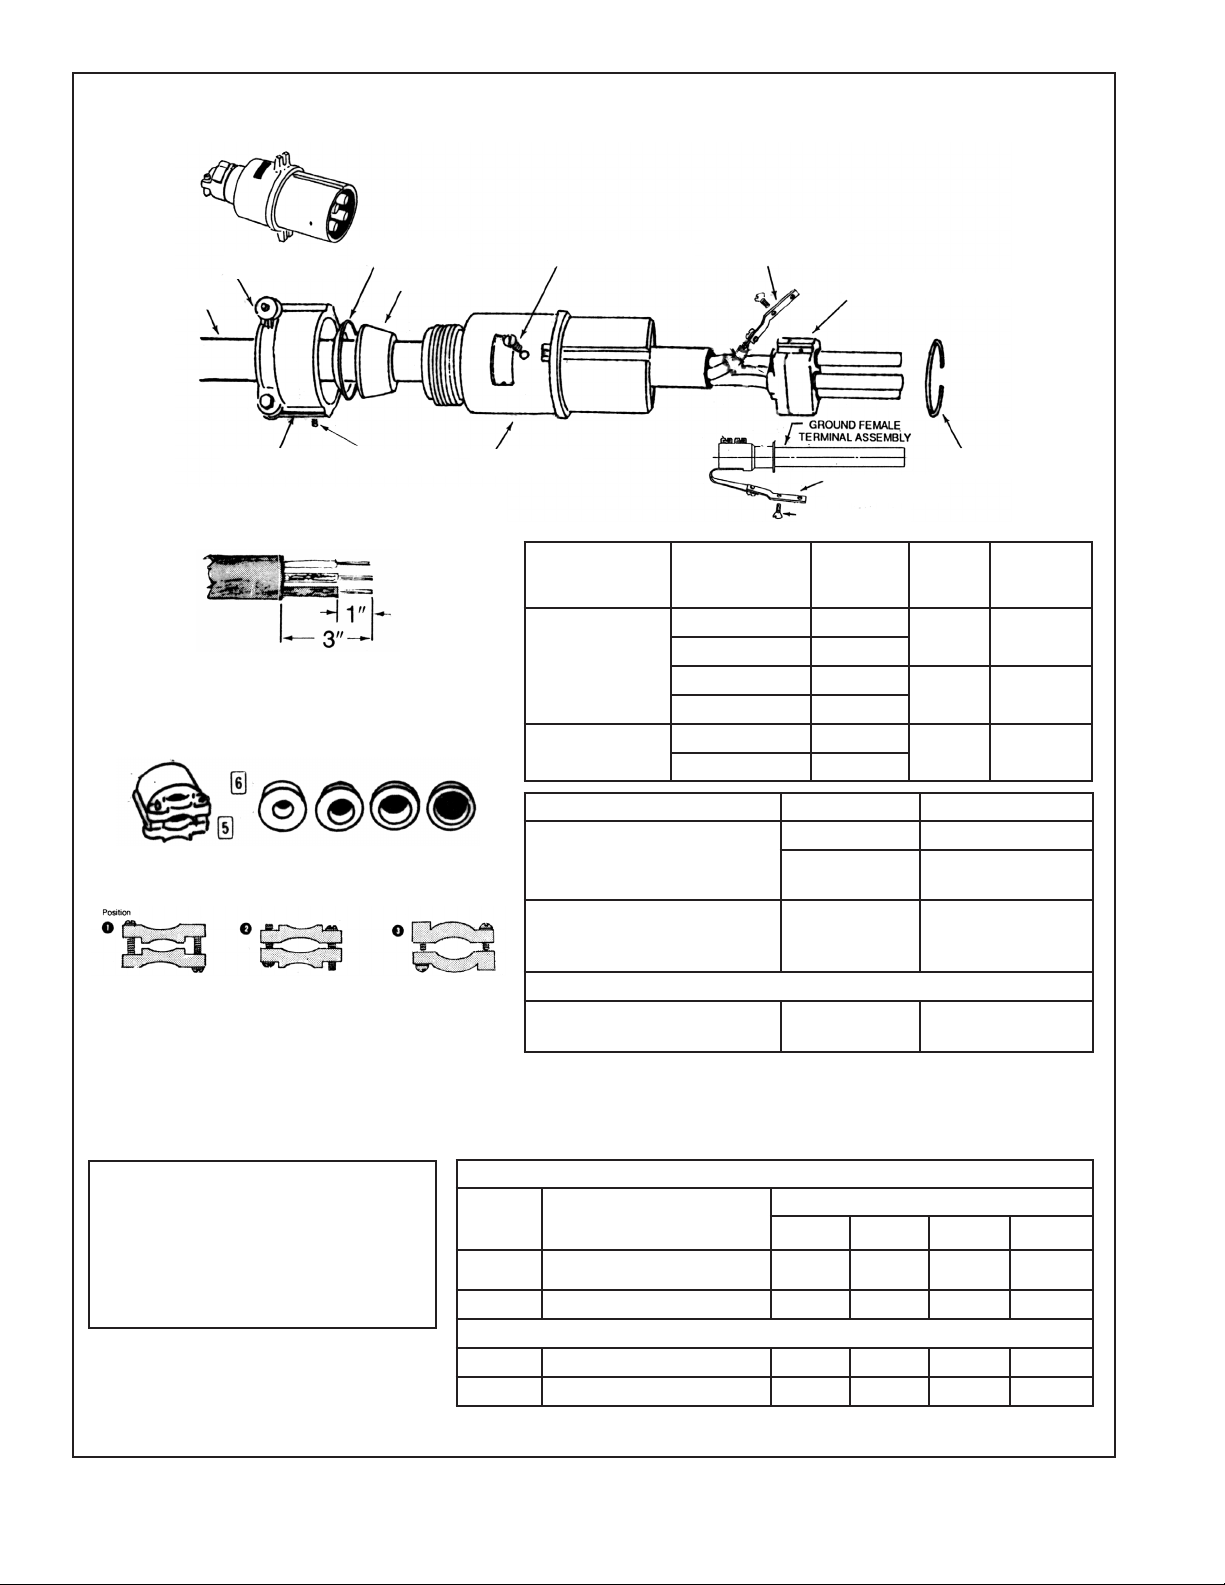
Powertite® 200 AmP Pin & Sleeve PlugS: nemA 4X.
600 volt Ac, 250 volt dc. wire receSS diAmeter: .687”. wire Size rAnge: 250mcm - 4/0 And 3/0 - #4.
Style 1 (only)
Ground Wire
Cable Clamps (5)
Steel Ring (7)
Grommet (6)
Flat Heat Screw (1)
Assembly
Terminal Block Assy (9)
Cap (4) Set Screw (2) Housing (8)
1. Disassemble as shown by removing screw (1),
loosen setscrew (2) and unscrew cap (4), remove
retaining ring (3) and terminal block (9).
2. Strip the proper cable as shown: (also applies to
connector and receptacle).
3. Prepare cable clamp (5) and select the proper
grommet (6) as shown:
Reversible cable clamp (just loosen screws and ip
over) permits wide cable range.
4. Slide cap (4) with clamps (5), steel ring (7), proper
grommet (6) and housing (8) over the cable.
5. Insert Wires into the proper terminals and tighten
set screws securely.
6. Slide terminal block assembly (9) into the
housing (8) aligning the hole in the ground
bar with the hole in the housing. Replace the
at head screw (1) and tighten securely.
WARNING: A wire schematic must
be followed so the same color wire is
always put into the same numbered
contact openings in all plugs, connectors
and receptacles in the system. This will
insure the correct polarity for the system
and eliminates possibilities for equipment damage and/or personal injuries.
7. Place the grommet (6) and steel ring
(7) in the back of the housing and tighten
the cap (4) until grommet (6) is tightened
around the cable and tighten the setscrew
(2). Tighten the clamps (5) screw securely.
Retaining
Ring (3)
Clamp
Position
Clamp No.
-1- 304350
-2- 304350
-3- 304045
Plug and
Connector Cable
Dia. Range
.875 to 1.906
1.875 to 2.500
Terminal Recess Conductor Size Type Conductor
Grounding Bar
(Style 2 only)
Ground Screw
Cable Dia.
Grommet
I.D.
.875 to 1.062 1-1/32
1.062 to 1.281 1-9/32
1.281 to 1.561 1-19/32
1.562 to 1.906 1-29/32
1.875 to 2.187 2-3/16
2.187 to 2.500 2-1/2
250 MCM General wires
0.687 Dia.
* 0.687 Dia. with Stainless
Pressure Plate Included
(see page 5)
4/0
3/0 to 1/0
Flexible & extra
exible cable
Flexible & extra
exible cable
* Option: Cat. No. PTK200WA3 and PTK200WA4 (see page 5)
0.687 Dia. with Copper
Pressure Plate
#1 to #4
Flexible & extra
exible cable
Reference Guide Of Horsepower Ratings
For Use With Single Motor Application
For disconnect use only - not for current rupture
Phase
Motor
Wire/Pole
120 VAC 240 VAC 480 VAC 600 VAC
Motor Horsepower
1-Phase 2W, 3P 60 120 160
3-Phase 3W, 3P; 3W, 4P or 4W, 4P 60 120 160
For emergency interrupting - maximum horsepower
1-Phase 2W, 3P 15 30 40 40
3-Phase 3W, 3P; 3W, 4P or 4W, 4P 20 40 50 50
EGS Electrical Group • www.appletonelec.com • 800-621-1506Page 2 330087 Rev. G 10/16
Page 3
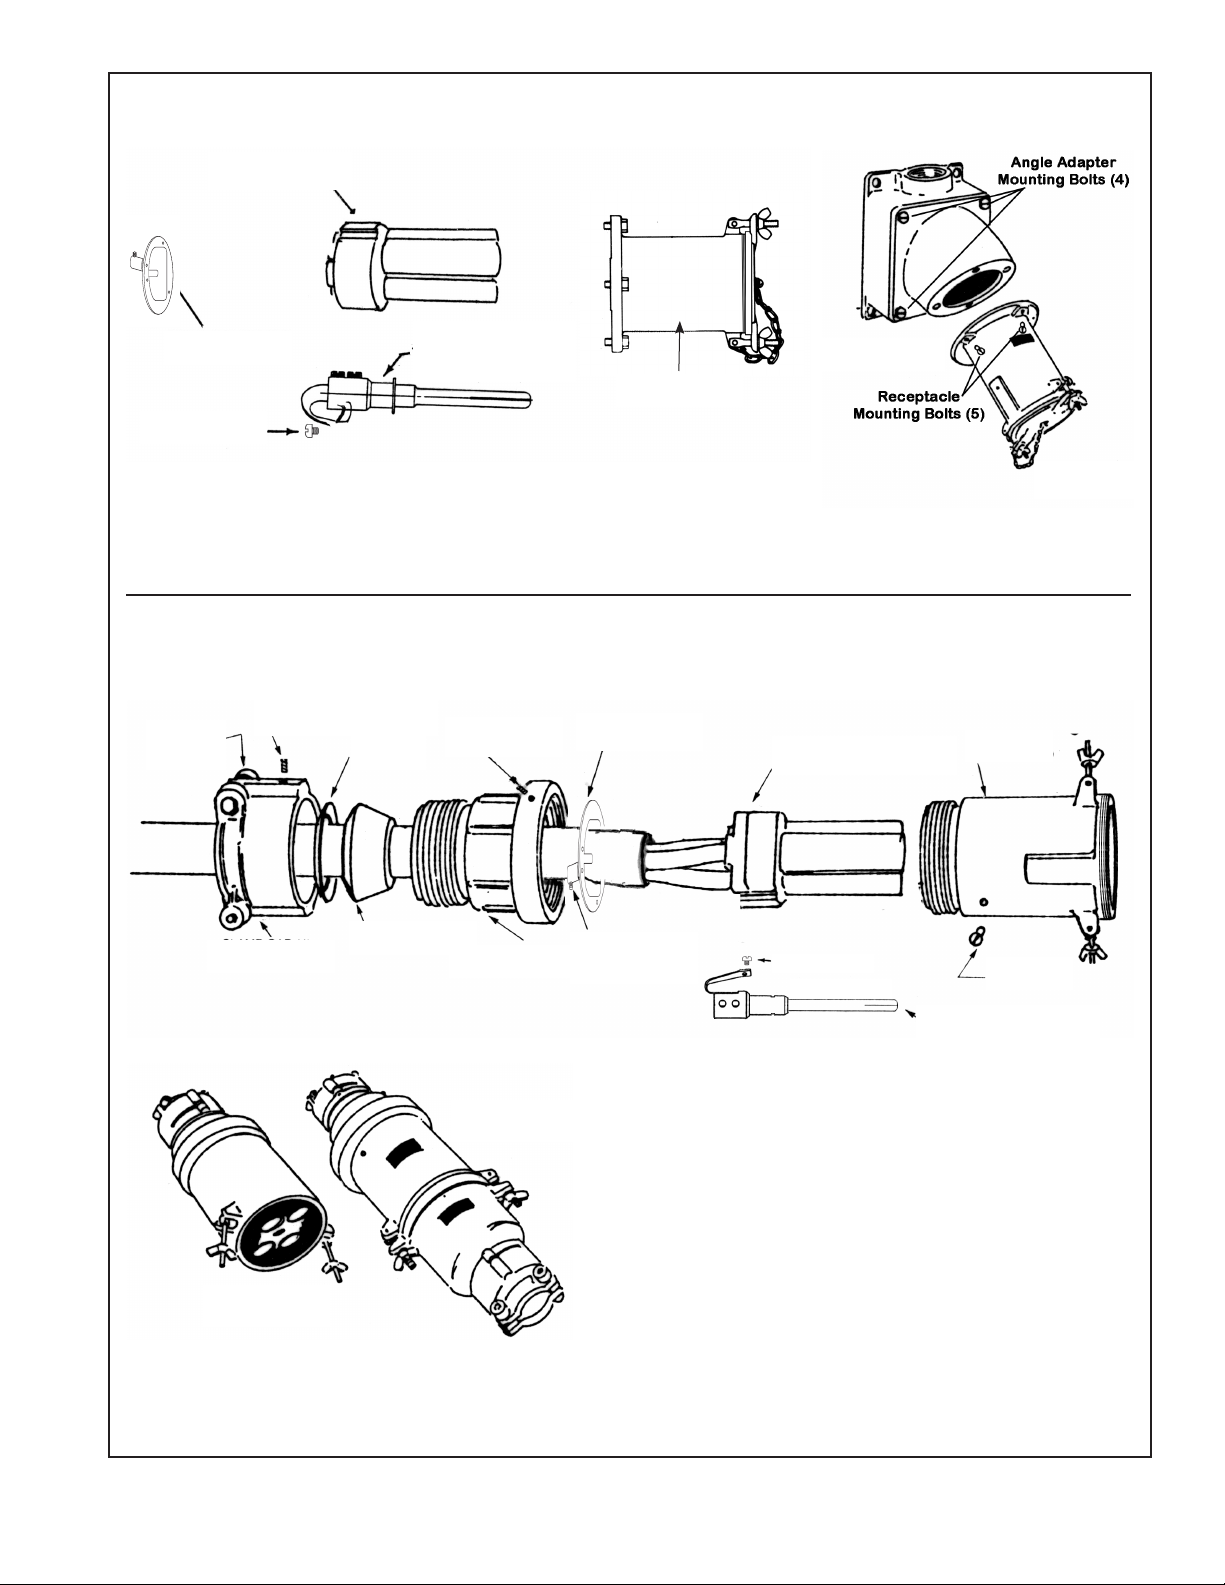
Powertite® 200 AmP Pin & Sleeve recePtAcleS: nemA 4X.
600 volt Ac, 250 volt dc. wire receSS diAmeter: .687”. wire Size rAnge: 250mcm - 4/0 And 3/0 - #4.
Terminal Block
Assy (2)
Rear Polarizing
Ring (1)
Ground
Screw
Ground Male
Terminal Assembly
(Style 2 only)
Housing (3)
AJA
Mounting Box
1. Remove the rear polarizing ring (1). Slide out the terminal block (2).
2. Follow paragraphs No. 2 and No. 5 for the plugs.
3. After wiring, slide terminal block assembly (2) in the back of housing (3). Replace the polarizing ring (1).
4. Tighten the angle adapter mounting bolts (4) to 50 to 70 in.-lbs. torque.
5. Tighten the receptacle mounting bolts (5) to 120 to 150 in.-lbs. torque.
Powertite® 200 AmP Pin & Sleeve connector: nemA 4X.
250 volt dc, 600 volt Ac. wire receSS diAmeter: .687”. wire Size rAnge: 250mcm - 4/0 And 3/0 - #4.
Cable
Clamps (5)
Set Screw (2)
Steel
Ring (7)
Set Screw (1)
Polarizing Plate (8)
Terminal Block
Assy (10)
Housing (11)
Receptacle
Only*
Clamp Cap (4)
Connector
Body Only
Grommet (6)
Housing Cap (9)
Complete
Connector
EGS Electrical Group • www.appletonelec.com • 800-621-1506
Style 1 (only)
Ground Wire
Assembly
Ground Screw
Style 2
Flat Head
Screw (12)
Ground Male
Terminal Assembly
1. Disassemble, as shown by loosening setscrews (1) and (2),
unscrew clamp cap (4) and housing cap (9), remove polarizing
plate (8), at head screw (12) and terminal block assembly (10).
2. Follow instructions shown on paragraphs No. 2 and No. 3 for the
plugs.
3. Slide clamp cap (4), steel ring (7), proper grommet (6), housing
cap (9) and polarizing plate (8) over the cable.
4. Follow instructions shown on paragraph No. 5 for the plugs.
5. Slide terminal block assembly (10) into the housing (11) aligning
the hole in the ground bar with hole in the housing, Put in at head
screw (12), tighten securely and put in polarizing plate (8).
6. Tighten housing cap (9) on the housing (11) and tighten
setscrew (1) securely.
7. Place the grommet (6) and steel ring (7) on the back of housing
cap (9), tighten the clamp cap (4) until the grommet (6) is tightened
around the cable and tighten the setscrew (2) and cable clamps (5)
securely.
330087 Rev. G 10/16 Page 3
Page 4

Powertite® technicAl dAtA:
grounding StyleS, mAXimum wire SizeS.
dimenSionS:
Powertite® 200 AmP Pin & Sleeve recePtAcleS,
PlugS, cAble connectorS, And mounting boXeS.
Option
for AJB
Receptacles Mounted on AJA and AJC Boxes
A B C D E F G H
8.00 10.75 6.75 9.50 14.00 15.25 3.75 1.88
PLUG – Equipment grounding
conductor is wired directly to
a solderless lug which is connected to the plug housing with a
pressure connector. All terminals
are “current carrying.”
RECEPTACLE - Two detent
spring clips engage the grounded plug housing on plug insertion - grounded plug shell makes
contact with receptacle ground
spring before line and load poles
are engaged. Grounding path
is maintained until after currentcarrying contacts disengage. All
terminals are “current carrying.”
Standard Service
PLUG - Equipment grounding
conductor is not only connected
to the solderless lug in the plug
housing, but also to an extra
grounding pole. Grounding pole
has copper alloy grounding
jumper strap that connects to
plug housing.
RECEPTACLE - Two detent
spring clips engage the grounded plug housing on plug insertion. Jumper from extra grounding pole is electronically connected to a screw on receptacle
housing. Longer grounding pole
“makes rst and breaks last.”
Reverse Service
Receptacle
No. Poles A B C D E F
3 3.25 5.63 4.19 8.00 6.63 6.56
4 3.63 5.63 4.56 8.00 6.63 6.56
Connector Body
No. Poles A B C
3 13.00 4.19 5.38
4 13.00 4.56 5.75
Style 2
Shell and Extra
Pole Grounding
Page 4 330087 Rev. G 10/16
Plug
No. Poles A B C D E
3 11.94 7.81 3.81 3.75 6.44
4 11.94 7.81 4.19 4.13 6.81
EGS Electrical Group • www.appletonelec.com • 800-621-1506
Page 5

Powertite® 200 AmP PreSSure PlAte.
For 3/0, 2/0 And 1/0 wire Size* with receSSed terminAl only
1. Prepare components as shown in gure 1.
2. Insert stripped end of wire into terminal.
3. Insert pressure plate into terminal so that set screws, pressure plate and wire are aligned (gure 2).
4. Tighten set screw securely (80-100 in-Ibs).
3. Terminal
2. Stripped Wire
Figure 1
Figure 2
4. Hex Set Screw
1. Pressure Plate
Recessed Terminal
oPtionAl AcceSSorieS For wire Size* #1 to #4 - SPeciAl APPlicAtion
cAtAlog number PtK200wA3 (3 PlAteS) And PtK200wA4 (4 PlAteS)
1. Prepare components as shown in gure 3.
2. Insert copper plate into terminal.
3. Insert stripped end of wire into terminal so that set screws, wire and copper plate are aligned (gure 4).
4. Tighten set screw securely (50-60 in-Ibs).
3. Terminal
1. Copper Plate
Figure 3
4. Hex Set Screw
* Caution: Check National Electrical Code for proper wire size and application.
EGS Electrical Group • www.appletonelec.com • 800-621-1506
2. Stripped Wire
Figure 4
330087 Rev. G 10/16 Page 5
Page 6

oPtionAl AcceSSorieS For Powertite® 200 And 400 AmP Pin & Sleeve recePtAcleS
inStAllAtion inStructionS For cAtAlog numberS:
PtlocK2004 - Powertite 200 AmP 3 & 4 Pole locKing Kit
PtlocK4004 - Powertite 400 AmP 4 Pole locKing Kit
1. With both wing nuts fully tightened, loosen the RIGHT
wing nut that secures the receptacle cover ¼ turn and
position both wing nuts as shown in Figure 1.
2. Slide the locking bar to the right and slip the locking
bracket under the left wing nut and over the at washer.
Figure 1
3. Slide the locking bar to the left side.
4. Slip the locking bracket under the right wing nut and
over the at washer as shown in Figure 2. Tighten
the wing nut ¼ turn until it is parallel with the locking
bracket
5. Slide the locking bar in place until it is ush with both
ends of the locking bracket as shown in Figure 3.
6. Install padlock(s) in one or more of the ve 11/32”
(8.9mm) padlock holes provided.
Figure 2
Figure 3
EGS Electrical Group • www.appletonelec.com • 800-621-1506Page 6 330087 Rev. G 10/16
Page 7

200 AmP ground lug For Style 1 recePtAcle
To Assemble Grounding Lug
1. Locate threaded hole on polarizing plate (1).
2. Insert the brass screw (3) through the top of lug (2).
3. Line-up edge of plate (1) with at on lug (2).
4. Thread screw into plate until tight.
5. Thread set screw (4) into lug (2).
To Connect Ground Wire To Lug
1. Prepare wire by stripping 3/4” from the end of the wire (wire size range: #2-4/0).
2. Loosen the set screw enough to t the wire in the lug.
3. Tighten set screw securely (50-60 in-lbs).
EGS Electrical Group • www.appletonelec.com • 800-621-1506
330087 Rev. G 10/16 Page 7
Page 8

EGS Electrical Group • www.appletonelec.com • 800-621-1506Page 8 330087 Rev. G 10/16
 Loading...