

Page 1
OWNERS MANUAL
www.egoscoota.com
30
4
40
+
That’s right!
The all NEW electric
ego streetscoota travels
40 miles at 30 mph
and produces exactly
0 emissions.
So for style, economy and
environmental care...
The ego streetscoota just makes sense!
www.streetscoota.com
Page 2

Congratulations and welcome to Ego Scooters. We are certain your Scooter
will give you years of service and riding pleasure.
One of the best ways to get the most out of your scooter is to read this
manual. In it you will nd valuable information on the set up of your scooter,
how to operate the controls, warranty details, a trouble shooting guide and
other useful infomation.
Best wishes and Happy Scooting!
(The information contained in this manual was correct at the time of printing. Ego
Scooters reserves the right to change the specication or design of their products at
any time without notice or incurring any obligation whatsoever.)
INTRODUCTION
Page 3

A FEW WORDS ABOUT SAFETY
Your safety and the safety of others is very important. Operating
this scooter safely is an important responsibility.
We provide you with supporting information on the operation of
your scooter to help you make informed decisions about safety
from the procedures listed in this manual.
Of course, it is not practical or possible to warn you about all the
hazards associated with operating and maintaining your scooter.
You must use your own good judgement.
Page 4

To ensure removal of the bike is done most eciently and safely we recommend
two people remove the bike from the packing crate.
Your bike has arrived in a steel delivery crate wrapped in cardboard. To remove
your bike from the delivery crate please follow this procedure.
Remove the cardboard, plastic sheeting and dispose of them in a suitable refuse
bin. Put to one side the auxillary items which require attaching to the bike during
set up.
Cut through the plastic zip ties and wires holding the bike safely in the delivery
crate.
CONTENTS
1) Getting Started. Assembly and set up.
2) Instruments & Controls. Operation of
the bike.
3) Features. Auxilary Items.
4 ) Maintenance
5) Warranty & Insurance
6) Contact & Support
Page 5
Your scooter at a glance.
Tools you will need to remove your bike from the packing crate:
To ensure removal of the bike is done most eciently and safely we recommend
two people remove the bike from the packing crate.
Your bike has arrived in a steel delivery crate wrapped in cardboard. To remove
your bike from the delivery crate please follow this procedure.
Remove the cardboard, plastic sheeting and dispose of them in a suitable refuse
bin. Put to one side the auxillary items which require attaching to the bike during
set up.
Cut through the plastic zip ties and wires holding the bike safely in the delivery
crate.
Scissors
Wire Cutters
Rigger Gloves
Phillips Screw Driver
10mm open ended spanner
Page 6
Page 7

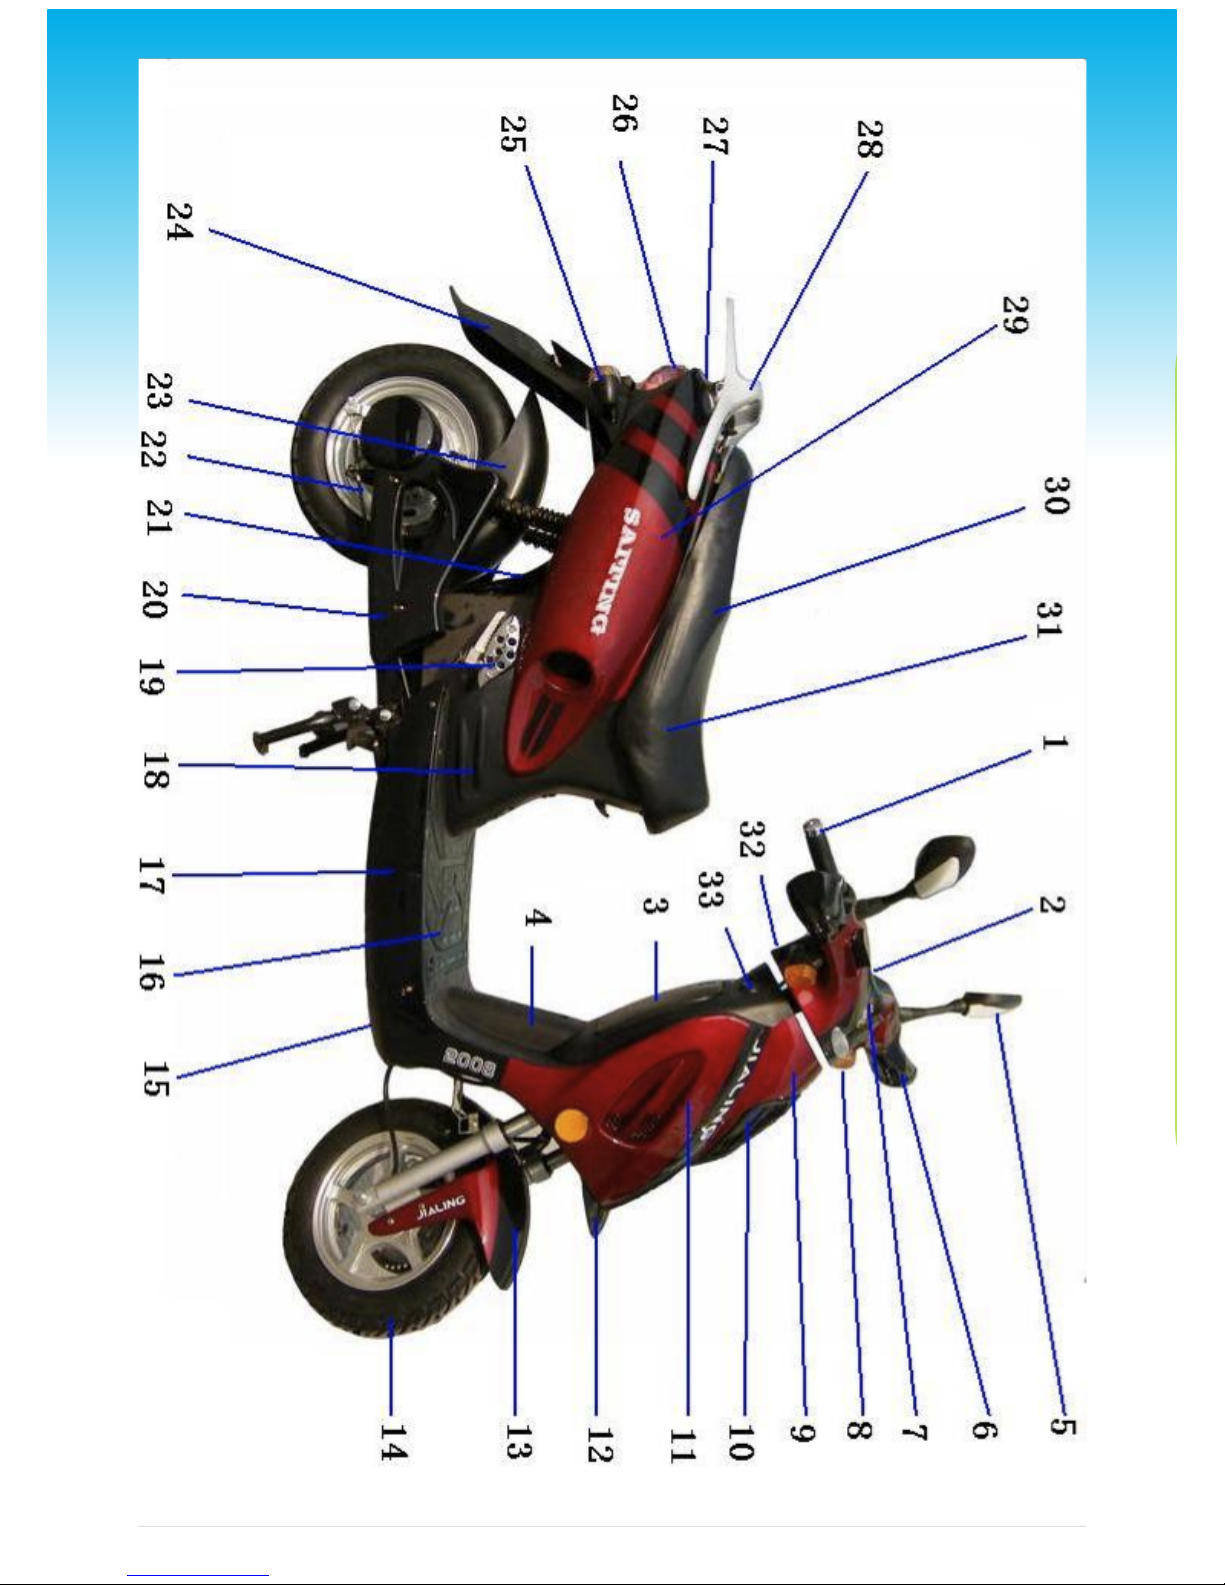
1 Accelerator 18 Central Cover Panel
2 Instrument Panel 19 Body Decoration
3 Storage Box 20 Rear Fender Cover
4 Chassis Number Cover 21 Inside Back Mud Guard
5 Mirror 22 Back Brake Wire
6 Wind Breaker 23 Small Mud Guard
7 Brake Fluid Cap 24 Back Mud Guard
8 Front Turning Light 25 Back Turning Light
9 Front Cover 26 Tail Lamp
10 Front Light 27 Saddle Lock Cover
11 Left and Right Front Wall 28 Back Box Bracket
12 Cap Peak 29 Side Panels
13 Mudguard 30 Seat Mat
14 Tyre and Tube 31 Luggage Box
15 Bottom Side Panels Front 32 Plastic Instrument Mask
16 Rubber Mat 33 Ignition Lock
17 Bottom Side Panels Rear
Page 8
Using two people (recommended), slide the bike out
of the crate when it becomes free from the wheel stays
in the bottom of the crate taking care not to catch the
bike on the frame of the crate and remembering to use
a set of gloves to safe guard your hands from any sharp
edges on the crate.
Once you have removed the bike from the packing
crate please stand the bike on either the side stand for
convenience or the centre stand.
Please dispose of your packing crate and other delivery
refuse in a responsible manner.
1) GETTING STARTED
Page 9

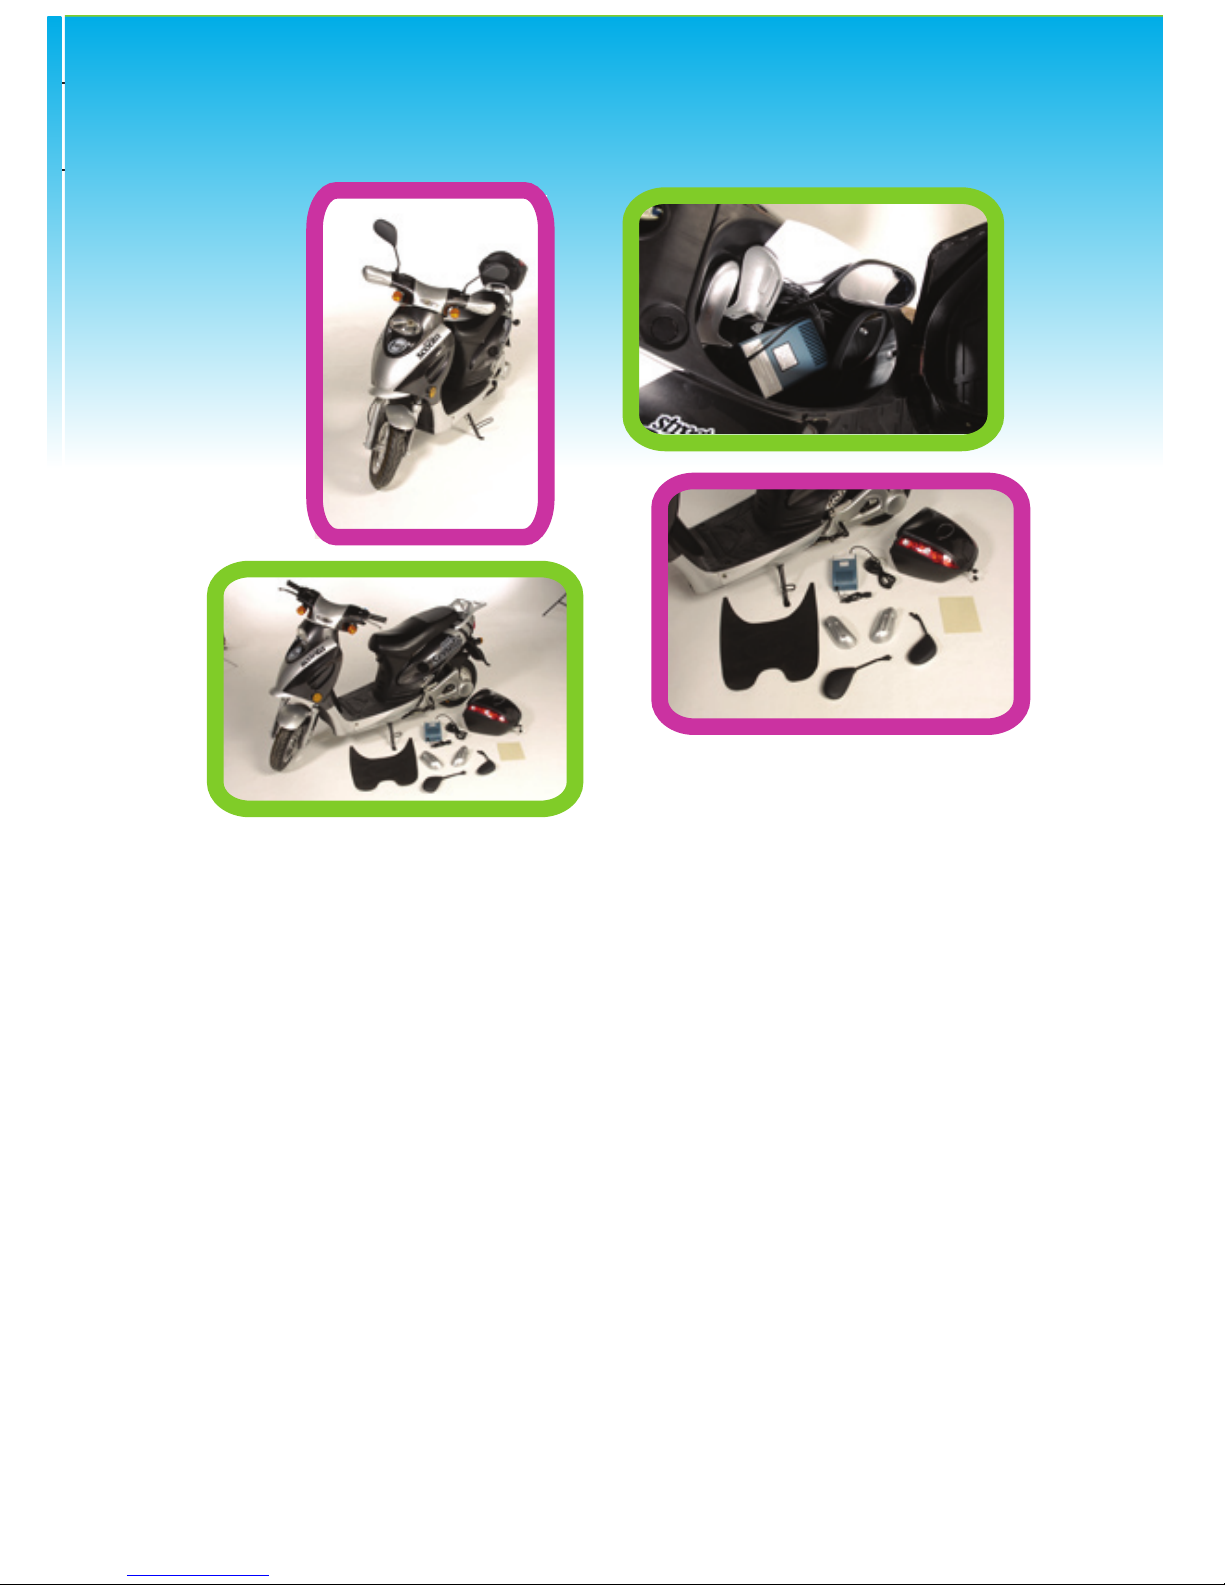
Inside the stowage area you will nd the following items which are
required or need assembly onto your bike:
1 – Plastic Handle Covers
2 – Mirrors
3 – Charging Unit
4 - Your Number Plate, if provided
You will nd that the keys for your new scooter
are attatched to the handlebars. You will need
these to gain access to under the seat. Once
you have located the keys please insert them
into the lock behind the seat where you will
nd items for attachment in the under seat
stowage area. Please note, due to the new-
ness of your bike you may nd that you need to
push down slightly on your seat whilst turning
the key in the lock.
Page 10

ASSEMBLY
The following information explains how to assemble the
attachment of the handle covers, mirrors and how to
charge your bike.
Handle Covers:
The two plastic colour coded handle covers require
attaching to the bike using a Phillips screw driver.
Taking the mirror covers and the self tapping screws
(provided) oer the mirror cover up to the handle bars
of the bike and insert using the locating tab on the cover
provided. This will ensure the cover lines up with the pre
drilled hole in the bikes handle bars. Screw the cover
onto position using the screw provided and a Phillips
screw driver.
Make sure you determine which is the left hand and right
hand mirror. On the top of the handle bars you will see
two pre manufactured threaded holes in the handle bars
Pulling back the plastic sheath on the stalk of the mirror
wind the mirror into the pre-manufactured hole until it
reaches the nut at the bottom of the thread. Then tighten
into position with the open ended 10mm spanner
ensuring that the mirrors are facing behind you when sat
on the bike. Once in position move the mirrors around to
suit your own rearward facing view requirements.
Page 11

MIRROR ASSEMBLY
Make sure you determine which is the left hand and right
hand mirror. On the top of the handle bars you will see
two pre manufactured threaded holes in the handle bars
which are for you to locate the mirrors.
Pulling back the plastic sheath on the stalk of the mirror
wind the mirror into the pre-manufactured hole until it
reaches the nut at the bottom of the thread. Then tighten
into position with the open ended 10mm spanner
ensuring that the mirrors are facing behind you when sat
on the bike. Once in position move the mirrors around to
suit your own rearward facing view requirements.
Page 12

Insert the charging connector to the socket contained at the front
of the seat below the sitting position. Plug your charger into a
mains plug socket and you will see a RED light illuminate as the
bike is on charge. After six hours (approximately) this light will
turn to GREEN at which time you may remove the charger and the
bike is now fully charged. Please check this by turning the keys in
the ignition to ON and viewing the meter before setting o on your
journey.
The range of your bike can uctuate or be eected by the overall
run speed and/or the terrain on which you are using your bike. As a
general rule in normal driving conditions the range of your battery
is approximately 40 miles.
BATTERY CHARGING
Your bike comes with a charger to re-charge the bikes
batteries. Please note, your bike will need to be charged prior
to you making your rst journey. We advise that you give your
bike a full continuous charge prior to riding on the road for
the rst time.
Your bike has a charge meter on the instrument display panel.
Page 13

When the battery indicator reaches the amber light your
remaining run distance is approximately 10-15 miles.
Your Ego Scooter has four re-chargable batteries tted to the
bike. These batteries have a life expectancy of approximately 18
months, but this may uctuate depending on the use of your bike
and type of journeys you do generally. For details on replacement
of batteries please visit the maintenance section on our website.
Under the riders seat you will see an isolator switch. This switch
is turned to o while your scooter is being transported. Please
ensure you turn this switch to on, prior to your initial full charge.
You may use your isolator switch to safe guard battery life when
leaving your scooter for prolonged periods of time, or to increase
Scooter security when leaving your scooter unattended. We rec-
ommend that your scooter is left on charge at all times when not in
use to prolong the life of he batteries. Failure to do so could invali-
date your warranty.
RUBBER MAT
Your bike is provided with a Rubber Mat for your convenience.
This needs to be inserted onto the oor area and can be re-
moved for washing and to expose the maintenance cover.
Congratulations
Your bike is now ready for use.
Page 14

2) INSTRUMENTS CONTROLS & OPERATION
This section gives information about the controls and
display of your Street Scoota which contribute to its
daily operation. All the essential controls are easily
within your reach.
Turn Signal
Lights Indicator
Horn
Horn
Back Brake
High Beam
Front Brake
Accelerator
The instrument panel has indicators which give you
important information about your vehicle.
1 Turn signal. The left or right turn signal indicator blinks
when you signal a lane change or turn. The turn signal
switch is operated by pushing the switch left or right
which is located on the left hand handle bar next to the
steering grip. To cancel the indicator, simply push the
button located in the middle of the switch.
Page 15

2 Lights on indicator. This indicator reminds you that the
exterior lights are on. It comes on when the light switch
is in the rst or second position, rst position is for side
lights and second position is for main headlights.
High Beam Indicator. This indicator comes on with the
high beam when the high beam switch is pushed to start
operation.
3 Speedometer. This shows your speed in miles per
hour (mph) and kilometres per hour (kmh)
4 Battery Gauge. This shows how much charge is left
in the batteries on your scooter. This gauge may show
slightly more or less than the actual amount.
Fully charged batteries will run for approximately 40
miles depending upon conditions. We strongly advise
to keep the batteries on charge when the scooter is
not in use (see section on battery charging).
Page 16

5 Accelerator and Brake operation. The accelerator
control is on the right hand of the handle bars and
is operated with a twist and go action from rest
when the ignition is turned on
CAUTION: Be aware that as your Street Scoota is
silent from rest, please be aware that when you are
in the rest position and the ignition is switched on,
that twisting the throttle will cause the Scooter to
set o.
It is advised to take your seating position on the
scooter before turning on the ignition, as this will
prevent starting the scooter whilst getting on it.
The rear brake lever is operated by pulling the left
hand lever which is cable operated. The right hand
lever operates the front brake disc assembly which
contains brake uid.
Brake uid should only be replaced in accordance
with the recommendations contained within the
maintenance schedule by a suitably qualied me-
chanic.
Page 17

6 Horn. To use the horn press either of the two red
buttons located on the handle bars. Operation of
your horn will only work when the Scooter ignition is
turned on.
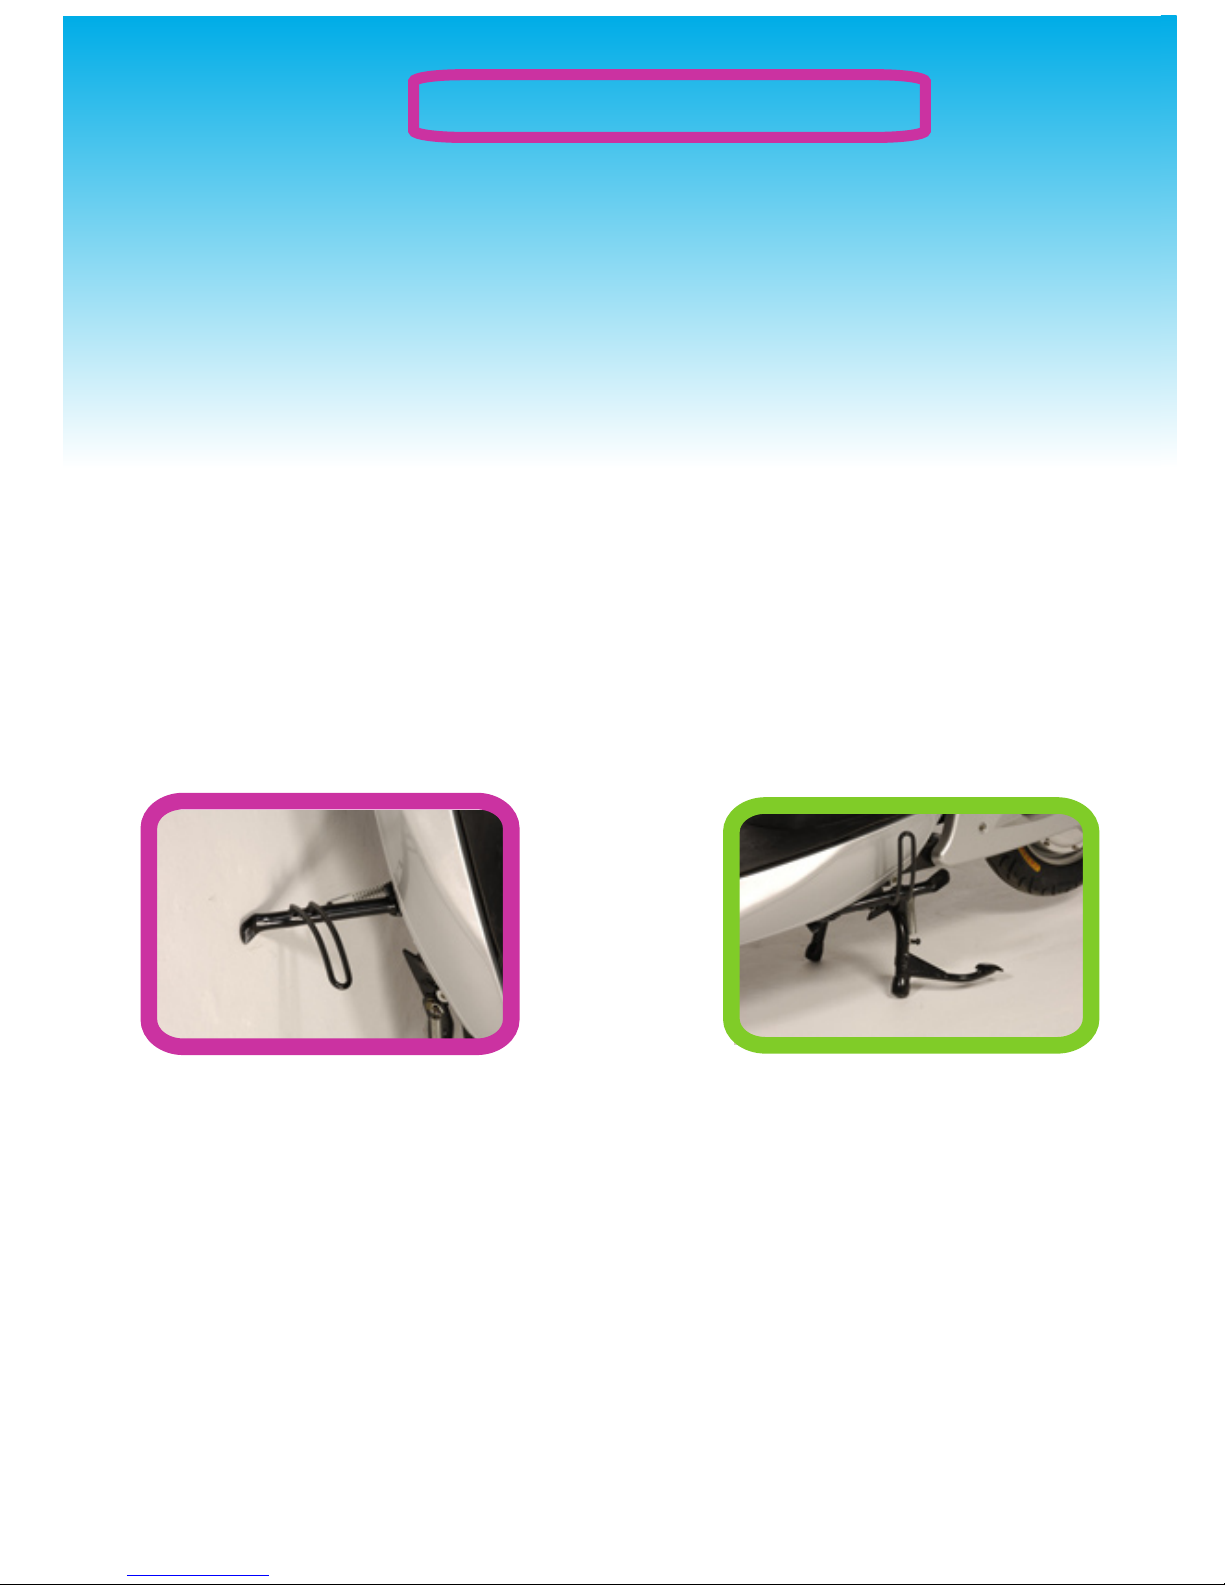
7 Stand. Your Scooter has two forms of stand.
A side stand for general use which is located on
the left hand side of the scooter and operated by
pushing the stand down with the bottom of your foot
and leaning the scooter slightly to the right where
it will stand on its own. Please note with this stand
down the ignition is cut so that your scooter cannot
operate. This is for your safety.
Page 18

Don’t Drink and Drive. Alcohol and driving don’t mix. Even one drink
can reduce your ability to respond eectively to driving conditions. Your
reaction time gets worse with every additional drink. Don’t drink and
drive.
Control your speed. Excessive speed is a major factor in crash injuries
and deaths. Generally the higher your speed the greater the risk. Serious
injuries can also occur at lower speeds. Never drive faster than is safe for
current conditions, regardless of the speed limits in force.
Keep your Scooter in safe condition. Having tyre problems or mechani-
cal failure can be hazardous. To reduce the possibility of such problems
check you tyre pressures and condition regularly and complete a general
review of your Scooters condition periodically to ensure it remains in
serviceable condition.
The main stand is predominately used for leaving
the Scooter over longer periods. This stand is on the
under side of the bike and is operated by standing
at the rear of the bike and pushing the stand down
until it connects with ground level. Simultaneously
pull the scooter back backward until it lifts itself
onto the stand.
Please note that when operating either stand your
scooter must be positioned on level ground.
Page 19

3) AUXILIARY ITEMS
Steering Lock. The steering lock is operated by
turning the handlebars to the far left position
and inserting the ignition key into the key barrel.
Now turn the key anticlockwise to the steering
lock position and remove the key. The Scooters
handle bars can now not be turned.
Top Box. Your Scooter is provided
with a storage top box located at
the rear of the bike. This box has
a separate key to unlock/lock the
top box which is an ideal area for
storing your belongings.
Page 20

Storage Cubby Hole. Underneath the
handle bar assembly is a lockable
cubby hole which is operated by
your ignition key.
Isolator Switch. The rider’s seat has a
lock assembly which is operated by a
separate key. The seat opens to allow
access to another storage
compartment. Contained within this
area is a Scooter isolation switch. You
will see that this switch has a lever
which is turned to the on or o posi-
tion. For increased security and to
save battery power when your scooter
is left for long periods of time such as
holidays etc please turn the isolator
to the ‘O’ position which then cuts all
power to the Scooter.
Page 21

4) MAINTENANCE
Maintenance. Regularly maintaining your Scooter is the best way
to protect your investment. You will be rewarded with safer, more
economical and trouble free riding if you carry out routine maintenance.
This means checking your Scooter regularly, carrying out simple tasks
you can do yourself such as checking the operation of your mirrors,
checking tyre pressures, brake eectiveness etc and generally keeping
your scooter clean and in god overall condition.
When checking your scooter over please ensure your are parked on level
ground, and that the scooter is securely positioned on either the side
stand or main stand.
To clean your scooters please ensure you use appropriate cleaners for
the job in hand. - Do not use a pressure washer/jet wash on your scooter.
We cannot warn you of every hazard that can arise from using your
scooter, only you can decide if it is safe to ride or perform maintenance
on your scooter under the current circumstances.
For guidance on maintenance of your scooter, please visit our website.
Page 22

WARRANTY FOR STREETSCOOTA
Lynx Group International Limited T/A Ego Scoota (henceforth Ego
Scoota) oers a one year parts warranty from the date of delivery (declared on the delivery notice by chosen courier) for the StreetsScoota
with the exception of batteries (3,000Km or 8 months whichever occurs
sooner) and tyres, brake pads/shoes and bulbs (no warranty cover).
All Ego Scoota bikes are rigorously checked at the time of their production and packing. However, during their nal handling and delivery it is
possible that the StreetScoota may suer some damage. By signing this
warranty agreement you agree that upon delivery an inspection was
carried out by yourself and no physical damage, damage in appearance
or damage to the normal workings of the Ego StreetScoota were observed ie.the Ego StreetScoota arrived in good working order. If there
are any signs of damage or lack of working order then you must inform
Ego Scoota customer service within 48 hours of taking delivery and you
will be informed by them of the procedure to take from this point.
In the event of a parts malfunction during the one year warranty period, the part at fault will be repaired or replaced by Ego Scoota. We
reserve the right to request photographic and written proof from a
qualied technician of the fault and also reserve the right to inspect the
StreetScoota part ourselves before replacing any parts. The customer
may be asked to send the eective part to Ego Scoota for inspection (at
customer’s expense). If we deem the malfunction to be beyond a part
replacement we will replace the StreetScoota with a new one or with
the same model of a similar age and mileage (subject to stock). The
delivery and handling of these parts to the StreetScoota owner will be
paid for by Ego Scoota. This is a parts warranty so any labour costs incurred by the customer in tting new StreetScoota parts or inspecting
the scooter by your mechanic, technician or engineer are not covered
or included by Ego Scoota and this warranty.
Page 23

Obligations of the original owner – you must retain your original, dated purchase receipt as proof of purchase, and present a copy upon
request before warranty services are performed. You are responsible
for reading the user manual and following all recommended operational and maintenance guidelines. If these obligations are not fullled, then the warranty is permanently invalidated.
The following items are not covered by the Ego Scoota warranty:
• Any damage that results from neglect of the periodic maintenance
in the manner that we recommend in the user manual
• Any damage that results from repair or maintenance performed
using methods not specied by Ego Scoota either in their manual,
or in any information provided by them. This includes damage to
batteries as a result of them not being on charge when your scooter is
not being used.
• Any damage that results from the use of the vehicle for race, rally or
similar competitive sports
• Any damage that results from using the StreetScoota on any other
surface than a public road
• Any damage that results from operating methods other than those
indicated in the owners manual or use beyond the limitations or
specications specied by Ego Scoota (maximum load, engine speed
and others)
Page 24

• Any damage that results from the use of non genuine parts or from
use of batteries, lubricants and liquid agents with specications different from those indicated in the user manual or provided in the
original StreetScoota delivered to you
• Any damage that results from modications not approved by EgoScoota (engine tune-up, vehicle performance modications, reduction
of lights and other changes)
• Any damage that results from the passage of time (natural fading of
painted surfaces, plated surface and other deterioration)
• Aesthetic phenomena that do not aect performance
• Any damage that results from improper storage or transport
• Any cosmetic damage, any damage to tyres or normal wear and tear
to parts like brake pads. It also does not cover damage due to accident, misuse or neglect by the driver
• Any damage to the bike if it is not at that time properly registered
and insured with the relevant companies and authorities
• Any malfunction or damage which is not reported to Ego Scoota
within 48 hours from the occurrence (with exception to delivery
checks which must be within 24 hours as stated above)
Page 25

By signing below I conrm that I have read, understood and
agree to all of the above terms & conditions of this warranty and
have read and understood the provided user manual. By signing
I also conrm that I will send one copy of this agreement to Ego
Scoota to the above address in order to activate this warranty
(within 14 days of receiving my StreetScoota or this warranty will
be deemed void) and will keep one copy for my records.
Full name of registered Ego Scoota owner
……………………………………………….
Date of Birth
……………………………………………….
Customer Reference (as shown on order)
……………………………………………….
Date of StreetScoota delivery
……………………………………………….
Signature (of Parent / Guardian if under 18)
……………………………………………….
Page 26

 Loading...