

Page 1
OPERATOR'S MANUAL
56-VOLT LITHIUM-ION
CORDLESS 15" STRING
TRIMMER
MODEL NUMBER
ST1500F (STRAIGHT SHAFT)
ST1500SF (HINGED SHAFT)
WARNING: To reduce the risk of injury, the user must read and understand the
Operator’s Manual before using this product. Save these instructions for future reference.
Español p. 70
Français p. 35
Page 2

56-VOLT LITHIUM-ION CORDLESS 15" STRING TRIMMER2
TABLE OF CONTENTS
Safety Symbols ..........................................4
Safety Instructions ......................................5-8
Introduction .............................................9
Specications ...........................................9
Packing List ............................................10
Description .........................................11-12
Assembly ...........................................13-16
Operation ...........................................17-24
Maintenance ........................................25-30
Troubleshooting ...................................... 31-32
Warranty ...........................................33-34
Page 3

56-VOLT LITHIUM-ION CORDLESS 15" STRING TRIMMER 3
READ ALL INSTRUCTIONS!
WARNING:
Some dust created by power sanding, sawing, grinding, drilling
and other construction activities contains chemicals known to the state of California
to cause cancer, birth defects or other reproductive harm. Some examples of these
chemicals are:
Lead from lead-based paints
Crystalline silica from bricks and cement and other masonry products, and
Arsenic and chromium from chemically-treated lumber.
Your risk from these exposures varies, depending on how often you do this type of
work. To reduce your exposure to these chemicals: work in a well ventilated area, and
work with approved safety equipment, such as those dust masks that are specially
designed to filter out microscopic particles.
Page 4
56-VOLT LITHIUM-ION CORDLESS 15" STRING TRIMMER4
SAFETY SYMBOLS
The purpose of safety symbols is to attract your attention to possible dangers. The
safety symbols and the explanations with them deserve your careful attention and
understanding. The symbol warnings do not, by themselves, eliminate any danger.
The instructions and warnings they give are no substitutes for proper accident
prevention measures.
WARNING:
Be sure to read and understand all safety instructions in this
Operator’s Manual, including all safety alert symbols such as “DANGER,” “WARNING,”
and “CAUTION” before using this tool. Failure to following all instructions listed below
may result in electric shock, fire, and/or serious personal injury.
SYMBOL MEANING
SAFETY ALERT SYMBOL:
Indicates DANGER, WARNING, OR CAUTION.
May be used in conjunction with other symbols or pictographs.
WARNING!
The operation of any power tools can result in foreign
objects being thrown into your eyes, which can result in severe eye
damage. Before beginning power tool operation, always wear safety
goggles or safety glasses with side shield and a full face shield when
needed. We recommend a Wide Vision Safety Mask for use over
eyeglasses or standard safety glasses with side shields. Always use eye protection
which is marked to comply with ANSI Z87.1.
Page 5

56-VOLT LITHIUM-ION CORDLESS 15" STRING TRIMMER 5
SAFETY INSTRUCTIONS
This page depicts and describes safety symbols that may appear on this product. Read,
understand, and follow all instructions on the machine before attempting to assemble
and operate it.
Safety Alert Indicates a potential personal injury hazard.
Read the
Operator’s
Manual
To reduce the risk of injury, user must read
operator’s manual.
Eye Protection
Always wear safety goggles or safety glasses
with side shields and a full face shield when
operating this product.
Recycle Symbols
This product uses lithium-ion (Li-ion) batteries.
Local, state, or federal laws may prohibit disposal
of batteries in ordinary trash. Consult your
local waste authority for information regarding
available recycling and/or disposal options.
IPX4
Ingress Protection
Degree
Protection from splashing water
V Volt Voltage
mm Millimeter Length or size
cm Centimeter Length or size
in. Inch Length or size
kg Kilogram Weight
lb Pound Weight
DC Direct Current Type or a characteristic of current
RPM
Revolutions per
minute
Rotational speed
Page 6

56-VOLT LITHIUM-ION CORDLESS 15" STRING TRIMMER6
IMPORTANT SAFETY INSTRUCTIONS
WARNING!
When using electric trimmers, basic safety precautions should
always be followed to reduce the risk of fire, electric shock, and personal injury,
including the following:
READ ALL INSTRUCTIONS
DANGER!
Do not rely on the tool’s insulation against electric shock. To reduce
the risk of electrocution, never operate the tool in the vicinity of any wires or cables
which may carry electric current.
CAUTION!
Wear appropriate personal hearing protection during use. Under some
conditions and durations of use, noise from this product may contribute to hearing loss.
Keep Children Away - All visitors should be kept at least 100 feet away from
work area.
Avoid Dangerous Environments – Don’t use appliances on damp or wet slope.
Dress Properly - Do not wear loose clothing or jewelry. They can be caught in
moving parts. Use of rubber gloves and substantial footwear is recommended
when working outdoors. Wear protective hair covering to contain long hair.
Use Safety Glasses - Always use face or dust mask if operation is dusty.
Use the Right Tool - Do not use the tool for any job except that for which it is
intended.
Don’t Force the Trimmer - It will do the job better and with less likelihood of a
risk of injury at the rate for which it was designed.
Don’t Overreach - Keep proper footing and balance at all times.
Stay Alert - Watch what you are doing. Use common sense. Do not operate the
trimmer when you are tired.
Do not operate the trimmer while under the inuence of alcohol or drugs.
Keep guards in place and in working order.
Keep hands and feet away from the cutting area.
Store Trimmer Indoors - When not in use the trimmer should be stored indoors in a
dry and high or locked-up place with the battery pack removed- out of reach of children.
Maintain Trimmer With Care - Keep the cutting attachment clean for best
performance and to reduce the risk of injury. Follow the instructions for changing
accessories. Keep the handles dry, clean, and free from oil and grease.
Page 7

56-VOLT LITHIUM-ION CORDLESS 15" STRING TRIMMER 7
Check Damaged Parts - Before further use of the trimmer, a guard or other
part that is damaged should be carefully checked to determine that it will operate
properly and perform its intended function. Check for alignment of moving parts,
binding of moving parts, breakage of parts, mounting, and any other condition
that may affect its operation. A guard or other part that is damaged should be
properly repaired or replaced by an authorized service center unless indicated
elsewhere in this manual.
Clear the area to be cut before each use. Remove all objects such as rocks,
broken glass, nails, wire, or string that can be thrown or become entangled in the
cutting attachment. Make sure that other persons and pets are at least 100 ft.
(30.5m) away.
Always hold the trimmer rmly, with both hands on the handles, while
operating. Wrap your ngers and thumbs around the handles.
Avoid Accidentally Starting - Don’t carry the trimmer with your finger on
the trigger.
Do not operate the trimmer in gaseous or explosive atmospheres. Motors
in these appliances normally spark, and the sparks might ignite fumes.
Damage to Trimmer - If you strike a foreign object with the trimmer or it
becomes entangled, stop the tool immediately, check for damage and have any
damage repaired before further operation is attempted. Do not operate with a
broken guard or spool.
If the equipment should start to vibrate abnormally, stop the motor and
check immediately for the cause. Vibration is generally a warning of trouble.
A loose head may vibrate, crack, break or come off the trimmer, which may result
in serious or fatal injury. Make sure that the cutting attachment is properly fixed
in position. If the head loosens after fixing it in position, replace it immediately.
Never use a trimmer with a loose cutting attachment.
Replace a cracked, damaged or worn-out cutting head immediately, even
if damage is limited to supercial cracks. Such attachments may shatter at
high speed and cause serious or fatal injury.
Check the cutting attachment at regular short intervals during operation,
or immediately if there is a noticeable change in cutting behavior.
When replacing the cutting line, use no more than 2.4mm nylon line;
using heavier lines than recommended by the manufacturer increases the load
on the motor and reduces its operating speed. This results in overheating and
damage to the trimmer.
Page 8

56-VOLT LITHIUM-ION CORDLESS 15" STRING TRIMMER8
To reduce the risk of serious injury, never use wire or metal-reinforced
line or other material in place of the nylon cutting lines. Pieces of wire
could break off and be thrown at high speed toward the operator or bystanders.
To reduce the risk of injury from loss of control, never work on a ladder
or on any other insecure support. Never hold the cutting attachment
above waist height.
If situations occur that are not covered in this manual, use care and
good judgment. Contact the EGO Customer Service Center for assistance.
Do not charge the battery pack in rain, or in wet locations.
Use only with the battery packs and chargers listed below:
BATTERY PACK CHARGER
BA1120, BA1400, BA2240,
BA2800, BA4200
CH5500
CH2100
Do not dispose of the battery in a re. The cells may explode. Check with
local codes for possible special disposal instructions.
Do not open or mutilate the battery. Released electrolyte is corrosive and
may cause damage to the eyes or skin. It may be toxic if swallowed.
Exercise care in handling batteries in order not to short the battery with
conducting materials such as rings, bracelets, and keys. The battery or
conductor may overheat and cause burns.
Replacement Parts - When servicing, use only identical EGO replacement parts.
Use of any other accessory or attachment may increase the risk of injury.
Battery tools do not have to be plugged into an electrical outlet;
therefore, they are always in operating condition. Be aware of possible
hazards even when the tool is not operating. Take care when performing
maintenance or service.
Remove or disconnect battery pack before servicing, cleaning or
removing material from the trimmer.
Do not wash with a hose; avoid getting water in motor and electrical
connections.
Save these instructions. Refer to them frequently and use them to instruct
others who may use this tool. If you lend this tool to someone else, also lend
these instructions to them to prevent misuse of the product and possible injury.
SAVE THESE INSTRUCTIONS!
Page 9

56-VOLT LITHIUM-ION CORDLESS 15" STRING TRIMMER 9
INTRODUCTION
Congratulations on your selection of the EGO 56-Volt Lithium-Ion Cordless 15" String
Trimmer. It has been designed, engineered and manufactured to give you the best
possible dependability and performance.
Should you experience any problem you cannot easily remedy, please contact EGO
customer service center 1-855-EGO-5656.
This manual contains important information on to the safe assembly, operation and
maintenance of your string trimmer. Read it carefully before using the string trimmer.
Keep this manual handy so you can refer to it at any time.
SERIAL NUMBER _____________________ DATE OF PURCHASE _________________
YOU SHOULD RECORD BOTH SERIAL NUMBER AND DATE OF PURCHASE AND KEEP THEM IN A
SAFE PLACE FOR FUTURE REFERENCE
SPECIFICATIONS
Voltage 56V DC
No-load speed 4000-5800 RPM
Cutting Mechanism Bump Head
Cutting Line Type 0.095" (2.4mm) nylon twist line
Cutting Width 15 in. (38 cm)
Weight (Without battery pack) 7.33 lb. (3.33Kg)
Recommended Cutting Line
PART NAME TYPE MODEL NUMBER
Cutting Line
0.095"/2.4mm twist line (Recommended) AL0951
0.080"/2.0mm twist line (Compatible) AL0803
Page 10

56-VOLT LITHIUM-ION CORDLESS 15" STRING TRIMMER10
PACKING LIST
PART NAME QUANTITY
String trimmer 1
Guard 1
Front-assist handle assembly 1
Hex wrench 1
Bolts for locking shaft (ST1500SF Only) 2
Operator's manual 1
Page 11
56-VOLT LITHIUM-ION CORDLESS 15" STRING TRIMMER 11
DESCRIPTION
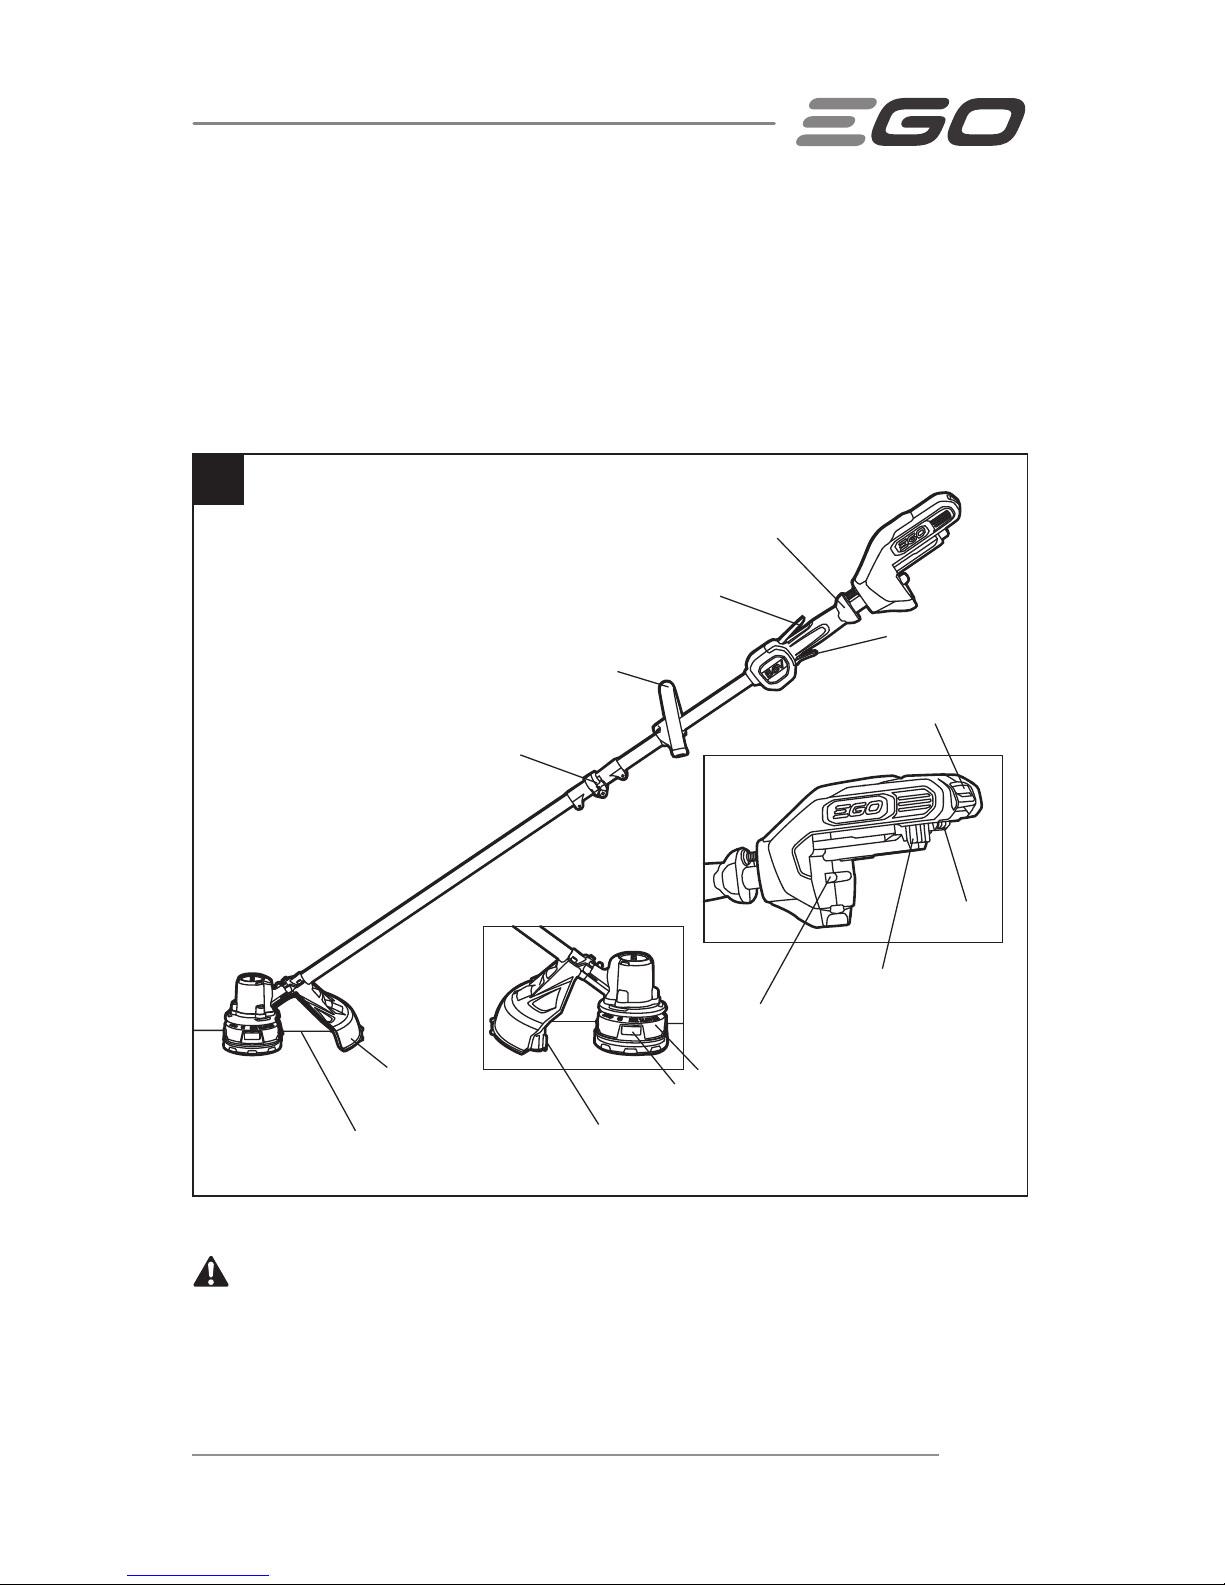
KNOW YOUR STRING TRIMMER (Fig. 1)
The safe use of this product requires an understanding of the information on the tool and
in this operator’s manual, as well as knowledge of the project you are attempting. Before
using this product, familiarize yourself with all operating features and safety rules.
1
Adjustable Front-Assist Handle
Cutting Line
Guard
Trimmer Head (Bump Head)
Line-Cutting Blade
Ejection Mechanism
Latch
Battery-Release
Button
Trigger
Electric Contacts
Lock-Off Lever
Hinge
ST1500SF only
Rear Handle
Release Tab
WARNING:
Never operate the tool without the guard securely in place. The
guard must always be on the tool to protect the user.
Page 12

56-VOLT LITHIUM-ION CORDLESS 15" STRING TRIMMER12
ADJUSTABLE FRONT-ASSIST HANDLE
For easy control of the trimmer during cutting.
REAR HANDLE
Ergonomic handle with overmold improves comfort and grip.
TRIGGER
Turns the string trimmer On and Off and adjusts the trimmer head speed.
LOCK-OFF LEVER
Helps prevent accidental or unauthorized activation of the trigger. It must be depressed
before the trigger can be activated.
HINGE (ST1500SF ONLY)
Connects and locks the two foldable shafts.
TRIMMER HEAD (BUMP HEAD)
Stores the cutting line and releases the cutting line when the head is lightly tapped on
the ground during operation.
GUARD
Reduces the risk of injury from foreign objects flung backwards toward the operator
and from contact with the cutting attachment.
LINE-CUTTING BLADE
Steel blade on the guard that maintains the cutting line at the proper length.
BATTERY-RELEASE BUTTON
Releases the battery pack from the tool.
LATCH
Secures the battery pack to the tool.
EJECTION MECHANISM
Aids in battery removal.
Page 13

56-VOLT LITHIUM-ION CORDLESS 15" STRING TRIMMER 13
ASSEMBLY
WARNING:
If any parts are damaged or missing, do not operate this product
until the parts are replaced. Use of this product with damaged or missing parts could
result in serious personal injury.
WARNING:
Do not attempt to modify this product or create accessories not
recommended for use with this string trimmer. Any such alteration or modification is
misuse and could result in a hazardous condition leading to possibly serious personal
injury.
WARNING:
Always remove the battery pack from the product when you are
assembling parts, making adjustments, cleaning, or when the product is not in use.
UNPACKING
This product requires assembly.
Carefully remove the product and any accessories from the box. Make sure that
all items listed in the packing list are included.
Inspect the tool carefully to make sure that no breakage or damage occurred
during shipping.
Do not discard the packing material until you have carefully inspected and
satisfactorily operated the tool.
If any parts are damaged or missing, please return the product to the place of
purchase.
Page 14
56-VOLT LITHIUM-ION CORDLESS 15" STRING TRIMMER14
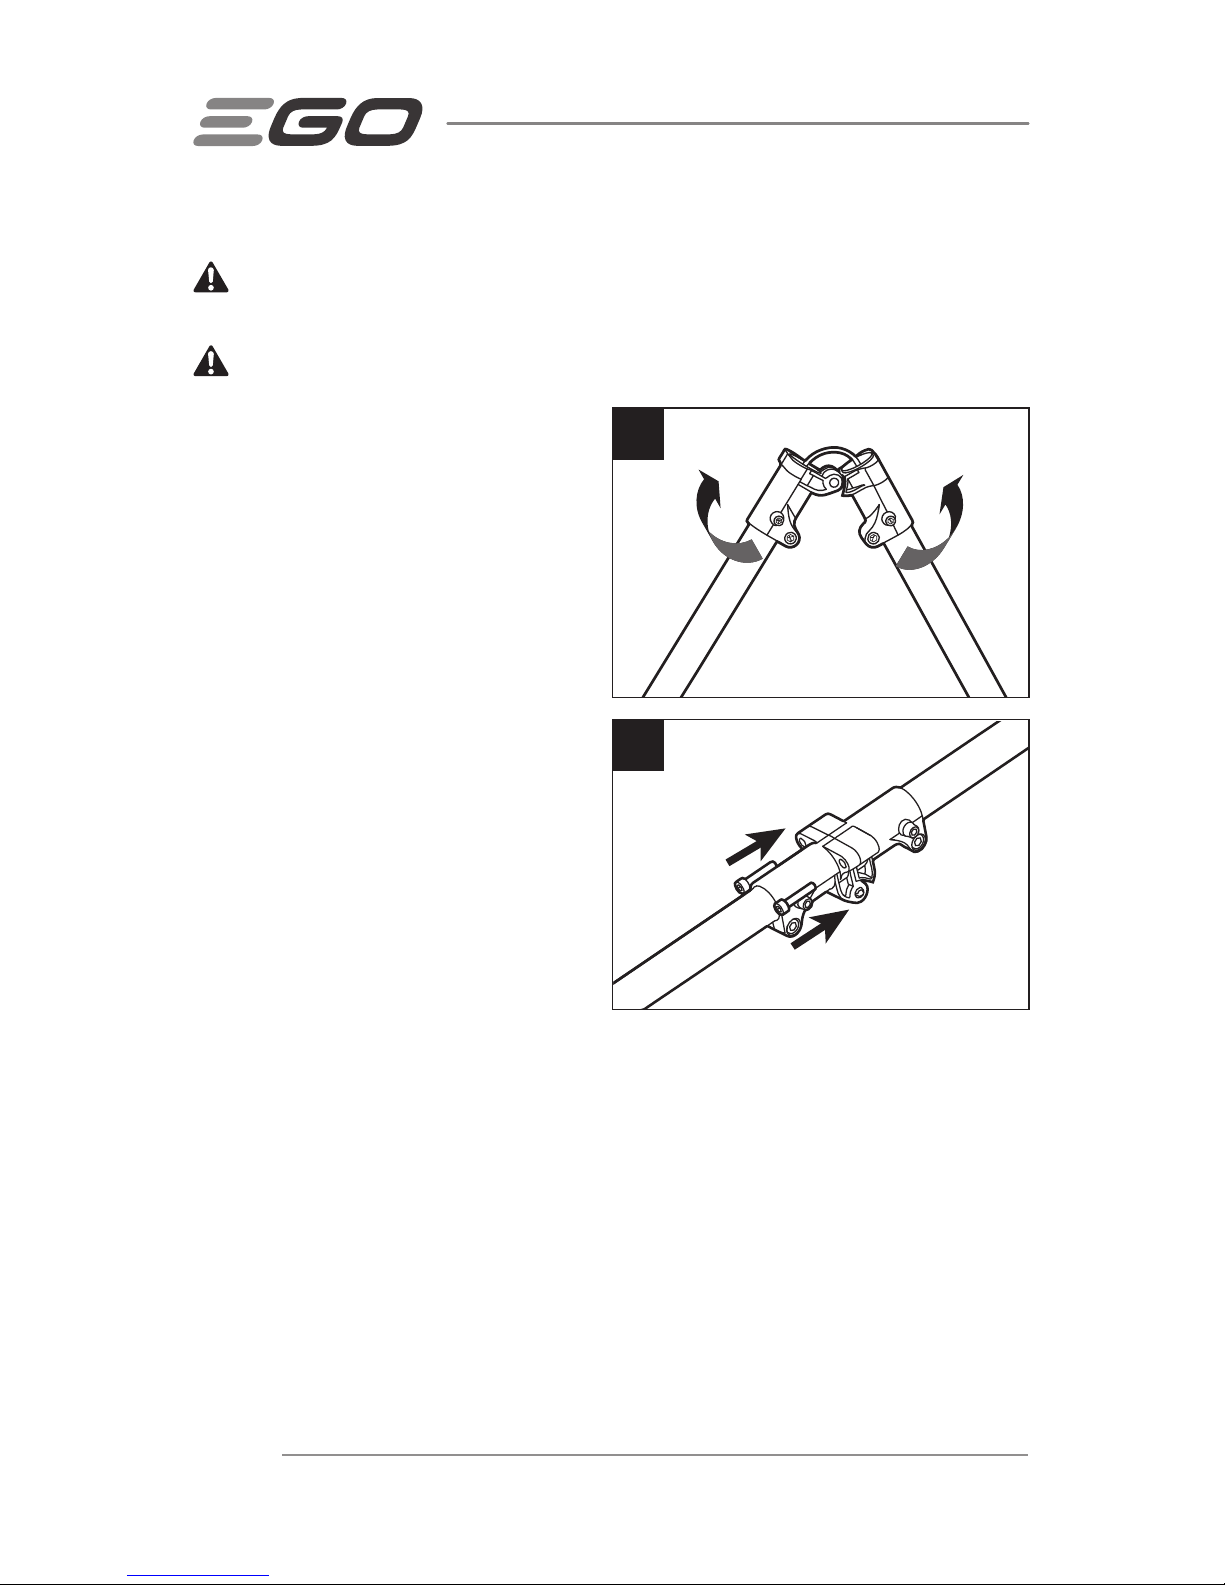
UNFOLDING THE SHAFT (ONLY FOR ST1500SF)
WARNING:
In order to avoid pinching your hands or fingers, do not hold the
shaft at the joints.
WARNING:
Do not attempt to start the trimmer until the shaft has been locked.
1. Remove the battery pack from the
trimmer.
2. Put your trimmer on the ground and
carefully unfold the shaft. Make sure
that the cable is inside the shaft
so that it will not be pinched when
closing the joints (Fig. 2).
3. Use the supplied hex wrench to lock
the shaft with the bolts supplied
(Fig. 3).
2
3
Page 15
56-VOLT LITHIUM-ION CORDLESS 15" STRING TRIMMER 15
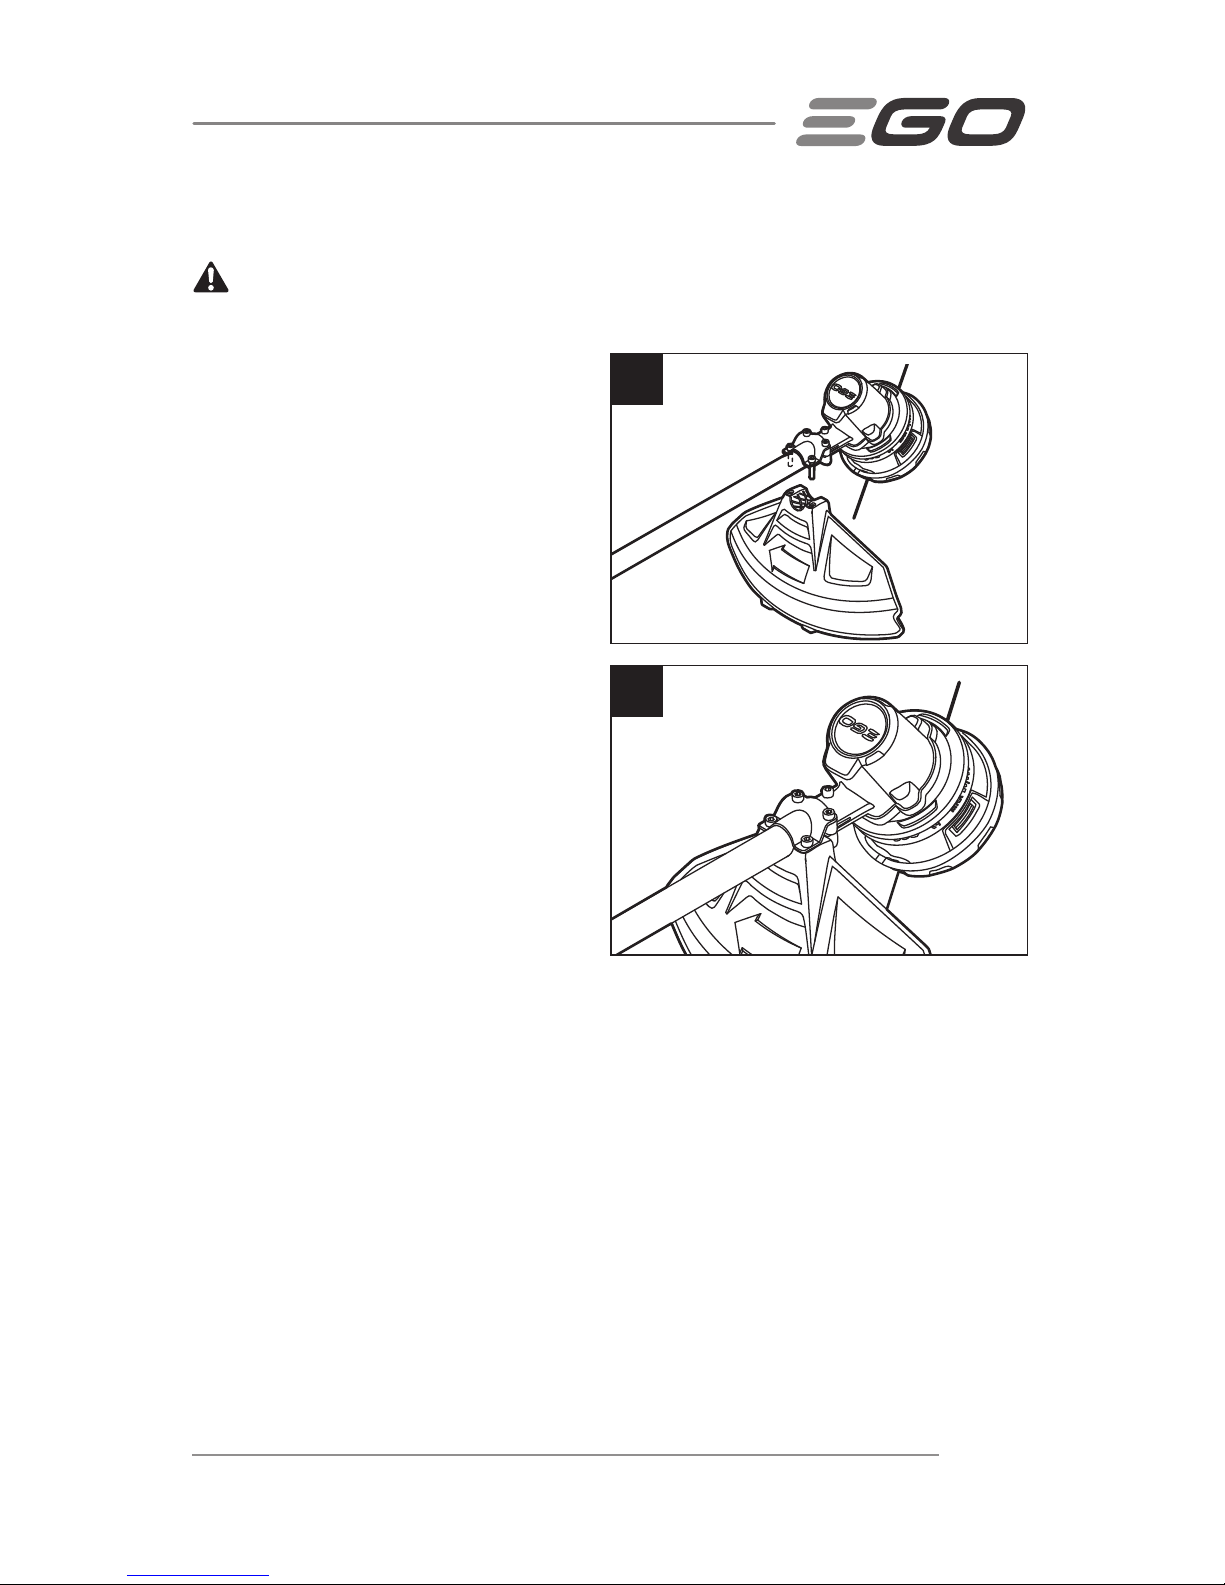
MOUNTING THE GUARD
WARNING:
Always wear gloves when mounting or replacing the guard. Be careful
of the blade on the guard and protect your hands from being injured by the blade.
1. Remove the battery pack from the
trimmer.
2. Lift the trimmer head and face it
downward; align the two mounting
holes in the guard with the two bolts
that are preassembled on the base
of the shaft. Make sure that the
internal surface of the guard faces
towards the trimmer head (Fig. 4).
3. Lock the guard in place with the two
bolts and the supplied hex wrench
(Fig. 5).
4
5
Page 16

56-VOLT LITHIUM-ION CORDLESS 15" STRING TRIMMER16
MOUNTING AND ADJUSTING THE FRONT-ASSIST HANDLE
WARNING:
Always remove the battery pack from the product when you are
assembling parts, making adjustments, cleaning, or when the product is not in use.
1. Remove the battery pack from the
trimmer.
2. Loosen the four screws in the
handle with the supplied hex
wrench and remove the screws and
the lower clamp from the handle
(Fig. 6).
3. Attach the front-assist handle and
lower clamp on the shaft and secure
them by pre-tightening the four
screws. Turn the front-assist handle
upwards so that it points toward the
top of the handle (Fig. 7).
4. Adjust the front-assist handle
position between the rear handle
housing and the joint of the shaft,
as shown in Fig. 7. For ST1500F,
adjust the handle position so that it
is between the rear handle housing
and the warning label on the shaft. Shorter users may adjust the handle to a
lower position (away from you) and taller users may adjust the handle to an upper
position (towards you). The handle should be adjusted so your front arm will be
straight when using the trimmer.
5. Tighten the four screws so that the handle cannot be rotated on the shaft.
7
6
Front-Assist Handle
Lower Clamp
Page 17
56-VOLT LITHIUM-ION CORDLESS 15" STRING TRIMMER 17
OPERATION
WARNING:
Do not allow familiarity with this product to make you careless.
Remember that a careless fraction of a second is sufficient to inflict serious injury.
WARNING:
Always wear eye protection with side shields marked to comply with
ANSI Z87.1, along with hearing protection. Failure to do so could result in objects being
thrown into your eyes and other possible serious injuries.
WARNING:
Do not use any attachments or accessories not recommended by the
manufacturer of this product. The use of attachments or accessories not recommended
can result in serious personal injury.
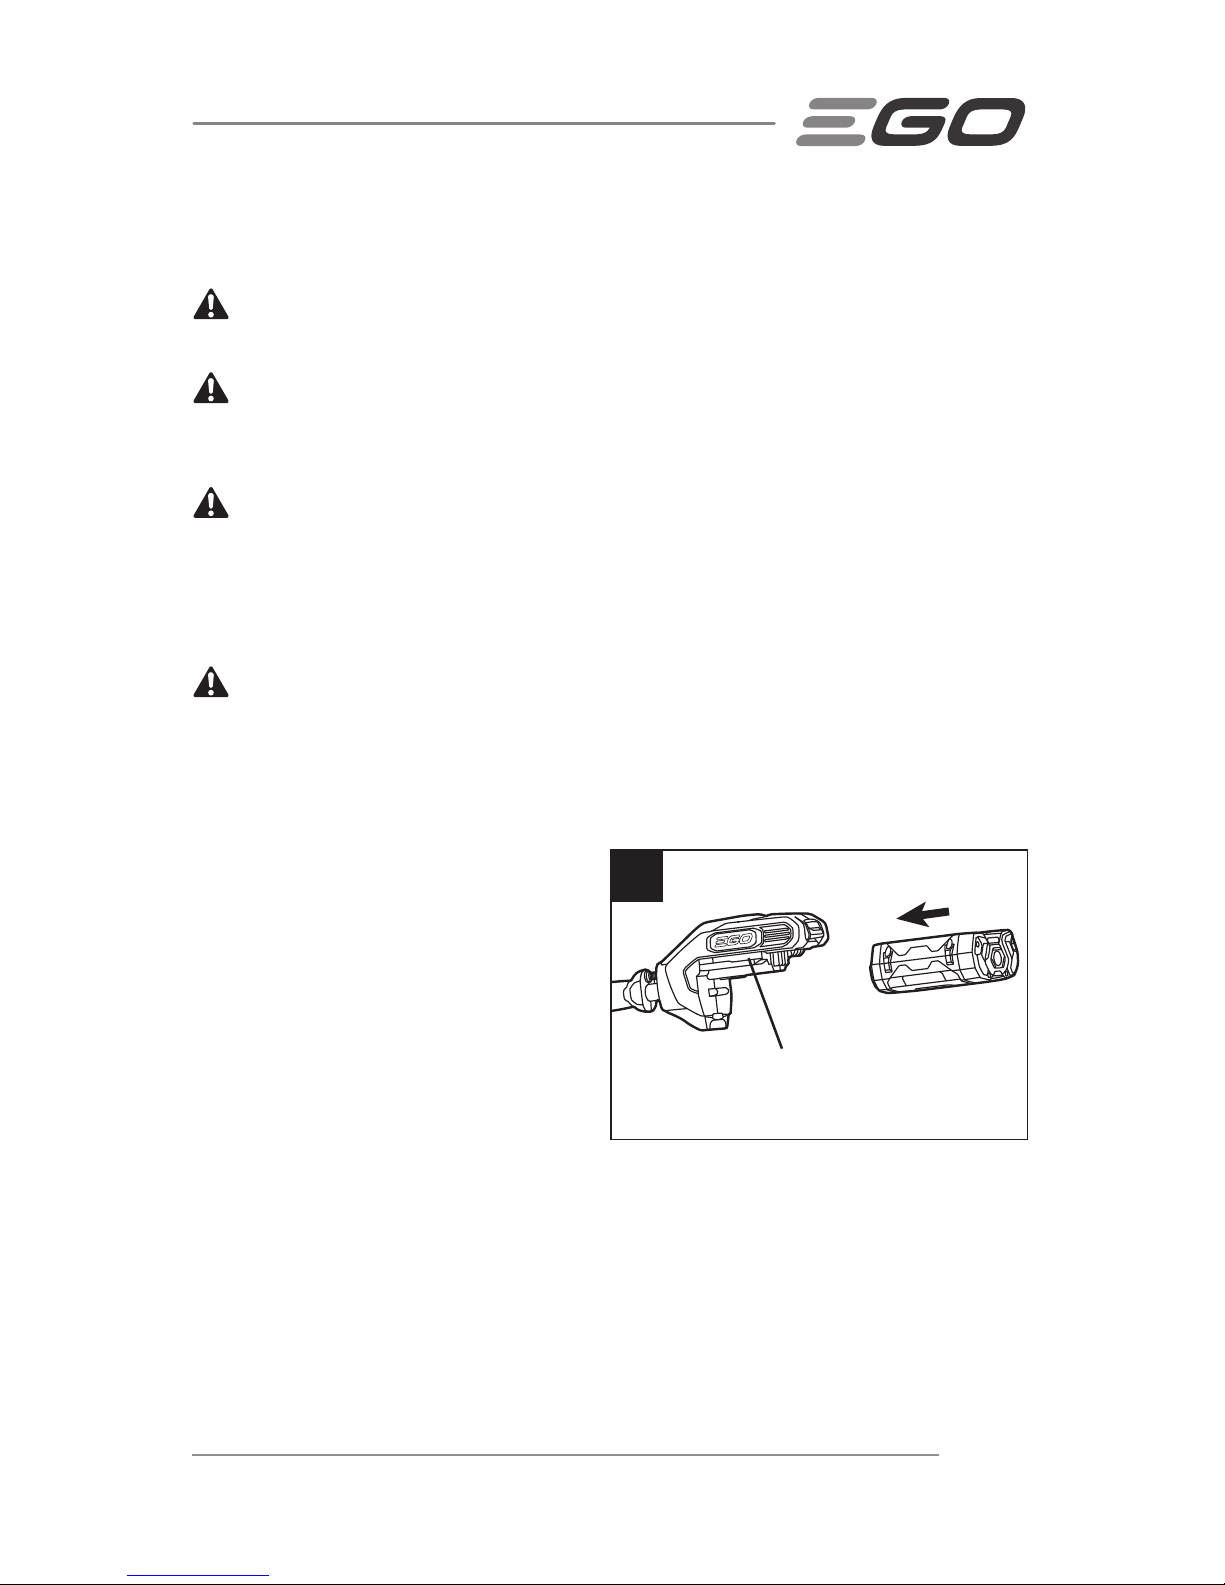
TO INSTALL/REMOVE BATTERY PACK (Fig. 8 & 9)
WARNING:
Always remove the battery pack from the product when you are
assembling parts, making adjustments, cleaning, or when not in use. Removing the
battery pack will prevent accidental starting that could cause serious personal injury.
NOTE: Fully charge the battery pack before first use.
To install battery pack (Fig. 8)
1. Align the ribs of the battery pack
with the mounting slots in the string
trimmer’s battery port.
2. Press the battery pack towards the
trimmer head until it snaps into
position.
NOTE: Make sure that the latch on the
string trimmer snaps into place and the
battery pack is secured to the tool before beginning operation.
8
Mounting Slot
Page 18
56-VOLT LITHIUM-ION CORDLESS 15" STRING TRIMMER18
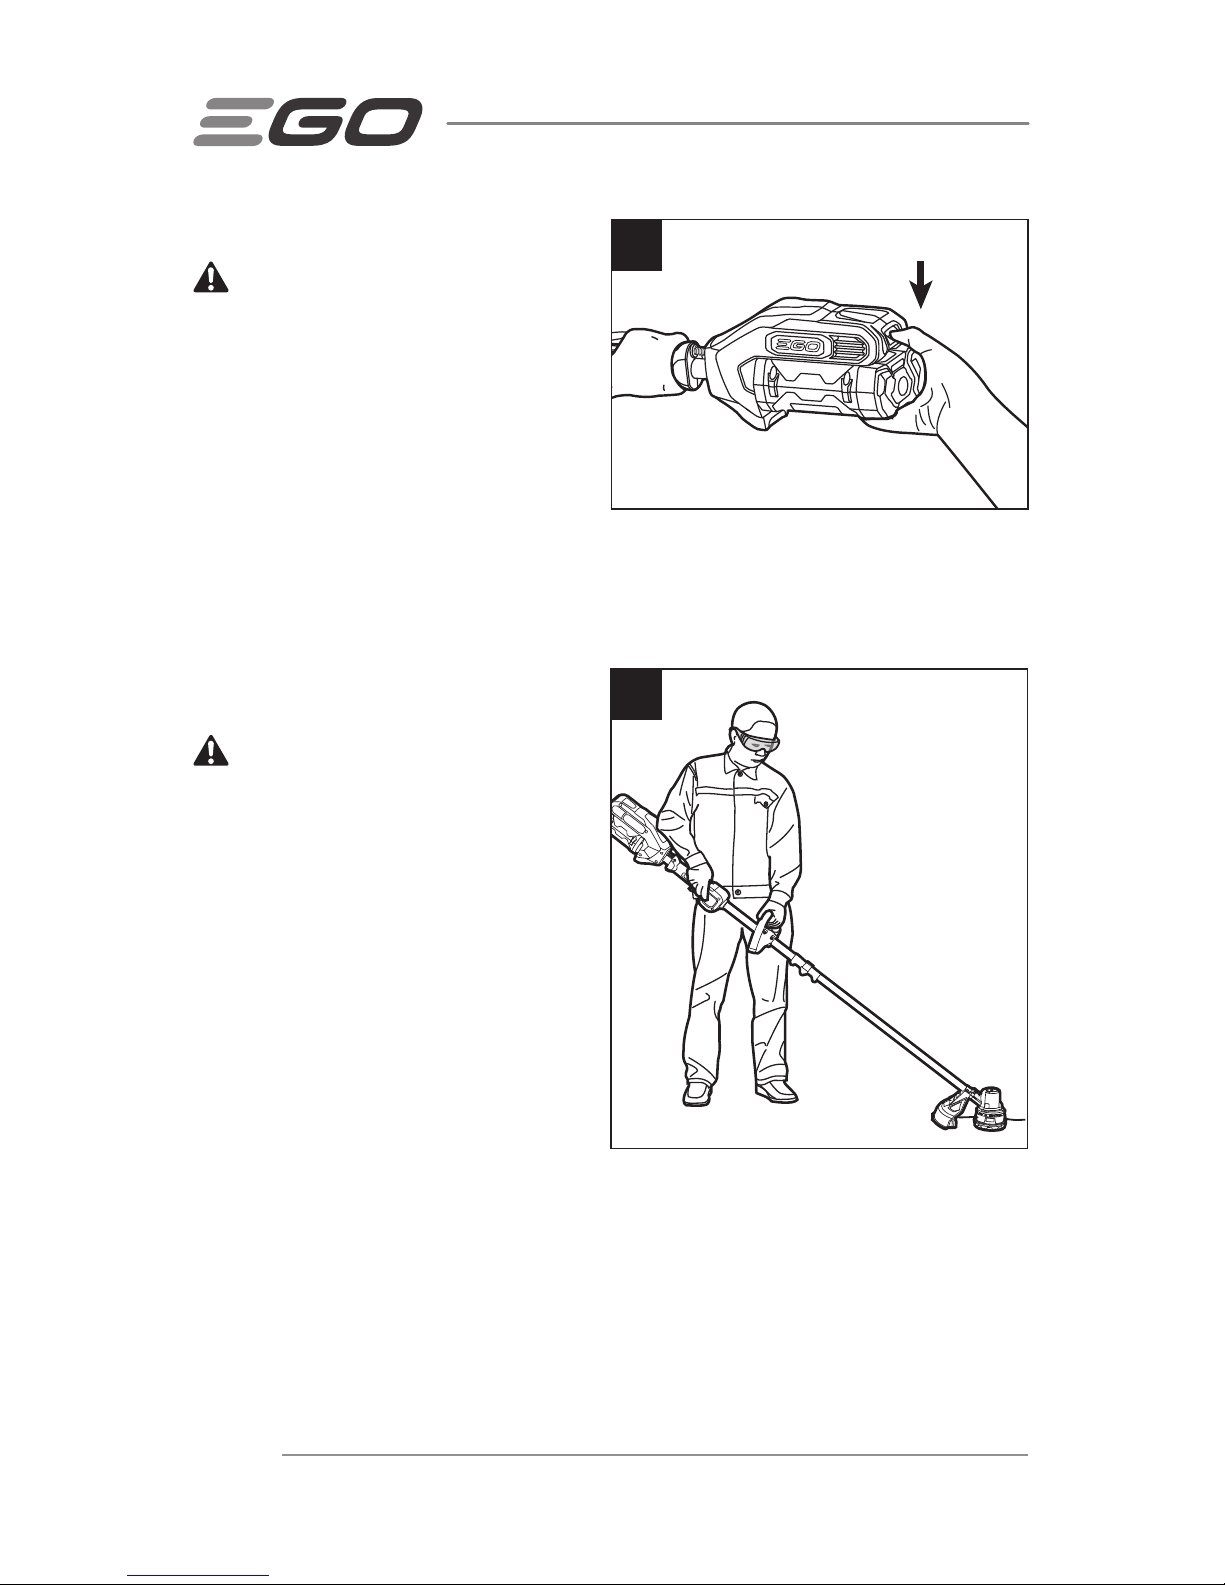
To remove battery pack (Fig. 9)
WARNING:
Always be aware of the
location of your feet and children or pets
around you when pressing the batteryrelease button. Serious injury could result
if the battery pack falls. NEVER remove
the battery pack at a high location.
1. Hold the battery pack in the palm of
your hand.
2. Press the battery-release button with your thumb; the battery pack will disengage
from the latch.
3. Grasp the battery pack and remove it from the string trimmer.
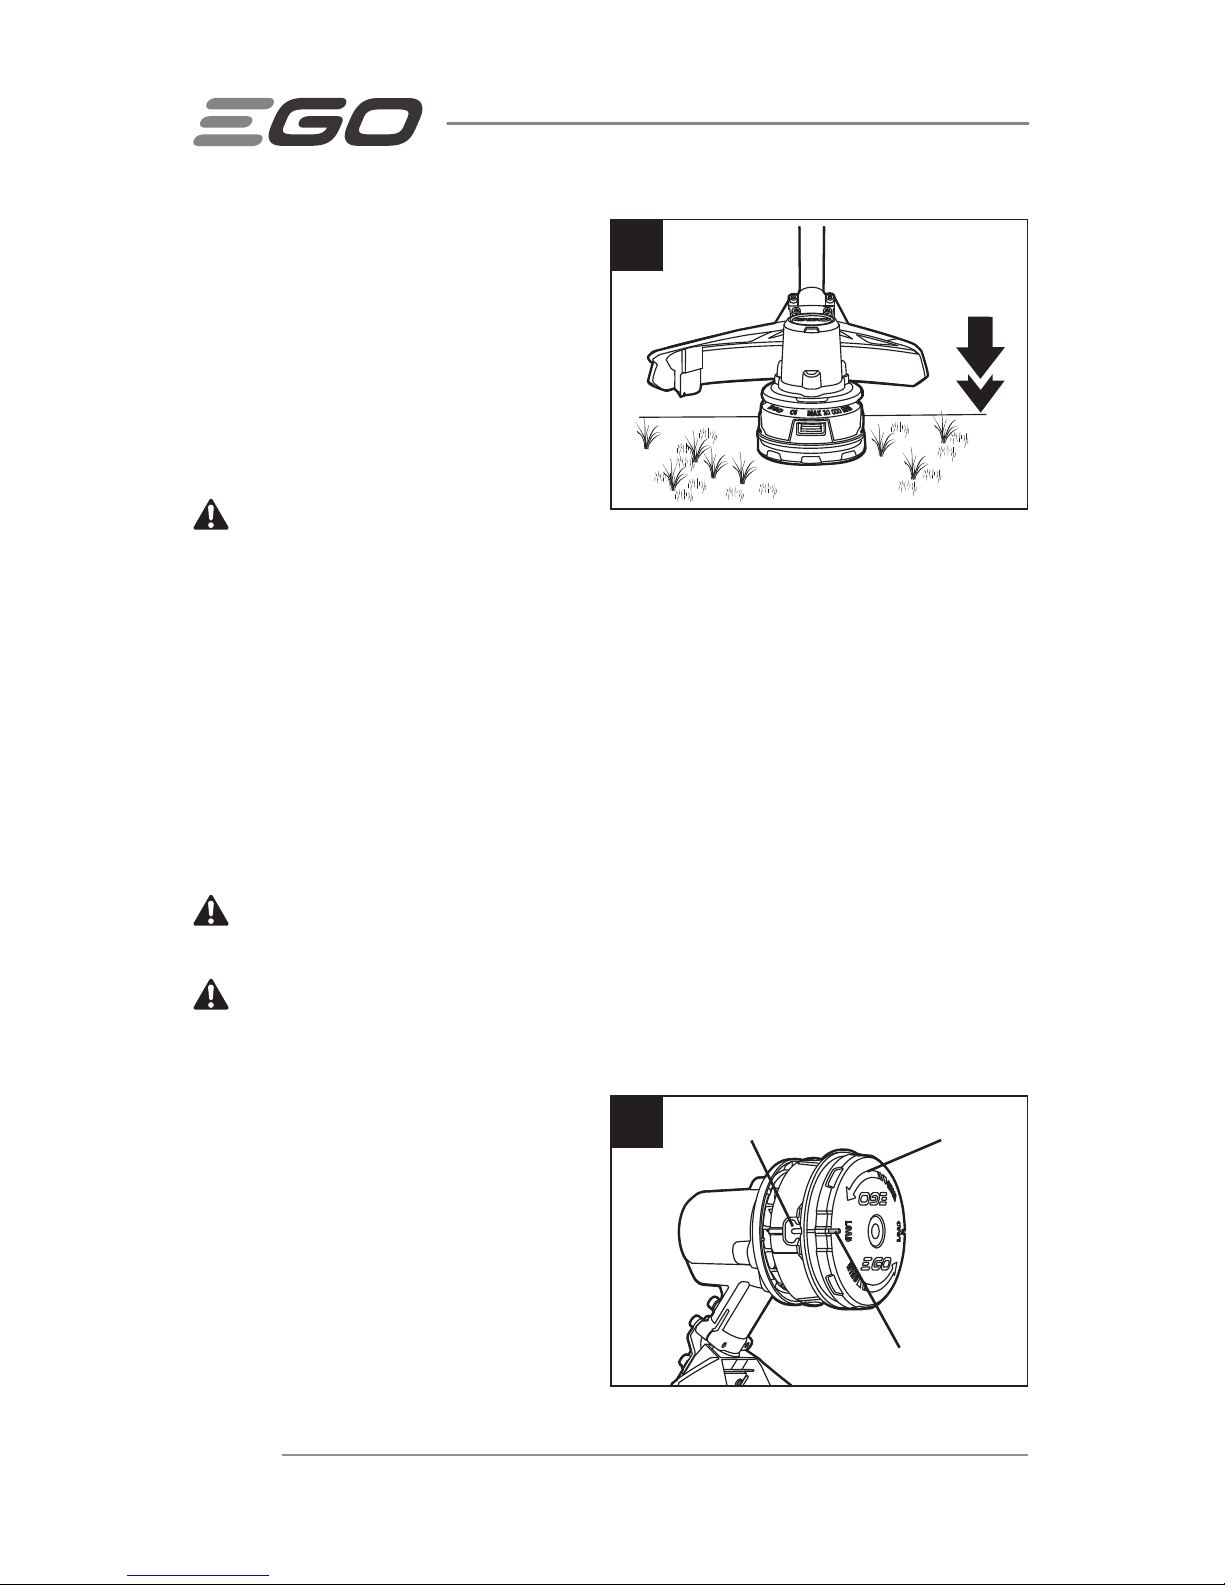
HOLDING THE STRING TRIMMER
WARNING:
Dress properly to
reduce the risk of injury when operating
this tool. Do not wear loose clothing
or jewelry. Wear eye and ear/hearing
protection. Wear heavy, long pants, boots
and gloves. Do not wear short pants or
sandals or go barefoot.
Before operating the unit, stand in the
operating position and check that:
The operator is wearing eye
protection and proper clothing.
One arm is slightly bent, and the
hand on that arm is holding the rear
handle.
The other arm is straight, with that hand holding the front-assist handle.
The trimmer head is parallel to the ground and easily contacts the material to be cut
without the operator having to bend over (Fig. 10).
Press to Release
9
10
Page 19
56-VOLT LITHIUM-ION CORDLESS 15" STRING TRIMMER 19
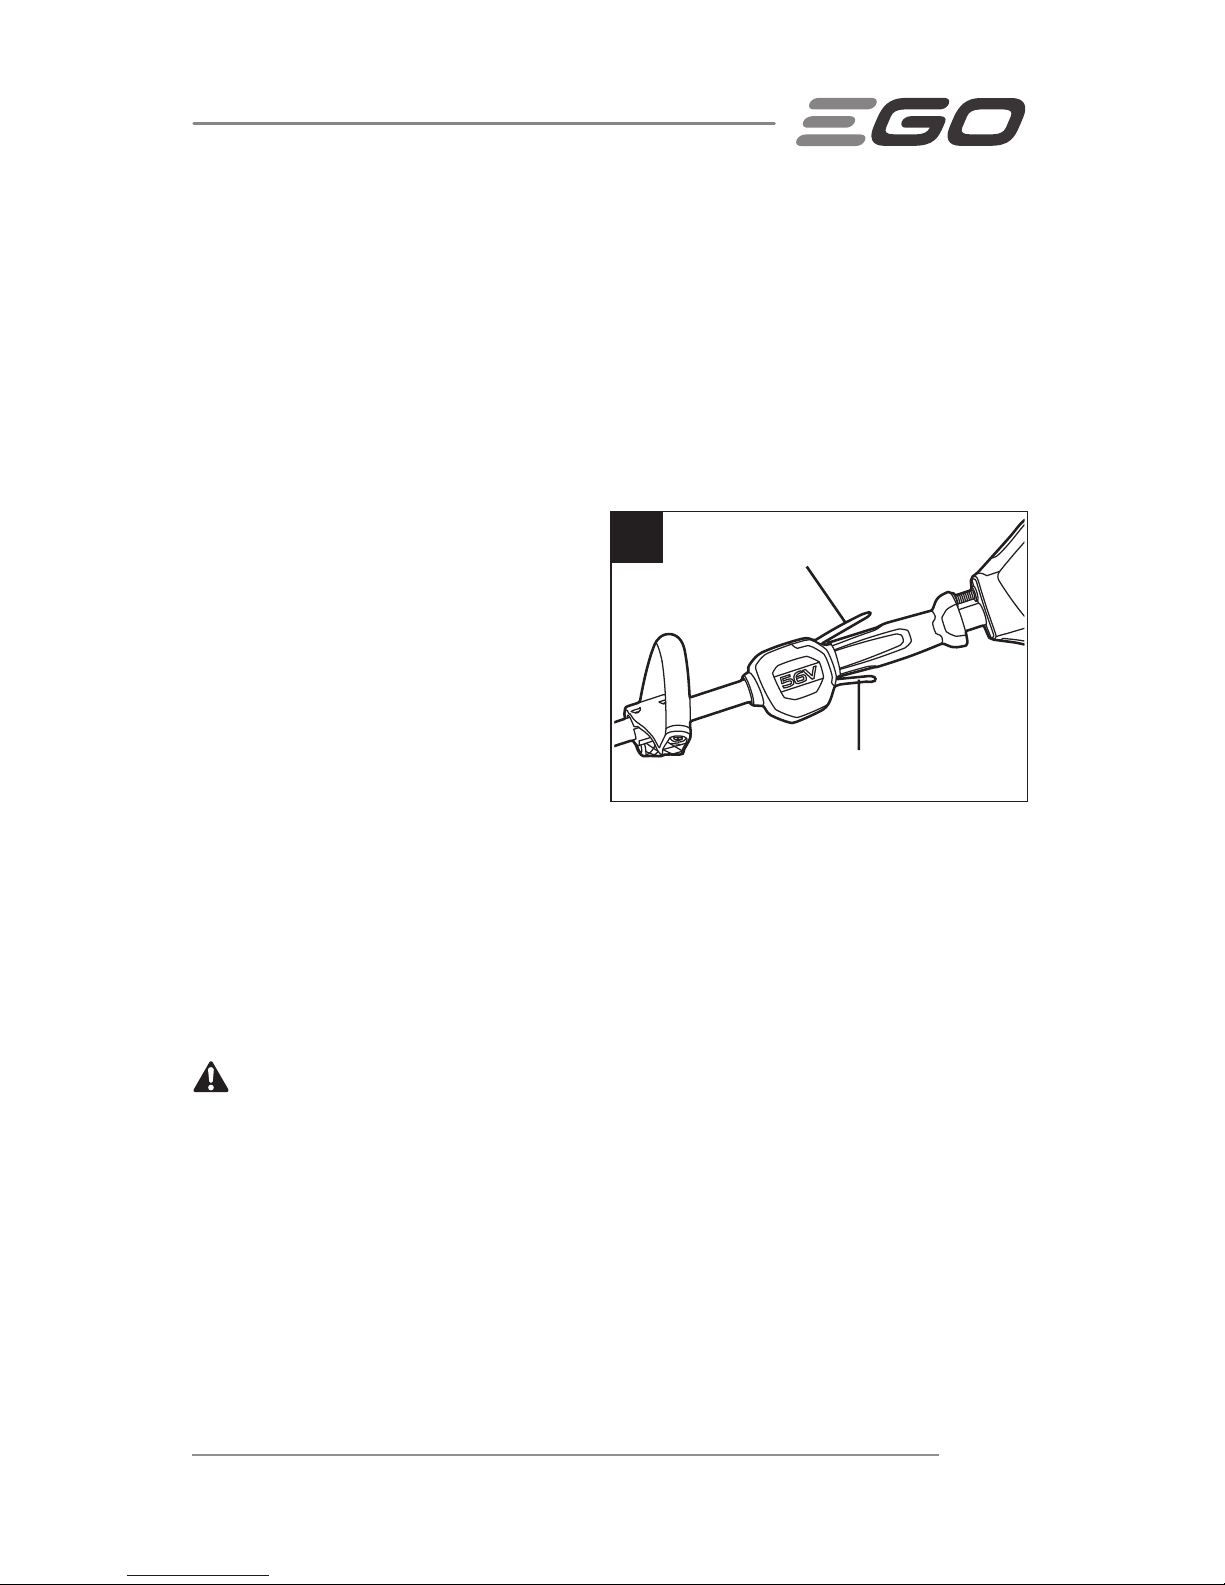
STARTING/STOPPING THE STRING TRIMMER
Before starting the string trimmer
Make sure that you have a secure and balanced footing.
Stand upright and hold the string trimmer in a relaxed position.
Make sure that the cutting line is not touching the ground or any other objects.
Hold the string trimmer with both hands: one hand on the rear handle and one
hand on the front-assist handle.
To start the string trimmer
(Fig. 11)
1. Press the lock-off lever down and
hold it in that position. Depress the
trigger to turn on the string trimmer.
2. The rotational speed of the cutting
line is controlled with the variable
speed trigger. More pressure on
the trigger results in higher cutting
speed; less pressure on the trigger results in lower cutting speed. Adjust the
speed to suit the task at hand.
NOTICE: The motor runs only when the lock-off lever and trigger are both pressed .
To stop the string trimmer
Release the lock-off lever and the trigger to stop the string trimmer.
WARNING:
Always remove the battery pack from the string trimmer during work
breaks and after finishing work.
11
Lock-off Lever
Trigger
Page 20

56-VOLT LITHIUM-ION CORDLESS 15" STRING TRIMMER20
USING THE STRING TRIMMER
WARNING:
To avoid serious personal injury, wear goggles or safety glasses at all
times when operating this unit. Wear a face mask or dust mask in dusty locations.
Clear the area to be cut before each use. Remove all objects, such as rocks, broken
glass, nails, wire, or string that can be thrown or become entangled in the cutting
attachment. Clear the area of children, bystanders, and pets. At a minimum, keep all
children, bystanders and pets at least 100 feet (30.5m) away; there still may be risk
to bystanders from thrown objects. Bystanders should be encouraged to wear eye
protection. If you are approached, stop the motor immediately.
WARNING:
To prevent serious personal injury, remove the battery pack from the
tool before servicing, cleaning, changing attachments or removing material from the unit.
Check for damaged/worn parts before each use
Check the trimmer head, guard and front-assist handle and replace any parts that are
cracked, warped, bent, or damaged in any away.
The line-cutting blade on the edge of the guard can dull over time. It is recommended
that you periodically sharpen it with a file or replace it with a new blade.
WARNING:
Always wear gloves when mounting or replacing the guard or when
sharpening or replacing the blade. Note the location of the blade on the guard and
protect your hand from injury.
Clean the trimmer after each use
See the Maintenance section for cleaning instructions.
WARNING:
Never use water for cleaning your trimmer. Avoid using solvents
when cleaning plastic parts. Most plastics are susceptible to damage from various
types of commercial solvents. Use clean clothes to remove dirt, dust, oil, grease, etc.
Page 21
56-VOLT LITHIUM-ION CORDLESS 15" STRING TRIMMER 21
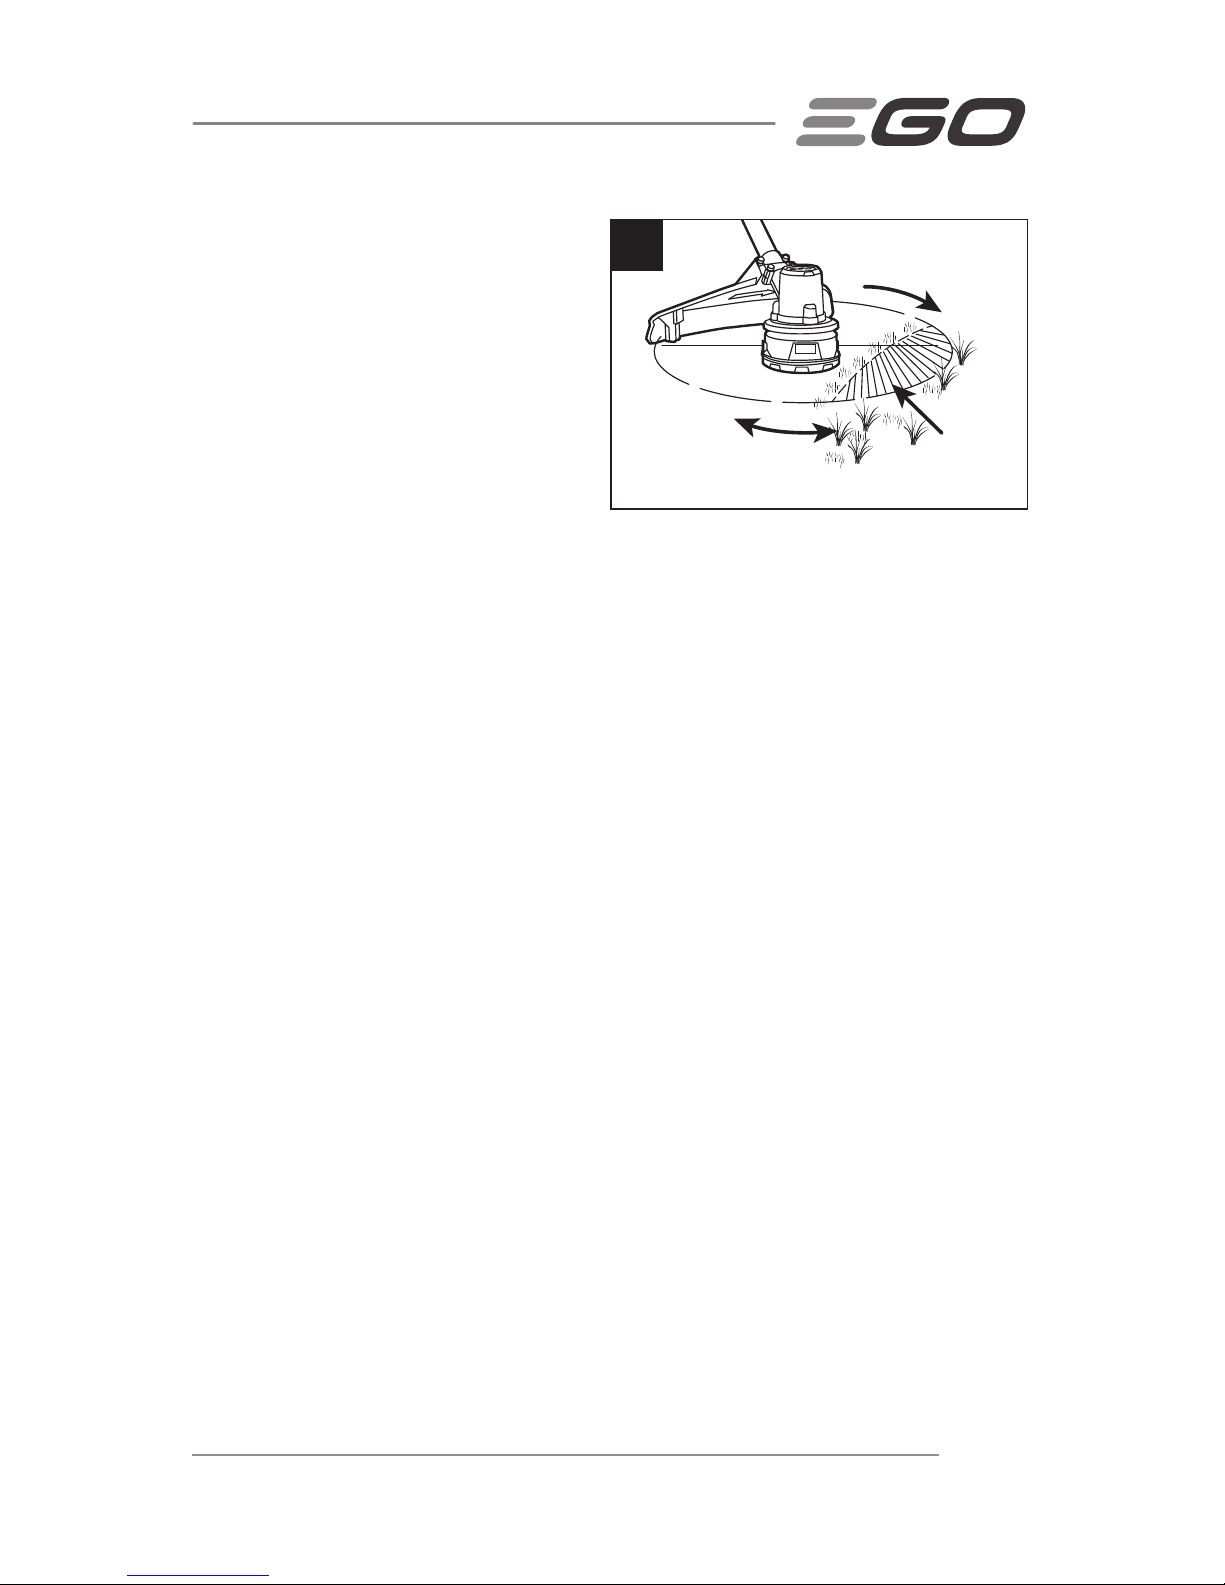
Tips for best trimming results
(Fig. 12)
The correct angle for the cutting
attachment is parallel to the ground.
Do not force the trimmer. Allow the
very tip of the line to do the cutting
(especially along walls). Cutting
with more than the tip will reduce
cutting efficiency and may overload
the motor.
The cutting height is determined by the distance of the cutting line from the lawn
surface.
Grass over 8 inches (200 mm) should be cut by working from top to the bottom in
small increments to avoid premature line wear or motor drag.
Slowly move the trimmer into and out of the area being cut, maintaining the
cutting head position at the desired cutting height. This movement can be either
a forward-backward motion or a side-to-side motion. Cutting shorter lengths
produces best results.
Trim only when grass and weeds are dry.
Wire and picket fences can cause extra string wear or breakage. Stone and brick
walls, curbs, and wood may wear strings rapidly.
Avoid trees and shrubs. Tree bark, wood moldings, siding, and fence posts can
easily be damaged by the strings.
12
Dangerous
cutting area
Best cutting
area
Page 22
56-VOLT LITHIUM-ION CORDLESS 15" STRING TRIMMER22
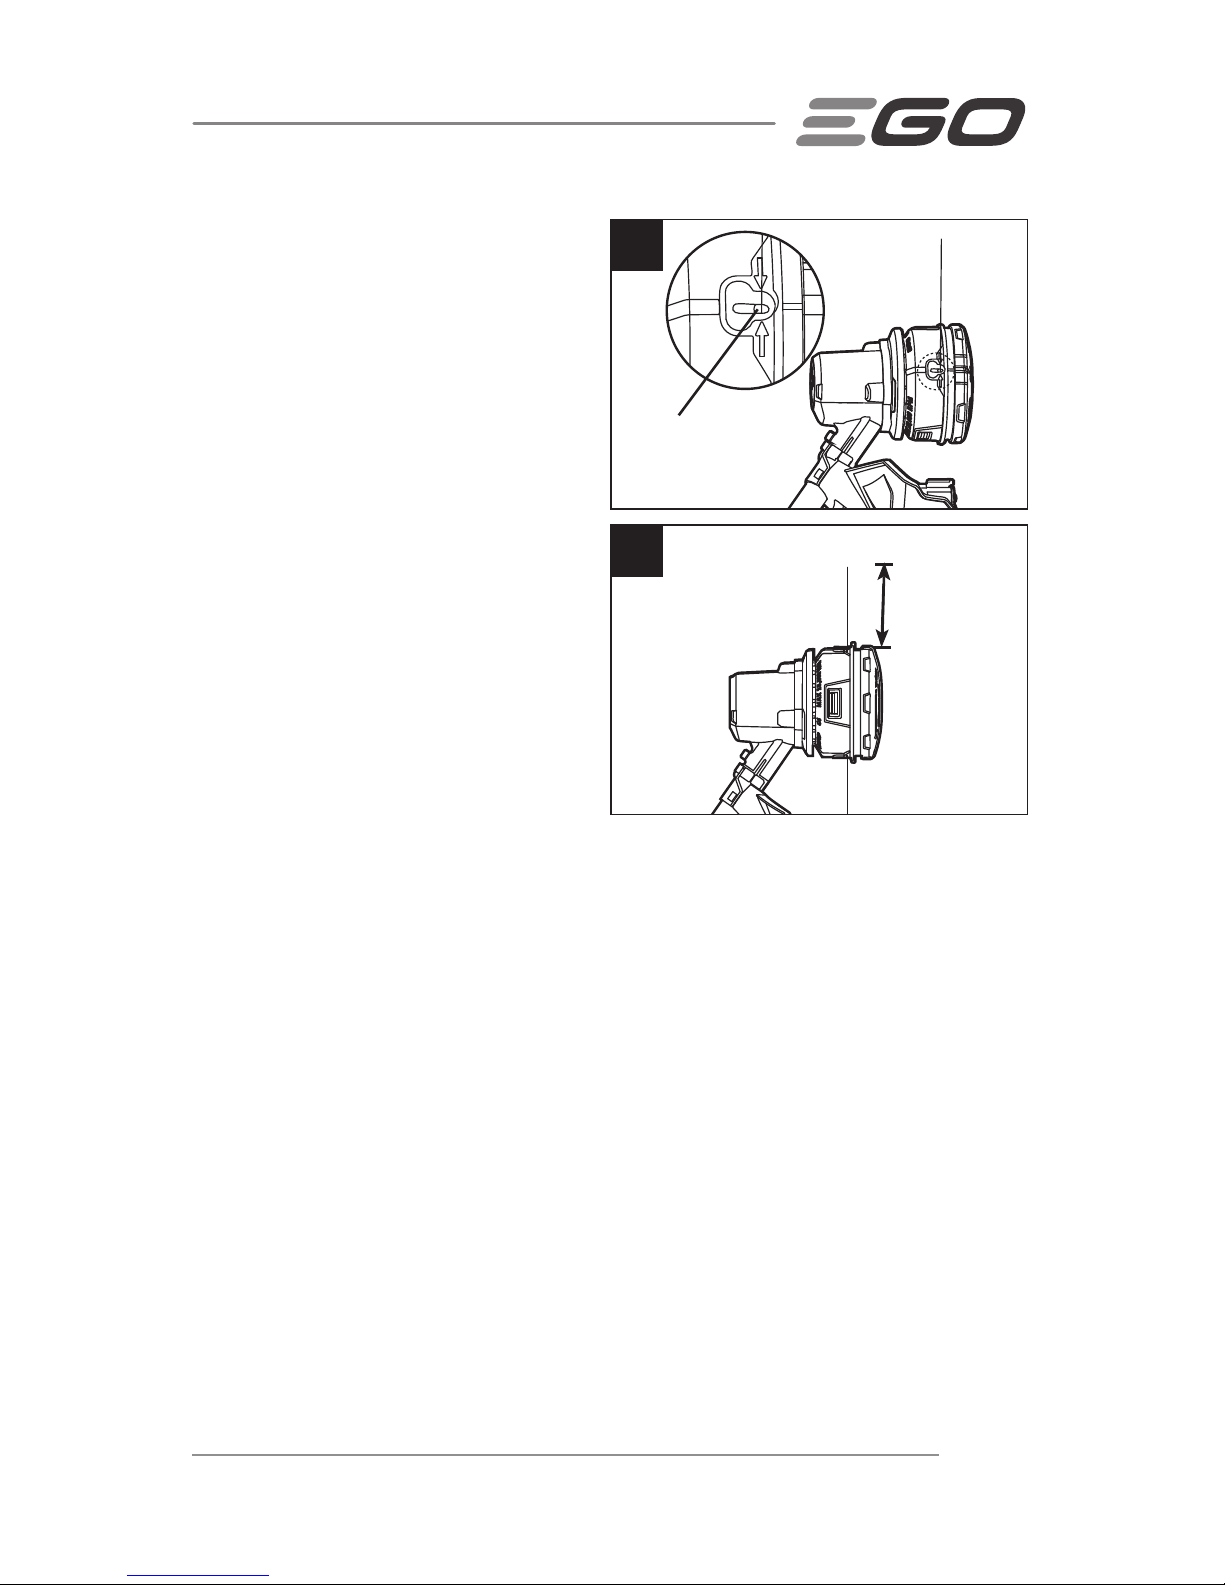
ADJUSTING CUTTING
LINE LENGTH
The trimmer head allows the operator to
release more cutting line without stopping
the motor. As line becomes frayed or worn,
additional line can be released by lightly
tapping the bump knob on the ground
while operating the trimmer (Fig. 13).
WARNING:
Do not remove or alter
the line cutting blade assembly. Excessive line length will cause the motor to overheat
and may result in serious personal injury.
For best results, tap the bump knob on bare ground or hard soil. If line release is
attempted in tall grass, the motor may overheat. Always keep the trimming line fully
extended. Line release becomes more difficult as the cutting line becomes shorter.
LINE REPLACEMENT
NOTICE: Always use the recommended nylon cutting line with a diameter that does not
exceed 0.095 in. (2.4 mm). Using line other than that specified may cause the string
trimmer to overheat or become damaged.
WARNING:
Never use metal-reinforced line, wire, or rope, etc. These can break
off and become dangerous projectiles.
WARNING:
To prevent serious personal injury, remove the battery pack from the
tool before servicing, cleaning, changing attachments or removing material from the
unit.
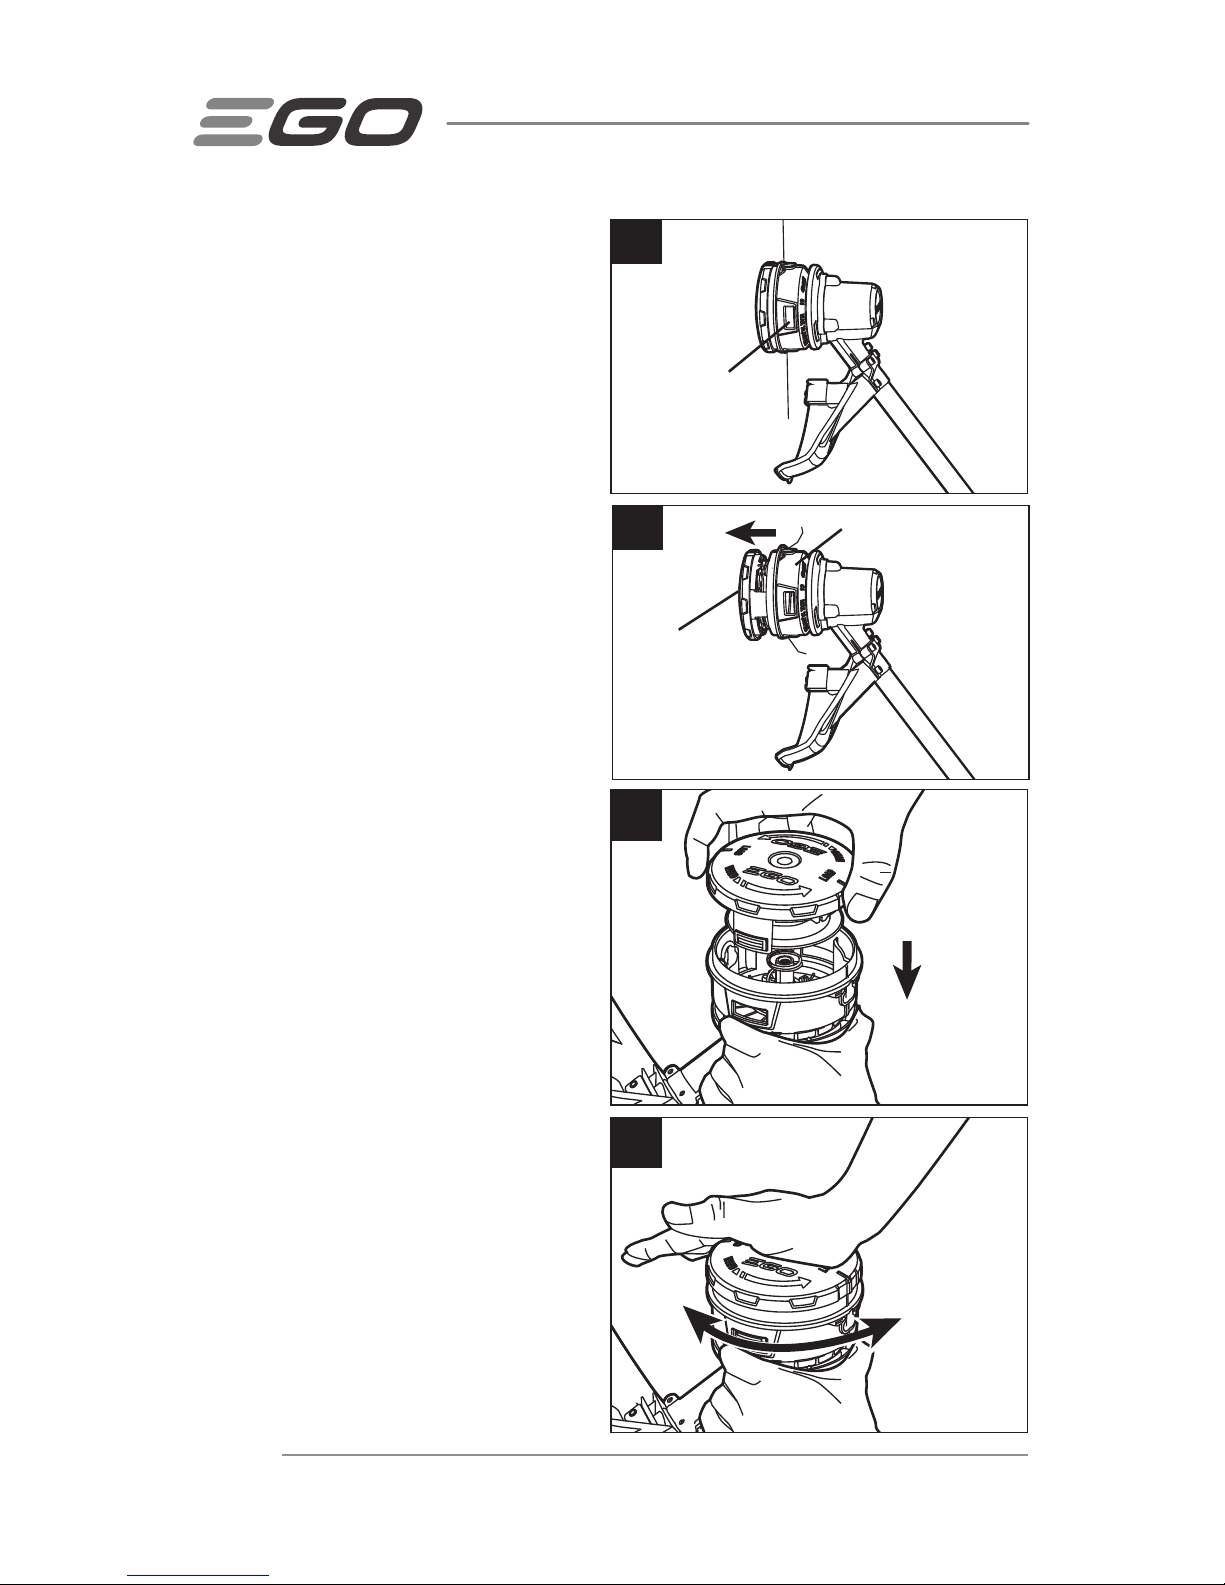
1. Remove the battery pack.
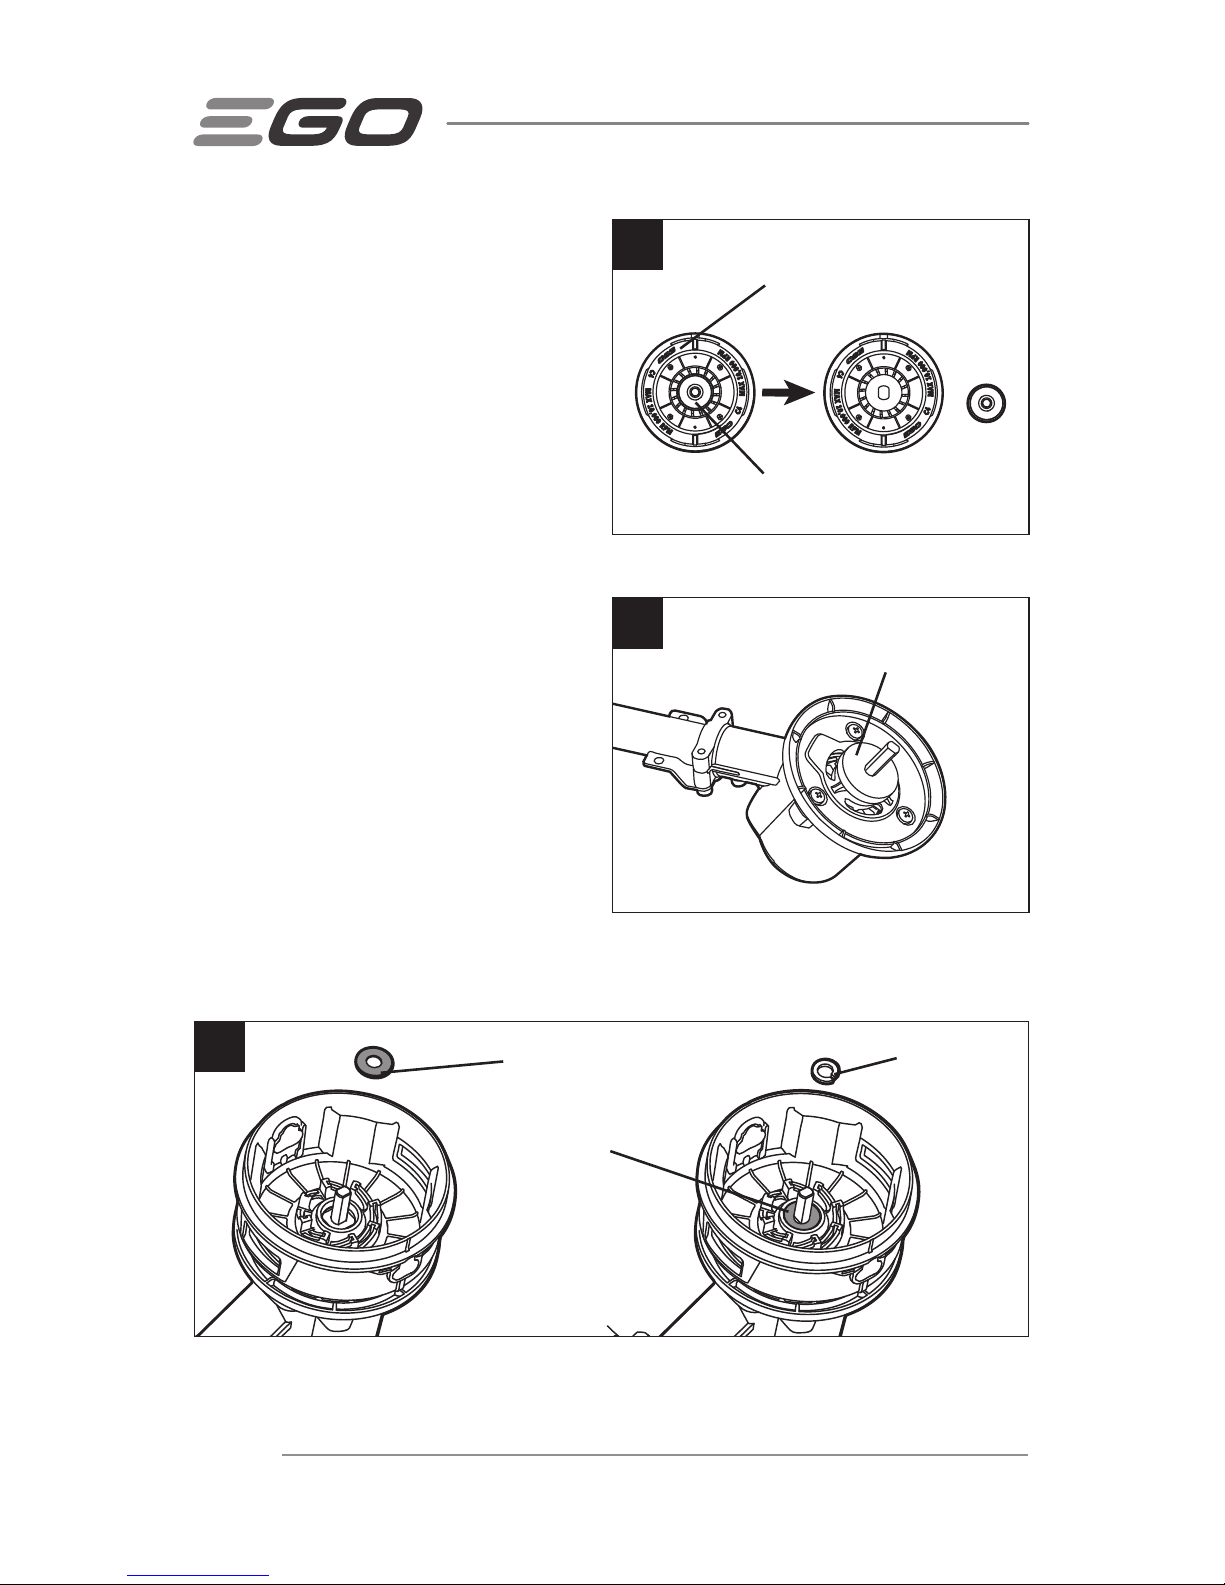
2. Rotate the spool retainer in the
arrow direction as necessary to
align the LOAD line on the spool
retainer with the eyelets in the spool
base (Fig. 14).
13
14
LOAD Line
Eyelet Arrow Direction
Page 23
56-VOLT LITHIUM-ION CORDLESS 15" STRING TRIMMER 23
3. Cut one piece of cutting line 16 ft.
(5m) long. Insert the line into the
mounting hole, which is located
inside the eyelet. Push until the end
of the line comes out of the other
side of the spool base. Pull the
line from the other side until equal
amounts of line appear on both
sides of the spool (Fig. 15).
4. Rotate the spool retainer in the
direction of the arrow to wind
the line onto the spool until
approximately 5.5 in. (14cm) of line
is showing on each side (Fig. 16).
5. Push the spool retainer down while
pulling on lines to manually advance
the line and to check for proper
assembly of the trimmer head.
RELOAD THE CUTTING LINE, IF
NECESSARY
NOTICE: When the cutting line breaks from the line outlet or the cutting line is not
released when the trimmer head is tapped, you need to remove the remaining cutting
line from the spool retainer and follow the steps below to reload the line.
1. Remove the battery pack.
16
5.5" (14 cm)
15
Mounting Hole
inside the
Eyelet
Page 24
56-VOLT LITHIUM-ION CORDLESS 15" STRING TRIMMER24
2. Press the release tabs on the spool
retainer and remove the spool
retainer by pulling it straight out
(Fig. 17 & 18).
3. Remove the cutting line from the
spool retainer.
4. With one hand holding the spool
base, use another hand to grasp the
spool retainer and align the tabs on
the spool retainer with the holes in
the spool base; use your palm to
press and rotate the spool retainer
left and right until the tabs lock with
the spool base. (Fig. 19 & 20).
5. Following the instructions in “LINE
REPLACEMENT” to reload the
cutting line.
19
Alignment
20
17
Release tab
18
Spool Retainer
Spool Base
Page 25
56-VOLT LITHIUM-ION CORDLESS 15" STRING TRIMMER 25
MAINTENANCE
WARNING:
When servicing, use only identical replacement parts. Use of any
other parts may create a hazard or cause product damage. To ensure safety and
reliability, all repairs should be performed by a qualified service technician.
WARNING:
Battery tools do not have to plugged into an electrical outlet;
therefore, they are always in operating condition. To prevent serious personal injury,
take extra precautions and care when performing maintenance, service or for changing
the cutting attachment or other attachments.
WARNING:
To prevent serious personal injury, remove the battery pack from
the tool before servicing, cleaning, changing add-on attachments or removing material
from the unit.
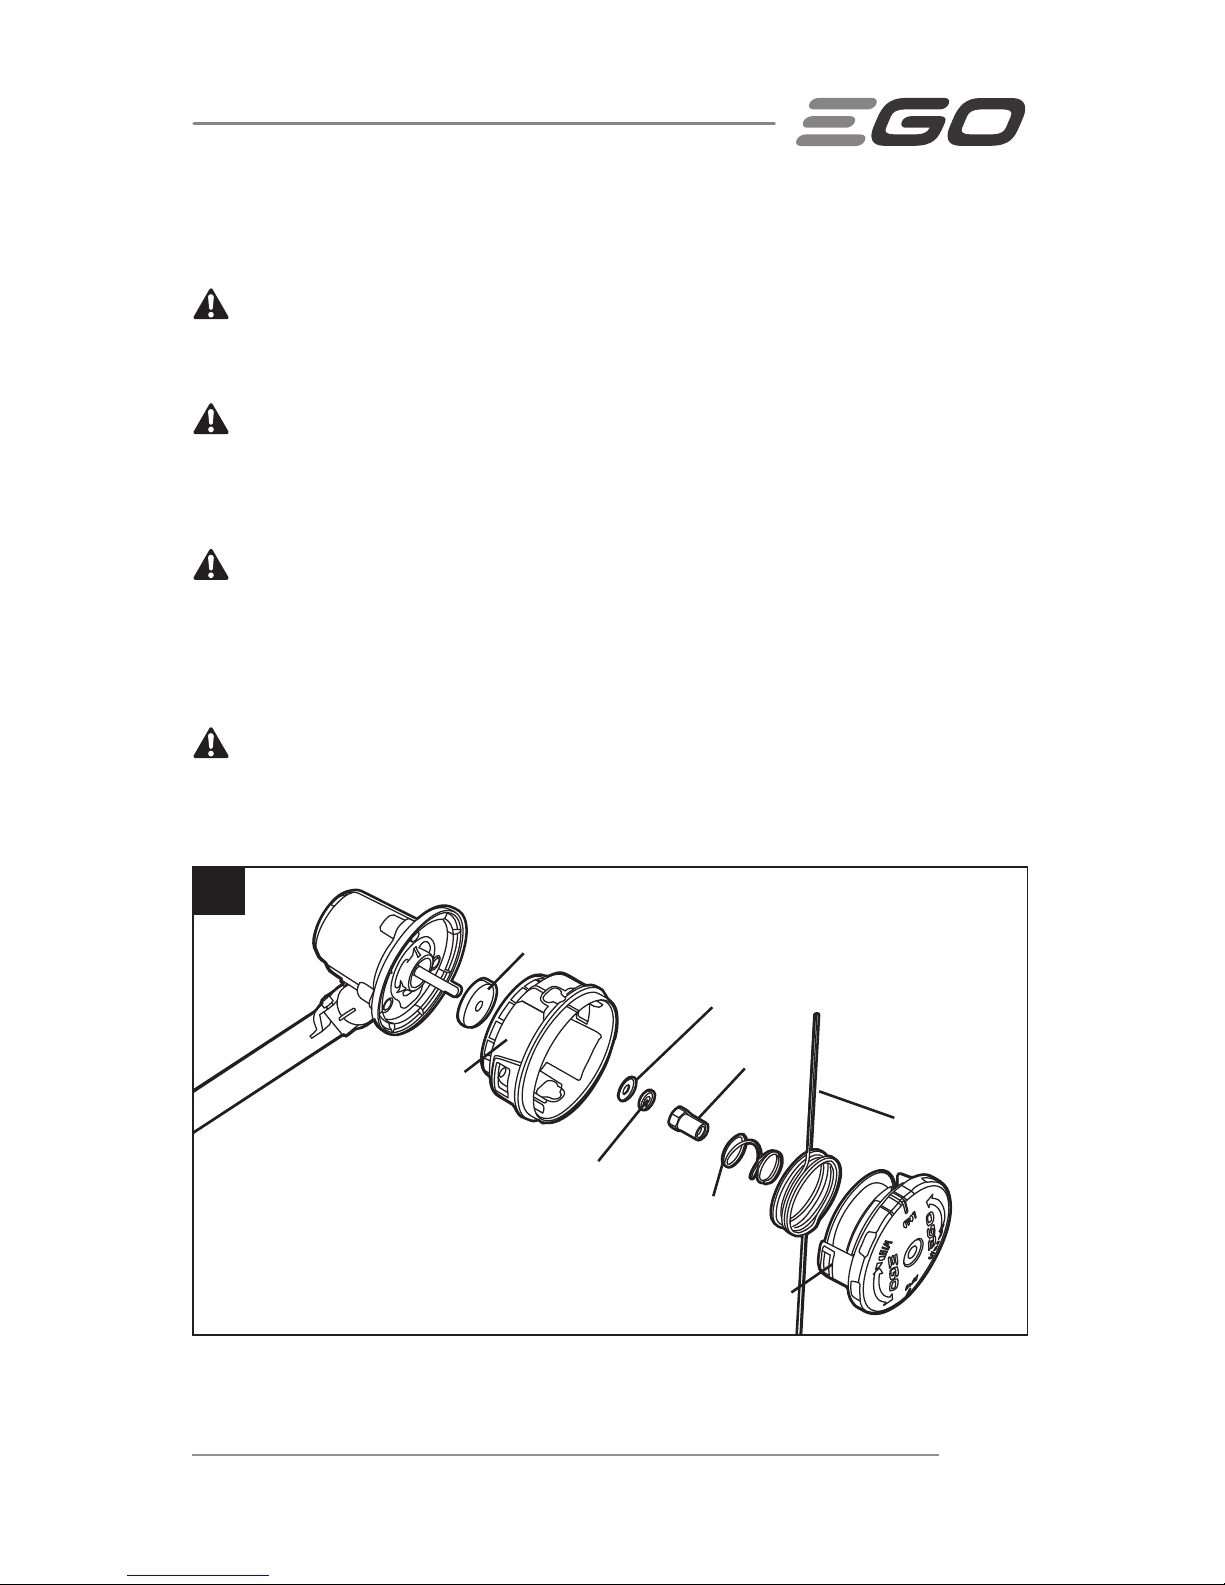
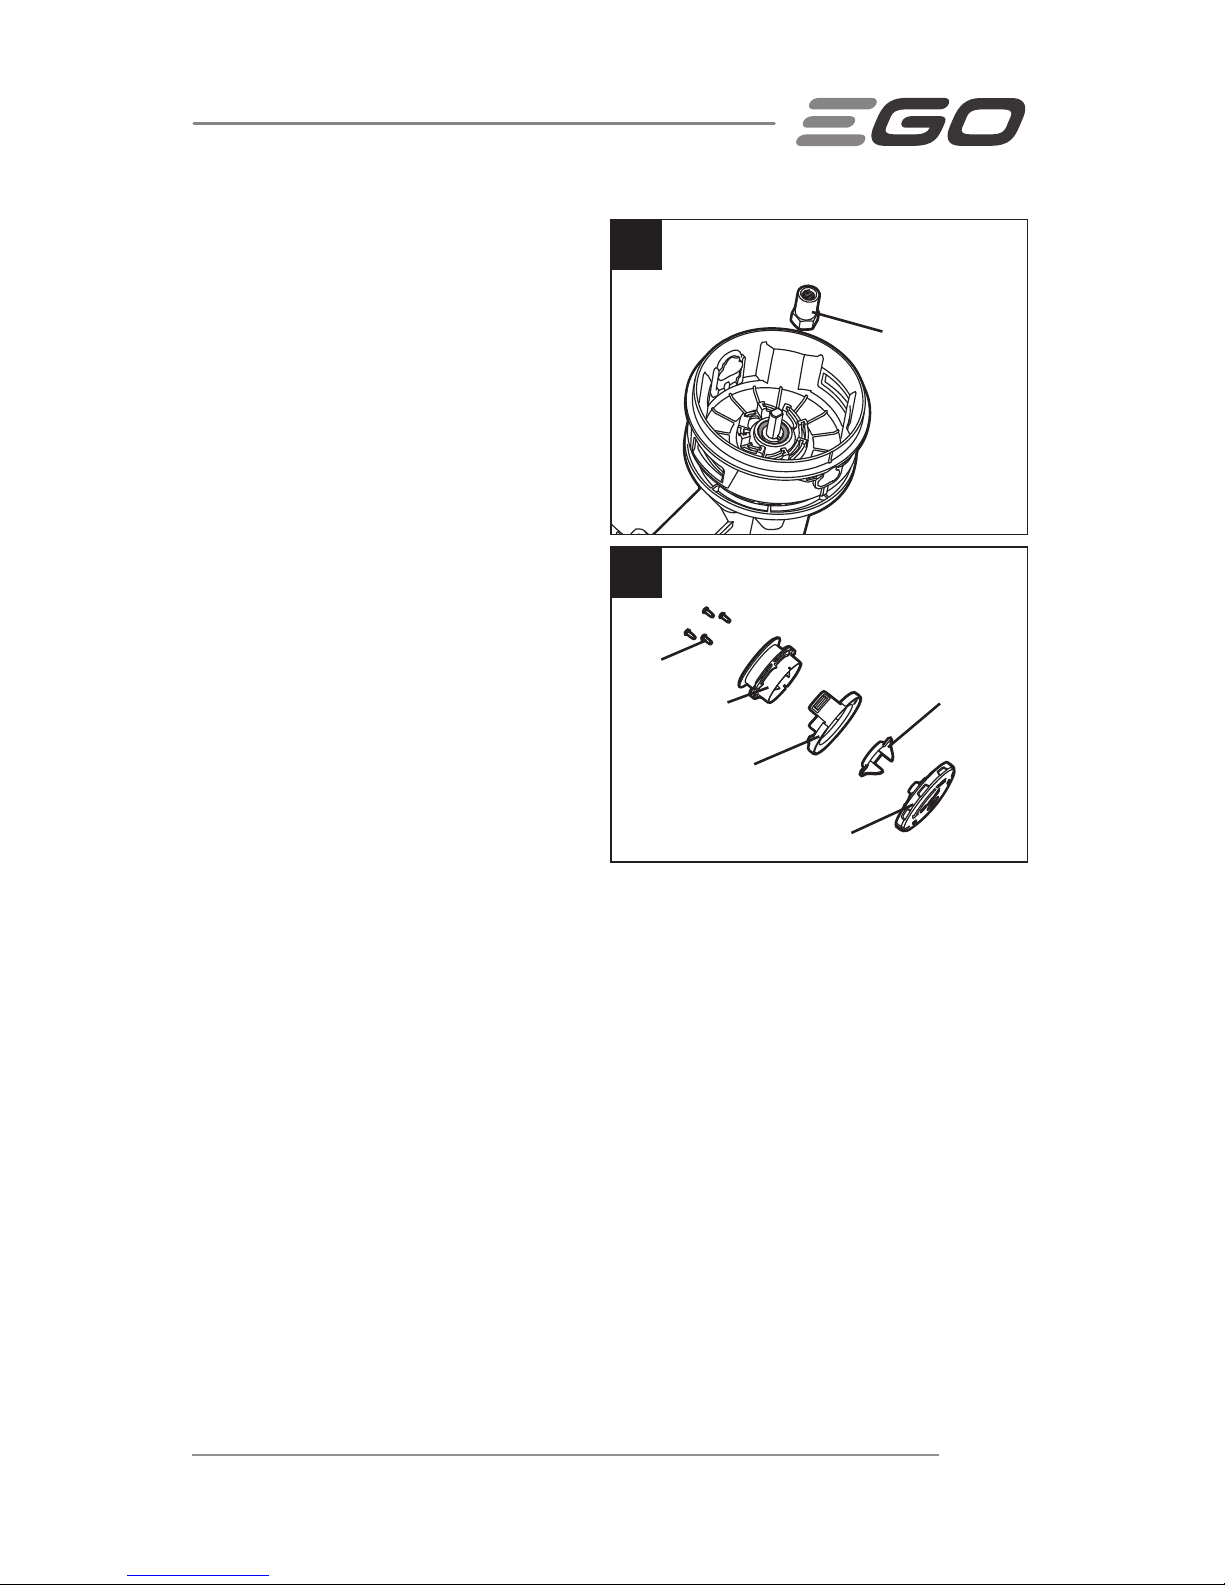
TRIMMER HEAD REPLACEMENT
DANGER: If the head loosens after it is fixed in position, replace it immediately.
Never use a trimmer with a loose cutting attachment. Replace a cracked, damaged
or worn out cutting head immediately, even if damage is limited to superficial cracks.
Such attachments may shatter at high speed and cause serious injury.
21
Flange
Plain Washer
Spool Base
Spring Washer
Cutting Line
Spool Retainer Assembly
Spring
Nut
Page 26
56-VOLT LITHIUM-ION CORDLESS 15" STRING TRIMMER26
Remove the trimmer head
1. Press the 2 release tabs on the
spool retainer to remove it
(see Fig. 17 & 18).
2. Pull the spring out of the spool base
(Fig. 22).
3. Wear gloves to hold the spool base
with one hand and, with the other
hand, use an impact socket wrench
(9/16" , 14mm) to loosen and
remove the nut (Fig. 23).
22
Spring
23
Nut
Spool Base
Page 27
56-VOLT LITHIUM-ION CORDLESS 15" STRING TRIMMER 27
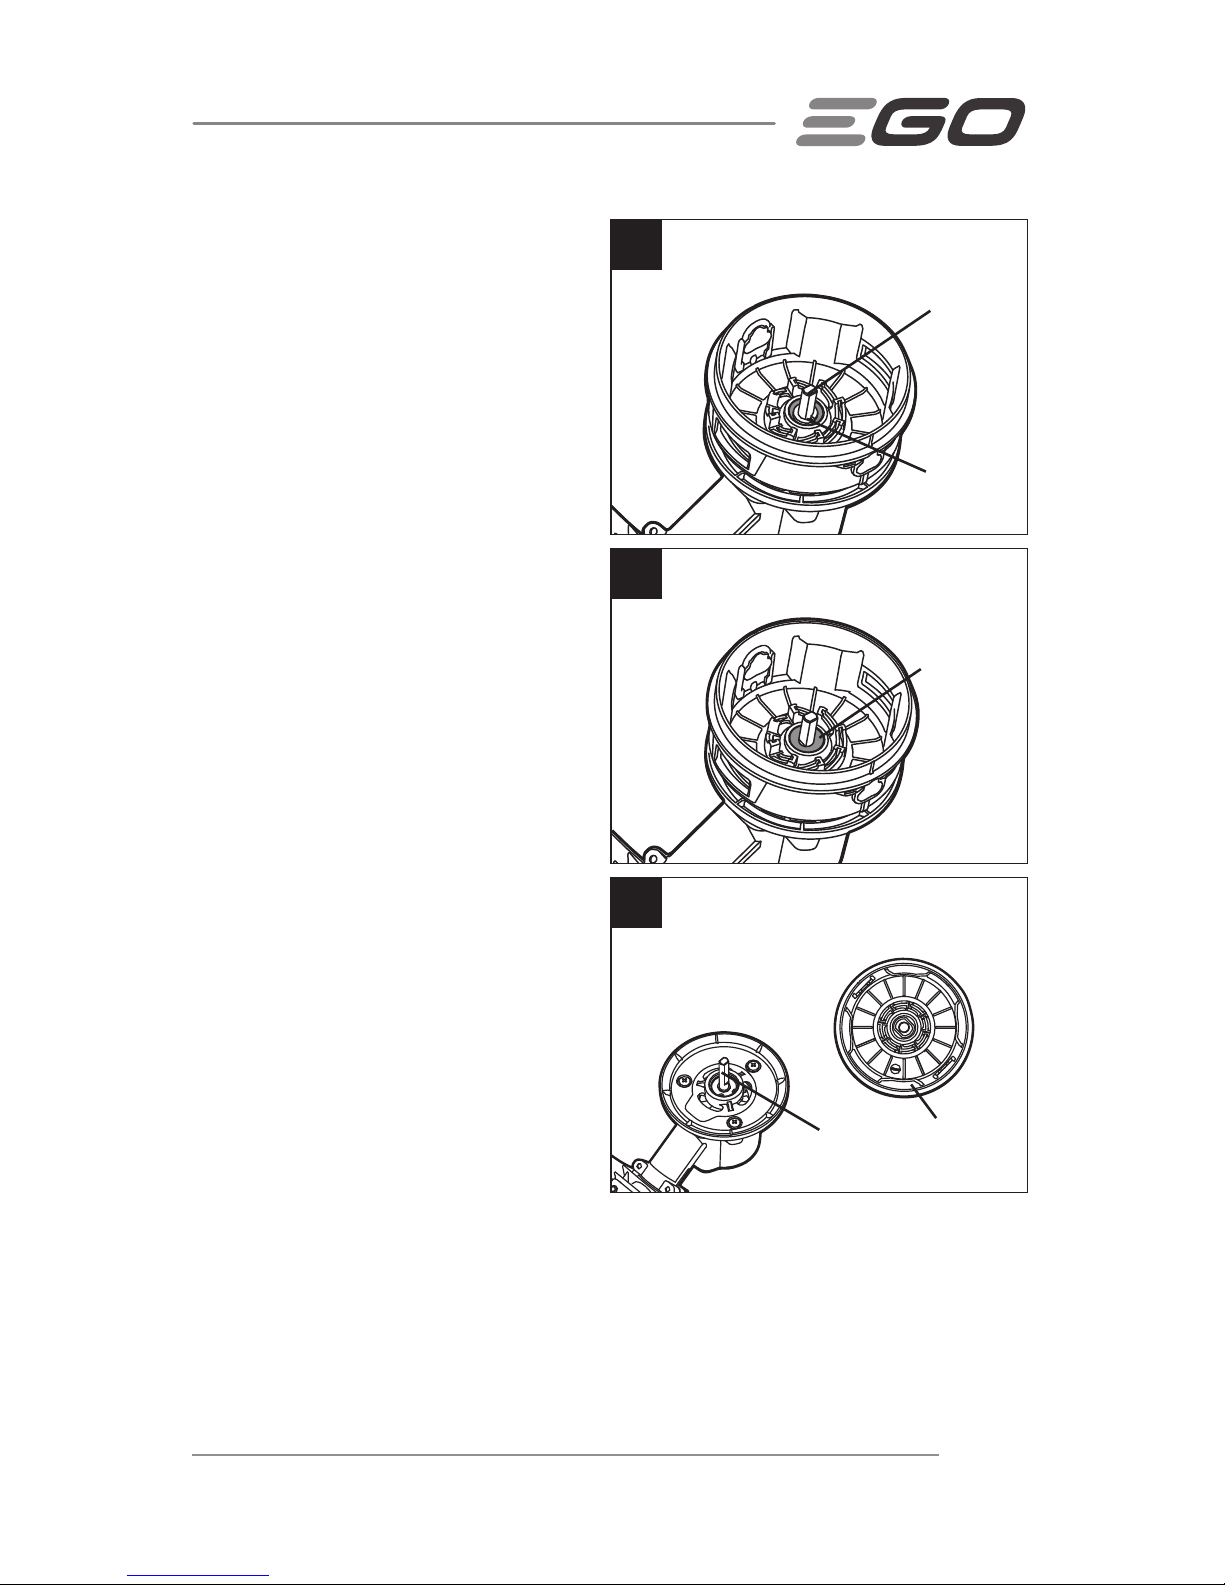
4. Remove the 2 washers from the
motor shaft and save them for
reassembly (Fig. 24 & 25).
5. Hold the spool base and pull it
straight out from the motor shaft
(Fig. 26).
24
Spring Washer
25
26
Motor shaft
Motor Shaft
Spool Base
Plain Washer
Page 28
56-VOLT LITHIUM-ION CORDLESS 15" STRING TRIMMER28
6. Remove the flange from the spool
base and save it to secure the new
spool base (Fig. 27).
Install the new trimmer head
1. Position the flange removed in step
6 of the “remove the trimmer head”
section onto the motor shaft with
the flat surface facing away from
the base (Fig. 28).
2. Align the mounting hole in the
spool base with the motor shaft and
mount the base onto the shaft.
3. Position the plain washer and then
the spring washer onto the motor shaft (Fig. 29).
27
Flange
28
Flat surface facing
away from the base
Spool Base
29
Plain Washer
Plain Washer
Spring Washer
Page 29
56-VOLT LITHIUM-ION CORDLESS 15" STRING TRIMMER 29
4. Mount the nut onto the shaft
and turn it clockwise by hand to
pre-tighten it (Fig. 30).
5. Wear gloves to hold the spool base
with one hand, and, with the other
hand, use a socket wrench (9/16",
14mm) to tighten the nut onto the
shaft.
6. Fit the spring into the spool base
and make sure it is pressed into
position (Fig. 22).
7. With one hand holding the spool
base, use the other hand to grasp
the spool retainer and align the tabs
on the spool retainer with the holes
in the spool base. Use your palm to
press and rotate the spool retainer
left and right until the tabs lock with
the spool base. (Fig. 19 & 20).
8. If any parts of the spool retainer
assembly are damaged or worn, replace the damaged part and reassemble them
as following showing (Fig. 31).
CLEAN THE UNIT
Clear any grass that may have wrapped itself around the motor shaft or trimmer head.
Use a small brush or a small brush and a small vacuum cleaner to clean the air
vents on the rear housing.
Keep the air vents free of obstructions.
Clean the unit using a damp cloth with a mild detergent.
Do not use any strong detergents on the plastic housing or the handle. They
can be damaged by certain aromatic oils, such as pine and lemon. Do not use
solvents such as kerosene. Moisture can also cause a shock hazard. Wipe off any
moisture with a soft dry cloth.
30
Nut
31
Screws
Wire Holder
Location Housing
Head Housing
Slot Covert
Spool Retainer Assembly
Page 30

56-VOLT LITHIUM-ION CORDLESS 15" STRING TRIMMER30
SHARPEN THE LINE-CUTTING BLADE
WARNING:
Always protect your hands by wearing heavy gloves when
performing any maintenance on the line-cutting blade.
1. Remove the line-cutting blade from the guard.
2. Secure the blade in a vise.
3. Wear proper eye protection and gloves and be careful not to cut yourself.
4. Carefully file the cutting edges of the blade with a fine-tooth file or sharpening
stone, maintaining the original cutting edge angle.
5. Replace the blade on the guard and secure it in place with the two screws.
STORING THE UNIT
Remove the battery pack from the trimmer.
Clean the tool thoroughly before storing it.
Store the unit in a dry, well-ventilated area, locked-up or up high, out of the reach
of children. Do not store the unit on or adjacent to fertilizers, gasoline, or other
chemicals.
Page 31

56-VOLT LITHIUM-ION CORDLESS 15" STRING TRIMMER 31
TROUBLESHOOTING
PROBLEM CAUSE SOLUTION
String trimmer fails
to start.
The battery pack is not
attached to the trimmer.
Attach the battery pack to the
trimmer.
No electrical contact
between the trimmer and
battery.
Remove battery, check contacts and
reinstall the battery pack.
The battery pack is
depleted.
Charge the battery pack.
The lock-off lever and
trigger are not depressed
simultaneously.
Press the lock-off lever and hold it,
then depress the trigger to turn on
the string trimmer.
String trimmer
stops while cutting.
The guard is not mounted
on the trimmer, resulting in
an overly long cutting line
and motor overload.
Remove the battery pack and mount
the guard on the trimmer.
Heavy cutting line is used.
Use recommended nylon cutting line
with diameter no greater than 0.095
in. (2.4 mm).
The motor shaft or trimmer
head is bound with grass.
Stop the trimmer, remove the
battery, and remove the grass from
the motor shaft and trimmer head.
The motor is overloaded.
Remove the trimmer head from the
grass. The motor will recover to work
as soon as the load is removed.
When cutting, move the trimmer
head in and out of the grass to be
cut and remove no more than 8
inches of length in a single cut.
The battery pack or string
trimmer is too hot.
Allow the battery pack or trimmer
to cool until the temperature drops
below 152°F (67°C).
The battery pack is
disconnected from the tool.
Re-install the battery pack.
The battery pack is
depleted.
Charge the battery pack.
Page 32

56-VOLT LITHIUM-ION CORDLESS 15" STRING TRIMMER32
PROBLEM CAUSE SOLUTION
Trimmer head will
not advance line.
The motor shaft or trimmer
head is bound with grass.
Stop the trimmer, remove the
battery, and clean the motor shaft
and trimmer head.
There is not enough line on
the spool.
Remove the battery and replace the
cutting line; follow the section "LINE
REPLACEMENT" in this manual.
The trimmer head is dirty.
Remove the battery and clean the
spool, spool retainer and spool base.
The line is tangled on the
spool.
Remove the battery, remove the line
from the spool and rewind; follow
the section "RELOAD THE CUTTING
LINE" in this manual.
The line is too short.
Remove the battery and pull the
lines manually while alternately
pressing down and releasing the
trimmer head.
Grass wraps around
trimmer head and
motor housing.
Cutting tall grass at ground
level.
Cut tall grass from the top down,
removing no more than 8 inches in
each pass to prevent wrapping.
The blade is not
cutting the line.
The line-cutting blade on
the edge of the guard has
become dull.
Sharpen the line-cutting blade with a
file or replace it with a new blade.
Cracks on the
trimmer head or
the spool retainer
comes loose with
spool base.
The trimmer head is worn
out.
Replace the trimmer head
immediately; follow the section
"TRIMMER HEAD REPLCEMENT"
in this manual.
During line
replacement, the
line can’t be loaded
into the trimmer
head properly.
Spool retainer’s LOAD
lines do not align with the
eyelets in the spool base.
Rotate the spool retainer in the
arrow direction to align the LOAD
lines on the spool retainer with the
eyelets in the spool base
The string line is not
correctly inserted into
the mounting hole in the
eyelet.
Align the LOAD lines with the eyelets
first, then insert the line into the
mounting hole, which is located
inside the eyelet.
Page 33

56-VOLT LITHIUM-ION CORDLESS 15" STRING TRIMMER 33
WARRANTY
EGO WARRANTY POLICY
5 year limited warranty on EGO outdoor power equipment and 3 year limited warranty
on EGO Power+ System battery packs and chargers.
Please contact EGO Customer Service Toll-Free at 1-855-EGO-5656 any time you
have questions or warranty claims.
LIMITED SERVICE WARRANTY
FOR FIVE YEARS from the date of original retail purchase, this EGO product is warranted
against defects in material or workmanship. Defective product will receive free repair.
FOR THREE YEARS from the date of original retail purchase, the EGO Power+ System
battery pack and charger are warranted against defects in material or workmanship.
Defective product will receive free repair.
a) This warranty applies only to the original purchaser from an authorized EGO retailer
and may not be transferred. Authorized EGO retailers are identified online at http://
egopowerplus.com/pages/warranty-policy.
b) The warranty period for any EGO product or part used for industrial, professional or
commercial purpose is one year.
c) This warranty is void if the product has been used for rental purpose.
d) This warranty does not cover the damage resulting from modification, alteration or
unauthorized repair or from use of any cutting line other than standard nylon cutting
line with a diameter that does not exceed 0.095 in. (2.4 mm) recommended for use
with this product.
e) This warranty only covers defects arising under normal usage and does not cover
any malfunction, failure or defect resulting from misuse, abuse (including overloading
of the product beyond capacity and immersion in water or other liquid), accidents,
neglect or lack of proper installation, and improper maintenance or storage.
f) This warranty does not cover normal deterioration of the exterior finish, including but
not limited to scratches, dents, paint chips, or to any corrosion or discoloring by heat,
abrasive and chemical cleaners.
Page 34

56-VOLT LITHIUM-ION CORDLESS 15" STRING TRIMMER34
HOW TO OBTAIN SERVICE
For warranty service, please contact EGO customer service toll-free at
1-855-EGO-5656. When requesting warranty service, you must present the original
dated sales receipt. An authorized service center will be selected to repair the product
according to the stated warranty terms.
ADDITIONAL LIMITATIONS
To the extent permitted by applicable law, all implied warranties, including warranties
of MERCHANTABILITY or FITNESS FOR A PARTICULAR PURPOSE, are disclaimed. Any
implied warranties, including warranties of merchantability or fitness for a particular
purpose, that cannot be disclaimed under state law are limited to five years from the
date of purchase for outdoor power equipment and three years from date of purchase
for battery pack and charger.
Chervon North America is not responsible for direct, indirect, incidental or consequential
damages.
Some states do not allow limitations on how long an implied warranty lasts and/or do
not allow the exclusion or limitation of incidental or consequential damages, so the
above limitations may not apply to you.
This warranty gives you specific legal rights, and you may also have other rights which
vary from state to state.
For customer service contact us toll-free at: 1-855-EGO-5656 or EGOPOWERPLUS.COM
EGO Customer Service, 120 Ionia Street SW / Suite 102 Grand Rapids, MI 49503
Page 35

GUIDE D’UTILISATION
TAILLE-BORDURE SANS FIL
DE 38 CM À BLOC-PILE AU
LITHIUM-ION DE 56 VOLTS
NUMÉRO DE MODÈLE
ST1500F (TIGE DROITE)/
ST1500SF (TIGE À CHARNIÈRE)
AVERTISSEMENT : Afin de réduire les risques de blessure, l’utilisateur doit lire et
comprendre le guide d’utilisation avant d’utiliser ce produit. Conservez le présent guide
afin de pouvoir le consulter ultérieurement.
Page 36

TAILLE-BORDURE SANS FIL DE 38 CM À BLOC-PILE AU LITHIUM-ION DE 56 VOLTS36
TABLE DES MATIÈRES
Symboles de sécurité ....................................38
Consignes de sécurité .................................39-43
Introduction ............................................43
Caractéristiques techniques ...............................44
Liste des pièces contenues dans l’emballage ..................44
Description .........................................45-46
Assemblage ......................................... 47-50
Fonctionnement ...................................... 51-58
Entretien ...........................................59-64
Dépannage .........................................65-67
Garantie ............................................68-69
Page 37

TAILLE-BORDURE SANS FIL DE 38 CM À BLOC-PILE AU LITHIUM-ION DE 56 VOLTS 37
LISEZ TOUTES LES INSTRUCTIONS!
LIRE ET COMPRENDRE TOUTES LES
INSTRUCTIONS DU GUIDE.
AVERTISSEMENT:
La poussière créée par le ponçage, le sciage, le meulage,
le perçage et autres activités de construction peut contenir des produits chimiques
connus dans l’État de la Californie comme étant la cause de cancer, d’anomalies
congénitales et d’autres problèmes du système reproducteur. Voici des exemples de
ces produits chimiques:
le plomb contenu dans la peinture au plomb;
la silice cristallisée contenue dans les briques, le ciment et d’autres produits de
maçonnerie; et
l’arsenic et le chrome contenus dans le bois d’œuvre traité avec des produits
chimiques.
Les risques liés à l’exposition à ces produits varient en fonction de la fréquence à
laquelle vous effectuez ce type de travaux. Pour réduire votre exposition à ces produits
chimiques: travaillez dans une zone bien ventilée et portez l’équipement de sécurité
approuvé, comme les masques antipoussières conçus pour ne pas laisser passer les
particules microscopiques.
Page 38

TAILLE-BORDURE SANS FIL DE 38 CM À BLOC-PILE AU LITHIUM-ION DE 56 VOLTS38
SYMBOLES DE SÉCURITÉ
L’objectif des symboles de sécurité est d’attirer votre attention sur les dangers
potentiels. Vous devez examiner attentivement et bien comprendre les symboles de
sécurité et les explications qui les accompagnent. Les symboles d’avertissement en
tant que tels n’éliminent pas le danger.
Les consignes et les avertissements qui y sont associés ne remplacent en aucun cas
les mesures préventives adéquates.
AVERTISSEMENT:
Avant d’utiliser ce taille-bordure, assurez-vous de lire
et de comprendre toutes les consignes de sécurité présentées dans le présent guide
d’utilisation, notamment toutes les consignes de sécurité indiquées par «DANGER»,
«AVERTISSEMENT» et «ATTENTION». Le fait de ne pas respecter toutes les consignes
de sécurité ci-dessous peut causer une décharge électrique, un incendie ou des
blessures graves.
SIGNIFICATION DES SYMBOLES
SYMBOLE D’ALERTE DE SÉCURITÉ:
Indique un DANGER, un
AVERTISSEMENT ou une MISE EN GARDE. Il peut être associé à d’autres symboles ou
pictogrammes.
AVERTISSEMENT!
L’utilisation de tout outil électrique peut
entraîner la projection de corps étrangers dans les yeux et ainsi causer
des lésions oculaires graves. Avant d’utiliser un outil électrique, veillez à
toujours porter des lunettes de sécurité couvrantes ou à écrans latéraux,
ou un masque complet au besoin. Nous recommandons le port d’un masque de
sécurité panoramique par-dessus les lunettes de vue ou de lunettes de sécurité
standard avec écrans latéraux. Portez toujours des lunettes de sécurité conformes à la
norme ANSIZ87.1.
Page 39

TAILLE-BORDURE SANS FIL DE 38 CM À BLOC-PILE AU LITHIUM-ION DE 56 VOLTS 39
CONSIGNES DE SÉCURITÉ
Vous trouverez ci-dessous les symboles de sécurité qui peuvent être présents sur le
produit, accompagnés de leur description. Vous devez lire, comprendre et suivre toutes les
instructions présentes sur l’appareil avant d’entamer son assemblage ou sa manipulation.
Alerte de sécurité Indique un risque de blessure.
Lire le guide
d’utilisation
Afin de réduire les risques de blessure,
l’utilisateur doit lire le guide d’utilisation.
Lunettes de sécurité Lorsque vous utilisez l’article, portez toujours
des lunettes de sécurité couvrantes ou à écrans
latéraux, ou un masque complet.
Symboles de
recyclage
Le produit fonctionne à l’aide de piles au lithium-ion
(Li-ion). La législation locale, provinciale ou fédérale
peut interdire la mise au rebut des blocs-piles dans
une poubelle ordinaire. Consultez l’organisme local de
gestion des déchets au sujet des possibilités offertes
en ce qui concerne la mise au rebut ou le recyclage.
IPX4
Niveau de protection
d’indice
Protection contre les projections d'eau
V Volt Tension
mm Millimètre Longueur ou taille
cm Centimètre Longueur ou taille
in. Pouce Longueur ou taille
kg Kilogramme Poids
lb Livre Poids
CC Courant continu Type de courant ou caractéristique de courant
TR/MIN Tours par minute Vitesse de rotation
Page 40

TAILLE-BORDURE SANS FIL DE 38 CM À BLOC-PILE AU LITHIUM-ION DE 56 VOLTS40
CONSIGNES DE SÉCURITÉ IMPORTANTES
AVERTISSEMENT!
Lorsque vous utilisez le taille-bordure, vous devez toujours
suivre les consignes de sécurité élémentaires ci-dessous afin de réduire le risque
d’incendie, de décharge électrique et de blessure.
LISEZ TOUTES LES INSTRUCTIONS!
DANGER!
Ne comptez pas sur l’isolation du taille-bordure pour vous protéger
des décharges électriques. Afin de réduire les risques d’électrocution, n’utilisez jamais
l’outil à proximité de fils ou de câbles susceptibles d’être sous tension.
ATTENTION!
Portez des protecteurs d’oreilles appropriés lorsque vous utilisez le
taille-bordure. Dans certaines conditions et selon la durée d’utilisation, le bruit produit
par le taille-bordure peut entraîner une perte auditive.
Maintenez les enfants à l’écart. Tous les visiteurs doivent se tenir à une distance d’au
moins 30,48m de la zone de travail.
Évitez les environnements dangereux - Ne pas utiliser d'appareils de pente humide ou
mouillé.
Habillez-vous convenablement. Ne portez pas de vêtements amples ni de bijoux qui
peuvent s’accrocher.Ils pourraient se coincer dans les pièces mobiles du taille-bordure.
Le port de gants de caoutchouc et de chaussures adaptées est recommandé lorsque
vous travaillez à l’extérieur. Portez une coiffe de protection pour retenir les cheveux longs.
Portez des lunettes de sécurité. Portez toujours un masque de protection ou un
masque antipoussières lorsque l’endroit est poussiéreux.
Utilisez l’outil adapté à la tâche. N’utilisez pas le taille-bordure à des fins autres que
celles pour lesquelles il a été conçu.
Ne forcez pas le taille-bordure. Si vous l’utilisez au rythme approprié, il vous permettra
de mieux accomplir le travail avec moins de risques de blessure.
N’essayez pas d’étendre votre portée. Gardez une posture sécuritaire et un bon
équilibre en tout temps.
Soyez vigilant Faites attention à ce que vous faites. Faites preuve de bon sens.
N’utilisez pas le taille-bordure lorsque vous êtes fatigué.
N’utilisez pas le taille-bordure sous l’effet de l’alcool ou de drogues.
Assurez-vous que les protecteurs sont bien en place et en état de fonctionnement.
Gardez les mains et les pieds à distance de la zone de coupe.
Page 41

TAILLE-BORDURE SANS FIL DE 38 CM À BLOC-PILE AU LITHIUM-ION DE 56 VOLTS 41
Rangez le taille-bordure à l’intérieur. Lorsque vous n’utilisez pas le taille-bordure,
rangez-le à l’intérieur, hors de portée des enfants, dans un endroit sec et en hauteur
ou dans un endroit verrouillé, et retirez le bloc-pile.
Entretenez soigneusement le taille-bordure. Gardez l’accessoire de coupe propre
pour obtenir un meilleur rendement et pour réduire les risques de blessure.
Suivez les instructions pour changer les accessoires. Les poignées doivent
toujours être sèches, propres et exemptes d’huile ou de graisse.
Vérifiez si des pièces sont endommagées. Avant d’utiliser le taille-bordure,
inspectez soigneusement les protecteurs ou les autres pièces endommagés pour
déterminer s’ils peuvent fonctionner correctement et être utilisés normalement.
Vérifiez l’alignement des pièces mobiles et leur fixation ainsi que l’état et
l’assemblage des pièces, et recherchez tout autre problème pouvant nuire au
fonctionnement du taille-bordure. Si un protecteur ou une autre pièce sont
endommagés, ils doivent être réparés correctement ou remplacés par un centre
de service autorisé à moins d’indications contraires dans le présent guide.
Avant chaque utilisation, dégagez l’aire de travail.Enlevez tous les objets, comme les
cailloux, les éclats de verre, les clous, les câbles ou les fils, qui pourraient être projetés
par le taille-bordure ou qui pourraient rester coincés dans le dispositif de coupe. Assurezvous qu’il n’y a aucune personne ni aucun animal à moins de 30,48m.
Lorsque vous utilisez le taille-bordure, tenez-le fermement par les poignées, avec
les deuxmains. Refermez les doigts et les pouces autour des poignées.
Pour éviter de mettre en marche le taille-bordure accidentellement, ne le
transportez pas en ayant le doigt sur la gâchette.
Ne faites pas fonctionner le taille-bordure dans un endroit présentant un
risque d’explosion ni en présence de gaz. Le moteur du taille-bordure produit
habituellement des étincelles qui pourraient enflammer les vapeurs.
Taille-bordure endommagé: si vous heurtez un objet quelconque avec le taillebordure, ou si un objet s’introduit dans le taille-bordure, arrêtez ce dernier
immédiatement. Vérifiez s’il est endommagé et, le cas échéant, faites-le réparer avant
de le réutiliser. N’utilisez pas le taille-bordure si le protecteur ou la bobine sont brisés.
Si le taille-bordure venait à vibrer de manière anormale, arrêtez le moteur et trouvez
immédiatement la cause des vibrations. Les vibrations indiquent généralement un
problème. Une tête desserrée peut vibrer, se fissurer, se briser ou se détacher du
taille-bordure et ainsi entraîner des blessures graves, voire mortelles. Assurez-vous
que le dispositif de coupe est correctement fixé. Si la tête se desserre après avoir
été mise en place, remplacez-la immédiatement. N’utilisez jamais le taille-bordure
si le dispositif de coupe n’est pas serré fermement.
Page 42

TAILLE-BORDURE SANS FIL DE 38 CM À BLOC-PILE AU LITHIUM-ION DE 56 VOLTS42
Remplacez immédiatement la tête de coupe si elle est fissurée, endommagée
ou usée, même si elle ne présente que des fissures superficielles. Ces pièces
peuvent se briser à haute vitesse et causer des blessures graves, voire mortelles.
Lorsque vous utilisez le taille-bordure, vérifiez régulièrement le dispositif de
coupe, ou dès que vous remarquez un changement au niveau de la coupe.
Lorsque vous remplacez le fil de coupe, n’utilisez pas de fil de nylon de plus de
2,4 mm. L’utilisation d’un fil dont le calibre est supérieur à celui recommandé
par le fabricant augmente la charge imposée au moteur et diminue la vitesse de
fonctionnement. De plus, cela entraîne une surchauffe et peut endommager le
taille-bordure.
Afin de réduire les risques de blessure grave, n’utilisez jamais de fil métallique,
de fil renforcé de métal ni d’autre matériau à la place du fil de coupe en nylon.
Des morceaux de métal pourraient être projetés à grande vitesse vers vous ou les
personnes à proximité.
Pour réduire les risques de blessure causée par une perte de contrôle, n’utilisez jamais
le taille-bordure lorsque vous êtes sur une échelle ou sur un autre type d’échafaudage
instable. Ne tenez jamais le dispositif de coupe au-dessus de la taille.
S’il se produit une situation qui ne figure pas dans le présent manuel, faites
preuve de prudence et de jugement. Communiquez avec le centre de service
d’EGO pour obtenir de l’aide.
Ne rechargez pas le bloc-pile sous la pluie ni dans un endroit humide.
Utilisez le produit uniquement avec les blocs-piles et les chargeurs indiqués ci-dessous:
BLOC-PILE CHARGEUR
BA1120, BA1400, BA2240,
BA2800, BA4200
CH5500
CH2100
Ne jetez pas le bloc-pile au feu. Les cellules pourraient exploser. Consultez la
réglementation locale pour connaître les instructions de mise au rebut.
N’ouvrez pas et n’abîmez pas le bloc-pile. L’électrolyte qu’il contient est corrosif
et peut causer des lésions oculaires ou cutanées. Il peut être toxique s’il est
ingéré.
Manipulez le bloc-pile avec soin pour ne pas créer un court-circuit avec des
matériaux conducteurs comme des bagues, des bracelets ou des clés. Le blocpile ou le conducteur peuvent surchauffer et causer des brûlures.
Page 43

TAILLE-BORDURE SANS FIL DE 38 CM À BLOC-PILE AU LITHIUM-ION DE 56 VOLTS 43
Pièces de rechange: lorsque vous procédez à l’entretien, utilisez uniquement
des pièces de remplacement EGO identiques aux pièces d’origine. L’utilisation de
toute autre pièce peut augmenter le risque de blessure.
Les outils munis d’un bloc-pile n’ont pas besoin d’être branchés sur une prise
de courant. Par conséquent, ils sont toujours prêts à l’emploi. Gardez à l’esprit
qu’il existe des dangers potentiels même lorsque l’outil ne fonctionne pas. Soyez
prudents lorsque vous effectuez l’entretien ou des réparations.
Enlevez ou débranchez le bloc-pile avant de procéder à l’entretien ou au
nettoyage du taille-bordure ou de retirer des pièces.
Ne nettoyez pas le taille-bordure avec un jet d’eau, car de l’eau pourrait s’infiltrer
dans le moteur et les connexions électriques.
Conservez ces instructions. Consultez-les régulièrement et utilisez-les pour
expliquer le fonctionnement de l’outil à d’autres personnes qui l’utiliseraient. Si
vous prêtez cet outil à une personne, prêtez-lui également ces instructions afin de
prévenir un usage inapproprié et des blessures potentielles.
CONSERVEZ CES INSTRUCTIONS!
INTRODUCTION
Nous vous félicitons d’avoir choisi ce taille-bordure EGO sans fil de 38cm à bloc-pile
au lithium-ion de 56volts. Cette scie a été conçue et fabriquée afin de vous offrir la
meilleure fiabilité et le meilleur rendement possible.
Si vous éprouvez un problème que vous n’arrivez pas à régler facilement, veuillez
communiquer avec le centre de service à la clientèle d’EGO au 1855EGO-5656.
Le présent guide contient des renseignements importants pour assembler, utiliser et
entretenir le taille-bordure en toute sécurité. Lisez-le soigneusement avant d’utiliser le taillebordure. Conservez ce guide à portée de main afin de pouvoir le consulter à tout moment.
NUMÉRO DE SÉRIE ____________________ DATE D’ACHAT_ ____________________
NOUS VOUS RECOMMANDONS DE NOTER LE NUMÉRO DE SÉRIE ET LA DATE D’ACHAT ET DE
LES CONSERVER EN LIEU SÛR AFIN DE POUVOIR LES CONSULTER ULTÉRIEUREMENT.
Page 44

TAILLE-BORDURE SANS FIL DE 38 CM À BLOC-PILE AU LITHIUM-ION DE 56 VOLTS44
CARACTÉRISTIQUES TECHNIQUES
Tension 56V, CC
Vitesse à vide 4000-5800TR/MIN
Mécanisme de coupe Tête de coupe
Type de fil de coupe Fil de nylon torsadé 2,4mm (0.095po)
Largeur de coupe 38cm (15po)
Poids (sans le bloc-pile) 3,33 kg (7,33 lb)
Fil De Coupe Recommandé
NOM DE PIÈCE
TYPE NUMÉRO DE
MODÈLE
Fil de coupe
Fil torsadé de 2,4 mm (0.095 po)
(recommandé)
AL0951
Fil torsadé de 2,0 mm (0.080 po)
(compatible)
AL0803
LISTE DES PIÈCES CONTENUES DANS L’EMBALLAGE
Nom de pièce Quantité
Taille-bordure 1
Protecteur 1
Poignée de manœuvre avant 1
Clé hexagonale 1
Boulons pour verrouiller le manche (seulement pour le modèle ST1500SF) 2
Guide d’utilisation 1
Page 45

TAILLE-BORDURE SANS FIL DE 38 CM À BLOC-PILE AU LITHIUM-ION DE 56 VOLTS 45
DESCRIPTION
FAMILIARISEZ-VOUS AVEC LE TAILLE-BORDURE (gure1)
Pour utiliser ce produit en toute sécurité, vous devez comprendre les renseignements
le concernant contenus dans ce guide d’utilisation et connaître le projet que
vous entreprenez. Avant d’utiliser ce produit, familiarisez-vous avec toutes les
caractéristiques de fonctionnement et consignes de sécurité.
1
Poignée de manœuvre avant réglable
Fil de coupe
Protecteur
Tête du taille-bordure (tête de coupe)
Lame coupe-fil
Mécanisme d’éjection
Verrou
Bouton d’éjection
du bloc-pile
Gâchette
Contacts électriques
Levier de blocage
Charnière
(seulement pour le
modèle ST1500SF)
Poignée arrière
Languette de dégagement
AVERTISSEMENT:
N’utilisez jamais le taille-bordure si le protecteur n’est
pas bien en place. Le protecteur doit toujours être installé sur le taille-bordure pour
vous protéger.
Page 46

TAILLE-BORDURE SANS FIL DE 38 CM À BLOC-PILE AU LITHIUM-ION DE 56 VOLTS46
POIGNÉE DE MANŒUVRE AVANT RÉGLABLE
Permet de contrôler facilement le taille-bordure pendant la coupe.
POIGNÉE ARRIÈRE
Poignée ergonomique surmoulée améliorant le confort et la prise.
GÂCHETTE
Permet de mettre en marche et d’arrêter le taille-bordure et d’en ajuster la vitesse de la tête.
LEVIER DE BLOCAGE
Aide à prévenir l’activation accidentelle de la gâchette.Il doit être maintenu enfoncé afin
d’enclencher la gâchette.
CHARNIÈRE (SEULEMENT POUR LE MODÈLE ST1500SF)
Raccorde et verrouille les deux parties du manche.
TÊTE DU TAILLE-BORDURE (TÊTE DE COUPE)
Contient le fil de coupe et le dégage lorsque la tête est frappée légèrement contre le sol
pendant que l’appareil est en.
PROTECTEUR
Réduit les risques de blessure causée par la projection d’objets quelconques vers
l’utilisateur et empêche tout contact avec le dispositif de coupe.
LAME COUPE-FIL
Lame en acier située sur le protecteur qui permet de garder le fil de coupe à la
longueur appropriée.
BOUTON D’ÉJECTION DU BLOC-PILE
Permet de retirer le bloc-pile du taille-bordure.
VERROU
Permet de bloquer le bloc-pile lorsque celui-ci est installé sur le taille-bordure.
MÉCANISME D’ÉJECTION
Aide à retirer le bloc-pile.
Page 47

TAILLE-BORDURE SANS FIL DE 38 CM À BLOC-PILE AU LITHIUM-ION DE 56 VOLTS 47
ASSEMBLAGE
AVERTISSEMENT:
S’il y a des pièces manquantes ou endommagées, ne
tentez pas d’utiliser la scie à chaîne tant que ces pièces n’auront pas été remplacées.
L’utilisation du taille-bordure avec des pièces endommagées ou manquantes peut
causer des blessures graves.
AVERTISSEMENT:
Ne tentez pas de modifier le taille-bordure ou de créer des
accessoires qui ne sont pas recommandés pour une utilisation avec ce taille-bordure.
Toute altération ou modification de ce type constitue un usage inapproprié et peut
engendrer une situation dangereuse susceptible de causer des blessures graves.
AVERTISSEMENT:
Enlevez toujours le bloc-pile de l’outil lorsque vous
assemblez des pièces, procédez à des ajustements ou à son nettoyage ou lorsque le
produit n’est pas utilisé.
DÉBALLAGE
Le taille-bordure doit être assemblé.
Retirez soigneusement la scie à chaîne et toutes les pièces de l’emballage. Assurezvous que toutes les pièces mentionnées sur la liste des pièces sont présentes.
Inspectez soigneusement le taille-bordure pour vérifier qu’il n’a pas été
endommagé pendant l’expédition.
Ne jetez pas le matériel d’emballage avant d’avoir inspecté soigneusement le
taille-bordure et de l’avoir fait fonctionner de manière satisfaisante.
S’il y a des pièces manquantes ou endommagées, veuillez retourner le taillebordure à l’endroit où vous l’avez acheté.
Page 48

TAILLE-BORDURE SANS FIL DE 38 CM À BLOC-PILE AU LITHIUM-ION DE 56 VOLTS48
DÉPLIAGE DU MANCHE (SEULEMENT POUR LE MODÈLE ST1500SF)
AVERTISSEMENT
:
Pour éviter de vous coincer les mains ou les doigts, ne
tenez pas le manche au niveau des joints.
AVERTISSEMENT
:
Ne tentez pas de démarrer le taille-bordure avant d’avoir
verrouillé le manche.
1. Retirez le bloc-pile du taille-bordure.
2. Placez votre taille-bordure au
sol, puis dépliez le manche avec
précaution. Assurez-vous que le
cable est à l’intérieur du manche
pour éviter qu’il ne soit coincé lors
de la fermeture des joints (figure 2).
3. Utilisez la clé hexagonale fournie
pour verrouiller le manche avec le
boulons fourni (figure 3).
2
3
Page 49

TAILLE-BORDURE SANS FIL DE 38 CM À BLOC-PILE AU LITHIUM-ION DE 56 VOLTS 49
INSTALLATION DU PROTECTEUR
AVERTISSEMENT
:
Portez toujours des gants lorsque vous installez le
protecteur ou le remplacez. Faites attention à la lame du protecteur et protégez vos mains
pour éviter de vous couper avec la lame.
1. Retirez le bloc-pile du taille-bordure.
2. Soulevez la tête du taille-bordure
et placez-la vers le bas. Alignez
les deux trous de montage du
protecteur aux deux boulons
préassemblés à la base de la tige.
Assurez-vous que la surface interne
du protecteur est face à la tête du
taille-bordure (figure 4).
3. Verrouillez le protecteur à l’aide
des deux boulons et de la clé
hexagonale fournie (figure 5).
4
5
Page 50

TAILLE-BORDURE SANS FIL DE 38 CM À BLOC-PILE AU LITHIUM-ION DE 56 VOLTS50
INSTALLATION ET RÉGLAGE DE LA POIGNÉE DE MANŒUVRE AVANT
AVERTISSEMENT
:
Enlevez toujours le bloc-pile de l’outil lorsque vous
assemblez des pièces, procédez à des ajustements ou à son nettoyage ou lorsque le
produit n’est pas utilisé.
1. Retirez le bloc-pile du taille-bordure.
2. Desserrez les quatre vis de
la poignée à l’aide de la clé
hexagonale fournie, puis retirez les
vis et l’élément de fixation inférieur
de la poignée (figure 6).
3. Placez la poignée de manœuvre
avant et l’élément de fixation
inférieur sur le manche et fixezles sans serrer complètement les
quatre vis. Tournez la poignée de
manœuvre avant vers le haut de
sorte qu’elle pointe vers le haut du
manche (figure 7).
4. Réglez la position de la poignée de
manœuvre avant entre l’extrémité
inférieure du boîtier de la poignée
arrière et le joint du manche,
comme l’illustre la figure 7. Pour le modèle ST1500F, ajustez la position de la
poignée afin qu’elle se situe entre l’extrémité inférieure du boîtier de la poignée
arrière et l’étiquette d’avertissement sur le manche. Les utilisateurs plus petits
peuvent régler la poignée en position plus basse (loin d’eux) et les plus grands
peuvent la régler en position plus haute (vers eux). La poignée doit être réglée de
façon à ce que votre bras soit droit lorsque vous utilisez le taille-bordure.
5. Vissez fermement les quatre vis afin que la poignée ne tourne pas sur le manche.
7
6
Poignée de manœuvre
avant
Élément de fixation
inférieur
Page 51

TAILLE-BORDURE SANS FIL DE 38 CM À BLOC-PILE AU LITHIUM-ION DE 56 VOLTS 51
FONCTIONNEMENT
AVERTISSEMENT
:
Même si vous connaissez parfaitement le taille-bordure,
soyez vigilant. N’oubliez pas qu’une fraction de seconde d’inattention suffit à se blesser
gravement.
AVERTISSEMENT
:
Portez toujours des lunettes de sécurité avec écrans
latéraux conformes à la norme ANSI Z87.1, ainsi que des protecteurs d’oreilles. Sinon,
vous pourriez recevoir des débris dans les yeux et vous blesser gravement.
AVERTISSEMENT
:
N’utilisez pas de pièces ni d’accessoires qui ne sont pas
recommandés par le fabricant de ce produit. L’utilisation de pièces ou d’accessoires
non recommandés peut causer des blessures graves.
INSTALLATION ET RETRAIT DU BLOC-PILE (gure 8 et 9)
AVERTISSEMENT
:
Enlevez toujours le bloc-pile de l’outil lorsque vous
assemblez des pièces, procédez à des ajustements ou à son nettoyage ou lorsque
l’article n’est pas utilisé. Le retrait du bloc-pile permet de prévenir une mise en marche
accidentelle pouvant occasionner des blessures graves.
REMARQUE : Chargez le bloc-pile au
maximum avant sa première utilisation.
Installation du bloc-pile
(gure 8)
1. Alignez les nervures du bloc-pile sur
les fentes de montage situées dans
le port du bloc-pile, sur le taillebordure.
2. Appuyez sur le bloc-pile en direction
de la tête du taille-bordure jusqu’à ce qu’il s’enclenche en position.
REMARQUE : Avant d’utiliser le taille-bordure, assurez-vous que le verrou situé sur le
taille-bordure s’enclenche et que le bloc-pile est solidement fixé.
8
Fente de guidage
Page 52

TAILLE-BORDURE SANS FIL DE 38 CM À BLOC-PILE AU LITHIUM-ION DE 56 VOLTS52
Retrait du bloc-pile (gure 9)
AVERTISSEMENT
:
Soyez
toujours conscient de l’emplacement
de vos pieds, de vos enfants et de vos
animaux de compagnie lorsque vous
appuyez sur le bouton d’éjection du blocpile. La chute du bloc-pile pourrait causer
des blessures graves. NE retirez JAMAIS
le bloc-pile lorsque vous êtes en hauteur.
1. Tenez le bloc-pile dans la paume de la main.
2. Pour libérer le bloc-pile du verrou, appuyez sur le bouton d’éjection du bloc-pile
avec le pouce.
3. Saisissez le bloc-pile et retirez-le du taille-bordure.
TENIR LE TAILLE-BORDURE
AVERTISSEMENT
:
Lorsque vous
utilisez le taille-bordure, habillez-vous
convenablement pour réduire les risques
de blessures. Ne portez pas de vêtements
ni de bijoux qui peuvent s’accrocher.
Portez des protections pour les yeux et les
oreilles. Portez un pantalon long et épais,
des bottes et des gants. Ne portez pas de
pantalon court ni de sandales. N’utilisez
pas le taille-bordure lorsque vous êtes
pieds nus.
Avant d’utiliser le taille-bordure, placezvous en position d’utilisation et vérifiez
les points suivants :
Vous portez des lunettes de sécurité
et des vêtements convenables.
Vous avez un bras légèrement plié et la main de ce bras tient la poignée arrière.
L’autre bras est droit et sa main tient la poignée de manœuvre avant.
La tête du taille-bordure est parallèle au sol et atteint facilement ce qui doit être
coupé sans avoir besoin de vous pencher (figure 10).
9
Appuyez pour éjecter.
10
Page 53

TAILLE-BORDURE SANS FIL DE 38 CM À BLOC-PILE AU LITHIUM-ION DE 56 VOLTS 53
MISE EN MARCHE ET ARRÊT DU TAILLE-BORDURE
Avant de mettre le taille-bordure en marche, suivez les instructions ci-dessous :
Assurez-vous que vous avez une posture sécuritaire et un bon équilibre.
Tenez-vous droit et tenez le taille-bordure sans vous crisper.
Assurez-vous que le fil de coupe ne touche pas le sol ni aucun autre objet.
Tenez le taille-bordure avec les deux mains : une main sur la poignée arrière et
l’autre sur la poignée de manœuvre avant.
Mise en marche du taillebordure (gure 11)
1. Appuyez sur le levier de blocage et
maintenez-le enfoncé. Pressez la
gâchette pour mettre en marche le
taille-bordure.
2. La gâchette à vitesse variable
permet de contrôler la vitesse
de rotation du fil de coupe. Une
pression plus grande sur la gâchette procure une vitesse de coupe plus élevée
tandis qu’une pression plus faible sur la gâchette amène une vitesse de coupe
réduite. Réglez la vitesse en fonction de la tâche à accomplir.
AVIS : Le moteur ne tourne que lorsque le levier de blocage et la gâchette sont
enclenchés simultanément.
Arrêt du taille-bordure
Relâchez le levier de blocage et la gâchette pour arrêter le taille-bordure.
AVERTISSEMENT
:
Retirez toujours le bloc-pile du taille-bordure lorsque vous
faites des pauses et une fois que vous avez terminé de l’utiliser.
11
Levier de blocage
Gâchette
Page 54

TAILLE-BORDURE SANS FIL DE 38 CM À BLOC-PILE AU LITHIUM-ION DE 56 VOLTS54
UTILISATION DU TAILLE-BORDURE
AVERTISSEMENT
:
Pour éviter des blessures graves, portez toujours des
lunettes de sécurité lorsque vous utilisez le taille-bordure. Portez un masque de
protection ou un masque antipoussières lorsque l’endroit est poussiéreux.
Avant chaque utilisation, dégagez l’aire de travail. Enlevez tous les objets, comme
les cailloux, les éclats de verre, les clous, les câbles ou les fils, qui pourraient être
projetés par le taille-bordure ou qui pourraient rester coincés dans le dispositif de
coupe. Assurez-vous de garder les enfants, les personnes et les animaux à distance.
Ils doivent être à une distance d’au moins 30,48 m (100 pi) pour éviter de recevoir des
projections de débris. Nous recommandons aux personnes à proximité de porter des
lunettes de sécurité. Si une personne s’approche de vous, arrêtez immédiatement le
moteur.
AVERTISSEMENT
:
Pour prévenir les blessures graves, retirez le bloc-pile
du taille-bordure avant d’en effectuer l’entretien, de le nettoyer, de remplacer des
accessoires ou de retirer des pièces.
Vériez si des pièces sont endommagées ou usées avant chaque
utilisation
Vérifiez la tête du taille-bordure, le protecteur et la poignée de manœuvre avant, puis
remplacez toute pièce fissurée, déformée, tordue ou endommagée.
La lame coupe-fil en bordure du protecteur peut s’émousser avec le temps. Il est
recommandé de l’affûter périodiquement à l’aide d’une lime ou de la remplacer par une
nouvelle lame.
AVERTISSEMENT
:
Portez toujours des gants lorsque vous installez ou
remplacez le protecteur, ou lorsque vous affûtez ou remplacez la lame. Notez
l’emplacement de la lame du protecteur et protégez vos mains pour éviter de vous
blesser.
Nettoyez le taille-bordure après chaque utilisation
Des instructions pour le nettoyage de l’appareil se trouvent à la section Entretien.
AVERTISSEMENT
:
N’utilisez jamais d’eau pour nettoyer le taille-bordure.
Évitez d’utiliser des solvants sur les pièces en plastique. La plupart des plastiques sont
susceptibles d’être endommagés par divers types de solvants commerciaux. Utilisez un
linge propre pour enlever la terre, la poussière, l’huile, la graisse, etc.
Page 55

TAILLE-BORDURE SANS FIL DE 38 CM À BLOC-PILE AU LITHIUM-ION DE 56 VOLTS 55
Conseils pour bien réussir la
taille des bordures (gure 12)
Pour obtenir un angle de coupe
adéquat, le dispositif de coupe doit
être parallèle au sol.
Ne forcez pas le taille-bordure.
Utilisez uniquement l’extrémité du fil
pour couper l’herbe (surtout le long
des murs). Dans le cas contraire,
vous réduiriez l’efficacité de la
coupe et pourriez surcharger le moteur.
La hauteur de coupe dépend de la distance entre le fil et la surface de l’herbe.
Si l’herbe est haute de plus de 20,32 cm (8 po), vous devez la couper en
effectuant un mouvement du haut vers le bas en abaissant lentement le taillebordure à chaque passage pour éviter d’user trop rapidement le fil ou de faire
forcer le moteur.
Déplacez lentement le taille-bordure en effectuant un mouvement de va-et-vient
au-dessus de la surface coupée, en maintenant la tête de coupe à la hauteur
désirée. Il peut s’agir d’un mouvement latéral ou de l’avant vers l’arrière. Pour
obtenir de meilleurs résultats, il est préférable de procéder à de petites coupes.
Coupez l’herbe seulement lorsqu’elle est sèche.
Les clôtures de métal ou de bois peuvent accélérer l’usure du fil ou le briser.
Le fil peut s’user rapidement s’il entre en contact avec un mur de pierres ou de
briques, une bordure de trottoir ou du bois.
Évitez le contact avec les arbres et les arbustes. Le fil peut facilement
endommager l’écorce des arbres, les moulures de bois, le revêtement extérieur et
les poteaux de clôture.
12
Zone de coupe
dangereuse
Meilleure
zone de coupe
Page 56

TAILLE-BORDURE SANS FIL DE 38 CM À BLOC-PILE AU LITHIUM-ION DE 56 VOLTS56
RÉGLAGE DE LA LONGUEUR DU
FIL DE COUPE
La tête du taille-bordure vous permet
de libérer du fil de coupe sans arrêter le
moteur. Lorsque le fil est effiloché ou usé,
il est possible de libérer une longueur de
fil supplémentaire en frappant doucement
la butée contre le sol pendant que le taillebordure fonctionne (figure 13).
AVERTISSEMENT
:
N’essayez
pas de retirer ni de modifier la lame coupe-fil. Un fil de coupe trop long entraînera une
surchauffe du moteur et pourra ainsi causer des blessures graves.
Pour de meilleurs résultats, frappez le bouton de butée contre un sol nu ou dur. Si vous
tentez de libérer du fil dans des herbes hautes, le moteur pourrait surchauffer. Assurezvous que le fil de coupe est toujours complètement étiré. Il devient plus difficile de libérer
du fil lorsque le fil de coupe est plus court.
REMPLACEMENT DU FIL
AVIS: Utilisez toujours le fil de coupe de nylon recommandé, avec un diamètre maximum de 2,4 mm (0.095 po). L’utilisation d’un autre fil peut entraîner une surchauffe du
taille-bordure ou l’endommager.
AVERTISSEMENT
:
N’utilisez jamais de fil de métal renforcé, de fil métallique,
de corde ou d’autre matériau. Ceux-ci
pourraient se rompre et être projetés.
AVERTISSEMENT
:
Pour prévenir
les blessures graves, retirez le bloc-pile
du taille-bordure avant d’en effectuer
l’entretien, de le nettoyer, de remplacer
des accessoires ou de retirer des pièces.
1. Retirez le bloc-pile.
2. Tournez le dispositif de retenue de
la bobine dans le sens de la flèche
jusqu’à ce que l’encoche indiquant « LOAD » (CHARGE) située sur le dispositif de
retenue soit alignée sur les œillets de la base de la bobine (figure 14).
13
14
Encoche indiquant «
LOAD » (CHARGE)
Œillet Direction de la flèche
Page 57

TAILLE-BORDURE SANS FIL DE 38 CM À BLOC-PILE AU LITHIUM-ION DE 56 VOLTS 57
3. Coupez un morceau de fil de coupe
de 4,87 m (16 pi) de long. Insérez
le fil dans le trou de montage situé
dans l’œillet. Poussez jusqu’à ce
que l’extrémité du fil sorte de l’autre
côté de la base de la bobine. Tirez le
fil de l’autre côté du trou jusqu’à ce
qu’il y ait autant de fil d’un côté de
la bobine que de l’autre (figure 15).
4. Tournez le dispositif de retenue de
la bobine dans le sens de la flèche
pour enrouler le fil sur la bobine
jusqu’à ce qu’environ 14 cm (5.5
po) de fil dépasse de chaque côté
(figure 16).
5. Appuyez sur le dispositif de retenue
de la bobine tout en tirant sur les
fils de manière à les faire avancer
manuellement et à vérifier que la
tête du taille-bordure est assemblée
correctement.
RECHARGEMENT EN FIL DE COUPE, SI NÉCESSAIRE
AVIS : WLorsque la ligne de coupe se casse à l’endroit où le fil sort ou qu’elle n’est
pas dégagée quand la tête du taille-bordure est frappée contre le sol, vous devez retirer
ce qui reste de fil de coupe dans le dispositif de retenue de la bobine et suivre les
instructions ci-dessous afin de recharger en fil.
1. Retirez le bloc-pile.
16
14 cm
(5.5 po)
15
Trou de
montage dans
l’œillet
Page 58

TAILLE-BORDURE SANS FIL DE 38 CM À BLOC-PILE AU LITHIUM-ION DE 56 VOLTS58
2. Appuyez sur les languettes de
dégagement du dispositif de
retenue de la bobine et retirez ce
dernier en tirant dessus (figure 17 et
18).
3. Retirez le fil de coupe du dispositif
de retenue de la bobine.
4. D’une main, tenez la base de
la bobine. De l’autre, prenez le
dispositif de retenue de la bobine et
alignez les languettes de celui-ci sur
les trous de la base de la bobine.
Appuyez et tournez le dispositif de
retenue vers la gauche et vers la
droite avec la paume de votre main
de façon à ce que les languettes
se verrouillent dans la base de la
bobine (figure 19 et 20).
5. Suivez les instructions de la section
« REMPLACEMENT DU FIL » pour
recharger en fil de coupe.
19
Alignement
20
17
Languette de
dégagement
18
Dispositif
de retenue
de la
bobine
Base de la bobine
Page 59

TAILLE-BORDURE SANS FIL DE 38 CM À BLOC-PILE AU LITHIUM-ION DE 56 VOLTS 59
ENTRETIEN
AVERTISSEMENT
:
Lorsque vous procédez à l’entretien de la scie à chaîne,
utilisez uniquement des pièces de remplacement identiques à celles d’origine.
L’utilisation de toute autre pièce peut constituer un danger ou endommager le
produit. Pour garantir une utilisation sécuritaire de ce produit et sa fiabilité, toutes les
réparations doivent être effectuées par un technicien qualifié.
AVERTISSEMENT
:
Les outils munis d’un bloc-pile n’ont pas besoin d’être
branchés sur une prise de courant. Par conséquent, ils sont toujours prêts à l’emploi.
Pour prévenir des blessures graves, prenez des précautions particulières lorsque vous
effectuez l’entretien ou des réparations, ou lorsque vous remplacez le dispositif de
coupe ou d’autres pièces.
AVERTISSEMENT
:
Pour prévenir les blessures graves, retirez le bloc-pile
du taille-bordure avant d’en effectuer l’entretien, de le nettoyer, de remplacer des
accessoires ou de retirer des pièces.
REMPLACEMENT DE LA TÊTE DU TAILLE-BORDURE
DANGER : Si la tête se desserre après avoir été mise en place, remplacez-la
immédiatement. N’utilisez jamais le taille-bordure si le dispositif de coupe n’est pas
serré fermement. Remplacez immédiatement la tête de coupe si elle est fissurée,
endommagée ou usée, même si elle ne présente que des fissures superficielles. Ces
pièces peuvent se briser à haute vitesse et causer des blessures graves.
Page 60

TAILLE-BORDURE SANS FIL DE 38 CM À BLOC-PILE AU LITHIUM-ION DE 56 VOLTS60
21
Bride
Rondelle ordinaire
Base de la bobine
Rondelle à ressort
Fil de coupe
Dispositif de retenue de la bobine
Ressort
Écrou
Retrait de la tête du taillebordure
1. Appuyez sur les 2 languettes
de dégagement du dispositif de
retenue de la bobine pour retirer ce
dernier (figure 17 et 18).
2. Retirez le ressort de la base de la
bobine (figure 22).
3. Portez des gants pour tenir la base
de la bobine d’une main et, de
l’autre main, servez-vous d’une clé
à choc de 14,28 mm (9/16 po) pour
desserrer et retirer l’écrou (figure
23).
23
Écrou
22
Ressort
Base de la
bobine
Page 61

TAILLE-BORDURE SANS FIL DE 38 CM À BLOC-PILE AU LITHIUM-ION DE 56 VOLTS 61
4. Retirez les 2 rondelles de l’arbre du
moteur et mettez-les de côté (figure
24 et 25).
5. Tenez la base de la bobine et tirezla de l’arbre du moteur (figure 26).
24
Rondelle à ressort
25
26
Arbre du
moteur
Arbre du moteur
Base de la bobine
Rondelle ordinaire
Page 62

TAILLE-BORDURE SANS FIL DE 38 CM À BLOC-PILE AU LITHIUM-ION DE 56 VOLTS62
6. Retirez la bride de la base de la
bobine et conservez-la pour fixer la
nouvelle base (figure 27).
Installation de la nouvelle tête
du taille-bordure
1. Placez sur l’arbre du moteur la bride
retirée à l’étape 6 de la section «
Retrait de la tête du taille-bordure »,
en s’assurant que la surface plane
est opposée à la base (figure 28).
2. Alignez le trou de montage de la
base de la bobine sur l’arbre du
moteur et insérez la base dans
l’arbre.
3. Placez la rondelle ordinaire, puis la rondelle à ressort sur l’arbre du moteur (figure
29).
27
Bride
28
Surface plane
opposée à la base
Base de la bobine
29
Rondelle ordinaire
Rondelle ordinaire
Rondelle à
ressort
Page 63

TAILLE-BORDURE SANS FIL DE 38 CM À BLOC-PILE AU LITHIUM-ION DE 56 VOLTS 63
4. Placez l’écrou sur l’arbre et tournezle manuellement dans le sens des
aiguilles d’une montre pour le serrer
partiellement (figure 30).
5. Portez des gants pour tenir la base
de la bobine d’une main et, de
l’autre main, servez-vous d’une clé
à douille manuelle de 14,28 mm
(9/16 po) pour serrer l’écrou sur
l’arbre.
6. Placez le ressort dans la base de la
bobine et assurez-vous d’appuyer
dessus pour le fixer (figure 22).
7. Tenez la base de la bobine d’une
main et, de l’autre, prenez le
dispositif de retenue de la bobine.
Alignez les languettes du dispositif
de retenue de la bobine sur les trous
de la base de la bobine. Appuyez
et tournez le dispositif de retenue
vers la gauche et vers la droite avec
la paume de votre main de façon à ce que les languettes se verrouillent dans la
base de la bobine. (figure 19 et 20).
8. Si une partie du dispositif de retenue de la bobine est endommagée ou usée,
remplacez-la et réassemblez l’ensemble comme il est montré ci-contre (figure
31).
NETTOYAGE DU TAILLE-BORDURE
S’il y a lieu, retirez l’herbe qui s’est enroulée autour de l’arbre moteur ou de la tête du
taille-bordure.
Utilisez une petite brosse ou l’accessoire brosse d’un petit aspirateur pour nettoyer les
évents d’aération situés sur le boîtier arrière.
Assurez-vous que les évents d’aération ne sont jamais obstrués.
Nettoyez le taille-bordure au moyen d’un linge humide et d’un détergent doux.
N’utilisez pas de détergents puissants pour nettoyer le boîtier en plastique ni la
30
Écrou
31
Vis
Porte-conducteur
Boîtier de maintien
Boîtier de tête
Couvercle à fente
Dispositif de retenue de la bobine
Page 64

TAILLE-BORDURE SANS FIL DE 38 CM À BLOC-PILE AU LITHIUM-ION DE 56 VOLTS64
poignée. Certaines huiles aromatiques, comme le pin et le citron, peuvent les
endommager. N’utilisez pas de solvants comme le kérosène. L’humidité peut
également causer un risque d’électrocution. Essuyez les parties humides à l’aide d’un
linge sec et doux.
AFFÛTAGE DE LA LAME COUPE-FIL
AVERTISSEMENT
:
Protégez toujours vos mains au moyen de gants épais
lorsque vous procédez à tout entretien de la lame coupe-fil.
1. Retirez la lame coupe-fil du protecteur.
2. Fixez la lame dans un étau.
3. Portez une protection oculaire appropriée ainsi que des gants et faites attention
de ne pas vous couper.
4. Limez soigneusement les bords coupants de la lame à l’aide d’une lime fine ou
d’une pierre à aiguiser, en suivant l’angle du bord original de coupe.
5. Replacez la lame du protecteur et fixez-la en place au moyen de deux vis.
RANGEMENT DU TAILLE-BORDURE
Retirez le bloc-pile du taille-bordure.
Nettoyez complètement le taille-bordure avant de le ranger.
Rangez le taille-bordure dans un endroit sec, bien aéré, surélevé ou verrouillé,
hors de portée des enfants. Ne rangez pas le taille-bordure sur des engrais, de
l’essence ou d’autres produits chimiques, ni à proximité de ces produits.
Page 65

TAILLE-BORDURE SANS FIL DE 38 CM À BLOC-PILE AU LITHIUM-ION DE 56 VOLTS 65
DÉPANNAGE
PROBLÈME CAUSE SOLUTION
Le taillebordure ne
démarre pas.
Le bloc-pile n’est pas
installé sur le taillebordure.
Installez le bloc-pile sur le taillebordure.
Il n’y a aucun contact
électrique entre le taillebordure et le bloc-pile.
Retirez le bloc-pile, vérifiez les contacts
électriques et réinstallez le bloc-pile.
Le bloc-pile est déchargé.
Chargez le bloc-pile.
Le levier de blocage et
la gâchette ne sont pas
enclenchés simultanément.
Pour mettre en marche le taille-bordure,
maintenez le levier de blocage enfoncé
lorsque vous appuyez sur la gâchette.
Le taille-bordure
s’arrête en
cours de fonctionnement.
Le protecteur n’est pas
installé sur le taillebordure, de sorte que le fil
de coupe est trop long et
que le moteur surcharge.
Retirez le bloc-pile, puis installez le
protecteur sur le taille-bordure.
Le calibre du fil de coupe
utilisé est trop gros.
Utilisez uniquement un fil de coupe en
nylon standard de 2,4mm (0.095po) de
diamètre ou moins.
De l’herbe s’est enroulée
autour de l’arbre moteur ou
de la tête du taille-bordure.
Arrêtez le taille-bordure, retirez le
bloc-pile, puis retirez l’herbe de l’arbre
moteur et de la tête du taille-bordure.
Le moteur est surchargé.
Retirez la tête du taille-bordure de la
pelouse.Le moteur fonctionnera de nouveau
sans problème dès que la cause de la
surcharge est éliminée.Durant la coupe,
déplacez le taille-bordure en effectuant un
mouvement de va-et-vient au-dessus de la
surface coupée et ne coupez au maximum
que 20,32cm de longueur à la fois.
Le bloc-pile ou le taillebordure sont trop chauds.
Laissez le bloc-pile et le taille-bordure
refroidir; leur température doit être
inférieure à 67°C (152°F).
Le bloc-pile est débranché
de l’outil.
Réinstallez le bloc-pile.
Le bloc-pile est déchargé.
Chargez le bloc-pile.
Page 66

TAILLE-BORDURE SANS FIL DE 38 CM À BLOC-PILE AU LITHIUM-ION DE 56 VOLTS66
PROBLÈME CAUSE SOLUTION
La tête du taillebordure ne fait
pas avancer
le fil.
De l’herbe s’est enroulée
autour de l’arbre moteur ou
de la tête du taille-bordure.
Arrêtez le taille-bordure, retirez le blocpile, puis nettoyez l’arbre moteur et la
tête du taille-bordure.
Il ne reste pas
suffisamment de fil sur la
bobine.
Retirez le bloc-pile et remplacez le fil
de coupe. Suivez les instructions à la
section REMPLACEMENT DU FIL.
La tête du taille-bordure
est sale.
Retirez le bloc-pile et nettoyez la bobine
ainsi que son dispositif de retenue et
sa base.
Le fil est emmêlé sur la
bobine.
Retirez le bloc-pile. Retirez le fil de la
bobine, puis enroulez-le de nouveau sur
la bobine. Suivez les instructions à la
section REMPLACEMENT DU FIL.
Le fil est trop court.
Retirez le bloc-pile et tirez sur le fil en
appuyant sur le bouton de butée, puis
en le relâchant.
L’herbe
s’enroule autour
de la tête du
taille-bordure
et du boîtier du
moteur.
L’herbe haute est coupée à
ras du sol.
Pour éviter l’enroulement, coupez
l’herbe haute du haut vers le bas, en
prenant soin de ne pas en couper plus
de 20,32cm à la fois.
Le fil ne se
coupe pas bien.
La lame coupe-fil en
bordure du protecteur est
émoussée.
Affûtez la lame coupe-fil au moyen
d’une lime ou remplacez-la par une
nouvelle lame.
La tête du
taille-bordure
est fissurée
ou le dispositif
de retenue de
la bobine se
désolidarise de
la base de la
bobine.
Le taille-bordure est usé.
Replacez immédiatement la tête
du taille-bordure; suivez la section
« REMPLACER LA TÊTE DE TAILLEBORDURE » dans le présent guide.
Page 67

TAILLE-BORDURE SANS FIL DE 38 CM À BLOC-PILE AU LITHIUM-ION DE 56 VOLTS 67
PROBLÈME CAUSE SOLUTION
Lors du
remplacement
du fil, ce
dernier ne se
charge pas
convenablement
dans la tête du
taille-bordure.
Les encoches indiquant
« LOAD » (CHARGE) sur
le dispositif de retenue
de la bobine ne sont pas
alignées sur les œillets de
la base de la bobine.
Tournez le dispositif de retenue de la
bobine dans le sens de la flèche afin
d’aligner les encoches indiquant « LOAD
» (CHARGE), situées sur le dispositif de
retenue, sur les œillets de la base de la
bobine.
Le fil n’est pas bien inséré
dans le trou de montage de
l’œillet.
Alignez d’abord les encoches indiquant
« LOAD » (CHARGE) sur les œillets, puis
insérez le fil dans le trou de montage
situé à l’intérieur de l’œillet.
Page 68

TAILLE-BORDURE SANS FIL DE 38 CM À BLOC-PILE AU LITHIUM-ION DE 56 VOLTS68
GARANTIE
POLITIQUE D’EGO EN MATIÈRE DE GARANTIE
Une garantie limitée de 5 ans est offerte pour l’équipement électrique d’extérieur
EGO et une garantie limitée de 3 ans est offerte pour les chargeurs et les blocs-piles
EGO Power+.
Veuillez communiquer avec le service à la clientèle d’EGO au 1-855-EGO-5656
(numéro sans frais) pour toute question sur les réclamations au titre de la garantie.
GARANTIE LIMITÉE
À compter de la date d’achat originale, ce produit EGO est garanti PENDANT CINQ
ANS contre les défauts de matériaux et de fabrication. Les produits défectueux seront
réparés gratuitement.
À compter de la date d’achat originale, le chargeur et le bloc-pile EGO Power+ sont
garantis PENDANT TROIS ANS contre les défauts de matériaux et de fabrication. Les
produits défectueux seront réparés gratuitement.
a) Cette garantie s’applique uniquement à l’acheteur initial s’étant procuré le produit
chez un détaillant EGO autorisé et est non transférable. La liste des détaillants
EGO autorisés est publiée en ligne sur le site http://egopowerplus.com/pages/
warranty-policy.
b) La période de garantie pour toute pièce ou tout produit EGO utilisés à des fins
industrielles, professionnelles ou commerciales est de unan.
c) Cette garantie n’est pas valide si le produit a été utilisé à des fins de location.
d) Cette garantie ne couvre pas les dommages résultant d’une modification, d’une
altération ou d’une réparation non autorisée ni de l’utilisation d’un fil de coupe
autre que le fil de coupe en nylon de 2,4mm (0.095po) EGOAL0950 ou AL0951
recommandé pour ce produit.
e) Cette garantie couvre uniquement les défauts survenant dans des conditions normales
d’utilisation et ne couvre aucun dysfonctionnement ou défaut ni aucune défaillance
découlant d’un usage inapproprié ou abusif (notamment la surcharge du produit et
son immersion dans l’eau ou dans tout autre liquide), d’un accident, d’une négligence,
d’une installation inadéquate et de tout entretien ou entreposage inadéquat.
f) Cette garantie ne couvre pas la détérioration normale du fini extérieur, notamment
les rayures, les bosselures, les craquelures de la peinture ni toute corrosion ou
Page 69

TAILLE-BORDURE SANS FIL DE 38 CM À BLOC-PILE AU LITHIUM-ION DE 56 VOLTS 69
décoloration résultant de la chaleur, de produits abrasifs et de nettoyants chimiques.
RÉCLAMATION AU TITRE DE LA GARANTIE
Pour faire une réclamation au titre de la garantie, veuillez communiquer avec le service
à la clientèle d’EGO au 1-855-EGO-5656 (numéro sans frais). Lorsque vous faites une
réclamation au titre de la garantie, vous devez présenter le reçu de vente original. Un
centre de service autorisé sera sélectionné pour la réparation du produit conformément
aux conditions de garantie prescrites.
RESTRICTIONS SUPPLÉMENTAIRES
Dans les limites prescrites par la législation locale, toutes les garanties implicites,
notamment les garanties de QUALITÉ MARCHANDE ou d’ADÉQUATION POUR UN USAGE
PARTICULIER, sont non valides.Toute garantie implicite, notamment les garanties de
qualité marchande ou d’adéquation pour un usage particulier, qui ne peut être déclinée
en vertu de la législation provinciale est limitée à cinq ans à compter de la date d’achat
pour l’équipement électrique d’extérieur et à trois ans à compter de la date d’achat
pour les chargeurs et blocs-piles.
ChervonNorthAmerica n’est pas responsable des dommages accessoires, consécutifs,
indirects ou directs.
Certaines provinces et certains États n’autorisent pas les restrictions de durée de
garantie implicite, ou l’exclusion ou la restriction des dommages consécutifs et
accessoires; c’est pourquoi les restrictions ci-dessus peuvent ne pas s’appliquer à
votre cas.
La présente garantie vous confère des droits précis. Il est possible que vous disposiez
également d’autres droits, qui varient d’une province ou d’un État à l’autre.
Pour communiquer avec le service à la clientèle, veuillez composer le numéro sans
frais suivant: 1-855-EGO-5656 ou consulter le siteWeb EGOPOWERPLUS.COM.
EGO Customer Service, 120Ionia Street SW / Suite102 Grand Rapids,
MI 49503 États-Unis
Page 70

MANUAL DEL USUARIO
ORILLADORA INALÁMBRICA
CON BATERÍA DE IONES DE
LITIO DE 15 PULG Y 56 VOLTIOS
NÚMERO DE MODELO
ST1500F (EJE RECTO)/
ST1500SF (EJE BISAGRA)
ADVERTENCIA: para reducir el riesgo de lesiones, el usuario debe leer y comprender
el Manual del usuario antes de usar este producto. Guarde estas instrucciones para
consultarlas en el futuro.
Page 71

ORILLADORA INALÁMBRICA SIN CEPILLO CON BATERÍA DE IONES DE LITIO DE 15 PULG Y 56 VOLTIOS
71
ÍNDICE
Símbolos de seguridad ...................................73
Instrucciones de seguridad .............................74-78
Introducción ............................................78
Especicaciones ........................................79
Lista de empaque .......................................79
Descripción .........................................80-81
Ensamble ........................................... 82-85
Funcionamiento ...................................... 86-93
Mantenimiento .......................................94-99
Solución de problemas ..............................100-102
Garantía ..........................................103-104
Page 72

ORILLADORA INALÁMBRICA SIN CEPILLO CON BATERÍA DE IONES DE LITIO DE 15 PULG Y 56 VOLTIOS
72
LEA TODAS LAS INSTRUCCIONES
LEA Y COMPRENDA EL MANUAL
DE INSTRUCCIONES
ADVERTENCIA:
Parte del polvo producto del lijado, aserrado, esmerilado,
taladrado y otras actividades de construcción, contiene sustancias químicas que el
estado de California reconoce como causantes de cáncer, defectos congénitos u otros
daños al sistema reproductor. Algunos ejemplos de estas sustancias químicas son los
siguientes:
El plomo de pinturas a base de plomo,
La sílice cristalina de ladrillos, cemento y otros productos de mampostería, y
El arsénico y el cromo de la madera tratada químicamente.
El riesgo de sufrir estas exposiciones varía según la frecuencia con que realice este
tipo de trabajo. Para reducir la exposición a estas sustancias químicas: trabaje en
un lugar bien ventilado y con equipos de seguridad aprobados, como las mascarillas
antipolvo que están diseñadas especialmente para filtrar partículas microscópicas.
Page 73

ORILLADORA INALÁMBRICA SIN CEPILLO CON BATERÍA DE IONES DE LITIO DE 15 PULG Y 56 VOLTIOS
73
SÍMBOLOS DE SEGURIDAD
El propósito de los símbolos de seguridad es alertarlo de posibles peligros. Los
símbolos de seguridad y sus explicaciones merecen una atención y comprensión
minuciosas. Las advertencias de los símbolos, por sí mismas, no eliminan los peligros.
Las instrucciones y las advertencias no sustituyen las medidas de prevención de
accidentes que correspondan.
ADVERTENCIA:
Asegúrese de leer y comprender todas las instrucciones de
seguridad que contiene este Manual del usuario, incluidos todos los símbolos de alerta
de seguridad como “PELIGRO”, “ADVERTENCIA” y “PRECAUCIÓN”, antes de usar esta
herramienta. Si no se siguen todas las instrucciones que figuran a continuación, se
pueden producir electrocuciones, incendios y lesiones.
SIGNIFICADO DE LOS SÍMBOLOS
SÍMBOLO DE ALERTA DE SEGURIDAD:
Indica PELIGRO, ADVERTENCIA O
PRECAUCIÓN. Puede aparecer junto con otros símbolos o pictografías.
¡ADVERTENCIA!
La utilización de herramientas eléctricas puede
arrojar objetos extraños a los ojos y causar heridas graves. Antes de
comenzar a utilizar la herramienta eléctrica, colóquese siempre gafas de
seguridad o anteojos de seguridad con protectores laterales y una
máscara que cubra todo el rostro, si es necesario. Recomendamos
utilizar una máscara de seguridad de visión amplia sobre los anteojos o gafas de
seguridad estándar con protectores laterales.Use siempre lentes de protección con la
marca de cumplimiento de la norma ANSI Z87.1.
Page 74

ORILLADORA INALÁMBRICA SIN CEPILLO CON BATERÍA DE IONES DE LITIO DE 15 PULG Y 56 VOLTIOS
74
INSTRUCCIONES DE SEGURIDAD
Esta página muestra y describe los símbolos de seguridad que pueden aparecer en este producto.
Lea, comprenda y siga todas las instrucciones de la máquina antes de ensamblarla y utilizarla.
Alerta de seguridad Indica un peligro potencial de producir lesiones.
Lea el Manual del
usuario
Para reducir el riesgo de lesiones, debe leer el
Manual del usuario.
Lentes de
protección
Use siempre gafas de seguridad o anteojos con
protección lateral y un protector facial al operar
este producto.
Símbolos de
reciclaje
Este producto usa baterías de iones de litio
(Li-ion). Es posible que las leyes municipales,
provinciales o nacionales prohíban desechar las
baterías con los residuos comunes. Consulte a la
autoridad local en materia de residuos sobre las
opciones de eliminación y reciclaje disponibles.
IPX4
Nivel de Protección
del Ingreso
Protección contra salpicaduras de agua
V Voltio Voltaje
mm Milímetro Longitud o tamaño
cm Centímetro Longitud o tamaño
in. Pulgada Longitud o tamaño
kg Kilogramo Peso
lb Libra Peso
CC Corriente continua Tipo o característica de la corriente
RPM
Revoluciones por
minuto
Velocidad de rotación
Page 75

ORILLADORA INALÁMBRICA SIN CEPILLO CON BATERÍA DE IONES DE LITIO DE 15 PULG Y 56 VOLTIOS
75
INSTRUCCIONES IMPORTANTES DE SEGURIDAD
¡ADVERTENCIA!
Al usar orilladoras eléctricas, siempre se deben tomar
medidas de seguridad básicas para reducir el riesgo de incendios, descargas eléctricas
o lesiones personales, incluidas las siguientes:
LEA TODAS LAS INSTRUCCIONES
¡PELIGRO!
No dependa del aislamiento de la herramienta para evitar las
descargas eléctricas. Para reducir el riesgo de electrocución, nunca opere la
herramienta en las cercanías de cables que conducen corriente eléctrica.
¡PRECAUCIÓN!
Use protección auditiva personal adecuada durante la
manipulación. Bajo algunas condiciones y periodos de uso, el ruido de este producto
podría contribuir a la pérdida de la audición.
Mantenga a los niños alejados: Todas las personas deben mantenerse a una
distancia mínima de 30,48 m del área de trabajo.
Evite ambientes peligrosos - No utilice aparatos de pendiente húmeda o mojada.
Vístase de manera adecuada: No use ropa holgada ni joyas. Estas pueden quedar
atascadas en las piezas móviles. Se recomienda usar guantes y calzado de goma para
trabajar en exteriores. Use protección para el cabello a fin de contener el cabello largo.
Use gafas de seguridad: Use siempre una máscara o mascarilla antipolvo si
operará en una zona con mucho polvo.
Use la herramienta adecuada: No use la herramienta para ninguna otra tarea que
no sea la prevista.
No fuerce la orilladora: Esta máquina funcionará mejor y con menos
probabilidades de producir lesiones si se usa al ritmo para el cual se diseñó.
No se extienda demasiado: Mantenga el punto de apoyo y el equilibrio adecuados
en todo momento.
Manténgase alerta: Concéntrese en lo que hace.Use el sentido común. No opere
la orilladora si está cansado.
No opere la orilladora bajo la influencia de drogas ni alcohol.
Mantenga las protecciones en su lugar y en buen estado.
Mantenga las manos y los pies alejados del área de corte.
Almacene la orilladora en interiores: Cuando no esté en uso, la orilladora debe
almacenarse en interiores, en un lugar seco y alto o bajo llave, sin el paquete de
baterías y fuera del alcance de los niños.
Page 76

ORILLADORA INALÁMBRICA SIN CEPILLO CON BATERÍA DE IONES DE LITIO DE 15 PULG Y 56 VOLTIOS
76
Cuide su orilladora: Mantenga los accesorios de corte limpios para obtener
mejores resultados y reducir el riesgo de lesiones. Siga las instrucciones para
cambiar los accesorios. Mantenga las empuñaduras limpias, secas y libres de
aceite y grasa.
Revise las piezas dañadas: Antes de continuar con la operación de su orilladora,
se deben revisar con cuidado las protecciones u otras piezas dañadas a fin
de determinar si funcionan correctamente y cumplen su función específica.
Compruebe la alineación de las piezas móviles, que las piezas no estén dobladas
o rotas, que el montaje sea el correcto y cualquier otra condición que pueda
afectar el funcionamiento.Las protecciones u otras piezas dañadas deben
repararse de manera adecuada o ser reemplazadas en un centro de servicio
autorizado, a menos que se indique lo contrario en este manual.
Limpie el área que cortará antes de cada uso. Retire todos los objetos como
piedras, vidrios rotos, clavos, alambres o cordeles que puedan ser arrojados o
atascarse en los accesorios de corte. Asegúrese de que las demás personas y las
mascotas estén a un mínimo de 30,48m de distancia.
Sostenga la orilladora con firmeza y mantenga ambas manos en las
empuñaduras durante la operación. Coloque sus dedos y pulgares alrededor de
las empuñadoras.
Evite los arranques accidentales: No transporte la orilladora con el dedo en el gatillo.
No opere la orilladora en entornos gaseosos o explosivos. Los motores de estos
aparatos comúnmente producen chispas, las que pueden encender los vapores.
Daños en la orilladora: Si golpea un objeto extraño con la orilladora o si esta se
atasca, detenga la herramienta de inmediato, revise si hay daños y, de haberlos,
repárelos antes volver a operar la herramienta. No la opere si las protecciones o
el carrete están dañados.
Si el equipo comienza a vibrar de un modo anormal, detenga el motor y verifique
inmediatamente la causa. La vibración, generalmente, advierte un problema. Un
cabezal suelto puede vibrar, agrietarse, romperse o desprenderse de la orilladora,
lo que podría provocar lesiones graves o fatales. Asegúrese de que el accesorio
de corte esté bien sujeto en su posición. Si el cabezal se suelta después de
fijarlo en su posición, reemplácelo de inmediato.Nunca use una orilladora con un
accesorio de corte suelto.
Reemplace de inmediato los cabezales de corte agrietados, dañados o gastados,
aunque el daño se limite a grietas superficiales. Dichos accesorios podrían
desprenderse a alta velocidad y provocar lesiones graves o fatales.
Page 77

ORILLADORA INALÁMBRICA SIN CEPILLO CON BATERÍA DE IONES DE LITIO DE 15 PULG Y 56 VOLTIOS
77
Revise el accesorio de corte con frecuencia durante el funcionamiento o
inmediatamente si nota un cambio evidente en el comportamiento de corte.
Al reemplazar el hilo de corte, use un hilo de nailon de no más de 2,4 mm. El
uso de hilos más gruesos que los recomendados por el fabricante aumenta
la carga en el motor y reduce la velocidad de funcionamiento. Esto provoca el
sobrecalentamiento y puede dañar la orilladora.
Para reducir el riesgo de lesiones graves, nunca utilice hilo de alambre o de metal
reforzado ni otro material en lugar de los hilos de corte de nailon. Se podrían
romper trozos de alambre y dispararse a alta velocidad hacia el operador o los
transeúntes.
Para reducir el riesgo de lesiones debido a la pérdida de control, nunca trabaje
sobre una escalera ni sobre ninguna superficie insegura. Nunca sostenga el
accesorio de corte sobre la altura de la cintura.
Si se presentan situaciones que no están previstas en este manual, tenga cuidado
y use el sentido común. Póngase en contacto con el Centro de Servicio al Cliente
de EGO para recibir ayuda.
No cargue el paquete de baterías bajo la lluvia o en lugares húmedos.
Úsela solo con los paquetes de baterías y cargadores que se mencionan a
continuación:
PAQUETE DE BATERÍA CARGADOR
BA1120, BA1400, BA2240,
BA2800, BA4200
CH5500
CH2100
No arroje las baterías al fuego. Las células pueden explotar. Consulte los códigos
locales para conocer las posibles instrucciones de desecho especiales.
No abra ni rompa la batería. Los electrolitos liberados son corrosivos y pueden
causar daños en los ojos o la piel. Si se traga puede ser tóxico.
Manipule las baterías con cuidado para no acortar su vida útil con materiales
conductores como anillos, brazaletes y llaves. La batería o el conductor podrían
sobrecalentarse y producir quemaduras.
Lista de piezas de repuesto: Al realizarle mantenimiento, utilice solo piezas de
repuesto EGO idénticas. El uso de cualquier otro accesorio puede aumentar el
riesgo de lesiones.
Page 78

ORILLADORA INALÁMBRICA SIN CEPILLO CON BATERÍA DE IONES DE LITIO DE 15 PULG Y 56 VOLTIOS
78
Las herramientas a batería no necesitan estar conectadas a un enchufe, por lo
que siempre se encuentran en condiciones de funcionar. Conozca los peligros
posibles que existen aun cuando la herramienta no esté en funcionamiento. Tenga
cuidado al realizarle mantenimiento o repararla.
Retire o desconecte el paquete de baterías antes de hacer el mantenimiento,
limpiar o quitar material de la orilladora.
No lave la orilladora con una manguera; evite que el motor y las conexiones
eléctricas se mojen.
Guarde estas instrucciones. Consúltelas con frecuencia y úselas para dar
instrucciones a otras personas que puedan usar esta herramienta. Si le presta
esta herramienta a alguien, préstele también estas instrucciones para evitar el
mal uso del producto y posibles lesiones.
GUARDE ESTAS INSTRUCCIONES.
INTRODUCCIÓN
Felicitaciones por elegir la orilladora inalámbrica de iones de litio de 15 pulg y
56voltios EGO. Está pensada, diseñada y fabricada para brindarle el mejor rendimiento
y confiabilidad posibles.
En caso de que tuviera algún problema que no pudiera resolver fácilmente, póngase en
contacto con el Centro de Servicio al Cliente de EGO al 1-855-EGO-5656.
Este manual contiene información importante para el ensamble, la operación y el
mantenimiento seguro de su orilladora de hilo. Léalo atentamente antes de usar la
orilladora de hilo. Mantenga este manual a mano para poder consultarlo en cualquier
momento.
NÚMERO DE SERIE ____________________ FECHA DE COMPRA __________________
DEBE ANOTAR EL NÚMERO DE SERIE Y LA FECHA DE COMPRA Y CONSERVARLOS EN UN
LUGAR SEGURO PARA CONSULTARLOS EN EL FUTURO.
Page 79

ORILLADORA INALÁMBRICA SIN CEPILLO CON BATERÍA DE IONES DE LITIO DE 15 PULG Y 56 VOLTIOS
79
ESPECIFICACIONES
Voltaje 56V CC
Velocidad sin carga 4000-5800 RPM
Mecanismo de corte Cabezal de golpe
Tipo de hilo de corte Hilo de nailon enrollado de 0.095 pulg (2.4 mm)
Ancho de corte 15 pulg (38 cm)
Peso (sin paquete de baterías) 7.33 lb. (3.33 Kg)
Hilo De Corte Recomendado
NOMBRE DE LA
PIEZA
TIPO NÚMERO DE
MODELO
Hilo de corte
Hilo enrollado de 2,4 mm/0,095 pulg.
(recomendado)
AL0951
Hilo enrollado de 2 mm/0,08 pulg.
(compatible)
AL0803
LISTA DE EMPAQUE
NOMBRE DE LA PIEZA CANTIDAD
Orilladora de hilo 1
Protección 1
Ensamble de la empuñadura de ayuda frontal 1
Llave para tornillo hexagonal 1
Pernos para eje de sujeción (disponible solo para el modelo ST1500SF) 2
Manual del usuario 1
Page 80

ORILLADORA INALÁMBRICA SIN CEPILLO CON BATERÍA DE IONES DE LITIO DE 15 PULG Y 56 VOLTIOS
80
DESCRIPCIÓN
CONOZCA SU ORILLADORA DE HILO (Fig. 1)
El uso seguro de este producto requiere que se comprenda la información que Fig.en
la herramienta y en este manual del usuario, además del conocimiento del proyecto
que desea llevar a cabo. Antes de usar este producto, familiarícese con todas las
características operativas y reglas de seguridad.
1
Empuñadura de asistencia
frontal ajustable
Hilo de corte
Protección
Cabezal de la orilladora (cabezal de golpe)
Cuchilla de corte lineal
Mecanismo de eyección
Palanca
Botón de
liberación de la
batería
Gatillo
Contactos eléctricos
Palanca de bloqueo
Bisagra Solo
ST1500SF
Empuñadura posterior
Lengüeta de liberación
ADVERTENCIA: Nunca opere la herramienta si la protección no está bien
colocada en su lugar. La protección debe estar siempre en la herramienta para proteger
al usuario.
Page 81

ORILLADORA INALÁMBRICA SIN CEPILLO CON BATERÍA DE IONES DE LITIO DE 15 PULG Y 56 VOLTIOS
81
EMPUÑADURA DE ASISTENCIA FRONTAL AJUSTABLE
Facilita el control de la orilladora durante el corte.
EMPUÑADURA POSTERIOR
Empuñadura ergonómica que mejora la comodidad y el agarre.
GATILLO
Para encender y apagar la orilladora de hilo y ajustar la velocidad del cabezal de la
orilladora.
PALANCA DE BLOQUEO
Ayuda a evitar la activación accidental o no autorizada del gatillo. Se debe presionar
antes de que se pueda activar el gatillo.
BISAGRA (SOLO ST1500SF)
Conecta y traba los dos ejes plegables.
CABEZAL DE LA ORILLADORA (CABEZAL DE GOLPE)
Almacena el hilo de corte y lo libera cuando el cabezal toca levemente el suelo durante
el funcionamiento.
PROTECCIÓN
Reduce el riesgo de lesiones por objetos extraños expulsados en dirección al operador y por el
contacto con el accesorio de corte.
CUCHILLA DE CORTE LINEAL
La cuchilla de acero en la protección mantiene el hilo de corte en el largo adecuado.
BOTÓN DE LIBERACIÓN DE LA BATERÍA
Libera el paquete de baterías de la herramienta.
PALANCA
Bloquea el paquete de baterías cuando se instala en la herramienta.
MECANISMO DE EYECCIÓN
Ayuda en la extracción de la batería.
Page 82

ORILLADORA INALÁMBRICA SIN CEPILLO CON BATERÍA DE IONES DE LITIO DE 15 PULG Y 56 VOLTIOS
82
ENSAMBLE
ADVERTENCIA:
Si faltan piezas o hay piezas dañadas, no opere este producto
hasta reemplazar dichas piezas. El uso de este producto con piezas dañadas o faltantes
podría provocar lesiones graves.
ADVERTENCIA:
No intente modificar este producto ni crear accesorios que
no estén recomendados para usarse con esta orilladora de hilo. Cualquier alteración o
modificación de ese tipo representa mal uso y puede generar condiciones peligrosas
que causen posibles lesiones personales graves.
ADVERTENCIA:
Siempre retire el paquete de baterías del producto cuando
ensamble piezas, realice ajustes, limpie el producto o cuando no lo esté usando.
DESEMBALAJE
Este producto requiere ensamble.
Retire con cuidado el producto y cualquier accesorio de la caja. Asegúrese de que
todos los elementos que aparecen en la lista de empaque estén incluidos.
Inspeccione la herramienta con cuidado para asegurarse de que no se rompieron
o se dañaron piezas durante el envío.
No deseche el embalaje hasta que no haya inspeccionado cuidadosamente la
herramienta y sepa que funciona correctamente.
Si hay alguna pieza dañada o faltante, devuelva el producto al lugar donde lo compró.
Page 83

ORILLADORA INALÁMBRICA SIN CEPILLO CON BATERÍA DE IONES DE LITIO DE 15 PULG Y 56 VOLTIOS
83
DESPLIEGUE DEL EJE (SOLO PARA EL MODELO ST1500SF)
ADVERTENCIA
:
evite sostener el eje por las juntas ya que podría pellizcarse las
manos o los dedos.
ADVERTENCIA
:
no intente arrancar la orilladora hasta que se haya asegurado
el eje.
1. Retire el paquete de baterías de la
orilladora.
2. Coloque la orilladora en el suelo y
despliegue el eje con cuidado. Para
evitar pellizcar el cable al cerrar los
empalmes, asegúrese de que este
se encuentre dentro del eje (Fig. 2).
3. Para cerrar y asegurar el eje, use
la llave de tuercas y el pernos
proporcionados (Fig. 3).
2
3
Page 84

ORILLADORA INALÁMBRICA SIN CEPILLO CON BATERÍA DE IONES DE LITIO DE 15 PULG Y 56 VOLTIOS
84
MONTAJE DE LA PROTECCIÓN
ADVERTENCIA
:
siempre use guantes al montar o reemplazar el protector. Tenga
cuidado con la cuchilla junto al protector y proteja sus manos ya que podría sufrir cortes.
1. Retire el paquete de baterías de la
orilladora.
2. Levante el cabezal de la orilladora
y ubíquelo en dirección al
suelo; alinee los dos orificios de
ensamblado en el protector con
los dos pernos ensamblados de
fábrica que se encuentran en la
base del eje. Asegúrese de que la
cara interna del protector se oriente
hacia el cabezal de la orilladora (Fig.
4).
3. Asegure el protector en su lugar con
los dos pernos y la llave de tuercas
proporcionada (Fig. 5).
4
5
Page 85

ORILLADORA INALÁMBRICA SIN CEPILLO CON BATERÍA DE IONES DE LITIO DE 15 PULG Y 56 VOLTIOS
85
MONTAJE Y AJUSTE DE LA MANIJA DE AYUDA FRONTAL
ADVERTENCIA
:
siempre retire el paquete de baterías del producto cuando
ensamble piezas, realice ajustes o limpie el producto, o cuando el producto no esté en
uso.
1. Retire el paquete de baterías de la
orilladora.
2. Retire los cuatro tornillos y la
abrazadera inferior de la manija con
la llave de tuercas proporcionada
(Fig. 6).
3. Fije la manija de ayuda frontal y
la abrazadera inferior en el eje;
asegúrelas apretando levemente los
cuatro tornillos. Gire la manija de
ayuda frontal hacia arriba para que
apunte hacia la parte superior de la
manija (Fig. 7).
4. Ubique la manija de ayuda frontal
entre el armazón de la manija
posterior y la unión del eje, tal como
se muestra en la Figura 7. En el
modelo ST1500F, ubique la manija
entre el armazón de la manija posterior y la etiqueta de advertencia del eje. Los
usuarios de menor estatura podrán ubicar la manija en una posición inferior (lejos
de uno) y los usuarios de mayor estatura podrán ubicar la manija en una posición
superior (más cerca de uno). La manija frontal debe estar ubicada de tal manera
que permita que, al usar la orilladora, el brazo que la toma esté estirado.
5. Apriete los cuatro tornillos de manera que la manija no pueda girar sobre el eje.
7
6
Manija de ayuda
frontal
Abrazadera inferior
Page 86

ORILLADORA INALÁMBRICA SIN CEPILLO CON BATERÍA DE IONES DE LITIO DE 15 PULG Y 56 VOLTIOS
86
FUNCIONAMIENTO
ADVERTENCIA
:
no permita que el conocimiento de este producto lo vuelva
imprudente. Recuerde que un descuido de una fracción de segundo es suficiente para
ocasionar lesiones graves.
ADVERTENCIA
:
siempre use lentes de protección con protección lateral que
cumplan con la norma ANSI Z87.1, junto con protección auditiva. De lo contrario, podría
provocar que se disparen objetos hacia sus ojos y otras posibles lesiones graves.
ADVERTENCIA
:
no use ningún aditamento o accesorio que no haya sido
recomendado por el fabricante de este producto. El uso de suplementos o accesorios
diferentes a los recomendados podría provocar lesiones graves.
INSTALACIÓN/EXTRACCIÓN DEL PAQUETE DE BATERÍAS (Fig. 8 y 9)
ADVERTENCIA
:
siempre retire el paquete de baterías del producto cuando
ensamble piezas, realice ajustes o limpie el producto, o cuando no esté en uso. De esta
manera, evitará el arranque accidental, el que podría provocar lesiones personales
graves.
NOTA: cargue completamente el paquete
de baterías antes de usarlo por primera
vez.
Instalación del paquete de
baterías (Fig. 8)
1. Alinee las aletas del paquete de
baterías con las ranuras de montaje
en el puerto de la batería de la
orilladora.
2. Presione el paquete de baterías hacia el cabezal de la orilladora hasta que calce
en su posición.
NOTA: asegúrese de que las aletas de la orilladora encajen en su lugar y que el
paquete de baterías esté bien colocado en la herramienta antes de ponerla en
funcionamiento.
8
Ranura de montaje
Page 87

ORILLADORA INALÁMBRICA SIN CEPILLO CON BATERÍA DE IONES DE LITIO DE 15 PULG Y 56 VOLTIOS
87
Extracción del paquete de
baterías (Fig. 9)
ADVERTENCIA
:
siempre tenga
cuidado con la ubicación de sus pies, los
niños o las mascotas cuando presione
el botón de liberación de la batería. Se
podrían provocar lesiones graves si
se cae el paquete de baterías. NUNCA
retire el paquete de baterías cuando se
encuentre a gran altura del suelo.
1. Sostenga el paquete de baterías en la palma de su mano.
2. Presione el botón de liberación de la batería con el pulgar; el paquete de baterías
se separará del pasador.
3. Tome el paquete de baterías y
retírelo de la orilladora.
MODO DE SOSTENER LA
ORILLADORA
ADVERTENCIA
:
utilice la ropa
adecuada para reducir el riesgo de
lesiones cuando opere la herramienta. No
use ropa holgada ni joyas. Use protección
para los ojos y los oídos/la audición. Use
pantalones largos, mangas largas, botas
y guantes gruesos. No use pantalones
cortos, sandalias ni ande descalzo.
Antes de operar la unidad, colóquese en
la posición de operación y verifique que:
El operador use lentes de protección y ropa adecuada.
Un brazo esté ligeramente doblado y que la mano de ese brazo sostenga la
manija posterior.
El otro brazo esté recto y que con la mano se sostenga la manija de ayuda frontal.
El cabezal de la orilladora esté paralelo al suelo y que haga contacto fácilmente
con el material de corte sin que el operador deba agacharse (Fig. 10).
9
Presione para liberar
10
Page 88

ORILLADORA INALÁMBRICA SIN CEPILLO CON BATERÍA DE IONES DE LITIO DE 15 PULG Y 56 VOLTIOS
88
ARRANQUE Y DETENCIÓN DE LA ORILLADORA DE HILO
Antes de poner en funcionamiento la orilladora de hilo
Asegúrese de estar bien parado, con los pies firmes y en equilibrio.
Párese derecho y sostenga la orilladora en una posición relajada.
Asegúrese de que el hilo de corte no toque el piso ni otros objetos.
Sostenga la orilladora de hilo con ambas manos: una mano en la manija posterior
y la otra en la manija de ayuda frontal.
Arranque de la orilladora de hilo
(Fig. 11)
1. Presione la palanca de bloqueo
hacia abajo y manténgala en esa
posición. Presione el gatillo para
encender la orilladora de hilo.
2. La velocidad de rotación del hilo
de corte se controla con el gatillo
de velocidad variable. Aplique más
presión sobre el gatillo para aumentar la velocidad de corte; aplique menos
presión para disminuir la velocidad de corte. Ajuste la velocidad según la tarea
que deba realizar.
AVISO: el motor funcionará solo cuando la palanca de bloqueo y el gatillo se
encuentren presionados.
Detención de la orilladora de hilo
Para detener la orilladora de hilo, suelte la palanca de bloqueo y el gatillo.
ADVERTENCIA:
retire siempre el paquete de baterías de la orilladora de hilo
durante pausas en el trabajo y después de finalizarlo.
11
Palanca de bloqueo
Gatillo
Page 89

ORILLADORA INALÁMBRICA SIN CEPILLO CON BATERÍA DE IONES DE LITIO DE 15 PULG Y 56 VOLTIOS
89
USO DE LA ORILLADORA DE HILO
ADVERTENCIA
:
para evitar lesiones personales graves, use siempre gafas de
seguridad o lentes de protección al operar este producto. Use una máscara o mascarilla
antipolvo en lugares polvorientos.
Limpie el área que cortará antes de cada uso. Retire todos los objetos como piedras,
vidrios rotos, clavos, alambres o cordeles que puedan ser arrojados o atascarse en los
accesorios de corte. Mantenga alejados a los niños, los transeúntes y las mascotas.
Mantenga a los niños, los transeúntes y las mascotas a 30,48 m de distancia
como mínimo; aún podrían existir riesgos para los transeúntes debido a los objetos
disparados. Se debe pedir a los transeúntes que usen lentes de protección. Si un
transeúnte se acerca a usted, pare el motor inmediatamente.
ADVERTENCIA
:
para evitar lesiones personales graves, retire el paquete de
baterías de la herramienta antes de realizarle mantenimiento, limpiarla, cambiar los
accesorios o retirar materiales de la unidad.
Revisión de piezas dañadas o desgastadas antes de cada uso
Revise el cabezal de la orilladora, la protección y la manija de ayuda frontal, y
reemplace todas las piezas agrietadas, torcidas, dobladas o dañadas.
La cuchilla del hilo de corte en el borde de la protección puede desafilarse con el
tiempo. Se recomienda que la afile con una lima o la reemplace por una cuchilla nueva.
ADVERTENCIA
:
siempre use guantes al montar o reemplazar la protección o
al afilar o reemplazar la cuchilla. Sea consciente de la ubicación de la cuchilla junto al
protector y proteja las manos contra lesiones.
Limpie la orilladora después de cada uso
Para obtener instrucciones sobre la limpieza del producto, diríjase a la sección
Mantenimiento.
ADVERTENCIA
:
nunca utilice agua para limpiar la orilladora. Evite el uso de
solventes para limpiar las piezas de plástico. La mayoría de los plásticos son susceptibles a diferentes tipos de solventes comerciales. Utilice paños limpios para eliminar la
suciedad, el polvo, el aceite, la grasa, etc.
Page 90

ORILLADORA INALÁMBRICA SIN CEPILLO CON BATERÍA DE IONES DE LITIO DE 15 PULG Y 56 VOLTIOS
90
Consejos para obtener mejores
resultados de corte (Fig. 12)
El ángulo correcto para el accesorio
de corte es paralelo al suelo.
No fuerce la herramienta. Permita
que la punta del hilo realice el corte
(especialmente contra las paredes).
Si no corta solo con la punta, se
reducirá la eficiencia de corte y se
podría sobrecargar el motor.
El alto del corte está determinado por la distancia del hilo de corte desde la
superficie del césped.
El césped por sobre 200 mm debe cortarse comenzando desde la parte superior
hacia abajo en incrementos pequeños para evitar el desgaste prematuro del hilo
o la guía del motor.
Mueva lentamente la orilladora dentro y fuera del área que cortará y mantenga la
posición del cabezal de corte en la altura de corte que desea. Este puede ser un
movimiento hacia delante y hacia atrás, o de un lado a otro. El corte de medidas
más reducidas produce mejores resultados.
Corte solo cuando el césped y las malezas estén secos.
Las cercas de alambre y de estacas pueden causar un desgaste excesivo
o roturas. Las paredes de piedra o ladrillo, los bordillos y la madera pueden
desgastar los hilos rápidamente.
Evite los árboles y arbustos. Los hilos pueden dañar con facilidad la corteza de
los árboles, las molduras de madera, los paneles de revestimiento y los postes de
cercas.
12
Área de corte
peligrosa
Área de
corte ideal
Page 91

ORILLADORA INALÁMBRICA SIN CEPILLO CON BATERÍA DE IONES DE LITIO DE 15 PULG Y 56 VOLTIOS
91
AJUSTE DE LA LONGITUD DEL
HILO DE CORTE
El cabezal de corte permite al operador
liberar más hilo de corte sin detener el
motor. A medida que el hilo se deshilacha
o desgasta, es posible que se libere hilo
adicional al golpear levemente la perilla
del golpeador en el suelo mientras opera la
orilladora (Fig. 13).
ADVERTENCIA
:
no retire ni
modifique el ensamble de la cuchilla del hilo de corte. Un largo excesivo del hilo puede
provocar que el motor se sobrecaliente y resultar en lesiones personales graves.
Para obtener mejores resultados, golpee la perilla del golpeador en un suelo sin plantas o
en suelo duro. Si se intenta liberar el hilo en césped alto, el motor podría sobrecalentarse.
Mantenga siempre el hilo de corte completamente extendido. La liberación del hilo se
hace más difícil a medida que este se hace más corto.
REEMPLAZO DEL HILO
AVISO: use siempre el hilo de corte de nailon recomendado con un diámetro que no
supere los 2,4 mm (0,095 pulg.). Usar un hilo distinto al especificado puede causar que
la orilladora de hilo se sobrecaliente o se dañe.
ADVERTENCIA
:
nunca use hilo de metal reforzado, alambre o cuerda, etc. Este
podría romperse y convertirse en un proyectil peligroso.
ADVERTENCIA
:
para evitar lesiones personales graves, retire el paquete de
baterías de la herramienta antes de
realizarle mantenimiento, limpiarla,
cambiar los accesorios o retirar
materiales de la unidad.
1. Retire el paquete de baterías.
2. Gire el contenedor del carrete en la
dirección que indica la flecha para
alinear la línea LOAD del contenedor
con los ojales de la base del carrete
(Fig. 14).
13
14
Línea LOAD
Ojal
Dirección de la
flecha
Page 92

ORILLADORA INALÁMBRICA SIN CEPILLO CON BATERÍA DE IONES DE LITIO DE 15 PULG Y 56 VOLTIOS
92
3. Corte un trozo de hilo de corte de 5
m (16 pies) de largo. Inserte el hilo
en el orificio de montaje, ubicado
dentro del ojal. Empuje hasta que la
punta del hilo aparezca por el otro
lado de la base del carrete. Jale de
la punta del hilo del otro lado hasta
que haya la misma cantidad de hilo
en ambos lados del carrete (Fig. 15).
4. Gire el contenedor del carrete en la
dirección que muestra la flecha para
enrollar el hilo dentro del carrete
hasta que haya 14 cm (5,5 pulg.) de
hilo aproximadamente en cada lado
(Fig. 16).
5. Empuje el contenedor del carrete
hacia abajo y, al mismo tiempo,
jale de los hilos para hacer avanzar
el hilo de forma manual y para
confirmar que el cabezal de la
orilladora está ensamblado correctamente.
RECARGA DEL HILO DE CORTE (SI FUERA NECESARIO)
AVISO: si el hilo de corte se corta de la salida de hilo o si, al momento de presionar el
cabezal de la orilladora contra el suelo, el hilo de corte no sale, deberá retirar el hilo
de corte restante del contenedor del carrete y seguir los pasos a continuación para
recargar el hilo.
1. Retire el paquete de baterías.
16
14 cm
(5,5 pulg.)
15
Orificio de
montaje dentro
del ojal
Page 93

ORILLADORA INALÁMBRICA SIN CEPILLO CON BATERÍA DE IONES DE LITIO DE 15 PULG Y 56 VOLTIOS
93
2. Presione las lengüetas de liberación
en el contenedor del carrete y
retírelo jalando hacia fuera
(Fig. 17 y 18).
3. Retire el hilo de corte del
contenedor del carrete.
4. Use una mano para sostener la base
del carrete y otra mano para sujetar
el contenedor del carrete y alinear
las lengüetas del contenedor del
carrete con los orificios de la base
del carrete. Use la palma de la mano
para presionar y girar el contenedor
del carrete hasta que las lengüetas
queden aseguradas en la base del
carrete. (Fig. 19 y 20).
5. Siga las instrucciones en
"REEMPLAZO DEL HILO" para
recargar el hilo de corte.
19
Alineación
20
17
Lengüeta de
liberación
18
Contenedor
del carrete
Base del carrete
Page 94

ORILLADORA INALÁMBRICA SIN CEPILLO CON BATERÍA DE IONES DE LITIO DE 15 PULG Y 56 VOLTIOS
94
MANTENIMIENTO
ADVERTENCIA
:
cuando realice el mantenimiento, solo use piezas de repuesto
idénticas. El uso de otras piezas puede generar un peligro o dañar el producto. Para
garantizar la seguridad y confiabilidad, todas las reparaciones las debe realizar un
técnico calificado.
ADVERTENCIA
:
las herramientas a batería no necesitan estar conectadas a
un enchufe, por lo que siempre se encuentran en condiciones de funcionar. Para evitar
lesiones personales graves, tome precauciones adicionales y tenga cuidado al realizar
mantenimiento, reparar o cambiar el accesorio de corte u otros accesorios.
ADVERTENCIA
:
para evitar lesiones personales graves, retire siempre el
paquete de baterías de la herramienta antes de realizarle mantenimiento, limpiarla,
cambiar los accesorios adicionales o retirar materiales de la unidad.
REEMPLAZO DEL CABEZAL DE LA ORILLADORA
PELIGRO: si el cabezal se afloja luego de fijarlo en su posición, reemplácelo
de inmediato. Nunca use una orilladora con un accesorio de corte suelto. Reemplace
los cabezales agrietados, dañados o gastados de inmediato, aunque solo se trate
de grietas superficiales. Dichos accesorios podrían desprenderse a alta velocidad y
provocar lesiones graves.
Page 95

ORILLADORA INALÁMBRICA SIN CEPILLO CON BATERÍA DE IONES DE LITIO DE 15 PULG Y 56 VOLTIOS
95
21
Brida
Arandela plana
Base del carrete
Arandela de resorte
Hilo de corte
Ensamble del contenedor del carrete
Resorte
Tuerca
Extracción del cabezal de la
orilladora
1. Presione las 2 lengüetas de
liberación del contenedor del carrete
para retirarlo (ver Fig. 17 y 18).
2. Jale del resorte para quitarlo de la
base del carrete (Fig. 22).
3. Use guantes para sostener la base
del carrete con una mano y, con
la otra, use una llave de tubo de
impacto (14 mm, 9/16 pulg.) para
aflojar y retirar la tuerca (Fig. 23).
23
Tuerca
22
Resorte
Base del carrete
Page 96

ORILLADORA INALÁMBRICA SIN CEPILLO CON BATERÍA DE IONES DE LITIO DE 15 PULG Y 56 VOLTIOS
96
4. Retire las 2 arandelas del eje del
motor y guárdelas para cuando
vuelva a ensamblarlo (Fig. 24 y 25).
5. Sujete la base del carrete y jálela
hacia fuera del eje del motor
(Fig. 26).
24
Arandela
de resorte
25
26
Eje del motor
Eje del motor
Base del
carrete
Arandela plana
Page 97

ORILLADORA INALÁMBRICA SIN CEPILLO CON BATERÍA DE IONES DE LITIO DE 15 PULG Y 56 VOLTIOS
97
6. Retire la brida de la base del carrete
y guárdela para usarla en la base
nueva del carrete (Fig. 27).
Instalación del nuevo cabezal de
la orilladora
1. Coloque la brida que retiró en el
paso 6 de la sección "Extracción del
cabezal de la orilladora" sobre el eje
del motor, con la superficie plana
mirando hacia fuera de la base (Fig.
28).
2. Alinee el orificio para montaje de la
base del carrete con el eje del motor
y coloque la base sobre el eje.
3. Coloque primero la arandela plana y luego la arandela de resorte en el eje del
motor (Fig. 29).
27
Bridat
28
Superficie plana mirando
hacia fuera de la base
Base del carrete
29
Arandela plana
Arandela plana
Arandela de
resorte
Page 98

ORILLADORA INALÁMBRICA SIN CEPILLO CON BATERÍA DE IONES DE LITIO DE 15 PULG Y 56 VOLTIOS
98
4. Coloque la tuerca en el eje y
gírelo con la mano en dirección
de las manecillas del reloj para
preajustarlo (Fig. 30).
5. Use guantes para sostener la base
del carrete con una mano y, con la
otra, use una llave de tubo (14 mm,
9/16 pulg.) para ajustar la tuerca al
eje.
6. Coloque el resorte en la base del
carrete y asegúrese de que está
bien ubicado en su lugar (Fig. 22).
7. Use una mano para sostener la
base del carrete y, con la otra,
sujete el contenedor del carrete y
alinee las lengüetas del contenedor
del carrete con los orificios de la
base del carrete. Use la palma de
la mano para presionar y girar el
contenedor del carrete hacia la
izquierda y la derecha hasta lograr
que las lengüetas estén aseguradas con la base del carrete. (Fig. 19 y 20).
8. Si alguna de las piezas del ensamble del contenedor del carrete se encuentra
dañada o desgastada, reemplácela y vuelva a ensamblar la pieza como se
muestra en la (Fig. 31).
LIMPIEZA DE LA UNIDAD
Limpie todo el pasto que haya quedado alrededor del eje del motor o del cabezal de la
orilladora.
Use un cepillo pequeño o una aspiradora pequeña para limpiar los orificios de
ventilación de la carcasa posterior.
Mantenga los orificios de ventilación libres de obstrucciones.
Limpie la unidad con un paño húmedo y detergente suave.
30
Tuerca
31
Tornillos
Soporte del hilo
Carcasa de la
guía
Carcasa del cabezal
Cubierta de
la ranura
Ensamble del
contenedor del carrete
Page 99

ORILLADORA INALÁMBRICA SIN CEPILLO CON BATERÍA DE IONES DE LITIO DE 15 PULG Y 56 VOLTIOS
99
No use detergentes fuertes en la carcasa de plástico o la manija. Pueden dañarse
con ciertos aceites aromáticos, como el de pino o limón. No use solventes como el
queroseno. La humedad también puede producir riesgos de descargas eléctricas.
Limpie la humedad con un paño limpio y seco.
AFILADO DE LA CUCHILLA DE CORTE LINEAL
ADVERTENCIA
:
siempre proteja las manos con guantes para trabajo pesado
cuando realice el mantenimiento de la cuchilla de corte lineal.
1. Retire la cuchilla de corte lineal de la protección.
2. Asegure la cuchilla en una prensa de tornillo.
3. Use guantes y lentes de protección adecuados y tenga cuidado de no cortarse.
4. Lime cuidadosamente los bordes de corte de la cuchilla con una lima de dientes
finos o una piedra de afilar y mantenga el borde de corte original.
5. Reemplace la cuchilla en el protector y asegúrela con dos tornillos.
ALMACENAMIENTO DE LA UNIDAD
Retire el paquete de baterías de la orilladora.
Limpie bien la herramienta antes de almacenarla.
Almacene la unidad en un área bien ventilada, cerrada o en altura, alejada del
alcance de los niños. No almacene la unidad con fertilizantes, gasolina u otros
químicos o en cercanía de estos.
Page 100

ORILLADORA INALÁMBRICA SIN CEPILLO CON BATERÍA DE IONES DE LITIO DE 15 PULG Y 56 VOLTIOS
100
SOLUCIÓN DE PROBLEMAS
PROBLEMA CAUSA SOLUCIÓN
La orilladora de
hilo no arranca.
El paquete de baterías no está
bien colocado en la orilladora.
Coloque el paquete de baterías
en la orilladora.
No hay contacto eléctrico
entre la orilladora y la batería.
Retire la batería, revise los contactos
y vuelva a instalar el paquete de baterías.
El paquete de baterías está
agotado.
Cargue el paquete de baterías.
La palanca de bloqueo y el
gatillo no se presionaron
simultáneamente.
Mantenga presionada la palanca de
bloqueo hacia abajo y suelte el gatillo
para encender la orilladora de hilo.
La orilladora de
hilo se detiene
durante el corte.
El protector no está montado
en la orilladora, lo que hace
que el hilo de corte sea
demasiado largo y que el
motor se sobrecargue.
Retire el paquete de baterías e instale
la protección en la orilladora.
El hilo de corte que utiliza
es pesado.
Use solo un hilo de corte de nailon de
0.095 pulg (2.4 mm) de diámetro o menos.
Hay césped enredado en
el eje del motor o en el
cabezal de la orilladora.
Detenga la orilladora, retire la batería y
limpie el césped del eje del motor y del
cabezal de la orilladora.
El motor está
sobrecargado.
Retire el cabezal de la orilladora del
césped. El motor volverá a funcionar
cuando se retire la carga. Cuando
realice cortes, mueva el cabezal de la
orilladora hacia adentro y hacia afuera
del césped a cortar. No corte más de
Change to: 8 pulgadas (20.32 cm) de
largo en una sola cortada.
El paquete de baterías o
la orilladora están muy
calientes.
Deje enfriar el paquete de baterías o
la orilladora hasta que la temperatura
descienda por debajo de los 152 °F (67°C).
El paquete de baterías
está desconectado de la
herramienta.
Vuelva a instalar el paquete de baterías.
El paquete de baterías está
agotado.
Cargue el paquete de baterías.
 Loading...