

Page 1
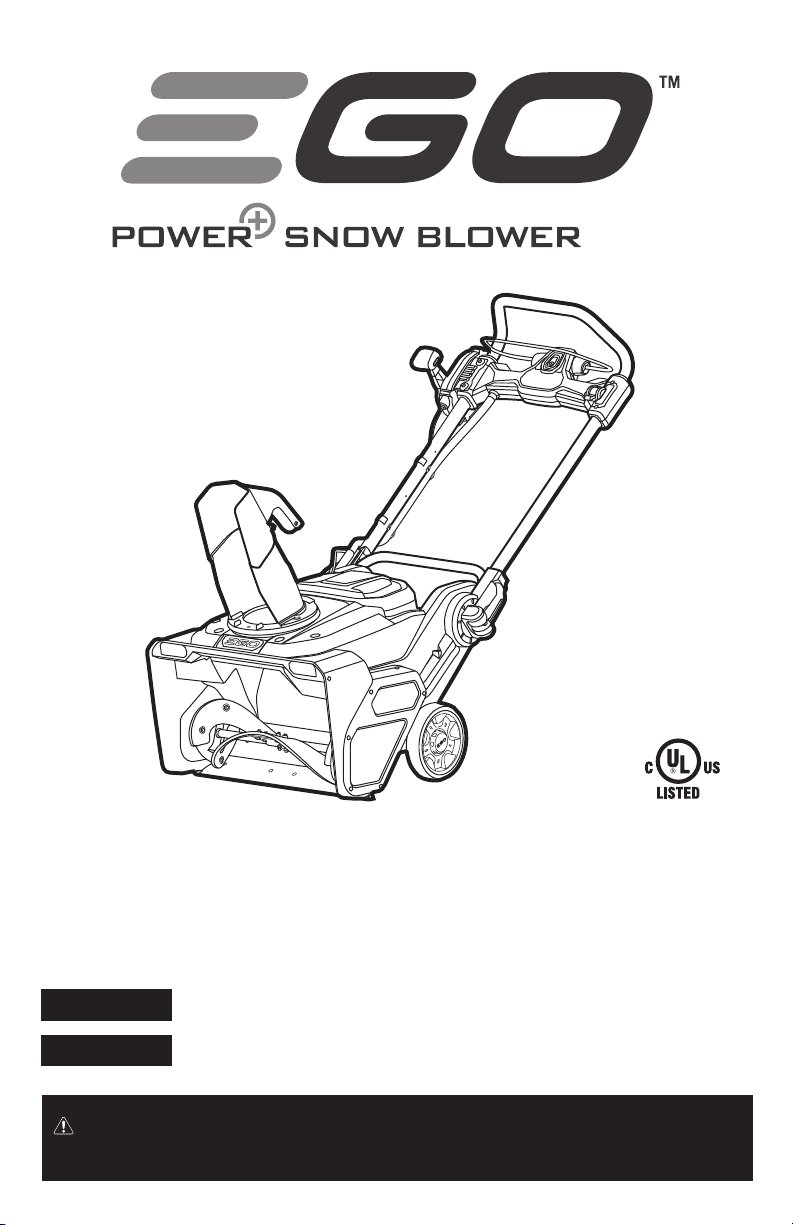
OPERATOR'S MANUAL
56-VOLT LITHIUM-ION
CORDLESS BRUSHLESS
Français p. 35
SNOW BLOWER
Español p. 71
WARNING: To reduce the risk of injury, the user must read and understand the
Operator’s Manual before using this product. Save these instructions for future reference.
MODEL NUMBER SNT2100
Page 2

TABLE OF CONTENTS
Safety Symbols ..........................................4
Safety Instructions ......................................5-6
Safe Operation Practices for Walk-behind Snow Blower .........6-9
Specications ..........................................10
Assembly ...........................................11-14
Description .........................................15-16
Operation ........................................... 17-25
Maintenance ........................................26-30
Troubleshooting .........................................31
Warranty ...........................................32-33
56V LITHIUM-ION CORDLESS BRUSHLESS SNOW BLOWER — SNT21002
Page 3

READ ALL INSTRUCTIONS!
READ & UNDERSTAND
INSTRUCTION MANUAL
WARNING:
the state of California to cause cancer, birth defects or other reproductive harm. Some
examples of these chemicals are:
Lead from lead-based paints
Crystalline silica from bricks and cement and other masonry products, and
Arsenic and chromium from chemically-treated lumber.
Your risk from these exposures varies, depending on how often you do this type of
work. To reduce your exposure to these chemicals: work in a well ventilated area, and
work with approved safety equipment, such as those dust masks that are specially
designed to lter out microscopic particles.
Some dust created by power cutting contains chemicals known to
56V LITHIUM-ION CORDLESS BRUSHLESS SNOW BLOWER — SNT2100 3
Page 4
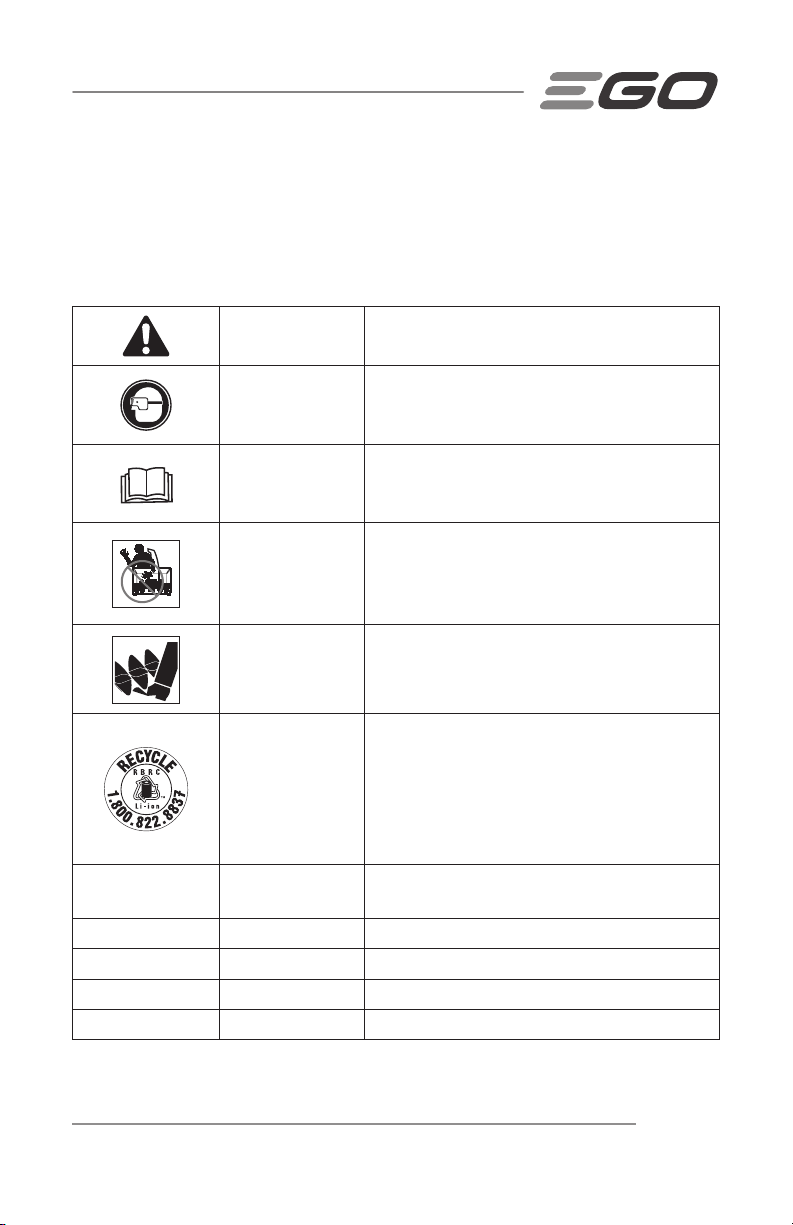
SAFETY SYMBOLS
The purpose of safety symbols is to attract your attention to possible dangers. The
safety symbols and the explanations with them deserve your careful attention and
understanding. The symbol warnings do not, by themselves, eliminate any danger. The
instructions and warnings they give are no substitutes for proper accident prevention
measures.
WARNING:
Operator’s Manual, including all safety alert symbols such as “DANGER,” “WARNING,”
and “CAUTION” before using this tool. Failure to follow all instructions listed below may
result in electric shock, re, and/or serious personal injury.
Be sure to read and understand all safety instructions in this
SYMBOL MEANING
SAFETY ALERT SYMBOL:
May be used in conjunction with other symbols or pictographs.
WARNING:
foreign objects being thrown into your eyes, which can result in severe
eye damage. Before beginning power tool operation, always wear
safety goggles or safety glasses with side shields and a full face shield
when needed. We recommend a Wide Vision Safety Mask for use over
eyeglasses or standard safety glasses with side shields. Always use
eye protection which is marked to comply with ANSI Z87.1.
Indicates DANGER, WARNING, or CAUTION.
The operation of any power tools can result in
56V LITHIUM-ION CORDLESS BRUSHLESS SNOW BLOWER — SNT21004
Page 5
SAFETY INSTRUCTIONS
This page depicts and describes safety symbols that may appear on this product. Read,
understand, and follow all instructions on the machine before attempting to assemble
and operate.
Safety Alert Indicates a potential personal injury hazard.
Always wear safety goggles or safety glasses
Eye Protection
Read Operator’s
Manual
DANGER —
Keep Hands
Away from the
Impeller
with side shields and a full face shield when
operating this product.
To reduce the risk of injury, user must read
and understand operator’s manual before
using this product.
Do not use hands to unclog the chute.
Keep Feet Out of
Impeller
Recycle Symbols
IPX4
V Volt Voltage
A Amperes Current
Hz Hertz Frequency (cycles per second)
W Watt Power
56V LITHIUM-ION CORDLESS BRUSHLESS SNOW BLOWER — SNT2100 5
Ingress Protection
Degree
Keep feet away from rotating impeller
This product uses lithium-ion (Li-ion)
batteries. Local, state, or federal laws may
prohibit disposal of batteries in ordinary
trash. Consult your local waste authority for
information regarding available recycling and/
or disposal options.
Protection from splashing water
Page 6

min Minutes Time
Alternating
Current
Direct Current Type or a characteristic of current
n
0
... /min per Minute Revolutions per minute
No Load Speed Rotational speed, at no load
Type of current
WARNING:
qualied service technician.
To ensure safety and reliability, all repairs should be performed by a
SAFE OPERATION PRACTICES FOR WALK-BEHIND
SNOW BLOWER
DANGER:
throwing objects. Failure to observe the following safety instructions could result in
serious injury.
FOR ALL SNOW BLOWERS
Do not use on graveled surface.
Keep Children Away- All visitors should be kept a safe distance from work area.
Dress properly-Do not wear loose clothing or jewelry. They can be caught in
moving parts.
Wear rubber boots when operating the snow blower.
Keep hands away from moving parts.
Keep guards in place and in working order.
Don’t Force Snow blower-It will perform better and safer at the rate for
which it was designed.
Don’t Overreach-Keep proper footing and balance at all times.
This snow blower is capable of amputating hands and feet and
56V LITHIUM-ION CORDLESS BRUSHLESS SNOW BLOWER — SNT21006
Page 7

If the snow blower strikes a foreign object follow these steps:
1) Stop snow blower. Release the switch.
2) Remove the battery packs.
3) Inspect for damage.
4) Repair any damage before restarting and operating the snow blower.
Store Idle Snow Blowers Indoors-When not in use, snow blowers should
be stored indoors in dry, looked-up place – out of reach of children.
Maintain Snow Blowers with Care – Following instructions for lubricating and
changing accessories.
TRAINING
Read, understand and follow all instructions on the machine and in the
manual(s) before operating this unit. Be thoroughly familiar with the controls and
the proper use of the equipment. Know how to stop the unit and disengage the
controls quickly.
Never allow children to operate the equipment. Never allow adults to operate the
equipment without proper instruction.
Keep the area of operation clear of all persons, particularly small children.
Exercise caution to avoid slipping or falling, especially when operating the snow
blower in reverse.
PREPARATION
Thoroughly inspect the area where the equipment is to be used and remove all
doormats, sleds, boards, wires, and other foreign objects.
Do not operate the equipment without wearing adequate winter garments. Avoid
loose ttings, clothing that can get caught in moving parts. Wear footwear that
will improve footing on slippery surfaces.
Never attempt to make any adjustments while the motor is running (except when
specically recommended by manufacturer).
Always wear safety glasses or eye shields during operation or while performing
an adjustment or repair to protect eyes from foreign objects that may be thrown
from the machine.
56V LITHIUM-ION CORDLESS BRUSHLESS SNOW BLOWER — SNT2100 7
Page 8

OPERATION
Do not put hands or feet near or under rotating parts. Keep clear of the discharger
opening at all times.
Exercise extreme caution when operating on or crossing gravel drives, walks, or
roads. Stay alert for hidden hazards or trafc.
After striking a foreign object, stop the motor, remove the battery packs,
thoroughly inspect the snow blower for any damage, and repair the damage
before restarting and operating the snow blower.
If the unit should start to vibrate abnormally, stop the motor and check
immediately for the cause. Vibration is generally a warning of trouble.
Stop the motor whenever you leave the operating position, before unclogging
the auger assembly housing or discharge chute, and when making any repairs,
adjustments or inspections.
When clearing, repairing or inspecting the snow blower, stop the motor and make
certain the auger assembly and all moving parts have stopped. Disconnect the
battery packs to prevent someone from accidentally starting the motor.
Excise extreme caution when operating on slopes.
Never operate the snow blower without proper guards and other safety protective
devices in place and working.
Never direct the discharge toward people or areas where property damage can
occur. Keep children and others away.
Do not overload the machine capacity by attempting to clear snow at too fast a
rate.
Disengage power to the auger assembly when snow blower is transported or not
in use.
Use only attachments and accessories approved by the manufacturer of the snow
blower (such as rubber paddles, scraper bar and drive belt).
Never operate the snow blower without good visibility or light. Always be sure of
your footing, and keep a rm hold on the handles. Walk; never run.
56V LITHIUM-ION CORDLESS BRUSHLESS SNOW BLOWER — SNT21008
Page 9

Use only with the battery packs and chargers listed below:
BATTERY PACK CHARGER
BA1120, BA1400, BA2240
BA2800, BA4200
NOTICE: For best performance, recommend for use with 2pcs 4.0Ah or higher Ah batteries.
CH2100
CH5500
CLEARING A CLOGGING DISCHARGE CHUTE
Hand contact with the rotating auger assembly inside the discharge chute is the most
common cause of injury associated with snow blowers. Never use your hand to clean
out the discharge chute.
To clear the chute:
SHUT THE MOTOR OFF!
Wait 10 seconds to be sure the auger assembly blades have stopping rotating.
Always use a clean-out tool, not your hands.
MAINTENANCE AND STORAGE
Check all bolts or fasteners at frequent intervals for proper tightness to be sure
the equipment is in safe working condition.
Always refer to operator’s manual for important details if the snow blower is to be
stored for an extended period.
Maintain or replace safety and instruction labels, as necessary.
Run the machine a few minutes after blowing snow to prevent freeze-up of the
auger assembly.
SAVE THESE INSTRUCTIONS. Refer to them frequently and use them to instruct others
who may use this tool. If you lend this tool to someone else, also lend these instructions
to them to prevent misuse of the product and possibly injury.
56V LITHIUM-ION CORDLESS BRUSHLESS SNOW BLOWER — SNT2100 9
Page 10

INTRODUCTION
Congratulations on your selection of a new generation of 56V Lithium-ion powered
snow blower. It has been designed, engineered and manufactured to give you the best
possible dependability and performance.
Should you experience any problem you cannot easily remedy, please contact EGO
customer service center 1-855-EGO-5656.
This manual contains important information on to the safe assembly, operation and
maintenance of your snow blower.
Read it carefully before using the tool. Keep this manual handy so you can refer to it at
any time.
SERIAL NUMBER _____________________ DATE OF PURCHASE _________________
THE MODEL AND SERIAL NUMBERS WILL BE FOUND ON A LABEL ATTACHED ON AUGER
ASSEMBLY HOUSING.
YOU SHOULD RECORD BOTH SERIAL NUMBER AND DATE OF PURCHASE AND KEEP IN A SAFE
PLACE FOR FUTURE REFERENCE. SAVE YOUR SALES RECEIPT.
SPECIFICATIONS
Voltage 56V DC
Clearing Width 21"
Intake Height 13"
Throwing Distance Up to 35 ft.
Wheel Size 7"
Snow Blower Weight (Without battery pack) TBD
56V LITHIUM-ION CORDLESS BRUSHLESS SNOW BLOWER — SNT210010
Page 11
ASSEMBLY
WARNING:
injury, always remove the battery packs from the tool when assembling parts.
WARNING:
until the parts are replaced. Use of this product with damaged or missing parts could
result in serious personal injury.
WARNING:
recommended for use with this product. Any such alteration or modication is misuse
and could result in a hazardous condition leading to serious injury.
To prevent accidental starting that could cause serious personal
If any parts are damaged or missing, do not operate this product
Do not attempt to modify this tool or create accessories not
UNPACKING
Grasp the rear handle and the front part of the product at the same time to
carefully lift the tool up and out of the carton. Remove any other accessories from
the carton. Make sure that all items listed in the packing list are included.
WARNING:
assembled to your product when you unpack it. Parts on this list are not assembled to
the product by the manufacturer and require customer installation. Use of a product
that may have been improperly assembled could result in serious personal injury.
Inspect the product carefully to make sure that no breakage or damage occurred
during shipping.
Do not discard the packing material until you have carefully inspected and
satisfactorily operated the tool.
If any parts are damaged or missing, please return the product to the place of
purchase.
Do not use this product if any parts on the packing list are already
LIST OF CONTENTS
PART NAME QUANTITY
Snow Blower 1
Discharge Chute 1
Operator’s Manual 1
Hex Wrench 1
56V LITHIUM-ION CORDLESS BRUSHLESS SNOW BLOWER — SNT2100 11
Page 12

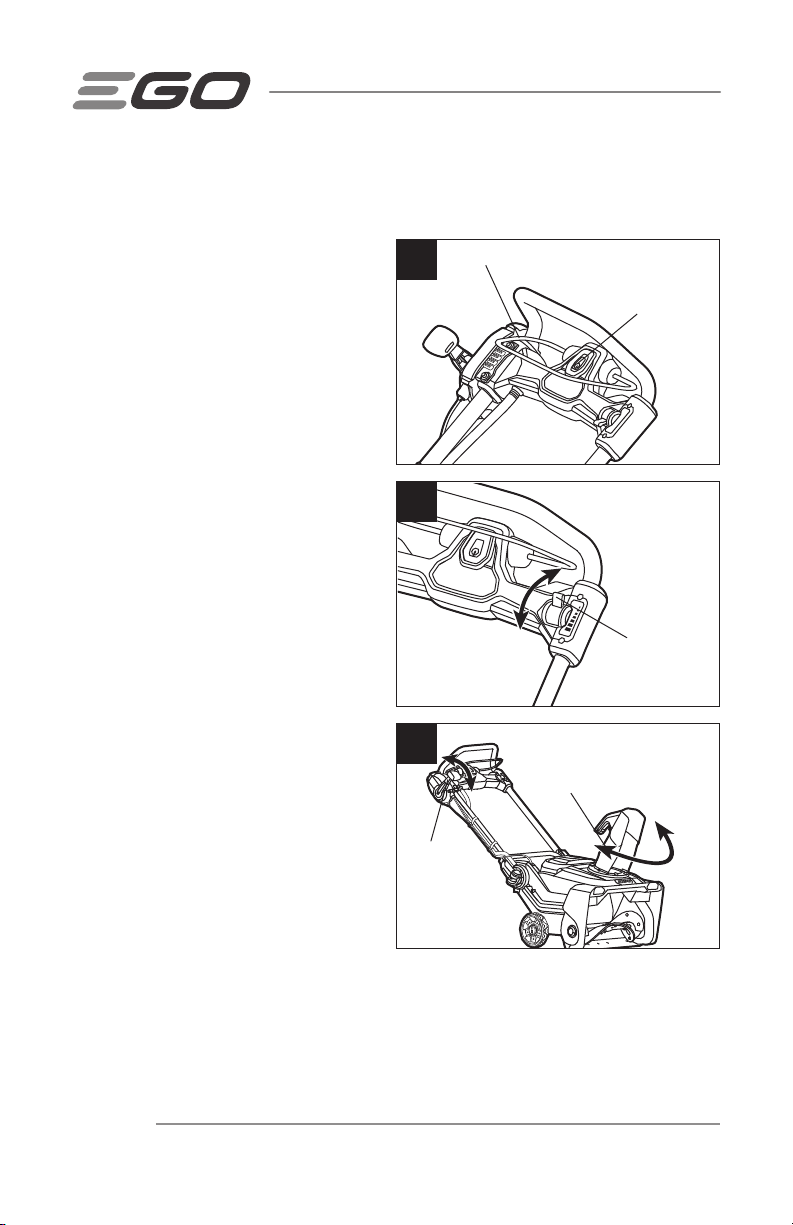
UNFOLDING/FOLDING THE
SIDE RAILS
1
WARNING:
the snow blower when the side rails are
folded down.
Do not attempt to start
To unfold the side rails
1. Your snow blower is shipped with
the side rails in the compact, locked
position (Fig. 1).
2. Open the quick release levers on
both sides and gently pivot the side
rails upwards until they come to a
stop (Fig. 2 & 3).
3. Close the quick release levers and
then tighten the knobs to secure the
side rails in place (Fig. 4).
2
3
4
1
56V LITHIUM-ION CORDLESS BRUSHLESS SNOW BLOWER — SNT210012
2
Page 13

To fold the side rails
1. Push the chute-rotation handle
forward to the farthest so that the
chute is towards left discharging
direction and tilt down the chute
deector maximumly by squeezing
the trigger in the chute deector
handle (Fig. 5).
5
2
1
2. Open the quick release levers on
both sides to fold the side rails into
the storage position (Fig. 6).
2
6
1
56V LITHIUM-ION CORDLESS BRUSHLESS SNOW BLOWER — SNT2100 13
Page 14

INSTALLING THE CHUTE
1. Loosen the two bolts in the chute
housing with the supplied hex
wrench and remove them from the
chute housing (Fig. 7).
2. Align the grooves of the chute with
the slot on the chute housing and then
push the chute into place (Fig. 8).
7
Chute
Housing
3. Use the hex wrench to lock the chute
in place with the two bolts (Fig. 9).
WARNING:
rotation handle located at the operator’s
position, make sure that the chute rotates
properly with the discharge opening never
crossing operator controls.
WARNING:
blower without having full discharge
chute in place.
Using the chute-
Never operate snow
Groove of the Chute
8
Slot on
the Chute
Housing
9
56V LITHIUM-ION CORDLESS BRUSHLESS SNOW BLOWER — SNT210014
Page 15
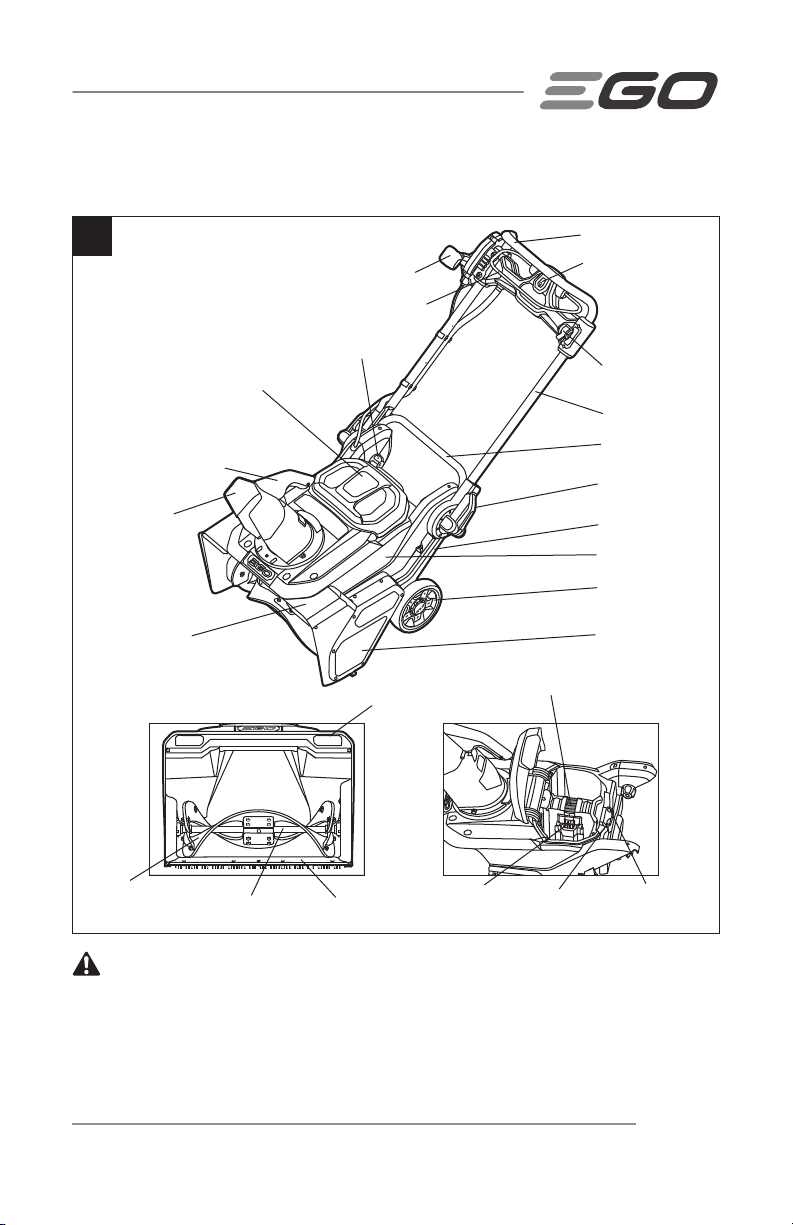
DESCRIPTION
10
Chute-Deector Handle
Chute Deector
Front Metal Deck
Chute-Rotation Handle
Bail Switch (Switch Lever)
Battery Cover
Knobs
LED Headlights
Handle
Safety Button
Variable Auger
Speed Adjustment
Side Rail
Rear Handle
Quick Release
Lever
Back Housing
Main Housing
Wheels
Drive-Belt Cover
Battery-Release Button
Rubber Paddle
WARNING:
Steel Auger Shaft
Scraper Bar
Electric
Contact
Power
Indicator
The safe use of this product requires an understanding of the
Switch Button for
LED Headlights
information on the tool and in this operator’s manual, as well as knowledge of the project
you are attempting. Before use of this product, familiarize yourself with all operating
features and safety rules.
56V LITHIUM-ION CORDLESS BRUSHLESS SNOW BLOWER — SNT2100 15
Page 16

Safety Button
The safety button must be pressed down before the motor can be started.
Bail Switch
The bail switch is located on the upper handle of the snow blower. The switch
engages and disengages the motor and auger.
WARNING:
attempt to bypass their operations.
The bail switch and the safety button are safety devices. Never
Electric Brake
Quickly stops auger rotation when the bail switch is released.
Quick Release Lever
Locks/unlocks the side rails for working or storage positions.
Variable Auger Speed Adjustment
Variable adjusts the auger speed to control the throwing distance as you want.
Chute-rotation Handle
Rotates the chute so that the user may direct the discharged snow as desired. The
handle allows the chute to rotate toward 90° (left) to 90° (right).
Chute-deector Handle
Changes the distance that snow will discharge from the chute.
Led Headlights
The LED headlights are located on the front of the unit. This feature provides extra light
for increased visibility.
56V LITHIUM-ION CORDLESS BRUSHLESS SNOW BLOWER — SNT210016
Page 17

OPERATION
WARNING:
Remember that a careless fraction of a second is sufcient to inict serious injury.
WARNING:
ANSI Z87.1. Failure to do so could result in objects being thrown into your eyes and
other possible serious injuries.
WARNING:
manufacturer of this product. The use of attachments or accessories not recommended
can result in serious personal injury.
Do not allow familiarity with this product to make you careless.
Always wear eye protection with side shields marked to comply with
Do not use any attachments or accessories not recommended by the
APPLICATION
You may use this product for purpose listed below:
Removing snow from areas such as driveways and sideways.
56V LITHIUM-ION CORDLESS BRUSHLESS SNOW BLOWER — SNT2100 17
Page 18
TO ATTACH/DETACH THE BATTERY PACK
CHARGE BEFORE FIRST USE.
NOTE: For best performance, we recommend for use with 2 x 4.0Ah batteries and
higher Ah arc lithium 56V batteries.
WARNING:
If any parts are broken or missing, do not attempt to attach the
battery packs to the snow blower or operate the snow blower until the broken or
missing parts are replaced. Failure to do so could result in serious injury.
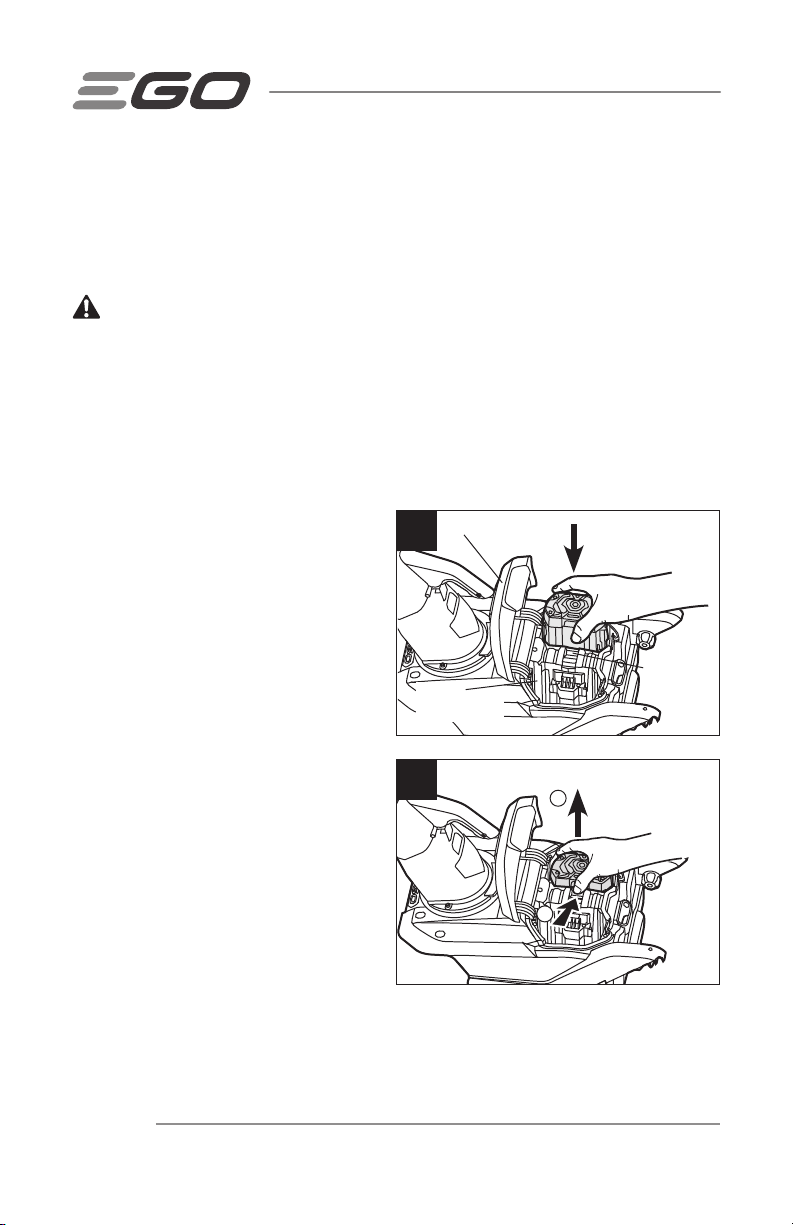
1. The battery cover is hinged. Raise the battery cover by lifting the front of the
cover.
2. The snow blower is equipped with two battery compartments, which can contain
two battery packs at the same time.
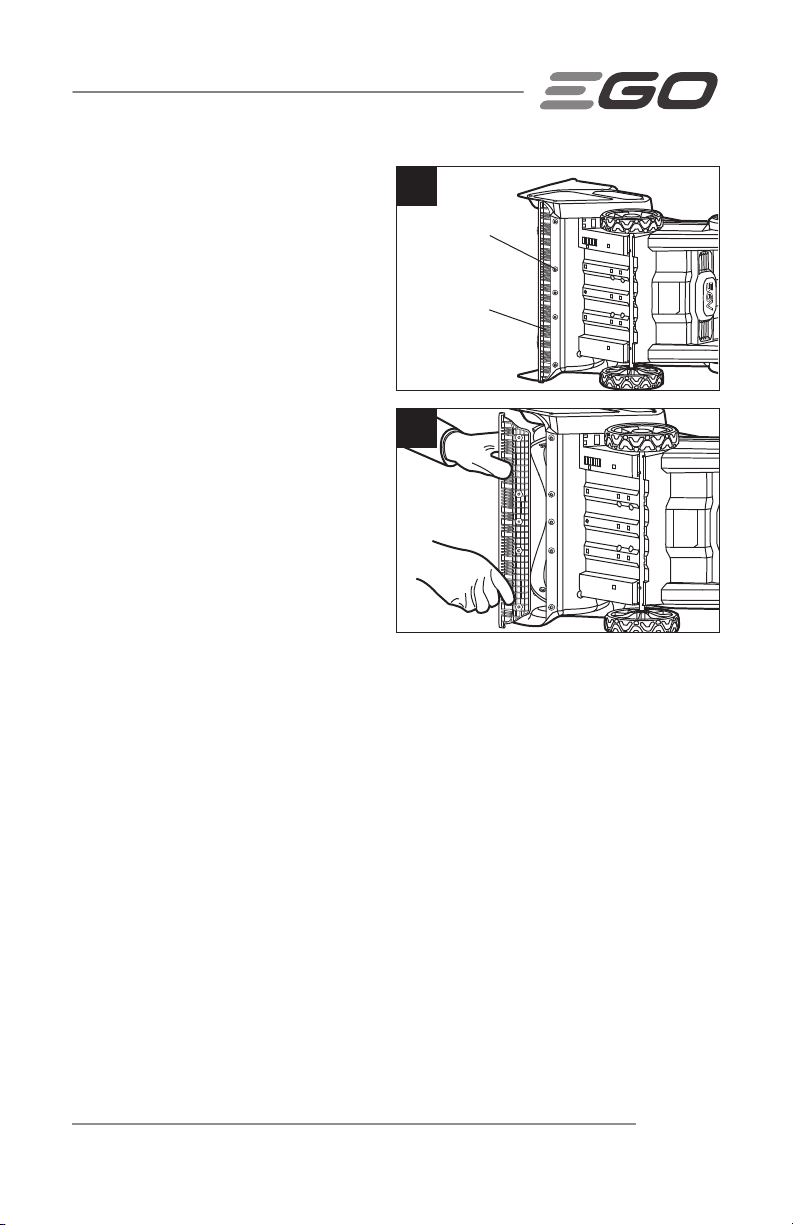
3. Align the grooves in the battery pack
with the raised ribs in either battery
11
Battery Cover
Battery Install
compartment, and then insert the
battery pack into the compartment
(Fig. 11).
4. Push the battery pack until you hear
a “click”. The battery-release button
will spring up when the battery pack
is securely attached.
Battery
Compartment
BatteryRelease
Button
5. Go on inserting the other battery
pack into the spare battery
compartment in the same way.
12
Battery Removal
2
6. To detach the battery pack, depress
the battery-release button to release
the battery pack, and then lift it out
of the compartment (Fig. 12).
1
7. Close the battery cover.
NOTICE: Make sure that the latch on the
snow blower snaps into place and that the battery packs are secured to the unit before
starting operation.
56V LITHIUM-ION CORDLESS BRUSHLESS SNOW BLOWER — SNT210018
Page 19

STARTING/STOPPING THE SNOW
BLOWER
13
CAUTION:
override the operation of the safety button
and bail switch.
WARNING:
blower can result in foreign objects being
thrown into your or others’ eyes, which can
damage eyes severely. Always wear safety
glasses while operating the snow blower
or while performing any adjustments or
repairs on the snow blower.
WARNING:
and pets remain at least 100’ (30m) away
from the snow blower when it is in use.
WARNING:
to rotate for a few seconds after the snow
blower is turned off. Allow the auger to
stop rotating before starting it again. Do not
rapidly turn the snow blower off and on.
Do not attempt to
The operation of a snow
Ensure that other people
The auger will continue
To Start the Snow Blower
1. Ensure that the side rails are
securely locked in the unfolded
position.
21
14
2
1
15
2. Attach the battery packs to the
snow blower and close the battery cover.
NOTICE: Make sure that the latch on the snow blower snaps into place and that the
battery packs are secured to the snow blower before operation.
3. Depress the safety button and, with the button depressed, pull the bail switch
upward to meet the handle (Fig. 13 &14).
4. Once the tool powers on, release the safety button and begin operation (Fig. 15).
56V LITHIUM-ION CORDLESS BRUSHLESS SNOW BLOWER — SNT2100 19
Page 20
NOTICE: The tool can only be started by depressing the safety button rst, followed
by squeezing the bail switch; the reverse operation will not start the tool.
To Stop the Snow Blower
1. Fully release the bail switch (Fig. 16).
2. The electric brake in the Automatic
Braking Mechanism will stop the
auger rotation within 3 seconds of
the bail-switch release.
Variable Auger Speed System
(Fig. 17)
The speed of the auger can be adjusted to
control the throwing distance as you want.
1. To increase the speed, move the
speed-adjustment lever forwards.
2. To decrease the speed, move the
speed-adjustment lever backwards.
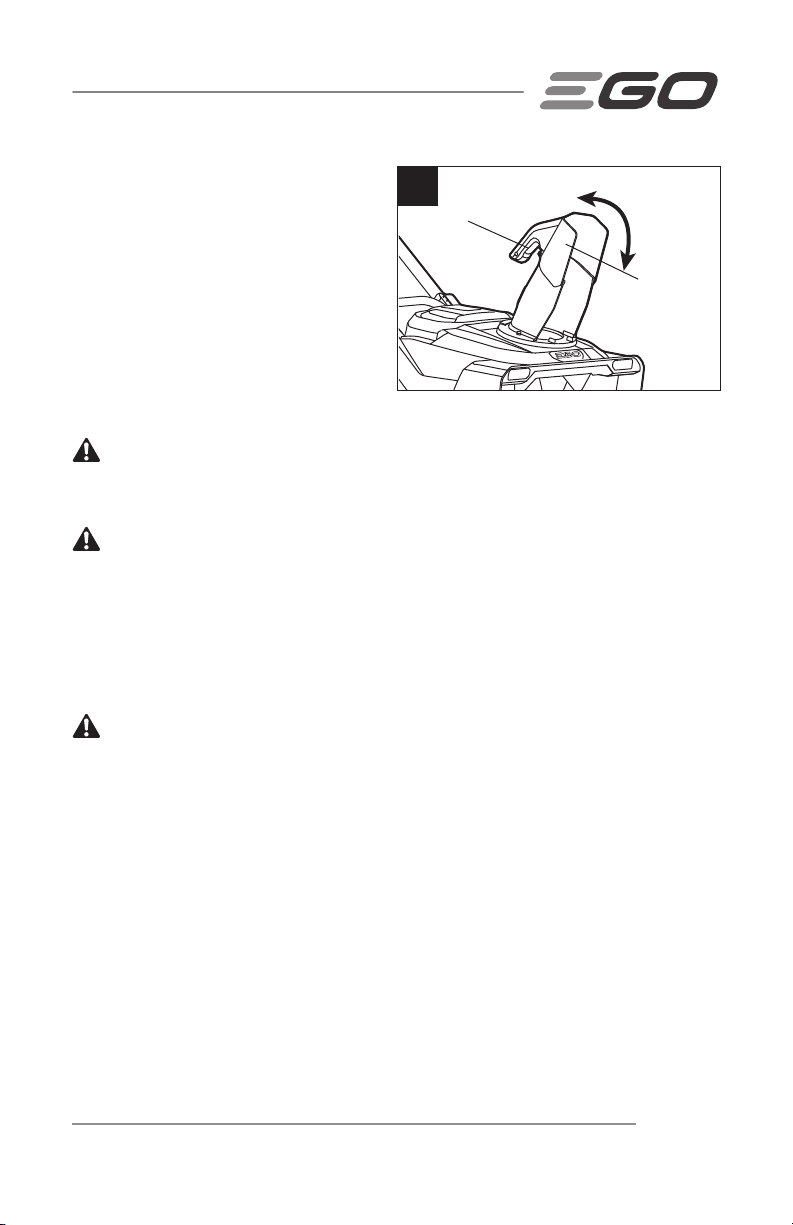
ADJUSTING THE CHUTE
The chute can be adjusted to change
both the direction and the distance of the
discharged snow to assist you in moving
snow away from one area and placing it
in another.
The direction of snow removal can be
adjusted up to 180° (Fig. 18).
Bail Switch (Fully released)
16
17
18
Chute
Rotation
Handle
Safety Button
(Fully released)
Variable Auger
Speed Adjustment
Chute
1. Push the chute rotation handle
forward to rotate the chute to the
left.
2. Pull the chute rotation handle backward to rotate the chute to the right.
56V LITHIUM-ION CORDLESS BRUSHLESS SNOW BLOWER — SNT210020
Page 21
The throwing distance of the snow
blower is adjusted by moving the chute
deector up or down (Fig. 19). Release
the bail switch before adjusting the chute
deector.
1. Squeeze the trigger on the chute
deector handle and move the chute
deector up or down (Fig. 19).
2. Move the chute deector up to
increase the distance the snow will be thrown.
19
Triggle
Chute
Deector
WARNING:
the deector and the chute itself. Snow or other debris could be thrown through the
gap back at the operator, resulting in serious personal injury.
WARNING:
Release the bail switch before adjusting the chute deector.
3. Move the chute deector down to decrease the distance the snow will be thrown.
4. Release the trigger to lock the chute deector in place.
Do not force the chute so far forward that a gap appears between
Do not adjust the chute deector with the bail switch engaged.
CLEARING A CLOGGING CHUTE
WARNING:
the most common cause of injury associated with snow blowers. Never use your hand
to clean out the chute.
Hands coming in contact with the rotating auger inside the chute is
To Clear the Chute:
1. Shut the motor and auger off!
2. Remove the battery packs from the snow blower.
3. Wait 10 seconds to be sure the auger has stopped rotating.
4. Always use a cleanout tool, such as a wood rod or other clearing tools which are
available in supermarket, not your hand.
56V LITHIUM-ION CORDLESS BRUSHLESS SNOW BLOWER — SNT2100 21
Page 22

LED HEADLIGHTS (Fig. 20)
The LED headlights are located on the
front of the snow blower.
1. To turn on the lights, press the
LED button (Fig. 21 & 22). The
headlights provide bright light in
front of the snow blower.
2. To turn off the headlights, press the
LED button again.
POWER INDICATOR ON THE
SNOW BLOWER (Fig. 21 & 22)
The snow blower is equipped with a
power indicator to indicate the charge
level of the battery pack of higher charge
and the working status of the snow
blower. The power indicator will illuminate
when the auger is rotating or when the
LED headlights are turned on.
The green light indicates that the
battery pack of higher charge is
over 15% of its charge capacity.
The red light indicates the two
battery packs' charge are low.
The blinking red light indicates
that the battery packs are nearly
depleted and need to be charged
immediately.
20
LED
Headlights
21
22
Power Indicator
Button for LED
Headlights
56V LITHIUM-ION CORDLESS BRUSHLESS SNOW BLOWER — SNT210022
Page 23

POWER INDICATOR MEANING ACTION
Snow blower is working
Shining green
Shining red
Flashing red
Shining orange
Flashing orange
properly; each battery has
at least 15% of its charge.
Both of batteries are low
charge.
Both of batteries are
nearly depleted.
The snow blower or
the battery pack is
overheated.
The snow blower is
overloaded.
n/a
Stop the snow blower and
charge the battery packs.
Stop the snow blower and
charge the battery packs.
Stop the snow blower and
wait for some time to cool the
machine or the battery packs.
Remove the battery packs, check
and clean if snow has collected
beneath the deck or been stuck
into the auger. Slow down your
pace or decrease the snow
clearing cut width when working.
SNOW BLOWER OVERLOAD PROTECTION
To prevent overload conditions, do not try to remove too much snow at one time. Slow
down your pace or decrease the snow clearing cut width.
Your snow blower has built-in overload sensing elements. When the snow blower
is overloaded, the motor will decrease the speed automatically, you will hear the
motor sound volume is down a bit. Please slow down your walk pace or narrow the
clearing cutting width in this case. And then the motor speed will rise to normal setting
automatically. If you don’t do as above suggestion, the motor speed is decreased,
you still keep pushing forward as quick as possible, the sensing element will shut
off the motor automatically, and the power indicator on the snow blower is blinking
orange color. Remove the battery packs from the snow blower. Check to see if there is
snowfall stuck into the auger and deck, and then use clean-out tool to clear them out if
necessary, then reinstall the batteries and restart the snow blower.
56V LITHIUM-ION CORDLESS BRUSHLESS SNOW BLOWER — SNT2100 23
Page 24

BATTERY HIGH-TEMPERATURE PROTECTION
To prevent battery high temperature protection, don’t try to use only one battery to
power the snow blower when the snowfall is over 3 inch depth or snowfall in very wet/
icy condition.
Always keep two batteries working simultaneously. This is helpful to release out the peak
power of the snow blower. If somehow the battery temperature exceeds 158°F (70°C)
during operation, the temperature protection circuit will immediately shut off the snow
blower to protect the battery packs from overheating damage. The power indicator on the
snow blower will shine orange color and LED light on the batteries will ash orange color
too. Please release the bail switch, and wait until the overheat batteries cools down to
safe temperature (until the ashed orange light of the battery LED turns into green light),
then restart the snow blower. Once over temperature protection happened, please slow
down your walk pace and narrow the clearing cutting width to reduce the load current of
the battery. This is helpful to prolong battery cycle life.
OPERATING TIPS
:
DANGER
Death or serious injury could occur if the ice breaks.
DANGER
which can result in death or serious personal injury.
Never use a snow blower on frozen lakes, rivers, or similar surfaces.
:
Never use the snow blower on a rooftop or other unstable surface,
WARNING:
and fall, resulting in possible serious personal injury.
WARNING:
in moving parts and cause death or serious personal injury.
WARNING:
reduce the risk of electrocution or electric shock.
WARNING:
people or pets. Thrown snow or other objects can cause serious personal injuries.
WARNING:
gravel, and other objects that could be accidentally thrown by the snow blower in any
direction and cause serious personal injury to the operator and others.
Do not use snow blower on ice, which can cause the operator to slip
Do not wear loose clothing, scarves, or jewelry. They can be caught
Keep all snow discharge pointed away from all electrical devices to
Never point the snow blower or discharge chute in the direction of
Make sure that the area to be cleared is free of stones, sticks, wires,
56V LITHIUM-ION CORDLESS BRUSHLESS SNOW BLOWER — SNT210024
Page 25

If the unit comes in contact with any type of obstruction or debris during use, stop
the snow blower, remove the battery packs, remove the obstruction, and inspect
the unit carefully for damage before proceeding.
WARNING:
snow blower when the unit is operating or when the battery packs are installed. Always ensure
all moving parts have stopped and the battery packs have been removed before clearing any
obstructions. Failure to follow these instructions can result in serious personal injury.
Take notice of the direction of the wind before beginning. When possible,
discharge snow in the same direction as the wind to prevent snow from being
thrown back into your face.
Some parts of the snow blower can freeze under extreme weather conditions.
Do not attempt to operate the unit with frozen parts.
When nished, allow the motor to run for an additional few minutes to prevent
moving parts from freezing, then turn the chute rotation handle back and forth
several times to free it from any ice buildup. Make sure that clean off any snow
and ice from the base of the chute.
In snowy and cold conditions, some controls and moving parts may freeze. Do not
use excessive force when trying to operate frozen controls. If you have difculty
operating any control or part, start the machine as “STARTING/STOPING THE
SNOW BLOWER” section shown and let it run for a few minutes.
Never reach into the discharge chute or place any body part in front of the
56V LITHIUM-ION CORDLESS BRUSHLESS SNOW BLOWER — SNT2100 25
Page 26
MAINTENANCE
WARNING:
snow blower before cleaning or performing any maintenance.
WARNING:
parts may create a hazard or cause product damage. To ensure safety and reliability, all repairs
should be performed by a qualied service technician.
To avoid serious personal injury, always remove the battery packs from the
When servicing, use only identical replacement parts. Use of any other
NOTICE: Periodically inspect the entire product for damaged, missing, or loose parts such as
screws, nuts, bolts, caps, etc. Tighten securely all fasteners and caps and do not operate this
product until all missing or damaged parts are replaced.
GENERAL MAINTENANCE
Avoid using solvents when cleaning plastic parts. Most plastics are susceptible to
damage from various types of commercial solvents and may be damaged by their use.
Use clean clothes to remove dirt, dust, oil, grease, etc.
WARNING:
penetrating oils, etc., come in contact with plastic parts. Chemicals can damage, weaken, or
destroy plastic which can result in serious personal injury.
Do not at any time let brake uids, gasoline, petroleum-based products,
LUBRICATING THE MACHINE
All of the bearings in this product are lubricated with a sufcient amount of high grade
lubricant for the life of the unit under normal operating conditions. Therefore, no further
bearing lubrication is required.
REPLACING THE SCRAPER BAR
WARNING:
the bail switch, remove the battery packs
before performing any maintenance task
on your snow blower.
1. The scraper bar is located at the
bottom of the snow blower beneath
the auger (Fig. 23).
Make sure to turn off
56V LITHIUM-ION CORDLESS BRUSHLESS SNOW BLOWER — SNT210026
23
Scraper Bar
Page 27
2. Turn the snow blower on its side
(Fig. 24).
24
3. To reduce the risk of injury, please
wear gloves rst and then use a
4mm hex wrench to remove the
5 bolts (Fig. 24). Detach the worn
scraper bar from the snow blower
(Fig. 25).
4. Install the new scraper bar and
fasten it securely to the snow
blower with the 5 bolts (Fig. 24).
Bolt
Scraper Bar
25
56V LITHIUM-ION CORDLESS BRUSHLESS SNOW BLOWER — SNT2100 27
Page 28

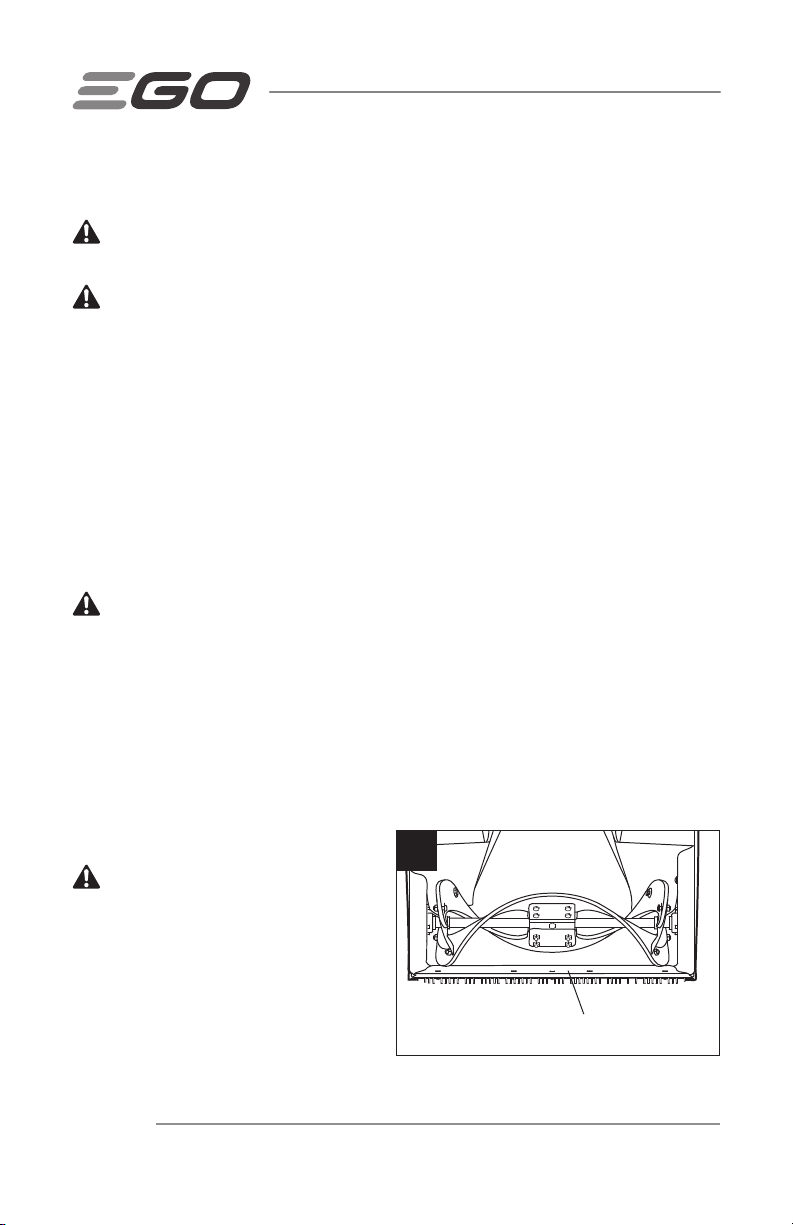
REPLACING THE RUBBER
PADDLE
26
8 sets of bolts
and nuts
WARNING:
Make sure to turn off
the bail switch, remove the battery packs
before performing any maintenance task
on your snow blower.
NOTICE: When replacing the worn
rubber paddles, pay close attention to
the order in which you remove them.
Assemble the new rubber paddles in the
reverse order of the disassembly.
1. By using two 10mm wrenches(not
included), remove the 8 sets of nuts
and bolts xed on the middle steel
plates and 8 sets of nuts, washers
and bolts on both sides, that are
used to secure the rubber paddles
(Fig. 26 & 27).
2. Install the new rubber paddles in the
reverse order of the disassembly.
Secure them by tightening the 8
sets of nuts, washers and bolts on
both sides and the 8 sets of nuts
and bolts in the middle.
4 sets of bolts, washers and
nuts separately on both sides
27
Steel Plates
28
Screw
Drive Belt
Cover
REPLACING THE DRIVE BELT
29
Spring
Hook
If the drive belt becomes worn,
oil-soaked, excessively cracked, frayed,
Drive Belt
or otherwise damaged, replace the belt.
WARNING:
Make sure to turn off
the bail switch, remove the battery packs
before performing any maintenance task
Auger Pulley
on your snow blower.
1. Remove the drive belt cover by removing the 8 screws as shown in Fig. 28.
56V LITHIUM-ION CORDLESS BRUSHLESS SNOW BLOWER — SNT210028
Engine
Pulley
Idler Pulley
Page 29
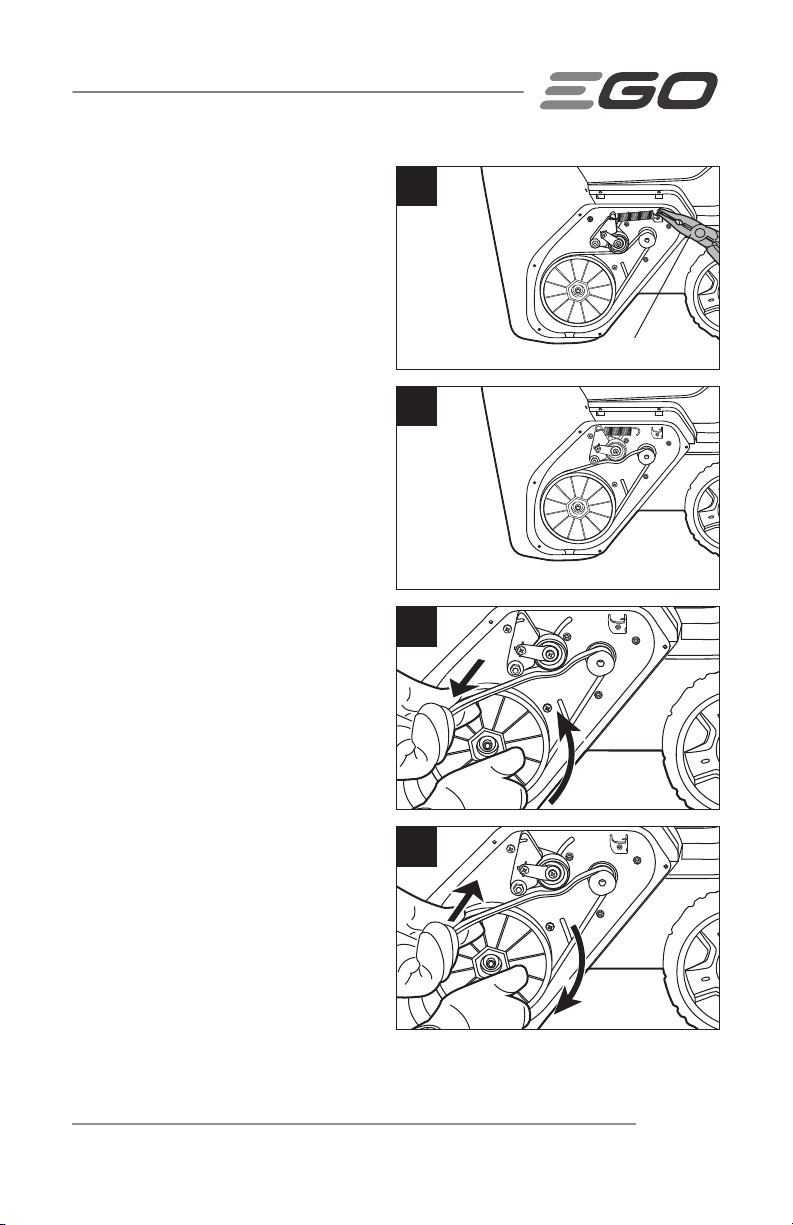
2. Remove the spring from the hook by
needle nose pliers (not included) to
release the belt tension (Fig. 30 & 31).
3. Remove the drive belt by
slowly turning the auger pulley
counterclockwise while pulling the
belt outwards (Fig. 32).
4. Install the new drive belt, rotating it
onto the pulleys (Fig. 33).
Tips: Rotate the new drive belt rst
around the engine pulley, then the idle
pulley, and nally around the auger pulley.
Slowly turn the auger pulley clockwise to
drive the belt inwards.
5. Install the spring onto the hook to
tension the drive belt (Fig. 30).
30
Needle nose pliers
31
6. Install the drive belt cover with the
screws (Fig. 28).
32
NOTICE: Ensure that the drive belt is
properly adjusted and rotating without
incline.
33
56V LITHIUM-ION CORDLESS BRUSHLESS SNOW BLOWER — SNT2100 29
Page 30

STORING THE SNOW BLOWER
CAUTION:
properly wiped up to prevent a slip and fall hazard.
Remove the battery packs and store in a secure location out of the reach of
children.
Ensure all melted snow that may drip from the snow blower is
NOTE: Do not store or charge battery outside. Battery must be charged and
stored indoors prior to use of the snow blower. Battery may not properly start if its
temperature is 12°F( -20°C) or lower. If unit doesn’t start, remove battery from the
snow blower and warm it indoors for 10 minutes or longer. Reinstall the battery and try
again.
Before storage, wipe any moisture, dirt, or debris from the battery area.
Wipe the snow blower with a clean dry cloth.
Check all nuts, bolts, knobs, screws, etc., for tightness.
Inspect moving parts for damage, breakage, and wear. Have repairs made on any
damaged or missing parts.
Fold the side rails to the storage position.
Store the snow blower indoors in a clean, dry place out of the reach of children.
Do not store near corrosive materials such as fertilizer or rock salt.
56V LITHIUM-ION CORDLESS BRUSHLESS SNOW BLOWER — SNT210030
Page 31

TROUBLESHOOTING
WARNING:
the snow blower. Always protect your hands by wearing gloves when performing any
maintenance on the snow blower auger or scraper.
PROBLEM CAUSE SOLUTION
Side rails not in position
Snow blower not starting
The motor is on but the
auger does not turn.
After passing, the snow
blower leaves a layer of
snow on the ground.
Always remove the battery packs when servicing or transporting
Knobs on the side rails
and/or handle-clamp
lever are not secured.
Battery charge is low.
Safety Button is not
depressed.
The drive belt is worn
or broken.
The scraper bar is
worn.
Make sure that knobs on the
side rails are fully tightened and
handle-clamp levers are fully
closed.
Charge the battery.
Press the safety button and then
squeeze the bail switch.
Have the drive belt replaced
following the section
“REPLACING THE DRIVE BELT”
in this manual.
Have the scraper replaced
following the section
“REPLACING THE SCRAPER
BAR” in this manual.
ACCESSORIES
WARNING:
Use only identical replacement parts listed below. Use of parts that do not meet the
original equipment specications may lead to improper performance and compromised
safety.
The following parts are subjected to be worn out from normal use.
PART NAME MODEL NUMBER
Scraper Bar ASS2100
Rubber Paddle ARP2100
Drive Belt AVB2306
56V LITHIUM-ION CORDLESS BRUSHLESS SNOW BLOWER — SNT2100 31
Page 32

WARRANTY
EGO WARRANTY POLICY
5 year limited warranty on EGO outdoor power equipment and 3 year limited warranty
on EGO Power+ System battery packs and chargers.
Please contact EGO Customer Service Toll-Free at 1-855-EGO-5656 any time you have
questions or warranty claims.
LIMITED SERVICE WARRANTY
FOR FIVE YEARS from the date of original retail purchase, this EGO product is warranted
against defects in material or workmanship. Defective product will receive free repair.
FOR THREE YEARS from the date of original retail purchase, the EGO Power+ System
battery pack and charger are warranted against defects in material or workmanship.
Defective product will receive free repair.
This warranty does not cover routine maintenance parts and consumables, such as the
scraper bar that can wear out from normal use within the warranty period.
a) This warranty applies only to the original purchaser from an authorized EGO
retailer and may not be transferred. Authorized EGO retailers are identied online
at http://egopowerplus.com/pages/warranty-policy.
b) The warranty period for any EGO product or part used for industrial, professional
or commercial purpose is one year.
c) This warranty is void if the product has been used for rental purpose.
d) This warranty does not cover the damage resulting from modication, alteration
or unauthorized repair.
e) This warranty only covers defects arising under normal usage and does not cover any
malfunction, failure or defect resulting from misuse, abuse (including overloading of
the product beyond capacity and exposure to water or rain), accidents, neglect or lack
of proper installation, and improper maintenance or storage.
f) This warranty does not cover normal deterioration of the exterior nish, including
but not limited to scratches, dents, paint chips, or to any corrosion or discoloring
by heat, abrasive and chemical cleaners.
56V LITHIUM-ION CORDLESS BRUSHLESS SNOW BLOWER — SNT210032
Page 33

HOW TO OBTAIN SERVICE
For warranty service, please contact EGO customer service toll-free at 1-855-EGO-5656.
When requesting warranty service, you must present the original dated sales receipt. An
authorized service center will be selected to repair the product according to the stated
warranty terms.
ADDITIONAL LIMITATIONS
To the extent permitted by applicable law, all implied warranties, including warranties
of MERCHANTABILITY or FITNESS FOR A PARTICULAR PURPOSE, are disclaimed. Any
implied warranties, including warranties of merchantability or tness for a particular
purpose, that cannot be disclaimed under state law are limited to ve years from the
date of purchase for outdoor power equipment and three years from date of purchase
for battery pack and charger.
Chervon North America is not responsible for direct, indirect, incidental or consequential
damages.
Some states do not allow limitations on how long an implied warranty lasts and/or do
not allow the exclusion or limitation of incidental or consequential damages, so the
above limitations may not apply to you.
This warranty gives you specic legal rights, and you may also have other rights which
vary from state to state.
For customer service contact us toll-free at:1-855-EGO-5656 or EGOPOWERPLUS.COM
EGO Customer Service, 120 Ionia Street SW / Suite 102 Grand Rapids, MI 49503
56V LITHIUM-ION CORDLESS BRUSHLESS SNOW BLOWER — SNT2100 33
Page 34

 Loading...