

Page 1
RP105 / RP108B / RP108W Record Player
Ref. nr.: 102.100,102.101; 102.102
INSTRUCTION MANUAL
GEBRUIKSAANWIJZING
BEDIENUNGSANLEITUNG
MANUAL DE INSTRUCCIONES
MANUEL D'INSTR UCT IO NS
INSTRUKCJA OBSŁUGI
V1.1
Page 2

2
Page 3

ENGLISH
Do not attempt to make any repairs yourself. This would invalid your warranty. Do not make any changes to the unit. This would also invalid
and warnings. This is also applicable to all damages in whatever form.
Congratulations to the purchase of this Fenton product. Please read this manual thoroughly prior to using the unit in order to
benefit fully from all features.
Read the manual prior to using the unit. Follow the instructions in order not to invalidate the warranty. Take all precautions to
avoid fire and/or electrical shock. Repairs must only be carried out by a qualified technician in order to avoid electrical shock.
Keep the manual for future reference.
- Prior to using the unit, please ask advice from a
specialist. When the unit is switched on for the first time,
some smell may occur. This is normal and will disappear
after a while.
- The unit contains voltage carrying parts. Therefore do
NOT open the housing.
- Do not place metal objects or pour liquids into the unit
This may cause electrical shock and malfunction.
- Do not place the unit near heat sources such as
radiators, etc. Do not place the unit on a vibrating
surface. Do not cover the ventilation holes.
- The unit is not suitable for continuous use.
- Be careful with the mains lead and do not damage it. A
faulty or damaged mains lead can cause electrical sh oc k
and malfunction.
- When unplugging the unit from a mains outlet, always
pull the plug, never the lead.
- Do not plug or unplug the unit with wet hands.
- If the plug and/or the mains lead are damaged, they
need to be replaced by a qualified technician.
- If the unit is damaged to such an extent that internal
parts are visible, do NOT plug the unit into a mains outlet
and DO NOT switch the unit on. Contact your dealer. Do
NOT connect the unit to a rheostat or dimmer.
- To avoid fire and shock hazard, do not expose the unit to
rain and moisture.
- All repairs should be carried out by a qualified technician
only.
- Connect the unit to an earthed mains outlet (220240Vac/50Hz) protected by a 10-16A fuse.
- During a thunderstorm or if the unit will not be used for a
longer period of time, unplug it from the mains. The rule
is: Unplug it from the mains when not in use.
- If the unit has not been used for a longer period of time,
condensation may occur. Let the unit reach room
temperature before you switch it on. Never use the unit in
humid rooms or outdoors.
- To prevent accidents in companies, you must follow the
applicable guide lines and follow the instructions.
- Do not repeatedly switch the fixture on and off. This
shortens the life time.
- Keep the unit out of the reach of children. Do not leave
the unit unattended.
- Do not use cleaning sprays to clean switches. The
residues of these sprays cause deposits of dust and
grease. In case of malfunction, always seek advice from
a specialist.
- Do not force the controls.
- This unit is with speaker inside which can cause
magnetic field. Keep this unit at least 60cm away from
computer or TV.
- If this unit have a built-in lead-acid rechargeable battery.
Please recharge the battery every 3 months if you are
not going to use the unit for a long period of time. Or the
battery may be damaged.
- If the battery is damaged please replace with same
specifications battery. And dispose the damaged battery
environment friendly.
- If the unit has fallen, always have it checked by a
qualified technician before you switch the unit on again.
- Do not use chemicals to clean the unit. They damage the
varnish. Only clean the unit with a dry cloth.
- Keep away from electronic equipment that may cause
interference.
- Only use original spares for repairs, otherwise serious
damage and/or dangerous radiation may occur.
- Switch the unit off prior to unplugging it from the mains
and/or other equipment. Unplug all leads and cables
prior to moving the unit.
- Make sure that the mains lead cannot be damaged when
people walk on it. Check the mains lead before every use
for damages and faults!
- The mains voltage is 220-240Vac/50Hz. Check if power
outlet match. If you travel, make sure that the mains
voltage of the country is suitable for this unit.
- Keep the original packing material so that you can
transport the unit in safe conditions.
This mark attracts the attention of the user to high voltages that are present inside the housing and that are of sufficient
magnitude to cause a shock hazard.
This mark attracts the attention of the user to important instructions that are contained in the manual and that he should
read and adhere to.
The unit has been certified CE. It is prohibited to make any changes to the unit. They would invalidat e the CE cert ifi cate a nd
their guarantee!
NOTE: To make sure that the unit will function normally, it must be used in rooms with a temperature between 5°C/41°F and
35°C/95°F.
Electric products must not be put into household waste. Please bring them to a recycling centre. Ask your local authorities or your
dealer about the way to proceed. The specifications are typical. The actual values can slight ly change from one unit to the other.
Specifications can be changed without prior notice.
your warranty. The warranty is not applicable in case of accidents or damages caused by inappropriate use or disrespect of the warnings
contained in this manual. Fenton cannot be held responsible for personal injuries caused by a disrespect of the safety recommendations
3
Page 4
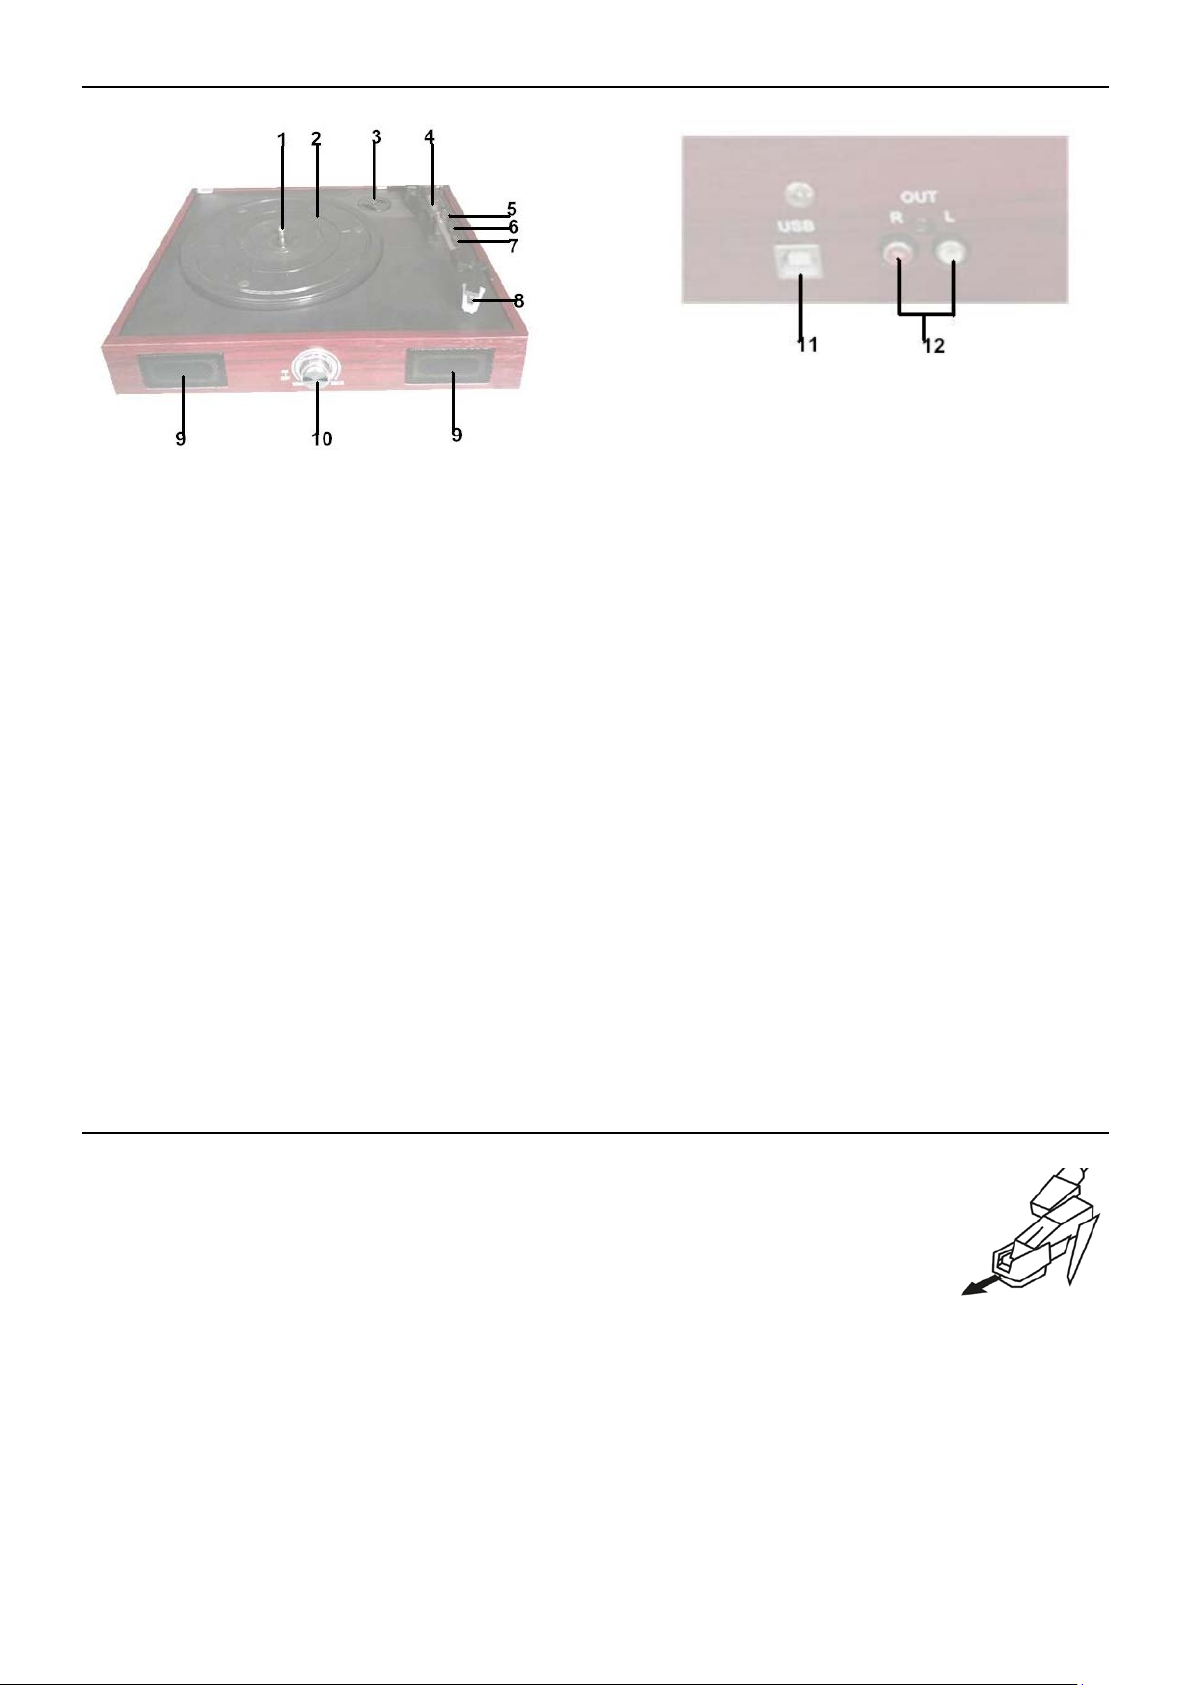
OVERVIEW
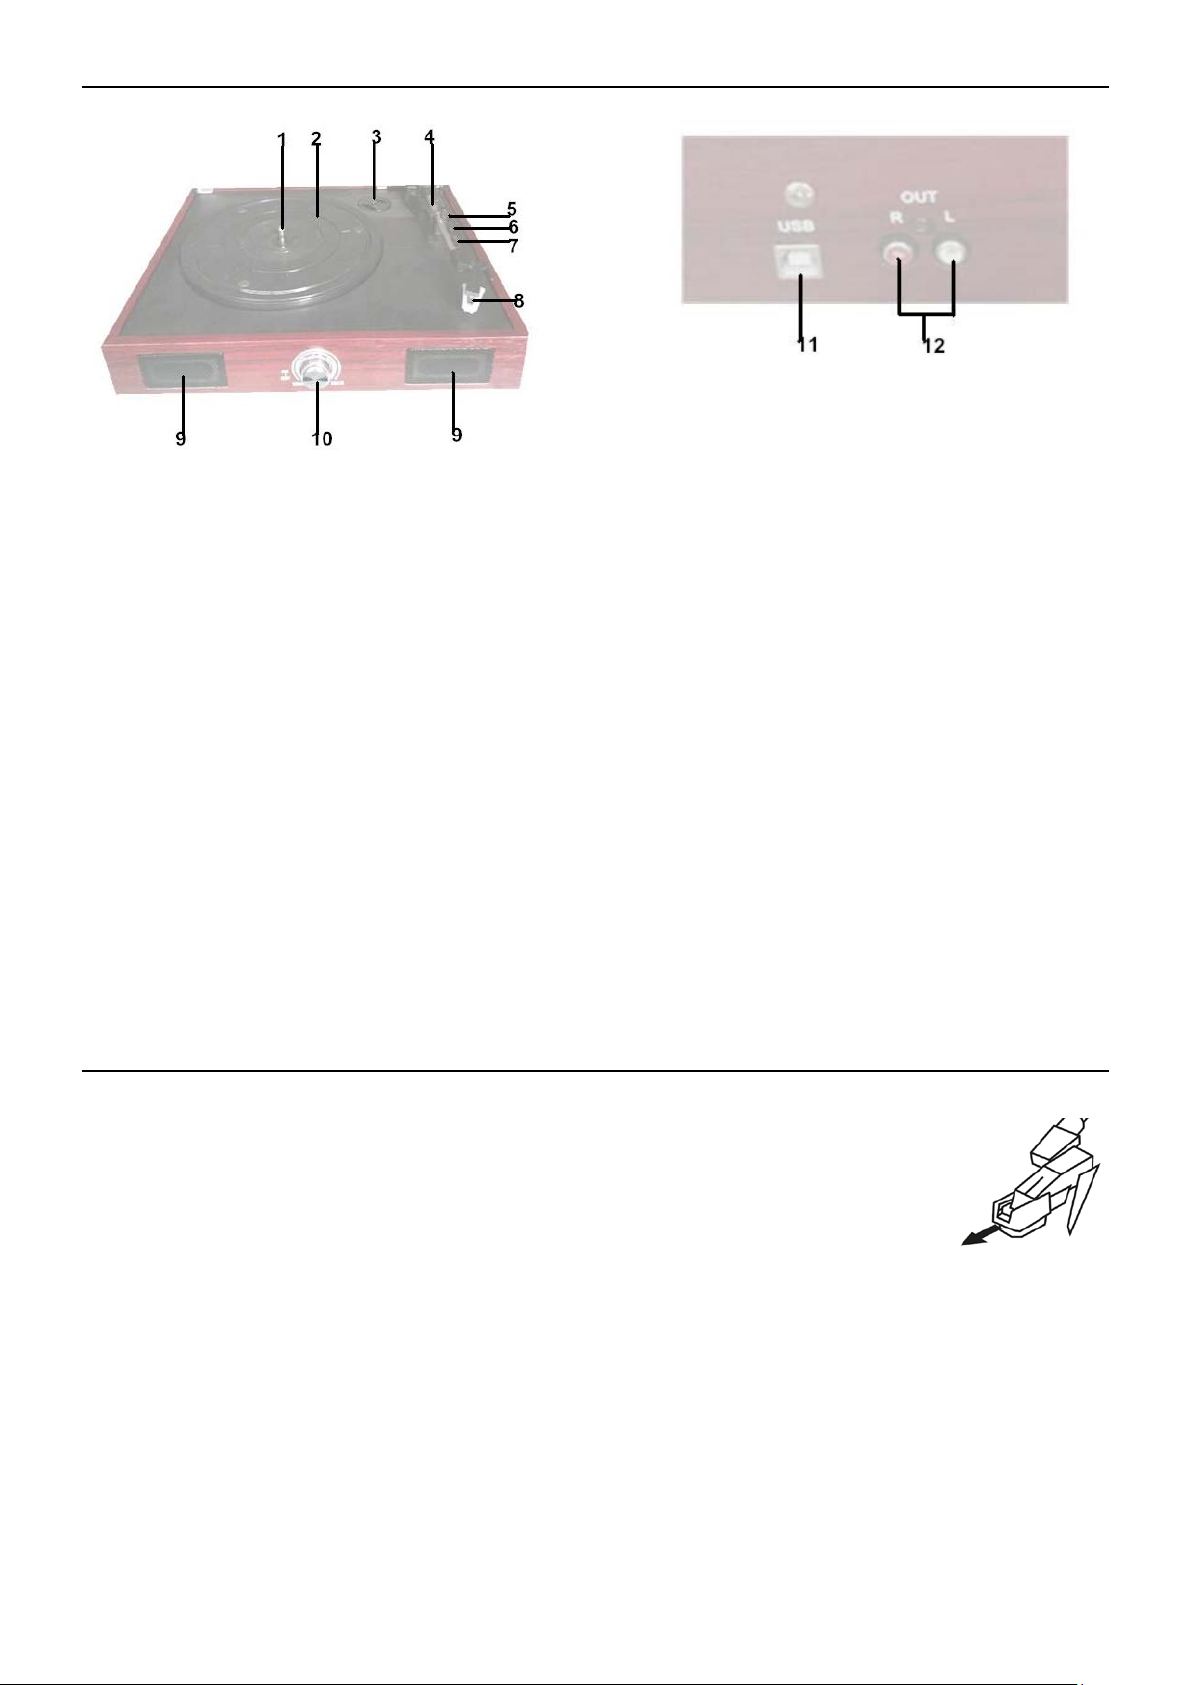
1. Spindle
2. Platter
Place your record here.
3. 45RPM Adaptor
This adaptor allows you to play 45RPM records.
4. Tone arm Lever
The fixed tonearm can be raised and lowered pressing the raise / lower lever.
5. Tone arm Clip
This specially designed arm clip secures the tonearm while at rest or when not in use.
6. Autostop Switch ON/OFF
This switch turns auto stop on or off. When auto stop is on, the platter will start spinning when the tonearm is placed
over the record and stop spinning when the record has reached the end.
7. 33 / 45 RPM Switch
This switch controls the RPM of the turntable platter.
8. Cartridge with needle
When the turntable is not in use, it is recommendable to place the removable protection cover on the stylus.
9. Speaker
Built in stereo speakers.
10. Volume control
Adjust the volume for the internal speakers and headphones.
11. USB port
Use the included USB cable to connect your turntable to your computer. The USB connection will send audio signal
from the turntable to your computer.
12. Line output
The audio from a playing vinyl record is sent to this line-level coaxial audio output. This must not be connected to
phono level devices.
OPERATION
1. Connect the record player with the power adapter and plug the other end into a wall power outlet.
2. Remove white protective needle cover by gently pulling towards the front of the unit.
3. Place a vinyl record on the turntable platter and select the desired speed (33/45RPM) according
to the record.
4. Open the tone arm clip to release the tone arm. Gently move the tone arm and put the car tridge
onto the desired position of the record and the turntable player starts to play.
5. Turn the volume control knob clo ckw ise to adjust the volume.
Noted: If the AUTO STOP ON/OFF Switch is turned ON, the record will stop automatically when finished. If Auto Stop Control is
turned OFF, record will NOT stop automatically when finished.
4
Page 5
CONNECTING WITH COMPUTER
Before you connect the turntable to a computer, unplug it from your mixer or Hi-Fi system.
The included software is a third party application and therefore Fenton does not handle any questions or problems regarding the
software.
1. Turn the computer on
2. If the computer is booted, connect the turntable. The computer will now install the drivers.
3. After the drivers are installed, you must now install the Audacity software.
Windows users: insert the CD or download the newest software via http://audacity.sourceforge.net
MAC users: download the newest software via http://audacity.sourceforge.net
To Install Software (PC)
1. Plug in your turntable to an power supply and connect the USB port on the Turntable to the USB port of your computer.
2. Turn on the power switch to your turntable.
3. The Windows system will detect a new device and indicate that it is available to use.
4. Insert the CD that came with your USB turntable.
5. Run the file to install the Audacity software. Once installed, run the Audacity program.
To Install Software (MAC)
1) Insert the included CD.
2) Open the CD icon on the desktop.
3) Drag the installation folder for audacity to your hard drive. We recommend that you move the folder to your “Applications”
folder.
4) A window will come up which shows the files copying.
5) EJECT the CD.
6) Open “Audacity” from where you moved it to on your hard drive.
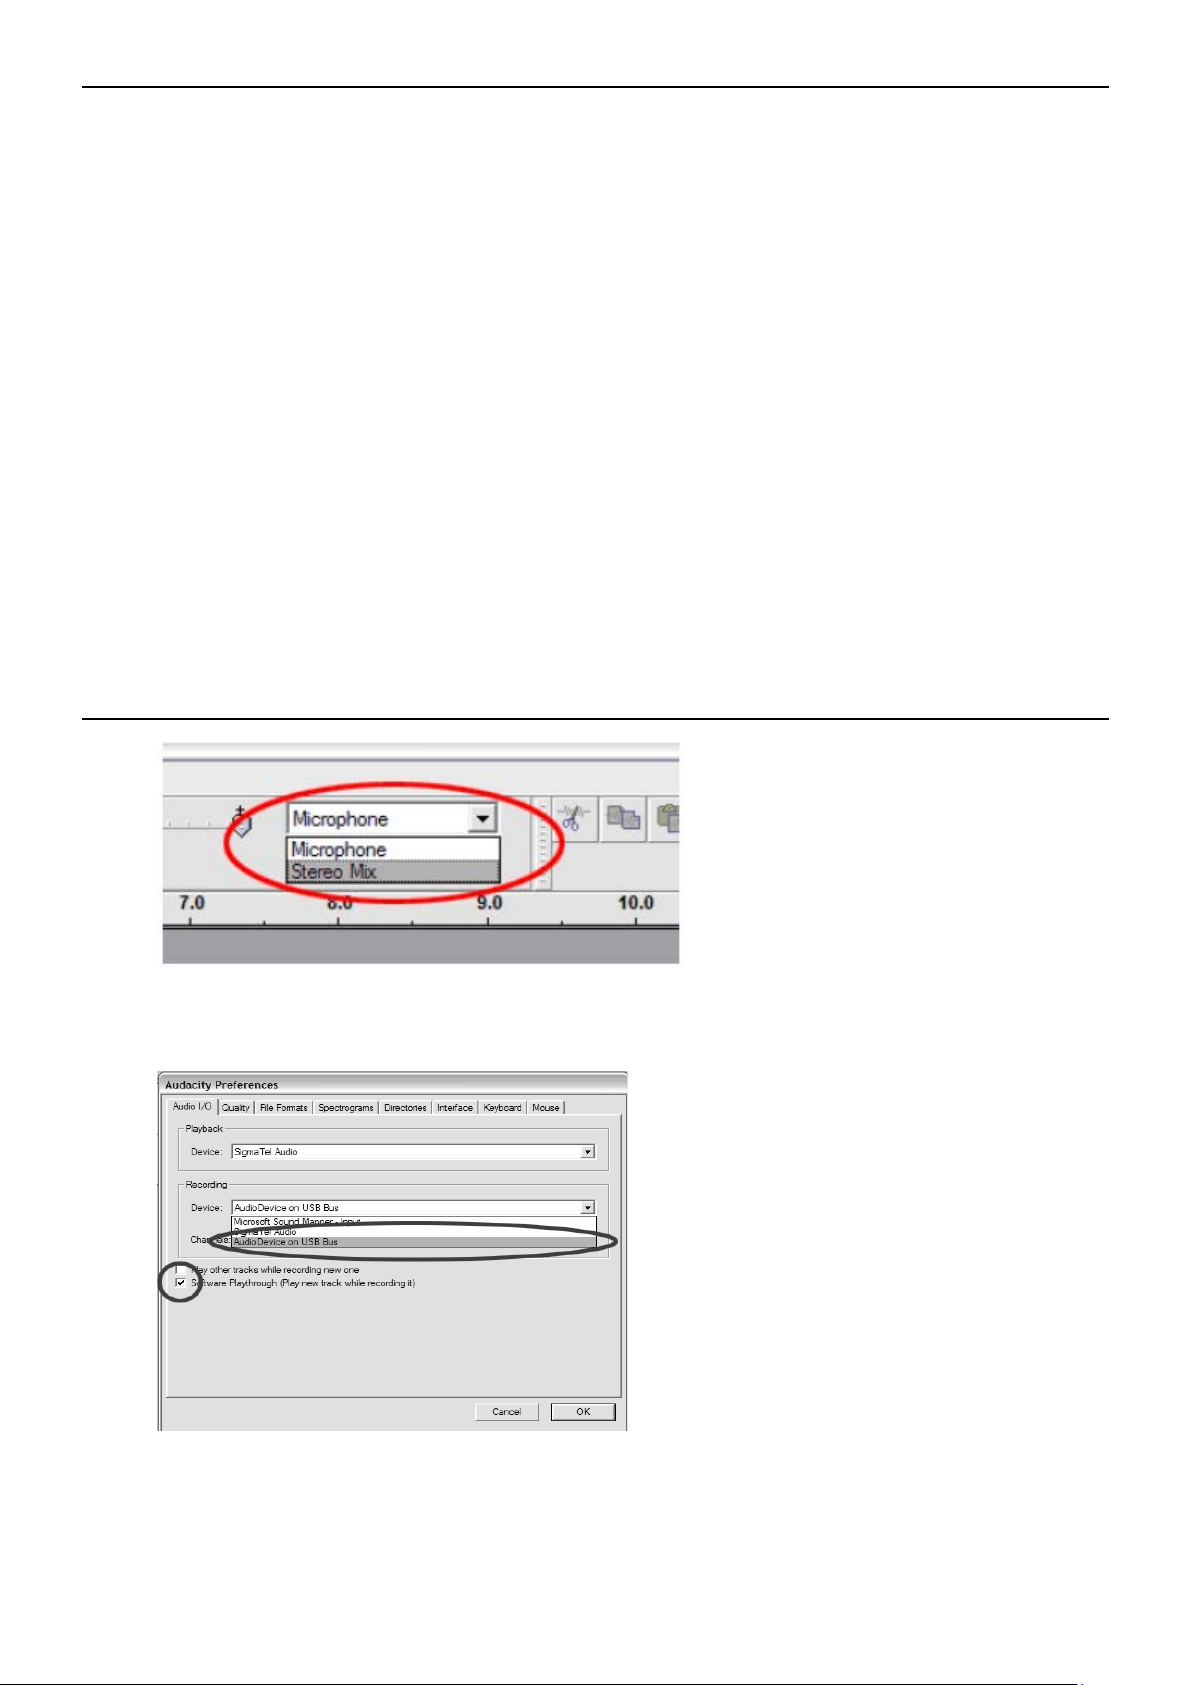
SOFTWARE CONFIGURATION
1. Click on Microphone in the drop down menu and select “Stereo Mix”.
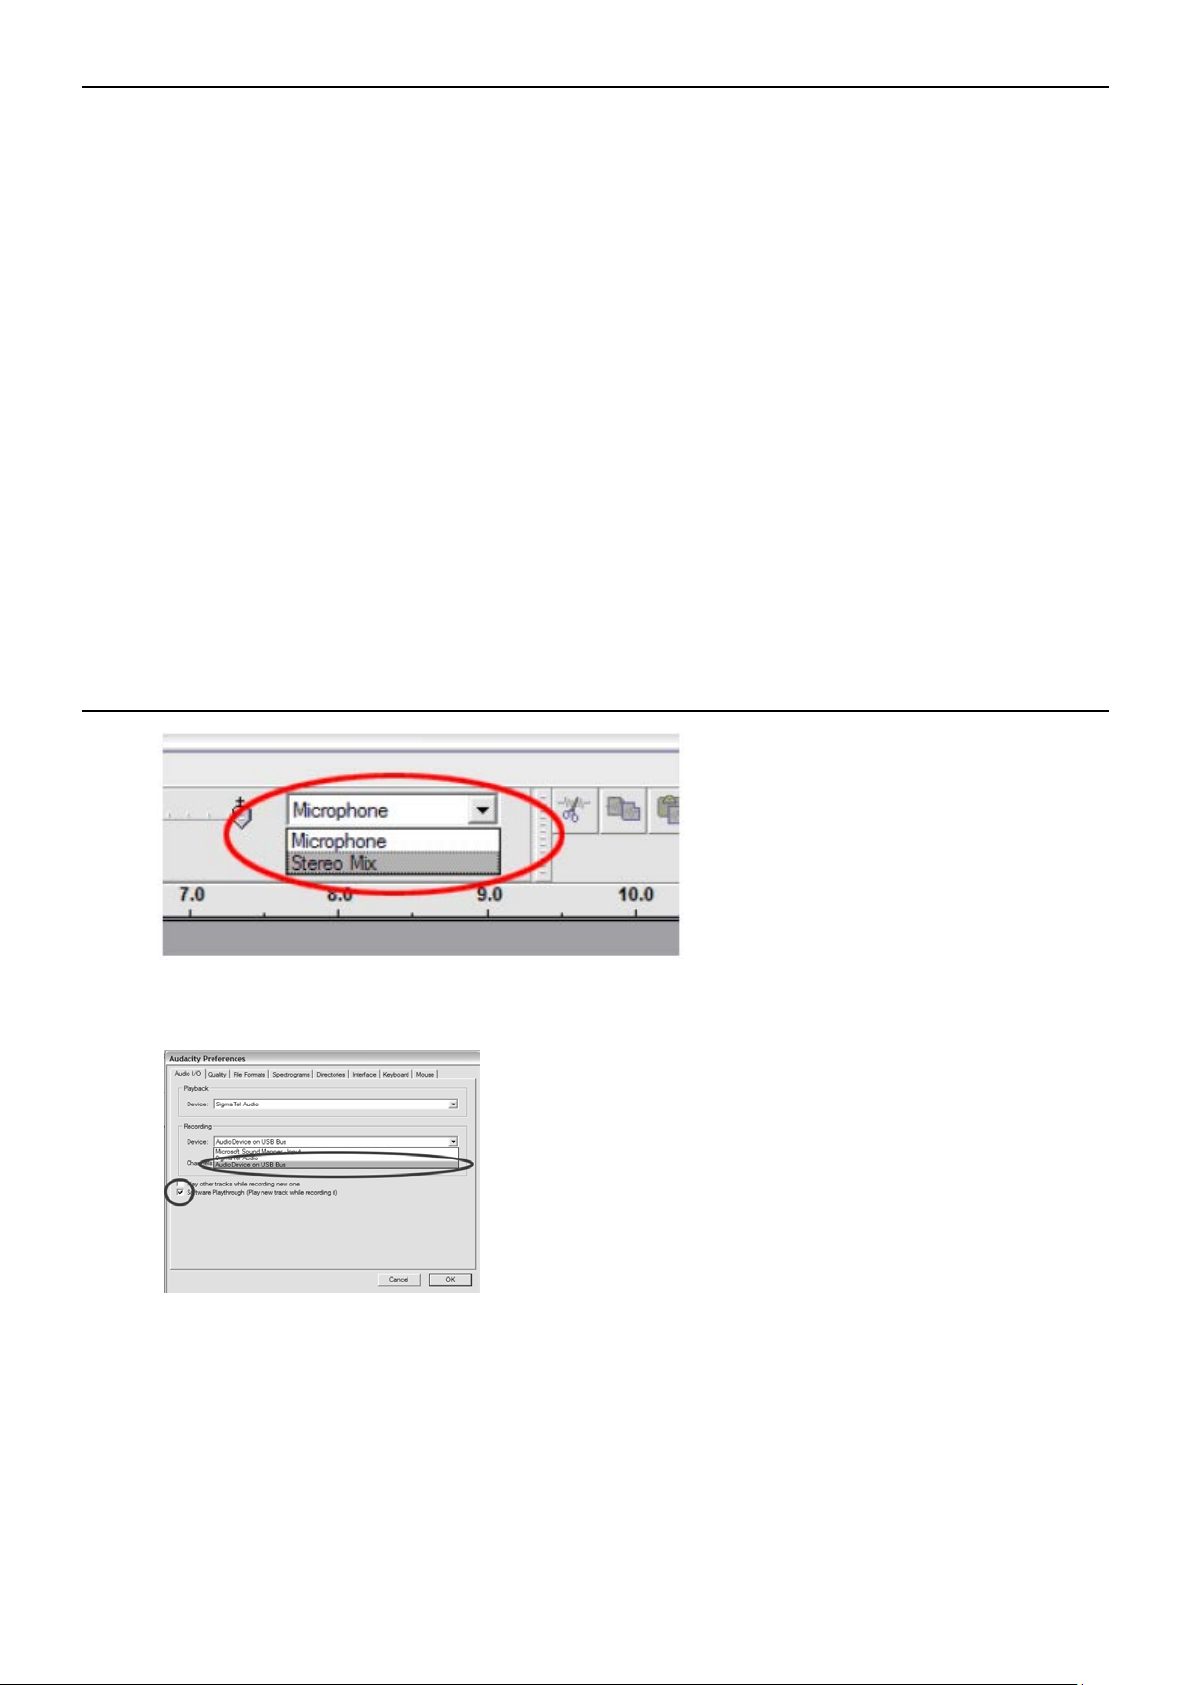
2. Select the “Edit” menu and then “Preferences”
Select the USB audio device under the “Recording” selection as shown. Select “Software Playthrough” to hear the
audio while recording.
3. After the above settings are completed, you are ready for recording. If you are still having difficulties in finding the USB
Turntable, try to check your system settings or control panel to adjust the audio input settings from the sound control
panel.
Note: The attached Audacity software is for reference only. For more information and latest software version, plea se
check the website: http://www.audacity.com
5
Page 6

NEDERLANDS
Alle (defecte) artikelen dienen gedurende de garantieperiode altijd retour t e worden gezonden in de originele verpakk i ng. Voer zelf geen
Hartelijk dank voor de aanschaf van dit Fenton product. Neemt U a.u.b. een paar momenten de tijd om deze handleiding
zorgvuldig te lezen, aangezien wij graag willen dat u onze producten snel en volledig gebruikt.
Lees deze handleiding eerst door alvorens het product te gebruiken. Volg de instructies op anders zou de garantie wel eens
kunnen vervallen. Neem ook altijd alle veiligheidsmaatregelen om brand en/of een elektrische schok te voorkomen. Tevens is
het ook raadzaam om reparaties / modificaties e.d. over te laten aan gekwalificeerd personeel om een elektrische schok te
voorkomen. Bewaar deze handleiding ook voor toekomstig gebruik.
- Bewaar de verpakking zodat u indien het apparaat defect is,
dit in de originele verpakking kunt opsturen om
beschadigingen te voorkomen.
- Voordat het apparaat in werking wordt gesteld, altijd eerst
een deskundige raadplegen. Bij het voor de eerste keer
inschakelen kan een bepaalde reuk optre den. Dit is normaal
en verdwijnt na een poos.
- In het apparaat bevinden zich onder spanning staa nde
onderdelen; open daarom NOOIT dit apparaat.
- Plaats geen metalen objecten en mors geen vloei stof in het
effect. Dit kan leiden tot elektrische schokken of defecten.
- Toestel niet opstellen in de buurt van warmtebronnen zoals
radiatoren etc. en niet op een vibrerende onder- grond
plaatsen. Dek ventilatieopeningen nooit af.
- Het apparaat is niet geschikt voor continu gebruik.
- Wees voorzichtig met het netsnoer en beschadig deze niet.
Als het snoer kapot of beschadigd is, kan dit leiden tot
elektrische schokken of defecten.
- Als u de stekker uit het stopcontact neemt, trek dan niet aan
het snoer, maar aan de stekker.
- Om brand of elektrische schok te voorkomen, dient u dit
apparaat niet bloot te stellen aan regen of vocht.
- Verwijder of plaats een stekker nooit met natte handen resp.
uit en in het stopcontact.
- Indien zowel de stekker en/o f nets noer als snoeri ngan g in het
apparaat beschadigd zijn dient dit door een vakman hersteld
te worden.
- Indien het apparaat zo beschadigd is dat inwendige
(onder)delen zichtbaar zijn mag de stekker NOOIT in het
stopcontact worden geplaatst en het apparaat NOOIT
worden ingeschakeld. Neem in dit geval contact op met de
dealer.
- Sluit het apparaat nooit op een dimmer aan.
- Reparatie aan het apparaat dient te geschieden door een
vakman of een deskundige.
- Sluit het apparaat alleen aan op een 220-240VAC / 50Hz
(geaard) stopcontact, verbonden met een 10-16A
meterkastgroep.
- Bij onweer altijd de stekker uit het stopcontact halen, zo ook
wanneer het apparaat voor een langere tijd niet gebruikt
wordt. Stelregel: Bij geen gebruik stekker verwijderen.
Deze markering wordt weergegeven om u erop attent te maken dat een levensgevaarlijke spanning in het product
aanwezig is en dat bij aanraking van deze delen een elektrische schok wordt verkregen.
Deze instructiemarkering wordt weergegeven om u erop te wijzen dat de instructie zeer belangrijk is om te lezen en/of op
te volgen.
OPMERKING: Om zeker te zijn van een correcte werking, dient u dit apparaat in een ruimte te gebruiken waar de temperatuur
tussen de 5°C/41°F en 35°C/95°F ligt.
Raadpleeg eventueel www.wecycle.nl en/of www.vrom.nl v.w.b. het af danken van elektronische apparaten in het kader van de
WEEE-regeling. Vele artikelen kunnen worden gerecycled, gooi ze daarom niet bij het huisvuil maar lever ze in bij een gemeentelijk
depot of uw dealer. Lever ook afgedankte batterijen in bij uw gemeentelijk depot of bij de dealer, zie www.stibat.nl
reparaties uit aan het toestel; in élk geval vervalt de totale garantie. Ook mag het toestel niet eigenmachtig worden gemodificeerd, ook in dit
geval vervalt de totale garantie. Ook vervalt de garantie bij ongevallen en beschadigingen in élke vorm t.g.v. onoordeelkundig gebruik en
het niet in achtnemen van het gestelde in deze gebruiksaanwijzing. Tevens aanvaardt Fenton geen enkele aansprakelijkheid in geval van
persoonlijke ongelukken als gevolg van het niet naleven van veiligheidsinstructies en waarschuwingen . Dit geldt ook voor gev ol gsc hade in
- Als u het apparaat lang niet gebruikt heeft en het weer wil
gebruiken kan er condens ontstaan; laat het apparaat eerst
op kamertemperatuur komen alvorens het weer in werking
te stellen.
- Apparaat nooit in vochtige ruimten en buiten gebruiken.
- Om ongevallen in bedrijven te voorkomen moet rekening
worden gehouden met de daarvoor geldende richtlijnen en
moeten de aanwijzingen/waarschuwingen worden gevolgd.
- Het apparaat buiten bereik van kinderen houden.
Bovendien mag het apparaat nooit onbeheerd gelaten
worden.
- Gebruik geen schoonmaakspray om de schakelaars te
reinigen. Restanten van deze spray zorgen ervoor dat
smeer en stof ophopen. Raadpleeg bij storing te allen tijde
een deskundige.
- Gebruik geen overmatige kracht bij het bedienen van het
apparaat.
- Dit apparaat kan magnetisch veld veroorzaken. Houd dit
apparaat ten minste 60 cm afstand van de computer of tv.
- Indien voorzien van accu, laad de accu elke 3 maanden als
u het apparaat voor een langere periode niet gebruikt. De
batterij kan worden beschadigd.
- Bij een ongeval met dit produc t altijd eer st een deskundige raadplegen alvorens opnieuw te gebruiken.
- Tracht het apparaat niet schoon te maken met chemi sch e
oplossingen. Dit kan de lak beschadigen. Gebruik een
droge doek om schoon te maken.
- Blijf uit de buurt van elektronische apparatuur die
bromstoringen zouden kunnen veroorzaken.
- Bij reparatie dienen altijd originele onderdelen te worden
gebruikt om onherstelbare beschad igi ngen en/ of
ontoelaatbare straling te voorkomen.
- Schakel eerst het toestel uit voordat u het netsnoer
verwijdert. Verwijder netsnoer en aansluitsnoeren voordat u
dit product gaat verplaatsen.
- Zorg ervoor dat het netsnoer niet beschadigd/ defect kan
raken wanneer mensen erover heen lopen. Het netsnoer
vóór ieder gebruik controleren op breuken/defecten!
- In Nederland/België is de netspanning 220-240Vac/50Hz.
Indien u reist (en u neemt het apparaat mee) informeer dan
naar de netspanning in het land waar u verblijft.
6
Page 7

OVERZICHT
1. Spindel
2. Plateau
Plaatst hier u uw langspeelplaat voordat u deze afspeelt.
3. 45RPM Adapter
Met behulp van deze adapter kunt u 45RPM platen te draaien.
4. Toonarm hendel
De vaste toonarm kan worden opgetild en neergelaten door de hendel.
5. Toon arm Clip
Deze speciaal ontworpen arm clip stelt de toonarm in rust of wanneer niet in gebruik.
6. Autostop schakelaar AAN/UIT
Met deze schakelaar schakelt automatisch stoppen aan of te schakelen. Als de automatische stop is ingeschakeld, zal
het plateau beginnen te draaien zodra de toonarm wordt geplaatst over de plaat en stopt met draaien wanneer de het
einde van langspeelplaat heeft bereikt.
7. 33 / 45 RPM Schakelaar
Deze schakelaar regelt u de toerental van de platenspeler.
8. Cartridge met naald
Wanneer de platenspeler niet wordt gebruikt, raden wij u aan het meegeleverde beschermingskap te plaatsen.
9. Luidspreker
Ingebouwde stereo luidsprekers.
10. Volume control
Aanpassen van geluidsniveau ingebouwde luidsprekers en hoofdtelefoon.
11. USB poort
Gebruik de meegeleverde USB-kabel om uw platenspeler aan te sluiten op uw computer. De USB-verbinding zal
audiosignaal sturen van de platenspeler naar uw computer.
12. Lijn uitgang
Het geluidsignaal van langspeelplaat wordt verzonden naar deze lijn uitgang. Sluit dit signaal aan op lijn-ingang van
bijvoorbeeld een versterker.
WERKING
1. Verbind de platen speler met de meegeleverde voedi ngs ad apt er en plug dez e in een
wandcontactdoos.
2. Verwijder het witte beschermingskap middels deze naar vore n te schuiv en.
3. Plaats een langspeelplaat op het tableau van de platenspeler en selecteer het toerental
(33/45RPM) afhankelijk van type langspeelplaat.
4. Open de toonarm clip en plaats de toonarm voorzichtig op de juiste positie van langspeelplaat, de
platenspeler zal starten met muziek afspelen.
5. Stel de volumeregelaar in op gewenste geluidsniveau.
Opmerking: Als de Auto Stop functie is ingeschakeld, zal de platenspeler automatisch stoppen bij einde muziek. Als Auto Stop
is uitgeschakeld, wordt de platenspeler niet automatisch gestopt en zal het plateau doordraaien.
7
Page 8
VERBINDEN MET COMPUTER
De bijgeleverde software is een applicatie van derden en Fenton handelt daarom geen vragen of problemen af die betrekking
hebben op deze software.
1. Zet de computer aan
2. Sluit de platenspeler aan wanneer de computer is opgestart. De computer zal nu de besturingsprogramma’s
installeren.
3. Nadat de besturingsprogramma’s geïnstalleerd zijn dient u de Audacity software te installeren.
Windows gebruikers; voer de CD in of download de nieuwste software via http://audacity.sourceforge.net
MAC gebruikers; download de nieuwste software via http://audacity.sourceforge.net
De software installeren (PC)
1. Sluit uw platenspeler aan op een voedingsbron en sluit de USB-poort van de platenspeler aan op de USB-poort van uw
computer.
2. Schakel de platenspeler in.
3. Het Windows-systeem zal een nieuw apparaat detecteren en aangeven dat het beschikbaar is om te gebruiken.
4. Voer de CD in die is meegeleverd met uw USB-platenspeler.
5. Voer het bestand uit om de Audacity-software te installeren. Na de installatie, start het Audacity programma.
De software installeren (MAC)
1) Voer de meegeleverde CD in.
2) Open het CD-icoontje op het bureaublad.
3) Sleep de installatiefolder van Audacity naar uw harddrive. Wij raden u aan de folder naar uw “Applications”
(applicaties/toepassingen) folder te slepen.
4) Er zal een venster verschijnen om aan te geven dat de bestanden worden gekopieerd.
5) Haal de CD uit de computer.
6) Open “Audacity” vanuit de folder waar u de software naar hebt gesleept op uw harddrive.
SOFTWARECONFIGURATIE
1. Klik op “Microphone” in het submenu en selecteer “Stereo Mix”
2. Selecteer het menu “Edit” (bewerken) en vervolgens “Preferences”.
Selecteer het USB-audioapparaat onder de selectie “Recording” zoals afgebeeld. Selecteer “Software Playthrough” om
tijdens de opname audio te horen.
3. Nadat de bovenstaande instellingen zijn voltooid, bent u klaar voor de opname. Indien u problemen ondervindt,
probeer dan uw systeeminstellingen te controleren of de audio-ingangsinstellingen via het geluidspaneel aan te
passen.
Opmerking: De meegeleverde Audacity software dient slechts ter referentie. Vo or meer infromatie en actuele updates zie
http://www.audacity.com .
8
Page 9

DEUTSCH
Reparieren Sie das Gerät niemals selbst und nehmen Sie niemals eigenmächtig Veränderungen am Gerät vor. Sie verlieren dadurch den
Vielen Dank für den Kauf dieses Fenton gerat. Nehmen Sie sich einen Augenblick Zeit, um diese Anleitung sorgfältig
durchzulesen, damit sie die Möglich keit en, die uns er Pro duk t bietet , sofor t voll aus nutz en k önnen.
Lesen Sie erst die Anleitung vollständig vor der ersten Inbetriebnahme durch. Befolgen Sie die Anweisung, da sonst jeglicher
Garantieanspruch verfällt. Treffen Sie stets alle Sicherheits-vorkehrungen um Feuer und/oder Stromschlag zu vermeiden.
Reparaturen dürfen nur von qualifiziertem Fachpersonal ausgeführt werden, um Stromschlag zu vermeiden. Bewahren Sie
diese Anleitung für spätere Bezugnahme auf.
- Bewahren Sie die Verpackung auf, um das Gerät im
Bedarfsfall sicher transportieren zu können.
- Bevor das Gerät in Betrieb genommen wird, muss es erst
von einem Fachmann überprüft werden. Bei der ersten
Benutzung kann etwas Geruch auftreten. Das ist normal und
verschwindet nach einer Weile
- Das Gerät enthält unter Spannung stehende Teile. Daher
NIEMALS das Gehäuse öffnen.
- Keine Metallgegenstände oder Flüssigkeiten ins Gerät
dringen lassen. Sie können zu Stromschlag und Defekten
führen.
- Gerät nicht in der Nähe von Wärmequellen wie Heizkörpern
aufstellen. Nicht auf eine vibrierende Oberfläche stellen.
Niemals die Belüftungsschlitze abdecken.
- Das Gerät ist nicht für Dauerbetrieb geeignet.
- Gehen Sie vorsichtig mit dem Netzkabel um und
beschädigen Sie es nicht. Eine beschädigte Netzschnur kann
zu Stromschlag und Defekten führen.
- Wenn Sie das Gerät vom Netz trennen, immer am Stecker
ziehen, niemals an der Schnur.
- Um Feuer und Stromschlag zu vermeiden, das Gerät vor
Regen und Feuchtigkeit schützen.
- Den Stecker nie mit nassen Händen in eine Netzsteckdose
stecken oder abziehen.
- Wenn sowohl der Stecker und/oder die Netzschnur bzw. der
Kabeleintritt ins Gerät beschädigt sind, müssen sie von
einem Fachmann repariert werden.
- Wenn das Gerät so beschädigt ist, dass Innenteile si chtb ar
sind, darf der Stecker NICHT in eine Steckdose gesteckt
werden und das Gerät darf NICHT eingeschaltet werden.
Wenden Sie sich in dem Fall an Ihren Fachhändler. Das
Gerät darf nicht an einen Dimmer angeschlossen werden.
- Reparaturen dürfen nur von einem Fachmann oder
Sachverständigen ausgeführt werden.
- Das Gerät nur an eine geerdete 10-16A Netzsteckdose mit
220-240V AC/50Hz Spannung anschließen.
- Bei Gewitter oder längerem Nichtgebrauch den Netzstecker
abziehen. Die Regel gilt: Bei Nichtgebrauch Netzstecker
abziehen.
- Wenn das Gerät längere Zeit nicht benutzt wurde, kann sich
Kondenswasser gebildet haben. Lassen Sie das Gerät erst
auf Zimmertemperatur kommen, bevor Sie es einschalten.
Dieses Zeichen weist den Benutzer darauf hin, dass lebensgefährliche Spannungen im Gerät anliegen, die bei
Berührung einen Stromschl ag v erur sachen.
Dieses Zeichen lenkt die Aufmerksamkeit des Benutzers auf wichtige Hinweise in der Anleitung hin, die unbedingt
eingehalten werden müssen.
HINWEIS: Um einen einwandfreien Betrieb zu gewährleisten, muss die Raumtemperatur zwischen 5° und 35°C.
liegen.
Tronios BV Registrierungsnummer : 21003000 (Bat t eri eG).
Lithiumbatterien und Akkupacks sollten nur im entladenen Zustand in die Altbatteriesammelgefäße bei Handel und bei öffentlich-rechtlichen
Entsorgungsträgern gegeben werden. Bei nicht vollständig entladenen Batterien V orsorge gegen Kurzsc hl üß treff en durch Isolier en der Pole mit
Klebestreifen. Der Endnutzer ist zur Rückgabe von Altbatterien gesetzlich verpflic htet.
Tronios BV Registrierungsnummer : DE51181017 (El ekt roG ).
Dieses Produkt darf am Ende seiner Lebensdauer nicht über den normalen Haushaltsabfall entsorgt werden, sondern muss an einem
sammelpunkt für das Recycling abgegeben werden. Hiermit leisten Sie einen wichtigen Beitrag zum Schutze unserer Umwelt.
Garantieanspruch. Der Garantieanspruch verfällt ebenfalls bei Unfällen und Schäden in jeglicher Form, die durch unsachgemäßen
Gebrauch und Nichtbeachtung der Warnungen und Sicherheitshinweise in dieser Anleitung entstanden sind. Fenton ist in keinem Fall
verantwortlich für persönliche Schäden in Folge von Nichtbeachtung der Sicherheitsvorschriften und Warnungen. Dies gilt auch für
Folgeschäden jeglicher Form.
Das Gerät nicht in feuchten Räumen oder im Freien
benutzen.
- Um Unfällen in der Öffentlichkeit vorzubeugen, müssen die
geltenden Richtlinien beachtet und die
Anweisungen/Warnungen befolgt werden.
- Niemals das Gerät kurz hintereinander ein- und
ausschalten. Dadurch verkürzt sich die Lebensdauer
erheblich.
- Das Gerät außerhalb der Reichweite von Kindern halten.
Das Gerät niemals unbeaufsichtigt la ssen.
- Die Regler nicht mit Reinigungssprays reinigen. Diese
hinterlassen Rückstände, die zu Staub- und
Fettansammlungen führen. Bei Störungen immer einen
Fachmann um Rat fragen.
- Das Gerät nur mit sauberen Händen bedienen.
- Das Gerät nicht mit Gewalt bedienen.
- Dieses Gerät kann dazu führen Magnetfeld. Halten Sie das
Gerät mindestens 60 cm vom Computer oder Fernseher.
- Wird mit Batterie bereitgestellt. Bitte laden Sie die Batterie
alle 3 Monate, wenn Sie nicht gehen, um das Gerät für
längere Zeit nicht benutzen. Oder die Batterie kann
beschädigt werden.
- Fachmann um Rat fragen, bevor Sie es wieder einschalten.
- Keine chemischen Reinigungsmittel benutzen, die den
Lack beschädigen. Das Gerät nur mit einem trockenen
Tuch abwischen.
- Nicht in der Nähe von elektronischen Geräten benutzen,
die Brummstörungen verursachen können.
- Bei Reparaturen nur die Original-Ersatzteile verwenden,
um starke Schäden und/oder gefährliche Strahlungen zu
vermeiden.
- Bevor Sie das Netz- und/o der A nschlusskabel abziehen,
erst das Gerät ausschalten. Netz- und Anschlusskabel
abziehen, bevor Sie das Gerät umstellen.
- Sorgen Sie dafür, dass das Netzkabel nicht beschädigt
werden kann, wenn Menschen darüber laufen. Das
Netzkabel vor jedem Einsatz auf Brüche/Schadstellen
überprüfen.
- In Deutschland beträgt die Netzspannung 220-240V AC /
50Hz. Wenn Sie das Gerät auf Reisen mitnehmen, prüfen
Sie, ob die örtliche Netzspannung den Anforderungen des
Geräts entspricht.
9
Page 10

BEDIENELEMENTEN
1. Spindel
2. Plattenteller
Platzieren Sie eine Schallplatte auf dem Plattenteller.
3. Adapter 45-rpm-Platten
Haben Sie Schallplatten, die mit 45rpm abgespielt werden müssen, nehmen Sie den Adapter aus seiner Halterung auf
der Oberseite des Plattenspielers und platzieren ihn auf der Spindel.
4. Tonarm-Hebel
Der feste Tonarm kann durch den Hebel angehoben und abgesenkt wird.
5. Tonarm-Klammer
Diese speziell entwickelte Arm Klammer sichert den Tonarm in Ruhe oder, wenn sie nicht in Gebrauch ist.
6. Auto-Stop-Schalter
Dieser Schalter schaltet den autom ati sch en Stopp ein oder a us. Wenn der automatische Stopp eingeschaltet ist,
beginnt die Plattenteller, sich zu drehen, wenn der Tonarm über den Plattenspieler gelegt wird und aufhört zu drehen,
wenn der Plattenspieler das Ende erreicht hat.
7. Drehzahl-Schalter 33/45rpm
Schalter steuern die Geschwindigkeit des Plattenspieler.
8. Nadelhalter
Wenn der Plattenspieler nicht in Gebrauch ist, wird empfohlen die abnehmbare Schutzabdeckung auf die Nadel zu
setzen.
9. Lautsprecher
Integrierte Stereo-Lautsprecher.
10. Lautstärkeregler
Anpassen der Lautstärkte eingebauten Lautsprecher und Kopfhörer.
11. USB-Anschluss
Schließen Sie das Gerät mit dem mitgelieferten USB-Kabel am USB-Anschluss eines Computers. Von der USBAnschluss wird das Audio-Signal von der Plattenspieler nach Ihren Computer gesendet.
12. Line-Ausgang
Das Tonsignal von Schallplatte wurde nach dem Line-Ausgang gesendet. Verbinden dieses mit Signaleingang an von
beispielsweise eine M ischp ult oder Verstärker.
BENUTZING
1. Schließen Sie den Plattenspieler mit dem mitgelieferten Netzteil und Stecker in eine Steckdose.
2. Entfernen der weißen Schutzkappe durch dieses Gleiten nach vorne.
3. Platzieren Sie eine Schallplate auf dem Plattenteller. Stellen Sie den RPM-Schalter in die
gewünschte Position (33/45RPM) je nach Art Schallplate.
4. Heben Sie den Tonarm leicht an und führen Sie ihn über die ersten Rillen der Schallplatte. Der
Spieler beginnt nun automatisch die Platte zu drehen.
5. Drehen Sie den VOLUME-Regler auf der Front des Plattenspielers im Uhrzeigersinn.
Hinweiss: Wenn die Auto-Stop-Funktion aktiviert ist, wird der Plattenspieler automatisch am Ende der Musik zu stoppen. Wenn
Auto-Stop-Funktion ausgeschaltet ist, wird der Plattenspieler nicht automatisch gestoppt und drehen die Plattenteller durch.
10
Page 11

VERBINDEN MIT COMPUTER
Bei der mitgelieferten Software handelt es sich um eine Anwendung eines Drittanbieters. Fenton bearbeitet keine Anfragen oder
Probleme, die sich auf die Software beziehen.
1. Schalten Sie Ihren Computer ein.
2. Wenn der Computer gestartet wird, schließen Sie den Plattenspieler an. Der Computer installiert die Treiber dann
automatisch.
3. Nachdem die Treiber installiert sind, müssen Sie dann die Audacity-Software installieren.
Windows-Benutzer: Legen Sie die CD ein oder laden Sie sich die neueste Software von der Webseite
http://audacity.sourceforge.net herunter.
MAC-Benutzer können sich die neueste Software direkt von der Webseite http://audacity.sourceforge.net herunterladen.
Installation der Software (PC)
1. Schließen Sie Ihren Plattenspieler an eine Steckdose an und verbinden Sie den USB-Anschluss des Plattenspielers an den
USB-Anschluss Ihres Computers an.
2. Schalten Sie den Plattenspieler ein.
3. Das Windows-System wird ein neues Gerät erkennen und Sie darauf hinweisen, dass es verwendet werden kann.
4. Legen Sie die CD ein, die mit Ihrem USB-Plattenspieler mitgeliefert wurde.
5. Führen Sie die Datei aus, um die Audacity-Software zu installieren. Nach der Installation führen Sie das Audacity-Programm
aus.
Installation der Software (MAC)
1) Legen Sie die mitgelie f erte C D ein.
2) Öffnen Sie das CD-Symbol auf dem Desktop.
3) Ziehen Sie den Installationsordner für Audacity auf Ihre Festplatte. Wir empfehlen, dass Sie den Ordner in Ihren Ordner
„Applications“ (Anwendungen) verschieben.
4) Es wird ein Fenster geöffnet, das die kopierten Dateien anzeigt.
5) WERFEN Sie die CD AUS.
6) Öffnen Sie „Audacity“ aus dem Ordner, in den Sie das Programm auf Ihrer Festplatte verschoben haben.
SOFTWAREKONFIGURATION
1. Klicken Sie im Dropdown-Menü auf „Microphone“ und wählen Sie „Stereo Mix“ aus.
2. Wählen Sie das Menü „Edit“ und dann „Preferences“
Wählen Sie das USB-Audiogerät aus der Auswahl „Recording“ aus, wie dargestellt. Wählen Sie „Software
Playthrough“, um den Ton während der Aufnahme zu hören.
3. Nachdem die obigen Einstellungen abgeschlossen sind, können Sie Aufzeichnungen vornehmen.
Sollten Sie weiterhin Schwierigkeiten haben, den USB-Plattenspieler zu finden, versuchen Sie Ihre
Systemeinstellungen oder die Systemsteuerung zu prüfen, sodass die Audio Eingangseinstellungen über das AudioKontrollfeld angepasst werden können.
Hinweis: Die beigefügte Audacity-Software dient nur als Referenz. Weitere Informationen und aktuelle Updates
http://www.audacity.com
11
Page 12
ESPAÑOL
Nunca intente reparar usted mismo este equipo. Esta manipulación anulará la garantía. No realice cambios en la unidad. Esta
instrucciones de este manual. Esto es aplicable también a los daños de cualquier tipo.
Felicitaciones a la compra de este producto Fenton. Por favor lea atentamente este manual antes de usar el aparato para
disfrutar al completo de sus prestaciones.
Seguir las instrucciones le permite no invalidar la garantía. Tome todas las precauciones para evitar que se produzca fuego o
una descarga eléctrica. Las reparaciones solo deben llevarse a cabo por técnicos cualificados para evitar descargas eléctricas.
Guarde el manual para futuras consultas.
sentirse cierto olor. Esto es normal y desaparece al poco tiempo.
- Este aparato contiene piezas que llevan voltaje. Por lo
tanto NO abra la carcasa.
- No coloque objetos metálicos o vierta líquido s dentro del
aparato Podría producir descargas eléctricas y fallos en
el funcionamiento.
- No coloque el aparato cerca de fuentes de calor tipo
radiadores, etc. No coloque el aparato en superficies
vibratorias. No tape los agujeros de ventilación.
- Este aparato no está preparado para un uso continuado.
- Tenga cuidado con el cable de alimentación y no lo
dañe. Un daño o defecto en el cable de alimentación
puede producir una descarga eléctrica o fallo en el
funcionamiento.
- Cuando desconecte el aparato de la toma de corriente,
siempre tire de la clavija, nunca del cable.
- No enchufe o desenchufe el aparato con las manos
mojadas.
- Si la clavija y/o el cable de alimentación están dañados,
necesitan reemplazarse por un técnico cualificado.
- Si el aparato está dañado de modo que puedan verse
sus partes internas, NO conecte el aparato a la toma de
corriente y NO lo encienda. Contacte con su distrib uidor .
NO conecte el aparato a un reostato o dimmer.
- Para evitar un fuego o peligro de descarga, no exponga
el aparato a la lluvia y a la humedad.
- Todas las reparaciones deben llevarse a cabo
exclusivamente por técnicos cualificados.
- Conecte el aparato a una toma de corriente con toma de
tierra (220-240Vca/50Hz) protegida por un fusible de 1016A.
- Durante una tormenta o si el aparato no va a usarse
durante un periodo largo de tiempo, desconéctelo de la
toma de corriente. La regla es: Desconéctelo si no lo va
a usar.
- Si el aparato no se ha usado en mucho tiempo puede
producirse condensación. Deje el aparato a temperatura
Esta señal advierte al usuario de la presencia de alto voltaje en el interior de la carcasa y que es de la suficiente
magnitud como para producir una descarga eléctr ica.
Esta señal advierte al usuario de que el manual contiene instrucciones importantes que han de leerse y seguirse al pie
de la letra.
NOTA: Para asegurarse de que el aparato funcione correctamente, debe usarse en ambientes a una temperatura de entre
5°C/41°F y 35°C/95°F.
Los productos electrónicos no pueden tirarse a la basura normal. Por favor lleve este producto a un centro de reciclaje. Pregunte a la
autoridad local en caso de duda. Las especificaciones son generales. Los valores actuales pueden variar de una unidad a otra. Las
especificaciones pueden variar sin previo aviso.
ambiente antes de encenderlo. Nunca utilice el aparato
en ambientes húmedos o en el exterior.
- Para prevenir accidentes en las empresas, debe seguir
las directrice s aplicables y seguir las instrucciones.
- No lo apague y encienda repetidamente. Esto acorta su
tiempo de vida.
- Mantenga el aparato fuera del alcance de los niños. No
deje el aparato sin vigilancia.
- No utilice sprays limpiadores para limpiar los
interruptores. Los residuos de esto s sprays pr odu cen
depósitos de polvo y grasa. En caso de mal
funcionamiento, siempre con sult e a un profesi onal .
- No fuerce los controles.
- Si el aparato se ha caído, siempre haga que lo verifique
un técnico cualificado antes de encenderlo otra vez.
- NO utilice productos químicos para limpiar el aparato.
Dañan el barniz. Tan solo límpielo con un trapo seco.
- Manténgalo lejos de equipos electrónicos ya que pueden
producir interferencias.
- Solo utilice recambios originales para las reparaciones,
de otro modo pueden producirse daños serios y/o
radiaciones peligrosas.
- Apague el aparato antes de desconectarlo de la toma de
corriente y/o de otros equipos. Desconecte todos los
cables y conexiones antes de mover el aparato.
- Asegúrese de que el cable de alimentación no puede
dañarse cuando la gente lo pise. Compruebe el cable de
alimentación antes de cada uso por si hay daños o
defectos.
- El voltaje de funcionamiento es 220-240Vca/50Hz.
Compruebe que la toma de corriente coincide. Si tien e
que viajar, asegúrese de que el voltaje del país es el
adecuado para este aparato.
- Guarde el embalaje original para poder transportar el
aparato en condiciones seguras.
manipulación anulará la garantía. Esta garantía no es aplicable en caso de accidente o daños ocasionados por uso indebido del aparato
o mal uso del mismo. Fenton no se hace responsable de daños personales causados por el no seguimiento de las normas e
12
Page 13
VISION GENERAL
1. Eje
2. Plato
Ponga su disco de vinilo aquí.
3. 45RPM Adaptador
Este adaptador le permite reproducir discos de 45RPM.
4. Brazo
El brazo fijo se puede levantar y bajar a mano, o presionando la palanca elevar / bajar.
5. Clip de brazo
Esta pinza de brazo especialmente diseñada asegura el brazo mientras está en reposo o cuando no está en uso. El
clip de brazo ha sido diseñado para permanecer en la posición de arriba mient r as est á des bloqu ead o.
6. Interruptor Autostop ON/OFF
Este interruptor activa o desactiva la parada automática. Cuando la parada automática está activada, el plato
comenzará a girar cuando el brazo se coloque sobre el disco y dejará de girar cuando el disco haya llegado al final.
7. Interruptor 33 / 45 RPM
Este interruptor controla las RPM del plato giratorio.
8. Cápsula
Cuando el plato giratorio no está en uso, es recomendable colocar la cubierta de protección extraíble en la cápsula.
9. Altavoces
Altavoces estéreo integrados.
10. Control Power y Volúmen
Para encender el plato, gire este botón en el sentido de las agujas del reloj hasta que haga clic. Cuando esté
encendido, utilice este mando para ajustar el volumen de los altavoces y auriculares internos. Para apagar el
reproductor de discos, gire este botón en sentido contrario a las agujas del reloj hasta que haga clic.
11. Puerto USB
Utilice el cable USB incluido para conectar el plato giratorio a su computadora. La conexión USB enviará audio a su
computadora.
12. Salida Linea
El audio de un disco de vinilo que se reproduce se envía a esta salida de audio coaxial de nivel de línea. No debe
conectarse a dispositivos de entrada de phono.
OPERACIÓN
1. Conecte el reproductor de discos con el adaptador de corriente y conecte el otro extremo a una
toma de corriente de pared.
2. Retire la cubierta protectora blanca de la aguja tirando suavemente hacia la parte delantera de la
unidad por primera vez
3. Coloque un disco de vinilo en el plato giratorio y seleccione la velocidad deseada (33 / 45RPM)
según el registro.
4. Abra la abrazadera del brazo para liberarlo. Mueva suavemente el brazo y coloque la aguja en la
posición deseada del disco y el tocadiscos empezará a sonar.
5. Gire la perilla de control de volumen en sentido horario para ajus tar el volumen.
6. Para un mejor rendimiento y mantenimiento del producto, desenchufe el plato giratorio cuando no esté en uso.
Nota: Si el interruptor AUTO STOP ON / OFF está activado, el disco se detendrá automáticamente cuando termine. Si el
control de parada automática está desactivado, el registro NO se detendrá automáticamente cuando haya terminado.
13
Page 14

CONECTANDO CON EL PC
El software incluido es una aplicación de terceros y por lo tanto Fenton no maneja ninguna pregunta o problema con respecto
al software.
1. Encienda el ordenador
2. Coloque el interruptor principal de alimentación en la parte posterior del plato giratorio en la posición "on"
3. Si la computadora se arranca, conecte el plato giratorio. El equipo ahora instalará los controladores.
4. Después de instalar los controladores, debe instalar el software Audacity.
Usuarios de Windows: inserte el CD o descargue el software más Nuevo via http://audacity.sourceforge.net
Usuarios de MAC: descargue el software más Nuevo via http://audacity.sourceforge.net
CONFIGURACIÓN DEL SOFTWARE
4. Haga clic en Micrófono en el menú desplegable y seleccione "Stereo Mix”.
5. Seleccione el menú "Editar" y luego "Prefer enc ia s"
Seleccione el dispositivo de audio USB en la selección "Grabación" como se muestra. Seleccione "Reprodu cc ión de
software" para escuchar el audio durante la grabación.
6. Una vez completadas las configuraciones anteriores, estará listo para la grabación. Si todavía tiene dificultades para
encontrar el plato USB, pruebe a comprobar la configuración del sistema o el panel de control para ajustar los ajustes
de entrada de audio desde el panel de control de sonido.
Nota: El software adjunto de Audacity es sólo de referencia. Para obtener más información y la última versión del software,
consulte el sitio web: http://www.audacity
14
Page 15

FRANÇAIS
N’essayez pas de réparer l’appareil vous-même. Vous perdriez tout droit à la garantie. Ne faites aucune modification sur l’appareil. Vous perdriez tout droit à la
des consignes de sécurité et avertissements. Cela est également valable pour tous les dommages quelle que soit la forme.
Nous vous remercions d’avoir acheté un produit Fenton. Veuillez lire la présente notice avant l’utilisation afin de pouvoir en
profiter pleinement.
Veuillez lire la notice avant toute utilisation. Respectez impérativement les instructions afin de continuer à bénéficier de la
garantie. Prenez toutes les précautions nécessaires pour éviter tout incendie ou décharge électrique. Seul un technicien
spécialisé peut effectuer les réparations. Nous vous conseillons de conserver la présente notice pour pouvoir vous y reporter
ultérieurement.
- Avant d’utiliser l’appareil, prenez conseil auprès d’un
spécialiste. Lors de la première mise sous tension, il est
possible qu’une odeur soit perceptible. C’est normal,
l’odeur disparaîtra peu de temps après.
- L’appareil contient des composants porteurs de tension.
N’OUVREZ JAMAIS le boîtier.
- Ne placez pas des objets métalliques ou du liquide sur
l’appareil, cela pourrait causer des déc har ge s éle ctriq ues
et dysfonctionnements..
- Ne placez pas l’appareil à proximité de sources de
chaleur, par exemple radiateur. Ne positionnez pas
l’appareil sur une surface vibrante. N’obturez pas les
ouïes de ventilation.
- L’appareil n’est pas conçu pour une utilisation en
continu.
- Faites attention au cordon secteur, il ne doit pas être
endommagé.
- Lorsque vous débranchez l’appareil de la prise secteur,
tenez-le par la prise, ne tirez jamais sur le cordon.
- Ne branchez pas et ne débranchez pas l’appareil avec
les mains mouillées.
- Seul un technicien spécialisé peut remplacer la fiche
secteur et / ou le cordon secteur.
- Si l’appareil est endommagé et donc les éléments
internes sont visibles, ne branchez pas l’appareil, NE
L’ALLUMEZ PAS. Contactez votre revendeur. NE
BRANCHEZ PAS l’appareil à un rhéostat ou un dimmer.
- Pour éviter tout risque d’incendie ou de décharge
électrique, n’exposez pas l’appareil à la pluie ou à
l’humidité.
- Seul un technicien habilité et spécialisé peut effectuer les
réparations
- Branchez l’appareil à une prise secteur 220-240 Vac/50
Hz avec terre, avec un fusible 10-16 A.
- Pendant un orage ou en cas de non utilisation prolongée
de l’appareil, débranchez l’appareil du secteur.
- En cas de non utilisation prolongée de l’appareil, de la
condensation peut être créée. Avant de l’allu mer, la i ss ez
l’appareil atteindre la température ambiante. Ne l’utilisez
jamais dans des pièces humides ou en extérieur.
- Afin d’éviter tout accident en entreprise, vous devez
respecter les conseils et instructions.
- N’allumez pas et n’éteignez pas l’appareil de manière
répétée. Cela réduit sa durée de vie.
- Conservez l’appareil hors de la portée des enfants. Ne
laissez pas l’appareil sans surveillance.
- N’utilisez pas d’aérosols pour nettoy er les inte r rupt eur s .
Les résidus créent des dépôts et de la graisse. En cas
de dysfonctionnement, demandez conseil à un
spécialiste.
- Ne forcez pas les réglages.
- L’appareil contient un haut-parleur pouvant engendrer
des champs magnétiques. Tenez cet appareil à 60 cm
au moins d’un téléviseur ou ordinateur.
- Cet appareil contient un accumulateur rechargeable au
plomb. Rechargez-le tous les trois mois en cas de non
utilisation prolongée de l’appareil sinon l’accumulateur
pourrait être endommagé.
- Si l’accumulateur est endommagé, remplacez-le par un
accumulateur de même type et déposez l’ancien
accumulateur dans un container de recyclage adapté.
- Si l’appareil est tombé, faites-le toujours vérifier par un
technicien avant de le rallumer.
- Pour nettoyer l’appareil, n’utilisez pas de produits
chimiques qui abîment le revêtement, utilisez
uniquement un tissu sec.
- Tenez toujours l’appareil éloigné de tout équipement
électrique pouvant causer des interfér en ces.
- Pour toute réparation, il faut impérativement utiliser des
pièces d’origine, sinon il y a risque de dommages graves
et / ou de radiations dangereuses.
- Eteignez toujours l’appareil avant de le débrancher du
secteur et de tout autre appareil. Débranchez tous les
cordons avant de déplacer l’appareil.
- Assurez-vous que le cordon secteur n’est pas abîmé si
des personnes viennent à marcher dessu s. Avant toute
utilisation, vérifiez son état.
- La tension d’alimentation est de 220-240Vac/50 Hz.
Vérifiez la compatibilité. Si vous voyagez, vérifiez que la
tension d’alimentation du pays est compat ibl e avec
l’appareil.
- Conservez l’emballage d’or igi n e pour pouvoir transporter
l’appareil en toute sécurité.
Ce symbole doit attirer l’attention de l’utilisateur sur les tensions élevées présentes dans le boîtier de l’appareil, pouvant
engendrer une décharge électrique.
Ce symbole doit attirer l’atte nti on de l’ut il isa teur sur des in structions importantes détaillées dans la notice, ell es doiv en t
être lues et respectées.
Cet appareil porte le symbole CE. Il est interdit d’effectuer toute modification sur l’appareil. La certification CE et la garantie
deviendraient caduques !
NOTE: Pour un fonctionnement normal de l’appareil, il doit être utilisé en intérieur avec une plage de température maximale
autorisée entre 5°C/41°F et 35°C/95°F.
Ne jetez pas les produits électriques dans la poubelle domestique. Déposez-les dans une décharge. Demandez conseil aux autorisés
ou à votre revendeur. Données techniques réservées. Les valeurs actuelles peuvent varier d’un produit à l’autre. Tout droit de
modification réservé sans notification préalable.
garantie La garantie deviendrait également caduque en cas d’accidents ou dommages causes par une utilisation inappropriée de l’appareil ou un non respect
des consignes présentes dans cette notice. Fenton ne pourrait être tenu responsable en cas de dommages matériels ou corporels causés par un non respect
15
Page 16

PRESENTATION
1. Axe disque
2. Plateau
Placez votre disque.
3. Adaptateur 45 tours
Cet adaptateur vous permet de lire des disques 45 tours.
4. Bras de lecture
Le bras, fixé, peut être levé et baissé à la main ou en appuyant sur le poussoir monter / baisser.
5. Verrouillage du bras
Ce système du bras permet de le verrouiller en cas de non utilisation ou pendant une pause. Il a été conçu pour rester
dans la position Up lorsqu'il est déverrouill é.
6. Interrupteur Autostop ON/OFF
Cet interrupteur active l'arrêt automatique ou le désactive. Lorsqu'il est activé, la platine démarre lorsque le bras est
placé sur le disque et s'arrête lorsque le disque est terminé.
7. Interrupteur 33/45 tours / mn
Détermine la vitesse du plateau.
8. Cellule
Lorsque la platine disque n'est pas utilisée, il est recommandé de placer la protection amovible sur l'aiguille.
9. Haut-parleurs
Haut-parleurs stéréo intégrés.
10. Bouton Power et réglage de volume
Pour allumez la platine disque, tournez le bouton dans le sens des aiguilles d'une montre ; une fois la platine disque
allumée, utilisez le bouton pour régler le volume des haut-parleurs internes et du casque. Pour arrêter la platine
disque, tournez ce bouton dans le sens inverse des aiguilles d'une montre jusqu'à ce qu'il clique.
11. Port USB
Utilisez le cordon USB livré pour relier votre platine disque à votre ordinateur. Le port USB envoie l'audio de votre
platine vers votre ordinateur.
12. Sortie Ligne
L'audio de la lecture d'un disque est envoyé vers cette sortie audio coaxiale niveau ligne. Elle ne doit pas être
branchée à des appareils niveau Phono.
FONCTIONNEMENT
7. Reliez la platine disque au bloc secteur et branchez ce dernier à une prise secteur murale.
8. Retirez la protection de l'aiguille en la poussant doucement vers l'avant de l'appareil pour la
première fois.
9. Placez un disque vinyl sur le plateau et sélectionnez la vitesse voulue (33/45 trs/mn) selon le
disque.
10. Ouvrez le clip de verrouillage du bras, déplacez le bras et mettez la cellule sur la position voulue
sur le disque, la platine commence la lecture.
11. Tournez le bouton de réglage du volume dans le sens des aiguilles d'une montre pour régler le
volume.
12. Pour garantir de meilleures performances et une longue durée de vie du produit, débranchez la platine en cas de non
utilisation.
Remarque : Si l'interrupteur AUTO STOP ON/OFF est sur ON, la platine s'arrête automatiquement lorsque le disque est
terminé. Si la fonction auto Stop Control est sur OFF, le disque ne s'arrête pas automatiquement lorsqu'il est fini.
16
Page 17

BRANCHEMENT AVEC UN ORDINATEUR
Le logiciel inclut est une application tierce, Fenton ne peut gérer les questions ou problèmes quant au logici el.
1. Allumez l'ordinateur.
2. Mettez l'interrupteur secteur sur la face arrière de la platine disque sur la position “ON“.
3. L'ordinateur installe les drivers.
4. Une fois les drivers installés, vous devez installer le logiciel Audacity.
Utilisateurs Windows : insérez le CD ou téléchargez la dernière version sur http://audacity.sourceforge.net.
Utilisateurs MAC: téléchargez la dernière version sur http://audacity.sourceforge.net
Pour installer le software (PC)
1. Reliez la platine disque au secteur et reliez le port USB de la platine au port USB de l'ordinateur.
2. Allumez la platine disque avec l'interrupteur Power.
3. Le système Windows détecte un nouvel appareil et indique qu'il est disponible pour l'utilisation.
4. Insérez le CD livré avec la platine d isque.
5. Ouvrez le dossier pour installer le logiciel Audacity. Une fois ce dernier installé, lancez le programme Audacity.
Pour installer le software (MAC)
1) Insérez le CD livré.
2) Ouvrez l'icône du CD sur le bureau.
3) Déplacez le dossier d'installation pour Audacity sur votre disque dur. Nous vous recommandons de déplacer le dossier votre
dossier “Applications“.
4) Une fenêtre s'ouvre montrant la copie des fichier s.
5) Ejectez le CD.
6) Ouvrez “Audacity” à partir de l'endroit où vous l'avez placez sur votre disque dur.
CONFIGURATION LOGICIEL
1. Cliquez Microphone dans la menu déroulant et sélectionnez “Stereo Mix”.
2. Sélectionnez le menu “Edit” puis “Preferences”
Sélectionnez l'appareil audio sous “AudioDevice on UBS Bus“ dans le menu “Recording” et cochez la case “Software
Playthrough” pour écouter l'audio pendant l'enregistrement.
3. Une fois les réglages précédents terminés, vous pouvez commencer à enregistrer. Si vous avez toujours des difficultés
à trouver la platine disque USB, essayez de vérifier les réglages du système ou sur le panneau de commande, vérifiez
les réglages entrée audio depuis le panneau de gestion audio.
Note: Le logiciel Audacity n'est qu'une référence. Pour plus d'information ou pour obtenir la dernière version du
logiciel, allez sur le site : http://www.audacity.com
.
17
Page 18

POLSKI
Nie próbuj dokonywać żadnych napraw samodzielnie, to spowoduje unieważnienie gwarancji. Gwarancja nie dotyczy uszkodzeń
zdrowiu oraz kontuzje spowodowane niestosowaniem się do zaleceń bezpieczeństwa. Dotyczy to wszelakich uszkodzeń.
Gratulujemy zakupu urządzenia marki Fenton. Proszę o przeczytanie instrukcji przed użyciem urządzenia, aby jak najlepiej móc
wykorzystać jego możliwości.
Przeczytaj tę instrukcję przed pierwszym użyciem urządzenia. Postępuj zgodnie z instrukcją, aby nie utracić gwarancji. Zwróć
uwagę na wszystkie ostrzeżenia, aby uniknąć pożaru lub/oraz porażenia prądem. Naprawy mogą być przeprowadzane jedynie
przez autoryzowany serwis. Zatrzymaj tę instrukcję na wypadek potrzeby w przyszłości.
- Przed użyciem skonsultuj się ze specjalistą. Podczas
pierwszego użycia urządzenie może wydzielić
specyficzny zapach. To zupełnie normalne, zniknie po
chwili.
- Urządzenie posiada podzespoły przewodzące prąd. Nie
otwieraj obudowy urządzenia.
- Nie umieszczaj metalowych obiektów ani płynów w
urządzeniu. Może to spowodować porażenie prądem lub
uszkodzenie sprzętu.
- Nie umieszczaj w pobliżu takich źródeł ciepła jak grzejnik
itd. Nie umieszczaj urządzenia na wibrującej
powierzchni. Nie zasłaniaj kanałów wentylacyjnych.
- Urządzenie nie jest przeznaczone do ciągłej pracy.
- Pamiętaj, aby nie uszkodzić przewodu zasilającego.
Uszkodzony przewód zasilający może spowodować
porażenie prądem lub uszkodzenie sprzętu.
- Podczas wyjmowania wtyczki z gniazdka zawsze ciągnij
za wtyczkę, nie za kabel.
- Nie wtykaj kabla mając mokre dłonie.
- Jeśli wtyczka lub/oraz kabel zasilający jest uszkodzony,
musi być wymieniony przez wykwalifikowaną osobę.
- Jeśli urządzenie jest uszkodzone na tyle, że widoczne są
części wewnętrzne, nie podłączaj sprzętu do gniazdka,
ani go nie uruchamiaj. Skontaktuj się z dystrybutorem.
Nie podłączaj urządzenia do opornika bądź dimmera.
- Aby uniknąć porażenia prądem, nie wystawiaj
urządzenia na działanie warunków atmosferycznych ani
na wilgoć.
- Sprzęt może być naprawiany tylko w autoryzowanym
serwisie.
- Podłączaj urządzenie do uziemionego źródła zasilania
(220-240Vac/50Hz) z bezpiecznikiem 10-16A.
- Podczas burzy lub w sytuacjach, gdy urządzenie nie jest
używane przez dłuższy czas, odłącz je od gniazdka.
Zasada brzmi: odłącz sprzęt od gniazdka, gdy go nie
używasz.
- Jeśli urządzenie nie było używane przez dłuższy czas,
może wystąpić kondensacja. Pozwól na to, aby sprzęt
osiągnął temperaturę pokojową. Nigdy nie używaj w
wilgotnych pomieszczeniach, bądź na zewnątrz.
- Podczas użytkowania znacznie wzrasta temperatura
obudowy. Nie dotykaj jej w czasie pracy, bądź
natychmiast po wyłączeniu urządzenia.
- Aby uniknąć wypadków w pracy, wykonuj polecenia
zawarte w tej instrukcji.
- Zabezpiecz urządzenie dodatkowym łańcuchem
bezpieczeństwa. Używaj wysokiej jakości haków.
Upewnij się, że nikt nie stoi w pobliżu okolicy montażu.
Montuj sprzęt w odległości co najmniej 50cm od
materiałów łatwopalnych i zachowuj co najmniej 1m
wolnej przestrzeni z każdej strony, aby zapewnić
odpowiednie chłodzenie
- Urządzenie posiada diody LED wysokiej mocy. Nie patrz
bezpośrednio na diody, aby nie uszkodzić wzroku.
- Nie włączaj i wyłączaj urządzenia co chwilę. Skraca to
jego żywotność.
- Trzymaj z dala od dzieci. Nie zostawiaj sprzętu bez
opieki.
- Nie używaj spray’ów do czyszczenia przełączników. To
powoduje osiadanie się kurzu oraz tłuszczu. W
przypadku usterki zasięgnij rady u specjalisty. Obsługuj
urządzenie mając czyste ręce.
- Nie naciskaj przycisków z zbyt dużą siłą.
- Jeśli urządzenie upadnie, przed kolejnym włączeniem
zawsze musi być sprawdzone przez wykwalifikowanego
technika.
- Nie używaj chemikaliów do czyszczenia obudowy.
Niszczą one lakier. Dokonuj czyszczenia za pomocą
suchej szmatki.
- Trzymaj z dala od innej elektroniki, która może
spowodować zakłócenia.
- Podczas serwisu używaj tylko oryginalnych części. W
innym przypadku może nastąpić poważne uszkodzenie
sprzętu, lub niebezpieczne promieniowanie.
- Wyłącz urządzenie przed wyciągnięciem kabla
zasilającego. Odłącz wszystkie kable przed
przenoszeniem sprzętu.
- Upewnij się, że nikt nie uszkodzi kabla zasilającego.
Sprawdź przed każdym użyciem, czy kabel zasilający nie
nosi znamion uszkodzenia.
- Urządzenie może pracować przy napięciu 220-
240Vac/50Hz. Jeśli podróżujesz ze sprzętem, sprawdź,
czy możesz je bezpiecznie podłączyć do prądu.
- Zachowaj oryginalny karton, aby móc transportować
urządzenie w bezpiecznych warunkach.
Ten znak zwraca uwagę użytkownika na wysokie napięcie, które jest obecne w środku obudowy urządzenia. Napięcie
jest wystarczające, aby porazić użytkownika.
Ten znak zwraca uwagę użytkownika do ważnych informacji, które znajdują się w instrukcji. Informacje te powinny być
przeczytane oraz uwzględnione w codziennym użytkowaniu
Urządzenie posiada certyfikat CE. Nie wolno wprowadzać żadnych zmian w urządzeniu. Każda modyfikacja sprzętu spowoduje
utratę certyfikatu CE oraz gwarancji!
UWAGA: Urządzenie może funkcjonować w pomieszczeniach o temperaturze pomiędzy 5°C/41°F oraz 35°C/95°F.
WA• NA INFORMACJA: Urządzenia elektryczne muszą być składowane w miejscach do tego przeznaczonych.
Sprawdź, gdzie w Twojej okolicy znajduje się najbliższe centrum recyklingu. Specyfikacja techniczna poszczególnych
urządzeniach może się nieznacznie różnić. Specyfikacja może ulec zmian bez powiadomień.
spowodowanych niewłaściwym użytkowaniem sprzętu, niezgodnie z instrukcją. Fenton nie jest odpowiedzialny za uszczerbek na
18
Page 19

PRZEGL• D
13. Silnik
14. Talerz
Miejsce, na którym należy położyć płytę gramofonową
15. Adapter 45RPM
Adapter umożliwiający odtwarzanie płyt z prędkością 45RPM
16. Rami•
Ramię może być podnoszone i opuszczane manualnie lub za pomocą odpowiedniego przycisku.
17. Blokada
Specjalnie zaprojektowana blokada, która chroni ramię, kiedy nie jest używane. Blokada powinna być w górze, gdy nie
blokuje ramienia.
18. Przełą cznik Autostop ON/OFF
Kiedy autostop jest włączony, talerz zacznie się kręcić, kiedy ramię zostanie umieszczone nad płytą oraz przestanie
się kręcić, kiedy nagranie się skończy.
19. Przełą cznik 33 / 45 RPM
Przełącznik zmieniający prędkość odtwarzania.
20. System
Gdy gramofon nie jest używany, zaleca się zasłonięcie igły ochronną pokrywą.
21. Głoą niki
Wbudowane głośniki stereofoniczne.
22. Pokrą tło zasilania oraz głoą noą ci
Aby włączyć odtwarzacz, przekręć pokrętło w prawo, aż usłyszysz charakterystyczny „klik”. Gdy gramofon jest
włączony, użyj pokrętła do regulacji głośności wbudowanych głośników i wyjścia słuchawkowego. Aby wyłączyć
odtwarzacz, przekręć pokrętło w kierunku przeciwnym do ruchu wskazówek zegara, aż zatrzaśnie się.
23. Port USB
Użyj dołączonego w zestawie kabla USB, aby podłączyć gramofon do komputera. Dzięki połączeniu USB, możliwe jest
zgrywanie płyt winylowych na komputer.
24. Wyj•cie liniowe
Sygnał audio z nagrania jest wysyłany do wyjścia liniowego. Uwaga! Nie podłączaj pod to złącze urządzeń phono!
U• YTKOWANIE
13. Podłącz gramofon za pomocą zasilacza do gniazdka zasilania.
14. Zdejmij delikatnie pokrywę ochronną z igły, wyciągając ją w stronę frontu urządzenia.
15. Połóż płytę na talerzu oraz wybierz odpowiednią prędkość (33/45RPM), w zależności od rodzaju
nagrania.
16. Zwolnij blokadę ramienia, podnosząc ją do góry. Delikatnie przenieś ramię oraz połóż igłę na
wybranej pozycji na nagraniu, a gramofon rozpocznie odtwarzanie.
17. Użyj pokrętła głośności, aby dopasować głośność.
18. Aby zapewnić jak najlepszą pracę urządzenia, odłącz gramofon od zasilania, gdy nie jest w
użyciu.
Uwaga: Gdy przełącznik Autostop ON/OFF jest w pozycji ON, nagranie zatrzyma się automatycznie, kiedy zakończy się ostatni
utwór (dla niektórych płyt winylowych zakończenie nastąpi po ostatnim utworze, na samym końcu płyty). Jeśli Autostop będzie
w pozycji OFF, odtwarzanie nie zatrzyma się automatycznie, kiedy nagranie się skończy.
19
Page 20

POŁą CZENIE Z KOMPUTEREM
• Przed podłączeniem gramofonu do komputera, odłącz go od miksera lub systemów Hi-Fi.
• Dołączone w zestawie oprogramowanie jest autorstwa firm trzecich. Z tego powodu Fenton nie udziela informacji na
pytania dotyczące programu lub pomocy z oprogramowaniem.
1. Uruchom komputer
2. Podłącz gramofon do zasilania
3. Uruchom gramofon za pomocą głównego włącznika, umieszczonego z tyłu urządzenia
4. Po uruchomieniu komputera, podłącz do niego gramofon za pomocą dołączonego kabla USB. Komputer
rozpocznie instalację sterowników.
5. Po instalacji sterowników, musisz zainstalować oprogramowanie (np. Audacity)
Windows: umieść płytę CD w napędzie lub pobierz najnowszą wersję z http://audacity.sourceforge.net
MAC: pobierz najnowszą wersję z http://audacity.sourceforge.net
KONFIGURACJA OPROGRAMOWANIA
7. Kliknij w Mikrofon w rozwijanym menu oraz wybierz „Stereo Mix”.
8. Wybierz menu “Edit”, a następnie “Preferences”.
W sekcji „Recording” wybierz urządzenie AudioDevice on USB Bus, jak na obrazku. Zaznacz „Software Playthrough”,
aby odsłuchiwać utwór podczas nagrywania.
9. Po ustawieniu powyższych funkcji, jesteś gotowy do nagrywania. Jeśli nadal masz kłopoty z odszukaniem urządzenia
w programie, sprwadź ustawienia systemowe, lub spróbuj wybrać źródło dźwięku w panelu sterowania dźwiękiem.
Uwaga: Przedstawione zrzuty ekranu są użyte w celach pokazowych. Aby uzyskać więcej informacji, lub w celu pobrania
najnowszej wersji oprogramowania, wejdź na stronę http://www.audacity
20
Page 21

Model:
RP105 Record Player
RP108B Record player
RP108W Record
Ref.nr:
102.100
102.101
102.102
Stylus:
Ceramic Stereo cartridge
Speed:
33 1/3 / 45 RPM
Built in speaker:
No
Yes
Yes
Line Output:
RCA
Power supply:
Via USB-B 5Volt
Dimesions :
315x280x92mm
325x275x110mm
Weight:
2.5kg
2.4kg
TECHNICAL SPECIFICATION / TECHNISCHE SPECIFICATIE / TECHNISCHE DATEN / ESPECIFICACIONES TÉCNICAS / SPÉCIFICATIONS TECHNIQUES / SPECYFIKACJA TECHNICZNA
The specifications are typical. The actual values can slightly change from one unit to the other. Specifications can
be changed without prior notice.
21
Page 22

Declaration of Conformity
Manufacturer: TRONIOS BV
Bedrijvenpark Twente 415
7602 KM – ALMELO
+31(0)546589299
+31(0)546589298
The Netherlands
Product number: 102.100; 102.101; 102.102
Product Description: RP105 Record Player Spk, PC
RP108B Record Player Spk, BLK
RP108W Record Player Spk, WHT
Trade Name: FENTON
Regulatory Requirement: EN 55013:2001+A1:2003+A2:2006
EN 61000-3-2:2006+A1:2009; -3-3:2008
EN 55020:2007+A11:2011
IEC 61000-4-2:2008;-4-3:2006+A1:2007+A2:2010;
-4-4:2004+A1:2010
I hereby declare that the product meets the requirements stated in Directives 2014/35/EU and 2014/30/EU
and conforms to the above mentioned Declarations.
Almelo,
31-03-2017
Name : M. Velders
Signature :
22
Page 23

Page 24

Specifications and design are to change without prior notice..
www.tronios.com
Copyright © 2017 by TRONIOS the Netherlands
 Loading...