

Page 1
BRUSHLESS
272652
OPERATOR'S MANUAL
FILL OIL TANK WITH BAR AND
CHAIN OIL BEFORE FIRST USE
Français p. 49
56V LITHIUM-ION
CORDLESS 18" CHAIN SAW
Español p. 101
WARNING: To reduce the risk of injury, the user must read and understand the
Operator’s Manual before using this product. Save these instructions for future reference.
MODEL NUMBER CS1800/CS1800-FC
Page 2

TABLE OF CONTENTS
Safety Symbols ..........................................4
Safety Instructions .....................................5-16
Glossary of terms ....................................16-17
Introduction ............................................17
Specications ..........................................18
Packing List ............................................18
Description .........................................19-21
Assembly ..............................................22
Operation ........................................... 23-35
Maintenance ........................................36-44
Troubleshooting ...................................... 45-46
Warranty ...........................................47-48
56V LITHIUM-ION CORDLESS CHAIN SAW — CS1800/CS1800-FC2
Page 3

READ ALL INSTRUCTIONS!
WARNING:
and other construction activities contains chemicals known to the state of California
to cause cancer, birth defects or other reproductive harm. Some examples of these
chemicals are:
◾
Lead from lead - based paints
◾
Crystalline silica from bricks and cement and other masonry products, and
◾
Arsenic and chromium from chemically - treated lumber.
Your risk from these exposures varies, depending on how often you do this type of
work. To reduce your exposure to these chemical: work in a well ventilated area, and
work with approved safety equipment, such as those dust masks that are specially
designed to lter out microscopic particles.
Some dust created by power sanding, sawing, grinding, drilling
56V LITHIUM-ION CORDLESS CHAIN SAW — CS1800/CS1800-FC 3
Page 4

SAFETY SYMBOLS
The purpose of safety symbols is to attract your attention to possible dangers. The
safety symbols and the explanations with them deserve your careful attention and
understanding. The symbol warnings do not, by themselves, eliminate any danger. The
instructions and warnings they give are no substitutes for proper accident prevention
measures.
WARNING:
Operator’s Manual, including all safety alert symbols such as “DANGER,” “WARNING,”
and “CAUTION” before using this tool. Failure to follow all instructions listed below may
result in electric shock, re, and/or serious personal injury.
Be sure to read and understand all safety instructions in this
SYMBOL MEANING
SAFETY ALERT SYMBOL:
be used in conjunction with other symbols or pictographs.
WARNING!
foreign objects being thrown into your eyes, which can result in severe
eye damage. Before beginning power tool operation, always wear
safety goggles or safety glasses with side shields and a full face shield
when needed. We recommend a Wide Vision Safety Mask for use over
eyeglasses or standard safety glasses with side shields. Always use eye
protection which is marked to comply with ANSI Z87.1.
Indicates DANGER, WARNING, OR CAUTION. May
The operation of any power tools can result in
56V LITHIUM-ION CORDLESS CHAIN SAW — CS1800/CS1800-FC4
Page 5
SAFETY INSTRUCTIONS
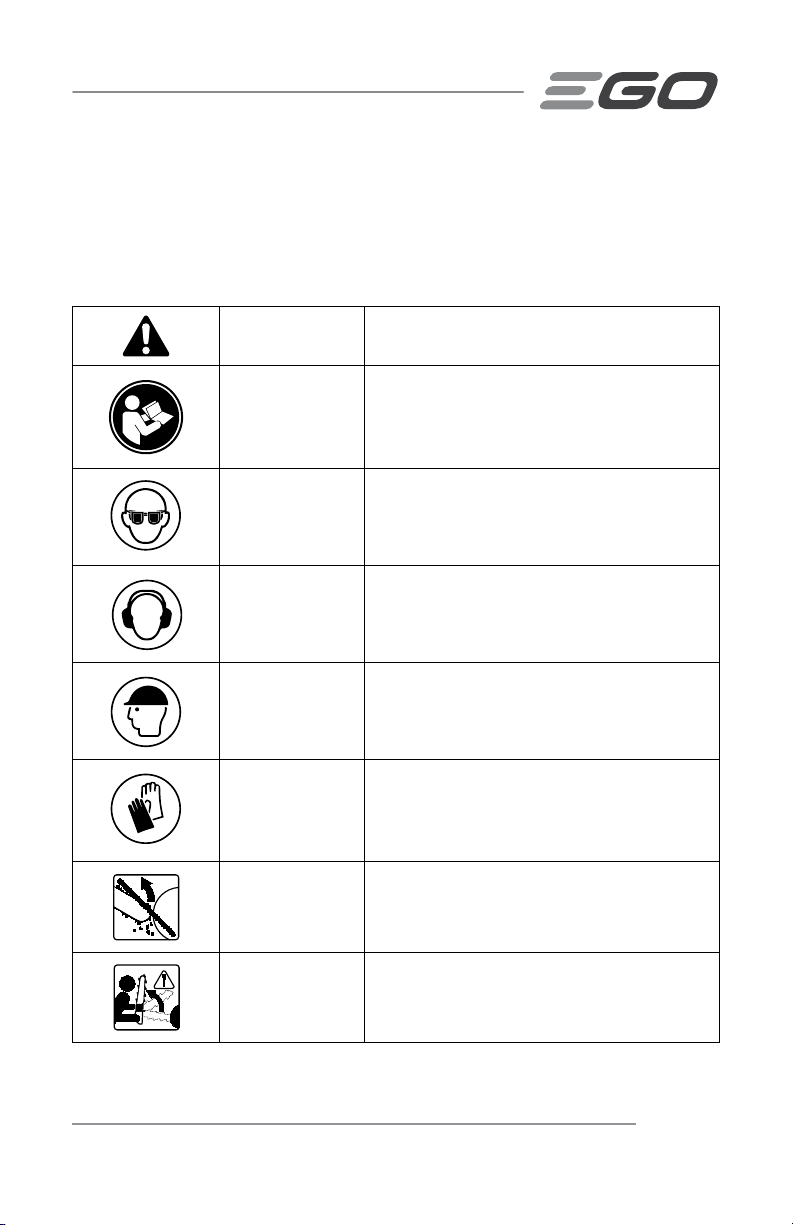
This page depicts and describes safety symbols that may appear on this product. Read,
understand, and follow all instructions on the machine before attempting to assemble
and operate it.
Safety Alert Indicates a potential personal injury hazard.
Read &
Understand
Operator's
Manual
Wear Eye
Protection
Wear Ear
Protection
Wear Head
Protection
Wear Protective
Gloves
Be aware of
kickback
To reduce the risk of injury, user must read
and understand the operator’s manual before
using this product.
Always wear safety goggles or safety glasses
with side shields and a full face shield when
operating this product.
Chain saw noise may damage your hearing.
Always wear sound barriers (ear plugs or ear
mufers) to protect your hearing.
Wear an approved safety hard hat to protect
your head.
Protect your hands with gloves when
handling saw and saw chain. Heavy-duty,
nonslip gloves improve your grip and protect
your hands.
Contact of the guide bar tip with any object
should be avoided.
Guide bar tip
kickback
56V LITHIUM-ION CORDLESS CHAIN SAW — CS1800/CS1800-FC 5
Tip contact can cause the guide bar to move
suddenly upward and backward, which can
cause serious injury.
Page 6

Two handed hold
Recycle Symbols
IPX4
V Volt Voltage
mm Millimeter Length or size
in. Inch Length or size
kg Kilogram Weight
lb Pound Weight
ml Milliliter Volume
.oz Fluid Ounce Volume
°C
°F
Ingress Protection
Degree
Direct Current Type or a characteristic of current
Celsius
Temperature
Fahrenheit
Temperature
Always use two hands when operating the
chain saw.
This product uses lithium-ion (Li-ion)
batteries. Local, state, or federal laws may
prohibit disposal of batteries in ordinary
trash. Consult your local waste authority for
information regarding available recycling and/
or disposal options.
Protection from splashing water
Temperature
Temperature
GENERAL BATTERY-OPERATED POWER TOOL SAFETY WARNINGS
WARNING!
specications provided with this power tool. Failure to follow all instructions
listed below may result in electric shock, re and/or serious injury.
Read all safety warnings, instructions, illustrations and
Save all warnings and instructions for future reference.
The term “power tool” in the warnings refers to your mains-operated (corded) power
tool or battery-operated (cordless) power tool.
56V LITHIUM-ION CORDLESS CHAIN SAW — CS1800/CS1800-FC6
Page 7

WORK AREA SAFETY
◾
Keep work area clean and well lit. Cluttered or dark areas invite accidents.
◾
Do not operate power tools in explosive atmospheres, such as in the
presence of ammable liquids, gases or dust. Power tools create sparks
which may ignite the dust or fumes.
◾
Keep children and bystanders away while operating a power tool.
Distractions can cause you to lose control.
PERSONAL SAFETY
◾
Stay alert, watch what you are doing and use common sense when
operating a power tool. Do not use a power tool while you are tired
or under the inuence of drugs, alcohol or medication. A moment of
inattention while operating power tools may result in serious personal injury.
◾
Always use personal protective equipment. Personal protective equipment
such as eye protection, dust mask, non-skid safety shoes, hard hat and/or
hearing protection used for appropriate conditions will reduce personal injuries.
◾
Prevent unintentional starting. Ensure the switch is in the off-position
before connecting to the battery pack, picking up or carrying the tool.
Carrying power tools with your nger on the switch or energizing power tools that
have the switch on invites accidents.
◾
Remove any adjusting key or wrench before turning the power tool on.
A wrench or a key left attached to a moving part of the power tool may result in
personal injury.
◾
Do not overreach. Keep proper footing and balance at all times. This
enables better control of the power tool in unexpected situations.
◾
Dress properly. Do not wear loose clothing or jewelry. Keep your hair and
clothing away from moving parts. Loose clothes, jewelry or long hair can be
caught in moving parts.
◾
If devices are provided for the connection of dust extraction and
collection facilities, ensure these are connected and properly used. Use
of dust collection can reduce dust-related hazards.
◾
Do not let familiarity gained from frequent use of tools allow you to
become complacent and ignore tool safety principles. A careless action
can cause severe injury within a fraction of a second.
56V LITHIUM-ION CORDLESS CHAIN SAW — CS1800/CS1800-FC 7
Page 8

POWER TOOL USE AND CARE
◾
Do not force the power tool. Use the correct power tool for your
application. The correct power tool will do the job better and safer at the rate for
which it was designed.
◾
Do not use the power tool if the switch does not turn it on and off. Any
power tool that cannot be controlled with the switch is dangerous and must be
repaired.
◾
Remove the battery pack, if detachable, from the power tool and/or
activate any battery disabling device before clearing jammed material,
making any adjustments, changing accessories, cleaning, or storing
power tools. Such preventive safety measures reduce the risk of starting the
power tool accidentally.
◾
Store idle power tools out of the reach of children and do not allow
persons unfamiliar with the power tool or these instructions to operate
the power tool. Power tools are dangerous in the hands of untrained users.
◾
Maintain power tools and accessories. Check for misalignment or
binding of moving parts, breakage of parts and any other condition that
may affect the power tool’s operation. If damaged, have the power tool
repaired before use. Many accidents are caused by poorly maintained power
tools and accessories.
◾
Keep cutting tools sharp and clean. Properly maintained cutting tools with
sharp cutting edges are less likely to bind and are easier to control.
◾
Use the power tool, accessories, tool bits, etc. in accordance with these
instructions, taking into account the working conditions and the work to
be performed. Use of the power tool for operations different from those intended
could result in a hazardous situation.
◾
Keep handles and grasping surfaces dry, clean and free from oil and
grease. Slippery handles and grasping surfaces may lead to unsafe handling
and/or loss of control of the tool.
BATTERY TOOL USE AND CARE
◾
Recharge only with the charger specied by the manufacturer. A charger
that is suitable for one type of battery pack may create a risk of re when used
with another battery pack.
56V LITHIUM-ION CORDLESS CHAIN SAW — CS1800/CS1800-FC8
Page 9

◾
Use power tools only with specically designated battery packs. Use of
any other battery packs may create a risk of injury and re.
◾
When battery pack is not in use, keep it away from other metal objects,
like paper clips, coins, keys, nails, screws or other small metal objects,
that can make a connection from one terminal to another. Shorting the
battery terminals together may cause burns or a re.
◾
Under abusive conditions, liquid may be ejected from the battery; avoid
contact. If contact accidentally occurs, ush with water. If liquid contact
eyes, additionally seek medical help. Liquid ejected from the battery may
cause irritation or burns.
◾
Do not use a battery pack or tool that is damaged or modied. Damaged
or modied batteries may exhibit unpredictable behavior resulting in re,
explosion or risk of injury.
◾
Do not expose a battery pack or tool to re or excessive temperature.
Exposure to re or temperature above 265 °F (130°C) may cause explosion.
◾
Follow all charging instructions and do not charge the battery pack or
tool outside the temperature range specied in the instructions. Charging
improperly or at temperatures outside the specied range may damage the
battery and increase the risk of re.
SERVICE
◾
Have your power tool serviced by a qualied repair person using only
identical replacement parts. This will ensure that the safety of the power tool
is maintained.
◾
Never service damaged battery packs. Service of battery packs should only
be performed by the manufacturer or authorized service providers.
SAFETY INSTRUCTIONS FOR CHAIN SAW
◾
Keep all parts of the body away from the saw chain when the chain saw
is operating. Before you start the chain saw, make sure that the saw
chain is not contacting anything. A moment of inattention while operating
chain saws may cause entanglement of your clothing or body with the chain.
◾
Always hold the chain saw with your right hand on the rear handle and
your left hand on the front handle. Holding the chain saw with a reversed hand
conguration increases the risk of personal injury and should never be done.
56V LITHIUM-ION CORDLESS CHAIN SAW — CS1800/CS1800-FC 9
Page 10

◾
Hold the chain saw by insulated gripping surfaces only, because the saw
chain may contact hidden wiring. Saw chains contacting a “live” wire may
make exposed metal parts of the chain saw“live” and could give the operator an
electric shock.
◾
Wear eye protection. Further protective equipment for hearing, head,
hands, legs and feet is recommended. Adequate protective equipment will
reduce personal injury from ying debris or accidental contact with the saw
chain.
◾
Do not operate a chain saw in a tree, on a ladder, from a rooftop, or
any unstable support. Operation of a chain saw in this manner could result in
serious personal injury.
◾
Always keep proper footing and operate the chain saw only when
standing on xed, secure and level surface. Slippery or unstable surfaces
may cause a loss of balance or control of the chain saw.
◾
When cutting a limb that is under tension be alert for spring back. When
the tension in the wood bers is released the spring loaded limb may strike the
operator and/or throw the chain saw out of control.
◾
Use extreme caution when cutting brush and saplings. The slender
material may catch the saw chain and be whipped toward you or pull you off
balance.
◾
Carry the chain saw by the front handle with the chain saw switched off
and away from your body. When transporting or storing the chain saw,
always t the guide bar cover. Proper handling of the chain saw will reduce
the likelihood of accidental contact with the moving saw chain.
◾
Follow instructions for lubricating, chain tensioning and changing the
bar and chain. Improperly tensioned or lubricated chain may either break or
increase the chance for kickback.
◾
Cut wood only. Do not use chain saw for purposes not intended. For
example: do not use chain saw for cutting metal, plastic, masonry or
non-wood building materials. Use of the chain saw for operations different
than intended could result in a hazardous situation.
◾
Do not attempt to fell a tree until you have an understanding of the
risks and how to avoid them. Serious injury could occur to the operator or
bystanders while felling a tree.
56V LITHIUM-ION CORDLESS CHAIN SAW — CS1800/CS1800-FC10
Page 11

CAUSES AND OPERATOR PREVENTION OF KICKBACK
Kickback may occur when the nose or tip of the guide bar touches an object,
or when the wood closes in and pinches the saw chain in the cut.
Tip contact in some cases may cause a sudden reverse reaction, kicking the
guide bar up and back towards the operator.
Pinching the saw chain along the top of the guide bar may push the guide bar
rapidly back towards the operator.
Either of these reactions may cause you to lose control of the saw, which
could result in serious personal injury. Do not rely exclusively upon the safety
devices built into your saw. As a chain saw user, you should take several
steps to keep your cutting jobs free from accident or injury.
Kickback is the result of chain saw misuse and/or incorrect operating
procedures or conditions and can be avoided by taking proper precautions as
given below:
◾
Maintain a rm grip, with thumbs and ngers encircling the chain saw
handles, with both hands on the saw and position your body and arm to
allow you to resist kickback forces. Kickback forces can be controlled by the
operator, if proper precautions are taken. Do not let go of the chain saw.
◾
Do not overreach and do not cut above shoulder height. This helps prevent
unintended tip contact and enables better control of the chain saw in unexpected
situations.
◾
Only use replacement guide bars and saw chains specied by the
manufacturer. Incorrect replacement guide bars and saw chains may cause
chain breakage and/or kickback.
◾
Follow the manufacturer’s sharpening and maintenance instructions
for the saw chain. Decreasing the depth gauge height can lead to increased
kickback.
56V LITHIUM-ION CORDLESS CHAIN SAW — CS1800/CS1800-FC 11
Page 12
KICKBACK SAFETY DEVICES ON THIS CHAIN SAW
Chain Brake
The chain saw comes equipped with a chain brake, which stops both the motor and
the motion of the chain when kickback occurs. The chain brake can be activated by
the forward motion of the chain-kickback brake handle as the saw rotates backward
during kickback; it can also be activated by the inertial forces generated during rapid
pushback.
:
WARNING
Make sure that the chain brake is working properly before using the chain saw. The
chain-kickback brake handle should move back and forth easily.
Never modify or attempt to disable the chain brake.
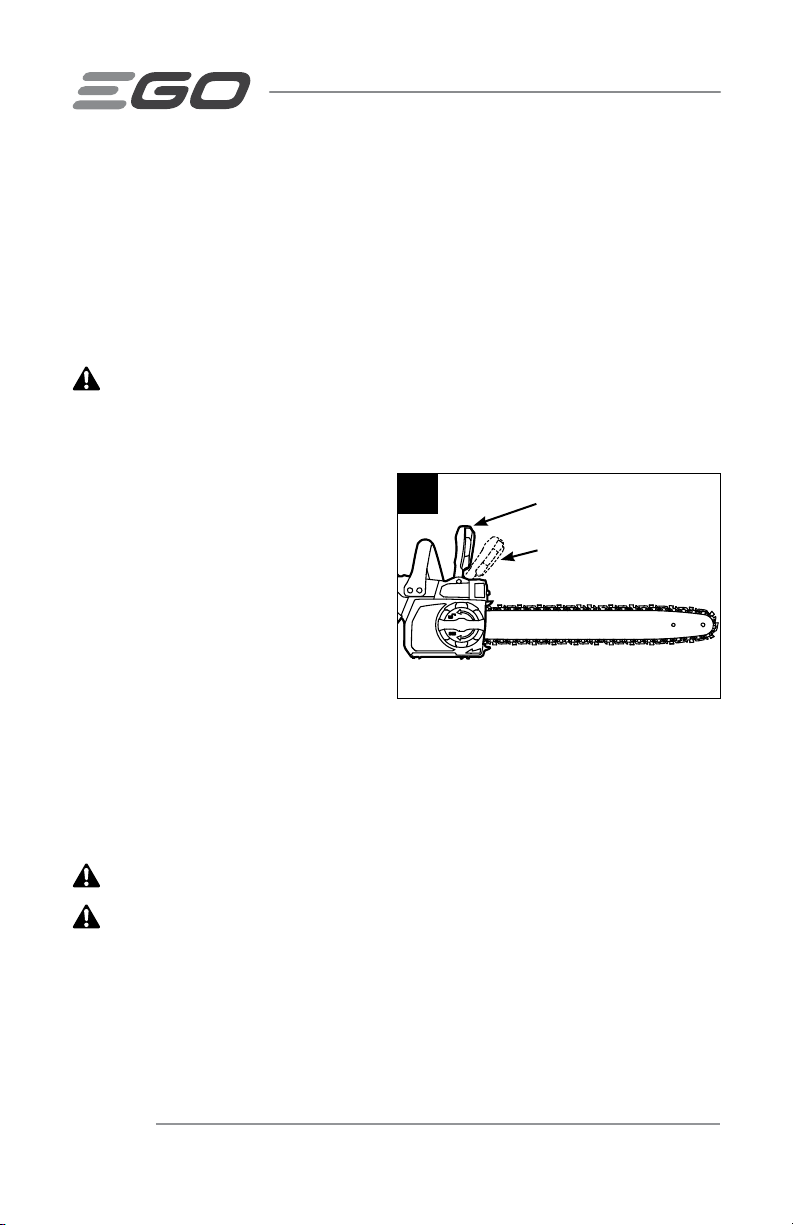
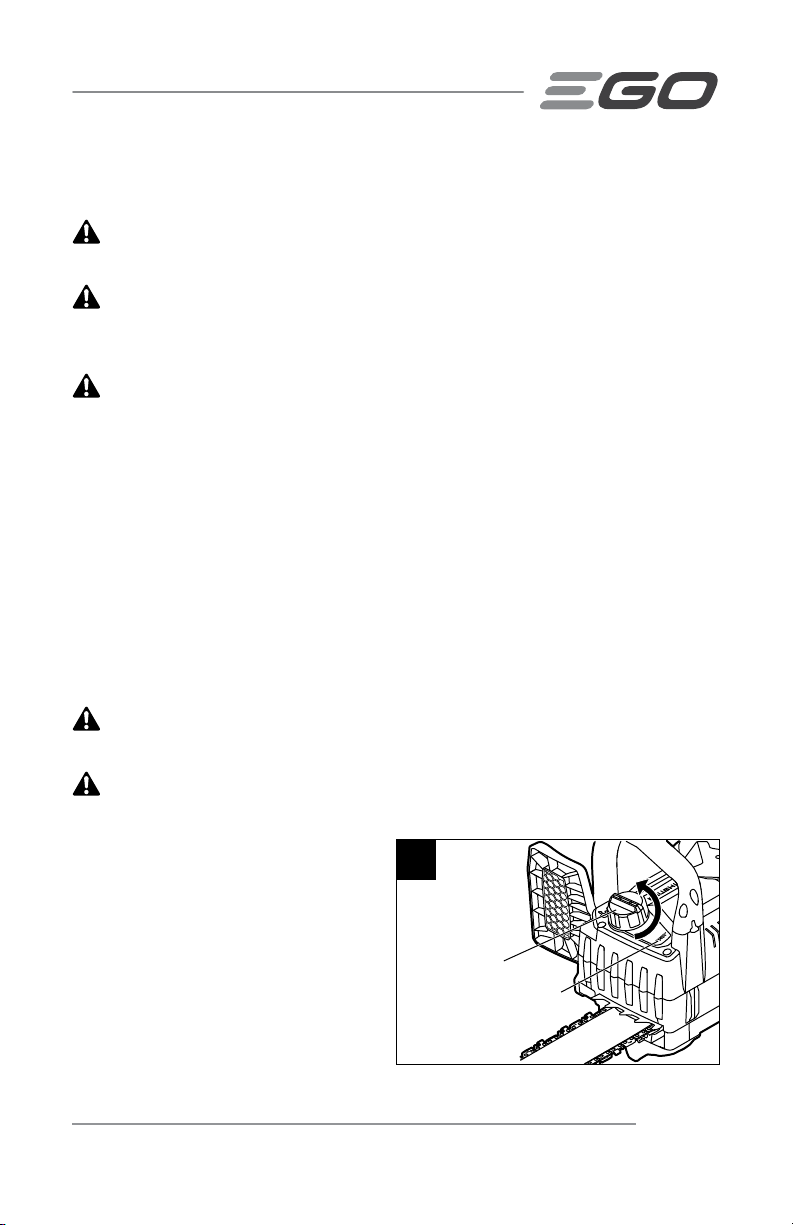
To test the operation of the chain brake,
perform the following steps (Fig. 1):
◾
Place the chain saw on a at bare
surface and make sure no objects
or obstructions that could come in
contact with the bar and chain are in
the immediate vicinity.
◾
Disengage the chain brake by
pulling the chain-kickback brake
handle towards the front handle.
◾
Start the chain saw.
◾
Push the chain-kickback brake handle towards the front of the saw. A properly
functioning hand brake will stop the movement of the chain immediately. If the
chain brake is not working properly, do not use the chain saw until it has been
repaired by a qualied service technician.
:
WARNING
WARNING
chain brake may deteriorate. Always keep the device clean.
Conrm that the chain brake works properly before each use.
:
If the chain brake is clogged with wood chips, the function of the
1
Chain kickbanck brake
handle in operationg position
Chain kickbanck brake
handle in brake position
56V LITHIUM-ION CORDLESS CHAIN SAW — CS1800/CS1800-FC12
Page 13
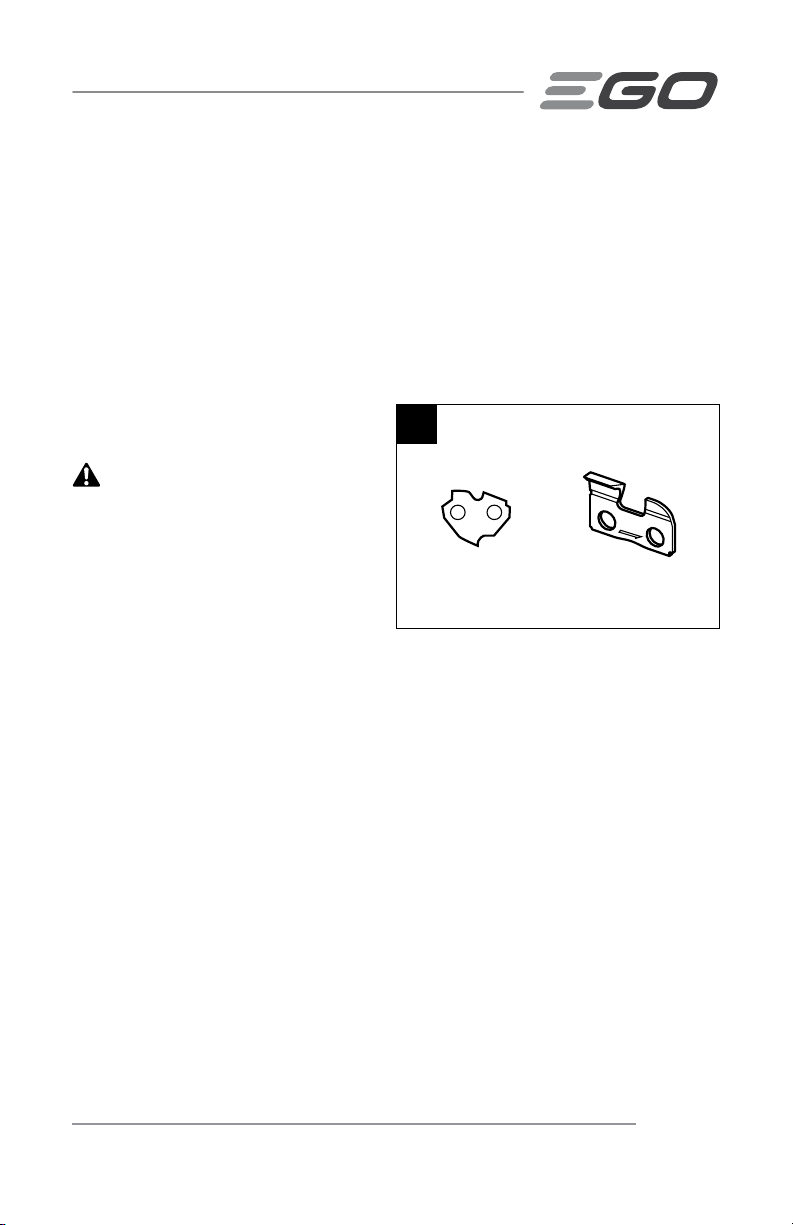
Low Kickback Saw Chain
The ramp-shaped depth gauges ahead of each cutter can minimize the force of a
kickback reaction by preventing the cutters from digging in too deeply at the kickback
zone. Only use a replacement chain that is equivalent to the original chain or has been
certied as a low kickback chain per ANSI B175.1. A low kickback tooth saw chain is a
chain that has met the kickback performance requirements of ANSI B175.1 (American
National Standard for Power Tools-Gasoline-Powered Chain Saws-Safety Requirements)
when tested on the representative sample of chain saws below 3.8 c.i.d. specied in
ANSI B175.1.
The bumper drive link (Fig. 2) also helps
deliver low-kickback performance.
CAUTION:
sharpened during their useful life, they
lose some of the low kickback qualities
and extra caution should be used.
As saw chains are
2
Bumper drive link Cutter type
GUIDE BAR
This saw comes equipped with a guide
bar that has a small radius nose. Small radius noses generally have less potential for
kickback. When replacing the guide bar, be sure to order the bar listed in this manual.
56V LITHIUM-ION CORDLESS CHAIN SAW — CS1800/CS1800-FC 13
Page 14
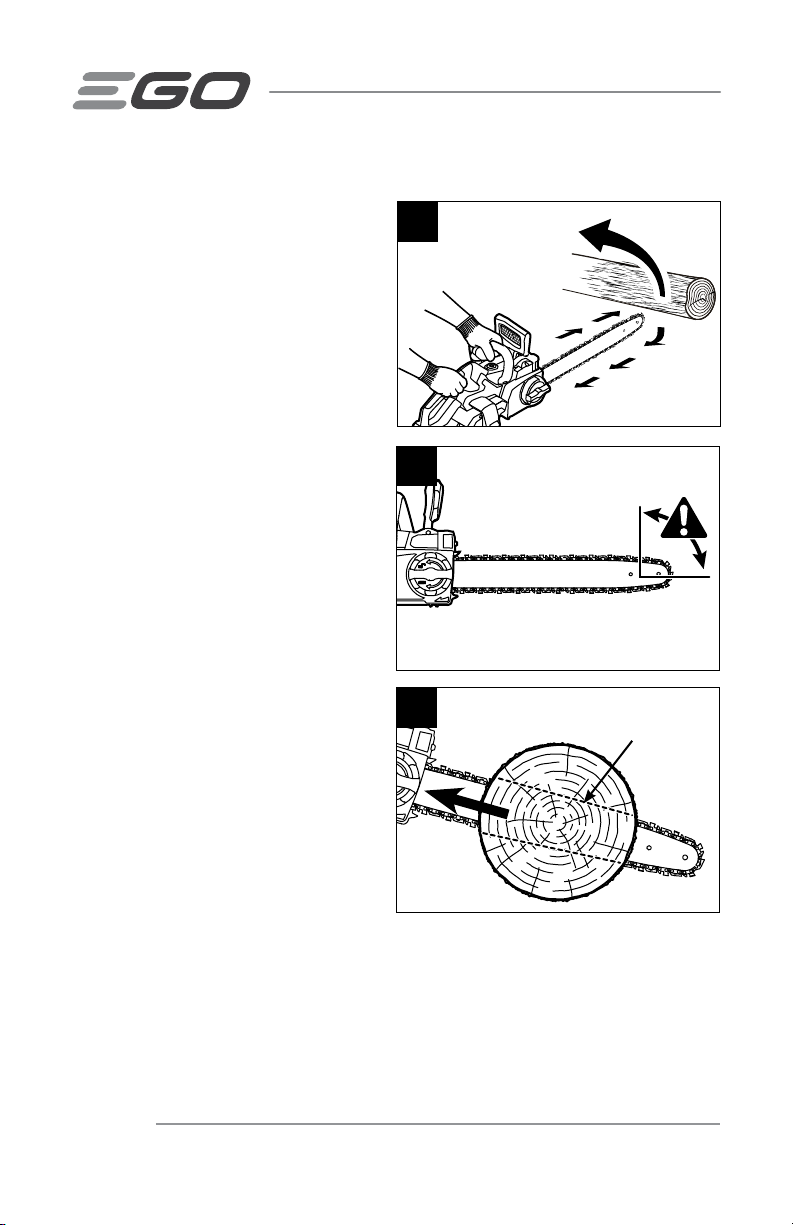
ADDITIONAL WARNINGS
◾
With a basic understanding of
kickback (Fig. 3-5), you can
reduce or eliminate the element
of surprise. Sudden surprise
contributes to accidents.
◾
Make sure that the area in
which you are cutting is free
from obstructions. Do not let
the nose of the guide bar contact
a log, branch, fence, or any other
obstruction that could be hit while
you are operating the saw.
◾
Inspect the work piece for nails,
wire, or other foreign objects
prior to cutting.
◾
Plan the work, ensuring an
obstacle-free work area and, in
the case of felling, at least one
escape path from the falling
tree.
◾
When felling, keep bystanders
at least two tree lengths away.
◾
Keep proper footing and balance
at all times.
3
4
5
Rotational
kickback
BRUSHLESS
Kickback
danger zone
Linear kickback
Pinch
Kickback
56V LITHIUM-ION CORDLESS CHAIN SAW — CS1800/CS1800-FC14
Page 15
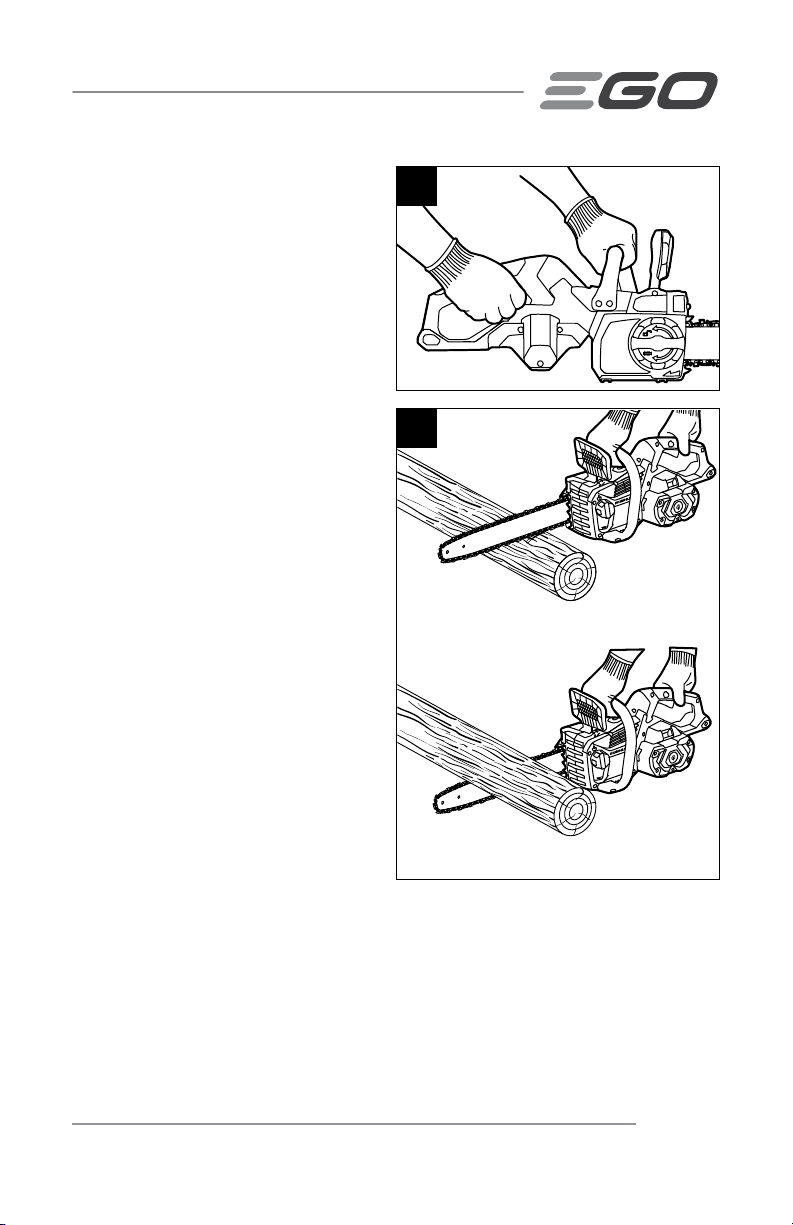
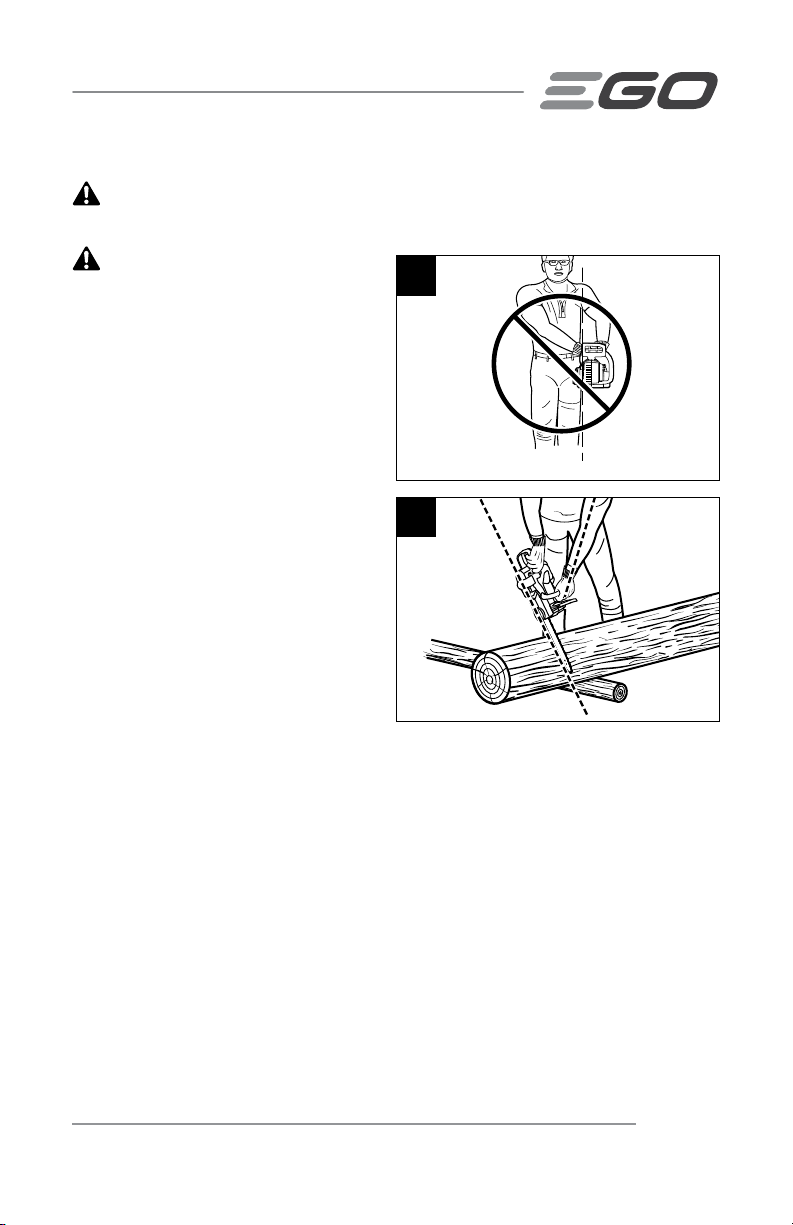
◾
BRUSHLESS
A chain saw is intended for two
handed use. Serious injury to the
operator, helpers, and/or bystanders
can result from one-handed
operation (Fig. 6).
◾
Always cut with the unit running
at full speed. Fully squeeze the
switch trigger and maintain cutting
speed.
◾
Push and Pull – The reaction force
is always opposite to the direction
the chain is moving where wood
contact is made. Thus, the operator
must be ready to control the PULL
when cutting on the bottom edge of
the bar, and the PUSH when cutting
along the top edge (Fig. 7).
◾
Avoid unintentional contact
with the stationary saw chain or
guide bar rails. These can be very
sharp. Always wear gloves and long
pants or chaps when handling the
chain saw, saw chain, or guide bar.
◾
Never operate a chain saw
that is damaged or improperly
adjusted or that is not
completely and securely
assembled. Be sure that the saw
chain stops moving when the trigger
switch is released.
◾
When bucking, secure the work piece prior to cutting. When felling or
pruning, identify and secure hazardous branches.
◾
Aggressive or abusive cutting or misuse of the chain saw can cause
premature bar, chain, and/or sprocket wear, as well as a broken chain or
bar, leading to kickback, chain throw or the ejection of material.
6
7
Pull
Push
56V LITHIUM-ION CORDLESS CHAIN SAW — CS1800/CS1800-FC 15
Page 16

◾
Never use the guide bar as a lever. A bent guide bar can cause premature bar,
chain, and/or sprocket wear, as well as a broken chain or bar, leading to kickback,
chain throw or the ejection of material.
◾
Cut only one work piece at a time.
◾
Use only with the battery packs and chargers listed below:
BATTERY PACK CHARGER
BA1120, BA1120-FC, BA1400, BA1400-FC,
BA2240, BA2240-FC, BA2800, BA2800-FC,
BA4200, BA4200-FC, BA1400T, BA1400T-FC,
BA2800T, BA2800T-FC, BA4200T, BA4200T-FC
◾
Do not charge the battery pack in rain or in wet locations.
◾
If situations occur which are not covered in this manual, use care and
good judgment. Contact EGO Customer Service for assistance.
CH2100, CH2100-FC,
CH5500, CH5500-FC
SAVE THESE INSTRUCTIONS!
GLOSSARY OF TERMS
Automatic Oiler: A system that automatically lubricates the guide bar and saw chain.
Bucking: The process of cross-cutting a felled tree or log into lengths.
Bucking Spikes: The pointed tooth or teeth for use when felling or bucking to pivot
the saw and maintain position while sawing.
Chain Brake: A device used to stop the saw chain immediately.
Chain Saw Power Head: A chain saw without the saw chain or guide bar.
Drive Sprocket: The toothed part that drives the saw chain.
Felling: The process of cutting down a tree.
Felling Back Cut: The nal cut in a tree felling operation made on the opposite side of
the tree from the notching undercut.
56V LITHIUM-ION CORDLESS CHAIN SAW — CS1800/CS1800-FC16
Page 17

Kickback: The backward or upward motion, or both, of the guide bar, which occurs
when the saw chain near the nose of the top area of the guide bar contacts any object,
such as a log or branch, or when the wood closes in and pinches the saw chain in the
cut.
Low-Kickback Chain: A chain that complies with the kickback performance
requirements of ANSIB175.1 when tested on a representative sample of chain saws.
Normal Cutting Position: Those positions assumed in performing bucking and felling
cuts.
Notching Undercut: A notch cut in a tree that directs the tree’s fall.
Reduced Kickback Guide Bar: A guide bar that has been demonstrated to reduce
kickback signicantly.
INTRODUCTION
Congratulations on your selection of the new generation of 56V Lithium-ion powered
chain saw. It has been designed, engineered and manufactured to give you the best
possible dependability and performance.
Should you experience any problem you cannot easily remedy, please contact EGO
customer service center 1-855-EGO-5656.
This manual contains important information on to the safe assembly, operation, and
maintenance of your product. Read it carefully before using the product. Keep this
manual handy so you can refer to it at any time.
SERIAL NUMBER _____________________ DATE OF PURCHASE _________________
YOU SHOULD RECORD BOTH SERIAL NUMBER AND DATE OF PURCHASE AND KEEP IN A SAFE
PLACE FOR FUTURE REFERENCE
56V LITHIUM-ION CORDLESS CHAIN SAW — CS1800/CS1800-FC 17
Page 18

SPECIFICATIONS
Voltage 56V
Guide Bar Length 18" (450mm)
Chain Pitch 3/8" (9.5mm)
Chain Gauge 0.050" (1.3mm)
Chain Type 91PX062X
Guide Bar Type 180SDEA041
Chain Oil Tank capacity 7 .oz (200ml)
Operating Temperature 5°F-104°F (-15°C-40°C)
Storage Temperature -4°F - 158° F (-20°C - 70°C)
Net Weight (Without battery pack, chain
sheath)
Recommended Bar and Chain for this Chain Saw
PART NAME TYPE MODEL NUMBER
180SDEA041(Recommend)
Guide Bar
Saw Chain
164MLEA041(Compatible)
144MLEA041(Compatible)
91PX062X(Recommend)
90PX056X(Compatible)
90PX052X(Compatible)
9.7 lbs. (4.4 kg)
AG1800(Recommend)
AG1600(Compatible)
AG1400(Compatible)
AC1800(Recommend)
AC1600(Compatible)
AC1400(Compatible)
PACKING LIST
PART NAME QUANTITY
Chain Saw 1
Chain Sheath 1
Operator's Manual 1
56V LITHIUM-ION CORDLESS CHAIN SAW — CS1800/CS1800-FC18
Page 19
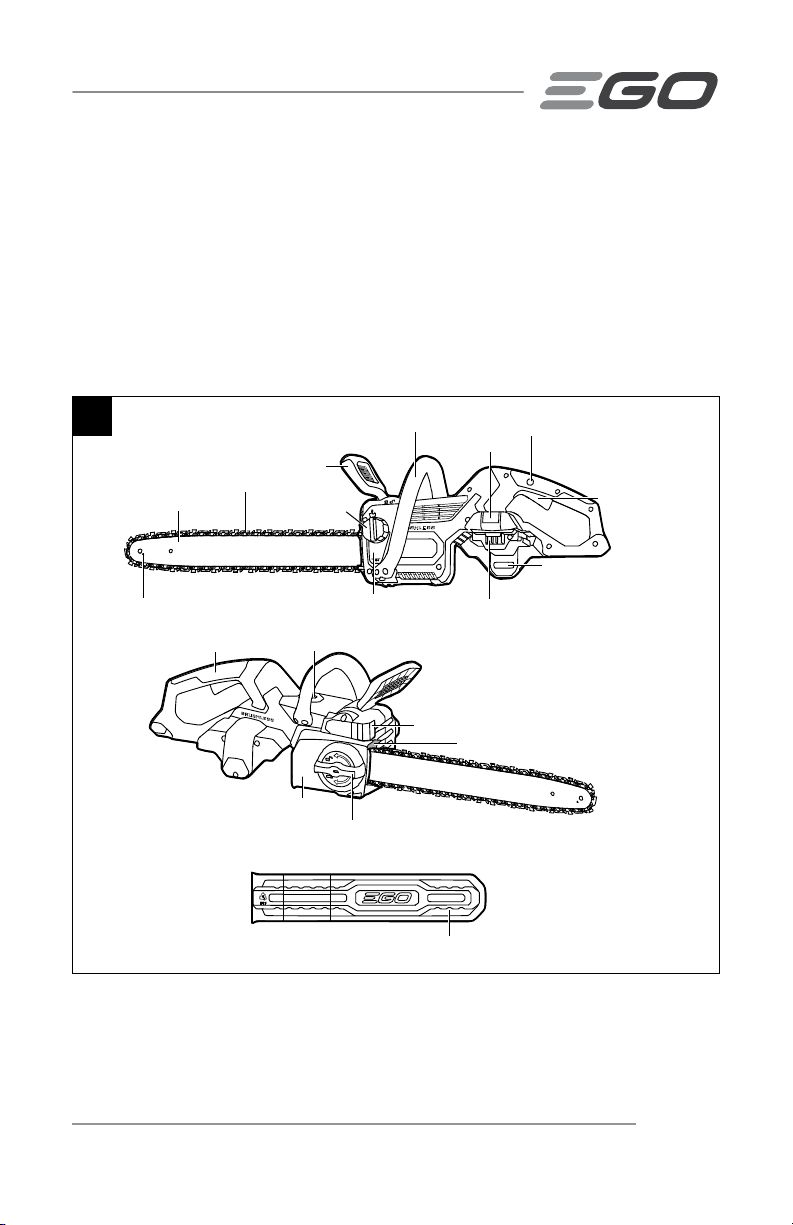
DESCRIPTION
KNOW YOUR CHAIN SAW (Fig. 8)
The safe use of this product requires an understanding of the information on the tool
and in this operator’s manual, as well as knowledge of the project you are attempting.
Before using this product, familiarize yourself with all operating features and safety
rules.
8
Chain Kickback Brake Handle
Guide Bar
Lubricating Hole
Saw Chain
Rear Handle
Front Handle
Oil-Tank Cap
Oil-Inspection Window Ejection Mechanism
LED Button
Side Cover
Quick Chain-tension Adjust Knob
BatteryRelease Button
LED Headlights
Bucking Spikes
Chain Sheath
Lock-off Button
Variable-Speed
Trigger Switch
Electric Contacts
56V LITHIUM-ION CORDLESS CHAIN SAW — CS1800/CS1800-FC 19
Page 20

Chain-Kickback Brake Handle
Serves as the lever for chain brake activation. It also provides protection against
projecting branches and helps prevent the left hand from touching the saw chain if it
slips off the front handle.
Variable-Speed Trigger Switch
Turns the chain saw On and Off and adjusts the chain speed.
Lock-off Button
Helps to prevent accidental or unauthorized activating of the trigger switch. It must be
depressed before the trigger switch can be activated.
Oil-Tank Cap
Seals the oil tank.
Oil-Inspection Window
Provides a view of the oil level in the oil tank.
Saw Chain
A loop of chain having cutting teeth that cut the wood when it is driven by the chain
saw power head and supported by the guide bar.
Chain Sheath
The chain sheath keeps the operator from coming in contact with the sharp chain
blades when the tool is not in use. It also helps keep the chain blades from being
nicked or damaged when the tool is in transportation and storage.
Guide Bar
Supports and guides the saw chain.
Front Handle
The support handle for the left hand at the front of the chain saw.
56V LITHIUM-ION CORDLESS CHAIN SAW — CS1800/CS1800-FC20
Page 21

Rear Handle
The support handle for the right hand, located at the rear of the chain saw. Always
hold the chain saw with your right hand on the rear handle and your left hand
on the front handle.
Quick Chain-tension Adjust Knob
Permits quick precise adjustment of chain tension without auxiliary device assistance.
Side Cover
Covers the drive sprocket and secures the guide bar.
Battery-Release Button
Press to release the battery pack from the tool.
Ejection Mechanism
Aids in removing the battery.
LED Headlights
The LED headlights are located in the front of the chain saw power head.
This feature provides extra light for increased visibility and it can be adjusted into 2
brightness.
LED Button
Switch ON or OFF of the LED headlights. Press once on the LED button and the
headlights shine with Level 1 brightness. Press the LED button again, and the lights will
shine more brightly: Level 2. The LED headlights will be turned off after pressing the
button a third time.
Bucking Spikes
The pointed metal teeth for use when felling or bucking to pivot the chain saw and
maintain position, preventing lumber sliding while sawing. It can improve the cutting
efciency.
56V LITHIUM-ION CORDLESS CHAIN SAW — CS1800/CS1800-FC 21
Page 22

ASSEMBLY
WARNING:
until the parts are replaced. Use of this product with damaged or missing parts could
result in serious personal injury.
WARNING:
recommended for use with this product. Any such alteration or modication is misuse
and could result in a hazardous condition leading to possibly serious personal injury.
WARNING:
injury, always remove the battery pack from the product when assembling parts,
making adjustments, cleaning, or when not in use.
If any parts are damaged or missing, do not operate this product
Do not attempt to modify this product or create accessories not
To prevent accidental starting that could cause serious personal
UNPACKING
◾
This product has been shipped completely assembled.
◾
Carefully remove the product and any accessories from the box. Make sure that
all items listed in the packing list are included.
◾
Inspect the product carefully to make sure that no breakage or damage occurred
during shipping.
◾
Do not discard the packing material until you have carefully inspected and
satisfactorily operated the product.
◾
If any parts are damaged or missing, please return the product to the place of
purchase.
56V LITHIUM-ION CORDLESS CHAIN SAW — CS1800/CS1800-FC22
Page 23
OPERATION
WARNING:
Remember that a careless fraction of a second is sufcient to inict serious injury.
WARNING:
Z87.1. Failure to do so could result in objects being thrown into your eyes and other
possible serious injuries.
WARNING:
manufacturer of this product. The use of attachments or accessories not recommended
can result in serious personal injury.
Before each use, inspect the entire product for damaged, missing, or loose parts such
as screws, nuts, bolts, etc. Securely tighten all fasteners and caps and do not operate
this product until all missing or damaged parts are replaced.
Do not allow familiarity with this product to make you careless.
Always wear eye protection that is marked to comply with ANSI
Do not use any attachments or accessories not recommended by the
APPLICATIONS
You may use this product for basic felling, limbing, pruning, and woodcutting of lumber
and trees.
FILLING OILTANK WITH BAR AND CHAIN LUBRICANT
WARNING:
injury, always remove the battery pack from the tool before lling the tank with oil.
WARNING:
Oil may spill and cause a re.
To prevent accidental starting that could cause serious personal
Do not smoke or bring any re or ame near the oil or the chain saw.
NOTICE: The chain saw is not lled
with oil at the time of purchase. It is
essential to ll the tank with oil before
use. Operating the chain saw without
chain oil or when the oil level is below
the minimum mark (Fig. 9) will result in
damage to the chain saw. Chain life and
cutting capacity depend on optimum
lubrication. The chain is automatically
lubricated with chain oil during operation.
56V LITHIUM-ION CORDLESS CHAIN SAW — CS1800/CS1800-FC 23
9
Oil Tank Cap
Minimum Oil Mark
Page 24

1. Remove the battery pack from the chain saw.
2. Clean the oil-tank cap and the area around it to ensure that no dirt falls into the
oil tank.
3. Position the chain saw on its side on a rm, at surface, so that the oil-tank cap
is facing upwards. Rotate the oil-tank cap counterclockwise to remove it (Fig. 9).
4. Carefully pour the bar and chain oil into the oil tank. Be careful not to let the oil
spill from the opening. Fill to the bottom of the ll neck. Wipe off any excess oil.
5. Replace the cap, place the saw upright, and view the level through the oilinspection window. Oil should ll the window.
NOTICE:
◾
Use OREGON® bar and chain oil for best results. It is specially designed to provide
low friction and faster cuts.
◾
Never use oil or other lubricants not specically designed for use on the bar and
chain. This can lead to a clogged oil system, which may cause premature wear of
the bar and chain.
◾
Check the oil level frequently and ll when the oil level falls below the minimum
mark. Never operate the chain saw if the oil is not visible.
◾
Do not use dirty, used, or otherwise contaminated oil. Damage may occur to the
bar or chain.
◾
It is normal for oil to seep from the saw when it is not in use. To prevent seepage,
empty the oil tank after each use, and then run the saw for one minute. When
storing the tool for a long period of time, be sure the chain is lightly lubricated;
this will prevent rust on the chain and bar as well as the inside drive sprocket.
◾
To preserve natural resources, please recycle or dispose of oil properly. Consult
your local waste authority for information regarding available recycling and
disposal options.
56V LITHIUM-ION CORDLESS CHAIN SAW — CS1800/CS1800-FC24
Page 25
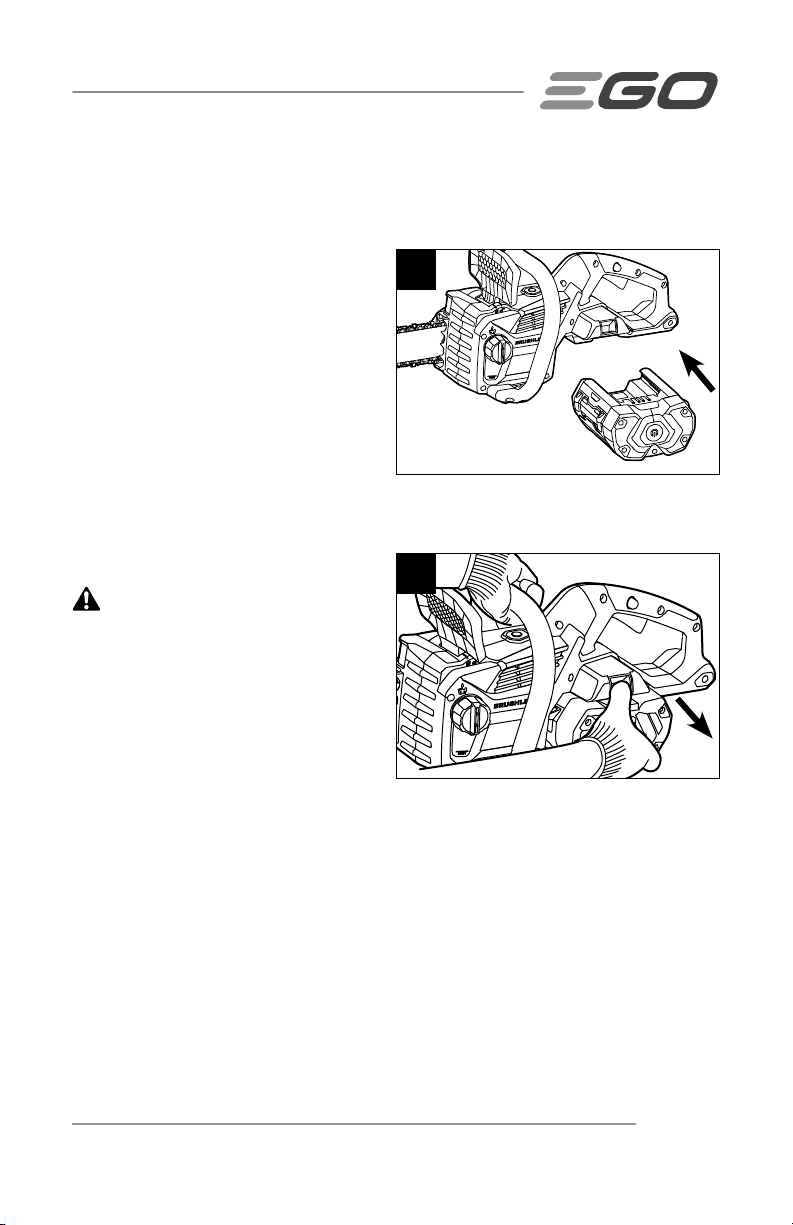
INSTALLING/REMOVING BATTERY PACK (Fig. 10 & 11)
NOTICE:
Fully charge the battery pack before its rst use.
To Install (Fig. 10)
1. Align the ribs of the battery pack
with the mounting slots in the chain
saw’s battery port.
2. Slide the battery pack into the tool
until it snaps into position.
10
NOTICE: Make sure that the latch on
the chain saw snaps into place and the
battery pack is secured to the tool before
beginning operation.
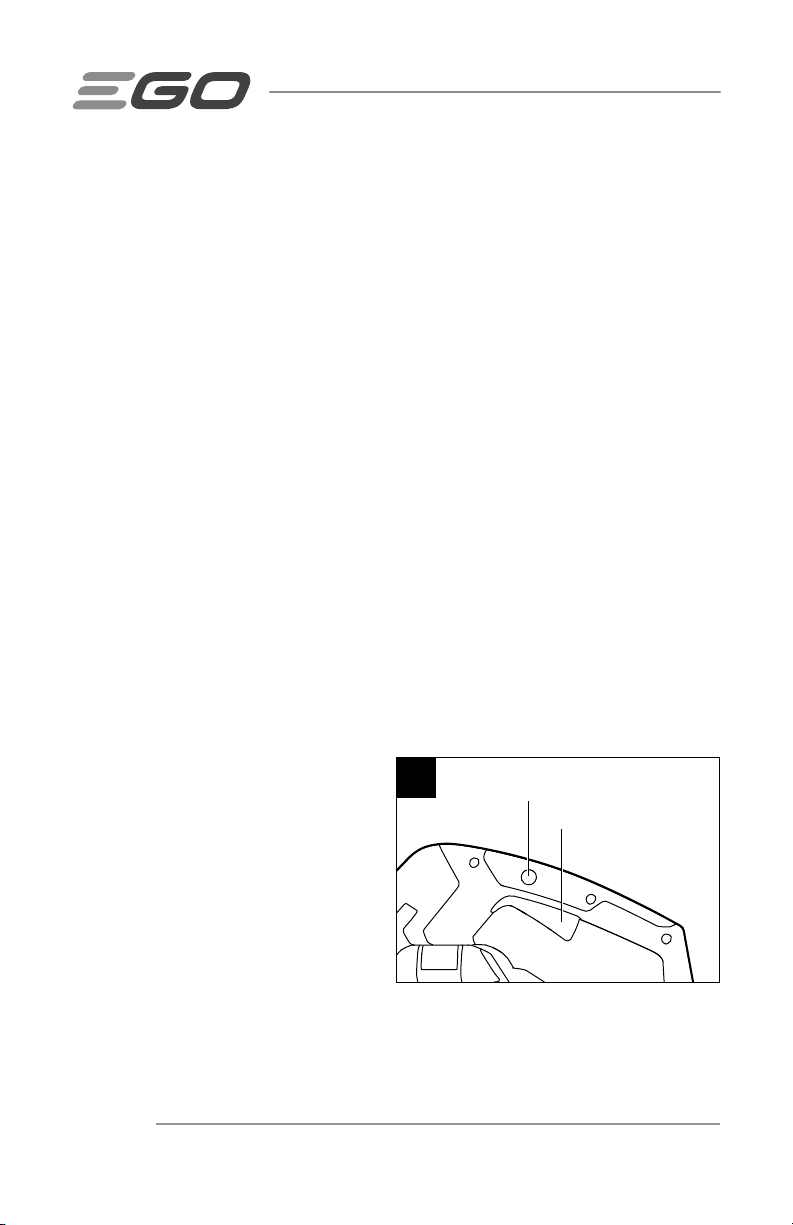
To Remove (Fig. 11)
WARNING:
the location of your feet, children, or pets
when pressing the battery-release button.
Serious injury could result if the battery
pack falls. NEVER remove the battery
pack at a high location.
1. Hold the battery pack in the palm of
your hand.
2. Press the battery-release button with your thumb; the battery pack will disengage
from the latch.
Always be aware of
11
3. Grasp the battery pack and remove it from the chain saw.
56V LITHIUM-ION CORDLESS CHAIN SAW — CS1800/CS1800-FC 25
Page 26
STARTING/STOPPING THE CHAIN SAW
Before Starting the Chain Saw:
1. Remove the battery pack for the steps itemized below.
2. Make sure that the chain is properly mounted and the quick chain-tension adjust
knob is fully tightened, which ensures that the chain is correctly tensioned.
3. Check the side cover, to ensure that it is against the guide bar and saw chain
without any looseness and damage.
4. Check the oil level and ll the tank as needed, ensuring that the chain is well
lubricated.
5. Check the sharpness of the saw-chain cutting teeth.
6. Make sure that the chain-kickback brake handle can move back and forth easily
between the brake position and the operating position.
7. Hold the chain saw with both hands: with the right hand on the rear handle and
the left hand on the front handle.
8. Stand upright and hold the chain saw in a relaxed position and make sure that
the saw chain is not touching the ground or any other objects.
9. Make sure that you have a secure and balanced footing. Watch out for obstacles
such as tree stumps, roots and ditches, which could cause you to trip or stumble.
To Start (Fig. 12)
1. Install the battery pack.
2. Make sure no objects or
obstructions that could come in
contact with the bar and chain are
in the immediate vicinity.
3. Pull the chain-kickback brake
handle towards the front handle to
the operating position (see Fig. 1).
4. Grasp the front and rear handles rmly, using both hands.
56V LITHIUM-ION CORDLESS CHAIN SAW — CS1800/CS1800-FC26
12
Lock-off Button
Variable-Speed
Trigger Switch
Page 27
5. Press and hold the lock-off button with the thumb of your right hand, then
squeeze the variable-speed trigger switch with the ngers of your right hand to
start the saw. Chain speed will increase with increased pressure on the variablespeed trigger.
6. Release the lock-off button and continue to squeeze the variable-speed trigger
switch for continued operation.
To Stop (Fig. 12)
1. Move the chain saw away from cutting area, and then release the variable-speed
trigger switch to stop the chain saw.
2. Push the chain-kickback brake handle forward to the brake position to engage
the chain brake (see Fig. 1).
WARNING:
breaks and after nishing work.
LED HEADLIGHTS (Fig. 13)
The LED headlights are located in the
front of the chain saw power head. This
feature provides extra light for increased
visibility and can be adjusted to 2
brightness levels.
To turn on the lights, press the LED button
one time. The headlights provide bright
light in front of the chain saw. Press the
LED button a second time and the headlights shine more brightly.
To turn off the headlights, press the LED button a third time.
Always remove the battery pack from the chain saw during work
13
LED Button LED Headlights
56V LITHIUM-ION CORDLESS CHAIN SAW — CS1800/CS1800-FC 27
Page 28
PREPARATION FOR CUTTING
Refer to section“SAFETY INSTRUCTIONS” earlier in this manual for appropriate safety
equipment.
Work Area Precautions
◾
Cut only wood or materials made from wood; do not cut sheet metal, plastics,
masonry, or non-wood building materials.
◾
Never allow children to operate the chain saw.
◾
Allow no person to use this chain saw who has not read this Operator’s Manual or
received adequate instructions for the safe and proper use of this chain saw.
◾
When felling a tree, keep everyone - helpers, bystanders, children, and animals - a
safe distance away from the cutting area. During felling operations, the safe distance
should be a least twice the height of the largest trees in the felling area. During
bucking operations, keep a minimum distance of 15 feet (4.5 m) between workers.
Trees should not be felled in a manner that would endanger any person, strike a utility
line, or cause any property damage. If a tree does make contact with a utility line, stay
clear of the tree and the line and notify the utility company immediately.
◾
Always cut with both feet on solid ground to prevent being pulled off balance.
◾
Do not cut above chest height, as a saw held higher is difcult to control against
kickback forces.
◾
Do not fell trees near electrical wires or buildings.
◾
Cut only when visibility and light are adequate for you to see clearly.
Proper Grip On Handles
◾
Wear non-slip gloves for maximum
grip and protection.
◾
With the saw on a rm, at surface,
hold the saw rmly with both hands.
◾
Always grasp the front handle with
the left hand and the rear handle
with the right hand.
◾
The ngers should encircle the
handle, with the thumb wrapped
under the front handle (Fig. 14).
56V LITHIUM-ION CORDLESS CHAIN SAW — CS1800/CS1800-FC28
14
Grip with thumb
below handle
BRUSHLESS
Page 29
WARNING:
would place your body or arm across the chain line.
Never use a left-handed (cross-handed) grip, or any stance which
WARNING:
trigger switch with your left hand and
hold the front handle with your right hand.
Never allow any part of your body to be in
the chain line while operating a chain saw
(Fig. 15).
Do not operate the
Proper Cutting Stance (Fig. 16)
◾
Both feet should be on solid ground,
with weight evenly spread between
them.
◾
The left arm should be straight,
with the elbow locked. This helps to
withstand the forces generated by
kickback.
◾
Your body should always be to the
left of the chain line.
15
16
Chain line
Chain line
Straight Arm
Position
56V LITHIUM-ION CORDLESS CHAIN SAW — CS1800/CS1800-FC 29
Page 30
CUTTING
Basic Cutting
WARNING:
both hands while the motor is running.
Practice cutting a few small logs using the following technique to get the “feel” of using
your saw before you begin a major sawing operation.
1. Take the proper stance in front of the wood with the saw off.
2. Press the lock-off button and squeeze the variable-speed trigger switch to start
the chain saw. Let the chain reach the full selected speed before beginning the
cut.
3. Begin cutting by lightly pressing the guide bar against the wood. Use only light
pressure, letting the saw do the work.
4. Maintain a steady speed throughout the cut, releasing pressure just before the
end of the cut.
5. Release the trigger switch as soon as the cut is completed, allowing the chain to
stop.
WARNING:
release the trigger switch; remove the saw chain and guide bar from the wood, then
restart the chain saw.
WARNING:
sawdust. Serious injury could result if the chain saw starts accidentally. Press the saw
chain against the wood, move the chain saw back and forth to discharge the debris.
Always remove the battery pack before cleaning. Wear heavy protective gloves when
handling the saw chain.
Always be sure of your footing and hold the chain saw rmly with
When the saw chain is stopped due to pinching during cutting,
Do not pull the saw chain with your hand when it is bound by the
WARNING:
Always allow the chain saw reach full speed before applying the saw to the wood.
Never start the chain saw when it is in contact with the wood.
56V LITHIUM-ION CORDLESS CHAIN SAW — CS1800/CS1800-FC30
Page 31

FELLING A TREE
Hazardous Conditions
WARNING:
warnings to prevent possibly serious injury.
◾
Do not fell trees during periods of high wind or heavy precipitation. Wait until the
hazardous weather has ended.
◾
Do not fell trees that lean at extreme angles or large trees with rotten limbs, loose
bark, or hollow trunks. Instead, have these trees pushed or dragged down with
heavy equipment and then cut them up.
◾
Do not fell trees near electrical wires or buildings.
◾
Check the tree for damaged or dead branches that could fall and hit you during felling.
◾
Periodically glance at the top of the tree during the back cut to assure the tree is
going to fall in the desired direction.
◾
If the tree starts to fall in the wrong direction, or if the saw gets caught or hung
up during the fall, leave the saw and save yourself!
When felling a tree, it is important that you heed the following
Preparation for Tree Felling
◾
When bucking and felling operations are being performed by two or more persons
at the same time, the felling operation should be separated from the bucking
operation by a distance of at least twice the height of the tree being felled. Trees
should not be felled in a manner that would endanger any person, strike any
utility line or cause any property damage. If a tree does make contact with a utility
line, stay clear of the tree and the line and notify the utility company immediately.
◾
The chain saw operator should stand on the uphill side of the terrain, as the tree
is likely to roll or slide downhill after it is felled.
56V LITHIUM-ION CORDLESS CHAIN SAW — CS1800/CS1800-FC 31
Page 32

◾
Before any cuts are started, pick
your escape route (or routes, in
17
Felling Direction
case the intended route is blocked).
Clear the immediate area around
Dangerous Zone
the tree and make sure that there
are no obstructions in your planned
paths of retreat. Clear a path of safe
retreat approximately 135° from the
planned line of fall. The retreat path
should extend back and diagonally
Safety
Retreat Path
Safety
Retreat Path
45°
Dangerous Zone
to the rear of the expected line of
fall. See Fig. 17.
◾
Before felling is started, consider the natural lean of the tree, the location of larger
branches and the wind direction to judge which way the tree will fall.
◾
Remove dirt, stones, loose bark, nails, staples, and wire from the tree where
felling cuts are to be made.
Notching undercut
Make the notch 1/3 the diameter of the
tree, perpendicular to the direction of fall,
as illustrated in Fig. 18. Make the lower
horizontal notching cut rst. This will help
18
Direction of fall
Notching Undercut
2 in.
(50.8 mm)
Felling back
cut
to avoid pinching of either the saw chain
or the guide bar when the second notch is
being made.
Notch
Hinge
Felling Back Cut
1. Make the felling back cut at least 2 inches (50.8 mm) higher than the horizontal
notching cut (see Fig. 18). Keep the felling back cut parallel to the horizontal
notching cut. Make the felling back cut so that enough wood is left to act as
a hinge. The hinge wood keeps the tree from twisting and falling in the wrong
direction. Do not cut through the hinge.
2. As the felling cut gets close to the hinge, the tree should begin to fall. If there is
any chance that the tree may not fall in the desired direction or it may rock back
and bind the saw chain, stop cutting before the felling back cut is complete and
use wedges of wood, plastic or aluminum to open the cut and drop the tree along
the desired line of fall.
56V LITHIUM-ION CORDLESS CHAIN SAW — CS1800/CS1800-FC32
2 in.
(50.8 mm)
Page 33

3. When the tree begins to fall, remove the chain saw from the cut, stop the motor,
put the chain saw down, then use the retreat path planned. Be alert for overhead
limbs falling and watch your footing.
LIMBING
Limbing is removing branches from a
fallen tree. When limbing, leave larger
limbs to support the log off the ground.
Remove the small limbs in one cut as
illustrated in Fig. 19. Branches under
tension should be cut from the bottom up
to avoid binding the chain saw.
WARNING:
danger of kickback during the limbing operation. Be extremely cautious and avoid
contacting the log or other limbs with the tip of the guide bar.
There is an extreme
19
Limb Cut
Tree Limbing
BUCKING A LOG (Fig. 20)
20
Bucking is cutting a log into lengths. It is
important to make sure your footing is
rm and your weight is evenly distributed
on both feet. When possible, the log
should be raised and supported by the
use of limbs, logs, or chocks. Follow the
simple directions for easy cutting.
WARNING:
area. Make sure that no objects can
contact the guide bar nose and chain
during cutting; this can cause kickback.
Keep a clear-cutting
Overbucking
Underbucking
Overbucking
Begin on the top side of the log with the
bottom of the saw against the log; exert
light pressure downward. Note that the
saw will tend to pull away from you.
56V LITHIUM-ION CORDLESS CHAIN SAW — CS1800/CS1800-FC 33
Page 34

Underbucking
Begin on the underside of the log with the
top of the saw against the log; exert light
pressure upward. During underbucking,
the saw will tend to push back at you. Be
prepared for this reaction and hold the
saw rmly to maintain control.
◾
When the log is supported along its
entire length, it should be cut from
the top (overbucking) (Fig. 21).
◾
When the log is supported on only
one end, cut 1/3 the diameter from
the underside (underbucking).
Then make the nishing cut by
overbucking to meet the rst cut
(Fig. 22).
◾
When the log is supported on both
ends, cut 1/3 of that diameter from
the top overbuck. Then make the
nished cut by underbucking the
lower 2/3 to meet the rst cut
(Fig. 23).
21
Log Supported Along the Entire Length
Cut From Top (Overbuck)
Avoid Cutting Earth
22
2nd Cut Overbuck (2/3 Diameter) to Meet 1st Cut
(To Avoid Pinching)
1st Cut Underbuck (1/3 Diameter) to Avoid Splintering
23
1st Cut Overbuck (1/3 Diameter) to Avoid
Splintering
Log Supported One End
Log Supported Both Ends
2nd Cut Underbuck (2/3 Diameter) to Meet 1st Cut
(To Avoid Pinching)
56V LITHIUM-ION CORDLESS CHAIN SAW — CS1800/CS1800-FC34
Page 35

◾
When bucking on a slope, always
stand on the uphill side of the log
(Fig. 24).
◾
To maintain complete control when
cutting through, release the cutting
pressure near the end of the cut
without relaxing the grip on the
chain saw handles. Don’t allow the
chain to contact the ground. After
completing the cut, wait for the saw
chain to stop before you move the
chain saw. Always stop the motor
before moving from tree to tree.
24
56V LITHIUM-ION CORDLESS CHAIN SAW — CS1800/CS1800-FC 35
Page 36

MAINTENANCE
WARNING:
chain saw before inspecting, cleaning, or performing maintenance. A battery-operated
tool with the battery pack inserted is always on and can start accidently.
WARNING:
other parts may create a hazard or cause product damage.
WARNING:
chain. Be careful of the saw chain and protect your hands from being injured by the
saw chain.
WARNING:
liquids.
WARNING:
products, penetrating oils, etc., come in contact with plastic parts. Chemicals can
damage, weaken, or destroy plastic, which may result in serious personal injury.
All chain saw service, other than the items listed in this manual, should be performed
by a qualied service technician.
To avoid serious personal injury, remove the battery pack from the
When servicing, use only identical replacement parts. Use of any
Always wear heavy gloves when doing any maintenance on the saw
When cleaning the chain saw, DO NOT immerse it in water or other
Do not at any time let brake uids, gasoline, petroleum-based
CLEANING
◾
After each use, clean debris from the chain and guide bar with a soft brush. Wipe
the chain saw surface with a clean cloth moistened with a mild soap solution.
◾
For deep clearing, remove the side cover, take down the guide bar and saw chain
and then use a soft brush to thoroughly remove debris from the guide bar, saw
chain, and the drive sprocket on the chain saw power head.
◾
Always clean out wood chips, saw dust, and dirt from the guide bar groove when
replacing the saw chain.
56V LITHIUM-ION CORDLESS CHAIN SAW — CS1800/CS1800-FC36
Page 37

REPLACING THE BAR AND CHAIN
WARNING:
Never touch or adjust the chain while the motor is running. The saw
chain is very sharp; always wear protective gloves when performing maintenance to
the chain.
NOTICE: When replacing the guide bar and chain, always use the specied bar and
chain combination listed in the later section “Recommended Bar and Chain for this
Chain Saw”.
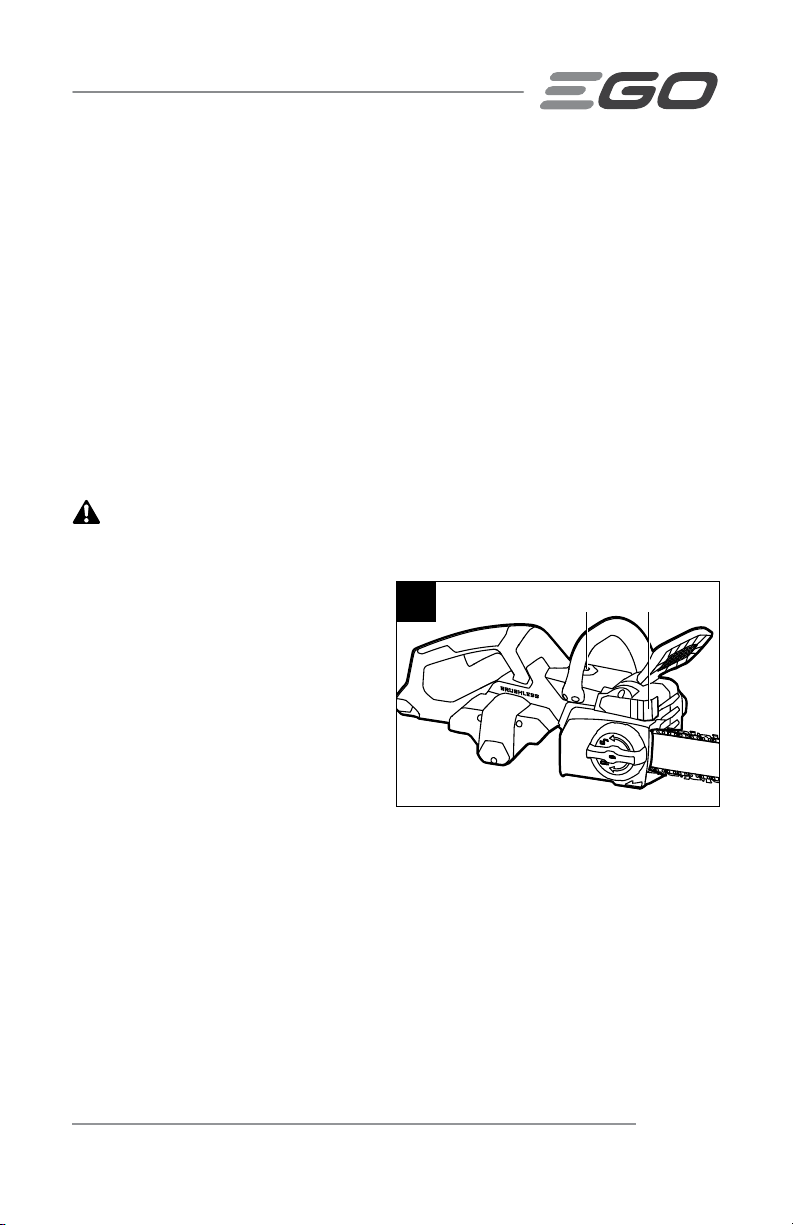
Disassembling the Worn Bar and Chain
1. Remove the battery, allow the chain saw to cool, and tighten the oil-tank cap.
2. Position the chain saw on its side on a rm, at surface, so that the side cover is
facing upwards (Fig. 25).
3. Wear gloves. Remove the side cover by turning the quick chain-tension adjust
knob counterclockwise as indicated by the “UNLOCK” arrow, marked on the
surface (Fig. 25). Thoroughly clean the side cover with a dry cloth.
25
BRUSHLESS
“UNLOCK” Arrow
Quick Chain-tension Adjust Knob Side Cover
4. Carefully remove the bar and chain from the chain saw power head.
5. Remove the worn chain from the
bar.
6. There is an adjustment plate
26
Drive
Sprocket
Guide Bar
connected on the guide bar by
a screw. If the guide bar needs
to be replaced, disassemble the
adjustment plate from the guide
bar and reassemble it onto the new
guide bar as Fig. 26 shown.
Screw
Adjustment Plate
Side Cover
56V LITHIUM-ION CORDLESS CHAIN SAW — CS1800/CS1800-FC 37
Saw Chain
Page 38

NOTICE: This is a good time to inspect
the drive sprocket for excessive wear or
27
Chain Cutter Rotation Direction
damage.
Assembling the New Bar and
Chain Drive Links
Chain
1. Lay the new saw chain in a loop on
a at surface and straighten any
kinks (Fig. 27).
2. Place the chain drive links into the guide bar groove. Position the chain so there is
a loop at the back of the guide bar (Fig. 28).
3. Hold the chain in position on the
guide bar and place the loop around
the drive sprocket of the power
head.
28
Chain Drive
Links
Guide Bar Groove
56V LITHIUM-ION CORDLESS CHAIN SAW — CS1800/CS1800-FC38
Page 39

NOTICE: Small direction arrows are
engraved in the saw chain and the power
head housing (Fig. 29). When looping
29
Rotation
Direction Arrow
the saw chain onto the guide bar, make
sure that, after mounting the guide bar
onto the power head, the direction of the
arrows on the saw chain will correspond
to the rotation direction arrow on the
Cutter Direction
power head housing. If they face in
opposite directions, reassemble the saw
chain onto the guide bar with the arrows facing the same direction. The guide bar
should be mounted with the adjustment plate facing away from the housing.
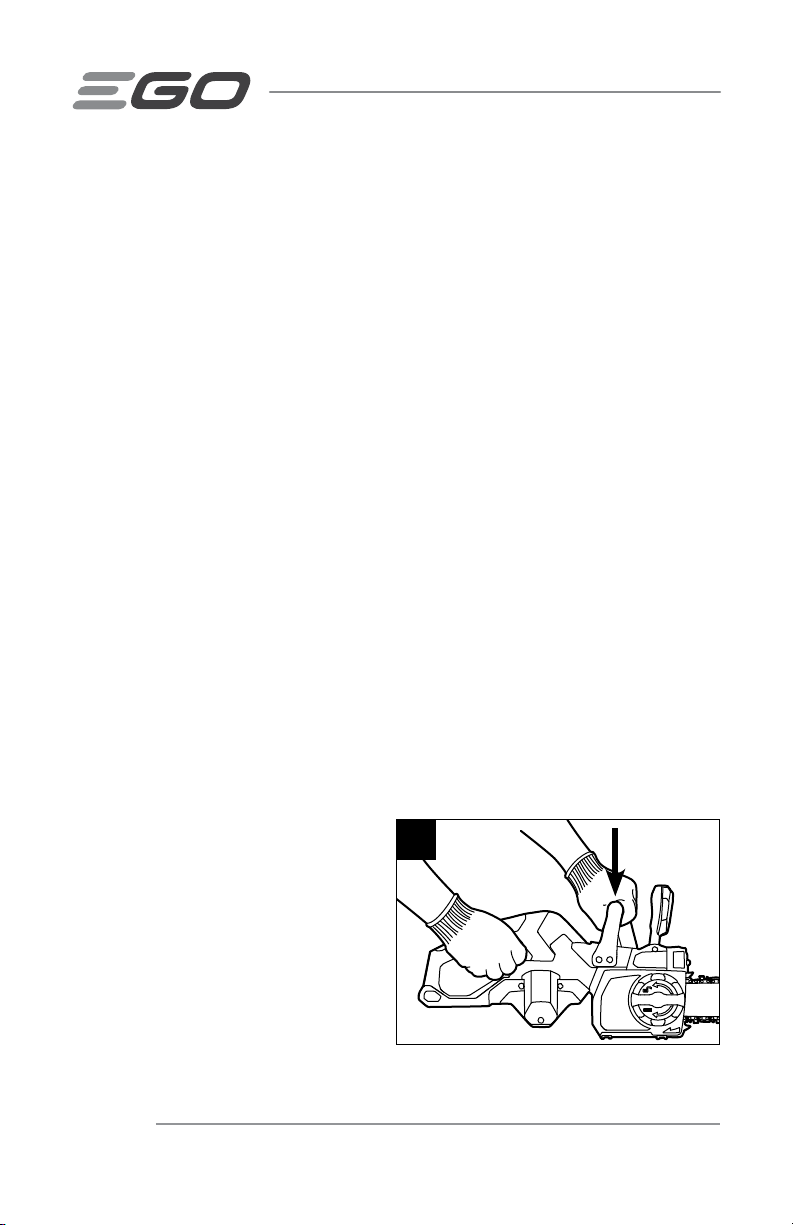
4. Replace the side cover onto the
power head by fully tightening the
30
quick chain-tension adjust knob
clockwise. The eccentric gear inside
the side cover is designed to ensure
that the chain will not be overtensioned (Fig. 30).
5. Adjust the chain-kickback brake
Adjustment plate facing outside
handle in the operating position,
and then rotate the chain by hand
to check whether the chain is properly assembled without binding. Otherwise,
reassemble the chain and bar.
CHAIN MAINTENANCE
Use only low-kickback chains on this saw. This fast cutting chain will provide kickback
reduction when properly maintained.
A properly sharpened saw chain cuts through wood effortlessly, even with very little
pressure. Never use a dull or damaged saw chain. A dull saw chain cutter leads to
increased physical strain, increased vibration load, unsatisfactory cutting results, and
increased wear.
56V LITHIUM-ION CORDLESS CHAIN SAW — CS1800/CS1800-FC 39
Page 40

For smooth and fast cutting, the chain needs to be maintained properly. The chain
requires sharpening when the wood chips are small and powdery, the chain must
be forced through the wood during cutting, or the chain cuts to one side. During
maintenance of your chain, consider the following:
◾
Improper ling angle of the side plate can increase the risk of a severe kickback.
◾
Depth gauge clearance. Too low increases the potential for kickback. Not low enough
decreases cutting ability.
◾
If cutter teeth have hit hard objects, such as nails and stones, or have been abraded by
mud or sand on the wood, have the chain sharpened by a qualied service technician.
NOTICE: Inspect the drive sprocket for wear or damage when replacing the chain. If
signs of wear or damage are present in the areas indicated, have the drive sprocket
replaced by qualied service technician.
How to Sharpen the Cutters
Be careful to le all cutters (Fig. 31) to the
specied angles and to the same length,
as fast cutting can be obtained only when
all cutters are uniform.
1. Remove the battery pack. Wear
gloves for protection.
2. Make sure that the chain is
properly mounted and the quick
chain-tension adjust knob is fully
tightened, which ensures that the chain is correctly tensioned.
3. Use a 5/32” (4.0 mm) diameter round le and holder (available separately). Do all
of your ling at the middle position of the guide bar for perfect balance.
4. Keep the le level with the top plate of the tooth. Do not let the le dip or rock.
31
Top Plate
Side Plate
Depth
Gauge
56V LITHIUM-ION CORDLESS CHAIN SAW — CS1800/CS1800-FC40
Page 41

5. Keep a correct sharpening angle of
30° between the le and the saw
chain; see Fig. 32 & 33. Always use
a le holder (available separately)
when sharpening saw chains by
hand. File holders have markings for
the sharpening angle.
6. Using light but rm pressure, stroke
towards the front corner of the
tooth. Lift the le away from the
steel on each return stroke.
7. Make a few rm strokes on every
tooth. File all left-hand cutters in
one direction. Then move to the
other side and le the right-hand
cutters in the opposite direction.
Occasionally remove lings from the
le with a wire brush (Fig. 34).
32
Filing Direction
33
5/32" (4.0 mm)
Round File
Cutter tooth
Sharpening
Angle: 30°
WARNING:
A dull or improperly
sharpened chain can cause excessive
motor speed during cutting, which may
result in severe motor damage.
WARNING:
Improper chain
sharpening increases the potential of
kickback.
WARNING:
Failure to replace or
repair a damaged chain can cause serious
injury.
56V LITHIUM-ION CORDLESS CHAIN SAW — CS1800/CS1800-FC 41
34
Left Hand
Cutters
Right Hand
Cutters
Page 42
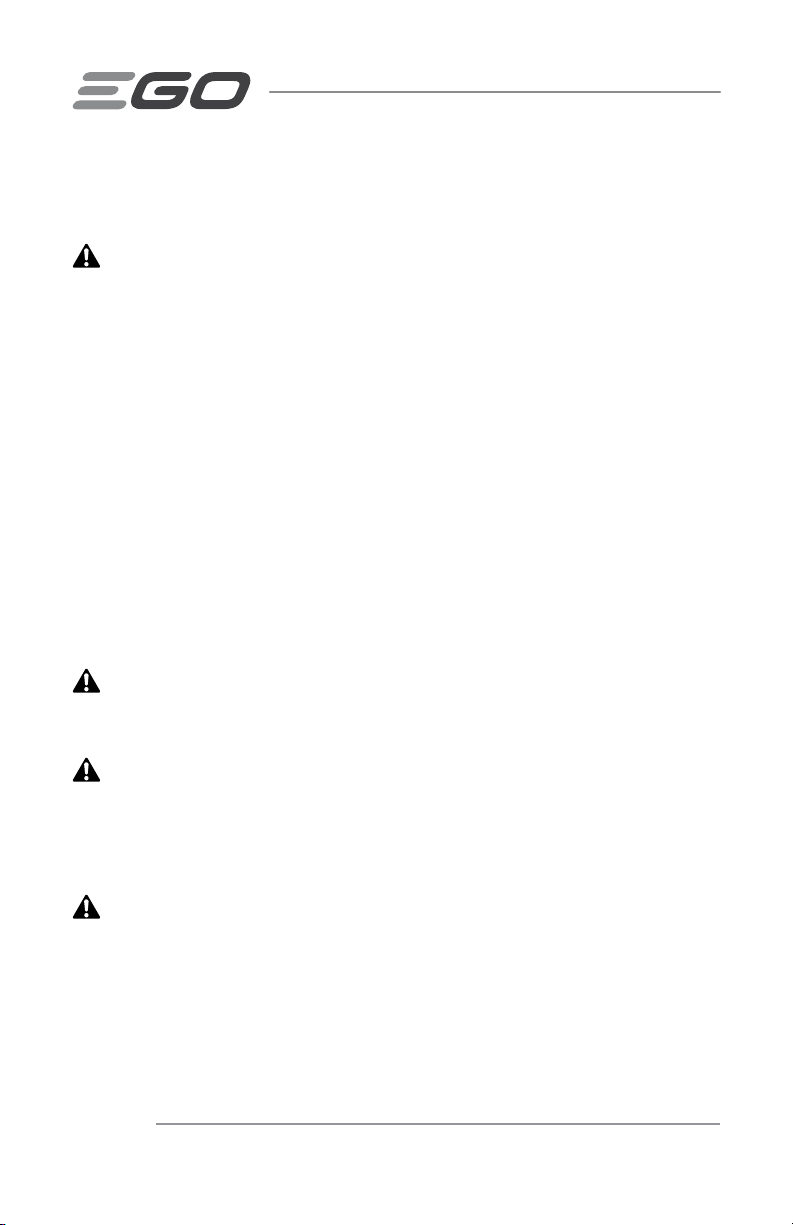
Top Plate Sharpening Angles (Fig. 35)
◾
CORRECT 30°- This optimal angle
can be obtained only when the
specied les and proper setting
are used. File holders are marked
with guide marks to align the le
properly to produce the correct top
plate angle.
◾
LESS THAN 30°- The tooth is too
dull for cutting.
◾
MORE THAN 30°- The edge of the
cutting tooth is feathered and dulls quickly.
35
CORRECT INCORRECT
Top Plate Sharpening Angles
LESS THAN 30° MORE THAN 30°
30°
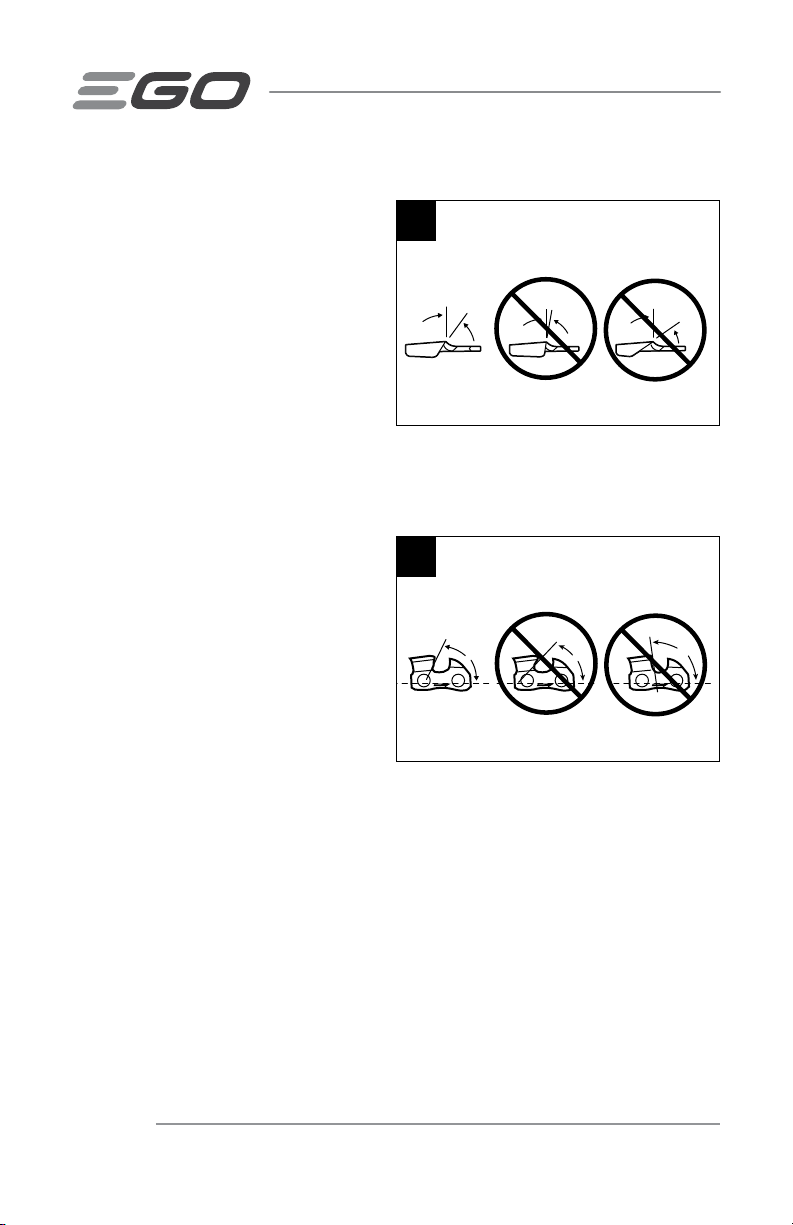
Side Plate Sharpening Angle (Fig. 36)
◾
CORRECT 80°- The optimal angle
can be produced automatically if the
correct diameter le is used in the
le holder.
◾
HOOK- “Grabs” and dulls quickly.
Increases potential of KICKBACK.
Results from using a le with a
diameter that is too small, or a le
held too low.
◾
BACKWARD SLOPE- Needs too
much feed pressure, causes excessive wear to bar and chain. Results from using
a le with a diameter too large, or a le held too high.
36
CORRECT INCORRECT
Side Plate Angle
Hook
80°
Backward Slope
INCORRECT
INCORRECT
56V LITHIUM-ION CORDLESS CHAIN SAW — CS1800/CS1800-FC42
Page 43

Depth-Gauge Clearance
1. The depth gauge should be
maintained at a clearance of 0.025
in. (0.6 mm), as shown in Fig. 37.
Use a depth-gauge tool (available
separately) to check the depthgauge clearances.
2. Check the depth-gauge clearance
every time the chain is led. Use a
at le and a depth-gauge jointer
(both available separately) to lower
all gauges uniformly (Fig. 38).
Depth-gauge jointers are available
from 0.020 in. to 0.035 in. (0.5 mm
to 0.9 mm). Use a 0.025 in. (0.6
mm) depth-gauge jointer.
37
38
Depth Gauge Jointer
Depth Gauge Clearance
0.025" (0.6 mm)
3. Depth-gauges must be adjusted
with the at le in the same
direction the adjoining cutter was
led with the round le. Use care not to contact the cutter face with the at le
when adjusting depth-gauges.
GUIDE BAR MAINTENANCE
When the guide bar shows signs of wear,
disassemble it from the chain saw power
head and reverse it for reassembly (Fig. 39),
in which case it will distribute the wear for
maximum bar life.
56V LITHIUM-ION CORDLESS CHAIN SAW — CS1800/CS1800-FC 43
39
Flat File
Page 44

The bar should be cleaned (including bar
rails and lubricating hole) every day of use
and checked for wear and damage
(Fig. 40). Feathering or burring of the bar
rails is a normal process of bar wear.
Such faults should be smoothed with a
le as soon as they occur. A bar with any
of the following faults should be replaced.
See the section” REPLACING THE BAR
AND CHAIN” in this manual.
◾
Wear inside the bar rails which
permits the chain to lay over
sideways.
◾
Bent guide bar.
◾
Cracked or broken rails.
◾
Spread rails.
The guide bar has a sprocket at its tip. The
sprocket must be lubricated weekly with a
grease syringe to extend the guide bar life
(Fig. 41 & 42). Turn the nose sprocket while
pumping grease into the lubricating hole
until the entire sprocket has new grease.
Do not push dirt into the hole.
40
41
42
Bar Rails
Lubricating Hole
Sprocket in
Guide Bar Tip
TRANSPORTING AND STORING
◾
Do not store or transport the chain
saw when it is running. Always
remove the battery pack before
storing or transporting.
◾
Always place the guide bar sheath
on the guide bar and chain before storing or transporting the chain saw. Use
caution to avoid the sharp teeth of the chain.
◾
Clean the chain saw thoroughly before storing. Store the chain saw indoors, in a
dry place that is locked and/or inaccessible to children.
◾
Keep away from corrosive agents such as garden chemicals and de-icing salts.
56V LITHIUM-ION CORDLESS CHAIN SAW — CS1800/CS1800-FC44
Lubricating Hole
Page 45

TROUBLESHOOTING
PROBLEM CAUSE SOLUTION
Motor does not
start.
Chain saw stops
running during
working.
Motor runs, but
chain does not
rotate.
◾
The battery pack is not
attached to the chain
saw.
◾
No electrical contact
between the saw and
battery.
◾
The battery pack is
depleted.
◾
The battery pack or
chain saw is too hot.
◾
Chain brake is engaged. ◾Pull the chain-kickback brake handle
◾
Debris in bar groove.
◾
Debris in side cover.
◾
The chain saw is
overloaded.
◾
The battery pack or
chain saw is too hot.
◾
Saw chain is bound in
the wood.
◾
Chain does not engage
drive sprocket.
◾
Attach the battery pack to the chain saw.
◾
Remove battery, check contacts and
reinstall the battery pack.
◾
Charge the battery pack.
◾
Allow the battery pack or chain saw to
cool until the temperature drops below
152°F (67°C).
backward toward the front handle, arriving
at the operating position.
◾
Press the saw chain against the wood,
move the chain saw back and forth to
discharge the debris.
◾
Remove battery pack, then remove side
cover and clean out debris.
◾
Decrease the load.
◾
Allow the battery pack or chain saw to
cool until the temperature drops below
152°F (67°C).
◾
Release the trigger switch; remove the
saw chain and guide bar from the wood,
then restart the chain saw.
◾
Reinstall the chain, following the section
“REPLACING THE BAR AND CHAIN”.
ensuring that the drive links on the chain
are fully seated onto the sprocket.
56V LITHIUM-ION CORDLESS CHAIN SAW — CS1800/CS1800-FC 45
Page 46

PROBLEM CAUSE SOLUTION
Chain brake
does not
engage.
Chain saw does
not cut properly.
Chain drops off
the guide bar.
Bar and chain
running hot and
smoking.
◾
Debris preventing full
movement of the chainkickback brake handle.
◾
Possible chain brake
malfunction.
◾
Insufcient chain
tension.
◾
Dull chain.
◾
Chain installed
backwards.
◾
Worn chain.
◾
Dry or excessively
stretched chain.
◾
Insufcient chain
tension.
◾
Chain does not engage
drive sprocket.
◾
Chain oil tank is empty.
◾
Debris in guide bar
groove.
◾
Clean debris from external chain brake
mechanism.
◾
Contact EGO Customer Service for repair.
◾
Loosen the quick chain-tension
adjust knob at least twice circles
counterclockwise rst and then fully
tighten it clockwise until the chain is
correctly tensioned.
◾
Sharpen the chain cutters, following
the section “HOW TO SHARPEN THE
CUTTERS”.
◾
Reinstall the saw chain, following the
section “REPLACING THE BAR AND
CHAIN”.
◾
Replace the saw chain, following the
section “REPLACING THE BAR AND
CHAIN”.
◾
Check the oil level in the oil tank. Rell the
oil tank if necessary.
◾
Loosen the quick chain-tension adjust knob
at least twice circles counterclockwise rst
and then fully tighten it clockwise until the
chain is correctly tensioned.
◾
Reinstall the chain, following the section
“REPLACING THE BAR AND CHAIN”.
ensuring that the drive links on the chain
are fully seated onto the sprocket.
◾
Filling bar and chain lubricant.
◾
Clear the debris in the groove.
56V LITHIUM-ION CORDLESS CHAIN SAW — CS1800/CS1800-FC46
Page 47

WARRANTY
EGO WARRANTY POLICY
5-year limited warranty on EGO POWER+ outdoor power equipment and portable power
for personal, household use.
3-year limited warranty on EGO POWER+ System battery packs and chargers for
personal, household use.
2 year/1year limited warranty on EGO outdoor power equipment, portable power,
battery packs, and chargers for professional and commercial use.
The detailed warranty periods by products can be found online at
http://egopowerplus.com/pages/warranty-policy.
Please contact EGO Customer Service Toll-Free at 1-855-EGO-5656 any time
you have questions or warranty claims.
LIMITED SERVICE WARRANTY
EGO products are warranted against defects in material or workmanship from the date
of original retail purchase for the applicable warranty period. Defective product will
receive free repair.
a) This warranty applies only to the original purchaser from an authorized EGO
retailer and may not be transferred. Authorized EGO retailers are identied online
at http://egopowerplus.com/pages/warranty-policy.
b) The warranty period for reconditioned or factory certied products used for
residential purpose is 1 year, for industrial, professional or commercial purpose is
90 days.
c) The warranty period for routine maintenance parts, such as, but not limited
to, blades, trimmer heads, chain bars, saw chains, belts, scraper bars, blower
nozzles, and all other EGO accessories is 90 days for residential purpose, 30 days
for industrial, professional or commercial purpose. These parts are covered for
90/30 days from manufacture defects in normal working conditions.
d) This warranty is void if the product has been used for rental purpose.
e) This warranty does not cover the damage resulting from modication, alteration
or unauthorized repair.
56V LITHIUM-ION CORDLESS CHAIN SAW — CS1800/CS1800-FC 47
Page 48

f) This warranty only covers defects arising under normal usage and does not
cover any malfunction, failure or defect resulting from misuse, abuse (including
overloading of the product beyond capacity and immersion in water or other
liquid), accidents, neglect or lack of proper installation, and improper maintenance
or storage.
g) This warranty does not cover normal deterioration of the exterior nish, including
but not limited to scratches, dents, paint chips, or to any corrosion or discoloring
by heat, abrasive and chemical cleaners.
HOW TO OBTAIN SERVICE
For warranty service, please contact EGO customer service toll-free at
1-855-EGO-5656. When requesting warranty service, you must present the original
dated sales receipt. An authorized service center will be selected to repair the product
according to the stated warranty terms. When bringing your product to the authorized
service center, there may be a small deposit that will be required when dropping off
your tool. This deposit is refundable when the repair service is deemed to be covered
under warranty.
ADDITIONAL LIMITATIONS
To the extent permitted by applicable law, all implied warranties, including warranties
of MERCHANTABILITY or FITNESS FOR A PARTICULAR PURPOSE, are disclaimed. Any
implied warranties, including warranties of merchantability or tness for a particular
purpose, that cannot be disclaimed under state law are limited to the applicable
warranty period dened at the beginning of this article.
Chervon North America is not responsible for direct, indirect, incidental or consequential
damages.
Some states do not allow limitations on how long an implied warranty lasts and/or do
not allow the exclusion or limitation of incidental or consequential damages, so the
above limitations may not apply to you.
This warranty gives you specic legal rights, and you may also have other rights which
vary from state to state.
For customer service contact us toll-free at: 1-855-EGO-5656 or EGOPOWERPLUS.COM.
EGO Customer Service, 769 SEWARD AVE NW / Suite 102 Grand Rapids, MI 49504
56V LITHIUM-ION CORDLESS CHAIN SAW — CS1800/CS1800-FC48
Page 49

BRUSHLESS
REMPLISSEZ LE RÉSERVOIR D’HUILE
AVEC DU LUBRIFIANT À CHAÎNE ET À
GUIDE CHAÎNE AVANT LA PREMIÈRE
UTILISATION
GUIDE D’UTILISATION
SCIE À CHAÎNE SANS FIL DE
45CM À BLOC-PILE AU
LITHIUM-ION DE 56VOLTS
NUMÉRO DE MODÈLE CS1800/CS1800-FC
AVERTISSEMENT: An de réduire les risques de blessure, l’utilisateur doit lire et
comprendre le guide d’utilisation avant d’utiliser ce produit. Conservez le présent
guide an de pouvoir le consulter ultérieurement.
272652
Page 50

TABLE DES MATIÈRES
Symboles de sécurité ....................................52
Consignes de sécurité .................................53-65
Lexique ............................................65-66
Introduction ............................................66
Caractéristiques techniques ...............................67
Liste des pièces contenues dans l’emballage ..................68
Description .........................................69-71
Assemblage ............................................72
Fonctionnement ...................................... 73-85
Entretien ...........................................86-95
Dépannage .........................................96-98
Garantie ...........................................99-100
SCIE À CHAÎNE SANS FIL AU LITHIUM-ION DE 56 VOLTS — CS1800/CS1800-FC50
Page 51

VEUILLEZ LIRE TOUTES LES INSTRUCTIONS!
AVERTISSEMENT:
coupe électriques contiennent des produits chimiques reconnus par l’État de Californie
comme causes de cancers, d’anomalies congénitales et de problèmes du système
reproducteur. Voici des exemples de ces produits chimiques:
◾
le plomb contenu dans la peinture au plomb;
◾
la silice cristallisée contenue dans les briques, le ciment et d’autres produits de
maçonnerie; et
◾
l’arsenic et le chrome contenus dans le bois d’œuvre traité avec des produits
chimiques.
Les risques liés à l’exposition à ces produits varient en fonction de la fréquence à
laquelle vous effectuez ce type de travaux. Pour réduire votre exposition à ces produits
chimiques, travaillez dans une zone bien ventilée et portez l’équipement de sécurité
approuvé, comme les masques antipoussières conçus pour ne pas laisser passer les
particules microscopiques.
Certaines poussières produites par l’utilisation d’outils de
SCIE À CHAÎNE SANS FIL AU LITHIUM-ION DE 56 VOLTS — CS1800/CS1800-FC 51
Page 52

SYMBOLES DE SÉCURITÉ
L’objectif des symboles de sécurité est d’attirer votre attention sur les dangers
potentiels. Vous devez examiner attentivement et bien comprendre les symboles de
sécurité et les explications qui les accompagnent. Les symboles d’avertissement en
tant que tels n’éliminent pas le danger. Les consignes et les avertissements qui y sont
associés ne remplacent en aucun cas les mesures préventives adéquates.
AVERTISSEMENT:
comprendre toutes les consignes de sécurité présentées dans ce guide d’utilisation,
notamment toutes les consignes de sécurité indiquées par «DANGER»,
«AVERTISSEMENT» et «MISE EN GARDE». Le fait de ne pas respecter toutes les
consignes de sécurité ci-dessous peut causer un choc électrique, un incendie ou des
blessures graves.
Avant d’utiliser l’outil, assurez-vous de lire et de
SIGNIFICATION DES SYMBOLES
SYMBOLE D’ALERTE DE SÉCURITÉ:
AVERTISSEMENT ou une MISE EN GARDE. Il peut être associé à d’autres symboles ou
pictogrammes.
AVERTISSEMENT!
entraîner la projection de corps étrangers dans les yeux et ainsi causer
des lésions oculaires graves. Avant d’utiliser un outil électrique, veillez à
toujours porter des lunettes de sécurité couvrantes ou à écrans latéraux,
ou un masque complet au besoin. Nous recommandons le port d’un
masque de sécurité panoramique par-dessus les lunettes de vue ou de
lunettes de sécurité standard avec écrans latéraux. Portez toujours un
équipement de protection oculaire conforme à la norme ANSIZ87.1.
indique un DANGER, un
L’utilisation de tout outil électrique peut
SCIE À CHAÎNE SANS FIL AU LITHIUM-ION DE 56 VOLTS — CS1800/CS1800-FC52
Page 53

CONSIGNES DE SÉCURITÉ
Cette page illustre et décrit les symboles de sécurité qui peuvent être présents sur ce
produit. Vous devez lire, comprendre et suivre toutes les instructions présentes sur
l’appareil avant d’entamer son assemblage ou sa manipulation.
Alerte de sécurité Indique un risque de blessure.
Lisez le guide
d’utilisation
Portez protection
pour les yeux
Portez protection
pour les oreilles
Portez protection
pour la tête
Portez gants de
protection
Faites attention
au rebond
Rebond du bout
du guide-chaîne
An de réduire les risques de blessure,
l’utilisateur doit lire le guide d’utilisation.
Lorsque vous utilisez l’article, portez toujours
des lunettes de sécurité couvrantes ou à
écrans latéraux, ou un masque complet.
Le bruit de la scie à chaîne peut endommager
votre ouïe. Portez toujours des protecteurs
auriculaires (bouchons ou protège-oreilles)
pour protéger votre ouïe.
Portez un casque de sécurité approuvé pour
protéger votre tête.
Portez des gants pour protéger vos mains
lorsque vous manipulez une scie ou sa
chaîne. Des gants renforcés antidérapants
assurent votre prise et protègent vos mains.
Évitez tout contact entre le bout du guidechaîne et un autre objet.
Un contact avec le bout du guide-chaîne
peut le faire rebondir soudainement vers le
haut et l’arrière, ce qui pourrait entraîner des
blessures graves.
SCIE À CHAÎNE SANS FIL AU LITHIUM-ION DE 56 VOLTS — CS1800/CS1800-FC 53
Page 54

Prise à deux
mains
Symbole de
recyclage
Niveau de
IPX4
V Volt Voltage
mm Millimètre Longueur ou taille
in. Pouce Longueur ou taille
kg Kilogramme Poids
lb Livre Poids
ml Millilitre Volume
.oz Once liquide Volume
°C
°F
protection
d’indice
Courant continu Type de courant ou caractéristique de courant
Celsius
Température
Fahrenheit
Température
Lorsque vous utilisez une scie à chaîne,
tenez-la toujours avec les deuxmains.
Ce produit fonctionne à l’aide d’un bloc-pile
au lithium-ion (Li-ion). La législation locale,
provinciale ou fédérale peut interdire la mise
au rebut des blocs-piles dans une poubelle
ordinaire. Consultez l’organisme local de
gestion des déchets au sujet des possibilités
offertes en ce qui concerne la mise au rebut
ou le recyclage.
Protection contre les projections d'eau
Température
Température
ADVERTENCIAS DE SEGURIDAD GENERAL EN EL MANEJO DE
HERRAMIENTAS ELÉCTRICAS QUE FUNCIONAN CON BATERÍAS
AVERTISSEMENT!
illustrations et spécications fournis avec cet outil électrique. Le non-respect
des consignes de sécurité ci-dessous peut occasionner un choc électrique, un incendie
ou des blessures graves.
SCIE À CHAÎNE SANS FIL AU LITHIUM-ION DE 56 VOLTS — CS1800/CS1800-FC54
Lisez tous les avertissements, instructions,
Page 55

Conservez tous les avertissements et toutes les instructions afin
de pouvoir les consulter ultérieurement.
Le terme «outil électrique» dans les avertissements désigne votre outil électrique
(avec cordon) alimenté par le secteur ou votre outil électrique (sans l) alimenté par un
bloc-pile.
SÉCURITÉ DE L’AIRE DE TRAVAIL
◾
Maintenez l’aire de travail propre et bien éclairée. Les aires de travail
sombres et encombrées sont propices aux accidents.
◾
N’utilisez pas d’outils électriques dans un milieu explosif, par
exemple où il y a présence de liquides, de vapeurs ou de poussières
inammables. Les outils électriques produisent des étincelles susceptibles
d’enammer ces poussières ou ces vapeurs.
◾
Gardez les enfants et les autres personnes à l’écart lorsque vous utilisez
un outil électrique. Une distraction peut vous faire perdre la maîtrise de l’outil.
SÉCURITÉ PERSONNELLE
◾
Soyez vigilant, prêtez attention à ce que vous faites et usez de votre
jugement lorsque vous utilisez un outil électrique. N’utilisez pas un outil
électrique lorsque vous êtes fatigué ou sous l’effet de drogues, d’alcool
ou de médicaments. Un moment d’inattention pendant que vous utilisez des
outils électriques peut occasionner des blessures graves.
◾
Utilisez toujours un équipement de protection individuelle. Le port
d’équipement de protection individuelle, comme des lunettes de sécurité, un
masque antipoussières, des chaussures de sécurité antidérapantes, un casque de
protection ou des protecteurs auditifs, lorsque les conditions l’exigent, réduit les
risques de blessures.
◾
Prenez des mesures an d’éviter que l’outil se mette en marche
accidentellement. Assurez-vous que l’interrupteur est sur la position
d’arrêt avant de brancher l’outil sur un bloc-piles, de le ramasser ou de
le transporter. Transporter les outils électriques avec le doigt sur l’interrupteur
ou brancher les outils lorsque l’interrupteur est en position de marche augmente
les risques d’accident.
◾
Retirez toutes les clés de réglage de l’outil électrique avant de le mettre
en marche. Une clé de réglage oubliée sur une pièce mobile de l’outil électrique
peut entraîner des blessures.
SCIE À CHAÎNE SANS FIL AU LITHIUM-ION DE 56 VOLTS — CS1800/CS1800-FC 55
Page 56

◾
Ne vous étirez pas pour étendre votre portée. Gardez une posture
sécuritaire et un bon équilibre en tout temps. Cela permet de mieux
contrôler l’outil électrique dans des situations inattendues.
◾
Habillez-vous convenablement. Ne portez pas de vêtements amples ni
de bijoux. Gardez vos cheveux et vos vêtements loin des pièces mobiles.
Les vêtements amples, les bijoux et les cheveux longs risquent de se prendre
dans les pièces en mouvement.
◾
Si un dispositif permet de raccorder un dépoussiéreur, assurez-vous
que celui-ci est branché et utilisé de manière appropriée. L’emploi d’un
dépoussiéreur contribue à réduire les dangers liés à la poussière.
◾
Même si vous connaissez parfaitement ces outils parce que vous les
utilisez souvent, soyez vigilant et respectez les principes de sécurité. Il
suft d’être négligent une fraction de seconde pour se blesser gravement.
UTILISATION ET ENTRETIEN DE L’OUTIL ÉLECTRIQUE
◾
Ne forcez pas l’outil électrique. Utilisez l’outil électrique approprié à
la tâche que vous souhaitez accomplir. L’utilisation de l’outil électrique
approprié permet d’obtenir de meilleurs résultats, de façon plus sécuritaire, selon
le régime de fonctionnement prévu.
◾
N’utilisez pas l’outil électrique si l’interrupteur ne fonctionne pas.
Tout outil électrique qui ne peut être commandé au moyen de l’interrupteur est
dangereux et doit être réparé.
◾
Retirez, si possible, le bloc-piles de l’outil électrique ou actionnez
tout dispositif de désactivation du bloc-piles avant de dégager un
objet coincé, d’effectuer des réglages, de changer d’accessoires ou
de nettoyer ou de ranger les outils électriques. Ces mesures de sécurité
préventives réduisent les risques de mise en marche accidentelle de l’outil
électrique.
◾
Rangez l’outil électrique à l’arrêt hors de la portée des enfants et
n’autorisez pas une personne ne sachant pas s’en servir ou n’ayant pas
lu ces instructions à l’utiliser. Les outils électriques sont dangereux s’ils se
retrouvent entre les mains d’utilisateurs qui ne savent pas s’en servir.
◾
Entretenez les outils électriques et les accessoires. Vériez les pièces
mobiles pour vous assurer qu’elles ne sont pas désalignées, enrayées,
brisées, ou dans un état qui pourrait nuire à leur fonctionnement. Si
l’outil électrique est endommagé, faites-le réparer avant de l’utiliser. De
nombreux accidents sont provoqués par des outils électriques et des accessoires
mal entretenus.
SCIE À CHAÎNE SANS FIL AU LITHIUM-ION DE 56 VOLTS — CS1800/CS1800-FC56
Page 57

◾
Gardez vos outils tranchants affûtés et propres. Des outils tranchants bien
entretenus et dont les lames sont affûtées risquent moins de se bloquer et sont
plus faciles à maîtriser.
◾
Utilisez l’outil électrique, les accessoires, les embouts ou autres
conformément aux instructions, en tenant compte des conditions de
travail et du travail à effectuer. L’utilisation de l’outil électrique à des ns
autres que celles auxquelles il est destiné pourrait entraîner une situation
dangereuse.
◾
Les poignées et autres surfaces de préhension doivent toujours être
sèches, propres et exemptes d’huile ou de graisse. Les poignées et autres
surfaces de préhension glissantes peuvent entraîner une manipulation non
sécuritaire ou une perte de contrôle de l’outil.
UTILISATION ET ENTRETIEN DU BLOC-PILE
◾
Rechargez uniquement le bloc-piles à l’aide du chargeur approuvé par le
fabricant. Un chargeur conçu pour un type de bloc-piles peut causer un incendie
s’il est utilisé avec un autre bloc-piles.
◾
Utilisez les outils électriques uniquement avec les blocs-piles désignés.
L’utilisation de tout autre bloc-piles peut constituer un risque de blessure et
d’incendie.
◾
Lorsque vous n’utilisez pas le bloc-piles, conservez-le à l’écart d’autres
objets métalliques, comme des trombones, des pièces de monnaie, des
clés, des clous, des vis et d’autres petits objets métalliques qui peuvent
connecter une borne à une autre. Un court-circuit entre les bornes du bloc-
piles peut occasionner des brûlures ou un incendie.
◾
Dans de mauvaises conditions, un liquide peut être éjecté du bloc-piles;
évitez tout contact avec celui-ci. En cas de contact accidentel, rincez
à grande eau. Si vos yeux entrent en contact avec ce liquide, consultez
un médecin. Le liquide provenant des piles peut causer de l’irritation ou des
brûlures.
◾
N’utilisez pas un bloc-piles ou un outil endommagé ou modié. Les blocspiles modiés ou endommagés peuvent fonctionner de façon imprévisible et
présenter un risque d’incendie, d’explosion ou de blessures.
◾
N’exposez pas un bloc-piles ou un outil à un feu ou à une température
excessive. L’exposition au feu ou à une température supérieure à 130 °C (265 °F)
peut provoquer une explosion.
SCIE À CHAÎNE SANS FIL AU LITHIUM-ION DE 56 VOLTS — CS1800/CS1800-FC 57
Page 58

◾
Suivez toutes les instructions pour le chargement et ne chargez pas le
bloc-piles ou l’outil en dehors de la plage de température précisée dans
les instructions. Une recharge inadéquate ou effectuée à des températures
en dehors de la plage précisée peut endommager le bloc-piles et augmenter le
risque d’incendie.
ENTRETIEN
◾
Demandez à un technicien qualié qui utilise seulement des pièces
de rechange identiques aux pièces d’origine d’effectuer l’entretien de
votre outil électrique. Vous vous assurerez ainsi que l’outil électrique demeure
sécuritaire.
◾
Ne réparez jamais un bloc-piles endommagé. Seuls le fabricant et les
fournisseurs de services autorisés peuvent effectuer la réparation d’un bloc-piles.
AVERTISSEMENTS DE SÉCURITÉ SCIE À CHAÎNE
◾
Gardez toutes les parties de votre corps éloignées de la chaîne de la
scie au moment de l’utilisation. Avant de démarrer la scie à chaîne,
assurezvous qu’elle n’entre pas en contact avec quoi que ce soit. Un
moment d’inattention suft pour que la chaîne de la scie s’accroche à vos
vêtements ou heurte votre corps
◾
Tenez toujours la scie à chaîne avec la main droite sur la poignée arrière
et la main gauche sur la poignée avant. N’inversez jamais la position des
mains en utilisant la scie, car cela augmente les risques de blessures.
◾
Tenez l’outil électrique uniquement par les poignées protégées, car la
chaîne de la scie pourrait entrer en contact avec un câblage caché. Si
la chaîne entre en contact avec un câble alimenté pendant que l’appareil est
en marche, cela risque d’exposer les pièces métalliques de l’outil électrique et
d’occasionner un choc électrique à l’utilisateur
◾
Portez des lunettes de sécurité et des protections auditives. Des
protections pour la tête, les mains, les jambes et les pieds sont aussi
recommandées. Des vêtements de protection adéquats réduisent les risques
de blessures provoquées par la projection de débris ou par un contact accidentel
avec la chaîne de la scie.
◾
N’utilisez pas de scie à chaîne si vous êtes dans un arbre. L’utilisation
d’une scie à chaîne lorsque vous êtes dans un arbre peut occasionner des
blessures graves.
SCIE À CHAÎNE SANS FIL AU LITHIUM-ION DE 56 VOLTS — CS1800/CS1800-FC58
Page 59

◾
Maintenez toujours des appuis fermes et n’utilisez la scie à chaîne que
lorsque vous vous tenez sur une surface sécuritaire et de niveau. Des
surfaces glissantes ou instables, comme une échelle, peuvent occasionner une
perte d’équilibre ou une perte de contrôle de la scie à chaîne.
◾
Lorsque vous coupez une branche soumise à une tension, prenez garde
à sa détente. Quand la tension des bres de bois se relâche, la branche peut
venir vous frapper ou vous faire perdre le contrôle de la scie à chaîne.
◾
Faites très attention lorsque vous coupez du sous-bois ou de jeunes
arbres. Leur matériau souple pourrait coincer dans la chaîne de la scie et être
envoyé dans votre direction ou encore tirer et vous faire perdre l’équilibre.
◾
Pour transporter la scie à chaîne, éteignez-la et tenez-la éloignée de
votre corps par la poignée avant. Installez toujours la gaine de la chaîne
avant de transporter ou de ranger la scie. Une manipulation appropriée de
lascie réduit les risques de contacts accidentels avec la chaîne en mouvement.
◾
Suivez les instructions pour le graissage, le tensionnage de la chaîne
et le changement d’accessoires. Une mauvaise tension ou une mauvaise
lubrication peut entraîner le bris de la chaîne ou augmenter le risque de rebond.
◾
Ne coupez que du bois. N’utilisez pas la scie à chaîne pour des tâches
autres que celles pour lesquelles elle a été conçue. Par exemple,
ne l’utilisez pas pour couper du métal, du plastique, des matériaux
de maçonnerie ni des matériaux de construction non faits de bois.
L’utilisation d’une scie à chaîne pour des tâches pour lesquelles elle n’a pas été
conçue pourrait créer une situation dangereuse.
◾
Ne tentez pas d’abattre un arbre avant d’avoir compris les risques qui y
sont associés et la façon de les éviter. L’abattage d’un arbre pourrait causer
des blessures graves à l’utilisateur ou aux gens à proximité.
CAUSES AND OPERATOR PREVENTION OF KICKBACK
Objet ou que le bois se referme et coince la chaîne de la scie dans la coupe.
Dans certains cas, un contact avec le bout du guide-chaîne peut causer une
réaction inverse soudaine qui fait rebondir le guide-chaîne et l’envoie vers
l’utilisateur.
Si la chaîne de la scie se coince dans la partie supérieure du guide-chaîne,
celui-ci peut être envoyé rapidement vers l’utilisateur.
SCIE À CHAÎNE SANS FIL AU LITHIUM-ION DE 56 VOLTS — CS1800/CS1800-FC 59
Page 60

L’une ou l’autre de ces réactions peut causer une perte de contrôle de la scie
à chaîne et occasionner des blessures graves.Ne comptez pas exclusivement
sur les dispositifs de sécurité intégrés à votre scie. En tant qu'utilisateur
de tronçonneuse, vous devez prendre plusieurs mesures pour éviter tout
accident ou blessure aux travaux de coupe.
En tant qu’utilisateur de la scie à chaîne, vous devez prendre les mesures qui
s’imposent pour que vos coupes s’effectuent sans accidents ni blessures.
◾
Ayez une prise ferme, tenez la scie à chaîne à deux mains en encerclant
ses poignées avec vos pouces et vos doigts et positionnez votre corps
de façon à résister à la pression des rebonds. Il est possible de contrôler la
force des rebonds en prenant les précautions appropriées. Ne lâchez pas la scie
à chaîne.
◾
Ne tendez pas vos bras trop loin, et n’effectuez pas de coupe au-dessus
de la hauteur de vos épaules. Ces mesures permettent d’empêcher tout
contact involontaire avec le bout de l’outil et de mieux contrôler la scie à chaîne
quand surviennent des situations inattendues.
◾
N’utilisez que les chaînes et les guides-chaîne de remplacementindiqués
par le fabricant. L’utilisation des mauvais guides-chaînes ou desmauvaises
chaînes de remplacement peut occasionner des bris ou des rebonds.
◾
Suivez les instructions du fabricant pour l’affûtage et l’entretien de la
chaîne de la scie. Réduire la hauteur du guide de profondeur peut augmenter
les risques de rebond.
SCIE À CHAÎNE SANS FIL AU LITHIUM-ION DE 56 VOLTS — CS1800/CS1800-FC60
Page 61
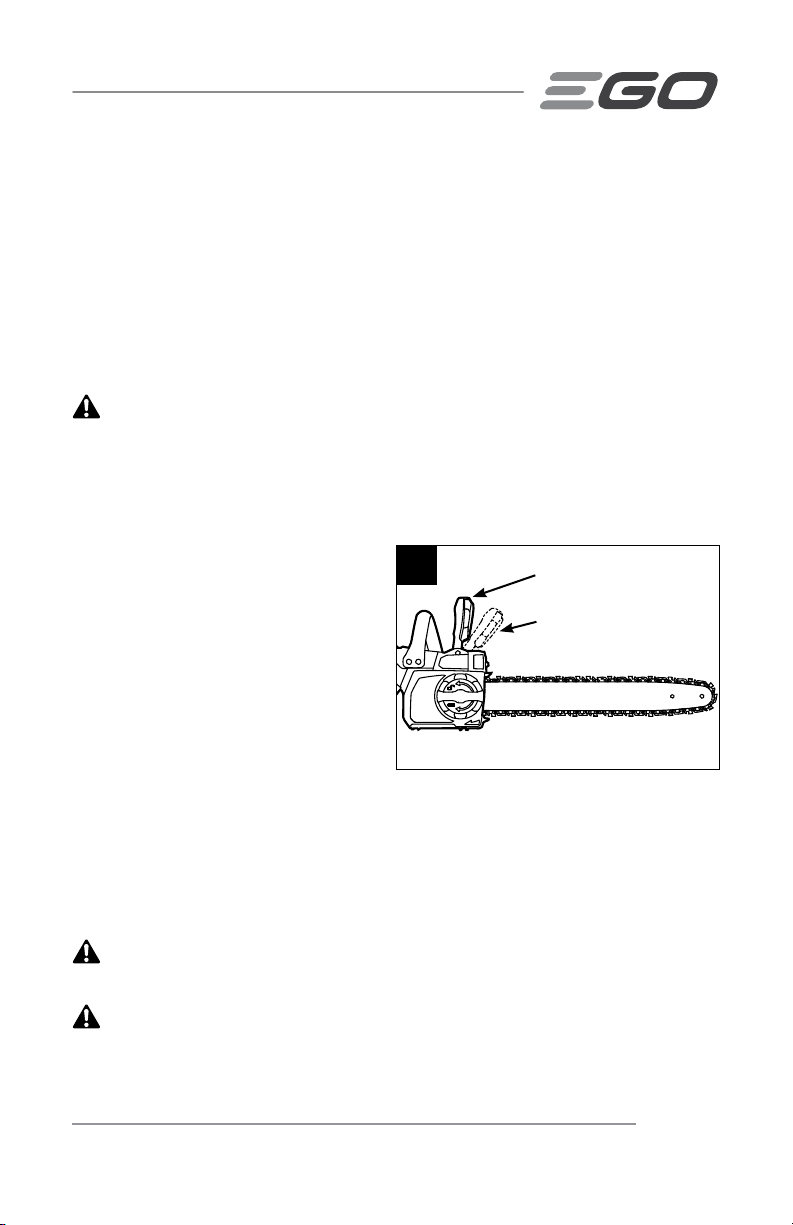
DISPOSITIFS DE SÉCURITÉ CONTRE LES REBONDS DE LA SCIE À
CHAÎN
Frein de chaîne
La scie comprend un frein de chaîne qui arrête le moteur et le mouvement de la chaîne
quand se produit un rebond. Le frein de chaîne peut être activé par le mouvement
vers l’avant de la poignée de frein à rebond de la chaîne, mouvement occasionné par
la rotation inverse de la scie au moment du rebond; le frein de chaîne peut également
être activé par les forces d’inertie générées par le mouvement de recul rapide.
:
AVERTISSEMENT
mettre hors d’état de fonctionner.
Avant d’utiliser la scie à chaîne, assurez-vous que le frein de chaîne fonctionne
correctement. La poignée du frein à rebond de la chaîne devrait se déplacer sans
difculté.
Ne tentez jamais de modier le frein de chaîne ni de le
Pour vérier si le frein de la chaîne
fonctionne, effectuez les étapes suivantes
(Fig. 1):
◾
Déposez la scie à chaîne sur
une surface plane et dégagée, et
assurez-vous qu’aucun objet ou
obstacle à proximité ne peut toucher
au guide-chaîne ou à la chaîne.
◾
Desserrez le frein de chaîne en
tirant la poignée du frein à rebond de la chaîne vers la poignée avant.
◾
Faites démarrer la scie à chaîne.
◾
Poussez la poignée du frein à rebond de la chaîne vers l’avant de la scie. Un frein
fonctionnel arrêtera immédiatement le mouvement de la chaîne. Si le frein de
chaîne ne fonctionne pas correctement, n’utilisez pas la scie à chaîne avant de
l’avoir fait réparer par un technicien qualié.
:
AVERTISSEMENT
avant chaque utilisation.
AVERTISSEMENT
nuire à son fonctionnement. Maintenez toujours la propreté de l’appareil.
Conrmez que le frein de chaîne fonctionne correctement
:
Les copeaux de bois peuvent entraver le frein de chaîne et
1
Poignée de frein de rebond
de la tronçonneuse en
position de fonctionnement
Chaîne de frein kickbanck
en position de freinage
SCIE À CHAÎNE SANS FIL AU LITHIUM-ION DE 56 VOLTS — CS1800/CS1800-FC 61
Page 62
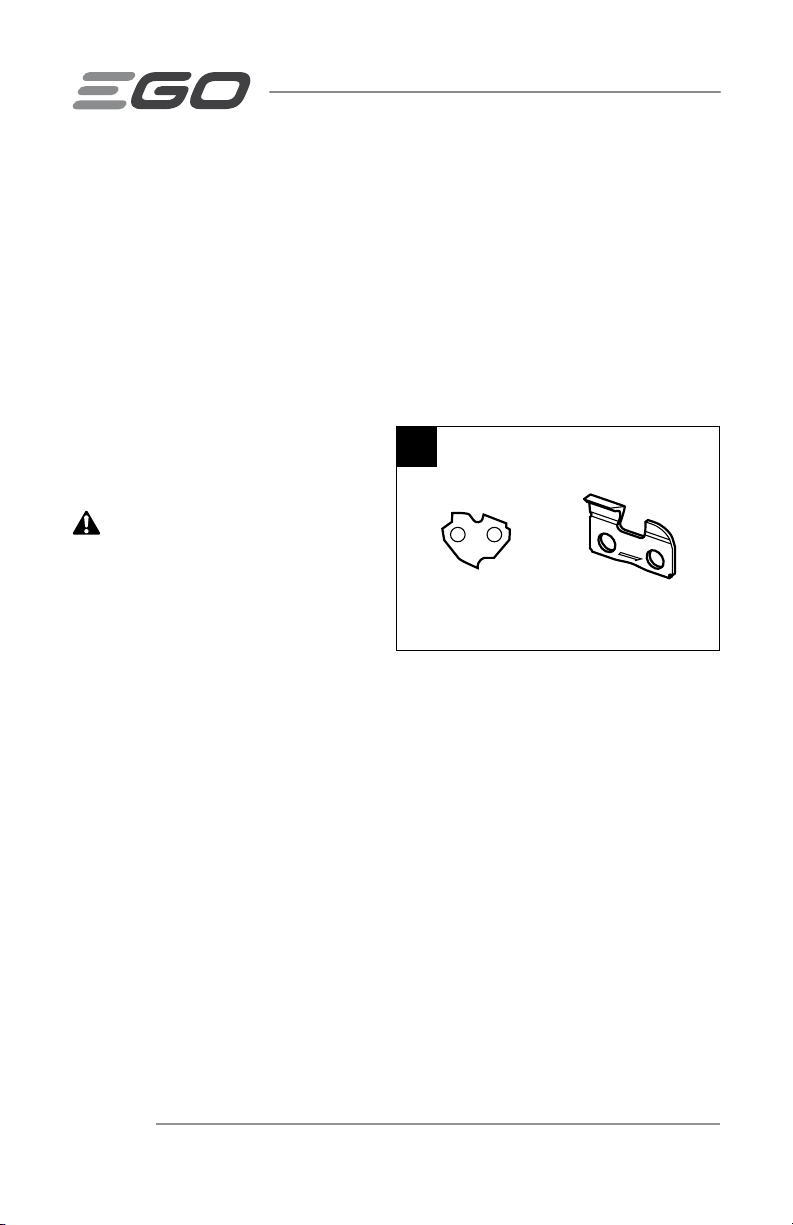
Chaîne de scie à faible rebond
Les guides (ou limiteurs) de profondeur situés devant chaque gouge peuvent réduire au
minimum la force d’un rebond en empêchant les gouges de creuser trop profondément
à l’endroit où survient ce rebond. N’utilisez qu’une chaîne de rechange équivalente
à la chaîne d’origine ou homologuée chaîne à faible rebond selon la norme ANSI
B175.1. Une chaîne de scie à faible rebond est une chaîne qui satisfait aux exigences
en matière de rebonds de la norme ANSI B175.1 (la norme de l’American National
Standard relative aux outils électriques – Exigences de sécurité des scies à chaîne à
essence) lors d’essais sur l’échantillon représentatif de scies à chaîne décrit dans la
norme ANSI B175.1, sous 3.8 c.i.d.
Les maillons d’entraînement du butoir
(Fig. 2) aident également à offrir un
rendement à faible rebond.
:
MISE EN GARDE
mesure qu’elles sont affûtées au cours de
leur vie utile, les chaînes de scie perdent
une partie de leurs propriétés anti-rebond
et doivent être utilisées avec davantage
de précautions.
Au fur et à
2
Maillons d’entraînement
du butoir
Type de cutter
GUIDE-CHAÎNE
La présente scie est équipée d’un guide-chaîne avec un bout de faible rayon. Les bouts
de faible rayon ont moins tendance à rebondir. Lors du remplacement du guide-chaîne,
assurez-vous de vous procurer le guide-chaîne indiqué dans le présent manuel.
SCIE À CHAÎNE SANS FIL AU LITHIUM-ION DE 56 VOLTS — CS1800/CS1800-FC62
Page 63
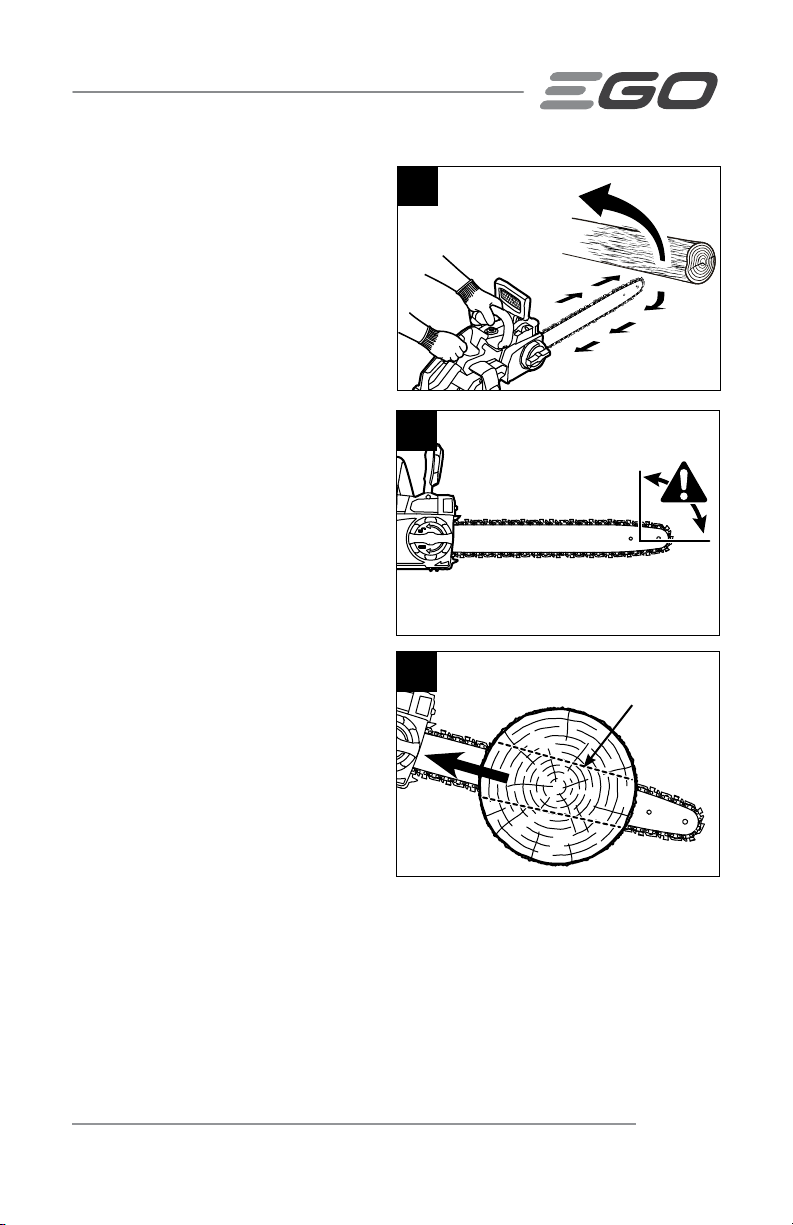
AVERTISSEMENTS
SUPPLÉMENTAIRES
◾
Une compréhension élémentaire
des rebonds (Fig. 3 à 5) vous
permettra de réduire ou
d’éliminer l’élément de surprise.
La surprise contribue aux accidents.
◾
Assurez-vous que la zone dans
laquelle vous faites la coupe est
dépourvue d’obstacles. Assurez-
vous que le bout du guide-chaîne
ne rencontre ni grume, ni branche,
ni clôture, ni tout autre obstacle
pendant que vous manipulez la scie
à chaîne.
◾
Inspectez la pièce à travailler
avant la coupe pour repérer
tout clou, câble ou autre corps
étranger.
◾
Planiez vos travaux : assurezvous d’avoir une aire de travail
dépourvue d’obstacles et, si
vous abattez un arbre, prévoyez
au moins une voie de retraite
pour échapper à la chute de
l’arbre.
◾
Lorsque vous abattez un arbre,
maintenez toute personne à une
distance d’au moins deux fois la
longueur de l’arbre.
◾
Gardez une posture sécuritaire et un bon équilibre en tout temps.
3
4
5
Rebond
BRUSHLESS
Rebond linéaire
Rebond
circulaire
Zone de risque
de rebond
Coincement
SCIE À CHAÎNE SANS FIL AU LITHIUM-ION DE 56 VOLTS — CS1800/CS1800-FC 63
Page 64

◾
BRUSHLESS
Une scie à chaîne doit être
utilisée à deux mains. Manipuler
la scie avec une seule main pourrait
occasionner des blessures graves
à l’utilisateur et aux personnes se
trouvant à proximité (Fig. 6).
◾
L’outil doit toujours tourner à
pleine vitesse lors des coupes.
Enfoncez complètement la gâchette
et conservez la vitesse de coupe.
◾
Poussée et traction – la force d’un
rebond va toujours dans la direction
opposée à celle de la chaîne à
l’endroit où le contact avec le bois a
lieu. Cela veut dire que vous devez
être prêt à contrôler la TRACTION
lorsque vous coupez à l’aide du bas
du guide-chaîne et que vous devez
résister à la POUSSÉE lorsque vous
coupez avec le haut du guide-chaîne
(Fig. 7).
◾
Évitez tout contact involontaire
avec la chaîne de la scie
immobile ou la rainure du guidechaîne. Elles peuvent être très
coupantes. Portez toujours des gants
et des pantalons ou des jambières
de protection pour manipuler la scie
à chaîne, la chaîne de la scie ou le
guide-chaîne.
◾
N’utilisez jamais une scie à chaîne endommagée, mal ajustée ou qui
n’est pas assemblée complètement et de façon sécuritaire. Assurez-vous
que la chaîne de la scie s’immobilise quand vous relâchez la gâchette.
◾
Immobilisez la pièce à travailler avant de la tronçonner. Avant d’abattre
ou d’élaguer un arbre, repérez et immobilisez les branches dangereuses.
6
7
Tirez
Poussez
SCIE À CHAÎNE SANS FIL AU LITHIUM-ION DE 56 VOLTS — CS1800/CS1800-FC64
Page 65
◾
Une coupe mal exécutée, effectuée avec brusquerie ou un usage
inapproprié de la scie à chaîne pourraient user prématurément le guidechaîne, la chaîne ou le pignon d’entraînement et occasionner le bris de
ces éléments (donnant lieu à des rebonds), le déraillement de la chaîne
ou l’éjection de matériaux.
◾
N’utilisez jamais le guide-chaîne comme un levier. Un guide-chaîne
plié peut entraîner l’usure prématurée de ce guide, de la chaîne et du pignon
d’entraînement, ou encore le bris de la chaîne et du guide-chaîne, ce qui pourrait
donner lieu à des rebonds, au déraillement de la chaîne et à l’éjection de
matériaux.
◾
Ne coupez qu’une pièce à travailler à la fois.
◾
Utilisez le produit uniquement avec les blocs-piles et les chargeurs
indiqués ci-dessous :
BLOC-PILE CHARGEUR
BA1120, BA1120-FC, BA1400, BA1400-FC,
BA2240, BA2240-FC, BA2800, BA2800-FC,
BA4200, BA4200-FC, BA1400T, BA1400T-FC,
BA2800T, BA2800T-FC, BA4200T, BA4200T-FC
◾
Ne rechargez pas le bloc-piles sous la pluie ni dans un endroit mouillé.
◾
S’il se produit une situation qui ne Fig. pas dans le présent manuel,
faites preuve de prudence et de jugement. Communiquez avec le centre
de service EGO pour obtenir de l’aide.
CH2100, CH2100-FC,
CH5500, CH5500-FC
CONSERVEZ CES INSTRUCTIONS!
LEXIQUE
Graisseur automatique: Système qui lubrie automatiquement le guide-chaîne et la
chaîne de la scie.
Tronçonnage: Coupe dans le sens de la largeur d’un arbre abattu ou d’une grume.
Griffes: La ou les dents pointues utilisées lors de la coupe ou du tronçonnage pour
faire pivoter la scie à chaîne tout en conservant sa position.
Frein de chaîne: Dispositif servant à arrêter immédiatement la chaîne de la scie.
SCIE À CHAÎNE SANS FIL AU LITHIUM-ION DE 56 VOLTS — CS1800/CS1800-FC 65
Page 66

Ensemble moteur: Scie à chaîne sans sa chaîne et son guide-chaîne.
Pignon d’entraînement: Pièce dentée qui entraîne la chaîne de la scie.
Abattage: Processus par lequel on coupe un arbre pour le faire tomber au sol.
Trait d’abattage: Entaille nale du processus d’abattage, fait sur le côté opposé à
l’entaille d’abattage.
Rebond: Mouvement du guide-chaîne vers l’arrière, vers le haut ou les deux qui se
produit quand la chaîne près du haut du bout du guide-chaîne touche un objet, comme
une grume ou une branche, ou quand le bois se referme et coince la chaîne dans la
coupe.
Chaîne de scie à faible rebond: Chaîne jugée conforme aux exigences en matière
de rebond de la normeANSIB175.1 lors de son essai par un échantillon représentatif
de scies à chaîne.
Position de coupe normale: Position adoptée lors du tronçonnage et de l’abattage.
Entaille d’abattage: Entaille qui dirige la chute de l’arbre.
Guide-chaîne à rebond réduit: un guide-chaîne dont la capacité à réduire
grandement les risques de rebond est prouvée.
INTRODUCTION
Nous vous félicitons d’avoir choisi une scie à chaîne de nouvelle génération alimentée
par un bloc-pile au lithium-ion de 56V. Cette scie a été conçue et fabriquée an de
vous offrir la meilleure abilité et le meilleur rendement possible.
Si vous éprouvez un problème que vous n’arrivez pas à régler facilement, veuillez
communiquer avec le centre de service à la clientèle d’EGO au 1855EGO-5656.
Le présent guide contient des renseignements importants pour assembler, utiliser et
entretenir en toute sécurité votre scie à chaîne. Lisez-le soigneusement avant d’utiliser
la scie à chaîne. Conservez ce guide à portée de main an de pouvoir le consulter à
tout moment.
NUMÉRO DE SÉRIE ____________________ DATE D’ACHAT _____________________
NOUS VOUS RECOMMANDONS DE NOTER LE NUMÉRO DE SÉRIE ET LA DATE D’ACHAT ET DE
LES CONSERVER EN LIEU SÛR AFIN DE POUVOIR LES CONSULTER ULTÉRIEUREMENT.
SCIE À CHAÎNE SANS FIL AU LITHIUM-ION DE 56 VOLTS — CS1800/CS1800-FC66
Page 67

CARACTÉRISTIQUES TECHNIQUES
Tension 56V, courant continu
Longueur du guide-chaîne 450 mm (18 po)
Pas de chaîne 9,5 mm (3/8 po)
Calibre 1,3 mm (0,050 po)
Type de chaîne 91PX062X
Type de guide-chaîne 180SDEA041
Capacité du réservoir d’huile de la chaîne 200 ml (7 oz)
Température de fonctionnement
recommandée
Température de stockage recommandée 20°C-70°C(-4°F-158°F)
Poids net (sans le bloc-piles et la gaine de
la chaîne)
Guide-chaîne et chaîne recommandés pour cette scie à chaîne
NOM DE PIÈCE TYPE DE PIÈCE NUMÉRO DE MODÈLE
180SDEA041
Guide-chaîne
Chaîne de la scie
(Modèle recommandé)
164MLEA041(Compatible)
144MLEA041(Compatible)
91PX062X
(Modèle recommandé)
90PX056X(Compatible)
90PX052X(Compatible)
-15°C-40°C( 5°F-104°F)
4.4 kg (9.7 lbs.)
AG1800
(Modèle recommandé)
AG1600(Compatible)
AG1400(Compatible)
AC1800
(Modèle recommandé)
AC1600(Compatible)
AC1400(Compatible)
SCIE À CHAÎNE SANS FIL AU LITHIUM-ION DE 56 VOLTS — CS1800/CS1800-FC 67
Page 68

LISTE DES PIÈCES CONTENUES DANS
L’EMBALLAGE
NOM DE PIÈCE QUANTITÉ
Scie à chaîne
Gaine de la chaîne
Guide d’utilisation
1
1
1
SCIE À CHAÎNE SANS FIL AU LITHIUM-ION DE 56 VOLTS — CS1800/CS1800-FC68
Page 69

DESCRIPCIÓN
FAMILIARISEZ-VOUS AVEC VOTRE SCIE À CHAÎNE (Fig. 8)
Pour utiliser ce produit en toute sécurité, vous devez comprendre les renseignements
gurant sur le produit et dans le présent guide d’utilisation et connaître le projet
que vous entreprenez. Avant d’utiliser ce produit, familiarisez-vous avec toutes les
caractéristiques de fonctionnement et consignes de sécurité.
8
Poignée du frein à rebond de la chaîne
Guide-chaîne
Trou de lubrication
Chaîne de la scie
Poignée arrière
Couvercle latéral
Capuchon du
réservoir d’huile
Hublot d’inspection de l’huile Mécanisme d’éjection
Bouton des phares à DEL
Poignée avant
Mécanisme d’éjection
Bouton d’éjection
du bloc-piles
Phares à DEL
Gaine de la chaîne
Bouton de verrouillage
Interrupteur à
vitesse variable
Contacts électriques
Griffes
SCIE À CHAÎNE SANS FIL AU LITHIUM-ION DE 56 VOLTS — CS1800/CS1800-FC 69
Page 70

Poignée du frein à rebond de la chaîne
Sert à activer ou désactiver le frein de la chaîne. Cette poignée sert aussi de protection
contre les branches saillantes et aide à empêcher que la main gauche ne touche à la
chaîne de la scie si elle glisse de la poignée avant.
Interrupteur à vitesse variable
Permet de mettre en marche et d’arrêter la scie à chaîne et d’ajuster la vitesse de la
chaîne.
Lock-off Button
Helps to prevent accidental or unauthorized activating of the trigger switch. It must be
depressed before the trigger switch can be activated.
Capuchon du réservoir d’huile
Ferme le réservoir d’huile.
Hublot d’inspection de l’huile
Permet de voir le niveau d’huile dans le réservoir d’huile.
Chaîne de la scie
Chaîne en boucle munie de dents tranchantes qui coupe le bois quand elle est
entraînée par l’ensemble moteur et soutenu par le guide-chaîne.
Gaine de la chaîne
Empêche l’utilisateur d’entrer en contact avec les dents tranchantes de la chaîne
lorsque l’outil n’est pas utilisé. Permet également d’empêcher que les dents de la
chaîne s’ébrèchent ou s’endommagent lorsque l’outil est transporté ou rangé.
Guide-chaîne
Soutient et guide la chaîne de la scie.
Poignée avant
Poignée de soutien pour la main gauche située à l’avant de la scie à chaîne.
SCIE À CHAÎNE SANS FIL AU LITHIUM-ION DE 56 VOLTS — CS1800/CS1800-FC70
Page 71

Poignée arrière
Poignée de soutien pour la main droite située à l’arrière de la scie à chaîne. Tenez
toujours la scie à chaîne avec la main droite sur la poignée arrière et la main
gauche sur la poignée avant.
Bouton de réglage rapide du tensionnage de la chaîne
Permet un réglage rapide et précis du tensionnage de la chaîne sans devoir utiliser des
appareils auxiliaires.
Bouton du panneau latéral
Verrouille et déverrouille le panneau latéral.
Bouton d’éjection du bloc-pile
Permet de retirer le bloc-pile lorsque l’on appuie dessus.
Mécanisme d’éjection
Aide à enlever le bloc-pile.
Phares à DEL
Les phares à DEL sont situés à l’avant de l’ensemble moteur. Cette fonctionnalité
procure un éclairage supplémentaire pour améliorer la visibilité. L’éclairage peut se
régler en 2 niveaux d’intensité.
Bouton des phares à DEL
Bouton pour ALLUMER ou ÉTEINDRE les phares à DEL. Appuyez une fois sur le bouton
des phares à DEL pour allumer les phares au niveau d’intensité 1. Appuyez de nouveau
sur le bouton des phares à DEL pour allumer les phares au niveau d’intensité 2. Les
phares à DEL s’éteindront lorsque vous aurez appuyé sur le bouton une troisième fois.
Griffes
Les dents pointues en métal utilisées lors de l’abattage ou du tronçonnage pour faire
pivoter la scie à chaîne tout en conservant sa position, ce qui permet d’éviter au bois
d’œuvre de glisser durant la coupe. Elles peuvent augmenter l’efcacité de la coupe.
SCIE À CHAÎNE SANS FIL AU LITHIUM-ION DE 56 VOLTS — CS1800/CS1800-FC 71
Page 72

ASSEMBLAGE
AVERTISSEMENT :
tentez pas d’utiliser cet article tant que ces pièces n’auront pas été remplacées. Le fait
d’utiliser cet article avec des pièces endommagées ou manquantes pourrait entraîner
des blessures graves.
AVERTISSEMENT :
accessoires qui ne sont pas recommandés pour cet article. Toute modication est
considérée comme un usage inapproprié et peut créer une situation dangereuse
susceptible d’entraîner des blessures graves.
AVERTISSEMENT :
causer des blessures graves, enlevez toujours le connecteur de l’outil lorsque vous
assemblez des pièces, procédez à des ajustements ou à son nettoyage ou lorsque
l’outil n’est pas utilisé.
S’il y a des pièces manquantes ou endommagées, ne
Ne tentez pas de modier cet article ou de créer des
Pour empêcher une mise en marche accidentelle pouvant
DéBALLAGE
◾
Cet article doit être assemblé.
◾
Retirez soigneusement l’outil et toutes les pièces de l’emballage. Assurez-vous
que toutes les pièces mentionnées sur la liste de l’emballage sont présentes.
◾
Inspectez soigneusement l’outil pour vérier qu’il n’a pas été endommagé
pendant l’expédition.
◾
Ne jetez pas le matériel d’emballage avant d’avoir inspecté soigneusement la scie
à chaîne et de l’avoir fait fonctionner de manière satisfaisante.
◾
S’il y a des pièces manquantes ou endommagées, veuillez retourner l’outil à
l’endroit où vous l’avez acheté.
SCIE À CHAÎNE SANS FIL AU LITHIUM-ION DE 56 VOLTS — CS1800/CS1800-FC72
Page 73

FONCTIONNEMENT
AVERTISSEMENT :
restez attentif. N’oubliez pas qu’une fraction de seconde d’inattention suft à se blesser
gravement.
AVERTISSEMENT :
écrans latéraux conformes à la norme ANSI Z87.1, ainsi que des protecteurs d’oreilles.
Sinon, vous pourriez recevoir des débris dans les yeux et vous blesser gravement.
AVERTISSEMENT :
pas recommandés par le fabricant de cette scie à chaîne. L’utilisation de pièces ou
d’accessoires non recommandés peut occasionner des blessures graves.
Avant chaque utilisation, inspectez l’intégralité du produit pour vérier s’il y a des
pièces endommagées, manquantes ou laches, comme des vis, des boulons, des
écrous, des capuchons, etc. Fixez fermement toutes les attaches et tous les capuchons
et ne faites pas fonctionner ce produit avant que toutes les pièces manquantes ou
endommagées aient été remplacées.
Même si vous connaissez parfaitement la scie à chaîne,
Portez systématiquement des lunettes de sécurité avec
N’utilisez pas de pièces ni d’accessoires qui ne sont
UTILISATION
Le présent produit peut servir à des tâches de base telle que l’abattage, l’ébranchage,
l’élagage et la coupe du bois d’oeuvre et des arbres.
REMPLISSEZ LE RÉSERVOIR D’HUILE DE LUBRIFIANT POUR GUIDECHAÎNE ET CHAÎNE.
AVERTISSEMENT:
causer des blessures graves, retirez toujours le bloc-pile de la scie à chaîne avant de
remplir le réservoir d’huile.
AVERTISSEMENT:
de la scie à chaîne. Le lubriant pourrait se renverser et occasionner un incendie.
Pour empêcher une mise en marche accidentelle pouvant
Ne fumez pas ni n’approchez de amme près de l’huile ou
AVIS: La scie à chaîne ne contient pas de lubriant à l’achat. Il est donc essentiel
de remplir son réservoir d’huile avant de l’utiliser. Utiliser la scie à chaîne quand
son réservoir d’huile est vide ou que son niveau est en dessous du minimum
l’endommagera. La durée de vie et l’efcacité de la chaîne dépendent d’une
lubrication optimale. La chaîne est automatiquement lubriée pendant son utilisation.
SCIE À CHAÎNE SANS FIL AU LITHIUM-ION DE 56 VOLTS — CS1800/CS1800-FC 73
Page 74
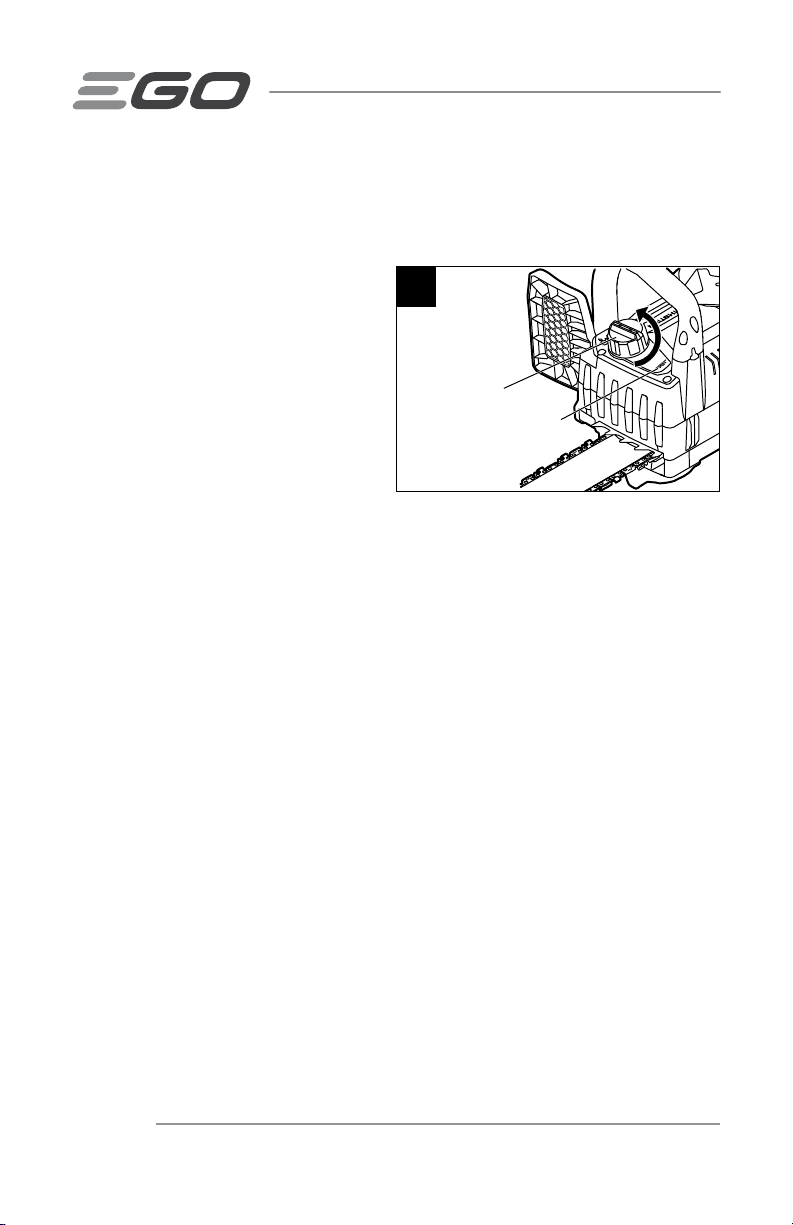
1. Retirez le bloc-pile de la scie à chaîne.
2. Nettoyez le capuchon du réservoir d’huile et la zone l’entourant pour vous assurer
qu’aucune saleté ne tombera à l’intérieur du réservoir.
3. Placez la scie à chaîne sur le côté sur
une surface solide et plane, de façon
que le capuchon du réservoir pointe
vers le haut. Tournez le capuchon
dans le sens contraire des aiguilles
d’une montre pour l’enlever (Fig.9).
4. Versez soigneusement le lubriant
à chaîne dans le réservoir. Le
ltre dans l’ouverture permet à
l’huile d’entrer lentement dans le
réservoir; attention au débordement.
Remplissez le réservoir jusqu’au goulot de remplissage. Essuyez l’excès d’huile.
5. Remettez le capuchon en place, redressez la scie à chaîne et regardez le niveau
d’huile par le hublot d’inspection de l’huile. Le lubriant devrait occuper tout le
hublot.
9
Capuchon du
réservoir d’huile
Marque d'huile minimale
AVIS:
◾
Utilisez de l’huile à chaîne et guide-chaîne de marque OREGON® pour obtenir
de meilleurs résultats. Elle est spécialement conçue pour réduire la friction et
accélérer les coupes.
◾
N’utilisez ni huiles ni lubriants n’ayant pas été précisément conçus pour être
utilisés avec des guide-chaîne et des chaînes. En utiliser pourrait boucher le
système de distribution de l’huile, ce qui entraînerait l’usure prématurée du
guide-chaîne et de la chaîne.
◾
Vériez souvent le niveau d’huile et remplissez le réservoir quand son niveau
descend en bas du minimum. N’utilisez pas la scie à chaîne si le niveau d’huile
n’est pas visible.
◾
N’utilisez pas d’huiles sales, usées ou autrement contaminées. Elles pourraient
endommager le guide-chaîne et la chaîne.
◾
Il est normal que de l’huile s’écoule de la scie à chaîne lorsqu’elle n’est pas
utilisée. Pour éviter cet écoulement, videz le réservoir d’huile après chaque
utilisation, puis faites fonctionner la scie une minute. Si vous prévoyez remiser
la scie à chaîne pendant longtemps, assurez-vous que sa chaîne est légèrement
lubriée; la chaîne, le guide-chaîne et le pignon d’entraînement seront ainsi
protégés de la rouille.
SCIE À CHAÎNE SANS FIL AU LITHIUM-ION DE 56 VOLTS — CS1800/CS1800-FC74
Page 75
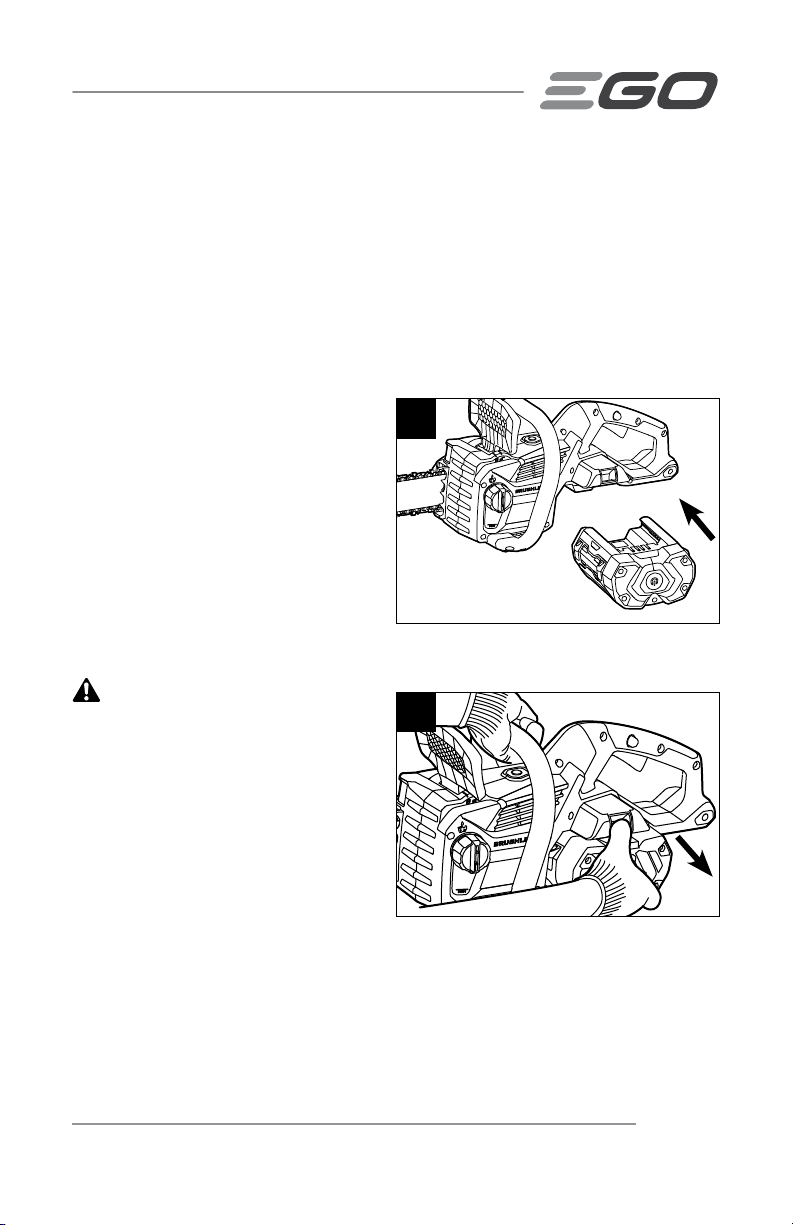
◾
Pour préserver les ressources naturelles, veuillez recycler ou jeter l’huile de
manière appropriée. Consultez l’organisme local de gestion des déchets au sujet
des possibilités offertes pour la mise au rebut ou le recyclage.
INSTALLATION ET RETRAIT DU BLOC-PILE (Fig. 10 & 11)
AVIS:
Chargez le bloc-pile au maximum avant sa premièreutilisation.
Installation (Fig. 10)
1. Alignez les nervures du bloc-pile sur les fentes de montage situées dans le port du
bloc-pile de la scie à chaîne.
2. Glissez le bloc-pile dans la scie à
chaîne jusqu’à ce qu’il se verrouille
en position.
10
AVIS: Avant d’utiliser le produit,
assurez-vous que le verrou de la scie à
chaîne se loge en place et que le bloc-pile
est xé à l’outil.
Retrait (Fig. 11)
AVERTISSEMENT:
toujours conscient de l’emplacement
de vos pieds, de vos enfants et de vos
animaux de compagnie lorsque vous
appuyez sur le bouton d’éjection du blocpile. La chute du bloc-pile pourrait causer
des blessures graves.
Ne retirez JAMAIS le bloc-pile lorsque
vous êtes en hauteur.
1. Tenez le bloc-pile dans la paume de
la main.
2. Pour libérer le bloc-pile du verrou, appuyez sur le bouton d’éjection du bloc-pile
avec le pouce.
3. Saisissez le bloc-pile et retirez-le de la scie à chaîne.
SCIE À CHAÎNE SANS FIL AU LITHIUM-ION DE 56 VOLTS — CS1800/CS1800-FC 75
Soyez
11
Page 76
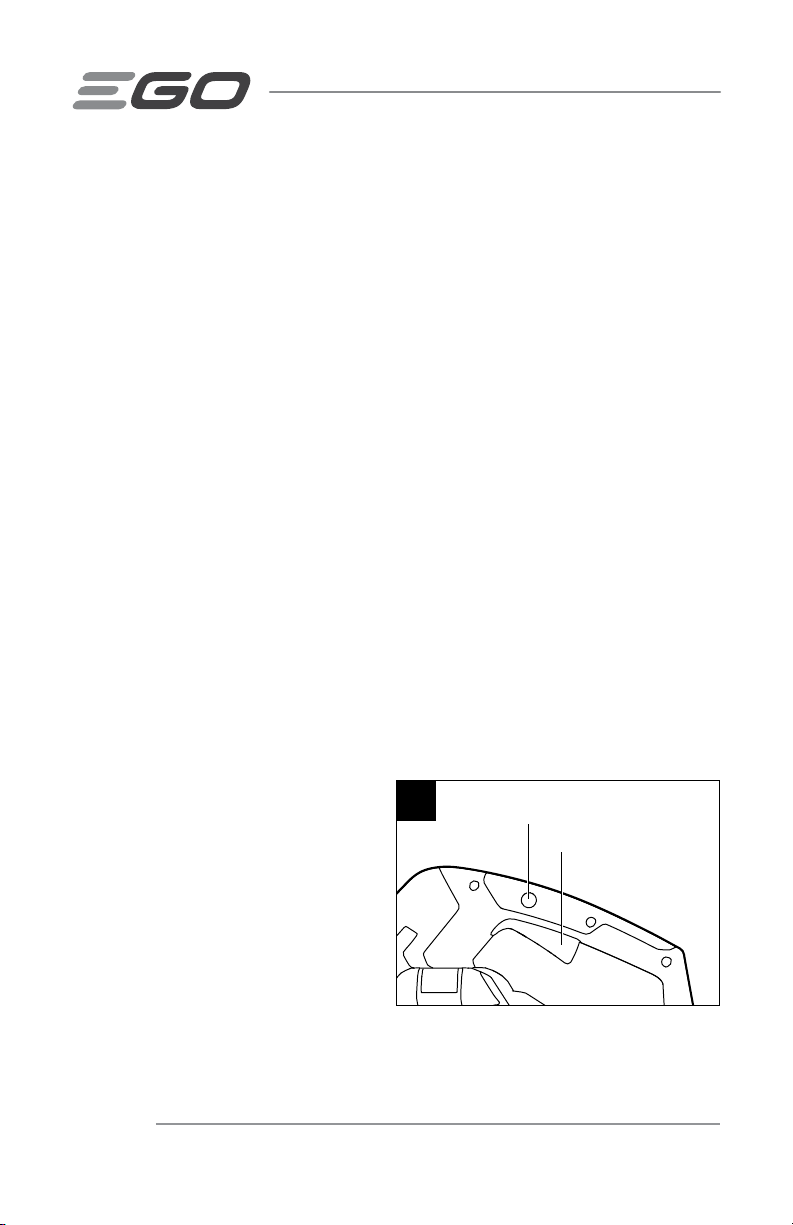
MISE EN MARCHE ET ARRÊT DE LA SCIE À CHAÎNE
Avant de mettre la scie à chaîne en marche, suivez les instructions
ci-dessous :
1. Installez le bloc-pile.
2. Assurez-vous que la chaîne est correctement installée et tensionnée
3. Vériez le couvercle latéral en vous assurant qu’il n’est pas endommagé et qu’il
est bien xé sur le guide-chaîne et la chaîne de la scie.
4. Vériez le niveau d’huile et remplissez le réservoir au besoin.
5. Vériez l’affûtage des dents tranchantes de la chaîne de la scie.
6. Assurez-vous que la poignée du frein à rebond de la chaîne se déplace
facilement en position de freinage, puis tirez-la en position de démarrage, vers la
poignée avant.
7. Tenez la scie à chaîne à deux mains : tenez la poignée arrière avec la main droite
et la poignée avant avec la main gauche.
8. Tenez-vous droit et tenez la scie à chaîne sans vous crisper. Assurez-vous que la
chaîne de la scie ne touche ni le sol ni tout autre objet.
9. Assurez-vous que vous avez une posture sécuritaire et un bon équilibre. Faites
attention aux obstacles, comme les souches, les racines et les fossés, qui
pourraient vous faire trébucher ou tombe
Mise en marche (Fig. 12)
1. Installez le bloc-pile.
2. Assurez-vous qu’aucun objet
ou obstacle à proximité ne peut
toucher au guide-chaîne ou à la
chaîne.
3. Tirez la poignée du frein à rebond
de la chaîne vers la poignée avant
pour la mettre en position de
démarrage (voir Fig. 1).
SCIE À CHAÎNE SANS FIL AU LITHIUM-ION DE 56 VOLTS — CS1800/CS1800-FC76
12
Bouton de
verrouillage
Interrupteur à
gâchette
Page 77
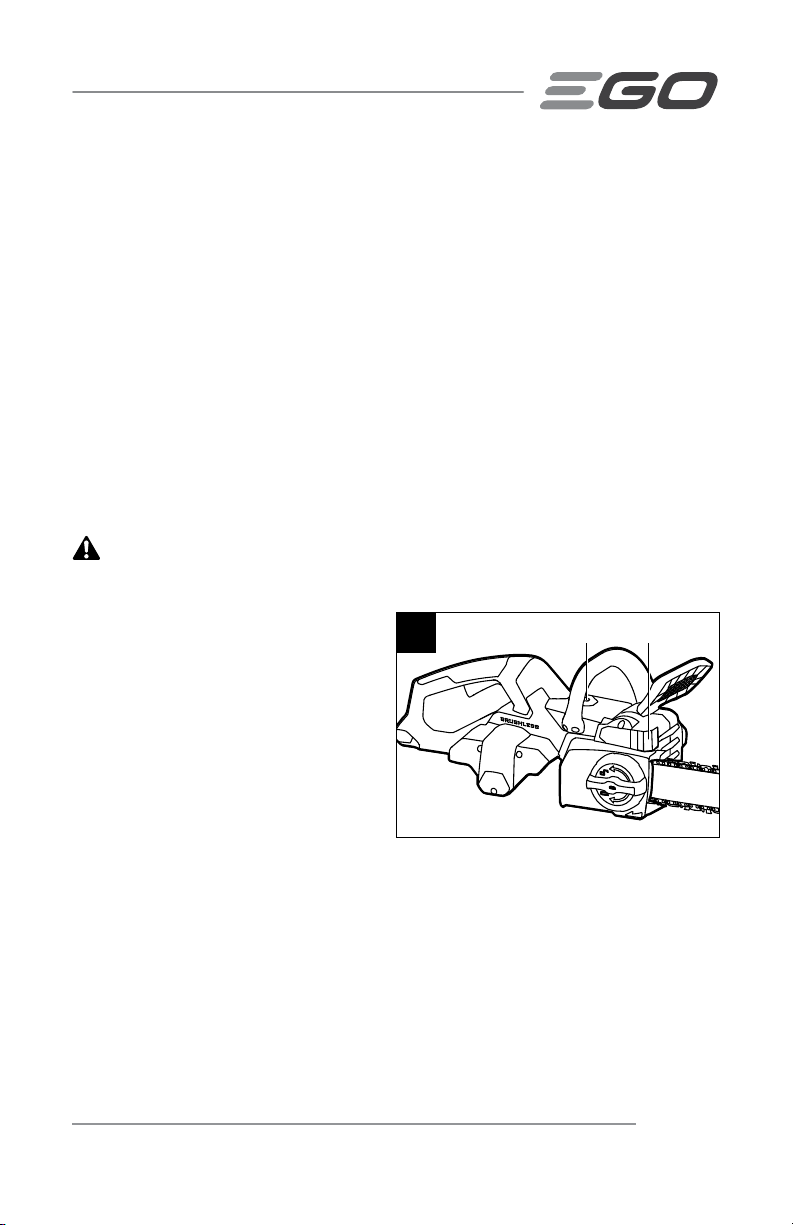
4. Saisissez fermement les poignées avant et arrière avec les deux mains.
5. Tenez enfoncé le bouton de blocage avec le pouce de votre main droite, puis
appuyez sur la gâchette avec les doigts de votre main droite pour faire démarrer
la scie à chaîne. Relâchez le bouton de blocage et gardez la gâchette enfoncée
pour utiliser la scie à chaîne de façon continue.
6. Relâchez le bouton de verrouillage et gardez l’interrupteur à vitesse variable
enfoncé pour utiliser l’outil de façon continue.
Arrêt (Fig. 12)
1. Pour arrêter la scie à chaîne, éloignez-la de l’aire de découpe, puis relâchez la
gâchette.
2. Poussez la poignée du frein à rebond de la chaîne vers l’avant en position de
freinage an d’activer le frein de la chaîne (voir Fig. 1).
:
AVERTISSEMENT
vous faites des pauses et une fois que vous avez terminé de l’utiliser.
Retirez toujours le bloc-pile de la scie à chaîne lorsque
PHARES À DEL (Fig. 13)
Les phares à DEL sont situés à l’avant de
l’ensemble moteur. Cette fonctionnalité
procure un éclairage supplémentaire pour
améliorer la visibilité. L’éclairage peut se
régler en 2 niveaux d’intensité.
Pour allumer les phares, appuyez sur le
bouton des phares à DEL une première
fois. Les phares projettent une lumière
vive devant la scie à chaîne. Appuyez une deuxième fois sur le bouton des phares à
DEL pour augmenter l’intensité des phares.
Pour éteindre les phares, appuyez une troisième fois sur le bouton des phares à DEL.
SCIE À CHAÎNE SANS FIL AU LITHIUM-ION DE 56 VOLTS — CS1800/CS1800-FC 77
Bouton des phares à DEL Phares à DEL
13
Page 78

PRÉPARATION POUR LA COUPE
Consultez les importantes consignes de sécurité énoncées ci-dessus pour connaître
l’équipement de sécurité approprié.
Précautions dans l’aire de travail
◾
Ne coupez que du bois ou des matériaux faits de bois; ne coupez pas de tôle, de
plastique, de matériaux de maçonnerie ni de matériaux de construction non faits
de bois.
◾
Ne laissez jamais des enfants utiliser la scie à chaîne.
◾
Ne permettez pas l’utilisation de la scie à chaîne par quiconque n’ayant pas
consulté le présent guide d’utilisation ou reçu des instructions adéquates quant à
son utilisation sécuritaire et appropriée.
◾
Lors de l’abattage d’un arbre, gardez tout le monde– personnes qui vous aident,
observateurs, enfants et animaux– à une distance sécuritaire de l’aire de
découpe. Cette distance devrait équivaloir au moins au double de la hauteur des
plus grands arbres de l’aire d’abattage. Lors du travail de tronçonnage, observez
une distance minimale de 4,5m (15pi) entre les travailleurs. Les arbres ne
doivent pas être abattus de façon à mettre quiconque en danger, à heurter un
câble de service public ou à causer tout dommage matériel. Si un arbre entre en
contact avec un câble de service public, restez à l’écart et avisez-en l’entreprise
concernée immédiatement.
◾
Lorsque vous utilisez la scie à chaîne, placez vos deux pieds fermement au sol
an de ne pas perdre l’équilibre.
◾
N’effectuez pas de coupe au-dessus de la poitrine, étant donné qu’il est difcile à
cette hauteur de résister à la pression du rebond.
◾
N’abattez pas d’arbres près de ls électriques ou d’immeubles.
◾
N’utilisez la scie à chaîne que si la visibilité et l’éclairage vous permettent de voir
clairement.
SCIE À CHAÎNE SANS FIL AU LITHIUM-ION DE 56 VOLTS — CS1800/CS1800-FC78
Page 79
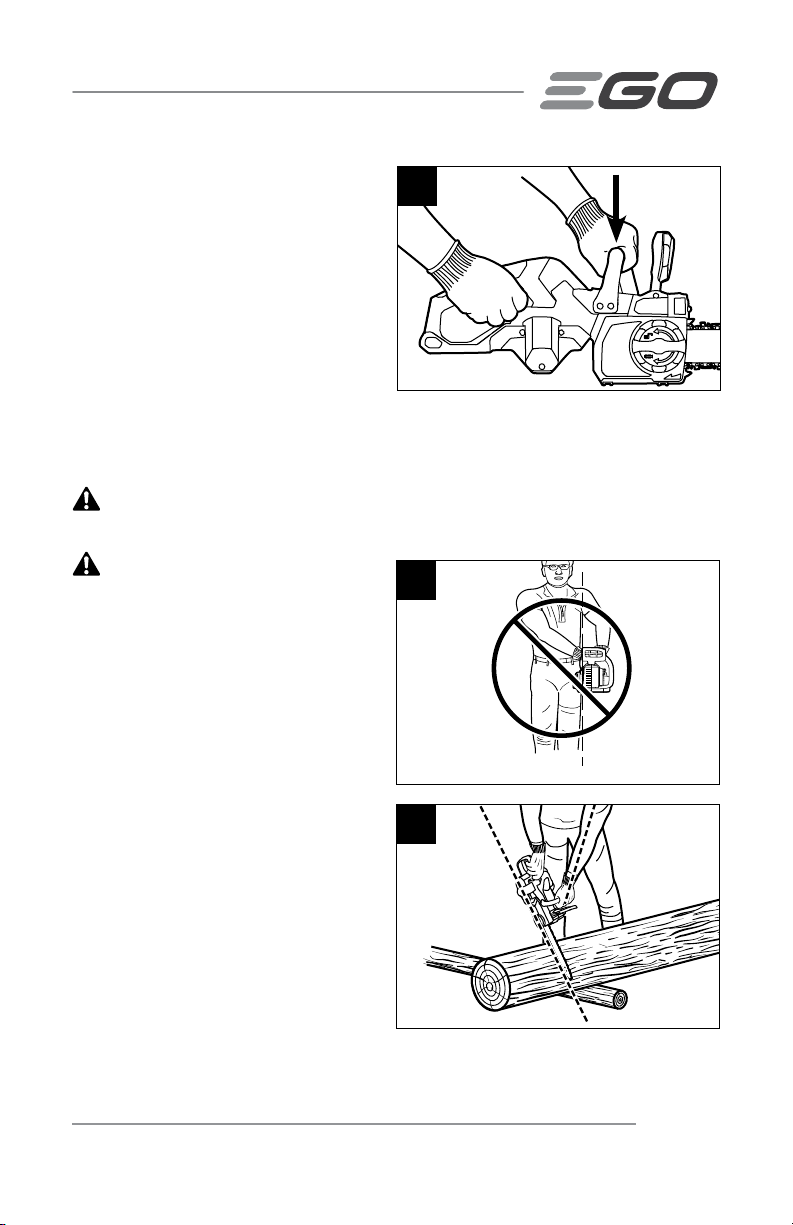
Bonne prise des poignées
◾
Portez des gants antidérapants
pour une prise et une protection
optimales.
◾
Placez la scie à chaîne sur une
surface solide et plane, et tenez-la
fermement avec les deux mains.
◾
Tenez toujours la poignée avant
avec la main gauche et la poignée
arrière avec la main droite.
◾
Les doigts doivent entourer les poignées, le pouce enveloppant le bas de la
poignée avant (Fig. 14).
14
BRUSHLESS
Poignée avec le
pouce sous la
poignée
AVERTISSEMENT:
toute autre position qui placerait votre corps ou votre bras dans l’axe de la chaîne.
AVERTISSEMENT:
pas la gâchette avec votre main gauche en
tenant la poignée avant avec votre main
droite. Ne placez jamais quelque partie
de votre corps que ce soit dans l’axe de
la chaîne lorsque vous utilisez une scie à
chaîne (Fig. 15).
Posture de coupe adéquate
N’utilisez jamais de prise inversée (les bras croisés), ou
Ne pressez
15
Ligne de la chaîne
(Fig. 16)
◾
Vos pieds doivent reposer
fermement sur le sol, et votre poids
doit être réparti de façon uniforme.
◾
Votre bras gauche doit être droit et
votre coude, bloqué. Vous pouvez
ainsi résister à la pression du
rebond.
◾
Votre corps doit toujours être situé à
gauche de l’axe de la chaîne.
16
Ligne de la
chaîne
Position du
bras droit
SCIE À CHAÎNE SANS FIL AU LITHIUM-ION DE 56 VOLTS — CS1800/CS1800-FC 79
Page 80

COUPE
Coupe rudimentaire
AVERTISSEMENT:
stable et tenez la scie à chaîne fermement avec les deux mains.
Avant d’entreprendre des travaux de sciage importants, exercez-vous à couper quelques
petites billes en suivant la technique suivante an de vous familiariser avec votre scie.
1. Adoptez une posture appropriée devant le bois, la scie éteinte.
2. Enfoncez le bouton de blocage et pressez la gâchette pour démarrer la scie à chaîne.
Attendez que la chaîne atteigne son plein régime avant de commencer la coupe.
3. Commencez la coupe en exerçant une faible pression sur le bois avec le guidechaîne. N’appliquez qu’une légère force et laissez la scie faire le travail.
4. Maintenez une vitesse constante tout le long de la coupe et relâchez la pression
juste avant la n.
5. Relâchez la gâchette aussitôt que la coupe est terminée, de façon à permettre à
la chaîne d’arrêter.
AVERTISSEMENT:
gâchette, retirez la scie et le guide-chaîne du bois et redémarrez la scie.
AVERTISSEMENT:
main lorsqu’elle est couverte de bran de scie. Si la scie à chaîne se mette en
marcheaccidentellement, çapourrait causer des blessures graves. Appuyez la
chaînesur le bois, déplacez la scie à chaîned'avant en arrière pour décharger les
debris. Retireztoujours le bloc-pile avant le nettoyage. Portez des gants de protection
renforcéslorsquevousmanipulez la scie à chaîne.
Lorsque le moteur tourne, maintenez toujours une posture
Si la scie à chaîne se coince pendant la coupe, relâchez la
Ne tirez pas la chaîne de la scie avec votre
AVERTISSEMENT:
en contact avec le bois. Attendez que la scie à chaîne atteigne son plein régime avant
d’appliquer la scie à bois.
SCIE À CHAÎNE SANS FIL AU LITHIUM-ION DE 56 VOLTS — CS1800/CS1800-FC80
Ne démarrez jamais la scie à chaîne tandis qu'elle est
Page 81

ABATTRE UN ARBRE
Situations dangereuses
AVERTISSEMENT:
compte des avertissements suivants an d’éviter toute blessure grave.
◾
N’abattez pas d’arbres par temps de grands vents ou de fortes précipitations.
Attendez la n de ces conditions météorologiques dangereuses.
◾
N’abattez pas d’arbres inclinés à des angles extrêmes ou de grands arbres dont
les branches sont moisies, l’écorce détachée ou le tronc creux. Plutôt, faites-les
pousser ou tirer à l’aide de machinerie lourde avant de les couper.
◾
N’abattez pas d’arbres près de ls électriques ou d’immeubles.
◾
Vériez si l’arbre comporte des branches endommagées ou mortes qui pourraient
vous tomber dessus pendant l’abattage.
◾
Jetez périodiquement un coup d’œil au sommet de l’arbre pendant l’exécution
du trait d’abattage an de vous assurer que l’arbre tombera dans la direction
désirée.
◾
Si l’arbre commence à tomber dans la mauvaise direction ou si la scie se coince
ou s’accroche pendant la chute, laissez la scie où elle est et fuyez!
Lors de l’abattage d’un arbre, il est important de tenir
Préparation pour l’abattage d’un arbre
◾
La distance sécuritaire entre des travaux de tronçonnage et d’abattage effectués
simultanément par deux personnes ou plus doit équivaloir au moins au double
de la hauteur de l’arbre abattu. Les arbres ne doivent pas être abattus de façon à
mettre quiconque en danger, à heurter un câble de service public ou à causer tout
dommage matériel.Si un arbre entre en contact avec un câble de service public,
restez à l’écart et avisez-en l’entreprise concernée immédiatement.
◾
L’utilisateur de la scie à chaîne doit se tenir en amont, étant donné que l’arbre
abattu roulera ou glissera vraisemblablement vers le bas.
SCIE À CHAÎNE SANS FIL AU LITHIUM-ION DE 56 VOLTS — CS1800/CS1800-FC 81
Page 82

◾
Avant d’entreprendre tout travail
de coupe, déterminez votre
17
Direction d’abattage
chemin de repli (et vos chemins de
repli de rechange, si la première
Zone dangereuse
est bloquée). Dégagez la zone
immédiate autour de l’arbre et
assurez-vous que vos chemins
de repli prévus ne sont pas
obstrués. Dégagez une voie de repli
Chemin de repli
sécuritaire
Chemin de repli
sécuritaire
45°
Zone dangereuse
sécuritaire à environ 135° de l’axe
de chute prévu de l’arbre. Le chemin de repli doit être orienté de façon diagonale
et opposée à l’axe de chute prévu. Voir la Fig.17.
◾
Avant de commencer l’abattage, tenez compte de l’inclinaison naturelle de
l’arbre, de l’emplacement des grosses branches et de la direction du vent an
d’évaluer la direction vers laquelle l’arbre tombera.
◾
Retirez la saleté, les roches, l’écorce détachée, les clous, les agrafes et les ls
des emplacements de l’arbre où les traits d’abattage seront effectués.
Entaille d’abattage
Pratiquez l’entaille au tiers du diamètre de
l’arbre, perpendiculairement à la direction
de la chute (comme le montre la Fig.18).
Creusez l’entaille horizontale inférieure
en premier. Cette méthode vous aidera à
18
Direction de la
chute de l’arbre
Encoche
Entaille d’abattage
50,8 mm
(2 po)
éviter le coincement de la chaîne ou du
guide-chaîne lors de la deuxième entaille.
Trait d’abattage
1. Le trait d’abattage doit être situé à au moins 50,8mm (2po) au-dessus de
l’entaille horizontale (Fig.18). Le trait d’abattage doit être parallèle à l’entaille
d’abattage horizontale. Pratiquez le trait de façon à ce qu’il reste sufsamment
de bois pour servir de charnière. Cette charnière empêche l’arbre de tourner et de
tomber dans la mauvaise direction. Ne coupez pas à travers la charnière.
SCIE À CHAÎNE SANS FIL AU LITHIUM-ION DE 56 VOLTS — CS1800/CS1800-FC82
Trait
d’abattage
50,8 mm
(2 po)
Charnière
Page 83

2. À mesure que le trait d’abattage s’approche de la charnière, l’arbre devrait
commencer à tomber. S’il y a un risque que l’arbre ne tombe pas dans la direction
désirée ou bascule vers l’arrière et bloque la scie à chaîne, cessez le trait avant de
l’avoir terminé et utilisez des coins d’abattage de bois, de plastique ou d’aluminium,
de façon à ouvrir la brèche et faire tomber l’arbre dans l’axe voulu.
3. Quand l’arbre commence à tomber, retirez la scie à chaîne de la brèche, arrêtez
le moteur, posez la scie par terre et empruntez le chemin de repli préalablement
établi. Faites attention aux branches au-dessus de vous et gardez l’équilibre.
ÉBRANCHAGE
L’ébranchage consiste à retirer les
branches d’un arbre abattu. Lorsque vous
ébranchez un arbre, ne coupez pas les
grosses branches, de façon à ce qu’elles
servent d’appui. Retirez les petites
branches d’un coup, comme le montre
la Fig.19. Coupez du bas vers le haut les
branches soumises à une tension an
d’éviter de coincer la scie à chaîne.
AVERTISSEMENT:
de rebond. Soyez très prudent et évitez de faire toucher le bout du guide-chaîne à la
grume ou aux autres branches.
Les travaux d’ébranchage présentent un risque extrême
19
Coupe des branches
Ébranchage
SCIE À CHAÎNE SANS FIL AU LITHIUM-ION DE 56 VOLTS — CS1800/CS1800-FC 83
Page 84

TRONÇONNER UNE GRUME
(Fig. 20)
Le tronçonnage consiste à couper une
grume en billes. Il est important de vous
assurer que votre assise est ferme et
que votre poids est uniformément réparti
sur vos deux pieds. Si possible, la grume
devrait être soulevée et soutenue par des
branches, d’autres morceaux de bois ou
des cales. Suivez ces directives simples
pour assurer une découpe facile.
20
Tronçonnage
par le dessus
Tronçonnage par le dessous
AVERTISSEMENT:
zone de coupe. Assurez-vous qu’aucun
objet ne peut entrer en contact avec
le bout du guide-chaîne ou la chaîne
pendant le sciage; un tel contact peut
causer un rebond.
Dégagez la
Tronçonnage par le dessus
Commencez à couper au-dessus de la grume avec le dessous de la scie; exercez une
légère pression vers le bas. Notez que la scie aura tendance à s’éloigner de vous.
Tronçonnage par le dessous
Commencez à couper au-dessous de la
grume avec le dessus de la scie; exercez
une légère pression vers le haut. Notez
que la scie aura tendance à s’approcher
de vous. Soyez préparé à la réaction de
la scie, et tenez-la fermement an d’en
garder le contrôle.
◾
Si la grume est appuyée sur toute
sa longueur, tronçonnez-la par le
dessus (Fig.21).
21
Grume soutenue sur toute sa longueur
Tronçonnez par le dessus
et évitez de scier la terre
SCIE À CHAÎNE SANS FIL AU LITHIUM-ION DE 56 VOLTS — CS1800/CS1800-FC84
Page 85

◾
Si la grume n’est soutenue que
d’une extrémité, coupez-en un
tiers du diamètre par le dessous.
Effectuez ensuite le trait de nition
par le dessus an de rejoindre le
premier trait (Fig.22).
◾
Si la grume est soutenue aux deux
extrémités, coupez-en un tiers du
diamètre par le dessus. Effectuez
ensuite le trait de nition des deux
tiers restants par le dessous an de
rejoindre le premier trait (Fig.23).
◾
Lorsque vous tronçonnez sur une
pente, placez-vous en amont de la
grume (Fig.24).
◾
An de garder un contrôle total,
relâchez la pression vers la n de
la coupe, sans détendre la prise
des poignées de la scie à chaîne.
Ne laissez pas la chaîne toucher le
sol. Après la coupe, attendez l’arrêt
de la scie à chaîne avant de la
déplacer. Arrêtez toujours le moteur
avant de passer à un autre arbre.
22
Deuxième trait par le dessus (deux tiers du diamètre)
an de rejoindre le premier trait (et éviter un
coincement de la chaîne)
Premier trait par le dessous (un tiers du diamètre) an
d’éviter que la grume ne se fende en éclats
23
Premier trait par le dessus (un tiers du diamètre)
an d’éviter que la grume ne vole en éclats
Deuxième trait par le dessous (deux tiers du diamètre)
an de rejoindre le premier trait (et éviter un coincement
de la chaîne)
Grume soutenue à une extrémité
Grume soutenue aux deux extrémités
24
SCIE À CHAÎNE SANS FIL AU LITHIUM-ION DE 56 VOLTS — CS1800/CS1800-FC 85
Page 86

ENTRETIEN
AVERTISSEMENT:
utilisez uniquement des pièces de remplacement identiques à celles d’origine. L’utilisation
de toute autre pièce peut constituer un danger ou endommager le produit.
AVERTISSEMENT:
poussière, portez toujours des lunettes de sécurité couvrantes ou à écrans latéraux. Si la
tâche génère de la poussière, portez également un masque antipoussières.
AVERTISSEMENT:
de la scie à chaîne avant de procéder à l’inspection, à l’entretien ou au nettoyage. Un outil
alimenté par un bloc-pile dont le bloc-pile est inséré est toujours allumé et peut démarrer
accidentellement.
AVERTISSEMENT:
dans l’eau ou dans un autre liquide.
AVERTISSEMENT:
des produits à base de pétrole, des huiles dégrippantes et autres produits de ce genre entrer
en contact avec les pièces en plastique. Les produits chimiques peuvent endommager, affaiblir
ou détruire le plastique et engendrer ainsi des risques de blessures graves.
L’entretien des pièces de la scie à chaîne qui ne Fig.nt pas dans le présent manuel doit
être effectué par un technicien qualié.
Lorsque vous procédez à l’entretien de la scie à chaîne,
Lorsque vous utilisez un outil électrique ou soufez la
Pour éviter des blessures graves, retirez toujours le bloc-pile
Lors du nettoyage de la scie à chaîne, NE l’immergez PAS
Ne laissez en aucun temps du liquide pour freins, de l’essence,
NETTOYAGE
◾
Après chaque utilisation, retirez les débris de la chaîne et du guide-chaîne à l’aide
d’une brosse douce. Essuyez la surface de la scie à chaîne au moyen d’un linge
propre et d’une solution de savon doux Pour un nettoyage en profondeur, retirez
le couvercle latéral et démontez le guide-chaîne et la chaîne de la scie.
◾
Pour un nettoyage en profondeur, retirez le couvercle latéral et démontez le
guide-chaîne et la chaîne de la scie. Utilisez ensuite une brosse douce pour
enlever tous les débris du guide-chaîne, de la chaîne de la scie et du pignon
d’entraînement de l’ensemble moteur.
◾
Retirez toujours les copeaux de bois, la sciure et la saleté de la rainure du guidechaîne lorsque vous remplacez la chaîne de la scie.
SCIE À CHAÎNE SANS FIL AU LITHIUM-ION DE 56 VOLTS — CS1800/CS1800-FC86
Page 87

REMPLACER LE GUIDE-CHAÎNE ET LA CHAÎNE
:
AVERTISSEMENT
Ne touchez ni n’ajustez jamais la chaîne pendant que le
moteur tourne. La chaîne de la scie est très tranchante; portez toujours des gants de
protection lorsque vous en effectuez l’entretien.
AVIS : Lors du remplacement du guide-chaîne et de la chaîne, utilisez toujours
la combinaison indiquée dans la précédente section « Guide-chaîne et chaîne
recommandés pour cette scie à chaîne ».
Démonter le guide-chaîne et la chaîne usés
1. Retirez le bloc-pile, laissez la scie refroidir et serrez le capuchon du réservoir
d’huile.
2. Placez la scie à chaîne sur le côté sur une surface solide et plane, de façon à ce
que le panneau latéral pointe vers le haut (Fig. 25).
3. Portez des gants. Retirez le panneau latéral en tournant sa poignée dans le sens
contraire des aiguilles d’une montre (Fig. 25). Utilisez un linge sec pour nettoyer
le panneau.
25
BRUSHLESS
Couvercle latéral
DÉBLOQUER la èche
Bouton de réglage rapide du
tensionnage de la chaîne
4. Retirez soigneusement le guide-chaîne et la chaîne de l’ensemble moteur.
5. Retirez la chaîne usée du guide-chaîne.
SCIE À CHAÎNE SANS FIL AU LITHIUM-ION DE 56 VOLTS — CS1800/CS1800-FC 87
Page 88

6. Une plaque de réglage est xée au
guide-chaîne par une vis. Si vous
devez remplacer le guide-chaîne,
démontez la plaque de réglage du
guide-chaîne et remontez-la sur
le nouveau guide-chaîne comme
l’illustre la Fig. 26.
AVIS : Le moment est bien choisi
pour vérier l’absence d’usure ou de
dommages excessifs sur le pignon
d’entraînement.
26
Pignon
d’entraînement
Plaque de réglage
Guide-chaîne
Chaîne de la scie
Vis
Couvercle latéral
Assembler le nouveau
guidechaîne et la nouvelle
chaîne
1. Faites une boucle sur une surface
plane avec la nouvelle chaîne en
redressant tout pli (Fig. 27).
2. Insérez les maillons d’entraînement
dans la rainure du guide-chaîne.
Positionnez la chaîne de la scie de
façon qu’une boucle se forme à
l’arrière du guide-chaîne (Fig. 28).
3. Tenez la chaîne en place sur le
guide-chaîne et entourez le pignon
d’entraînement de l’ensemble
moteur avec la boucle.
27
Gouge de la chaîne
Maillon d’entraînement
28
Maillons
d’entraînement
Rainure du guide-chaîne
Direction de la rotation
SCIE À CHAÎNE SANS FIL AU LITHIUM-ION DE 56 VOLTS — CS1800/CS1800-FC88
Page 89

AVIS : De petites èches indiquant
l’orientation sont gravées sur la chaîne
de la scie et le boîtier de l’ensemble
moteur (Fig. 29). Lorsque vous entourez le
29
Flèche de
direction de
rotation
guide-chaîne de la chaîne de la scie après
avoir xé le guide-chaîne sur l’ensemble
moteur, assurez-vous que les èches de
la chaîne de la scie et celle du boîtier de
l’ensemble moteur pointent dans la même
Direction
de la fraise
direction. Si elles pointent dans des
directions opposées, remontez la chaîne de la scie sur le guide-chaîne. La plaque de
réglage doit être xée sur le guide-chaîne du côté opposé au boîtier.
4. Replacez le couvercle latéral sur
l’ensemble moteur en serrant
30
complètement le bouton de réglage
rapide du tensionnage de la chaîne
dans le sens des aiguilles d’une
montre. L’engrenage à excentrique
à l’intérieur du couvercle latéral est
conçu pour veiller à ce que la chaîne
Plaque de réglage tournée vers l'extérieur
ne soit pas surtendue (Fig. 30).
5. Réglez la poignée du frein à rebond
de la chaîne à la position de fonctionnement, puis faites tourner la chaîne à la
main pour vérier qu’elle tourne correctement sans se coincer. Sinon, remontez la
chaîne et le guide-chaîne.
ENTRETIEN DE LA CHAÎNE
N’utilisez que des chaînes à faible rebond avec cette scie. Une telle chaîne à coupe
rapide offrira une réduction du rebond si elle est bien entretenue.
Une chaîne bien affûtée coupe le bois sans effort, même si vous exercez une pression
minime. N’utilisez jamais une chaîne émoussée ni endommagée. Une gouge émoussée
entraîne une augmentation de l’effort physique demandé et de la vibration, des
résultats de découpe insatisfaisants et une usure accrue.
SCIE À CHAÎNE SANS FIL AU LITHIUM-ION DE 56 VOLTS — CS1800/CS1800-FC 89
Page 90
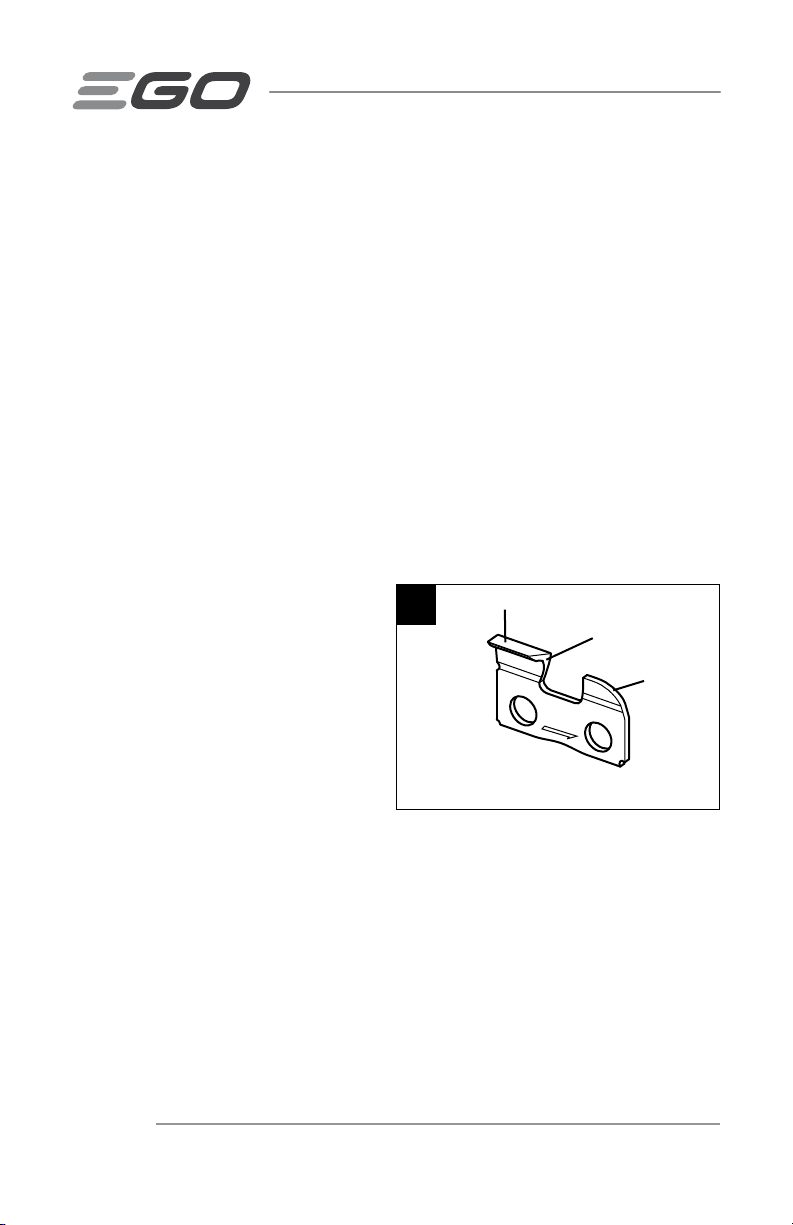
Pour assurer une découpe rapide et en douceur, la chaîne doit être correctement
entretenue. Vous devez affûter la chaîne lorsque les copeaux de bois sont petits et
poudreux, que vous devez exercer une pression accrue sur la scie pendant la découpe
ou que la chaîne ne coupe que d’un côté. Lors de l’entretien de la chaîne, tenez compte
des éléments suivants
◾
Un angle d’affûtage incorrect de la plaque latérale peut accroître le risque de rebond
important.
◾
Le réglage du guide de profondeur. Un réglage trop profond accroît le risque de rebond.
Une profondeur insufsanteréduit l’efcacité de coupe.
◾
Si les dents de la gouge ont heurté des objets durs comme des clous ou despierres
ou ont été abrasées par de la boue ou du sable se trouvant sur le bois, faites affûter la
chaîne par un technicien qualié.
AVIS : Lors du remplacement de la chaîne, vériez l’absence d’usure ou de
dommages excessifs sur le pignon d’entraînement. S’il présente des signes d’usure ou
d’endommagement, faites-le remplacer par un technicien qualié.
Comment affûter les gouges
Veillez à limer toutes les gouges
(Fig. 31) aux angles spéciés et à
la même longueur, car des gouges
uniformes sont nécessaires à une coupe
rapide.
1. Retirez le bloc-pile. Portez des gants
de protection.
2. Assurez-vous que la chaîne est
correctement installée et que le bouton de réglage rapide du tensionnage de
la chaîne est complètement serré, ce qui assure un tensionnage adéquat de la
chaîne.
3. Utilisez une lime ronde et un porte-lime de 4 mm (5/32 po) de diamètre (vendus
séparément). Tout le limage doit être effectué au point central du guide-chaîne
pour un équilibre parfait.
4. Gardez la lime de niveau avec la plaque supérieure de la dent. Ne l’inclinez pas et
ne la faites pas basculer.
SCIE À CHAÎNE SANS FIL AU LITHIUM-ION DE 56 VOLTS — CS1800/CS1800-FC90
31
Plaque supérieure
Plaque latérale
Guide (ou
limiteur) de
profondeur
Page 91

5. Conservez un angle d’affûtage de
30° entre la lime et la chaîne de la
scie; voir les Fig. 32 et 33. Utilisez
toujours un porte-lime (non inclus)
pendant l’affûtage manuel. Les
porte-limes sont munis d’indicateurs
d’angles d’affûtage.
6. Exercez une pression légère, mais
ferme, puis limez en direction du
coin avant de la dent. Soulevez la
lime du métal après chaque retour.
7. Effectuez quelques passes fermes
sur chaque dent. Limez toutes les
gouges de gauche dans un sens.
Ensuite, passez de l’autre côté et
limez toutes les gouges de droite
dans l’autre sens. De temps à autre,
éliminez la limaille de la lime au
moyen d’une brosse métallique
(Fig. 34).
AVERTISSEMENT:
Une chaîne
émoussée ou incorrectement affûtée peut
causer une vitesse excessive du moteur
pendant la coupe et l’endommager
gravement.
Lime ronde de
32
4 mm (5/32 po)
Direction de
limage
33
34
Gouges
gauches
Dent de la
gouge
Angle d’affûtage
de 30°
Gouges
droites
AVERTISSEMENT:
Une chaîne
incorrectement affûtée accroît le risque de
rebond.
AVERTISSEMENT:
Une chaîne endommagée non remplacée ou non réparée
peut causer des blessures graves.
SCIE À CHAÎNE SANS FIL AU LITHIUM-ION DE 56 VOLTS — CS1800/CS1800-FC 91
Page 92

Angles d’affûtage de la plaque supérieure (Fig.35).
◾
ANGLE CORRECT DE 30°– on
n’obtient cet angle optimal que
si l’on utilise les limes et les
réglages indiqués. Les porte-limes
sont munis d’indicateurs servant
à aligner la lime correctement,
de façon à produire le bon angle
d’affûtage de la plaque supérieure.
◾
ANGLE INFÉRIEUR À 30°– la dent
est trop émoussée pour effectuer
une coupe.
◾
ANGLE SUPÉRIEUR À 30°– la lame de la dent est amincie et s’émousse
rapidement.
Angles d’affûtage de la plaque supérieure
35
INFÉRIEUR À 30° SUPÉRIEUR À 30°
30°
CORRECT INCORRECT
INCORRECT
Angle de la plaque latérale
36
(Fig.36).
◾
ANGLE CORRECT DE 80°–
on obtient cet angle optimal
automatiquement si la lime
circulaire de la bonne dimension est
utilisée dans le porte-lime.
◾
CROCHET– «s’accroche» et
s’émousse rapidement. Accroît le
risque de REBOND. Un crochet est causé par une lime trop petite ou tenue trop bas.
◾
INCLINAISON VERS L’ARRIÈRE– requiert trop de pression d’alimentation et use
excessivement le guide-chaîne et la chaîne. Un crochet est causé par une lime
trop petite ou tenue trop bas.
CORRECT INCORRECT
Angle de la plaque latérale
Crochet
80°
Inclinaison vers
l’arrière
INCORRECT
SCIE À CHAÎNE SANS FIL AU LITHIUM-ION DE 56 VOLTS — CS1800/CS1800-FC92
Page 93
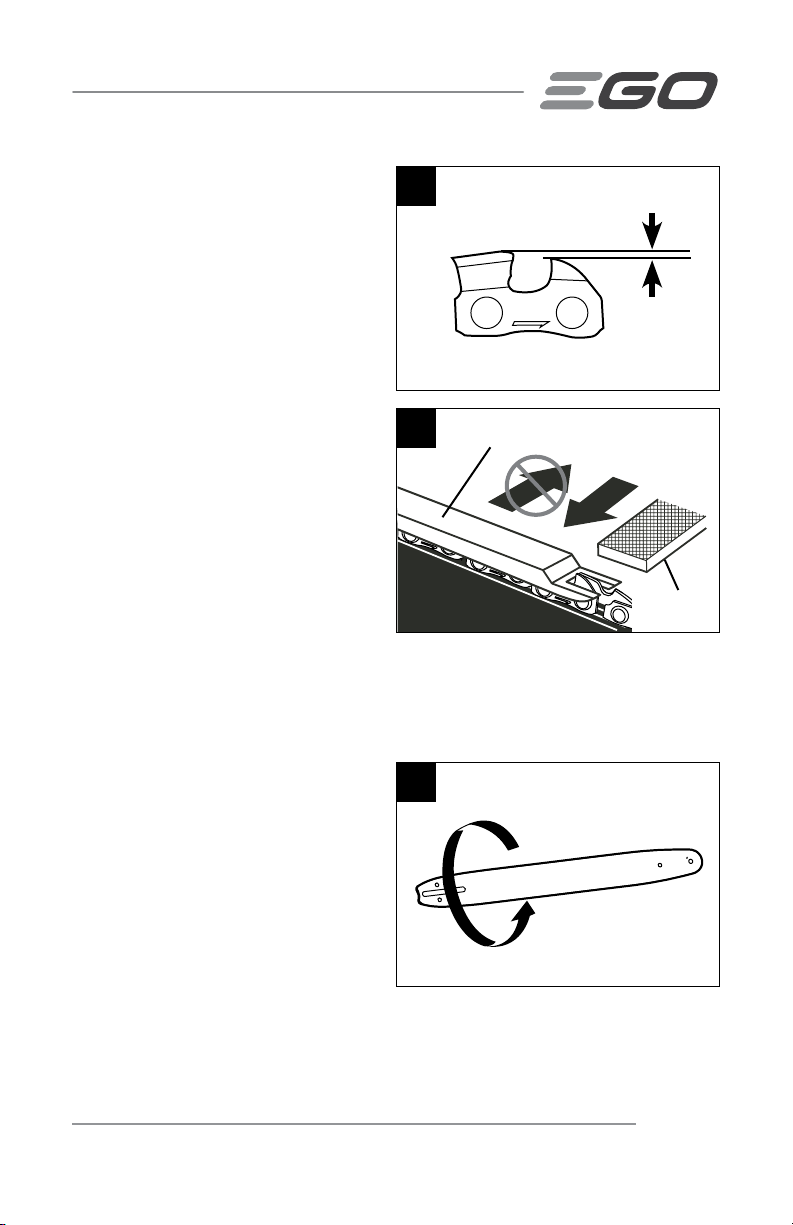
Réglage du guide de profondeur
1. Le guide de profondeur doit être
37
Réglage du guide (ou
limiteur) de profondeur
réglé à 0,6 mm (0.025 po), comme
le montre la (Fig. 37). Utilisez
un outil de guide de profondeur
(vendu séparément) pour vérier ce
réglage.
2. Chaque fois que vous limez la
chaîne, vériez le réglage du
guide de profondeur. Utilisez une
lime plate et un gabarit (vendus
Gabarit du guide de
38
profondeur
séparément) pour abaisser tous les
guides de façon uniforme (Fig. 38).
Les gabarits sont disponibles en
tailles allant de 0,5 mm à 0,9 mm
(de 0.02 po à 0.035 po). Utilisez un
gabarit de 0,6 mm (0.025 po).
3. Utilisez la lime plate pour régler
les guides de profondeur dans la
direction vers laquelle la gouge adjacente a été limée avec la lime ronde. Prenez
soin de ne pas toucher le devant de la gouge avec la lime plate lorsque vous
réglez les guides de profondeur.
0,6 mm
(0,025 po)
Lime plate
RETOURNER LE GUIDE-CHAÎNE
Lorsque le guide-chaîne présente des
signes d’usure, démontez-le de l’ensemble
moteur et remontez-le en inversant ses
côtés (Fig. 39), ce qui aura pour effet de
répartir son usure et d’optimiser sa durée
de vie.
SCIE À CHAÎNE SANS FIL AU LITHIUM-ION DE 56 VOLTS — CS1800/CS1800-FC 93
39
Page 94
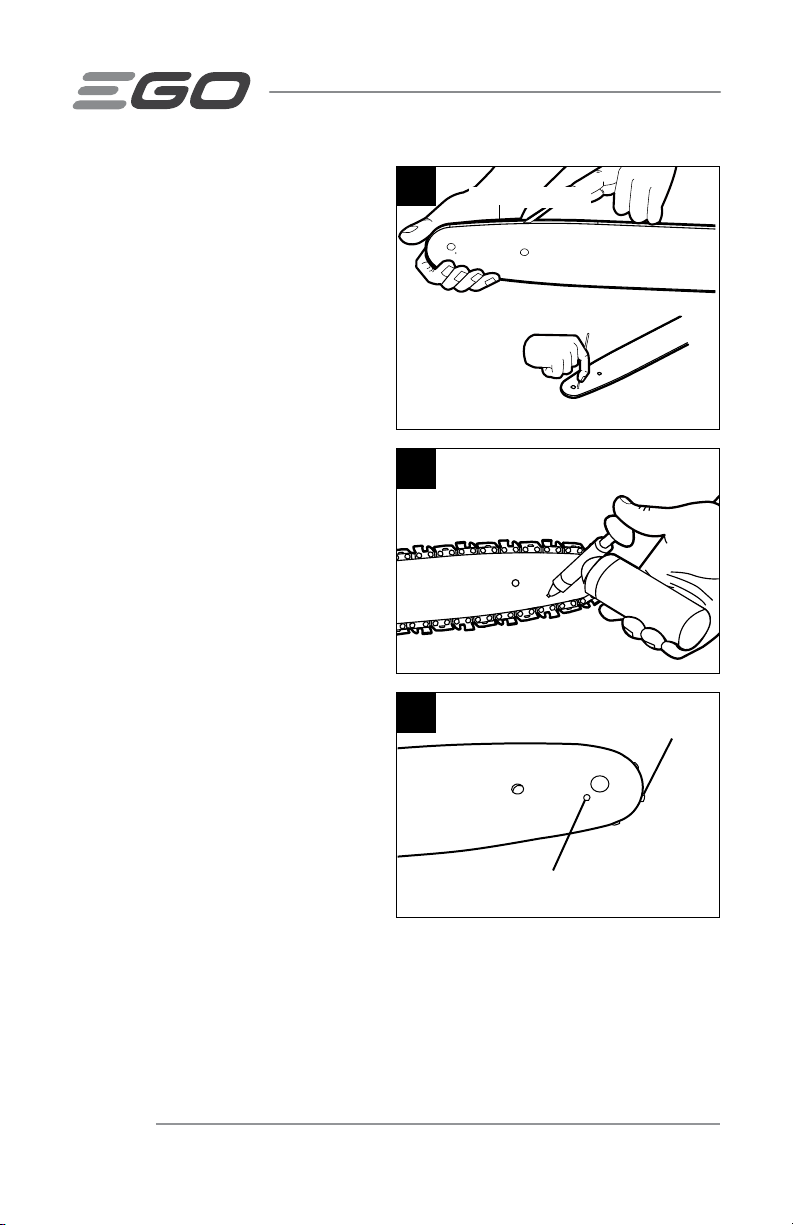
Vous devez nettoyer le guide-chaîne
(y compris la rainure du guide-chaîne,
le trou de lubrication) tous les jours
où vous l’utiliser et vérier l’absence
d’usure ou de dommages (Fig. 40).
L’amincissement ou l’apparition de
bavures sur les parois de la rainure du
guide-chaîne est un processus d’usure
normal. De tels défauts doivent être limés
dès leur apparition. Un guide-chaîne
présentant n’importe lequel des défauts
suivants doit être remplacé. Consultez
la section « REMPLACER LE GUIDE-
CHAÎNE ET LA CHAÎNE » dans le présent
manuel.
◾
Usure de l’intérieur des parois de la
rainure du guide-chaîne, qui permet
à la chaîne de se coucher sur le
côté.
◾
Guide-chaîne tordu.
◾
Parois de la rainure fendues ou
brisées.
◾
Parois de la rainure écartées.
L’extrémité du guide-chaîne est munie
d’un pignon. Ce dernier doit être lubrié
toutes les semaines à l’aide d’une seringue
à graisse an de prolonger la vie utile du
guide-chaîne (Fig.s 41 et 42). Tournez le
pignon de renvoi lorsque vous injectez
de la graisse dans le trou de lubrication
jusqu’à ce que le pignon soit rempli de
nouvelle graisse. N’introduisez pas de poussière dans le trou.
40
41
42
Trou de lubrication
Sprocket in Guide Bar Tip
Trou de lubrication
Pignon dans la
barre de guidage
SCIE À CHAÎNE SANS FIL AU LITHIUM-ION DE 56 VOLTS — CS1800/CS1800-FC94
Page 95

TRANSPORT ET ENTREPOSAGE
◾
Ne transportez ou ne remisez jamais la scie à chaîne lorsque le moteur tourne.
Retirez toujours le bloc-pile lorsque vous l’entreposez ou la transportez.
◾
Placez systématiquement la gaine sur le guide-chaîne et la chaîne avant de
ranger ou de transporter la scie à chaîne.
◾
Nettoyez complètement la scie à chaîne avant de la ranger. Entreposez la scie à
chaîne à l’intérieur, dans un endroit sec fermé à clé ou auquel les enfants n’ont
pas accès.
◾
Rangez-la à l’écart des agents corrosifs, comme des produits chimiques de
jardinage ou des sels de déglaçage.
SCIE À CHAÎNE SANS FIL AU LITHIUM-ION DE 56 VOLTS — CS1800/CS1800-FC 95
Page 96

DÉPANNAGE
PROBLÈME CAUSE SOLUTION
Le moteur ne
tourne pas.
La scie à
chaîne cesse
de fonctionner
lorsqu’elle est
en marche.
Le moteur tourne,
mais pas la
chaîne.
◾
Le bloc-pile n’est pas
installé sur la scie à chaîne.
◾
Il n’y a aucun contact
électrique entre la scie à
chaîne et le bloc-pile.
◾
Le bloc-pile est déchargé.
◾
La scie à chaîne ou le blocpile est trop chaud.
◾
Le frein de la chaîne est
actionné.
◾
Débrisdans la rainure du
guide-chaîne.
◾
Il y a des débris dans le
panneau latéral.
◾
La scie à chaîne est
surchargée.
◾
La scie à chaîne ou le blocpiles est trop chaud.
◾
La chaîne de la scie est
coincée dans l’arbre.
◾
La chaîne n’est pas
engagée dans le pignon
d’entraînement.
◾
Installez le bloc-pile sur la scie à
chaîne
◾
Retirez le bloc-pile, vériez les
contacts électriques et réinstallez le
bloc-pile.
◾
Chargez le bloc-pile.
◾
Laissez la scie à chaîne ou le blocpile refroidir; leur température doit
être inférieure à 67°C (152°F).
◾
Tirez la poignée du frein à rebond
de la chaîne vers l’arrière, vers la
poignée avant.
◾
Appuyez la chaînesur le bois,
déplacez la scie à chaîned'avant en
arrière pour décharger les debris.
◾
Retirez le bloc-pile suivi du panneau
latéral, puis enlevez les débris.
◾
Réduisez la charge.
◾
Laissez la scie à chaîne ou le blocpiles refroidir; leur température doit
être inférieure à 67°C (152°F).
◾
Relâchez l’interrupteur, retirez la
chaîne de la scie et le guide-chaîne
du bois, puis remettez la scie à
chaîne en marche.
◾
Remontez la chaîne en suivant
les indications de la section «
REMPLACER LE GUIDE-CHAÎNE ET
LA CHAÎNE » en vous assurant que
les maillons d’entraînement reposent
entièrement sur le pignon.
.
SCIE À CHAÎNE SANS FIL AU LITHIUM-ION DE 56 VOLTS — CS1800/CS1800-FC96
Page 97

PROBLÈME CAUSE SOLUTION
Le frein de
la chaîne ne
s’actionne pas.
La scie à chaîne
ne coupe pas correctement.
◾
Des débris empêchent le
mouvement complet de la
poignée du frein à rebond de
la chaîne.
◾
Le frein de la chaîne
fonctionne possiblement mal.
◾
La chaîne n’est pas
sufsamment tendue.
◾
La chaîne est émoussée.
◾
La chaîne est installée à
l’envers.
◾
La chaîne est usée.
◾
La chaîne est sèche ou
excessivement étirée.
◾
Retirez les débris du mécanisme
externe de frein de la chaîne.
◾
Communiquez avec le service à la
clientèle d’EGO.
◾
Desserrez d’abord le bouton de
réglage rapide du tensionnage de la
chaîne d’au moins deux tours dans
le sens contraire des aiguilles d’une
montre, puis serrez-le dans le sens
des aiguilles d’une montre jusqu’à
ce que la chaîne soit tendue de
manière adéquate.
◾
Affûtez les gouges de la chaîne en
consultant la section «COMMENT
AFFÛTER LES GOUGES».
◾
Réinstallez la chaîne de la scie
en suivant les consignes de la
partie intitulée «ASSEMBLER OU
REMPLACER LE GUIDE-CHAÎNE ET
LA CHAÎNE».
◾
Remplacez la chaîne en consultant
la section «ASSEMBLER OU
REMPLACER LE GUIDE-CHAÎNE ET
LA CHAÎNE».
◾
Vériez le niveau d’huile. Remplissez
le réservoir d’huile, au besoin.
SCIE À CHAÎNE SANS FIL AU LITHIUM-ION DE 56 VOLTS — CS1800/CS1800-FC 97
Page 98

PROBLÈME CAUSE SOLUTION
La chaîne tombe
du guide-chaîne.
La chaîne et le
guide-chaîne
sont chauds et
produisent de la
fumée.
◾
La chaîne n’est pas
sufsamment tendue.
◾
La chaîne n'engage pas le
pignon d'entraînement.
◾
Le réservoir d’huile de la
chaîne est vide.
◾
Il y a des débris dans la
rainure du guide-chaîne.
◾
Desserrez d’abord le bouton de
réglage rapide du tensionnage de la
chaîne d’au moins deux tours dans
le sens contraire des aiguilles d’une
montre, puis serrez-le dans le sens
des aiguilles d’une montre jusqu’à
ce que la chaîne soit tendue de
manière adéquate.
◾
Remontez la chaîne en suivant
les indications de la section «
REMPLACER LE GUIDE-CHAÎNE ET
LA CHAÎNE » en vous assurant que
les maillons d’entraînement reposent
entièrement sur le pignon.
◾
Remplissez le réservoir de lubriant
du guide-chaîne et de la chaîne.
◾
Nettoyez la rainure.
SCIE À CHAÎNE SANS FIL AU LITHIUM-ION DE 56 VOLTS — CS1800/CS1800-FC98
Page 99

GARANTIE
POLITIQUE D’EGO EN MATIÈRE DE GARANTIE
Garantie limitée de 5 ans sur les équipements d’alimentation électrique d’extérieur
EGO POWER+ et les équipements d’alimentation électrique portable pour un usage
personnel et domestique.
Garantie limitée de 3 ans sur les blocs-piles et chargeurs du système EGO POWER+
pour un usage personnel et domestique.
Garantie limitée de 2 ans/1 an sur les équipements d’alimentation électrique
d’extérieur, les équipements d’alimentation électrique portables, les blocs-piles et les
chargeurs EGO pour un usage professionnel et commercial.
La durée et les détails de la garantie de chaque produit sont indiqués en ligne à
l’adresse http://egopowerplus.com/pages/warranty-policy.
Veuillez communiquer avec le service à la clientèle d’EGO au 1855EGO-5656
(numéro sans frais) pour toute question sur les réclamations au titre de la garantie.
GARANTIE LIMITÉE
Les produits EGO sont garantis contre tout défaut de matériel ou de fabrication à
compter de la date d’achat d’origine pour la période de garantie applicable. Les
produits défectueux recevront une réparation gratuite.
a) Cette garantie s’applique uniquement à l’acheteur initial s’étant procuré le produit chez
un détaillant EGO autorisé et est non transférable. La liste des détaillants EGO autorisés
est publiée en ligne sur le site http://egopowerplus.com/pages/warranty-policy.
b) La période de garantie pour les produits remis en état ou certiés par l’usine
utilisés à des ns résidentielles est de 1 an, et de 90 jours lorsqu’ils sont utilisés
à des ns industrielles, professionnelles ou commerciales.
c) La période de garantie pour les pièces d’entretien régulier, y compris, sans s’y
limiter, les lames, les têtes de taille-bordure, les guides-chaînes, les chaînes de
scie, les courroies, les barres de raclage, les buses de soufeur, ainsi que tous
les autres accessoires EGO, est de 90 jours lorsqu’elles sont utilisées à des ns
résidentielles et de 30 jours lorsqu’elles sont utilisées à des ns industrielles,
professionnelles ou commerciales. Ces pièces sont couvertes contre les défauts
de fabrication pour une période de 90 jours ou de 30 jours si elles sont utilisées
dans des conditions de travail normales.
SCIE À CHAÎNE SANS FIL AU LITHIUM-ION DE 56 VOLTS — CS1800/CS1800-FC 99
Page 100

d) La présente garantie n’est pas valide si le produit a été utilisé aux ns de location.
e) La présente garantie ne couvre pas les dommages résultant d’une modication,
d’une altération ou d’une réparation non autorisée.
f) Cette garantie couvre uniquement les défauts survenant dans des conditions
normales d’utilisation et ne couvre aucun dysfonctionnement ou défaut ni
aucune défaillance découlant d’un usage inapproprié ou abusif (notamment la
surcharge du produit et son immersion dans l’eau ou dans tout autre liquide),
d’un accident, d’une négligence, d’une installation inadéquate et de tout entretien
ou entreposage inadéquat.
g) La présente garantie ne couvre pas la détérioration normale du ni extérieur,
notamment les rayures, les bosselures, les craquelures de la peinture ou toute
corrosion ou décoloration résultant de la chaleur, de produits abrasifs ou de
nettoyants chimiques.
RÉCLAMATION AU TITRE DE LA GARANTIE
Pour faire une réclamation au titre de la garantie, veuillez communiquer avec le service
à la clientèle d’EGO au 1 855 EGO-5656 (numéro sans frais). Lorsque vous faites une
réclamation au titre de la garantie, vous devez présenter le reçu de vente original. Un
centre de service autorisé sera sélectionné pour la réparation du produit conformément
aux conditions de garantie prescrites. Il se peut qu’un petit dépôt soit exigé lorsque
vous laissez votre outil dans un centre de service autorisé. Ce dépôt est remboursable
lorsque le service de réparation est considéré comme étant couvert par la garantie.
RESTRICTIONS SUPPLÉMENTAIRES
Dans la mesure permise par la loi en vigueur, toutes les garanties implicites, y compris
les garanties de QUALITÉ MARCHANDE ou D’ADÉQUATION À UN USAGE PARTICULIER,
sont exclues. Toute garantie implicite, y compris la garantie de qualité marchande ou
d’adéquation à un usage particulier, qui ne peut être rejetée en vertu de la loi de l’État ou de
la province est limitée à la période de garantie applicable dénie au début de cet article.
ChervonNorthAmerica n’est pas responsable des dommages accessoires, consécutifs,
indirects ou directs.
Certaines provinces n’autorisent pas les restrictions de durée de garantie implicite, ou
l’exclusion ou la restriction des dommages consécutifs et accessoires; c’est pourquoi
les restrictions ci-dessus peuvent ne pas s’appliquer à votre cas.
Cette garantie vous confère des droits précis. Il est possible que vous disposiez
également d’autres droits, qui varient d’une province à l’autre.
Pour communiquer avec le service à la clientèle, veuillez composer le numéro sans
frais suivant: 1855EGO-5656 ou consulter le siteWeb EGOPOWERPLUS.COM.
EGO Customer Service, 769 SEWARD AVE NW / Suite 102 Grand Rapids, MI 49504, États-Unis.
SCIE À CHAÎNE SANS FIL AU LITHIUM-ION DE 56 VOLTS — CS1800/CS1800-FC100
 Loading...