

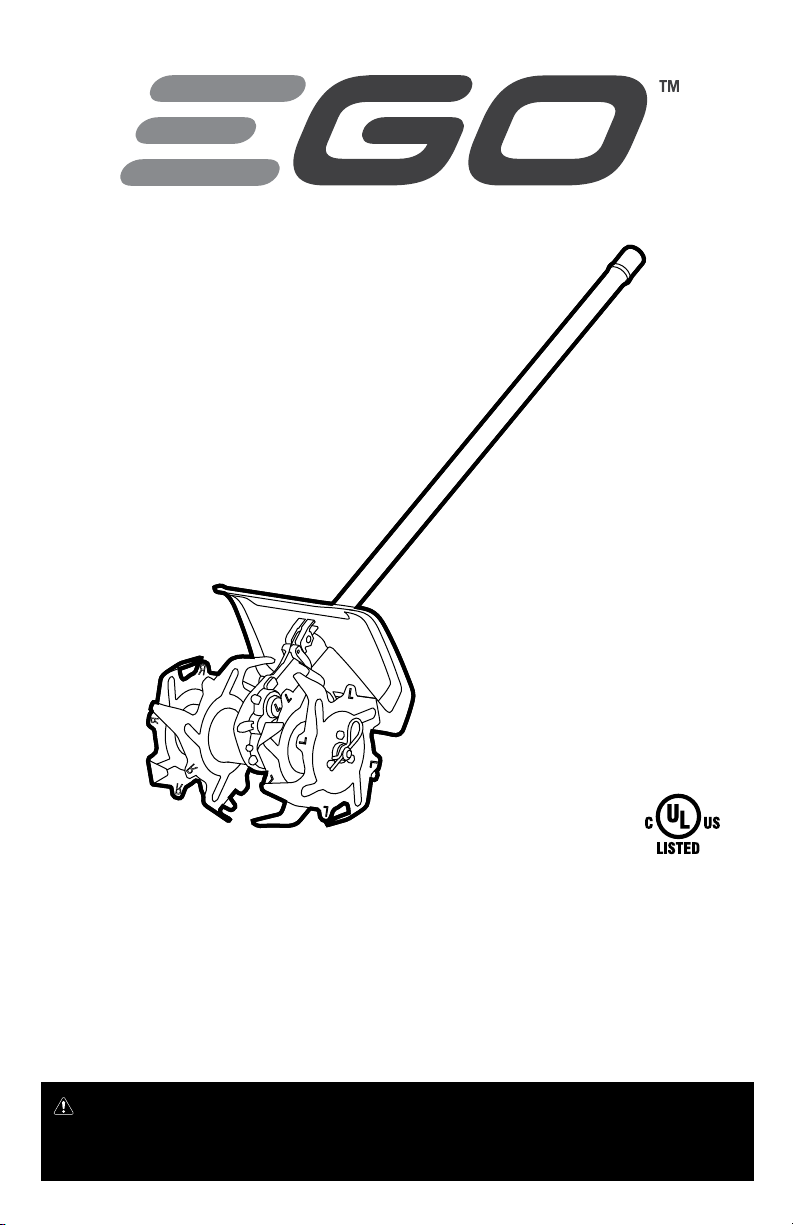
Page 1

EXCLUSIVELY FOR USE WITH
EGO POWER+ POWER HEAD
PH1400/PH1400-FC
OPERATOR'S MANUAL
Français p. 31
CULTIVATOR ATTACHMENT
Español p. 63
WARNING: To reduce the risk of injury, the user must read and understand the
Operator’s Manual before using this product. Save these instructions for future reference.
MODEL NUMBER CTA9500/CTA9500-FC
Page 2

TABLE OF CONTENTS
Safety Symbols ..........................................4
Safety Instructions .....................................5-11
Introduction ............................................12
Specications ..........................................12
Packing List ............................................12
Description .........................................13-14
Assembly ...........................................15-18
Operation ........................................... 19-21
Maintenance ........................................22-26
Troubleshooting ...................................... 27-28
Warranty ...........................................29-30
CULTIVATOR ATTACHMENT — CTA9500/CTA9500-FC2
Page 3

READ ALL INSTRUCTIONS!
READ & UNDERSTAND
OPERATOR'S MANUAL
WARNING:
and other construction activities contains chemicals known to the state of California
to cause cancer, birth defects or other reproductive harm. Some examples of these
chemicals are:
◾
Lead from lead - based paints
◾
Crystalline silica from bricks and cement and other masonry products, and
◾
Arsenic and chromium from chemically - treated lumber.
Your risk from these exposures varies, depending on how often you do this type of
work. To reduce your exposure to these chemical: work in a well ventilated area, and
work with approved safety equipment, such as those dust masks that are specially
designed to lter out microscopic particles.
Some dust created by power sanding, sawing, grinding, drilling
CULTIVATOR ATTACHMENT — CTA9500/CTA9500-FC 3
Page 4
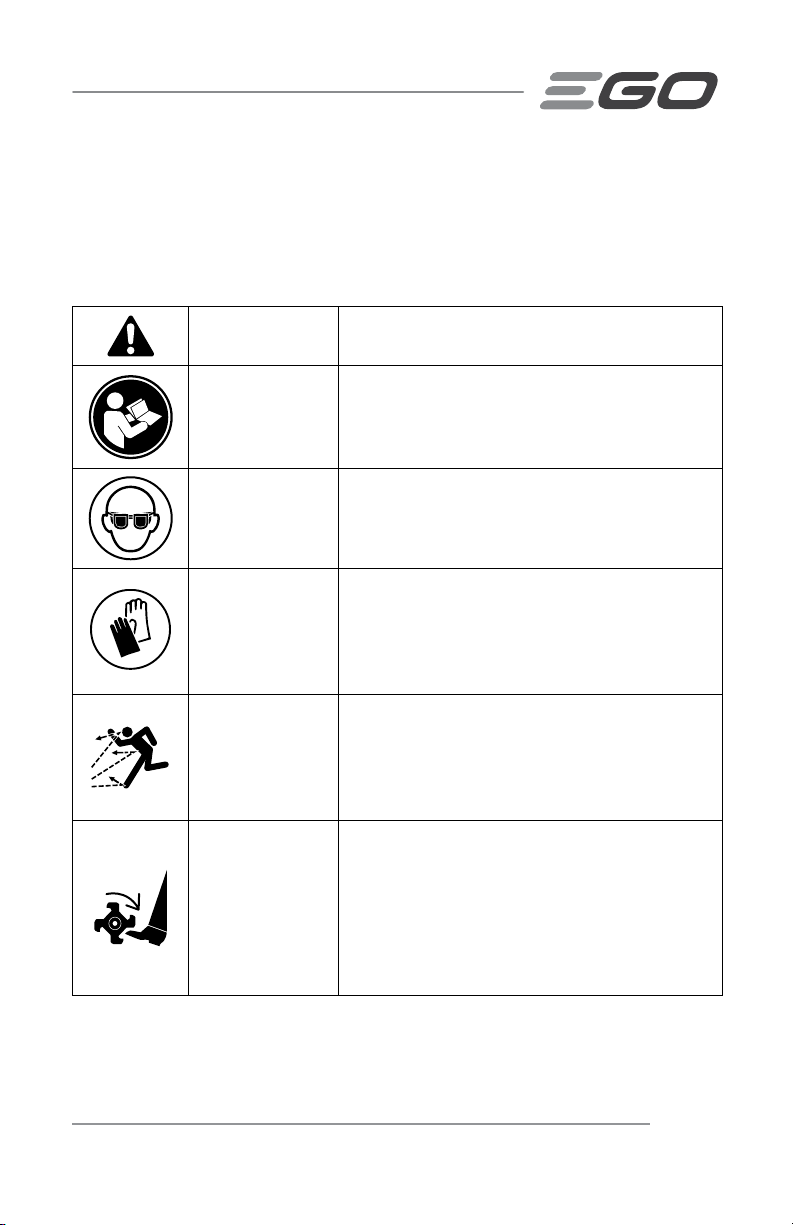
SAFETY SYMBOLS
The purpose of safety symbols is to attract your attention to possible dangers. The
safety symbols and the explanations with them deserve your careful attention and
understanding. The symbol warnings do not, by themselves, eliminate any danger. The
instructions and warnings they give are no substitutes for proper accident prevention
measures.
WARNING:
Operator’s Manual, including all safety alert symbols such as “DANGER,” “WARNING,”
and “CAUTION” before using this tool. Failure to following all instructions listed below
may result in electric shock, re, and/or serious personal injury.
Be sure to read and understand all safety instructions in this
SYMBOL MEANING
SAFETY ALERT SYMBOL:
May be used in conjunction with other symbols or pictographs.
WARNING!
objects being thrown into your eyes, which can result in severe eye
damage. Before beginning power tool operation, always wear safety
goggles or safety glasses with side shield and a full face shield when
needed. We recommend a Wide Vision Safety Mask for use over
eyeglasses or standard safety glasses with side shields. Always use eye protection
which is marked to comply with ANSI Z87.1.
Indicates DANGER, WARNING, OR CAUTION.
The operation of any power tools can result in foreign
CULTIVATOR ATTACHMENT — CTA9500/CTA9500-FC4
Page 5
SAFETY INSTRUCTIONS
This page depicts and describes safety symbols that may appear on this product. Read,
understand, and follow all instructions on the machine before attempting to assemble
and operate it.
Safety Alert Indicates a potential personal injury hazard.
Read &
Understand
Operator's
Manual
Wear Eye
Protection
Wear Protective
Gloves
Ricochet
Keep Hands and
Feet Away
To reduce the risk of injury, user must read and
understand the operator’s manual before using
this product.
Always wear safety goggles or safety glasses
with side shields when operating this product.
Protect your hands with gloves when handling
blades. Heavy-duty, nonslip gloves improve your
grip and protect your hands.
Thrown objects can ricochet and result in
personal injury or property damage.
Never attempt to operate this product with one
hand. Loss of control of this product resulting in
serious or fatal injury may result. To reduce the
risk of cut injuries, keep hands and feet away
from the rotating blades. Never touch the rotating
blades with your hand or any other part of your
body.
CULTIVATOR ATTACHMENT — CTA9500/CTA9500-FC 5
Page 6
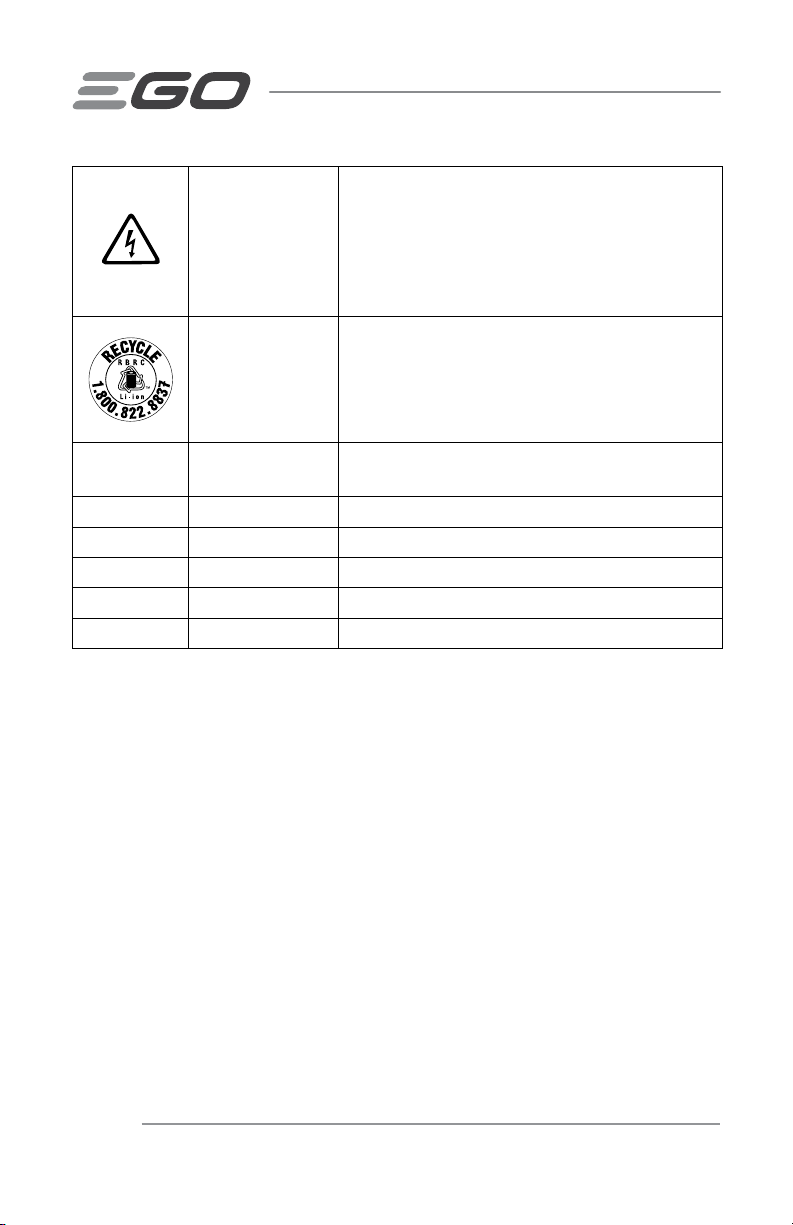
To reduce the risk of electrocution, ensure that
there are no buried power cables that may be
Danger - Electric
Shock
carrying electric current that could come into
contact with the working tool. Damaging such
cables with the tool can cause electric shocks
with serious or fatal consequences.
This product uses lithium-ion (Li-ion) batteries.
Local, state, or federal laws may prohibit disposal
Recycle Symbols
of batteries in ordinary trash. Consult your
local waste authority for information regarding
available recycling and/or disposal options.
IPX4
Ingress Protection
Degree
Protection from splashing water
V Volt Voltage
mm Millimeter Length or size
in. Inch Length or size
kg Kilogram Weight
lb Pound Weight
CULTIVATOR ATTACHMENT — CTA9500/CTA9500-FC6
Page 7

GENERAL BATTERY-OPERATED POWER TOOL SAFETY WARNINGS
WARNING!
specications provided with this power tool. Failure to follow all instructions
listed below may result in electric shock, re and/or serious injury.
Save all warnings and instructions for future reference.
Read all safety warnings, instructions, illustrations and
WORK AREA SAFETY
◾
Keep work area clean and well lit. Cluttered or dark areas invite accidents.
◾
Do not operate power tools in explosive atmospheres, such as in the
presence of ammable liquids, gases or dust. Power tools create sparks
which may ignite the dust or fumes.
◾
Keep children and bystanders away while operating a power tool.
Distractions can cause you to lose control.
PERSONAL SAFETY
◾
Stay alert, watch what you are doing and use common sense when
operating a power tool. Do not use a power tool while you are tired
or under the inuence of drugs, alcohol or medication. A moment of
inattention while operating power tools may result in serious personal injury.
◾
Always use personal protective equipment. Personal protective equipment
such as eye protection, dust mask, non-skid safety shoes, hard hat and/or
hearing protection used for appropriate conditions will reduce personal injuries.
◾
Prevent unintentional starting. Ensure the switch is in the off-position
before connecting to the battery pack, picking up or carrying the tool.
Carrying power tools with your nger on the switch or energizing power tools that
have the switch on invites accidents.
◾
Remove any adjusting key or wrench before turning the power tool on.
A wrench or a key left attached to a moving part of the power tool may result in
personal injury.
◾
Do not overreach. Keep proper footing and balance at all times. This
enables better control of the power tool in unexpected situations.
◾
Dress properly. Do not wear loose clothing or jewelry. Keep your hair and
clothing away from moving parts. Loose clothes, jewelry or long hair can be
caught in moving parts.
CULTIVATOR ATTACHMENT — CTA9500/CTA9500-FC 7
Page 8

◾
If devices are provided for the connection of dust extraction and
collection facilities, ensure these are connected and properly used. Use
of dust collection can reduce dust-related hazards.
◾
Do not let familiarity gained from frequent use of tools allow you to
become complacent and ignore tool safety principles. A careless action
can cause severe injury within a fraction of a second.
POWER TOOL USE AND CARE
◾
Do not force the power tool. Use the correct power tool for your
application. The correct power tool will do the job better and safer at the rate for
which it was designed.
◾
Do not use the power tool if the switch does not turn it on and off. Any
power tool that cannot be controlled with the switch is dangerous and must be
repaired.
◾
Remove the battery pack, if detachable, from the power tool and/or
activate any battery disabling device before clearing jammed material,
making any adjustments, changing accessories, cleaning, or storing
power tools. Such preventive safety measures reduce the risk of starting the
power tool accidentally.
◾
Store idle power tools out of the reach of children and do not allow
persons unfamiliar with the power tool or these instructions to operate
the power tool. Power tools are dangerous in the hands of untrained users.
◾
Maintain power tools and accessories. Check for misalignment or
binding of moving parts, breakage of parts and any other condition that
may affect the power tool’s operation. If damaged, have the power tool
repaired before use. Many accidents are caused by poorly maintained power
tools and accessories.
◾
Keep cutting tools sharp and clean. Properly maintained cutting tools with
sharp cutting edges are less likely to bind and are easier to control.
◾
Use the power tool, accessories, tool bits, etc. in accordance with these
instructions, taking into account the working conditions and the work to
be performed. Use of the power tool for operations different from those intended
could result in a hazardous situation.
◾
Keep handles and grasping surfaces dry, clean and free from oil and
grease. Slippery handles and grasping surfaces may lead to unsafe handling
and/or loss of control of the tool.
CULTIVATOR ATTACHMENT — CTA9500/CTA9500-FC8
Page 9
◾
Keep cables away from the working area of the tool. During operation
cables may be hidden from view and can be accidentally damaged by the tool.
BATTERY TOOL USE AND CARE
◾
Recharge only with the charger specied by the manufacturer. A charger
that is suitable for one type of battery pack may create a risk of re when used
with another battery pack. Use only with the battery packs and chargers listed
below.
BATTERY PACK CHARGER
BA1120, BA1120-FC, BA1400, BA1400-FC,
BA2240, BA2240-FC, BA2800, BA2800-FC,
BA4200, BA4200-FC, BA1400T, BA1400T-FC,
BA2800T, BA2800T-FC, BA4200T, BA4200T-FC
◾
Use power tools only with specically designated battery packs. Use of
any other battery packs may create a risk of injury and re.
◾
When battery pack is not in use, keep it away from other metal objects,
like paper clips, coins, keys, nails, screws or other small metal objects,
that can make a connection from one terminal to another. Shorting the
battery terminals together may cause burns or a re.
◾
Under abusive conditions, liquid may be ejected from the battery; avoid
contact. If contact accidentally occurs, ush with water. If liquid contact
eyes, additionally seek medical help. Liquid ejected from the battery may
cause irritation or burns.
◾
Do not use a battery pack or tool that is damaged or modied. Damaged
or modied batteries may exhibit unpredictable behavior resulting in re,
explosion or risk of injury.
◾
Do not expose a battery pack or tool to re or excessive temperature.
Exposure to re or temperature above 212 °F (100°C) may cause explosion.
◾
Follow all charging instructions and do not charge the battery pack or
tool outside the temperature range specied in the instructions. Charging
improperly or at temperatures outside the specied range may damage the
battery and increase the risk of re.
CH2100, CH2100-FC,
CH5500, CH5500-FC
CULTIVATOR ATTACHMENT — CTA9500/CTA9500-FC 9
Page 10

SERVICE
◾
Have your power tool serviced by a qualied repair person using only
identical replacement parts. This will ensure that the safety of the power tool
is maintained.
◾
Never service damaged battery packs. Service of battery packs should only
be performed by the manufacturer or authorized service providers.
SAFETY INSTRUCTIONS FOR CULTIVATOR
◾
Keep hands away from blades.
◾
Do not use near underground electric cables, telephone lines, pipes, or hoses. If in
doubt, contact your utility or telephone company to locate underground services.
◾
Rotating blades can cause severe injury, keep all body parts away from rotating
blades.
◾
Use extreme caution when reversing or pulling the machine towards you.
◾
If the cultivator should start to vibrate abnormally or become noisy, stop the motor
and check immediately for the cause. Abnormal noise is generally a warning of
trouble.
◾
Keep all fasteners tight to be sure the cultivator is in safe working condition.
◾
Check that the hitch pins are fully inserted on the blade shaft before each use.
◾
Do not operate power equipment after it has been dropped or damaged. Return it
to your nearest authorized servicing dealer for inspection and repair.
◾
Make sure all proper guards and other safety devices are properly and securely
attached before using this product.
◾
Be extremely careful when tilling in hard ground. The blades could catch in the
ground and propel the cultivator forward.
◾
Do not overload the capacity of the machine by attempting to till too deep at too
fast a speed.
◾
Inspect the area where the equipment is to be used and remove all foreign
objects.
◾
Do not charge the battery pack in rain, or in wet locations.
◾
Do not dispose of the battery in a re. The cells may explode. Check with
local codes for possible special disposal instructions.
◾
Do not open or mutilate the battery. Released electrolyte is corrosive and may
cause damage to the eyes or skin. It may be toxic if swallowed.
CULTIVATOR ATTACHMENT — CTA9500/CTA9500-FC10
Page 11

◾
Battery tools do not have to be plugged into an electrical outlet;
therefore, they are always in operating condition. Be aware of possible
hazards even when the tool is not operating. Take care when performing
maintenance or service.
◾
Do not wash with a hose; avoid getting water in motor and electrical
connections.
◾
If situations occur that are not covered in this manual, use care and
good judgment. Contact the EGO Customer Service Center for assistance.
◾
SAVE THESE INSTRUCTIONS. Refer to them frequently and use them to instruct
others who may use this tool. If you lend this tool to someone else, also lend
these instructions to them to prevent misuse of the product and possible injury.
NOTE: SEE YOUR POWER HEAD OPERATOR’S MANUAL FOR
ADDITIONAL, SPECIFIC SAFETY RULES.
CULTIVATOR ATTACHMENT — CTA9500/CTA9500-FC 11
Page 12

INTRODUCTION
Congratulations on your selection of the EGO CULTIVATOR ATTACHMENT. It has been
designed, engineered and manufactured to give you the best possible dependability
and performance.
Should you experience any problem you cannot easily remedy, please contact EGO
customer service center 1-855-EGO-5656.
This manual contains important information on the safe assembly, operation and
maintenance of your product. Read it carefully before using the product. Keep this
manual handy so you can refer to it at any time.
SERIAL NUMBER _____________________ DATE OF PURCHASE _________________
YOU SHOULD RECORD BOTH SERIAL NUMBER AND DATE OF PURCHASE AND KEEP THEM IN A
SAFE PLACE FOR FUTURE REFERENCE
SPECIFICATIONS
Blade Size 8-1/2” (215 mm)
Tilling Depth 8-1/2” (215 mm)
Tilling Width 9-1/2” (240 mm)
Operating Temperature 32°F-104°F(0°C-40°C)
Storage Temperature -4°F-158°F(-20°C-70°C)
Weight (including the guard) 8.6 lbs(3.9 kg)
PACKING LIST
PART NAME QUANTITY
Cultivator Attachment 1
Guard (with bolt) 1
Hex Wrench 1
Operator’s Manual 1
CULTIVATOR ATTACHMENT — CTA9500/CTA9500-FC12
Page 13
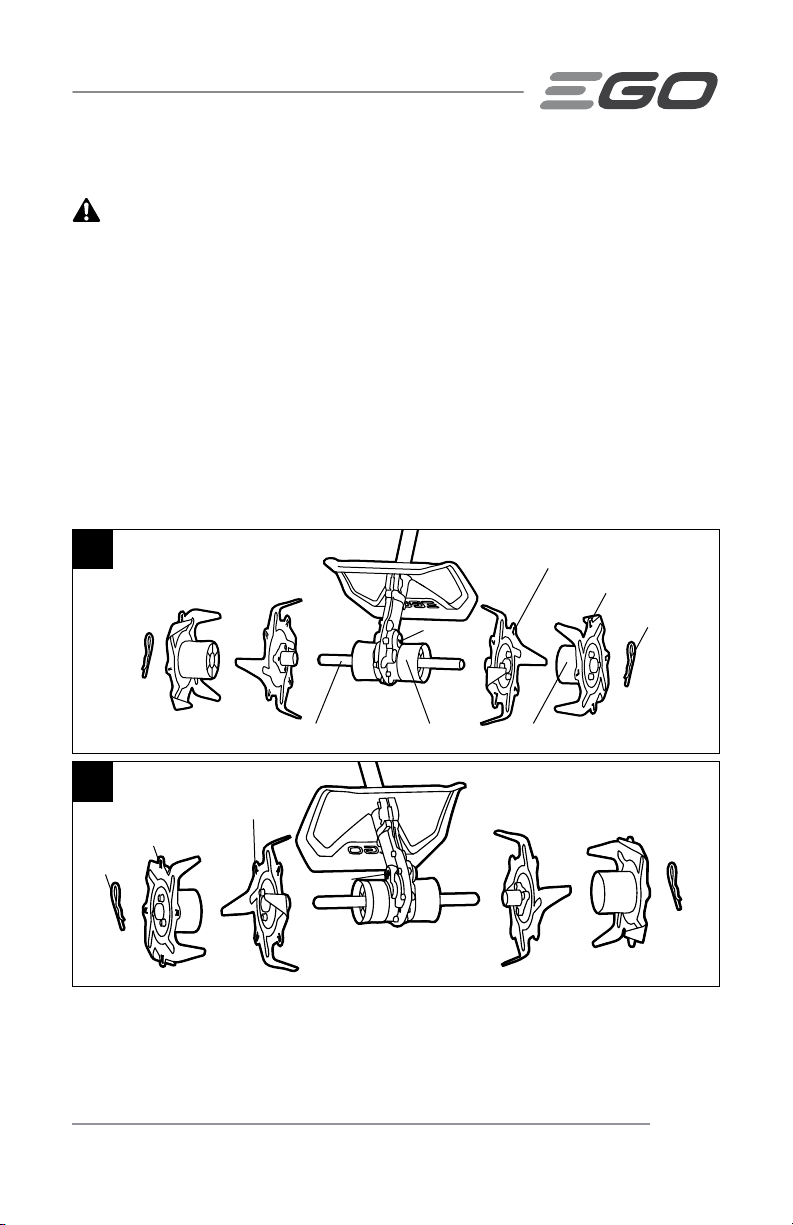
DESCRIPTION
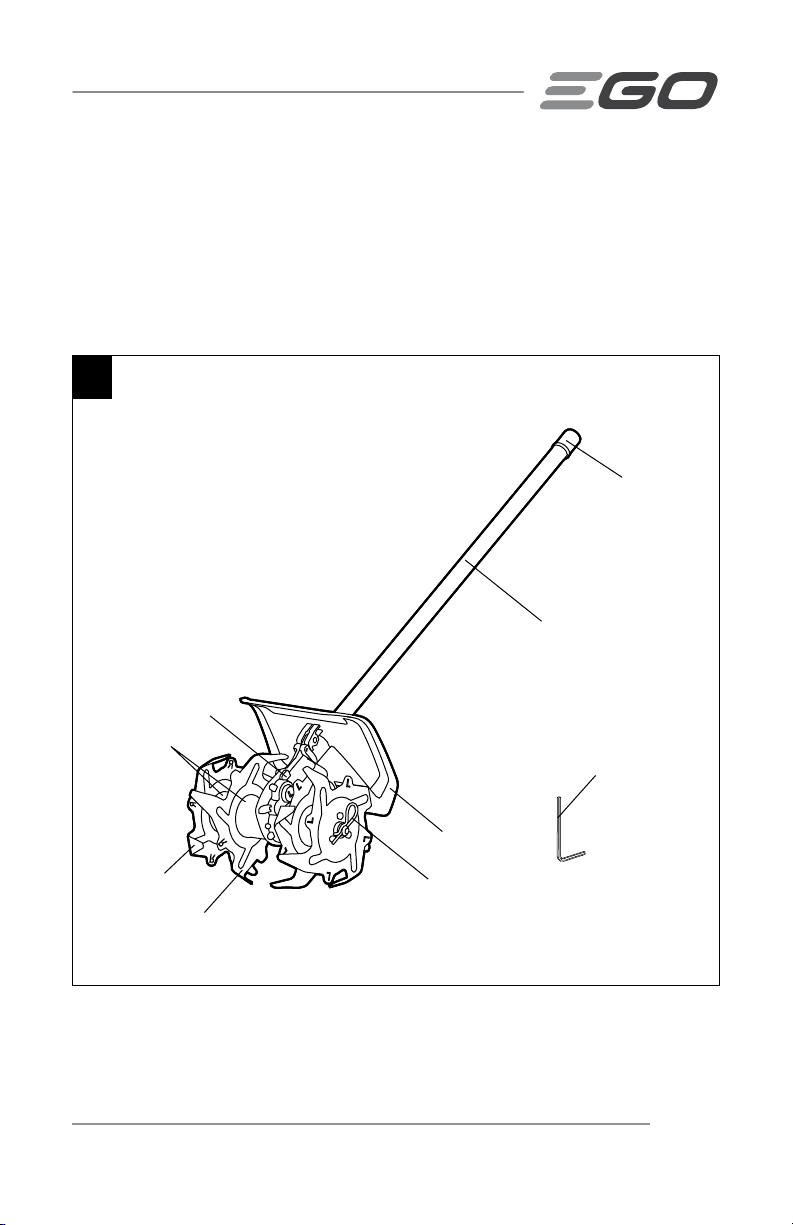
KNOW YOUR CULTIVATOR ATTACHMENT (Fig.1)
The safe use of this product requires an understanding of the information on the tool and
in this operator’s manual, as well as knowledge of the project you are attempting. Before
using this product, familiarize yourself with all operating features and safety rules.
1
End Cap
Cultivator Attachment Shaft
Gear Box
Sleeve
Hex Wrench
Outer Blade
Inner Blade
Guard
Hitch Pin
CULTIVATOR ATTACHMENT — CTA9500/CTA9500-FC 13
Page 14

WARNING:
must always be on the tool to protect the user.
Never operate the tool without the guard rmly in place. The guard
END CAP
Protects shaft from the intrusion of dirt and debris when the cultivator is not in use.
GUARD
Reduces the risk of injury from foreign objects that are ung backwards toward the
operator and from contact with the blades.
HITCH PIN
Secures the blades and simplies removal and installation of the blades.
SLEEVES
Four sleeves help to prevent or reduce grass intertwining on the drive shaft.
INNER BLADES
Metal blades with curved tines facing in two directions.
OUTER BLADES
Metal blades with curved tines all facing in the same direction.
HEX WRENCH
To lock/unlock the hex head screw of the guard or the blades.
CULTIVATOR ATTACHMENT — CTA9500/CTA9500-FC14
Page 15
ASSEMBLY
WARNING:
until the parts are replaced. Use of this product with damaged or missing parts could
result in serious personal injury.
WARNING:
recommended for use with this product. Any such alteration or modication is misuse
and could result in a hazardous condition leading to possibly serious personal injury.
WARNING:
doing any maintenance on the blade. Be careful of the blade and protect your hands
from being injured by the blade.
WARNING:
complete. Failure to comply could result in accidental starting and possible serious
personal injury.
If any parts are damaged or missing, do not operate this product
Do not attempt to modify this product or create accessories not
Always wear heavy gloves when installing or removing the blade or
Do not connect the cultivator to the power head until assembly is
UNPACKING
◾
This product requires assembly.
◾
Carefully remove the product and any accessories from the box. Make sure that
all items listed in the packing list are included.
WARNING:
assembled to your product when you unpack it. Parts on this list are not assembled to
the product by the manufacturer and require customer installation. Use of a product
that may have been improperly assembled could result in serious personal injury.
◾
Inspect the tool carefully to make sure that no breakage or damage occurred
during shipping.
◾
Do not discard the packing material until you have carefully inspected and
satisfactorily operated the tool.
◾
If any parts are damaged or missing, please return the product to the place of
purchase.
Do not use this product if any parts on the packing list are already
CULTIVATOR ATTACHMENT — CTA9500/CTA9500-FC 15
Page 16

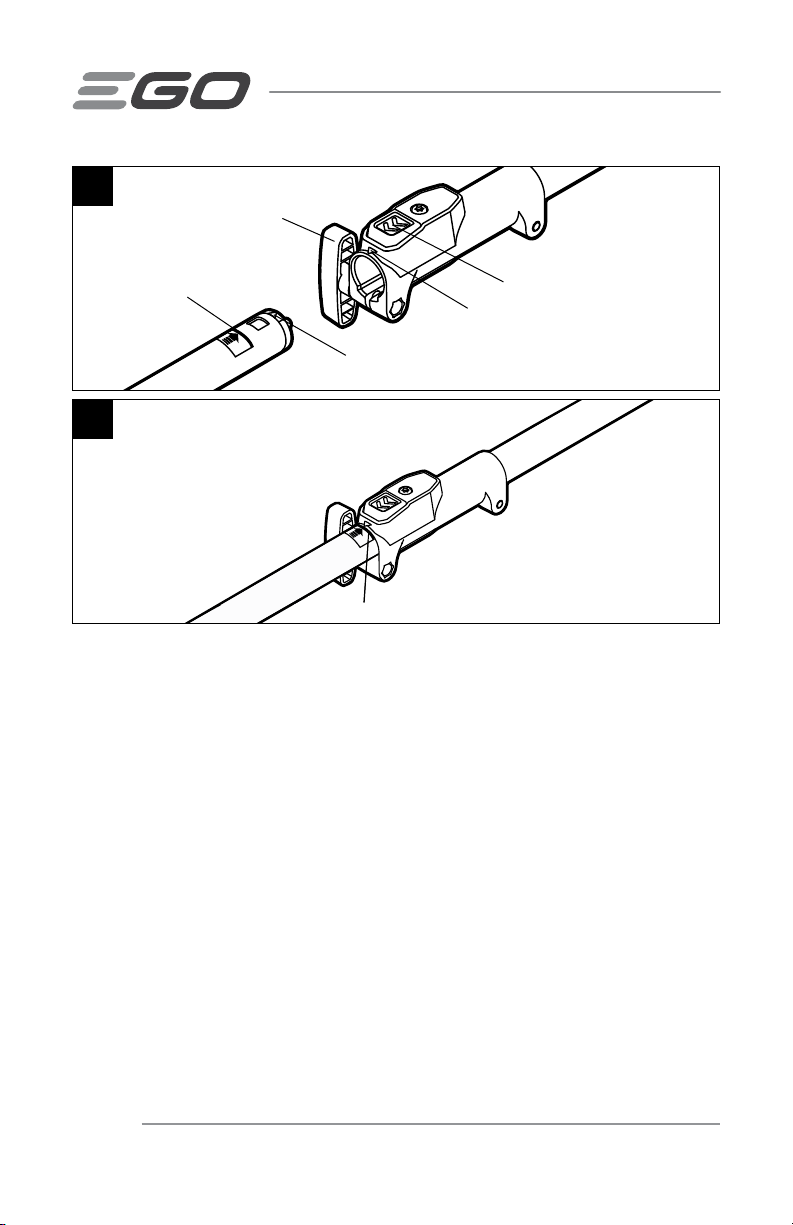
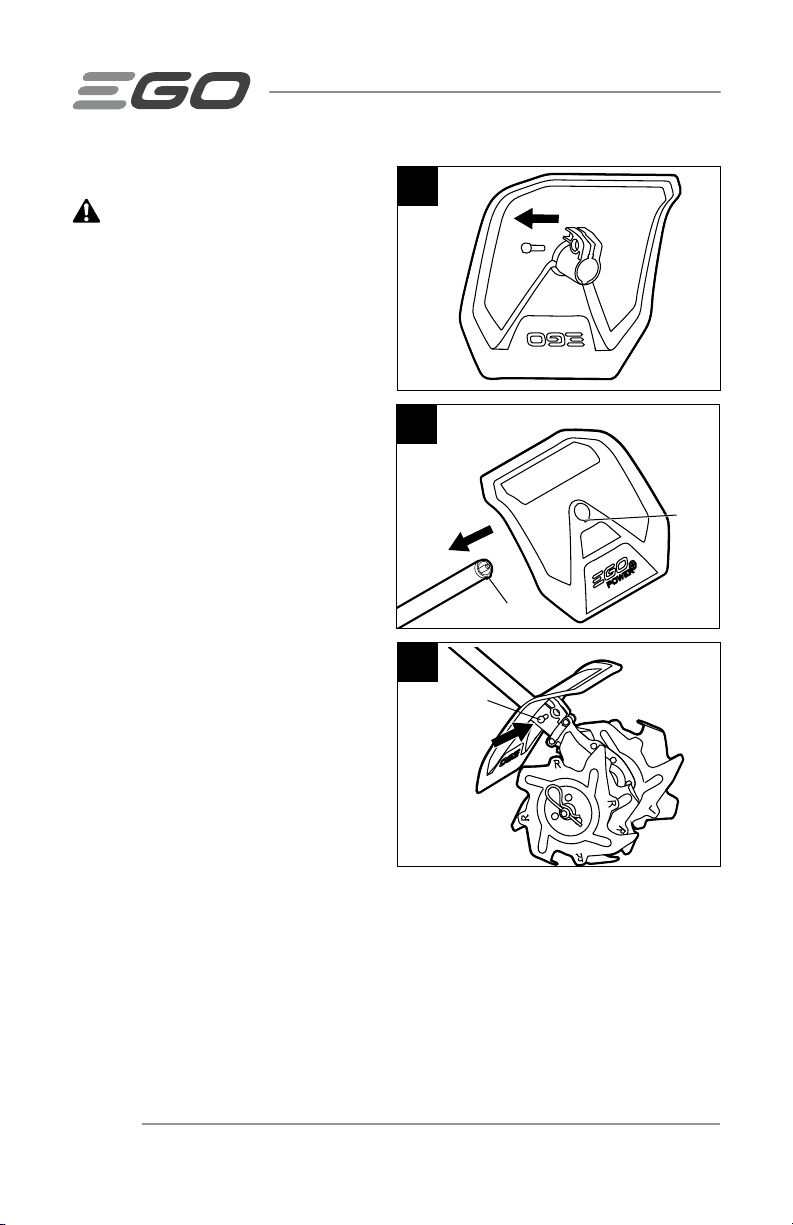
MOUNTING THE GUARD
WARNING:
the cultivator attachment is connected to
the power head.
1. Loosen and remove the bolt from
the guard with the supplied hex
wrench (Fig. 2).
2. Lift the cultivator attachment shaft
and remove the end cap from the
shaft.
3. With the slot in the guard aligned
with the rib on the end of the shaft,
pass the guard through the shaft
until the screw holes in the guard
and in the shaft are aligned
(Fig. 3 & 4).
4. Use the supplied hex wrench to
tighten the bolt clockwise to lock
the guard securely.
Install the guard before
2
3
Slot
Rib
4
Bolt
CULTIVATOR ATTACHMENT — CTA9500/CTA9500-FC16
Page 17

CONNECTING THE CULTIVATOR ATTACHMENT TO THE POWER HEAD
WARNING:
running or with the battery installed. Failure to stop the motor and remove the battery
may cause serious personal injury.
This cultivator attachment is designed for use with EGO Power Head PH1400/PH1400-FC.
The cultivator attachment connects to the power head by means of a coupler device.
1. Stop the motor and remove the battery pack.
2. Loosen the wing knob on the power head coupler.
3. If the end cap is on the attachment shaft, remove it and save it in a safe place
for later use. Align the arrow on the cultivator shaft with the arrow on the coupler
(Fig. 5a) and push the cultivator shaft into the coupler until you hear a clear
“CLICK” sound. The coupler should be positioned all the way to the RED LINE
labeled on the shaft: red line mark must be ush with the coupler edge (Fig. 5b).
4. Pull on the shaft of the cultivator attachment to verify that it is securely locked
into the coupler. If not, rotate the cultivator shaft from side to side in the coupler
until a clear “CLICK” sound indicates that it is engaged.
5. Tighten the wing knob securely.
WARNING:
operating the equipment; check it periodically for tightness during use to avoid serious
personal injury.
Never attach or adjust any attachment while the power head is
Be certain the wing knob on the coupler is fully tightened before
CULTIVATOR ATTACHMENT — CTA9500/CTA9500-FC 17
Page 18
5a
Wing Knob
Red Line
Arrow on the Attachment Shaft
Shaft-Release Button
Arrow on the Coupler
5b
Red Line
REMOVING THE ATTACHMENT FROM THE POWER HEAD
1. Stop the motor and remove the battery pack.
2. Loosen the wing knob.
3. Press the shaft-release button and, with the button depressed, pull or twist the
cultivator attachment shaft out of the coupler to separate it from the power head.
CULTIVATOR ATTACHMENT — CTA9500/CTA9500-FC18
Page 19

OPERATION
WARNING:
Remember that a careless fraction of a second is sufcient to inict serious injury.
WARNING:
Z87.1. Failure to do so could result in objects being thrown into your eyes and other
possible serious injuries.
WARNING:
manufacturer of this product. The use of attachments or accessories not recommended
can result in serious personal injury.
Do not allow familiarity with this product to make you careless.
Always wear eye protection that is marked to comply with ANSI
Do not use any attachments or accessories not recommended by the
APPLICATIONS
You may use this product for the purpose listed below:
◾
Breaking up garden soil to prepare seed beds for re-planting.
◾
Shallow cultivating to uproot weeds or loosen soil around plants, making it easier
for the air or water to penetrate deep into the soil.
◾
Top dressing soil with compost, leaves or other organic fertilizers. Shallow
cultivation will loosen the top crust of soil and integrate the added nutrients.
◾
Trenching or furrowing in loosened soil.
NOTICE: To avoid any damage to the cultivator or trees, take care not to catch the
blades on large roots of trees. Avoid cultivating too deeply, as this could damage the
shallow roots of some plants.
USING THE CULTIVATOR ATTACHMENT WITH POWER HEAD
WARNING:
Do not wear loose clothing or jewelry. Wear eye protection. Wear heavy, long pants,
boots, and gloves. Do not wear short pants or sandals or go barefoot.
Hold the cultivator with one hand on the rear handle and the other hand on the frontassist handle. Keep a rm grip with both hands while operating the cultivator. The
cultivator should be held at a comfortable position, with the rear handle about hip
height.
Dress properly to reduce the risk of injury when operating this tool.
CULTIVATOR ATTACHMENT — CTA9500/CTA9500-FC 19
Page 20
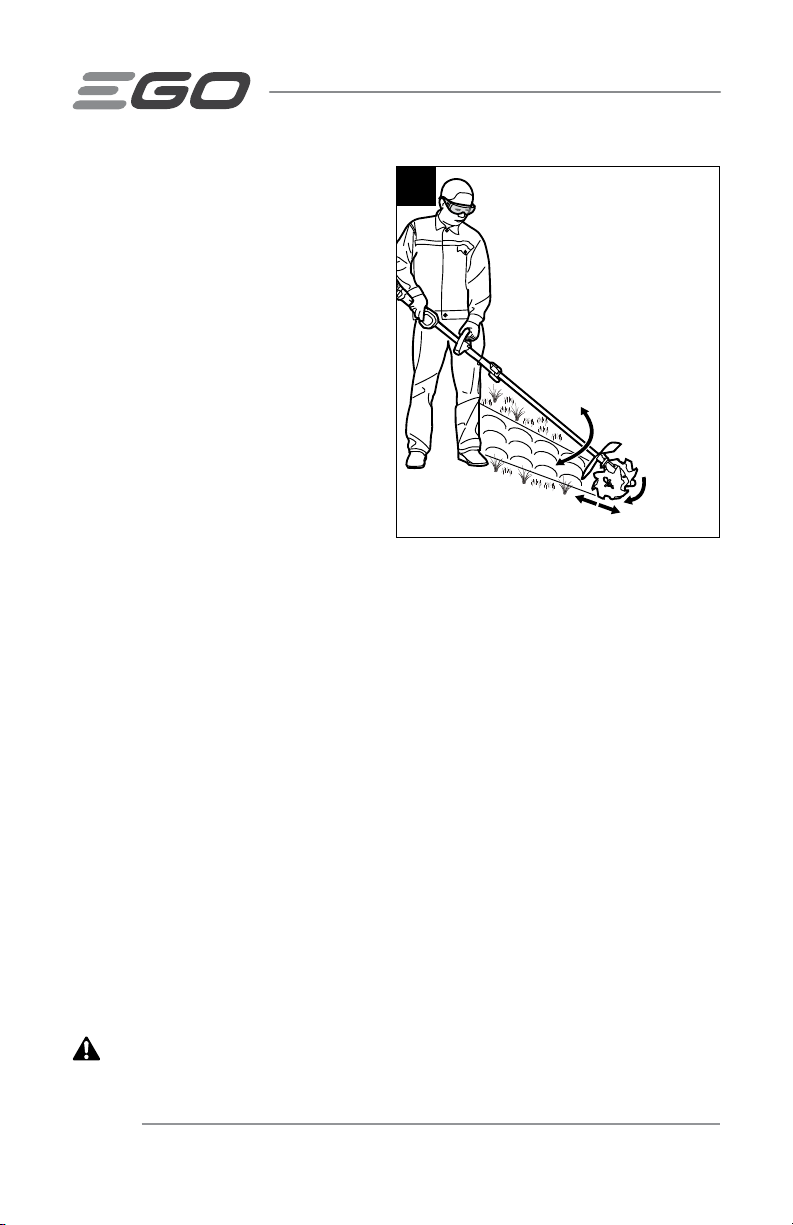
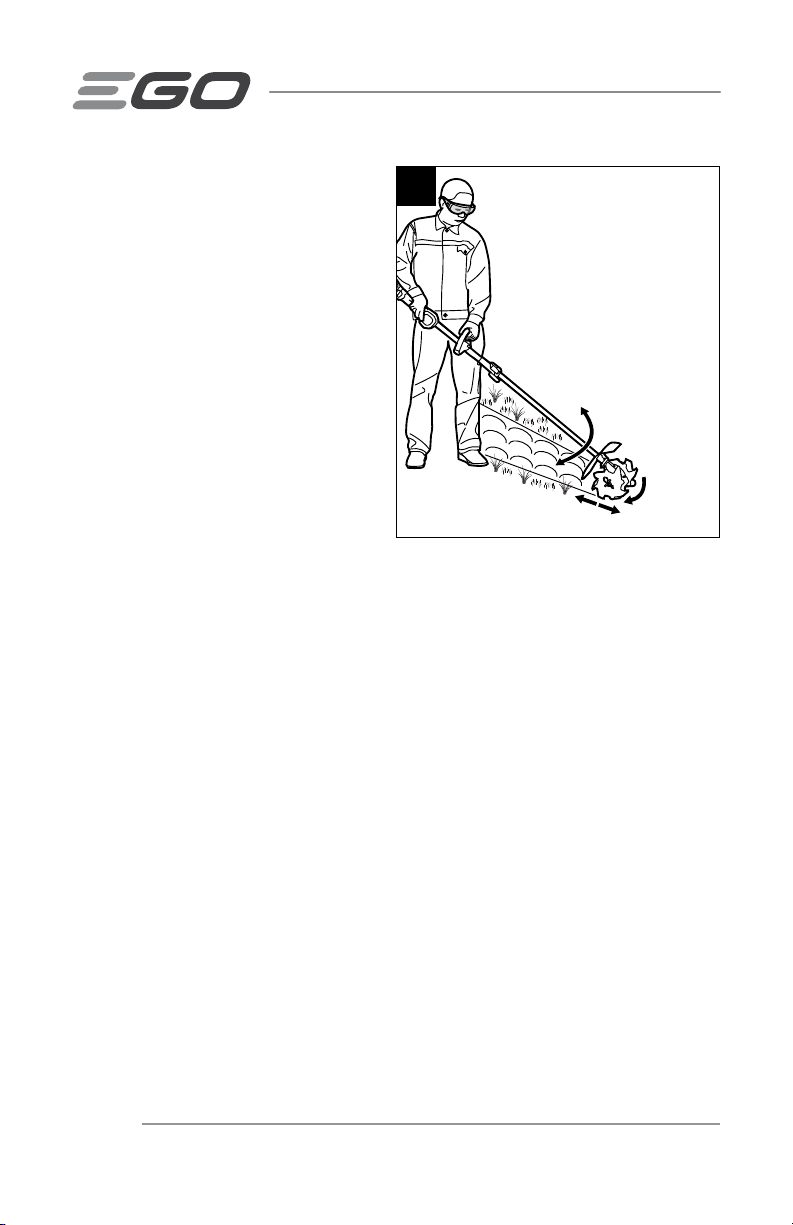
Maintain your grip, and balance on both
feet (Fig. 6).
You can work moving the cultivator
forward or backward, from left to right,
right to left, or in a circular motion.
Choose the best method to suit your
purpose, which will depend on the shape
and size of the area and soil conditions.
6
Working in an alternating backward and
forward motion is particularly suitable for
loosening packed soil.
When trenching or furrowing, walk slowly
backward and pull the cultivator to create
the furrow. Repeat as necessary to obtain
deeper furrows.
Backward or Forward Direction
Circular Direction
Blade
Rotation
NOTICE: Pulling the cultivator carefully toward you while it is digging into the soil will
reduce your effort and make the tilling easier.
Thrown materials may seriously injure the operator or bystander. To reduce the risk of
personal injury, it is essential to take the following precautions:
◾
Inspect and clear the area of any hidden objects such as glass, stones, rocks,
concrete, fence wire, pieces of metal, etc., which can be thrown or entangled in
the blades. Avoid contact with hard or solid foreign objects.
◾
Inspect the blades regularly and often for signs of damage or after hitting a hard
object. Do not continue working with a damaged blade.
◾
Always hold the cultivator with both hands when operating. Use a rm grip on
both handles.
◾
Move the cultivator to the work area before starting and start the cultivator at a
lower speed.
Before each use check for damaged and/or worn parts
Check the blades, guard, and front-assist handle and replace any parts that are
cracked, warped, bent, or damaged in any way.
WARNING:
Be careful of the blades and protect your hands from being injured by the blades.
CULTIVATOR ATTACHMENT — CTA9500/CTA9500-FC20
Always wear heavy gloves when installing or removing the blades.
Page 21

Clean the cultivator after each use
See the maintenance section for cleaning instructions.
WARNING:
removed before cleaning or servicing the cultivator. Failure to comply could result in
possibly serious personal injury.
Ensure the blades have come to a complete stop and the battery is
TO START/STOP THE TOOL
See "STARTING/STOPPING THE POWER HEAD" section in the power head PH1400/
PH1400-FC operator's manual.
CULTIVATOR ATTACHMENT — CTA9500/CTA9500-FC 21
Page 22
MAINTENANCE
WARNING: When servicing, use only identical replacement parts. Use of any
other parts may create a hazard or cause product damage. To ensure safety and
reliability, all repairs should be performed by a qualied service technician.
WARNING: Battery tools do not have to be plugged into an electrical outlet;
therefore, they are always in operating condition. To prevent serious personal injury,
take extra precautions and care when performing maintenance, service or for changing
the cutting attachment or other attachments.
WARNING: To prevent serious personal injury, remove the battery pack from the
power head and wait for all blades to stop before servicing, cleaning, changing add-on
attachments or when the product is not in use.
WARNING: Always wear heavy gloves when installing or removing the blade
or performing any maintenance on the blade. Be careful of the blade and protect your
hands from being injured by the blade.
GENERAL MAINTENANCE
Avoid using solvents when cleaning plastic parts. Most plastics are susceptible to
damage from various types of commercial solvents and may be damaged by their use.
Use a clean cloth to remove dirt, dust, oil, grease, etc.
WARNING: Do not at any time let brake uids, gasoline, petroleum-based
products, penetrating oils, etc., come in contact with plastic parts. Chemicals can
damage, weaken, or destroy plastic, which may result in serious personal injury.
WARNING: When cleaning the cultivator attachment, DO NOT immerse it in
water or other liquids. Do not clean your machine with a pressure washer. The solid jet
of water may damage parts of the machine.
BLADE MAINTENCE
◾
Maintain the blades with anti-rust oil regularly.
◾
If any of the blades needs replacing due to wear, replace all four blades for best
performance.
All cultivator service, other than the items listed in these maintenance instructions,
should be performed by a authorized service personnel.
CULTIVATOR ATTACHMENT — CTA9500/CTA9500-FC22
Page 23
REPLACING OR ADJUSTING THE BLADES
WARNING: A worn, cracked, or damaged blade can break and pieces of the
damaged blade can become dangerous projectiles. Thrown objects can cause serious
injury. Inspect the blade regularly and do not operate the cultivator with a worn or
damaged blade.
To Replace
The cultivator has four blades – two inner blades and two outer blades. For correct
operation of the cultivator, the blades must be installed in the correct orientation.
Symbols R and L are stamped on the blades (Fig. 7a & 7b).
NOTICE: THE BLADES THAT HAVE TINES FACING IN BOTH DIRECTIONS
MUST BE MOUNTED ON THE INSIDE, CLOSEST TO THE GEAR BOX.
7a
7b
Inner Blade Stamped "R"
Outer Blade Stamped "R"
Hitch Pin
Inner Blade Stamped "L"
Outer Blade Stamped "L"
Symbol L
Driven Shaft Inner Sleeve Outer Sleeve
Symbol R
Hitch Pin
CULTIVATOR ATTACHMENT — CTA9500/CTA9500-FC 23
Page 24
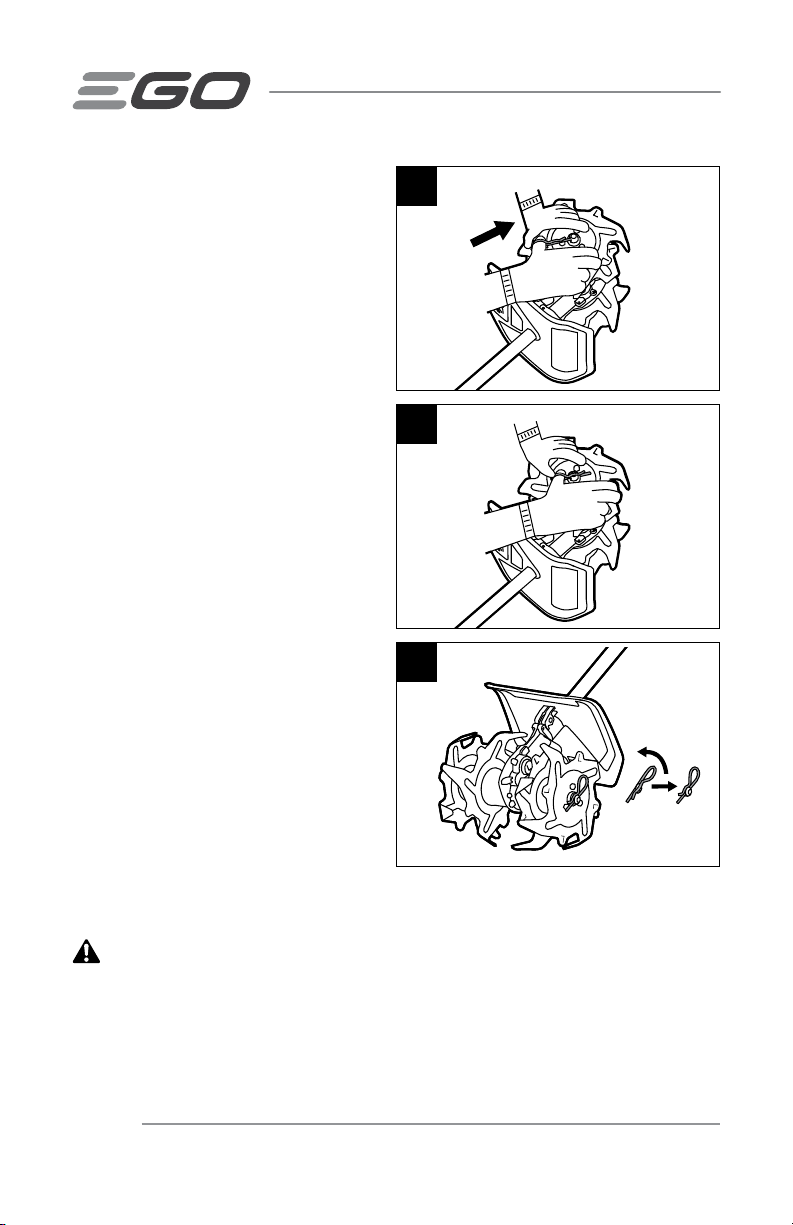
1. Wear gloves.
8
2. Place the inner blade, stamped
"L", which has tines facing in both
directions, to the left of the gear
box. The stamped side with the L
should face outward.
R
R
3. Place the outer blade, stamped "L",
(tines face one way only) on the
same side. The stamped side with
the L should face outward, with the
outer sleeve against the inner blade.
9
4. To secure the blade to the drive
shaft, insert the hitch pin into the
locking hole-1. See Fig. 8, 9, 10 for
reference.
R
R
5. Turn over the tool with the installed
blade resting against the ground.
6. Place the inner blade stamped
"R", which has tines facing in both
10
directions, to the right of the gear
box. The stamped side with the R
should face outward.
7. Place the outer blade , stamped "R",
(tines face one way only) on the
same side. The stamped side with R
should face outward, with the outer
sleeve against the inner blade.
R
R
R
R
Fold the Hitch
Pin Flat Against
the Blade
8. To secure the blade to the drive
shaft, insert the hitch pin into the locking hole-1. See Fig. 8, 9, 10 for reference.
90°
WARNING: The unit will not operate properly or may cause danger to the
operator or bystanders if the blades are installed incorrectly. If you notice a problem
with the cultivating operation of the unit, check for proper blade positioning. THE
BLADES THAT HAVE TINES FACING IN BOTH DIRECTIONS MUST BE MOUNTED ON
THE INSIDE, CLOSEST TO THE GEAR CASE.
CULTIVATOR ATTACHMENT — CTA9500/CTA9500-FC24
Page 25
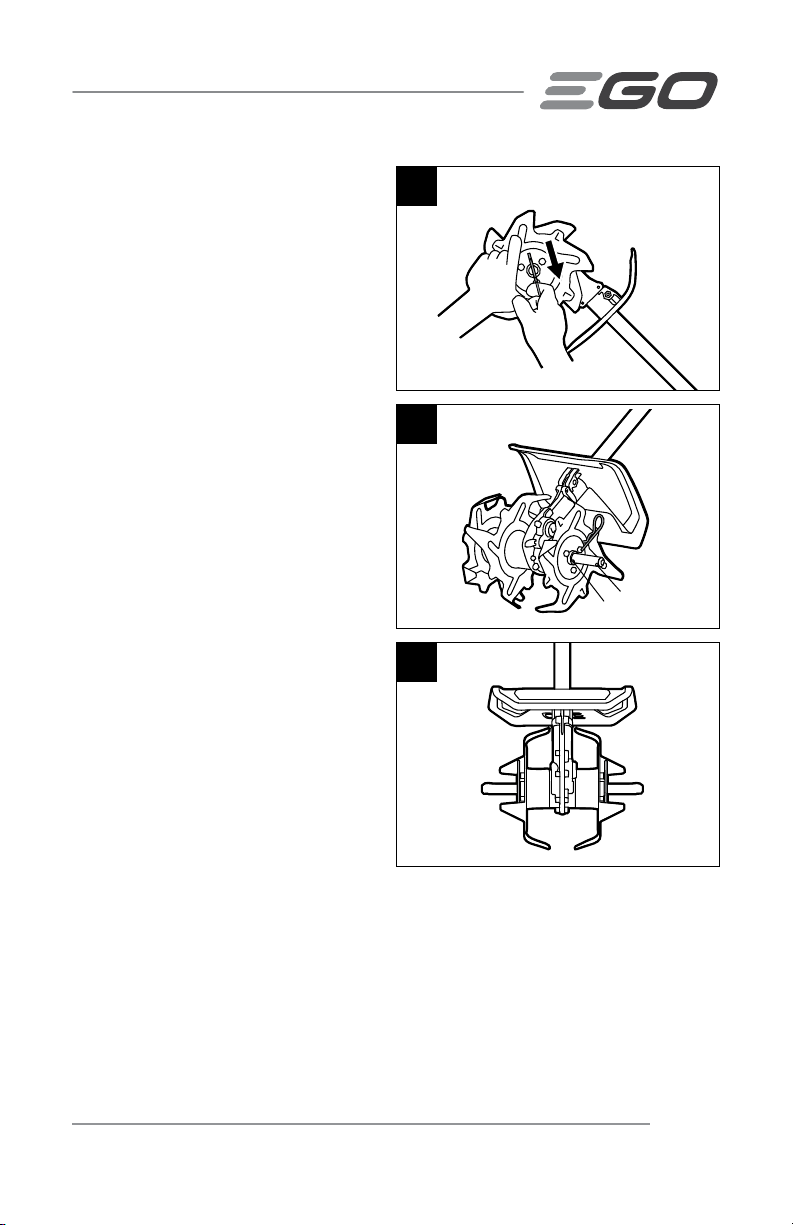
To Adjust
11
When tilling in a conned area or between
rows, the cultivator may be used with only
the inner blades installed.
Wear gloves and remove the two hitch
pins to remove the two outer blades
(Fig. 11), and then insert the hitch pins
into the locking hole-2 (Fig.12 & 13).
NOTICE: Do not force the blades on
or off the drive shaft. If you experience
difculty when removing the blades, apply
some penetrating oil on the shaft. When
reinstalling the blades, make sure to clean
and oil the drive shaft and the blades.
CLEAN THE UNIT
Parts of plants, such as roots, can become
tightly wrapped around or between the
rotating blades during operating. To clean
the rotating blades:
◾
Remove the battery.
◾
Wear gloves. Clean the pieces of
roots, clogged soils or plants on
the blade, guard or the gear box.
For thorough cleaning, remove the
blades and guard to wash them
thoroughly. For detailed replacement
steps please see above section
“REPLACING OR ADJUSTING THE BLADES”.
◾
Wipe the tool surface with a clean cloth moistened with a mild soap solution.
Keep the air vents free of obstructions.
12
13
R
R
R
R
Locking Hole-1
Locking Hole-2
CULTIVATOR ATTACHMENT — CTA9500/CTA9500-FC 25
Page 26

STORING THE UNIT
◾
Remove the battery pack from the tool.
◾
Wear heavy gloves to clean the tool thoroughly and inspect the blades.
◾
Remove the cultivator attachment from the power head and cover the attachment
shaft with end cap to avoid dirt getting into the coupling.
◾
Store the tool in a dry, well-ventilated area, locked-up or up high, out of the reach
of children. Do not store the unit on or adjacent to fertilizers, gasoline, or other
chemicals.
CULTIVATOR ATTACHMENT — CTA9500/CTA9500-FC26
Page 27
TROUBLESHOOTING
PROBLEM CAUSE SOLUTION
Cultivator fails to start.
The battery pack is not
properly attached to the
power head.
Attach the battery pack
to the power head.
No electrical contact
between the power
head and the battery
pack.
The battery pack is
depleted.
The lock-off lever
and trigger are
not depressed
simultaneously.
Remove battery, check
contacts and reinstall
the battery pack so that
it snaps into place.
Charge the battery pack
with an EGO charger
listed in this manual.
Press the lock-off
lever and hold it, then
depress the trigger to
turn on the unit.
CULTIVATOR ATTACHMENT — CTA9500/CTA9500-FC 27
Page 28
PROBLEM CAUSE SOLUTION
Cultivator stops while
tilling.
The motor is
overloaded.
The motor will
recover when the
load is removed. For
continuous work,
decrease the load on
the cultivator and avoid
deep tilling; instead,
make progressively
deeper cuts.
The battery pack or the
power head is too hot.
The blades are jammed.
The battery pack is
disconnected from the
tool.
The battery pack is
depleted.
Allow the battery pack
or the power head
to cool until the its
temperature drops
below 152°F (67°C).
Remove the battery
from the power head,
manually rotate the
blades back and forth
to remove the stones
or other obstacles
between the blades or
between the blade and
the gear box.
Re-install the battery
pack.
Charge the battery pack
with an EGO charger
listed in this manual.
CULTIVATOR ATTACHMENT — CTA9500/CTA9500-FC28
Page 29

WARRANTY
EGO WARRANTY POLICY
5-year limited warranty on EGO POWER+ outdoor power equipment and portable power
for personal, household use.
3-year limited warranty on EGO POWER+ System battery packs and chargers for
personal, household use.
2 year/1year limited warranty on EGO outdoor power equipment, portable power,
battery packs, and chargers for professional and commercial use.
The detailed warranty periods by products can be found online at
http://egopowerplus.com/pages/warranty-policy.
Please contact EGO Customer Service Toll-Free at 1-855-EGO-5656 any time you
have questions or warranty claims.
LIMITED SERVICE WARRANTY
EGO products are warranted against defects in material or workmanship from the date
of original retail purchase for the applicable warranty period. Defective product will
receive free repair.
a) This warranty applies only to the original purchaser from an authorized EGO
retailer and may not be transferred. Authorized EGO retailers are identied online
at http://egopowerplus.com/pages/warranty-policy.
b) The warranty period for reconditioned or factory certied products used for
residential purpose is 1 year, for industrial, professional or commercial purpose is
90 days.
c) The warranty period for routine maintenance parts, such as, but not limited
to, blades, trimmer heads, chain bars, saw chains, belts, scraper bars, blower
nozzles, and all other EGO accessories is 90 days for residential purpose, 30 days
for industrial, professional or commercial purpose. These parts are covered for
90/30 days from manufacture defects in normal working conditions.
d) This warranty is void if the product has been used for rental purpose.
e) This warranty does not cover the damage resulting from modication, alteration
or unauthorized repair.
CULTIVATOR ATTACHMENT — CTA9500/CTA9500-FC 29
Page 30

f) This warranty only covers defects arising under normal usage and does not
cover any malfunction, failure or defect resulting from misuse, abuse (including
overloading of the product beyond capacity and immersion in water or other
liquid), accidents, neglect or lack of proper installation, and improper maintenance
or storage.
g) This warranty does not cover normal deterioration of the exterior nish, including
but not limited to scratches, dents, paint chips, or to any corrosion or discoloring
by heat, abrasive and chemical cleaners.
HOW TO OBTAIN SERVICE
For warranty service, please contact EGO customer service toll-free at
1-855-EGO-5656. When requesting warranty service, you must present the original
dated sales receipt. An authorized service center will be selected to repair the product
according to the stated warranty terms. When bringing your product to the authorized
service center, there may be a small deposit that will be required when dropping off
your tool. This deposit is refundable when the repair service is deemed to be covered
under warranty.
ADDITIONAL LIMITATIONS
To the extent permitted by applicable law, all implied warranties, including warranties
of MERCHANTABILITY or FITNESS FOR A PARTICULAR PURPOSE, are disclaimed. Any
implied warranties, including warranties of merchantability or tness for a particular
purpose, that cannot be disclaimed under state law are limited to the applicable
warranty period dened at the beginning of this article.
Chervon North America is not responsible for direct, indirect, incidental or consequential
damages.
Some states do not allow limitations on how long an implied warranty lasts and/or do
not allow the exclusion or limitation of incidental or consequential damages, so the
above limitations may not apply to you.
This warranty gives you specic legal rights, and you may also have other rights which
vary from state to state.
For customer service contact us toll-free at: 1-855-EGO-5656 or EGOPOWERPLUS.
COM. EGO Customer Service, 769 SEWARD AVE NW / Suite 102 Grand Rapids, MI
49504
CULTIVATOR ATTACHMENT — CTA9500/CTA9500-FC30
Page 31
À UTILISER UNIQUEMENT AVEC
LA TÊTE D’ALIMENTATION EGO
POWER+ PH1400/PH1400-FC
GUIDE D’UTILISATION
ACCESSOIRE DE CULTIVATEUR
NUMÉRO DE MODÈLE CTA9500/CTA9500-FC
AVERTISSEMENT : Afin de réduire les risques de blessure, l’utilisateur doit lire et
comprendre le guide d’utilisation avant d’utiliser ce produit. Conservez le présent guide
afin de pouvoir le consulter ultérieurement.
Page 32

TABLE DES MATIÈRES
Symboles de sécurité ....................................34
Consignes de sécurité .................................35-42
Introduction ............................................43
Caractéristiques techniques ...............................43
Liste des pièces contenues dans l’emballage ..................44
Description .........................................45-46
Assemblage ......................................... 47-50
Fonctionnement ...................................... 51-54
Entretien ...........................................55-58
Dépannage .........................................59-60
Garantie ............................................61-63
ACCESSOIRE DE CULTIVATEUR — CTA9500/CTA9500-FC32
Page 33

LISEZ TOUTES LES INSTRUCTIONS!
LE GUIDE D’UTILISATION
LIRE ET COMPRENDRE
:
AVERTISSEMENT
le polissage, le perçage et d’autres activités liées à la construction peut contenir
des produits chimiques reconnus par l’État de la Californie comme étant la cause
de cancers, d’anomalies congénitales et d’autres problèmes liés aux fonctions
reproductrices. Voici des exemples de ces produits chimiques :
◾
Le plomb provenant de peintures à base de plomb;
◾
La silice cristallisée contenue dans les briques, le ciment et d’autres produits de
maçonnerie;
◾
L’arsenic et le chrome contenus dans le bois d’œuvre traité avec des produits
chimiques.
Les risques liés à l’exposition à ces produits varient en fonction de la fréquence à
laquelle vous effectuez ce type de travaux. Pour réduire votre exposition à ces produits
chimiques, travaillez dans une zone bien ventilée et portez l’équipement de sécurité
approuvé, comme les masques antipoussières conçus pour ne pas laisser passer les
particules microscopiques.
La poussière créée pendant le ponçage, le sciage,
ACCESSOIRE DE CULTIVATEUR — CTA9500/CTA9500-FC 33
Page 34

SYMBOLES DE SÉCURITÉ
L’objectif des symboles de sécurité est d’attirer votre attention sur les dangers
potentiels. Vous devez examiner attentivement et bien comprendre les symboles de
sécurité et les explications qui les accompagnent. Les symboles d’avertissement en
tant que tels n’éliminent pas le danger. Les consignes et les avertissements qui y sont
associés ne remplacent en aucun cas les mesures préventives adéquates.
:
AVERTISSEMENT
comprendre toutes les consignes de sécurité présentées dans le présent guide
d’utilisation, notamment toutes les consignes de sécurité indiquées par « DANGER »,
« AVERTISSEMENT » et « MISE EN GARDE ». Le non-respect des consignes de
sécurité ci-dessous peut occasionner une décharge électrique, un incendie ou des
blessures graves.
SIGNIFICATION DES SYMBOLES
SYMBOLE D’ALERTE DE SÉCURITÉ
AVERTISSEMENT ou une MISE EN GARDE. Il peut être associé à d’autres symboles ou
pictogrammes.
AVERTISSEMENT
entraîner la projection de corps étrangers dans les yeux et ainsi causer
des lésions oculaires graves. Avant d’utiliser un outil électrique, veillez à
toujours porter des lunettes de sécurité couvrantes ou à écrans latéraux,
ou un masque complet au besoin. Nous recommandons le port d’un
masque de sécurité panoramique par-dessus les lunettes ou de lunettes de sécurité
standard avec écrans latéraux. Portez toujours des lunettes de sécurité conformes à la
norme ANSI Z87.1.
Avant d’utiliser cet outil, assurez-vous de lire et de
:
Indique un DANGER, un
!
L’utilisation de tout outil électrique peut
ACCESSOIRE DE CULTIVATEUR — CTA9500/CTA9500-FC34
Page 35

CONSIGNES DE SÉCURITÉ
Vous trouverez ci-dessous les symboles de sécurité qui peuvent être présents sur le
produit, accompagnés de leur description. Vous devez lire, comprendre et suivre toutes
les instructions présentes sur l’appareil avant de commencer à l’assembler ou à le
manipuler.
Alerte de sécurité Indique un risque de blessure.
Assurez-vous
de lire et de
comprendre le
guide d’utilisation
Portez des
lunettes de
sécurité
Portez des gants
de protection
Ricochet
Gardez les mains
et les pieds à
distance
An de réduire les risques de blessure,
l’utilisateur doit lire et comprendre le guide
d’utilisation avant d’utiliser ce produit.
Portez toujours des lunettes de sécurité ou des
lunettes protectrices pourvues d’écrans latéraux
lorsque vous utilisez cet article.
Protégez vos mains en portant des gants lorsque
vous manipulez des lames. Des gants robustes et
antidérapants améliorent votre prise et protègent
vos mains.
Des objets propulsés peuvent rebondir et causer
des blessures ou des dommages matériels.
N’essayez jamais de faire fonctionner cet article
d’une seule main. Une perte de maîtrise de cet
article peut entraîner des blessures graves, voire
mortelles. Pour réduire les risques de coupures,
gardez vos mains et vos pieds à distances des
lames en rotation. Ne touchez jamais les lames
en rotation avec votre main ou toute autre partie
de votre corps.
ACCESSOIRE DE CULTIVATEUR — CTA9500/CTA9500-FC 35
Page 36

An de réduire les risques d’électrocution,
assurez-vous qu’il n’y a pas de câbles enfouis
Danger – Choc
électrique
susceptibles d’être sous tension et d’entrer en
contact avec l’outil. Endommager ces câbles
avec l’outil peut provoquer des chocs électriques
et entraîner des blessures graves, voire mortelles.
Le produit fonctionne à l’aide de piles au lithium-
ion (Li-ion). La législation locale, provinciale
Symboles de
recyclage
ou fédérale peut interdire la mise au rebut des
piles dans les ordures ménagères. Consultez
l’organisme local de gestion des déchets au sujet
des options de mise au rebut ou de recyclage.
IPX4
Indice de
protection
Protection contre les éclaboussures d’eau
V Volt Tension
mm Millimètre Longueur ou taille
po Pouce Longueur ou taille
kg Kilogramme Poids
lb Livre Poids
ACCESSOIRE DE CULTIVATEUR — CTA9500/CTA9500-FC36
Page 37

AVERTISSEMENTS DE SÉCURITÉ GÉNÉRAUX RELATIFS AUX OUTILS
ALIMENTÉS SUR SECTEUR OU PAR PILES
AVERTISSEMENT!
illustrations et spécications fournis avec cet outil électrique. Le non-respect
des consignes de sécurité ci-dessous peut occasionner un choc électrique, un incendie
ou des blessures graves.
Conservez tous les avertissements et toutes les instructions pour les
consulter ultérieurement.
Lisez tous les avertissements, instructions,
SÉCURITÉ DE L’AIRE DE TRAVAIL
◾
Maintenez l’aire de travail propre et bien éclairée. Les aires de travail
sombres et encombrées sont propices aux accidents.
◾
N’utilisez pas d’outils électriques dans un milieu explosif, par
exemple où il y a présence de liquides, de vapeurs ou de poussières
inammables. Les outils électriques produisent des étincelles susceptibles
d’enammer ces poussières ou ces vapeurs.
◾
Gardez les enfants et les autres personnes à l’écart lorsque vous utilisez
un outil électrique. Une distraction peut vous faire perdre la maîtrise de l’outil.
SÉCURITÉ PERSONNELLE
◾
Soyez vigilant, prêtez attention à ce que vous faites et usez de votre
jugement lorsque vous utilisez un outil électrique. N’utilisez pas un outil
électrique lorsque vous êtes fatigué ou sous l’effet de drogues, d’alcool
ou de médicaments. Un moment d’inattention pendant que vous utilisez des
outils électriques peut entraîner des blessures graves.
◾
Utilisez toujours un équipement de protection individuelle. Le port
d’équipement de protection individuelle, comme des lunettes de sécurité, un
masque antipoussières, des chaussures de sécurité antidérapantes, un casque de
protection ou des protecteurs auditifs, lorsque les conditions l’exigent, réduit les
risques de blessures.
◾
Prenez des mesures an d’éviter que l’outil se mette en marche
accidentellement. Assurez-vous que l’interrupteur est sur la position
d’arrêt avant de brancher l’outil sur un bloc-piles, de le ramasser ou de
le transporter. Transporter les outils électriques avec le doigt sur l’interrupteur
ou brancher les outils lorsque l’interrupteur est en position de marche augmente
les risques d’accident.
ACCESSOIRE DE CULTIVATEUR — CTA9500/CTA9500-FC 37
Page 38

◾
Retirez toutes les clés de réglage de l’outil électrique avant de le mettre
en marche. Une clé de réglage oubliée sur une pièce mobile de l’outil électrique
peut entraîner des blessures.
◾
Ne vous étirez pas pour étendre votre portée. Gardez une posture sécuritaire
et un bon équilibre en tout temps. Cela vous permet de mieux maîtriser l’outil
électrique lorsque des situations inattendues se présentent.
◾
Habillez-vous de manière appropriée. Ne portez pas de vêtements
amples ni de bijoux. Gardez vos cheveux et vos vêtements loin des pièces
mobiles. Les vêtements amples, les bijoux et les cheveux longs risquent de se
prendre dans les pièces en mouvement.
◾
Si un dispositif permet de raccorder un dépoussiéreur, assurez-vous
que celui-ci est branché et utilisé de manière appropriée. L’emploi d’un
dépoussiéreur contribue à réduire les dangers liés à la poussière.
◾
Même si vous connaissez parfaitement ces outils parce que vous les
utilisez souvent, soyez vigilant et respectez les principes de sécurité. Il
suft d’être négligent une fraction de seconde pour se blesser gravement.
UTILISATION ET ENTRETIEN DES OUTILS ÉLECTRIQUES
◾
Ne forcez pas l’outil électrique. Utilisez l’outil électrique approprié à
l’utilisation que vous envisagez. L’utilisation de l’outil électrique approprié
permet d’obtenir de meilleurs résultats, de façon plus sécuritaire, selon le régime
de fonctionnement prévu.
◾
N’utilisez pas l’outil électrique si l’interrupteur ne fonctionne pas.
Tout outil électrique qui ne peut être commandé au moyen de l’interrupteur est
dangereux et doit être réparé.
◾
Retirez, si possible, le bloc-piles de l’outil électrique ou actionnez
tout dispositif de désactivation du bloc-piles avant de dégager un
objet coincé, d’effectuer des réglages, de changer d’accessoires ou
de nettoyer ou de ranger les outils électriques. Ces mesures de sécurité
préventives réduisent les risques de mise en marche accidentelle de l’outil
électrique.
◾
Rangez l’outil électrique à l’arrêt hors de la portée des enfants et
n’autorisez pas une personne ne sachant pas s’en servir ou n’ayant pas
lu ces instructions à l’utiliser. Les outils électriques sont dangereux s’ils se
retrouvent entre les mains d’utilisateurs qui ne savent pas s’en servir.
ACCESSOIRE DE CULTIVATEUR — CTA9500/CTA9500-FC38
Page 39

◾
Entretenez les outils électriques et les accessoires. Vériez les pièces
mobiles pour vous assurer qu’elles ne sont pas désalignées, enrayées,
brisées, ou dans un état qui pourrait nuire à leur fonctionnement. Si
l’outil électrique est endommagé, faites-le réparer avant de l’utiliser. De
nombreux accidents sont provoqués par des outils électriques et des accessoires
mal entretenus.
◾
Gardez vos outils tranchants affûtés et propres. Des outils tranchants bien
entretenus et dont les lames sont affûtées risquent moins de se bloquer et sont
plus faciles à maîtriser.
◾
Utilisez l’outil électrique, les accessoires, les embouts ou autres
conformément aux instructions, en tenant compte des conditions de
travail et du travail à effectuer. L’utilisation de l’outil électrique à des ns
autres que celles pour lesquelles il a été conçu pourrait entraîner une situation
dangereuse.
◾
Les poignées et autres surfaces de préhension doivent toujours être
sèches, propres et exemptes d’huile ou de graisse. Les poignées et autres
surfaces de préhension glissantes peuvent entraîner une manipulation non
sécuritaire ou une perte de contrôle de l’outil.
◾
Éloignez les câbles de la zone de travail de l’outil. Durant l’utilisation, des
câbles pourraient être dissimulés et être accidentellement endommagés par
l’outil.
UTILISATION ET ENTRETIEN DU BLOC-PILES
◾
Rechargez uniquement le bloc-piles à l’aide du chargeur approuvé par le
fabricant. Un chargeur conçu pour un type de bloc-piles peut causer un incendie
s’il est utilisé avec un autre bloc-piles. Utilisez l’article uniquement avec les
blocs-piles et les chargeurs indiqués ci-dessous.
BLOC-PILE CHARGEUR
BA1120, BA1120-FC, BA1400, BA1400-FC,
BA2240, BA2240-FC, BA2800, BA2800-FC,
BA4200, BA4200-FC, BA1400T, BA1400T-FC,
BA2800T, BA2800T-FC, BA4200T, BA4200T-FC
◾
Utilisez les outils électriques uniquement avec les blocs-piles désignés.
L’utilisation de tout autre bloc-piles peut constituer un risque de blessure et
d’incendie.
ACCESSOIRE DE CULTIVATEUR — CTA9500/CTA9500-FC 39
CH2100, CH2100-FC,
CH5500, CH5500-FC
Page 40

◾
Lorsque vous n’utilisez pas le bloc-piles, conservez-le à l’écart d’autres
objets métalliques, comme des trombones, des pièces de monnaie, des
clés, des clous, des vis et d’autres petits objets métalliques qui peuvent
connecter une borne à une autre. Un court-circuit entre les bornes du bloc-
piles peut occasionner des brûlures ou un incendie.
◾
En cas d’usage abusif, du liquide peut s’échapper du bloc-piles; évitez
tout contact avec ce liquide. En cas de contact accidentel, rincez à
grande eau. Si vos yeux entrent en contact avec ce liquide, consultez
un médecin. Le liquide provenant des piles peut causer de l’irritation ou des
brûlures.
◾
N’utilisez pas un bloc-piles ou un outil endommagé ou modié. Les blocspiles modiés ou endommagés peuvent fonctionner de façon imprévisible et
présenter un risque d’incendie, d’explosion ou de blessures.
◾
N’exposez pas un bloc-piles ou un outil à un feu ou à une température
excessive. L’exposition au feu ou à une température supérieure à 100 °C (212
°F) peut provoquer une explosion.
◾
Suivez toutes les instructions pour le chargement et ne chargez pas le
bloc-piles ou l’outil en dehors de la plage de température spéciée dans
les instructions. Une recharge inadéquate ou effectuée à des températures
en dehors de la plage spéciée peut endommager le bloc-piles et augmenter le
risque d’incendie.
ENTRETIEN
◾
Demandez à un technicien qualié qui utilise seulement des pièces
de rechange identiques aux pièces d’origine d’effectuer l’entretien de
votre outil électrique. Vous vous assurerez ainsi que l’outil électrique demeure
sécuritaire.
◾
Ne réparez jamais un bloc-piles endommagé. Seuls le fabricant et les
fournisseurs de services autorisés peuvent effectuer la réparation d’un bloc-piles.
CONSIGNES DE SÉCURITÉ POUR LE CULTIVATEUR
◾
Gardez les mains éloignées des lames.
◾
Ne l’utilisez pas près de câbles électriques, de lignes téléphoniques ou de tuyaux
souterrains. En cas de doute, communiquez avec votre compagnie de téléphone
ou d’électricité pour localiser les câbles souterrains.
ACCESSOIRE DE CULTIVATEUR — CTA9500/CTA9500-FC40
Page 41

◾
Les lames en rotation peuvent causer des blessures graves. Gardez toutes les
parties du corps à distance des lames en rotation.
◾
Faites preuve d’une extrême prudence lorsque vous tournez ou tirez l’outil vers
vous.
◾
Si le cultivateur venait à vibrer de manière anormale ou s’il devenait bruyant,
arrêtez le moteur et trouvez immédiatement la cause des vibrations. Les sons
anormaux indiquent généralement un problème.
◾
Vériez le serrage de toutes les xations pour vous assurer que le cultivateur est
en bon état de marche.
◾
Assurez-vous que les goupilles d’attelage sont complètement insérées dans
l’arbre de lame avant chaque utilisation.
◾
N’utilisez pas un appareil électrique s’il est tombé ou a été endommagé.
Retournez-le chez le détaillant autorisé le plus près de chez vous pour qu’il soit
inspecté et réparé.
◾
Assurez-vous que tous les protecteurs et autres dispositifs de sécurité sont xés
correctement et de façon sécuritaire avant d’utiliser cet article.
◾
Soyez extrêmement prudent lorsque vous labourez un sol dur. Les lames
pourraient rester prises dans le sol et projeter le cultivateur vers l’avant.
◾
Ne forcez pas la capacité de l’outil en tentant de labourer trop profondément à
une vitesse trop rapide.
◾
Inspectez la zone où l’équipement doit être utilisé et retirez tous les corps
étrangers.
◾
Ne rechargez pas le bloc-piles sous la pluie ni dans un endroit mouillé.
◾
Ne jetez pas le bloc-pile au feu. Les cellules pourraient exploser. Consultez la
réglementation locale pour connaître les instructions de mise au rebut.
◾
N’ouvrez pas et n’abîmez pas le bloc-piles. L’électrolyte qu’il contient est
corrosif et peut causer des lésions oculaires ou cutanées. Il peut être toxique s’il
est ingéré.
◾
Les outils munis d’un bloc-piles n’ont pas besoin d’être branchés sur
une prise de courant. Par conséquent, ils sont toujours prêts à l’emploi.
Gardez à l’esprit qu’il existe des dangers potentiels même lorsque l’outil ne
fonctionne pas. Soyez prudents lorsque vous effectuez l’entretien ou des
réparations.
◾
Ne lavez pas l’outil avec un jet d’eau, car de l’eau pourrait s’inltrer
dans le moteur et les connexions électriques.
ACCESSOIRE DE CULTIVATEUR — CTA9500/CTA9500-FC 41
Page 42

◾
S’il se produit une situation qui ne gure pas dans le présent manuel,
faites preuve de prudence et de jugement. Communiquez avec le centre
de service à la clientèle d’EGO pour obtenir de l’aide.
◾
CONSERVEZ CES INSTRUCTIONS. Consultez-les régulièrement et utilisez-les
pour expliquer le fonctionnement de l’outil à d’autres personnes qui l’utiliseraient.
Si vous prêtez cet outil à une personne, prêtez-lui également ces instructions an
de prévenir un usage inapproprié et des blessures potentielles.
REMARQUE : CONSULTEZ VOTRE GUIDE D’UTILISATION DE LA TÊTE
D’ALIMENTATION POUR CONNAÎTRE LES RÈGLES DE SÉCURITÉ
PARTICULIÈRES SUPPLÉMENTAIRES.
ACCESSOIRE DE CULTIVATEUR — CTA9500/CTA9500-FC42
Page 43

INTRODUCTION
Nous vous félicitons d’avoir choisi la tête d’alimentation EGO au lithium-ion de 56 volts.
Elle a été conçue et fabriquée an de vous offrir la meilleure abilité et le meilleur
rendement possible.
Si vous éprouvez un problème que vous n’arrivez pas à régler facilement, veuillez
communiquer avec le centre de service à la clientèle d’EGO au 1 855 EGO-5656.
Le présent guide contient des renseignements importants pour assembler, utiliser
et entretenir en toute sécurité votre produit. Lisez-le soigneusement avant d’utiliser
le produit. Conservez ce guide à portée de main an de pouvoir le consulter à tout
moment.
NUMÉRO DE SÉRIE ____________________ DATE D’ACHAT _____________________
NOUS VOUS RECOMMANDONS DE NOTER LE NUMÉRO DE SÉRIE ET LA DATE D’ACHAT ET DE
LES CONSERVER EN LIEU SÛR AFIN DE POUVOIR LES CONSULTER ULTÉRIEUREMENT.
CARACTÉRISTIQUES TECHNIQUES
Taille De La Lame 21,59 cm (8 1/2 po)
Profondeur De Labourage 21,59 cm (8 1/2 po)
Largeur De Labourage 24,13 cm (9 1/2 po)
Température De Fonctionnement 0 °C à 40 °C (32 °F à 104 °F)
Température De Rangement De -20 °C à 70 °C (de -4 °F à 158 °F)
Poids (Protecteur Inclus) 3,9 kg (8,6 lb)
ACCESSOIRE DE CULTIVATEUR — CTA9500/CTA9500-FC 43
Page 44

LISTE DES PIÈCES CONTENUES DANS
L’EMBALLAGE
NOM DE PIÈCE QUANTITÉ
Accessoire De Cultivateur 1
Protecteur (Avec Boulon) 1
Clé Hexagonale 1
Manuel D’utilisation 1
ACCESSOIRE DE CULTIVATEUR — CTA9500/CTA9500-FC44
Page 45

DESCRIPTION
FAMILIARISEZ-VOUS AVEC VOTRE ACCESSOIRE DE CULTIVATEUR
(gure 1)
Pour utiliser ce produit en toute sécurité, vous devez comprendre les renseignements
gurant sur le produit et dans le présent guide d’utilisation et connaître le projet que vous
entreprenez. Avant d’utiliser ce produit, familiarisez-vous avec toutes les caractéristiques
de fonctionnement et consignes de sécurité.
1
Capuchon
Tige De L’accessoire De Cultivateur
Boîte À Engrenage
Manchon
Lame
Extérieure
Lame Intérieure
Clé Hexagonale
Protecteur
Goupille D’attelage
ACCESSOIRE DE CULTIVATEUR — CTA9500/CTA9500-FC 45
Page 46

AVERTISSEMENT :
fermement. Le protecteur doit toujours être installé sur l’outil pour protéger l’utilisateur.
N’utilisez jamais l’outil si le protecteur n’est pas xé
EMBOUT
Empêche la pénétration de saletés et de débris dans la tige lorsque l’outil n’est pas
utilisé.
PROTECTEUR
Réduit les risques de blessure causée par la projection d’objets quelconques vers
l’utilisateur et empêche tout contact avec les lames.
GOUPILLE D’ATTELAGE
Fixe les lames en place et en facilite le retrait et l’installation.
MANCHONS
Quatre manchons permettant d’empêcher ou de réduire l’entremêlement de l’herbe sur
l’arbre d’entraînement.
LAMES INTÉRIEURES
Lames en métal dotées de dents incurvées orientées dans deux directions.
LAMES EXTÉRIEURES
Lames en métal dotées de dents incurvées orientées dans la même direction.
CLÉ HEXAGONALE
Pour serrer et desserrer la vis à tête hexagonale du protecteur ou des lames.
ACCESSOIRE DE CULTIVATEUR — CTA9500/CTA9500-FC46
Page 47

ASSEMBLAGE
AVERTISSEMENT :
tentez pas d’utiliser cet article tant que ces pièces n’auront pas été remplacées. Le fait
d’utiliser cet article avec des pièces endommagées ou manquantes pourrait entraîner
des blessures graves.
AVERTISSEMENT :
accessoires qui ne sont pas recommandés pour cet article. Toute modication est
considérée comme un usage inapproprié et peut créer une situation dangereuse
susceptible d’entraîner des blessures graves.
AVERTISSEMENT :
retirez une lame ou lorsque vous en effectuez l’entretien. Faites attention à la lame et
protégez vos mains pour éviter de vous couper avec celle-ci.
AVERTISSEMENT :
avant la n de l’assemblage. Le non-respect de ces consignes pourrait provoquer des
mises en marche accidentelles ainsi que de graves blessures.
S’il y a des pièces manquantes ou endommagées, ne
Ne tentez pas de modier cet article ou de créer des
Portez toujours des gants épais lorsque vous installez ou
Ne raccordez pas le cultivateur à la tête d’alimentation
DÉBALLAGE
◾
Cet article doit être assemblé.
◾
Retirez soigneusement l’article et toutes les pièces de l’emballage. Assurez-vous
que toutes les pièces mentionnées sur la liste des pièces sont incluses.
AVERTISSEMENT :
la liste des pièces contenues dans l’emballage sont déjà assemblées sur votre
produit au moment où vous le déballez. Les pièces gurant sur cette liste n’ont pas
été assemblées au produit par le fabricant et devront être installées par le client.
L’utilisation d’un article qui pourrait avoir été mal assemblé pourrait entraîner des
blessures graves.
◾
Inspectez soigneusement le taille-bordure pour vérier qu’il n’a pas été
endommagé pendant l’expédition.
◾
Ne jetez pas le matériel d’emballage avant d’avoir inspecté soigneusement la scie
à chaîne et de l’avoir fait fonctionner de manière satisfaisante.
◾
S’il y a des pièces manquantes ou endommagées, veuillez retourner l’outil à
l’endroit où vous l’avez acheté.
N’utilisez pas ce produit si des pièces gurant sur
ACCESSOIRE DE CULTIVATEUR — CTA9500/CTA9500-FC 47
Page 48
INSTALLATION DU PROTECTEUR
AVERTISSEMENT :
protecteur avant de raccorder l’accessoire
de cultivateur à la tête d’alimentation.
1. Desserrez et retirez le boulon
du protecteur à l’aide de la clé
hexagonale fournie (gure 2).
2. Soulevez la tige de l’accessoire de
cultivateur et retirez l’embout de la
tige.
3. En alignant la fente du protecteur
avec la nervure située à l’extrémité
de la tige, insérez le protecteur dans
la tige jusqu’à ce que les trous de
vis du protecteur et de la tige soient
alignés (gures 3 et 4).
4. Utilisez la clé hexagonale fournie
pour serrer le boulon dans le sens
des aiguilles d’une montre an de
xer fermement le protecteur.
Installez le
2
3
Fente
Nervure
4
Boulon
ACCESSOIRE DE CULTIVATEUR — CTA9500/CTA9500-FC48
Page 49

RACCORDEMENT DE L’ACCESSOIRE DE CULTIVATEUR À LA TÊTE
D’ALIMENTATION
AVERTISSEMENT :
d’alimentation est en marche ou sans avoir enlevé le bloc-piles au préalable. Si vous
n’arrêtez pas le moteur et ne retirez pas le bloc-piles, vous risquez de subir de graves
blessures.
Cet accessoire de cultivateur est conçu pour être utilisé avec la tête d’alimentation EGO
PH1400/PH1400-FC.
L’accessoire de cultivateur doit être raccordé à la tête d’alimentation au moyen d’un
raccord.
1. Arrêtez le moteur et enlevez le bloc-pile.
2. Desserrez le bouton à oreilles du raccord de la tête d’alimentation.
3. Si l’embout se trouve sur la tige de l’accessoire, retirez-le et conservez-le dans
un endroit sûr pour une utilisation ultérieure. Alignez la èche de la tige du
cultivateur avec la èche du raccord (gure 5a) et insérez la tige du cultivateur
dans le raccord jusqu’à ce que vous entendiez un déclic net. Le raccord doit
être inséré jusqu’à la LIGNE ROUGE gurant sur la tige : la ligne rouge doit être
alignée sur le bord du raccord (gure 5b).
4. Tirez sur la tige de l’accessoire de cultivateur pour vérier qu’elle est fermement
emboîtée dans le raccord. Sinon, faites tourner la tige du cultivateur d’un côté
à l’autre dans le raccord jusqu’à ce que vous entendiez un déclic net indiquant
qu’elle est emboîtée.
5. Serrez fermement le bouton à oreilles.
Ne xez ou n’ajustez jamais un accessoire lorsque la tête
AVERTISSEMENT :
complètement serré avant d’utiliser l’équipement. Vériez périodiquement qu’il est bien
serré pendant l’utilisation pour éviter des blessures graves.
Assurez-vous que le bouton à oreilles du raccord est
ACCESSOIRE DE CULTIVATEUR — CTA9500/CTA9500-FC 49
Page 50

5a
Bouton À Oreilles
Ligne Rouge
Flèche De La Tige De L’accessoire
Bouton De Dégagement De La Tige
Flèche Du Raccord
5b
Ligne Rouge
RETRAIT DE L’ACCESSOIRE DE LA TÊTE D’ALIMENTATION
1. Arrêtez le moteur et enlevez le bloc-pile.
2. Desserrez le bouton à oreilles.
3. Appuyez sur le bouton de dégagement de la tige puis, en maintenant le bouton
enfoncé, tirez ou tournez la tige de l’accessoire de cultivateur hors du raccord
pour la retirer de la tête d’alimentation.
ACCESSOIRE DE CULTIVATEUR — CTA9500/CTA9500-FC50
Page 51

FONCTIONNEMENT
AVERTISSEMENT :
vigilant. Gardez en tête qu’il suft d’être négligent une fraction de seconde pour se
blesser gravement.
AVERTISSEMENT :
norme ANSI Z87.1. Sinon, vous pourriez recevoir des débris dans les yeux et vous
blesser grièvement.
AVERTISSEMENT :
recommandés par le fabricant de cet article. L’utilisation de pièces ou d’accessoires
non recommandés peut causer des blessures graves.
Même si vous connaissez parfaitement cet article, soyez
Portez toujours des lunettes de sécurité conformes à la
N’utilisez pas de pièces ni d’accessoires qui ne sont pas
UTILISATIONS
Vous pouvez utiliser ce produit pour les types de travaux indiqués ci-dessous :
◾
Aérer la terre de jardin pour préparer le lit de semences en vue de la replantation.
◾
Gratter la terre pour déraciner les mauvaises herbes ou ameublir le sol autour des
plantes an de faciliter la pénétration de l’air ou de l’eau dans le sol.
◾
Épandre la terre en surface avec du compost, des feuilles ou d’autres engrais
organiques. Le grattage permet d’ameublir la croûte à la surface du sol et de faire
pénétrer les substances nutritives ajoutées.
◾
Creuser des tranchées ou des sillons dans un sol ameubli.
REMARQUE : Pour éviter d’endommager le cultivateur ou les arbres, assurez-
vous que les lames ne se coincent pas dans de grosses racines. Évitez de creuser la
terre trop profondément, car vous pourriez endommager les racines supercielles de
certaines plantes.
UTILISATION DE L’ACCESSOIRE DE CULTIVATEUR AVEC LA TÊTE
D’ALIMENTATION
AVERTISSEMENT :
convenablement pour réduire les risques de blessures. Ne portez pas de vêtements
amples ni de bijoux. Portez des lunettes de sécurité. Portez un pantalon long et épais,
des bottes et des gants. Ne portez pas de pantalon court ni de sandales. N’utilisez pas
l’outil lorsque vous êtes pieds nus.
Tenez le cultivateur en plaçant une main sur la poignée arrière et l’autre main sur la
poignée de manœuvre avant. Tenez fermement les poignées à deux mains lorsque vous
utilisez le cultivateur. Tenez la poignée arrière à la hauteur des hanches pour assurer
votre confort lorsque vous utilisez le cultivateur.
Lorsque vous utilisez cet outil, habillez-vous
ACCESSOIRE DE CULTIVATEUR — CTA9500/CTA9500-FC 51
Page 52
Tenez fermement l’article et distribuez
votre poids sur vos deux pieds (gure 6).
Vous pouvez utiliser le cultivateur vers
l’avant ou vers l’arrière, de gauche à
droite, de droite à gauche ou dans un
mouvement circulaire. Choisissez la
meilleure méthode selon votre besoin,
qui dépendra de la forme et de la taille de
l’aire de travail ainsi que des conditions
du sol.
Le mouvement en alternance vers l’avant
et vers l’arrière est idéal pour ameublir un
sol compact.
Pour creuser des tranchées ou des sillons,
reculez lentement en tirant le cultivateur.
Répétez cette étape pour creuser des sillons plus profonds.
6
Mouvement Vers L’avant Ou
Vers L’arrière
Mouvement Circulaire
Rotation
de la lame
REMARQUE : Tirez soigneusement le cultivateur vers vous pendant qu’il creuse le
sol pour réduire votre effort et faciliter le labourage.
La projection de matériaux peut blesser gravement l’utilisateur ou un passant. An de
réduire les risques de blessure, vous devez prendre les précautions suivantes :
◾
Inspectez l’aire de travail et dégagez-la de tout objet caché qui pourrait se
coincer dans les lames ou être projeté, comme le verre, les pierres, le béton, les
ls pour clôture et les morceaux de métal. Évitez tout contact avec des corps
étrangers durs ou solides.
◾
Vériez si les lames présentent des signes de dommages de façon régulière
ou lorsqu’elles heurtent un objet dur. Ne continuez pas à utiliser une lame
endommagée.
◾
Tenez toujours le cultivateur à deux mains lorsque vous l’utilisez. Tenez
fermement les deux poignées.
◾
Déplacez le cultivateur jusqu’à l’aire de travail avant de le démarrer et mettez-le
en marche à basse vitesse.
ACCESSOIRE DE CULTIVATEUR — CTA9500/CTA9500-FC52
Page 53

Avant chaque utilisation, vériez si des pièces sont endommagées
ou usées.
Vériez les lames, le protecteur et la poignée de manœuvre avant, puis remplacez toute
pièce ssurée, déformée, tordue ou endommagée.
:
AVERTISSEMENT
retirez les lames. Faites attention aux lames et protégez vos mains pour éviter de vous
couper avec celles-ci.
Portez toujours des gants épais lorsque vous installez ou
Nettoyez le cultivateur après chaque utilisation.
Des instructions pour le nettoyage de l’appareil se trouvent à la section Entretien.
:
AVERTISSEMENT
et que le bloc-piles est retiré avant de nettoyer ou de réparer le cultivateur. Le nonrespect de cet avertissement peut occasionner des blessures graves.
Assurez-vous que les lames sont complètement arrêtées
MISE EN MARCHE ET ARRÊT DE L’OUTIL
Voir la section « DÉMARRAGE ET ARRÊT DE LA TÊTE D’ALIMENTATION » du guide
d’utilisation de la tête d’utilisation PH1400/PH1400-FC.
ACCESSOIRE DE CULTIVATEUR — CTA9500/CTA9500-FC 53
Page 54

ENTRETIEN
AVERTISSEMENT : Lors de l’entretien, utilisez seulement des pièces de
rechange identiques aux pièces d’origine. L’utilisation de toute autre pièce peut
constituer un danger ou endommager le produit. Pour en assurer la sûreté et la abilité,
toute réparation doit être effectuée par un technicien qualié.
AVERTISSEMENT : Les outils munis d’un bloc-piles n’ont pas besoin d’être
branchés sur une prise de courant. Par conséquent, ils sont toujours prêts à l’emploi.
Pour prévenir des blessures graves, prenez des précautions particulières lorsque vous
effectuez l’entretien ou des réparations, ou lorsque vous remplacez le dispositif de
coupe ou d’autres pièces.
AVERTISSEMENT : Pour prévenir les blessures graves, retirez le bloc-piles
de la tête d’alimentation et attendez que toutes les lames s’arrêtent lorsque vous
souhaitez procéder à l’entretien, au nettoyage ou au remplacement des accessoires ou
lorsque l’article n’est pas utilisé.
AVERTISSEMENT : Portez toujours des gants épais lorsque vous installez ou
retirez une lame ou lorsque vous en effectuez l’entretien. Faites attention à la lame et
protégez vos mains pour éviter de vous couper avec celle-ci.
ENTRETIEN GÉNÉRAL
Évitez d’utiliser des solvants sur les pièces en plastique. La plupart des plastiques
peuvent être endommagés par divers types de solvants commerciaux. Utilisez un linge
propre pour enlever la saleté, la poussière, l’huile, la graisse, etc.
AVERTISSEMENT : Ne laissez jamais du liquide de frein, de l’essence, des
produits à base de pétrole, etc., entrer en contact avec les pièces en plastique. Les
produits chimiques peuvent endommager, affaiblir ou détruire le plastique et entraîner
ainsi des risques de blessures graves.
AVERTISSEMENT : Lors du nettoyage de l’accessoire de cultivateur, NE
l’immergez PAS dans l’eau ou dans un autre liquide. Ne nettoyez pas votre machine à
l’aide d’une laveuse à pression. Le jet d’eau plein peut endommager les pièces de la
machine
ENTRETIEN DE LA LAME
◾
Entretenez régulièrement les lames avec de l’huile antirouille.
◾
Si vous devez remplacer une lame en raison de l’usure, remplacez les quatre
lames pour obtenir un rendement optimal
Tout entretien du cultivateur, à l’exception des éléments énumérés dans ces
instructions d’entretien, doit être effectué par un technicien autorisé.
ACCESSOIRE DE CULTIVATEUR — CTA9500/CTA9500-FC54
Page 55

REMPLACEMENT OU RÉGLAGE DES LAMES
AVERTISSEMENT : Une lame usée, ssurée ou endommagée peut se briser et
les morceaux de la lame endommagée pourraient être projetés. Les objets propulsés
peuvent causer de graves blessures. Inspectez régulièrement les lames et n’utilisez pas
le cultivateur avec une lame usée ou endommagée.
Remplacement
Le cultivateur est muni de quatre lames : deux lames internes et deux lames externes.
Pour assurer le bon fonctionnement du cultivateur, les lames doivent être installées
dans l’orientation adéquate. Les symboles R et L sont marqués sur les lames
(gures 7a et 7b).
REMARQUE : LES LAMES QUI PRÉSENTENT DES DENTS ORIENTÉES
DANS LES DEUX DIRECTIONS DOIVENT ÊTRE INSTALLÉES À
L’INTÉRIEUR, À PROXIMITÉ DE LA BOÎTE À ENGRENAGE.
7a
7b
Lame Extérieure Marquée
D’un « R »
Goupille
D’attelage
Lame Intérieure Marquée
D’un « R »
Lame Intérieure Marquée D’un « L »
Outer Blade Stamped "L"
Symbole L
Arbre D’entraînement Manchon Intérieur Manchon Extérieur
Symbole R
Goupille D’attelage
ACCESSOIRE DE CULTIVATEUR — CTA9500/CTA9500-FC 55
Page 56

1. Portez des gants.
8
2. Placez la lame intérieure, marquée
d’un « L » et dont les dents sont
orientées dans les deux directions,
à gauche de la boîte à engrenage.
Le côté marqué d’un « L » doit être
orienté vers l’extérieur
R
R
3. Placez la lame extérieure, marquée
d’un « L » et dont les dents sont
orientées dans une seule direction,
sur le même côté. Le côté marqué
9
d’un « L » doit être vers l’extérieur
et le manchon extérieur doit être
posé contre la lame intérieure.
4. Pour xer la lame à l’arbre
d’entraînement, insérez la
R
R
goupille d’attelage dans le trou de
verrouillage 1. Reportez-vous aux
gures 8, 9 et 10.
5. Tournez l’outil an que la lame
10
installée soit appuyée contre le sol.
6. Placez la lame intérieure, marquée
d’un « R » et dont les dents sont
orientées dans les deux directions,
à droite de la boîte à engrenage.
Le côté marqué d’un « R » doit être
orienté vers l’extérieur.
R
R
R
R
90°
Pliez La Goupille
D’attelage À Plat
Contre La Lame
7. Placez la lame extérieure, marquée
d’un « R » et dont les dents sont
orientées dans une seule direction, sur le même côté. Le côté marqué d’un « R »
doit être orienté vers l’extérieur et le manchon extérieur doit être posé contre la
lame intérieure.
8. Pour xer la lame à l’arbre d’entraînement, insérez la goupille d’attelage dans le
trou de verrouillage 1. Reportez-vous aux gures 8, 9 et 10.
ACCESSOIRE DE CULTIVATEUR — CTA9500/CTA9500-FC56
Page 57

AVERTISSEMENT : L’appareil ne fonctionnera pas correctement ou pourrait
constituer un danger pour l’utilisateur et les gens à proximité si les lames ne sont
pas installées correctement. Si vous remarquez un problème de fonctionnement
du cultivateur, vériez si les lames sont alignées correctement. LES LAMES QUI
PRÉSENTENT DES DENTS ORIENTÉES DANS LES DEUX DIRECTIONS DOIVENT
ÊTRE INSTALLÉES À L’INTÉRIEUR, À PROXIMITÉ DE LA BOÎTE À ENGRENAGE.
Ajustement
Lorsque vous labourez dans un
espace restreint ou entre les rangées,
vous pouvez employer le cultivateur
en installant uniquement les lames
intérieures.
Portez des gants. Retirez les deux
goupilles d’attelage pour retirer les deux
lames externes (gure 11), puis insérez
les goupilles d’attelage dans les trous de
verrouillage 2 (gures 12 et 13).
REMARQUE : Ne forcez pas
l’installation ou le retrait des lames de
l’arbre d’entraînement. Si vous éprouvez
des difcultés à retirer les lames,
appliquez de l’huile pénétrante sur l’arbre.
Lorsque vous installez à nouveau les
lames, assurez de nettoyer et d’huiler
l’arbre d’entraînement et les lames.
11
12
13
R
R
R
R
Trou De
Verrouillage 1
Trou De Verrouillage 2
ACCESSOIRE DE CULTIVATEUR — CTA9500/CTA9500-FC 57
Page 58

NETTOYAGE DE L’APPAREIL
Des parties de plantes, comme les racines, peuvent s’enrouler fermement autour ou
entre les lames en rotation pendant l’utilisation. Pour nettoyer les lames :
◾
Retirez le bloc-piles.
◾
Portez des gants. Nettoyez les morceaux de racines, de terre ou de plantes sur la
lame, le protecteur ou la boîte à engrenage. Pour un nettoyage complet, retirez
les lames et le protecteur et lavez-les soigneusement. Pour connaître les étapes
de remplacement détaillées, veuillez consulter la section « REMPLACEMENT OU
RÉGLAGE DES LAMES » ci-dessus.
◾
Nettoyez la surface de l’outil à l’aide d’un linge propre humecté d’une solution
légèrement savonneuse. Assurez-vous que les évents d’aération ne sont jamais
obstrués.
RANGEMENT DE L’APPAREIL
◾
Retirez le bloc-piles de l’outil.
◾
Portez des gants épais pour nettoyer soigneusement l’outil et inspecter les lames.
◾
Retirez l’accessoire de cultivateur de la tête d’alimentation, puis couvrez l’arbre
d’accessoire d’un embout pour éviter que de la terre s’inltre dans le raccord.
◾
Rangez l’outil dans un endroit sec, bien aéré, surélevé ou verrouillé, et hors de
portée des enfants. Ne rangez pas l’appareil sur des engrais, de l’essence ou
d’autres produits chimiques, ni à proximité de ces produits.
ACCESSOIRE DE CULTIVATEUR — CTA9500/CTA9500-FC58
Page 59

DÉPANNAGE
PROBLÈME CAUSE SOLUTION
Le cultivateur ne
démarre pas.
Le bloc-piles n’est pas
installé correctement
dans la tête
d’alimentation.
Installez le bloc-piles sur
la tête d’alimentation.
Il n’y a pas de contact
électrique entre la tête
d’alimentation et le
bloc-piles.
Le bloc-piles est
déchargé.
Le levier de blocage
et la gâchette ne
sont pas enclenchés
simultanément.
Retirez le bloc-piles,
vériez les contacts
électriques, puis
réinstallez le bloc-piles
an qu’il s’enclenche.
Chargez le bloc-piles avec
un chargeur EGO indiqué
dans ce guide.
Maintenez le levier de
blocage enfoncé lorsque
vous appuyez sur la
gâchette pour démarrer
l’appareil.
ACCESSOIRE DE CULTIVATEUR — CTA9500/CTA9500-FC 59
Page 60

PROBLÈME CAUSE SOLUTION
Le cultivateur s’arrête
lors du labourage.
Le moteur est
surchargé
Le moteur fonctionnera
de nouveau sans
problème lorsque la cause
de la surcharge sera
éliminée. Pour assurer un
fonctionnement continu,
réduisez la charge sur
le cultivateur et évitez le
labourage en profondeur.
Effectuez plutôt des
coupes de plus en plus
profondes.
Le bloc-piles ou la tête
d’alimentation est trop
chaud.
Les lames sont
bloquées.
La batterie est
déconnectée de l'outil.
Le bloc-piles est
déchargé
Laissez le bloc-piles et
la tête d’alimentation
refroidir; leur température
doit être inférieure à
67 °C (152 °F).
Retirez le bloc-piles de la
tête d’alimentation, faites
pivoter manuellement
les lames dans un
mouvement de va-et-vient
an de retirer les pierres
et d’autres obstacles
entre les lames ou entre
les lames et la boîte à
engrenage.
Réinstallez le bloc-pile.
Chargez le bloc-piles avec
un chargeur EGO indiqué
dans ce guide
ACCESSOIRE DE CULTIVATEUR — CTA9500/CTA9500-FC60
Page 61

GARANTIE
POLITIQUE D’EGO EN MATIÈRE DE GARANTIE
Garantie limitée de 5 ans sur les équipements d’alimentation électrique d’extérieur
EGO POWER+ et les équipements d’alimentation électrique portable pour un usage
personnel et domestique.
Garantie limitée de 3 ans sur les blocs-piles et chargeurs du système EGO POWER+
pour un usage personnel et domestique.
Garantie limitée de 2 ans/1 an sur les équipements d’alimentation électrique
d’extérieur, les équipements d’alimentation électrique portables, les blocs-piles et les
chargeurs EGO pour un usage professionnel et commercial.
La durée et les détails de la garantie de chaque produit sont indiqués en ligne à
l’adresse http://egopowerplus.com/pages/warranty-policy.
Veuillez communiquer avec le service à la clientèle d’EGO au 1855EGO-5656
(numéro sans frais) pour toute question sur les réclamations au titre de la garantie.
GARANTIE LIMITÉE
Les produits EGO sont garantis contre tout défaut de matériel ou de fabrication à
compter de la date d’achat d’origine pour la période de garantie applicable. Les
produits défectueux recevront une réparation gratuite.
a) Cette garantie s’applique uniquement à l’acheteur initial s’étant procuré le produit chez
un détaillant EGO autorisé et est non transférable. La liste des détaillants EGO autorisés
est publiée en ligne sur le site http://egopowerplus.com/pages/warranty-policy.
b) La période de garantie pour les produits remis en état ou certiés par l’usine
utilisés à des ns résidentielles est de 1 an, et de 90 jours lorsqu’ils sont utilisés
à des ns industrielles, professionnelles ou commerciales.
c) La période de garantie pour les pièces d’entretien régulier, y compris, sans s’y
limiter, les lames, les têtes de taille-bordure, les guides-chaînes, les chaînes de
scie, les courroies, les barres de raclage, les buses de soufeur, ainsi que tous
les autres accessoires EGO, est de 90 jours lorsqu’elles sont utilisées à des ns
résidentielles et de 30 jours lorsqu’elles sont utilisées à des ns industrielles,
professionnelles ou commerciales. Ces pièces sont couvertes contre les défauts
de fabrication pour une période de 90 jours ou de 30 jours si elles sont utilisées
dans des conditions de travail normales.
ACCESSOIRE DE CULTIVATEUR — CTA9500/CTA9500-FC 61
Page 62

d) La présente garantie n’est pas valide si le produit a été utilisé aux ns de location.
e) La présente garantie ne couvre pas les dommages résultant d’une modication,
d’une altération ou d’une réparation non autorisée.
f) Cette garantie couvre uniquement les défauts survenant dans des conditions
normales d’utilisation et ne couvre aucun dysfonctionnement ou défaut ni
aucune défaillance découlant d’un usage inapproprié ou abusif (notamment la
surcharge du produit et son immersion dans l’eau ou dans tout autre liquide),
d’un accident, d’une négligence, d’une installation inadéquate et de tout entretien
ou entreposage inadéquat.
g) La présente garantie ne couvre pas la détérioration normale du ni extérieur,
notamment les rayures, les bosselures, les craquelures de la peinture ou toute
corrosion ou décoloration résultant de la chaleur, de produits abrasifs ou de
nettoyants chimiques.
RÉCLAMATION AU TITRE DE LA GARANTIE
Pour faire une réclamation au titre de la garantie, veuillez communiquer avec le service
à la clientèle d’EGO au 1 855 EGO-5656 (numéro sans frais). Lorsque vous faites une
réclamation au titre de la garantie, vous devez présenter le reçu de vente original. Un
centre de service autorisé sera sélectionné pour la réparation du produit conformément
aux conditions de garantie prescrites. Il se peut qu’un petit dépôt soit exigé lorsque
vous laissez votre outil dans un centre de service autorisé. Ce dépôt est remboursable
lorsque le service de réparation est considéré comme étant couvert par la garantie.
RESTRICTIONS SUPPLÉMENTAIRES
Dans la mesure permise par la loi en vigueur, toutes les garanties implicites, y compris
les garanties de QUALITÉ MARCHANDE ou D’ADÉQUATION À UN USAGE PARTICULIER,
sont exclues. Toute garantie implicite, y compris la garantie de qualité marchande ou
d’adéquation à un usage particulier, qui ne peut être rejetée en vertu de la loi de l’État ou de
la province est limitée à la période de garantie applicable dénie au début de cet article.
ChervonNorthAmerica n’est pas responsable des dommages accessoires, consécutifs,
indirects ou directs.
Certaines provinces n’autorisent pas les restrictions de durée de garantie implicite, ou
l’exclusion ou la restriction des dommages consécutifs et accessoires; c’est pourquoi
les restrictions ci-dessus peuvent ne pas s’appliquer à votre cas.
Cette garantie vous confère des droits précis. Il est possible que vous disposiez
également d’autres droits, qui varient d’une province à l’autre.
Pour communiquer avec le service à la clientèle, veuillez composer le numéro sans
frais suivant: 1855EGO-5656 ou consulter le siteWeb EGOPOWERPLUS.COM.
EGO Customer Service, 769 SEWARD AVE NW / Suite 102 Grand Rapids, MI 49504, États-Unis.
ACCESSOIRE DE CULTIVATEUR — CTA9500/CTA9500-FC62
Page 63

PARA USO EXCLUSIVO CON EL
CABEZAL ELÉCTRICO EGO POWER+
PH1400/PH1400-FC
MANUAL DEL OPERADOR
ACCESORIO PARA LA CULTIVADORA
MODELO NÚMERO CTA9500/CTA9500-FC
ADVERTENCIA: para reducir el riesgo de lesiones, el usuario debe leer y comprender
el Manual del usuario antes de usar este producto. Guarde estas instrucciones para
consultarlas en el futuro.
Page 64

ÍNDICE
Símbolos de seguridad ...................................66
Instrucciones de seguridad .............................67-74
Introducción ............................................75
Especicaciones ........................................75
Lista de empaque .......................................75
Descripción ......................................... 76-77
Ensamblaje .........................................78-81
Funcionamiento ...................................... 82-84
Mantenimiento .......................................85-89
Solución de problemas ................................ 90-91
Garantía ............................................92-94
ACCESORIO PARA LA CULTIVADORA — CTA9500/CTA9500-FC64
Page 65

¡LEA TODAS LAS INSTRUCCIONES!
LEA Y COMPRENDA EL
MANUAL DEL USUARIO
:
ADVERTENCIA
taladrado y otras actividades de construcción, contiene sustancias químicas que el
estado de California reconoce como causantes de cáncer, defectos congénitos u otros
daños al sistema reproductor. Algunos ejemplos de estas sustancias químicas son los
siguientes:
◾
Plomo de pinturas a base de plomo;
◾
Sílice cristalina de ladrillos, cemento y otros productos de mampostería; y
◾
Arsénico y cromo de madera tratada químicamente.
El riesgo de sufrir estas exposiciones varía según la frecuencia con que realice este
tipo de trabajo. Medidas para reducir la exposición a estos químicos: trabaje en un
lugar bien ventilado y con equipos de seguridad aprobados, como las mascarillas
antipolvo que están diseñadas especialmente para ltrar partículas microscópicas.
Parte del polvo producto del lijado, aserrado, esmerilado,
ACCESORIO PARA LA CULTIVADORA — CTA9500/CTA9500-FC
65
Page 66

SÍMBOLOS DE SEGURIDAD
El propósito de los símbolos de seguridad es alertarlo sobre posibles peligros. Los
símbolos de seguridad y sus explicaciones merecen una atención y comprensión
minuciosas. Las advertencias de los símbolos, por sí mismas, no eliminan los peligros.
Las instrucciones y las advertencias no sustituyen las medidas de prevención de
accidentes que correspondan.
:
ADVERTENCIA
comprender todas las instrucciones de seguridad en este Manual del usuario, incluidos
todos los símbolos de alerta de seguridad como “PELIGRO”, “ADVERTENCIA” y
“PRECAUCIÓN”. No seguir todas las instrucciones que se indican a continuación podría
resultar en descargas eléctricas, incendios y/o lesiones personales graves.
SIGNIFICADO DE LOS SÍMBOLOS
SÍMBOLO DE ALERTA DE SEGURIDAD
PRECAUCIÓN. Puede aparecer junto con otros símbolos o pictografías.
hacer que algunos objetos extraños golpeen los ojos y cause heridas
graves. Antes de comenzar a operar una herramienta eléctrica, use
siempre gafas protectoras o gafas de seguridad con blindaje lateral y un
protector facial si es necesario. Le recomendamos usar una máscara de
seguridad de visión amplia sobre anteojos o gafas de seguridad estándar con
protección lateral. Use siempre lentes de protección con la marca de cumplimiento de
la norma ANSI Z87.1.
Antes de utilizar esta herramienta, asegúrese de leer y
:
Indica PELIGRO, ADVERTENCIA O
!
¡ADVERTENCIA
La utilización de herramientas eléctricas puede
ACCESORIO PARA LA CULTIVADORA — CTA9500/CTA9500-FC66
Page 67

INSTRUCCIONES DE SEGURIDAD
Esta página muestra y describe los símbolos de seguridad que pueden aparecer en
este producto. Lea, comprenda y siga todas las instrucciones de la máquina antes de
ensamblarla y utilizarla.
Alerta de
seguridad
Lea y comprenda
el Manual del
usuario
Use lentes de
protección
Use guantes de
protección
Rebote
Mantenga las
manos y los pies
alejados
Indica que existe el riesgo de que se produzcan
lesiones personales.
Para reducir el riesgo de lesiones, el usuario debe
leer y comprender el Manual del operador antes
de utilizar este producto.
Cuando utilice este producto, siempre use gafas
o lentes de seguridad con protecciones laterales.
Use guantes para proteger las manos cuando
manipule las cuchillas. Los guantes para trabajo
pesado antideslizantes mejoran el agarre y
protegen las manos.
Los objetos que lanza la máquina pueden rebotar
y producir lesiones personales o daños a la
propiedad.
Nunca intente utilizar este producto con una
mano. Si pierde el control de este producto puede
sufrir lesiones graves o mortales. Para reducir
el riesgo de sufrir lesiones por corte, mantenga
las manos y los pies alejados de las cuchillas
giratorias. Nunca toque las cuchillas giratorios
con la mano o con ninguna otra parte del cuerpo.
ACCESORIO PARA LA CULTIVADORA — CTA9500/CTA9500-FC
67
Page 68

Para reducir el riesgo de sufrir una descarga
eléctrica, asegúrese de que no hayan cables de
Peligro: riesgo
de descarga
eléctrica
alimentación enterrados que puedan transmitir
corriente eléctrica y que puedan entrar en
contacto con la herramienta de trabajo. Si se
dañan los cables con la herramienta puede
provocar descargas eléctricas y causar lesiones
graves o mortales.
Este producto utiliza baterías de iones de litio.
Las leyes locales, estatales o federales podrían
Símbolos de
reciclaje
prohibir la eliminación de baterías en basureros
comunes. Consulte con la autoridad reguladora
de desechos local para obtener información
sobre las opciones de reciclaje o eliminación
disponibles.
Grado de
IPX4
protección de
Protección contra las salpicaduras
admisión
V Voltio Voltaje
mm Milímetro Largo o tamaño
in. Pulgada Largo o tamaño
kg Kilogramo Peso
lb Libra Peso
ACCESORIO PARA LA CULTIVADORA — CTA9500/CTA9500-FC68
Page 69

ADVERTENCIAS GENERALES DE SEGURIDAD PARA EL MANEJO DE
HERRAMIENTAS ELÉCTRICAS QUE FUNCIONAN A BATERÍA
ADVERTENCIA
instrucciones, las imágenes y las especicaciones que se incluyen con
esta herramienta eléctrica. No seguir todas las instrucciones que se detallan a
continuación podría provocar descargas eléctricas, incendios o lesiones graves.
Guarde todas las advertencias e instrucciones en caso de que necesite
consultarlas en el futuro.
lea todas las advertencias de seguridad, las
SEGURIDAD EN EL ÁREA DE TRABAJO
◾
Mantenga el área de trabajo limpia y bien iluminada. Las áreas
desordenadas u oscuras aumentan las posibilidades de sufrir accidentes.
◾
No utilice herramientas eléctricas en atmósferas en las que exista riesgo
de explosión, como en presencia de líquidos inamables, gases o polvo.
Las herramientas eléctricas producen chispas que podrían encender el polvo o
humo.
◾
Mantenga a los niños y a las personas que se encuentran cerca alejados
mientras utiliza una herramienta eléctrica. Las distracciones pueden
provocar que pierda el control.
SEGURIDAD PERSONAL
◾
Manténgase alerta, preste atención a lo que hace y utilice el sentido
común cuando utilice una herramienta eléctrica. No utilice una
herramienta eléctrica si está cansado o bajo los efectos de drogas,
alcohol o medicamentos. Un momento de desatención mientras opera
herramientas eléctricas puede provocar lesiones personales graves.
◾
Siempre use un equipo de protección personal. Los equipos de protección
personal, como lentes de protección, mascarillas antipolvo, zapatos de seguridad
antideslizantes, cascos protectores o auriculares de seguridad, utilizados para
condiciones adecuadas, disminuyen las lesiones personales.
◾
Evite un arranque accidental. Asegúrese de que el interruptor esté en la
posición de apagado antes de conectar el paquete de baterías, levantar
o transportar la herramienta. Transportar herramientas eléctricas con el dedo
en el interruptor o enchufar herramientas eléctricas que tienen el interruptor
encendido aumenta las posibilidades de accidentes.
ACCESORIO PARA LA CULTIVADORA — CTA9500/CTA9500-FC
69
Page 70

◾
Antes de encender la herramienta eléctrica, retire todas las llaves de
ajuste o las llaves inglesas. Si se deja una llave inglesa o una llave conectada
a una pieza en movimiento de la herramienta eléctrica, se pueden producir
lesiones personales.
◾
No se extienda demasiado. Mantenga una postura y un equilibrio
adecuados en todo momento. Esto permite controlar mejor la herramienta
eléctrica ante situaciones inesperadas.
◾
Use ropa adecuada. No use ropa holgada ni joyas. Mantenga el cabello y la
ropa alejados de las piezas en movimiento. La ropa holgada, las joyas o el cabello
largo pueden quedar atrapados en las piezas en movimiento.
◾
Si se proporcionan dispositivos para la conexión de instalaciones de
extracción y recolección de polvo, asegúrese de que se conecten y se
usen de manera adecuada. Utilizar un sistema de recolección de polvo puede
disminuir los peligros relacionados con el polvo.
◾
No permita que la familiaridad que obtiene por el uso frecuente de
las herramientas provoque que no tenga en cuenta los principios de
seguridad a la hora de manejar las herramientas. Un descuido puede
ocasionar una lesión grave en cuestión de segundos.
USO Y CUIDADO DE LAS HERRAMIENTAS ELÉCTRICAS
◾
No fuerce la herramienta eléctrica. Utilice la herramienta eléctrica
adecuada para su tarea. Si utiliza la herramienta eléctrica adecuada podrá
realizar un trabajo más seguro y de mejor calidad al ritmo de trabajo para el que
se diseñó.
◾
No utilice la herramienta eléctrica si no se enciende o apaga con el
interruptor. Cualquier herramienta eléctrica que no se pueda controlar con el
interruptor es peligrosa y se debe reparar.
◾
Retire el paquete de baterías de la herramienta eléctrica, si es posible,
o active cualquier dispositivo de desactivación de la batería antes de
limpiar material atascado, realizar cualquier ajuste, cambiar accesorios,
limpiar o almacenar herramientas eléctricas. Este tipo de medidas de
seguridad preventivas permiten reducir el riesgo de que la herramienta eléctrica
se encienda de manera accidental.
◾
Almacene las herramientas eléctricas que no estén en uso fuera del
alcance de los niños y no permita que las personas que no conozcan
cómo usar la herramienta o estas instrucciones la utilicen. Las
herramientas eléctricas son peligrosas en manos de usuarios no calicados.
ACCESORIO PARA LA CULTIVADORA — CTA9500/CTA9500-FC70
Page 71

◾
Realice mantenimiento a las herramientas eléctricas y a los accesorios.
Verique si hay piezas móviles desalineadas, torcidas, rotas y si existe
cualquier otra condición que pueda afectar el funcionamiento de la
herramienta eléctrica. Si se daña la herramienta eléctrica, pídale a
alguien que la repare antes de usarla. Muchos accidentes son producto del
mantenimiento incorrecto de las herramientas eléctricas y los accesorios.
◾
Mantenga las herramientas de corte aladas y limpias. Las herramientas
de corte que se mantienen de manera adecuada, con los bordes de corte alados,
tienen menos posibilidades de trabarse y son más fáciles de controlar.
◾
Use la herramienta eléctrica, los accesorios, las brocas, etc. de acuerdo
con estas instrucciones; tenga en cuenta las condiciones laborales y el
trabajo que desea realizar. Si usa la herramienta eléctrica en operaciones para
las que no fue diseñada podría generar una situación de peligro.
◾
Mantenga las manijas y las supercies de agarre secas, limpias y sin
aceite ni grasa. Los mangos y las supercies de agarre húmedos podrían
causar una manipulación insegura o pérdida del control de la herramienta.
◾
Mantenga los cables alejados del área de trabajo de la herramienta.
Durante su funcionamiento, es posible que los cables permanezcan ocultos y la
herramienta los dañe por accidente.
USO Y CUIDADO DE LA HERRAMIENTA A BATERÍA
◾
Use solo el cargador que indica el fabricante para recargar la batería. Si
se utiliza un cargador que es adecuado para un tipo de paquete de baterías con
otro paquete de baterías puede generar un riesgo de incendio. Use solamente los
paquetes de baterías y los cargadores que se indican a continuación.
PAQUETE DE BATERÍAS CARGADOR
BA1120, BA1120-FC, BA1400, BA1400-FC,
BA2240, BA2240-FC, BA2800, BA2800-FC,
BA4200, BA4200-FC, BA1400T, BA1400T-FC,
BA2800T, BA2800T-FC, BA4200T, BA4200T-FC
◾
Use las herramientas eléctricas solo con los paquetes de baterías
designados especícamente para estas. Si usa cualquier otro paquete de
baterías puede provocar una lesión o un incendio.
CH2100, CH2100-FC,
CH5500, CH5500-FC
ACCESORIO PARA LA CULTIVADORA — CTA9500/CTA9500-FC
71
Page 72

◾
Cuando el paquete de baterías no esté en uso, aléjelo de objetos
metálicos, como sujetapapeles, monedas, llaves, clavos, tornillos u otros
objetos metálicos pequeños que pudieran crear una conexión entre
los terminales. Es posible que conectar los terminales de la batería entre sí
produzca quemaduras o un incendio.
◾
En condiciones de maltrato, es posible que salga líquido de la batería.
Evite mantener contacto. Si se produce un contacto accidental, enjuague
con agua. Si el líquido entra en contacto con los ojos, solicite atención
médica adicional. El líquido que sale de la batería puede provocar irritación o
quemaduras.
◾
No utilice un paquete de baterías ni una herramienta si están dañadas
o modicadas. Las baterías dañadas o modicadas pueden presentar un
comportamiento impredecible que podría provocar incendios, explosiones o
riesgo de lesiones.
◾
No exponga el paquete de baterías ni la herramienta al fuego o a una
temperatura excesiva. La exposición al fuego o a las temperaturas superiores
a 100 °C (212 °F) puede provocar una explosión.
◾
Siga todas las instrucciones de carga y no cargue el paquete de baterías
ni las herramientas fuera del rango de temperatura que se especica en
las instrucciones. Si carga la batería de forma inadecuada o a temperaturas
fuera del rango especicado podría dañar la batería y aumentar el riesgo de
incendio.
REPARACIÓN
◾
Solo una persona capacitada puede reparar la herramienta eléctrica,
únicamente mediante el uso de piezas de repuesto idénticas. De esta
forma se podrá garantizar la seguridad de la herramienta eléctrica.
◾
Nunca realice mantenimiento a los paquetes de batería. Solo el fabricante
o los proveedores de servicio autorizados pueden realizar el mantenimiento de los
paquetes de baterías.
INSTRUCCIONES DE SEGURIDAD PARA LA CULTIVADORA
◾
Mantenga las manos lejos de las cuchillas.
◾
No use el producto cerca de cables eléctricos subterráneos, teléfonos, líneas,
tuberías o mangueras. Si tiene dudas, póngase en contacto con su compañía de
servicios o telefónica para ubicar los servicios subterráneos.
ACCESORIO PARA LA CULTIVADORA — CTA9500/CTA9500-FC72
Page 73

◾
Manténgase completamente alejado de las cuchillas giratorias ya que pueden
provocar lesiones graves.
◾
Tenga mucho cuidado al invertir o jalar la máquina hacia usted.
◾
Si la cultivadora comienza a vibrar de manera anormal o comienza a hacer
ruidos, detenga el motor y busque la causa de inmediato. Por lo general, los
ruidos anormales advierten acerca de un problema.
◾
Mantenga los sujetadores ajustados para asegurarse de que la cultivadora se
encuentre en una condición de trabajo segura.
◾
Antes de usar la herramienta, verique que los pasadores de enganche estén
completamente insertados en el eje de la cuchilla.
◾
No utilice un equipo electromecánico si se cayó o está dañado. Lleve el producto
al distribuidor de servicio autorizado más cercano para que realicen una
inspección y reparación.
◾
Antes de usar el producto, asegúrese de que todos los protectores adecuados y
otros dispositivos de seguridad estén asegurados de manera correcta.
◾
Sea muy cuidadoso al momento de arar un terreno duro. Las cuchillas se podrían
atascar en el suelo e impulsar la cultivadora hacia adelante.
◾
No intente arar muy profundo a un ritmo muy rápido, ya que puede sobrecargar la
capacidad de la máquina.
◾
Inspeccione el área donde se utilizará la herramienta y retire todos los objetos
extraños que encuentre.
◾
No cargue el paquete de baterías en un lugar húmedo o mojado.
◾
No incinere la batería. Las celdas pueden explotar. Consulte los códigos
locales para obtener instrucciones especiales sobre cómo eliminar las baterías.
◾
No abra ni mutile la batería. Los electrolitos liberados son corrosivos y pueden
causar daños en los ojos o la piel. Pueden ser tóxicos si se ingieren.
◾
Las herramientas que funcionan a batería no se deben enchufar en
un tomacorriente; por lo tanto, siempre están en condiciones de
funcionamiento. Tenga en cuenta los posibles peligros incluso cuando no
use la herramienta. Tenga cuidado cuando lleve a cabo la reparación o el
mantenimiento.
◾
No lave la herramienta con una manguera; evite que ingrese agua al
motor y a las conexiones eléctricas.
ACCESORIO PARA LA CULTIVADORA — CTA9500/CTA9500-FC
73
Page 74

◾
Si se presenta alguna situación que no aparece en este manual, tenga
cuidado y aplique su criterio. Comuníquese con el Departamento de
Servicio al Cliente de EGO para obtener ayuda.
◾
GUARDE ESTAS INSTRUCCIONES. Consúltelas de manera periódica y utilícelas
para capacitar a otras personas que puedan utilizar esta herramienta. Si le presta
la herramienta a otra persona, proporciónele también estas instrucciones para
evitar que utilice el producto de forma incorrecta y que se produzcan posibles
lesiones.
NOTA: CONSULTE EL MANUAL DEL OPERADOR PARA LOS
CABEZALES ELÉCTRICOS PARA OBTENER INFORMACIÓN ADICIONAL
Y ESPECÍFICA SOBRE LAS NORMAS DE SEGURIDAD.
ACCESORIO PARA LA CULTIVADORA — CTA9500/CTA9500-FC74
Page 75

INTRODUCCIÓN
Felicitaciones por elegir el cabezal motor EGO de iones de litio de 56 voltios. Este
está pensado, diseñado y fabricado para brindarle el mejor rendimiento y la mejor
conabilidad posibles.
En caso de que tuviera algún problema que no pudiera resolver fácilmente, póngase en
contacto con el Centro de Servicio al Cliente de EGO al 1-855-EGO-5656.
NÚMERO DE SERIE ____________________ FECHA DE COMPRA __________________
DEBE ANOTAR EL NÚMERO DE SERIE Y LA FECHA DE COMPRA Y CONSERVARLOS EN UN
LUGAR SEGURO PARA CONSULTARLOS EN EL FUTURO.
ESPECIFICACIONES
Tamaño De Cuchilla 215 mm (8-1/2")
Profundidad Del Arado 215 mm (8-1/2")
Ancho Del Arado 240 mm (9-1/2")
Temperatura De Funcionamiento 0°C a 40°C (32°F a 104°F)
Temperatura De Almacenaje -4 °F a 158 °F (-20 °C a 70 °C)
Peso (Incluido El Protector) 3,9 kg (8,6 lbs.)
LISTA DE EMPAQUE
NOMBRE DE LA PIEZA CANTIDAD
Accesorio Para La Cultivadora 1
Protector (Con Perno) 1
Llave Hexagonal 1
Manual Del Operador 1
ACCESORIO PARA LA CULTIVADORA — CTA9500/CTA9500-FC
75
Page 76

DESCRIPCIÓN
CONOZCA EL ACCESORIO PARA LA CULTIVADORA (Fig. 1)
Para usar este producto de manera segura, debe comprender la información que se
presenta junto con la herramienta y en el manual del operador; también debe tener
conocimiento sobre el proyecto que intenta llevar a cabo. Antes de usar este producto,
debe conocer todas las características de funcionamiento y las normas de seguridad.
1
Tapa De Extremo
Mango Del Accesorio Para La Cultivadora
Caja De Velocidades
Manguito
Llave Hexagonal
Cuchilla
Exterior
Cuchilla Interior
ACCESORIO PARA LA CULTIVADORA — CTA9500/CTA9500-FC76
Protector
Pasador De Enganche
Page 77

ADVERTENCIA:
rmemente en su lugar. El protector siempre debe estar en la herramienta para
proteger al usuario.
nunca utilice la herramienta sin antes colocar el protector
TAPA DEL EXTREMO
Cuando no utilice la herramienta, esta pieza evita que ingrese polvo y desechos a
través del mango.
PROTECTOR
Reduce el riesgo de sufrir lesiones provocadas por los objetos extraños que lanza la
herramienta hacia atrás en dirección al operador y el riesgo provocado por mantener
contacto con las cuchillas.
PASADOR DE ENGANCHE
Permite asegurar las cuchillas y simplica el proceso de retiro e instalación de las
cuchillas.
MANGUITOS
Los cuatro manguitos ayudan a prevenir o reducir la cantidad de césped que se
entrelaza en el eje motor.
CUCHILLAS INTERIORES
Cuchillas de metal con dientes curvos que apuntan en dos direcciones.
CUCHILLAS EXTERIORES
Cuchillas de metal con dientes curvos que apuntan a la misma dirección.
LLAVE HEXAGONAL
Se utiliza para bloquear o desbloquear el tornillo hexagonal del protector o de las
cuchillas.
ACCESORIO PARA LA CULTIVADORA — CTA9500/CTA9500-FC
77
Page 78
ENSAMBLAJE
ADVERTENCIA:
hasta que las reemplace. Usar este producto con piezas dañadas o faltantes podría
provocar lesiones personales graves.
ADVERTENCIA:
sean recomendados para utilizar con este producto. Cualquier alteración o modicación
se considera un uso inapropiado y podría generar una condición peligrosa y provocar
lesiones personales graves.
ADVERTENCIA:
retire la cuchilla o cuando lleve a cabo el mantenimiento de la cuchilla. Tenga cuidado
con la cuchilla y proteja sus manos para evitar que se produzcan lesiones.
ADVERTENCIA:
el ensamblaje. De lo contrario, puede producirse un arranque accidental de la
herramienta, lo que puede provocar lesiones graves.
si hay piezas dañadas o faltan piezas, no utilice el producto
No intente modicar este producto ni crear accesorios que no
siempre use guantes para trabajo pesado cuando instale o
no conecte la cultivadora al cabezal eléctrico hasta nalizar
RETIRO DEL EMPAQUE
◾
Este producto requiere de ensamblado.
◾
Retire el producto y los accesorios de la caja cuidadosamente. Asegúrese de que
estén incluidos todos los elementos que guran en la lista de empaque.
ADVERTENCIA:
ya cuenta con algunas piezas de la lista de empaque ensambladas, no lo use. El
fabricante no vende el producto con las piezas de la lista ensambladas; el cliente debe
ensamblarlas. Si se usa un producto con piezas ensambladas de manera incorrecta, se
pueden producir lesiones personales graves.
◾
Inspeccione la herramienta con cuidado para asegurarse de que no se produjo
ninguna ruptura o daño durante el envío.
◾
No deseche el material de embalaje hasta que haya inspeccionado con cuidado y
haya utilizado la herramienta de manera satisfactoria.
◾
Si hay piezas faltantes o dañadas, devuelva este producto al lugar donde lo
compró.
si, luego de retirar el producto del empaque, nota que
ACCESORIO PARA LA CULTIVADORA — CTA9500/CTA9500-FC78
Page 79

MONTAJE DEL PROTECTOR
ADVERTENCIA:
cultivadora al cabezal eléctrico.
1. Con la llave hexagonal que se suministra, aoje y retire el perno del protector
(Fig. 2).
2. Levante el mango del accesorio para la cultivadora y retire la tapa del extremo del
mango.
3. Una vez que la ranura del protector esté alineada con el borde del extremo del
mango, pase el protector a través del mango hasta que los oricios para tornillos
que se encuentran en el protector y en el mango estén alineados (Fig. 3 y 4).
4. Utilice la llave hexagonal que se suministra para ajustar el perno en dirección de
las manecillas del reloj para asegurar el protector.
coloque el protector antes de conectar el accesorio de la
ACCESORIO PARA LA CULTIVADORA — CTA9500/CTA9500-FC
79
Page 80

CÓMO CONECTAR EL ACCESORIO
DE LA CULTIVADORA AL
CABEZAL ELÉCTRICO
2
ADVERTENCIA:
ni ajuste ningún accesorio si el cabezal
eléctrico está funcionando o con la batería
instalada. El no detener el motor y el
retirar la batería puede ocasionar lesiones
personales graves.
Este accesorio de la cultivadora está
diseñado para utilizarse con el cabezal
eléctrico EGO PH1400/PH1400-FC.
El accesorio de la cultivadora se conecta
al cabezal eléctrico por medio del
dispositivo acoplador.
1. Detenga el motor y retire el paquete
de baterías.
2. Aoje la perilla mariposa del
acoplador del cabezal eléctrico.
3. Si la tapa del extremo se encuentra
en el mango del accesorio, retírela
y colóquela en un lugar seguro para
utilizarla después. Alinee la echa
que se encuentra en el mango de
la cultivadora con la echa en el
acoplador (Fig. 5a) y presione el
mango de la cultivadora contra el
acoplador hasta escuchar un "CLIC". El acoplador se debe colocar por completa
hasta la etiqueta LÍNEA ROJA que se encuentra en el mango: la marca de línea
roja debe estar al ras con el borde del acoplador (Fig. 5b).
Nunca coloque
3
Borde
4
Perno
Ranura
4. Jale el mango del accesorio de la cultivadora para vericar que esté asegurado
con rmeza en el acoplador. Si no lo está, gire el mango de la cultivadora de lado
a lado en el acoplador hasta escuchar un "CLIC" que indique que se enganchó.
5. Ajuste rmemente la perilla mariposa.
ACCESORIO PARA LA CULTIVADORA — CTA9500/CTA9500-FC80
Page 81
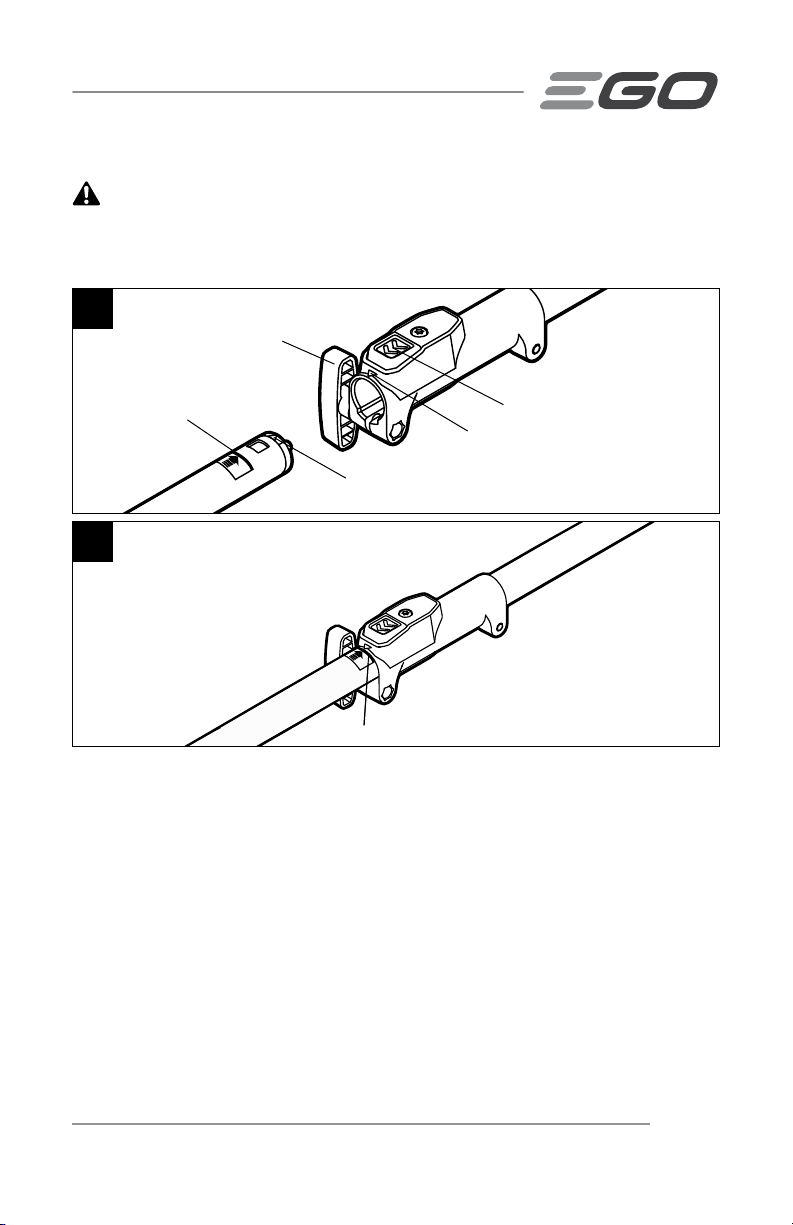
ADVERTENCIA:
completamente ajustada antes de utilizar el equipo y verique de manera periódica que
esté bien asegurada con el n de evitar que se produzcan daños personales graves.
asegúrese de que la perilla mariposa en el acoplador esté
5a
Perilla Mariposa
Línea Roja
Flecha En El Mango Del Accesorio
Botón De Liberación Del Mango
Flecha En El Acoplador
5b
Línea Roja
CÓMO RETIRAR EL ACCESORIO DEL CABEZAL ELÉCTRICO
1. Detenga el motor y retire el paquete de baterías.
2. Aoje la perilla mariposa.
3. Presione el botón de liberación del mango y, sin presionar el botón, jale o gire el
mango del accesorio de la cultivadora del acoplador para separarlo del cabezal
eléctrico.
ACCESORIO PARA LA CULTIVADORA — CTA9500/CTA9500-FC
81
Page 82

FUNCIONAMIENTO
ADVERTENCIA:
producto. Recuerde que un descuido de una fracción de segundo es suciente para
sufrir lesiones graves.
ADVERTENCIA:
ANSI Z87.1. De lo contrario, los objetos que salgan despedidos pueden ingresar en los
ojos y provocar otras lesiones graves.
ADVERTENCIA:
este producto no recomiende. Si utiliza acoplamientos o accesorios no recomendados
puede sufrir lesiones personales graves.
no se descuide por el hecho de conocer cómo funciona el
siempre use lentes de protección que cumplan con la norma
no utilice ningún acoplamiento o accesorio que el fabricante de
APLICACIONES
Puede usar este producto para los nes que se indican a continuación:
◾
Romper la tierra para jardín y preparar semilleros para volver a plantar.
◾
Realizar un cultivo supercial para retirar las raíces de las malezas o aojar la
tierra alrededor de las plantas y facilitar la penetración del aire o el agua hasta
las profundidades del suelo.
◾
Colocar capas de abono, hojas u otros fertilizantes orgánicos en el suelo. El
cultivo supercial permitirá aojar la capa superior del suelo e integrar los
nutrientes adicionales.
◾
Cavar zanjas o surcos en el suelo ojo.
AVISO: para evitar que se produzca cualquier daño a la cultivadora o a los árboles,
tenga cuidado de no atascar las cuchillas en las raíces grandes de los árboles. Evite
cultivar demasiado profundo, ya que podría dañar las raíces superciales de algunas
plantas.
CÓMO USAR EL ACCESORIO DE LA CULTIVADORA CON EL CABEZAL
ELÉCTRICO
ADVERTENCIA:
cuando utilice esta herramienta. No use ropa holgada ni joyas. Use lentes de
protección. Use pantalones largos y pesados, botas y guantes. No use pantalones
cortos ni sandalias, ni la utilice con los pies descalzos.
ACCESORIO PARA LA CULTIVADORA — CTA9500/CTA9500-FC82
use ropa adecuada para reducir el riesgo de sufrir lesiones
Page 83

Coloquen una mano en la manija trasera y la otra mano en la manija de ayuda frontal
para sostener la cultivadora. Agarre la cultivadora rmemente con ambas manos
mientras la utiliza. La cultivadora se debe colocar en una posición cómoda y se debe
mantener la manija trasera a la altura de la cadera.
Sosténgala y mantenga el equilibrio en
ambos pies (Fig. 6).
Puede utilizar la cultivadora hacia
adelante o hacia atrás, de izquierda a
derecha, de derecha a izquierda o realizar
movimientos circulares. Elija el método
que mejor se adapte al objetivo que desea
implementar, el cual depende de la forma
y el tamaño del área y las condiciones del
suelo.
Trabajar realizando movimientos
alternativos hacia atrás y hacia adelante
es particularmente adecuado para aojar
el suelo compacto.
Cuando cave una zanja o haga surcos,
camine lentamente hacia atrás y tire de la cultivadora para hacer el surco. Repita estos
pasos según sea necesario para hacer surcos más profundos.
6
Dirección Hacia Delante O
Hacia Atrás
Movimiento Circular
Rotación de
la cuchilla
AVISO: si tira de la cultivadora con cuidado hacia usted mientras cava en el suelo
reducirá el esfuerzo que realiza y será más fácil llevar a cabo el arado.
Los materiales que salen despedidos pueden provocar daños graves al operador o a las
personas que se encuentren cerca. Para reducir el riesgo de sufrir lesiones personales,
es fundamental que tome las siguientes precauciones:
◾
Inspeccione y limpie el área para retirar cualquier objeto oculto, tales como vidrio,
piedras, rocas, concreto, alambre para cerca, piezas de metal, etc., que puedan
salir despedidos o que se puedan enredar en las cuchillas. Evite mantener
contacto con objetos extraños duros o sólidos.
◾
Inspeccione las cuchillas regularmente y, a veces, para detectar si hay signos de
daños o después de golpear un objeto duro. No continúe trabajando si se dañó
una cuchilla.
ACCESORIO PARA LA CULTIVADORA — CTA9500/CTA9500-FC
83
Page 84

◾
Sostenga la cultivadora con ambas manos cuando la utilice. Sujete las manijas
con rmeza.
◾
Mueva la cultivadora hasta el área de trabajo antes de arrancar la cultivadora a
una velocidad más baja.
Antes de utilizar el producto, verique que las piezas no estén
desgastadas o dañadas.
Verique las cuchillas, el protector y la manija de ayuda frontal y reemplace cualquier
pieza que esté agrietada, deformada, doblada o dañada de alguna manera.
ADVERTENCIA:
retire las cuchillas. Tenga cuidado con las cuchillas y proteja sus manos para evitar que
se produzcan lesiones.
siempre use guantes para trabajo pesado cuando instale o
Siempre limpie la cultivadora después de usarla.
Consulte la sección de mantenimiento para obtener información sobre las instrucciones
de limpieza.
ADVERTENCIA:
cuchillas se detengan por completo y de retirar la batería. No cumplir con estos pasos
podría provocar lesiones personales graves.
antes de limpiar o reparar la cultivadora, asegúrese de que las
CÓMO ENCENDER/DETENER LA HERRAMIENTA
Consulte la sección "CÓMO ENCENDER/DETENER EL CABEZAL ELÉCTRICO" en el
manual del operador del cabezal eléctrico PH1400/ PH1400-FC.
ACCESORIO PARA LA CULTIVADORA — CTA9500/CTA9500-FC84
Page 85
MANTENIMIENTO
ADVERTENCIA: al realizar el mantenimiento, utilice solo piezas de repuesto
idénticas. El uso de cualquier otra pieza puede crear un peligro o causar daños en
el producto. Para garantizar la seguridad y conabilidad, un técnico de reparación
calicado se debe encargar de realizar las reparaciones.
ADVERTENCIA: las herramientas que funcionan a batería no se deben enchufar
en un tomacorriente; por lo tanto, siempre están en condiciones de funcionamiento.
Para evitar lesiones personales graves, tome precauciones y cuidados adicionales
cuando realice el mantenimiento, haga reparaciones o cambie el accesorio de corte u
otros accesorios.
ADVERTENCIA: para evitar que se produzcan lesiones personales graves,
retire el paquete de baterías del cabezal eléctrico y aguarde a que todas las cuchillas
se detengan antes de realizar el mantenimiento, limpiar, cambiar los accesorios
adicionales o cuando no utilice el producto.
ADVERTENCIA: siempre use guantes para trabajo pesado cuando instale o
retire la cuchilla o cuando realice el mantenimiento de la cuchilla. Tenga cuidado con la
cuchilla y proteja sus manos para evitar que se produzcan lesiones.
MANTENIMIENTO GENERAL
Evite utilizar solventes para limpiar las piezas de plástico. La mayoría de los plásticos
tienden a dañarse con los distintos tipos de solventes comerciales. Utilice un paño
limpio para eliminar la suciedad, el polvo, el aceite, la grasa, etc.
ADVERTENCIA: Nunca deje que el líquido de frenos, la gasolina, los productos
a base de petróleo, los aceites penetrantes, etc. entren en contacto con las piezas
plásticas. Los productos químicos pueden dañar, debilitar o destruir el plástico, lo que
puede provocar lesiones personales graves.
ADVERTENCIA: al limpiar el accesorio de la cultivadora, NO lo sumerja en agua
ni en otros líquidos. No limpie la máquina con un equipo de lavado con agua a presión.
El chorro sólido de agua puede dañar las piezas de la máquina.
MANTENIMIENTO DE LAS CHUCHILLAS
◾
Utilice con frecuencia un aceite contra la corrosión para mantener las cuchillas.
◾
Si se deben reemplazar las cuchillas debido al desgaste, reemplace las cuatro
cuchillas para obtener un mejor rendimiento.
ACCESORIO PARA LA CULTIVADORA — CTA9500/CTA9500-FC
85
Page 86

Solo el personal de mantenimiento autorizado debe llevar a cabo todas las
instrucciones de mantenimiento que requiera la cultivadora, salvo que se trate de los
artículos que guran en estas instrucciones de mantenimiento.
CÓMO REEMPLAZAR O AJUSTAR LAS CUCHILLAS
ADVERTENCIA: una cuchilla desgastada, agrietada o dañada se puede romper
y las piezas se pueden convertir en proyectiles peligrosos. Los objetos que lance la
cultivadora pueden ocasionar lesiones graves. Inspeccione la cuchilla de manera
regular y no utilice la cultivadora con una cuchilla que esté desgastada o dañada.
Cómo reemplazar las cuchillas
La cultivadora tiene cuatro cuchillas: dos internas y dos externas. Para que la
cultivadora funcione de manera correcta, las cuchillas se deben instalar en la
orientación correcta. Los símbolos R y L están impresos en las cuchillas (Fig. 7a y 7b).
AVISO: LAS CUCHILLAS QUE TIENEN DIENTES QUE APUNTAN EN
AMBAS DIRECCIONES SE DEBEN COLOCAR EN EL INTERIOR, MÁS
CERCA DE LA CAJA DE VELOCIDADES.
7a
"L" Impresa En La
Cuchilla Interior
Símbolo L
"L" Impresa En La
Cuchilla exterior
Pasador De
Enganche
7b
"R" Impresa En La
Cuchilla Exterior
Pasador De
Enganche
ACCESORIO PARA LA CULTIVADORA — CTA9500/CTA9500-FC86
Eje Motor Manguito Interior Manguito Exterior
"R" Impresa En La
Cuchilla Interior
Símbolo R
Page 87
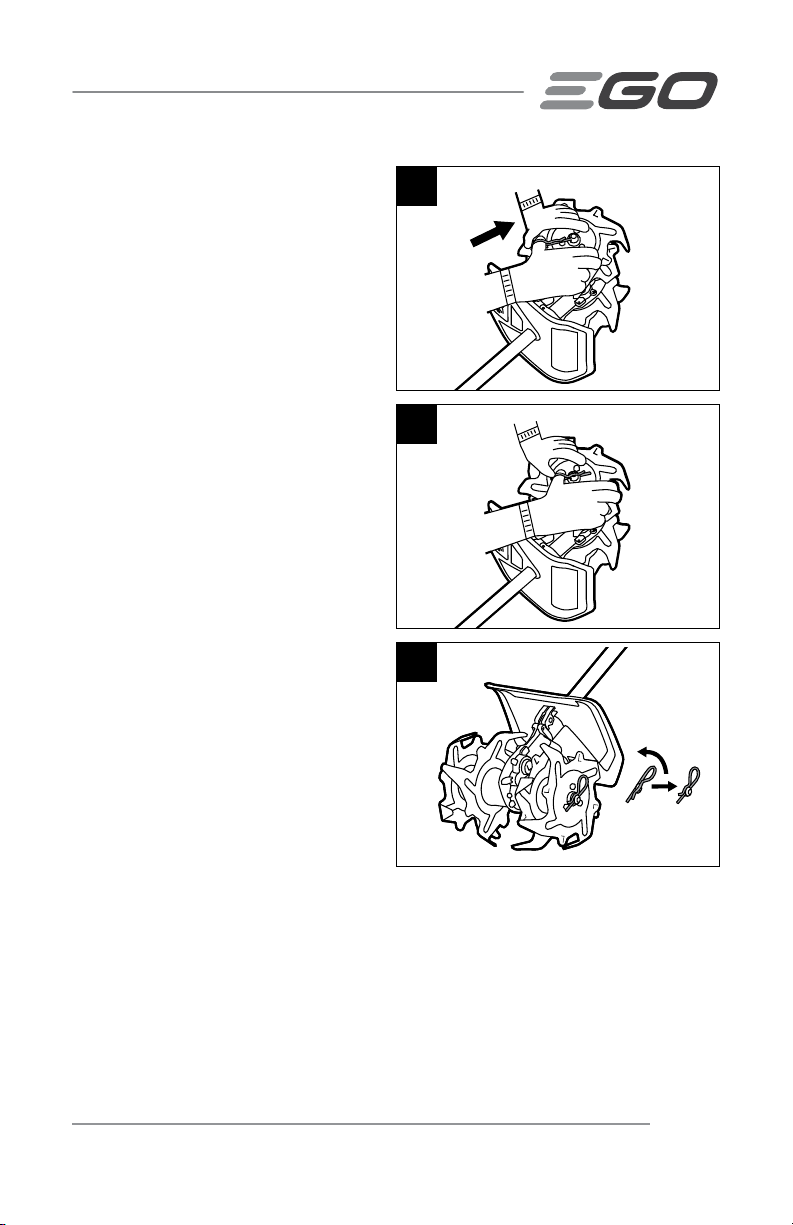
1. Use guantes.
8
2. Coloque la cuchilla interior, con la
"L" impresa, que tiene dientes que
apuntan en ambas direcciones, a la
izquierda de la caja de velocidades.
El lado impreso con la L debe
apuntar hacia afuera.
R
R
3. Coloque la cuchilla exterior con
la "L" impresa (los dientes solo
apuntan hacia una dirección) en
el mismo lado. El lado que tiene
9
la L impresa debe apuntar hacia
afuera y el maguito exterior se debe
colocar contra la cuchilla interna.
4. Para asegurar la cuchilla al eje
motor, inserte el pasador de
R
R
enganche en el oricio de
bloqueo 1. Consulte la g. 8, 9 y10
como referencia.
5. De vuelta la herramienta y apoye la
10
cuchilla instalada contra el suelo.
6. Coloque la cuchilla interior, con la
"R" impresa, que tiene dientes que
apuntan en ambas direcciones, a la
derecha de la caja de velocidades.
El lado impreso con la R debe
apuntar hacia afuera.
R
R
R
R
90°
Doble El Pasador
De Enganche Plano
Contra La Cuchilla
7. Coloque la cuchilla exterior con
la "R" impresa (los dientes solo
apuntan hacia una dirección) en el mismo lado. El lado que tiene la R impresa
debe apuntar hacia afuera y el maguito exterior se debe colocar contra la cuchilla
interna.
8. Para asegurar la cuchilla al eje motor, inserte el pasador de enganche en el
oricio de bloqueo 1. Consulte la g. 8, 9 y10 como referencia.
ACCESORIO PARA LA CULTIVADORA — CTA9500/CTA9500-FC
87
Page 88
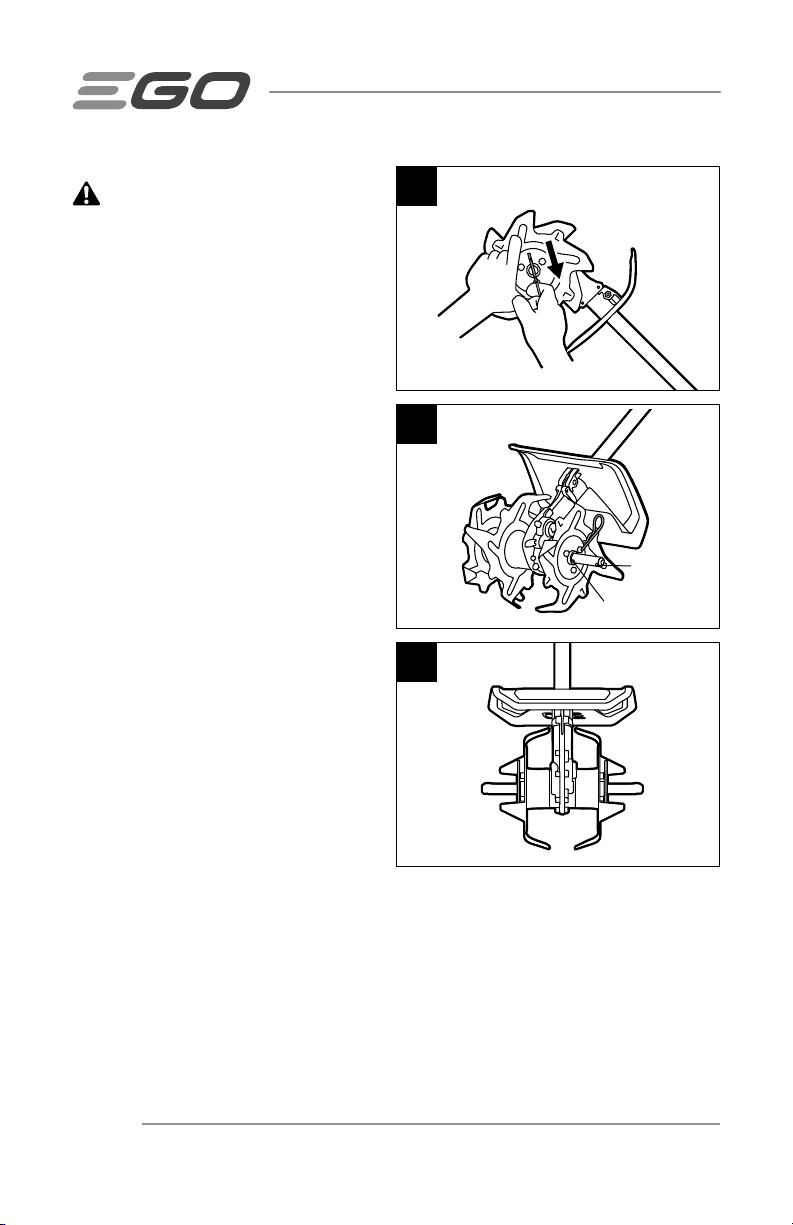
ADVERTENCIA: si las cuchillas
no están instaladas de manera correcta,
la unidad no funcionará de manera
adecuada o puede provocar daños
al operador o a las personas que se
encuentran cerca. Si nota que existe
algún problema con la operación de
cultivo de la unidad, verique que las
cuchillas se encuentren en la posición
adecuada. LAS CUCHILLAS QUE TIENEN
DIENTES QUE APUNTAN EN AMBAS
DIRECCIONES SE DEBEN COLOCAR EN
EL INTERIOR, MÁS CERCA DE LA CAJA
DE VELOCIDADES.
Cómo ajustar las cuchillas
Cuando are un área cerrada o entre las,
la cultivadora se puede usar solo con las
cuchillas internas instaladas.
Use guantes y retire los dos pasadores de
enganche para retirar las dos cuchillas
externas (Fig. 11); luego, inserte los
pasadores de enganche en el oricio de
bloqueo 2 (Fig. 12 y 13).
11
12
13
R
R
R
R
Oricio De
Bloqueo 1
Oricio De
Bloqueo 2
AVISO: no fuerce las cuchillas para
activar o desactivar el eje motor. Si tiene
dicultades para retirar las cuchillas,
aplique un poco de aceite penetrante en
el eje. Cuando vuelva a colocar las cuchillas, asegúrese de limpiar y colocar aceite en
el eje motor y en las cuchillas.
ACCESORIO PARA LA CULTIVADORA — CTA9500/CTA9500-FC88
Page 89

LIMPIEZA DE LA UNIDAD
Las partes de las plantas, tales como las raíces, pueden quedar atascadas alrededor
o entre las cuchillas giratorias durante el funcionamiento. Para limpiar las cuchillas
giratorias:
◾
Retire la batería.
◾
Use guantes. Limpie los pedazos de raíces, la tierra o las plantas atascadas
en la cuchilla, en el protector o en la caja de velocidades. Para realizar una
limpieza profunda, retire las cuchillas y el protector para lavarlos por completo.
Para consultar los pasos detallados que se deben seguir para realizar el
reemplazo, consulte la sección anterior "CÓMO REEMPLAZAR O AJUSTAR LAS
CUCHILLAS".
◾
Limpie la supercie de la herramienta con un paño limpio y húmedo con jabón
suave. Mantenga los respiraderos libres de obstrucciones.
ALMACENAMIENTO DE LA UNIDAD
◾
Retire el paquete de baterías de la herramienta.
◾
Utilice guantes para trabajo pesado para limpiar bien la herramienta e
inspeccionar las cuchillas.
◾
Retire el accesorio de la cultivadora del cabezal eléctrico y coloque la tapa
del extremo en el mango del accesorio para evitar que la suciedad ingrese al
acoplador.
◾
Guarde la herramienta en un lugar seco y bien ventilado, alto o con seguro y fuera
del alcance de los niños. No almacene la unidad sobre o cerca de fertilizantes,
gasolina u otros químicos.
ACCESORIO PARA LA CULTIVADORA — CTA9500/CTA9500-FC
89
Page 90

SOLUCIÓN DE PROBLEMAS
PROBLEMA SOLUCIÓN SOLUTION
La cultivadora no
arranca.
El paquete de baterías
no está colocado de
manera correcta en el
cabezal eléctrico.
Fije el paquete de baterías
al cabezal eléctrico.
No hay contacto
eléctrico entre el
cabezal eléctrico y el
paquete de batería.
El paquete de baterías
está agotado.
La palanca de bloqueo
y el gatillo no se
presionan de manera
simultánea.
Retire la batería, verique
los contactos y vuelva a
instalarla de forma tal que
quede ja en su lugar.
Cargue el paquete de
baterías con el cargador
EGO que se indica en este
manual.
Para encender la unidad,
presione hacia abajo la
palanca de bloqueo y
sosténgala; luego, presione
el gatillo.
ACCESORIO PARA LA CULTIVADORA — CTA9500/CTA9500-FC90
Page 91
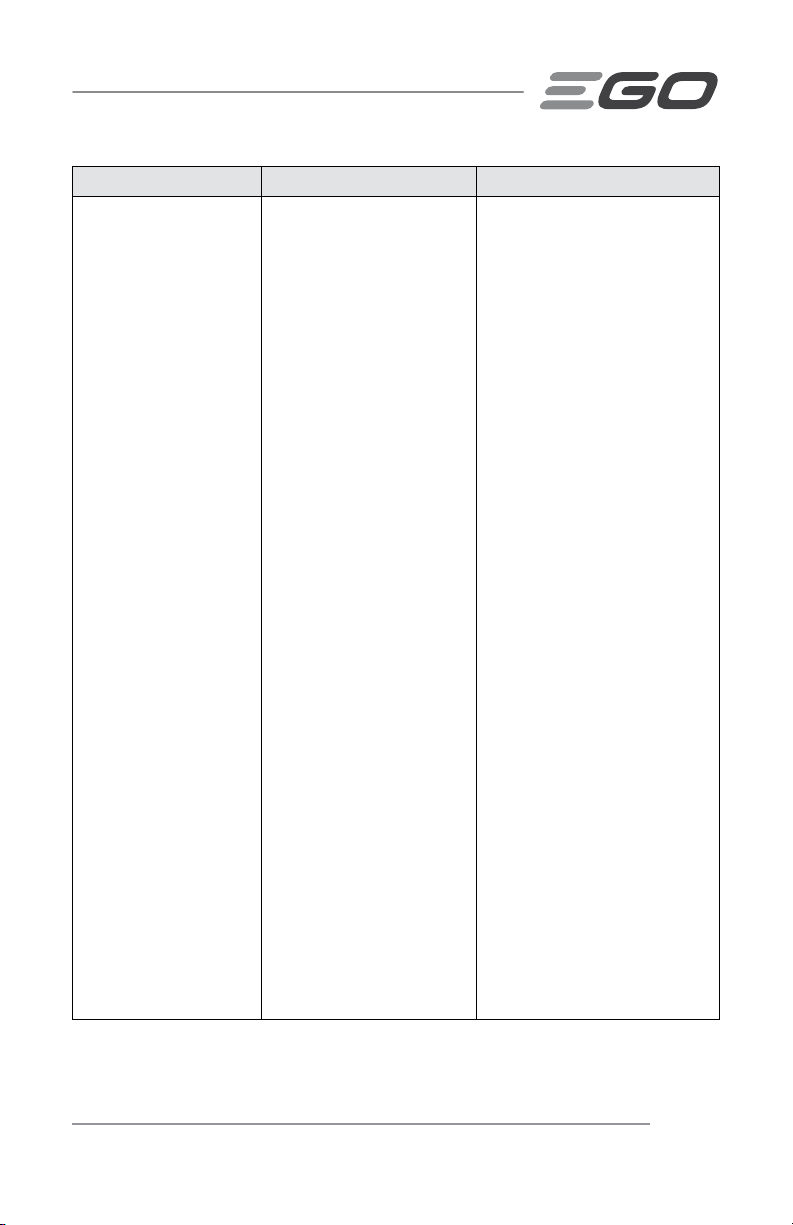
PROBLEMA SOLUCIÓN SOLUTION
La cultivadora se
detiene durante el
arado.
El motor está
sobrecargado
El motor volverá a
funcionar cuando se retire
la carga. Para realizar
trabajos continuos,
disminuya la carga en la
cultivadora y evite realizar
un arado profundo; en su
lugar, realice cortes más
profundos de manera
progresiva.
El paquete de baterías o
el cabezal eléctrico está
demasiado caliente.
Las cuchillas están
atascadas.
La batería está
desconectada de la
herramienta.
El paquete de baterías
está agotado.
Permita que el paquete de
baterías o que el cabezal
eléctrico se enfríen hasta
que la temperatura se
encuentre por debajo de los
67 °C (152 °F).
Retire la batería del cabezal
eléctrico, gire las cuchillas
con las manos hacia
adelante y hacia atrás
para retirar las piedras
u otros obstáculos que
se encuentren entre las
cuchillas o entre la cuchilla
y la caja de velocidades.
Vuelva a colocar el paquete
de baterías.
Cargue el paquete de
baterías con el cargador
EGO que se indica en este
manual
ACCESORIO PARA LA CULTIVADORA — CTA9500/CTA9500-FC
91
Page 92

GARANTÍA
POLÍTICA DE GARANTÍA
Garantía limitada de 5 años en equipos de energía para exteriores y energía portátil
EGO POWER+ para uso doméstico personal.
Garantía limitada de 3 años en paquetes de baterías y cargadores con el Sistema EGO
POWER+ para uso doméstico personal.
Garantía limitada de 2 años/1 año en equipos de energía para exteriores, energía
portátil, paquetes de baterías y cargadores EGO para uso profesional y comercial.
Los períodos de garantía detallados por productos se pueden encontrar en línea en
http://egopowerplus.com/pages/warranty-policy.
Póngase en contacto con Servicio al Cliente de EGO de manera gratuita al
1-855-EGO-5656, cuando tenga preguntas o reclamaciones de garantía.
GARANTÍA LIMITADA DE SERVICIO
Los productos EGO están garantizados contra defectos de material o de fabricación
a partir de la fecha de compra original al por menor durante el período de garantía
aplicable. El producto defectuoso será reparado gratuitamente.
a) Esta garantía se aplica solo al comprador original del distribuidor minorista
autorizado de EGO y podría no ser transferible. Los distribuidores minoristas
autorizados de EGO se identican en línea, en http://egopowerplus.com/pages/
warranty-policy.
b) El período de garantía para productos reacondicionados o certicados de fábrica
que se utilizan para nes residenciales es de 1 año, para nes industriales,
profesionales o comerciales es de 90 días.
c) El período de garantía para piezas del mantenimiento de rutina, incluidas,
entre otras, cuchillas, cabezales de orilladoras, listones de cadenas, cadenas
de motosierras, correas, barras raspadoras, boquillas de sopladores y todos
los demás accesorios EGO, es de 90 días con nes residenciales y de 30 días
para propósitos industriales, profesionales o comerciales. Estas piezas tienen
cobertura durante 90/30 días por defectos de fabricación en condiciones
normales de trabajo.
d) Esta garantía queda nula si el producto se ha puesto en alquiler.
ACCESORIO PARA LA CULTIVADORA — CTA9500/CTA9500-FC92
Page 93

e) Esta garantía no cubre daños producto de modicaciones, alteraciones o
reparaciones no autorizadas.
f) Esta garantía solo cubre defectos que surjan del uso normal y no cubre el mal
funcionamiento, las fallas ni los defectos que resulten del mal uso, el abuso (que
incluye la sobrecarga del producto más allá de su capacidad y sumergirlo en
agua o en cualquier otro líquido), accidentes, negligencia o falta de instalación
adecuada y mantenimiento o almacenamiento inadecuados.
g) Esta garantía no cubre el deterioro normal del acabado exterior, incluidos, entre
otros, rayones, abolladuras, trozos de pintura o cualquier corrosión o decoloración
producida por el calor o limpiadores químicos y abrasivos.
CÓMO OBTENER EL SERVICIO
Para obtener el servicio de garantía, póngase en contacto con Servicio al Cliente de
EGO de manera gratuita al 1-855-EGO-5656. Cuando pida un servicio cubierto por la
garantía, debe presentar el recibo con la fecha original de venta. Un centro de servicio
autorizado será seleccionado para reparar el producto de acuerdo con los términos
establecidos en la garantía. Cuando lleve el producto al centro de servicio autorizado,
es posible que deba hacer un pequeño depósito cuando deje la herramienta. Este
depósito se reembolsará cuando se considere que el servicio de reparación se haya
cubierto con la garantía.
LIMITACIONES ADICIONALES
En la medida en que la ley aplicable lo permita, se deniegan todas las garantías
implícitas, inclusive las garantías de COMERCIABILIDAD o IDONEIDAD PARA UN
PROPÓSITO ESPECÍFICO. Todas las garantías implícitas, inclusive las garantías de
comerciabilidad o idoneidad para un propósito especíco, que no se puedan denegar
bajo la ley estatal, están limitadas al período de garantía aplicable denido al comienzo
de este artículo.
Chervon North America no se hará responsable por daños directos, indirectos,
accidentales o resultantes.
Algunos estados no permiten limitaciones con respecto a la duración de una garantía
implícita y/o no permiten la exclusión o limitación de daños accidentales o resultantes,
de modo que las limitaciones antes descritas podrían no aplicarse en su caso.
Esta garantía le otorga derechos legales especícos, pero podría tener también otros
derechos que varían según el estado.
ACCESORIO PARA LA CULTIVADORA — CTA9500/CTA9500-FC
93
Page 94

Para obtener el servicio al cliente, póngase en contacto con nosotros de manera
gratuita al: 1-855-EGO-5656 o visite: EGOPOWERPLUS.COM
EGO Customer Service, 769 SEWARD AVE NW / Suite 102 Grand Rapids, MI 49504
ACCESORIO PARA LA CULTIVADORA — CTA9500/CTA9500-FC94
 Loading...