

Egnite Querx TH, Querx WLAN TH, Querx WLAN PT, Querx PT User Manual
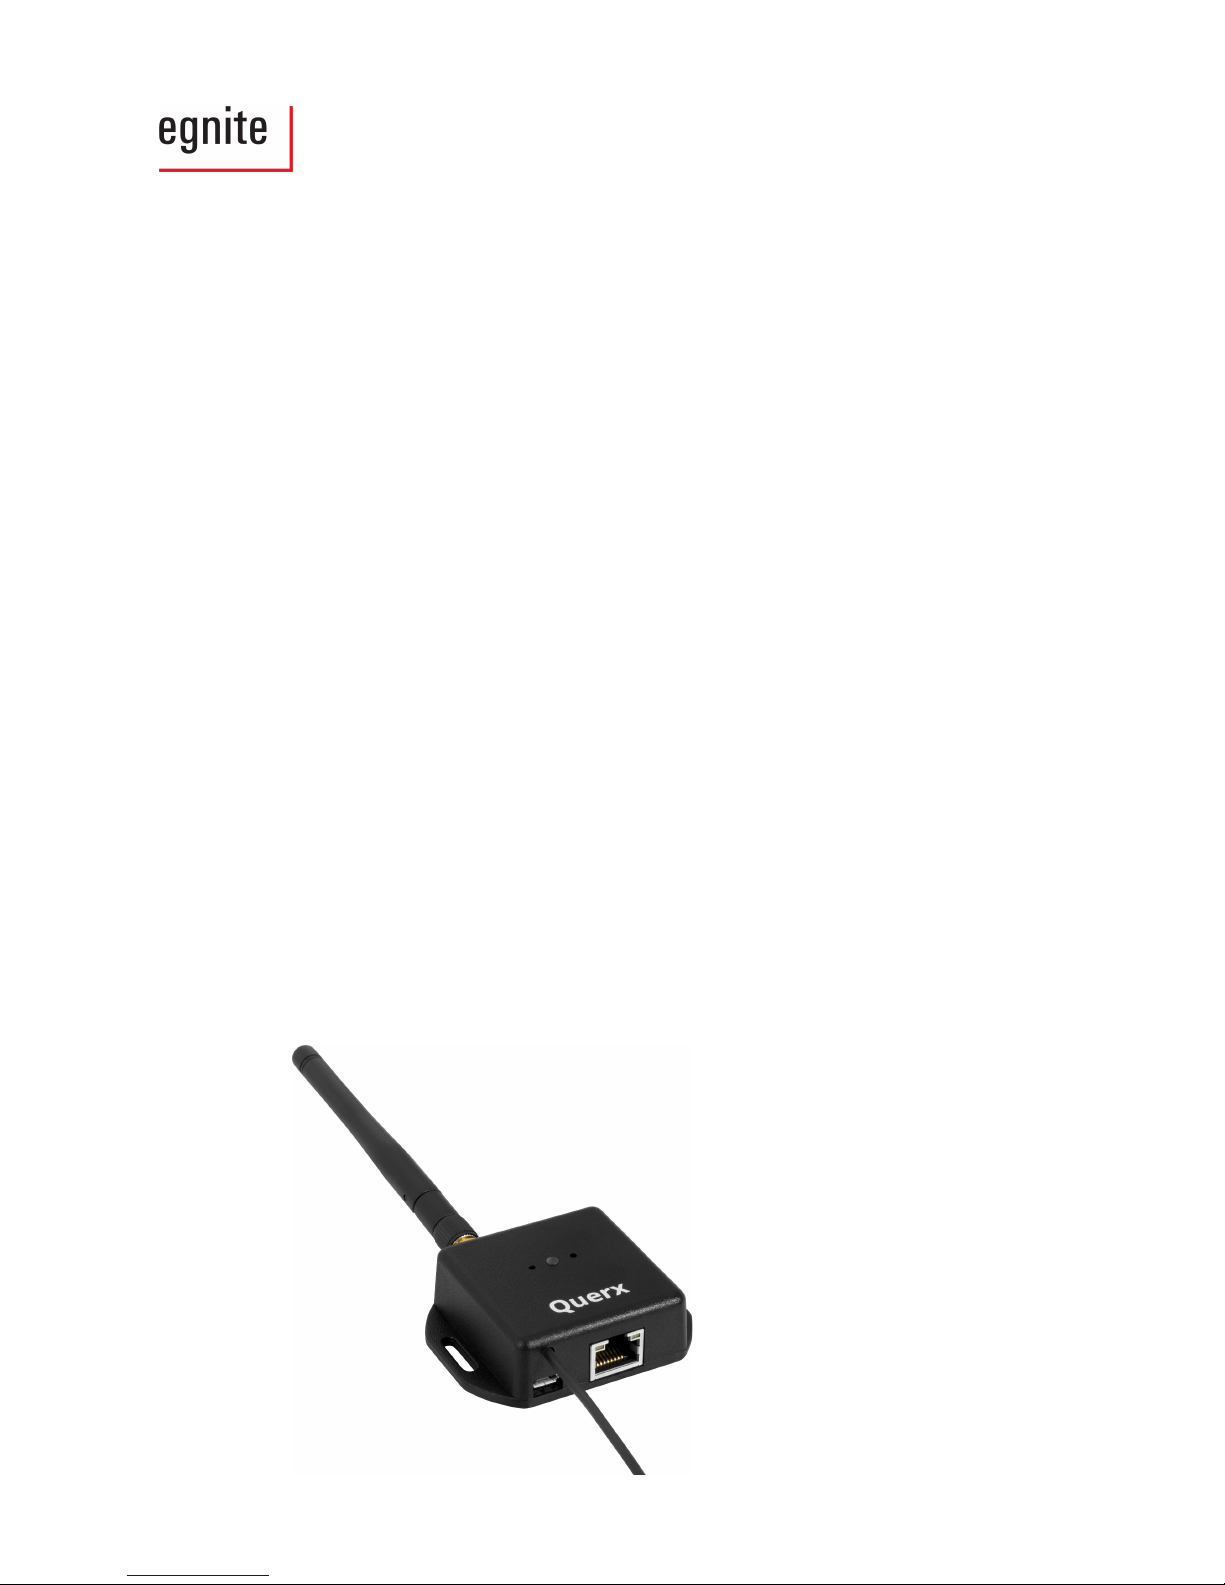
Querx
Network thermometer, hygrometer
and data logger
User Guide
Querx TH
Querx WLAN TH
Querx PT
Querx WLAN PT
Handbook version 3.0
Firmware version 3.2

Table of Contents
1 Introduction
1 1.1 Safety Notes
2 1.2 Symbols
3 1.3 About Querx
4 Querx at a Glance
5 Features
5 Possible Application Areas
6 Ships With
8 Querx Accessories
2 First Use
10 2.1 Before First Use
10 2.2 Mounting the Sensor
11 2.3 Model PT: Connecting the Sensor Cable
11 Connecting a Sensor
12 Mounting Individual Cable Cores
12 2.4 Establishing the Network Connection
13 2.5 Power Supply
13 2.6 Network Configuration Via DHCP
14 2.7 Manual Network Configuration
14 Installing the Device Discoverer
14 Configuring the Network Connection
3 Web Interface and Configuration Area
16 3.1 Accessing the Web Interface
17 3.2 Home Page
17 3.3 Log in as a User
18 3.4 Accessing the Configuration Area
18 3.5 The Configuration Area
4 Basic Configuration
19 4.1 General Settings
19 General Information, Language and Date
21 Configuring the Temperature Sensor
22 Setting the System Time
24 Configuring the Data Logger
25 Deactivating the Discovery Function
26 Resetting the Internal Memory
27 4.2 Network Configuration
27 Ethernet Interface
Dynamic Network Configuration
29 WLAN Models: WiFi Interface
Dynamic and Static Network Configuration
30 WLAN Models: Selecting the Active Network Interface
31 4.3 User Administration
32 Creating a New User Account
33 Editing a User Account

34 Removing a User
35 Deactivating the Anonymous User
5 Configuring Alerts
36 5.1 Basic Alert Configuration
36 Alerts and Dead-band
37 Alert Delays
38 Variation Alerts
39 Reacting to Alerts
40 5.2 Configuring Alerts
40 Temperature Alerts
42 TH Models: Humidity Alerts
44 TH Models: Dew Point Alerts
6 Configuring the Interfaces
45 6.1 The web Interface
45 Basic settings for the web interface
Configuring the Graph
46 6.2 The Email Interface
47 Managing Email Accounts
49 Managing Email Recipients
52 Email Templates
53 Event Descriptions
54 6.3 Cloud Services
54 Exporting Data to ThingSpeak
56 Exporting Data to Xively
57 6.4 Modbus/TCP
57 Activating Modbus/TCP
58 6.5 SNMP
58 General Data
58 Activating SNMP
59 Activating SNMP Traps
60 Downloading the MIB
60 6.6 Syslog
61 6.7 Signalers
61 Optical Signals
62 Acoustic Signals
7 Data Access
63 7.1 Web Interface
63 Viewing Current Values and Alerts
64 Viewing Recent Sensor Events
64 Viewing Logged Data
66 Exporting Data
66 Embedding Graphs Into Other Sites
67 7.2 Data Access Via the Cloud
67 7.3 Mobile Apps
67 7.4 The HTTP Interface
68 Exporting Current Values

70 Exporting Logged Values
73 TLS and User-login
73 Application Examples
8 Maintenance, Tips and Troubleshooting
74 8.1 Reboot
74 Soft Boot
74 Cold Boot
75 8.2 Saving the Configuration
75 Exporting the Configuration
75 Restoring the Configuration
76 8.3 Resetting the Configuration
76 Resetting the Configuration Via the Web Interface
77 Performing a Hardware Reset
78 8.4 Firmware-Updates
78 Installing Firmware Images
79 Activating a Firmware Image
79 Activating an Alternate Firmware Image
81 8.5 Changing the Battery
81 Opening the Casing
82 Changing the Battery
82 8.6 Troubleshooting
9 Appendix
84 9.1 Drill Templates
85 9.2 Specifications
85 Querx TH
87 Querx WLAN TH
89 Querx PT100 / Querx PT1000
90 Querx WLAN PT100 / Querx WLAN PT1000
91 TH Models: Sensor Details
Temperature Sensor
Humidity Sensor
Inaccuracies in Extreme Conditions
Calculating the Dew Point
93 9.3 Conformity
94 9.4 Sensor Calibration
95 9.5 Modbus Registers
96 9.6 SNMP Object Identifiers
96 9.7 The Measuring and Data-Logging Processes
96 9.8 Supported Export Data Formats
97 9.9 Technical Support
97 9.10 Notes on Storage
97 9.11 Environmentally Appropriate Disposal
98 9.12 Manufacturer and Contact Information
98 9.13 Disclaimer

1 Introduction
The Querx product line comprises smart sensors that gather
and monitor temperature- and humidity-values.
This user manual will tell you how to configure, use and
maintain the network-compatible devices.
Current and further
information on the Querx range of products can be found at
www.egnite.de and sensors.egnite.de.
1.1 Safety Notes
Please read this use manual carefully and take not of the
following safety notes, in order to minimize the risk of
damage or injury.
Querx is intended to
monitor and analyze climate data and make this data
available via various interfaces.
Any other use of the devices is considered contrary to the
designated use. The manufacturer takes no responsibility for
consequences resulting out of any application that is
contrary to the designated use.
Please follow these safety
notes, in order to minimize the
risk of electrical accidents:
Only use the device, cables and power supply in faultless
condition.
Disconnect the device from the power source before
maintenance.
Do not manipulate the device or its accessories.
Only let qualified personnel carry out maintenance work.
Do not submerge the device in water or any other liquid.
Introduction 1
Intended purpose
Querx online
Danger of death caused
by electrical shocks
1.2 Symbols
The following symbols will be used throughout this manual:
⚠
Danger
Indicates possible danger of injuries.
⚠
Attention
Indicates issues that can damage the device.
⚠
Information
Points out interesting hints and tips.
Introduction 2

1.3 About Querx
Querx sensors gather climate data and make it accessible via
network-interfaces. If limit values are exceeded, an alert
function automatically sends notifications via e-mail (TLS /
StartTLS), SNMP and Syslog.
The integrated data logger tracks the data of up to 7.5 years
in the WLAN-models (51 days for the non-WiFi models). The
gathered values are displayed in an interactive graph on the
web-interface. The data can additionally be exported in
various formats or accessed via an HTTP-interface.
Querx can be connected to the internet of things, using
cloud services, making data accessible globally via the web
and apps.
SNMP makes it possible to integrate the device into network-
management solutions, Modbus/TCP allows for the
application in industrial process control (SCADA). Status-,
error- and alert-notifications can also be forwarded to a
Syslog-server.
Introduction 3
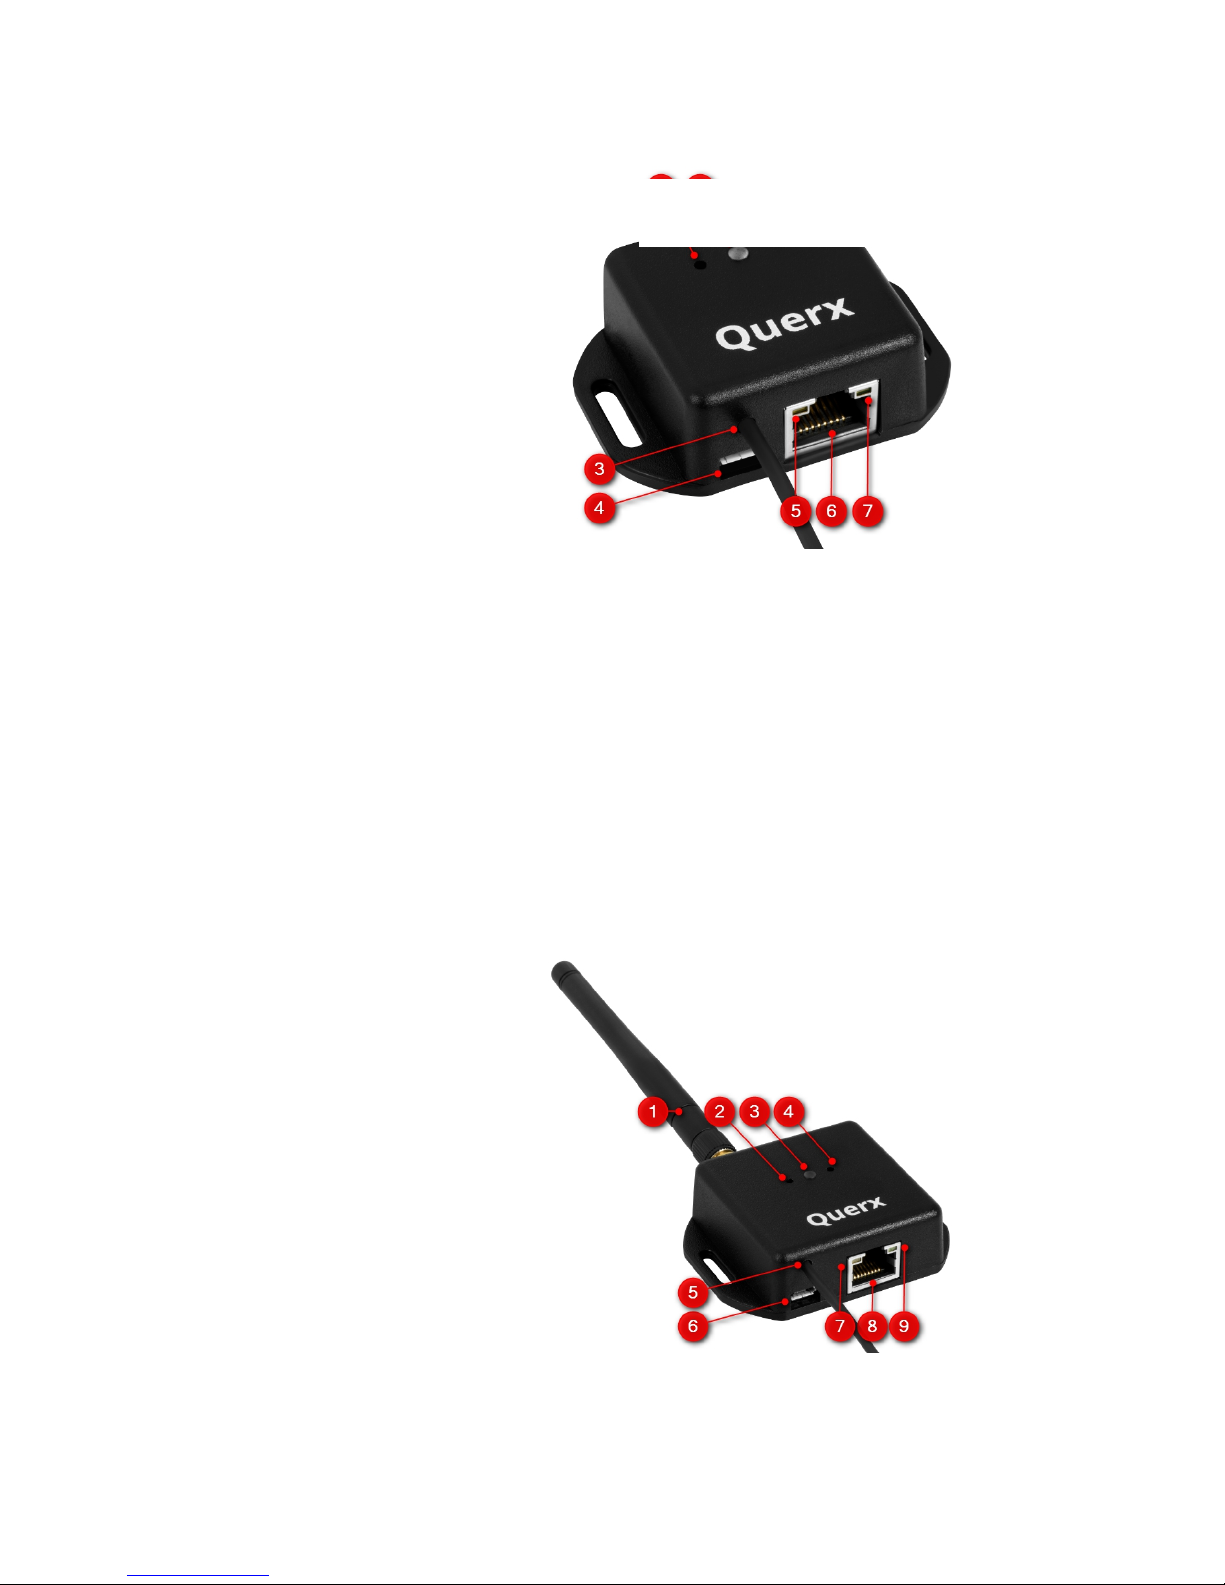
1.3.1 Querx at a Glance
(1) Reset button
(2) Status LED
(3) Sensor-cable
(4) Micro-USB socket for power supply
(5) Link LED
(6) RJ45-socket for Ethernet connection
(7) Network-activity LED
Introduction 4
Querx WLAN TH
Querx WLAN PT
Querx TH
Querx PT

(1) WiFi antenna
(2) Button (currently without function)
(3) Status LED
(4) Reset button
(5) Sensor-cable
(6) Micro-USB socket for power supply
(7) Link LED
(8) RJ45-socket for Ethernet connection
(9) Network-activity LED
1.3.2 Features
Stand-alone device, no additional computer or software
required for operation
Notifies you of limit value exceedances via e-mail, SNMP-
trap and Syslog
Data logger with a capacity of 73,728 entries / 4 million
(WLAN-models); equivalent to at least 51 days / 7.5 years
at a frequency of one entry per minute
Data export in the CSV-, JSON- and XML-formats
Current and logged values can be accessed via various
interfaces
Encrypted e-mails (StartTLS / TLS)
Cloud-connectivity for global data access
Compact footprint
1.3.3 Possible Application Areas
Server room monitoring
Pharmacies
Hospitals
Introduction 5

Food hygiene
Property monitoring
Automated buildings
Preventive stock conservation in museums, archives and
warehouses
Determining the cause of mould
1.3.4 Ships With
Querx TH Set (item number
EGN600114)
Querx TH with integrated temperature- and humidity-
sensors
Ethernet cable
Micro-USB cable
USB power adapter with interchangeable plugs for UK,
EU, US and AU outlets
CD with software and documentation
Querx TH (item number EGN600214)
Querx TH with integrated temperature- and humidity-
sensors
Querx PT100 Set (item
number EGN600414)
Querx PT 100
Simple Pt100-sensor without pocket sleeve
Ethernet cable
Micro-USB cable
USB power adapter with interchangeable plugs for UK,
EU, US and AU outlets
CD with software and documentation
Querx PT100 (item number EGN600514)
Introduction 6
Querx TH
Querx PT

Querx PT 100
Simple Pt100-sensor without pocket sleeve
Querx PT1000 Set (item number EGN600714)
Querx PT 1000
Simple Pt1000-sensor without pocket sleeve
Ethernet cable
Micro-USB cable
USB power adapter with interchangeable plugs for UK,
EU, US and AU outlets
CD with software and documentation
Querx PT1000 (item number EGN600814)
Querx PT 1000
Simple Pt1000-sensor without pocket sleeve
Querx WLAN TH Set (item
number EGN601115)
Querx WLAN TH with integrated temperature- and
humidity-sensors
WiFi antenna
Ethernet cable
Micro-USB cable
USB power adapter with interchangeable plugs for UK,
EU, US and AU outlets
CD with software and documentation
Querx WLAN TH (item number EGN601215)
Querx WLAN TH with integrated temperature- and
humidity-sensors
Querx WLAN PT100 Set (item
number EGN601315)
Querx WLAN PT 100
WiFi antenna
Introduction 7
Querx WLAN TH
Querx WLAN PT

Simple Pt100-sensor without pocket sleeve
Ethernet cable
Micro-USB cable
USB power adapter with interchangeable plugs for UK,
EU, US and AU outlets
CD with software and documentation
Querx WLAN PT100 (item number EGN601415)
Querx WLAN PT 100
WiFi antenna
Simple Pt100-sensor without pocket sleeve
Querx WLAN PT1000 Set (item number EGN601615)
Querx WLAN PT 1000
WiFi antenna
Simple Pt1000-sensor without pocket sleeve
Ethernet cable
Micro-USB cable
USB power adapter with interchangeable plugs for UK,
EU, US and AU outlets
CD with software and documentation
Querx WLAN PT1000 (item number EGN601715)
Querx WLAN PT 1000
WiFi antenna
Simple Pt1000-sensor without pocket sleeve
1.3.5 Querx Accessories
The following accessories and spare parts can be purchased
from the manufacturer egnite:
WiFi antenna
Ethernet cable
Introduction 8

Micro-USB cable
USB power adapter with interchangeable plugs for UK,
EU, US and AU outlets
DAkkS-calibration certificate (German Accreditation Body)
A selection of Pt100- and Pt1000 sensors is available from
shop.egnite.de.
Introduction 9

2 First Use
2.1 Before First Use
The device should be left to acclimatize before setup, if its
temperature differs from the ambient climate.
In this case, wait for approximately two hours, before
connecting Querx to the power supply.
⚠
Attention
Temperature differences between the smart sensor and its
surroundings can lead to condensation, damaging the
device.
⚠
Information
Temperature differences between the smart sensor and its
surroundings can lead to measurement errors.
2.2 Mounting the Sensor
Querx sensors can be mounted using the latches on the
case. They can alternatively be mounted using zip-ties, for
instance tying them to piping
Please take note of the following points when mounting the
device:
Querx is designed for indoor use.
Do not mount Querx in locations that are directly exposed
to sunlight.
TH Models: The device should be exposed to a sufficient
airflow. Measurements can be made in still air, but the
results for humidity will be falsified.
Do not mount Querx with the sensor cable pointing
upward. The cable should point downward or to either
side.
First Use 10
2.3 Model PT: Connecting the Sensor Cable
The Querx PT models support 2-, 3- or 4- wire Pt100 or
Pt1000 sensors. Their color coding can vary depending on
the underlying standards.
You will require the following tools, in order to connect a
sensor.
A tool with a fine tip, e.g. an fine screwdriver or a pair of
A biro
Possibly a magnifying glass
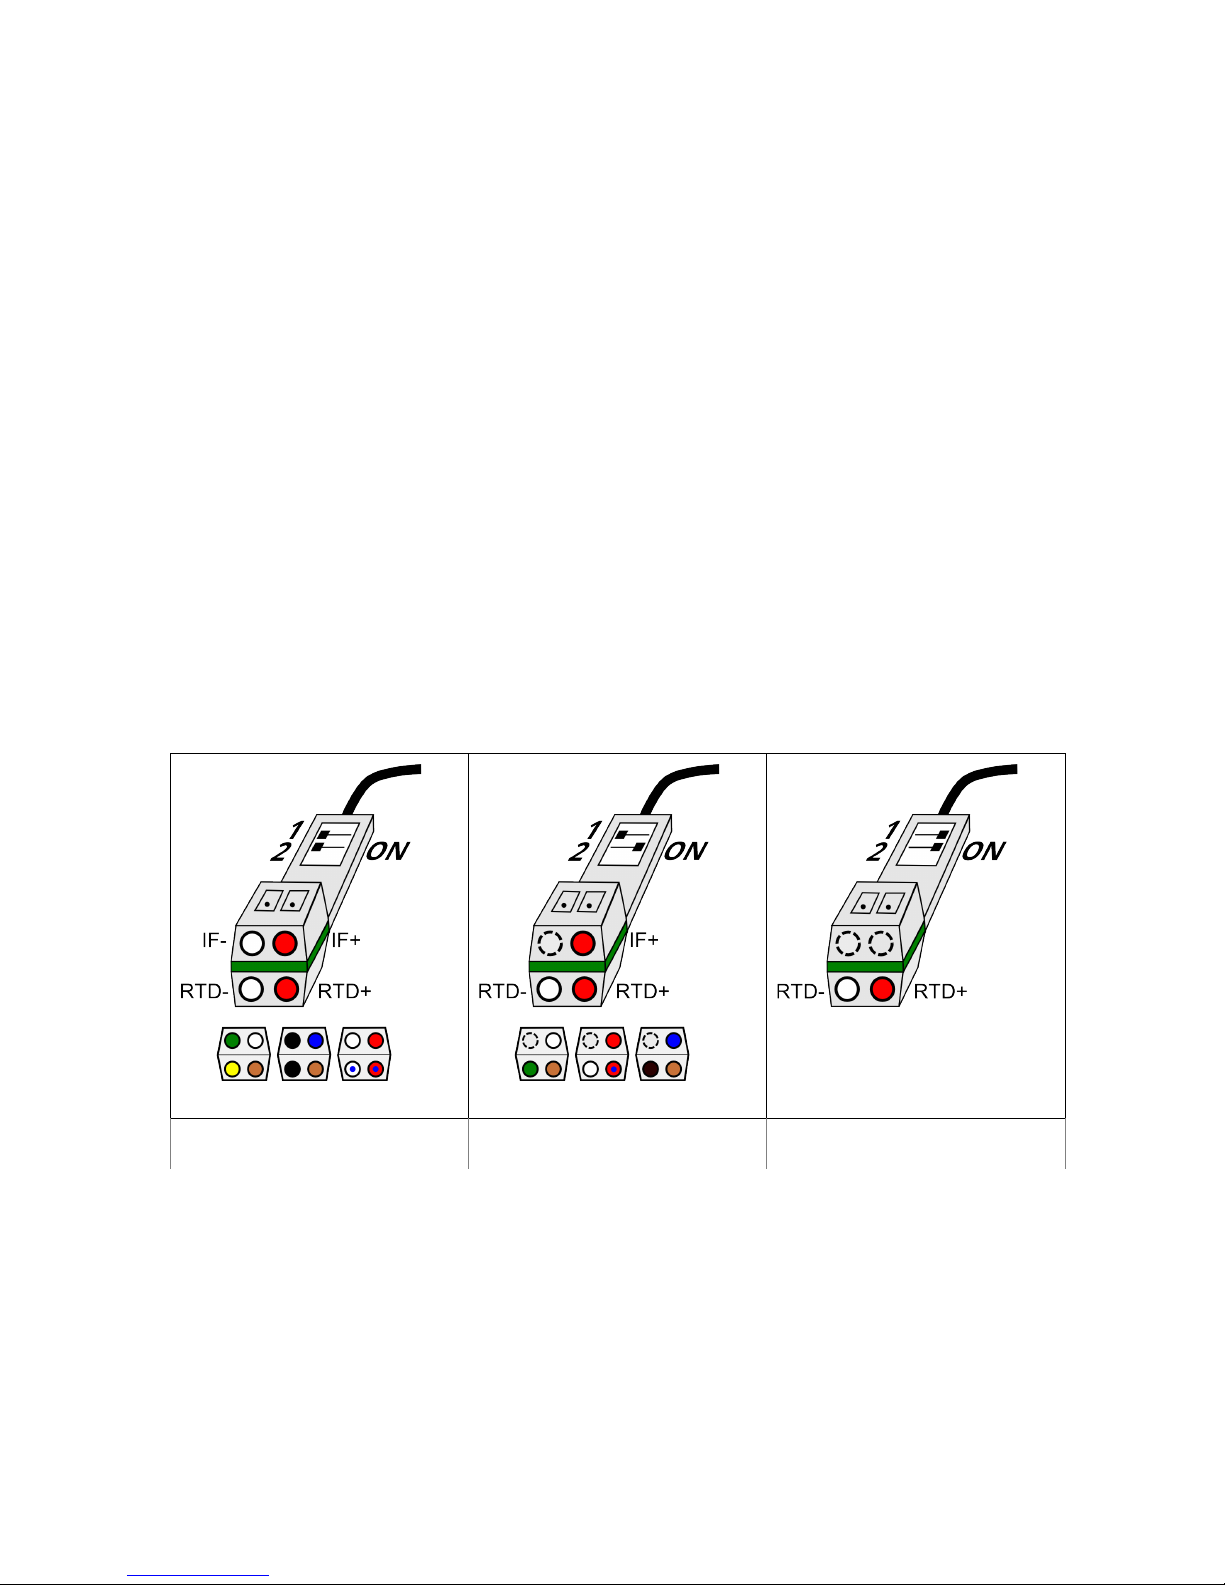
2.3.1 Connecting a Sensor
Two dipswitches located above the terminals for the cable
cores are used to select whether the sensor is connected to
Querx PT using two, three or four cable cores.
4-core Sensor 3-core Sensor 2-core Sensor
1. The above illustrations tell you which switch position your
sensor requires.
2. Use a tool with a fine tip to set the dipswitches into the
required position. If required, use a magnifying glass.
First Use 11
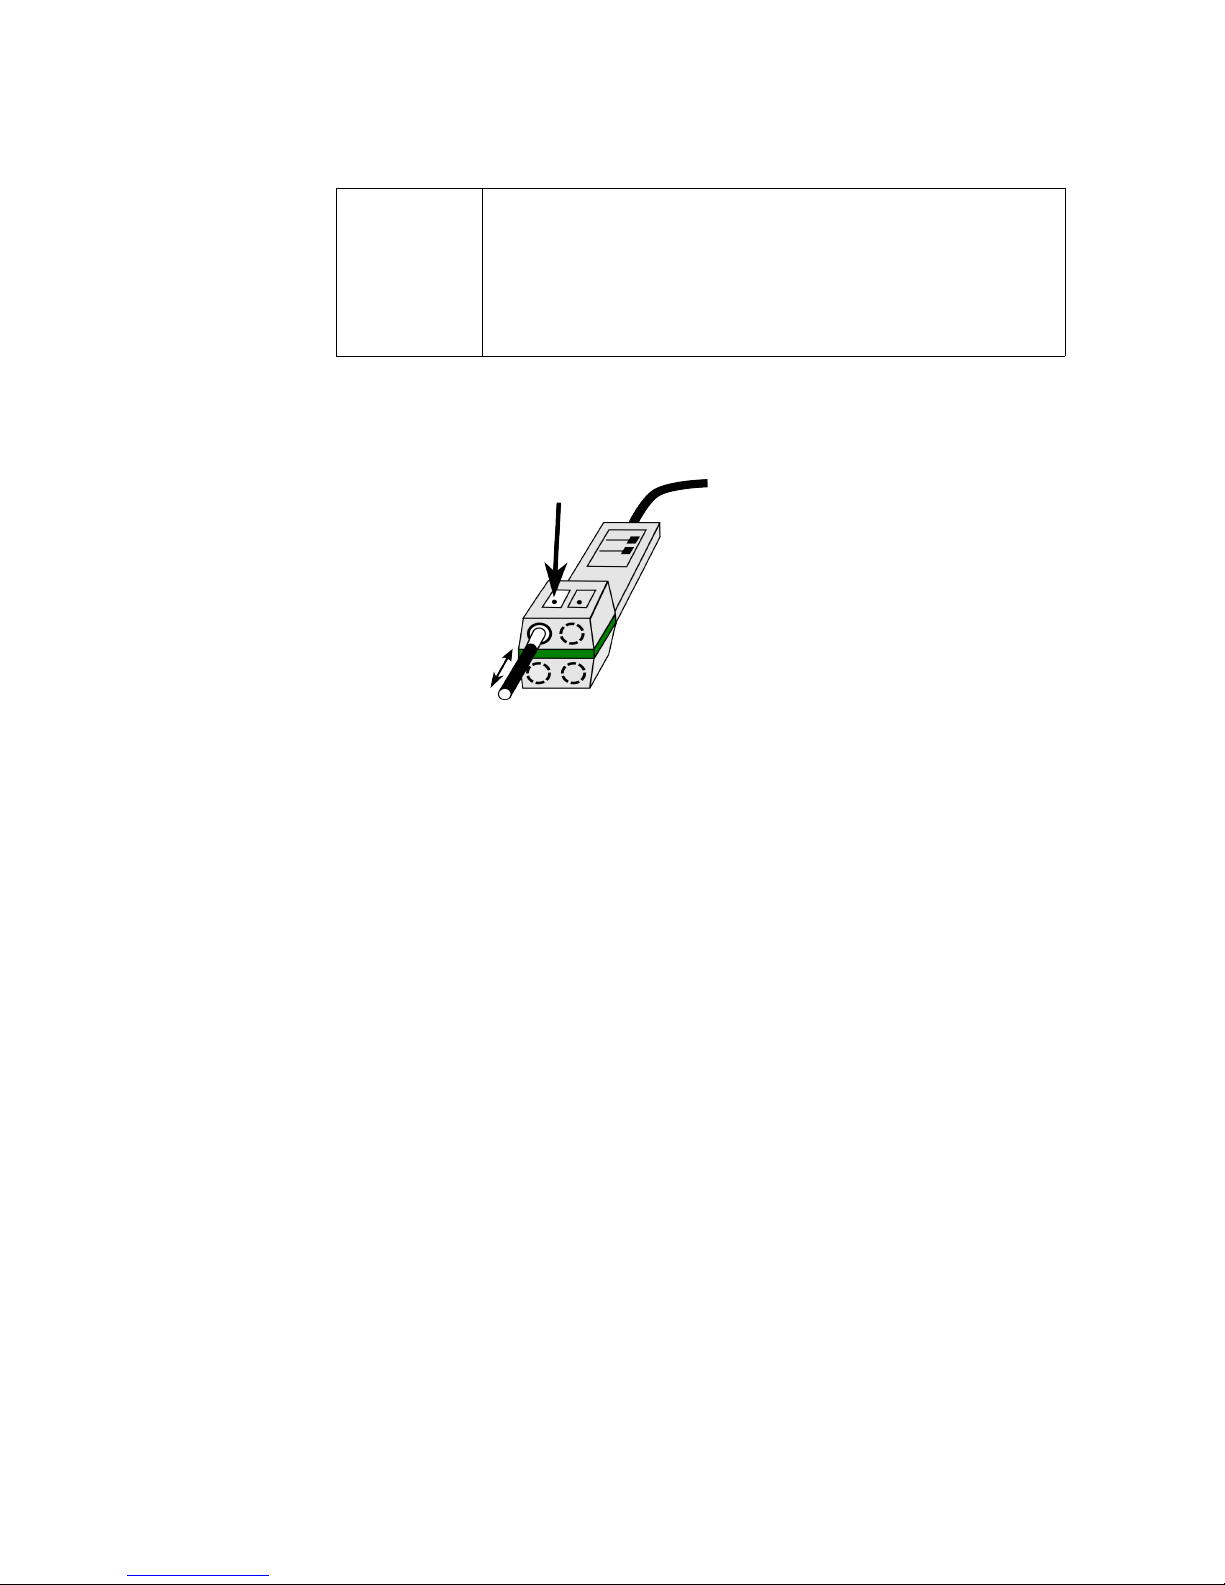
3. Proceed to connect the individual cable cores to the
terminals as displayed in the images.
⚠
Information
It might be that none of the displayed cable core colors
correspond with your sensor, depending on the standard
underlying the sensor. In this case, please consult the data
sheet provided by the manufacturer.
2.3.2 Mounting Individual Cable Cores
1. Depress the fixture corresponding with the terminal to
which you want to connect the cable core.
2. Insert the core into the terminal.
3. Release the fixture.
4. Test the connection by pulling on the cable with a little
force.
In order to remove the cable, depress the fixture again and
pull the cable out.
2.4 Establishing the Network Connection
Connect Querx to your network or directly to the computer
you intend to use to configure the device, using a network
cable.
First Use 12
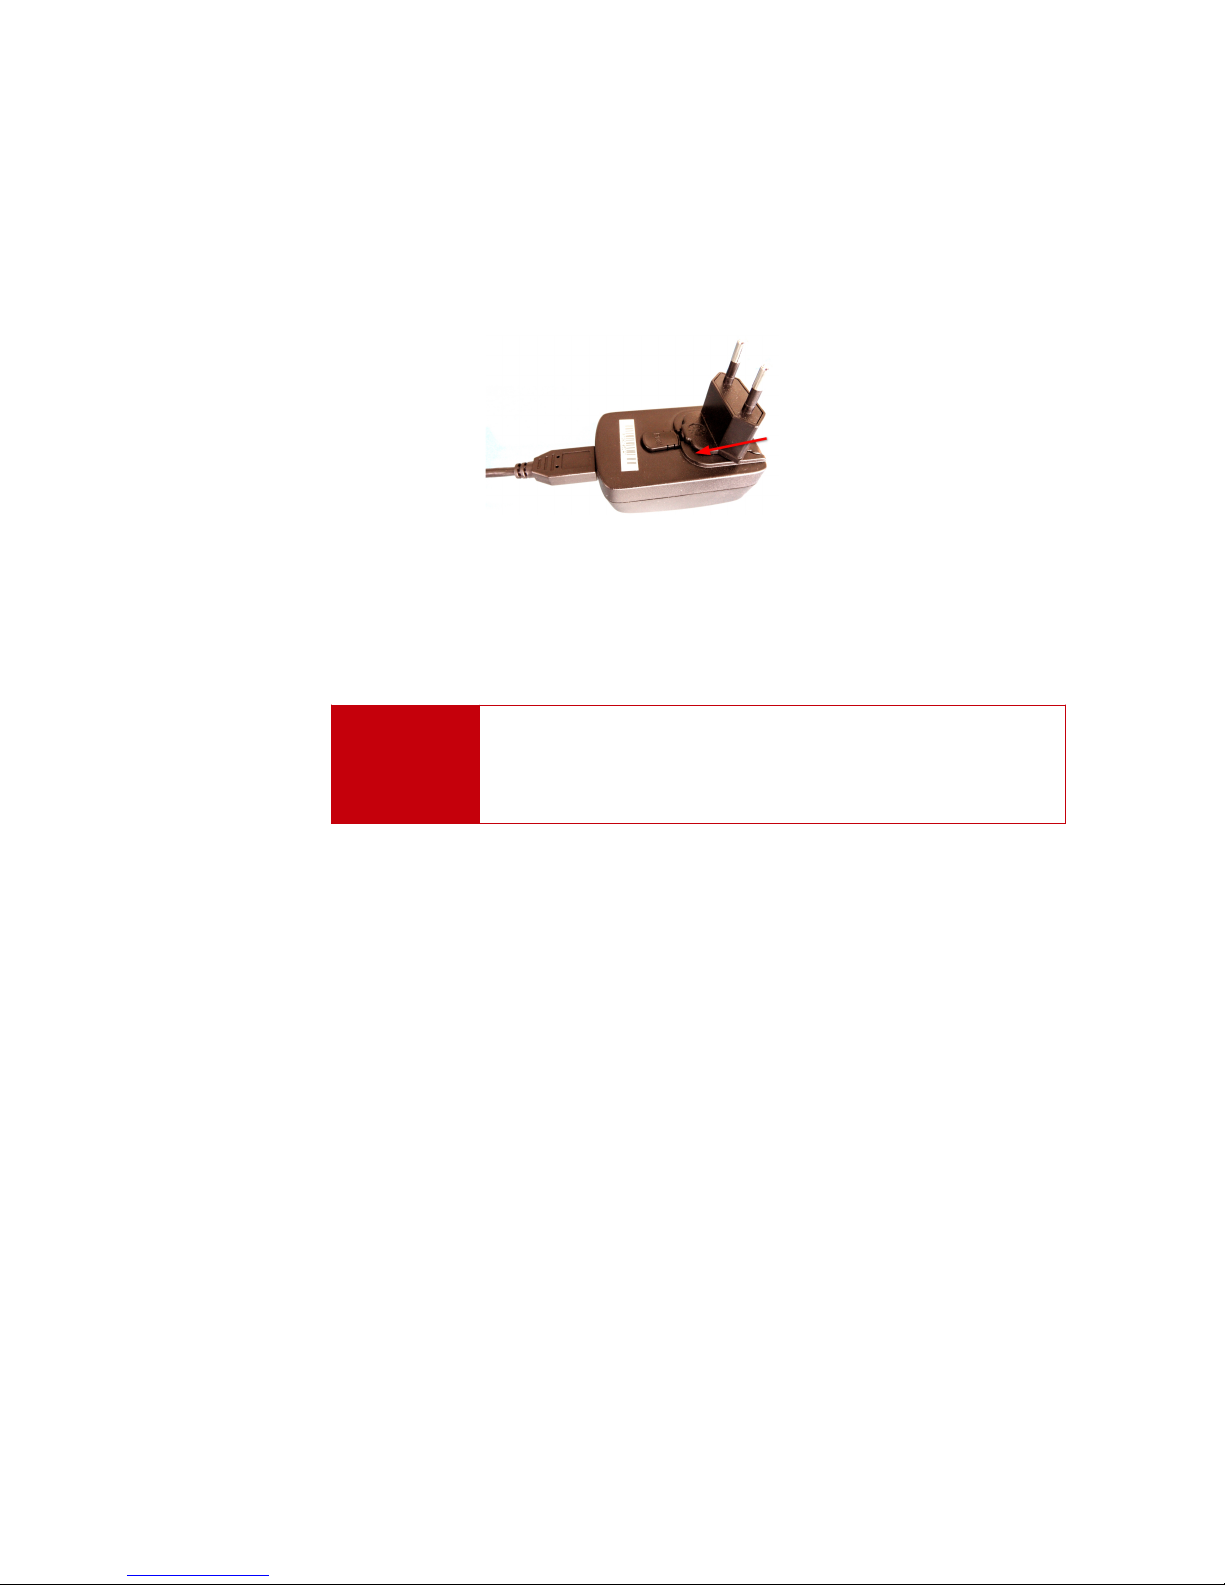
2.5 Power Supply
1. Prepare the power supply by inserting the plug that is
used in your country. An audible click indicates that the
connection has been made.
2. Connect Querx to the power supply using a micro-USB
cable.
3. Plug the power supply into a socket. The Querx status-
LED will now light up yellow.
⚠
Danger
Never use the device with a defective power supply! Risk of
death from electrical shock!
Querx can alternatively be connected to a free USB-Port, if
no free outlet is available.
2.6 Network Configuration Via DHCP
Access the integrated web-interface via LAN, in order to
configure Querx.
The network can be configured automatically, using DHCP.
The status-LED will light up yellow if the device has received
valid data.
The LED will flash yellow if a network error occurs. In this
case, check that all wires are connected correctly.
Talk to your network administrator or connect the device to
your computer directly, if the problem persists.
First Use 13
2.7 Manual Network Configuration
An ethernet connection needs to be established, in order to
configure Querx. This initial connection is normally
configured automatically, which will let you access the device
as described in chapter 3.1 Accessing the Web Interface. The
network connection will need to be configured manually, if
your network does not support DHCP, or if the computer you
wish to use for the configuration does not support mDNS.
⚠
Information
The steps detailed in the following section are not needed
by most users. Please continue reading at chapter 3 Web
Interface and Configuration Area and chapter 4 Basic
Configuration.
2.7.1 Installing the Device Discoverer
The Device Discoverer application can be found on the CD-
ROM included in the package. It can also be downloaded
from sensors.egnite.de. The application will help you set up
Querx.
1. Open the Device Discoverer installation file.
2. Follow the install wizard’s instructions.
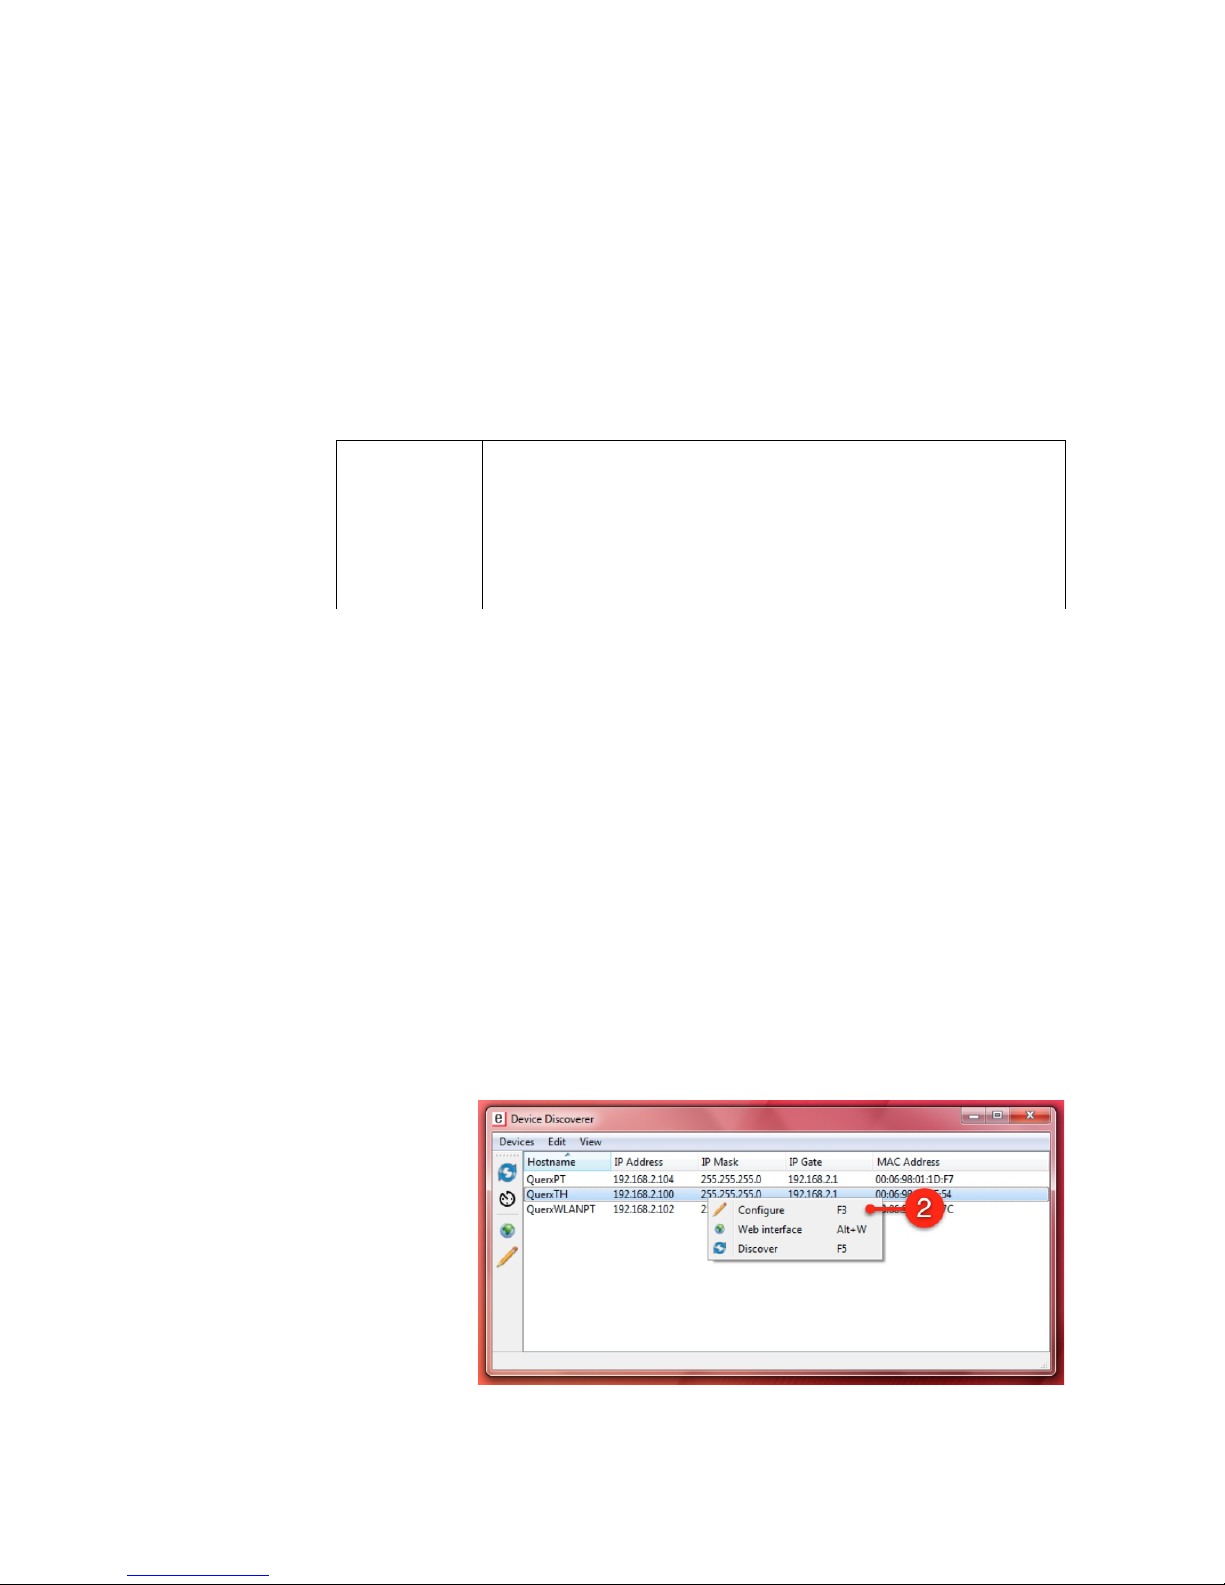
2.7.2 Configuring the Network Connection
1. Start the Device Discoverer.
First Use 14
2. Right-click the device you wish to configure and select
Configure.
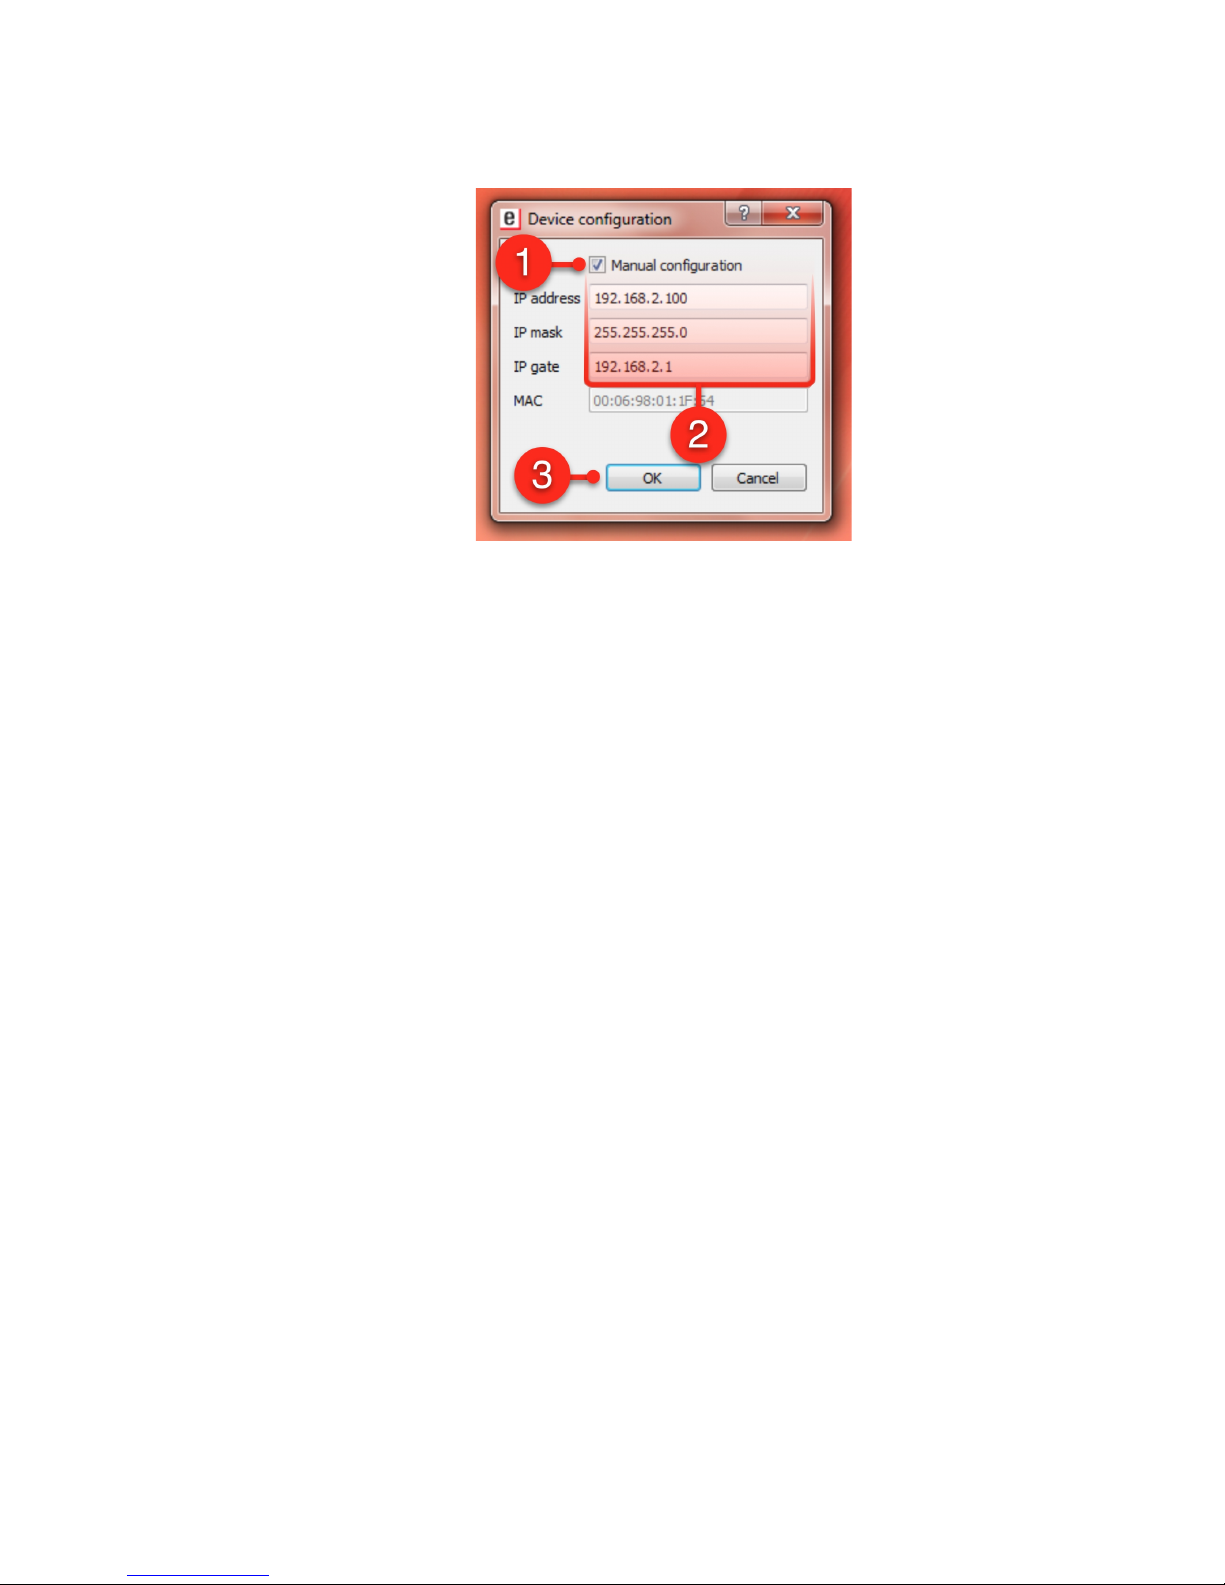
1. Activate the checkbox Manual configuration.
2. Enter the IP address, the IP mask and the IP gate.
3. Save the changes by clicking OK.
4. Querx will apply the settings and then restart. The status-
LED will light up yellow. The status-LED will flash green as
soon as the device is operational.
5. Querx is now available on your network and can be
accessed as described in chapter 3 Web Interface and
Configuration Area.
First Use 15
3 Web Interface and Configuration Area
3.1 Accessing the Web Interface
Querx is accessible via
mDNS, using the system
name. You can later customize this name.
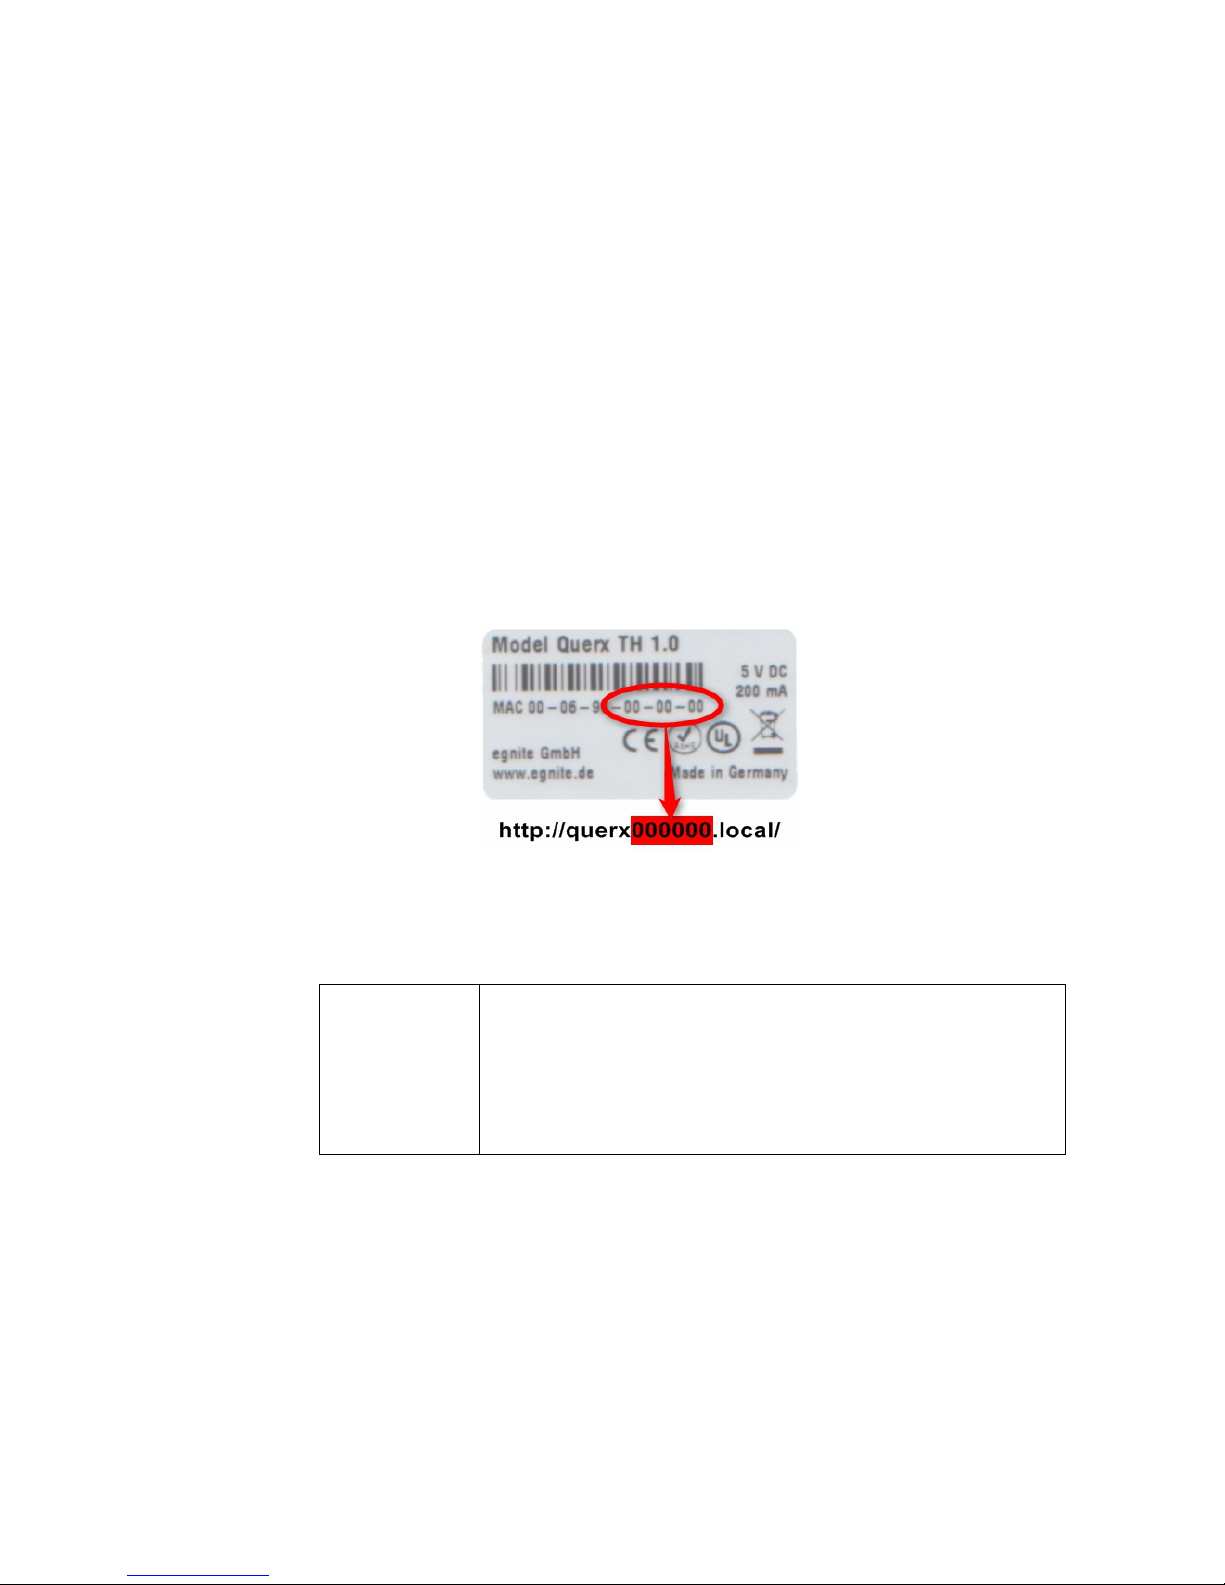
Open your web browser and enter the following URL:
http://<system name>.local/
The default system name is querx000000. The six zeros are
placeholders for the last six digits of the device’s MAC
address. The MAC address can be found on the sticker on
the back of your device.
The URL for the example in the illustration is
http://querx000000.local/
⚠
Information
You may need to flush the DNS-Cache after changing the
device’s IP address. Simply enter the command
“ipconfig /flushdns” into the command line.
Querx can be accessed
directly from the Safari web
browser, using the Bonjour menu.
Web Interface and Configuration Area 16
Access via the system
name
Access via Bonjour
⚠
Information
The network settings need to be configured manually,
which is necessary if you cannot access the web
interface. See chapter 2.7 Manual Network Configuration
for a guide.
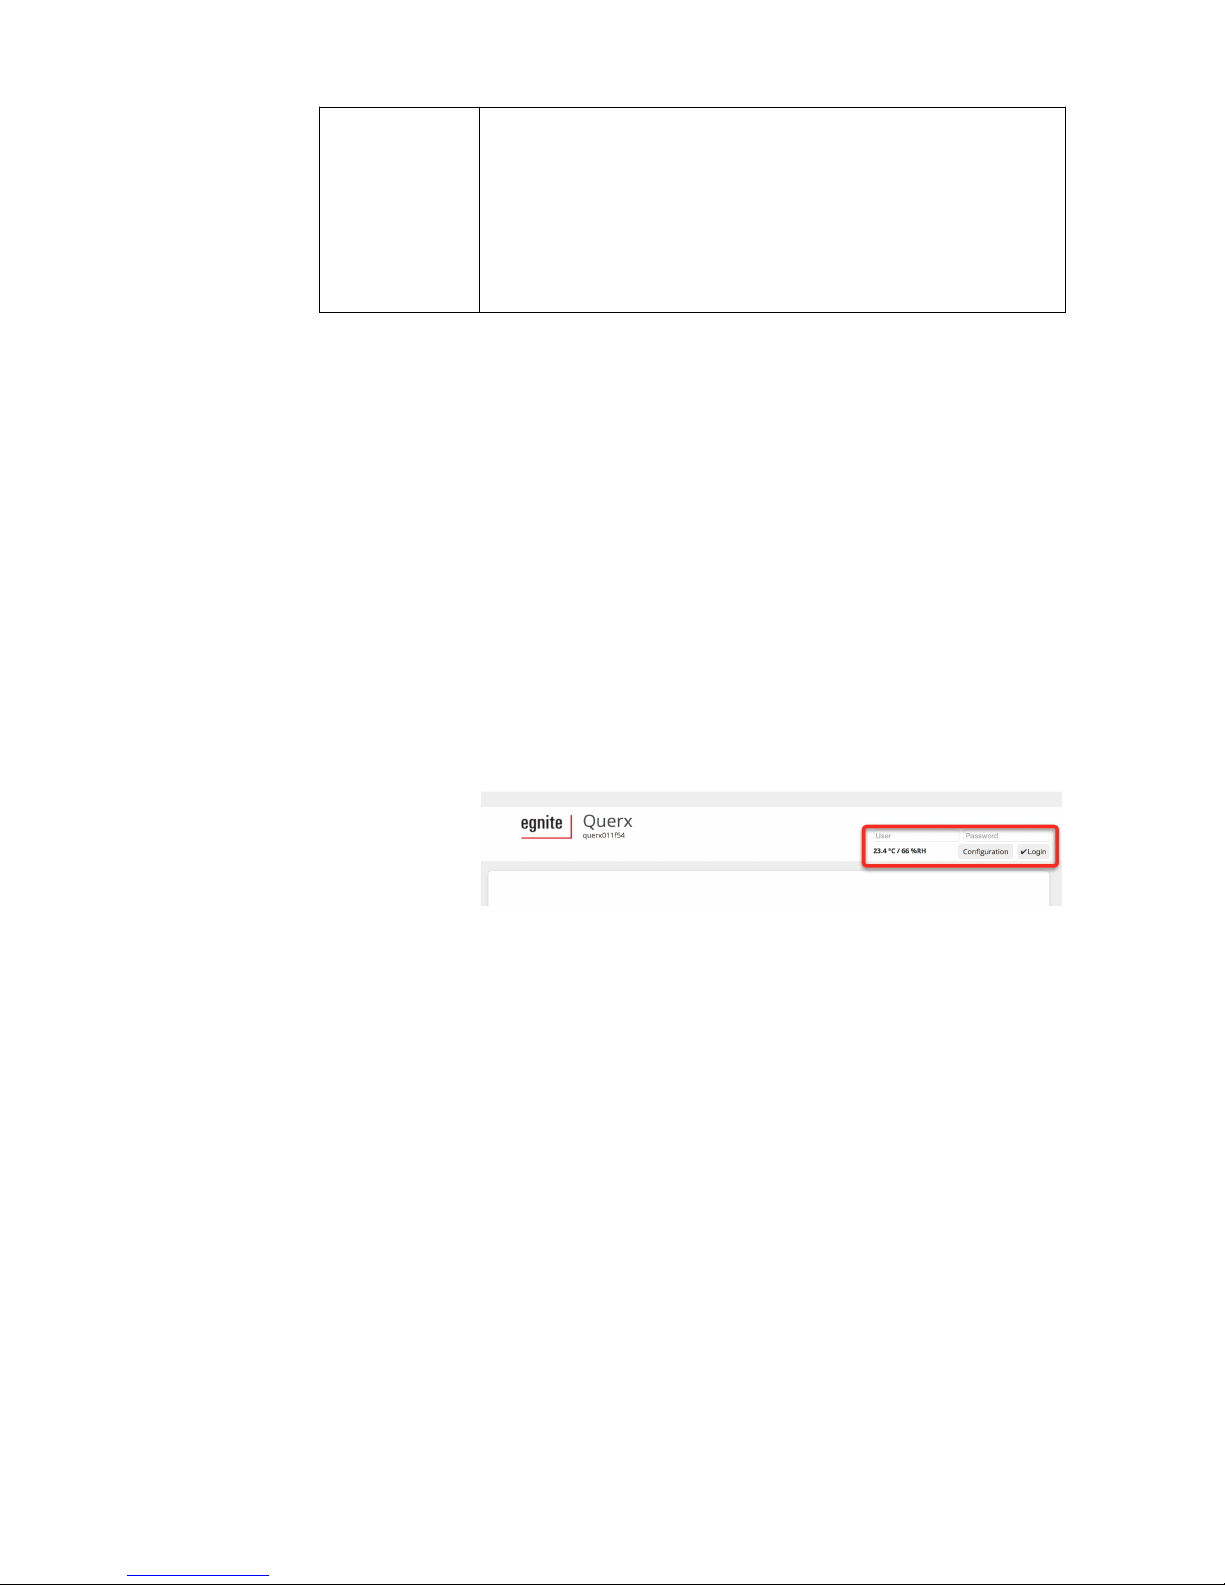
3.2 Home Page
The home page shows a graph that displays all the data
gathered by Querx. The configuration of the display and
export of data are described in the chapters 6 Configuring
the Interfaces and 7 Data Access.
The buttons that let you log in users and access the
configuration screen are located in the top right area of the
home page.
3.3 Log in as a User
If you have set up users and assigned access rights to them,
you will first need to log into the device.
1. Enter the user name into the input field User and the
password into the input field Password.
2. Click Login.
The default settings do not include any password-protected
users. Chapter 4.3 User Administration describes how to
create and manage users.
Web Interface and Configuration Area 17
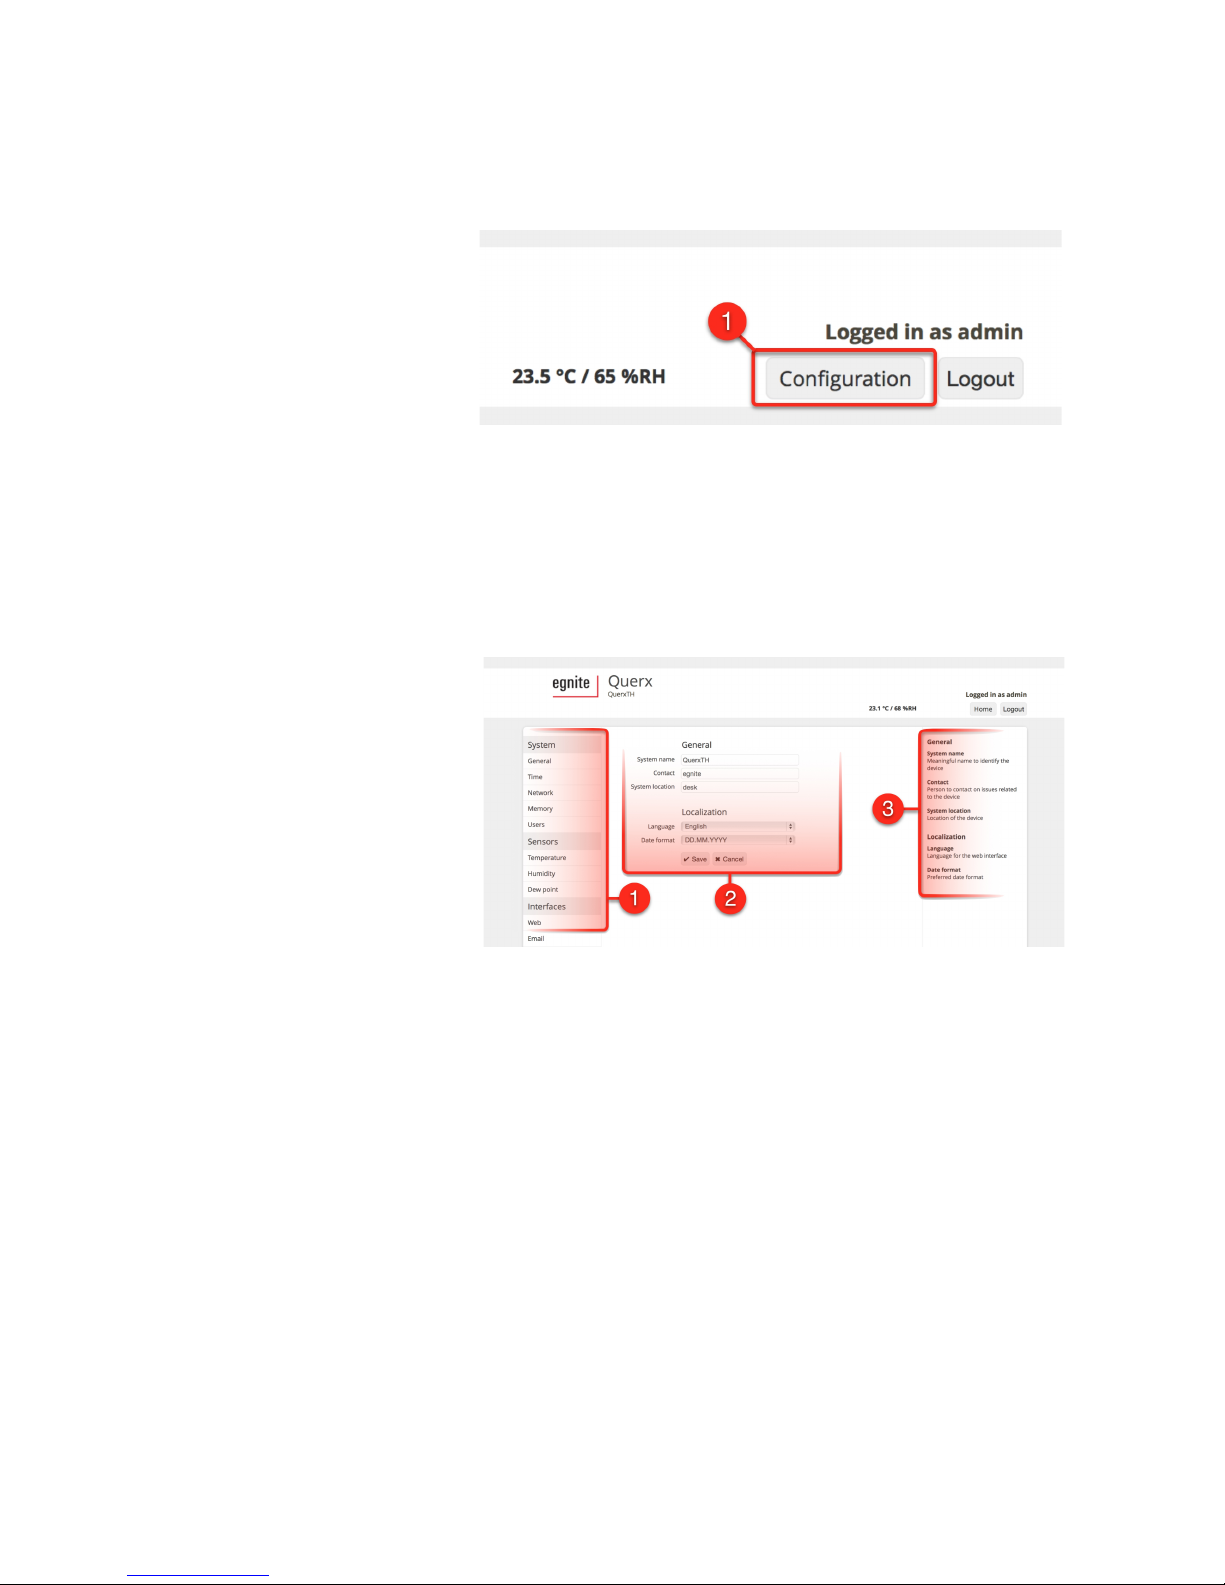
3.4 Accessing the Configuration Area
Now enter the configuration area.
1. Click the button Configuration in the top right screen area.
3.5 The Configuration Area
You are now viewing the start screen of the configuration
area. You can change all the device’s settings from here.
1. Setup menu
Navigate to all the setup options from this menu.
2. Settings
The middle area lets you change the corresponding
settings.
3. Help section
The section on the right of the screen displays short
explanations of all the parameters that can be found on
each page.
Web Interface and Configuration Area 18
4 Basic Configuration
4.1 General Settings
The following settings need to be configured for Querx to
function correctly.
4.1.1 General Information, Language and Date
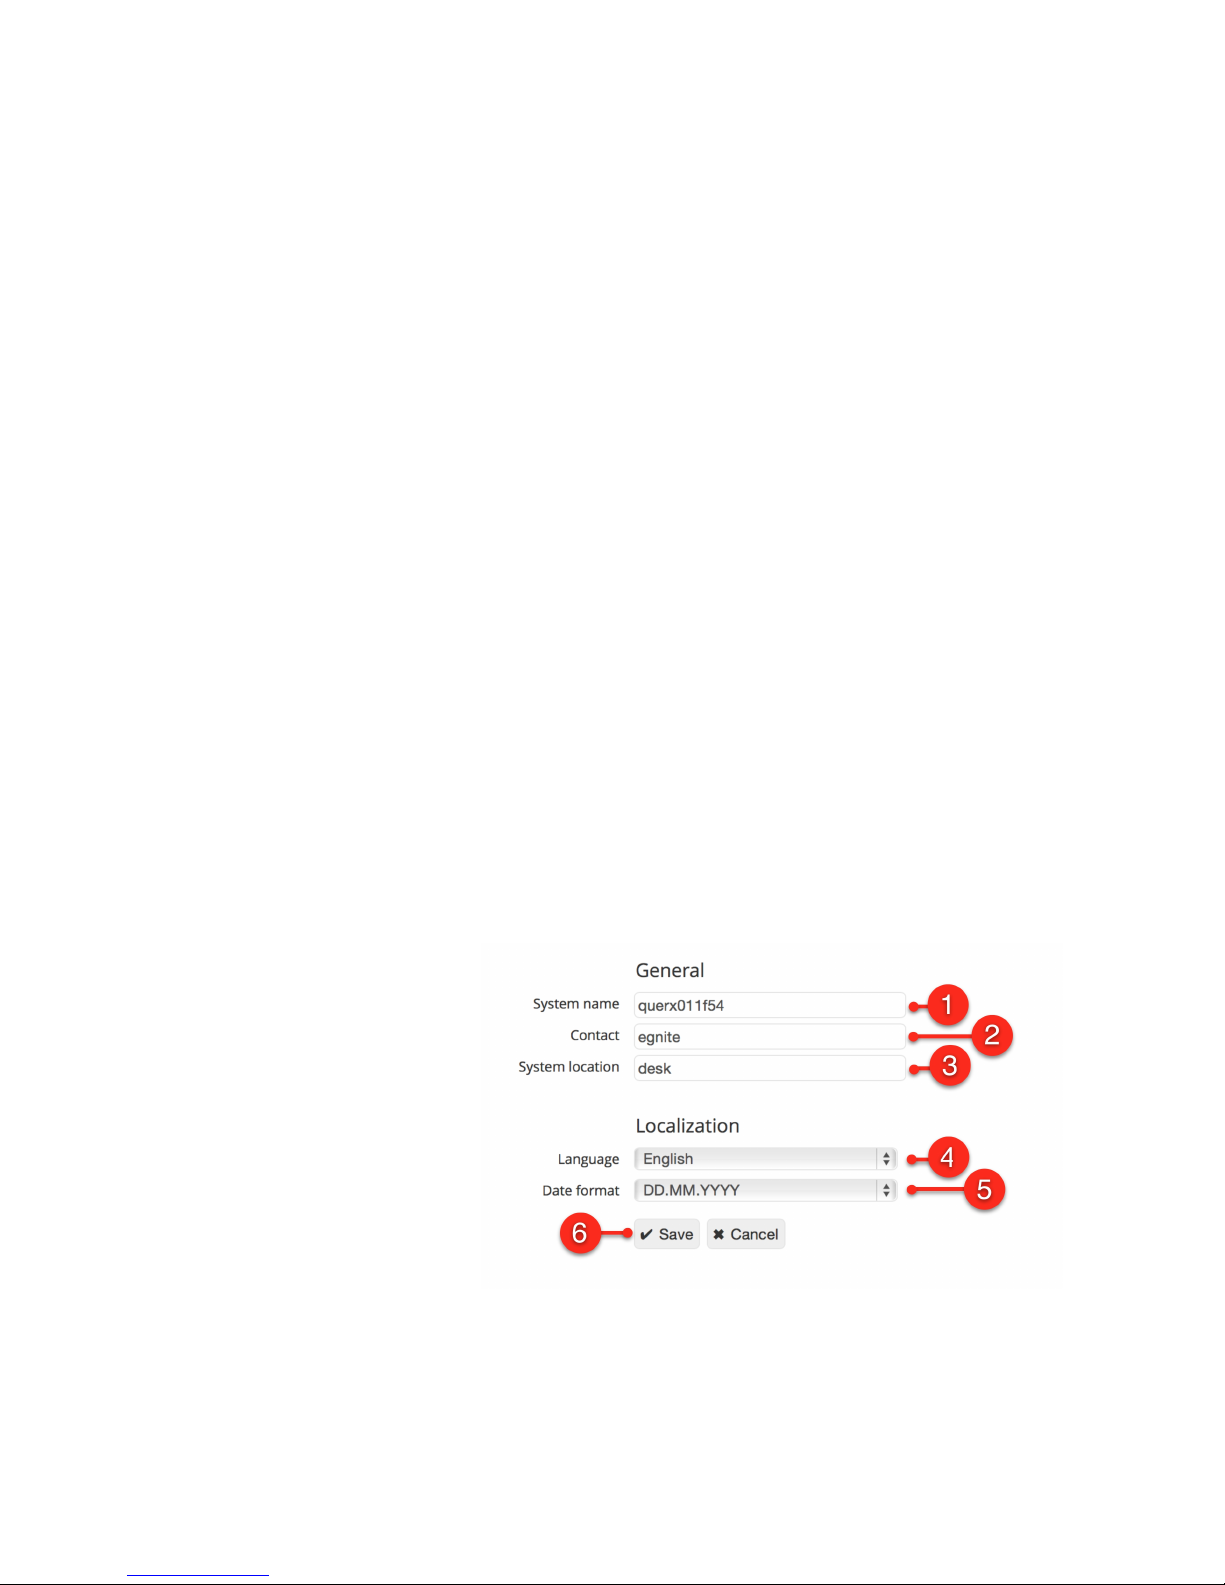
The page System / General is the configuration area’s
homepage. This page lets you enter general information on
the device.
The system name identifies the device whenever it sends
alarms and when using M2M interfaces. It also serves as the
host name which can be used to access Querx via a web
browser (cf. section 3.1 Accessing the Web Interface).
The contact and location parameters can be retrieved via
SNMP (cf. section 6.5 SNMP).
The language selection lets you set the web interface’s
language. The date format field is used to select the format in
which calendar dates are displayed in the web interface and
in exported files.
1. Enter the device’s system name in the input field System
name.
Basic Configuration 19

2. Enter the responsible contact person into the input field
Contact, if using SNMP.
3. Enter the device’s location into the input field Location, if
using SNMP.
4. Select the Language in which the web interface is to be
displayed.
5. Select the Date format for the web interface and exported
files.
6. Click Save to apply your changes.
Basic Configuration 20
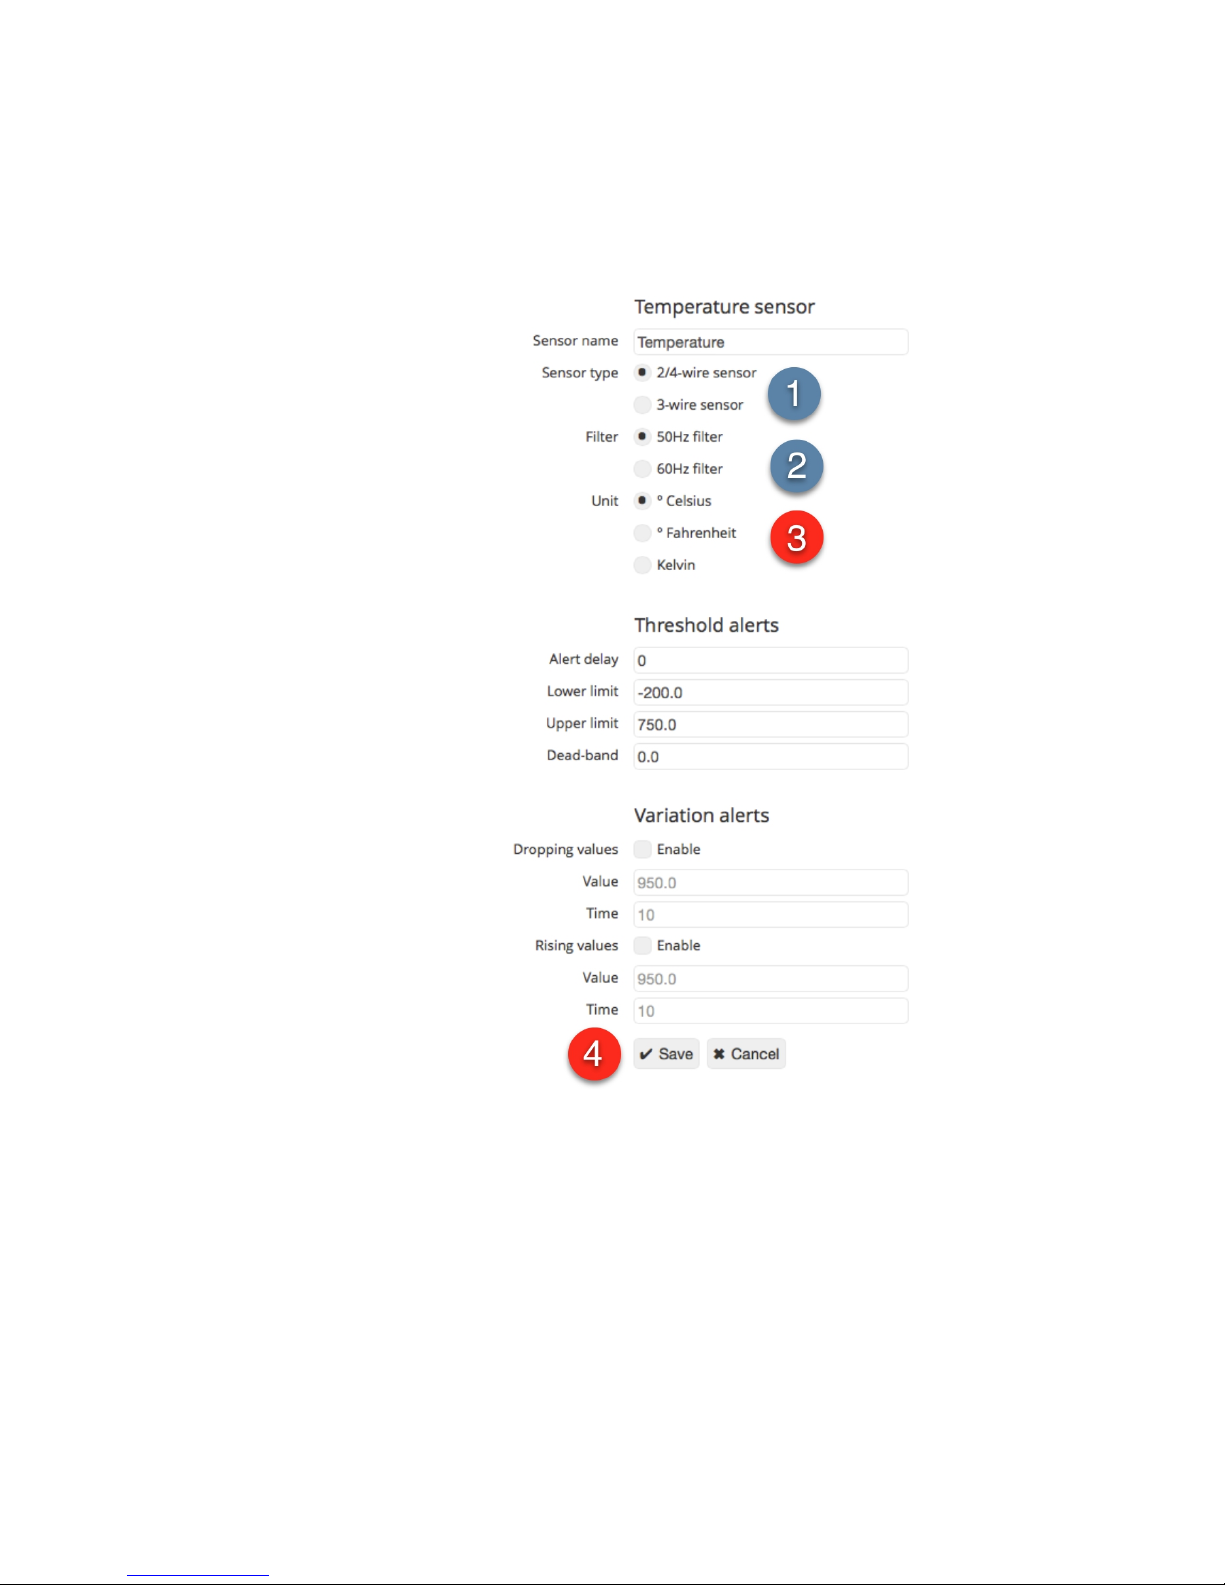
4.1.2 Configuring the Temperature Sensor
Enter the page Sensors / Temperature in the configuration
area, in order to configure the temperature sensor.
1. PT Models: Select whether you are going to use a 2-. 3- or
4-wire sensor in the input field Sensor type.
2. PT Models: Set the Mains filter to the mains frequency
used in your country. In Europe this is 50 Hz.
3. Enter the physical Unit which you want Querx to use by
selecting ° Celsius, ° Fahrenheit or Kelvin.
4. Click Save to apply your changes.
Basic Configuration 21
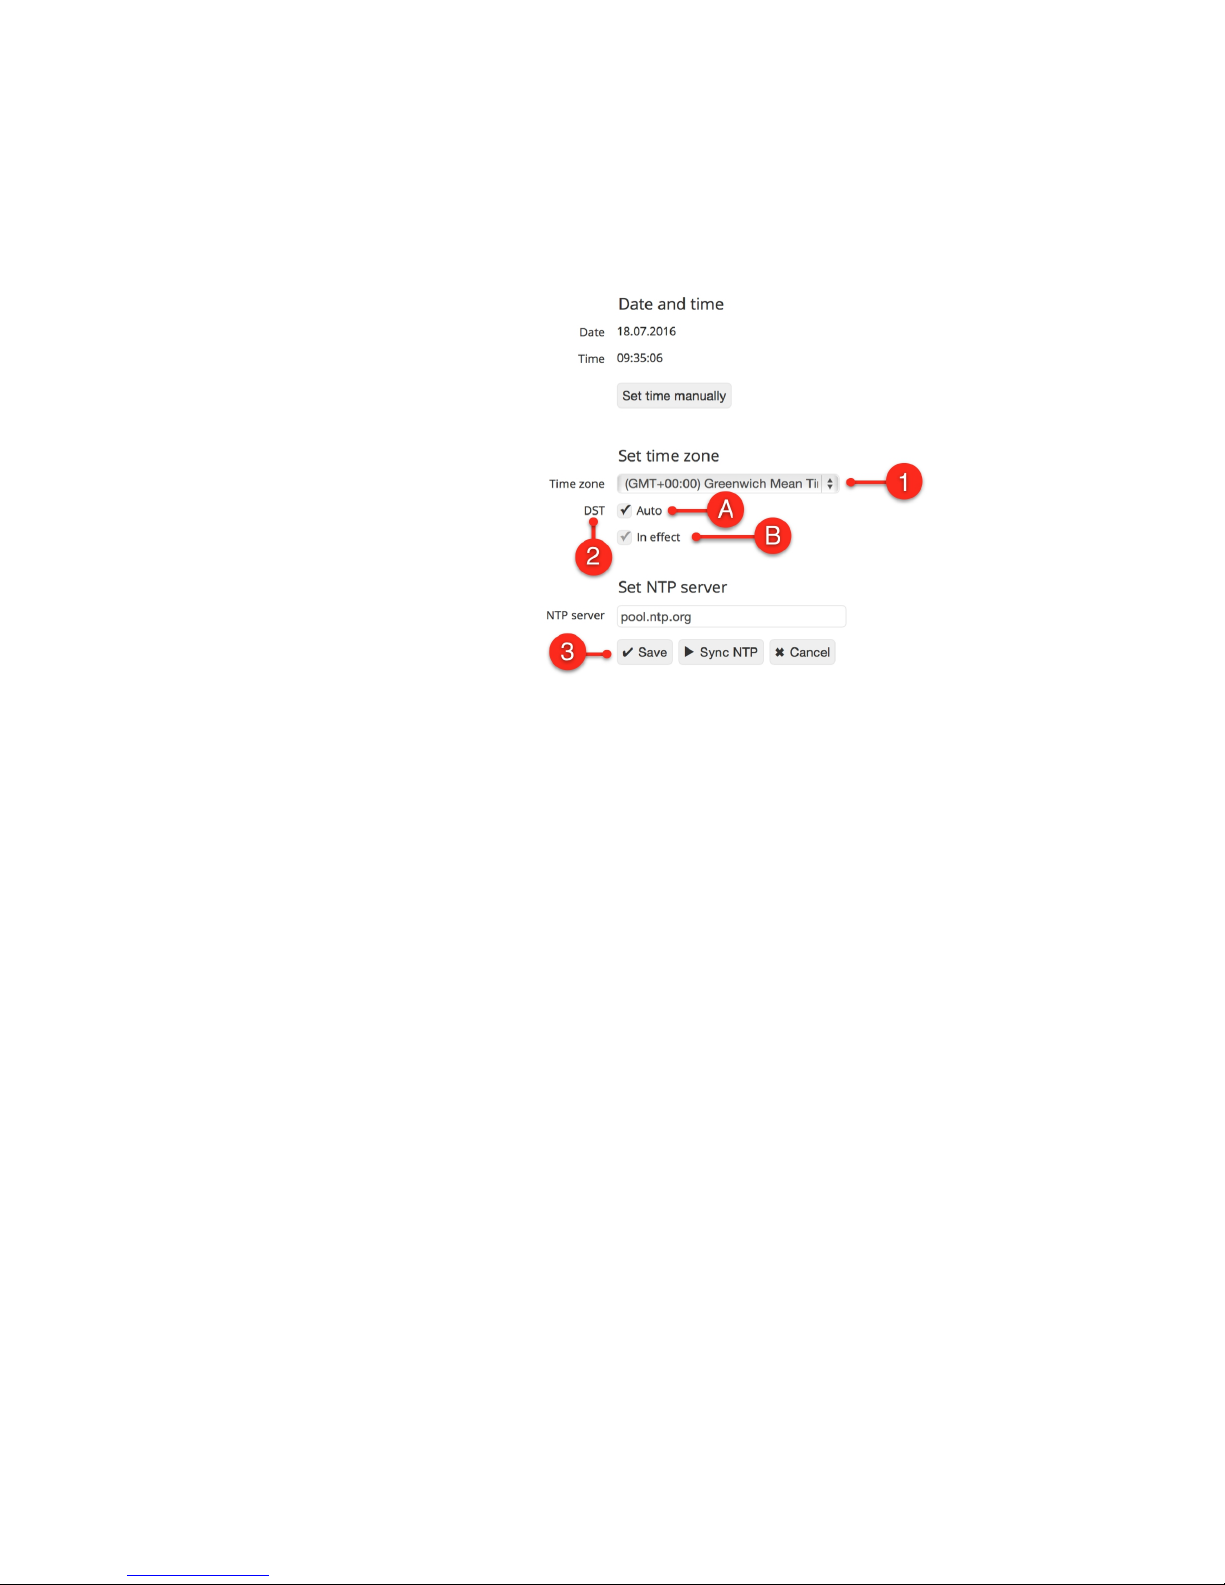
4.1.3 Setting the System Time
Open the page System / Time.
First, set the Time zone:
1. Select the correct time zone for your country from the
drop down menu Time zone.
2. Now select the settings for daylight saving time.
A. Select Auto in the DST settings, if your country uses
daylight saving time and the clocks are changed on the
last Sundays of March and October.
B. Deactivate the setting Auto, if your country uses
daylight saving time but the clocks are not changed on
the last Sundays of March and October. In this case,
you will need to manually select whether daylight
saving time is currently in effect, whenever the clocks
are changed.
3. Click Save to apply your changes.
Basic Configuration 22
⚠
Information
The following settings are recommended for users in
central Europe:Time zone: (GMT +01:00) Amsterdam,
Berlin […]
DST: automatic
The following settings are recommended for users in the
UK:
Time zone: (GMT +00:00) Greenwich Mean Time: Dublin,
Edinburgh, Lisbon, London)
DST: automatic
The settings for users in the US depend on the time zone
you are in.
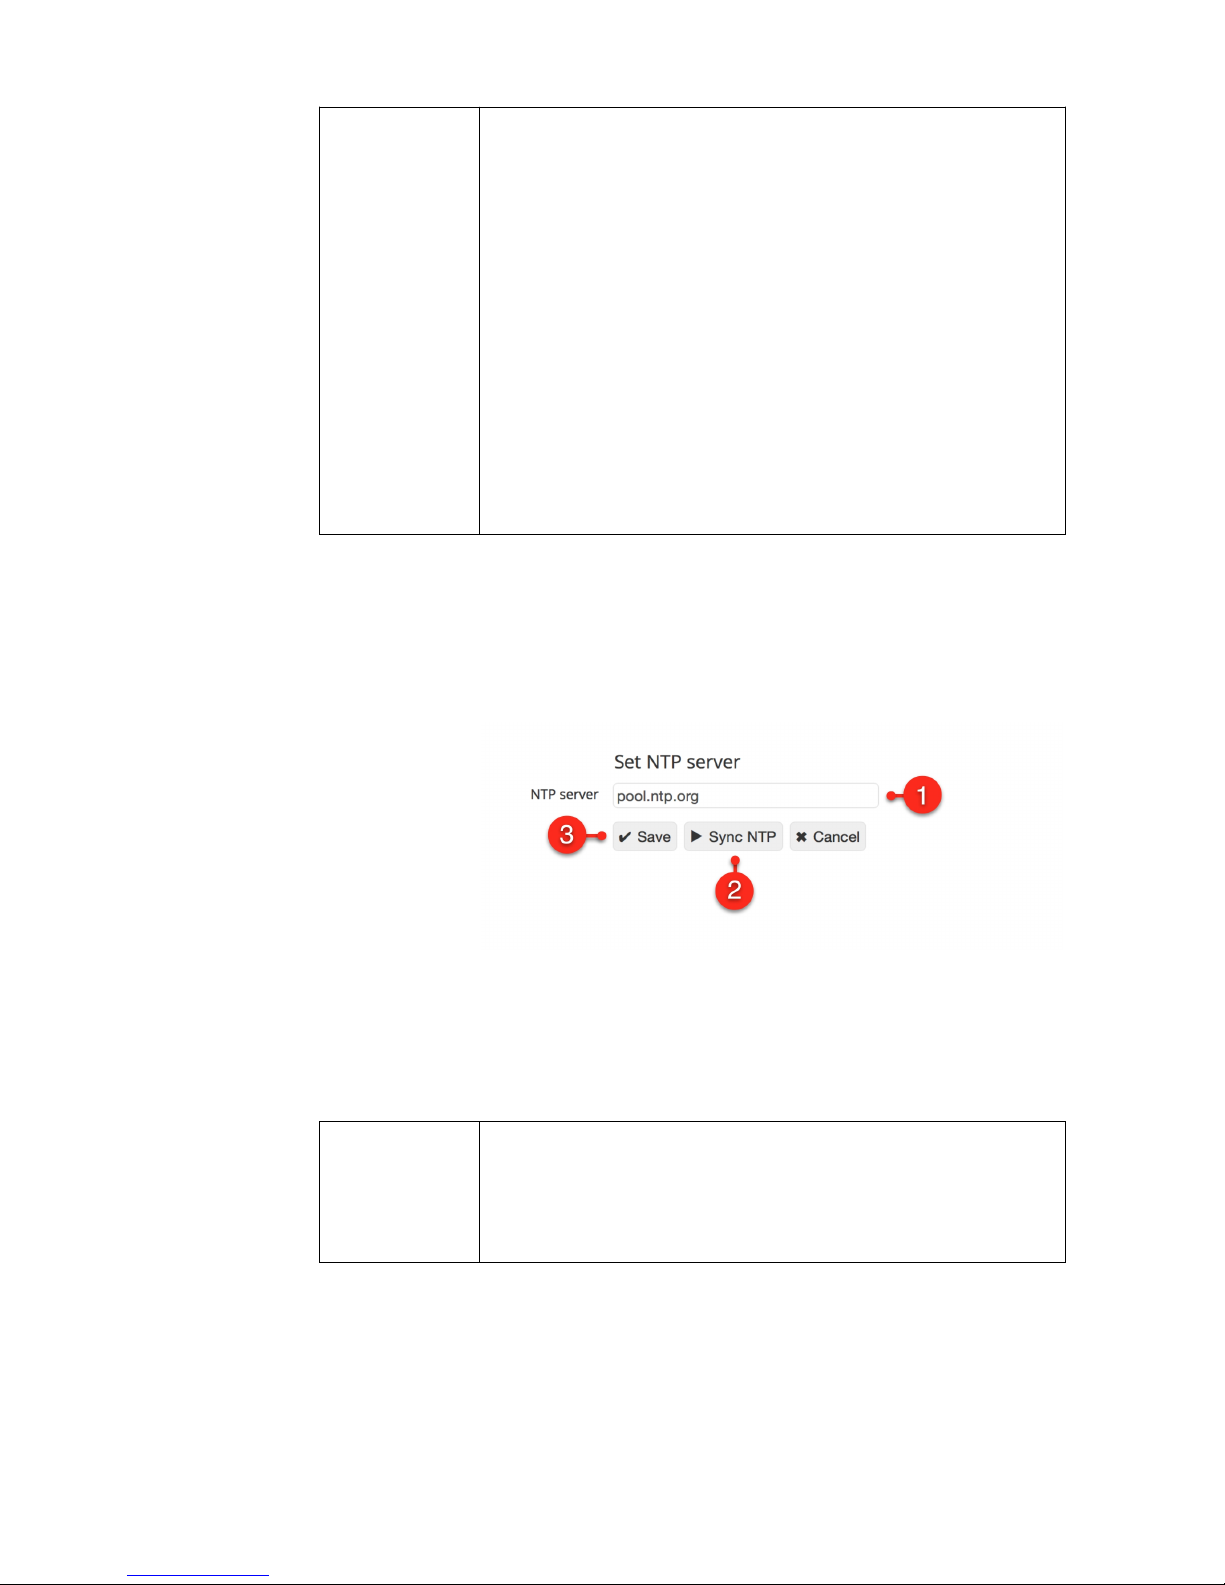
The automatic configuration of
date and time via SNTP is
advisable if the device is connected to the internet, or an
NTP server is accessible on the local network.
1. Enter an NTP-server.
2. Click Sync NTP to update time and date.
3. Click Save to apply your changes.
⚠
Information
If a valid NTP-server is entered, time and date are
automatically updated once an hour.
Time and date can also be set
manually, if no NTP-server is
Basic Configuration 23
Updating date and time
over the network
Setting time and date
manually
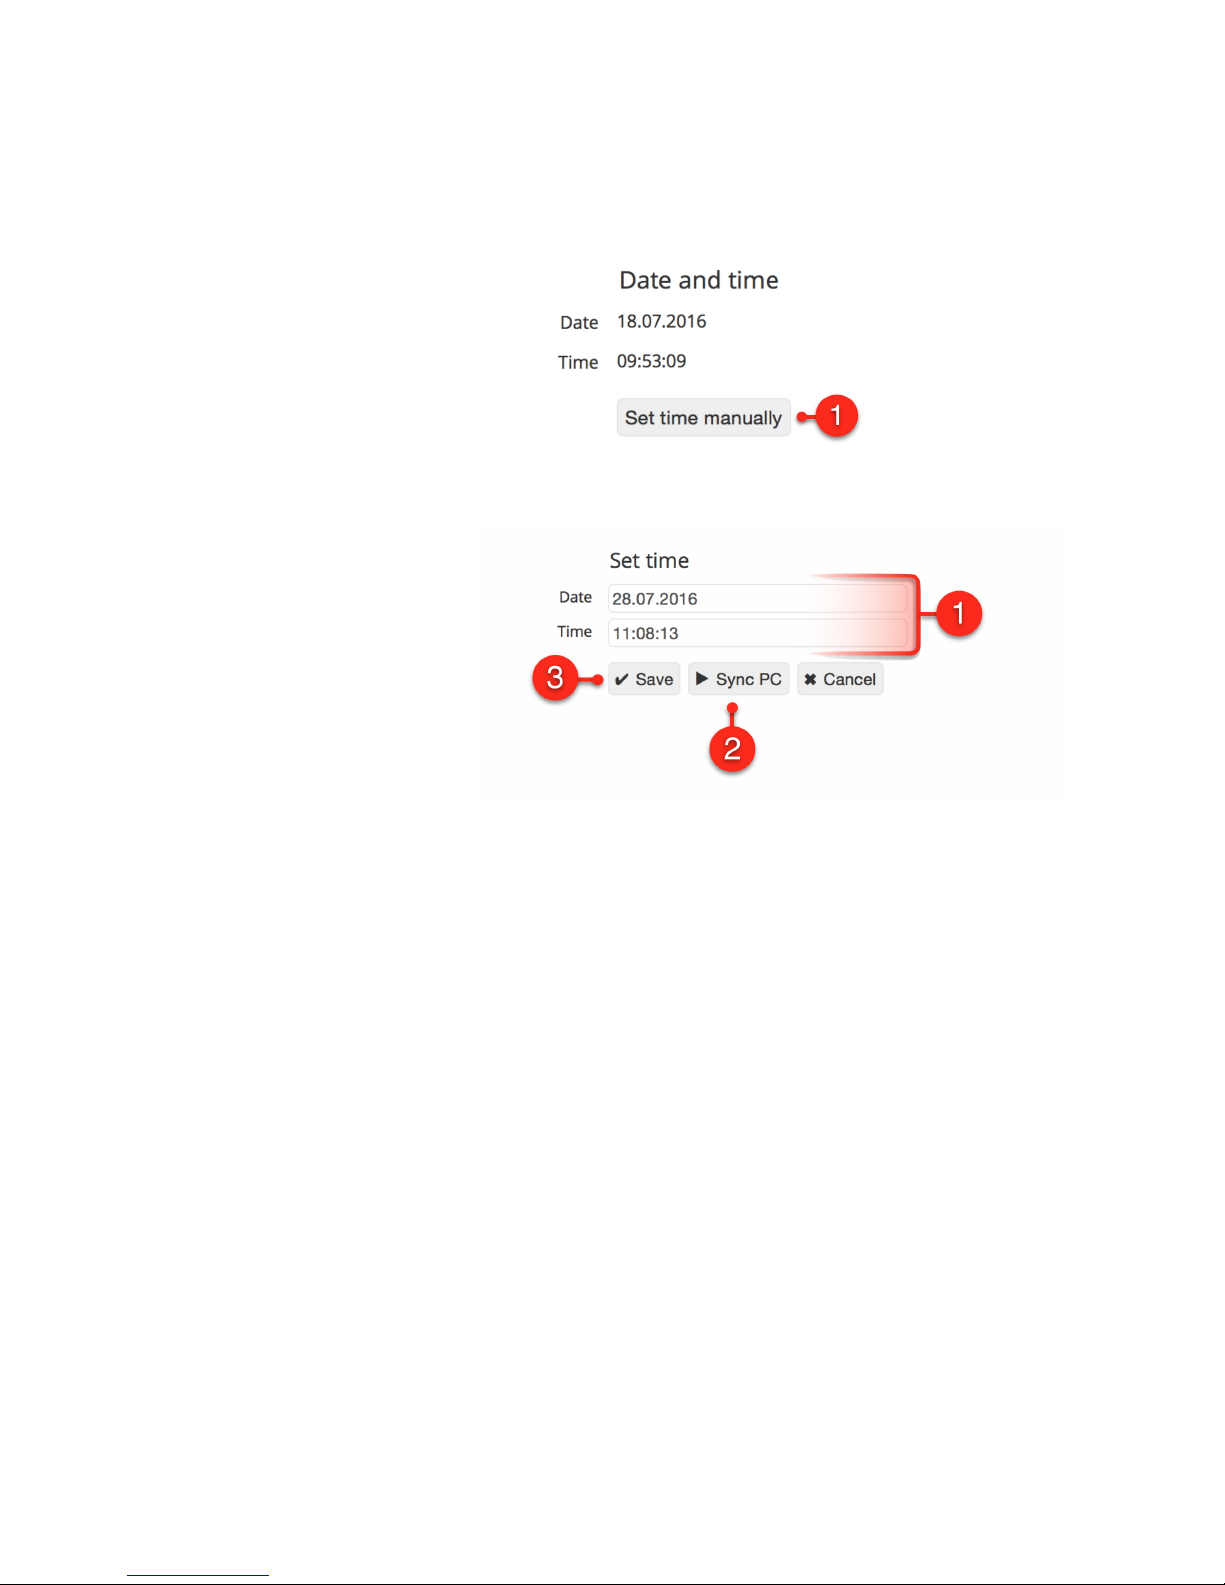
available. Querx includes a battery backed real-time clock,
which lets it keep time if a power shortage should occur.
1. Click Set time manually.
1. Type the values into the input fields Date and Time. Please
enter these in the format which you selected on the page
System / Basic settings.
2. Alternatively, you can synchronize the date and time
settings with the PC you are using to configure the device.
Simply click Sync PC to do so.
3. Click Save to apply your changes.
4.1.4 Configuring the Data Logger
Querx features an integrated data logger that tracks the
following data in configurable time intervals:
Peak temperature values
TH models: Peak humidity values
Basic Configuration 24
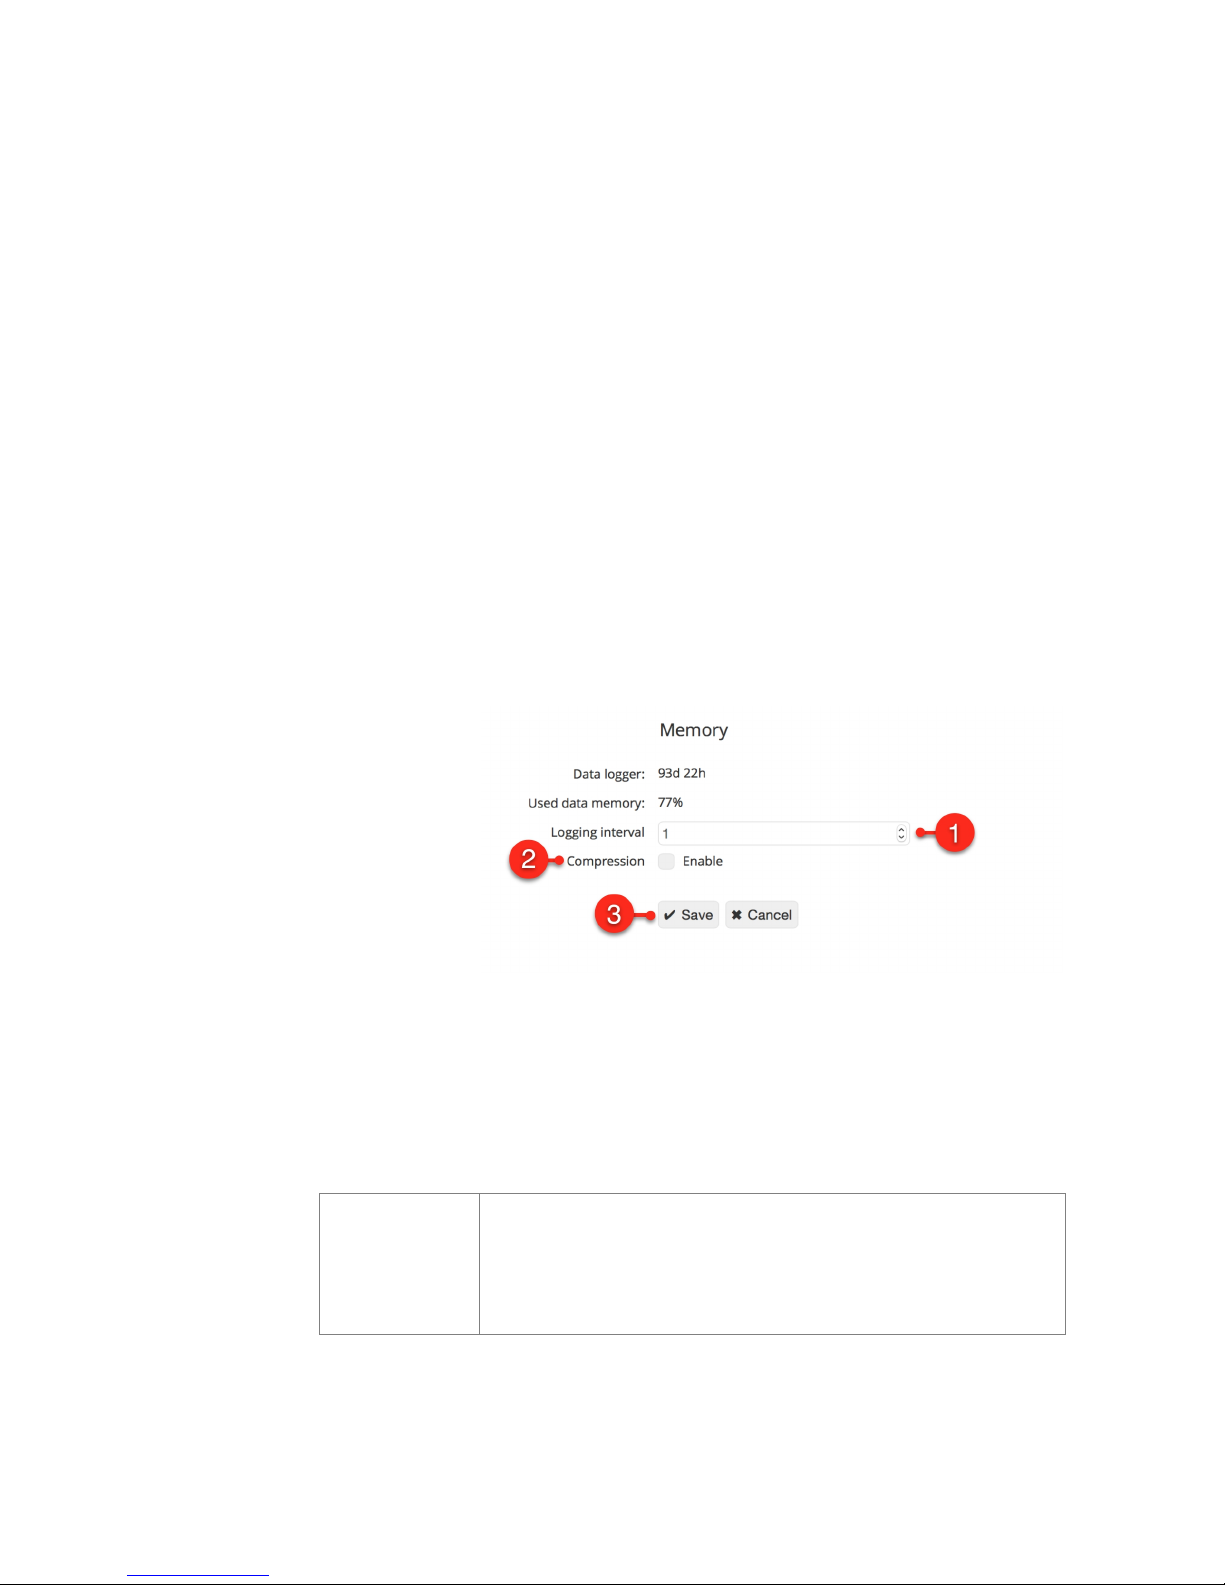
Lowest temperature values
TH models: Lowest humidity values
Average temperature values
TH models: Average humidity values
Querx can save up to 73,728 entries; the WLAN models have
a capacity of 4 million entries. This means that Querx can
store the data of 51 days, when logging one entry per
minute. Querx WLAN can track data for 7.5 years when using
the same settings. Data compression can be activated, in
order to increase the timespan that can be logged. If
compression is activated, entries are only saved if any
change has occurred since the last entry.
The memory is designed as a ring memory. If the memory’s
maximum capacity is reached, the oldest entries will be
overwritten.
1. Set the interval between logged entries by entering the
required number of minutes in the input field Logging
interval.
2. If required, activate data Compression.
3. Click Save to apply your changes.
⚠
Information
Data compression can lead to noncritical display errors in
the representation of measurements in the diagram.
Basic Configuration 25
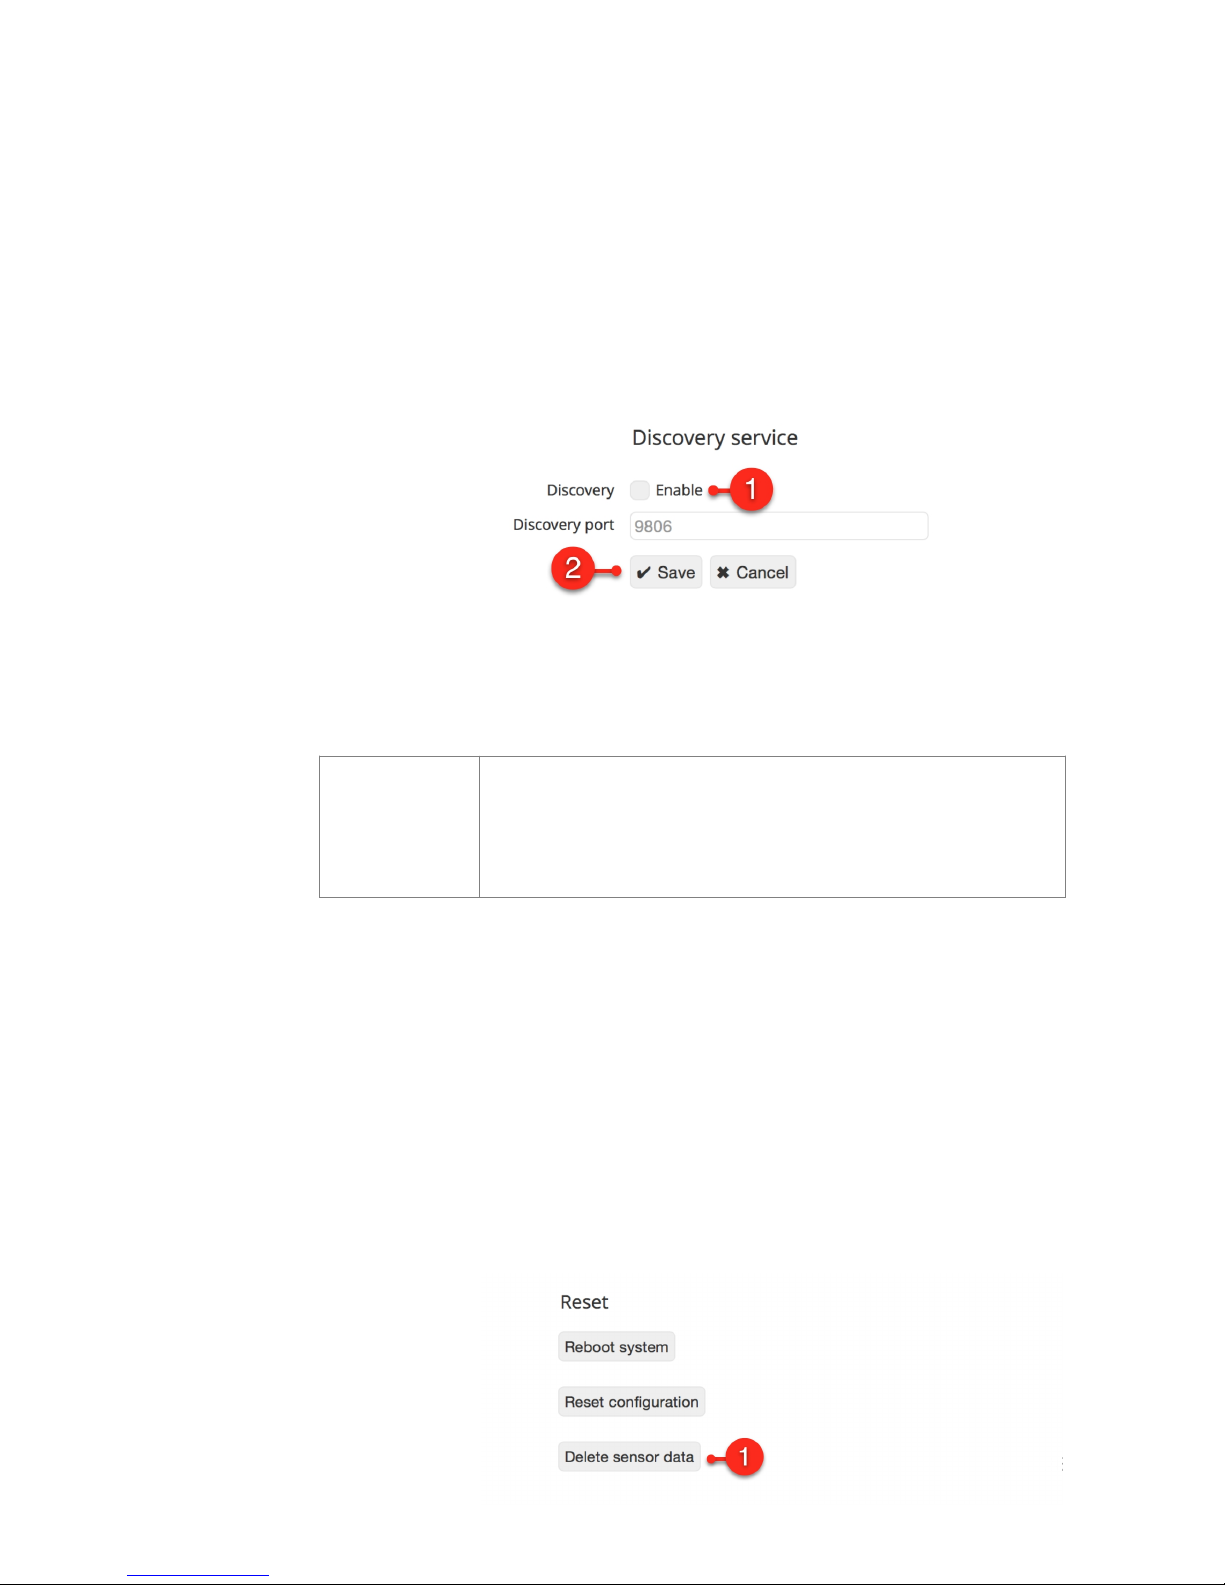
4.1.5 Deactivating the Discovery Function
In its as-delivered state Querx is accessible via the Discovery
Service in order to facilitate the manual configuration of its
network settings using the Device Discoverer. It is advisable
to deactivate this service once the device is configured, to
increase the system’s security. For this purpose, open the
page System / Network.
1. Deactivate the checkbox Discovery.
2. Click Save to apply your changes.
⚠
Information
Querx will no longer be displayed in the Device
Discoverer if the Discovery Service is deactivated.
4.1.6 Resetting the Internal Memory
Querx begins logging data as soon as the device is taken into
operation.
The previously logged data needs to be deleted, in order to
begin logging data according to the basic settings you have
configured.
Open the page Maintenance / Reset.
Basic Configuration 26
 Loading...