

Eglo NOOSA Series, NOOSA 203369, NOOSA 203371, NOOSA 203372, NOOSA 203373 Installation Manual, Use & Care Manual
...
NOOSA Ceiling Fan
NOOSA Ceiling Fan
203369 203371
203372 203373
Installation Manual
Use & Care Guide
Warranty Information
NOOSA Ceiling Fan with Light
202969 202971
202972 202973
Distributed by:
Reduction Revolution Pty Ltd
www.reductionrevolution.com.au
NOOSA Ceiling Fan
Do not dispose of electrical appliances as unsorted municipal waste, use separate collection facilities. Contact your local council for
more information regarding the collection systems available. If electrical appliances are disposed of in landfills or dumps, hazardous
substances can leak into the ground water and get into the food chain, damaging your health and well-being.
EGLO Lighting has a policy of continual product improvement and development, dimensions, hardware and designs may change to reflect
this policy. EGLO reserves the right to discontinue or change product specifications & designs at any time without notice and without
incurring obligations. The images including all features and specifications in this manual are for illustrative purposes only. Product details,
images & line drawings may vary depending on specific product models.
NOOSA Ceiling Fan
CONTENT
FOR YOUR SAFETY: 4
BEFORE INSTALLATION: 5
SPECIFICATIONS: 5
SELECTING A LOCATION: 6
INSTALLING THE HANGING BRACKET: 6
ASSEMBLING AND INSTALLING THE FAN: 6
WIRING CONNECTIONS: 8
OPERATING YOUR REMOTE CONTROL (NON-LIGHT MODELS): 8
OPERATING YOUR REMOTE CONTROL (LIGHT MODELS): 9
CODE LEARNING MODE: 9
REVERSE FUNCTION: 9
CLEANING AND MAINTENANCE: 10
RIPPLE CONTROL: 10
TROUBLE SHOOTING: 10
TROUBLE SHOOTING CHECKLIST: 11
WARRANTY CLAIMS ON INSTALLED PRODUCTS: 12
A. AUSTRALIAN CONSUMER LAW: 12
B. LIMITED REPAIR / REPLACEMENT WARRANTY: 12
C. IN-HOME WARRANTY: 13
D. WARRANTY TRANSFER: 13
E. COMMERCIAL USE: 14
WARRANTY CONDITIONS: 15
HOW TO MAKE A WARRANTY CLAIM: 15
Thank you for purchasing your new EGLO ceiling fan.
To ensure a safe and successful installation, please make sure to read this manual, ensure
it is on hand for your installer to refer to, and keep in a safe place for future reference.

NOOSA Ceiling Fan
FOR YOUR SAFETY:
1. Please read this manual carefully before attempting the assembly or installation of your new ceiling fan.
2. ALL electrical work should only be carried out by a suitably qualified and licenced electrical contractor. This ceiling fan MUST be
installed ONLY by a suitably qualified and licenced electrical contractor.
3. This appliance is not intended for use by persons (including children) with reduced physical, sensory, or mental capabilities, or lack
of experience and knowledge, unless they have been given supervision or instruction concerning the use of the appliance by a person
responsible for their safety.
4. Do NOT allow children to play with this appliance, and supervise children around electrical devises at all times.
5. Before commencing any electrical work, ensure the power is disconnected and/or the mains switched off at the circuit box and ensure
all pole isolation of the power supply.
6. This ceiling fan can weigh up to 15Kg. The fixing point for your ceiling fan must be of sound construction, undamaged, and capable
of supporting a load 4 times the weight of the fan plus the method of attachment. Verifying the stability of the mounting structure
is the sole responsibility of the consumer and qualified installer.
7. Care needs to be taken to ensure the installation location does not allow the fan blades to come into contact with any object or
surface. There must be a minimum of 30cm clearance between the blade tip (end) and the nearest wall or object. Reduced clearances
to walls or ceilings can also reduce the amount of air your fan can move.
8. The installation must also allow for a minimum clearance of 2.3m between the floor and the bottom of the blades. The installation
must allow for a minimum of 3.0m between ceiling fans.
9. The fan must be earthed.
10. The fan must be connected to a mains supply only. Fans connected to alternate power systems such as Solar, Wind, Battery etc will
not be covered under the terms of this warranty.
11. Use ONLY the EGLO controller supplied with your fan. Use of non-standard or solid-state dimmer type controllers can cause inferior
performance, and permanently induce a humming noise in your fan motor which cannot be repaired, and which will not be covered under
warranty.
12. Do NOT change the direction of your fan whilst it is spinning. ONLY change the direction after the fan blades have come to a complete stop.
13. Do NOT insert any object into the fan blades whilst in operation, as this can cause damage to the fan, and personal injury.
14. Do NOT use ceiling fans and gas appliances in the same room at the same time.
15. Only globes specified on the products rating label are to be used in EGLO ventilation products.
16. All EGLO products are warranted to be free from defects in workmanship and materials provided the products are used with a voltage
supply within the range the product is designed to operate.
17. This fan is designed for use indoors only.
18. EGLO lighting will not be liable for any advice given to the consumer from any of our suppliers or third parties, related or otherwise.
19. Proper performance relies on the right fan being correctly installed in the optimum location. Fans that do not perform as expected
and which are not faulty cannot be replaced or exchanged under warranty.
4
20. The important safeguards and instructions in this manual are not designed to cover every possible condition or circumstance. It is
understood that common sense, caution and care are factors that cannot be built into the product, those using and maintaining this
product must supply these factors.
NOOSA Ceiling Fan
BEFORE INSTALLATION:
• Carefully unpack your fan on a soft surface to avoid damage to the fan finish.
• Do not lay the motor housing on its side, as the decorative housings may become bent or
damaged.
• Check that all parts are present before commencing assembly. Refer to Parts List.
• If any parts are missing, carefully check the packaging, polyfoam and plastic bags for
the missing parts, and if they cannot be located, contact EGLO for assistance before
commencing assembly or installation.
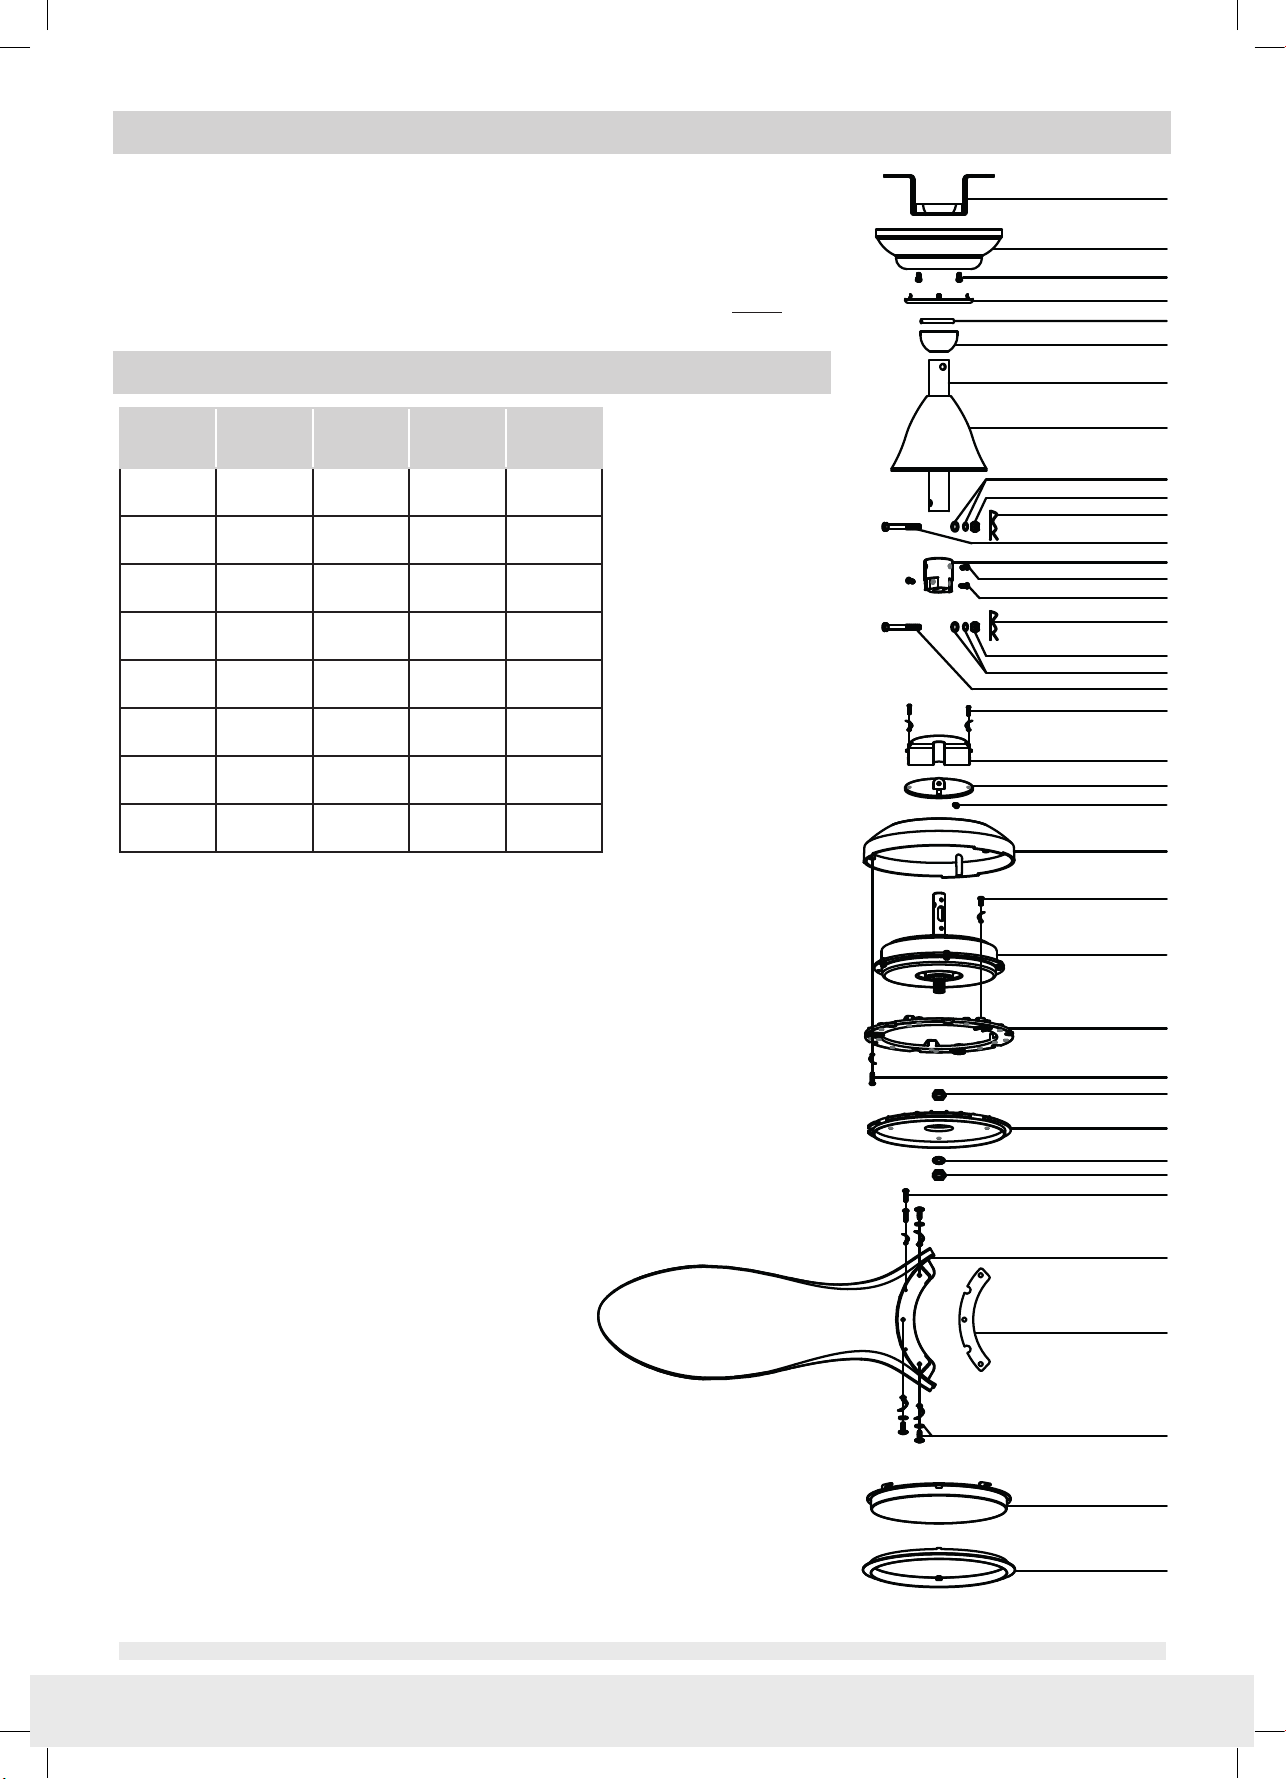
SPECIFICATIONS:
Motor
Model Input V
202969 220-240V 24W 18W 6.3 Kg
202971 220-240V 24W 18W 6.3 Kg
202972 220-240V 37.6W 18W 6.8 Kg
202973 220-240V 37.6W 18W 6.8 Kg
203369 220-240V 24W - 6.0 Kg
203371 220-240V 24W - 6.0 Kg
203372 220-240V 37.6W - 6.4 Kg
Wattage Light Weight
Hanger Bracket
Canopy
Canopy Screws
Canopy Cover
Pin
Hanger Ball
Downrod
Coupling Cover
Coupling Screws & Washers
Coupling Lock Pin Nut
Coupling R Pin
Coupling Lock Pin
Coupling (Yoke)
Coupling Screws
Coupling Screws
R Pin
Lock Pin Nut
Screws & Washers
Lock Pin
Screws
LED Driver
Plate
Screw
203373 220-240V 37.6W - 6.4 Kg
TOOLS REQUIRED:
• Phillips head screwdriver
• Flat head screwdriver
• Pair of pliers
• Wire cutter
• Ladder
• Wiring supply cable as required by AS/NZS 3000 wiring rules.
Upper Motor Housing
Screw
Motor
Blade Holder
Screw
Nut
Light Plate
Washers
Nut
Blade Screw
Blade
Blade Plate
Screw
Light Shade or Bottom Plate
Decorative Ring
Note: The use of electric drivers can overtighten the screws and damage threads, DO NOT use power tools for tightening screws.
5
NOOSA Ceiling Fan
SELECTING A LOCATION:
Canopy
Downrod
Coupling Cover
1. The ceiling fan must be installed in a location so that the blades are a minimum 300mm spacing from the tip of the blade, to the nearest
objects or walls.
2. The ceiling fan must be installed in a location so that the blades
are a minimum 2.3m above the floor.
Fig. 2
Fixing point MUST be
able to support a load
4 times the weight of
the fan
3. The fixing point for your ceiling fan must be of sound
construction, undamaged, and capable of supporting a load
4 times the fans weight and the method of attachment. If the
location does not have a solid mounting point, you will need to
install a timber support between two ceiling joists.
Refer to Figure 2.
4. Many EGLO fans are designed for indoor use, though they can
also be installed in appropriately covered outdoor locations where
NOTE: Image is for representation only,
and does not represent the actual bracket.
the fan is fully undercover with a minimum of 2 walls. This fan is
not waterproof. When installed in outdoor areas, the ceiling fan
must be installed in a location protected from water, wind, dust, and salt. Exposure to these elements will void the warranty. In
some more tropical areas of Australia, it is suggested you increase the distance from the fan to the edge of the roof.
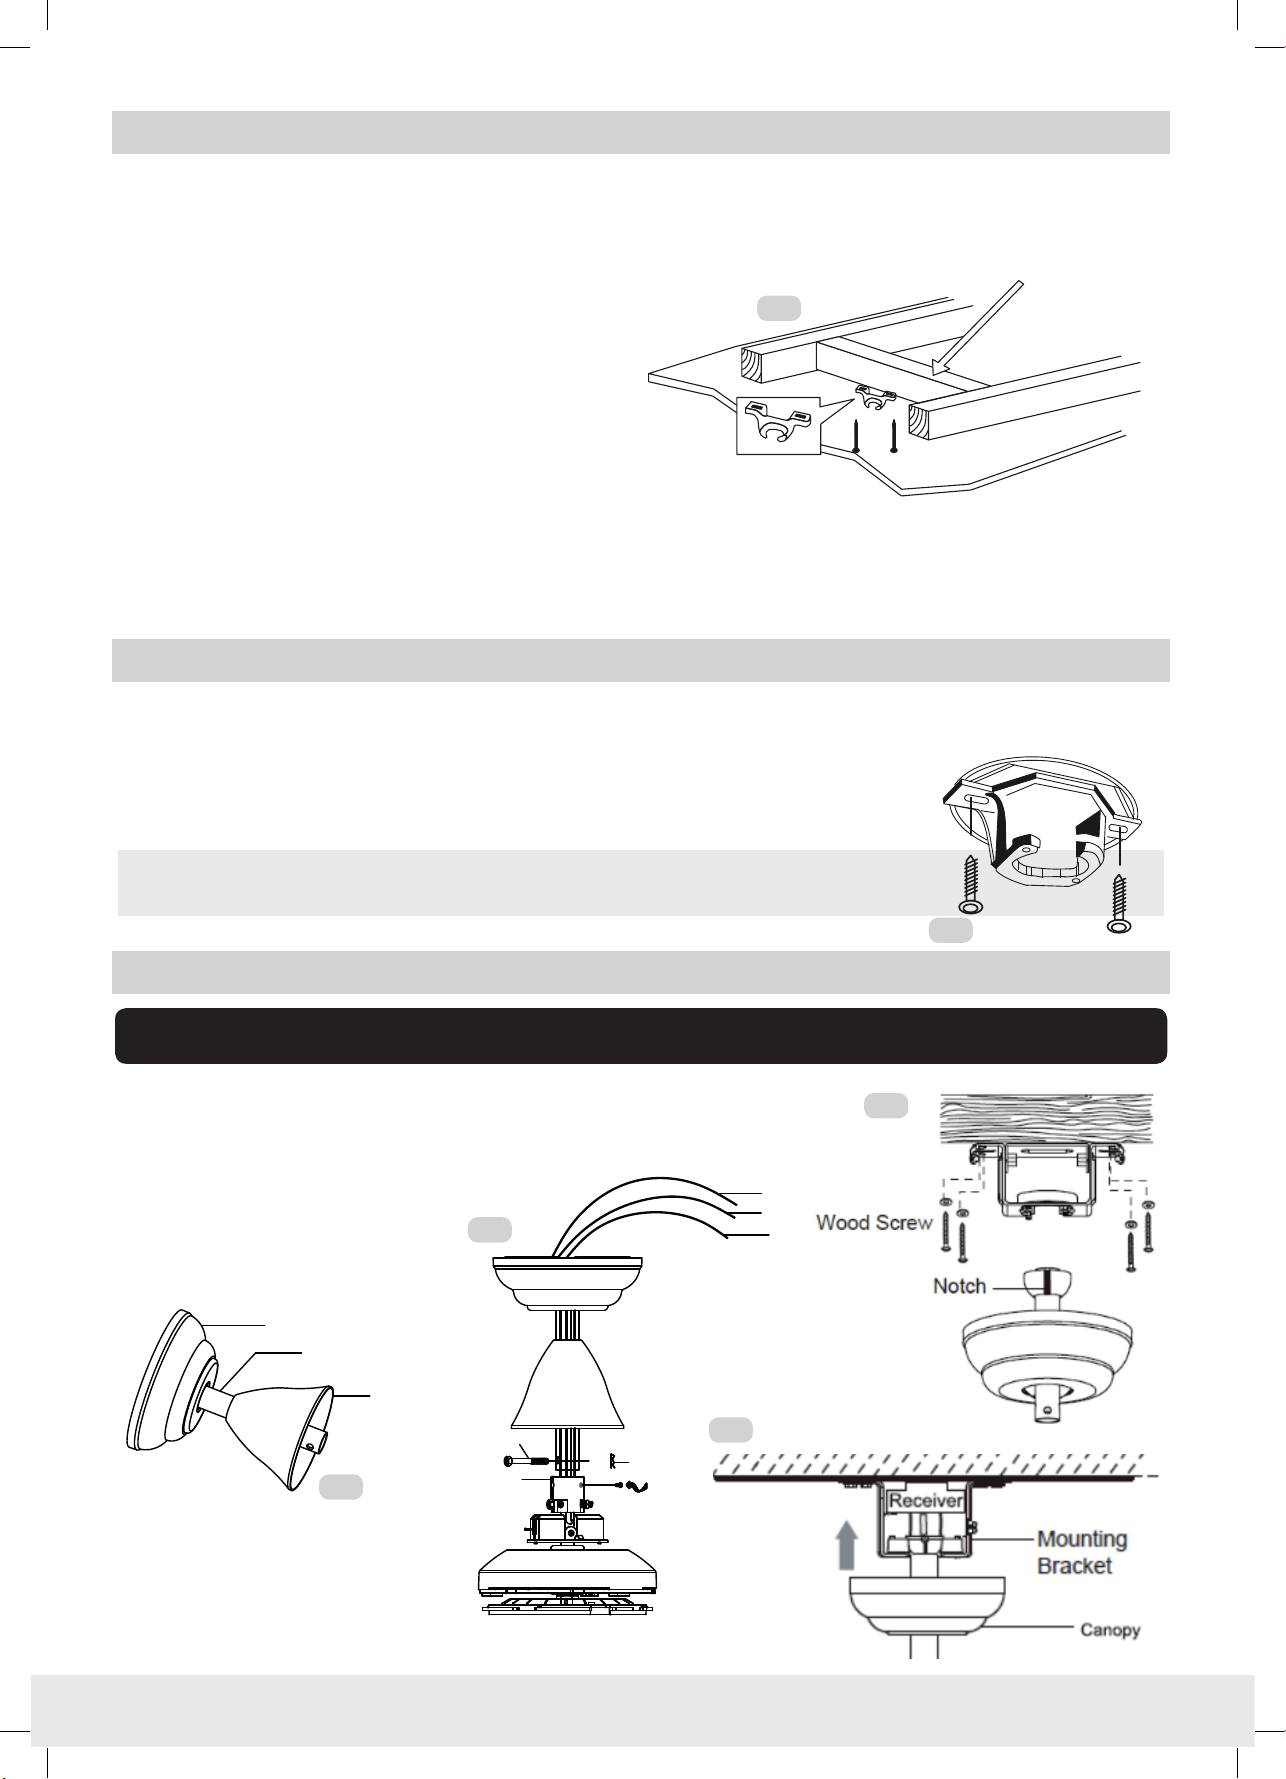
INSTALLING THE HANGING BRACKET:
1. Install the hanging bracket to the ceiling joist or timber support with the long installation
screws provided. Pass the screws through the slotted holes in the hanging bracket and secure to
the ceiling. Refer Fig. 3
2. Ensure that at least 30mm of the screw is threaded into the ceiling joist or timber support.
Note: The fixing screws included are designed for use with timber ceiling joists, for all other materials,
the appropriate fixing screws will need to be purchased. Your fans hanging bracket allows for mounting
on angled/sloped ceilings up to a 18-degree pitch.
Fig. 3
Fig 3
ASSEMBLING AND INSTALLING THE FAN:
IMPORTANT: Check that the power is disconnected and/or the mains switched off at the
circuit box to ensure all pole isolation of the power supply.
1. Assemble the canopy and coupling cover over the downrod. Refer to Fig 4.
2. Insert the wiring loom from the motor into and through the downrod.
3. Attach the downrod to the coupler
using the bolt, washer, and nut,
and tighten firmly before inserting
Fig. 5
the R pin. Refer to Fig 5.
Canopy
Downrod
Coupling Cover
Bolt
Clevis Pin
Fig. 4
Shaft
PINK
GRAY
RED
Fig. 7
Fig. 7
Fig. 6
6
 Loading...