

Page 1
egg, BabyStyle UK Ltd, 36 Charles Street,
Sileby, Leicestershire, LE12 7RJ
United Kingdom
Tel: 0044 1509 816444
Fax:0044 1509 816555,
info@eggstroller.com
www.eggstroller.com
egg Shell, HBRX1+
AJB1137/2019v2
egg Shell
Child Restraint System
User Manual and
Maintenance Instruction
40-80cm/<=13kg
UN Regulation R129 Universal
Isofix ECE R44/04
Approval no. E4-129R-000013
Page 2
1 2
This type of product is referred to by
several terms:
CRS (Child Restraint System)
Car seat
Infant carrier
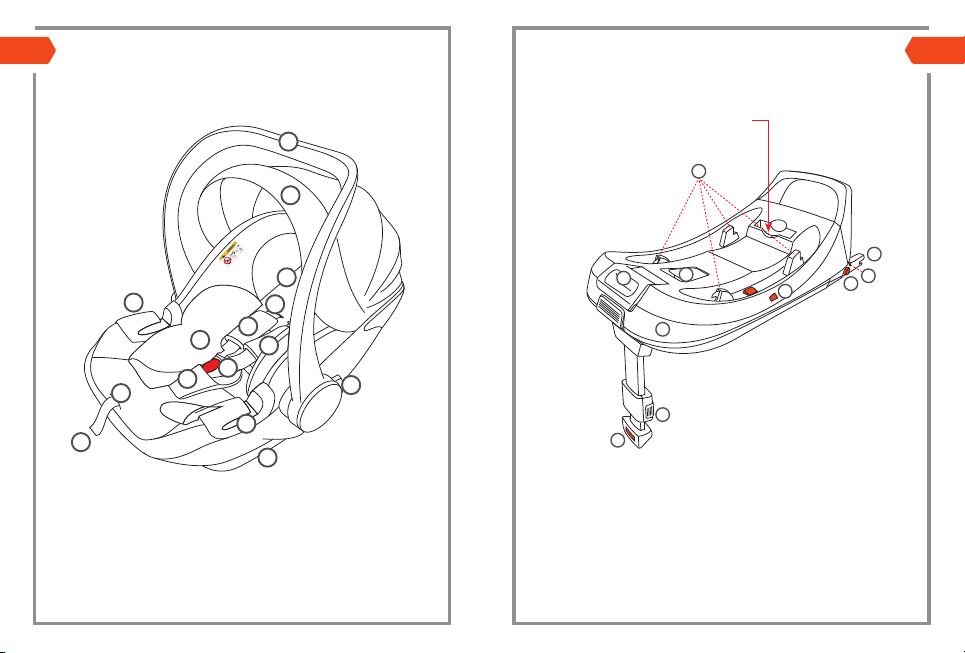
1
Instruction Manual Location when base
purchased separately
14
10
15
11
9
12
7
4
6
3
3
5
2
9
8
13
18
23
17
20
19
22
21
16
Instruction manual is located in compartment
on back of infant carrier/car seat
(1)
(2)
Page 3

3 4
A
4
Child Restraint System fitted to ISOFIX base
2
B
1
(4)
2
(5)(3)
C
1
Page 4

5 6
(6)
1
(7)
2
(8)
(9)
Page 5

7 8
1
2
(10)
(11)
(12)
(13)
Page 6

11 12
(18)
(20)
2
1
(19)
2
1
(21)
Page 7

13 14
Child restraint System fitted using the car seatbelt
(23)
1
1
3
2
(22)
3
(24)
Page 8

15 16
Attach car seat to stroller
2
1
CRS (Child Restraint System / Infant Carrier /
Car Seat) Features
Refer to page 1
1, Handle
Locked; handle down
2, Handle button
3, Shoulder pad
WARNING:
Never use unless
handle is in locked
position, check
car seat is secure
before use
(25)
Remove car seat from stroller
1
2
4, Crotch pad
5, Buckle
6, Webbing-Harness belts
7, Center function adjustment
8, Regular harness adjustment
9, Lap-belt guide (for belt installation)
Upright Unlocked
10, Canopy
11, Headrest
12, Inner pad
13, Car seat shell
(26)
Page 9

17 18
Isofix Base for CRS (Child Restraint System / Infant
Carrier / Car Seat)
Features
Refer to page 2
14, CRS connecting hook
15, ISOFIX connector anchor points
16, ISOFIX release button
17, ISOFIX rear leg extension lever
18, Release handle- CRS from ISOFIX base 19,
ISOFIX Base cover
20, Indicator window; indicates correct installation
WARNING: Only use in positions indicated
of CRS on base when shows green
21, Indicator window to show ISOFIX locked,
shows green when correctly fitted
22, Adjustment for support leg
23, Indicator window for support leg , shows
green when correctly adjusted
:Do Not use this CRS in the seating positions where the front
airbag is activiated.
Page 10

19 20
IMPORTANT: KEEP FOR FUTURE REFERENCE
Notice:
This is an "i-Size" Child Restraint System. It is
approved to Regulation No.129, for use in, "i-Size
compatible" vehicle seating positions as indicated by
vehicle manufacturers in the vehicle users’ manual.
If in doubt, consult either the child restraint
manufacturer or the retailer.
This CRS is also suitable for use without an ISOFIX base
when fitted in a compatible vehicle with a suitable car
seatbelt, when used with the vehicles integral 3 point belt
this CRS complies with ECE 44/04
Warnings:Any straps holding the restraint to the
vehicle must be tight. Any support-leg must be in
contact with the vehicle floor. Any straps restraining
the child must be adjusted to the child's body, and that
straps should not be twisted.
Any rigid items and/or plastic parts of a child restraint
must be so located and installed that they are not
liable, during everyday use of the vehicle, to become
trapped by a movable seat or in a door of the vehicle.
Do not use the car seat in seating positions where an
active frontal airbag installed.
The car seat and or base must be changed if it is damaged
or involved in a collision or accident.
ALWAYS READ THE INSTRUCTIONS BEFORE USE
Do Not make any alterations or changes to the Egg Shell
CRS as this could affect the performance of the car
seat and render it unsafe.
Ensure the harness is fitted snugly, you should not be able
to fit more than two fingers between the child and
the harness belt.
Always follow closely the installation instructions
provided by the child restraint manufacturer.
Never leave your child unattended
Any luggage or other objects liable to cause injuries in the
event of a collision must be properly secured prior to
travel.
This CRS shall not be used without the fabric cover;
The seat cover should not be replaced with any other than
the one recommended by the manufacturer, the cover
constitutes an integral part of the CRS performance.
The user should also refer to the vehicle
manufacturer's handbook.
Check the CRS regularly, do not use if any part is broken
torn or damaged.
The instruction manual should be kept in location
as illustrated in the picture on page 2 or page 5,during the
life time of the product.
It is dangerous to place the car seat on an elevated
surface, e.g. a table or work top etc.
This car seat is is not intended for prolonged periods
of continuous use or sleeping, recommended max of 2
hours without a break, see point 15
Stop using this CRS after your baby is capable of
sitting by himself/herself reaches 13kg or is longer than
80cm
Page 11

21 22
Take your child out of the CRS as often as possible in
order to relieve pressure on his/her spine.
The CRS is not suitable for sleeping for long periods of
time, please use a suitable lie-flat bed instead.
Please contact your retailer or the manufacturer to
replace or supplement any parts or components if they
are missing or damaged
IMPORTANT: KEEP FOR FUTURE REFERENCE
Handle Adjustment: To adjust the carrying handle,
simultaneously press the left and right buttons 1 (picture
4). You can lock the carrying handle in pace in one of
three positions A,B or C see picture 4.
A: Vehicle position in the car or carry position outside of
the car.
B: Free standing rocking position or locked position when
used on a stroller.
C: Stable position, non-rocking or the position to place the
child into the CRS
Adjusting the harness and placing the child in the
CRS: Loosen the shoulder belts (picture 5) by
pressing the adjustment button (1) on the
central adjuster and pulling both shoulder belts forwards
(2)
Press the button under the rear central belt guide to open
the manual compartment (picture 6). Lift up the lever
(1) (picture 7) and simultaneously slide up and down to
adjust the headrest and shoulder belts to the desired
position. The harness shoulder belts should be
adjusted to fit as shown in picture 8.
the child in the CRS. Guide the harness belts directly over
the child's shoulders and ensure they are not twisted. Place
both buckle tongues together and lock them in place in the
belt buckle, you should hear an audible
'CLICK' (picture 10). Pull carefully but firmly on the central
adjustment to tighten the the harness until they fith the
child's body (picture 11)
Adjusting the canopy: The canopy can be gradually
extended forwards by pulling on the plastic cover. To fold;
push back on the same plastic cover.
Fitting the ISOFIX base into the vehicle: Lift the lever (1)
and simultaneously push forwards the top cover (2) of the
supporting leg until it stops, this extends the rear legs
(picture 12)
With the base sat on top of the vehicle seat; push the base
back to connect the extended rear legs with the car ISOFIX
anchor points. The indicator colour of the ISOFIX connector
turns to green from orange when the legs are connected
correctly (picture 13/14)
Push the whole ISOFIX base so that it touches the car seat
backrest.
On the front support leg; push in the adjuster (1)as indicated
by the arrow (picture 15) and lower the support leg until it
firmly touched the floor of the vehicle. The colour of the
indicator in the support leg should turn from orange to green
when correctly fitted (picture 16).
WARNING: If there is any under-floor storage in the area
where the support leg touches down; Do Not use the
ISOFIX base in this position. Lower the carrier with the
child onto the base (picture 17), if the CRS is fitted correctly
the indicator colour will change from orange to green
(picture 18).
Separate the extended shoulder belts (picture 9) and place
Page 12

23 24
ATTENTION: The CRS should only ever face the
back of the car when fitted.
Removing the CRS from the ISOFIX base. Pull the
handle forwards (1), (picture 19) and lift the infant carrier/
car seat up and off the base (
2) (picture 19)
Removing the ISOFIX base
Lift up the lever (picture 20) and pull the whole base
forwards to extend the ISOFIX legs.
Push back the orange buttons as indicated by the red
arrow (1) (picture 21) to release the two ISOFIX
connectors from the vehicle anchors and pull the ISOFIX
base away in the direction of the arrow (2) (picture 21).
CRS Installation (Belted)
Installation in the car with car seatbelt :
Place the CRS facing the rear of the vehicle on the
vehicle seat. WARNING: The CRS is not suitable for use
with a two-point or lap seatbelt. Securing with a twopoint seatbelt could result in serious or fatal injuries to the
child in the event of an accident.
Pull out the vehicle seatbelt and route it over the CRS.
Lock the buckle tongue in place in vehicle seatbelt,
the striped belt section (pictures 22 and 23) show the lap
belt position. Take the diagonal section of the seat belt
shown in solid blue (Pictures 22,23 and 24) and route it
around the back of the CRS and through the rear guide 3
(picture 22and 24)
Warning: it may be that buckle part of the car seatbelt is too
long so that it reaches the blue belt guides of the infant car
seat. This means that the infant car seat cannot be fastened
tightly. If this is the case, choose another seat in the car for
the fitting of the CRS.
ADVICE: Seek fitting guidance from your local retailer who
can offer expert advice.
Page 13

25 26
Care and Maintenance
Check the egg shell CRS regularly to make sure no parts are damaged/
torn/broken etc. This CRS is only safe for use if all parts are in good
working order. Contact your retailer if you have concerns or require
replacement parts
Avoid leaving the CRS in direct sunlight either in the vehicle or outside,
even normal exposure to sunlight can cause the colour of the fabric to
change, cover the CRS when left in direct sunlight. Plastic and metal
parts can become hot as vehicles naturally experience very high
temperature fluctuations , be aware and use caution on hot days.
Cleaning
The cover and the belt can be sponge cleaned
with lukewarm soapy water. The plastic parts can
be cleaned with a mild detergent and warm water, do not
use aggressive cleaning agents. Where individual items
are provide with care labels follow the specific guidelines on
the label.
Your egg Warranty
At egg we pride ourselves in producing and delivering high
quality products with our customers safety and wellbeing at
the forefront of our minds.
Date of effect.
The warranty of this product becomes valid from the date of purchase as
stated on the original receipt of purchase. This does not affect your
statutory rights.
Registering your egg product
Thank you for purchasing an egg product. To activate you warranty
and register you product visit www.eggstroller.com and click on
'Register your product' to complete the registration online.
Your warranty policy
At egg, we guarantee your product has been manufactured in
accordance with all current European safety standards which are
applicable to this product, and that the product is free from defects in
workmanship and material at the time of purchase. During the
production process this product has gone through rigorous quality
checks. Despite our efforts, if this product does show manufacturing
or material defect within the 24 consecutive months warranty period
we will comply with the warranty terms and conditions providing the
product has been used for normal use as described within the
instruction manual and it has been serviced and maintained correctly
also described in the instruction manual. For further information
please contact the place of purchase. Please retain your original
receipt of purchase as it will be required should you need to use you
warranty.
The warranty (24 consecutive months) only applies to the original
purchaser and is non-transferable.
The warranty will be invalidated in the following circumstances:
a, This product has not been used for its purpose other than
described within the instruction manual.
b, the product is returned for repair through a dealer which is not
authorised by egg.
c, if the defect is a result of improper use or incorrect maintenance,
negligence or impact damage.
d, If the original receipt of purchase cannot be provided.
e, If the parts show normal wear that may be expected from regular
use of the product.
For complete information about your egg product including:
Registration, important updates and support; please visit the Product
Information 'Support' section on ...
eggstroller.com
 Loading...