

Page 1
Instruction Manual
Quail Instruction Manual Dec 2017 v1_Layout 1 22/12/2017 12:12 Page 1
Page 2

3
2
WARNING: The maximum weight for the standard shopping basket is 3kg.
WARNING: Only use the quail seat unit, carrycot, accessories and car
seats recommended by quail/ egg.
WARNING: Never lift/carry the chassis while occupied.
WARNING: Do not use the vehicle on steps, stairs or escalators; as it
may be dangerous to your child or children.
WARNING: Always descend/mount kerbs on the back wheels, do not tip
the stroller forward.
WARNING: Pram body/carrycot: This product is suitable for a child who
cannot sit up unaided, roll over and cannot push itself up on its hands
and knees. Maximum weight of the child for the carrycot must not
exceed 9kg.
WARNING: No additional mattress should be added to the carrycot;
only use the mattress provided.
WARNING: Any load attached to the handle and/or the back of the
backrest and/or the sides of the vehicle will affect the stability of the
vehicle.
WARNING: Never use a parasol attached to the stroller if there is wind.
WARNING: For car seats used in conjunction with a chassis, this vehicle
does not replace a cot or a bed. Should your child need to sleep, then it
should be placed in a suitable pram body, cot or bed.
IMPORTANT: Read these instructions carefully before use
and keep for future reference.
Important Safety Information.
This vehicle is intended for children from birth to a maximum of 22kg.
Age and weight usage: Pram body/carrycot 0 to 9kg, Car seat 0 to 13kg (follow
manufacturer’s guidelines), Seat unit 0 to 22kg, Ride on board/platform max
20kg, Thermal basket max 8kg. Any weight added to the stroller will affect the
stability of the vehicle.
The seat unit, carrycot or car seat is suitable for one child only to the maximum
weight stated above.
WARNING: Never leave the child unattended.
WARNING: Always use the seat in the most reclined position for new
born babies to approx. 6 months.
WARNING: This product is not suitable for running or skating.
WARNING: Ensure that all the locking devices are engaged before use.
WARNING: To avoid injury ensure that your child is kept away when
unfolding and folding this product.
WARNING: Do not let your child play with this product.
WARNING: Always use the restraint system in combination with the
seat unit.
WARNING: Check that the pram body, seat unit or car seat attachment
devices are correctly engaged before use.
Quail Instruction Manual Dec 2017 v1_Layout 1 22/12/2017 12:12 Page 2
Page 3
5
4
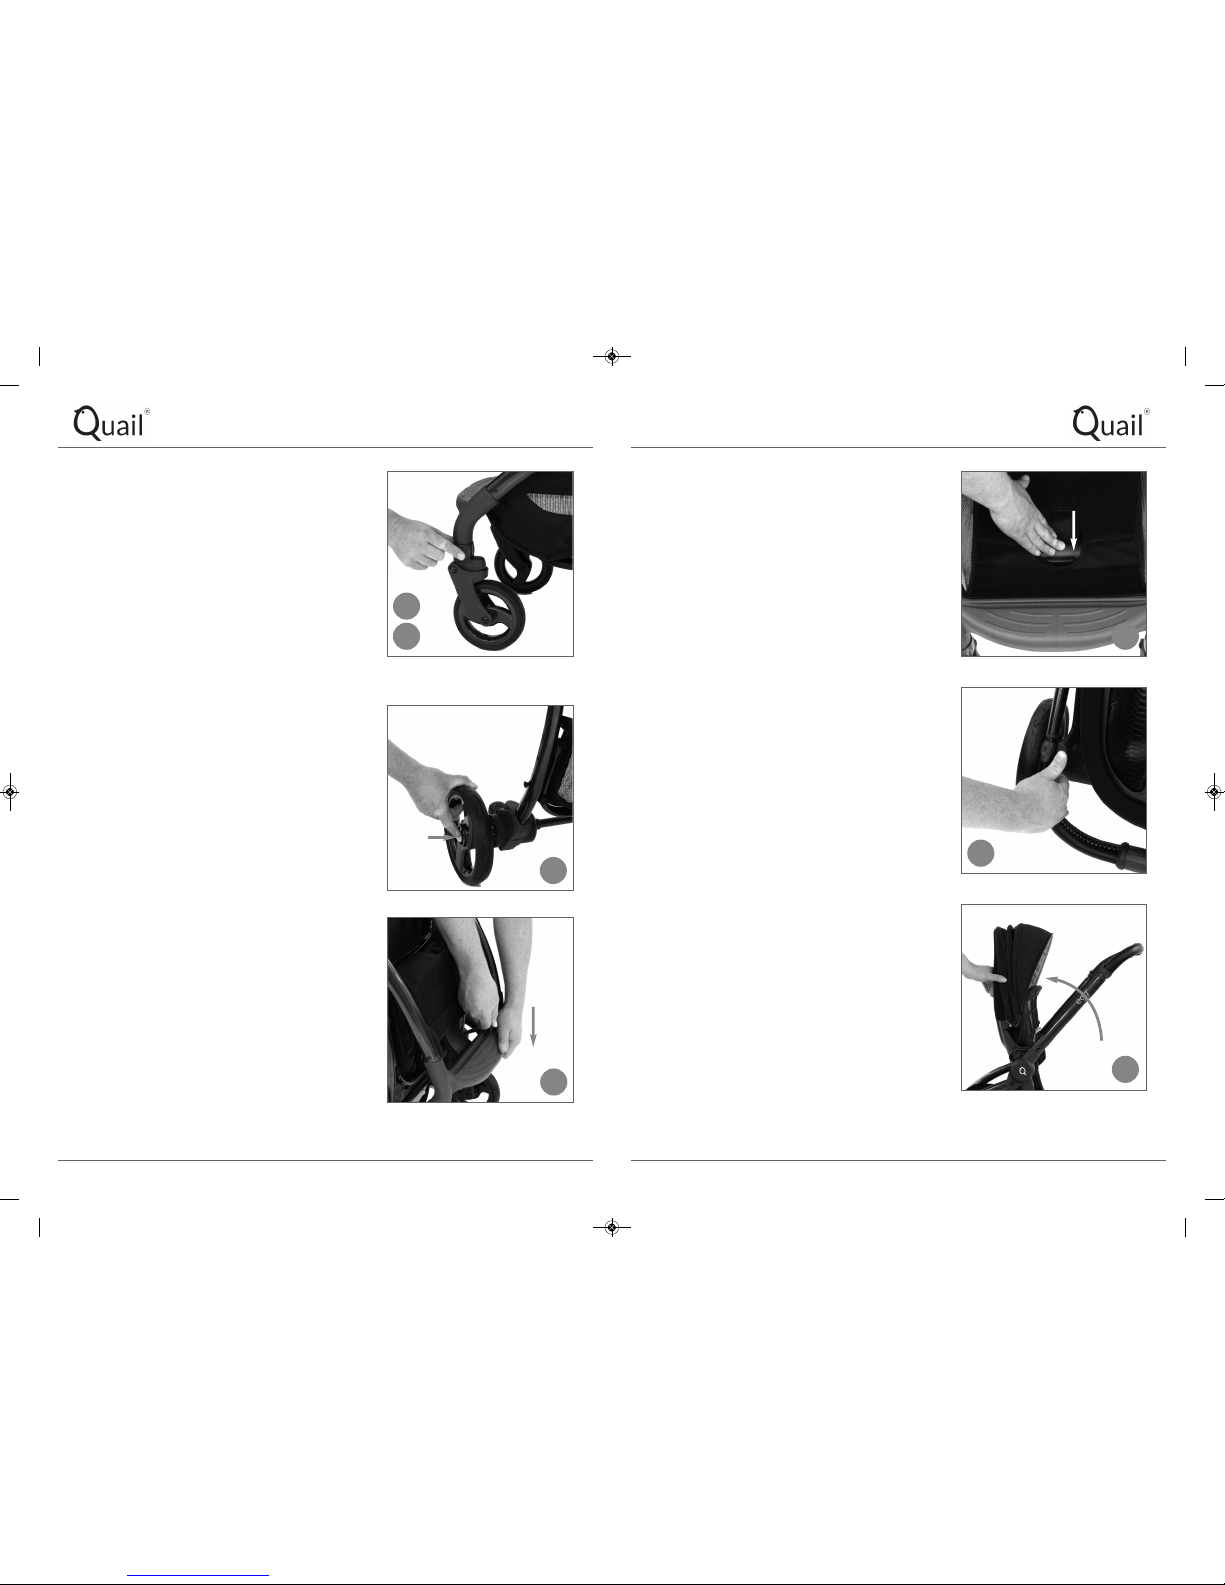
4a. Allow the lower part of the chassis to fully
open and lock into position with an audible click.
Push down on the basket frame gently to assist
with this process if necessary.
4b. Release the handle by pushing the catch
situated at the side of the chassis above the rear
left wheel, squeezing the handle towards the
chassis if necessary. Lift the handle until it locks
into position with a click.
4c. Rotate the seat upwards by lifting the back of
the seat until it is approximately vertical.
CAUTION: Do not try to move the seat unit until
the handle has been lifted into position. You may
damage the seat unit if you lift the seat before
placing the handlebar in the erect position.
Section 1 – The Chassis.
1. Front Wheels.
The front wheels are permanently fitted and
cannot be removed.
2. Locking & unlocking the front swivel wheels.
Rotate the barrel shaped collar at the top of the
front wheel unit left or right to lock or unlock the
swivel wheels. When locked the front wheels will
not be able to swivel and this may help when
travelling over uneven surfaces (e.g.
cobblestones).
3. Fitting/Removing the rear wheels.
Press and hold the button in the centre of the rear
wheel and push the wheel into the rear wheel
housing; release the button and the wheel should
lock in position.
IMPORTANT: Check each rear wheel is secure by
pulling outwards.
To remove; press and hold the button in the centre
of the rear wheel and pull the wheel away from the
wheel housing.
4. Opening the chassis.
With the stroller standing upright unlatch the
locking clip situated above the footrest by
reaching over the stroller and pushing down on
the footplate and pulling up the locking clip.
2
1
3
4
4a
4c
4b
PUSH
DOWN
PUSH
DOWN
ROTATE
& LIFT
PRESS
& HOLD
Quail Instruction Manual Dec 2017 v1_Layout 1 22/12/2017 12:12 Page 4
Page 4
7
6
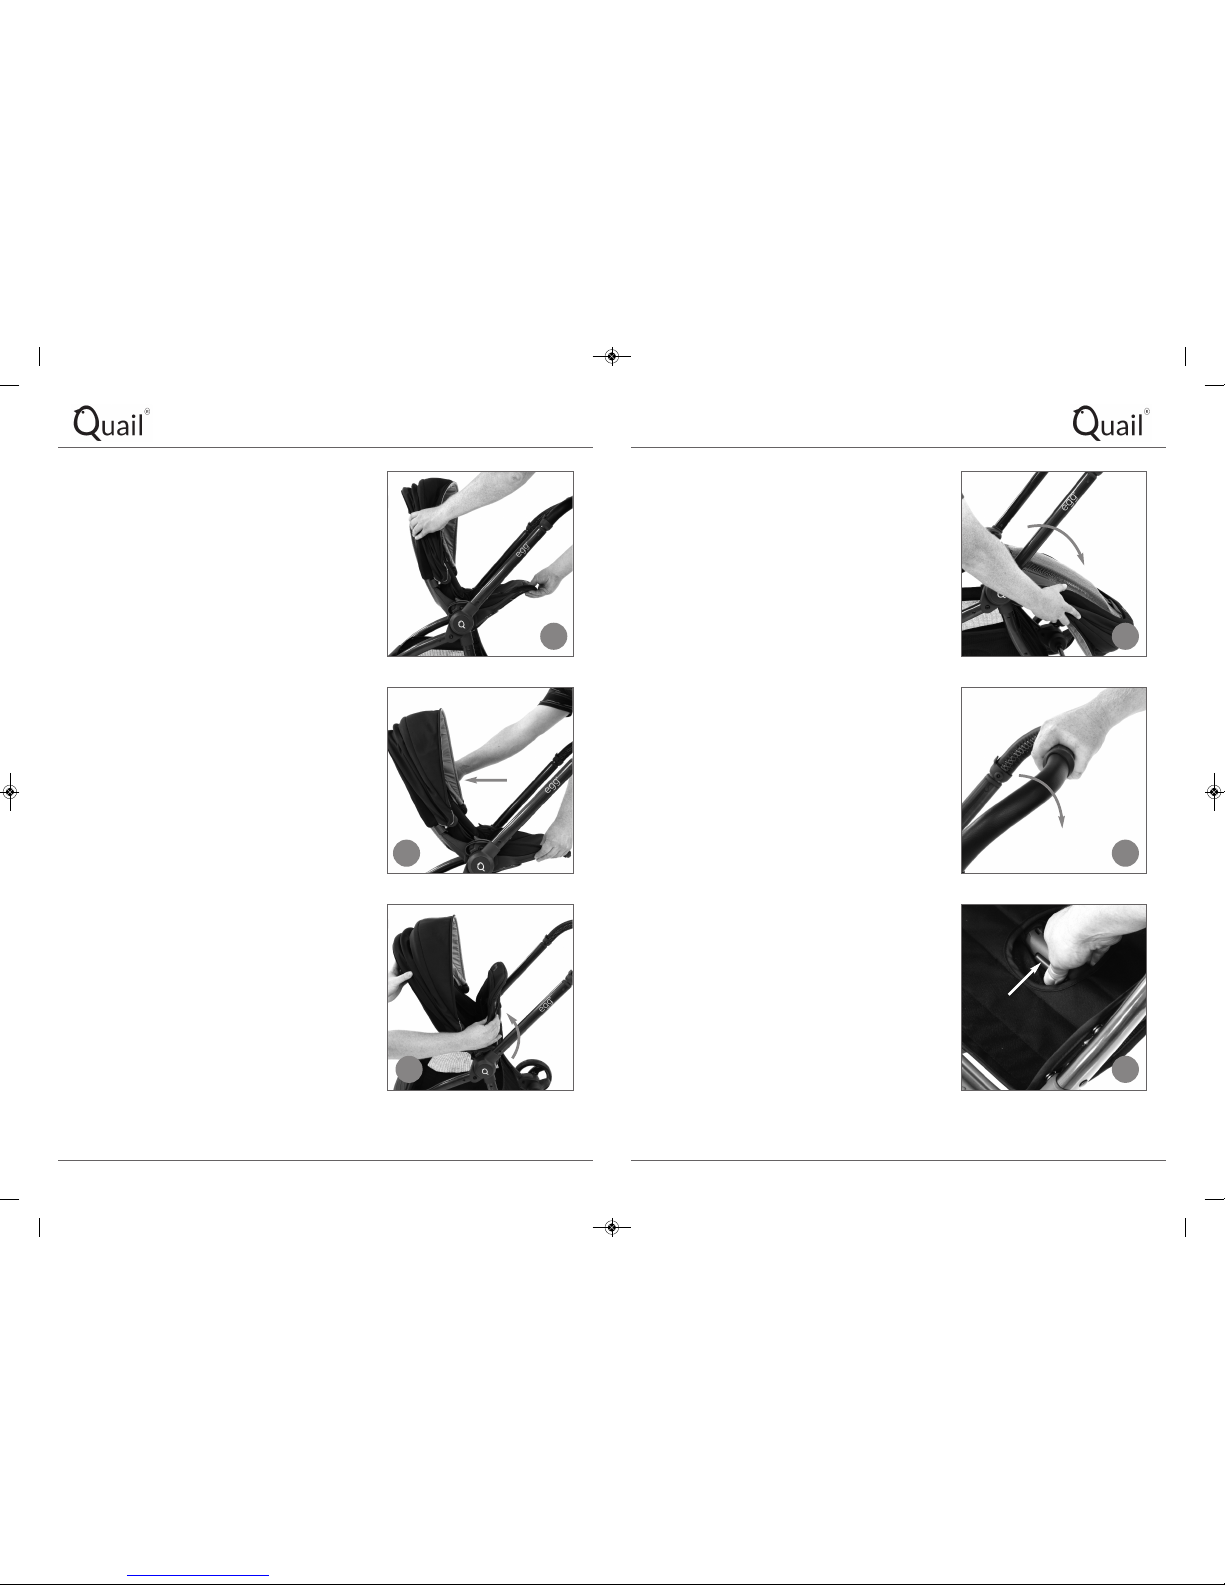
5a. Rotate the fully folded seat and lower it
towards the rear of the chassis.
Ensure the handle is in its lowest position and
ensure the front wheels are unlocked.
5b. Fully rotate the central section of the handle
towards you which unlocks and releases the
handle. Lower the handle towards the floor. When
lowered far enough the handle will automatically
lock with an audible click.
5c. Ensure all items are removed from the basket.
Locate the carry handle within the centre of the
shopping basket and press and hold the button on
the carry handle to unlock it and pull the handle
upwards to fold the chassis. Squeeze the front of
the chassis towards the rear to assist with this if
required. When folded far enough the chassis will
automatically lock with the clip over the footrest.
CAUTION: The chassis cannot be folded with the
swivel front wheels locked. Please also ensure
that the wheels are reverse pointing, as if you had
been pulling the vehicle backwards.
4d. While supporting the seat back, rotate the seat
base down from the seat back. The seat base will
rotate until it reaches its stop position.
4e. The seat back can then be rotated backwards
(away from the seat base) until it locks into
position with a click.
NB: During use the seat base is not prevented
from further upward rotation if lifted; this is
normal.
WARNING: Ensure the locking devices are
engaged before use.
5. To fold the stroller.
Ensure the child is removed and the shopping
basket is empty before attempting to fold the
stroller.
While supporting the seat back, rotate the seat
base fully upwards towards the seat back. This
disengages all the seat locks.
4e
4d
5
5a
5b
5c
R
OTATE
PRESS
& HOLD
LOCK
ROTATE
UPWARDS
ROTATE &
PULL DOWN
Quail Instruction Manual Dec 2017 v1_Layout 1 22/12/2017 12:12 Page 6
Page 5

9
8
Section 2 - Seat Unit.
8. Adjusting the seat backrest.
Lift the adjustment handle on the top side of the
seat back and adjust the backrest to the desired
position.
NB: The seat unit has 3 positions
9. Removing and fitting the seat unit to the
chassis.
To remove the seat unit, fold the seat back and
seat base together so that they are approximately
vertical and keep hold of the seat back with your
left hand.
9a. Hold on to the right-hand side central hub and
position your thumb on the lever. Rotate the seat
unit backwards with your left hand so that it is
resting against your forearms and position your
left hand over the other central hub release lever.
6. Operating the parking brake
Press down on the pedal to engage the parking
brake. Press down and release to disengage the
parking brake.
WARNING: Never leave the vehicle without first
fully engaging the parking brake.
7. Adjusting the handle height.
Rotate the central section of the handle forward
and slide the handle up or down into one of the 5
available positions.
6
7 9
9a
8
P
RESS
DOWN
FOLD
BACK
LIFT
ROTATE
Quail Instruction Manual Dec 2017 v1_Layout 1 22/12/2017 12:12 Page 8
Page 6

11
10. Using the 5-point safety harness.
Fit together the two connectors on the harness
straps and push firmly into the buckle housing
until they click together. To open the harness press
in the grey button on the buckle housing and the
two connectors will release from the main buckle.
IMPORTANT: Ensure the buckle and connectors
are fully engaged before use.
10a. As your child grows, the height of the
shoulder straps can be adjusted. Remove the
magnetic panel on the back of the seat by pulling
it out from the bottom.
10
9b. Push both levers with your thumbs and lift the
seat up and off the chassis to detach it.
9c. To fit the seat unit to the chassis, position the
folded seat unit above the unfolded chassis, align
the central hubs on the seat unit with the central
hubs on the chassis and lower the seat unit until it
clicks and locks into position. Unfold the seat base
to engage the seat locks and then fold the back of
the seat away from the seat base to the recline
position of your choice.
WARNING: Ensure the seat unit is locked in place
on the chassis before use.
NB: The seat unit can be fitted facing in either
direction.
9b
9c
10
10a
PUSH
DOWN
P
U
S
H
D
O
W
N
ALIGN
ALIGN
P
USH
PULL
Quail Instruction Manual Dec 2017 v1_Layout 1 22/12/2017 12:12 Page 10
Page 7

13
12. Fitting the Rain Cover.
Unfold the rain cover and with the quail canopy
open place the rain cover over so that it covers all
of the textile parts. Fasten the straps to the chassis
to secure the rain cover.
13. Fitting the footmuff.
Position the footmuff onto the seat unit. Thread
the crotch strap through the corresponding hole in
the footmuff. Unfasten the Velcro tabs on the back
of the footmuff near the shoulder areas and thread
the footmuff sides under the shoulder straps.
Re-fasten the Velcro tabs.
Fasten the fabric strap around the rear of the seat
unit with the Velcro.
12
10b. Squeeze together the upper two adjusters on
the exposed back of the seat unit and slide the
mechanism up or down to the position that best
suits your child. Replace the magnetic seat back
cover. Further adjust the strap lengths to suit your
child using the buckles on the harness.
WARNING: To avoid serious injury always use the
5 point safety harness.
Important: Always ensure the parking brake is
engaged when seating or removing children from
the vehicle.
11. Adjusting the hood/canopy height position.
Remove the magnetic panel on the back of the
backrest by pulling it out from the bottom.
Squeeze together the lower two adjusters on the
exposed back of the seat unit and slide the
mechanism up or down to the position that best
suits your child or circumstances. Replace the
magnetic seat back cover. The extended position
of the canopy can be adjusted by pushing
backwards or pulling forwards.
12
13
10b
11
S
QUEEZE
TOGETHER
SQUEEZE
TOGETHER
Quail Instruction Manual Dec 2017 v1_Layout 1 22/12/2017 12:12 Page 12
Page 8

15
17. Fitting a car seat.
With the car seat adaptors fitted to the chassis,
hold the car seat centrally above the car seat
adaptors and lower it so that the car seat adaptors
insert into the car seat at the base of the car seat
handle. The car seat should be locked in position
before use. Check the car seat is locked onto the
adaptors and chassis by lifting the car seat.
14
Section 3 – Car Seat Fitting and
Adaptors.
14. Fitting the car seat adaptors.
With the chassis open and the seat unit removed;
insert the car seat adaptors marked ‘L’ and ‘R’ into
the left and right sides (also marked ‘L’ and ‘R’) of
the chassis central hub until they click and lock in
position.
15. Removing the car seat adaptors.
Use your thumb to push the lever located just
above the chassis central hub on the car seat
adaptor and lift the adaptor up and away from the
chassis central hub. Repeat this process for the
other adaptor.
16. Folding the chassis with the car seat
adaptors fitted.
The chassis will not fold with the car seat adaptors
fitted unless the latch at the bottom of the righthand adaptor is rotated and held while
simultaneously lowering the handle with the twist
grip on the stroller.
14
15
16
17
ROTATE
LOWER
P
U
S
H
D
O
W
N
I
N
S
E
R
T
Quail Instruction Manual Dec 2017 v1_Layout 1 22/12/2017 12:12 Page 14
Page 9

17
21. Fitting the carrycot to the chassis.
Fit the car seat/carrycot adaptors as described in
Section 3. Lower the carrycot onto the adaptors so
that the opening of the carrycot is facing the
handle bar. Push down firmly until it clicks and
locks into position.
WARNING: Ensure the carrycot is locked in place
on the adaptors/chassis before use.
WARNING: Use only on a firm, horizontal level
and dry surface.
WARNING: Do not use if any part of the carry cot
is broken, torn or missing.
WARNING: No additional mattress shall be
added unless recommended by the manufacturer.
22. Removing the carrycot.
Press in the buttons on the top of the central
carrycot attachment device and lift upwards and
away from the chassis.
16
Section 4 – Carrycot.
18. Assembling the carrycot.
Remove the apron and mattress to gain access to
the stay bars in the bottom of the carrycot. Using
the webbing tabs; pull the stay bars into the clips
on the baseboard until you hear them click into
place. Replace the lining and the mattress, refit
the apron.
Important: Ensure that the stay bars are fully
engaged before using the carrycot.
19. Fitting the carrycot apron.
Fasten the zip on the apron to the corresponding
zip on the carrycot and pull all the way round.
Secure the press studs between the apron and
carrycot and fasten the Velcro over both sides.
20. Adjusting the carrycot hood.
Press in the buttons on the sides of the hood and
pull up until you hear them click into place. Press
in the buttons again to put the hood down.
19
18
20
21
22
P
ULL
F
A
S
T
E
N
P
R
E
S
S
P
R
E
S
S
P
U
S
H
Quail Instruction Manual Dec 2017 v1_Layout 1 22/12/2017 12:12 Page 16
Page 10

19
18
23. Fitting the carrycot rain cover.
The carrycot hood must be fully extended to
support the rain cover. Place the rain cover over
the carrycot and secure the side panels (left and
right) using the Velcro tabs.
WARNING: Never leave rain covers, hoods,
aprons and baby-nests etc on or over the stroller
indoors or in a hot atmosphere or near a heat
source; your child may overheat.
IMPORTANT.
Only use replacement parts supplied or approved by the
manufacturer.
Do not place the carry cot near an open fire or other source of
strong heat.
The handles and the bottom of carry cot should be inspected
regularly for signs of damage and wear.
Before carrying or lifting, make sure that the handle(s) is (are) in
the correct position of use.
The head of the child in the carry cot should never be lower than
the body of the child.
Do not add another mattress on the mattress provided or
recommended by the manufacturers.
Care and Maintenance.
• Regularly check screws, rivets, bolts and fastenings to ensure they are locked tight and
secure. Replace any parts in an inferior condition. When using this product during the
winter, by the sea or off-road it is important to clean using clean fresh water and dry
thoroughly. Salt water and salt and grit from the roads will corrode metal parts unless
removed.
• Check on a regular basis that all chassis locking devices are working correctly.
• If any part of the product is damaged, contact your local egg/quail retailer
immediately.
• Do not expose the product to excessive sunlight for extended periods of time, even
normal exposure to sunlight may cause change to the colour of the fabrics.
• Take care not to tear fabrics when transporting the product.
• Light oil or silicone spray can be used to lubricate moving parts. Periodically remove
the rear wheels; clean; lubricate and replace.
• Ensure zips are either fully open or closed to prevent damage.
• Always use the rain cover in inclement weather.
• Do not place items on top of the hood/canopy, it could damage the fabrics or render
the product unsafe.
• Any load attached to the handle and/or on the back of the backrest and/or on the sides
of the vehicle will affect the stability of the vehicle.
• Tyres can leave marks on some surfaces such as vinyl flooring and carpet.
• Fabrics should be cleaned in accordance to the care labels.
• Do not place fabrics in a washing machine, hand wash or sponge clean only using a
mild detergent and warm water (30◦C).
23
Quail Instruction Manual Dec 2017 v1_Layout 1 22/12/2017 12:12 Page 18
Page 11

21
20
Keep your original receipt of purchase safe with your
warranty information.
It will be required should you unfortunately find a defect. The receipt must show the date
of purchase clearly. In the first instance you must contact the original place of purchase.
Exchanging or returning the product cannot be requested. Repairs to any part of this
product do not extend the warranty period. Do not return your product direct to the
manufacturer.
Servicing of your quail product.
We recommend that this product is regularly maintained and is serviced by an egg/quail
authorized dealer at least every 12 months. Only replacement parts supplied or
recommended by the manufacturer/distributor shall be used.
Disclaimer.
Whilst we believe the information set out in this instruction manual to be correct and
reliable at the time of print, we do not accept responsibility for its accuracy and we shall
not be liable for its interpretation and its use. We reserve the right to change, modify add
or delete product specifications at any time without prior notice.
Your egg/quail warranty.
At egg we pride ourselves in manufacturing high quality products with our customers’
safety and wellbeing at the forefront of our minds.
Registering your egg product.
Thank you for purchasing an egg product. To activate your warranty and register your
product visit eggstroller.com and click on ‘Register your product’ to complete the
registration online.
Your warranty policy.
At egg, we guarantee your product has been manufactured in accordance with all current
European safety standards which are applicable to this product, and that this product is
free from defects in workmanship and material at the time of purchase. During the
production process this product has gone through rigorous quality checks. Despite our
efforts, if this product does show a manufacturing or material defect within the 24 months
warranty period for the chassis and seat frames and 6 months for carrycot, seat fabrics and
PVC rain cover we will comply to the warranty terms and conditions providing the product
has been used for normal use as described within the instructional manual and it has been
serviced and maintained correctly also described within the instruction manual. For further
information please contact the place of purchase. Please retain your original receipt of
purchase safely in the back of this booklet.
Warranty terms.
• Chassis and seat frames: 24 consecutive months.
• Seat fabrics, carrycot, accessories and PVC rain cover: 6 consecutive months.
• The warranty only applies to the original purchaser and is non-transferrable.
The warranty will be invalidated in the following circumstances:
a. This product has not been used for its purpose other than described within the
instruction manual.
b If the product is returned for repair through a dealer which is not authorized by us.
c. If the original receipt of purchase cannot be provided.
d. If the defect is as a result of improper use or incorrect maintenance, negligence or
impact damage.
e. If the parts show normal wear that may be expected from daily use of the product,
(wheels, rotating or moving parts etc).
The warranty of this product becomes valid from the date of purchase as stated on the
original receipt of purchase. This does not affect your statutory rights.
Register your product today at eggstroller.com
Quail Instruction Manual Dec 2017 v1_Layout 1 22/12/2017 12:12 Page 20
Page 12

23
22
Notes. Notes.
Quail Instruction Manual Dec 2017 v1_Layout 1 22/12/2017 12:12 Page 22
Page 13

36 Charles Street, Sileby,
Leicestershire LE12 7RJ.
T: 01509 816444
E: info@eggstroller.com
eggstroller.com
©BabyStyle UK Ltd, RWH1106/15122017v1
Quail Instruction Manual Dec 2017 v1_Layout 1 22/12/2017 12:12 Page 24
 Loading...