

Page 1
E3NITRO
Electric Bicycle
Owner’s Manual
Currie Technologies
®
3850A Royal Avenue, Simi Valley, CA 93063
eflowebike.com | currietech.com
Version
101
Last modied: December 9, 2014 2:10 PM
Owner's Manual - eFlow E3Nitro.indd.indd
Page 2

Contents
Section 1 Introduction .....................3
Section 2 Important safety information .....4–7
Important symbols and terms .........6–7
Section 3 Recording your bicycle’s important
serial numbers ...................8
Section 4 Specications .................9–11
Bicycle ...........................9–10
Battery ..........................10–11
Section 5 eFlow component chart .........12
Section 6 Prior to your rst ride ..........13–22
Installing a quick release
front wheel .......................15–17
Adjusting a quick release
seatpost clamp ...................17–19
Section 7 Operation ................... 23–38
Installing & removing the battery ....23–24
How to ride. . . . . . . . . . . . . . . . . . . . . . . . . . 25
Operating modes ....................26
Display details ....................27–35
Gears & shifting ...................35–36
Range & tips .....................37–38
Section 8 Battery care .................39–45
Charging ........................ 40-43
Storage ..........................43–44
Disposal ............................44
Section 9 Troubleshooting ..............45–48
Flat tire ..........................46–50
Currie Tech Technical and Customer Service: +1 800-377-4532
p. 2/52
Page 3

I. Introduction: A word about this Owner’s Manual and your
safety…
Dear Customer,
Currie Tech would like to thank you for purchasing our product.
Cycling (electric or otherwise) can be a hazardous activity,
no matter what type of bicycle you ride. Trafc, weather,
distractions, and many other factors can endanger you while
using any type of bicycle or vehicle. Mistakes and accidents
can lead to severe injury or death so please read this manual
before riding our product.
You have a responsibility to learn how to operate your new
bicycle safely and correctly. Keep it in good shape by
maintaining it and making sure that anyone who uses it knows
how to operate it safely.
Please take the time to read and understand the following
warnings and cautions. Throughout this manual we will attempt
to reinforce the guidelines that we have summarized below.
This is important. If others use your bicycle, please show this
section to them so that they are aware of these important
guidelines to help avoid accidents and reduce the severity of
injuries when they occur.
Thank you.
p. 3/52
Page 4

II. Important Safety Information
• Helmets: There is no single factor that works better at
reducing the severity of injuries sustained in bicycle
accidents more than a quality bicycle helmet. Please
don’t ever ride your bicycle without one.
• It’s not a tandem: Your bicycle was engineered to carry
one (1), [that is a single rider,] person safely. The rack on
the back is for luggage or a battery. Overloading the
bicycle with a second rider is a bad idea that can lead to
severe injury or death! Not to mention the fact that you
will severely impact the performance of the bicycle.
• It’s the law; obey it: Obey all trafc laws. Always ride
on the right side, with, not against, trafc. STOP signs
and trafc lights apply to cyclists as well as cars and
pedestrians.
• Be alert to conditions around you! Unfortunately, a
motorist that has successfully parallel parked his/her car
is not always thinking about the cyclist fast approaching
from behind. An impact with a car door suddenly
opened into your path will ruin your day.
• Weather: If you get caught in rain or snow, please be
aware that distance to stop your bicycle may double or
triple over the distance that it takes under dry conditions.
Ride more slowly and anticipate your stops by applying
the brakes MUCH earlier. Don’t forget that the roads are
a lot more slippery when wet. Bicycle tires don’t grip wet
pavement as well as dry pavement. Take the corners
carefully.
Currie Tech Technical and Customer Service: +1 800-377-4532
p. 4/52
Page 5

• Night time: Motorists have a hard time seeing you when
the sun goes down. We make the bicycle easier to see
with reectors, and you can help with additional lights
and strobes (available accessories). However, even with
these additional features, you’re still not as visible as in
the daytime. If you must ride at night, wear light-colored
clothing, preferably with reective strips. Buy a ashing
LED light and use it. Make sure that the reectors on
your bicycle are properly positioned and clean. Use the
headlight so that you can see the obstacles in your path.
Ride more slowly. Be wary of cars and assume that they
do not see you.
• Maintenance: It worked ne when we put it in the
box: Please maintain your bicycle. We have included
maintenance instructions in this manual. We’re smart
guys, but we haven’t gured out how to make a bicycle
that takes care of itself. Check the brakes and the tires
and the tightness of all those important fasteners before
each and every ride. Pretend that you’re a pilot doing
a walk-around of his airplane before taking-off. The pilot
knows that his life depends on the airworthiness of his
plane; your life depends on the roadworthiness of your
bicycle. Please have your bicycle checked by a qualied
bicycle mechanic AT LEAST once a year. It’s a small
investment in your well-being.
• Battery: We have equipped your eFlow bicycle with a
state-of-the-art lithium ion battery. This is the same battery
chemistry that powers your cell phone and laptop, but
on a much bigger scale. Lithium ion batteries feature the
highest gravimetric energy density available. (How’s that
for engineering techno-speak? What it means is that you
get more energy per pound than with any other battery
chemistry.) We have built-in a sophisticated battery
management system (BMS) that helps control all that
p. 5/52
Page 6

energy. But the battery requires care and maintenance
to ensure that it will perform safely and reliably for many
miles of riding. We have devoted an entire chapter of
this manual to the battery. Please read and understand
this important information. As always, if you have any
questions, please don’t hesitate to contact us.
If you have a question about any aspect of riding your bicycle,
please don’t hesitate to give us a call. We love to talk about
the safe use of our products. Or call the Authorized Dealer
where you purchased the bicycle. Remember, we love to do
anything that we can to make sure that you remain a healthy
and loyal customer.
IN SUMMARY:
1. WEAR A HELMET EACH AND EVERY TIME YOU GET ON THE
BICYCLE!
2. Don’t carry passengers.
3. Obey the Rules of the Road.
4. Ride defensively! Watch out for both moving and
stationary cars.
5. Be careful in wet conditions. Braking and traction are
signicantly reduced.
6. Ride carefully at night and make sure you are wearing
high visibility reective clothing.
7. Maintain your bicycle.
8. Care for your battery.
9. Read and study the rest of this manual.
10. If you do not understand any aspect of the use and care
of your bicycle, PLEASE call us: Currie Tech Customer
Service: (800-377-4532).
Important Symbols and Terms
This Owner’s Manual uses the following symbols and terms to call
your attention to Warnings, Cautions and Notes:
Currie Tech Technical and Customer Service: +1 800-377-4532
p. 6/52
Page 7

Term: WARNING
Meaning: This term calls attention to a Warning. A
Warning indicates a potentially hazardous situation,
which if not avoided, could result in bodily injury or
death, in addition to property damage. Read the text
accompanying the warning to be aware of the specic
hazard.
Term: CAUTION
Meaning: This term calls attention to a Caution. A
Caution indicates a potentially hazardous situation, which
if not avoided, may result in damage to equipment or
inadvertent system failure. Read the text accompanying
the Caution to be aware of the specic hazard and avoid
damage or system failure.
Term: Note:
Meaning: This term calls attention to a Note. The text
accompanying a Note provides helpful or other important
related information.
Please read, understand and follow all Warning, Caution
and Note notices on your eFlow bicycle and those
included in this Manual. If you do not understand any
of this important information, please contact your selling
dealer or the Currie Tech Customer Service Department
at 800-377-4532.
Related Manuals: Many of the components that are installed
on your eFlow bicycle have manuals that provide operating
and maintenance instructions regarding those particular
components. Please read and understand the important
information contained in those manuals as well.
p. 7/52
Page 8

III. Recording Your Bicycle’s Important Serial
Numbers:
Your bicycle and certain key components have unique serial
numbers. We urge you to record these serial numbers for
warranty purposes or in case your bicycle is ever lost or stolen.
Bicycle: The bicycle’s serial number is located on the underside
of the frame near the pedal crank:
Bicycle serial number: ______________________________
Motor: The motor serial number is on a label attached to the
left side of the motor hub:
Motor serial number: _____________________________
Battery: The battery serial number is on a label afxed to the
right side of the battery:
Battery serial number: _____________________________
Please also record this other important information:
Date of Purchase: ______________________________
Selling Dealer: ______________________________
Street Address: ______________________________
City/State/Zip: ______________________________
Telephone: ______________________________
Salesman: ______________________________
Please keep this information in a safe place for future reference.
Currie Tech Technical and Customer Service: +1 800-377-4532
p. 8/52
Page 9

IV. Specications*
• Performance
o Maximum speed: 20 miles/hour (32 kilometers/
hour)*
o Maximum range: Up to 20 miles (32 kilometers)*
(with standard battery pack)
o Maximum Weight: 275 lbs (125 kilograms)
*Note: many factors affect speed and range
capabilities of the eFlow bicycle. Terrain, average
speed, rider weight, tire ination pressure, winds, hills,
etc., all have an impact on how far and how fast you
go. Please see the Operations section of this Owner’s
Manual for more details.
• Operating modes
o Power-On-Demand Mode (POD): Motor power
regulated by a twist-grip throttle
o Pedal Assist Mode (PAS): Motor power proportional
to rider pedaling effort
• Bicycle
o Frame Aluminum
o Frame size 14.5”
o Front fork: RST SS-A6-T shock front fork
o Handlebar: Kalloy FB-13
o Handlebar stem: Kalloy AS-025
o Grips: Velo VLG-311
o Rims: 26” Alex FR-30 aluminum
o Tires: Maxxis M2003 26” x 2.0”
o Tubes: CST 26” x 2.0”
o Front derailleur SRAM Apex (2 x 10)
o Rear derailleur SRAM Apex (10 speeds)
o Shifters SRAM SL700 Flatbar trigger
o Front brake: Tektro AURIGA E-SUB 51M
o Rear brake Tektro AURIGA E-SUB 51S
o Saddle: Velo VLG-311
p. 9/52
Page 10

• Motor
o Type: TDCM brushless, gearless hub motor
o Power rating: 500-watts
• Standard Battery Pack
o Model: HTEnergy
o Chemistry: Lithium Ion
o Conguration: 10S5P, 2.2 Amp-hr 18650 cells
o Rated voltage: 37 Volts
o Rated capacity: 11Ah (407 watt-hrs)
o Weight: 3.9 kg (8.6 lbs)
o Max discharge current: 26A
o Over-discharge limits: 2.30V±0.025V per cell
o Pack cut-off voltage: 30V±4V
o Charge method: Constant Current/Constant Voltage
o Over-charge limits: 4.25V±0.025V per cell
o Max charge current: 5A (0.5C5)
o Max charge voltage: 42V
o Internal resistance: ≤150mΩ
• Optional, High Capacity Battery Pack
o Model: HTEnergy
o Chemistry: Lithium Ion
o Conguration: 10S8P, 2.2 Amp-hr 18650 cells
o Rated voltage: 37 Volts
o Rated capacity: 17.6Ah (634 watt-hrs)
o Weight: 5.2 kg (11.4 lbs)
o Max discharge current: 26A
o Over-discharge limits: 2.30V±0.025V per cell
o Pack cut-off voltage: 30V±4V
o Charge method: Constant Current/Constant Voltage
o Over-charge limits: 4.25V±0.025V per cell
o Max charge current: 5A (0.5C5)
o Max charge voltage: 42V
o Internal resistance: ≤150mΩ
Currie Tech Technical and Customer Service: +1 800-377-4532
p. 10/52
Page 11

• Charger
o Model: HP8204L3(10S)/36V2A
o Dimensions: 188mm x 93mm x 53mm
o Weight: 850g (1.8lb)
o Input voltage: AC110V~264V/47~63HZ
o Output voltage: 42±0.5VDC
o Output amperage: 2.0±0.2A
o AC line fuse rating: 10 amp
*Note: Specications are subject to change without notice.
p. 11/52
Page 12

V. eFlow Component Chart
1. Saddle (seat)
2. Seat post/Battery pack
3. Quick-release seat post clamp
4. Adjustable handlebar stem
5. Throttle
6. Display
7. Front tire/wheel
8. Front disc brake
9. Pedal
10. Crank arm
11. Chain ring
12. Kick stand
13. Drive chain
14. Rear tire/wheel
15. Rear derailleur
16. Rear disc brake
17. Rear hub motor
1
2
3
4
5
6
7
8
9
11
12
14
15
16
17
13
10
Currie Tech Technical and Customer Service: +1 800-377-4532
p. 12/52
Page 13

VI. Prior to your rst ride
IMPORTANT NOTICE: All Currie Tech products are intended to be
delivered in a completely assembled and adjusted condition.
To ensure your total satisfaction, the agreement that we sign with
our dealers prohibits the sale of an unassembled Currie Tech
product. If you are sold an unassembled Currie Tech vehicle,
please call our Customer Service Department at (800) 377-4532.
WARNING: There are no user serviceable elements
incorporated into the motor, motor controller, battery, battery
charger, throttle, or wiring harness of your Currie Tech electric
bicycle. DO NOT ATTEMPT TO DISASSEMBLE OR ADJUST ANY OF
THESE COMPONENTS. Doing so may cause extensive damage
to these components, will void your warranty, and may cause
a hazardous condition. If you cannot resolve a problem using
the troubleshooting guide in Chapter IX, contact your Currie
Tech authorized dealer, or call the Currie Tech Customer Service
Department at (800) 377-4532 for assistance.
Note: Throughout this manual, we will refer to the “right side”
and the “left side” of the bicycle. For clarication purposes,
“left” and “right” are relative to your position when sitting on the
bicycle in the normal riding position.
Note: It is important to fully charge the battery prior to rst
use. Unpack the battery and battery charger, and charge the
battery (per the instructions found in Section VIII of this manual)
for at least 8 hours before using the bicycle for the rst time.
Before you ride:
Use the following checklist to ensure that your eFlow bicycle is
ready for safe and enjoyable use.
• Quick releases: Make sure that the front wheel quick
release and seat height adjustment quick release are
properly adjusted and tight.
p. 13/52
Page 14

WARNING: Failure to properly adjust and lock the front
wheel quick release may result in the inadvertent separation
of the front wheel while you are riding the bicycle. This
occurrence can result in serious injury or death, and property
damage. Please refer to the instructions below for the
proper installation and adjustment of the front quick release
hub. If you are uncertain about any aspect of the assembly
and adjustment of your bicycle, seek help from a qualied
bicycle mechanic or the Currie Tech Customer Service
Department at (800) 377-4532.
Your eFlow bicycle uses quick release (QR) levers to facilitate
common tasks such as front wheel removal and seat height
adjustment.
When properly adjusted, quick release levers are both safe
and convenient, but you must understand and apply the
correct technique to adjust them properly before riding your
bicycle to prevent serious injury or death from a fall.
Quick release levers use a cam action to clamp the wheel
or other components in place. Because of their adjustable
nature, it is critical that you understand how they work, how
to use them properly, and how much force you need to
apply to secure them.
Warning: The full force of the cam action is needed to clamp
the wheel or other components securely. Holding the nut
with one hand and turning the lever like a wing nut is NOT
a safe or effective way to close a quick release and will not
clamp the wheel or other components safely.
Currie Tech Technical and Customer Service: +1 800-377-4532
p. 14/52
Page 15

WHEEL QUICK RELEASE USAGE
Riding with an improperly adjusted wheel quick release can
allow the wheel to wobble or fall off the bicycle, which can
cause serious injury or death.
Therefore, it is essential that you:
1. Ask your dealer or a local bike shop to help you make
sure you know how to install and remove your wheels
safely.
2. Understand and apply the correct technique for
clamping your wheel in place with a quick release.
3. Each time, before you ride the bike, check that the
wheel is securely clamped.
Installing a quick release front wheel
In a quick release system, the wheel hub is clamped in
place by the force of the quick release cam pushing against
one dropout and pulling the tension-adjusting nut, by way
of the skewer, against the other dropout. (Please refer to
the illustrations below.) The amount of clamping force is
controlled by the adjustment of the tension-adjusting nut.
Turning the tension-adjusting nut clockwise while keeping
the cam lever from rotating increases clamping force;
turning it counterclockwise while keeping the cam lever from
rotating reduces clamping force. Less than half a turn of the
tension-adjusting nut can make the difference between safe
clamping force and unsafe clamping force.
p. 15/52
Page 16
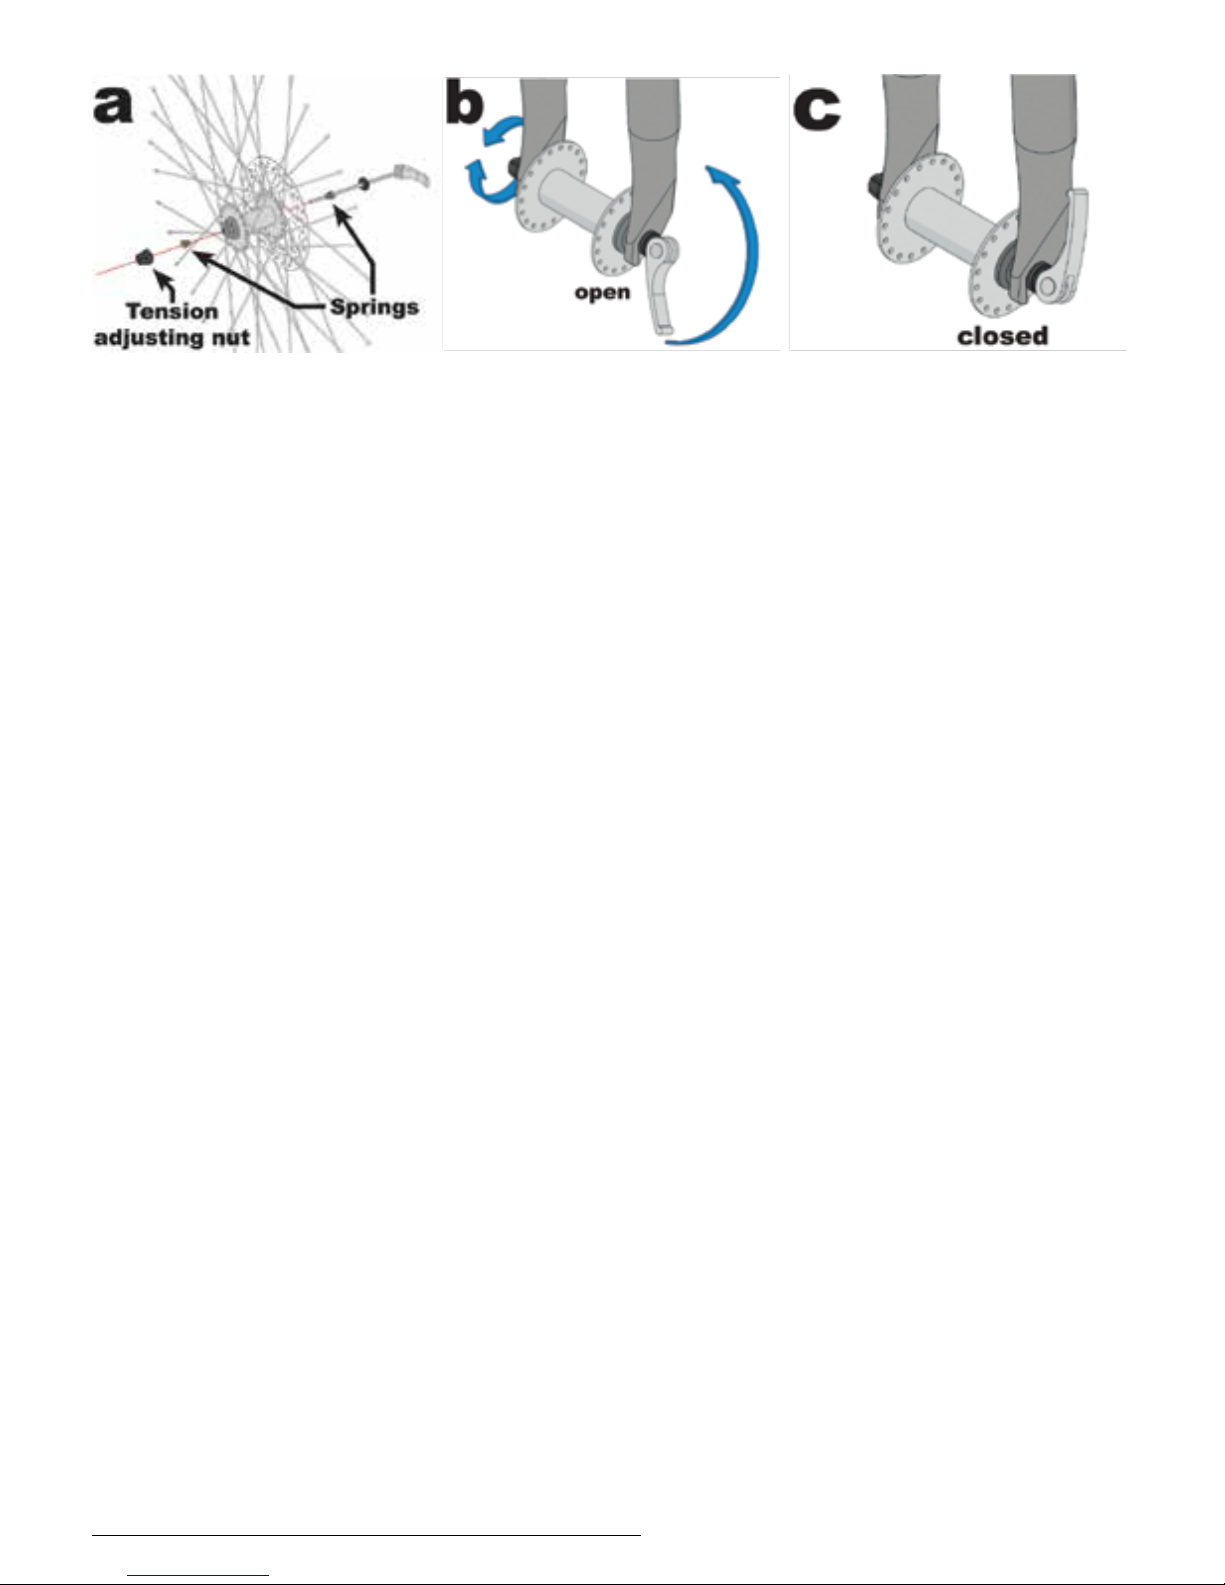
1. Remove the tension adjusting nut and one of the small
springs, then slide the quick release skewer through the hub.
If your bicycle has a disc brake, insert the skewer starting on
the side with the brake rotor. Replace the spring and tension
adjusting nut (g. a).
2. If your bicycle has rim brakes, disengage them to increase
the clearance between the tire and brake pads.
3. Install the wheel into the dropouts, making sure the quick
release lever is on the left side of the bicycle.
4. Holding the quick release lever in the OPEN position with
one hand, tighten the tension adjusting nut with your other
hand until it is nger tight against the fork dropout.
5. While pushing the wheel rmly to the top of the slots in the
fork dropouts, and at the same time centering the wheel rim
in the fork, move the quick release lever upwards and swing
it into the CLOSED position (gs. b & c) The lever should now
be parallel to the fork blade and curved toward the wheel.
To apply enough clamping force, you should have to wrap
your ngers around the fork blade for leverage, and the lever
should leave a clear imprint in the palm of your hand.
Currie Tech Technical and Customer Service: +1 800-377-4532
p. 16/52
Page 17

WARNING: Securely clamping the wheel takes considerable
force. If you can fully close the quick release without
wrapping your ngers around the fork blade for leverage,
and the lever does not leave a clear imprint in the palm of
your hand, the tension is insufcient. Open
the lever; turn the tension adjusting nut clockwise a quarter
turn; then try again.
6. If the lever cannot be pushed all the way to a position
parallel to the fork blade, return the lever to the OPEN
position. Then turn the tension-adjusting nut counterclockwise
one-quarter turn and try tightening the lever again.
7. Re-engage the brake to restore correct brake pad-to-rim
clearance; spin the wheel to make sure that it is centered
in the frame and clears the brake pads; then squeeze the
brake lever and make sure that the brakes are operating
correctly.
WARNING: An improperly secured seat post could lead
to loss of control of the bicycle while riding, causing an
accident that may result in serious injury or death, and
property damage. If you are not sure how to properly
adjust and apply the quick release seat post clamp, please
consult your authorized Currie Tech dealer, or the Currie
Tech Customer Service Department at (800) 377-4532 for
additional instructions.
Adjusting a quick release seat post clamp
In a seat post quick release system, the seat post is clamped
in place by the force of the quick release cam pushing
against one side of the clamp and pulling the tension
adjusting nut, by way of the skewer, against the other. The
amount of clamping force is controlled by the tensionadjusting nut. Turning the tension-adjusting nut clockwise
while keeping the cam lever from rotating increases
clamping force; turning it counterclockwise while keeping
p. 17/52
Page 18

the cam lever from rotating reduces clamping force. Less
than half a turn of the tension-adjusting nut can make
the difference between safe clamping force and unsafe
clamping force.
1. With the quick release clamp in the OPEN position, insert
the seat post, with saddle attached, into the bicycle’s seat
tube. (Refer to the illustrations above.)
2. Swing the quick release lever into the CLOSED position.
3. Grab the saddle with both hands and attempt to push it
down.
4. If you are able to force the seat post further into the frame,
the seat post clamp needs to be adjusted. Holding the quick
release lever in the OPEN position with one hand, tighten the
tension-adjusting nut with your other hand about 1/2 turn
clockwise.
5. Attempt to swing the lever into the CLOSED position. If the
lever cannot be pushed all the way to the CLOSED position
(g. b), return the lever to the OPEN position, then turn the
tension adjusting nut counterclockwise one-quarter turn
and try tightening the lever again. Repeat steps 3, 4 & 5 until
Currie Tech Technical and Customer Service: +1 800-377-4532
p. 18/52
Page 19

proper quick release tension is achieved.
Tires:
Bicycle tires normally lose pressure over time. An under
inated tire can cause premature tire failure, and will require
signicantly more energy (electric and human) to propel the
bicycle. Low tire pressure will have a signicant negative
impact on battery range. Ensure that both front and rear
tires are inated to the recommended tire pressure indicated
on the sidewall of the tire. Check the tires for any damage
or unusual wear. The tire should be properly seated in the rim
and the t of the tire bead in the rim should be periodically
checked. Ensure that the tire is not cracked or excessively
worn. Check for foreign objects in the tread, and that the
valve stem is straight in the rim. Damaged or worn tires
should be replaced immediately. Take the bicycle to a
qualied bicycle mechanic to repair and/or replace your
tires if necessary.
Reectors:
Your bicycle comes equipped with eight (8) reectors (front
handle bar, rear fender, front wheel, rear wheel and two
each on the left and right pedals) to make you more visible
at night. Please ensure that those reectors are in place,
properly positioned and clean before each ride.
Drive chain:
Your eFlow bicycle is equipped with a high quality roller
chain that needs to be cleaned and lubricated regularly.
p. 19/52
Page 20

Brakes:
Check your brakes before each ride.
WARNING: Riding with brakes that are damaged,
excessively worn and/or misadjusted will signicantly
degrade the stopping capabilities of your bicycle. This
condition could lead to an accident resulting in serious
injury or death, and property damage. If you are uncertain
about any aspect of the assembly and/or adjustment of your
bicycle, seek help from a qualied bicycle mechanic or the
Currie Tech Customer Service Department at (800) 377-4532.
WARNING: Bicycle brakes lose effectiveness when wet.
Avoid riding in wet weather. If it is unavoidable, be aware of
the fact that stopping your bicycle will require extra distance.
Ride more slowly, keep a greater distance between yourself
and other trafc, and begin braking sooner than normal.
Failure to take these precautions could lead to an accident
causing serious injury or death, and property damage. If you
are uncertain about any aspect of the brake operation under
any condition, seek help from a qualied bicycle mechanic
or the Currie Tech Customer Service Department at (800) 377-
4532.
Test the function of your brakes by riding your bicycle in
an area free from trafc and obstructions prior to every
ride.
• Brake cut-off switches: To maximize the effectiveness
and efciency of the braking system, and to save
battery power, your eFlow bicycle uses a system that
turns power to the motor “OFF” when the brakes are
applied. Check the function of the brake cut-off
switches before each ride. To do so, turn the power
“ON”, set the Mode to POD (see below), lift the rear
wheel off the ground by pushing the bicycle onto the
lowered kickstand, and actuate the throttle.
Currie Tech Technical and Customer Service: +1 800-377-4532
p. 20/52
Page 21

CAUTION: Ensure that there is no one standing close to the
rear wheel, and that all clothing and other objects are a safe
distance away from the rear wheel when performing this
test. The rear wheel will spin at high speed during this test. If
necessary, ask a friend to assist with this test.
With the rear wheel off the ground, actuate the twist grip
throttle on the right side of the handlebar. The electric
motor will spin the rear wheel. With the throttle partially
actuated, alternately apply the left and right brake levers.
When the brake lever is applied, power to the motor
should turn “OFF”. Power will resume when the brake
lever is released, assuming that you continue to actuate
the throttle.
Note: Fully applying the right brake lever will not only turn
off the motor, the brake should also stop the spinning
wheel.
If actuation of either brake lever does not cause power to
the motor to turn off, consult your Currie Tech authorized
dealer, or the Currie Tech Customer Service Department
at (800) 377-4532.
• Battery: Use ONLY the battery supplied with your eFlow
bicycle.
CAUTION: Use of any battery not supplied with your eFlow
bicycle WILL void the warranty and may cause damage
to the electrical system of the bicycle and the hub motor.
Use only the battery supplied with the bicycle, or a battery
provided by Currie Tech as a replacement for the battery
supplied with the bicycle.
• Note: Prior to its rst use, charge the battery supplied with
your bicycle for at least eight (8) hours.
p. 21/52
Page 22

WARNING: Use only the charger supplied with your battery. If
you use any other battery charger, you will void the warranty,
you may damage the battery and you could cause a re
that would result in property damage and possibly injury or
death. Follow the instructions for battery charging in Section
VIII, and in the Battery & Charger Instruction Manual supplied
with your bicycle.
Note: If you plan to store your bicycle in excess of thirty
(30) days, please follow the battery storage guidelines
given in the Battery Storage instructions in Section VIII, and
in the Battery & Charger Instruction Manual supplied with
your bicycle.
WARNING: Failure to properly use, charge and store the
battery supplied with your eFlow bicycle will void the
warranty and may cause a hazardous situation. Please read
and follow all instructions for the use and care of the battery
provided with your bicycle. If you are uncertain about any
aspect of the use and care of your battery, please do not
hesitate to call the Currie Tech Customer Service Department
at (800) 377-4532.
Currie Tech Technical and Customer Service: +1 800-377-4532
p. 22/52
Page 23

VII. Operation
Installing the battery
Your eFlow E3Nitro electric bicycle is equipped with a battery
pack that is nested in the frame in the seat tube. This unique
and patented design feature allows for optimum battery
placement from a weight distribution standpoint, while allowing
the bike to maintain clean, aerodynamic lines.
To install the battery:
o Elevate the ‘shoe’ in the seat mast to its highest
position and lock it in place with the seat post quick
release.
o Position the battery with the nose of the saddle
pointing toward the front of the bike, taking care to
align the mounting groves of the battery with the
mating groves in the shoe. (See photo.)
o Push the battery to the rear of the shoe until the
connector on the battery pack securely engages
with the connector in the shoe.
The battery
“shoe”
p. 23/52
Page 24

o Unlock the position of the seat post by opening the
quick release lever. Lower the seat post to the
desired riding position, then securely clamp the seat
post quick release.
o Refer to the instructions for the operation of the seat
post quick release on Page 17.
To remove the battery:
o Loosen the seat post clamp quick release lever by
rotating the lever to the OPEN position. (See photo.)
o Elevate the seat/seat post/battery assembly all
the way to the top-most extent of its travel,
exposing the battery ‘shoe’ to which the battery is
connected. (See photo.)
o Close the seatpost quick release lever to lock the
shoe in place. Gently tap the battery toward the
front of the bike to disconnect the battery from
the connector in the shoe. Remove the battery.
Currie Tech Technical and Customer Service: +1 800-377-4532
p. 24/52
Page 25

How to ride
Before you turn the bike on and start riding, you should
understand the way the pedal torque sensor works. Mounted
in the drive-side rear dropout, the torque sensor measures the
very slight deection in the dropout plate that occurs when
you pedal. Based on this measurement, the sensor outputs a
signal to the controller which is processed further and ultimately
translated into motor output.
In order to properly measure relative deection of the sensor,
the controller rst needs to recognize a “zero point”. This zero
point is calculated each and every time the bike is turned on,
immediately after you push the power button.
Because the sensor zero point is the basis for all measurement in
the system, it’s important that it be very accurate, considering
the conditions the bike is being used under; most importantly,
the weight of the rider.
Because of this, we recommend you follow this procedure every
time you turn the bike on:
1. Sit on the bike, putting as much of your weight on
the saddle as possible. Put your feet on the oor
for balance, but try not to rest too much weight on
them.
2. Press the SET button on the display to turn the bike
on.
3. Wait a second or two, then begin riding.
For the best ride, do not put your feet on the pedals, and do
not begin moving the bike until after powering up the system as
recommended above. Although the software is fairly forgiving,
it’s possible that the bike could be too sensitive, or not sensitive
enough to ride ideally if the procedure isn’t followed.
p. 25/52
Page 26

A note about operating modes:
Your eFlow electric bicycle features two operating modes:
1. Power-On-Demand Mode (POD)
2. Pedal Assist Mode (PAS)
In Power-On-Demand Mode (POD), motor power is regulated
by actuation of the twist-grip throttle mounted on the right-hand
side of the handlebar. Twist the throttle toward you to apply
motor power. Pedaling is optional. Power is available whether
you pedal or not. The position of the throttle will determine how
much power is applied. To terminate power, release the throttle
allowing it to return to its “OFF” position.
In Pedal Assist Mode (PAS), motor power output is dependent
on the rider’s pedaling power. In other words, the bike’s
electrical system ‘senses’ rider pedaling effort, and applies
motor power in proportion to rider effort: the harder you pedal,
the more motor power is applied. The proportion of the ‘Assist’
is set via the display (see the following pages). If the rider
does not pedal, no power is output from the motor. Ceasing
pedaling during the ride will cause the motor to turn off. Motor
power will be restarted when the rider begins pedaling again.
While in Pedal Assist Mode (PAS), you can override the PAS
function with the throttle. After beginning to ride, rotate the
throttle toward you to achieve any percentage of motor power
up to 100%.
Currie Tech Technical and Customer Service: +1 800-377-4532
p. 26/52
Page 27

Display
Your eFlow E3Nitro electric bicycle is equipped with a multifunction display that also serves as a security device.
By removing the Display from the handlebar, you disable the
electrical system of the bicycle, preventing unauthorized use.
HOWEVER, removal of the Display DOES NOT prevent theft of
the bicycle. If you plan to leave the bike unattended, even for
a short time, in addition to removing the display, securely lock
the bike to an immovable object with a high quality chain- or
cable-locking device.
The display is your user interface to the bike. Using the display,
you can program the riding characteristics of the bike, monitor
the system self-tests as they occur, and note any system errors.
The display also serves as a cycle computer, giving information
regarding time, speed and distance.
p. 27/52
Page 28

Connecting the display
2
While pushing down on the display, rotate it 45° clockwise until it
stops, parallel with the handlebars.
3
Sit on the bike, then turn it on by pressing the SET
button.
Place the display on the
handlebar display mount at
a 45° angle, aligning the tabs
on the bottom of the display
with the slots on the face of
the mount.
1
Currie Tech Technical and Customer Service: +1 800-377-4532
p. 28/52
Page 29

Setting the clock and speed units
Hold SET to conrm your changes.
Hold SET and “–” together to exit
the code screen and save the
changes.
4
In the setting screen,
tap SET to cycle
between characters.
Tap “+” or “–” to
change the ashing
character.
3
Hold SET and “–” together for 5
seconds to enter setup mode.
1
In setup mode, you will enter
codes corresponding to the
setting you wish to change.
Tap SET to cycle between digits. Hold
to conrm after the code is entered.
Tap “+” or “–” to set each digit
in the code.
2
Codes:
Set clock: 0001
Set speed units: 0003
Please do not experiment with undocumented codes. While other
settings exist, using them may cause the bike to become unsafe to
ride or to stop functioning altogether.
p. 29/52
Page 30

Using the display functions
To reset all trip data, hold “+”
and “–” together for 3 seconds.
Displays the total
ride time for the
bicycle in hours.
Available in PAS
mode only; sets
the strength of
motor assist.
Displays the ride
time for this trip.
Displays the
maximum speed
recorded on this
trip.
Odometer;
displays the total
mileage for the
bicycle.
Displays the
average speed
for this trip.
Displays the
distance traveled
on this trip.
Tap SET to cycle
between functions.
Displayed Level Motor output
1
40%
2
60%
3
80%
4
100%
Power levels
Currie Tech Technical and Customer Service: +1 800-377-4532
p. 30/52
Page 31

Turning on the headlight and LCD backlight
Hold “–” for 3 seconds to turn on the LCD backlight and the bicycle
headlight/taillight (if present).
The backlight will not function unless
the display is mounted on the bike
(with a battery installed).
Hold “+” for
3 seconds to
change from PAS
to POD.
In PAS mode, the
motor will activate
when the system
senses the rider
applying pressure
to the pedals.
The amount of pedal pressure and the amount of motor assist are
proportional; harder pedaling will result in the motor providing more
assistance.
Use the “PWR LVL” display function to choose between light assist,
medium assist, and strong assist.
The throttle acts like a “boost”, allowing full control over 0-100% of
motor power at any time, regardless of power level.
In POD mode, only the throttle controls motor speed. There is no
power level setting in this mode, as the throttle can always apply
0-100% of motor power. The torque sensor is disabled, and there is no
need to pedal.
Changing the assist mode
p. 31/52
Page 32

Each “bar” on the battery gauge represents 20% of the
battery’s full charge. The gauge should show the battery
level within a few moments of turning on.
If the gauge still shows completely empty after a few
seconds, check all connections to the controller and
display, and re-connect.
You may also need to begin riding the bike before the
battery “wakes up” fully and begins sending the charge
signal to the display.
Understanding the battery gauge
“F” Illuminates when
the battery is nearly full.
The cell diagram
indicates the charge
level of the main battery.
“E” Illuminates
when battery is
nearly empty.
The down arrow Illuminates
while braking, indicating
that regen mode is active.
The up arrow Illuminates
while the motor is being
powered.
Regenerative braking is automatically activated when the
brake lever is held, even if only partially. This feature slowly
pushes energy back into the bike’s battery, which can
extend overall riding range if used frequently.
Currie Tech Technical and Customer Service: +1 800-377-4532
p. 32/52
Page 33

Comm Error
Interpreting error messages
The eFlow display shows coded
error messages to help diagnose
problems with the bike. These
messages appear automatically if
the system senses an issue.
The most common error message
you may see is Error 13: “Comm
Error”. If this error comes up,
it means that the display is
connected to the bike but cannot communicate with the main
controller (located in the bike’s downtube).
Make sure the bike’s battery is installed and fully charged. Check
all connections between the display and the controller, the battery
and the controller, and the display and its mounting bracket. Remount the display, making sure it engages the mount fully.
If problems persist, or for information on other error codes, please
contact Currie Tech customer service.
p. 33/52
Page 34

Changing the display battery
The display can use power either from its
internal battery, or from the bike’s main
battery. The internal battery is used when
the display is disconnected from the bike,
so you can browse your ride data (like
distance, time, and average speed).
The display is powered by the bike’s
battery when connected to the bike. Even
if the internal battery in the display is dead
or not installed, the display will still operate
using main battery power. However, if you disconnect the display
from the bike, it will immediately shut off.
The display uses one CR2032 3V watch battery. It should be
available at any store that sells electronics.
To replace, unscrew the display’s back cover using a coin. Remove
the old battery, then replace with a new one, oriented as shown
(you should be able to see the + symbol on the top of the cell).
Replace the back cover, tightening about 3/4 turn until snug.
After replacing the battery, you will need to re-set the clock. Trip
time, trip distance, average speed, and max speed will also be
reset. The odometer and total time values are stored in memory and
will not be reset.
Currie Tech Technical and Customer Service: +1 800-377-4532
p. 34/52
Page 35

Note: The electrical system of your eFlow bicycle allows for
gradual application of power, and allows for adjustment of
power between OFF and FULL. This feature enables you to set
the speed at which you are most comfortable.
Note: The electrical system of your eFlow bicycle will provide
instantaneous power whether you are pedaling or not.
Therefore, there is no need to pedal as you start-up. However,
the motor consumes more power during a start from a stop than
at any other time. More power is consumed during start-up
than even climbing a steep hill. Therefore, in order to conserve
battery power and increase your overall range, pedal from a
stop to relieve some of the load from the battery then use the
throttle.
Note: Remember that there are power cut-off switches
embedded in the brake levers. When you apply the brakes,
power to the motor will turn “OFF”. Therefore, do not hold the
brake lever(s) when you want the motor to run.
Gears and Shifting
o Your Currie Tech eFlow features a 10-speed rear
derailleur. The derailleur control is a SRAM 10-speed
“trigger” style shifter. You normally use your index
nger and thumb to up- and downshift the derailleur,
respectively.
o To up-shift (makes pedaling harder but you go faster for
a specic pedal speed), pull the top lever of the shifter
with your index nger toward you. The rear derailleur will
shift the drive chain to a smaller diameter sprocket on
the freewheel, resulting in a higher gear.
o To downshift (makes pedaling easier to accelerate
and climb hills, but you go slower for a specic pedal
speed), push the bottom lever with your thumb away
from you. The derailleur will shift the drive chain to a
larger diameter sprocket on the freewheel, resulting in a
lower gear.
p. 35/52
Page 36

o The shifter accomplishes one gear change for each full
travel motion of the shift lever, regardless of whether
you are upshifting or downshifting.
WARNING: Never pedal backward while shifting. This can cause
the chain to derail and may cause you to lose control, resulting
in an accident that could cause serious injury or death, and
property damage. Always pedal forward at a steady pace
when shifting gears.
o The 10-speed rear derailleur operates independently of
the motor.
o To maximize the range that you can ride with electric
assistance and to give yourself a pleasant aerobic
workout, we recommend that you use the Pedal
Assist Mode. This is best accomplished by using a
combination of pedal- and motor power to achieve
your desired speed, Then, using the derailleur control,
adjust the gear setting to nd a gear that makes
pedaling comfortable while assisting the motor.
Currie Tech Technical and Customer Service: +1 800-377-4532
p. 36/52
Page 37

Range
o Many factors affect the range that you will experience
with the bicycle. These include:
Battery state-of-charge
Mode setting (the bike will use less power in the PAS
Mode due to the required contribution of the rider.)
Tire ination pressure
Adjustment of the wheel bearings and brakes (tight
bearings or a dragging brake shoe will adversely
affect range.)
Rider weight (it takes more energy to accelerate a
heavier person.)
The speed at which you travel, and local wind
conditions (air resistance increases exponentially
with speed.)
Terrain (road surface and hills; traveling on a soft
surface, such as dirt or gravel, or climbing a hill uses
energy faster.)
Lots of starts and stops (full power from a standing
start draws the most amperage from the battery.)
o There are many things that you can do to maximize
your range. These include:
Fully charge your battery before each ride.
Ride in the PAS Mode and pedal! Enjoy the health
benets available from cycling. Every watt of
power that you provide is one less watt that the
battery has to provide. Make your bicycle a true
human/electric hybrid!
Check your tire pressure regularly and inate the
tires to the maximum pressure printed on the tire
sidewall.
Have your bicycle serviced periodically to ensure
that the bearings turn freely and the brakes do not
rub the rims when they are not applied.
Minimize the weight that you carry.
Ride at slower speeds.
Accelerate more slowly. Assist the system by
p. 37/52
Page 38

pedaling as you accelerate to your cruising speed.
o As your battery ages, it will gradually lose capacity.
With proper care and maintenance, your battery
will retain up to 80% of its capacity over at least 500
discharge/recharge cycles. As capacity diminishes,
you will notice a gradual drop-off in maximum range
capability. When range falls to an unacceptable
level, contact your Currie Tech authorized dealer for
information regarding battery replacement.
A word about hills
o Your eFlow bicycle uses a high torque, precision hub
motor to drive the bicycle under electric power. We
have congured the electrical drive system to provide
ample torque to help you climb hills. However,
depending on the ‘steepness’, length of the hill, and
the mass (weight) that you want to carry up the hill,
you can overstress and damage important elements of
the drive system. Please use the following guidelines to
ensure safe operation:
If you encounter a hill that causes the speed of
your bicycle to drop below 7 miles per hour (11
kilometers per hour) on electric power only (POD
Mode with no pedaling) with the throttle fully
applied, PEDAL to assist the bicycle up the hill.
Failure to do so could overstress the motor and
controller, possibly causing permanent damage to
those components. Further, failure to pedal to assist
the bicycle will overstress the battery, reducing its
capacity and shortening its useful life.
At the end of your ride…
o Fully recharge your battery as soon as possible. A
lithium ion battery left in a discharged condition
will deteriorate much faster than a fully charged
battery.
Currie Tech Technical and Customer Service: +1 800-377-4532
p. 38/52
Page 39

VIII. Battery Use, Care and Maintenance
For the proper use, maintenance, and storage of this battery
it is crucially important that you read and understand the
instructions given in this manual.
WARNING: Failure to properly use, charge, and store this battery
will void the warranty and may cause a hazardous situation.
DO NOT use this battery with any other vehicle or appliance.
Use of this battery with any other product will void the warranty,
and may create a hazardous condition that could cause a re
resulting in severe injury or death, and property damage.
If you have any questions about this battery or its usage, please
do not hesitate to contact the Customer Service Department at
Currie Tech at (800) 377-4532.
WARNING: Never short circuit the discharge terminals of the
battery. A short circuit will damage the battery and could
cause a re resulting in severe injury or death, and property
damage.
CAUTION: Keep the battery away from excessive heat and/or
open ames. Avoid long term exposure to direct rays from the
sun.
CAUTION: Protect the battery from water or other moisture. If
the battery becomes wet from rain during use, dry it as soon as
possible. Remove the battery from the electric bicycle before
washing the bicycle.
CAUTION: To avoid damage to the battery, never subject it to
intense physical shock or severe vibration.
p. 39/52
Page 40

Charging Instructions
WARNING: Use only the battery charger supplied with this
battery. If you use any other battery charger, you will void the
warranty, you may damage the battery and you could cause a
re that would result in property damage and possible injury or
death.
The Battery supplied with your eFlow can be charged either
while it is installed in the bike, or removed from the bike.
Charging the battery outside of the bike can be convenient
if there is not access to a 110-volt outlet near where you
parked your bike. Instructions for both charging options are
below. In either case, the following instructions are relevant:
• Check the Voltage Selector switch on the charger to
ensure that it is set to your local line voltage (110 volts for
the United States).
• Plug the charger into the wall outlet.
• Ensure that the charger switch is OFF before connecting
the charger to the battery.
To charge the battery while it is installed in the bike:
• Locate the charger port on the left side of the bike frame,
just above the bottom bracket; rotate the charger port
cover on the side of the battery housing clockwise or
counter clockwise to expose the charger receptacle.
(See below.)
Currie Tech Technical and Customer Service: +1 800-377-4532
p. 40/52
Page 41

• Carefully align the connector pins and connect the
charger to the battery by plugging the connector into the
charger receptacle.
•
• Turn ON the charger using the ON/OFF switch on the
charger.
To charge the battery when it is not installed in the bike:
• Locate the battery adapter supplied with the bike and
connect it to the battery charger connector. (See below.)
• Plug the adapter into the battery pack at the pack
connector at the bottom of the battery. (See below.)
p. 41/52
Page 42

• Battery charger LED Indications:
The Power LED will illuminate RED when the charger is
plugged into a wall outlet and the ON/OFF switch is in
the ON position.
The Indicator LED will illuminate AMBER while the
charger is charging the battery.
The Indicator LED will change to GREEN when the
battery is fully charged.
• When charging is complete (the Indicator LED is GREEN),
turn “OFF” the charger using the ON/OFF switch on the
charger.
• Carefully unplug the charger from the battery by pulling
the connector out of the charger receptacle.
• Rotate the charger port cover clockwise or counter
clockwise to cover the charger receptacle.
• Your eFlow bicycle is now ready for use.
Important notes about charging your battery
• You can charge the battery while it is in or out of the
electric bicycle.
• It normally takes four to six hours to fully charge your
battery from a fully discharged condition.
• Fully charge the battery for at least twelve hours before
using your eFlow bicycle for the rst time.
• Fully charge the battery for at least twelve hours after
every ten charges.
• To maximize the life of your battery, and to ensure that
your eFlow bicycle is always ready for use, recharge the
battery as soon as possible after every use. A lithium ion
battery left in a discharged condition will deteriorate
much faster than a fully charged battery.
• Always connect the charger to the AC power source,
with the charger turned OFF, before connecting the
charger to the battery.
• Always disconnect the charger from the battery, with the
charger turned OFF, before disconnecting the charger
Currie Tech Technical and Customer Service: +1 800-377-4532
p. 42/52
Page 43

from the AC power source.
• To avoid damage to the charger, never subject it to
intense physical shock or severe vibration.
• WARNING: Improper use of the battery charger can result
in a re with property damage and physical injury or
death.
• CAUTION: Do not block the fan vent on the charger while
charging the battery. This can cause the charger to
overheat.
• CAUTION: The battery charger supplied with this battery is
for INDOOR use only.
• CAUTION: Avoid any contact with water or other uids
while charging the battery. If the battery, charger or
any connections become wet, immediately unplug
the charger and thoroughly dry all components prior to
charging the battery.
Long Term Storage
• If you do not plan to use your eFlow bicycle for an extended
period of time (1 month or more), remove the battery from
the bicycle for storage.
• Fully charge the battery for at least twelve hours before
storing the battery.
• Fully recharge the battery for at least twelve hours at least
every 30 days of storage.
• Store the battery in a cool (50º to 70ºF, 10º to 21ºC), dry
place. Avoid direct exposure from the sun.
• CAUTION: Your eFlow bicycle is supplied with a very high
capacity lithium ion battery. This battery incorporates a
microprocessor-controlled Battery Management System
(BMS) to ensure that the battery performs reliably and
safely during the course of its service life. To operate,
p. 43/52
Page 44

the BMS uses a small amount of electric energy to run
the microprocessor ALL OF THE TIME, even when the
bicycle is not in use. In other words, the BMS is always
on, consuming a small amount of power from the battery.
This power drain is inconsequential under normal use, as
the battery is recharged on a regular basis. However, if
the electric bicycle is not used for an extended period
of time, this constant power usage will eventually
completely drain the battery, resulting in permanent
damage. Therefore, it is VERY IMPORTANT that you
recharge the battery AT LEAST every 30 days if the bicycle
is not in use. Failure to follow this battery maintenance
procedure will void the warranty. If you have any
questions regarding this instruction, please do not hesitate
to contact the Currie Tech Customer Service Department
at 1-800-377-4532.
If you have any questions about this battery or its usage, please
do not hesitate to contact the Customer Service Department at
Currie Tech at (800) 377-4532.
Battery Disposal
We are condent that you will enjoy many miles of pleasurable
riding with your eFlow bicycle battery. However, batteries
do eventually wear out. When this happens, we urge you to
properly dispose of your used battery.
For guidance regarding proper disposal of your battery,
please contact the Customer Service Department at Currie
Tech. Or, you can nd very useful information regarding used
battery drop-off sites from the Rechargeable Battery Recycling
Corporation (RBRC) at www.rbrc.org.
Currie Tech Technical and Customer Service: +1 800-377-4532
p. 44/52
Page 45

Damage in Transit
The battery and charger should be tested when received.
If the battery or charger is damaged in any way, a claim should
be led with the carrier. A full report of the damage should
be obtained by the claim agent, and this report should be
forwarded to Currie Tech. Currie Tech will advise the disposition
to be made of the equipment and arrange for repair or
replacement.
IX. Troubleshooting
We have engineered your eFlow bicycle to be a safe and
reliable transportation vehicle. However, from time-to-time,
things can go wrong. The following is intended to be a general
guide for diagnosing and remedying simple issues that may
happen. If you are unsuccessful in resolving a problem, please
do not hesitate to contact your selling dealer or the Customer
Service Team at Currie Tech at 1-800-377-4532.
Problem: Bicycle does not turn on
Cause #1: Dead battery
Solution #1: Recharge the battery (Please see the
instruction for proper charging of the battery
in Section VIII and/or in the Instruction Manual
supplied with the battery.
Cause #2: The battery is improperly installed on the
bicycle.
Solution #2: Check that the battery is securely plugged
into the battery receptacle. (Please refer to
page 23.)
p. 45/52
Page 46

Problem: Bicycle turns “ON” (start-up self test
successful) but motor does not run.
Cause #1: A brake lever is applied. (When the brakes
are applied, a signal is sent to the controller
to turn power to the motor “OFF”.)
Solution #1: Do not apply the brakes when attempting
to power the bicycle. Ensure that the brake
levers are fully forward when using the
bicycle.
Cause #2: The motor power connector is unplugged.
Solution #2: Ensure that the motor power connector is
securely connected. (See photo below.)
Repairing a at tire
If you do have to repair a tire, it is important to know the correct
procedure for removing and reinstalling the wheels.
• Removing the front wheel
o Release the front hub quick release by rotating the
quick release lever away from the hub.
o Turn the adjusting nut on the opposite side of the
hub from the quick release lever counter clockwise
until the nut and quick release lever body clears the
safety protrusions on the fork tip.
o After repairing the at tire, replace the front wheel
taking care that the disk if properly inserted into the
disk brake caliper.
WARNING: Failure to properly adjust and lock your front
wheel quick release may result in the inadvertent separation
of the front wheel while you are riding the bicycle. This
occurrence can result in serious injury or death, and property
damage. Please refer to the instructions on Page 15 for
the proper installation and adjustment of your front wheel
Currie Tech Technical and Customer Service: +1 800-377-4532
p. 46/52
Page 47

quick release. If you are uncertain about any aspect of the
assembly and adjustment of your bicycle, seek help from
a qualied mechanic or the Currie Tech Customer Service
Department at (800) 377-4532.
WARNING: If you are unsure about the brake set-up and
adjustment procedure, please take your eFlow bicycle
to your selling dealer, or any qualied bicycle mechanic,
and ask for assistance in adjusting the brakes. Improperly
adjusted brakes may cause reduced braking performance,
leading to an accident that could result in serious injury or
death, and property damage. DO NOT ride your bicycle if
you are not condent that the brakes are working properly.
• Removing the rear wheel:
o Removing the rear wheel of an electric bike
is similar to the procedures used to remove
a rear wheel from a conventional bike, with
one exception. On an electric bike, you must
disconnect the motor from the bike’s electrical
system. To do this, locate the motor connector.
The motor connector and associated cables are
zip-tied to the underside of the left chain stay. (See
photo below.)
o Clip the zip tie holding the motor power cable to
the frame.
p. 47/52
Page 48

o Disconnect the motor power plug. (See photo.)
o Open the rear quick release paddles. See page 49
for more information.
o Remove the rear wheel by allowing it to slide
vertically from the dropout, taking care to pull the
derailleur to the rear of the bike to allow the axle
and freewheel to clear the derailleur.
o After repairing the at tire, replace the rear wheel
by reversing the removal instructions above, taking
care that the disk if properly inserted into the disk
brake caliper.
o After reconnecting the motor power plug, zip tie
the plug and associated cables to the ttings on
the bottom of the chain stay.
o Ensure that the wheel is properly centered in the
frame. Securely x the quick release mechanism.
See page 49.
WARNING: If you are unsure about the brake set-up and
adjustment procedure, please take your eFlow bicycle
to your selling dealer, or any qualied bicycle mechanic,
and ask for assistance in adjusting the brakes. Improperly
adjusted brakes may cause reduced braking performance,
leading to an accident that could result in serious injury or
death, and property damage. DO NOT ride your bicycle if
Currie Tech Technical and Customer Service: +1 800-377-4532
p. 48/52
Page 49

you are not condent that the brakes are working properly.
• Using the Axle Release™ Quick-Release Adapters (rear
wheel)
See referenced gures on the next page.
INSTALLATION: Position bicycle upside down. Using a wrench,
remove and dispose of the threaded securing nut from one
side of the axle if applicable (see ‘A’). Retain any safety
washers in place. If the bicycle comes equipped with the
axle release; disregard step A. While holding the spacer
snugly to the assembly, grasp such assembly with the lever in
an open position. Place the threaded opening against the
end of the axle and spin it slowly in a clockwise motion. While
doing so, apply light pressure until contact is made against
the bicycle frame by the spacer- (see ‘B’). (If the lever
assembly does not thread on smoothly or appears to be the
wrong size, STOP! Reposition the device and restart. While
gripping the bicycle rmly, close the lever to its fully closed
position (see ‘C’-‘D’). If the lever closes without resistance,
reopen lever, spin the assembly further clockwise and reclose
until rm and secure connection is found. Repeat processes
for both sides of each wheel. Note: Do not perform this
installation for both sides of the axle concurrently as axle may
rotate. Always ensure proper installation prior to use by lifting
the bicycle frame off the ground. While holding, strike the top
of the inated rubber tire with a few sharp blows. Sample test
is good indication but does not guarantee proper installation
has occurred.
UNDESIRABLE LEVER POSITIONS: If lever is in an undesirable
closed position on the wheel (undesirable on front: forward
or down, undesirable on rear: up or down), reopen lever,
and unthread using counter-clockwise spinning motion
until assembly is removed. Remove the spacer from
assembly (see ‘E’). Each washer (labeled 90, 180, or 270) will
progressively add around 90 degrees of counter-clockwise
turn to the nal handle position. Carefully select a washer
p. 49/52
Page 50

from the three included, press rmly between the metal cup
and the nylon spacer (see ‘F’). Slide spacer back over the
bottom of the assembly (see ‘G’) and repeat steps ‘B’-‘D’. If
handle continues to be in an undesirable position, remove
the assembly from the bicycle and repeat steps ‘E’-‘H’ and
‘B’-‘D’ until both handles are in optimal positions using the
remaining washers
CAUTION: This product should be installed only on bicycles
with inherent factory installed safety devices for wheel
retention such as no turn washers; lipped dropouts or hooked
washers that t into eyelets in the bicycle’s front fork. Carefully
follow the installation instructions and tests prior to use.
Improper installation could result in wheel/frame separation
and cause serious bodily injury. This product should only be
operated by a person 14 years of age or older under adult
supervision in order to ensure proper installation has occurred.
MAINTENANCE: Keep clean, dry, and lightly lubricate all
moving parts.
(Instructions reproduced with permission from Coombs
Cycling Technologies LLC, 520 North Main, Ste 304
Heber City, UT, 84032-USA)
Currie Tech Technical and Customer Service: +1 800-377-4532
p. 50/52
Page 51

Finally…
We have provided all of the information necessary for
you to have an ongoing enjoyable and fullling experience
with our electric bicycles. However, if we have overlooked
some aspect of the product, or if the information presented is
not clear, PLEASE do not hesitate to contact the dealer where
you purchased the bicycle, or the Currie Tech Customer Service
Department. It is easy and convenient to do so. You may call
Customer Service at +1 (800) 377-4532 from 8:00 AM until 4:00
PM Pacic Standard Time or you may send a request for help
using the form on www.CurrieTech.com at any time. We are
committed to your satisfaction, and will do everything that we
can to help to ensure that you are happy with your bicycle.
Thank you!
©Copyright by:
Currie Technologies
3850A Royal Avenue
Simi Valley, CA 93063
Phone: +1 (800) 377-4532
www.CurrieTech.com
All rights reserved. January 2013
p. 51/52
Page 52

 Loading...