

Page 1

VR-CM50 CONSOLE SYSTEM
INSTALLATION GUIDE
Second Printing
February 1996
Supersedes 004-3039-274 May 1995
Page 2

Page 3

VR-CM50 CONSOLE SYSTEM
INSTALLATION GUIDE
Copyright 1995 by the E.F. Johnson Company
The E.F. Johnson Company designs and manufactures two-way radio equipment to serve a wide variety of communications
needs. Johnson produces equipment for the mobile telephone and land mobile radio services which include business, industrial, government, public safety, and personal users. In addition, Johnson designs and manufactures electronic components used
in communications equipment and other elect r oni c devi ces .
LAND MOBILE PRODUCT WARRANTY
The manufacturer’s warranty statement for this product is available from your product supplier or from the E.F. Johnson
Company, 299 Johnson Avenue, Box 1249, Waseca, MN 56093-0514. Phone (507) 835-6222.
WARNING
This device complies with Part 15 of the FCC rules. Operation is s ubject to the condition that this device does not cause
harmful interference. In addition, changes or modification to this equipment not expressly approved by E. F. Johnson could
void the user’s authority to operate this equipment (FCC rules, 47CFR Part 15.19 ).
DO NOT allow the antenna to come close to or touch, the eyes, face, or any exposed body parts while the radio is transmitting.
DO NOT operate the radio near electrical blasting caps or in an explosive atmosphere.
DO NOT operate the radio unless all the radio frequency connectors are secure and any open connectors are properly terminated.
DO NOT allow children to operate transmitter equipped radio equipment.
SAFETY INFORMATION
Proper operation of this radio will result in user exposure below the Occup ational Safety and Health Act and Federal Communication Commissi on limi t s .
The information in this document is subject to change without notice.
Page 4

Page 5

TABLE OF CONTENTS
1 PRE-INSTALLATION INFORMATION
1.1 RECEIVING INFORMATION . . . . . . . . . . . . . . . . . . . . . . . . . . . . . . . . . . . . . . . . . . . . . . . . . . . . . . . . . . . . . . . 1-1
VISIBLE LOSS OR DAMAGE. . . . . . . . . . . . . . . . . . . . . . . . . . . . . . . . . . . . . . . . . . . . . . . . . . . . . . . . . . . . . . . . . 1-1
CONCEALED LOSS OR DAMAGE . . . . . . . . . . . . . . . . . . . . . . . . . . . . . . . . . . . . . . . . . . . . . . . . . . . . . . . . . . . . 1-1
PACKING LIST. . . . . . . . . . . . . . . . . . . . . . . . . . . . . . . . . . . . . . . . . . . . . . . . . . . . . . . . . . . . . . . . . . . . . . . . . . . . . 1-1
UNPACKING THE SHIPMENT. . . . . . . . . . . . . . . . . . . . . . . . . . . . . . . . . . . . . . . . . . . . . . . . . . . . . . . . . . . . . . . . 1-1
TOOLS REQUIRED . . . . . . . . . . . . . . . . . . . . . . . . . . . . . . . . . . . . . . . . . . . . . . . . . . . . . . . . . . . . . . . . . . . . . . . . . 1-2
2 CENTRAL PROCESSOR PACKAGE INSTALLATION
2.1 LOCATION OF THE CENTRAL PROCESSOR PACKAGE (CPP) . . . . . . . . . . . . . . . . . . . . . . . . . . . . . . . . 2-1
2.2 ASSEMBLY OF THE CENTRAL PROCESSOR PACKAGE (CPP) CABINETRY. . . . . . . . . . . . . . . . . . . . 2-1
2.3 CONNECTION OF THE CENTRAL PROCESSOR PACKAGE CABLES. . . . . . . . . . . . . . . . . . . . . . . . . . . 2-3
CABLE ROUTING . . . . . . . . . . . . . . . . . . . . . . . . . . . . . . . . . . . . . . . . . . . . . . . . . . . . . . . . . . . . . . . . . . . . . . . . . . 2-3
2.4 MOUNTING OF SURGE ARRESTOR BOXES AND GROUND BRACKET. . . . . . . . . . . . . . . . . . . . . . . . . 2-4
PLACEMENT OF SURGE ARRESTOR BOXES . . . . . . . . . . . . . . . . . . . . . . . . . . . . . . . . . . . . . . . . . . . . . . . . . . 2-4
WALL OR PANEL BOARD INSTALLATION. . . . . . . . . . . . . . . . . . . . . . . . . . . . . . . . . . . . . . . . . . . . . . . . . . . . 2-4
2.5 GROUNDING THE SYSTEM . . . . . . . . . . . . . . . . . . . . . . . . . . . . . . . . . . . . . . . . . . . . . . . . . . . . . . . . . . . . . . . . 2-5
2.6 GROUNDING INSTALLATION . . . . . . . . . . . . . . . . . . . . . . . . . . . . . . . . . . . . . . . . . . . . . . . . . . . . . . . . . . . . . . 2-6
2.7 CPP I/O PANELS. . . . . . . . . . . . . . . . . . . . . . . . . . . . . . . . . . . . . . . . . . . . . . . . . . . . . . . . . . . . . . . . . . . . . . . . . . . 2-7
2.8 SAMPLE CUSTOMER DATA SHEETS . . . . . . . . . . . . . . . . . . . . . . . . . . . . . . . . . . . . . . . . . . . . . . . . . . . . . . . 2-8
2.9 WIRING OF SURGE ARRESTOR BOXES. . . . . . . . . . . . . . . . . . . . . . . . . . . . . . . . . . . . . . . . . . . . . . . . . . . . 2-11
2.10 DISPATCH POSITION CONNECTIONS . . . . . . . . . . . . . . . . . . . . . . . . . . . . . . . . . . . . . . . . . . . . . . . . . . . . . 2-12
2.11 VOTER SYSTEM CONNECTIONS . . . . . . . . . . . . . . . . . . . . . . . . . . . . . . . . . . . . . . . . . . . . . . . . . . . . . . . . . . 2-12
2.12 LOGGING RECORDER CONNECTIONS . . . . . . . . . . . . . . . . . . . . . . . . . . . . . . . . . . . . . . . . . . . . . . . . . . . . 2-12
2.13 PRINTER INSTA LL ATION . . . . . . . . . . . . . . . . . . . . . . . . . . . . . . . . . . . . . . . . . . . . . . . . . . . . . . . . . . . . . . . . 2-13
2.14 MODEM INSTALLA TI ON . . . . . . . . . . . . . . . . . . . . . . . . . . . . . . . . . . . . . . . . . . . . . . . . . . . . . . . . . . . . . . . . . 2-13
2.15 CONNECTION TO AUXILIARY CONTROL FUNCTIONS (Standard Cabinet) . . . . . . . . . . . . . . . . . . . . 2-13
2.16 CONNECTION TO AUXILIARY CONTROL FUNCTIONS (14 Card Central Cabinet) . . . . . . . . . . . . . . 2-15
2.17 PA SYSTEM FEED . . . . . . . . . . . . . . . . . . . . . . . . . . . . . . . . . . . . . . . . . . . . . . . . . . . . . . . . . . . . . . . . . . . . . . . . 2-16
2.18 CONNECTIONS TO AC POWER. . . . . . . . . . . . . . . . . . . . . . . . . . . . . . . . . . . . . . . . . . . . . . . . . . . . . . . . . . . . 2-16
3 CABINETRY ASSEMBLY FOR CRT CONSOLE SYSTEMS
3.1 INTRODUCTION . . . . . . . . . . . . . . . . . . . . . . . . . . . . . . . . . . . . . . . . . . . . . . . . . . . . . . . . . . . . . . . . . . . . . . . . . . 3-1
3.2 TOOLS REQUIRED . . . . . . . . . . . . . . . . . . . . . . . . . . . . . . . . . . . . . . . . . . . . . . . . . . . . . . . . . . . . . . . . . . . . . . . . 3-1
3.3 CONSOLE ARRANGEMENT . . . . . . . . . . . . . . . . . . . . . . . . . . . . . . . . . . . . . . . . . . . . . . . . . . . . . . . . . . . . . . . . 3-1
3.4 MAIN CONSOLE ASSEMBLY . . . . . . . . . . . . . . . . . . . . . . . . . . . . . . . . . . . . . . . . . . . . . . . . . . . . . . . . . . . . . . . 3-2
3.5 CONSOLE LEVELI NG . . . . . . . . . . . . . . . . . . . . . . . . . . . . . . . . . . . . . . . . . . . . . . . . . . . . . . . . . . . . . . . . . . . . . 3-2
3.6 FORMICA WRITING SURFACE ARRANGEMENT . . . . . . . . . . . . . . . . . . . . . . . . . . . . . . . . . . . . . . . . . . . . 3-3
3.7 WRITING SUPPORT RAIL MOUNTING. . . . . . . . . . . . . . . . . . . . . . . . . . . . . . . . . . . . . . . . . . . . . . . . . . . . . . 3-3
3.8 ATTACHING THE FORMICA WRITING SURFACE . . . . . . . . . . . . . . . . . . . . . . . . . . . . . . . . . . . . . . . . . . . 3-5
3.9 FORMICA WRITING SURFACE AND TRIM . . . . . . . . . . . . . . . . . . . . . . . . . . . . . . . . . . . . . . . . . . . . . . . . . . 3-6
3.10 CABINETRY OPTIONS. . . . . . . . . . . . . . . . . . . . . . . . . . . . . . . . . . . . . . . . . . . . . . . . . . . . . . . . . . . . . . . . . . . . . 3-6
STABILIZER KIT (Option 1) . . . . . . . . . . . . . . . . . . . . . . . . . . . . . . . . . . . . . . . . . . . . . . . . . . . . . . . . . . . . . . . . . . 3-6
ADJUSTABLE KEYBOARD SEAT (Option 2). . . . . . . . . . . . . . . . . . . . . . . . . . . . . . . . . . . . . . . . . . . . . . . . . . . . 3-7
UNIVERSAL KEYBOARD DRAWER MOUNTING (Option 3) . . . . . . . . . . . . . . . . . . . . . . . . . . . . . . . . . . . . . . 3-7
UNIVERSAL PENCIL DRAWER MOUNTING (Option 4) . . . . . . . . . . . . . . . . . . . . . . . . . . . . . . . . . . . . . . . . . . 3-8
TYPEWRITER EXTENSION ASSEMBLY (Option 5). . . . . . . . . . . . . . . . . . . . . . . . . . . . . . . . . . . . . . . . . . . . . . 3-8
PIE SUPPORT RAIL MOUNTING (Option 6). . . . . . . . . . . . . . . . . . . . . . . . . . . . . . . . . . . . . . . . . . . . . . . . . . . . . 3-8
CRT MONITOR SHELF - FXM-192 (Option 7) . . . . . . . . . . . . . . . . . . . . . . . . . . . . . . . . . . . . . . . . . . . . . . . . . . . 3-9
1
Page 6

TABLE OF CONTENTS (CONT.)
4 CRT-BASED ELECTRONICS ASSEMBLY PART I
4.1 INTRODUCTION. . . . . . . . . . . . . . . . . . . . . . . . . . . . . . . . . . . . . . . . . . . . . . . . . . . . . . . . . . . . . . . . . . . . . . . . . . .4-1
4.2 INSTALL THE PC/UPS SLIDE TRAY. . . . . . . . . . . . . . . . . . . . . . . . . . . . . . . . . . . . . . . . . . . . . . . . . . . . . . . . . 4-1
4.3 CRT INTERFACE PROCESSOR (CIP) . . . . . . . . . . . . . . . . . . . . . . . . . . . . . . . . . . . . . . . . . . . . . . . . . . . . . . . .4-1
INSTALL THE CIP POWER SUPPLY. . . . . . . . . . . . . . . . . . . . . . . . . . . . . . . . . . . . . . . . . . . . . . . . . . . . . . . . . . 4-1
INSTALL THE CRT INTERFACE PROCESOR (CIP) TRAY . . . . . . . . . . . . . . . . . . . . . . . . . . . . . . . . . . . . . . . 4-2
5 CRT-BASED ELECTRONICS ASSEMBLY PART II
5.1 INTRODUCTION. . . . . . . . . . . . . . . . . . . . . . . . . . . . . . . . . . . . . . . . . . . . . . . . . . . . . . . . . . . . . . . . . . . . . . . . . . .5-1
5.2 INSTALL THE PC AND UPS. . . . . . . . . . . . . . . . . . . . . . . . . . . . . . . . . . . . . . . . . . . . . . . . . . . . . . . . . . . . . . . . .5-1
5.3 CONNECT THE PC CPU AND PC UPS POWER CORDS . . . . . . . . . . . . . . . . . . . . . . . . . . . . . . . . . . . . . . . . 5-1
5.4 CONNECT THE CRT INTERFACE PROCESSOR (CIP) TRAY CABLES . . . . . . . . . . . . . . . . . . . . . . . . . . 5-2
5.5 INSTALL THE CRT MONITOR. . . . . . . . . . . . . . . . . . . . . . . . . . . . . . . . . . . . . . . . . . . . . . . . . . . . . . . . . . . . . . 5 -3
CRT MONITOR CONNECTIONS . . . . . . . . . . . . . . . . . . . . . . . . . . . . . . . . . . . . . . . . . . . . . . . . . . . . . . . . . . . . . 5-3
ADDITIONAL CONNECTION FOR A 17 " OR 21 " IDEK MONITOR . . . . . . . . . . . . . . . . . . . . . . . . . . . . . . . 5-3
5.6 INSTALL CRT TOUCHSCREEN (Option TDV-OP492) . . . . . . . . . . . . . . . . . . . . . . . . . . . . . . . . . . . . . . . . . . 5-3
MOUNT TABS. . . . . . . . . . . . . . . . . . . . . . . . . . . . . . . . . . . . . . . . . . . . . . . . . . . . . . . . . . . . . . . . . . . . . . . . . . . . . 5-3
INSTALL THE TOUCHSCREEN. . . . . . . . . . . . . . . . . . . . . . . . . . . . . . . . . . . . . . . . . . . . . . . . . . . . . . . . . . . . . . 5-3
CONNECT THE TOUCHSCREEN CABLES . . . . . . . . . . . . . . . . . . . . . . . . . . . . . . . . . . . . . . . . . . . . . . . . . . . . 5-3
5.7 INSTALL CRT TRACKBALL OPTION/MOUSE OP TION . . . . . . . . . . . . . . . . . . . . . . . . . . . . . . . . . . . . . . .5-4
5.8 INSTALL HEADSET JACK (Options TDV-OP406, 407, 409). . . . . . . . . . . . . . . . . . . . . . . . . . . . . . . . . . . . . .5-4
5.9 INSTALL SECOND VOLUME CONTROL KNOB . . . . . . . . . . . . . . . . . . . . . . . . . . . . . . . . . . . . . . . . . . . . . . 5-4
5.10 SET UP AND OPERATION OF THE HEADSET JACK . . . . . . . . . . . . . . . . . . . . . . . . . . . . . . . . . . . . . . . . . . 5-5
5.11 CONNECTING A TELEPHONE INSTRUMENT TO THE TELCO INTERFACE. . . . . . . . . . . . . . . . . . . . 5-5
6 EQUIPMENT CHECK-OUT AND ADJUSTMENTS
6.1 INITIAL POWER-UP AND CHECK-OUT. . . . . . . . . . . . . . . . . . . . . . . . . . . . . . . . . . . . . . . . . . . . . . . . . . . . . . 6-1
6.2 CPP ADJUSTMENTS . . . . . . . . . . . . . . . . . . . . . . . . . . . . . . . . . . . . . . . . . . . . . . . . . . . . . . . . . . . . . . . . . . . . . . . 6-2
6.3 CONSOLE ADJUSTMENTS . . . . . . . . . . . . . . . . . . . . . . . . . . . . . . . . . . . . . . . . . . . . . . . . . . . . . . . . . . . . . . . . . 6-2
6.4 ALIGN THE CRT TOUCHSCREEN WITH THE PC COMPUTER . . . . . . . . . . . . . . . . . . . . . . . . . . . . . . . . 6 -3
6.5 AFTER SYSTEM CHECK-OUT . . . . . . . . . . . . . . . . . . . . . . . . . . . . . . . . . . . . . . . . . . . . . . . . . . . . . . . . . . . . . . 6-4
LIST OF FIGURES
1-1 HARDWARE INCLUDED FOR INSTALLATION AND ASSEMBLY . . . . . . . . . . . . . . . . . . . . . . . . . . . . . . . . 1-2
2-1 REAR VIEW - JOINING TWO CPU CABINETS . . . . . . . . . . . . . . . . . . . . . . . . . . . . . . . . . . . . . . . . . . . . . . . . . 2-2
2-2 CPU CABINET CABLE CONNECTIONS. . . . . . . . . . . . . . . . . . . . . . . . . . . . . . . . . . . . . . . . . . . . . . . . . . . . . . . 2-3
2-3 MOUNTING SURGE ARRESTOR BOXES AND GROUND BRACKET . . . . . . . . . . . . . . . . . . . . . . . . . . . . . . 2-4
2-4 STAR GROUNDING CONFIGURATION. . . . . . . . . . . . . . . . . . . . . . . . . . . . . . . . . . . . . . . . . . . . . . . . . . . . . . . 2-5
2-5 COMMON GROUND BRACKET ASSEMBLY . . . . . . . . . . . . . . . . . . . . . . . . . . . . . . . . . . . . . . . . . . . . . . . . . . 2-6
2-6 CPP I/O PANELS. . . . . . . . . . . . . . . . . . . . . . . . . . . . . . . . . . . . . . . . . . . . . . . . . . . . . . . . . . . . . . . . . . . . . . . . . . . 2-7
2-7 I/O CONNECTOR PANEL ASSIGNMENTS. . . . . . . . . . . . . . . . . . . . . . . . . . . . . . . . . . . . . . . . . . . . . . . . . . . . . 2-8
2-8 RTL I/O PANEL ASSIGNMENTS . . . . . . . . . . . . . . . . . . . . . . . . . . . . . . . . . . . . . . . . . . . . . . . . . . . . . . . . . . . . . 2-9
2-9 VOTING COMPARATOR DISPLAY/CONTROL MODULE . . . . . . . . . . . . . . . . . . . . . . . . . . . . . . . . . . . . . . . 2-9
2-10 LOGGING RECORDER . . . . . . . . . . . . . . . . . . . . . . . . . . . . . . . . . . . . . . . . . . . . . . . . . . . . . . . . . . . . . . . . . . . . 2-10
2-11 AUXILIARY CONTROL RELAY ASSIGNMENTS. . . . . . . . . . . . . . . . . . . . . . . . . . . . . . . . . . . . . . . . . . . . . . 2-10
2-12 SURGE ARRESTOR BOX WIRING . . . . . . . . . . . . . . . . . . . . . . . . . . . . . . . . . . . . . . . . . . . . . . . . . . . . . . . . . . 2-11
2-13 CPU RELAY PANEL. . . . . . . . . . . . . . . . . . . . . . . . . . . . . . . . . . . . . . . . . . . . . . . . . . . . . . . . . . . . . . . . . . . . . . . 2-14
2
Page 7

TABLE OF CONTENTS (CONT.)
2-14 14 CARD RELAY PANEL . . . . . . . . . . . . . . . . . . . . . . . . . . . . . . . . . . . . . . . . . . . . . . . . . . . . . . . . . . . . . . . . . . 2-15
2-15 CPP POWER SUPPLY. . . . . . . . . . . . . . . . . . . . . . . . . . . . . . . . . . . . . . . . . . . . . . . . . . . . . . . . . . . . . . . . . . . . . . 2-16
3-1 SAMPLE CONSOLE LAYOUT . . . . . . . . . . . . . . . . . . . . . . . . . . . . . . . . . . . . . . . . . . . . . . . . . . . . . . . . . . . . . . . 3-1
3-2 WRITING SUPPORT MOUNTING HOLES . . . . . . . . . . . . . . . . . . . . . . . . . . . . . . . . . . . . . . . . . . . . . . . . . . . . . 3-2
3-3 ASSEMBLY OF CONSOLE SECTIONS . . . . . . . . . . . . . . . . . . . . . . . . . . . . . . . . . . . . . . . . . . . . . . . . . . . . . . . . 3-2
3-4 FORMICA SURFACE ARRANGEMENT . . . . . . . . . . . . . . . . . . . . . . . . . . . . . . . . . . . . . . . . . . . . . . . . . . . . . . . 3-3
3-5 LEVELING THE CONSOLE. . . . . . . . . . . . . . . . . . . . . . . . . . . . . . . . . . . . . . . . . . . . . . . . . . . . . . . . . . . . . . . . . . 3-3
3-6 WRITING SUPPORT RAIL MOUNTING . . . . . . . . . . . . . . . . . . . . . . . . . . . . . . . . . . . . . . . . . . . . . . . . . . . . . . . 3-4
3-7 CTP TRAY . . . . . . . . . . . . . . . . . . . . . . . . . . . . . . . . . . . . . . . . . . . . . . . . . . . . . . . . . . . . . . . . . . . . . . . . . . . . . . . . 3-5
3-8 JOINING FORMICA . . . . . . . . . . . . . . . . . . . . . . . . . . . . . . . . . . . . . . . . . . . . . . . . . . . . . . . . . . . . . . . . . . . . . . . . 3-5
3-9 SECURING THE FORMICA WRITING SURFACE. . . . . . . . . . . . . . . . . . . . . . . . . . . . . . . . . . . . . . . . . . . . . . . 3-5
3-10 FORMICA WRITING SURFACE AND TRIM . . . . . . . . . . . . . . . . . . . . . . . . . . . . . . . . . . . . . . . . . . . . . . . . . . . 3-6
3-11 STABILIZER KIT . . . . . . . . . . . . . . . . . . . . . . . . . . . . . . . . . . . . . . . . . . . . . . . . . . . . . . . . . . . . . . . . . . . . . . . . . . 3-7
3-12 ADJUSTABLE KEYBOARD SEAT. . . . . . . . . . . . . . . . . . . . . . . . . . . . . . . . . . . . . . . . . . . . . . . . . . . . . . . . . . . . 3-7
3-13 KEYBOARD DRAWER MOUNTING . . . . . . . . . . . . . . . . . . . . . . . . . . . . . . . . . . . . . . . . . . . . . . . . . . . . . . . . . . 3-7
3-14 UNIVERSAL PENCIL DRAWER MOUNTING . . . . . . . . . . . . . . . . . . . . . . . . . . . . . . . . . . . . . . . . . . . . . . . . . . 3-8
3-15 TYPEWRITER EXTENSION ASSEMBLY . . . . . . . . . . . . . . . . . . . . . . . . . . . . . . . . . . . . . . . . . . . . . . . . . . . . . . 3-8
3-16 PIE SUPPORT RAIL MOUNTING. . . . . . . . . . . . . . . . . . . . . . . . . . . . . . . . . . . . . . . . . . . . . . . . . . . . . . . . . . . . . 3-9
3-17 INSTALLING TINNERMAN CLIPS . . . . . . . . . . . . . . . . . . . . . . . . . . . . . . . . . . . . . . . . . . . . . . . . . . . . . . . . . . . 3-9
3-18 CRT MONITOR SHELF . . . . . . . . . . . . . . . . . . . . . . . . . . . . . . . . . . . . . . . . . . . . . . . . . . . . . . . . . . . . . . . . . . . . 3-10
4-1 PC AND UPS SLIDE TRAY ASSEMBLY. . . . . . . . . . . . . . . . . . . . . . . . . . . . . . . . . . . . . . . . . . . . . . . . . . . . . . . 4-1
4-2 CIP POWER SUPPLY . . . . . . . . . . . . . . . . . . . . . . . . . . . . . . . . . . . . . . . . . . . . . . . . . . . . . . . . . . . . . . . . . . . . . . . 4-2
4-3 CIP TRAY WITH MICROPHONE . . . . . . . . . . . . . . . . . . . . . . . . . . . . . . . . . . . . . . . . . . . . . . . . . . . . . . . . . . . . . 4-3
5-1 CPU AND UPS POWER CONNECTIONS. . . . . . . . . . . . . . . . . . . . . . . . . . . . . . . . . . . . . . . . . . . . . . . . . . . . . . . 5-1
5-2 CIP POWER SUPPLY LINE TERM BOARD - A1709230 . . . . . . . . . . . . . . . . . . . . . . . . . . . . . . . . . . . . . . . . . . 5-2
5-3 TOUCHSCREEN INSTALLATION . . . . . . . . . . . . . . . . . . . . . . . . . . . . . . . . . . . . . . . . . . . . . . . . . . . . . . . . . . . . 5-3
5-4 CABLE CONNECTION TO CIP PS . . . . . . . . . . . . . . . . . . . . . . . . . . . . . . . . . . . . . . . . . . . . . . . . . . . . . . . . . . . . 5-3
5-5 HEADSET JACK . . . . . . . . . . . . . . . . . . . . . . . . . . . . . . . . . . . . . . . . . . . . . . . . . . . . . . . . . . . . . . . . . . . . . . . . . . . 5-4
5-6 CIP BOARD . . . . . . . . . . . . . . . . . . . . . . . . . . . . . . . . . . . . . . . . . . . . . . . . . . . . . . . . . . . . . . . . . . . . . . . . . . . . . . . 5-4
5-7 CONNECTOR HEADSET. . . . . . . . . . . . . . . . . . . . . . . . . . . . . . . . . . . . . . . . . . . . . . . . . . . . . . . . . . . . . . . . . . . . 5-5
5-8 TELCO CONNECTION TO CIP PS . . . . . . . . . . . . . . . . . . . . . . . . . . . . . . . . . . . . . . . . . . . . . . . . . . . . . . . . . . . . 5-5
LIST OF TABLES
1-1 SAMPLE PACKING LIST . . . . . . . . . . . . . . . . . . . . . . . . . . . . . . . . . . . . . . . . . . . . . . . . . . . . . . . . . . . . . . . . . . . .1-1
2-1 CPU CABINET HARDWARE . . . . . . . . . . . . . . . . . . . . . . . . . . . . . . . . . . . . . . . . . . . . . . . . . . . . . . . . . . . . . . . . .2-1
2-2 I/O PANEL REPORT . . . . . . . . . . . . . . . . . . . . . . . . . . . . . . . . . . . . . . . . . . . . . . . . . . . . . . . . . . . . . . . . . . . . . . . .2-8
2-3 STANDARD COLOR CODE ASSIGNMENTS . . . . . . . . . . . . . . . . . . . . . . . . . . . . . . . . . . . . . . . . . . . . . . . . . .2-12
3-1 MONITOR SHELF HARDWARE . . . . . . . . . . . . . . . . . . . . . . . . . . . . . . . . . . . . . . . . . . . . . . . . . . . . . . . . . . . . .3-10
4-1 PC UPS OPTION NUMBERS . . . . . . . . . . . . . . . . . . . . . . . . . . . . . . . . . . . . . . . . . . . . . . . . . . . . . . . . . . . . . . . . .4-1
4-2 SLIDE TRAY HARDWARE . . . . . . . . . . . . . . . . . . . . . . . . . . . . . . . . . . . . . . . . . . . . . . . . . . . . . . . . . . . . . . . . . .4-1
4-3 POWER SUPPLY HARDWARE . . . . . . . . . . . . . . . . . . . . . . . . . . . . . . . . . . . . . . . . . . . . . . . . . . . . . . . . . . . . . . .4-1
4-4 CIP TRAY HARDWARE . . . . . . . . . . . . . . . . . . . . . . . . . . . . . . . . . . . . . . . . . . . . . . . . . . . . . . . . . . . . . . . . . . . . .4-2
4-5 CIP TRAY CABLE CONNECTIONS . . . . . . . . . . . . . . . . . . . . . . . . . . . . . . . . . . . . . . . . . . . . . . . . . . . . . . . . . . .4-3
5-1 PC UPS OPTIONS . . . . . . . . . . . . . . . . . . . . . . . . . . . . . . . . . . . . . . . . . . . . . . . . . . . . . . . . . . . . . . . . . . . . . . . . . .5-1
5-2 CRT CABLE CONNECTIONS . . . . . . . . . . . . . . . . . . . . . . . . . . . . . . . . . . . . . . . . . . . . . . . . . . . . . . . . . . . . . . . .5-2
5-3 VOLUME CONTROL HARDWARE . . . . . . . . . . . . . . . . . . . . . . . . . . . . . . . . . . . . . . . . . . . . . . . . . . . . . . . . . . .5-4
3
Page 8

Page 9

PRE-INSTALLATION INFORMATION
SECTION 1 PRE-INSTALLATION INFORMATION
1.1 RECEIVING INFORMATION
I M P O R T A N T
This merchandise was carefully packed and thoroughly inspected before leaving our factory. Responsibility for its saf e delive ry was assumed by the carr ier
upon acceptance of the shipment. Claims for loss or
damage sustained in transit must therefore be made
upon the carrier as follows:
1.1.1 VISIBLE LOSS OR DAMAGE
Any external evidence of l o ss or d amage mu st b e
noted on the freight bill or express receipt and signed
by the carrier’s agent. Failure to adequately describe
such external evid ence of loss o r damage may result in
the carrier refusing to honor a damage claim. The
form required to file such a claim is supplied by the
carrier.
1.1.2 CONCEALED LOSS OR DAMAGE
tor, PC and UPS units for CRT-based consoles. You
are strongly advised to save at least one shipping carton for each of these devices in the event a return for
repair is needed.
You as the consignee, are responsible for filing
any claims for loss or damage. E.F. Johnson will
assist you in establishing the value of the claim after
you have filed the claim with the carrier. Call the
Customer Service Department at 1-800-328-3911 for
further assistance.
1.1.3 PACKING LIST
Since this product is cus tom designed to meet our
customer’s needs, it is not practical to pack our products in any specific pattern.
As each loose item (see Note below) is packed it
is noted on the Packing List (see Table 1-1).
1.1.4 UNPACKING THE SHIPMENT
Concealed loss or damage means ; loss or damag e
that is not apparent until the merchandise has been
unpacked. The contents may be damaged in transit
due to rough handling even though the carton or cabinet may not show external damage. When the damage is discovered upon unpacking, you must make a
As each item is removed from the container,
please check it against the Packing List. If there are
any discrepancies, please contact Customer Service,
1-800-328-3911, within 7 days of receipt. E.F.
Johnson cannot be held responsible for discrepancies beyond this 7 day period.
written request for inspection by the carrier’s agent
within 15 days of the delive ry date . Then file a claim
with the carrier since such damage is the carrier’s
responsibility .
Note: Commercial items packaged in the original
manufacturer’s container(s) are considered loose
items. Items packaged within their containers, by the
manufacturer (power cords, etc.), are not considered
It is a requirement of certain OEM vendors that
equipment returned for repair must be shipped in its
loose items and are not listed on the E.F. Johnson
Packing List.
original carton. This specificallyapplies to the Moni-
Table 1-1 SAMPLE PACKING LIST
Container Number Part Number Description Quantity
1 A100960 Headset Jack Assy 2
... ... ... ...
1-1
February 1996
Part No. 004-3039-274
Page 10
PRE-INSTALLATION INFORMATION
1.1.5 TOOLS REQUIRED
The following tools are needed for the mechanical assembly and installation of the VR-CM50 Console System:
1/4" Flat Blade Screwdriver
#1 Phillips Screwdriver
#2 Phillips Screwdriver
7/16" Open End Wrench
3/8" Nut Driver
3/16" Ball Point Driver
3/8" Square Drive 3/16" Hex Bit
If you are in stalling cabinetry, the tools required
for those as semblies are listed in Section 3.
3/16" Hex Key
3/8" Square Drive 7/16" Socket
3/8" Drive Ratchet Wrench
Wire Strippers
Carpenter’s Level
Hand Terminal Crimp Tool - "Champ" Tool
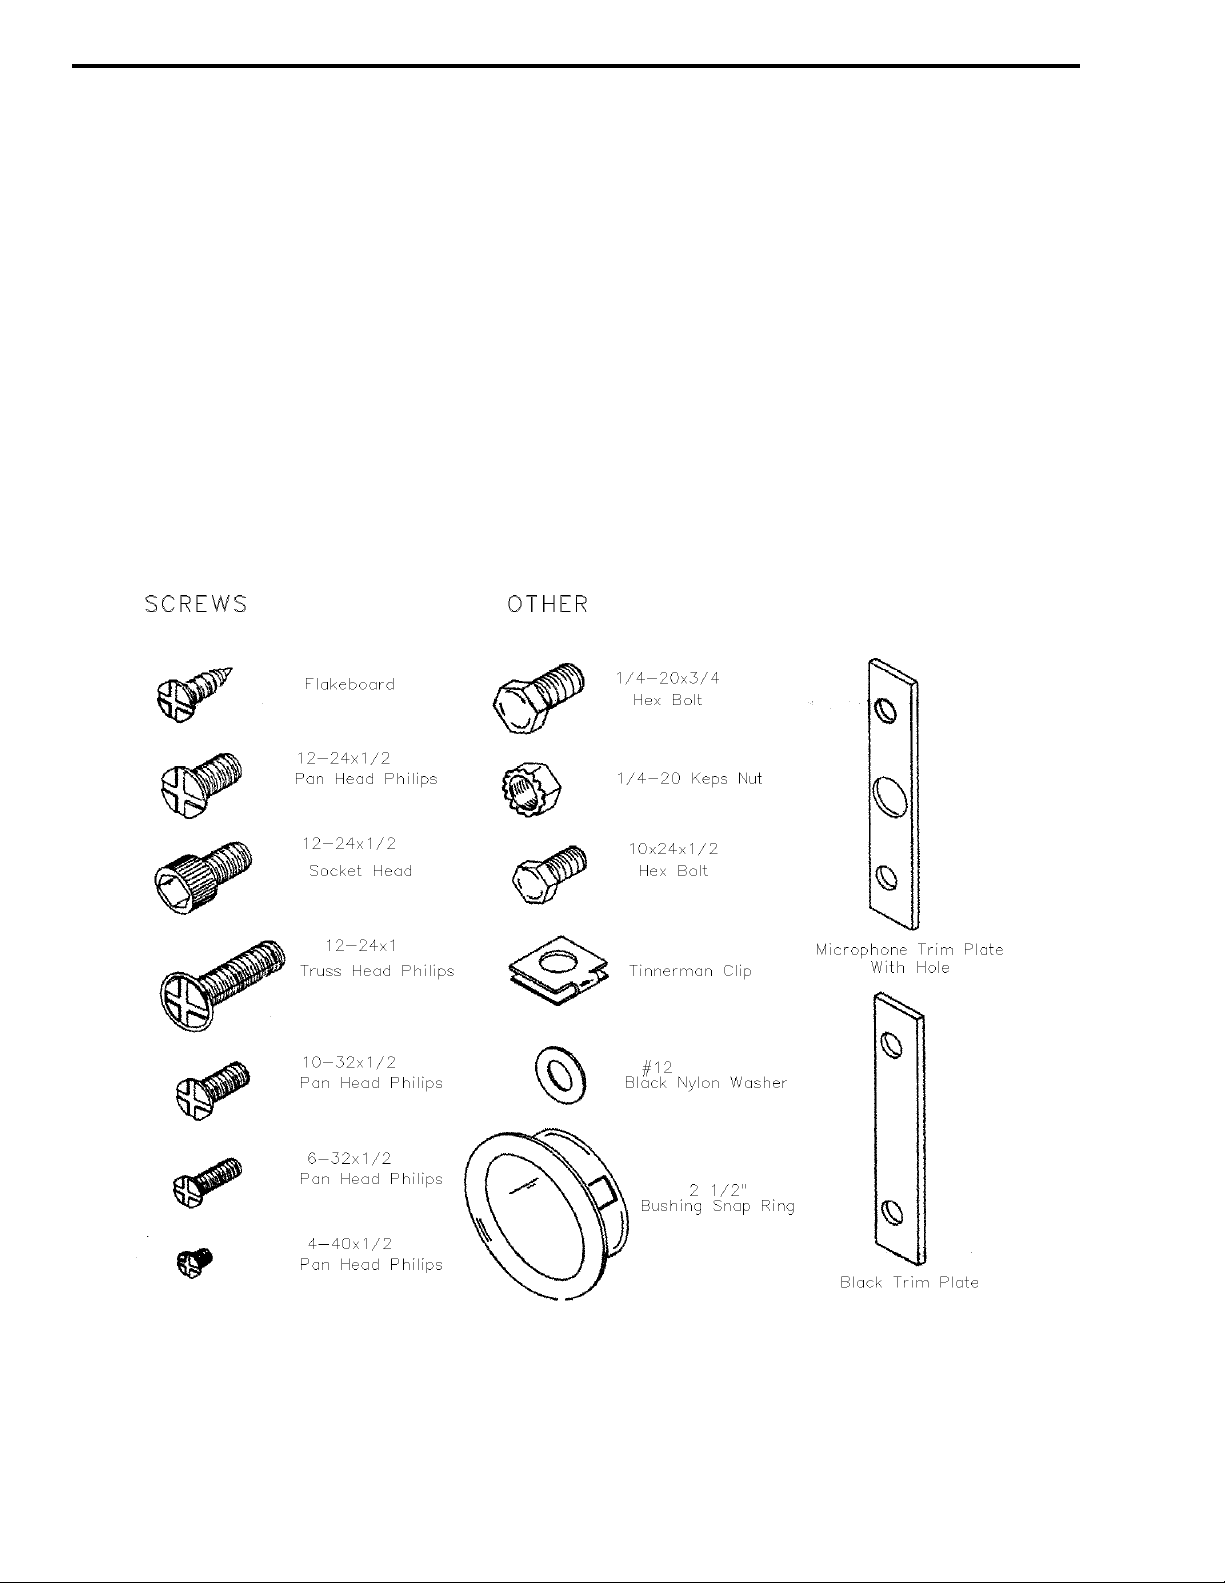
Figure 1-1 HARDWARE INCLUDED FOR INSTALLATION AND ASSEMBLY
February 1996
Part No. 004-3039-274
1-2
Page 11

CENTRAL PROCESSOR PACKAGE INSTALLATION
SECTION 2 CENTRAL PROCESSOR PACKAGE INSTALLATION
2.1 LOCATION OF THE CENTRAL PROCESSOR PACKAGE (CPP)
In selecting a location for the Central Processor
Package (CPP) equipment cabinet, the following criteria should be considered :
1. Avoid locations which are subject to high ambient
temperatures, excessive moistu re, fl oodi ng, excessive dust or infestation by insects or small animals.
2. The cabinet must be placed in an indoor location
having a floor area l arge enough to allow access to
both the front and rear of the cabinet. The minimum
cabinet size is 21" wide by 26" deep. In addition,
wall space will be re qui red for the common ground
bracket, surge arrestor box(es) and any additional
RTL punch block(s).
3. A single, 120 VAC, 15/20 amp dedicated branch cir-
cuit is require d for CPPs of 60 c ard capacity or l ess.
Two such branch circuits are required for packages
equipped with 60 to 120 cards. Systems ordered
with options TDM-OP200/E, /GB, /I and /NZ
require 230 VAC circuits. If the building is
equipped with an emergency generator, the CPP
branch circuits should be part of the emergency
power system.
4. An earth ground bond must be provided. A contin-
uous copper cold water pipe or driven copper
ground rod are suitable grounds. Electrical con duit,
steam lines, sprinkler system l ines, util ity ma ins or
building steel may not be used as ground bonds.
Note: Verify the ground integrity yourself. It is
risky to blindly trust grounds used by others.
5. The cable run to any console location may not
exceed 4000 feet, using E.F. Johnson-provided
cable. If the console is located in a different building or if the cabl e route place s its proximity t o other
electrical lines that can induce interference, the use
of a Remote Interface Adapter (RIA) is required.
6. In placement of the cabinet, the front door of the
enclosure must be readily accessible for service.
7. A connection to an ou tside telephone lin e is required
for diagnostic modem access. If a dedicated
modem line cannot be provided, an administrative
line or a phone pa tch line can be used by r outing the
line through the modem. Progr amming the modem
to auto-answer after several rings, will allow the
line to be used for normal voic e operation as well as
CPP diagnostics.
8. Mounting space will be required for the system
diagnostic printer (TDM-OP205). If the CPP is
housed in a 60" c abinet, the printer can be p laced on
top of the CPP. If the CPP is housed in a 88" cabinet, a shelf must be provided for the printer. The
printer is supplied with a tab le-top stand which provides paper supply storage and an output tray. Do
not attempt to mount the printer inside the CPP cabinet.
2.2 ASSEMBLY OF THE CENTRAL PROCES-
SOR PACKAGE (CPP) CABINETRY
If the CPP is housed in a single cabinet (30 cards
or less in a 60" cabinet, 60 cards or less in a 88" cabinet), no field assembly is required. If the CPP
requires two or more cabinets, each cabinet section
will be shipped separately to facilitate handling.
Assembly of the cabinets is illustrated bel ow in Figure 2-1. Be sure to install all of the required hardware; do not omit any bolts or lockwashers.
The hardware in Table 2-1 is included in Assembly A2809201 for joining 2 - 60" CPU Cabinets and
Assembly A2809301 for joining 2 - 88" CPU Cabinets:
Table 2-1 CPU CABINET HARDWARE
Qty. Part No. Description
Joining 2 - 60" CPU Cabinets
6
28011H0B2012
6
280211082041
2
240B25312420
Joining 2 - 88" CPU Cabinets
8
28011H0B2012
8
280211082041
2
240B25312420
1/4"-20 Hex Bolt
1/4"-20 Keps Nut
2.5" Bushing Snap Ring
1/4"-20 Hex Bolt
1/4"-20 Keps Nut
2.5" Bushing Snap Ring
2-1
February 1996
Part No. 004-3039-274
Page 12
CENTRAL PROCESSOR PACKAGE INSTALLATION
February 1996
Part No. 004-3039-274
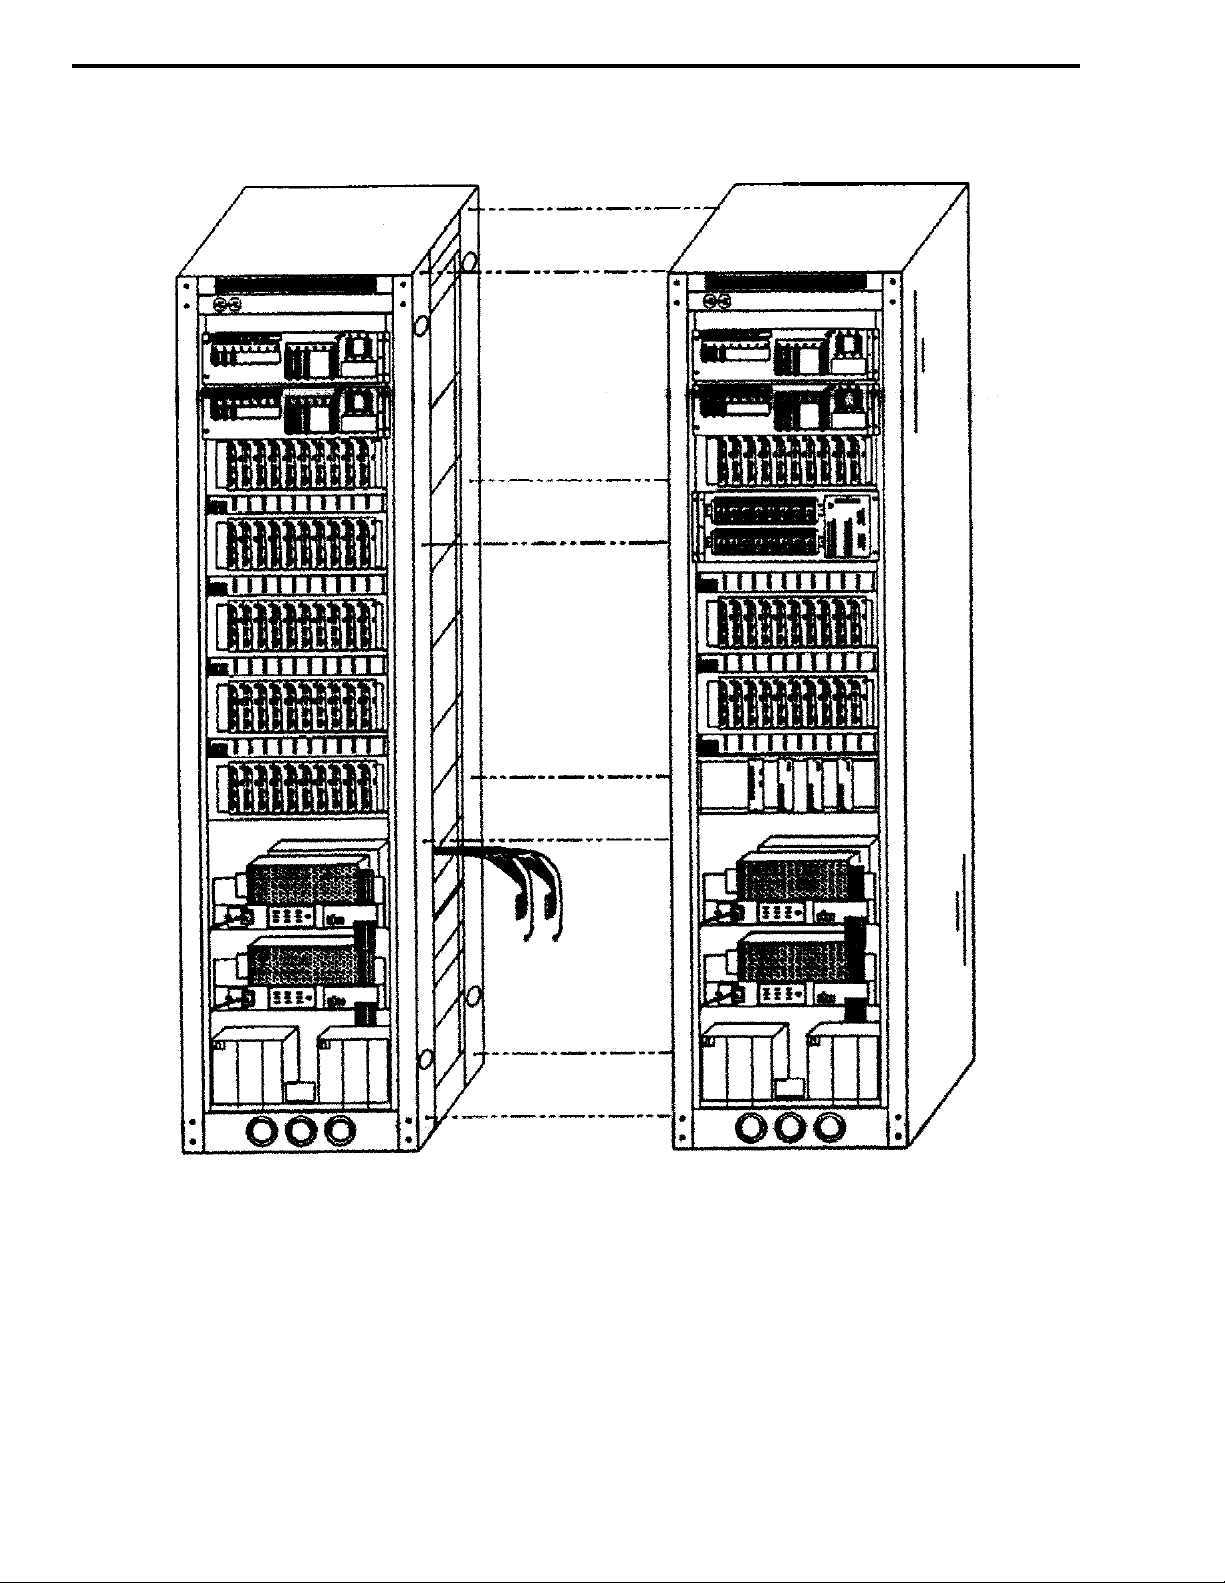
Figure 2-1 REAR VIEW - JOINING TWO CPU CABINETS
2-2
Page 13
CENTRAL PROCESSOR PACKAGE INSTALLATION
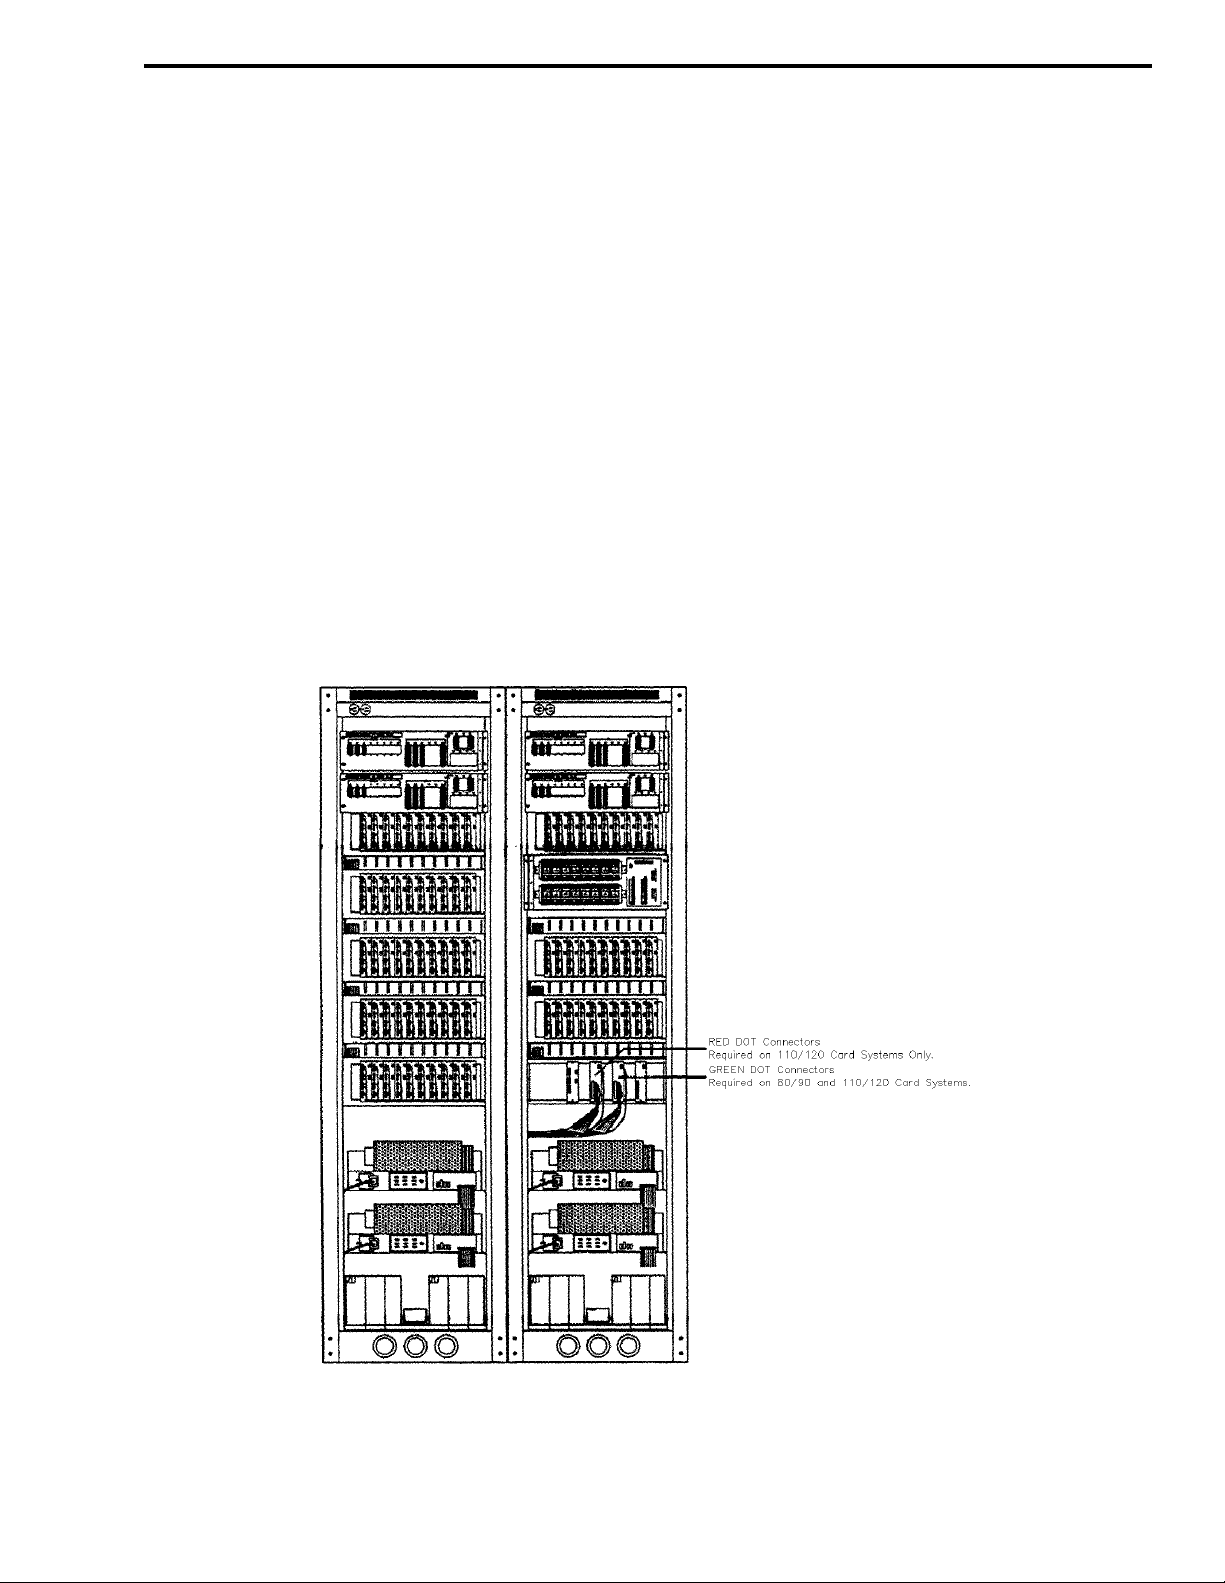
2.3 CONNECTION OF THE CENTRAL PROCESSOR PACKAGE CABLES
When multiple CPP cabinets are reuired, the system layout will have been designed to minimize the
cabling needed between cabinets. At minimum, it will
be necessary to connect the ribon cables from the
Inter-Cabinet Repeater (ICR) cards in the first cabinet,
to the backplanes and power supplies in the expansion cabinets. Depending on the size of the CPP, the
cables are marked with either RED DOTS or GREEN
DOTS.
Connect the cables ma rked wit h a RED do t to the
Line Terminator Board, which is also marked with a
RED dot. Perform the same procedure if the cables
are marked with GREEN dots (see Figure 2-2.
In some cases, it may be neces sary to co nnect I/O
ribbon cables or intercabinet mute wiring. Instructions for these details are unique to each system and
will be found in a doc ument titled "Installat ion Notes"
at the front of the "Customer Data" Section in in Volume 1 of the VR-CM50 Console Service Manual.
2.3.1 CABLE ROUTING
60" CPP cabinets are designed for cable feed
from the bottom of the cabinet.
80" CPP cabinets are designed to accept cable
feeds from either the top or the bottom of the cabinet.
88" CPP cabinets are shipped with the assumpt ion that
the cables will feed from the top or from beneath the
floor. If cable access through the bottom rear cowl is
desired, remove the black hole plugs from the cowl
and exchange them with the cable bushings in the top
vent panel.
Figure 2-2 CPU CABINET CABLE CONNECTIONS
2-3
February 1996
Part No. 004-3039-274
Page 14
CENTRAL PROCESSOR PACKAGE INSTALLATION
2.4 MOUNTING OF SURGE ARRESTOR BOXES AND GROUND BRACKET
2.4.1 PLACEMENT OF SURGE ARRESTOR
BOXES
The surge arrestor box(es) may be mounted
directly on a wall or on a plywood board at a location
near the central equipment cabinet. (Be sure the
ground lug is on top).
Figure 2-3 gives a general idea of how the Surge
Arrestor Boxes would appear o n a t ypical pane l boar d
complete with the common copper ground bracket
assembly.
2.4.2 WALL OR PANEL BOARD INSTALLATION
Use 1/4" diameter screws (not furnished) to
attach the surge arrestor boxes and the common
ground bracket assemb ly t o the wall . Wall mount keyholes (see Figure 2-3) are provided on the surge arrestor boxes. If the wall is of masonry construction,
again, the use of a plywood sub-panel is recommended.
C A U T I O N
DO NOT mount with the ground lug on the bottom.
Figure 2-3 MOUNTING SURGE ARRESTOR BOXES AND GROUND BRACKET
February 1996
Part No. 004-3039-274
2-4
Page 15
CENTRAL PROCESSOR PACKAGE INSTALLATION
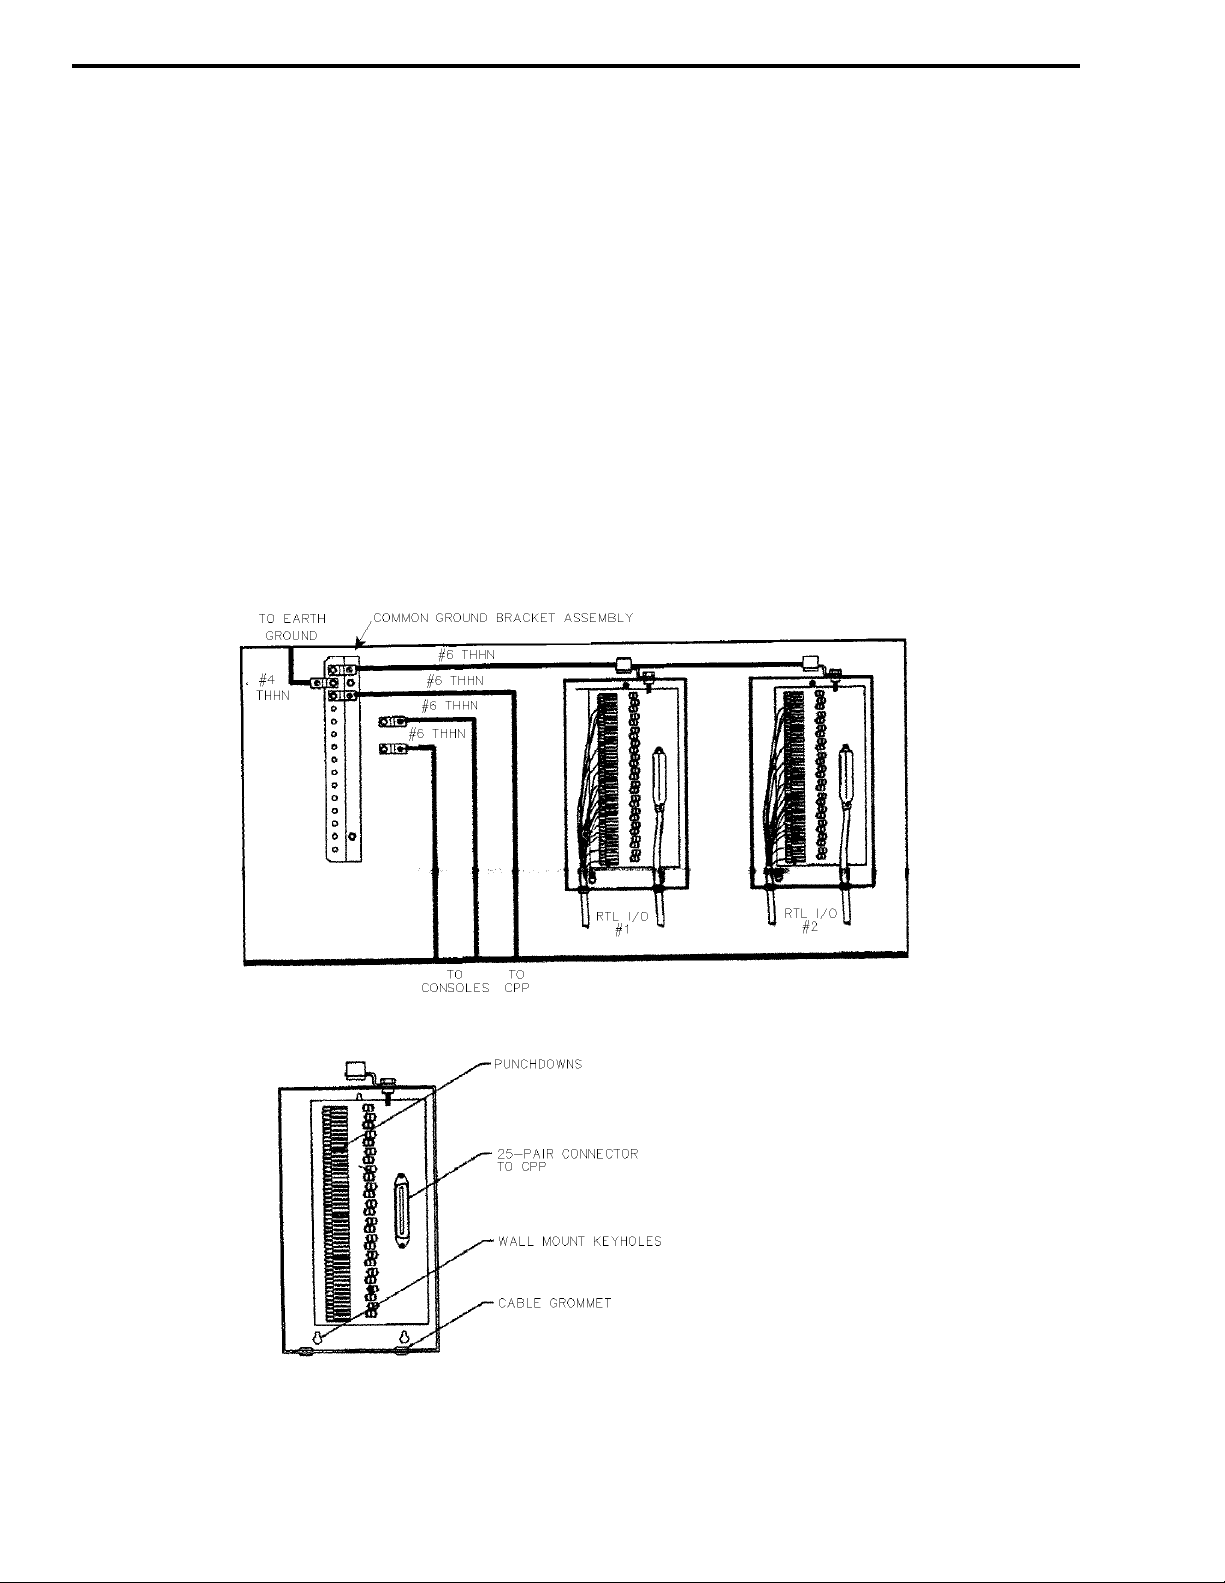
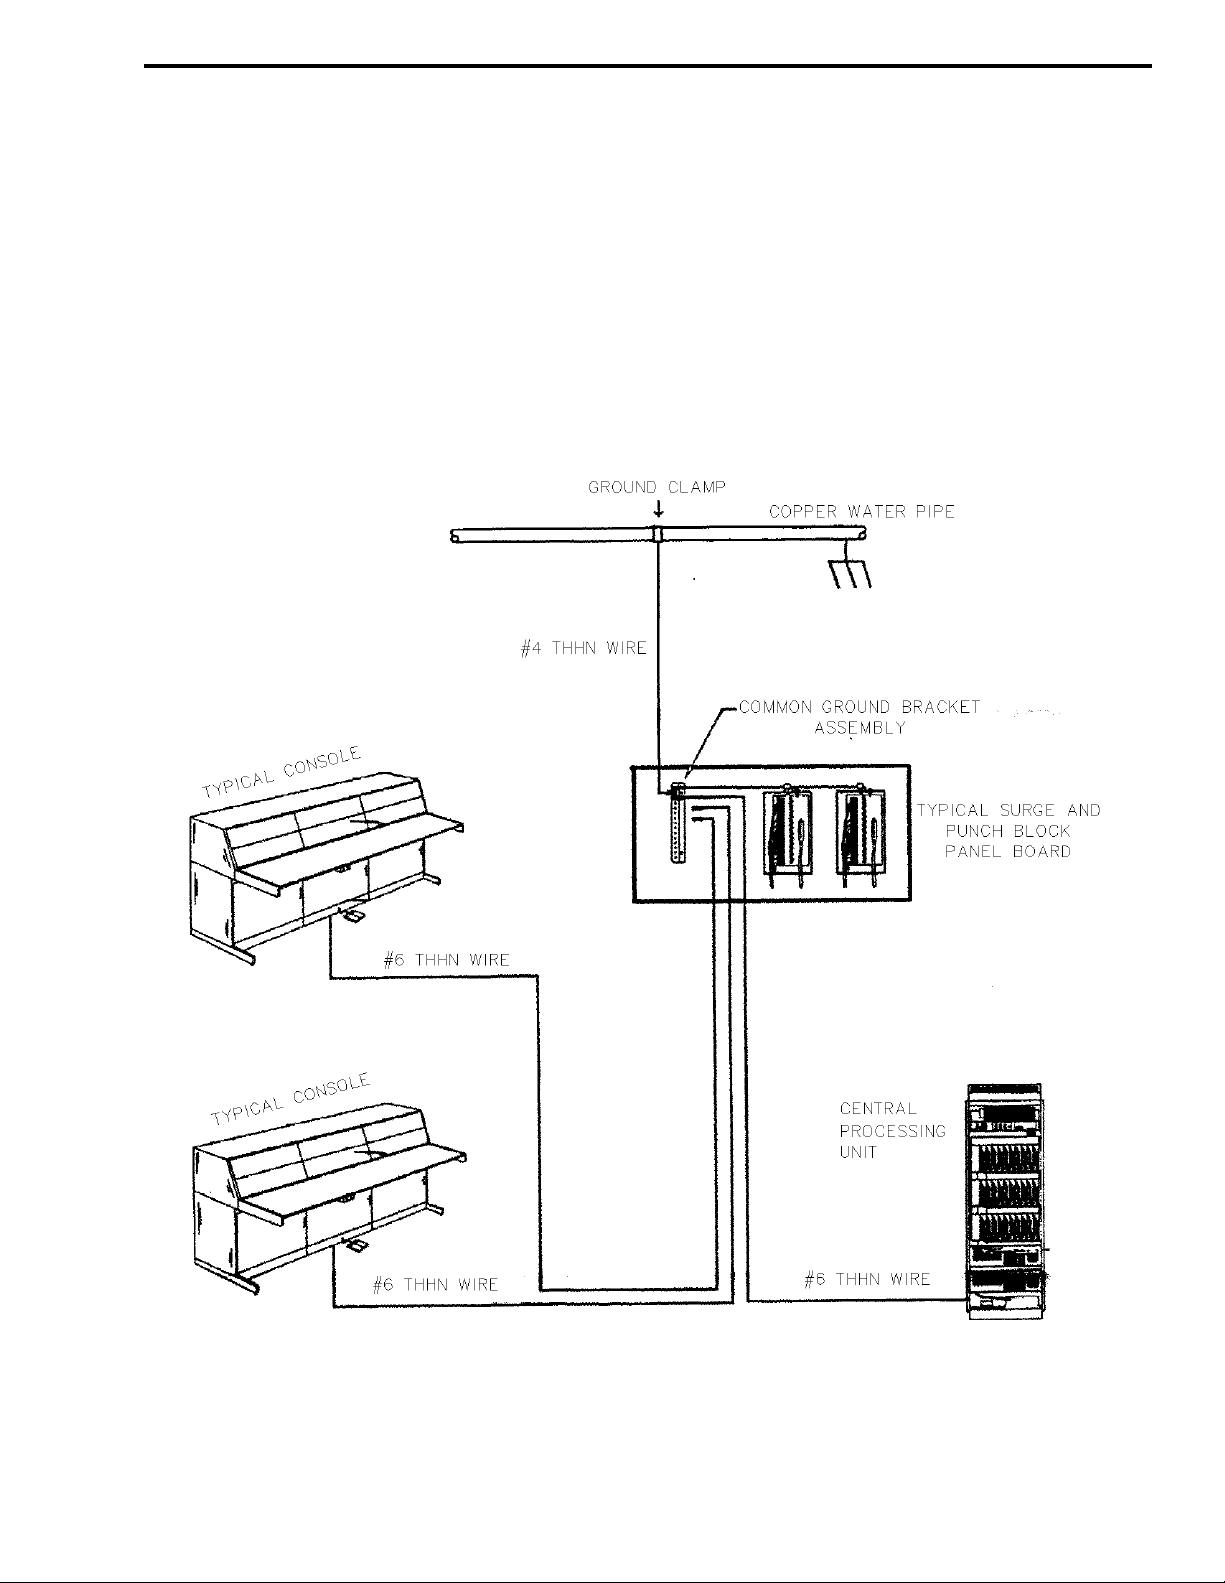
2.5 GROUNDING THE SYSTEM
Proper grounding is the single most important
consideration in installing the system. Poor or incorrect grounding can lead to unpredictable and erratic
performance problems, damage to system components in the event of lightning or power surges and
injury to personnel in extreme cases.
The VR-CM50 uses a STAR GROUNDING SYSTEM (below) in which each console is individually
bonded to a common point at the CPP using a #6
insulated wire. Connectivity instructions with
exploded views are continued on the following pages.
I M P O R T A N T
Ground the system before connecting any radio tie
lines or AC power to the system.
Figure 2-4 STAR GROUNDING CONFIGURATION
2-5
February 1996
Part No. 004-3039-274
Page 16

CENTRAL PROCESSOR PACKAGE INSTALLATION
Figure 2-5 COMMON GROUND BRACKET ASSEMBLY
2.6 GROUNDING INSTALLATION
#1 Lug
Connect a #6 THHN bare ground wire to the T OP
RIGHT (first) copper lug on the common ground
bracket asse mbly to all RTL kits (make this by taking
a length of the #6 THHN wire and stripping it). If
multiple surge arrestor boxes are used, run the #6
THHN wire through the lugs of all boxes in a straight
line. Tight en all clamps securely using the proper size
screwdriver ( 1/4" flatblade).
#2 Lug
It is very important to connect the earth ground
wire to lug #2, the lug opposite the CPP Cabinet lug
and RTL kits lugs. Refer to Figure 2-5 for acorrect
placement of the connections on the common ground
bracket assembly. Use #4 THHN wire to connect to
the ground clamp.
#3 Lug
Connect a #6 THHN wire to lug #3 (third from
top) on the common ground bracket assembly to the
ground lug in the CPP cabinet. Refer to Figure 2-5
for the location of the ground lug in the CPP cabinet.
#4, #5 Lug
Connect a #6 THHN ground wire from lugs 4, 5,
etc. of the ground bracket assembly to the ground lug
on each console position. A ground lug and hardware
has been furnished with the cable kit for each console.
February 1996
Part No. 004-3039-274
2-6
Page 17

CENTRAL PROCESSOR PACKAGE INSTALLATION
2.7 CPP I/O PANELS
CPPs with a capacity of twenty or more cards
will have one or more CPP I/O panels as shown in
Figure 2-6. If there is more than one I/O panel, each
panel is numbered. The I/O pane ls are h inged to a llow
easy access to the rear of the card cages. In routing
the I/O cables, all wiring should be dressed from the
hinge side of the panel.
Fourteen card CPPs have a single I/O panel as
shown in Fig. 2-9. This panel is at the lower left side
of the cabinet as viewed from the rear. This panel is
fixed in position - no rear access is required.
Figure 2-6 CPP I/O PANELS
2-7
February 1996
Part No. 004-3039-274
Page 18

CENTRAL PROCESSOR PACKAGE INSTALLATION
2.8 SAMPLE CUSTOMER DATA SHEETS
The Customer Data Sheets which are included in
the VR-CM50 Console Service Manual, Volume 1,
will detail t he connector and pair assignments for all
I/O functions. Connect or as signment s are defi ned in a
report titled I/O CONNECTOR PANEL ASSIGNMENTS located behind the T/R CHANNEL CONTROL PROGRAMMING sheets. If there is more
than one connector I/O panel, a report will be provided for each panel.
An illustration of the I/O Connector Panel
Assignments report is shown in SAMPLE 1 below.
Separate reports for RTL I/O Lines are shown as
SAMPLES 2, 3 and 4. A sample Auxiliary Con-
trol Relay Assignments report is shown as SAMPLE
5. These can be found on the following pages.
A separate report is provided for each I/O Con-
nector Panel.
Table 2-2 I/O PANEL REPORT
I/O Conn. Panel Report 14 Card
Dispatch position I/O Lines
RTL I/O Lines
Data I/O Lines
P1-P3
P4-P7
P8-P11
CPP
20+ Card
CPP
P1-P8
P9-P14
P15-P21
February 1996
Part No. 004-3039-274
Figure 2-7 I/O CONNECTOR PANEL ASSIGNMENTS
2-8
Page 19

CENTRAL PROCESSOR PACKAGE INSTALLATION
Figure 2-8 RTL I/O PANEL ASSIGNMENTS
Figure 2-9 VOTING COMP ARATOR DISPLAY/CONTROL MODULE
2-9
Part No. 004-3039-274
February 1996
Page 20

CENTRAL PROCESSOR PACKAGE INSTALLATION
Figure 2-10 LOGGING RECORDER
February 1996
Part No. 004-3039-274
Figure 2-11 AUXILIARY CONTROL RELAY ASSIGNMENTS
2-10
Page 21

CENTRAL PROCESSOR PACKAGE INSTALLATION
2.9 WIRING OF SURGE ARRESTOR BOXES
Typically, connectors P9 through P13 on the standard I/O panel (connectors P4 through P6 on 14 card
cabinets) will be assigned for RTL I/O connectors.
1. Connect the female end of an A600950A, 25 pair
cable to the connector in the surge box. Dress the
cable as shown in Fig. 2- 10. above . Use a s plit rub ber grommet (furnished) to pr otect the cable where
it passes through the surge box bottom flange.
Connect the male end of this cable to the appropriate mating connector in the CPP cabinet. Use a
CHAMP LOC spring (furnished) to secure each end
of the connector. Coil and t ie any excess cable - do
not shorten the cable length.
2. Use 25 pair inside telephone cable to connect the
surge arrestor block to an RTL demarcation point
punch block following the standard color code
assignment shown in Table 2-3. Since not all
installations us e all pairs presen t o n the surge arr estor block, some insta llers prefer to use indi vidual 24
gauge solid twisted pair cross-connect wires rather
than a 25 pair cable. Dress the cable or wire pairs
using standard te lephone wire management de vices
and techniques to ef fect a neat installa tion. The use
of bridging clips on each demarcation block is
strongly recommended to allow the console sys tem
to be isolated for tro ubleshooting. The connections
are defined in reports titled RTL I/O PAIR
ASSIGNMENTS. A separate report is provided for
each I/O connector.
3. Be sure to replace the lids on all surge arrestor
boxes. It is suggested that you place a copy of the
pair assignments for each box inside the box for
future reference.
Figure 2-12 SURGE ARRESTOR BOX WIRING
2-11
February 1996
Part No. 004-3039-274
Page 22

CENTRAL PROCESSOR PACKAGE INSTALLATION
Table 2-3 STANDARD COLOR CODE
ASSIGNMENTS
CABLE LINE COLOR
Pair
1
Pair
2
Pair
3
Pair
4
Pair
5
Pair
6
Pair
7
Pair
8
Pair
9
Pair
10
Pair
11
Pair
12
Pair
13
Pair
14
Pair
15
Pair
16
Pair
17
Pair
18
Pair
19
Pair
20
Pair
21
Pair
22
Pair
23
Pair
24
Pair
25
February 1996
Part No. 004-3039-274
10
11
12
13
14
15
16
17
18
19
20
21
22
23
24
25
26
27
28
29
30
31
32
33
34
35
36
37
38
39
40
41
42
43
44
45
46
47
48
49
50
1
2
3
4
5
6
7
8
9
White/Blue
Blue/White
White/Orange
Orange/White
Green/White
White/Green
White/Brown
Brown/White
White/Slate
Slate/White
Red/Blue
Blue/Red
Red/Orange
Orange/Red
Red/Green
Green/Red
Red/Brown
Brown/Red
Red/Slate
Slate/Red
Black/Blue
Blue/Black
Black/Orange
Orange/Black
Black/Green
Green/Black
Black/Brown
Brown/Black
Black/Slate
Slate/Black
Yellow/Blue
Blue/Yellow
Yellow/Orange
Orange/Yellow
Yellow/Green
Green/Yellow
Yellow/Brown
Brown/Yellow
Yellow/Slate
Slate/Yellow
Violet/Blue
Blue/Violet
Violet/Orange
Orange/Violet
Violet/Green
Green/Violet
Violet/Brown
Brown/Violet
Violet/Slate
Slate/Violet
2.10 DISPATCH POSITION CONNECTIONS
Each dispatch position will plug directly into the
J1 connector on the PIC line terminator board as
shown in Figure 2-15. Console posit ions hav ing more
than four speakers will have two or more PICs and
line terminator bo ar ds assigned. A label on the top of
the line terminator board, as shown in Figure 2-15,
will identify the position with the Console ID. The
jumpers on the line terminator board determine
whether the selected audio is sent to the le ft or right
speaker on the console. Refer to the VR-CM50 Console Service Manual to adjust them. Refer to Section
2.6 for grounding information.
2.11 VOTER SYSTEM CONNECTIONS
If this system is specified for use with a voter
system, the CPP is equipped with a TDM-AUX/V
card for each voter shelf to be connected. The connection to each voter is through a 25 pair, male ribbon
connector and a l ocal inter face board to be inst alle d at
the voter shelf. The I/O CONNECTOR PANEL
ASSIGNMENTS report will define the connector
position for each voter. The VOTING COMPARATOR DISPLAY/CONTROL MODU LE report, as
shown in Figure 2-9, defines the site and control connections. This report is formatted for either General
Electric or Motorola voters in accordance with the
data furnished to E.F. Johnson at the time of order.
These reports are interleaved with the RTL I/O PAIR
ASSIGNMENTS sheets at the designated connector
locations . Refer to the VR-CM50 Voter Modification
Kit Installation Guide - P/N 700901 ECL A, for specific voter shelf connection details.
2.12 LOGGING RECORDER CONNECTIONS
Mixed Tx/Rx audio for each individual channel
is provided for connection to a logging recorder. The
logging recorder output is a 600W balanced line at a
level of -10 dBm. On tone controlled channels, the
transmit audio will be stripped of guard tone (2175
hz) and function tones. On DC controlled channels,
the transmit audio is DC blocked.
In the case of multi-receiver base stations, the
audio from all receivers is summed with the transmit
audio by bridging the logging recorder outputs of the
LIC and the QRC cards. Jumpers on the QRC card,
associated with the base station, can be set to isolate
individual receiver audio, if required.
2-12
Page 23

CENTRAL PROCESSOR PACKAGE INSTALLATION
Typically, logging recorder audio appears on connector P14 on the standard I/O panel (connector P7 on
14 card CPP cabinets). If the CPP is housed in more
than one cabinet, a separate logging recorder output
will be provided from each cabinet to minimize the
need for intercabinet wiring. Logging recorder connections are defined in reports titled RTL I/O PAIR
ASSIGNMENTS , as shown in Figure 2-10. A separate report i s provided for each conne ctor.
2.13 PRINTER INSTALLATION
The Logging Diagnostic Printer option, TDMOP205 is strongly recommended. In the event of a
system reset, either manually or automatically initiated, the printed record is the only way to determine
what actually happened.
Assemble the printer stand in accordance with the
instructions supplied. If your CPP is housed in a 60"
cabinet, the printer may be placed on top of the CPP.
If your CPP is housed in an 88" cabinet, a separate
printer shelf will be required. Do not attempt to mount
the printer in the CPP cabinet. Unpack the printer and
remove all shipping mat erial . Inse rt th e paper, making
sure the tractor feed in engaged and the friction feed is
disengaged.
Two 120 VAC convenience outlets for the printer
and modem transformer are located in the upper left
side of the CPP vent housing. If your CPP is housed
in a 26" cabinet, the print er can be plac ed on top of the
CPP, but no outlet is provided.
Special note for 230 volt system users: The printer
supplied with your system is configured for 120 VAC
operation. The convenience outlets on the CPP are
powered via an approved 230V/120V step-down
transformer. The printer must be connected to this
outlet.
2.14 MODEM INST ALLATION
This system is equipped with a modem to allow
remote diagnostics and programming via a dial-up
phone line. The modem has been p roperl y conf igure d
for 2400 baud operation and tested at the factory prior
to shipment. Do not c hange t he modem pr ogrammin g
without specific authorization from E.F. JOHNSON
Technical Support. If you wish to access the system
via modem, your PC must be equipped with TDMOP208/PC Maintenance Software. Contact E.F.
Johnson Technical Support for details.
Connect the RS232 jack on the modem to the
modem port on the I/O panel designated in the I/O
CONNECTOR PANEL ASSIGNMENTS report.
Usually, this is P17 on 60" and 88" cabinets, P10 on
26" cabinets.
T wo 1 20 VAC convenience outle ts for the mode m
transformer and printer are located in the upper left
side of the CPP vent housing o n 60" and 88" ca binets.
If your CPP is housed in a 26" cabinet, no outlet is
provided.
Special note for 230 volt system users: The modem
transformer supplied wi th your system is designed for
120 VAC operation. The convenience outlets on the
CPP are powered via an approved 230V/120V stepdown transformer. The modem must be connected to
one of these outlets.
Connect the RJ-11 modular LINE jack on the
modem to the telephone line designated for modem
communications. If additional instruments are to be
routed through the modem for voice use, these should
be connected to the RJ-11 PHONE jack on the
modem.
2.15 CONNECTION TO AUXILIARY CONTROL
FUNCTIONS (Standard Cabinet)
Connect the printer to th e port on the I /O panel
designated in the I/O CONNECTOR PANEL
ASSIGNMENTS report. Usually, this is P15 on 60"
and 88" cabinets, P8 on 26" cabinets. The printer has
been programmed and tested prior to shipment. Refer
to the printer instruction manual should problems be
encountered.
If the console was ordered with auxiliary switch
functions specified, the CPP cabinet will have one or
more auxiliary relay panels installed. A typical relay
panel is shown in Figure 2-13. The standard relay
panel, furnished with a TDM-AUX includes eight
relays. An additional eight relays can be added by
specifying option T DM-AUX/E8. Rela ys 1 t hrough 8
are located at the bottom of the panel. Expansion
February 1996
2-13
Part No. 004-3039-274
Page 24

CENTRAL PROCESSOR PACKAGE INSTALLATION
relays 9 through 16 mount at the top of the panel.
The Customer Data Sheets which are included in the
VR-CM50 Console Service Manual, Volume 1, will
define the relay panel assignments for all Auxiliary I/
O functions. Individual relay and input assignments
are defined in a report titled AUXILIARY CONTROL RELAY ASSIGNMENTS located behind the
RTL I/O PAIR ASSIGNMENTS sheets.
Each auxiliary function key has two logic inputs
and one output relay assigned to it. Input functions
vary widely from system to system but typically, the
inputs control key indications. In most cases, A
inputs control the lef t or of f indic ation and B inputs
control the right or "on" indication. Inputs must be a
logic ground which can sink approximately 20 ma.
Use extreme caution in wiring the auxiliary func-
tions. The application of AC line voltage to an A or
B input terminal will cause serious damage to the processor circuitry.
Each auxiliary output is a 4PDT relay having a
contact rating of 5 amperes at 120 VAC. If higher
voltages or currents must be controlled, use the relay
in the CPP as a pilot relay to operate an external contactor. Each relay is mounted in a DIN socket with
screw terminals that can accept up to #12 wire. Refer
to Figure 2-13, for a detail of the relay connections.
I M P O R T A N T
The relay panel in the CPP is hinged to allow access
to the backplane circuitry behind it. In wiring to the
auxiliary inputs and relays, dress all wiring from the
hinge side of the panel.
February 1996
Part No. 004-3039-274
Figure 2-13 CPU RELAY PANEL
2-14
Page 25

CENTRAL PROCESSOR PACKAGE INSTALLATION
2.16 CONNECTION TO AUXILIARY CONTROL
FUNCTIONS (14 Card Central Cabinet)
The 14 card Central Processor can accommodate
only one Auxiliary Control Relay card with a maximum of 16 relays. A somewhat different relay
mounting arrangement is used due to space limitations. Relays 1 through 8 are mounted ve rtica lly wit h
RY1 at the bottom of the mounting strip. Note carefully the loca tion of the COIL terminals; the relay
sockets are rotated 900 clockwise from the
CPU main Relay Panel as shown in Figure 2-14.
The TDM-AUX/E8 accessory provides relays 9
through 16, just as in the larger cabinets. In this package however, the accessory relay strip is stacked
above the primary relay strip as shown in Figure 2-14
with addition of AUX/E8.
The A and B control inputs are contained on a
circuit board which mounts on the sidewall of the
relay housing to the left of the primary relay strip.
All control functions are identical to those shown for
larger CPP cabinets.
Figure 2-14 14 CARD RELAY PANEL
2-15
February 1996
Part No. 004-3039-274
Page 26

CENTRAL PROCESSOR PACKAGE INSTALLATION
2.17 PA SYSTEM FEED
The CPP can be connected to a building public
address to permit paging via the dispatch console(s).
The console(s) must be equipped with programming
option TDM-OP431 or TDV-OP431 to use this feature.
1. Connection to the PA system is made from TB4 on
the CSC line terminator I/ O board, located on the
rear of the CPP power supply as shown in (see Figure 2-15 for terminal locations on the Line Terminator Board).
2. PA feed audio is obtained from terminals A1 and
A2. The audio output is a 600W balanced line at 10 dBm.
3. PA PTT is obtained fr om termi nals K1 an K2. PTT
is an isolated, normally open dry contact closure,
which may be wired into the audio path or used to
control an amplifier gate (preferable).
2.18 CONNECTIONS TO AC POWER
The CPP is connected to its AC power feed via a
surge protect ed power dist ribution strip in the CPP
cabinet. One strip will be provide d for every two , 60"
cabinets or each individual 88" cabinet. An IEC-320
input connector and l ine cor d is l ocate d on the b ottom
of the AC strip. The line cor d co nnector has been supplied in accordance with the power supply option
specified at the time of order.
February 1996
Part No. 004-3039-274
Figure 2-15 CPP POWER SUPPL Y
2-16
Page 27

CABINETRY ASSEMBLY FOR CRT CONSOLE SYSTEMS
SECTION 3 CABINETRY ASSEMBLY FOR CRT CONSOLE SYSTEMS
3.1 INTRODUCTION
This section contains the instructions to assemble VR-CM50 CABINETRY. If you purchased a
complete VR-CM50 system, most electronic components will be pre-installed in your VR-CM50 cabinetry.
3.2 TOOLS REQUIRED
The following tools are needed for mechanical
assembly of the TDM-150 Console cabinetry.
#2 Phillips Screwdriver
Power Screwdriver with #2 Phillips Bit
3/8" Open End Wrench
7/16" Open End Wrench
1/2" Open End Wrench
3/8" Square Drive 7/16" Socket
Carpenter’s Level
White Carpenter s Glue (Required only if multiple
writing surfaces must be joined)
3.3 CONSOLE ARRANGEMENT
Consoles are shipped in 2, 3 or 4 bay sections
depending on the final cabinet configuration. Before
assembly begins, arrange the console sections (bays)
in their proper room layout positions. Individual sections will be identified with letters A , B , and C ,
beginning with left-most section. The letter designations will appear on the inside ends of the console
frame. Refer to your proposal diagram for the correct
layout positions. A sa mple propos al diagr am is shown
in Figure 3-1.
It is important to note that the console sections
should not be forced to conform to surrounding walls
or structures. This will ultimately bend the console
frames so that the Formica will not fit properly as
designed.
Once the Formica writing surface is permanently
mounted, DO NOT ATTEMPT TO MOVE THE
CONSOLES!
Figure 3-1 SAMPLE CONSOLE LA YOUT
3-1
February 1996
Part No. 004-3039-274
Page 28

CABINETRY ASSEMBLY FOR CRT CONSOLE SYSTEMS
3.4 MAIN CONSOLE ASSEMBLY
4. Remove the front a nd rear keylocke d enclosure panels from each bay and set them aside.
C A U T I O N
Keylocks will scratch keylock enclosure panels if they
are stacked or leaned against each other.
5. Accurately place the console s ection at it s final lo cation before continuing with STEP 3.
6. Using #1/4-20 x 3/4 hex bolts and #1/4-20 x 3/4
Keps nuts, attach the consol e sections together using
pass-through holes in the sides.
Note: Be consistent when orienting the bolts in the
pass-through holes. Refer to Figure 3-3.
Figure 3-3 ASSEMBLY OF CONSOLE SEC-
TIONS
Do not attach the consol es at the centermost hole s.
These holes will be used to fasten the writing support rails. Refer to Section 3.7.
7. Be sure the sections are in p erfect alignment before
securing the fasteners.
HINT: When aligning console sections, a #2 Phillips screwdriver may be placed through one of the
centermost holes and used as an alignment tool.
3.5 CONSOLE LEVELING
1. Consider carefully where the consoles are located.
Any gross unevenness in the flooring should be
eliminated. Small deviations can be compensated
using the individual levelers at each console.
Note: Levelers are screwed in all the w ay in shipment. Refer to Figure 3-5.
2. Level the console assembly both side-to-side and
front-to-back using the threaded levele rs in each
cabinet section. Levelers can be adjusted by using
an 1/2" open end wrench o r by ha nd tu rning. Hin t:
a piece of scrap wood may be used to prop up the
console to aid in leveling. Be sure each leveler is
snug against the floor and supports its proper share
of the overall weight.
Figure 3-2 WRITING SUPPORT MOUNTING
HOLES
February 1996
Part No. 004-3039-274
NOTE: Once the levelers have been extended, do
not shift the console position. Lateral movement
can bend the leveler stems making proper adjustment extremely difficult.
3-2
Page 29

CABINETRY ASSEMBLY FOR CRT CONSOLE SYSTEMS
Figure 3-4 FORMICA SURFACE ARRANGEMENT
Figure 3-5 LEVELING THE CONSOLE
3.6 FORMICA WRITING SURFACE ARRANGEMENT
1. Locate all writing surface Formica and arrange on
the floor in front of console. A typical layout is
shown in Figure 3-4. Permanent mounting can be
accomplished more easily if the Formica is arranged
on the floor directly in line to its mo unting positio n
on the console.
2. Mark the console face where the breaks occu r in the
Formica writing surface. The marks should be
made below the writing surface plane so that they
will be hidden when the Formica is installed.
3.7 WRITING SUPPORT RAIL MOUNTING
The writing support rails are necessary for
mounting and providing support to the Formica writing surfaces of consoles. One support rail is provided
for each side-by-side cabinet bay consisting of two or
more consoles including pie-shaped pieces. For twobay cabinetry, one support rail is provided at each end
and in the middle. For conveni ence, t he rai ls an d their
mounting locations are numbered.
1. Install the writing support rail number at the corre-
sponding location number found on the side of the
console frame.
3-3
February 1996
Part No. 004-3039-274
Page 30

CABINETRY ASSEMBLY FOR CRT CONSOLE SYSTEMS
Figure 3-6 WRITING SUPPORT RAIL MOUNTING
2. Fasten the writing support ra il with thr ee #1/4-20x3 /
4 Keps nuts as shown in Figure 3-6. One support
rail must be used on either side of writing surface
break as previously marked.
3. All other bays use only one support rail per bay as
shown in Figure 3-6.
4. It may become necessary to partially remove the
equipment in the sloped turret to access holes for
mounting the support rails. Removal of four panel
mounting screws allows the t ray t o sl ide out and r et
on hinges as shown in Figure 3-7.
February 1996
Part No. 004-3039-274
NOTE: If the console has a keyboard recess, a
shorter keyboard support rail is used in place of a
writing support rail. Refer to Figure 3-11.
If the system configuration includes 45° sections:
1. Remove the front #1/4-20x3/4 hex bolt.
2. Slide the support rail through the slot and replace
the bolt.
3-4
Page 31

CABINETRY ASSEMBLY FOR CRT CONSOLE SYSTEMS
3. Pass the driver through the access in the bottom of
the support rail and drive #10x3/4" flakeboard
screws* up into the Form ica wr iting surfa ce. Refe r
to Figure 3-9.
4. Align as necessary using an electric screwdriver
with a #2 Phillips driver.
NOTE: Hex extensions or long hex driver s will no t
pass through the holes.
C A U T I O N
Use only VR-CM50-provided flakeboard screws to fasten the writing surface. Longer screws will protrude
through the Formica surface.
Figure 3-7 CTP TRAY
3.8 ATTACHING THE FORMICA WRITING SURFACE
1. Position all writing s urfac es on the wri ting support
rails.
2. Where a split occurs i n the Formica writi ng surface,
insert wood biscuit s into the slots on the sides of the
surfaces. Refer to Figure 3-8.
HINT: To help align the Formica writing surfaces
flush, it is advisable to glue the biscuits into place
using white carpenter’s glue.
Figure 3-8 JOINING FORMICA
Figure 3-9 SECURING THE FORMICA WRIT-
ING SURFACE
3-5
February 1996
Part No. 004-3039-274
Page 32

CABINETRY ASSEMBLY FOR CRT CONSOLE SYSTEMS
Figure 3-10 FORMICA WRITING SURFACE AND TRIM
3.9 FORMICA WRITING SURFACE AND TRIM
1. Align the Formica writing surface end trim with the
double holes in the las t writing support ra il. Use the
bottom-most hole, on the rail, to mo unt the Formica
writing surface end trim.
2. Fasten the Formica writing surface end trim using
the two (2) fender 1/4x1" washers and two (2) 832x1/2 screws as shown in Figure 3-10.
3. A correctly mounted Formica writing surface end
trim is show n in Fig. 3-15. Notice that the bottom
of the end trim aligns perfectly with the co nsole end
kit metal.
February 1996
Part No. 004-3039-274
Replace all keylocked enclosure panels. The
standard mechanical assembly is now complete. If
your console configuration has optional equipment,
PLEASE CONTINUE.
3.10 CABINETRY OPTIONS
VR-CM50 offers the following cabinetry options
for your system. Installation instructions begin in the
follow sections:
3.10.1 STABILIZER KIT (OPTION 1)
Refer to Figure 3-11. For cabinetry consisting o f
two or more in-line cabinet bays, two (2) stabilizer
kits are required - one at each end of the console. For
3-6
Page 33

cabinetry consisti ng of a pi e-shap e secti ons al ong with
2 or more cabinet bays in-line before the turn, one (1)
stabilizer kit only is required at the end opposite the
pie-shaped section. For assembly purposes, each console that is required to have a stabilizer installed, is
identified with a label: Mount Stabilizer Leg Here
1. Align the stabili zer l eg wit h the bottom holes of the
console bay as indicated.
2. Fasten with two (2) # -20x hex bolts.
3. Conceal the bolts b y placing hole plu gs as shown in
Figure 3-11.
CABINETRY ASSEMBLY FOR CRT CONSOLE SYSTEMS
Figure 3-12 ADJUSTABLE KEYBOARD SEAT
3.10.3 UNIVERSAL KEYBOARD DRAWER
MOUNTING (OPTION 3)
Figure 3-11 STABILIZER KIT
3.10.2 ADJUSTABLE KEYBOARD SEAT (OPTION 2)
Refer to Figure 3-12.
1. Mount the keyboard sup port rail (#2 short rail) in the
rear of the keyboard opening.
2. Align the adjustable keyboard seat with the wri ti ng
surface cutout.
Refer to Figure 3-13.
1. Mount the #2 short keyboard support rails as in
Option 2, behind the keyboard drawer.
2. Position the keyboard drawer 1" back from the
front of the Formica writing surface.
3. Drive six (6) #10 x 3/4 flakeboard screws up into
the wood.
3. Drive seven (7) #10 x 3/4 flakeboard screws up into
the wood using the pre-drilled holes.
Figure 3-13 KEYBOARD DRAWER MOUNT-
ING
February 1996
3-7
Part No. 004-3039-274
Page 34

CABINETRY ASSEMBLY FOR CRT CONSOLE SYSTEMS
3.10.4 UNIVERSAL PENCIL DRAWER MOUNTING (OPTION 4)
1. Remove the pencil drawer from the mounting frame
by depressing th e black slide retainers. Refer to Fig ure 3-14.
2. Position the mounting frame in the desi red loc ation
between the writing support rails - 1 " back from the
front of the Formica writing surface.
3. Drive six (6) #10 x 3/4 flakeboard screws up into
wood. Refer to Figure 3-14
4. Re-insert the pencil drawer.
3. Attach the typewriter extension support to the typewriter extension using four (4) 10x3/4 flakeboard
screws. (On 21" typewriter extensions, five (5)
10x3/4 flakeboard screws are used) .
4. Attach the entire assembly to the position desired on
the Formica writing surface. Use four (4) 10x3/4
flakeboard screws to secure t he assembly to the For mica writing surface. (On 21" typewriter extensions, five (5) 10x3/4 flakeboard screws are used).
5. Hand turn the leveling fe et at the bottom of t he modesty panel to ensure a level typewriter extension
surface.
Figure 3-14 UNIVERSAL PENCIL DRAWER
MOUNTING
3.10.5 TYPEWRITER EXTENSION ASSEMBLY
(OPTION 5)
Refer to Figure 3-15. The Typewriter Extension
Assembly consists of a typewriter extension, a typewriter extension support, two (2) triangle braces and
hardware. It is packed flat for shipping and must be
assembled in the field.
NOTE: The following asse mbly instr uctions pertain t o
both 18" and 21" typewriter extension lengths.
1. Attach the triangle brace to the modesty pan el using
three (3) 10-32x1/2 p an head screws for each tr ian gle brace.
2. Flip the typewriter extension over on its top side to
attach the other side of the triangle brace. Use three
(3) 10x3/4 flakeboard screws for each triangl e brace
and attach to the typewr iter extensio n.
Figure 3-15 TYPEWRITER EXTENSION AS-
SEMBLY
3.10.6 PIE SUPPORT RAIL MOUNTING (OPTION 6)
Refer to Figure 3-16. The Pie Support Rail is
attached using the same hole pattern as the writing
support rail.
1. Mount the rail with the angle of the rail following
the angle of the break in the writing surface.
2. When the Formica writing surface is attached, use
two (2) flakeboard scre ws on each si de of t he writ ing surface break. Refer to the Section 3.5.
February 1996
Part No. 004-3039-274
3-8
Page 35

Figure 3-16 PIE SUPPORT RAIL MOUNTING
3.10.7 CRT MONITOR SHELF - FXM-192 (OPTION 7)
CABINETRY ASSEMBLY FOR CRT CONSOLE SYSTEMS
2. Mount the CRT Monitor Shelf
The monitor shelf is mounted in the base section
of the FC192 cabinet. Refer to Figure 3-18.
a. Snap Tinnerman clips to the 6th hole countin g
down from the top of the lower frame side on both
the front left and right sides of the cabinet.
b. Snap Tinnerman clips to the 8th hole counting
down from the top of the lower frame side on both
the rear left and right sides of the cabinet.
c. Install the monitor shelf with the four (4) 12-24x
pan head Phillips screws provided. The monitor
shelf mounts with the 2.5" hole to the rear.
d. Remount the distribution rail to holes 31 and 33
(counting up from the console bottom) using the
(4) -20x3/4 hex bolts previously removed.
The hardware in Table 3-1 is included with the
Monitor Shelf assembly (FXM-192):
1. Mount the Tinnerman Clips
a. Snap the Tinnerman clips onto the left and right
sides of the console frame at the second, third and
seventh hole, counting up from the bottom cowl.
Repeat the same, counting down from the top
cowl.
b. Attach the EIA Shims - Attach the EIA shims using
two (2) 12-24x pan head Phillips screws per shim
to the Tinnerman clips at holes 3 and 7, 12 and 16,
counting down from the top cowl.
c. Remove the Distribution Rail - Remove the
distribution rail at the rear of the cabinet by
removing the four (4) 1/4-20x3/4 hex bolts. Put
them aside to use for reassembly.
d. Install the Right and Left Inner Closures - Install
the right-side inner closure by sliding it in from the
front of the console and placing its shim between
the already installed "EIA" shims" and "inner
closure" itself. (All holes line up when seated
properly). Screw in the right-side closure with the
four (4) 12-24x1" black truss head Phillips screws
and #12 black nylon washers. Repeat this
procedure for the left side.
Figure 3-17 INSTALLING TINNERMAN CLIPS
3-9
February 1996
Part No. 004-3039-274
Page 36

CABINETRY ASSEMBLY FOR CRT CONSOLE SYSTEMS
Figure 3-18 CRT MONITOR SHELF
Table 3-1 MONITOR SHELF HARDWARE
Qty. Part No. Description
280621122400
16
280114122408
12
280129122416
4
280359120010
4
141140093B
4
144153069
2
144153161I
1
144153161R
1
144153162
1
Tinnerman Cli ps
12-24x1/2 Pan Head Philips Screw
12-24x1 Truss Head Philips Screw
#12 Black Nylon Washer
"EIA" Shim
10.5 inch Long Shim
Left Inner Closure
Right Inner Closure
Monitor shelf
February 1996
Part No. 004-3039-274
3-10
Page 37

CRT-BASED ELECTRONICS ASSEMBLY PART I
SECTION 4 CRT -BASED ELECTRONICS ASSEMBLY PART I
4.1 INTRODUCTION
Since you have purchased the E.F. JOHNSON
console system as electronics only and intend to use
another manufacturer s cabinetry, these install instructions will have to be interpreted broadly.
4.2 INSTALL THE PC/UPS SLIDE TRAY
Table 4-1 PC UPS OPTION NUMBERS
PC CPU Part No. 200TC4862501
Possible option numbers for the PC UPS
Part Number Country
TDV-OP400/A
TDV-OP400/GB
TDV-OP400/E
TDV-OP400/I
TDV-OP400/NZ
North America
Great Britain, S. Africa
Europe
India
New Zealand/Australia
Table 4-2 SLIDE TRAY HARDWARE
4. Slide the Slide Tray Assembly onto the slide
mounts. Refer to Figure 4-1.
Qty Part No. Description
88280621122400
280124102412
2 Slide Assembly (see Figure 4-1)
Qty.
2
2
1 Slide Assembly (see Figure 4-1)
1
1
1
Part No.
144233259
146563216
144233258
124163270
144233386
Tinnerman Clips
12-24x1/2 PH Phil Screw
Description
Mounting Bracket
16" Slide Assembly
Tray
Swivel Mount
PC Tray Bracket
3. Attach the slide mount assembl ies to the bottom of
the console using eight (8) Tinnerman clips
(280621122400) and eight (8) 12-24x pan head
Phillips screws (280124102412) to the left and
right sides. If you have E.F. JOHNSON cabinetry,
use the second hole and eighth hole from the bottom.
Figure 4-1 PC AND UPS SLIDE TRAY AS-
SEMBLY
4.3 CRT INTERFACE PROCESSOR (CIP)
Table 4-3 POWER SUPPLY HARDWARE
Qty Part No. Description
44280621122400
280124102412
Tinnerman Cli ps
12-24x1/2 PH Phil Screw
4.3.1 INSTALL THE CIP POWER SUPPLY
1. Install the CIP Power Supply is installed in the
upper turret of the console directly behind the CIP
tray. Use the four (4) Tinnerman cli p s a nd four (4)
12-24x1/2 pan head Phillips screws to secure the
power supply to the console frame.
4-1
February 1996
Part No. 004-3039-274
Page 38

CRT-BASED ELECTRONICS ASSEMBLY PART I
Figure 4-2 CIP POWER SUPPLY
NOTE: If the CIP power-supply and the CIP tray are
being mounted over the monitor in a 5 or 10 turret,
a shield plate has to be installed between the monitor
and turret. Use a 16 ga cold rolled steel magnetic
shield plate. The part number used in cabinetry is
144113434.
A UPS Power Fail
B CPP Data
C PC COM3
D Circu it Breaker
E Power Connector
F 13.7V DC Accessory Outlets
G Touchscreen (DIN) Connector
4.3.2 INSTALL THE CRT INTERF ACE PROCESOR (CIP) TRAY
Table 4-4 CIP TRAY HARDW ARE
Qty Part No. Description
280621122400
8
280114122408
4
280129122416
4
280359120010
4
141230970A
1
Tinnerman Clips
12-24x1/2 PH Phil Screw
12-24x1 Truss Head Phil
#12 black nylon washer
Black trim strip
Mount The CIP Tray
Install the CIP tray at the location indicated in the
Customer Specification s Do cumen tat i on or as per the
customer s preference.
1. If the cabinetry you are using does not have a panel
reveal depth of 5/8", you may have to perform one
of the following two procedures to ensure flush
mounting :
a. remove the "mounting slides" if the cabinetry is too
shallow or,
b. use a shim if it is too deep.
2. Slide the CIP tray into the cabinet and attach the
slide shims of the tray using the (4) 12-24x pan
head Phillips screws on the two innermost Tinnerman clip positions (see Figure 4-3).
NOTE: These instructions will have to be interpreted
broadly when using another manufacturer’s cabinetry.
February 1996
Part No. 004-3039-274
4-2
Page 39

Figure 4-3 CIP TRAY WITH MICROPHONE
Table 4-5 CIP TRAY CABLE CONNECTIONS
CRT-BASED ELECTRONICS ASSEMBLY PART I
3. After the CIP tray is mounted, connect the following cables using Table 4-5.
4. Mount the panel microphone (TDV-OP402/HR) to
the CIP:
All other microphone options, i.e., Dual Arm
Boom Microphone (TDV-OP403), Desk-Top Microphone (TDV- OP404), and Auxiliary Microphone
Location (TDV-OP405), have customer specific
installation requirements and will not be included in
this Installation Guide.
CIP Tray Board Connections (A1709228) CIP PS Line Term Boar d Connections (A1709230)
1st Line Term Cable - P9 (I/O 1) Connect to P1 (I/O 1)
2nd Line Term Cable - P6 (I/O 2) Connect to P1 (I/O 2)
Red/Black CIP Power Cable Connect to P2 (13.7V DC) on CIP Tray
Ground Cable (A600966.18) Connect to CIP Power Supply
The ground cable is attached to the center
Pem nut on the rear of the CIP tray.
Remove the 5-32x1/2 Philips head screw at location marked
with a ground symbol on the rear of the power supply and
attach the ground cable.
4-3
February 1996
Part No. 004-3039-274
Page 40

CRT-BASED ELECTRONICS ASSEMBLY PART I
This page intentionally left blank.
February 1996
Part No. 004-3039-274
4-4
Page 41

SECTION 5 CRT-BASED ELECTRONICS ASSEMBLY P ART II
5.1 INTRODUCTION
CRT-BASED ELECTRONICS ASSEMBLY PART II
7. Place the PC UPS (TDV-OP400/XX) onto the
swivel mount so that the feet engage the holes.
Refer to Figure 4-1.
If you have ordered a CRT-Based console system
installed in E.F. JOHNSON cabinetry, most of the
assembly will already have been done at the factory.
This section, CRT-Based Electronics Assembly - Part
II , details the additional assembly required for e ither
a complete E.F. Johnson CRT-Based system or an
Electronics Only CRT- Based system.
5.2 INSTALL THE PC AND UPS
Table 5-1 PC UPS OPTIONS
PC CPU Part No. 200TC4862501
Possible option numbers for the PC UPS
Part Number Country
TDV-OP400/A
TDV-OP400/GB
TDV-OP400/E
TDV-OP400/I
TDV-OP400/NZ
North America
Great Britain, S. Africa
Europe
India
New Zealand/Australia
5.3 CONNECT THE PC CPU AND PC UPS POWER CORDS
Part Numbers:
PC UPS - TDV-OP400/xx
PC CPU - 200TC4862501
Refer to Figure 5-1.
1. Connect one end of the supplied power cord to the
PC CPU. Plug the other end into the top left receptacle at the rear of the PC UPS. (Coil up th e excess
cable and secure).
2. Connect one end of the other supplied power cord to
the PC UPS. Plug the other end into the customerfurnished receptacle box feeding the console.
(Leave enough slack on the power cord so that it
will not unplug when the tray is fully extended).
5. Remove the two bottom screws of the PC CPU
(holding the PC cover together) and completely
slide the PC CPU into the PC tray bracket.
6. Replace the two sc rews that were removed wit h two
(2) 6-32x1/2 pan head Phillips screws (furnished).
Figure 5-1 CPU AND UPS POWER CONNEC-
TIONS
February 1996
5-1
Part No. 004-3039-274
Page 42

CRT-BASED ELECTRONICS ASSEMBLY PART II
5.4 CONNECT THE CRT INTERFACE PROCESSOR (CIP) TRAY CABLES
Refer to Figure 5-2 and Table 5-2.
Figure 5-2 CIP POWER SUPPLY LINE TERM BOARD - A1709230
Table 5-2 CRT CABLE CONNECTIONS
CIP Power Supply Line Term Board
(A1709230) Cable Conn
Footswitch Cable (A210906) Connect to Footswitch Jack
Red to AUX-FSPTT (TB11)
Green to AUX-FSMON (TB11)
Black to AUX-GND (TB11)
Power Fail Cable (A2109116) Connect to PC UPS (see Figure 5-1)
Green to AUX-AUX1 (TB11)
Red to AUX-AUX2 (TB11)
Black to AUX-GND (TB11)
Console Serial Cable (A600991.6) Connect to PC CPU (see Figure 5-1)
P8 (CONSOLE) COM 3 (CIP Control Tray) connector
ections
Mounts in the 5/8" hole at the base of the bay where the CIP
is installed. If there is no hole, provide one.
POWER FAIL connector
February 1996
Part No. 004-3039-274
5-2
Page 43

CRT-BASED ELECTRONICS ASSEMBLY PART II
5.5 INSTALL THE CRT MONITOR
5.5.1 CRT MONITOR CONNECTIONS
Refer to Figure 5-1.
1. Plug the female end of the IEC cord into the CRT
monitor.
2. Plug the other end of the IEC cord into the 2nd top
outlet on the PC UPS.
NOTE: Leave enough slack on the power cable so
that it will not unplug when the tray is fully extended.
3. Connect the VGA connect or from the monitor to the
"Monitor" port on the PC CPU.
5.5.2 ADDITIONAL CONNECTION FOR A 17 "
OR 21 " IDEK MONITOR
1. Connect the RGB cable to the 15 pin connector on
the rear of the CRT monitor.
5.6.2 INSTALL THE TOUCHSCREEN
Install the Touchscreen: Place the Touchscreen
onto the monitor, slipping the sides of the touchscreen
over the tabs you just installed, as shown in Figure
5-3.
Figure 5-3 TOUCHSCREEN INSTALLATION
2. Connect the VGA connect or from the monitor to the
"Monitor" port on the PC CPU.
5.6 INSTALL CRT TOUCHSCREEN (Option
TDV- OP49 2)
NOTE: Skip Steps 1 and 2 if the Touchscreen has
already been mounted on the monitor.
5.6.1 MOUNT T ABS
The Touchscreen is shipped with mounting tabs
that have been installed on the front of the CRT monitor at the factory. In the event that they were not
installed, perform the following:
1. Slide the CRT Touchscree n ont o t h e CRT monitor
and hold it firmly in place. Transfer the two side
holes on the Touchscreen to the CRT monitor by
marking with a thin sharp-pointed pencil.
5.6.3 CONNECT THE TOUCHSCREEN CABLES
Two cables, already attached to the Touchscreen,
have to be connected to the CIP Power Supply and
CPU as follows:
1. Connect the touchscreen power cable (mini DIN
type) to the CIP PS mini DIN co nnector as shown in
Figure 5-4.
2. Connect the data cable (DE9-M) to the PC CPU
(COM 1). Refer to Figure 5-1.
3.
2. Remove the paper from the back of the tabs to
expose the adhesive surface. Place the tabs firmly
on the pencil-marked holes.
Figure 5-4 CABLE CONNECTION TO CIP PS
February 1996
5-3
Part No. 004-3039-274
Page 44

CRT-BASED ELECTRONICS ASSEMBLY PART II
5.7 INSTALL CRT TRACKBALL OPTION/
MOUSE OPTION
TRACKBALL OPTION - TDV-OP490
MOUSE OPTION - TDV-OP491
Plug the DE9-M connector into the PC CPU
(COM 2) Mouse/Trackball DIN. Refer to Figure 5-1.
5.8 INSTALL HEADSET JACK (Options TDVOP406, 407, 409)
This instal lation applie s for either one or two
headset jacks.
4. Install the black trim strip (141230970A).
5. Secure the tray using t he four 12-24x1 " blac k truss
head screws (28012912240 6) and #12 blac k nylon
washers (280359120010) provided.
Figure 5-6 CIP BOARD
5.9 INSTALL SECOND VOLUME CONTROL
KNOB
Figure 5-5 HEADSET JACK
1. Mount the headset jack(s) to the Formica writing
surface in the location desired using the four #10
flakeboard screws (280SCSM0112P) provided.
2. VERY IMPORTANT! Connect the ground wire,
located at the rear of the headset, to the rail of the
console supporting the Formica usin g the 8-32x1/ 2
pan head Phillips s crew and 8-32 nut attached to the
ground wire. Refer to Figure 5-5.
3. Plug the connector end(s) of the he adset jack(s) int o
the CIP board. Connec t the first heads et to P4(HSJ
I/O 1) and the second headset to P5(HSJ I/O 2).
Refer to Figure 5-6.
February 1996
Part No. 004-3039-274
TDV-OP409 (Electronic 1A2 TELCO Headset)
will be equipped with two volume control knobs. The
volume control knob mounted on the right side, controls the radio audio to the headset. The volume control knob mounted on the left, controls the audio f rom
the enhanced TELCO.
I M P O R T A N T
Option TDV-OP409 provides two volume control
knobs. If your system does not include option TDVOP407 (second headset jack), store the leftover parts
from TDV-OP409 for a future order of a second headset.
Table 5-3 VOLUME CONTROL HARDWARE
Qty Part No. Description
11240FPV12BA1
4751904Z5001
Volume Control Knob
5k Pot
NOTE: If the system was ordered with TDV-OP409,
these steps will have been done at the factory. If the
option was ordered after delivery, these steps will
have to be performed to install the second volume control knob. Refer to Figure 5-5.
5-4
Page 45

CRT-BASED ELECTRONICS ASSEMBLY PART II
1. Remove the hole plug from the le ft side of the headset jack housing.
2. Install the volume control (4751904Z5001) in the
housing in the place of the hole plug.
3. Connect the three pin molex connector, located on
the end of the wire ha rness, to t he vol ume cont ro l.
This connector can only be connected one way.
Caution: Be careful not to bend pins when making
the connection.
4. Attach the volume control knob (240FPV12BA1).
5.10 SET UP AND OPERATION OF THE HEAD-
SET JACK
The headset jack is equipped with a switch on
both sides of the unit. These switches are slightly
recessed to prevent acci dental movemen t. The switch
on the right, as shown in Figure 5-7, is used for selecting 4W/6W operation. Four wire (4W) headsets do
not have a push-to-talk (PTT) switch.
5.11 CONNECTING A TELEPHONE INSTRUMENT TO THE TELCO INTERFACE
The telephone instrument must be headset compatible. The instr ument must have a sepa rate mic pat h
and earpiece path. The telephone instrument should
also provide a contact closure output when a line is
selected. If the telephone does not have this capability, a key on the Radio Control Panel may be programmed to switch from Radio to Telephone but this
is not a preferred method of operation.
W A R N I N G
If a 4 wire headset is plugged into the jack when it is
set for 6 wir e operati on, the channel will i nstan tly ke y
up and remain on until the headset is unplugged.
The switch on the left, as shown in Figure 5-7, is
typically used for training purposes. In the MIC On
position, the headset MIC and earpiece are active for
normal dispatch operation. In the MIC Off position,
the headset earpiece is active but the MIC is disabled
for use by a trainee in parallel with a trained operator.
Figure 5-8 TELCO CONNECTION TO CIP PS
Note the following abbreviations: TT and TR are
abbreviat ions for Talk Tip and Talk Return. RT and RR
are abbreviations for Receiver Tip and Receiver
Return. OHS is an abbreviation for Off-Hook Sense.
GND is an abbreviation for logic GROUND. Refer to
Figure 5-8, Line Term Board A1709230.
1. Connect the Microphone Input to the telephone
instrument to te rmi nal s T T and TR of t he CIP Line
Term Board, A1709230.
2. Connect the Receiver Output from the telephone
instrument to termin als RT and RR of t he CIP L ine
Term Board, A1709230.
Figure 5-7 CONNECTOR HEADSET
3. Connect the Line Select contact c losure output fro m
the telephone instrument to terminals OHS and
GND of the CIP Line Term Board, A1709230.
February 1996
5-5
Part No. 004-3039-274
Page 46

CRT-BASED ELECTRONICS ASSEMBLY PART II
This page intentionally left blank.
February 1996
Part No. 004-3039-274
5-6
Page 47

EQUIPMENT CHECK-OUT AND ADJUSTMENTS
SECTION 6 EQUIPMENT CHECK-OUT AND ADJUSTMENTS
6.1 INITIAL POWER-UP AND CHECK-OUT
I M P O R T A N T
Be sure AC power is available at the outlets. If the
CPP or console(s) are turned on without AC power
available, their internal UPS batteries will power the
system until they are depleted.
1. Turn-on t he printer and modem before powering-up
the system.
2. Turn on t he CPP power using the rocker swi tches on
the front of each power supply.
If the Power Fail LED lights, press the RESET
switch on the top of the power supply as shown in
Figure 5-2. [Probable Cause: A magnetic latch is
used to trans fer AC from the main to the reserve
power supply. A sufficiently hard bump in transit can
cause the magnet to drop to the reserve position.]
3. Visually observe each card in the CPP.
4. Check the Printer Output Report. n The printer
should begin to print the startup log immediately
upon power-up. This printout will require several
seconds to complete. Large systems may require
nearly a minute to complete the report.
Check the printed report for any failure or error
messages. If the individual consoles are not powered
at the time of startup, off-line/failure messages will be
printed for those consoles.
5. Plug in DC Appliqu’s.
To avoid acci dental electric shock while initially
working on the system, all LIC cards configured for
DC control are shipped with the DC appliqu’s
unplugged. Before placing the card in service, the
ribbon cable from the appliqu must be plugged into
P1 on the LIC card.
W A R N I N G
Wit h the DC appliqu ’s connected, as much as 200 volts
may be present in the LIC card and the RTL control
pairs. Use Extreme Caution!
The green and red LEDs should light as soon as
power is applied. Within a few secon ds, a ll re d LEDs
should be extinguished. Yellow LEDs will be lit on
any cards designated a hot-standbys.
If red LEDs are lit on any CPP cards after an
interval of 10 seconds, press the RESET button on
that card and wait for the red LED to extinguish.
If the red LED continues to be illuminated, contact E.F. Johnson Technical Support for assistance.
Check to see that all CPP cards are pro perly
seated and all plug-in relays are fully seated in their
sockets.
If all CPP cards have green LEDs i lluminated and
there are no red LEDs illuminated, it may initially be
assumed that the system is functioning properly.
6. Apply power to the Consoles. n Apply power to the
individual console positions using the rocker
switches on the front of each power supply.
Within 10 seconds of power-up, the console
should establish communications with the CPP.
The clock will display "????". n When console/
CPP communications are established, the clock will
display the time generated by the CSC real time
clock. Note particularly the seconds readout. If the
console is communicating properly with the CPP, the
seconds count will advance smoothly with no gaps or
delays.
As individual consoles are powered-up, the
printer will log a report for each control tray and module tray at the position.
February 1996
6-1
Part No. 004-3039-274
Page 48

EQUIPMENT CHECK-OUT AND ADJUSTMENTS
7. Observe the LEDs on the channel modules. On
module-based consoles, each channel module
should have either the yellow or green LED adjacent to the volume control on.
Touch the volume control ca p on individual channel modules. The LEDs should toggle smoothly
between yellow and green, with no delay as the cap is
touched.
In normal operation, auxiliary switch and paging
modules may show no indicati ons until the funct ion is
actually used. Think before you press buttons! You
could interfere with other operations or accidentally
set off pagers and sirens.
8. If at this point, the CPP and all console positions
appear to be performing n ormally , proceed ahead to
level setting and point by point testing.
NOTE: The system should be allowed to "burn-in"
for a minimum of 72 hours, befor e being placed int o
actual service, to allow any possible "infant mortality" problems to surface and be resolved.
6.2 CPP ADJUSTMENTS
The only level to be adjusted in the CPP is the Tx
Output from each Line Interface Controller. Rx levels are automatically adjusted under processor control. The initial Tx and Rx level settin gs are factory
adjusted and programmed in accordan ce with the data
furnished to E.F. Johnson at the time of order. Tx levels should be set using industry standard techniques
for 600W balanced line audio.
NOTES:
The receive input for each channel will be programmed for either 2 wire or 4 wire audio input in
accordance with the data furnished at the time of
order. The 2 wire receive audio path is disabled on
any channel specified by the customer as having a 4
wire interface.
All DC controlled channels are shipped with the DC
curren t gene rat or appliqu board disconnected to prevent accidental electric shock injury to the installer.
These appliqu s must be plugged in prior to testing
any DC controlled channels.
The Tx and Rx levels between the CPP and the
Console are fixed and cannot be adjusted. The nominal level is 0 dBm across 600W. If the console is
being operated through a Remote Interface Adapter
(RIA), level adjustment is automatically maintained
through ALC amplifiers.
6.3 CONSOLE ADJUSTMENTS
There are several control adjustments that can be
made to optimize the performance of the console.
These adjustments are located on the right side of the
control tray when viewed from the front of the console.
Panel Microphone
The sensitivity of the panel (or primary) microphone is adjusted by the MIC 1 control, R11. This
control should be adjusted to just below the knee of
compression for a typical operator speaking in a normal voice at the normal working distance from the
microphone. If set too high, the mobile units will
complain about excessive background noise and a
"barrel" quality to the dispatcher’s voice. This is
caused by excessive compres sor act io n on th e cont r o l
tray.
NOTE: The MIC 1 and MIC 2 controls are SENSITIVITY adjustments, not OUTPUT adjustments. The
audio level from the tray is fixed and cannot be
increased through the use of these controls.
Auxiliary Microphone
If the console is equipped with an Auxiliary (or
secondary) microphon e, suc h as a desk mic rophone at
an NCIC terminal, it’s sensitivity can be adjusted by
the MIC 2 control, R16. See the paragraph above for
details.
Headset Transmit
The transmit sensitivity of the headset li pmicrophone is adjusted by the HS control, R6. Note that
many amplified headsets have an internal compressor
as part of the headset mic circuitry. Be sure the console HS control is set just below the knee of compression to avoid double or constant compression.
February 1996
Part No. 004-3039-274
6-2
Page 49

EQUIPMENT CHECK-OUT AND ADJUSTMENTS
Headset Receive Limit
The receive audio sensitivity and the method of
handling audio over load v aries widel y among heads et
manufacturers. To avoid dispatcher complaints about
excessive receive background noise, use the following procedure to set the headset receive limit:
Inject a tone into the Rx port of an available LIC card
and Select the channel.
Turn the radio headset ja ck v o lu me control to its maximum (loudest) setting.
If the headset amplifier has a volume control and/or
volume switch, set them to maximum.
Locate the Headset Limit con trol (HS LIM) on
the Selected Audio spea ker amplifie r board. Turn
this control to its maximum setting. While listening to
the tone, slowly turn this control down until you hear
the output from the headset earpiece just begin to
decrease. Set the control slightly above this point
such that the headset is just into compression with its
volume controls at maximu m. The headset j ack rad io
volume control and any controls on the headset itself
can be used to adjust the volume to each operator’s
preference.
NOTE: The ENCDR control does not affect the output
of the internal keypad encoder on the control tray.
Paging tones are actually generated on the LIC card,
not in the control tray.
Telephone Ringer
If the console is equipped with the Integrated
Telephone Screen option, the internal telephone
ringer volume can be set by the S MIX control, R86.
6.4 ALIGN THE CRT TOUCHSCREEN WITH
THE PC COMPUTER
If your system is equipped with a touchscreen
option (TDV-OP492/xx), the touchscreen must be calibrated for th e specific monitor on which it is
installed. Before calibrating the touchscreen, adjust
the height, width and position of the CRT image.
1. Return to the Main Screen:
If you are at any other screen but the Main Screen,
Press "MAIN" to return to the Main Screen.
TELCO Level Adjustments
TDV-OP409 is an electronic interface which provides amplification and adjustments for the receive
level. Refer to the VR-CM50 Console Service Manual, Volume 1, CRT- Technical Manual Section , for
jumper configuration settings.
External Encoder
If the console is equipped wi th an ext ernal pa ging
encoder (such as ZETRON), the input sensitivity is
adjusted by the ENCDR control , R33. There is no signal compression in the external encoder audio path.
If the data furnished to E.F. JOHNSON at the time of
order did not specify the use of an external encoder,
the port on the tray will not be programmed to be
active.
2. Access the c:\> prompt:
Press CTRL + 5 using the "5" from the NUMERIC
KEYPAD.
c:\orba> will display.
Type cd\ (Enter)
c:\> will display.
3. Begin the Calibration Program:
At the c:\> prompt:
Type "sfcal" (Enter)
Follow the instructions on the screen:
6-3
February 1996
Part No. 004-3039-274
Page 50

EQUIPMENT CHECK-OUT AND ADJUSTMENTS
SCREEN 1
______________________________________________________________________________________
TOUCH THE UPPER LEFT POINT USING ONLY ONE FINGER
FINGER SHOULD BE PERPENDICULAR TO SCREEN
HOLD FINGER IN PLACE UNTIL YOU ARE INSTRUCTED TO REMOVE IT
Press ANY key to ABORT calibration
______________________________________________________________________________________
SCREEN 2
______________________________________________________________________________________
AFTER PRESSING UPPER LEFT, TOUCH THE LOWER RIGHT POINT USING
ONLY ONE FINGER
FINGER SHOULD BE PERPENDICULAR TO SCREEN
HOLD FINGER IN PLACE UNTIL YOU ARE INSTRUCTED TO REMOVE IT
Press ANY key to ABORT calibration
______________________________________________________________________________________
When the calibration is complete, the message
6.5 AFTER SYSTEM CHECK-OUT
SF CAL Written, Calibration updated on Installed
SFKERN Driver , will be displayed.
At this point, the E.F. Johnson CRT Console system
installation and checkout has been completed. If you
c:\> prompt will display:
have any questions or problems, contact Technical Support, 1-800-328-3911. Be sure to complete and mail the
4. Initiali ze the CRT Console:
warranty cards for other manufacturer’s equipment, such
as the CRT monitor, printer, modem, etc. These can be
Reboot the system by pressing t he RESET button on
the computer.
found at the back of the VR-CM50 Console Service Man-
ual, Volume 2.
The Main Screen will then be displayed.
NOTE: if the Main Screen does not appear, check
the AUTOEXE.BAT file and make sure the drivers
are in stall ed. If t hey are not, cal l for tech nic al hel p
if you do not know how to install them.
February 1996
Part No. 004-3039-274
6-4
 Loading...