

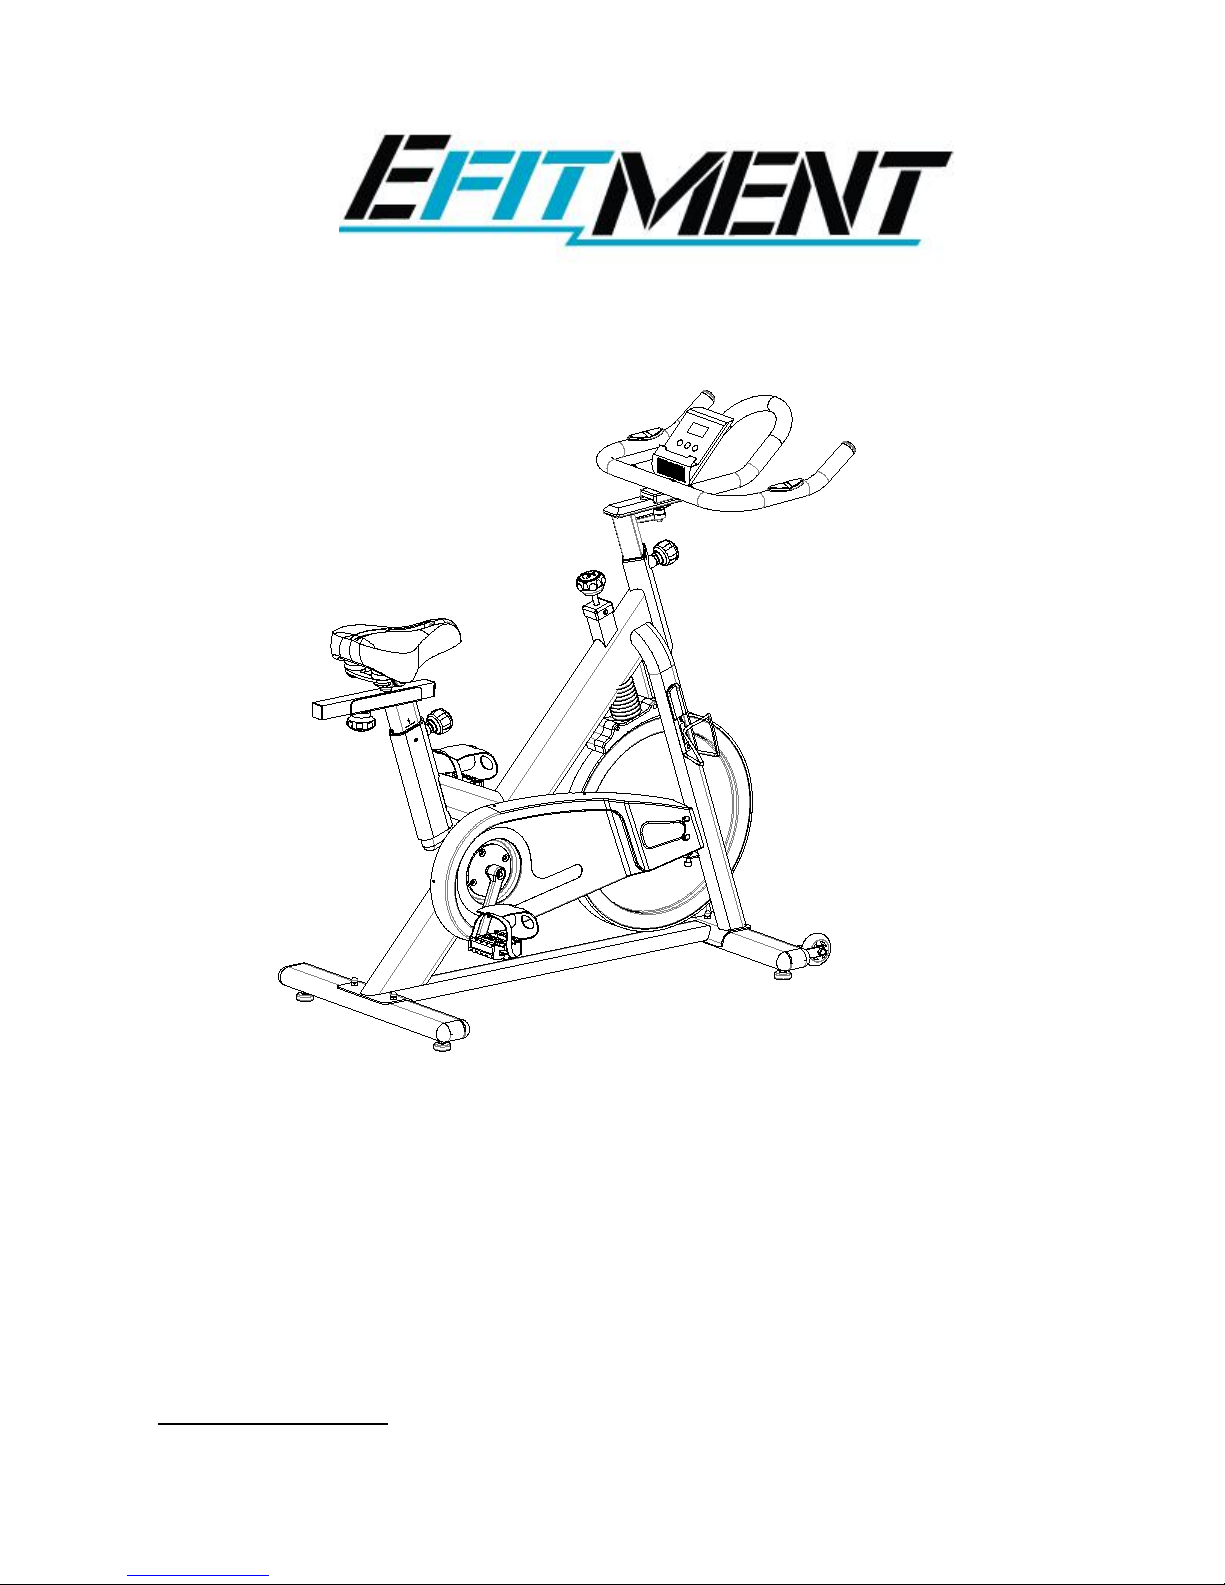
IC031
Magnetic Belt Drive Performance Indoor Cycle Bike
USER MANUAL
IMPORTANT: Read all instructions carefully before using this product. Retain
owner’s manual for future reference. For customer service, please contact:
service@zoovaa.com

1
IMPORTANT SAFETY INFORMATION
Please read these instructions very carefully before using this item.
Note the following precautions before assembling or operating the equipment.
1. Keep children and pets away from the equipment at all times. Do not leave unattended
children in the same room with the equipment.
2. This equipment is not suitable for therapeutic use.
3. If the user experiences dizziness, nausea, chest pain, or any other abnormal symptoms,
stop the workout at once. Consult a physician immediately.
4. Before beginning training, remove all objects 2 feet from the equipment. Do not place
any sharp objects around the equipment.
5. Position the equipment on a clear, level surface away from water and moisture. Place a
mat under the equipment to help keep the equipment stable and to protect the floor. For
indoor use only.
6. Use the equipment only for its intended use as described in this manual. Do not use any
other accessories not recommended by the manufacturer.
7. Assemble the equipment exactly as the descriptions in this manual.
8. Check all bolts and other connections before using the equipment for the first time and
ensure that the equipment is in the safe condition.
9. Perform a routine inspection of the equipment. Pay special attention to components
which are the most susceptible to wear, such as connecting points and wheels. The
defective components should be replaced immediately. The safety level of this equipment
can only be maintained by doing so properly.
10. Never operate the equipment if it is not functioning properly.
11. This equipment can be used by one person at a time.
12. Do not use abrasive cleaning articles to clean the equipment. Remove drops of sweat
from the equipment immediately after finishing training.
13. Always wear appropriate workout clothing when exercising. Wear athletic shoes. Do not
wear loose clothing that could get caught in the equipment.
14. This equipment is for home use only. It is not intended for commercial use.
15. Maximum user weight is 275 lbs.
Warning: Before beginning this or any exercise program, consult your physician first. This is
especially important for individuals with pre-existing health problems. Read all instructions
before using the equipment.
WARNING: This product can expose you to one or more chemicals known to the State
of California to cause cancer and birth defects or reproductive harm.
For more information go to www.P65Warnings.ca.gov.
2
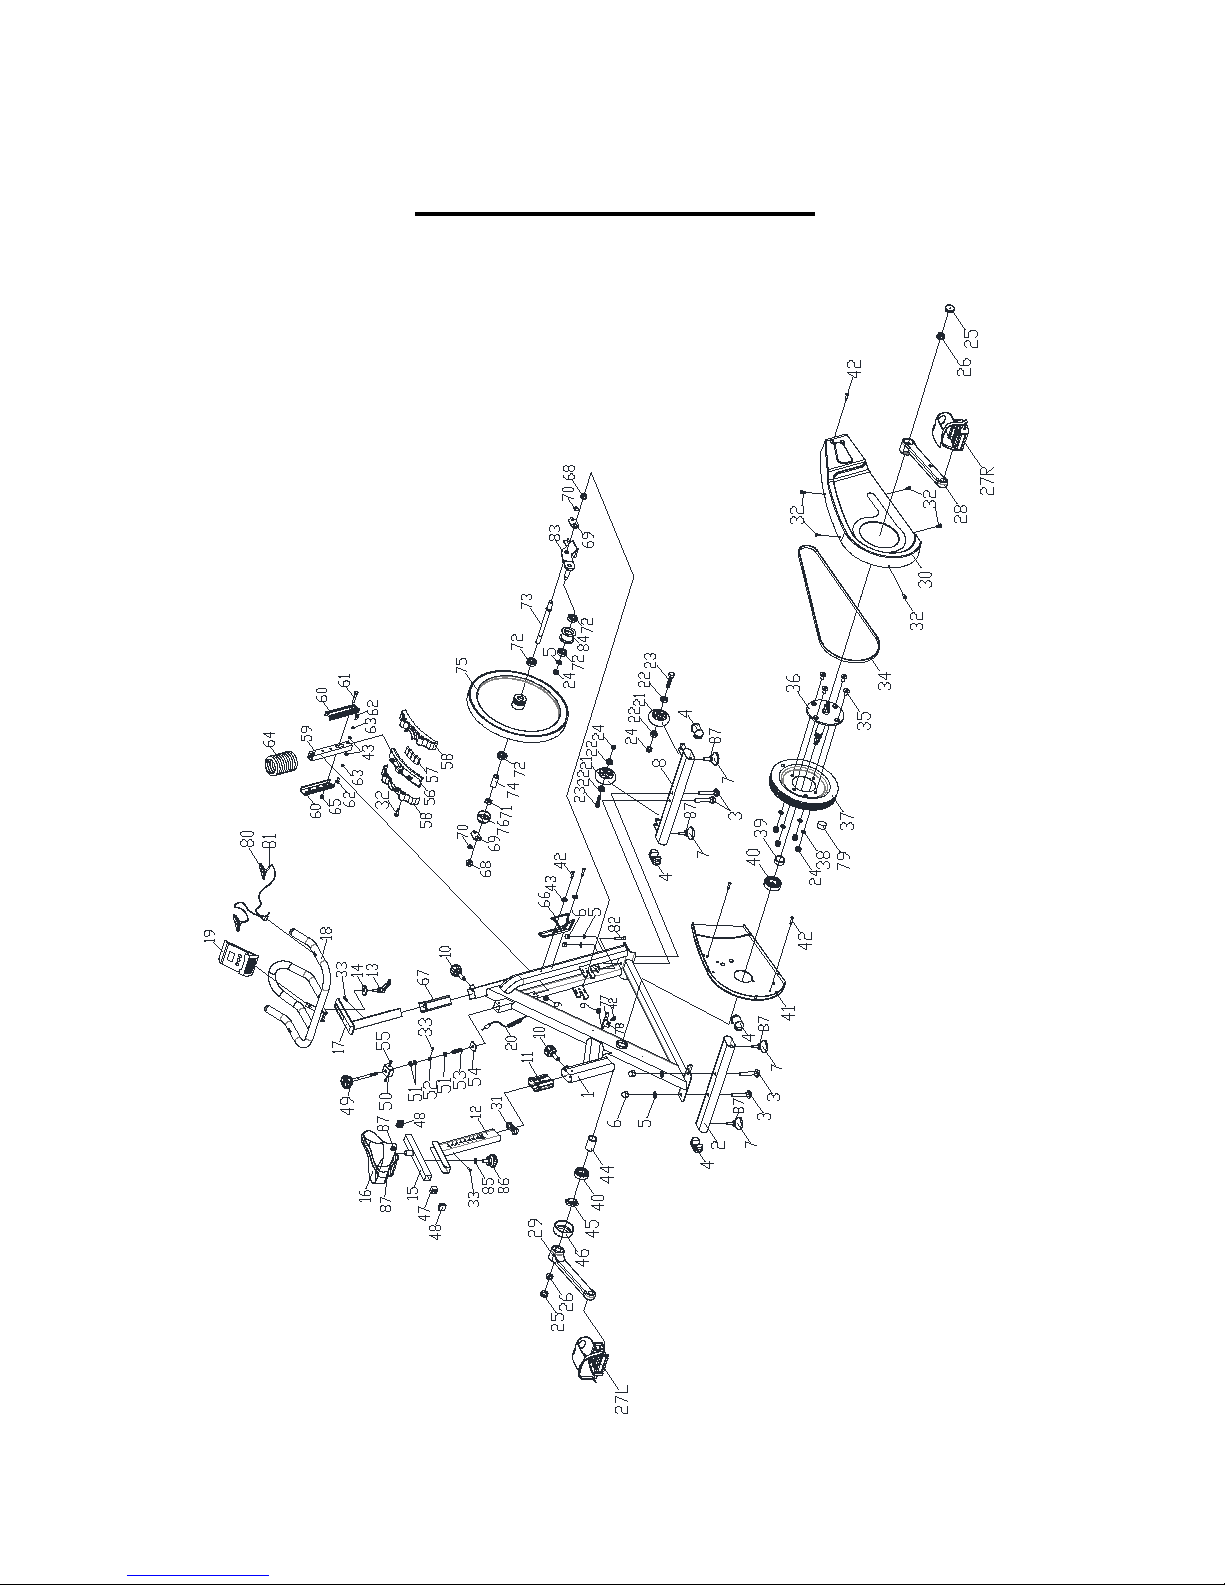
EXPLODED DRAWING

3
PARTS LIST
4
5
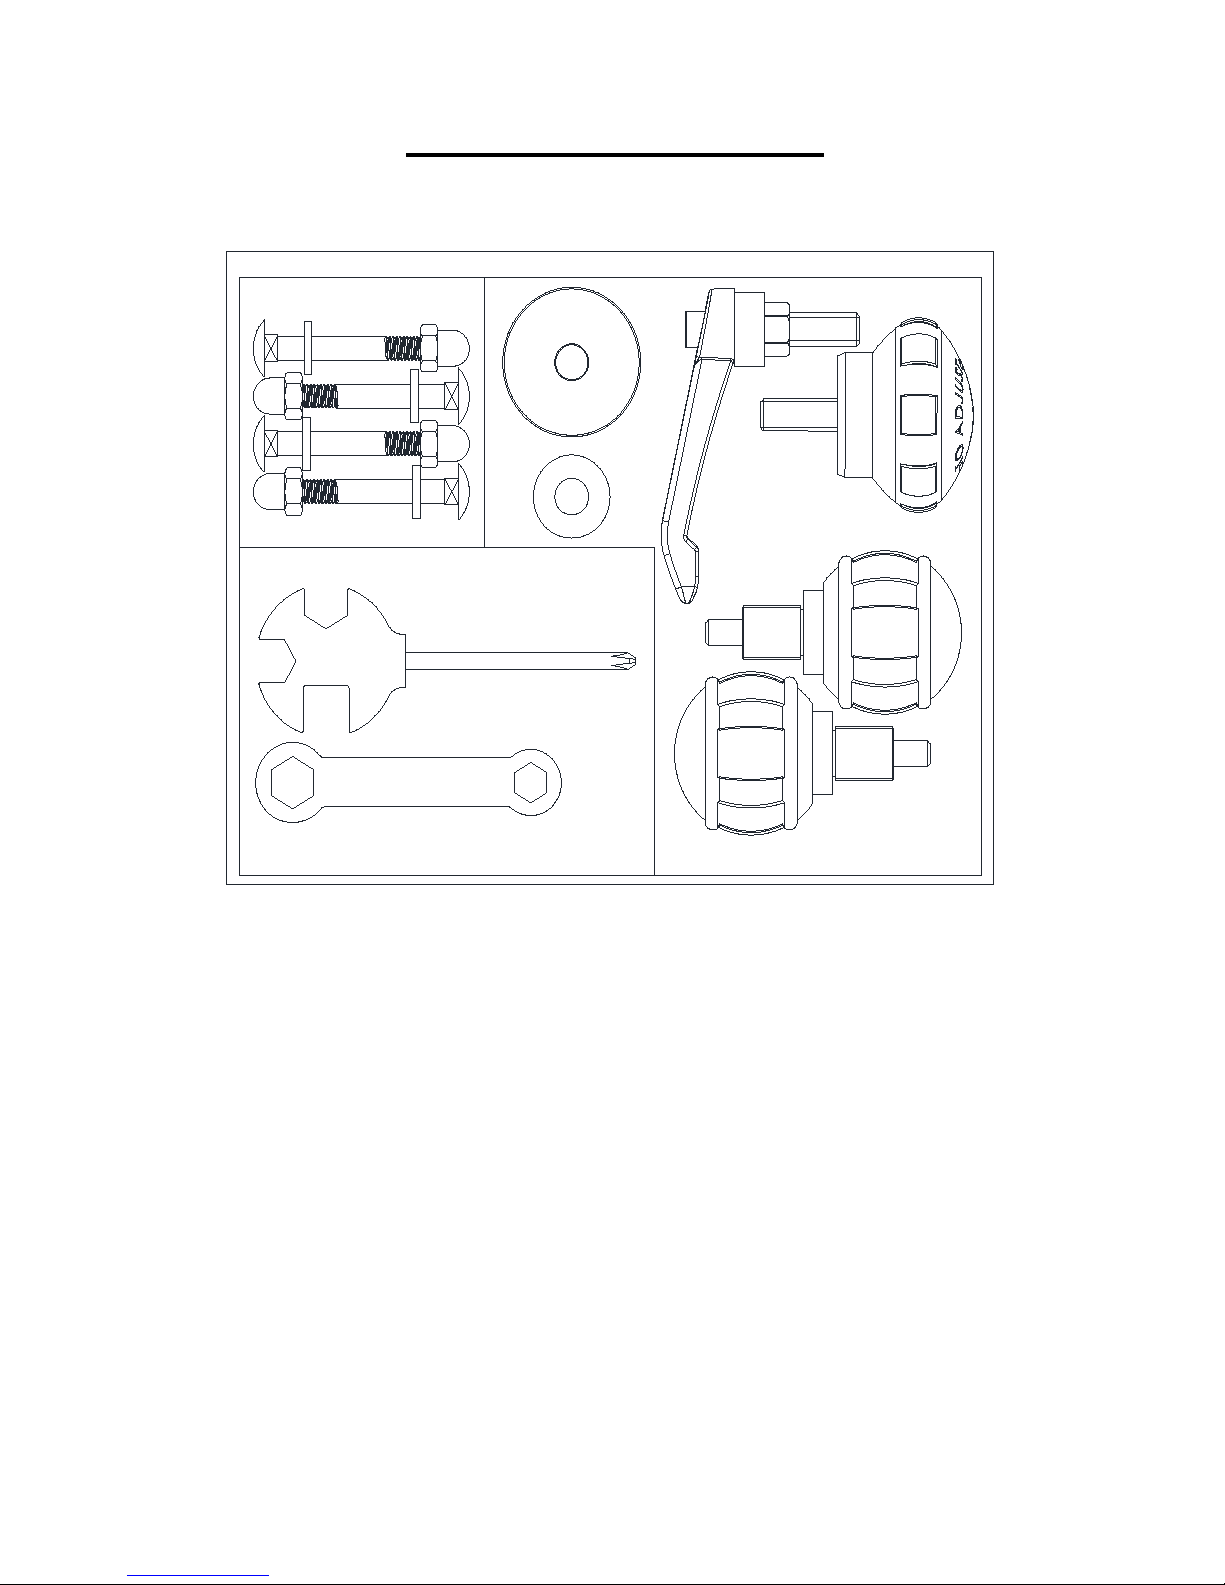
HARDWARE PACKAGE
Tools & Accessories for Bike
NO.3 NO.5 NO.6
Spanner
Crosshead spanner
NO.14
NO.13
NO.85
NO.86
NO.10
NO.10
(P1120)

6
ASSEMBLY INSTRUCTIONS
PREPARATION
A. Before assembly, make sure that you will have enough space around the item and you
have all the parts.
B. We recommend having 2 people to do the assembly.
ASSEMBLY INSTRUCTIONS:
STEP 1:
Attach the Front Stabilizer (No.8) and the Rear Stabilizer (No.2) to the Main Frame (No.1)
using 4 Flat Washers (No.5), 4 Domed Nuts (No.6) and 4 Carriage Bolts (No.3). Tighten
with spanner.

7
STEP 2:
Insert the Vertical Seat Post (No.12) into the Main Frame (No.1) and set at desired height.
Insert and tighten the Adjustment Knob (No.10).
Attach the Seat Slider (No.15) to the Vertical Seat Post (No.12) using the Adjustment
Knob (No.86) and the Flat Washer (No.85).
Unscrew Hexagonal Nut (No.87). Attach the Seat (No.16) to the Seat Slider (No.15).
Tighten Hexagonal Nut (No.87) with crosshead spanner.

8
STEP 3:
Insert the Handlebar Post (No.17) into the Main Frame (No.1). Set at desired height, then
insert and tighten the Adjustment Knob (No.10).
Attach the Handlebar (No.18) to the Handlebar Post (No.17) using the Adjustment Knob
(No.13) and the Flat Washer (No.14). NOTE: Make sure the Adjustment Knob (No.13) is
tightened.
Fix the Computer (No.19) to the Handlebar (No.18). Then plug the Sensor Wire (No.20)
and the Pulse Sensing Line (No.81) into the holes on the back of the Computer (No.19).

9
STEP 4:
Note: The Pedals (No.27L & No.27R) are marked "L" and "R" for Left and Right. Make
sure you attach the correct pedal to the corresponding crank. Attaching the pedal to the
wrong crank could irreversibly damage both the pedal and the crank.
Attach Left Pedal (No.27L) to Left Crank (No.29). Turn counterclockwise to tighten.
Attach Right Pedal (No.27R) to Right Crank (No.28). Turn clockwise to tighten.
Unscrew 2 Screws (No.42) and 2 Flat Washers (No.43) from the Main Frame (No.1). Fix
the Bottle Holder (No.66) to the Main Frame (No.1) using the 2 Screws (No.42) and 2
Flat Washers (No.43) you just removed. Tighten with crosshead spanner.
Assembly is complete!

10
TENSION ADJUSTMENT
A. Adjusting the Tension:
Increasing or decreasing the tension
allows you to add variety to your
workout sessions.
To increase the tension, rotate the
Brake Knob (No.49) clockwise.
To decrease the tension, turn the
Brake Knob (No.49)
counter-clockwise.
B. Emergency Brake Function:
The Brake Knob (No.49) is also the
emergency brake. Use this safety
feature in any situation when you would
need to get off the bike or stop the
bike’s flywheel.
During exercise, press down the Brake
Knob (No.49) to stop the bike
immediately.

11
SEAT AND HANDLEBAR ADJUSTMENT
The seat of this bike is fully adjustable as it moves Up, Down, Forward, Backward.
A. To adjust the height of the Vertical Seat Post (No.12), loosen and pull on the
Adjustment Knob (No.10), then raise or lower the seat to the desired height. Once
adjusted, re-insert and tighten the Adjustment Knob (No.10) to secure the seat in place.
B. To adjust the seat forward and backward, loosen and pull on Adjustment Knob
(No.86), then slide the Seat Slider (No.15) to the desired position. Once positioned,
re-insert and tighten the Adjustment Knob (No.86) to secure the Seat Slider (No.15) in
place.
C. To adjust the height of handlebar, loosen the Adjustment Knob (No.10), then slide the
Handlebar Post (No.17) up or down to the desired height. Once adjusted, re-insert and
tighten the Adjustment Knob (No.10) to secure the Handlebar Post (No.17) in place.
D. To adjust the handlebar forward or backward, loosen the Adjustment Knob (No.13) in
counterclockwise direction, then slide the Handlebar (No.18) to the desired position.
Once positioned, re-insert and tighten the Adjustment Knob (No.13) to secure the
Handlebar (No.18) in place.

12
BALANCE ADJUSTMENT
To achieve a smooth and comfortable experience, you must ensure that the bike is
stable. During use, if you notice that the bike is unbalanced, you can adjust the Base
Levelers (No.7) located beneath the Front and Rear Stabilizers (No.2 and 8).
To adjust, use the crosshead spanner to loosen the Hexagonal Nut (No.87) by turning it
clockwise. With the nut loosened, rotate the Base Leveler (No.7) until it sits level with
the surface that the bike is on.
When you have finished adjusting the Base Levelers (No.7), re-tighten the Hexagonal
Nut (No.87) by turning it counter-clockwise using crosshead spanner. If needed, repeat
this process to adjust the remaining Base Levelers (No.7).

13
BELT TENSION ADJUSTMENT
If you feel slippage when pedaling, the belt may need to be tightened. This may happen
after a long period of use.
To tighten the belt, loosen Hexagonal Nut (No.87) counter clockwise, turn Bolt (No.82)
clockwise to tighten, then tighten Hexagonal Nut (No.87) clockwise.
Try turning the crank to see if the belt runs smoothly. You can also try riding the bike to test
the belt tension.
If tension still needs to be adjusted, repeat this step until belt is at correct tension.

14
HOW TO MOVE THE BIKE
Firmly grasp and hold each side of the Handlebar (No.18). Place one foot on the
front base and tilt the bike towards you until the transport wheels on the front
base touch the ground. With the wheels on the ground, you can transport the
bike to the desired location with ease.

15
COMPUTER INSTRUCTIONS
KEY FUNCTIONS:
MODE: Press to select a function.
SET: Press to preset value for TIME, DISTANCE, CALORIES.
CLEAR (RESET): Press to clear the value.
HOW TO USE:
The computer can either:
(1) count the values for this workout session
(2) countdown from a preset value for TIME, DISTANCE, CALORIES)
To turn on the computer, start pedaling or press any key.
The computer has these functions:
SCAN, TIME, SPEED, DISTANCE, CALORIES, ODOMETER, PULSE
When the meter turns on, SCAN and TIME will appear. When SCAN appears, the display will
repeatedly rotate through all the functions for about 6 seconds each.
If you do not want to SCAN, press MODE. SCAN will disappear and the computer will display
TIME until you press the MODE key to go to the next function. Press MODE until screen
displays the function you want to view.
(1) Start pedaling and computer will count TIME, SPEED, DISTANCE and CALORIES.
(2) COUNTDOWN FUNCTION
You can preset values to countdown TIME, CALORIES or DISTANCE. Press MODE until the
function you want is displayed. Make sure computer is not in SCAN. Press SET to increase
the value to the number you want to preset. If you need to clear the value, press RESET.
Start pedaling and the computer will countdown. When the value reaches zero, the computer
will beep and start to count up again.
ODOMETER accumulates the total distance of your workouts since batteries are installed in
the computer.
PULSE: Press MODE button until PULSE appears. To measure your pulse rate, place the
palms of your hands on both the pulse sensors. The monitor will show your current heart
rate in beats per minute (BPM) after 6~7 seconds.
Note: During the first few seconds, the value will be higher than the actual value. The

16
RESET: To reset values to zero, press and hold the MODE key for 3 seconds. This does
not reset ODOMETER.If you change the batteries, all values will reset to 0, including
ODOMETER.
BATTERY: The computer uses 2 AAA batteries, which are included. If there is a problem
with the display, try changing the batteries first. When changing the batteries, change
both of them. Do not mix old and new batteries. Do not mix battery types. Dispose old
batteries according to your regional guidelines.
SPECIFICATIONS:
FUNCTION
SCAN
Every 6 seconds
TIME
0:00’~99:59’
SPEED
0.0~999.9 MILE/H
DISTANCE
0.00~999.9 MILE
CALORIES
0.0~999.9 CAL
ODOMETER
0.0 ~ 9999 MILE
PULSE RATE
40~240 BPM
BATTERY TYPE
2pcs of SIZE –AAA or UM –4
OPERATING TEMPERATURE
0°C ~ +40°C (32℉~104℉)
STORAGE TEMPERATURE
-10°C ~ +60°C (14℉~140℉)
Version 1.1

17
 Loading...