

Page 1
B027 FOLDING DESK EXERCISE BIKE
USER MANUAL
IMPORTANT! Read all instructions carefully before using this product. Save this user manual for
future reference. For customer service, contact: [email protected]
Page 2

1
IMPORTANT SAFETY NOTICE
Note the following precaution before assembling and operating the machine.
1. Assemble the machine exactly as described in the instruction manual.
2. Check all the bolts, nuts and other connections before using the machine for the first time to
ensure the machine is in the safe condition.
3. Set up the machine in a dry level place and keep it away from moisture and water.
4. Place a suitable base (e.g. rubber mat, wooden board etc.) beneath the machine in the area of
assembly to avoid dirt.
5. Before beginning exercise, remove all objects within a radius of 4 feet from the machine.
6. Do not use aggressive cleaning articles to clean the machine. Only use the supplied tools or
suitable tools of your own to assemble the machine or repair any parts of machine. Remove drops
of sweat from the machine immediately after finishing training.
7. Your health can be affected by incorrect or excessive training. Consult a doctor before beginning
the training program. This machine is not suitable for therapeutic purpose.
8. Only use the bike when it is working correctly. Use only original spare parts for any necessary
repairs.
9. This machine can be used by one person at a time.
10. Wear training clothes and shoes that are suitable for fitness training with the machine. Do not
wear clothing that could get tangled in the machine.
11. If you have a feeling of dizziness, sickness or other abnormal symptoms, please stop training
and consult a doctor immediately.
12. This bike is intended for adult use only. Keep children away from the bike.
13. Do not put fingers or objects in the moving parts of the machine.
14. Maximum user’s weight is 220LBS.
15. This machine is not intended for commercial use.
CAUTION: Your bike was not designed for reverse pedaling. Reverse pedaling will damage the
bike.
WARNING
: This product can expose you to one or more chemicals known to
the State of California to cause cancer and birth defects or reproductive harm.
For more information go to www.P65Warnings.ca.gov.
Page 3
2
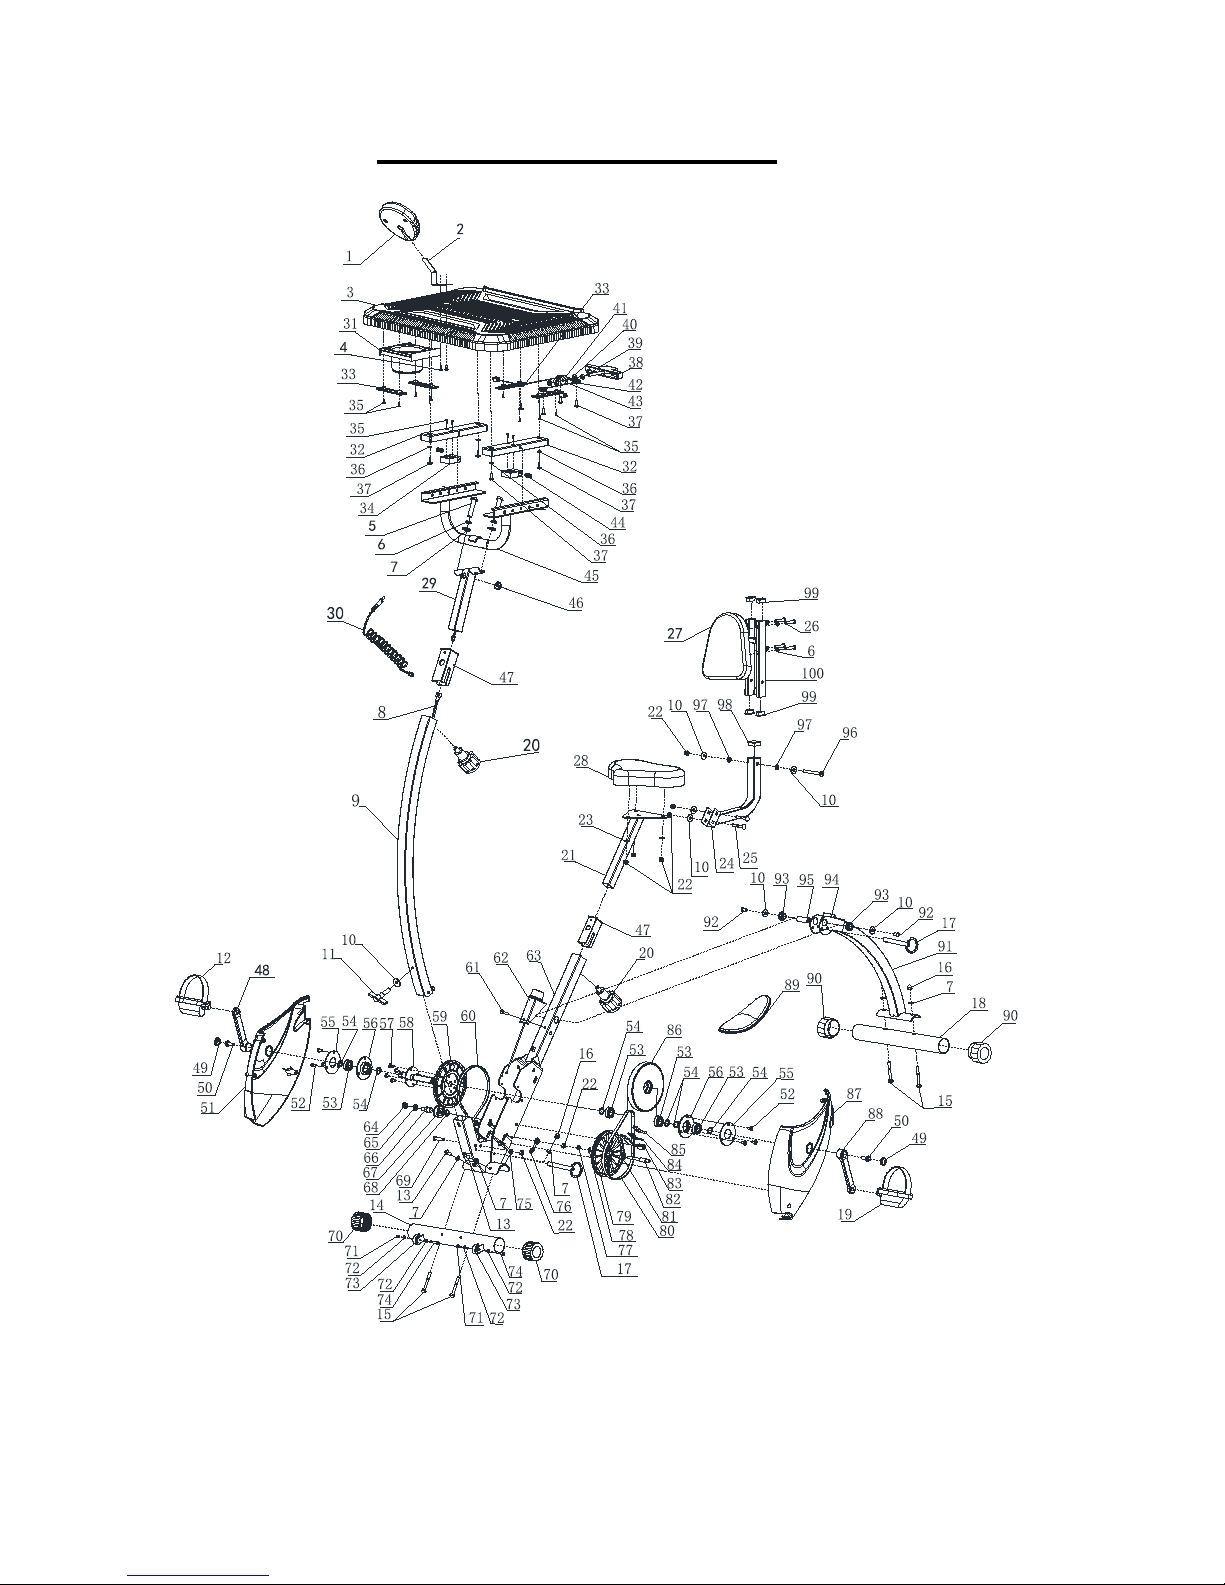
EXPLODED DRAWING
Page 4
3
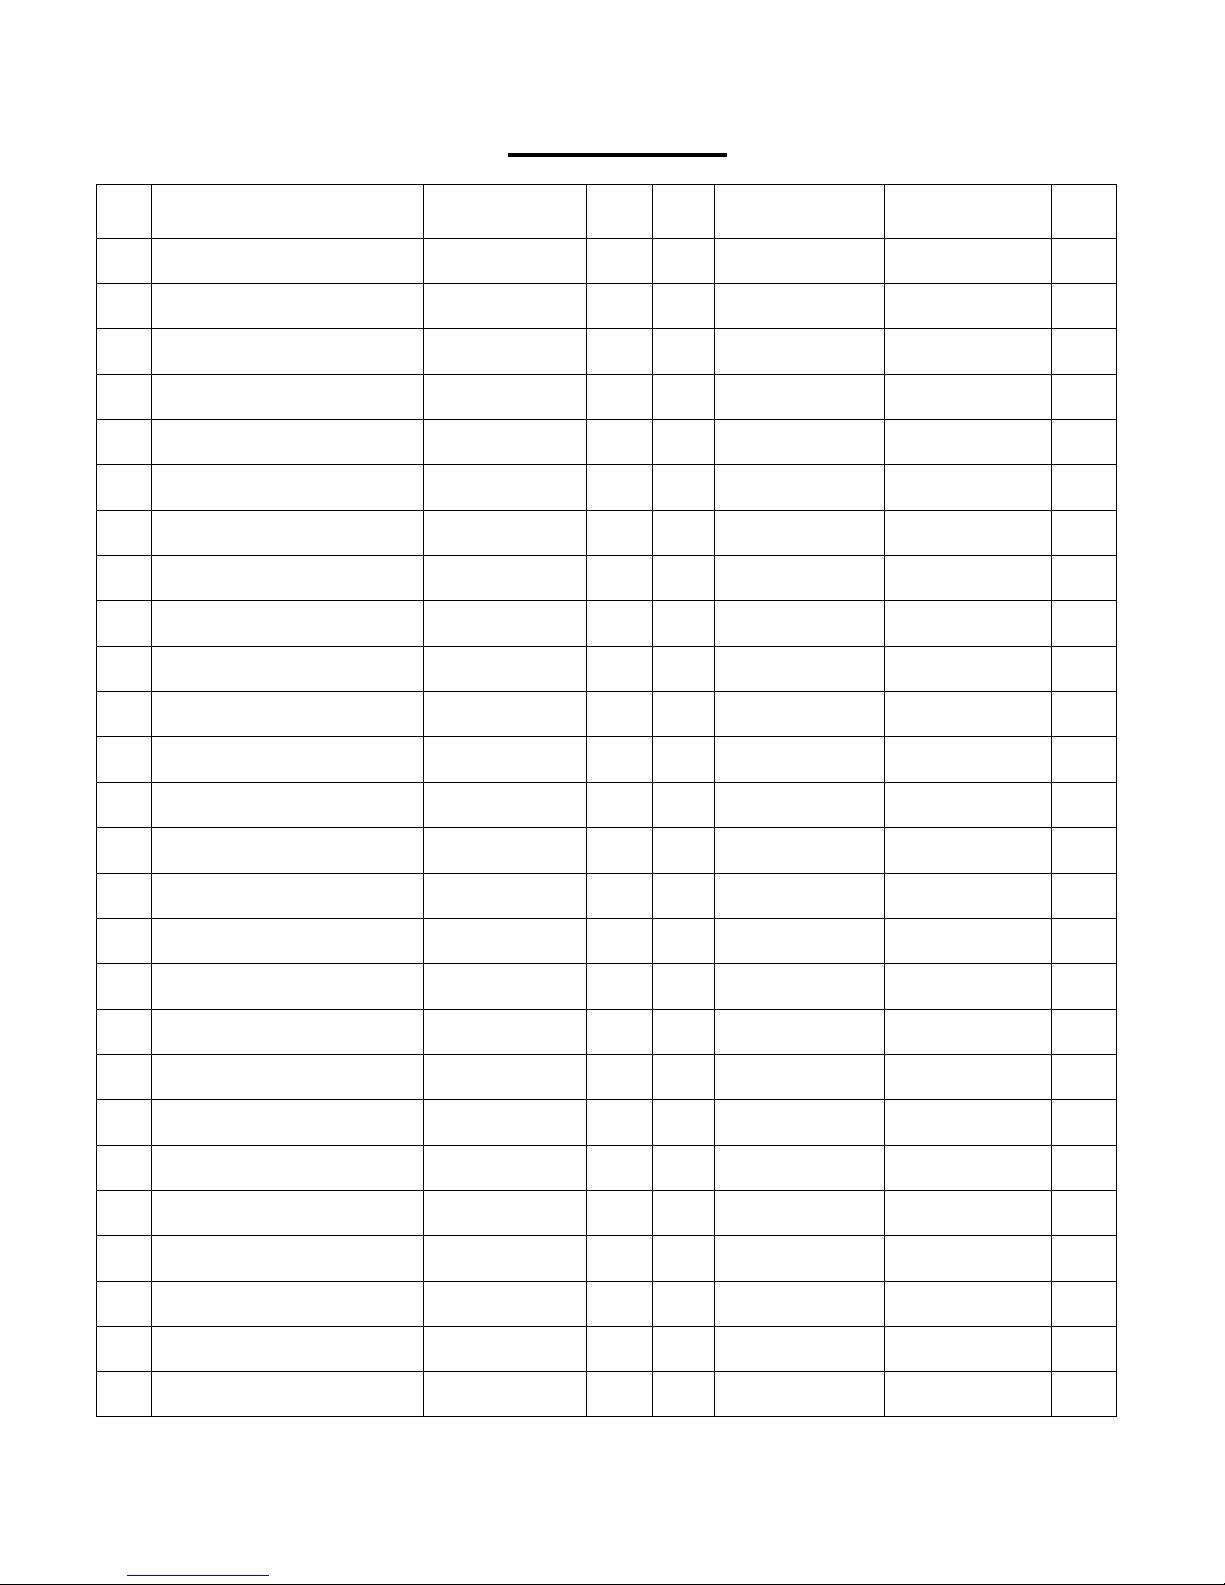
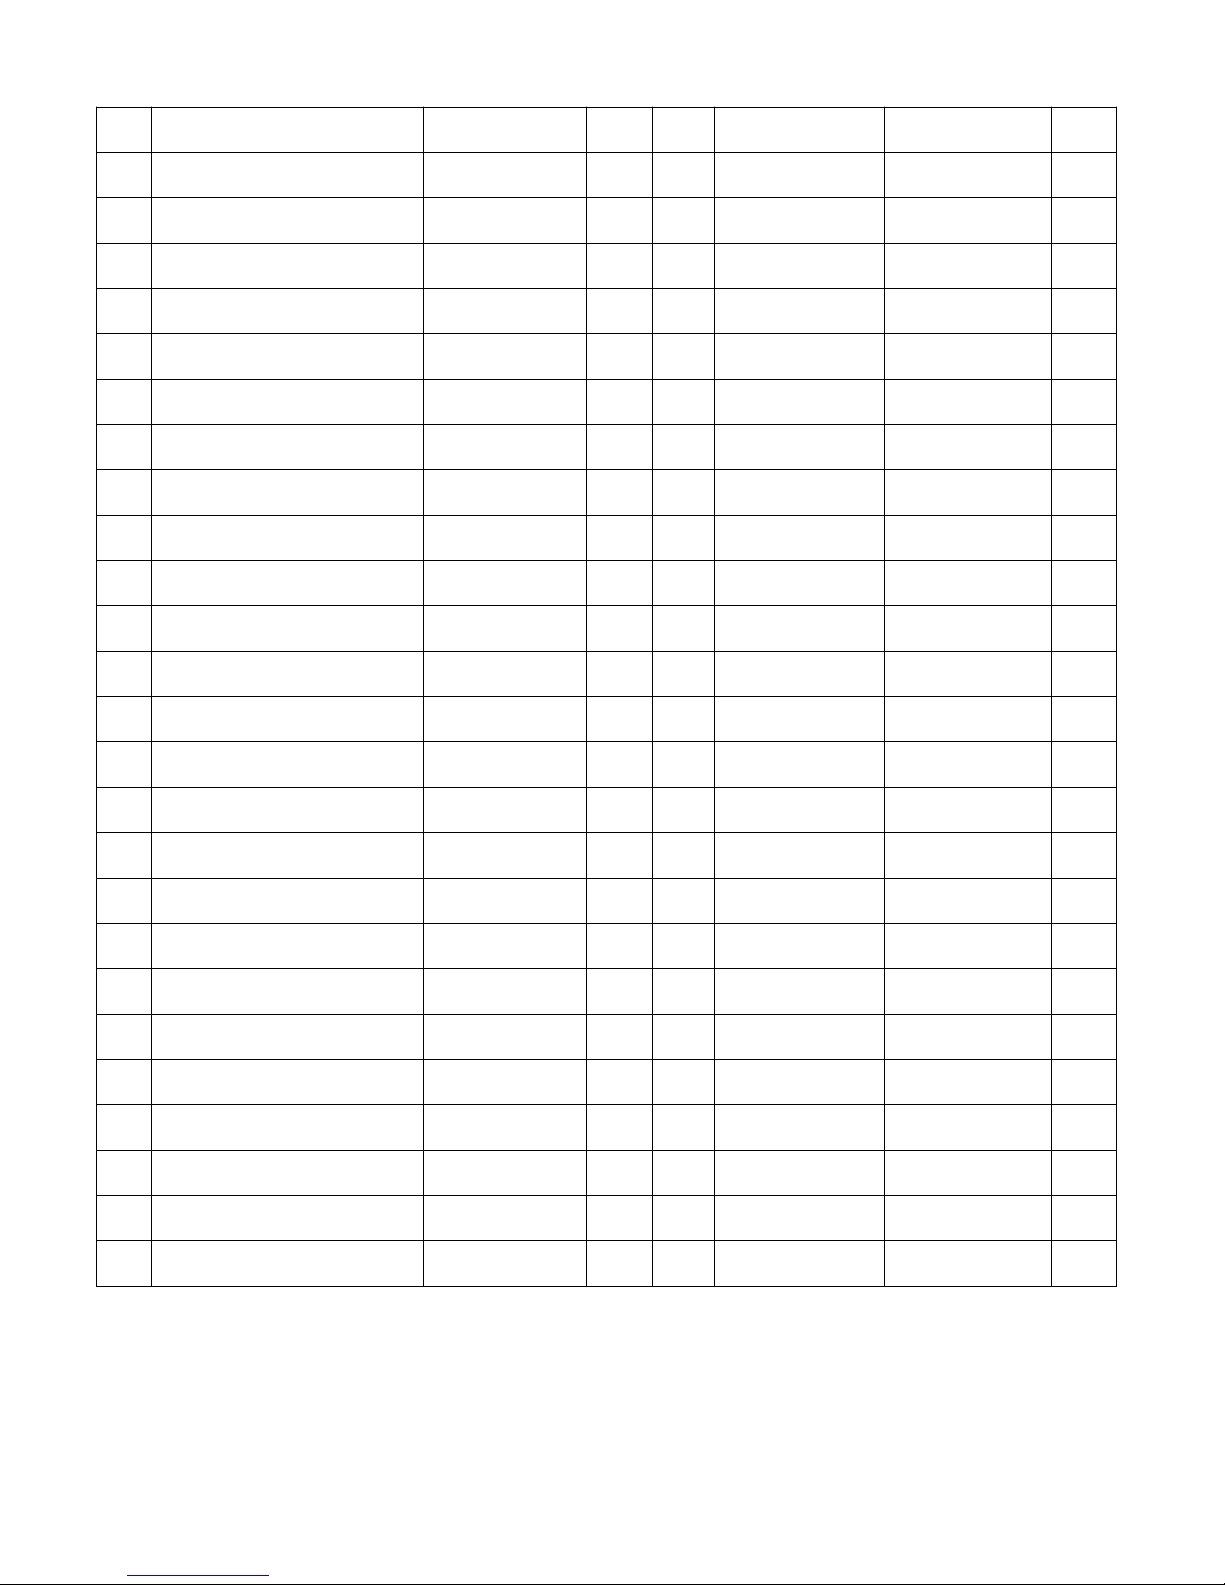
PARTS LIST
NO.
DESCRIPTION
SPECIFICATION
QTY
NO.
DESCRIPTION
SPECIFICATION
QTY
1
Meter
127Back Cushion
1
2
Meter Holder
128Saddle
1
3
Desk
129Desk Post
1
4
Screw
ST4*12
230Upper Signa Wire
1
5
Bolt
M8*35
231Cup Holder
1
6
Washer
ø14*ø8.2*2
632Inner Slide Rail
2
7
Curved Washer
ø20Xø8.5XT1.5
833Fixed Plate
4
8
Lower Signal Wire
134Base
2
9
Main Frame
135Screw
ST3*10
12
10
Flat Washer
ø25*ø8.5*2
736Flat Washer
Ø16*ø5.2*T1.0
4
11
Cross Shaped Knob
137Screw
ST4*12
10
12
Right Pedal
138Button
119.7*35.5*16.5
1
13
Bolt
M8*20
239Nut
M6
2
14
Front Stabilizer
140Washer
2
15
Carriage Bolt
M8*65
441Fixed Block
Ø20*8
1
16
Nut
M8
442Reel
4
17
Pull Pin
243Steel Cable
2
18
Rear Stabilizer
144Spring
2
19
Left Pedal
145Handle Bar Base
1
20
Adjustable Knob
M16*1.5
246Plug
1
21
Saddle Post
147Bushing
2
22
Nut
M8
848Right Crank
1
23
Flat Washer
ø20Xø8.2XT1.5
349Crank Cover
2
24
Seat Bracket
150Screw
M8*25
2
25
Carriage Bolt
M8*50
251Right Cover
1
26
Bolt
M8*45
452Screw
B03-M6*10
6
Page 5
4
53
Bearing
6003Z
479Belt Pulley
1
54
Clamp Spring
680Belt
1
55
Big Washer
281Bearing
608RS
2
56
Bearing Block
282Axis Of Pulley
1
57
Screw
M6*12
483Magnet Frame
1
58
Crank Shaft
184Magnet Frame
1
59
Belt Pulley
185Magnet
4
60
Belt
186Flywheel
1
61
Screw
187Left Cover
1
62
Tension Knob
188Left Crank
1
63
Post
189Decorate Cover
1
64
Nut
M10*1.5
190End Cap
2
65
Washer
ø24*ø12.3*T1.5
191Rear Support
1
66
Axis
ø17*35.5
192Screw
M8*15
2
67
Wheel
ø38.1*15.8
193Spacer
2
68
Jump Ring
194Pad
1
69
Screw
M8*55
195Axle
ø16*50.5
1
70
End Cap
196Screw
M8X75
1
71
Grip Nut
M5
297Plastic Spacer
¢20*¢8.5*2.5
2
72
Flat Washer
ø10*ø5.5*1.0
498Pipe Plug
1
73
Transport Wheel
ø30*ø5.5*16
299Pipe Plug
4
74
Screw
M5*30
2
100
Backrest Bracket
1
75
Flat Washer
Ø16*ø8.5*1.5
1
101
Spanner
13*15
1
76
Screw
M6
2
102
Allen Wrench
5
1
77
Hex Nut
M6
1
78
Jump Ring
1
Page 6
5
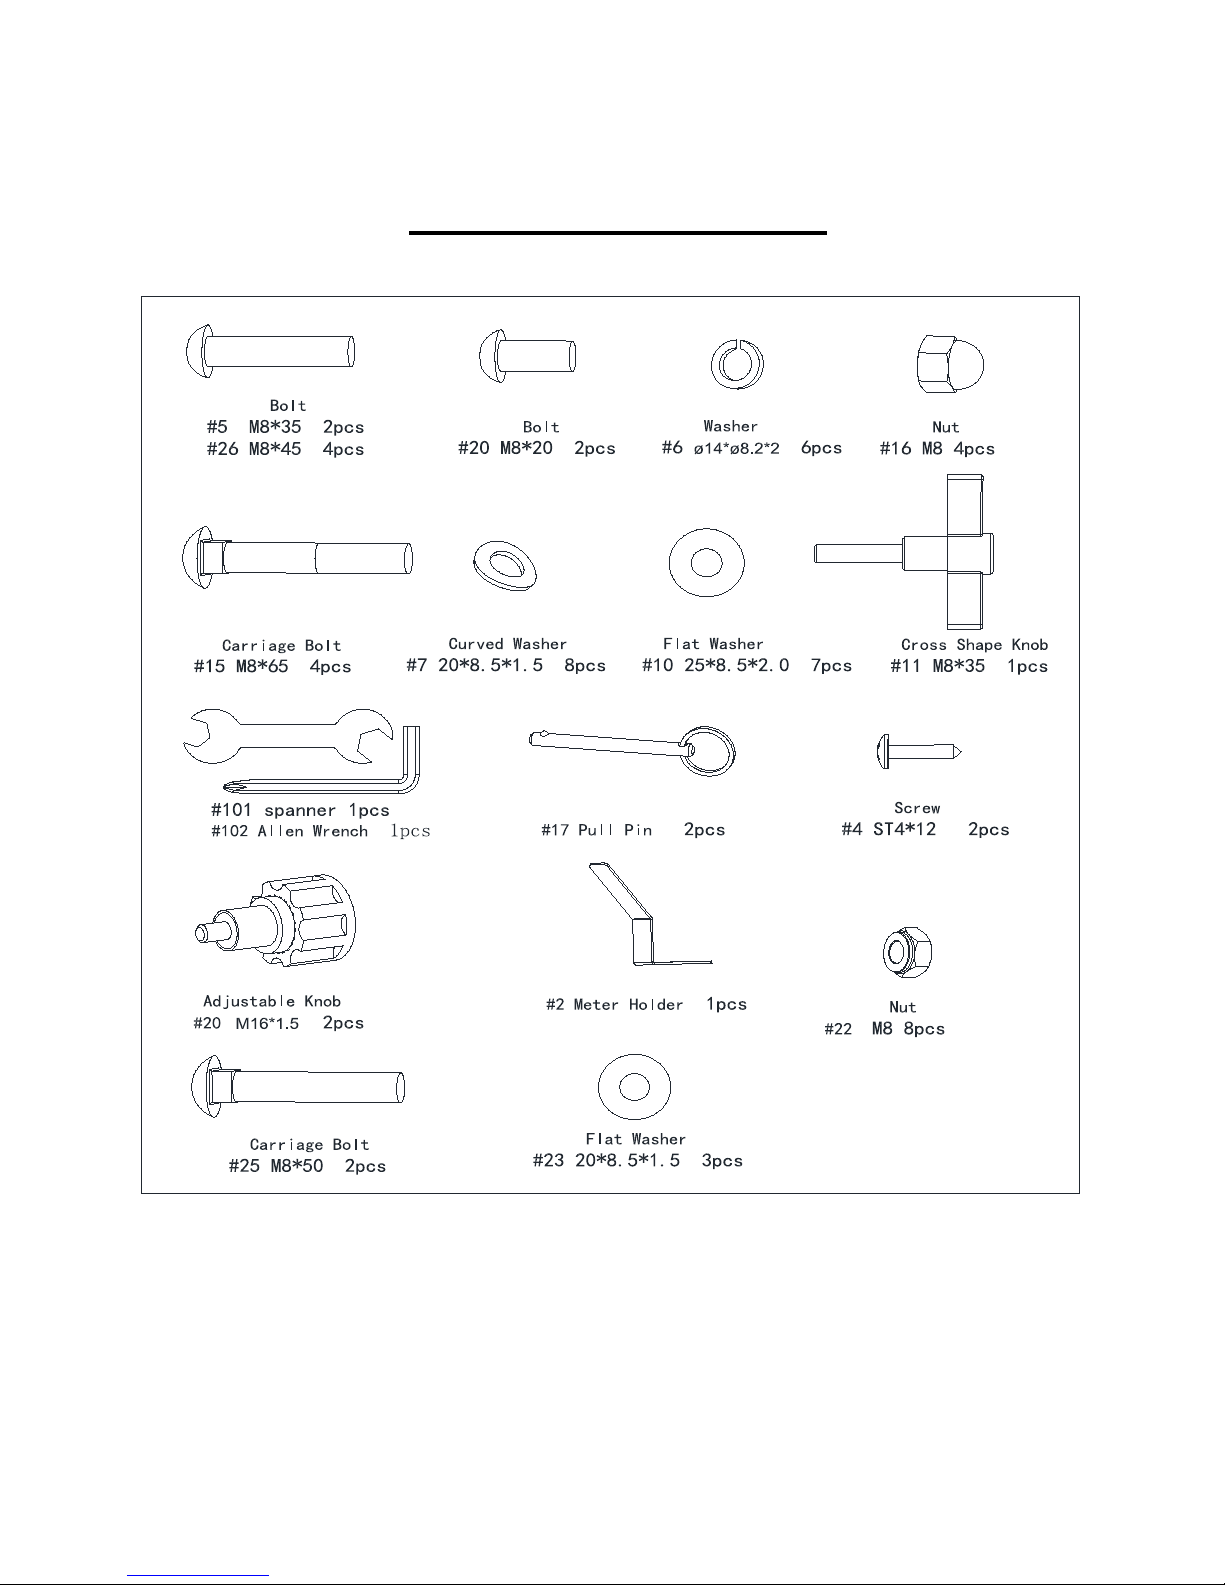
HARDWARE PACKAGE
Page 7
6
ASSEMBLY INSTRUCTION
STEP 1
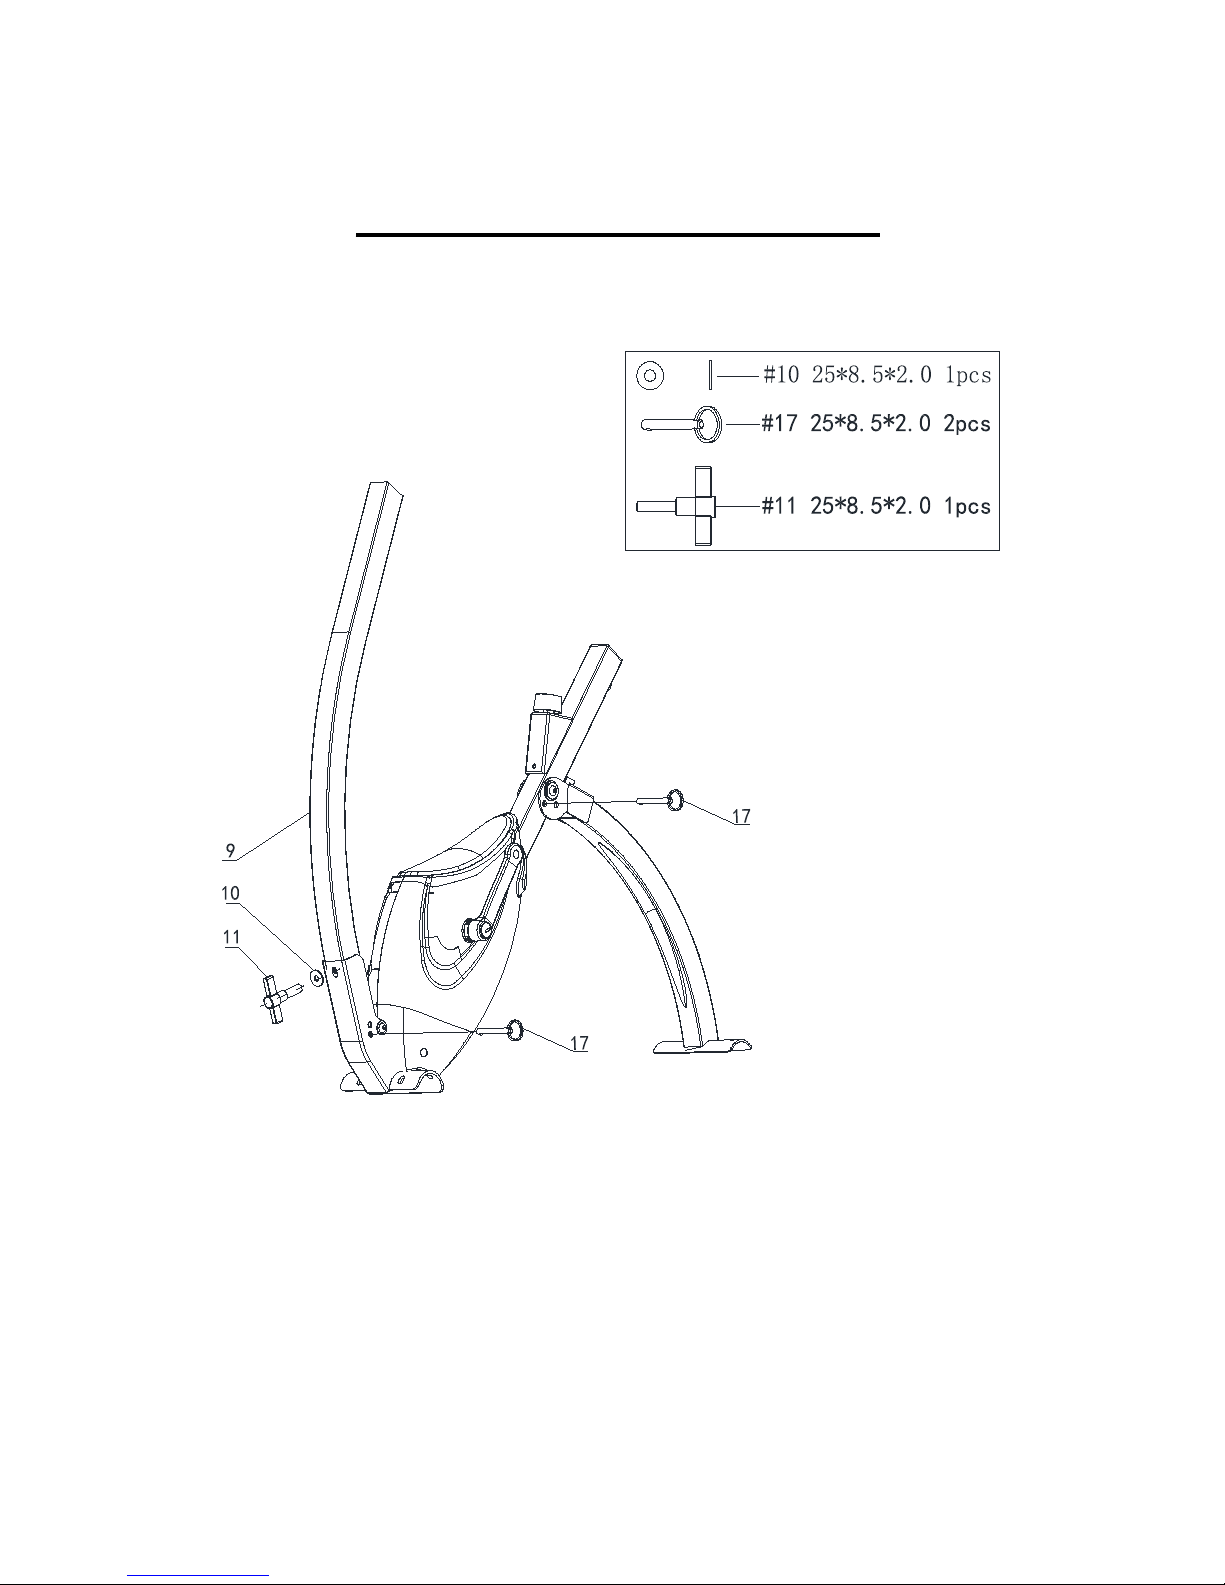
Take out the Main Frame (No.9) from carton, then insert the Pull Pin (No.17) into the hole as
shown above. Using 1 Flat Washer (No.10) and 1 Cross Shaped Knob (No.11), tighten the post
for Main Frame (No.9).
Page 8
7
STEP 2
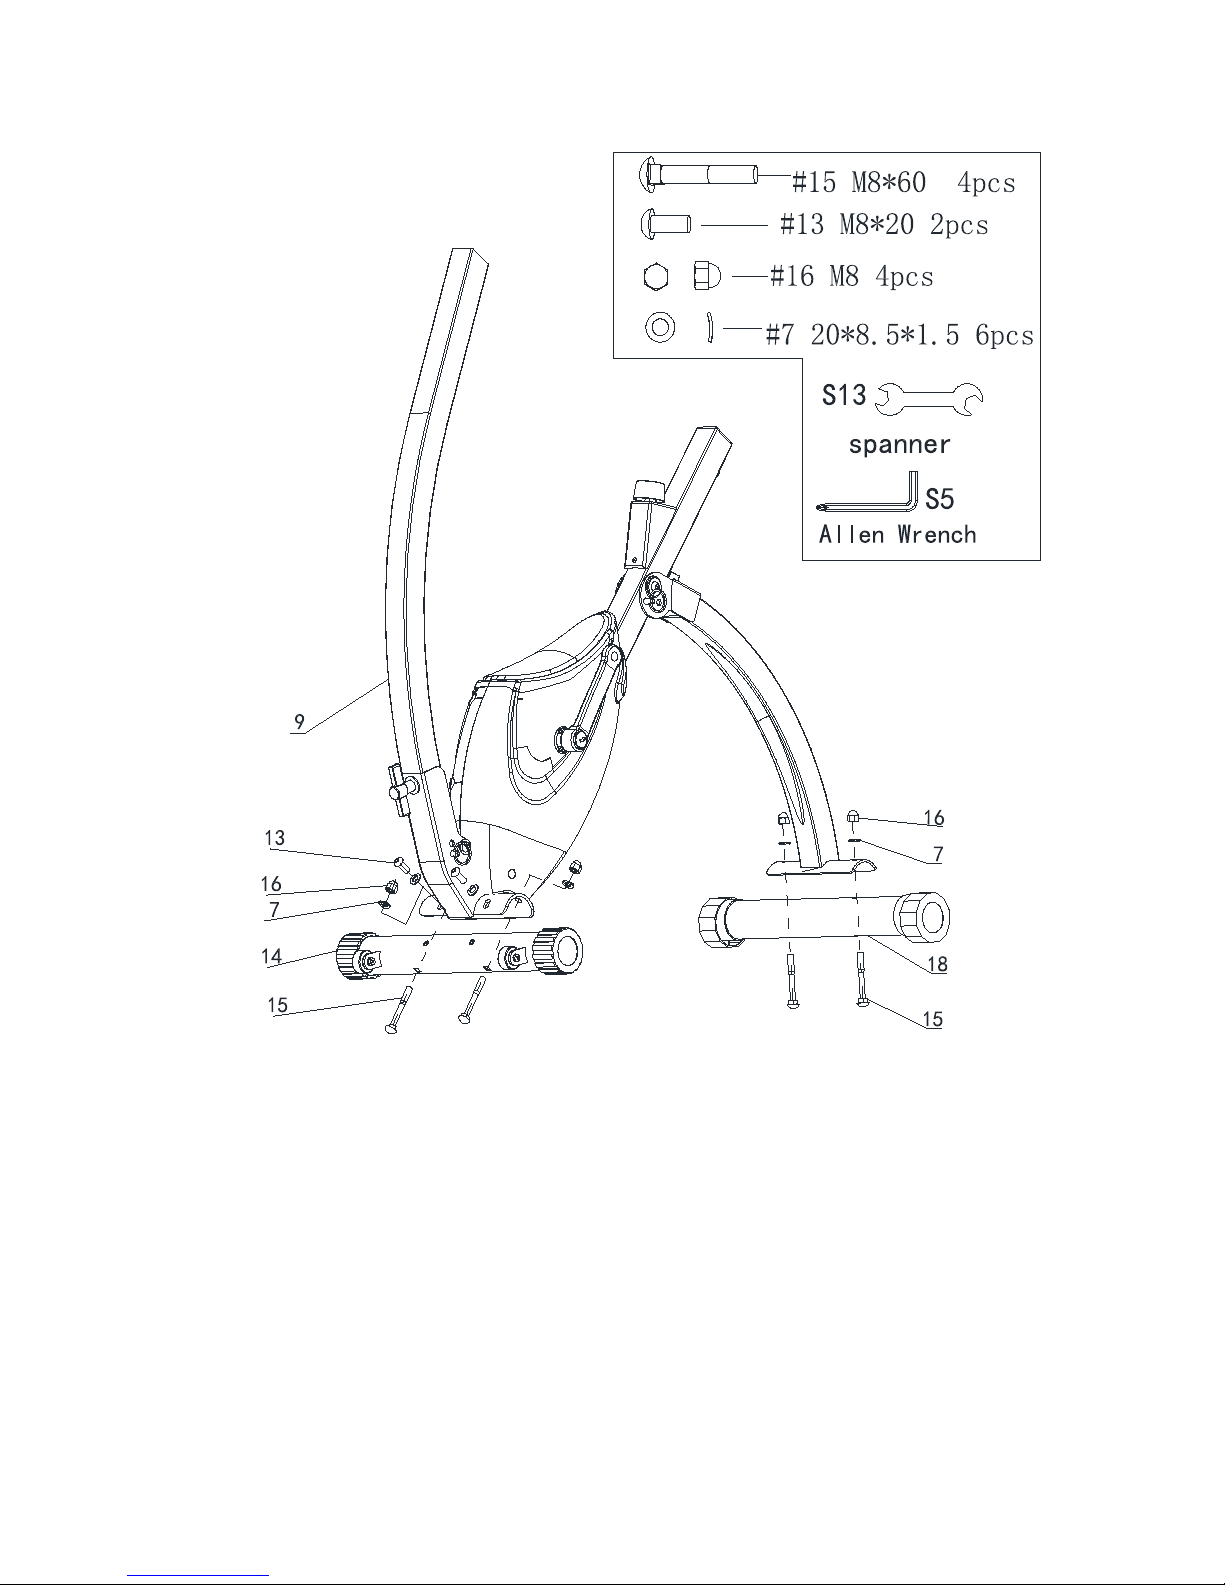
Attach the Front Stabilizer (No.14) to the Main Frame (No.9) using 2 Bolts (No.13), 2 Nuts
(No.16), 2 Curved Washers (No.7) and 2 Carriage Bolts (No.15). Tighten with Spanner and Allen
Wrench.
Attach the Rear Stabilizer (No.18) to the Main Frame (No.9) using 2 Nuts (No.16) 2 Curved
Washers (No.7) and 2 Carriage Bolts (No.15). Tighten with Spanner.
Page 9
8
STEP 3
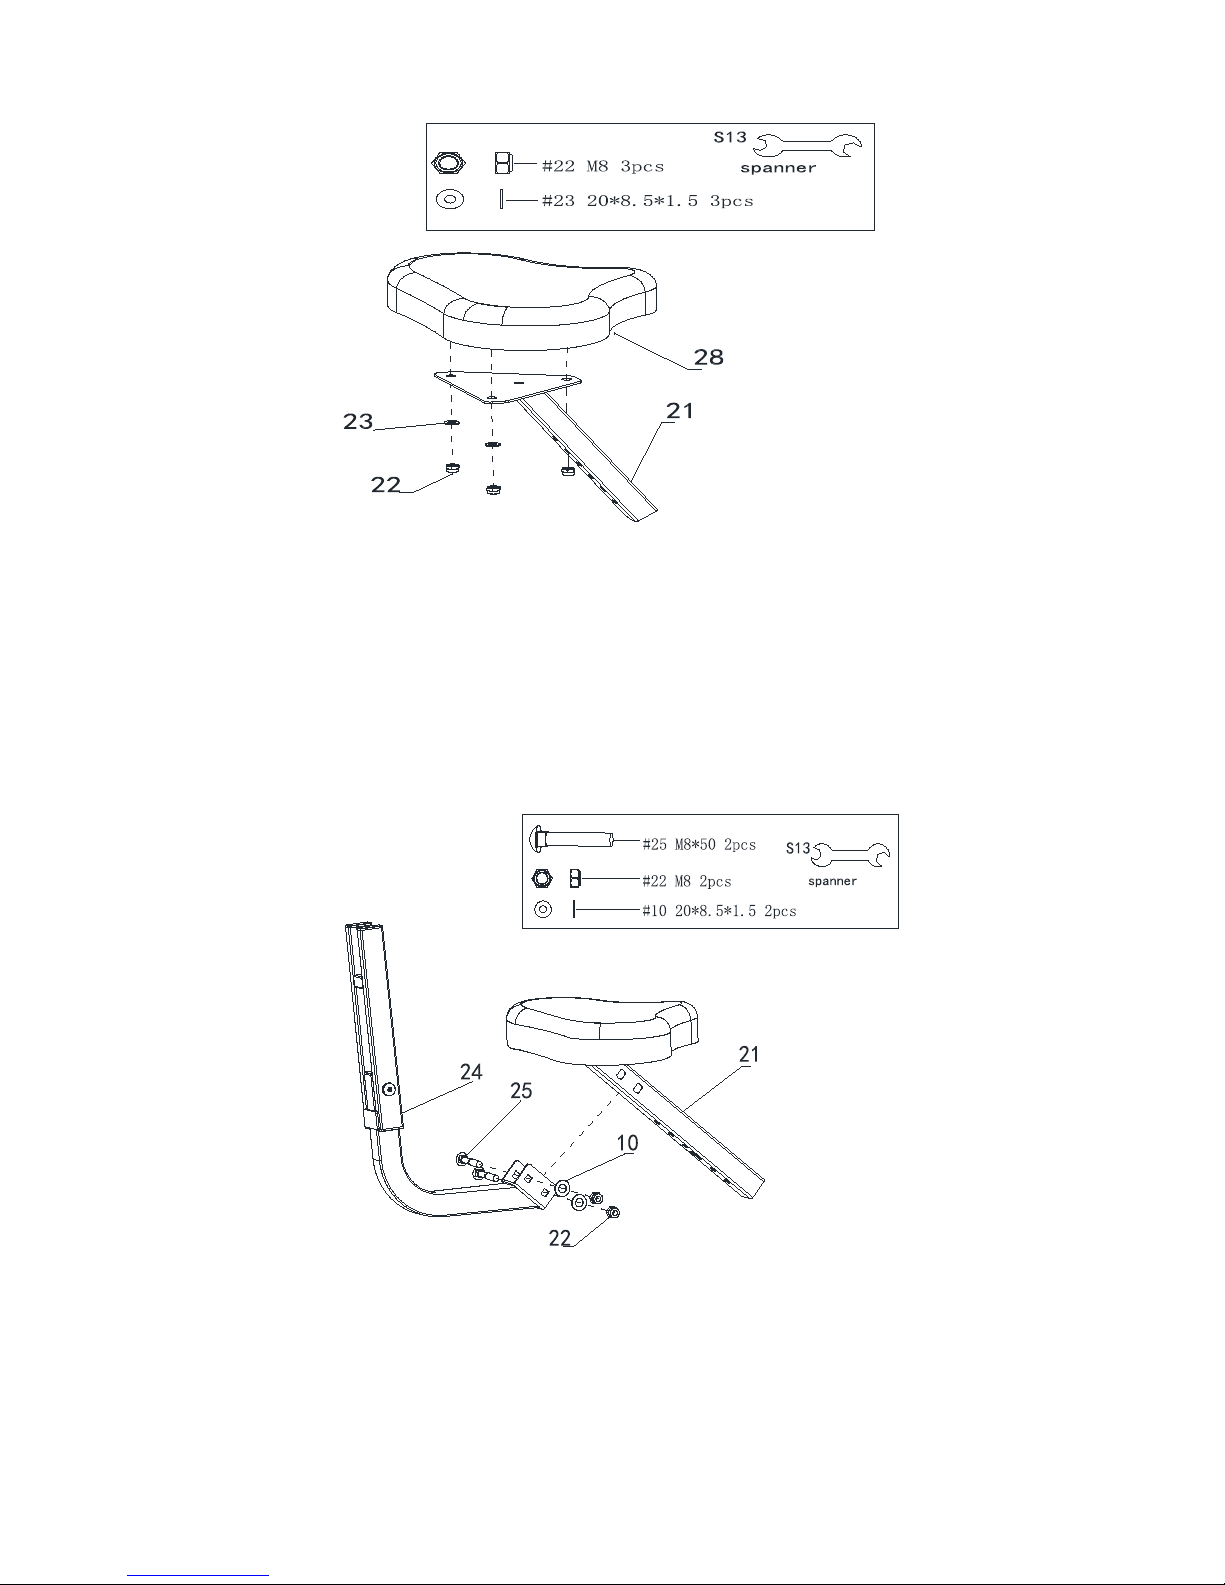
Attach the Saddle Post (No.21) to the Saddle (No.28) using 3 Flat Washers (No.23) and 3 Nuts
(No.22). Tighten with Spanner.
STEP 4
Secure the Seat Bracket (No.24) to the Saddle Post (No.21) using 2 Nuts (No.22), 2 Flat
Washers (No.10) and 2 Carriage Bolts (No. 25). Tighten with Spanner.
Page 10
9
STEP 5
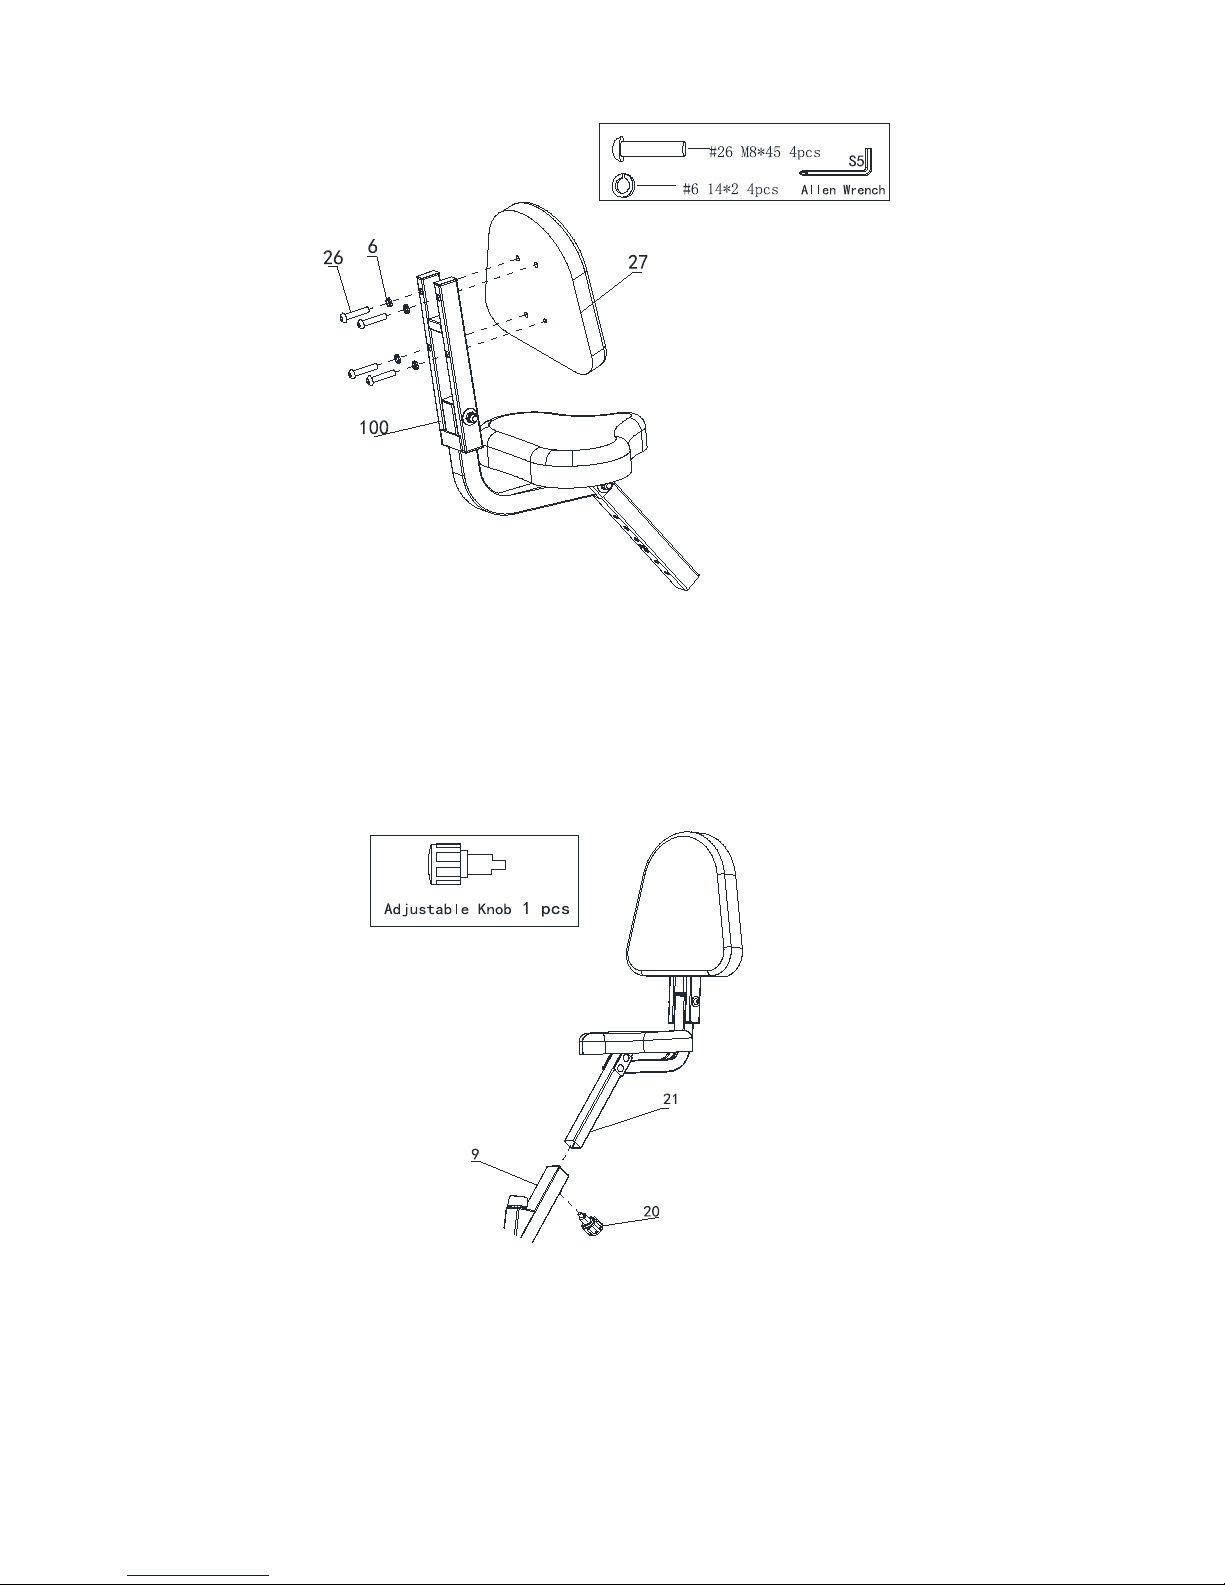
Attach the Back Cushion (No.27) to the Backrest Bracket (No.100) using 4 Nuts (No.26) and 4
Washers (No.6). Tighten with Allen Wrench.
STEP 6
Insert the Saddle Post (No.21) into the Main Frame (No.9). Secure with Adjustable Knob
(No.20).
Page 11
10
STEP 7
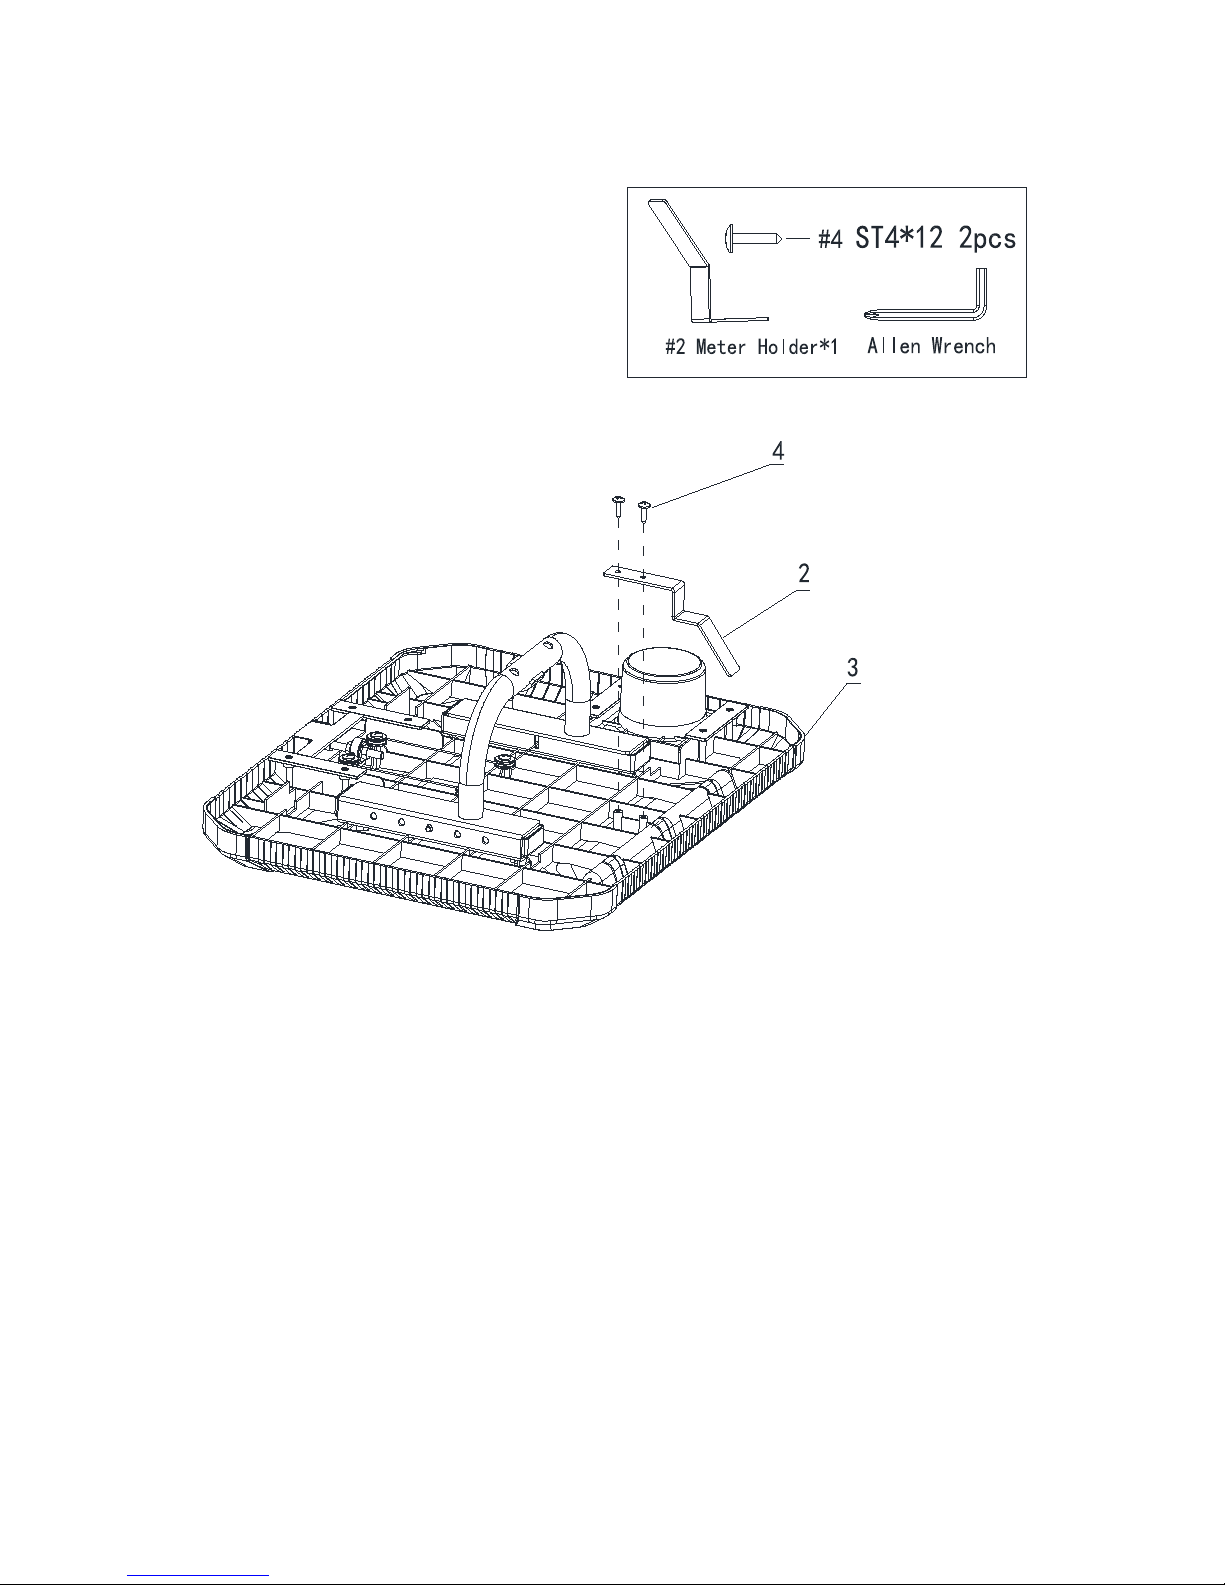
Attach the Meter Holder (No.2) into the Desk (No.3), using 2 Screws (No.4). Tighten with Allen
Wrench.
Page 12
11
STEP 8
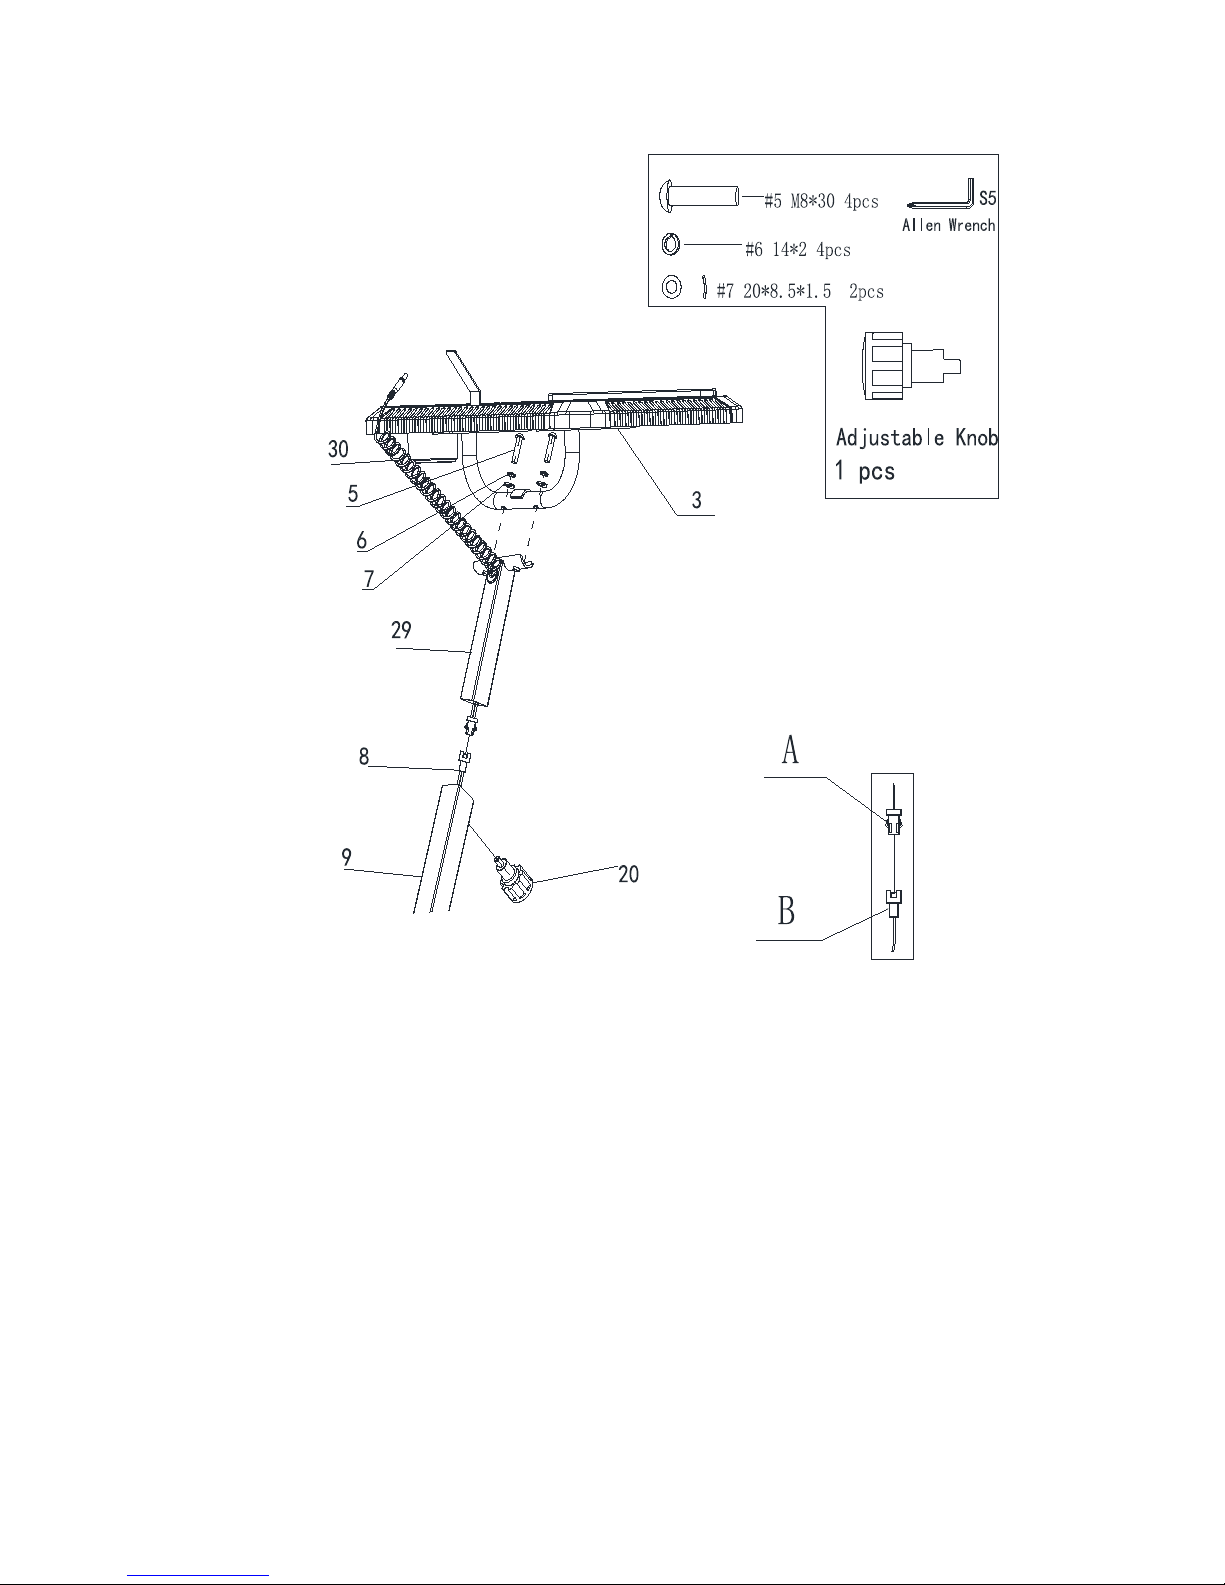
Attach the Desk (No.3) to the Desk Post (No.29) using 2 Bolts (No.5), 2 Washers (No.6) and 2
Curved Washers (No.7). Tighten with Allen Wrench.
Connect Upper Signal Wire (No.30) with Lower Signal wire (No.8), as shown in picture.
Insert the Desk Post (No.29) into the Main Frame (No.9). Secure with the Adjustable Knob
(No.20).
Page 13
12
STEP 9
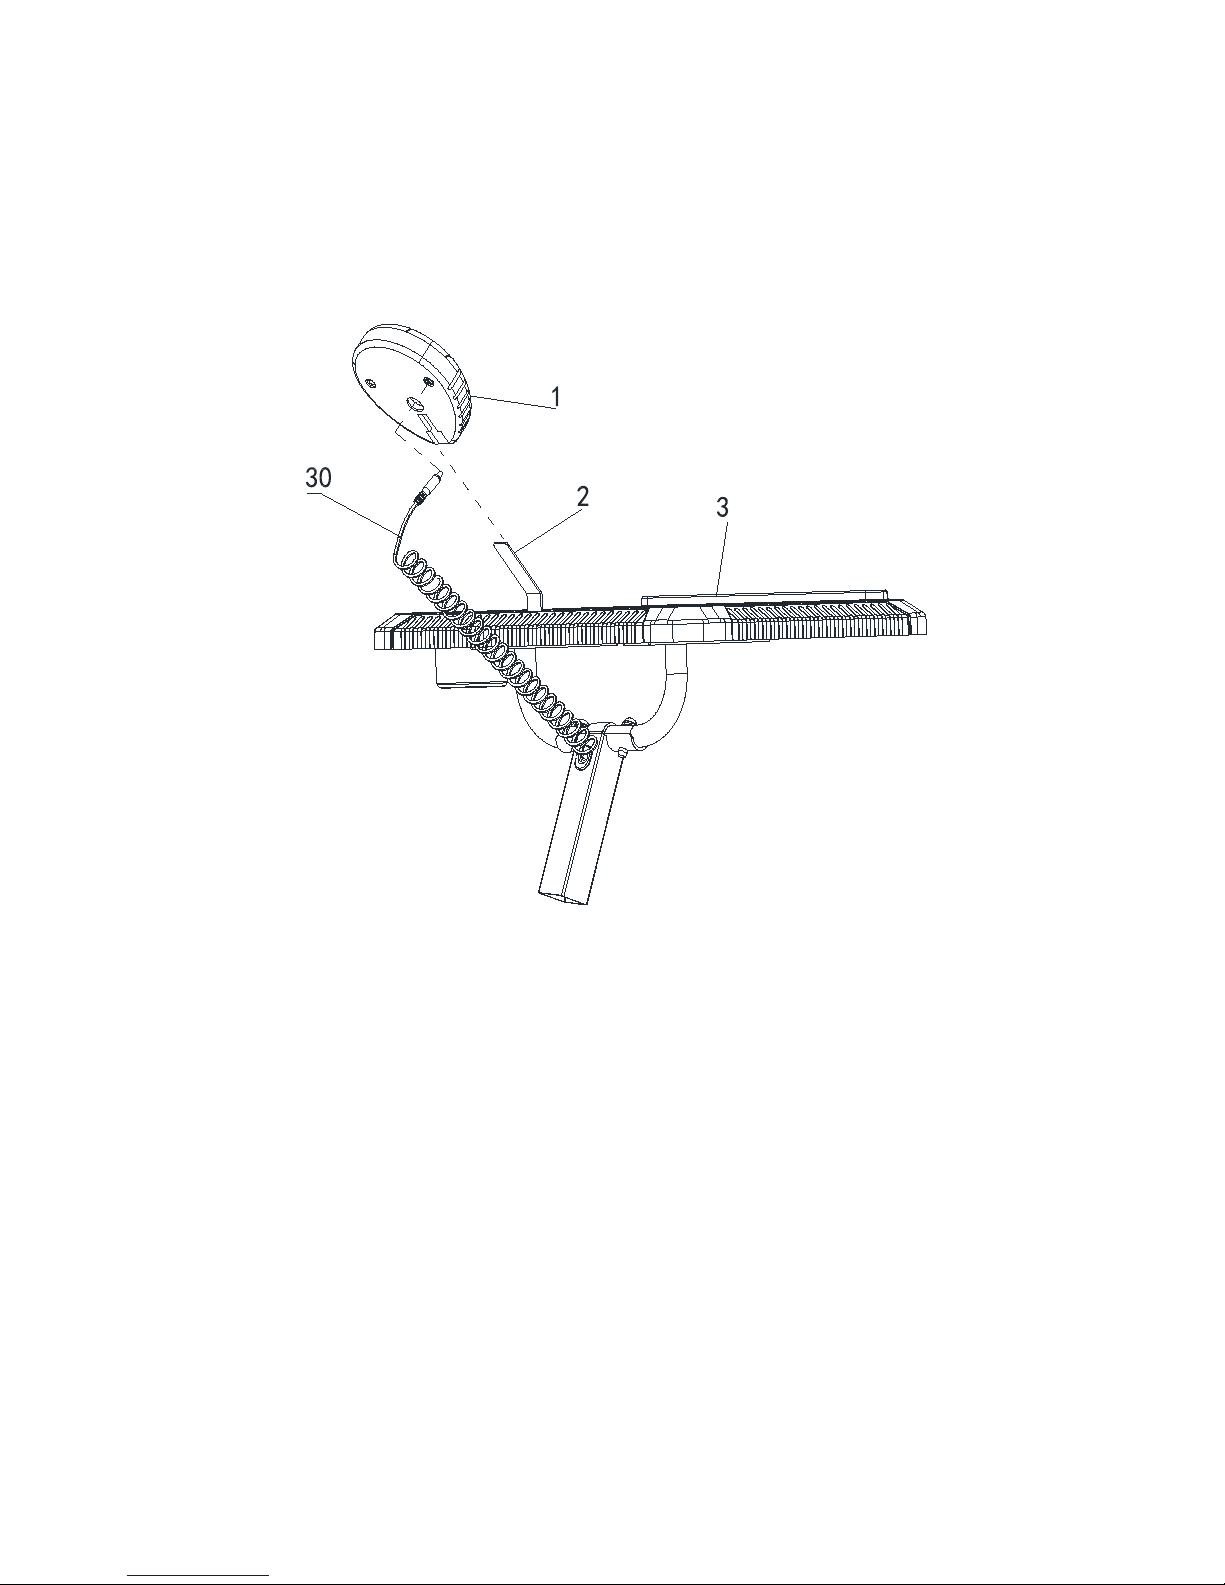
Connect Upper Signal Wire (No.30) to Meter (No.1), then assemble it to Meter Holder (No.2).
Page 14
13
STEP 10
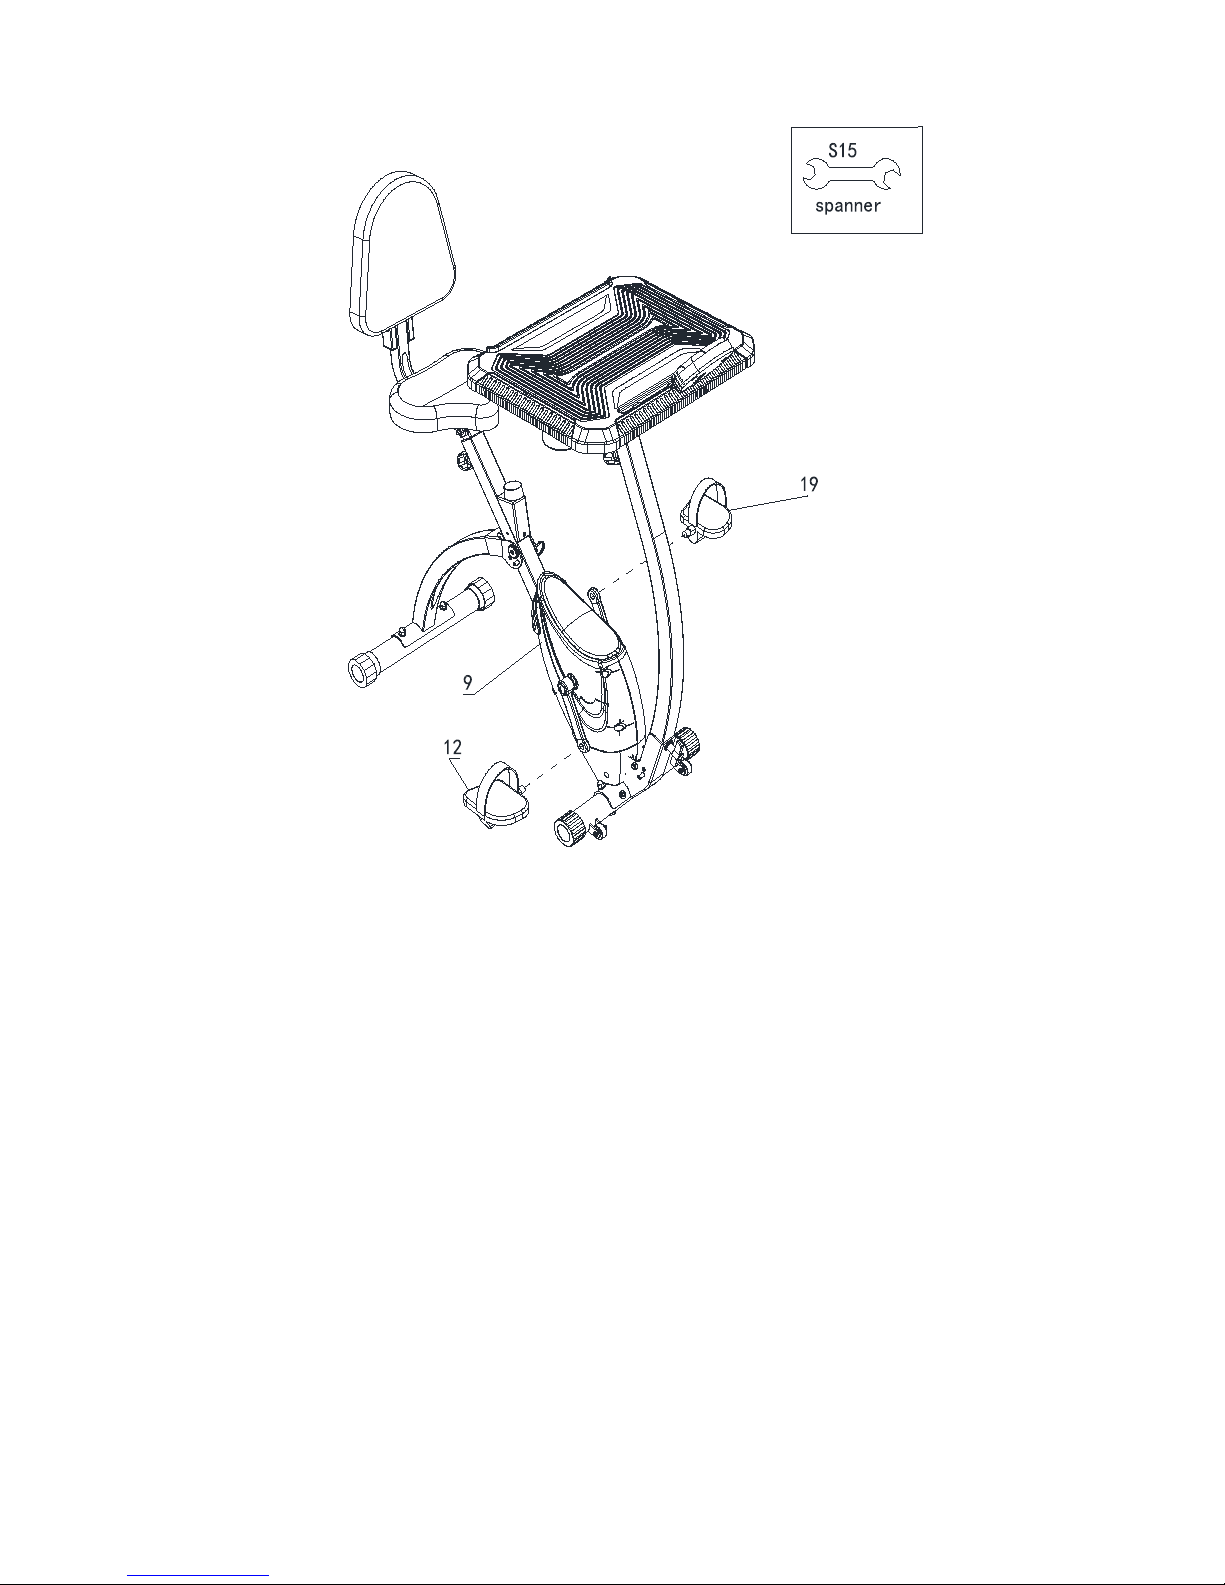
Screw Right Pedal (No.12) into the Right Crank (No.48) in CLOCKWISE direction. Screw Left
Pedal (No.19) into the Left Crank (No.88) in COUNTER-CLOCKWISE direction. Tighten with
Spanner.
Page 15
14
HOW TO ADJUST THE DESK
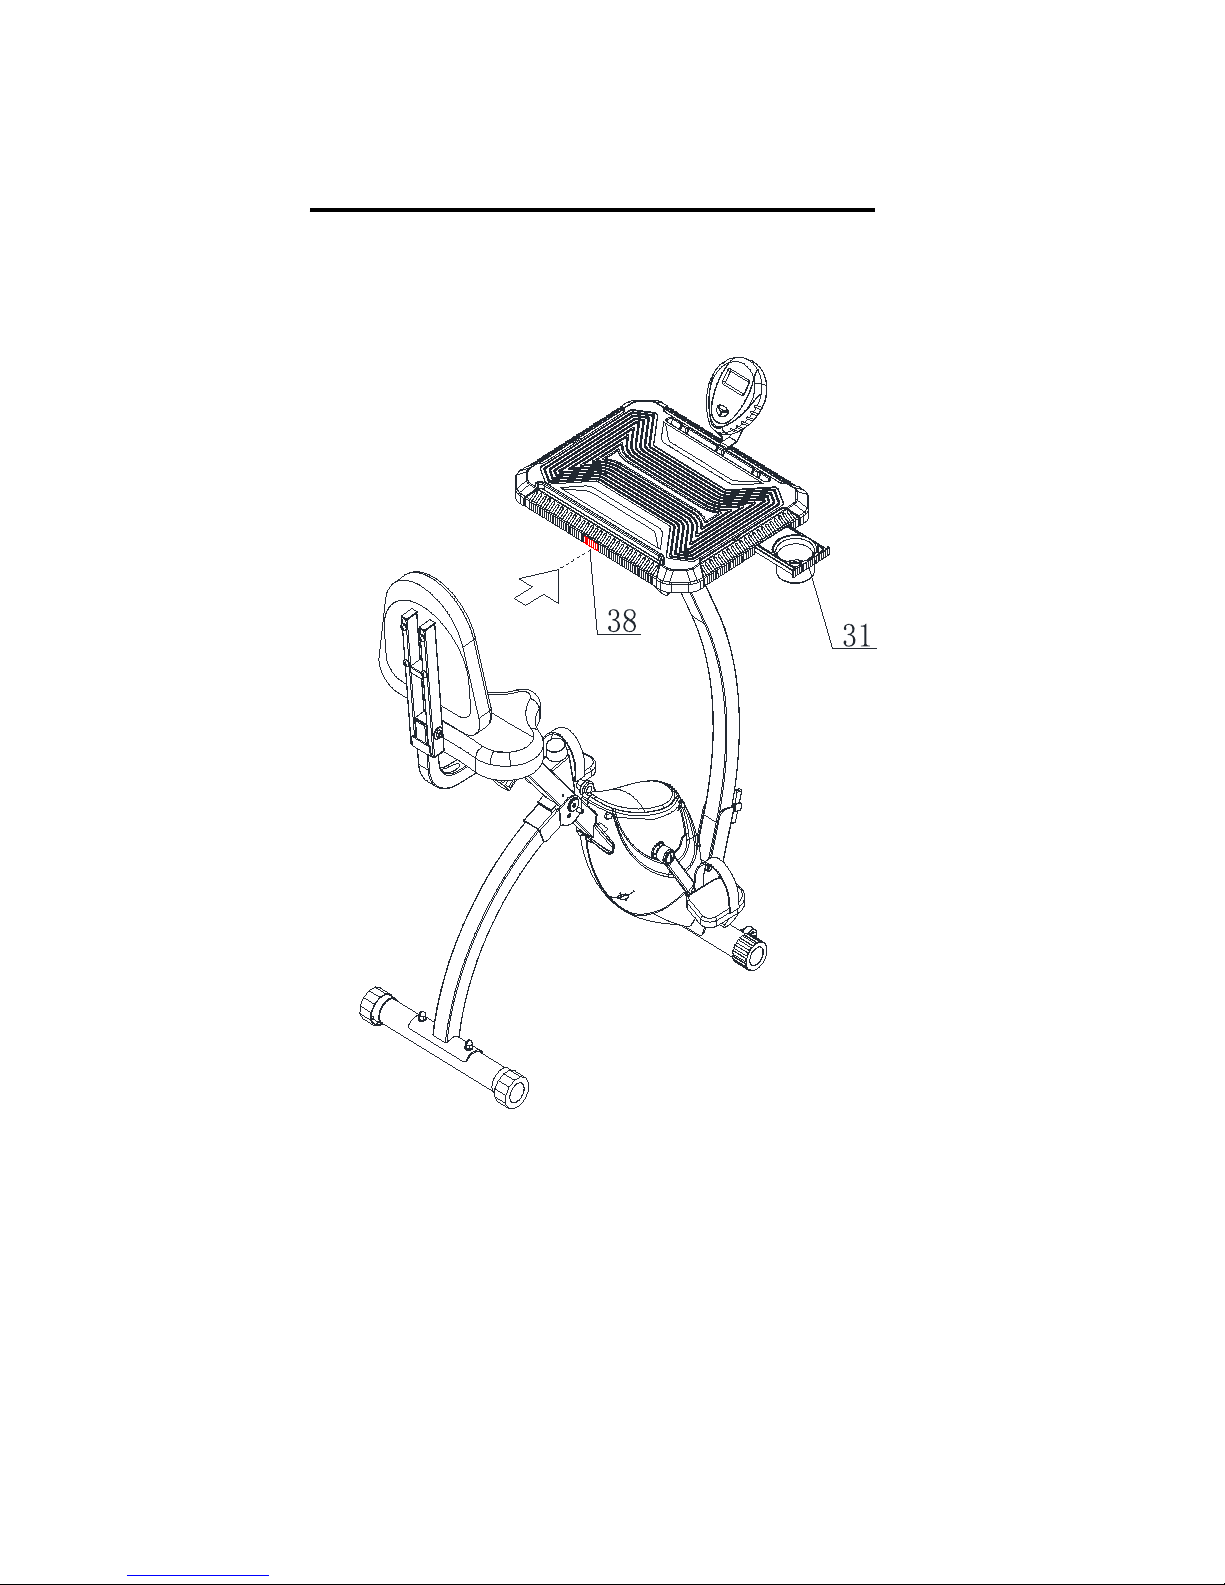
Hold the desk with your left hand. Push the Button (No.38) with your right hand. Slide the desk
forward or back. Release Button (No.38).
Note: There is a Cup Holder (No.31) on the right side of the desk. Slide it out to use.
Page 16
15
HOW TO FOLD THE BIKE
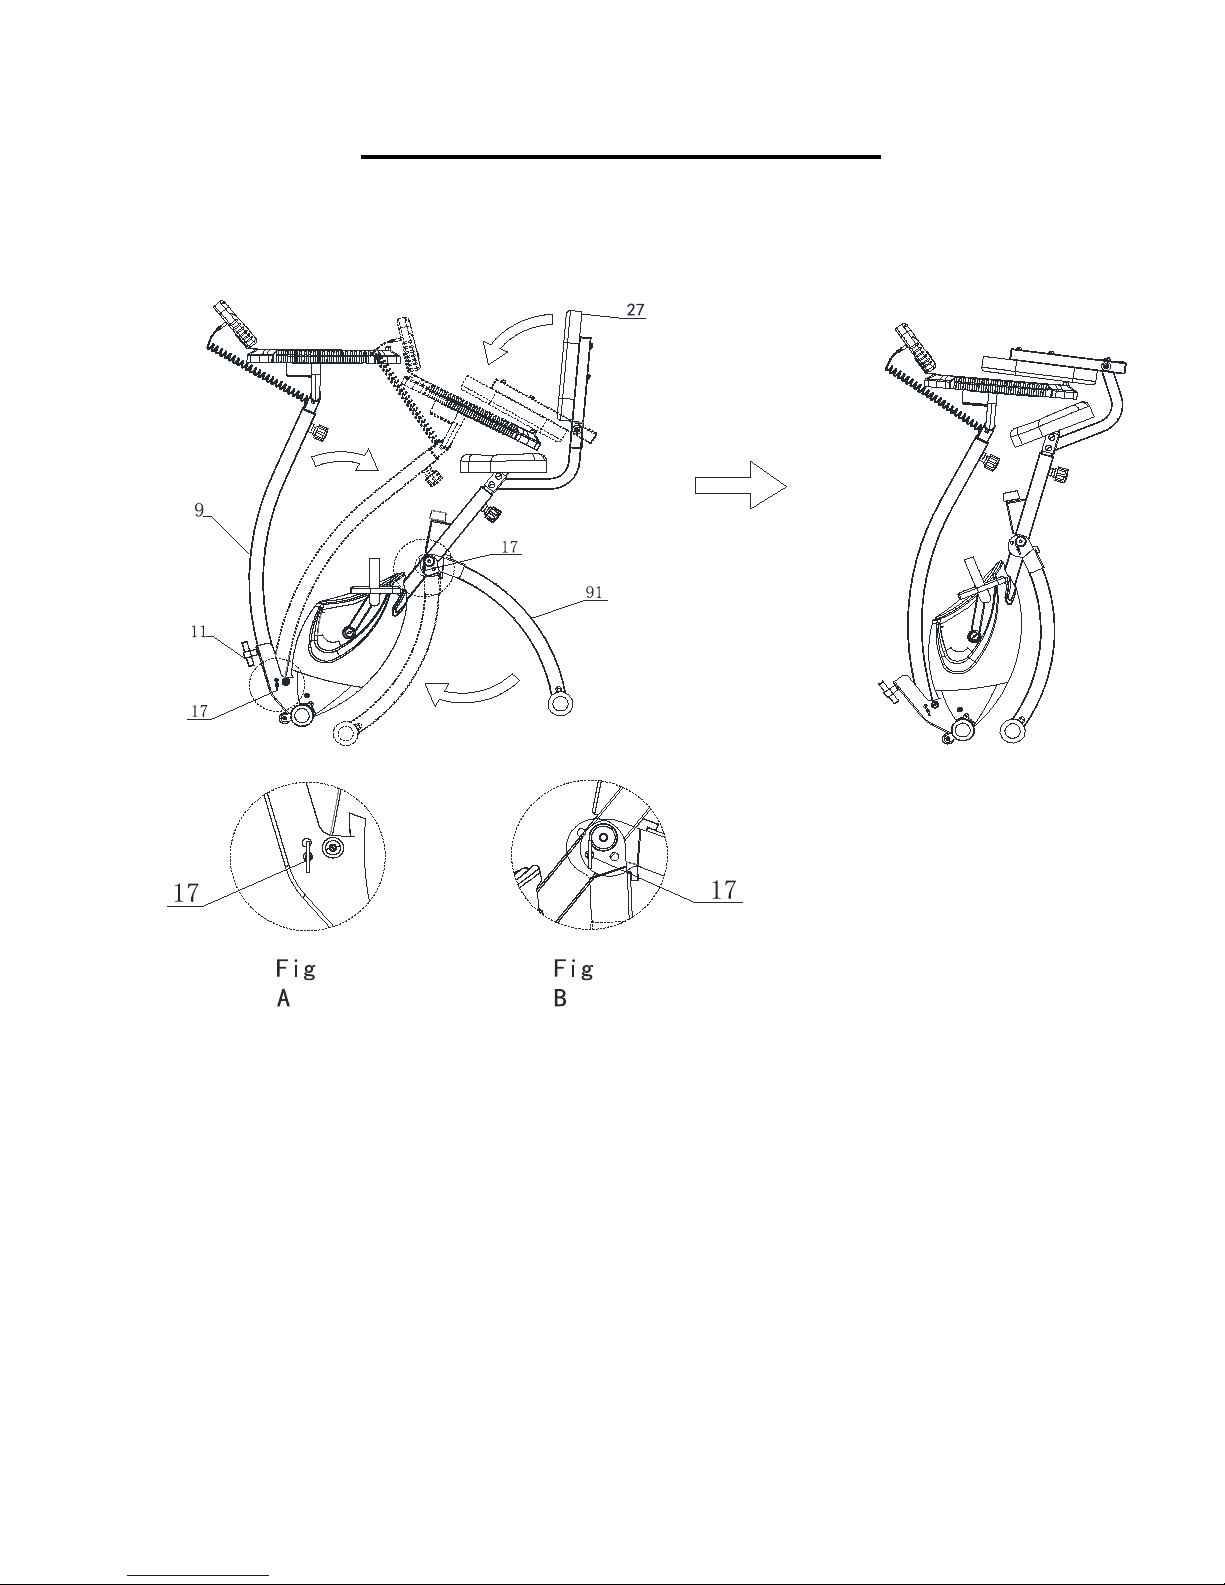
Slide the desk towards the seat and adjust seat to the lowest position.
Loosen and pull out Pull Pin (No.17) Hold the Back Cushion (No.27) by the left hand, and grasp
Main Frame (No.9) by the right hand and push it forward until the holes shown in Fig. A align with
each other. Then insert Pull Pin (No.17).
Loosen and remove Cross Shape Knob (No.11). Pull out Pull Pin (No.17), hold the Back
Cushion (No.27) by the left hand, and grasp the Main Frame (No.9) by the right hand and push it
forward until the holes show in Fig. B align with each other. Then insert Pull Pin (No.17). Keep the
Cross Shape Knob (No.11). You will need it when you unfold the bike.
Press down the Back Cushion (No.27).
Page 17
16
HOW TO MOVE THE BIKE
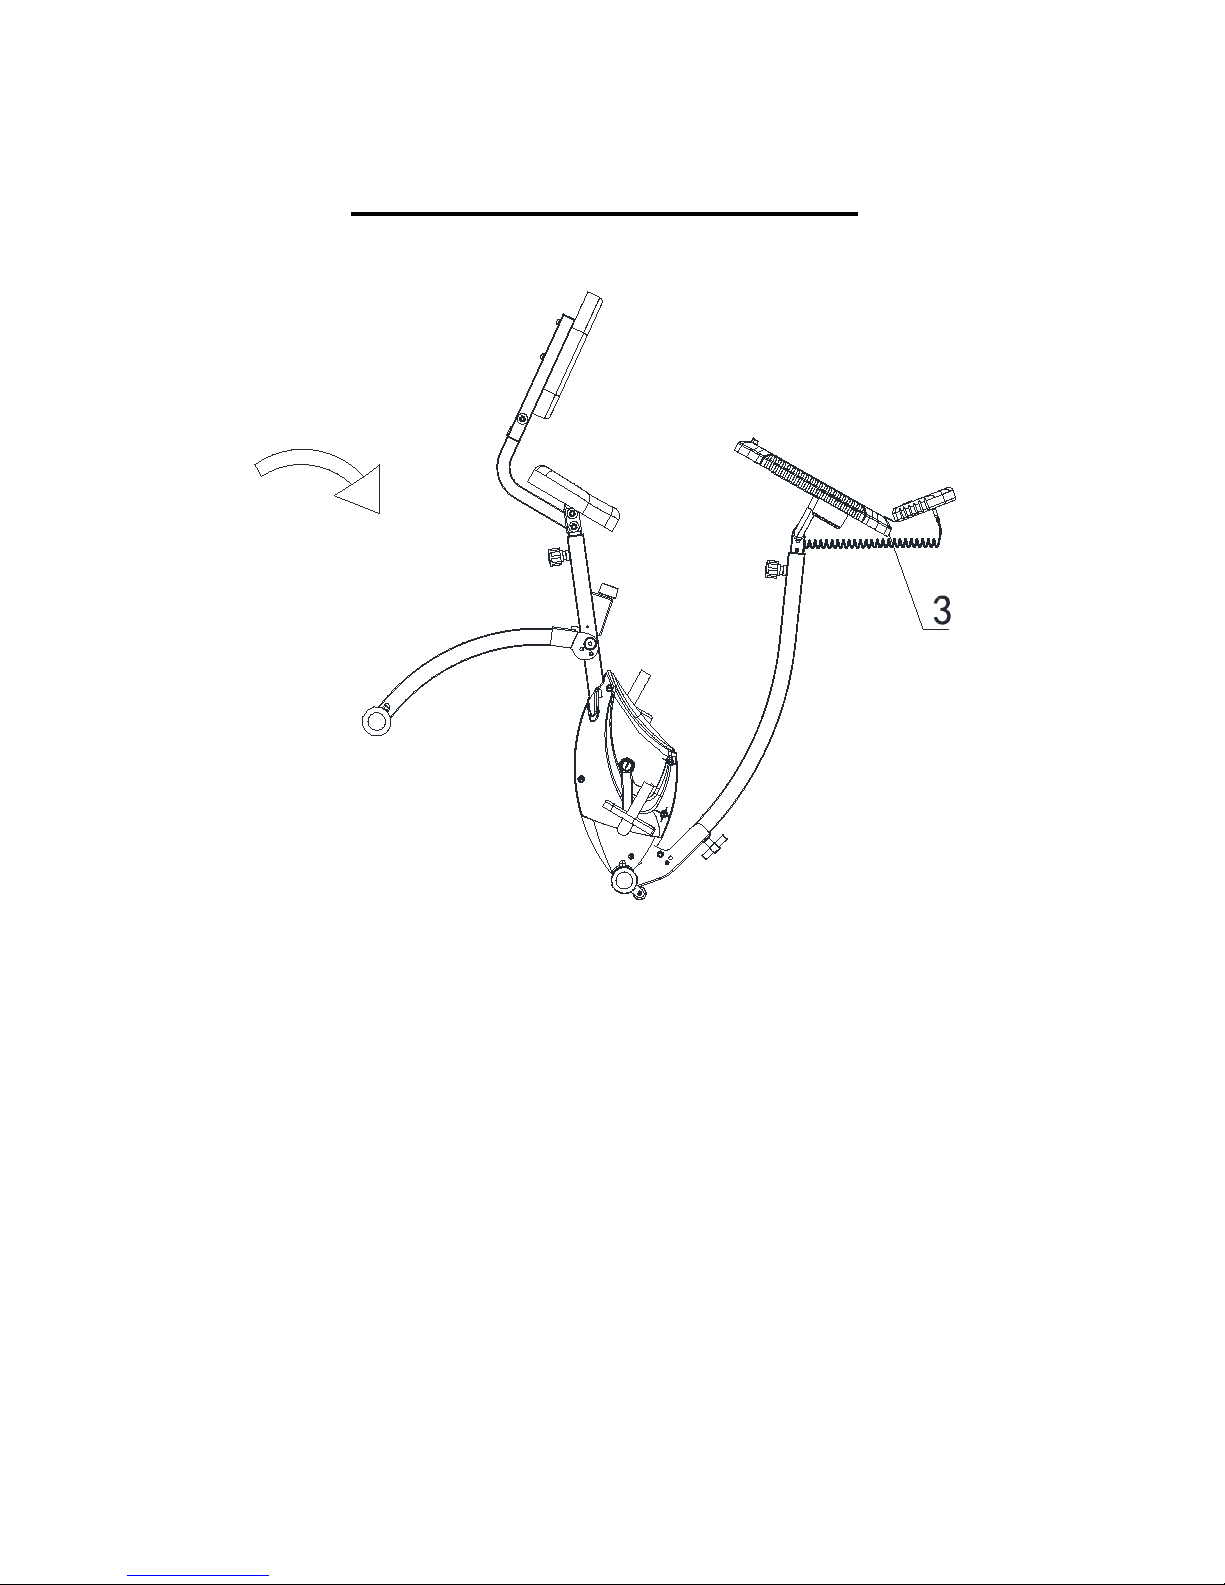
Put your hands on the Desk (No.3) and tilt the bike until the wheels are able to move on the ground.
Now you can move the bike to the desired location with ease.
Page 18

17
Meter Instruction
SPECIFICATIONS:
TIME (TMR)……………………………………………….…………….…00:00-99:59 MIN
SPEED (SPD)…………………………………………….…………………..0.0-99.9 ML/H
DISTANCE (DST)……………………………………………….……………0.00-999.9 MI
CALORIES (CAL)………………………………………………….…….……0-9999 KCAL
ODOMETER (ODO)……………………………………………….….……0.00-999.9 MI
MODE: Press this button to select and stay on a function you want.
SET: Press to set values of time, distance, or calories when not in SCAN mode.
RESET: Press to reset time, distance and calories to zero when not in SCAN mode. Press
and hold for 3 seconds to reset all values.
Meter will power on when you press any button or when you start to pedal. When you start pedaling,
the meter will start counting. After approximately 4 minutes of no activity, meter will automatically
shut off.
This meter can count the value from this workout or countdown from a value you set.
SCAN: Press MODE until pointer points to SCAN. Display will rotate through all 5
functions: Time, Speed, Distance, Odometer and Calorie. Pointer will point to the
function being displayed. Each function will display for 4 seconds.
TIME: Displays time of your exercise session.
SPEED: Displays current speed.
DISTANCE: Displays distance you have pedaled.
CALORIES: Displays the approximate number of calories burned.
ODOMETER: Monitor displays the total accumulated distance. Pressing RESET does not reset
the odometer. Taking out the batteries resets the odometer.
To view a specific function, press MODE until pointer points to function you want.
FUNCTIONS
Page 19

18
The meter has a countdown function for TIME, DISTANCE, and CALORIES. To use the countdown
function, press MODE to select TIME, DISTANCE or CALORIES. Press SET to set the value. You
can start pedaling. The meter will countdown from the value you set. When the countdown is done,
it will automatically start counting from 0.
This monitor uses one AAA battery, included. To replace the batteries, open the battery
compartment at the back of the meter.
Version 1.1
 Loading...