

Page 1
READ ME FIRST
®
*DSL Equipment Installation Guide:
Efficient Networks® 5260
*Digital Subscriber Line
©2001 SBC Advanced Solutions, Inc. All rights reserved.
Part Number: 5260MC02A
Version 1.2-A
Page 2

Table of Contents
Follow Steps 1 through 8 to complete the DSL Equipment Installation
Step 1: Verify Your System Requirements and Documents 2
Step 2: Verify the Contents of Your DSL Equipment Kit 3
Step 3: Install a Telephone Filter on Every Telephone Line 4
Step 4: Choose Your Modem and Minimum Requirements Check 8
Step 5: Installing the Kingston® Hardware 11
Step 6: Install the Efficient Networks® DSL Modem 12
Step 7: Finish Configuring your System 14
Step 8: Configure Internet Connection Software 17
APPENDICES 19
Having Trouble? 20
Installing the Kingston® Software and Hardware 21
DESKTOP Systems - Installing the Kingston® Ethernet Adapter 22
LAPTOP Systems - Installing the Kingston® Ethernet Adapter 24
Uninstalling/Reinstalling the Kingston® Adapter 26
Troubleshooting SBC Express 29
For Support:
• Review the troubleshooting in this guide on page 20
• Equipment installation or DSL connection (Steps 1-8)
• Call your Internet Service Provider 'help desk' for further information on Internet Service
Provider connection, and registration.
IMPORTANT NOTE: This guide portrays the typical flow for the installation process.
Please follow the instructions, including running the SBC Express software BEFORE
installing any NIC cards or modems. Some computer or network configurations may cause
software windows to appear that are not depicted in this guide. Please read and follow the
instructions on those screens to continue the installation process.
Verify that you are installing your DSL equipment AFTER the “Service Completion Date”
given to you when you ordered your DSL Internet Service.
SBC Advanced Solutions, Inc. and affiliates have no responsibility for any personal injury
or property damage which may result from your installation of DSL Equipment as
discussed in this Guide. SBC Advanced Solutions, Inc. and its affiliates specifically
disclaim any liability for such injury or damage. By proceeding with this installation, you
assume all risk of personal injury or property damage. Please consult the documentation
provided by your PC vendor to identify any impacts to your warranty. SBC, SBC
EXPRESS and the SBC Logo are registered trademarks of SBC Communications, Inc.
Installation Guide for Customer Self-Install: Efficient Networks® 5260, Macintosh Page 1
©2001 SBC Advanced Solutions, Inc. All rights reserved.
Page 3

Step 1: Verify Your System Requirements and Documents
This Installation Guide is for Macintosh® users only.
The SBC Express installation software will ensure that you meet the following minimum
requirements. You will not be able to complete the installation without meeting these
requirements.
• Macintosh® system with any one of the following:
a) A built-in Ethernet port (consult your system’s documentation for details)*
b) An available PCI slot (if Ethernet port not available)
c) An available PCMCIA slot and a floppy disk drive
*Please note: many Macintosh® systems already have a Network Interface Card installed.
The SBC Express software will detect if you have a Network Interface Card installed. If your
system already has a card installed, you DO NOT need to install an additional one. If you have
any questions, please consult the information that came with your Macintosh® system.
Other items you may need during the installation process:
• Your system manufacturer Owner’s Manual.
• Documentation and/or software from your Internet Service Provider.
Call your Internet Service Provider if you have questions regarding System Requirements
or System Documentation.
Installation Guide for Customer Self-Install: Efficient Networks® 5260, Macintosh Page 2
©2001 SBC Advanced Solutions, Inc. All rights reserved.
Page 4
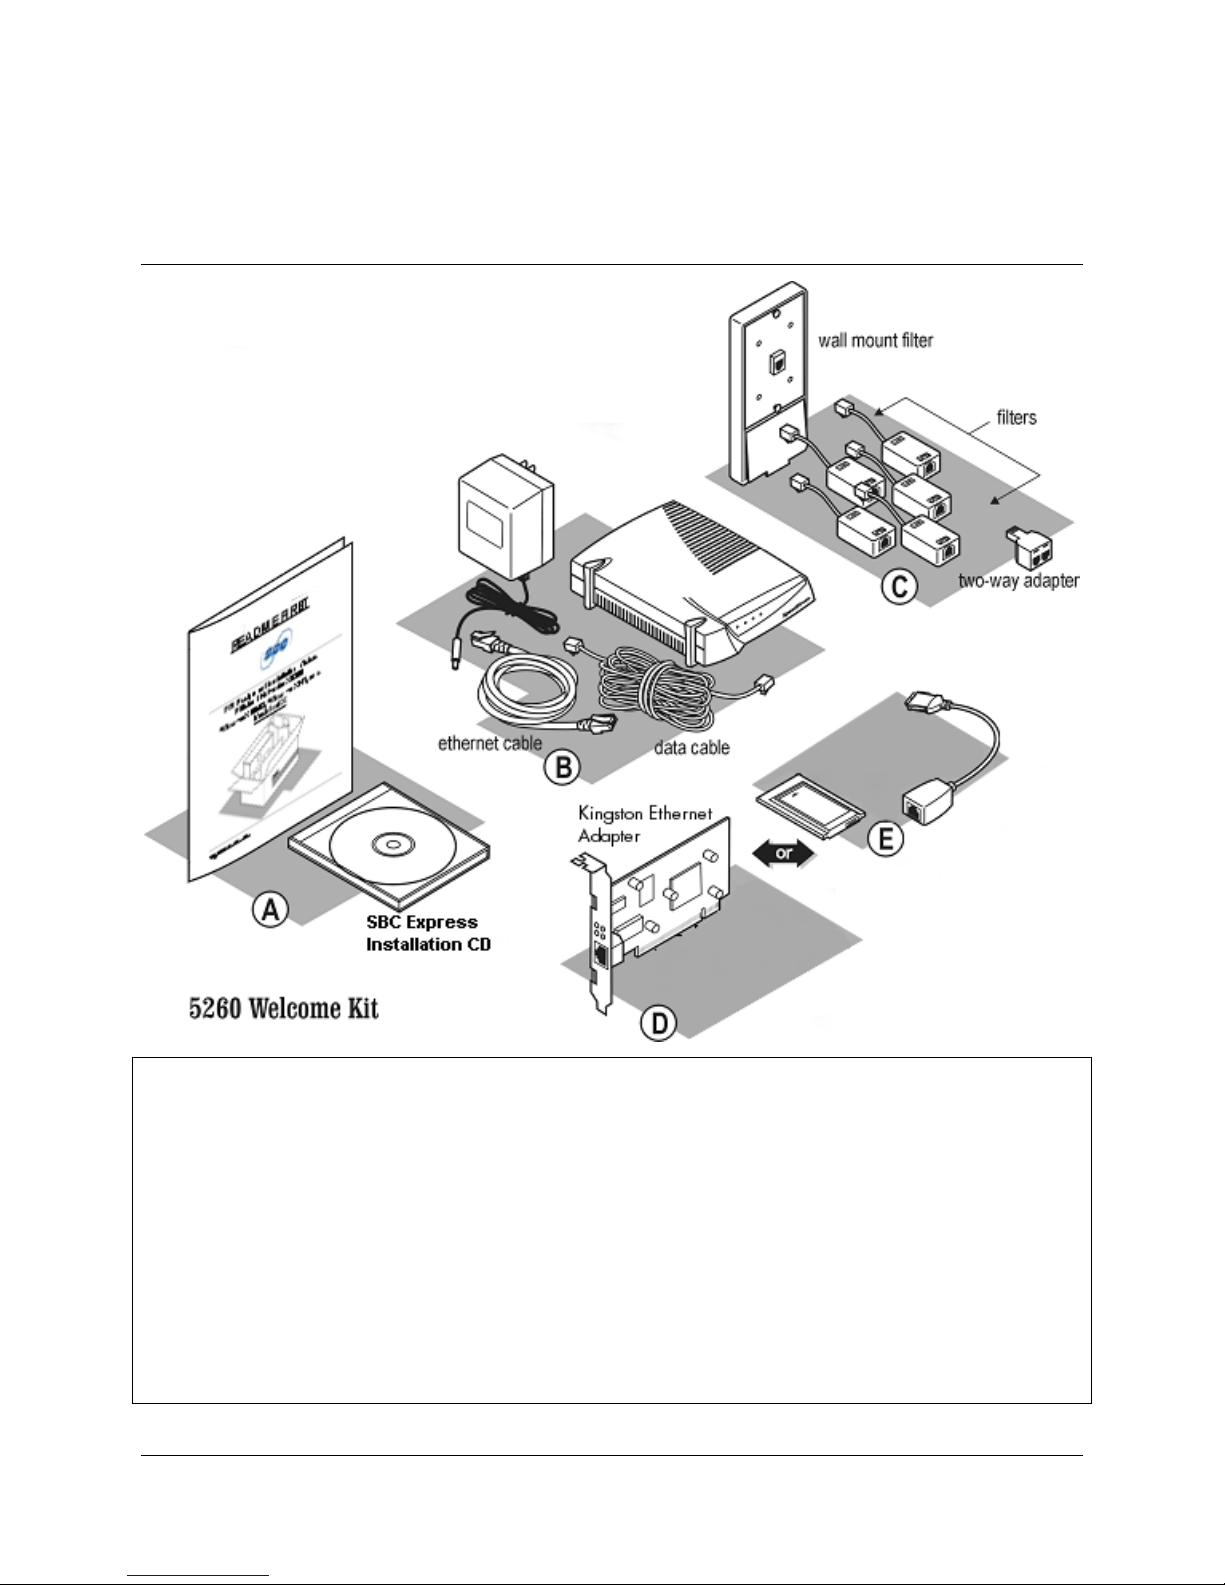
Step 2: Verify the Contents of Your DSL Equipment Kit
Your DSL Equipment Kit Contains:
A: This Installation Guide and the SBC Express Installation CD.
B: 1 Efficient Networks® 5260 DSL Modem with Ethernet cable (connects to Adapter, below), and
power cable.
C: 1 Filter Pack containing: 5 in-line filters, 1 wall-mount filter, 1 two-way adapter, and 1 data cable.
D: 1 Kingston® Ethernet Adapter for Desktop Macintosh
--OR--
E: 1 Kingston® Ethernet Adapter for Laptop Macintosh
Note: Internet Software and/or instructions may be provided separately by your Internet Service
Provider.
Installation Guide for Customer Self-Install: Efficient Networks® 5260, Macintosh Page 3
©2001 SBC Advanced Solutions, Inc. All rights reserved.
Page 5
j
j
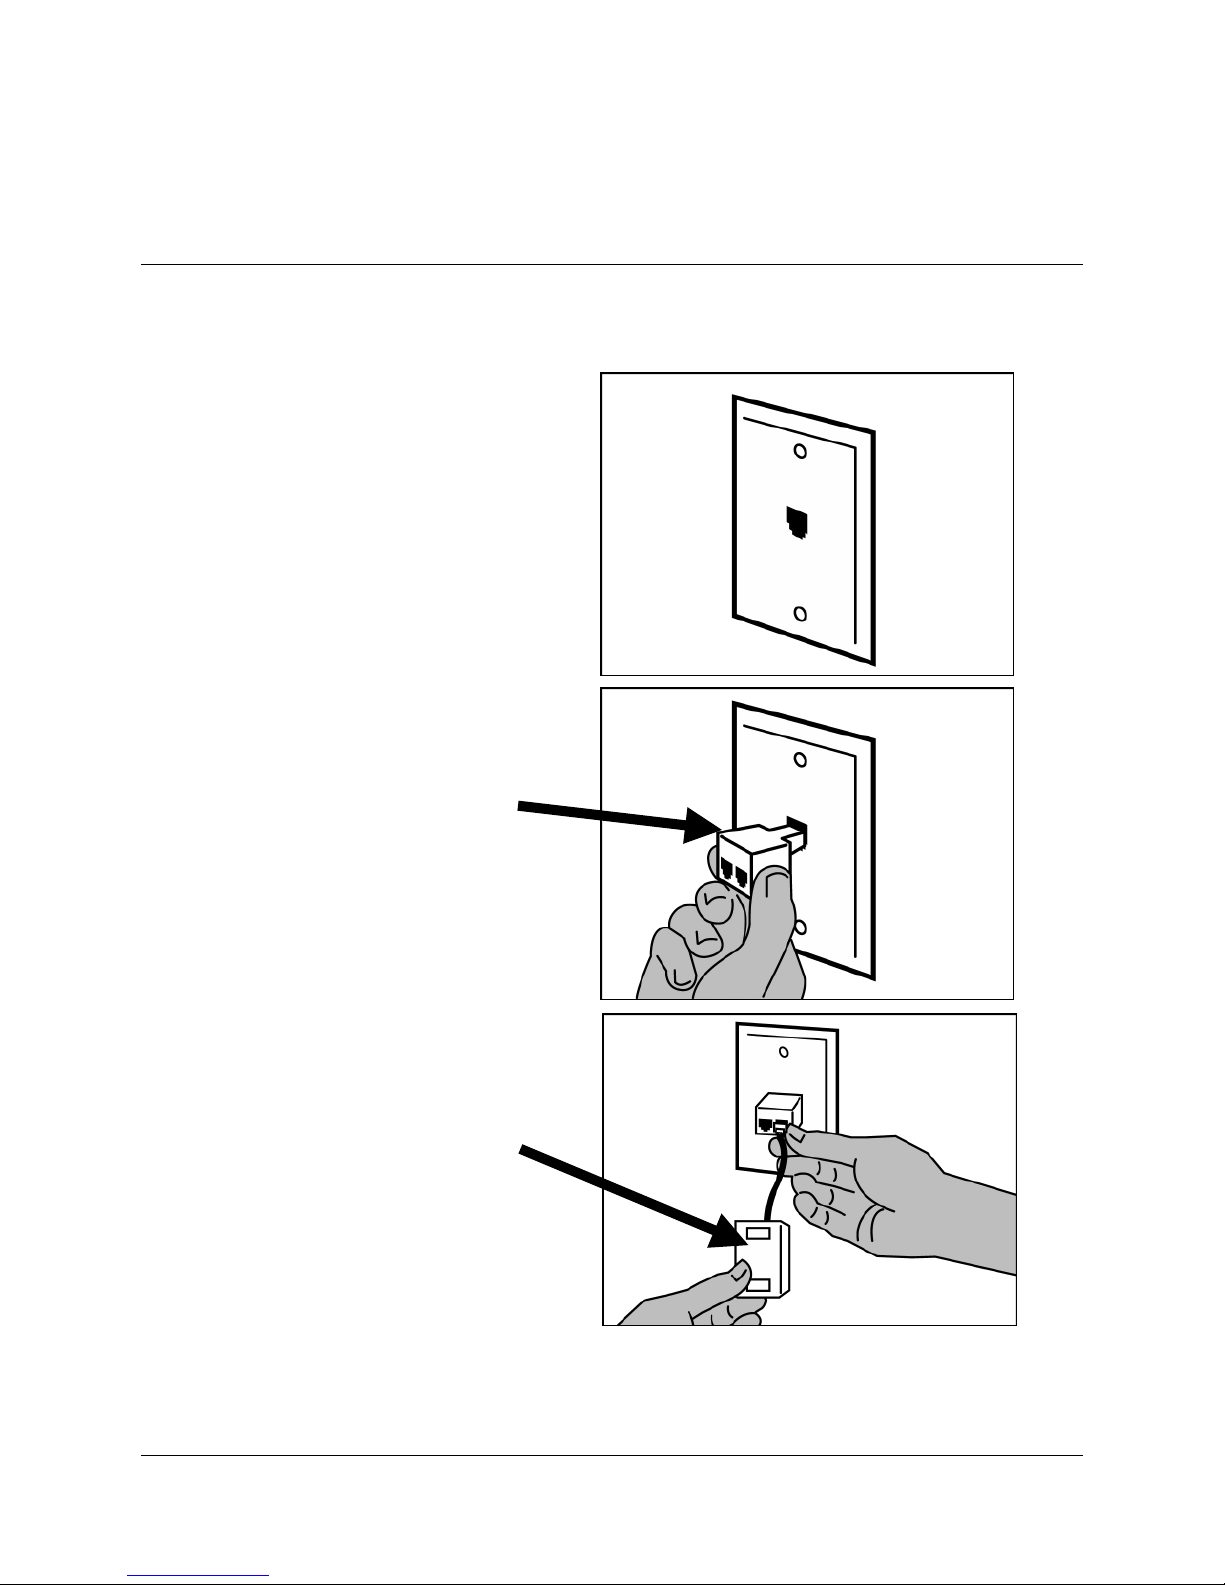
Step 3: Install a Telephone Filter on Every Telephone Line
3-1 Set up the phone jack where your DSL modem will go.
1) Locate the phone
ack where you want
to connect your DSL
2) Insert the 2-way
adapter in the phone
ack
3) Connect a filter to
one side of the 2-way
adapter
Installation Guide for Customer Self-Install: Efficient Networks® 5260, Macintosh Page 4
©2001 SBC Advanced Solutions, Inc. All rights reserved.
Page 6
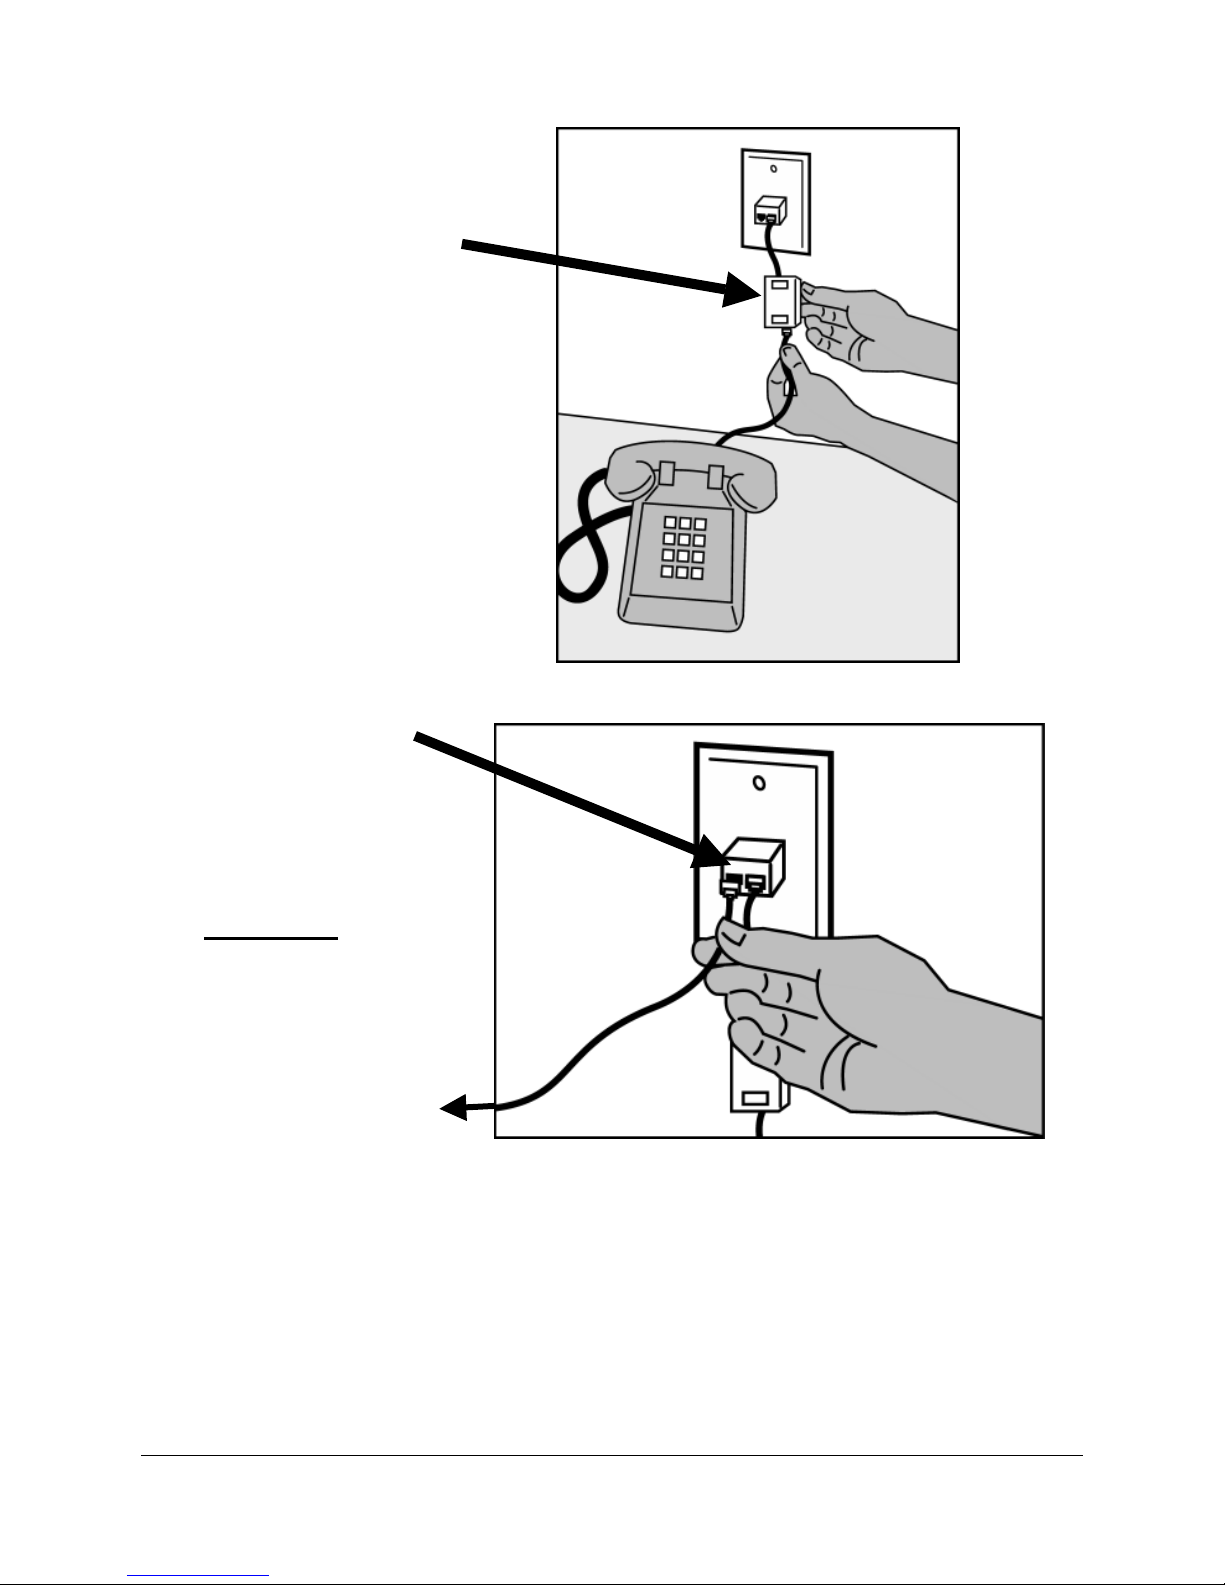
4) If you have a
phone, fax machine,
analog modem or
other phone device at
this location, connect
it to the filter
5) Connect the data
cable that will go to
your DSL modem to
the unfiltered
side of
the 2-way adapter
To the DSL modem
Installation Guide for Customer Self-Install: Efficient Networks® 5260, Macintosh Page 5
©2001 SBC Advanced Solutions, Inc. All rights reserved.
Page 7
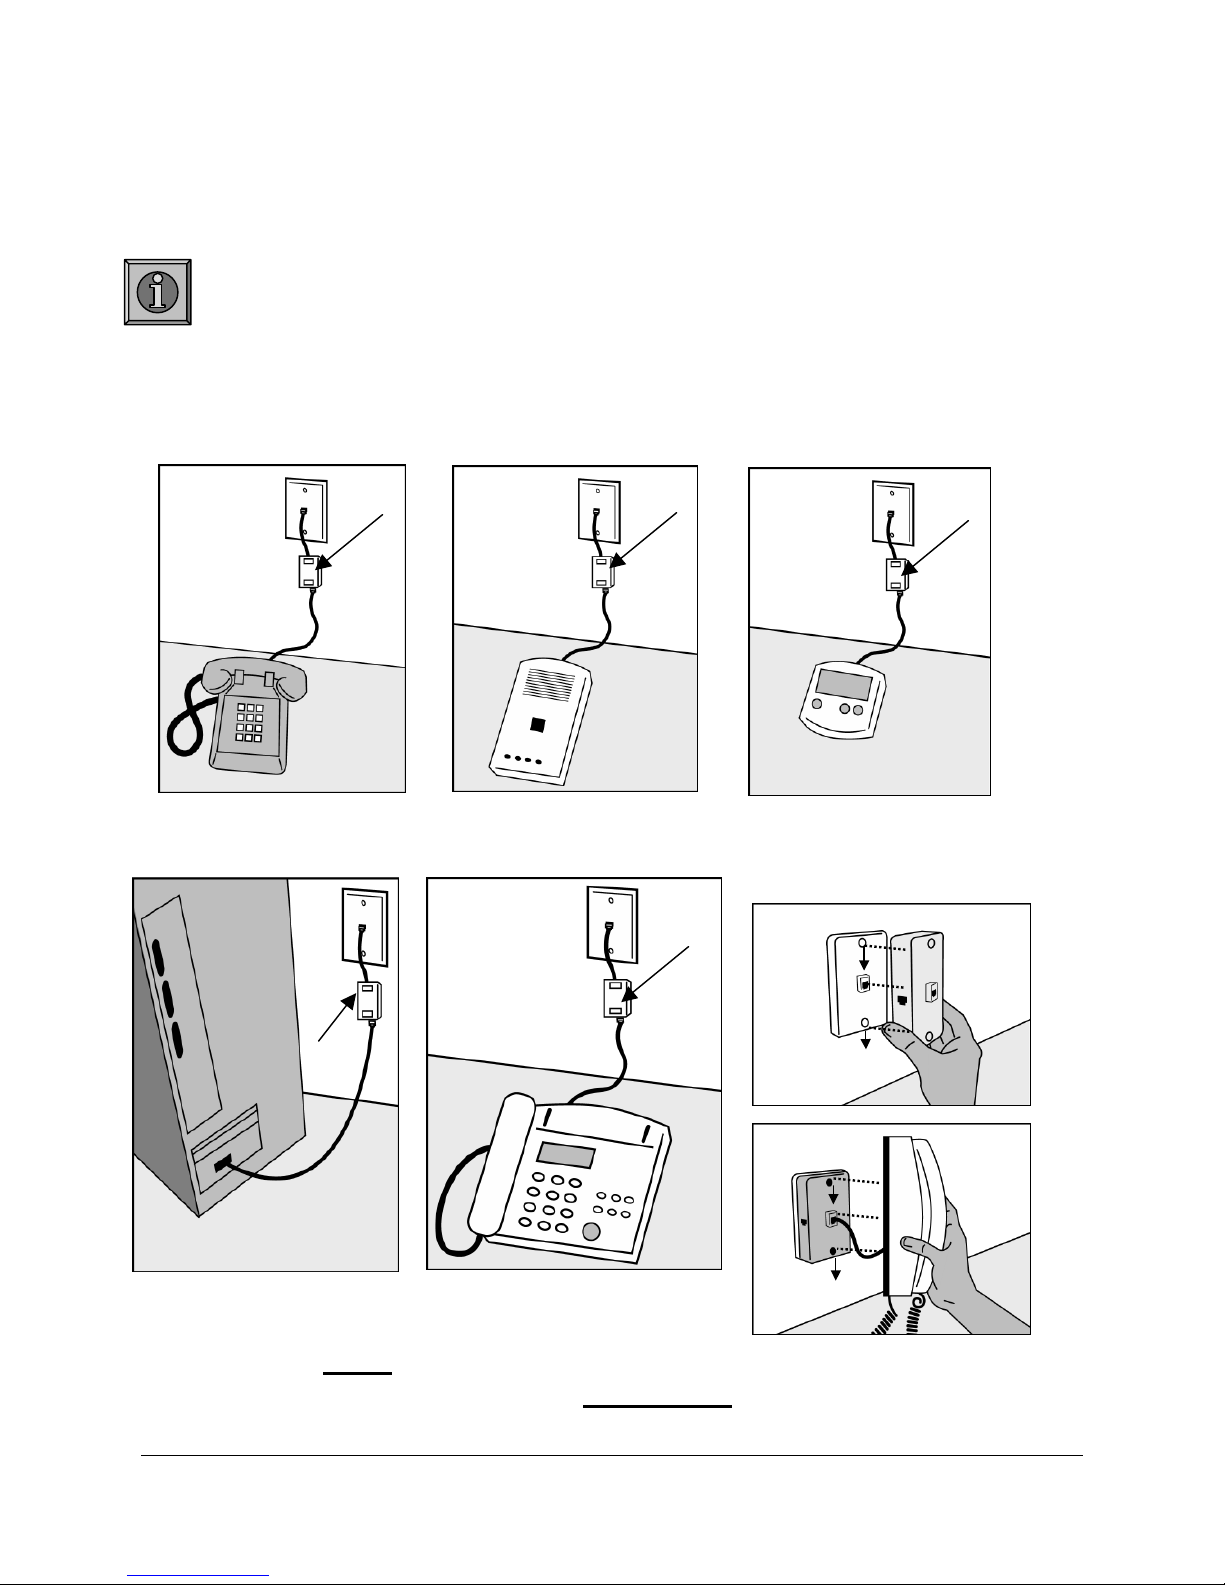
3-2 Install a filter on all other phones and phone devices.
Why do I need a filter on all my other phones and phone devices?
Converting your regular phone line into a high-speed Digital Subscriber Line (DSL) can
cause audible noise (high pitched tones and static) when you talk on the phone. You
need to install a filter on every telephone or device that shares the same phone number as
your DSL line to eliminate this noise.
Other phones
filter
Analog computer modems
Answering machines
filter
Fax machines
filter
Caller ID boxes
filter
Wall mount phones
Use the wall mount filter shown
Wall mount filter
filter
Remember! Don’t install a filter on the data cable that you are
connecting to your DSL modem
Installation Guide for Customer Self-Install: Efficient Networks® 5260, Macintosh Page 6
©2001 SBC Advanced Solutions, Inc. All rights reserved.
.
Page 8
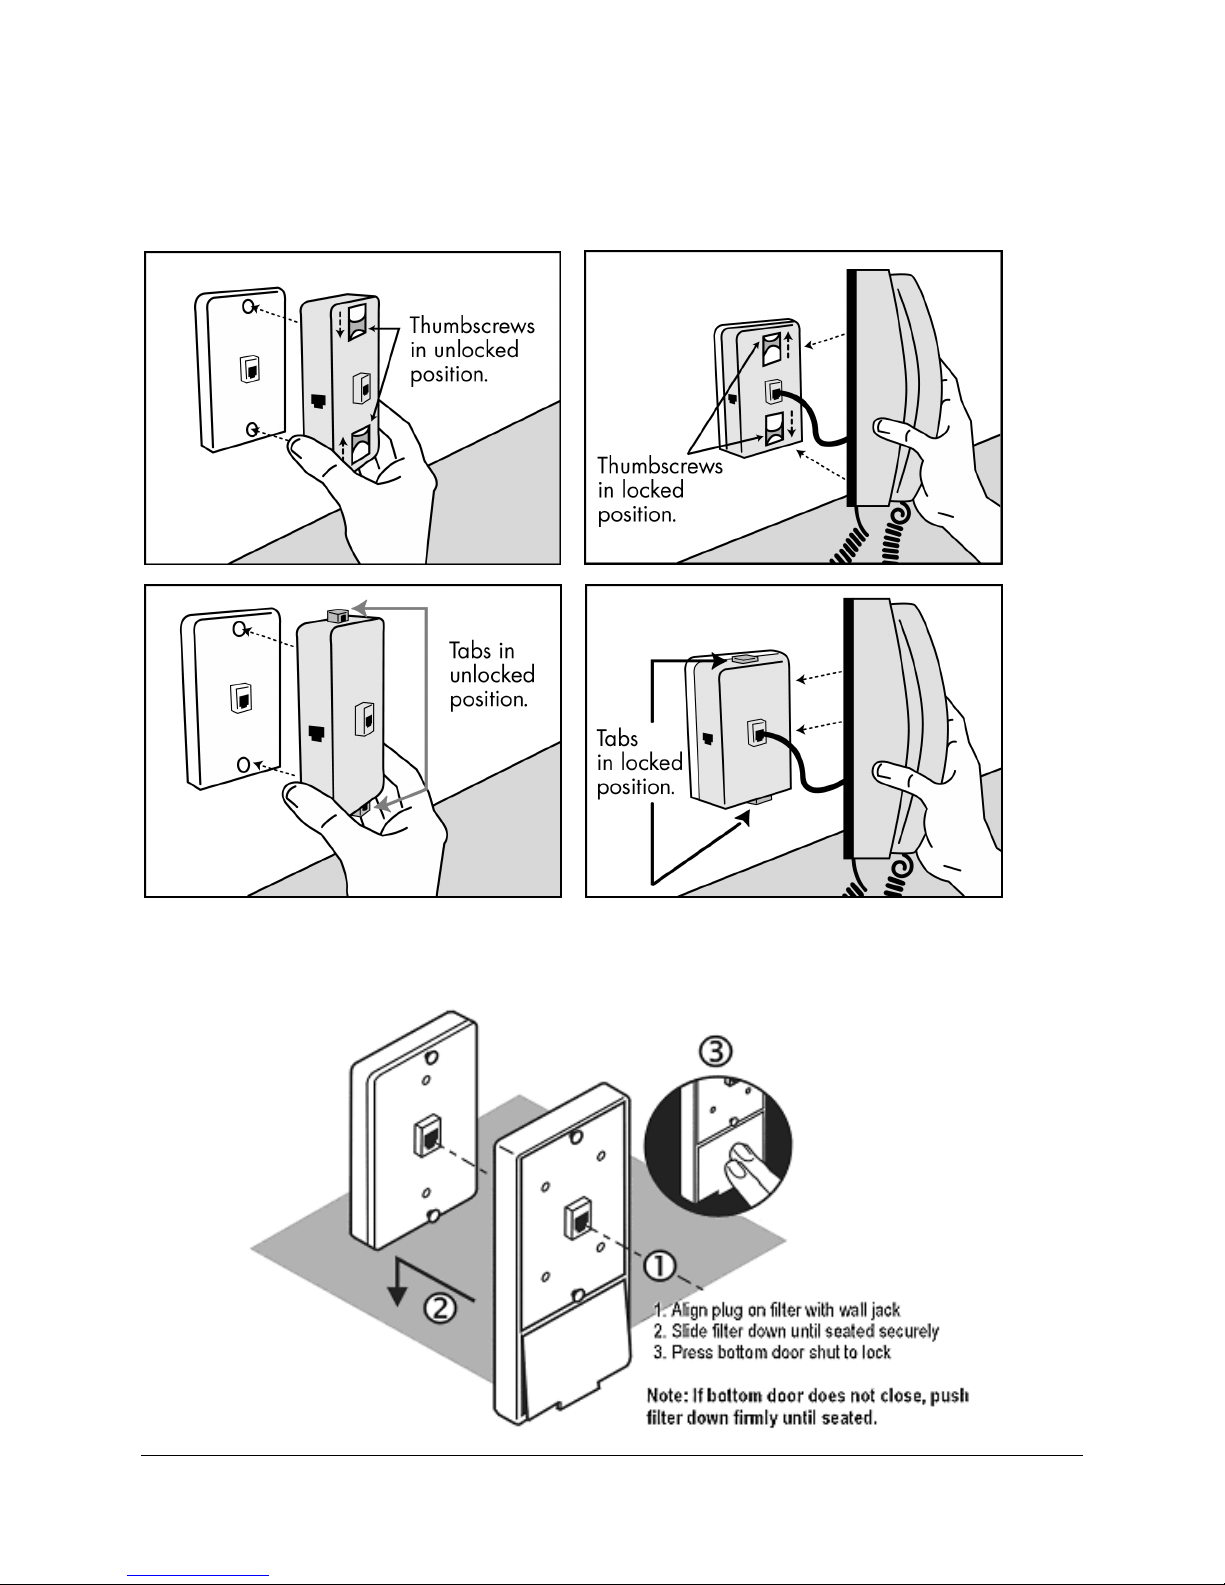
3-3 Other filters you may encounter in your DSL Equipment Kit.
Installation Guide for Customer Self-Install: Efficient Networks® 5260, Macintosh Page 7
©2001 SBC Advanced Solutions, Inc. All rights reserved.
Page 9
Step 4: Choose Your Modem and Minimum Requirements Check
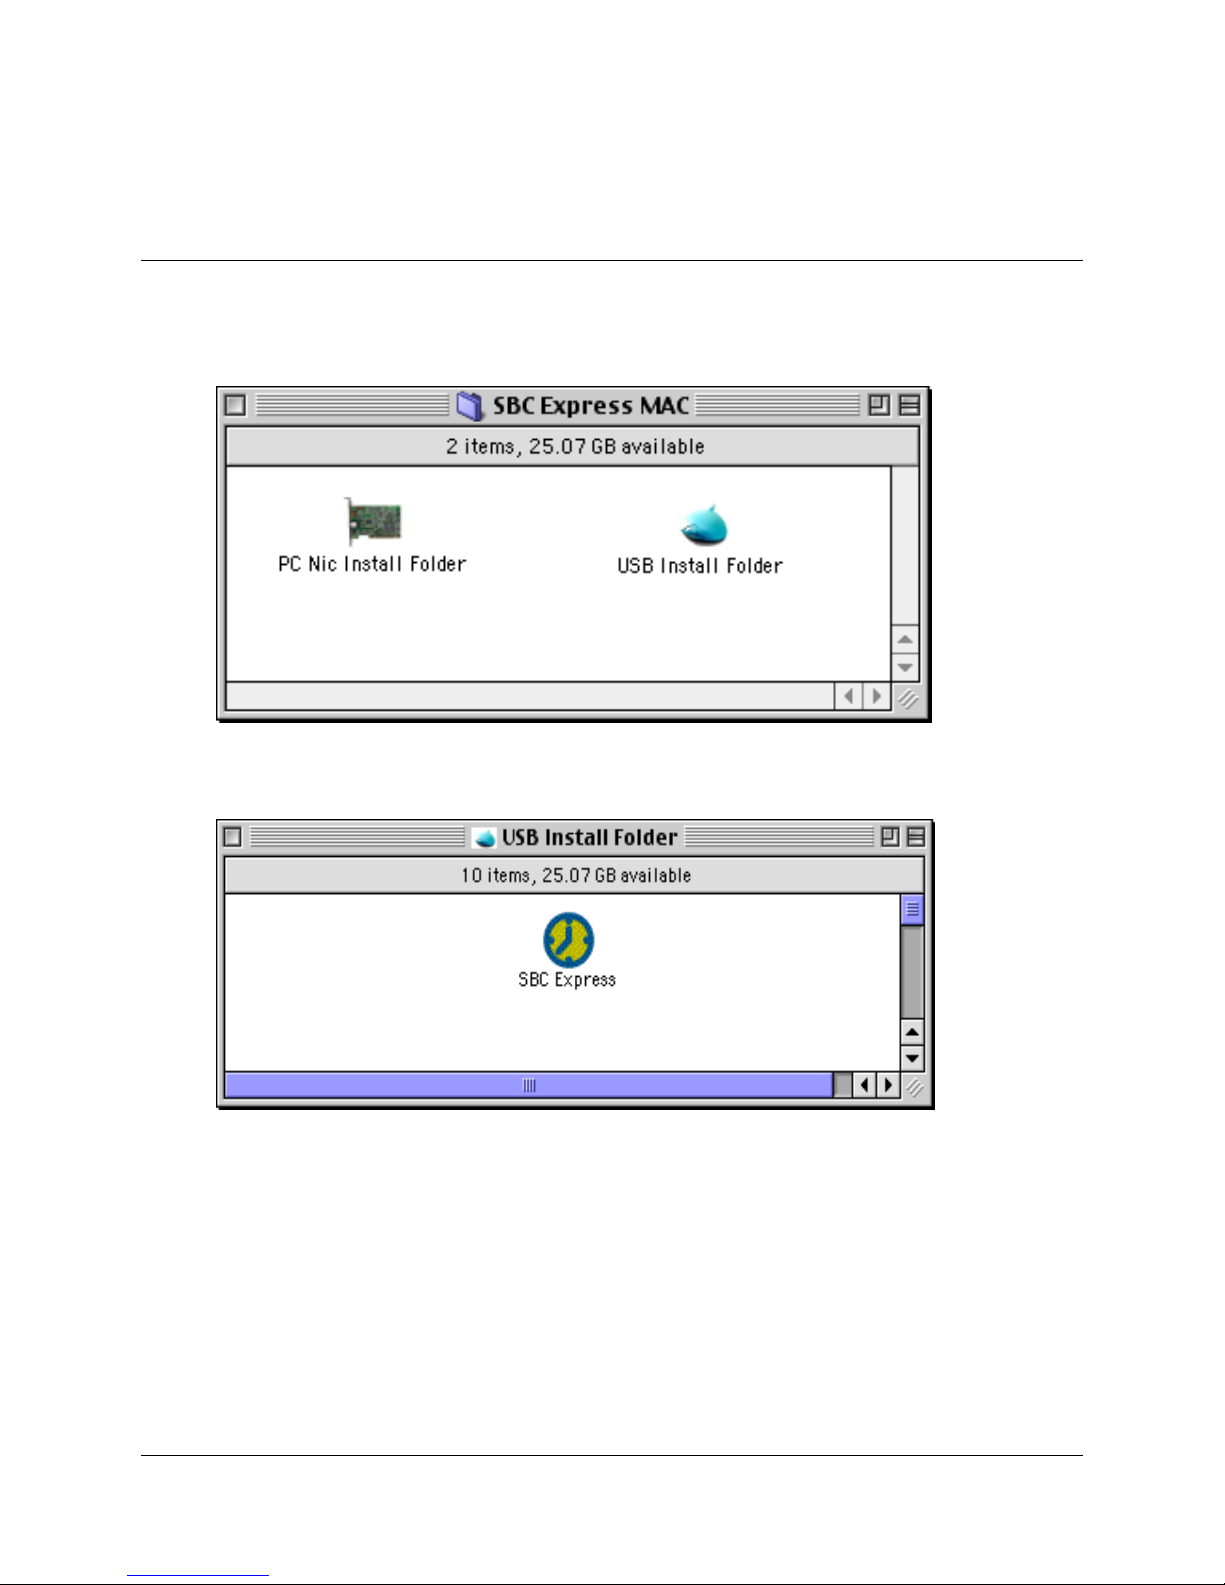
4-1 Insert the SBC Express CD into your CD-ROM drive. Double click the “Install Folder”
icon that matches the modem you are installing.
4-2 Double Click on the SBC Express icon to begin the installation process.
Installation Guide for Customer Self-Install: Efficient Networks® 5260, Macintosh Page 8
©2001 SBC Advanced Solutions, Inc. All rights reserved.
Page 10

4-3 SBC Express displays the Welcome screen. Click Start to proceed.
4-4 SBC Express displays the license agreement. If you agree to the terms, click Accept. If
you do not accept, installation cannot continue.
Installation Guide for Customer Self-Install: Efficient Networks® 5260, Macintosh Page 9
©2001 SBC Advanced Solutions, Inc. All rights reserved.
Page 11

4-5 SBC Express quickly checks your computer system to ensure that it meets the minimum
requirements for DSL service. Click Next to proceed if you meet all requirements.
If your computer meets the minimum requirements, SBC Express
automatically proceeds to the next step. You should continue to Step 6
on page 12.
If you shutdown your computer, leave the CD in the CD-ROM drive,
and SBC Express will continue after you restart.
If your computer does not meet the minimum requirements, SBC Express displays a
message with details of the problem. Your computer must meet the minimum requirements
before you proceed.
If your computer fails the minimum requirements check because it does not have a
Ethernet Adapter installed, please go to Appendix B on page 21.
If your network card is incorrectly installed, SBC Express will help you fix it. See
Troubleshooting SBC Express on page 29 for help troubleshooting network card and
minimum requirement problems.
Installation Guide for Customer Self-Install: Efficient Networks® 5260, Macintosh Page 10
©2001 SBC Advanced Solutions, Inc. All rights reserved.
Page 12

Step 5: Installing the Kingston® hardware (if needed)
IMPORTANT NOTE: Most Macintosh computers already have an Ethernet card installed.
If this is the case with your Macintosh, SBC Express would have reported that
minimum requirements. If you see the following screen, it is not necessary to install the Kingston®
Ethernet Adapter
provided in this equipment package.
you passed the
You may proceed directly to Step 6 on page 12 if you see the screen above. If not, you will
need to install the Ethernet Adapter provided, and this requires that you open your computer.
Please follow the instructions in Appendix B and consult the documentation provided by your
computer vendor to identify any impacts to your warranty.
Installation Guide for Customer Self-Install: Efficient Networks® 5260, Macintosh Page 11
©2001 SBC Advanced Solutions, Inc. All rights reserved.
Page 13

Step 6: Install the Efficient Networks® DSL Modem
Your computer should be turned on. Your modem should be turned OFF.
You should be at the following screen in the SBC Express Installation Software:
6-1 Consult the following diagram to install your modem.
Installation Guide for Customer Self-Install: Efficient Networks® 5260, Macintosh Page 12
©2001 SBC Advanced Solutions, Inc. All rights reserved.
Page 14

6-2 Plug the power cable into the DSL modem and an electrical outlet.
6-3 Connect the data cable to your telephone jack and your DSL modem. There should NOT
be a filter between the data cable and the wall jack.
6-4 Connect the Ethernet cable to the Kingston® Ethernet Port or the built –in Ethernet Port
on the back or side of your Macintosh and to the Ethernet Port on the back of your DSL
modem.
6-5 Turn the DSL Modem power switch ON.
6-6 The Sys, ATM, Enet and DSL lights should all turn solid green within two minutes.
• If the Sys or ATM light does not turn solid green, check your power cable. Are you
connected to a live electrical outlet? Are connections secured? Is the modem turned on?
• If the Enet light does not turn solid green, check your Ethernet connections. Are they
secure? Is the Macintosh turned on?
• If the DSL light does not turn solid green:
• Verify that there is NO in-line filter on the data cable from your DSL modem to
the telephone jack.
• Try another telephone jack in your home.
• Turn off the modem, reboot the computer and then turn the modem back on.
• Verify that you are installing your DSL equipment AFTER the “Service
Completion Date” given to you when you ordered your DSL Internet Service.
• If none of these steps cause the DSL light to turn green, please call your Internet
Service Provider 'help desk'.
6-7 Proceed to Step 7 by clicking Next on the DSL Modem Setup screen.
Installation Guide for Customer Self-Install: Efficient Networks® 5260, Macintosh Page 13
©2001 SBC Advanced Solutions, Inc. All rights reserved.
Page 15

Step 7: Finish Configuring Your System
7-1 SBC Express now prompts you for your first and last name. Please type your first and last
name and then click Next to proceed.
7-2 Enter your 10-digit phone number in the next screen. Click Next to proceed.
Installation Guide for Customer Self-Install: Efficient Networks® 5260, Macintosh Page 14
©2001 SBC Advanced Solutions, Inc. All rights reserved.
Page 16

7-3 SBC Express will install the software necessary for your service. Follow the directions
on the screen to install EnterNet 300.
7-4 During the installation process, you will be prompted for your username and password. If
you have already set up a DSL account with your ISP, type the username and password
given to you.
If you have not yet received ISP account information, enter “user0” and “pass0” for
the username and password fields. Upon completion of this installation, you will be
instructed to follow your ISP instructions. At that time, you will get account information
and further configuration instructions.
Installation Guide for Customer Self-Install: Efficient Networks® 5260, Macintosh Page 15
©2001 SBC Advanced Solutions, Inc. All rights reserved.
Page 17

7-5 Restart computer.
7-6 You have finished software installation for DSL. Click Quit in SBC Express window and
then proceed to Step 8 to configure the connection to your Internet Service Provider.
Installation Guide for Customer Self-Install: Efficient Networks® 5260, Macintosh Page 16
©2001 SBC Advanced Solutions, Inc. All rights reserved.
Page 18

Step 8: Configure Internet Connection Software
8-1. On the desktop locate the Enternet 300 alias. Double click on the icon.
8-2. Select the TCP/IP drop down option from the Protocol Menu.
Installation Guide for Customer Self-Install: Efficient Networks® 5260, Macintosh Page 17
©2001 SBC Advanced Solutions, Inc. All rights reserved.
Page 19

8-3. Change the “connect via” value to the EnterNet option.
8-4. Close the “TCP/IP (DSL) “ window and save the settings.
8-5. Close the EnterNet300 window.
8-6. Double click on the Enternet 300 alias icon.
8-7. If you have entered your ISP provided username and password in step 7-4, you will now
be connected to the internet. Otherwise, call your Internet Service Provider for further
information on connection and registration.
Installation Guide for Customer Self-Install: Efficient Networks® 5260, Macintosh Page 18
©2001 SBC Advanced Solutions, Inc. All rights reserved.
Page 20

Appendices
Installation Guide for Customer Self-Install: Efficient Networks® 5260, Macintosh Page 19
©2001 SBC Advanced Solutions, Inc. All rights reserved.
Page 21

APPENDIX A
Having Trouble?
If the suggestions below don’t resolve your problem, technical support is available from your
Internet Service Provider. Please refer to the Internet Service Provider's information on how to
contact them for technical assistance.
I can’t open my computer case. What do I do?
• Consult your computer manufacturer’s Owner’s Manual.
• Call your computer manufacturer’s Support Line.
I can’t connect. What do I do?
• Make sure there is no filter on the phone jack/cord connected to your DSL modem
• Check your Ethernet cable connection. Is it secure?
• Verify that you are installing your DSL equipment AFTER the “Service Completion Date”
given to you when you ordered your DSL Internet Service.
Installation Guide for Customer Self-Install: Efficient Networks® 5260, Macintosh Page 20
©2001 SBC Advanced Solutions, Inc. All rights reserved.
Page 22

APPENDIX B: Installing the Kingston® hardware (if needed—see
Step 5)
IMPORTANT NOTE: If your computer already has an Ethernet card installed and you
passed the minimum requirements step in the SBC Express Installation Software, it is not
necessary to install the Kingston® Ethernet Adapter
you have a newer Macintosh (
do not need to install the provided Kingston
iMac®, iBook®, and G4 Cube®) with a built in Ethernet port you
® Ethernet Adapter.
provided in this equipment package. If
If you shutdown your computer, leave the CD in the the CDRom drive,
and SBC Express will continue after you restart.
Installation Guide for Customer Self-Install: Efficient Networks® 5260, Macintosh Page 21
©2001 SBC Advanced Solutions, Inc. All rights reserved.
Page 23

Installing the Kingston® Ethernet Adapter
• Follow steps B-1 through B-10 below for Desktop Macintosh installations.
• For Laptops
, skip to step B-11.
DESKTOP Systems
B-1 Click Quit in SBC Express and then turn off all peripheral devices. Remember to
leave the SBC Express CD in the CD-ROM drive.
B-2 Unplug the power cord for your computer from the electrical outlet.
B-3 Open the case of your computer (review your computer manufacturer’s Owner’s Manual
for specific instructions).
B-4 Touch the computer chassis (metal frame) before touching the Kingston® Ethernet
Adapter. This helps to protect the Kingston® Adapter from static electricity.
B-5 Locate an available PCI slot (usually white in color). You may use any available PCI
slot. Make sure you are looking downwards on the PCI slot. You may need to turn the
computer on its side to accomplish this (review your computer manufacturer’s Owner’s
Manual for specific instructions).
B-6 Remove the metal PCI slot cover from the unused PCI slot, and retain the screw.
PCI Slot
Re move P CI s lot
cover
B-7 Carefully insert the Kingston® Ethernet Adapter into any empty PCI slot. Make sure the
card is completely seated by pressing firmly.
Installation Guide for Customer Self-Install: Efficient Networks® 5260, Macintosh Page 22
©2001 SBC Advanced Solutions, Inc. All rights reserved.
Page 24

B-8 Verify that the end bracket is flush against the chassis. Make sure the gold connectors
along the base of the Kingston® Ethernet Adapter are completely and evenly inserted into
the PCI slot.
B-9 Fasten the card into the computer chassis with the screw you set aside earlier.
B-10 Replace the computer cover. Plug the power cord back into the electrical outlet and turn
on your Macintosh, making sure the SBC Express CD is in the CD-ROM drive. Proceed
to step B-15.
Installation Guide for Customer Self-Install: Efficient Networks® 5260, Macintosh Page 23
©2001 SBC Advanced Solutions, Inc. All rights reserved.
Page 25

LAPTOP Systems- Installing the Kingston® Ethernet Adapter
B-11 Click Quit in SBC Express and then turn off all peripheral devices. Remember to
leave the SBC Express CD in the CD-ROM drive.
B-12 Insert the Kingston® Card into your computer’s PCMCIA Type II or Type III slot.
B-13 Carefully push the Media Access Module (MAM) into the socket on the Card until the
locking tabs click into place.
B-14 Power up your laptop after making sure the SBC Express CD is still in the CD-ROM
drive.
Installing the Kingston® Software
B-15 Insert the SBC Express Installation CD. Open the “Drivers” folder. Open the
“Kne111tx” (desktop) or “Knepc2t” (laptop) folder.
B-16 Double click on the Installer icon.
Installation Guide for Customer Self-Install: Efficient Networks® 5260, Macintosh Page 24
©2001 SBC Advanced Solutions, Inc. All rights reserved.
Page 26
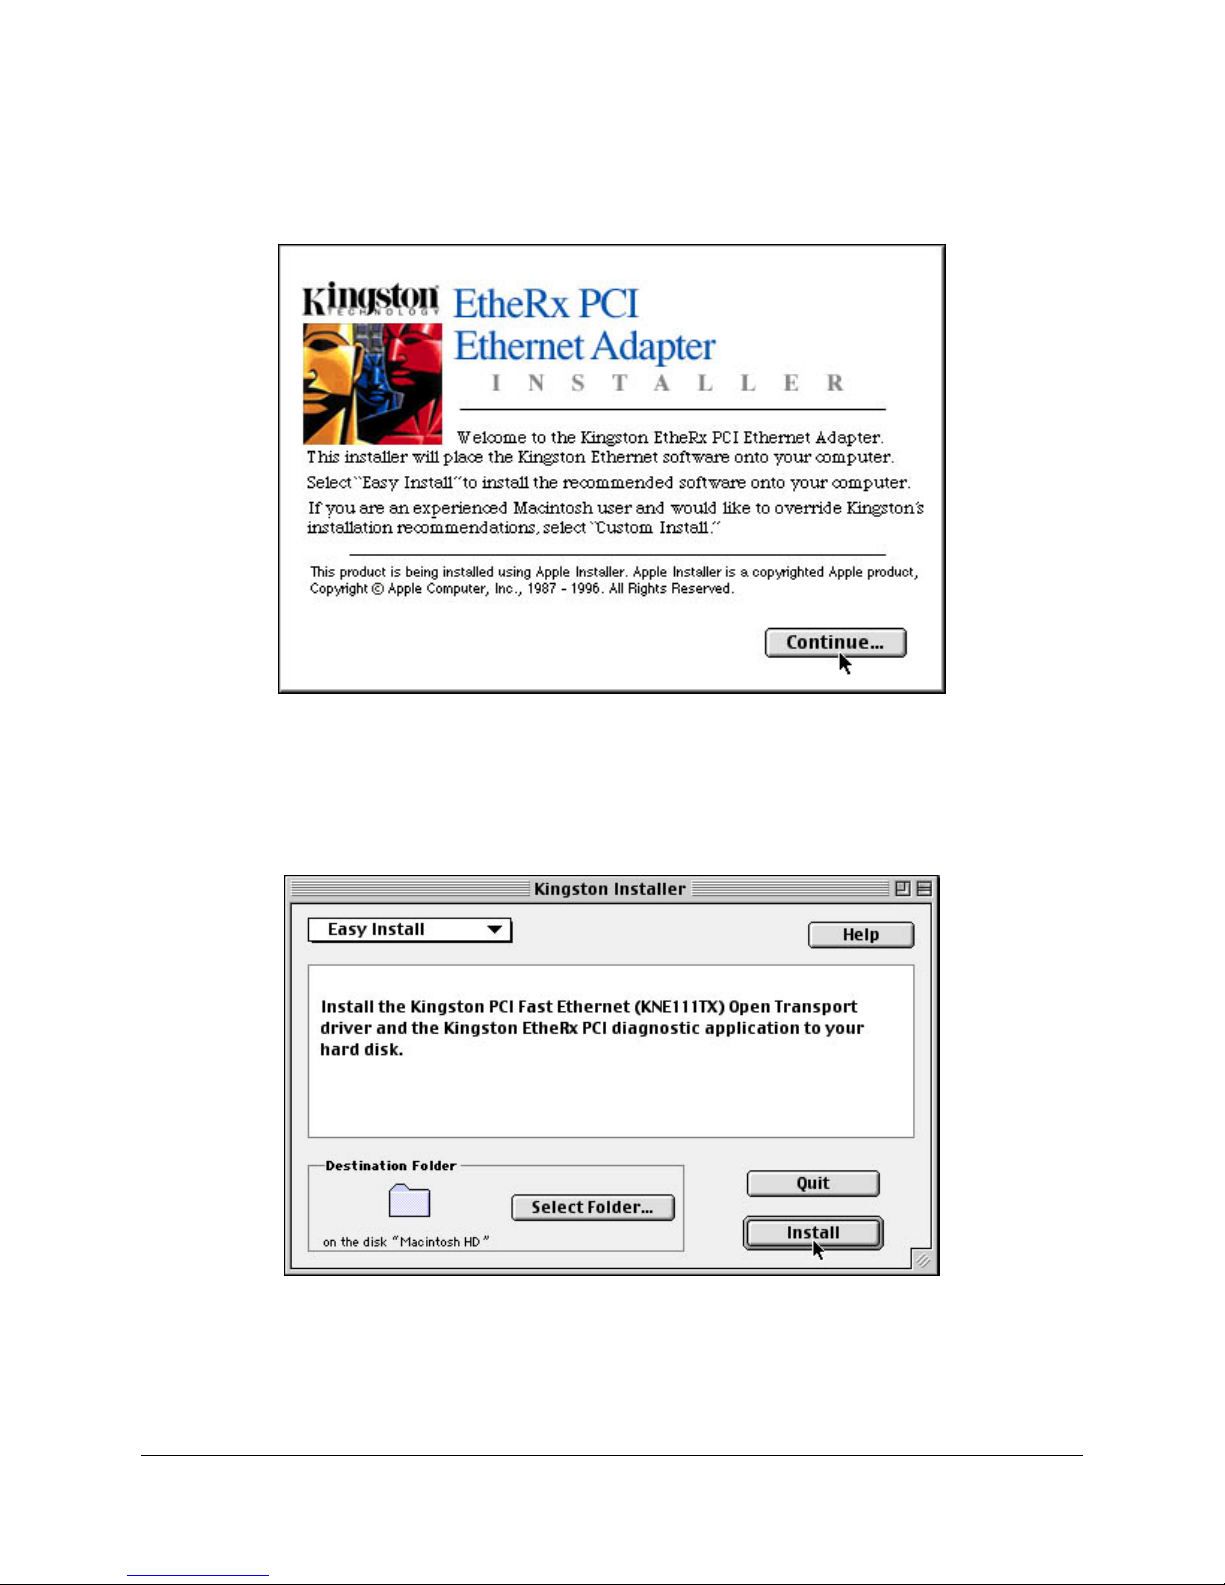
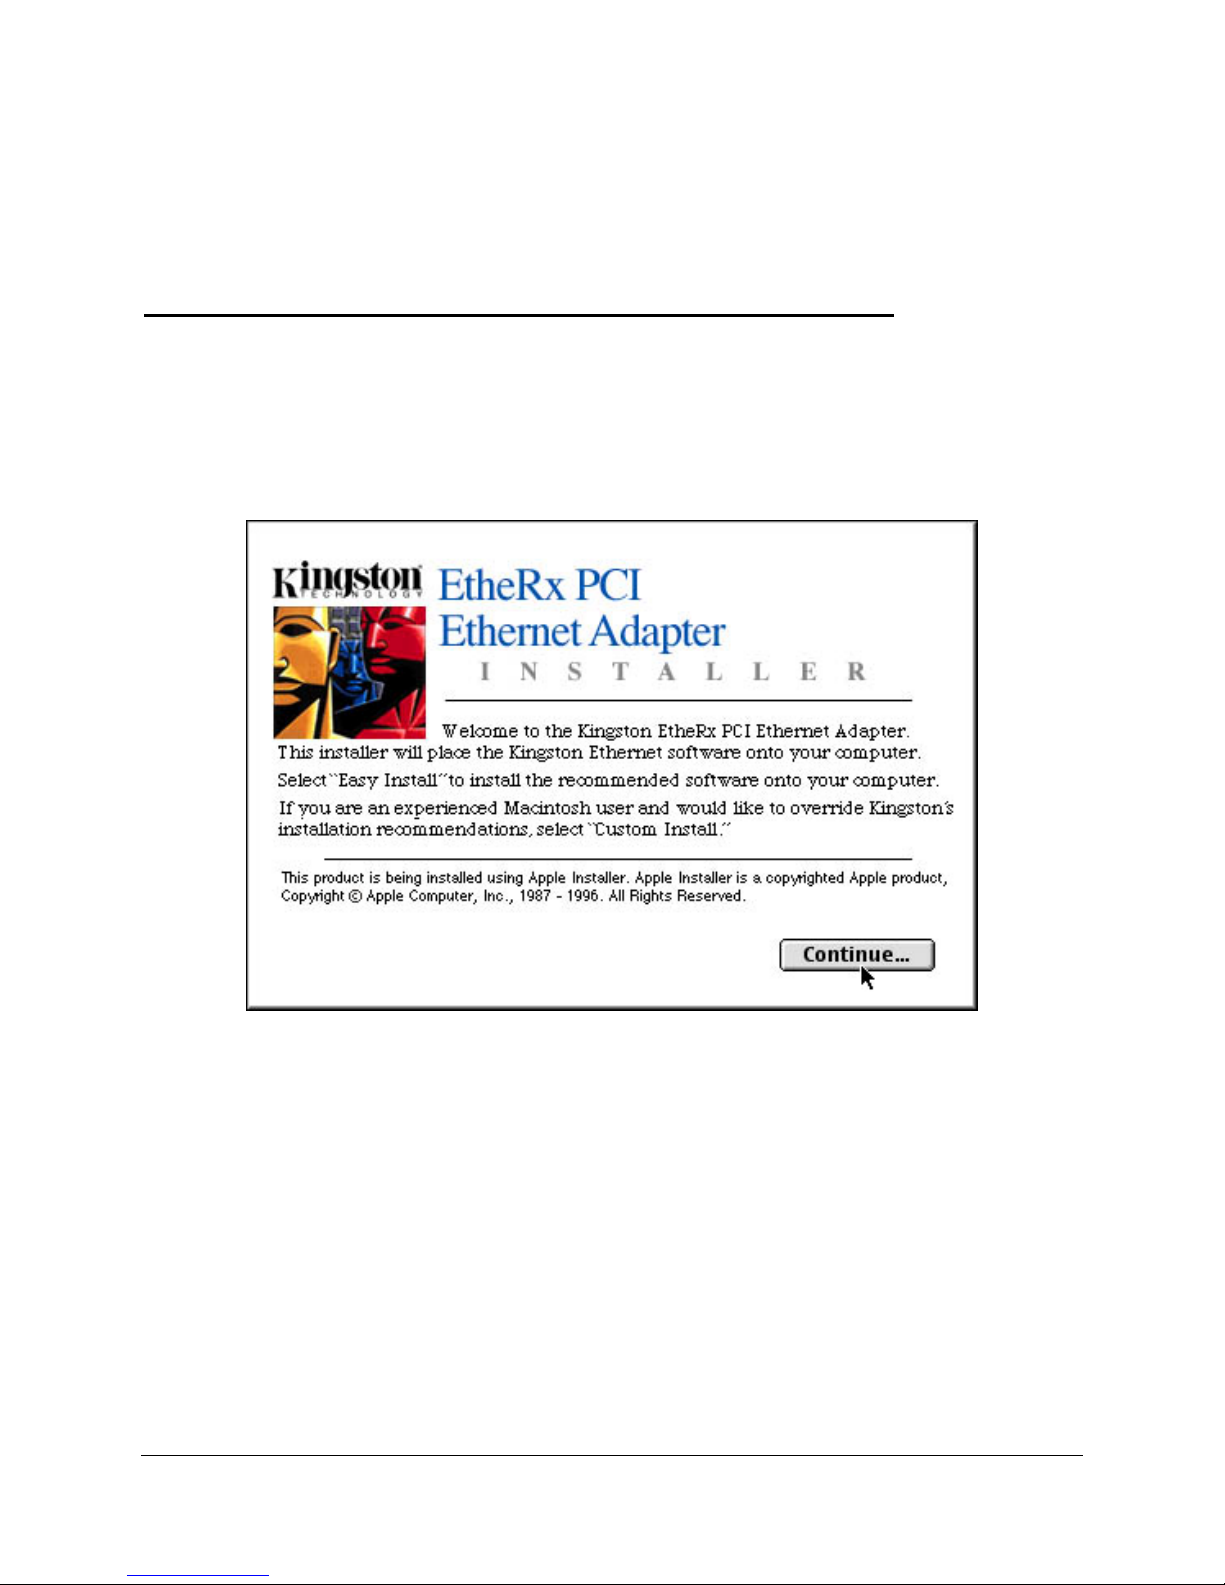
B-17 From the Kingston® Welcome screen, click on Continue to proceed.
B-18 Click on the Install button in the bottom right corner of the Kingston® Installer window
to proceed with the default Easy Install option. This option will install the Kingston®
driver and diagnostics application.
B-19 Restart the System when prompted to complete the installation.
B-20 Proceed to Step 6 (page 12).
Installation Guide for Customer Self-Install: Efficient Networks® 5260, Macintosh Page 25
©2001 SBC Advanced Solutions, Inc. All rights reserved.
Page 27
Appendix C
I want to uninstall/reinstall the Kingston® Adapter. What do I do?
1. Insert the SBC Express Installation CD. Open the “Drivers” folder. Open the “Kne111tx”
(desktop) or “Knepc2t” (laptop) folder.
2. Double click on the Installer icon.
3. From the Kingston® Welcome screen, click on Continue to proceed.
Installation Guide for Customer Self-Install: Efficient Networks® 5260, Macintosh Page 26
©2001 SBC Advanced Solutions, Inc. All rights reserved.
Page 28
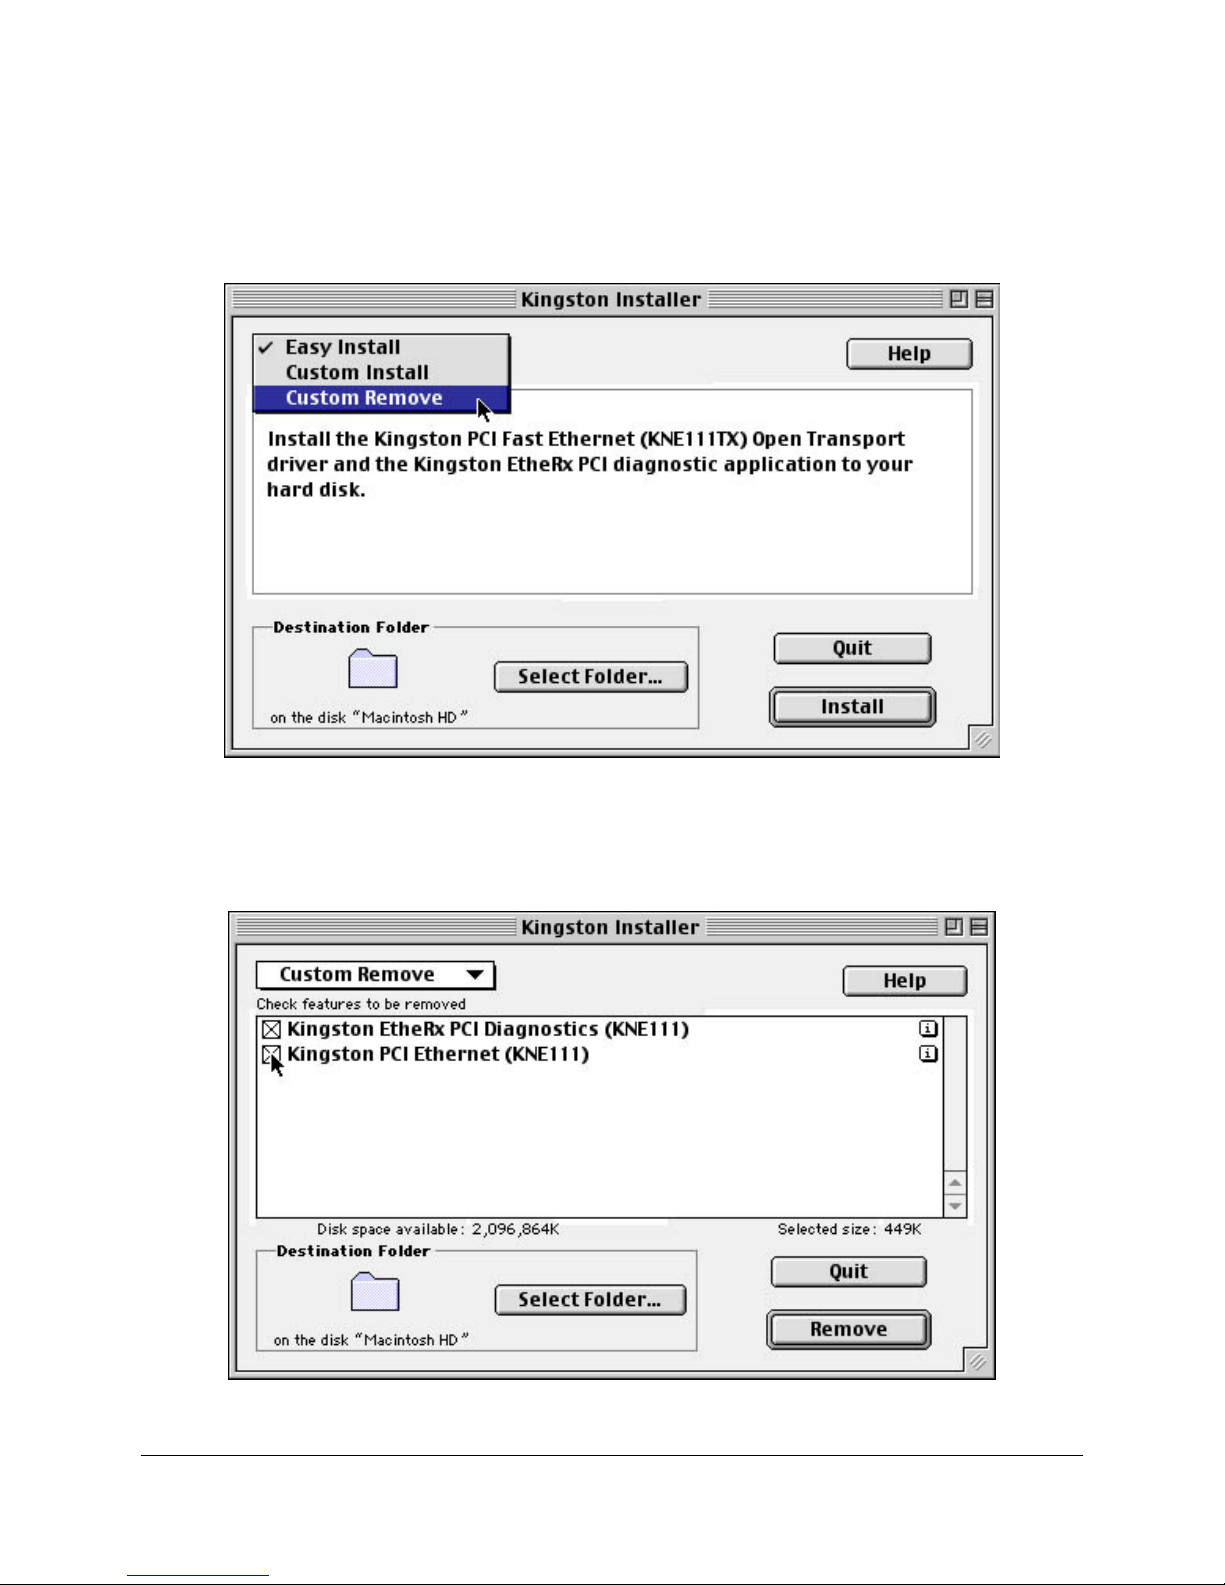
4. Select the Custom Remove option from the pulldown menu in the upper left corner.
5. Place an X in the boxes to select the components to remove and click the Remove button in
the lower right corner of the window.
Installation Guide for Customer Self-Install: Efficient Networks® 5260, Macintosh Page 27
©2001 SBC Advanced Solutions, Inc. All rights reserved.
Page 29

6. Click Restart to complete the Kingston® software removal.
7. Once the computer has restarted, select Shut Down to power down the desktop or laptop.
8. After the computer shuts down, unplug the computer and any peripheral devices.
9. Remove the Kingston® Adapter Card
DESKTOP: For the Internal Kingston® Ethernet Adapter Card:
• Open the computer case using your computer manufacturer’s instructions and then
remove the screw holding card in place.
• Carefully remove the Kingston® Adapter card from the PCI slot.
LAPTOP For the PCMCIA Card
• Press the release button (consult your computer manufacturer’s Owner’s Manual if
you don’t know where this button is located).
• Slide the Card completely out of the slot.
10. Reinstall the card following procedures in Step 4. Desktop users should try a different PCI
slot, if possible.
Installation Guide for Customer Self-Install: Efficient Networks® 5260, Macintosh Page 28
©2001 SBC Advanced Solutions, Inc. All rights reserved.
Page 30

APPENDIX D
Troubleshooting SBC Express
Please refer to this list if you are having problems using SBC Express or if you receive an error
message. If after troubleshooting, you are still having problems, then you should contact the
numbers listed in Appendix A.
Step Problem Solution
Minimum
Resources
Installing
Network
Interface Card
Incompatible
Adapter
Missing Internet
Protocol
Disabled
Network Adapter
Ping Test The Ping Test is usually accomplished within the
SBC Express verifies minimum requirements on
several resources including hard drive space, RAM,
operating system level, and processor speed and
family.
If any of these resources are under the required value,
an error will display describing which resource did not
meet the requirement.
When installing Network Interface Cards the
installation process may ask for the original installation
disk.
This scenario can occur when a machine had a
previous NIC or Network Adapter installed, but the
physical device is missing or was misconfigured.
This scenario can occur if Client for Microsoft
Networks is not installed with the TCP/IP protocol or
if the NIC is installed without binding TCP/IP to the
NIC.
This scenario can occur when a NIC is present in the
system, yet the adapter has been disabled.
Configure TCP/IP step, where SBC Express pings the
default gateway. An explicit IP address can also be
used.
Update your computer to the recommended
resource level.
You may have to provide an installation CDROM for the installation of the drivers to be
successful.
Use the “Fix” button to launch the appropriate
system control panel along with context sensitive
help. The help provided will guide you through
the steps to disable or remove the adapter.
Use the “Fix” button to launch the appropriate
control panel and context sensitive help to guide
you in binding TCP/IP to the network adapter.
Use the “Fix” button with context sensitive help
to guide you through enabling the adapter.
Failure during this test can occur from invalid
network settings, the Ethernet cable not being
plugged in, the DSL modem not being in synch,
or if the specified IP address does not allow a
ping.
Make sure your Ethernet cable is plugged in and
powercycle your DSL modem. Use the “Retry”
button to try the test again.
DNS Test The DNS Test will determine the currently defined
DNS servers, attempt to ping them, and upon a
successful ping, will resolve a specified hostname to an
IP address.
This concludes the DSL Equipment Installation Guide
Installation Guide for Customer Self-Install: Efficient Networks® 5260, Macintosh Page 29
©2001 SBC Advanced Solutions, Inc. All rights reserved.
This test can fail if the DNS server is invalid. If
you entered static IP information, ensure you
entered the DNS servers correctly.
 Loading...