

Page 1

Page 2
Page 3
Page 4
Page 5
Page 6

Italiano 3
English 23
Français 42
Deutsch 63
Español 84
Slovensky 105
Português 125
Ελληνικα 146
Türkçe 167
Česky 187
Pуccкий 207
Polski 228
Page 7

TRANSLATION OF ORIGINAL INSTRUCTIONS
INTRODUCTION
For correct use of the machine and to avoid
accidents, do not start working until you have
re ad this manua l careful ly. You will find
explanations concerning the operation of the
various parts plus instructions for necessary
checks and relative maintenance.
NOTE: The descriptions and illustrations
contained in this manual are not binding. The
ma nu fa ct ur er re se rv es th e ri gh t t o
und ertake any mo dificat ions it deems
necessary without revising this manual.
In addition to the operating instructions, this
manual contains paragraphs that require your
special attention. Such paragraphs are marked
with the symbols described below:
WARNING: where there is a risk of an accident
or personal, even fatal, injury or serious damage
to property.
CAUTION: where there is a risk of damaging the
machine or its individual components.
WARNING
RISK OF HEARING DAMAGE
IN NORMAL CONDITIONS OF USE, THIS
MACHINE MAY EXPOSE THE OPERATOR TO A
PERSONAL DAILY NOISE LEVEL EQUAL TO OR
HIGHER THAN
85 dB (A)
CONTENTS
1. SAFETY PRECAUTIONS (precautions
for using the machine safety)
2. SYMBOLS AND SAFETY WARNINGS
(explanations on how to identify the
machin e and the me aning of t he
symbols)
3. MAIN COMPONENTS (position of the
main parts that make up the machine)
4. ASSEMBLY (explanations on how to
remove the packaging and assemble
detached parts)
5. STARTING 26
6. STOPPING THE ENGINE 29
7. USING THE MACHINE 29
8. TRANSPORTING 32
23
25
25
25
9. MA IN TE NA NCE ( all i nf or mat io n
required to keep the machine at peak
efficiency)
10. STORAGE 35
11. ENVIRONMENTAL PROTECTION
(advice on using the machine in ways
that respect the environment)
12. TECHNICAL DATA (a summary of the
main specifications of the machine)
13. DECLARATION OF CONFORMITY 40
14. WARRANTY CERTIFICATE (a summary
of the warranty conditions)
15. TROUBLESHOOTIN G (helps you to
quickly solve any problems you may encounter while using the machine)
1. SAFETY PRECAUTIONS
WARNING
- The machine, when used correctly, is a
us ef ul a nd e ff ec tiv e to ol ; i f use d
inc orrect ly or witho ut the nece ssary
pr ecau tio ns, it can be dan gero us. To
ensure your safety and comfort, always
observe the safety instructions given here
below and throughout this manual.
- E x po s ur e t o v i br at i on s t h ro ug h
prolo nged use of combus tion enginedriven tools could cause blood vessel or
nerve damage in the fingers, hands, and
wr ists of pe ople prone to cir cul atio n
di so rd er s o r a bn or ma l s we ll in gs .
Prolonged use in cold weather has been
li nk ed t o b loo d ves se l da ma ge i n
otherwise healthy people. If symptoms
occur such as numbne ss, pain , loss of
strength, change in skin colour or texture,
or loss of feeling in the fingers, hands, or
wrists, discontinue the use of this tool and
seek medical attention.
- T he ig nit ion s yst em of your m ach ine
produces an electromagnetic field of very
low intensity. This field could interfere
with certain pacemakers. To reduce the
risk of serious or fatal injury, persons with
pacemakers should consult their doctor or
the m anufact urer o f th e p acem aker
before using this machine.
33
36
37
40
41
GB
23
Page 8

WARNING: National regulations may limit
GB
the use of the machine.
1 - Do not operate the machine unless you
have received specic instruction on its use.
First time users must familiarise themselves
thoroughly with the operation of the
machine before working in the eld.
2 - The machine must only be used by adults
in good physical condition who are familiar
with the operating instructions.
3 - Never use the brush cutter when you are
tired or fatigued or if you have taken alcohol,
drugs or medication.
4 - Wear appropriate clothing and safety articles
such as: boots, heavy-duty trousers, gloves,
protective eyewear, ear protection and
protective helmet. Use clothing which is
close-tting but comfortable.
5 - Do not allow children to use the brush cutter.
6 - Do not allow other people to remain within
15 metres during brush cutter use .
7 - Before using the brush cutter, make sure
that the blade xing bolt is well-tightened.
8 - The brush cutter must be equipped with
the cutting accessories recommended by
the manufacturer (look pag. 38).
9 - Never use the brush cutter without the blade
guard or the head.
10 - Before starting the engine, make sure that
the blade is free to move and is not in contact
with any foreign objects.
11 - Every now and then while working, stop
the engine and check the blade. Replace it
at the rst sign of cracks or breaks.
12 - Only use the machine in well-ventilated
places, do not use in explosive or ammable
atmospheres or in closed environments.
13 - Never touch the blade or attempt any
maintenance work while the engine is
running.
14 - It is prohibited to t any device other than
that supplied by the manufacturer.
15 - Do not use a machine that has been
damaged, badly repaired, improperly
assembled or modied. Do not attempt to
remove or bypass any of the safety devices.
Only use cutting attachments indicated in
24
the table.
16 - All labels with health hazards must be kept
in good conditions. In case of damage or
deterioration, immediately substitute them
(Fig. 24).
17 - Do not utilize the ma chine for uses
different from the ones specified in the
manual (see pag. 29).
18 - Never leave the machine unattended with
the engine running.
19 - Do not start the engine with the arm not
mounted.
20 - Check the brush cutter daily to be sure that
components and safety devices are full
functioning properly.
21 - Do not attempt to carry out operations
or repairs that are not part of the normal
maintenance. See the authorised dealer.
22 - When disposing of the machine at the
end of its u seful l ife, think o f the
environment. Take your old unit to your
dealer who will be able to dispose of it in
a proper manner.
23 - Only experienced p ersons who are
familiar with the operation and safe use of
this machine should use it. If you lend the
blower to someone, also give them the
instruction manual and ensure that they
read it before using the machine.
24 - All saw service, other than the operations
shown in the present manual, should be
performed by competent personnel.
25 - Keep this manual on hand and consult it
before each use of the tool.
26 - Please note that the owner or the user is
responsible for any accidents or damage to
third parties or their property.
WARNING
- Never use a machine with faulty safety
eq ui pm en t. Th e ma ch in e’ s s af et y
e qu ip me nt mu st b e c he ck ed a nd
maintained as described in this section. If
your machine fails any of these checks
contact an Authorised Service Centre to
get it repaired.
- Any use of the machine not expr essly
en vi sa ge d in t hi s m anu al i s t o be
Page 9

co nsi der ed impro per and therefore a
source of risk to people and property.
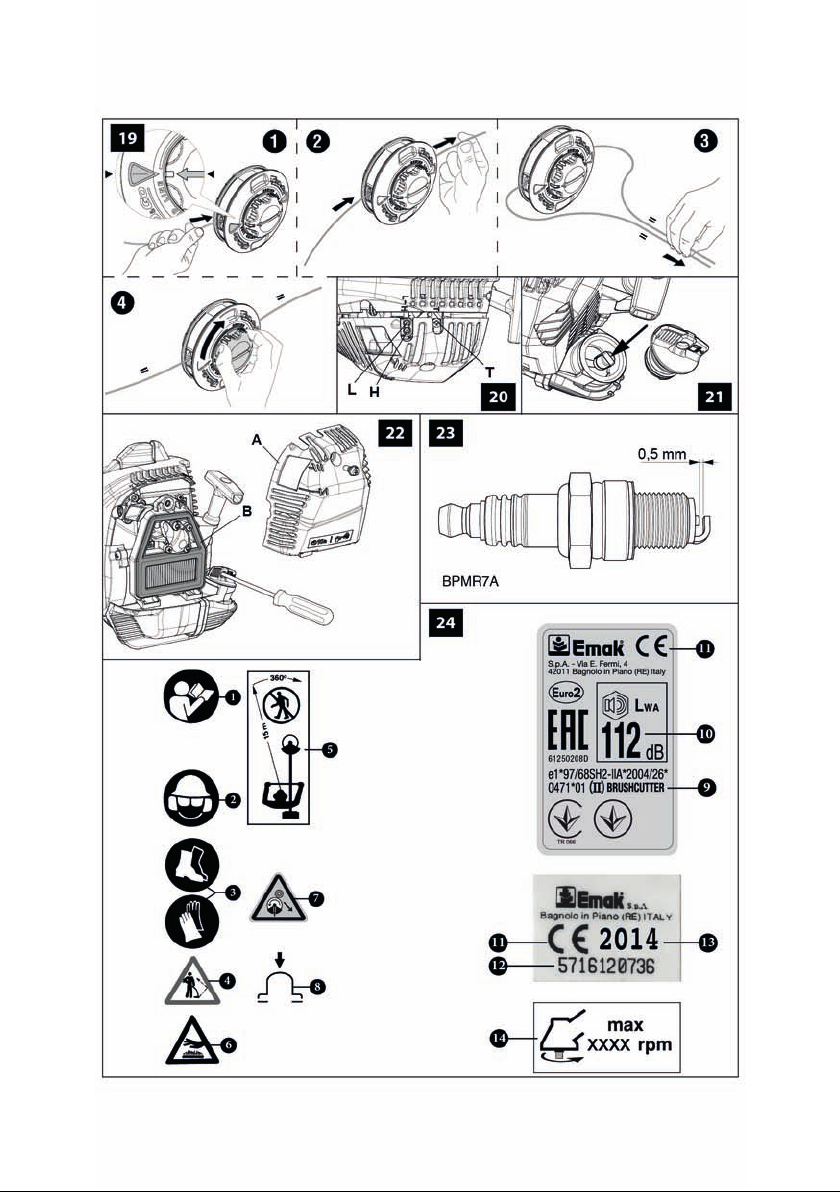
2. SYMBOLS AND SAFETY WARNINGS (Fig.24)
1 - Read operator’s instruction book before
operating this machine.
2 - Wear head, eye and ear protection.
3 - Wear strong boots and gloves when cutting
with metal or plastic blades.
4 - Be aware that objects can be thrown.
5 - Keep bystanders away 15 m.
6 - WARNING! – The surface can be hot!
7 - Warning! Kickback it’s danger.
8 - Purge Bulb.
9 - Type of machine: BRUSH CUTTER.
10 - Guaranteed sound power level.
11 - CE conformity marking.
12 - Serial number.
13 - Year of manufacture.
14 - Max. speed of output shaft, RPM
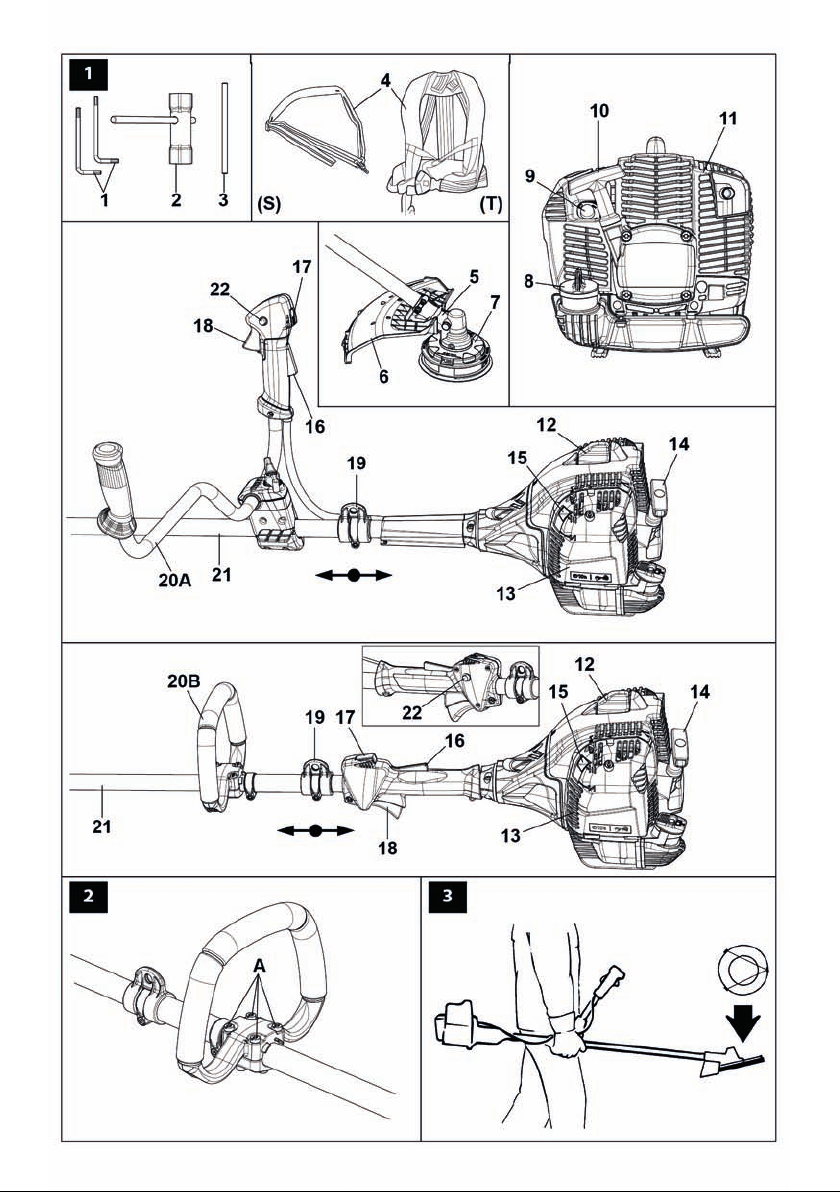
3. MAIN COMPONENTS (Fig.1)
1÷3 - Tools supplied
4 - Harness
5 - Bevel gear
6 - Curved guard
7 - Nylon line head
8 - Fuel tank cap
9 - Purge Bulb
10 - Carburettor adjustment screws
11 - Muer guard
12 - Spark plug
13 - Air lter
14 - Starter Handle
15 - Choke Lever
16 - Throttle trigger lockout
17 - STOP button
18 - Throttle lever
19 - Harness attachment
20 - Handle
21 - Shaft arm
22 - Button half-throttle
4. ASSEMBLY
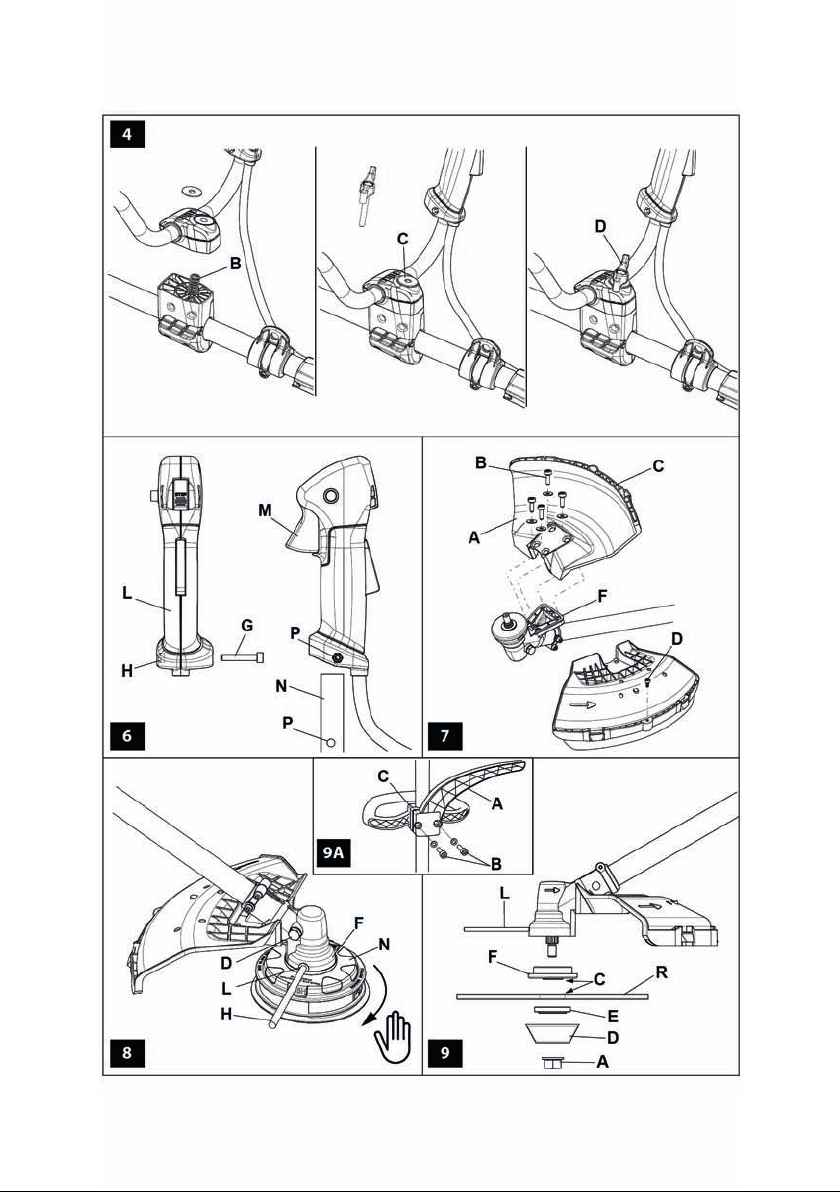
FITTING THE SAFETY GUARD (Fig.7)
Fit the blade guard (A) to the shaft arm with screws
in a position allowing the operator to work safely (B).
NOTE: use the guard (C) only with nylon head.
Secure the guard (C) to the protection (A) by
means of the screw (D).
FITTING THE NYLON LINE HEAD (Fig. 8)
Put the upper (F) ange in place. Put the head xing
pin (H) in the appropriate hole (L) and tighten the
head (N) anti-clockwise by hand.
FITTING THE DISK (Fig. 9)
Fix the blade (R) onto the upper ange (F) making
sure that the rotation direction is correct.
Fix the lower ange (E), the cup (D) and tighten bolt
(A) anti-clockwise.
Put the pin provided in the appropriate hole (L)
to block the blade and allow the bolt (A) to be
tightened to 2.5 kgm (25 Nm).
WARNING – Collar (see arrows C, Fig.9)
must locate in blade’s mounting hole.
FITTING THE HANDLE (Fig. 2)
Fit the handle onto the shaft arm and secure it
using screws (A). The handle position is calculated
depending on the requirements of the operator.
ASSEMBLING THE SAFETY BOOM (Fig. 9A)
When using the disc instead of nylon line head, it
is necessary to set up the “safety boom”. Fix the
boom (A) under the attachment (C) of handle (20B,
Fig. 1) by means of the screws (B). Taking care to
verify the “safety boom” being on the left side of
the brushcutter.
ASSEMBLING THE BIKE HANDLE (Fig. 4)
- To x the handle, insert the spring (B) and washer
(C)
- Line up the handlebar at a right angle to the
drive tube.
- Then tighten the clamp with the screw (D)
MOUNTING THE CONTROL HANDLES (Fig. 6)
- Loosen the screw (G, Fig.6). The nut (H) remains
in the control handle (L).
- Push the control handle (L) (throttle trigger M
25
GB
Page 10
must point toward the gearbox) onto the bike
handle (N) so that the holes (P) line up.
- Insert screw (G) and tighten down rmly.
GB
WARNING: M ake sure that al l
components are connected properly and all
screws tightened.
APPROVED POWER TOOL ATTACHMENTS
The following Emak attachments may be mounted
to the basic power tool:
EH 25 Hedge trimmer (adjustable) (1) (2)
EH 50 Hedge trimmer (adjustable) (1) (2)
EP 100 Pole pruner (2)
EP 120 Pole pruner (2)
PREPARING TO WORK
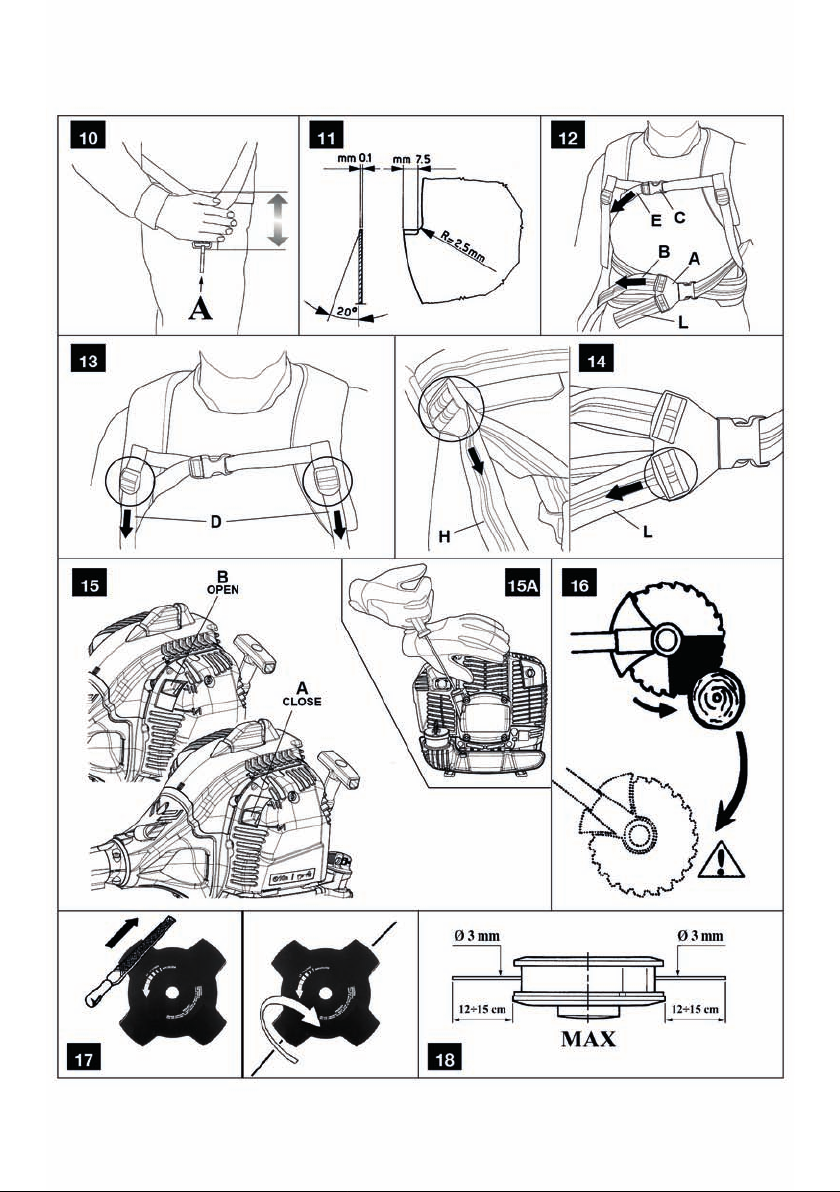
HARNESS (4S, Fig. 1)
Correct adjustment of the harness permits the
brush cutter to be properly balanced and at an
appropriate height from the ground (Fig. 10).
- Put on the single harness.
- Hook the brush cutter to the harness using the
hook (A, Fig. 10).
- Position the hook (19, Fig. 1) to obtain the best
brush cutter balance.
- Position the buckle to obtain the correct brush
cutter height.
CORRECT ADJUSTMENT OF THE HARNESS
DS 3500 T - BC 350 T models
1. Put on the double harness (4T, Fig.1).
2. Fasten the waist buckle (A, Fig.12) and adjust
by tightening the top belt strap (B) until
comfortable.
3. Fasten the chest buckle (C).
4. Adjust the shoulders by tightening the two
straps (D, Fig.13) until comfortable. With this
type of harness, the weight of the machine can
be distributed between shoulders and waist
according to the preference of the operator.
5. Adjust the chest strap (E, Fig.12).
6. Hook the brushcutter to the harness with the
snap (A, Fig.10).
7. Adjust the carrying height by shortening or
lengthening the belt straps (H-L, Fig.14). The
correct distance between the belt and the
snap can be measured as in Fig.10. This
adjustment will also help to distribute the
weight of the brushcutter so that it stays
comfortably balanced during operation.
WARNING! – When using wood-cutting
blades (22-60-80 teeth) a double harness with
quick-release mechanism must be worn.
26
(1) Safety boom (A, Fig.9A) must be assembled
under the loop handle.
(2) Not approved for use with bike handle units
(DS 3500 T - BC 350 T).
5. STARTING
FUELING
WARNING: Gasoline is an extremely
ammable fuel. Use extreme caution when
handling gasoline or fuel mix. Do not smoke
or bring any re or ame near the fuel or the
unit.
· To reduce the risk of fire and burn injury,
handle fuel with care. It is highly flammable.
· Mix and store fuel in a container approved for
gasoline.
· Mix fuel outdoors where there are no sparks or
flames.
· Select bare ground, stop engine, and allow to
cool before refueling.
· Loosen fuel cap slowly to release pressure and
to keep fuel from escaping around the cap.
· Tighten fuel cap securely after refueling. Unit
vibration can cause an improperly tightened
fuel cap to loosen or come off and spill
quantities of fuel.
· Wipe spilled fuel from the unit. Move 3 metre
away from refueling site before starting
engine.
· Never attempt to burn off spilled fuel under
any circumstances.
· Do not smoke while handling fuel or while
operating the unit.
· Store fuel in a cool, dry, well ventilated place.
Page 11
· Never place the machine in a combustible
area such as dry leaves, straw, paper, etc.
· Store the unit and fuel in an area where fuel
vapors cannot reach sparks or open flames
from water heaters, electric motors or
switches, furnaces, etc.
· Never take the cap off the tank when the
engine is running.
· Never use fuel for cleaning operations.
· Take care not to get fuel on your clothing
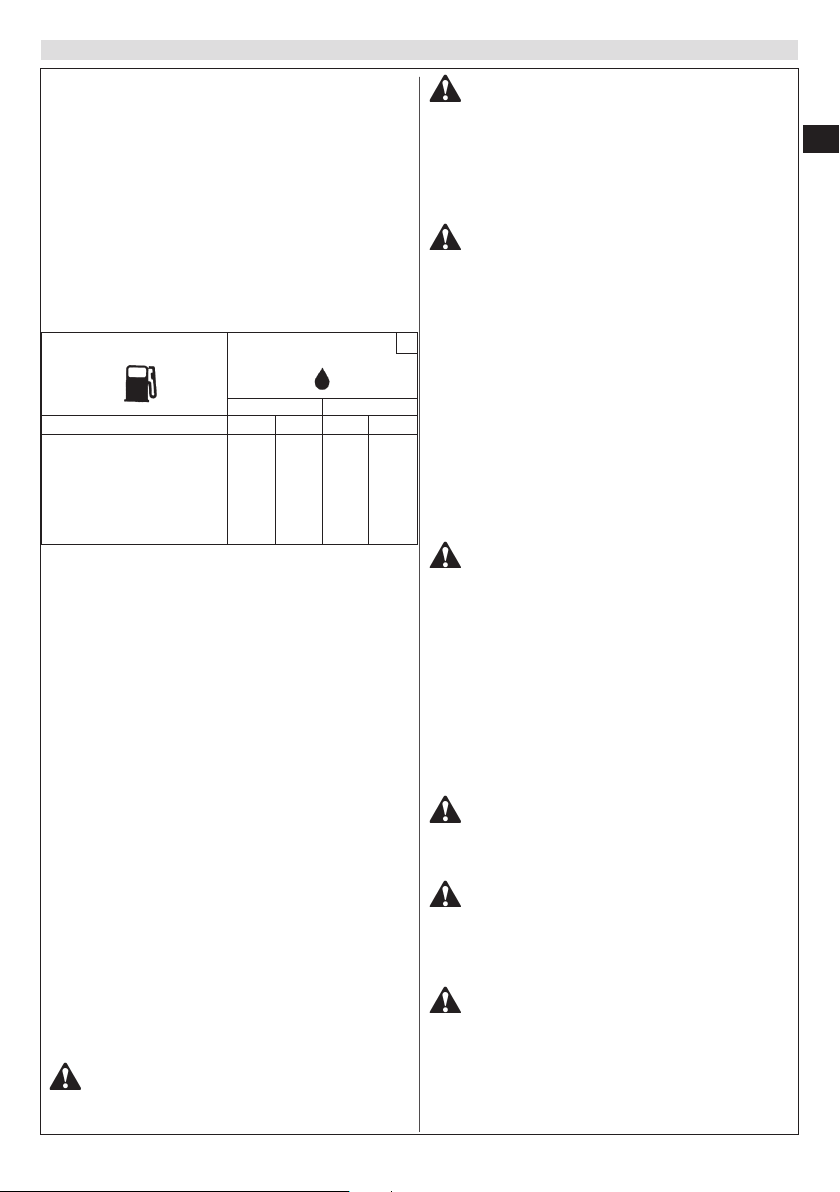
GASOLINE
l
1
5
10
15
20
25
2%-50 : 1
l (cm
0,02 (20)
0,10 (100)
0,20 (200)
0,30 (300)
0,40 (400)
0,50 (500)
OIL
4%-25 : 1
3
) l (cm3)
0,04 (40)
0,20 (200)
0,40 (400)
0,60 (600)
0,80 (800)
1,00 (1000)
This product is powered by a 2-cycle engine and
requires pre-mixing gasoline and 2-cycle oil.
Pre-mix unleaded gasoline and 2-cycle engine
oil in a clean container approved for gasoline.
RECOMMENDED FUEL: THIS ENGINE IS
CERTIFIED TO OPERATE ON UNLEADED
GASOLINE INTENDED FOR AUTOMOTIVE USE
WITH AN OCTANE RATING OF 89 ([R + M] / 2) OR
HIGHER.
Mix 2-cycle engine oil with gasoline according to
the instructions on the package.
We strongly recommend the use of 2% (1:50)
Efco - Oleo-Mac two cycle engine oil, which is
specifically formulated for all air-cooled twostroke engines.
The correct oil / fuel proportions shown in the
table (Fig. A) are suitable when using the
PROSINT 2 and EUROSINT 2 or an equivalent
high-quality engine oil (JASO specification FD
or ISO specification L-EGD). When oil
specifications are NOT equivalent or unknown
use 4% (1:25) oil / fuel mixing ratio.
CAUTION: DO NOT USE AUTOMOTIVE
OIL OR 2-CYCLE OUTBOARD OIL.
CAUTION:
- Match your fuel purchases to your
consumption; don’t buy more than you will
use in one or two months;
- Store gasoline in a tightly-closed container
in a cool, dry place.
CAUTION - For the mixture, never use a
fuel with an ethanol percentage higher than
10%; gasohol (mixture of gasoline and
ethanol) up to 10% ethanol or E10 fuel are
acceptable.
A
NOTE - Prepare only the quantity of mixture
required for immediate use; do not leave fuel in
the tank or a container for a long time. Were
commend the use of the additive Emak ADDITIX
2000 code 001000972 if the mixture is to be
stored for 30 days.
Alkylate gasoline
CAUTIONS – Alkylate fuels have
different density than normal fuel. Therefore
engines, set with normal fuel, need different
H jet regulation to avoid critical issues. For
this operation it’s necessary turned at a
Licensed Service Dealer.
Filling the tank
stir the mixture well before refuelling.
STARTING
Before starting the engine, make sure
that the blade is free to move and is not in
contact with any foreign objects.
The cutting attachment must not rotate
when the engine is idling. Otherwise contact
an Authorized Service Center to carry out a
check and x the problem.
WARNING: Hold the brush cutter rmly
with both hands. Always keep your body is to
the left of tube. Never use a cross-handed grip.
Left-handers should follow these instructions
too.
Keep a proper cutting stance.
GB
27
Page 12

Over exposure to vibrations can result in
blood-vessel or nerve injury to persons
GB
suering with blood circulation problems. Seek
medical attention if you experience physical
symptoms such numbness, lack of feeling,
reduction in normal strength, changes in the
colour of the skin. These symptoms normally
appear in the fingers, hands or wrists.
Before starting the engine, make sure that the
throttle lever works freely.
WARNING: Follow safety instruction for
fuel handling. Always shut off engine before
fuelling. Never add fuel to a machine with a
running or hot engine. Move at least 3 m from
refuelling site before starting engine. DO
NOT SMOKE!
1. Clean surface around fuel cap to prevent
contamination.
2. Loosen fuel cap slowly.
3. Carefully pour fuel mixture into the tank.
Avoid spillage.
4. Prior to replacing the fuel cap, clean and
inspect the gasket.
5. Immediately replace fuel cap and hand
tighten. Wipe up any fuel spillage.
WARNING: Check for fuel leaks, if any
are found, correct before use. Contact a
Servicing Dealer if necessary.
Engine is Flooded
- Engage a suitable tool in the spark plug boot.
- Pry off the spark plug boot.
- Unscrew and dry off the spark plug.
- Open the throttle wide.
- Pull the starter rope several times to clear the
combustion chamber.
- Refit the spark plug and connect the spark
plug boot, press it down firmly.
- Set the choke lever to OPEN position – even
if engine is cold.
- Now start the engine.
2) Pull the choke lever (15, Fig.1) in the CLOSE
position (A, Fig.15)
3) Pull the throttle lever (18, Fig. 1) and stop it
at half-throttle by pressing the button (22),
then release the lever (18).
4) Place the brush cutter on the ground in a
stable position. Check that the blade is free.
Holding the brush cutter down (Fig.15A), pull
the starter rope until the rst kick over of the
engine is heard (no more than 3 pulls). A new
unit may require additional pulls.
5) Push the choke lever (15, Fig.1) in OPEN
position (B, Fig.15).
6) Pull the starter cord to start the engine. Once
the machine is started, warm up the machine
for about few seconds, without touch the
throttle lever. The machine could need more
seconds to warm up with cold weather or at
high altitudes. Finally, push the throttle lever
(18, Fig.1) for deactivate the half-throttle.
CAUTION:
- Never wrap the starter cord around your
hand.
- When pulling the starter rope, do not
use the full extent of the rope as this can
cause the rope to break.
- Do not let starter rope snap back. Hold the
starter handle (14, Fig.1) and let the rope
rewind slowly.
WARNING: Once the engine is warmed
up do not use the choke to start up again.
WARNING: Use the semi-acceleration
device only in the phase of starting the engine
to cold.
BREAKING-IN THE ENGINE
The engine reaches the maximum power after
5÷8 hours of activity.
During this period of breaking-in do not use the
engine at wide open throttle without load, to avoid
excessive functioning stress.
STARTUP PROCEDURE
1) Slowly push the purge bulb 4 times (9, Fig.1).
28
WARNING! - During the breaking-in
period do not vary the carburetion to obtain a
Page 13

presumed power increment; the engine can be
damaged.
NOTE: It is normal for smoke to be emitted
from a new engine during and after first use.
6. STOPPING THE ENGINE
Set the throttle lever to idle position (18, Fig. 1)
and wait a few seconds to let the engine cool o.
Turn o the engine, pushing the ON/OFF switch
(17).
7. USING THE MACHINE
PROHIBITED USE
WARNING: Avoid kickout which can
result in serious injury. Kickout is the
sideward or sudden forward motion of the
machine occurring when the blade contacts
any object such as a log or stone, or when the
wood closes in and pinches the saw blade in
the cut. Contacting a foreign object can also
result in loss of brush cutter control.
WARNING! - Always follow the safety
precautions. The brush cutter must only be
used to trim grass material. Cut wood only with
appropriate saw blade. Do not cut metal,
plastics, masonry, or non-wood building
materials. Do not use the brush cutter as a lever
to lift, move or break objects, nor lock it on
xed supports. It is forbidden to apply tools or
applications that are not the ones indicated by
the manufacturer onto the brush cutter’s power
take-o.
WARNING: When using rigid blades,
avoid cutting close to fences, sides of
buildings, tree trunks, stones or other such
objects that could cause the brush cutter to
kick out or could cause damage to the blade.
We recommends use of the nylon line heads
for such jobs. In addition, be alert to an
increased possibility of ricochets in such
situations.
Never use the brushcutter for trimming
hedges.
WARNING: If the blade loosens after
being properly tightened, stop work
immediately. The retaining nut may be worn
or damaged and should be replaced. Never
use unauthorized parts to secure the blade. If
the blade continues to loosen, see your
dealer. Never use the brushcutter for
trimming hedges.
Work Area Precautions
• Always cut with both feet on solid ground to
prevent being pulled off balance.
• Make sure you can move and stand safely.
Check the area around you for possible
obstacles (roots, rocks, branches, ditches, etc.)
in case you have to move suddenly.
• Do not cut above chest height, as a brush
cutter held higher is difficult to control against
kickout forces.
• Do not work near electrical wires. Leave this
operation for professionals.
• Cut only when visibility and light are adequate
for you to see clearly.
• Do not cut from a ladder, this is extremely
dangerous.
• Stop the brush cutter if the blade strikes a
foreign object. Inspect the blade and brush
cutter; repair parts as necessary.
• Keep the blade out of dirt and sand. Even a
small amount of dirt will quickly dull a blade
and increase the possibility of kickout.
• Stop the engine before setting the brush
cutter down.
• Be particularly cautious and alert while
wearing hearing protection because such
equipment may restrict your ability to hear
sounds indicating danger (calls, signals,
warnings, etc).
• Be extremely cautious when working on
slopes or uneven ground.
GB
WARNING: Never use of a brush cutter
above ground level or with the cutting
attachment perpendicular to the ground.
WARNING: Never use rigid blades when
cutting in stony areas. Thrown objects or
damaged blades may result in serious or fatal
29
Page 14

injury to the operator or bystanders. Watch
out for thrown objects. Always wear approved
eye protection. Never lean over the cutting
GB
attachment guard. Stones, rubbish, etc. can
be thrown up into the eyes causing blindness
or serious injury. Keep unauthorised persons
at a distance. Children, animals, onlookers
and helpers should be kept outside the safety
zone of 15 m. Stop the machine immediately
if anyone approaches. Never swing the
machine around without first checking
behind you to make sure no-one is within the
safety zone.
obstacles (roots, rocks, branches, ditches, etc.)
in case you have to move suddenly. Take great
care when working on sloping ground.
4. Switch off the engine before moving to
another area.
5. Never put the machine down with the engine
running.
• Always use the correct equipment.
• Make sure the equipment is well adjusted.
• Organise your work carefully.
• Always use full throttle when starting to cut
with the blade.
• Always use sharp blades.
Working Techniques
General Working Instructions
WARNING: This section describes the
basic safety precautions for working with
clearing saws and trimmers. If you encounter
a situation where you are uncertain how to
proceed you should ask an expert. Contact
your dealer or your service workshop. Avoid
all usage which you consider to be beyond
your capability. You must understand the
difference between forestry clearing, grass
clearing and grass trimming before use.
Basic safety rules
1. Look around you:
• To ensure that people, animals or other things
cannot affect your control of the machine.
• To ensure that people, animals, etc., do not
come into contact with the cutting attachment
or loose objects that are thrown out by the
cutting attachment.
WARNING: Do not use the machine
unless you are able to call for help in the
event of an accident.
2. Do not use the machine in bad weather, such
as dense fog, heavy rain, strong wind, intense
cold, etc. Working in bad weather is tiring and
often brings added risks, such as icy ground,
etc.
3. Make sure you can move and stand safely.
Check the area around you for possible
30
WARNING: Neither the operator of the
machine nor anyone else may attempt to
remove the cut material while the engine is
running or the cutting equipment is rotating,
as this can result in serious injury. Stop the
engine and cutting equipment before you
remove material that has wound around the
blade as otherwise there is a risk of injury.
The bevel gear can get hot during use and
may remain so for a while afterwards. You
could get burnt if you touch it.
WARNING: Sometimes branches or
grass get caught between the guard and
cutting attachment. Always stop the engine
before cleaning.
Check before starting
• Check the blade to ensure that no cracks have
formed at the bottom of the teeth or by the
centre hole. Discard a blade if cracks are
found.
• Check that the support flange is not cracked
due to fatigue or due to being tightened too
much. Discard the support flange if it is
cracked.
• Ensure the locking nut has not lost its captive
force. The tightening torque of the locking nut
should be 25 Nm.
• Check that the blade guard is not damaged or
cracked. Replace the blade guard if it is
cracked.
WARNING: Never use the machine
Page 15

without a guard or with a defective guard.
Never use the machine without the
transmission shaft.
Forestry clearing
• Before you start clearing, check the clearing
area, the type of terrain, the slope of the
ground, whether there are stones, hollows etc.
• Start at whichever end of the area is easiest,
and clear an open space from which to work.
• Work systematically to and fro across the area,
clearing a width of around 4-5 m on each pass.
This exploits the full reach of the machine in
both directions and gives the operator a
convenient and varied working area to work
in.
• Clear a strip around 75 m long. Move your fuel
can as work progresses.
• On sloping ground you should work along the
slope. It is much easier to work along a slope
than it is to work up and down it.
• You should plan the strip so that you avoid
going over ditches or other obstacles on the
ground. You should also orient the strip to
take advantage of wind conditions, so that
cleared stems fall in the cleared area of the
stand.
Grass clearing using a grass blade
• Grass blades and grass cutters must not be
used on woody stems.
• A grass blade is used for all types of tall or
coarse grass.
• The grass is cut down with a sideways,
swinging movement, where the movement
from right-to-left is the clearing stroke and the
movement from left-to-right is the return
stroke. Let the left-hand side of the blade
(between 8 and 12 o’clock) do the cutting.
• If the blade is angled to the left when clearing
grass, the grass will collect in a line, which
makes it easier to collect, e.g. by raking.
• Try to work rhythmically. Stand firmly with
your feet apart. Move forward after the return
stroke and stand firmly again.
• Let the support cup rest lightly against the
ground. It is used to protect the blade from
hitting the ground.
• Reduce the risk of material wrapping around
the blade by following these instructions:
1. Always work at full throttle.
2. Avoid the previously cut material during the
return stroke.
• Stop the engine, unclip the harness and place
the machine on the ground before you start to
collect the cut material.
Grass trimming with a trimmer head
CAUTION: Do not work with mowing
line longer than the intended diameter. With
a properly mounted guard, the built-in cutter
will automatically adjust the line to its proper
length. Overly long lines can overload the
engine, resulting in damage to the clutch
mechanism and nearby parts.
Trimming
• Hold the trimmer head just above the ground
at an angle. It is the end of the cord that does
the work. Let the cord work at its own pace.
Never press the cord into the area to be cut.
• The cord can easily remove grass and weeds
up against walls, fences, trees and borders,
however it can also damage sensitive bark on
trees and bushes, and damage fence posts.
• Reduce the risk of damaging plants by
shortening the cord to 10-12 cm and reducing
the engine speed.
Clearing
• The clearing technique removes all unwanted
vegetation. Keep the trimmer head just above
the ground and tilt it. Let the end of the cord
strike the ground around trees, posts, statues
and the like.
CAUTION: This technique increases the
wear on the cord.
• The cord wears quicker and must be fed
forward more often when working against
stones, brick, concrete, metal fences, etc., than
when coming into contact with trees and
wooden fences.
• When trimming and clearing you should use
less than full throttle so that the cord lasts
GB
31
Page 16

longer and to reduce the wear on the trimmer
head.
GB
Cutting
• The trimmer is ideal for cutting grass that is
difficult to reach using a normal lawn mower.
Keep the cord parallel to the ground when
cutting. Avoid pressing the trimmer head
against the ground as this can ruin the lawn
and damage the tool.
• Do not allow the trimmer head to constantly
come into contact with the ground during
normal cutting. Constant contact of this type
can cause damage and wear to the trimmer
head.
Sweeping
• The fan effect of the rotating cord can be used
for quick and easy clearing up. Hold the cord
parallel to and above the area to be swept and
move the tool to and fro.
• When cutting and sweeping you should use
full throttle to obtain the best results.
WARNING: Never cut, when visibility is
poor or in very high or low temperatures or in
freezing weather.
Forestry clearing using a saw blade
• The risk of kickout increases with increasing
stem size. You should therefore avoid cutting
with the area of the blade between 12 o’clock
and 3 o’clock (Fig.16).
• To fell to the left, the bottom of the tree should
be pushed to the right. Tilt the blade and bring
it diagonally down to the right, exerting firm
pressure. At the same time push the stem using
the blade guard. Cut with the area of the blade
between 3 o’clock and 5 o’clock. Apply full
throttle before advancing the blade.
• To fell to the right, the bottom of the tree
should be pushed to the left. Tilt the blade and
bring it diagonally up to the right. Cut with the
area of the blade between 3 o’clock and 5
o’clock so that the direction of rotation of the
blade pushes the bottom of the tree to the left.
• To fell a tree forwards, the bottom of the tree
should be pulled backwards. Pull the blade
backwards with a quick, firm movement.
• If the stems are tightly packed, adapt your
walking pace to suit.
• If the blade jams in a stem, never jerk the
machine free. If you do this the blade, bevel
gear, shaft or handlebar may be damaged.
Release the handles, grip the shaft with both
hands and gently pull the machine free.
Using the circular saw blade
WARNING: Circular saw blades are suitable
for thinning brush and cutting small trees up
to a diameter of 5 cm. Do not attempt to cut
trees with larger diameters, since the blade
may catch or jerk the clearing saw forward.
This may cause damage to the blade or loss of
control of the clearing saw which may result
in serious injury.
WARNING: A saw blade can only be used in
connection with the proper guard (see table
pag.38) a twin handle and double harness
with release mechanism.
Brush cutting with a saw blade
• Thin stems and brush are mown down. Work
with a sawing movement, swinging sideways.
• Try to cut several stems in a single sawing
movement.
• With groups of hardwood stems, first clear
around the group. Start by cutting the stems
high up around the outside of the group to
avoid jamming. Then cut the stems to the
required height. Now try to reach in with the
blade and cut from the centre of the group. If it
is still difficult to gain access, cut the stems
high up and let them fall. This will reduce the
risk of jamming.
8. TRANSPORTING
TRANSPORTION
Carry the brush cutter with the engine o and with
the protective blade cover on (Fig. 3).
ATTENTION: Fit the disk protection p.n.
4196086 as shown (Fig. 3) before transporting or
storing the brushcutter.
32
Page 17

9. MAINTENANCE
Maintenance Chart
Please note that the following maintenance intervals apply for normal operating conditions only. If your daily work
requires longer than normal or harsh cutting conditions are present, then the suggested intervals should be shortened
accordingly.
Complete Machine
Controls (STOP button, Choke Lever, Throttle
Trigger, Trigger interlock)
Fuel Tank
Fuel Filter and tube
Cutting Attachments
Bevel Gear
Clutch Drum
Cutting Attachments Guard
All Accessible Screws and Nuts (Not Adjusting Screws)
Air Filter
Cylinder Fins
Starter System Vents
Starter Rope
Carburetor
Spark Plug
Vibration Mounts
Cutting Attachments nuts and screws
Inspect (Leaks, Cracks, and Wear)
Clean after finishing daily work
Check Operation
Inspect (Leaks, Cracks, and Wear)
Clean
Inspect
Clean, Replace Filter Element
Inspect (Damage, Sharpness, and Wear)
Check Tension
Sharpen
Inspect (Damage, Wear and Grease Level)
Inspect (Damage, Wear and Grease Level)
Replace
Inspect (Damage, and Wear)
Replace
Inspect
Retighten
Clean
Replace
Clean
Clean after finishing daily work
Inspect (Damage, and Wear)
Replace
Check Idle (Cutting Attachments must not
rotate at idle)
Check Electrode Gap
Replace
Inspect (Damage, and Wear)
Replace by Dealer
Check that the locking nut of the cutting
equipment is tighten correctly
GB
Faulty
Monthly
Before Each Use
x
x
x
x
x
x
x
x
x
x
x
x
x
x
x
x
x
x
x
x
As Required
If Damaged or
x
x
x
x
x
x
x
x
x
x
x
x
x
1 year or 100 hrs.
6 mouths or 50 hrs.
x
x
x
x
x
33
Page 18

BLADE SHARPENING 234 TOOTH
1. Blades are reversible: when one side is no
GB
longer sharp, the blade can be turned over
and used on the other side (Fig. 17).
2. Blades are sharpened using a at single-cut
le (Fig. 17).
3. To maintain the correct balance, le all cutting
edges uniformly.
4. If the blades are not sharpened correctly, this
can set up abnormal vibrations in the machine
and cause the blades themselves to break
ultimately.
BLADE SHARPENING (8 TOOTH
Always check the general condition of the blade.
Correct sharpening permits the maximum
performance of the brush cutter. To sharpen the
teeth, use a le or grindstone and proceed with
light touches, respecting the corners and the
dimensions shown in Fig. 11.
SHARPENING THE SAW BLADE
• See the cutting attachment packaging for
correct sharpening instructions.
A correctly sharpened blade is essential for
working efficiently and to avoid unnecessary
wear to the blade and clearing saw.
• Make sure that the blade is well supported
when you file it. Use a 5.5 mm round file.
• The filing angle is 15°. File alternate teeth to
the right and those in between to the left. If
the blade has been heavily pitted by stones it
may be necessary to dress the top edges of
the teeth with a flat file, in exceptional cases. If
so, this should be done before filing with a
round file. The top edges must be filed down
by the same amount for all the teeth.
WARNING! – The wrong type of cutter or
an incorrectly sharpened blade will increase the
risk of kickback. Check mower blades for
deterioration or cracks, and replace if damaged.
WARNING: Never repair damaged
cutting attachments by welding,
straightening or modifying the shape. This
may cause parts of the cutting tool to come
off and result in serious or fatal injuries.
NYLON LINE HEAD
Only use line of the same diameter as the original
to avoid overloading the engine (Fig. 18).
In order to get more line out of the cutting head,
tap it lightly on the ground while working.
Note: Never hit the nylon head against hard spots
such as concrete or stones, it could be dangerous.
Replacing the nylon line on the LOAD&GO
trimmer head (Fig.19)
1. Cut 6.0 m of nylon line Ø 3.0 mm.
2. Align the arrows and insert the line into the
trimmer head (Fig. 19.1) until it is released from
the opposite side (Fig.19.2).
3. Divide the line into two equal parts (Fig. 19.3)
and then load the trimmer head by turning the
knob (Fig. 19.4).
WARNING! – Always wear protective
gloves during maintenance operations. Do not
carry out maintenance with the engine hot.
AIR FILTER
Every 8-10 working hours, remove the cover (A,
Fig. 22), clean the lter (B).
Blow with compressed air, at a distance.
Replace if dirty or damaged. The engine runs
irregularly if the lter is clogged, with consequent
higher consumption and lower performance.
FUEL TANK
Check fuel lter periodically. A dirty lter can cause
dicult starting and lower engine performance.
To clean lter proceed as follows: remove it from
fuel lling hole. Replace it (Fig. 21) if too dirty.
ENGINE
Clean cylinder ns with a brush or compressed
air periodically. Dangerous overheating of engine
may occur due to impurities on the cylinder.
SPARK PLUG
Clean spark plug and check electrode distance
periodically (Fig. 23). Use Champion NGK BPMR7A
or of other brand with the same thermal grade.
GEAR HOUSING
Every 30 working hours, remove screw (D, Fig. 8)
34
Page 19

on the gear housing and check the quantity of
grease. Do not use more than 10 grams. Use high
quality molybdenum bisulde grease.
Never use fuel for cleaning operations.
CARBURETOR
Before adjusting the carburetor, clean the air lter
(B, Fig. 22) and warm up the engine. This engine
is designed and manufactured in order to comply
with the applicable 97/68/EC, 2002/88/EC and
2004/26/EC Directive. The carburetor (Fig. 20)
is designed to permit only the adjustement
of L and H screws in a range of 1/4; the quarter
round the hall range admissible for L and H ± 1/8
screws is determined by the manufacturer and
you can not modify it.
WARNING: Don’t try to force the screws
outside the range!
Idle screw T is adjusted in order to ensure a good
safety margin between idle running and clutch
engagement.
Screw L must be adjusted so that the engine
promptly responds to sharp accelerations and
gives good idle operation.
Screw H must be adjusted so that the engine gives
maximum power during the cutting phase.
WARNING: With the engine idling (2800
rpm), the blade should not rotate. We
recommend that you have your nearest
authorised dealer or service workshop carry
out any carburettor adjustments.
WARNING: Weather conditions and
altitude may aect carburation.
MUFFLER
WARNING! - This muer is tted with a
catalytic converter needed for the engine to be in
compliance with the emissions requirements.
Never modify or remove the catalytic converter:
failure to do so is a violation of law.
WARNING! - Muers tted with catalytic
converters get very hot during use and remain
so for some time after stopping. This also
applies at idle speed. Contact can result in burns
to the skin. Remember the risk of re!
CAUTION! -
must be replaced. If the muffler frequently
becomes blocked, this could be an indication that
the efficiency of the catalytic converter is limited.
WARNING: Do not operate your brush
cutter if the muffler is damaged, missing or
modified. An improperly maintained muffler
will increase the risk of fire and hearing loss.
EXTRA MAINTANANCE ADVISABLE
It is advisable to inspect the machine by a
specialized technician at an authorized service
network at t he e nd of se ason, if us ed
intensively, and every two years if with normal
use.
ATTENTION: All maintenance operations
not reported in this manual must be carried
out by an authorized Service Center.
To ensure steady and regular brush cutter
operation, remember that parts must only be
replaced with ORIGINAL SPARES.
Any unauthorized changes and/or use
of non-original replacement parts may result
in serious injury or death to the operator or
third parties.
10. STORAGE
If the machine is to be stored for long periods:
- Drain and clean the fuel tank in a well-ventilated
area. To drain the tank, start the engine and
wait until the fuel is exhausted and the engine
stops (leaving fuel mixture in the carburettor
could damage the membranes).
- The procedures for returning the machine to
service following winter storage are the same as
for starting up during everyday use (page 26).
- Follow all the maintenance regulations
previously described.
- Clean the brush cutter completely and lubricate
the metallic parts.
If the muffler is damaged, it
GB
35
Page 20

- Remove, clean and lubricate the blade to
prevent rusting.
- Remove the blade xing anges, clean, dry
GB
and lubricate the bevel gear seat.
- Empty the fuel tank and put the cap back on.
- Thoroughly clean the cooling slots and the air
lter (B, Fig. 22).
- Store the brush cutter in a dry place, preferably
not in direct contact with the oor and away
from heat sources.
11. ENVIRONMENTAL PROTECTION
Environmental protection should be a priority of
conside rable importance when using the
machine, for the benefit of both social cohesion
and the environment in which we live.
- Try not to cause any disturbance to the
surrounding area.
- Scrupulously comply with local regulations
and provisions for the disposal of waste
materials after mowing.
- Scrupulously comply with local regulations
and provisions for the disposal of oils, petrol,
batteries, filters, deteriorated parts or any
elements which have a strong impact on the
environment. T h is wa s te mu s t not be
disposed of as normal waste, it must be
separated and taken to specified waste
disposal centres where the material will be
recycled.
Demolition and disposal
When the machine reaches the end of its service
life, do not dispose of it into the environment;
instead take it to a waste disposal centre.
Most materials used in the manufacture of the
ma chine are recyclable; all metals (s teel,
aluminium, brass) can be delivered to a normal
recycling station. For information contact your
local waste recycling service. Waste disposal
must be carrie d out with respect for the
environment, avoiding soil, air and water
pollution.
In all cases, applicable local legislation must
be complied with.
36
Page 21

12. TECHNICAL DATA
GB
Displacement
Engine
Power
Min. rpm
Maximum speed of output
spindle
Engine speed at maximum
output spindle speed
Fuel tank capacity
Primer carburetor
Antivibration system
Cutting width
cm
kW
min
min
min
cm
cm
DS 3500 S - BC 350 S
3
36.3
DS 3500 T - BC 350 T
2 stroke EMAK
1.4
-1
-1
-1
3
2800
8.500
11.700
600 (0.6 l)
Yes
Yes
42
Weight without cutting tool
and guard
kg
6.9
7.4
37
Page 22

GB
Recommended cutting attachments
Model Cutting attachments Guards
DS 3500
BC 350
DS 3500
BC 350
DS 3500
BC 350
DS 3500
BC 350
DS 3500
BC 350
DS 3500
BC 350
DS 3500 T - BC 350 T P.N. 4095635AR P.N. 4174279
DS 3500 T - BC 350 T P.N. 4095066AR P.N. 4174279
* protection p. n. 4174283A not needed
P.N. 63129003
P.N. 63129004
P.N. 63019018
P.N. 63019017
P.N. 4095673AR
P.N. 4095674AR
P.N. 4095638AR
P.N. 4095563AR
P.N. 4095565AR
P.N. 4095065AR
P.N. 61042035A
P.N. 61042036A
P.N. 61042035A
P.N. 61042036A
P.N. 61042035A
P.N. 61042036A
P.N. 61042035A
P.N. 61042036A
P.N. 61042035A
P.N. 61042036A
P.N. 61042035A
P.N. 61042036A
*
*
*
*
WARNING!!!
Using an incorrect cutting attachment increases the risk of accidents! Only use the
recommended cutting attachments and guards and follow the manufacturer’s sharpening
instructions.
38
Page 23

DS 3500 S - BC 350 S DS 3500 T - BC 350 T
GB
Pressure level
Uncertainty
Measured sound
power level
Uncertainty
Guaranteed
sound power
level
Vibration level
Uncertainty
dB (A)
dB (A)
dB (A)
dB (A)
dB (A)
m/s
m/s
EN 11806
EN 22868
2000/14/EC
EN 22868
EN ISO 3744
2000/14/EC
EN 22868
EN ISO 3744
EN 11806
2
EN 22867
EN 12096
2
EN 12096
LpA av
L
WA
96.5 91.5 91.5 91.5
3.0 3.0 3.0 3.0
110.0 106.0 106.0 106.0
2.0 2.0 2.0 2.0
112.0 108.0 108.0 108.0
5.5 (sx)
5.2 (dx)
2.5 (sx)
1.1 (dx)
5.2 (sx)
4.6 (dx)
1.3 (sx)
1.1 (dx)
3.1 (sx)
4.1 (dx)
3.4 (sx)
2.4 (dx)
4.4 (sx)
4.4 (dx)
2.4 (sx)
2.1 (dx)
*
*
- Weighted average values: 1/2 minimum rpm, 1/2 at full load (head) or 1/2 racing (blade).
*
39
Page 24

13. DECLARATION OF CONFORMITY
The undersigned, Emak spa via Fermi, 4 - 42011 Bagnolo in
Piano (RE) ITALY declares under its own responsibility that
GB
the machine:
1. Category: brushcutter/grass trimmer
2. Brand Efco, Type DS 3500 S - DS 3500 T
Brand Oleo-Mac, Type BC 350 S - BC 350 T
3. Serial ID 246 XXX 0001 ÷ 246 XXX 9999 (DS 3500 S - BC 350
S) - 249 XXX 0001 ÷ 249 XXX 9999 (DS 3500 T - BC 350 T)
conforms to the requirements of Directives:
2006/42/CE - 2000/14/CE - 2004/108/CE - 97/68/CE - 2004/26/
CE, conforms to the provisions of the following harmonized
standards:
EN 55012 - EN ISO 11806
Procedures for evaluation of conformity followed:
Annex V - 2000/14/CE
Measured sound power level: 110.0 dB (A) (DS 3500 S - BC
350 S) - 106.0 dB (A) (DS 3500 T - BC 350 T)
14. WARRANTY CERTIFICATE
This machine has been designed and manufactured using the
most modern techniques. The manufacturer guarantees its
products for 24 months from the date of purchase, for private
and hobby use. The warranty is limited to 12 months in case
of professional use.
Limited warranty
1) The warranty period starts on the date of purchase. The
manufacturer, acting through the sales and technic al
assistance network, shall replace free of charge any parts
p ro ve n de f ec ti v e i n m at er ia l, ma c hi ni n g o r
ma nuf act uri ng. The war ran ty d oes no t af fec t the
purcha ser’s ri ghts a s est abli shed un der legislati on
governing the consequences of defects in the machine.
2) Technical personnel will undertake the necessary repairs
in th e mi nimu m t ime po ssi ble , com pati ble wi th
organisational needs.
3) To make any claim under the warranty, this certificate
of warr anty, fully co mplete d, bearing th e d ealer’s
sta mp and accom panied by the invo ice or receipt
showing the date of purchase, must be displayed to
the personnel authorised to approve work.
4) The warranty shall be null and void if:
- the machine has evidently not been serviced correctly
Guaranteed sound power level: 112.0 dB (A) (DS 3500 S - BC
350 S) - 108.0 dB (A) (DS 3500 T - BC 350 T)
Technical Do cumentation deposit ed with Admin istrative
Headquarters: Technical Department
Signed in Bagnolo in Piano (RE) Italy - via Fermi, 4
Date: 31/01/2014
s.p.a.
Fausto Bellamico - President
- the machine has been used for improper purposes or has
been modified in any way,
- unsuitable lubricants and fuels have been used
- non-original spare parts and accessories have been fitted
- work ha s been done on the machine by unauthor ised
personnel
5) The war ranty does no t cover con sumab les or par ts
subject to normal wear.
6) The warranty does not cover work to update or improve
the machine.
7) T he wa rra nty does n ot co ver an y pre par ation or
servicing work required during the warranty period.
8) Damage incurred during transport must be immediately
brought to the attention of the carrier: failure to do so
shall render the warranty null and void.
9) Engi nes of other manu facture rs (Bri ggs & Stra tton,
Subaru, Honda, Lombardini, Kohler, etc.) fitted to our
machines are covered by the warranties of the engine
manufacturer.
10) The warranty does not cover injury or damage caused
directly or indirectly to persons or things by defects in
the machine or by periods of ex tended disuse of the
machine resulting from the said defects.
MODEL
SERIAL No
BOUGHT BY Mr.
Do not send! Only attach to requests for technical warranties.
40
DATE
DEALER
Page 25

15. TROUBLESHOOTING
WARNING: always stop the machine and remove the key before carrying out any of the
corrective checks recommended in the table below, except when they require the unit
to be in operation.
When all the possible causes have been checked and the problem is not resolved, consult an
Authorised Service Centre. If a problem occurs that is not listed in this table, consult an Authorised
Service Centre.
PROBLEM POSSIBLE CAUSES SOLUTION
Engine will not start or will
run only a few seconds
after starting.
Engine starts but will not
accelerate properly or will
not run properly at high
speed.
1. No spark
2. Flooded engine.
Ca rburetor re qui res
adjustment.
1. Watch for spark at spark plug
tip. If there is no spark, repeat
test with a new spark plug
(BPMR7A).
2. Follow procedure page 28. If
engine still fails to start, repeat
procedure with a new spark
plug.
Contact a Servicing Dealer for
carburetor adjustment.
GB
Engine does not reach full
speed and / or emits
excessive smoke
Engine starts, runs and
accelerates but will not
idle.
Engine starts and runs, but
cutting attachment is not
rotating
WARNING: Never
touch the cutting
attachment while the
engine is running.
WARNING: Do not attempt to carry out repairs without the necessary repairs and
technical expertise. Poorly executed repairs will automatically invalidate the warranty and
relieve the manufacturer of all liability.
1. Check oil fuel mixture.
2. Air filter dirty.
3. Carburetor requires
adjustment.
Ca rburetor re qui res
adjustment.
Clutch, bevel drive or
transmission shaft damaged
1. Use fresh fuel and the correct
2-cycle oil mix.
2. Clean per instruction in
Maintenance-Air Filter Section.
3. Contact a Servicing Dealer for
carburetor adjustment.
Turn idle speed screw
(Fig. 20) clockwise to increase idle
speed. See Operation-Carburetor
Adjustment.
Replace if necessary - contact a
Servicing Dealer.
“T”
41
Page 26

PREKLAD PÔVODNÝCH POKYNOV
ÚVOD
Aby ste strojové zariadenie používali správne a
aby ste predišli nehodám, nezačínajte prácu
bez toho, že by ste si veľmi pozorne prečítali
návod na používanie. V tomto návode nájdete
vysve tle nia čin nos ti rôznych častí, ako aj
pokyny pre nevyhnutné kontroly a údržbu.
Poz námka. Popisy a ilustrácie uvedené v
tomt o n ávod e n ie sú prísn e z áv äzn é.
V ý ro b c a si v y h r ad z u je p r áv o n a
vykonávanie zmien v tomto návode bez
predchádzajúceho upozornenia.
Okrem pok ynov na obsluhu obsahuje tento
ná vo d in fo rm áci e, k to ré si v yž ad uj ú
mimoriadnu pozornosť. Tieto informácie sú
o zn a če n é s ym b o lm i p o p í s an ý mi v
nasledujúcom texte:
POZOR: v prípade nebezpečenstva úrazov
alebo vážnych poranení osôb alebo vážneho
poškodenia majetku.
UPOZORNENIE: v prípade nebezpečenstva
poškodenia jednotky alebo jednotlivých častí
strojového zariadenia.
POZOR
RIZIKO POŠKODENIA SLUCHU
ZA NORMÁLNYCH PODMIENOK POUŽÍVANIA
SA OSOBA, KTORÁ STROJ POUŽÍVA, VYSTAVUJE
DENNEJ HLADINE HLUKU ROVNEJ ALEBO
VYŠŠEJ AKO
85 dB (A)
OBSAH
1. B E Z PE Č N O S TN É P RE D P I S Y
(obsahuje predpisy na používanie
stroja bezpečným spôsobom)
2. V YS V ET LE NI E S YM B OLO V A
BE ZPE ČNO STN É UPO ZORNENI A
(vysvetľuje, ako identifikovať strojové
zariadenie a význam symbolov)
3. HLAVNÉ KOMPONENTY (vysvetľuje
um ie st nen ie hl av ný ch pr vkov
tvoriacich strojové zariadenie)
4. MONTÁŽ (vysvetľuje ako odstrániť
obal a dokončiť montáž odpojených
prvkov)
105
107
107
107
5. ŠTARTOVANIE 109
6. ZASTAVENIE MOTORA 111
7. P O U ŽÍ V AN I E S T RO J O V ÉH O
ZARIADENIA
8. PREPRAVA 115
9. ÚDRŽBA (obsahuje všetky informácie
na zachovanie účinnosti strojového
zariadenia)
10. USKLADNENIE 119
11. O C H R A N A Ž I V O T N É H O
PROSTREDIA (Obsahuje niektoré
rady na použív anie strojové ho
zariaden ia v sú lade s o chranou
životného prostredia)
12. TECHNICKÉ ÚDAJE (Súhrn hlavných
charakteristík strojového zariadenia)
13. VYHLÁSENIE O ZHODE 123
14. ZÁRUCA A SERVIS (Súhrn záručných
podmienok)
15. PRÍRUČKA NA RIEŠENIE
PROBLÉMOV (Pomáha pri rýchlom
vyriešení prípadných problémov pri
používaní)
1. BEZPEČNOSTNÉ PREDPISY
POZOR
- Pokiaľ sa strojové zariadenie používa
správne, j e r ýc hlym p om oc níkom a
účinným nástrojom. Pokiaľ sa používa
nes pr ávn e al eb o be z do drž iava ni a
bezpečnostných predpisov, môže sa stať
nebezpečným nástrojom. Aby bola vaša
pr ác a v žd y pr íj emn á a bez peč ná,
dô sle dne do drži avajte be zpečn ost né
prav idlá, ktoré sú uvedené v tomto
návode na použitie.
- Vystavenie sa vibráciám vznikajúcich pri
dlh od ob om po už ív an í mo to ro vý ch
nástrojov s vnútorným spaľovaním môže
spôsobiť poškodenie ciev alebo nervov
prstov, rúk a zápästí u osôb, u ktorých sa
pr ejavujú prob lémy s obeho m kr vi a
anomálne opuchy. Dlhodobé používanie
za s tuden ého p oč asia m ôže v ies ť k
poškodeniu ciev aj ináč zdravých ľudí. Ak
sp ozor uje te symptó my ako tŕ pnut ie,
bo lesť , stratu cit livosti, zmeny farby
111
116
119
120
123
124
SK
105
Page 27

po kožk y aleb o jej vzhľa du, prípadn e
st ra tu c it liv os ti p rst ov, rú k a le bo
zápä stia, prest aňte stroj používať a
vyhľadajte lekára.
- Štartovací systém jednotky produkuje
el ektrom agnetické po le veľ mi nízkej
intenzity. Toto pole môže rušiť činnosť
niektorýc h pacemakerov. Na zníženie
ri zi ka vá žny ch al eb o sm rt eľ nýc h
poranení, by sa osoby s pacemakerom
mali p oradiť s o s vojím l ek árom a s
v ýr ob co m p ac em ak era e št e pr ed
používaním tohto stroja.
SK
POZOR: Vnútroštátne predpisy môžu
obmedz ovať p ouž ívanie strojového
zariadenia.
1 - Stroj nepoužívajte skôr, kým sa podrobne
neoboznámite s jeho obsluhou.
Začiatočníci by si mali pred prácou obsluhu
stroja vyskúšať.
2 - Stroj smú používať iba dospelé osoby, v
dobrom fyzickom stave, ktoré sú
oboznámené s jeho obsluhou v rozsahu
tohto návodu.
3 - Nepoužívajte krovinorez, keď ste unavení
alebo pod vplyvom alkoholu, drog, iných,
omamných látok alebo liekov.
4 - Noste vh odný o chzanný o dev a aj
iné ochranné prostriedky, ako čižmy,
hrubé nohavice, rukavice, slúchadlá a
protiúrazovú prilbu. Noste priliehavé, ale
pohodlné oblečenie.
5 - Nedovoľte používať krovinorez deťom.
6 - N ed ov oľ te in ým os ob ám , aby sa
zdrž iavali v ok ru hu 15 metrov od
krov inor ezu poč as je ho použ ívani a.
7 - Pred použitím krovinorezu skontrolujte,
či je upevňovacia skrutka kotúča dobre
utiahnutá.
8 - Krovinorez musí byť vybavený reznými
nástrojmi, ktoré sú odporúčané výrobcom
(pozri str. 121).
9 - Nepoužívajte krovinorez bez ochranného
štítu kotúča alebo hlavy.
10 - Pred naštartovaním motora sa ubezpečte,
či sa kotúč voľne točí a či nie je v kontakte
s cudzími predmetmi.
11 - Po čas práce kotúč často kontrolujte
zastavením motora. V prípade výskytu
trhlín alebo prasklín kotú č okam žite
vymeňte.
12 - Stroj používajte iba na dobre vetraných
miestach, nepoužívajte ho vo výbušnom
alebo horľavom prostredí ani v uzavretých
priestoroch.
13 - Ak je motor spustený, nerobte žiadnu
údržbu ani nechytajte kotúč.
14 - Na pohon stroja sa nesmie namontovať
žiadne zariadenie, ak ho neodporučil
výrobca.
15 - Nepracujte s poškodeným, zle opraveným,
ne spr ávne zm ontovaným alebo ináč
upraveným s trojom. Ne odstraňujte,
nepoškodzujte a nev yraďujte žiadne
bezpečnostné zariadenie. Používajte iba
rezacie zariadenia uvedené v tabuľke.
16 - Všetky štítky a nálepky s výstražnou
signalizáciou udržiavajte v dokonalom
stave . V prípa d e poškodenia alebo
opotrebovania ich treba včas vymeniť
(Obr. 24).
17 - Stroj nepoužívajte na iné účely ako sú
uvedené v návode (pozrite ods. 111).
18 - Stroj nenechávajte bez dozoru, ak je
zapnutý jeho motor.
19 - Motor neštartujte ak nie je krovinorez
kompletne zložený.
20 - Vž dy p re d k ažd ým z ač atí m p rác e
kontrolujte krovino rez, aby s te sa
ube zp eč il i, č i j e k až dá s úči as tk a,
bezpečnostné zariadenie úplne funkčné a
skrutkové spoje sú dotiahnuté.
21 - Nevykonávajte zása hy alebo opravy,
ktoré nie sú súčasťou normálnej údržby.
V takomto prípade sa radšej obráťte sa na
autorizovaný servis.
22 - V prípade, že stroj budete musieť vyradiť,
nevyhadzujte ho voľne, ale odovzdajte
ho v predajni, kde ste ho kúpili alebo v
zbernom stredisku.
23 - Vyžínač odovzdajte alebo požičiavajte len
skúseným osobám, ktoré sú oboznámené
s j eho obsluhou . S troj odovzdaj te
ďalším používateľom aj s návodom na
106
Page 28

používanie, aby si ho mohli pred použitím
prečítať.
24 - V prípade potreby akéhokoľvek ďalšieho
objasnenia alebo zásahu sa vždy sa
obráťte na vášho.
25 - Tento návod starostlivo uschovajte a pred
každým použitím píly ho konzultujte.
26 - Nezabudnite, že majiteľ alebo obsluhujúci
pracovník nesú zodpovednosť za úrazy
alebo riziká pre iné osoby, ako aj za ich
majetok.
POZOR
- J e dn o tk u n i kd y n e p ou ž ív a jt e s
p o š k o d e ný m i b e z p e č n o s t n ý mi
funk ciami. B ezpečnostné zari adenia
musíte kontro lovať a udržiav ať podľa
pokynov uvedených v tejto časti. Ak stroj
ne zo dp ov ed á p od mie nk am p od ľ a
pok ynov kont roly, zavolaj te servis a
dajte stroj opraviť.
- Akékoľvek používanie stroja, ktoré nie je
vyslovene uvedené v návode, sa musí
považovať za nevhodné používanie, teda
za zdroj rizika pre osoby a majetok.
3. HLAVNÉ KOMPONENTY (Obr.1)
1÷3 - Náradie
4 - Popruh
5 - Pár kužeľovitý
6 - Ochranný štít
7 - Kosiaca strunová hlavica
8 - Uzáver palivovej nádrže
9 - Vstrekovač paliva
10 - Skrutka nastavenia karburátora
11 - Kryt tlmiča výfuku
12 - Sviečka
13 - Vzduchový filter
14 - Štartovacia rukoväť
15 - Páčka sýtiča
16 - Bezpečnostná poistka plynu
17 - Tlačidlo stop
18 - Páčka plynu
19 - Pripojenie popruhu cez rameno
20 - Rukoväť
21 - Rúrka hriadeľa
22 - Tlačidlo polovičná plyn
4. MONTÁŽ
SK
2 . V Y S V E T L E N I E S Y M B O L O V A
BEZPEČNOSTNÉ UPOZORNENIA (Obr. 24)
1 - Pred prácou s týmto prístrojom si prečítajte
návod na použitie a údržbu.
2 - Používajte ochrannú prilbu, okuliare a
slúchadlá.
3 - Pri používaní kovových alebo plastových
kotúčov používajte ochrannú obuv a
rukavice.
4 - Pozor na odmrštené redmety.
5 - Udržiavajte min. vzdialenosť 15 m od
okolostojacich osôb a zvierat.
6 - POZOR! - Povrch môže byť horúci!
7 - Mimoriadnu pozornosť venujte spätnému
vrhu. Môže byť veľmi nebezpečný.
8 - Vstrekovač paliva.
9 - Druh stroja: VYŽÍVAČE.
10 - Zaručená hladina akustického výkonu
11 - Značka zhody CE
12 - Číslo série
13 - Rok výroby.
14 - Max. otáčky výstupného hriadeľa, OT./MIN.
MO NTÁ Ž O CHRANNÉHO ŠTÍT U (Obr. 7)
Pripevnite štít (A) k rúrke hriadeľa pomocou
skrutiek (B) v postoji, ktorý umožňuje bezpečnú
prácu.
POZNÁMKA: používajte nástavec štítu (C)
iba pri použití strunovej kosiacej hlavice.
Nást ave c štítu (C) m usí by ť up evnený
pomocou skrutky (D) ku krytu (A).
MONTÁŠ HLAVICE Z NYLONOVÝCH VLÁKIEN
(Obr. 8)
Nasaľte horný unášač (F). Vlošte čap hlavice (H)
do príslušného otvoru (L) a dotiahnite hlavicu
(N) rukou proti smeru hodinových ručičiek.
MONTÁŽ KOTÚČA (Obr. 9)
Povoľte lištu (A) v smere hodinových ručičiek;
odnímte spodný kryt (D) a spodný unášač (E).
Nasaľte kotúč (R) na horný unášač (F), dávajte
pozor na smer rotácie. Nasaľte spodný unášač
(E), spodný kryt (D) a dotiahnite skrutku (A) proti
smeru hodinových ručičiek. Do otvoru (L) vsuÀte
107
Page 29

čap a zablokujte kotúč a dotiahnite skrutku (A)
krútiacim momentom 2.5 kgm (25 Nm).
POZOR – Objímka (pozri šípk y C, Obr. 9)
musí zapadnúť do otvoru na namontovanie
kotúča.
- Spojte krovinorez s popruhom pomocou
karabínky (A, Obr. 10).
- Nastavte závesné oko (19A, Obr. 1), aby ste
dosiahli lepšie vyváženie krovinorezu.
- Nastavte dÍžku ramenného popruhu aby
mal krovinorez potrebnú výšku nad zemou.
MONTÁŽ RUKOVÄTE (Obr. 2)
Nasaľte rukoväť na trubicu hriadeľa a upevnite
ju pomocou skrutiek (A). Poloha rukoväte je
nastaviteľná podľa pošiadaviek obsluhy.
MONTÁŽ BEZPEČNOSTNEJ OPIERKY (Obr.
SK
9A)
Ak poušívate namiesto hlavice z nylonových
vlákien kotúč, je potrebné namontovať
“bezpečnostnú opierku”. Upevnite opierku (A)
pod úchytku rukoväte (C) (20B, Obr. 1), dávajte
pritom pozor, aby bola “bezpečnostná opierka”
pripevnená na ľavej strane krovinorezu.
UPEVNENIE DVOJRAMENNÉHO DRŽADLA
(Obr. 4)
- Pri upevnení rukoväte vsuňte pružinu (B) a
kruhovú podložku (C).
- Zarovnajte dvojramenné držadlo do pravého
uhla vzhľadom na rúrku prevodu.
- Nakoniec utiahnite svorku so skrutkou (D).
MONTÁŽ OVLÁDACÍCH RUKOVÄTÍ Obr.6)
- Uvoľnite skrutku (G). Matica (H) ostane v
ovládacej rukoväti (L).
- Nasuňte ovládaciu rukoväť (L) (akcelerátor M
musí byť otočený smerom k ozubenému
súkoliu) na držadlo (N) tak, aby boli zarovnané
otvory (P).
- Vsuňte skrutku (G) a pevne utiahnite.
UPOZORN ENIE: Ubezpe čte sa, či sú
vš et ky sú ča sti k ro vi nor ez u s práv ne
namontované a skrutky dobre utiahnuté.
PRÍPRAVNÉ PRÁCE
SPRÁVNE NASTAVENIE POPRUHU (4S, Obr. 1)
Správne nastavenie popruhu umožní náležité
vyváženie krovinorezu a vhodnú vzdialenosť od
zeme (Obr. 10).
- Používajte jednoduchý popruh.
SPRÁVNE NASTAVENIE POPRUHOV modely
DS 3500 T - BC 350 T
1. Navlečte si dvojité popruhy (4T, Obr. 1).
2. Pracku (A, Obr. 12) zasuňte do príslušného
úchytu a nastavte ju pomocou horného
popruhu (B).
3. Pracku (C) zasuňte do príslušného úchytu na
hrudníku.
4. Ramenné popruhy nastavte dvomi popruhmi
(D, Obr. 13). Týmito popruhmi je možné
rozložiť váhu nákladu predovšetkým na
ramená alebo do pásikov podľa priania
pracovníka.
5. Nastavte popruh (E, Obr. 12) v oblasti
hrudníka.
6. Pomocou karabínky pripevnite krovinorez k
popruhom (F, Obr.-1).
7. Výšku prístroja nad terénom nastavte dvoma
popruhmi (H-L, Obr. 14). Správnu vzdialenosť
medzi popruhmi a karabínkou je nutné
vymerať ako na obr. 10. Toto nastavenie
prispeje k ešte lepšiemu rozloženiu váhy a
správnemu vyváženiu krovinorezu.
UPOZORNENIE! - V prípade, že použijete
čepele na drevo (22-60-80 zubov), je povinné
použiť dvojitý popruh s možnosťou rýchleho
uvoľnenia.
SCHVÁLENÉ PRÍSLUŠENSTVO
Na zá kl ad ný st ro j mož no na mo nto vať
nasledujúce príslušenstvo značky Emak:
EH 25 Krovinorez (nastaviteľný) (1) (2)
EH 50 Krovinorez (nastaviteľný) (1) (2)
EP 100 Orezávač (2)
EP 120 Orezávač (2)
(1) Ochranná bariéra (A , Obr. 9A) musí byť
namontovaná pod kruhovou rukoväťou (loop).
(2) Nie je schválená na použitie s modelmi s
dvojramenným držadlom (DS 3500 T - BC 350
T).
108
Page 30

5. ŠTARTOVANIE
odev.
BENZINE
OLIE
A
PALIVO
POZOR: benzín je mimoriadne horľavé
palivo. Pri manipulácii s benzínom
alebo zmesou palív dávajte veľ ký
pozor. V blízkosti paliva ani vyžínača
nefajčte ani sa k nim nepribližujte s
otvoreným plameňom.
· Aby sa znížilo nebezpečenstvo požiaru a
popálenia sa, s palivom zaobchádzajte
opatrne. Je veľmi horľavé.
· Palivo premiešajte a naplňte ním nádobu
vhodnú na uchovávanie paliva.
· Palivo miešajte vonku, mimo dosahu iskier
alebo plameňov.
· Pred dopĺňaním paliva stroj položte na zem.
· Uzáver palivovej nádrže odskrutkujte pomaly,
aby sa uvoľnil tlak a zabránilo sa úniku paliva.
· Po doplnení paliva pevne uzatvorte uzáver.
Vibrácie by mohli spôsobiť jeho uvoľnenie a
únik paliva.
· Palivo uniknuté z jednotky osušte. Presuňte
stroj o približne 3 metre od miesta, kde ste
dopĺňali palivo, až potom naštartujte motor.
· Nikdy a za žiadnych okolností sa nepokúšajte
zapáliť uniknuté palivo.
· Počas manipulácie s palivom ani počas
prevádzky stroja nefajčte.
· Palivo skladujte na čerstvom, suchom a dobre
vetranom mieste.
· Neskladujte palivo na miestach, kde je suché
lístie, slama, papier a pod.
· Jednotku a palivo uchovávajte na miestach,
kde výpary paliva neprídu do kontaktu s
iskrami alebo otvoreným plameňom,
ohrievačmi vody a kotlami, elektrickými
motormi alebo spínačmi, sporákmi a pod.
· Pokiaľ je motor v chode, neotvárajte uzáver
palivovej nádrže.
· Palivo nepoužívajte na čistenie.
· Dávajte pozor, aby ste si palivom nezašpinili
l
1
5
10
15
20
25
2%-50 : 1
l (cm
0,02 (20)
0,10 (100)
0,20 (200)
0,30 (300)
0,40 (400)
0,50 (500)
4%-25 : 1
3
) l (cm3)
0,04 (40)
0,20 (200)
0,40 (400)
0,60 (600)
0,80 (800)
1,00 (1000)
Tento stroj je poháňaný dvojtaktným motorom a
vyžaduje prípravu zmesi benzínu a oleja pre
2-taktné motory. Pripravte zmes bezolovnatého
benzínu a oleja pre dvojtaktné motory v čistej
nádobe, ktorá je vhodná na uchovávanie
benzínu.
ODPORÚČANÉ PALIVO: TENTO MOTOR JE
SCHVÁLENÝ NA NAPÁJANIE BEZOLOVNATÝM 89
OKTÁNOVÝM BENZÍNOM PRE MOTOROVÉ
VOZIDLÁ ([R + M] / 2) ALEBO S VYŠŠÍM
OKTÁNOVÝM ČÍSLOM.
Zmiešajte olej pre dvojtaktné motory s benzínom
podľa pokynov na obale.
Odporúčame vám používať olej pre 2-taktné
motory Efco - Oleo-Mac v pomere 2% (1:50),
vyvinutý špeciálne pre všetky dvojtaktné
motory chladené vzduchom.
Správne pomery zmesi olej/palivo uvedené v
schéme (obr.A) sa vzťahujú na motorový olej
PROSINT 2 a EUROSINT 2 alebo na rovnocenný
kvalitný olej (špecifikácie JASO FD alebo ISO
L-EGD). Keď špecifikácie oleja NIE SÚ
rovnocenné alebo nie sú známe, použite zmes v
pomere 4% (1:25).
UPOZORNENIE: NEPOUŽÍVAJTE OLEJ
PRE MOTOROVÉ VOZIDLÁ ANI PRE 2-TAKTNÉ
LODNÉ MOTORY.
UPOZORNENIE:
- Kupujte iba také množstvo paliva, ktoré
spotrebujete; nekupujte viac, ako
spotrebujete počas jedného alebo dvoch
mesiacov;
- Benzín uchovávajte v hermeticky
uzavretej nádrži, na čerstvom a suchom
mieste.
109
SK
Page 31

UPOZORNENIE - Pri príprave zmesi
nikdy nepoužívajte palivo s obsahom etanolu
vyšším ako 10 %; môže sa použiť gasohol
(zmes benzínu a etanolu) s percentuálnym
obsahom etanolu do 10 % alebo palivo E10.
POZNÁMKA - Pripravujte vždy iba také
množstvo zmesi, ktoré potrebujete,
nenechávajte palivo dlho v nádrži alebo v
kanistri. Odporúča sa použitie stabilizačnej látky
Emak ADDITIX 2000 s kódom 001000972, ktorá
umožňuje uskladniť palivovú zmes na dobu 30
SK
dní.
Benzín s obsahom alkylov
UPOZORNENIE - Benzín s obsahom
alkylov nemá rovnakú hustotu ako normálny
benzín. Preto motory nastavené na normálny
benzín si môžu vyžadovať odlišné nastavenie
skrutky H. Pri tomto postupe sa musíte
obrátiť na autorizované servisné stredisko.
DOPĹŇANIE PALIVA
Pred dopĺňaním zmesi bandaskou potraste.
ŠTARTOVANIE
Pred naštartovaním motora sa
ubezpečte, či sa kotúč voľne točí a či nie je v
kontakte s cudzími predmetmi.
Pri minimálnych otáčkach sa rezacie
zariadenie nesmie otáčať. V opačnom
prípade kontaktujte Autorizovaného
Servisného Strediska, aby v ykonala
kontrolu a odstránenie problému.
POZOR: Krovinorez držte pevne
oboma rukami. Vždy stojte tak, aby bolo
vaše telo vľavo od stroja. Nikdy stroj nedržte
prekríženými rukami. Tieto pokyny musia
dodržiavať aj ľaváci.
Udržiavajte správny pracovný postoj.
Vystavenie sa vibráciám môže
spôsobiť poranenia osôb, ktoré trpia
problémami s obehom krvi alebo majú
problémy nervového pôvodu. Ak
spozorujete príznaky ako stŕpnutie, strata
citlivosti, zníženie normálnej sily alebo
zmeny farby pokožky, obráťte sa na svojho
lekára. Tieto príznaky sa zvyčajne prejavujú
na prstoch, rukách a zápästiach.
Pred naštartovaním motora skontrolujte, či
sa plynová páčka voľne pohybuje.
POZOR: dodržiavajte bezpečnostné
predpisy o manipulácii s palivom. Pred
dopĺňaním paliva vždy vypnite motor.
Palivo nikdy nedopĺňajte, keď je stroj alebo
motor v činnosti a kým sú horúce. Pred
naštartovaním motora sa presuňte aspoň o
3 m od miesta, kde ste dopĺňali palivo.
NEFAJČTE!
1. Očistite okolie uzáveru paliva, aby ste predišli
znečisteniu nádrže.
2. Uzáver palivovej nádrže uvoľnite pomaly.
3. Opatrne nalejte palivovú zmes do nádrže.
Zabráňte rozliatiu.
4. Pred vrátením uzáveru na miesto očistite a
skontrolujte tesnenie.
5. Uzáver palivovej nádrže naskrutkujte na
miesto, utiahnite. Poutierajte prípadne
rozliate palivo.
POZOR: skontrolujte, či nedochádza k
úniku paliva a, ak k nim dochádza, pred
používaním ich odstráňte. Podľa potreby
zavolajte servisné stredisko predajcu.
Motor je zahltený
- Vsuňte vhodný nástroj pod koncovku sviečky.
- Vypáčte koncovku sviečky.
- Sviečku odskrutkujte a osušte.
- Plynovú páčku úplne stlačte.
- Potiahnite štartovacie lanko niekoľkokrát,
aby sa vyčistila spaľovacia komora.
- Upevnite sviečku späť a zapojte koncovku
sviečky, zatlačte koncovku pevne –
zmontujte ostatné časti.
110
Page 32

- Páčku sýtiča nastavte do OPEN polohy – aj
keď je motor studený.
- Teraz naštartujte motor.
Postup štartovania
1) Pomaly stlačte primer 4-krát (9, Obr. 1).
2) Presuňte páčku štartéra (15, Obr. 1) do polohy
CLOSE (A, Obr. 15).
3) Stlačte páčku plynu (18, Obr.1) a zablokujte ju
na polovičnom zrýchlení stlačením tlačidla
(22), uvoľnite páčku (18).
4) Položte vyžínač do stabilnej polohy na zem.
Skontrolujte, či je rezací mechanizmus voľný.
Držte vyžínač jednou rukou (Obr. 15A),
potiahnite štartovacie lanko (nie viac ako
3-krát), až kým nezačujete, že motor naskočil.
Nový stroj si môže vyžadovať viac potiahnutí.
5) Presuňte páčku štartéra (15, Obr. 1) do polohy
OPEN (B, Obr. 15).
6) Potiahnite štartovacie lanko, aby sa motor
naštartoval. Po naštartovaní stroja ho
niekoľko sekúnd nechajte bez dotyku
akcelerátora, aby sa zohrial. Stroj bude v
chladnom počasí alebo vo vysokej
nadmorskej výške potrebovať na zohriatie
možno aj viac sekúnd. Nakoniec stlačte
akcelerátor (18, Obr. 1), aby ste zrušili
semiakceleráciu.
UPOZORNENIE:
- Štartovacie lanko si nikdy neobtáčajte
okolo ruky.
- Pri ťahaní štartovacieho lanka ho
nevyťahujte úplne, mohlo by sa tým
roztrhnúť.
- Lanko nepúšťajte prudko; držte
štartovaciu rukoväť (14, Obr. 1) a nechajte,
aby sa lanko opäť pomaly navinulo.
UPOZORNENIE: Pri štartovaní teplého
motora nepoušívajte sýtič.
UPOZORNENIE: Polovičné zrýchlenie
poušívajte výhradne pri štartovaní studeného
motora.
ZÁBEH MOTORA
Motor dosiahne svoj maximálny výkon po 5÷8
hodinách práce.
Počas zábe hu nenechajte motor bežať na
voľnob ehu na maximáln e ot áčk y, aby ste
predišli zbytočnému namáhaniu.
UP OZO RN EN IE ! - Po ča s z áb ehu
nenastavujte karburátor, aby ste dosiahli
zvýšenie výkonu, mohli by ste tak spôsobiť
poškodenie motora.
POZN: Je normálne, že nový motor počas
prvého použitia dymí.
6. ZASTAVENIE MOTORA
Nastavte páčku plynu na voľnobeh (18, Obr. 1) a
počkajte niekoľko sekúnd, aby motor vychladol.
Vypnite motor, stlačením zapaľovania (17).
7. POUŽÍVANIE STROJOVÉHO ZARIADENIA
ZAKÁZANÉ POUŽITIE
POZOR: Predchádzajte spätnému
vrhu, ktorý vás môže vážne poraniť. Spätný
vrh je prudký pohyb stroja dopredu alebo
do strany pri náraze kotúča na nejaký
predmet, ako peň stromu alebo kameň
prípadne keď sa zuby rezného kotúča
zakliesnia v dreve. Náraz do cudzích
predmetov môže spôsobiť dokonca stratu
kontroly nad krovinorezom.
UPOZORNENIE! - Vždy dodržiavajte
bezpečn ostné p redpis y. Krov inorez sa
používa len na kosenie trávnatých porastov
alebo malých kríkov. Konáre vyžínajte iba s
použitím vhodných kotúčov. Nev yžínajte
ma ter iá ly ako kov, pl as t y, m úr y a
ne drevené časti. Je z akáz ané kosiť iné
druhy materiálu. Nepoužívajte krovinorez
ako páku pri zdv íhan í, premies tňovaní
alebo lámaní predmetov, ani ako podperu.
Používanie iných nástrojov alebo zariadení,
ktoré nie sú určené výrobcom, je zakázané.
SK
111
Page 33

POZOR: Pri použití neohybných
kotúčov sa vyhýbajte vyžínaniu v blízkosti
plotov, múrov budov, pňov stromov,
kameňov alebo iných predmetov, ktoré by
mohli spôsobiť spätný vrh krovinorezu
alebo poškodenie kotúča. Pri uvedených
prácach používajte hlavice so strunami.
Okrem toho, dávajte pozor na zvýšenú
možnosť nárazu v takýchto situáciách.
POZOR: Nikdy ne pou žívajte
krovinorez nad úrovňou povrchu alebo s
SK
rezným nástrojom v kolmej polohe k zemi.
Vyžínač nikdy nepoužívajte ako na rezanie
živého plotu.
• Nepracujte s krovinorezom, ak stojíte na
rebríku, je to mimoriadne nebezpečné.
• Krovinorez zastavte, ak kotúč narazil na cudzí
predmet. Skontrolujte kotúč a vyžínač;
prípadné poškodené časti opravte.
• Na kotúči nesmie byť piesok alebo špina. Aj
malým množstvom špiny sa čepeľ rýchlo otupí
a zvýši sa tým nebezpečenstvo spätného vrhu.
• Pred položením krovinorezu na zem zastavte
motor.
• Dávajte mimoriadny pozor a buďte ostražitý ak
nosíte ochranné prostriedky sluchu, pretože sa
tým môže znížiť schopnosť počuť zvuky
upozorňujúce na nebezpečenstvo (volanie,
signály, upozornenia a pod.).
• Dávajte mimoriadny pozor pri práci na svahoch
a na nerovnom povrchu.
POZOR: Ak sa dobre utiahnutý kotúč
začne uvoľňovať, okamžite prerušte prácu.
Mohla by byť poškodená upevňovacia matica/
skrutka, ktorú treba vymeniť. Na upevnenie
kotúča nikdy nepoužívajte neschválené diely.
Ak sa kotúč bude naďalej uvoľňovať, obráťte
sa na svojho predajcu, alebo autorizovaný
servis. Nikdy nepoužívajte krovinorez s
uvoľneným kotúčom.
Ochranné opatrenia v pracovnej oblasti
• Nikdy nedovoľte, aby krovinorez používali deti.
Iným osobám dovoľte používať krovinorez iba
vtedy, ak si prečítali Návod na použitie alebo ak
boli dostatočne zaškolení o správnom použití
krovinorezu.
• Vždy pracujte tak, že budete pevne stáť oboma
nohami na pevnom podklade, aby ste predišli
strate rovnováhy.
• Skontrolujte, či sa môžete bezpečne pohybovať
a stáť. Skontrolujte oblasť okolo, či v nej nie sú
prekážky (korene, skaly, vetvy, jamy a pod.) v
prípade, že by ste sa museli rýchlo presunúť.
• Nepracujte vo výške presahujúcej vaše plecia,
pretože tak bude ťažké udržať kontrolu v
prípade spätného vrhu.
• Nepracujte v blízkosti elektrických káblov.
Nechajte to radšej na odborníkov/
profesionálov.
• Pracujte iba za dobrého svetla a dobrej
viditeľnosti, aby ste videli jasne a zreteľne.
POZOR: Nikdy nepoužívajte neohybné
kotúče pri vyžínaní povrchu s kameňmi.
Odhodené predmety alebo poškodené
kotúče môžu spôsobiť vážne alebo smrteľné
zranenie obsluhy alebo okolostojacich
osôb. Dávajte pozor na odmrštené
predmety. Vždy noste ochranné prostriedky
očí. Nikdy sa nenahýnajte nad ochranný štít.
Kamene, odpadky a pod. by mohli byť
odmrštené smerom k očiam a mohli by Vás
oslepiť alebo vážne poraniť. Neoprávnené
osoby musia ostať v bezpečnej vzdialenosti.
Deti, zvieratá, okolostojaci a pomocníci by
mali ostať vo vzdialenosti aspoň 15 m. Ak sa
niekto priblíži, stroj okamžite zastavte.
Nikdy nemanipulujte krovinorezom, ak ste
sa predtým nepresvedčili, že v bezpečnej
zóne nie je nikto.
Pracovné techniky
Všeobecné pokyny pri práci
POZOR: Táto časť popisuje základné
bezpečnostné opatrenia pri práci pri
vyžínaní a kosení. Ak sa dostanete do
situácie, v ktorej budete mať pochybnosti
ako pokračovať, poraďte sa s odborníkom.
Zavolajte predajcu alebo servisné stredisko.
Nerobte nič, čo presahuje vaše schopnosti.
Musíte poznať rozdiely medzi čistením
lesného porastu, vyžínaním trávy a kosením
trávy ešte pred použitím krovinorezu.
112
Page 34

Základné bezpečnostné predpisy
1. Rozhliadnite sa okolo seba:
• Zabezpečte, aby Vás žiadne osoby, zvieratá a
iné veci neovplyvňovali, hlavne kontrolu nad
strojom.
• Zabezpečte, aby sa osoby, zvieratá atď.
nemohli dostať do kontaktu s rezným
nástrojom, ani s predmetmi, ktoré by mohli
byť odmrštené týmto zariadením.
POZOR: Stroj nepoužívajte bez toho,
že by ste neboli schopní v prípade potreby
zavolať pomoc.
2. Stroj nepoužívajte za zlého počasia, ako v
hustej hmle, v prudkom daždi, ak je veľmi
zima a pod. Práca v uvedených podmienkach
je namáhavá a často so sebou prináša ďalšie
riziká, ako tvorbu poľadovice a pod.
3. Presvedčte sa, že v pracovnej oblasti sa
budete môcť bezpečne pohybovať a stáť.
Skontrolujte pracovnú oblasť, či v nej nie sú
potenciálne prekážky (korene, skaly, konáre,
úvaly a pod.) pre prípad, že by ste sa museli
rýchlo presunúť. Pri práci na prudkom svahu
dávajte veľký pozor.
4. Pred prenesením stroja na iné miesto vypnite
motor.
5. Stroj nikdy neklaďte na zem, kým je motor v
chode.
• Vždy používajte správne vybavenie.
• Skontrolujte, či je vybavenie dobre nastavené.
• Starostlivo si zorganizujte prácu.
• Pri začatí práce s kotúčmi vždy použite plný
výkon.
• Vždy používajte naostrené kotúče.
POZOR: Obsluha stroja, ani iná osoba,
sa nesmie pokúsiť odstrániť pokosený
materiál, kým je motor v chode, mohlo by to
spôsobiť veľmi vážne poranenie. Predtým,
ako sa pokúsite odstrániť materiál, ktorý
zablokoval otáčanie kotúča, zastavte motor
a rezacie zariadenie, aby ste predišli
osobnému úrazu. Kónická spojka sa môže
počas používania veľmi zohriať a ostane
horúca dlhú dobu. Ak sa jej dotknete, mohli
by ste sa popáliť.
POZOR: Niekedy sa môžu medzi
rezným kotúčom a štítom zachytiť konáriky
a tráva. Pred ich odstránením vždy zastavte
motor.
Kontroly pred štartovaním
• Skontrolujte kotúče, aby ste zistili či na
spodnej časti alebo v strednom otvore nie sú
praskliny. Ak ste praskliny našli, kotúč
vymeňte, ale žiadnom prípade nepoužívajte
- vyhoďte ho.
• Skontrolujte, či podporná príruba nie je
prasknutá následkom preťaženia alebo
následkom prílišného utiahnutia. Ak je
podporná príruba prasknutá, vymeňte za
dobrú - zlú vyhoďte.
• Skontrolujte, či poistná matica nestratila
svoju upínaciu silu. Uťahovací moment
matice by mal byť 25 Nm.
• Skontrolujte, či nie je poškodený alebo
prasknutý ochranný štít kotúča. Ak je
ochranný štít kotúča prasknutý, vymeňte ho.
POZOR: Nikdy ne pou žívajte
krovinorez bez ochranného štítu alebo keď
je štít poškodený. Nikdy nepoužívajte
krovinorez bez prevodového hriadeľa.
Čistenie lesného porastu
• Predtým ako začnete s prácou, skontrolujte
oblasť, druh terénu, sklon svahu, prítomnosť
kameňov, jám a pod.
• Začnite pracovať na ktoromkoľvek kraji, kde
je to pre vás ľahšie a vyčistite otvorený
priestor, od ktorého začnete.
• Pracujte systematicky po pásoch, pričom pri
každom kroku vyčistite približne 4-5 m. Takto
využijete plný rozsah stroja v oboch smeroch
a získate tak voľnú širokú plochu, v ktorej sa
môžete ľahko pohybovať.
• Čistite pás dlhý približne 75 m. Nádrž s
palivom premiestňujte podľa postupu práce
vždy so sebou.
• Na svahoch pracujte v horizontálnom smere,
pretože je ľahšie pracovať zľava doprava/
zprava doľava ako zdola hore a naopak.
• Naplánujte si pás, aby ste predišli jamám a
113
SK
Page 35

iným prekážkam na teréne. Pás môžete
nasmerovať aj v závislosti od poveternostných
podmienok, aby zrezaný lesný porast padal
na čistú stranu.
Vyžínanie trávy použitím trávového kotúča
• Trávové kotúče sa nesmú používať na
zdrevnatené steblá a konáre.
• Trávový kotúč sa používa na všetky druhy
vysokej alebo hrubej trávy.
• Tráva sa kosí bočným, kolísavým pohybom,
kde pohyb sprava doľava je čistiacim úkonom
a pohyb zľava doprava je spätným úkonom.
SK
Koste ľavou stranou kotúča (v intervale medzi
8. a 12. hod. na ciferníku).
• Ak je kotúč pri kosení trávy naklonený doľava,
tráva sa bude ukladať v určitej línii, čím sa
uľahčí jej zber, napr. hrabaním.
• Snažte sa pracovať rytmicky. Stojte pevne na
rozkročených nohách. Postúpte vpred po
spätnom úkone a znovu sa pevne postavte.
• Nechajte, aby sa opierka jemne dotýkala
zeme. Používa sa na ochranu kotúča pred
nárazmi o terén.
• Znížte riziko, že sa materiál omotá okolo
kotúča dodržiavaním nasledujúcich pokynov:
1. Vždy pracujte pri plnom výkone.
2. Počas spätného úkonu sa v yhýbajte
pokosenému materiálu.
• Zastavte motor, odpnite si popruh a položte
stroj na zem, až potom začnite zbierať
pokosený materiál.
Kosenie trávy kosiacou hlavicou
UPOZORNENIE: Nikdy nepracujte s
dlhšou strunou ako je stanovený priemer.
Ak je správne namontovaný ochranný štít,
zabudovaný rezák automaticky skráti
strunu na správnu dĺžku. Veľmi dlhá struna
preťažuje motor, čím sa môže poškodiť
mechanizmus spojky a priľahlé časti.
Kosenie
• Držte hlavicu tesne nad zemou, v naklonenej
polohe. Uvedomte si, že pracuje len koniec
struny. Nechajte strunu pracovať vlastným
tempom. Strunu nikdy netlačte na terén
114
plochy, ktorý chcete kosiť.
• Struna ľahko odstráni trávu a burinu v okolí
múrov, plotov, stromov a obrubníkov, ale
môže aj poškodiť citlivú kôru stromov a
kríkov alebo poškodiť základy plotov.
• Znížte riziko poškodenia rastlín skrátením
struny na 10-12 cm a znížením rýchlosti
otáčok motora.
Čistenie
• Technika čistenia odstraňuje neželanú
vegetáciu. Držte hlavicu tesne nad zemou a
mierne ju nakláňajte. Nechajte koniec vlákna,
aby sa dotýkal stromov, stĺpov, sôch a pod.
UPOZORNENIE: Táto technika zvyšuje
opotrebovanie i spotrebu struny.
• Vlákno sa spotrebúva rýchlejšie a musíte ho
vysúvať častejšie ak pracujete okolo skál,
tehál, betónu, kovových plotov a pod., v
porovnaní s prácou okolo stromov a
drevených plotov.
• Pri kosení a čistení musíte používať nižší
výkon, struna tak dlhšie vydrží a zníži sa tým
aj opotrebovanie kosiacej hlavice.
Kosenie
• Krovinorez je ideálny na kosenie trávy, ktorá
sa nedá dosiahnuť normálnou kosačkou. Pri
kosení udržiavajte strunu v rovnobežnej
polohe k zemi. Vyhýbajte sa tlaku na kosaciu
hlavicu, pretože by sa tým mohol zničiť
trávnik a poškodiť kosiaci nástroj.
• Nedovoľte, aby bola hlavica pri bežnom
kosení v kontakte so zemou. Takýto
nepretržitý kontakt môže spôsobiť
poškodenie a opotrebovanie kosacej hlavice.
Zametanie
• Ventilátorový efekt rotujúcej struny môžete
využiť na rýchle a ľahké vyčistenie plochy.
Držte strunu rovnobežne nad plochou, ktorú
chcete “zametať” a pohybujte strojom zo
strany na stranu.
• Pri kosení a zametaní používajte na
dosiahnutie najlepších výsledkov max.
otáčky.
Page 36

POZOR: Nikdy nekoste pri zlej
viditeľnosti, pri veľmi vysokých alebo
nízkych teplotách, ani v mraze.
Čistenie lesného porastu použitím píliaceho
kotúča
• Riziko spätného vrhu sa zvyšuje úmerne s
hrúbkou rezaného porastu napr. konárov.
Preto sa vyhýbajte vyžínaniu s kotúčom v
intervale 12. hod. až 3. hod.(podľa ciferníku)
(Obr.16).
• Aby ste očistili porast vľavo, treba potlačiť
spodok stromu vpravo. Nakloňte kotúč a
silným tlakom ho posúvajte šikmo smerom
dole doprava. Súčasne zatlačte konár použitím
štítu kotúča. Režte kotúčom v intervale medzi
3. hod. až 5. hod. (podľa ciferníku). Pred
dotykom kotúča s porastom/drevinou úplne
stlačte plynovú páčku.
• Aby skosený porast padal vpravo, treba zatlačiť
spodnú časť koseného porastu vľavo. Nakloňte
kotúč a silný tlakom ho veďte šikmo dohora
vpravo. Režte kotúčom v intervale medzi 3.
hod. až 5. hod. (na ciferníku), aby smer otáčania
kotúča tlačil na porast/drevinu vľavo.
• Aby skosený porast padol dopredu, musíte
spodnú časť porastu potiahnuť dozadu.
Potiahnite kotúč dozadu rýchlym, pevným
pohybom.
• Ak je porast veľmi hustý, prispôsobte mu
tempo chôdze i postup kosenia.
• Ak sa kotúč zamotá v poraste, nevyťahujte ho
násilným ťahaním. Ak by sa tak stalo, mohla by
sa poškodiť rezacia hlava, prevodovka, hriadeľ
alebo rukoväť. Uvoľnite rukoväte, uchopte
hriadeľ oboma rukami a stroj opatrne uvoľnite.
stratu kontroly nad kotúčom, čím by mohlo
dôjsť k vážnemu poraneniu.
POZOR: Píliaci kotúč môžete použiť iba
spoločne s príslušným ochranným štítom
(pozrite tabuľku na str.121) s dvojramennou
rukoväťou a dvojitým popruhom s
uvoľňovacím mechanizmom.
Rezanie s pílovým kotúčom
• Vyžínanie porastu (konáriky, prúty, kmienky..)
a krovia. Krovinorezom pohybujte do strán,
ako pri pílení.
• Pokúste sa zrezať niekoľko konárikov jedným
pohybom.
• Ak natrafíte na trs trvdého porastu, vyčistite
najprv okolitý priestor. Začnite zrezávať porast
hore dookola celého trsu, aby sa nemohol
zapliesť. Potom zrežte porast na požadovanú
výšku. Teraz sa pokúste dosiahnuť vnútro a
vyžínať zo stredu skupiny. Ak je ešte vždy ťažký
prístup, zrežte vrch porastu a nechajte ho
padnúť. Tým sa zníži riziko zablokovania.
8. PREPRAVA
PREPRAVA
Krovinorez prenášajte s vypnutým motorom a
nasadeným krytom kotúča (Obr. 3).
UP OZORNE NIE: V prípade prepravy
alebo uskladnenia krovinorezu namontujte
ochranný kryt kotúča, kód 4196086 ako je
znázornené na obr. 3.
SK
Použitie pílového kotúča
POZOR: Pílové kotúče sú vhodné na
orezávanie kríkov a na rezanie malých
stromov s priemerom do 5 cm. Nepokúšajte
sa rezať stromy s väčším priemerom, pretože
kotúč by sa mohol zakliesniť v kmeni alebo
odmrštiť píliaci kotúč prudko vpred. To by
mohlo spôsobiť poškodenie kotúča alebo
115
Page 37

9. ÚDRŽBA
Onderhoudstabel
Let er alstublieft op dat de volgende onderhoudsintervals alleen van toepassing zijn op normale werkomstandigheden.
Als uw dagelijks werk meer tijd vergt dan normaal of als er sprake is van moeilijke maai-omstandigheden, dan moeten
de voorgestelde intervals dienovereenkomstig verkort worden
Complete Machine
SK
Bedieningselementen (Stop-knop, Chokehendel, Gashendel,
Interlockstarter)
Brandstoftank
Brandstoffilter en leidingen
Snijwerktuigen
Kegelwiel
Koppelingstrommel
Beschermkap snijwerktuigen
Alle toegankelijke schroeven en moeren (Niet de afstelschroeven)
Luchtfilter
Cilinderribben
Startsysteem ventilatiegaten
Startkoord
Carburateur
Bougie
Trillingstandaards
Moeren en schroeven snijwerktuig
Inspecteren (Lekkages, barsten, en slijtage)
Schoonmaken na afloop dagelijkse werkzaamhe
Werking controleren
Inspecteren (Lekkages, barsten, en slijtage)
Schoonmaken
Inspecteren
Schoonmaken, Filterelement vervangen
Inspecteren (Schade en Slijtage)
Spanning controleren
Slijpen
Inspecteren (Schade, Slijtage en Smeerniveau)
Inspecteren (Schade en Slijtage)
Vervangen
Inspecteren (Schade en Slijtage)
Vervangen
Inspecteren
Opnieuw aanhalen
Schoonmaken
Vervangen
Schoonmaken
Schoonmaken na afloop dagelijkse werkzaamheden
Inspecteren (Schade en Slijtage)
Vervangen
Controleer stationair toerental (snijwerktuig
mag niet draaien bij stationair toerental)
Controleer de opening van de elektrode
Vervangen
Inspecteren (Schade en Slijtage)
Door dealer laten vervangen
Controleer of de blokkeermoer van het
snijwerktuig goed vastzit
den
Vóór elk gebruik
x
x
x
x
x
x
x
x
x
x
x
x
defect
Elke maand
Indien beschadigd of
x
x
x
x
x
x
x
x
x
x
x
x
x
x x
x
x
50 uur
Zoals vereist
100 uur
jaarlijks of elke
6 maanden of om de
x
x
x
x
x
x
x
x
x
116
Page 38

BRÚSENIE NOŽA NA TRÁVU (2-3-4 ZUBY)
1. Nože na trávu sú ot áčateľné: ak jedna
strana už nie je viac ostrá, nôž možno
otočiť a použiť druhú stranu (Obr. 17).
2. Nôž na trávu ostrite plochým pilníkom s
hladkým rezom (Obr. 17).
3. A by ste udr žali r ovnováhu nabrús te
rovnakým spôsobom všetky ostria.
4. Ak nože nie sú správne nabrúsené, môžu
spôsobiť nepravidelné vibrácie prístroja a
následne prasknutie samotných nožov.
BRÚSENIE KOTÚČA (8 ZUBY)
Vždy kontrolujte celkový stav kotúča. Správne
na br ús en ie k ot úč a um ož ní dos ia hn uť
maximálny výkon krovinorezu.
Na nabrúsenie zubov používajte okrúhly pilník,
pri brúsení postupujte po malých častiach
(zub za zubom), pri ktorých dodržujte uhly a
rozmery znázornené na obr. 11.
OSTRENIE PÍLOVÉHO KOTÚČA
• Pokyny na správne nabrúsenie nájdete na
obale rezných nástrojov.
Správne nabrúsené ostrie je základom pre
účinnú prácu a aby sa predišlo zbytočnému
opotrebovaniu rezného nástroja alebo
pílového kotúča.
• Pri ostrení kotúča skontrolujte, či je dobre
zaistený. Používajte 5.5 mm okrúhly pilník.
• Uhol brúsenia je 15°. Každý druhý zub brúste
doprava, zub medzi nimi brúste doľava. Ak
kotúč prudko narazil do kameňa, vo
výnimočných prípadoch môže byť
nevyhnutné upraviť horné okraje zubov
plochým pilníkom. V takom prípade to urobte
pred brúsením okrúhlym pilníkom. Horné
okraje treba zbrúsiť rovnomerne na všetkých
zuboch.
UP OZO RN EN IE! - Ne sp ráv ny t yp
ko si ac eho nás tro ja , a le bo ne spr áv ne
nabrúsený kotúč zvyšujú riziko spätného vrhu.
Kontrolujte kotúče na kosenie trávy, aby ste
zistili, či sú poškodené alebo prasknuté, v
prípade poškodenia, ich vymeňte.
POZOR: Nikdy neopravujte poškodené
rezné nástroje zváraním, narovnávaním, ani
zmenou tvaru. Môže to spôsobiť uvoľnenie
rezacieho nástroja, následkom čoho môže
byť vážne poranenie.
KOSIACA STRUNOVÁ HLAVICA
Používajte vždy originálnu strunu (nylonovú)
rov na ké ho p ri em er u, a by s te p re di šl i
preťaženiu motora (Obr. 18).
Pri práci predÍžite strunu poklepaním hlavice
o zem.
POZNÁMKA: Neklepte hlavicu o betón alebo
dlažbu: môže to byť nebezpečné.
Vý me na n yl ono ve j s tr un y v hl av ic i
LOAD&GO (Obr. 19)
1. Odrežte 6,0 m nylonovej struny Ø 3,0 mm.
2. Zarovnajte šípky a vsuňte strunu do hlavice
(Obr. 19.1), až kým nevystúpi na opačnej
strane (Obr. 19.2).
3. Rozdeľte strunu na dve rovnaké časti (Obr.
19.3) a naviňte hlavicu otočením gombíka
(Obr. 19.4).
UPOZORNE NIE ! - Pri v ykonávaní
údržby používajte vždy ochranné rukavice.
Nevyko návajte ú drž bu, pok iaľ je moto r
horúci.
VZDUCHOVÝ FILTER
Po každých 8-10 hodinách práce, odstráňte
uzáver (A, Obr. 22) a očistite filter (B).
Prefúknite stlače ným vzduchom z vnútra
smerom von.
Ak je špinavý alebo poškodený, vymeňte ho.
Pri nasadzovaní filtra späť dbajte na to aby
tesne priliehal k držiaku filtra. Zanesený filter
spôsobuje nepravidelný chod motora, zvýšenú
spotrebu a znížený výkon.
PALIVOVÝ FILTER
Pravidelne kontrolujte stav palivového filtra.
Znečistený filter môže spôsobiť obtiažne
štartovanie a nižší výkon motora. Pre očistenie
filter vyberte otvorom palivovej nádrže, v
prípade prílišného znečistenia ho vymeňte
(Obr. 21).
SK
117
Page 39

MOTOR
Pravidelne čistite rebrovanie valca štetcom
alebo stlačeným vzduchom. Nahromadenie
nečistôt na valci môže spôsobiť prehriate,
ktoré škodí chodu motora.
SVIEČKA
Odporúčame svie čku pravid elne čistiť a
kontrolovať vzdialenosť medzi elektródami
(Obr. 23). Používajte sviečku NGK BPMR7A
alebo in ej znač ky rovnakého tep elného
stupňa.
SK
PREVODOVKA
Po každých 30 hodinách práce odstráňte na
prevodovke skrutku (D, Obr. 8) a skontrolujte
hladinu maziva. Nep oužívajte viac ako 10
gramov. Používajte kvalitné mazivá na báze
dvojsírnika molybdénu.
Na čistenie nepoužívajte palivo (zmes).
KARBURÁTOR
Pred nast ave n ím kar bu ráto ra vy čis tite
vzduchový filter (B, Obr. 22). Tento motor bol
navrhnutý a vyrobený v súlade so smernicami
97/6 8/ E S, 2 002 /8 8/ ES a 2 00 4/ 26 /E S.
Karburátor (Obr. 20) bol navrhnutý tak, aby
umožnil regulovanie skrutiek L a H o 1/4
otáčky. Rozpätie možnej regulácie skrutiek L a
H o ±1/8 otáčky je vopred nastavené výrobcom
a nie je možné zmeniť ho.
UPOZORN ENIE: Sk rutky neu ťahujte
násilím mimo možnú reguláciu!
Sk rutka voľnobehu T musí by ť nastavená
tak, aby sa zaistila bezpečná hranica medzi
voľnobe hom motora a režimom zopnutia
spojky.
Skrutka L musí byť nastavená tak, aby motor
rýchlo reagov al na pr ida nie plynu a mal
pravidelný chod na voľnobeh.
Skrutka H musí byť upravená tak, aby motor
počas kosenia podával plný výkon.
UP OZO RN EN IE : A k j e mo to r n a
voľnobe hu (280 0 ot áčok/mi n), kotúč sa
118
nesmie točiť. Odporúčame vám, aby ste sa
pri nastavovaní k arburátora obrátili na
vášho predajcu alebo autorizovaný servis.
UPOZOR NENIE: K limatické alebo
tlakové zmeny môžu mať vpl yv na chod
motoru.
TLMIČ VÝFUKU
PO ZOR ! – Tento v ýf uk je v ybavený
katalyzátorom, ktorý je pre motor nevyhnutný,
aby spĺňal p odmienk y pre p ožiadavky na
emisie. Na katalyzátore nikdy nevykonávajte
ži ad ne zme ny, a ni h o n eod st raňu jt e:
akoukoľvek úpravou katalyzátora porušíte
zákon.
P OZ O R ! – V ý f u k y v y ba v en é
katalyzátorom sa pri po užívaní ve ľm i
zoh rej ú a ost an ú h or úc e aj dlh o po
zastavení motora. K javu dôjde, aj keď je
moto r pr i minimálnom v ýkone. Do tyk
kataly zátora môž e spôs obiť popál eniny
ko že. Ne zabud nite na nebezpečens tvo
požiaru!
DÁVA JT E POZOR! – A k je v ýf uk
poškodený, musíte ho dať vymeniť. Ak sa
výfuk často upcháva, môže to by ť znakom
obmedzenia účinnosti katalyzátora.
POZOR: Krovinorez nepoužívajte, ak
je jeho tlmič poškodený, ak chýba alebo ak
je mod ifikovaný. Nesprávne udrži avaný
tlmič zvyčuje riziko požiaru a poškodenia
sluchu.
MIMORIADNA ÚDRŽBA
Po ukončení sezóny, po intenzívnom používaní
alebo vždy po dvoch rokoch bežného
používania zabezpečte generálnu kontrolu,
ktorú musí vykonať špecializovaný technik
autorizovaného strediska.
Page 40

UPOZORNE NIE: Vš etk y op erácie ,
ktoré nie sú opísané v tomto návode, musia
byť vykonané autorizovaným servisom. Aby
ste zaručili stále a prav idelné fungovanie
krovin orezu, nahr ádz ajte všetky diely iba
ORIGINÁLNYMI NÁHRADNÝMI DIELMI.
Prípadné nepovolené zmeny a/alebo
použitie neoriginálnych náhradných dielov
môže spôso biť váž ne poranenie
obsluhujúceho pracovníka, jeho smrť alebo
smrť a poranenie iných osôb.
10. USKLADNENIE
Ak ostane stroj bez používania dlhú dobu:
- Palivovú nádrž vyprázdnite a vyčistite na
dobre vetranom mieste. Aby sa vyprázdil
karburátor, naštartujte motor a počakjte,
kým sa nezastaví (ak by ste nechali zmes v
karburátore, mohla by sa poškodiť
membrána).
- Operácie pri uvedení do chodu po zimnom
uskladnení sú rovnaké ako pri bežnom
naštartovaní stroja (Obr. 108).
- Dodržiavajte všetky vyššie uvedené pravidlá
údržby.
- Krovinorez dokonale očistite a kovové časti
nakonzervujte olejom.
- Odmontujte kotúč, očistite ho a naolejujte,
aby ste zabránili zhrdzaveniu.
- Odmontujte unášače, očistite, osušte a
naolejujte hriadeľ prevodovky.
- Vyprázdnite palivovú nádrž a znovu nasaďte
uzáver.
- Dôkladne čistite vetracie chladiace otvory a
vzduchový filter (B, Obr. 22).
- Prístroj uskladnite na suchom mieste, nie
priamo na zemi a v dostatočnej vzdialenosti
od zdrojov tepla.
- Dôsledne dodržiavajte miestne predpisy o
likvidácii materiálov z kosenia.
- Dôsledne dodržiavajte miestne predpisy o
likvidácii obalov, oleja, benzínu,
akumulátorov, filtrov, opotrebovaných
dielov a všetkých dielov, ktoré by mohli
poškodiť životné prostredie. Takéto odpady
sa nesmú odhadzovať do zberných nádob
komunálneho odpadu, ale musia sa
separovať a odovzdať v zberných strediskách
na recykláciu odpadu.
Vyradenie z činnosti a likvidácia
Po vyradení strojového zariadenia ho
nevyhadzujte voľne v prostredí, ale odovzdajte
ho v zbernom stredisku.
Veľká časť materiálov použitých na konštrukciu
strojového zariadenia sa dá recyklovať. Všetky
kovy (oceľ, hliník, mosadz) možno odovzdať v
zbernom stredisku kovových odpadov.
Informácie dostanete na správe zberných
surovín vo vašej oblasti. Likvidáciu odpadov zo
strojového zariadenia treba vykonať v súlade s
platnými predpismi na ochranu životného
prostredia, aby sa predišlo kontaminácii
pozemkov, vzduchu a vody.
V každom prípade bude treba dodržať
platné predpisy.
SK
11. OCHRANA ŽIVOTNÉHO PROSTREDIA
Ochrana životného prostredia je významným a
primárnym aspektom pri používaní strojového
zariadenia a je na prospech spolužitia osôb a
ochranu prostredia, v ktorom žijeme.
- Snažte sa nerušiť okolie.
119
Page 41

12. TECHNICKÉ ÚDAJE
Objem valcov
SK
Motor
Výkon
Počet otáčok/minimálne otáčky
Maximálna rýchlosť
výstupného hriadeľa
Rýchlosť motora pri maximálnej
rýchlosti výstupného hriadeľa
Objem palivovej nádrže
Vstrekovač paliva
Antivibračný systém
Šírka rezu
cm
kW
min
min
min
cm
cm
DS 3500 S - BC 350 S
3
36.3
DS 3500 T - BC 350 T
2 Dvojtaktný EMAK
1.4
-1
-1
-1
3
2800
8.500
11.700
600 (0.6 l)
Áno
Áno
42
Hmotnosť bez rezného nástroja
a krytu
120
kg
6.9
7.4
Page 42

Odporúčané rezné nástroje
Modely Rezné nástroje Ochranné štíty
DS 3500
BC 350
DS 3500
BC 350
DS 3500
BC 350
DS 3500
BC 350
DS 3500
BC 350
DS 3500
BC 350
DS 3500 T - BC 350 T P.N. 4095635AR P.N. 4174279
DS 3500 T - BC 350 T P.N. 4095066AR P.N. 4174279
* ochrana pre č.d. 4174283A nie je nevyhnutná
P.N. 63129003
P.N. 63129004
P.N. 63019018
P.N. 63019017
P.N. 4095673AR
P.N. 4095674AR
P.N. 4095638AR
P.N. 4095563AR
P.N. 4095565AR
P.N. 4095065AR
P.N. 61042035A
P.N. 61042036A
P.N. 61042035A
P.N. 61042036A
P.N. 61042035A
P.N. 61042036A
P.N. 61042035A
P.N. 61042036A
P.N. 61042035A
P.N. 61042036A
P.N. 61042035A
P.N. 61042036A
SK
*
*
*
*
POZOR!!!
Riziko poranenia sa zvyšuje montážou nesprávnych rezacích zariadení! Používajte výhradne
odporúčané rezacie zariadenia a ochranné kryty a dodržiavajte pokyny na ich nabrúsenie.
121
Page 43

DS 3500 S - BC 350 S DS 3500 T - BC 350 T
Hladina akustického
tlaku
SK
Tolerancia
Nameraná hladina
akustického výkonu
Incerteza
Zaručená hladina
akustického výkonu
Úroveň vibrácií
Tolerancia
dB (A)
dB (A)
dB (A)
dB (A)
dB (A)
m/s
m/s
EN 11806
EN 22868
2000/14/EC
EN 22868
EN ISO 3744
2000/14/EC
EN 22868
EN ISO 3744
EN 11806
2
EN 22867
EN 12096
2
EN 12096
LpA av
L
WA
96.5 91.5 91.5 91.5
3.0 3.0 3.0 3.0
110.0 106.0 106.0 106.0
2.0 2.0 2.0 2.0
112.0 108.0 108.0 108.0
5.5 (sx)
5.2 (dx)
2.5 (sx)
1.1 (dx)
5.2 (sx)
4.6 (dx)
1.3 (sx)
1.1 (dx)
3.1 (sx)
4.1 (dx)
3.4 (sx)
2.4 (dx)
4.4 (sx)
4.4 (dx)
2.4 (sx)
2.1 (dx)
*
*
- Priemerné štatistické hodnoty: 1/2 voľnobeh, 1/2 na plný výkon (hlavica) alebo 1/2 max. rýchlosť bez záťaže (kotúč).
*
122
Page 44

13. VYHLÁSENIE O ZHODE
Podpísaná spol. Emak spa via Fermi, 4 - 42011 Bagnolo in
Piano (RE) TALIANSKO prehlasuje na vlastnú zodpovednosť,
že strojové zariadenie:
1. Druh: vyživače / kosačky
2. Značka Efco, Typ DS 3500 S - DS 3500 T
Značka Oleo-Mac, Typ BC 350 S - BC 350 T
3. Identifikácia série 246 XXX 0001 ÷ 246 XXX 9999 (DS 3500
S - BC 350 S) - 249 XXX 0001 ÷ 249 XXX 9999 (DS 3500 T BC 350 T)
vyhovuje požiadavkám smerníc:
2006/42/ES - 2000/14/ES - 2004/108/ES - 97/68/ES - 2004/26/
ES,
vyhovuje poži adavk ám nasledu júcic h har monizova ných
noriem:
EN 55012 - EN ISO 11806
Dodržané postupy pri hodnotení súladu:
14. ZÁRUKA A SERVIS
Tento prístr oj bo l navrh nutý a z real izov aný pom ocou
najmodernejších výrobných techník. Výrobca poskytuje na
svoje výrobky 24 mesač nú záruku od dátumu nákupu v
prípade používania súkromnými osobami a pri používaní vo
voľnom čase. V prípade profesionálneho používania je záruka
obmedzená na 12 mesiacov.
Všeobecné záručné podmienky
1) Z áruk a j e p lat ná od dát umu nák upu. Výr obca ,
prostredníctvom predajnej siete a technického servisu,
bezpl atne vymení časti, ktoré sú chybné v dôsledku
chyby mater iálu, opra covania al ebo výroby. Záruk a
neu berá kupujú cemu právne nárok y vyp lývajúce z
občianskeho zákonník a v prípade chýb alebo kazov
spôsobených predanou vecou.
2) Technický personál zasiahne čo najrýchlejšie v časových
lehotách, ktoré mu umožnia organizačné požiadavky.
3) Na vy žia da ni e z áru čn ej op rav y je po tre bn é
predlož iť oprávneném u personálu nižšie uvedený
záručný list opečiatkovaný predajcom, vyplnený vo
všetkýc h čas tiach a do plnený nákupnou faktú rou
alebo pokladničným blokom, povinným na daňové
účely, na ktorom je uvedený dátum nákupu.
4) Záruka sa neuplatňuje v prípade:
- Zjavne nevykonávanej údržby,
Príloha V - 2000/14/ES
Nameraná hladina hluku: 110.0 dB (A) (DS 3500 S - BC 350 S) -
106.0 dB (A) (DS 3500 T - BC 350 T)
Zaručená hladina hluku: 112.0 dB (A) (DS 3500 S - BC 350 S) -
108.0 dB (A) (DS 3500 T - BC 350 T)
Technická dokumentácia je uložená v administratívnom sídle:
Technická správa
Pripravené v Bagnolo in Piano (RE) Taliansko - via Fermi, 4
Dátum: 31/01/2014
Fausto Bellamico - Prezident
- Nesprávneho používania výrobk u alebo v prípade
vykonania zmien na ňom,
- Použ itia nevhodných mazadiel aleb o pohonn ých
látok,
- Použitia neoriginálnych náhradných súčiastok alebo
doplnkov,
- Zásahov vykonaných neoprávnenými osobami.
5) V ýrob ca vyníma zo zá ruky s potrebné materiály a
sú čast i, kto ré pod lieh ajú bež nému fu nkč nému
opotrebovaniu.
6) Záruka sa nevzťahuje na zásahy modernizácie alebo
vylepšenia výrobku.
7) Záruka sa nevzťahuje na nastavovanie a údržbu, ktoré
by boli nevyhnutné počas záručnej lehoty.
8) Prípadné škody spôsobené prepravou musia byť ihneď
nahlásené prepravcovi, inak záruku nemožno uplatniť.
9) Na motory ostatných značiek (Briggs & Stratton, Subaru,
Honda, Lombardini, Kohler, atď.), namontované na naše
st roje , sa vz ťahuje zá ruk a pos kytnutá v ýrobc ami
motora.
10) Záruka sa nevzťahuje na prípadné škody, priame alebo
ne pri ame, s pôsob ené os obá m aleb o na ve ciach
po ruch ami pr íst roja aleb o k tor é sú nás led kom
núteného predĺženého pozastavenia jeho používania.
s.p.a.
SK
MODEL
VÝROBNÉ č.
KÚPENÉ OD P.
Nezasielajte! Priložte iba k prípadnej žiadosti o technický servis.
DÁTUM
PREDAJCA
123
Page 45

15. RIEŠENIE PROBLÉMOV
POZOR: jednotku vždy zastavte a odpojte sviečku, až potom urobte všetky
nápravné opatrenia podľa tabuľky dolu, samozrejme okrem tých, pri ktorých sa
vyžaduje, aby bola jednotka v chode.
Ak sa vám nepodarilo problém odstrániť ani po overení všetkých príčin, obráťte sa na
autorizovaný servis. Ak príčina problému nie je uvedená v tejto tabuľke, obráťte sa na
autorizovaný servis.
PROBLÉM MOŽNÉ PRÍČINY RIEŠENIE
Motor sa nenaštartuje
alebo zhasne už po
SK
niekoľkých sekundách po
naštartovaní.
1. Sviečka nevydáva iskru
2. Motor je zahltený
1. Skontrolujte iskru sviečky. Ak
sviečka nevydáva iskru,
zopakujte test s novou sviečkou
(BPMR7A).
2. Postupujte podľa pokynov na
str.110. Ak sa motor ani tak
nenaštartuje, zopakujte
procedúru s novou sviečkou.
Motor sa naštartuje, ale
nezrýchľuje správne alebo
pri vyššej rýchlosti
nefunguje správne.
Motor nedosiahne plnú
rýchlosť a / alebo veľmi
dymí.
Motor sa naštartuje, otáča
sa a zrýchľuje, ale pri
minime zhasne.
Motor sa naštartuje a
funguje, ale rezacie
zariadenie sa neotáča
POZOR: Nikdy sa
n e d o t ý k a j t e
r e z a c i e h o
mechanizmu, kým
je motor v činnosti.
POZOR: Nikdy sa nepokúšajte vykonať opravy sami, bez potrebných prostriedkov a
technických znalostí. Akýkoľvek nesprávne vykonaný zásah bude automaticky znamenať
stratu nároku na záruku a odmietnutie akejkoľvek zodpovednosti Výrobcu.
Treba nastaviť karburátor.
1. Skontrolujte zmes olej /
benzín.
2. Špinavý vzduchový filter.
3. Treba nastaviť karburátor
Treba nastaviť karburátor.
Poškodená spojka, kónický
spoj alebo prevodový
hriadeľ
Zavolajte autorizovaný servis, aby
vám nastavili karburátor.
1. Používajte čerstvý benzín a olej
pre 2-taktné motory.
2. Vyčistite; pozrite pokyny v
kapitole Údržba vzduchového
filtra.
3. Zavolajte autorizovaný servis,
aby vám nastavili karburátor.
Nastavte skrutku minima „T“ (Obr.20)
smerom vpravo na dosiahnutie
vyššej rýchlosti; pozrite kapitolu
Údržba karburátora.
V prípade potreby ich vymeňte;
zavolajte autorizované servisné
stredisko
124
Page 46

PŘEKLAD ORIGINÁLNÍHO NÁVODU
ÚVOD
Abyste stroj mohli správně používat a vyhnuli se
nehodám, nezačínejte práci, než si přečtete
pozorně tento návod k obsluze. V tomto návodu
najdete vysvětlení činnosti různých částí stroje a
pokyny k provádění potřebných kontrol a
údržby.
Poznámka Ilustrace a specifikace uvedené v
tomto návo du ne jsou p řísně zá vazné.
Výrobce si vyhrazuje právo na provádění
změn bez předchozího upozornění.
Kromě návodu k obsluze a údržbě obsahuje tato
příručka i informace, které vyžadují zvláštní
pozornost. Tyto in formace jsou označeny
následujícími symboly:
POZOR: jestliže hrozí nebezpečí nehod, zranění
osob, sm rtelných z ranění n ebo váž ných
poškození věcí.
UPOZORNĚNÍ : Je stl iže hrozí nebe zpeč í
poškození stroje nebo jeho jednotlivých dílů.
POZOR
NEBEZPEČÍ POŠKOZENÍ SLUCHU
PŘI BĚŽNÝCH PRACOVNÍCH PODMÍNKÁCH
MŮŽE TENTO STROJ ZNAMENAT PRO
OBSLUHU HLADINU DENNÍHO OSOBNÍHO
VYSTAVENÍ HLUKU ROVNOU NEBO VYŠŠÍ NEŽ
85 dB (A)
OBSAH
1. B E Z PE Č N O S TN Í P ŘE D P I S Y
(obsahují pravidla pro bezpečné
používání stroje)
2. V Y S V Ě T L EN Í S Y M B O L Ů A
BEZPEČNOSTNÍCH UPOZORNĚNÍ
(vysvětluje, jak identifikovat stroj a
význam symbolů)
3. H L A V N Í C H K O M P O N E N T Y
(vysvětluje umístění hlavních prvků,
které tvoří stroj)
4. MONTÁŽ (vysvětluje, jak odstranit
balení a dokončit montáž volných
prvků)
5. SPOUŠTĚNÍ 191
187
189
189
189
6. ZASTAVENÍ MOTORU 193
7. POUŽITÍ STROJE 193
8. DOPRAVA 197
9. Ú DR Ž BA (o bs ah uje vš ec hny
informace pro údržbu stroje)
10. SKLADOVÁNÍ 201
11. OCHRANA ŽIVOTNÍHO PROSTŘEDÍ
(poskytuje některá doporučení pro
ekologické používání stroje)
12. TECHNICKÉ ÚDAJE (shrnuje hlavní
vlastnosti stroje)
13. PROHLÁŠENÍ O SHODĚ 205
14. ZÁR UČN Í LIS T (shr nuje záruční
podmínky)
15. PRŮVODCE ODSTRAŇOVÁNÍM
ZÁVAD (pomůže vám rychle vyřešit
případné problémy s používáním)
1. BEZPEČNOSTNÍ PŘEDPISY
POZOR
- P ři s pr áv né m p ou ž ív á ní je s tr oj
po ho dl ný m a ú čin ný m pr ac ov ním
ná str oj em ; al e př i n esp rá vné m a
neopatrném užití může být nebezpečný.
Chc ete-li, aby Vaše p ráce by la vždy
příjemná a bezpečná, přísně dodržujte
bezpečnostní předpisy uvedené zde a
dále v příručce.
- V ys tav en í v ib ra c ím z pů so b ený m
dl ouho dobým použí ván ím zař íze ní s
pohon em s palovací mi m otory m ůže
způsobit poškození oběhové soustavy
nebo nervů v prstech, dlaních a zápěstí u
osob náchylných k poruchám oběhové
so ustav y nebo tvorbě abnormá lníc h
otoků. Poškození cév se v důsledku delší
práce za studeného počasí projevuje i u
jinak zdravých lidí. Projeví-li se příznaky
necitlivosti, bolesti, slabosti, změny barvy
nebo struktury pokožky, nebo ztráty citu v
prstech, rukou nebo zápěstích, přerušte
práci se strojem a vyhledejte lékařskou
pomoc.
- Systém zapalování v jednotce vyt váří
ele ktroma gnetické pole velmi slabé
198
201
202
205
206
CZ
187
Page 47

intenzity. Toto pole může rušit některé
kardiostimulátory. Pro snížení nebezpečí
vážných nebo smrtelných zranění by se
osoby s kardiostimulátorem měly poradit
se svým lékařem před začátkem používání
stroje.
POZOR: Národní zákonné úpravy mohou
omezit používání stroje.
1 - Stroj používejte až po řádném seznámení s
jeho obsluhou. Osoby bez zkušeností by se
měly se strojem pečlivě seznámit již před
prací v terénu.
2 - Stroj smí používat pouze dospělé osoby v
dobré fyzické kondici, které se seznámily s
návodem k použití.
3 - Nikdy nepracujte s křovinořezem pokud
js te unavení , pok ud jste pod vlivem
alkoholu, narkotik či léků.
4 - Noste správné oblečení a bezpečnostní
po můc ky jako: pracovní boty, pevné
kalhoty, rukavice, ochranné brýle (štíty),
CZ
ochranu uší a ochrannou přilbu. Noste
pracovní oděv, který je přiléhavý, ale také
pohodlný.
5 - N e dov olt e d ět em , ab y p ou ží va ly
křovinořez.
6 - Nedovolte, aby se ve vzdálenosti do 15 m
od pracovního místa zdržovaly jiné osoby.
7 - Před prací s křovinořezem se ujistěte, že
matice, upevňující řezný nástroj, je pevně
utažena.
8 - Křovinořez smí být používán pouze s
nástroji nebo příslušenstvím, které jsou
doporučeny výrobcem (viz strana 204).
9 - Nikd y ne po u žívejt e křovinořez bez
ochranného štítu nástroje.
10 - Před nastartováním motoru se ujistěte, že
řezný kot ouč se voln ě pohyb uje a
nedotýká se žádného cizího předmětu.
11 - Během práce občas zastavujte motor a
kontrolujte sekací nástroj. Odstraňujte
trávu namotanou na nástroji nebo jeho
hřídeli. Kotouč vyměňte již při prvním
náznaku prasklin nebo poškození.
12 - Stroj používejte pouze v dobře větraných
188
prostorách, nepracujte s ním ve výbušném
ne bo h oř lav ém pr os tře dí neb o v
uzavřených prostorách.
13 - Nikdy se nedotýkejte řezného kotouče,
nebo neprovádějte jakoukoliv údržbu při
běhu motoru.
14 - Na výstupn í hř íd el stroje se nesmí
připojovat žádné zařízení, které nebylo
dodáno přímo výrobcem.
15 - S poškozeným, špatně opraveným, špatně
smontovaným nebo upraveným strojem
nepracujte. Neodstraňujte, nepoškozujte
an i ne vy řaz uj te z p ro voz u žá dn é
bezpečnostní zařízení. Používejte pouze
sekací zařízení uvedená v tabulce.
16 - Výst raž né št ítky, které jsou na stroji
umístěny z důvodu upozornění obsluhy na
nebezpečí, udržujte v čitelném stavu. V
případě poškození štítky vyměňte za nové
(obr. 24).
17 - Nepoužívejte křovinořez rosič k jiným
účelům, než ke kter ým je doporučen
výrobcem v tomto návodu k použití (viz
strana 195).
18 - Neopouštějte stroj se zapnutým motorem.
19 - N es t ar tu j te m ot or, p ok u d n e ní
namontována rukojeť stroje.
20 - Denně kontrolujte křovinořez, a ujistěte se,
že komponenty-součásti a bezpečnostní
zařízení jsou plně funkční a šroubové spoje
jsou dotažené.
21 - Nepokoušejte se provádět práce nebo
opr avy, které nejso u součá stí běžn é
údržby, popsané v tomto návodu k použití.
Vy hle dej te a uto rizovaný servis nebo
prodejce.
22 - Pokud přestanete stroj nadále používat,
myslete na životní prostředí. Obraťte se na
svého prodejce, který náležitým způsobem
zajistí jeho ekologickou likvidaci.
23 - Se strojem mohou pracovat pouze osoby,
které jsou řá dně s eznámeny s jeho
ovládáním a bezpečným používáním.
Pokud jej půjčujete další osobě, předejte
mu se strojem i tento návod k jeho použití
a zajistěte, aby si jej před použitím přečetl.
Page 48

24 - Veškeré opravy, které nejsou uvedeny v
tomt o návo du k po už i tí , mu sí bý t
provedeny kvalifikovaným pracovníkem.
25 - Uschovejte tento návod k použití v dosahu
stroje a nahlédněte do něj před každým
použitím stroje.
26 - Uvědomte si, že majitel nebo pracovník je
odpovědný za úrazy nebo nebezpečí, které
se stanou třetím osobám nebo jejich
majetku.
POZOR
- Nikdy nepoužívejte jednotku s vadnými
be zpe čno stn ími prvk y. Bezp ečn ost ní
fun kce j ed no tk y se m us í po dr ob it
kontrole a údržbě na zák ladě pokynů
uvedených v této části. Pokud jednotka
těmito kontrolami neprojde, obraťte se s
žádostí o opravu na servisní středisko.
- Každé použití stroje, které není výslovně
uve de no v tét o p řír uč ce , se m usí
považovat za nesprávné použití a jako
takové za zdroj nebezpečí pro osoby a
věci.
3. HLAVNÍCH KOMPONENTY (obr. 1)
1÷3) - Nástroje dodávané
4 - Popruh
5 - Pár kuželovitý
6 - Ochranný štít nástroje
7 - Hlava s nylonovými strunami
8 - Víčko palivové nádrže
9 - Balonek vstřikovače
10 - Šrouby nastavení karburátoru
11 - Kryt tlumiče výfuku
12 - Svíčka
13 - Vzduchový filtr
14 - Rukojeť startéru
15 - Páčka sytiče
16 - Bezpečnostní pojistka plynu
17 - Tlačítko zastavit
18 - Páčka plynu
19 - Úchytka ramenního popruhu
20 - Rukojeť
21 - Trubka hřídele
22 - Tlačítko poloviční plyn
CZ
4. MONTÁŽ
2 . V Y S V Ě T L E N Í S Y M B O L Ů A
BEZPEČNOSTNÍCH UPOZORNĚNÍ (obr. 24)
1 - Před pr vní m použitím křovinořezu si
pozorně přečtěte návod k použití a údržbě.
2 - Používejte ochran nou helmu, br ýle a
sluchátka.
3 - Při použití kovových nebo plastových
kotoučů noste ochrannou obuv a rukavice.
4 - Pozor na vymrštěné předměty.
5 - V okruhu 15 m nesmí stát jiné osoby.
6 - UPOZORNĚNÍ! - Povrch může být horký.
7 - Věnujte zvláštní pozornost jevu zpětného
vrhu. Zpětný vrh může být nebezpečný.
8 - Balonek vstřikovače.
9 - Typ stroje: KŘOVINOŘEZU
10 - Zaručená hladina akustického výkonu
11 - Sériové číslo
12 - Značka CE o souladu s předpisy ES
13 - Rok výroby.
14 - Max. otáčky výstupního hřídele, ot/min
MONTÁŽ OCHRANNÉHO ŠTÍTU (obr. 7)
Štít (A) přišroubujte pomocí šroubů (B) k trubce
hřídele do polohy umožňující bezpečnou práci.
POZNÁMKA: Nástave c štítu (C ) použijte
po uze s hlavi cí s nylonovými strunami.
Nástavec štítu (C) připevněte šroubem (D) ke
štítu (A).
VYŽÍNACÍ HLAVA obr. 8
Nasaìte horní unašeč (F) a zablokujte hřídel tak,
že čep vsunete do otvoru (L). Vyžínací hlavu (N)
dotáhněte rukou proti směru hodinov ých
ručiček.
KOTOUČ (obr. 9)
Na horní přírubu (F) namontujte kotouč (R) a
zkontrolujte správný směr otáčení. Namontujte
dolní přírubu (E), kryt (D) a zašroubujte šroub (A)
směrem doleva. Přiložený čep zasuňte do
příslušného o tvoru (L ) , aby by lo m ožné
189
Page 49

zablokovat kotouč a utáhnout šroub (A) na 2,5
kgm (25 Nm).
POZOR - Kroužek (viz šipky C, obr.9) se
musí u místit d o m ontážního ot voru v
kotouči.
MONTÁŽ RUKOJETI obr. 2
Ruk ojeť namontu jte na trubku hřídele a
přišroubujte ji pomocí šroubů (A). Polohu
rukojeti je možné upravit podle požadavků
pracovníka.
MONTÁŽ BEZPEČNOSTNÍ OPĚRKY obr. 9A
Při použití kotouče místo nylonové hlavy je
nutné namontovat “bezpečnostní opěrku”.
Opěrk u (A) přišroubujte z dolní (C) strany
rukojeti (20B, obr. 1) pomocí šroubů (B); dbejte
na to, aby “bezpečnostní opěrka” byla na levé
straně křovinořezu.
MONTÁŽ ŘÍDÍTEK (obr.4)
- Pro připevnění držadla vložte pružinu (B) a
CZ
podložku (C).
- Řídítka vyrovnejte v pravém úhlu k trubce
hřídele.
- Nakonec utáhněte svorku se šroubem (D).
MONTÁŽ OVLÁDACÍCH RUKOJETÍ (obr.6)
- Povolte šroub (G). Matice (H) zůstává v
ovládací rukojeti (L).
- Natlačte ovládací rukojeť (L) (páčka plynu M
musí být obrácená směrem ke kuželovému
převodu) na řídítka (N) tak, aby otvory (P)
byly vyrovnány.
- Vložte šroub (D) a pevně jej utáhněte.
UPOZORNĚNÍ! Zkontrolujte, zda jsou
všechny části křovinořezu dobře připojené a
šrouby utažené.
ÚVODNÍ KROKY
POPRUH PŘES RAMENO (4S, Fig. 1)
Správné nastavení délky ramenního popruhu
umožní správné vyvážení křovinořezu a jeho
snadnou obsluhu (Obr. 10).
190
Spojení závěsného oka a popruhu je zajištěno
pomocí pružiny, popř. karabinky (A, Obr. 10).
Polohu závěsného oka (19, Obr. 1) na trubce
nastavte tak, aby byl zavěšený křovinořez
vyvážen. Délku ramenního popruhu nastavte
tak, aby zavěšený křovinořez měl potřebnou
výšku nad zemí.
SPRÁVNÉ SEŘÍZENÍ POPRUHŮ U modelů
DS 3500 T - BC 350 T
1. Navlékněte si dvojité popruhy (4T, obr. 1).
2. Přezku (A, obr. 12) zasuňte do příslušného
úchytu pásku a seřiďte ji pomocí horního
pásku (B).
3. Přezku (C) zasuňte do příslušného úchytu na
hrudníku.
4. Ramenní popruhy seřiďte dvěma pásky (D,
obr. 13). Pomocí těchto popruhů je možné
rozložit váhu nákladu především na ramena
nebo do pásů podle přání pracovníka.
5. Seřiďte pásek (E, obr. 12) v oblasti hrudníku.
6. Pomocí karabinky připevněte křovinořez k
popruhům (A, obr. 10).
7. Výšku přístroje nad terénem seřiďte dvěma
pásky (H-L, obr. 14). Správnou vzdálenost
mezi páskem a karabinkou můžete změřit
jako na obr. 10. Toto seřízení přispěje k ještě
lepšímu rozložení váhy a správnému vyvážení
křovinořezu.
UPOZORNĚNÍ! - V případě, že použijete
pilový kotouč na dřevo (22-60-80 zubů), je
povinné použít dvojitý popruh s možností
rychlého uvolnění.
SCHVÁLENÉ PŘÍSLUŠENSTVÍ
Na základní stroj lze montovat následující
příslušenství Emak:
EH 25 Plotové nůžky (otočné) (1) (2)
EH 50 Plotové nůžky (otočné) (1) (2)
EP 100 Prořezávač (2)
EP 120 Prořezávač (2)
(1) Bezpečnostní zábrana (A, obr.9A) musí být
na montovaná pod t řmen ovou rukojeť
(loop).
Page 50

(2) Není schválena pro použití u modelů s
řídítky (DS 3500T - BC 350 T).
5. SPOUŠTĚNÍ
PALIVO
POZOR: benzín je velice hořlavé palivo.
Manipulaci s benzínem nebo se směsí paliva
věnujte maximální pozornost. Zákaz kouření
a manipulace s otevřeným ohněm v blízkosti
paliva nebo stroje.
• Nikdy neodstraňujte palivovou zátku, když je
motor v chodu.
• Palivo nepoužívejte na čištění.
• Dávejte pozor, aby se palivo nedostalo na
součásti oblečení.
2%-50 : 1
l (cm
OLEJE
4%-25 : 1
3
) l (cm3)
0,04 (40)
0,20 (200)
0,40 (400)
0,60 (600)
0,80 (800)
1,00 (1000)
BENZÍNU
l
1
5
10
15
20
25
0,02 (20)
0,10 (100)
0,20 (200)
0,30 (300)
0,40 (400)
0,50 (500)
A
• Pro snížení rizika požáru nebo popálenin
zacházejte s palivem opatrně. Je vysoce
hořlavé.
• Palivo míchejte a skladujte pouze v nádobě
schválené pro daný typ paliva.
• Palivo míchejte venku, kde nehrozí výskyt
jisker nebo ohně.
• Před doléváním paliva stroj položte na zem,
vypněte motor a počkejte až vychladne.
• Pomalu povolte palivovou zátku, aby mohl
uniknout přetlak a aby se vyloučilo vylití
paliva.
• Po dolití palivovou zátku řádně dotáhněte.
Vibrace mohou způsobit povolení zátky a
únik paliva.
• Případně rozlité palivo pečlivě utřete. Před
spuštěním motoru odejděte alespoň 3 metry
od místa, kde jste dolévali palivo.
• Nikdy se nesnažte spálit palivo rozlité za
jakýchkoli okolností.
• Během man ipulace s palivem a během
činnosti stroje nekuřte.
• Palivo skladujte na chladném, suchém a
dobře větraném místě.
• Palivo neskladujte v místech se suchým
listím, slámou, papírem atd.
• Motorovou jednotku a palivo skladujte v
místech, kde výpary paliva nepřijdou do
styku s jiskrami, otevřeným plamenem,
ohřívači vody, kotly topení, elektrickými
motory, spínači, sporáky, troubami atd.
Tento přístroj má pohon z dvoutaktního motoru
a vyžaduje tedy směs benzínu a oleje pro
dvoutaktní motor y. Směs bezolovn atéh o
benzínu a oleje pro dvoutaktní motory si
připravte předem v čisté nádobě schválené pro
benzín.
DOPORUČENÉ PALIVO: TENTO MOTOR JE
SCHVÁLEN PRO ČINNOST S BEZOLOVNATÝM
AUTOMOBILOVÝM BENZÍNEM S OKTANOVÝM
ČÍSLEM 89 ([R + M] / 2) NEBO VYŠŠÍM.
Olej pro d voutaktní motor y smíchejte s
benzínem podle pokynů na obalu.
Doporučujeme používat olej pro dvoutaktní
motory Efco - Oleo-Mac v množství 2 % (1:50),
kter ý byl vyvinut speciálně pro dvoutaktní
motory chlazené vzduchem.
Správný míchací poměr olej/palivo, uvedený v
prospektu (obr. A), je vhodný jak pro používání
motorového oleje PROSINT 2 a EUROSINT 2,
tak pro ekvivalentní motorové oleje vysoké
jakosti (specifikace JASO FD nebo ISO L-EGD).
Když specifikace oleje NEJSOU ekvivalentní
nebo nejsou známé, použijte míchací poměr
olej/palivo 4% (1:25).
UPOZORNĚNÍ: NEPOUŽÍVEJTE OLEJ
PRO AUTA ANI O LEJ PRO DVOU TAKTNÍ
MOTORY PRO ČLUNY.
UPOZORNĚNÍ:
- Kupujte pouze potřebné množství paliva
191
CZ
Page 51

podle vlastní spotřeby: nekupujte více,
než se spotřebu je za jed en nebo dva
měsíce;
- B en zí n uch ov áv ej te v h er me ti ck y
uzavřené nádobě, na chladném a suchém
místě.
UPOZORNĚNÍ - Pro palivovou směs
nikdy nepoužívejte palivo s podílem etanolu
větším než 10 %; přípustné jsou gasohol
(směs benzínu a etanolu) s podílem etanolu
do 10 % nebo palivo E10.
POZNÁMKA - Připravujte pouze takové
množství paliva, které potřebujete k práci,
nenechávejte směs v nádrži nebo kanystru příliš
dlouho. Pro skladování směsi po dobu 30 dnů
doporučujeme použít stabilizátor paliva Emak
ADDITIX 2000 kód 001000972.
Alkylový benzín
CZ
UPOZORNĚNÍ - alkylový benzín nemá
stejnou hustotu jako normální benzín. Proto
mohou motor y seří zené s no rm ál ním
benzínem vyžadovat jiné seřízení šroubu H.
K tomu je třeba se obrátit na autorizované
servisní středisko.
Dolévání paliva
Kanystrem se směsí před dolitím zatřepejte.
SPOUŠTĚNÍ
Před nastartováním motoru se ujistěte,
že ř ez ný k otouč se vol ně po hybu je a
nedotýká se žádného cizího předmětu.
Při minimálních otáčkách motoru se
řezací zařízení nesmí otáčet. V opačném
pří pa dě k on ta kt uj te Au to ri zov an éh o
Servisního Střediska, aby provedla kontrolu
a odstranění problému.
UPOZO RNĚNÍ: K řovinoře z dr žte p evně
oběma rukama. Vždy stůjte tak, abyste měli
tělo nalevo od trubky hřídele. Nikdy nedržte
192
rukojeť zkříženýma rukama. Tyto pokyny
platí i pro leváky.
Zaujměte správný pracovní postoj.
Vystaven í vibra cím může způsobit
poškození zdraví osob, které trpí problémy
obě hové ho sys tém u neb o ne rv ov ými
pr ob lémy. P ok ud s e p ro jev í fyz ic ké
sym pto my, jako zn ec it li věn í, s ní žen í
citlivosti, snížení normální síly nebo změny
zabarvení pokožky, obraťte se na lékaře. Tyto
symptomy se obvykle projeví na prstech,
rukou nebo zápěstí.
Před nastartováním motoru se ujistěte, že
páčka plynu se volně pohybuje.
POZO R: d od ržuj te b ez pe čnos tn í
předpisy pro manipulaci s palivem. Před
do lit ím b enz ínu vždy nej dří ve v ypn ěte
mo tor. Nelijt e nikdy palivo do stro je s
mo to rem v č inn os ti neb o za hř átý m
moto rem. P řed nastar tová ním m otoru
od ejděte alespoň 3 m od místa , kde se
dolévalo palivo. NEKUŘTE!
1. Povrch kolem palivové zátky očistěte, aby
nedošlo k znečištění.
2. Palivovou zátku pomalu povolte.
3. Směs paliva pozorně nalijte do nádrže. Dejte
pozor, abyste ji nerozlili.
4. Př ed vložením a zašroubo vání m zátky
zkontrolujte a očistěte těsnění zátky.
5. Palivovou zátku ihned vložte do nalévacího
hrdla a dotáhněte rukou. Případné rozlité
palivo odstraňte.
POZOR: zkontrolujte, jestli nedochází k
úniku paliva, případné netěsnosti opravte
před používáním stroje. Pokud je to nutné,
spojte se servisním střediskem prodejce.
Motor je zahlcený
- Vsuňte vhodný nástroj do sedla zapalovací
svíčky.
- Pákou sedlo zapalovací svíčky odstraňte.
Page 52

- Vyšroubujte a vysušte zapalovací svíčku.
- Otevřete úplně ovladač plynu.
- Několik rát zatáhně te za lanko, a by se
spalovací komora vyčistila.
- Zapalovací svíčku vložte zpět a připojte sedlo
zapalovací svíčky, pevně ho stlačte - znovu
sestavte další díly.
- Páčku sytiče nastavte do polohy OPEN, i když
je motor studený.
- Nyní nastartujte motor.
Postup při startování
1) Pomalu 4x stlačte vstřikovač (9, obr.1).
2) Páčku sytiče (15, obr.1) umístěte do polohy
CLOSE (A, obr.15).
3) Zatáhněte za páčku plynu (18, obr.1) a
zastavit ho na půl plynu stisknutím tlačítka
(22), uvolněte páčku (18).
4) Křovinořez opřete o zem ve stabilní poloze.
Zkontrolujte, jestli je řezný nástroj volný.
Křovinořez držte jednou rukou (obr.15A),
zatáhněte za startovací lanko (ne více než 3
krát), až motor naskočí. Nový stroj může
vyžadovat delší startování.
5) Páčku sytiče (15, obr.1) umístěte do polohy
OPEN (B, obr.15).
6) Zatáhněte za startovací lanko, aby motor
nastartoval. Jakmile je stroj nastartovaný,
nechte jej několik sekund zahřát, aniž byste
se dotkli plynové páčky. V chladu nebo ve
vysokých nadmořských výškách může stroj
vyžadovat pro zahřátí více času. Nakonec
stiskněte plynovou páčku (18, obr.1) pro
vyřazení půlplynu.
UPOZORNĚNÍ:
- Nikdy si startovací lanko neomotávejte
kolem ruky.
- Při tahu za startovací lanko nevyužívejte
celou jeho délku; mohlo by to způsobit
jeho poškození.
- Lanko nepouštějte prudce; držte rukojeť
startéru (14, obr.1) a nechte, aby se lanko
navinulo pomalu.
UPOZORNĚNÍ! Je-li motor již teplý,
startér ke spuštění nepoužívejte.
POZOR! – Poloviční plyn použijte pouze
při spouštění motoru za studena.
ZÁBĚH MOTORU
Motor dosáhne svého maximálního výkonu po
5÷8 hodinách práce.
V době záběhu nenechávejte motor běžet bez
zátěže ve vysokých otáčkách, aby nedocházelo k
nadměrnému zatížení motoru.
UP OZ OR NĚ NÍ ! - V do bě z áb ěhu
neměňte karburaci s cílem zvýšit výkon;
motor by se mohl poškodit.
POZNÁMKA: je normální, když nový motor
během a po prvním používání kouří.
6. ZASTAVENÍ MOTORU
Páčku plynu uvolněte do polohy volnoběhu (18,
obr. 1) a počkejte několik vteřin, až se motor
ochladí.
Vypněte motor, stisknutím spínače zapalování
(17).
7. POUŽÍTÍ STROJE
ZAKÁZANÉ POUÎITÍ
UPOZO RNĚ NÍ: S nažte se zabránit
ods koč ení nástroj e, které můž e mít za
následek vážné poranění. Odskočení, neboli
zp ětný rá z, j e boč ní n ebo náh lý p ohyb
křovinořezu do předu, ke kterému mů že
dojí t, když s e nůž d ostane do s tyku s
nějakým předmětem jako kmenem nebo
kamenem, nebo když se řezané dřevo sevře a
v řezu zablokuje pilový nůž. Náraz na cizí
předmě t může mít za násle dek i ztrátu
kontroly nad křovinořezem.
UP OZ OR NĚN Í! - V žd y d od rž uj te
bezpečnostní předpisy. Křovinořez je určen
pouze k sečení trávy a řezání malých keříků.
Řezán í jiných materi álů je zaká záno.
193
CZ
Page 53

Křo vinoř ez nepoužíve jte jako pá ku ke
zvedání, posunování nebo dělení předmětů,
neup ínejte jej d o p evných s tojanů. Je
zakázáno připojovat k pohonu křovinořezu
nástroje nebo ná stavce, kt eré nejsou
povoleny výrobcem.
UP OZORNĚNÍ: Při použi tí pevn ého
nože nesekejte blízko plotů, zdí budov,
km en ů s tr om ů, kam en ů n eb o jin ých
podobných objektů, které by mohly způsobit
od skočení křov inořezu, neb o by mohl y
poškodit nůž. K těmto pracím doporučujeme
použít nylonovou vyžínací strunovou hlavu.
V těchto situacích si musíte být stále vědomi
možnosti odskočení křovinořezu.
UP OZO RNĚ NÍ: Nikdy n epouž íve jte
křovinořez nad úrovní země, nebo s řezným
nástrojem kolmo k zemi. Křovinořez nikdy
nepoužívejte jako plotové nůžky.
CZ
UP OZO RN ĚN Í: J es tl iže s e d obř e
utažený nůž uvolní, okamžitě přest aňte
pr ac ov at . Po jis tn á ma ti ce mů že být
opotřebovaná nebo poškozená a je nutné
pr ovést výměn u. Nikdy nepo užívejte k
připevnění nože nehomologizované díly.
Pokud se nůž opět uvolní, obraťte se na
prodejce. Nikdy nepoužívejte křovinořez s
uvolněným nožem.
Zásady bezpečnosti na pracovním místě
• Při práci vždy stůjte oběma nohama na
pevné zemi, abyste neztratili rovnováhu.
• Přesvědč te se, zda se můžete bezpečně
pohybovat a stát. Zkontrolujte pracovní
plochu, zda na ní nejsou možné překážky
(kořeny, kameny, větve, příkopy apod.), pro
případ, že byste museli náhle přejít z místa na
místo.
• Neřežte výše než v úrovni hrudníku; při
řezání ve vě tší v ýšce j e o btížné če lit
zpětnému rázu křovinořezu.
• Nepracujte v blízkosti elektrických drátů.
Takovou práci přenechte odborníkům.
194
• Při řezání musí být dost světla a dostatečná
viditelnost, abyste viděli jasně a zřetelně.
• Je velmi nebezpečné stát při řezání na
žebříku.
• Když se nůž zasekne o cizí předmět, zastavte
křovinořez. Zkontrolujte kotouč a křovinořez;
opravte případné poškozené části.
• Na noži nesmí být nečistoty nebo písek. I
malé množství nečistot nůž rychle otupí a
zvýší možnost zpětného rázu.
• Před položením křovinořezu vypněte motor.
• Po nasazení chrániče sluchu buďte zvlášť
opatrní, protože toto vybavení může snížit
va ši s ch op nos t za sl ec hn ou t zv uk y
signalizující nebezpečí (volání, signály,
varování apod.).
• Velmi opatrně pracujte na svazích nebo
nerovném povrchu.
UP OZO RNĚN Í: Nikdy nepouž íve jte
pevné nože při sekání v kamenitém terénu.
Odmrštěné předměty mohou způsobit těžké
nebo i smrtelné poranění uživatele nebo
př ihl ížejícíc h. M ějte se na pozo ru p řed
odmrštěnými předměty. Při práci si vždy
chraňte zrak. Nikdy se nenaklánějte přes
ochranný štít nástroje. Kameny nebo zbytky
rostlin by se mohly odrazit a vlétnout vám do
očí a oslepit vás nebo vám způsobit vážné
zranění. Nedovolte neoprávněným osobám,
aby se přibližovaly na kratší než bezpečnou
vz dále nost. Děti, zvířata , přihl ížej ící a
p om áh aj íc í o s ob y m us í b ýt m im o
bezpečnostní zónu 15 m. Jestliže se někdo
přiblíží, okamžitě křovinořez vypněte. Nikdy
nepohybujte křovinořezem kolem sebe, aniž
jste předtím zkontrolovali, zda někdo nestojí
v bezpečnostní zóně.
Pracovní metody
Obecné pokyny k práci
UPOZORNĚNÍ: V této části jsou uvedeny
b e zp e čn o st n í z á sa d y př i p r ác i s
křov inořeze m. Pokud se d ostanete do
sit uace , ve kter é si nebudete jisti, jak
Page 54

postupova t, o braťte s e n a od borníka.
Obraťte se na svého prodejce nebo servis.
Pokud daná práce přesahuje vaše možnosti,
nezačínejte s ní. Je nutné pochopit rozdíl
mezi vysekáváním dřevin, sekáním trávy a
zastřihováním trávy.
Základní bezpečnostní zásady
1. Rozhlédněte se kolem sebe:
• Zajistěte, aby vás při práci nerušili lidé,
zvířata ani různé předměty.
• Zajistěte, aby se lidé, zvířata apod. nedostali
do kontaktu s řezným nástrojem ani nemohli
uvolnit předměty, které jím mohou být
odmrštěny.
UP OZORNĚNÍ : Nikdy nepou žívejte
křovinořez bez možnosti přivolat v případě
potřeby pomoc.
2. Nepoužívejte křovinořez v nepříznivém
počasí, jako je hustá mlha, silný déšť, silný
vítr, velká zima apod. Práce v nepříznivém
počasí je únavná a mohou při ní vzniknout
další nebezpečné situace, např. ledová půda,
nepředvídatelný směr pádu apod.
3. Přesvědčte se, zda se můžete bezpečně
pohybovat a stát. Zkontrolujte pracovní
plochu, zda na ní nejsou možné překážky
(kořeny, kameny, větve, příkopy apod.), pro
případ, že byste museli náhle přejít z místa na
místo. Na svažujícím se pozemku pracujte
velmi opatrně.
4. Před přechodem na jiné místo vypněte
motor.
5. Křovinořez nikdy nepokládejte na zem,
jestliže motor běží.
• Vždy používejte správné vybavení.
• Zkontrolujte, zda je vybavení dobře seřízené.
• Pečlivě si práci naplánujte.
• Vždy začněte praco vat s ma ximální mi
otáčkami.
• Vždy používejte ostré nože.
UPOZORNĚNÍ: Uživatel ani nikdo jiný
nesmí odstraňovat posekaný nebo odříznutý
materiál, jestliže motor běží nebo se řezný
nástroj otáčí, mohl by si způsobit vážné
poranění. Zastavte motor i řezný nástavec
dříve, než začnete odstraňovat zbytky, které
se namo taly na ko tou č, jinak r isku jete
zranění. Kuželové soukolí může být při práci
horké a trvá nějakou dobu, než vychladne.
Můžete se spálit, budete-li se jej dotýkat.
UPOZORNĚNÍ: Větve, tráva nebo dřevo
se mohou zachytit mezi ochranný štít a řezný
ná str oj. Před čišt ění m vžd y křovinořez
vypněte.
Kontrola před spuštěním
• Zkontrolujte nůž a přesvědčte se, že na
spodní straně zubů nebo u prostředního
ot voru nejsou žádné praskliny. Jestliže
najdete nějaké praskliny, musíte nůž vyhodit.
• Zkontrolujte, zda není opěrná příruba prasklá
z důvodu únavy materiálu nebo proto, že
byla příliš utažená. Jestliže je opěrná příruba
prasklá, vyhoďte ji.
• Zkontrolujte, zda pojistná matice neztratila
upínací sílu. Utahovací moment pojistné
matice musí být 2.5 kgm (25 Nm).
• Zkontrolujte, zda ochranný štít nože není
poškozený nebo prasklý. Jestliže štít nože
praskl, vyměňte jej.
UP OZORNĚNÍ : Nikdy nepou žívejte
křovinořez bez ochranného štítu nebo s
va dn ým št ít em. Nik dy ne po už íve jt e
křovinořez bez převodového hřídele.
Vyřezávání dřevin
• N ež za čn ete s v yřez áv ání m dře vi n,
zkontrolujte pracovní místo, typ terénu, sklon
pozemku, výskyt kamenů, propadlin apod.
• Začněte na jednodušším konci terénu a
vyč is tě te p ros to r, z k te réh o b ud et e
postupovat dále.
• Pracujte systematicky sem a tam na daném
místě, s každým krokem vyčistěte vždy šíři asi
4-5 m. Využijete tím plný dosah stroje v obou
smě re ch a z ís ká te t ak p oh od ln ou a
rozmanitou pracovní plochu, ve které můžete
195
CZ
Page 55

pracovat.
• Vyčistěte asi 75 m dlouhý pás. Přenášejte s
sebou kanystr na palivo.
• Na svažujícím se pozemku pracujte po svahu.
Práce po svahu je mnohem snadnější než
postupovat při práci nahoru a dolů.
• Naplánujte si pracovní pruh tak, abyste
nemuseli překonávat příkopy nebo jiné
pře ká žk y na z em i. P ra cov ní p ru h s i
nasměrujte tak, abyste mohli využít větru, a
uříznuté dřeviny tak padaly do již vymýcené
části.
Sečení trávy s použitím nože na trávu
• Nožové kotouče na trávu se nesmí používat
na dřeviny.
• Nožový kotouč na trávu je určen pro všechny
druhy vysoké nebo hrubé trávy.
• Tráva se seče ráznými pohyby do stran a
pohyb zprava doleva je sečný záběr a pohyb
zleva doprava je vratný pohyb. Trávu sečte
levou stranou nože (poloha mezi 8 a 12
CZ
hodinami na ciferníku).
• Pokud je nožový kotouč při sečení trávy
skloněn doleva, posečená tráva bude tvořit
řádku a bude se lépe sbírat nebo hrabat.
• Snažte se pracovat rytmicky. Stůjte pevně s
ch odi dly od sebe. Po vratném pohybu
nástroje postupte dopředu a opět si pevně
stoupněte.
• Opěru nechte lehce opírat o zem. Slouží k
ochraně kotouče před dotykem země.
• Riziko nabalení tráv y okolo nože snížíte
dodržením těchto pokynů:
1. Vždy pracujte na plný plyn.
2. Př i vr atném p ohybu se v yhněte již
posečené trávě.
• Zastavte motor, uvolněte popruh, položte
nástroj na zem, a teprve nyní začněte sbírat
posečenou trávu.
Zastřihování trávy pomocí vyžínací hlavy
VAROVÁNÍ: Nepracuj te se strunou,
která je delší než je stanovený průměr. U
správně namontovaného nás tavce ští tu
se řezává zabud ova ný nůž auto mati cky
strunu na správnou dél ku. Příliš dlouhé
struny mohou přehřívat motor a tím se může
poškodit mechanismus spojky a přilehlých
dílů.
Zastřihování trávy
• Držte skloněnou sekací hlavu těsně nad
terénem. Uvědomte si, že seče konec struny.
Přizpůsobte se pracovnímu tempu struny.
Nikdy netlačte strunu na plochu, kterou
sekáte.
• Struna snadno seče trávu a plevel u stěn,
keřů, stromů a záhonů, může však také
poškodit citlivou kůru dřevin i sloupky plotu.
• Riziko poškozen í dřevin snížíte tím, že
zkrátíte strunu na 10-12 cm a snížíte otáčky
stroje.
Čištění plochy
• Čištěním se odstraňuje veškerá nežádoucí
vegetace. Držte skloněnou sekací hlavu těsně
nad terénem. Nechte konec struny narážet
na zem kolem stromů, sloupů, soch apod.
VAROVÁNÍ: Při tomto způsobu sekání
se struna více opotřebovává.
• Struna se při práci rychleji opotřebovává a
musí být častěji vysunována, pracujete-li
mezi ka meny, c ihlami, beto nem nebo
kovovými ploty apod., než při práci mezi
dřevinami a dřevěnými ploty.
• Při za stř ihování a čištění n epo uží vejte
maximální rychlost, struna pak déle vydrží a
snížíte i opotřebení vyžínací hlavy.
Sečení
• Hlava je ideální na sečení trávy v místech,
kam se běžná sekačka nedostane. Při sečení
udržujte strunu rovnoběžně s terénem.
Netlačte vyžínací hlavu proti zemi, mohli
byste poškodit trávník i vyžínač.
• Při běžném sečení dbejte na to, aby vyžínací
hlava nebyla stále v kontaktu se zemí. Stálý
dotyk může poškodit vyžínací hlavu a působí
její opotřebení.
196
Page 56

Zametání
• Ventilační účinek rotující struny může být
využit pro rychlý a snadný úklid. Udržujte
strun u rovno běžn ě s terénem a nad
uklízenou plochou a nástrojem pohybujte ze
strany na stranu.
• Při sečení a úklidu docílít e nejlep ších
výsledků, budete-li pracovat s maximálními
otáčkami.
UPOZORNĚNÍ: Kotoučové pilové nože
jsou vhodné pro prořezávání a kácení malých
stromků do průměru 5 cm. Nepokoušejte se
kácet stromy s větším průměrem, protože nůž
by se mohl zaklínit, nebo by mohl odhodit
křovinořez dopředu. Nůž se tím může
poškodit a ztráta kontroly nad křovinořezem
může mít za následek vážné poranění.
UPOZORNĚNÍ: Nikdy nep racujte za
špatné viditelnosti, nebo za velmi vysokých
nebo nízkých teplot či za mrazivého počasí.
Při vyřezávání dřevin používejte pilový nůž
• Riziko zpětného rázu se zvyšuje s větším
průměrem řezané dřeviny. Neměli byste proto
řezat s úhlem pilového nože mezi 12. a 3.
hodinou (podle ciferníku) (obr. 16).
• Aby dřevina padla vlevo, musíte spodek kmenu
zatlačit doprava. Skloňte pilový nůž a veďte jej
silným tlakem šikmo dolů doprava. Současně
tlačte na kmen s použitím štítu pilového
nože. Řežte s úhlem pilového nože mezi 3. a 5.
hodinou (podle ciferníku). Použijte plný plyn, a
pak teprve přibližte pilový nůž.
• Aby dřevina padla vpravo, musíte spodek
kmenu zatlačit doleva. Skloňte pilový nůž a
veďte jej silným tlakem šikmo vzhůru doprava.
Řežte s úhlem pilového nože mezi 3. a 5.
hodinou (podle ciferníku) tak, aby směr rotace
nože tlačil spodek dřeviny doleva.
• Chcete-li, aby dřevina padla dopředu, musíte
spodek kmenu táhnout dozadu. Zatáhněte
pilový nůž rychlým pevným pohybem dozadu.
• Pokud jsou kmeny těsně u sebe, přizpůsobte
tomu tempo chůze.
• Jestliže pilový nůž uvízne ve kmeni, nikdy jej
neuvolňujte trhnutím. Mohl by se tím poškodit
nůž, kuželové soukolí, hřídel nebo rukojeť.
Uvolněte rukojeti, uchopte trubku hřídele
oběma rukama a lehce tahem křovinořez
uvolněte.
UPOZORNĚNÍ: Pilový kotouč se smí
použít pouze se správným ochranným
štítem (viz tabulka na str. 24), obouruční
rukojetí a dvojitým popruhem s uvolňovacím
mechanismem.
Řez křovin pilovým kotoučem
• Slabé kmínky a křoviny se seřezávají. Pohybujte
křovinořezem jako při řezání s výkyvy do stran.
• Zkuste přeříznout několik kmínků najednou.
• V případě skupiny kmínků z tvrdého dřeva
nejprve vyčistěte plochu okolo. Začněte řezat
kmínky nahoře okolo skupiny, aby se nemohly
vzájemně zaplést. Pak seřízněte kmínky na
požadovanou výšku. Teď se pokuste dosáhnout
nožem doprostřed a řezat ze středu skupiny.
Jestliže je přístup stále obtížný, seřízněte
kmínky nahoře a nechte je spadnout. Tím se
sníží riziko uvíznutí.
8. DOPRAVA
PŘEPRAVA
Přenáše jte křov ino řez pou ze s vypnu tým
mo torem a s na sazeným kr ytem řezného
kotouče (obr. 3).
UP OZORNĚNÍ ! V přípa dě p řep rav y
nebo skladování křovinořezu namontujte
kryt řezného kotouče kód 4196086 podle
obr. 3.
CZ
Použití kotoučového pilového nože
197
Page 57

9. ÚDRŽBA
Tabulka údržby
Uvědomte si prosím, že následující intervaly údržby lze použít pouze pro normální provozní podmínky. Jestliže
denně pracujete déle, než je obvyklé, nebo za drsných pracovních podmínek,potom je nutné navržené intervaly
odpovídajícím způsobem zkrátit.
Celý nástroj
Ovladače (Tlačítko zastavit, páčka sytiče, páčka plynu,
aretace)
Palivová nádrž
Palivový ltr a vedení
Řezné nástroje
CZ
Kuželové soukolí
Buben spojky
Ochranný štít řezných nástrojů
Všechny přístupné šrouby a matice (ne seřízovací šrouby)
Vzduchový ltr
Žebra válce
Větrací otvory startéru
Startovací lanko
Karburátor
Zapalovací svíčka
Antivibrační podložky
Matice a šrouby řezného nástroje
Kontrola (průsak, prasknutí, opotřebení)
Vyčistěte po skončení denního provozu
Zkontrolujte funkci
Kontrola (průsak, prasknutí, opotřebení)
Vyčistěte
Zkontrolujte
Vyčistěte, vyměňte ltr
Zkontrolujte (poškození, ostrost a opotřebení)
Zkontrolujte napětí
Naostřete
Zkontrolujte (poškození, opotřebení a hladina
maziva)
Zkontrolujte (poškození a opotřebení)
Vyměňte
Zkontrolujte (poškození a opotřebení)
Vyměňte
Zkontrolujte
Znovu utáhněte
Vyčistěte
Vyměňte
Vyčistěte
Vyčistěte po skončení denního provozu
Zkontrolujte (poškození a opotřebení)
Vyměňte
Zkontrolujte volnoběh (řezný nástroj se nesmí při
volnoběhu otáčet)
Zkontrolujte mezeru elektrody
Vyměňte
Zkontrolujte (poškození a opotřebení)
Nechte vyměnit prodejcem
Zkontrolujte, zda je pojistná matice řezného
nástroje správně utažená.
Před každým
x
x
x
x
x
x
x
x
x
x
x
x
použitím
x
x
x
x
x
x
x
x
Každý měsíc
Při poškození nebo
x
x
x
x
x
x
x
poruše
50 hod.
Po 6 měsících nebo
100 hod.
Jednou za rok nebo
Podle potřeby
x
x
x
x
xx
x
x
x
x
x
198
Page 58

BROUŠENÍ NOŽŮ NA TRÁVU (2-3-4 ZUBY)
1. Nože na trávu je možné obrátit: jestliže je
jedna strana tupá, můžete nůž obrátit a
používat jej z druhé strany (obr. 17).
2. Nože na trávu se brousí plochým pilníkem s
jednoduchým brusem (obr. 17).
3. Všechna ostří nabruste stejným způsobem,
abyste neporušili vyvážení nástroje.
4. Jestliže nože nejsou správně nabroušené,
moh ou zp ůsobo vat neob vyklé vi brace
křovinořezu a následné zlomení nožů.
BROUŠENÍ (8 ZUBY)
Před brouše ním vždy zkont r olu j te stav
kotouče. Správné nabroušení zubů umožňuje
maximální výkon křovinořezu.
K nabroušení zubů použijte brusný kotouč a
postupujte po malých částech s dodržováním
úhlů a rozměrů uvedených na obr. 11.
OSTŘENÍ PILOVÉHO KOTOUČE
• Správné pokyny jsou uvedeny na obalu
řezných nástrojů.
Správně naostřený nůž je zásadní pro efektivní
práci a zabraňuje zbytečnému opotřebení
kotouče a zubů.
• Při pilování musí být kotouč dobře zajištěn.
Používejte kulatý pilník 5,5 mm.
• Pilovací úhel je 15°. Každý druhý zub pilujte
doprava a zuby mezi nimi doleva. Jestliže má
čepel hodně důlků od kamenů, může být ve
výjimečných případech nutné zarovnat horní
kraje zubů plochým pilníkem. Tento postup
je nutné provést před pilováním kulatým
pilníkem. Horní okraje je nutné u všech zubů
opilovat stejně.
UPOZORNĚNÍ! - Nesprávný typ řezného
kotouče nebo nástroj se špatně nabroušeným
ostřím zv yšuje nebezpečí zpětného vrhu.
Kon tro lu jte , zda ne js ou no že na tr ávu
poškozené nebo popraskané; zjistíte-li závadu,
ihned je vyměňte.
UPOZORNĚNÍ: Ni kdy se nesnažte
op ra vov at po ško ze ný ře zný nás tro j
ohýbáním , na rovn áváním nebo ji ným
tva ro vá ní m. J ed no tl ivé dí ly ře zn éh o
nástroj e by se mohly uvoln it a způsobit
vážné či smrtelné zranění.
HLAVA S NYLONOVÝMI STRUNAMI
Používejte stále stejný průměr původní struny,
aby nedocházelo k přetížení motoru (obr. 18).
K prodloužení nylonové struny klepněte při
práci hlavicí o zem.
POZNÁMKA: Hlavicí nesmíte klepnout o beton
nebo dlažbu - je to nebezpečné.
Výměna nylonové struny v hlavě LOAD&GO
(obr.19)
1. Odstřihněte 6,0 m nylonové struny Ø 3,0
mm.
2. Srovnejte šipky a strunu vložte do hlavy
(obr.19.1), až vystoupí na opačné straně
(obr.19.2).
3. St ru nu roz dě lt e na dvě st ejn é čá st i
(obr.19.3) a pak ji naviňte otáčením knoflíku
(obr.19.4).
UP OZ OR NĚN Í! - P ři údr žb ov ýc h
pracích vždy používejte ochranné rukavice.
Úd ržbu neprovádějte, je-li motor j ešt ě
teplý.
VZDUCHOVÝ FILTR
Každých 8-10 provozních hodin odklopte
(popř. sejměte) kryt (A, obr. 22) a vyjměte filtr
(B).
Z bezpečné vzdálenosti jej vyfoukejte stlačeným
vzduchem zevnitř směrem ven.
Je-li zanesený nebo poškozený, vyměňte jej. Při
nasazování filtru zpět dbejte na to, aby těsně
přiléhal k držáku filtru. Poškozený filtr vždy
vyměňte. Pokud je vzduchový filtr zanesen,
motor má nižší výkon a vyšší spotřebu.
FILTR PALIVA
Pr avidelně kontrolujte stav fi ltru paliva.
Zane se ný filt r způs obu je prob l émy při
startování a snižuje výkon motoru. Chcete-li
filtr vyčistit, vyjměte jej z plnícího otvoru
199
CZ
Page 59

pa livové nádrže a proplá chn ěte v čistém
palivu; je-li příliš znečistěný, vyměňte jej (obr.
21).
MOTOR
Žebrování válce pravidelně čistěte štětcem nebo
stlačeným vzduchem. Nahromaděním nečistot
na v álci mů že d ojít k přehřát í, k teré je
nebezpečné pro chod motoru.
UPOZORNĚNÍ! Pokud běží motor na
volnoběh (2800 ot/min), kotouč se nesmí
otáčet. Doporučujeme vám nechat provést
veškerá seřízení spalování u prodejce nebo
ve specializované opravně.
UPOZORNĚNÍ! Na chod motoru mohou
mít vliv změny počasí a nadmořské výšky.
SVÍČKA
Doporučujeme pravidelné čištění svíčky a
kontrolu v zdálenosti el ektrod (o br. 23 ).
Používejte svíčky NGK BPMR7A nebo jinou
značku odpovídající tepelné hodnoty.
PŘEVODOVKA
Po k ažd ýc h 30 p ra co vn íc h h od iná ch
odšroubujte šroub (D, obr. 8) a zkontrolujte
úroveň maziva. Používejte pouze kvalitní maziva
na bázi dvojsirníku molybdenu.
Pro čištění nikdy nepoužívejte palivo.
CZ
KARBURÁTOR
Před seřízením karburátoru vyčistěte vzduchový
filtr (B, obr. 22) a zahřejte motor. Tento motor byl
navržen a vyroben v souladu s požadavky
směrnic 97/68/ES, 2002/88/ES a 2004/26/ES.
Ka rburátor (Obr. 2 0) je navržen tak, že
umožňuje seřízení šroubů L a H pouze v
rozsahu 1/4 otáčky. Možné seřízení šroubů L a
H v rozsahu ±1 /8 otáčky bylo stanoveno
výrobcem a není možné je změnit.
UPOZORNĚNÍ! - Nesnažte se šrouby
seřídit mimo povolený rozsah násilím!
TLUMIČ VÝFUKU
UPOZORNĚNÍ! - Tento tlumič výfuku je vybaven
katalyzátorem, aby byl v souladu s požadavky
na mno žs tví emi sí . K ata ly záto r ni kd y
neodstraňujte, ani jej neupravujte: odstranění
nebo úprava katalyzátoru znamená porušení
zákona.
UP OZORNĚNÍ ! - Tlum iče vybavené
katalyzátorem se při použití zahřívají na
velmi vysokou teplotu a jsou horké ještě
dlouho po zastavení motoru. To platí i v
případě motoru na volnoběh. Při dotknutí si
může te sp ál it po kožk u. Uvěd om te si
nebezpečí požáru!
OPATRN Ě! - V případě po škození
výfuku je nutná jeho výměna. Pokud se výfuk
často ucpává, může to být znakem snížené
účinnosti katalyzátoru.
U P O Z O R N Ě N Í : K ř o v i n o ř e z
nepoužívejte, je-li tlumič poškozený, chybí,
ne bo je n ěja k upr av en ý. N esp rá vn ě
udržovaný tlumič zvyšuje riziko požáru a
ztráty sluchu.
Šroub volnoběhu T je seřízený tak, aby zajišťoval
bezpečnou hranici mezi volnoběhem motoru a
režimem sepnutí spojky.
Šroub L musí být seřízen tak, aby motor správně
a rychle reagoval na přidání plynu a pracoval
dobře na volnoběh.
Šroub H musí být seřízen tak, aby motor během
řezání dával plný výkon.
200
MIMOŘÁDNÁ ÚDRÎBA
V p ř í pa d ě i nt e nz i vn í ho po u ží v á ní
doporučujeme provést celkovou kontrolu
odborným technikem servisu na konci sezóny, v
případě normálního používání každé dva roky.
UPOZORNĚ NÍ! Všec hny úd rž bo vé
práce, které nejsou uvedené v této příručce,
Page 60

smí provádět pouze autorizovaná dílna.
Chcete -li, aby vám křovinořez pravidelně a
dlouho sloužil, dbejte na to, abyste k případné
v ým ěn ě s ou čá stí p ouž íva li v ýh ra dn ě
ORIGINÁLNÍ NÁHRADNÍ DÍLY.
Případné neoprávněné úpravy a/nebo
používání neoriginálních náhradních dílů
může způsobit vážná či smrtelná zranění
pracovníka nebo třetích osob.
10. SKLADOVÁNÍ
Jestliže nebudete přístroj po dlouhou používat:
- Palivovou nádržku vyprázdněte a vyčistěte
na dobře větraném mí stě. Kar burátor
vyprázdníte tak, že spustíte motor, a počkáte,
až se zastaví (zbylá směs v karburátoru by
mohla poškodit membrány).
- Postup uvedení do provozu po zimním
uložení je stejný, jako postup při normálním
spouštění přístroje (str. 191).
- Dodržujte všechny dříve uvedené předpisy k
údržbě.
- Křovinořez dokonale vyčistěte a namažte
mazivem kovové části.
- Sejměte kotouč, vyčistěte jej a naolejujte, aby
nezrezavěl.
- Odstraňte unašeče kotouče; vyčistěte, otřete
a naolejujte uložení převodovky.
- Vylijte palivo z nádrže a opět našroubujte
víčko.
- Pečlivě očistěte chladicí štěrbiny a vzduchový
filtr (B, obr. 22).
- Přístroj skladujte na suchém místě, pokud
možno ne přímo na zemi, a v dostatečné
vzdálenosti od tepelných zdrojů.
- Důkladně dodržujte místní předpisy pro
likvidaci obalů, olejů, benzínu, akumulátorů,
filtrů, opotřebených součástí nebo jakéhokoli
prvku se s ilným do pade m n a životní
prostředí; tyto odpady nesmí být odloženy
do běžného komunálního odpadu, ale musí
se separovaně odevzdat do příslušných
sběrných středisek, která zajistí recyklaci
materiálů.
Odstranění a likvidace
Při vyřazení stroje z provozu jej nenechávejte
volně v přírodě, ale obraťte se na sběrné
středisko.
Hodně materiálů použitých při konstrukci stroje
lze recyklovat; všechny kovy (ocel, hliník, mosaz)
lze o devz dat do běžné sběrny kovů . Pr o
informace se obraťte na sběrnou službu odpadu
ve vaší oblasti. Likvidace odpadu pocházejícího
z demolice stroje musí být provedena s
ohledem na životní prostředí, aby se zabránilo
znečištění půdy, ovzduší a vody.
V každém případě je třeba dodržovat místní
platné zákony.
CZ
11. OCHRANA ŽIVOTNÍHO PROSTŘEDÍ
Ochrana životního prostředí je důležitý a
prvořadý aspekt př i p oužívání stroje v e
prospěch občanského spolužití a prostředí, v
němž žijeme.
- Vyva rujte se toho, abyste byli ruši vým
prvkem ve vztahu s vašimi sousedy.
- Pečlivě sledujte místní předpisy týkající se
likvidace materiálu vzniklého sečením.
201
Page 61

12. TECHNICKÉ ÚDAJE
Objem válce
Motor
Výkon
Minimální ot/min
Maximální otáčky výstupního
hřídele
CZ
Otáčky motoru při maximálních
otáčkách výstupního hřídele
Objem palivové nádrže
Nastříkovač paliva
Antivibrační systém
Šířka záběru
cm
kW
min
min
min
cm
cm
DS 3500 S - BC 350 S
3
36.3
DS 3500 T - BC 350 T
2 Dvoudobý EMAK
1.4
-1
-1
-1
3
2800
8.500
11.700
600 (0.6 l)
Ano
Ano
42
Hmotnost bez řezného nástroje
a štítu
202
kg
6.9
7.4
Page 62

Doporučené řezné nástroje
Model Řezné nástroje Ochranné štíty
DS 3500
BC 350
DS 3500
BC 350
DS 3500
BC 350
DS 3500
BC 350
DS 3500
BC 350
DS 3500
BC 350
DS 3500 T - BC 350 T P.N. 4095635AR P.N. 4174279
DS 3500 T - BC 350 T P.N. 4095066AR P.N. 4174279
* ochrana č. dílu 4174283A není třeba
P.N. 63129003
P.N. 63129004
P.N. 63019018
P.N. 63019017
P.N. 4095673AR
P.N. 4095674AR
P.N. 4095638AR
P.N. 4095563AR
P.N. 4095565AR
P.N. 4095065AR
P.N. 61042035A
P.N. 61042036A
P.N. 61042035A
P.N. 61042036A
P.N. 61042035A
P.N. 61042036A
P.N. 61042035A
P.N. 61042036A
P.N. 61042035A
P.N. 61042036A
P.N. 61042035A
P.N. 61042036A
*
*
*
*
POZOR!!!
Nebezpečí zranění je větší v případě chybných řezacích zařízení! Používejte pouze
doporučená řezací zařízení a kryty a dodržujte pokyny pro broušení.
CZ
203
Page 63

DS 3500 S - BC 350 S DS 3500 T - BC 350 T
Hladina
akustického tlaku
Odchylka
Naměřená hladina
akustického
výkonu
Odchylka
CZ
Garantovaná
hladina
akustického
výkonu
Úroveň vibrací
Odchylka
dB (A)
dB (A)
dB (A)
dB (A)
dB (A)
m/s
m/s
EN 11806
EN 22868
2000/14/EC
EN 22868
EN ISO 3744
2000/14/EC
EN 22868
EN ISO 3744
EN 11806
2
EN 22867
EN 12096
2
EN 12096
LpA av
L
WA
96.5 91.5 91.5 91.5
3.0 3.0 3.0 3.0
110.0 106.0 106.0 106.0
2.0 2.0 2.0 2.0
112.0 108.0 108.0 108.0
5.5 (sx)
5.2 (dx)
2.5 (sx)
1.1 (dx)
5.2 (sx)
4.6 (dx)
1.3 (sx)
1.1 (dx)
3.1 (sx)
4.1 (dx)
3.4 (sx)
2.4 (dx)
4.4 (sx)
4.4 (dx)
2.4 (sx)
2.1 (dx)
*
*
- Průměrné statistické hodnoty (1/2 volnoběh, 1/2 na plný výkon v řezu, 1/2 max. rychlost bez zátěže).
*
204
Page 64

13. PROHLÁŠENÍ O SHODĚ
Níže podepsaný, EMAK SpA Via Fermi, 4 - 42011 Bagnolo in
Piano (RE) ITÁLIE prohlašuje na svou vlastní odpovědnost, že
strojní zařízení:
1. Druh: motorové kosy a přislušentsví
2. Značka Efco, typ DS 3500 S - DS 3500 T
Značka Oleo-Mac, typ BC 350 S - BC 350 T
3. Identifikační číslo 246 XXX 0001 ÷ 246 XXX 9999 (DS 3500
S - BC 350 S) - 249 XXX 0001 ÷ 249 XXX 9999 (DS 3500 T BC 350 T)
je v souladu s požadavky směrnic:
2006/42/ES - 2000/14/ES - 2004/108/ES - 97/68/CE - 2004/26/
CE,
je v souladu s následujícími harmonizovanými normami:
EN 55012 - EN ISO 11806
Použité postupy pro posuzování shody:
Příloha V - 2000/14/ES
Naměřená hladina akustického výkonu: 110.0 dB (A) (DS 3500
14. ZÁRUČNÍ LIST
Te nt o p ří st ro j b yl n avr že n a vy ro ben s p om oc í
nejmodernějších výrobních technik. V případě soukromého
použití nebo pro hobby poskytuje výrobce záruku na své
výrobky v tr vání 24 měsíců od data zakoupení. Servis v České
repu blice a na Slovensku provádí firma MOUNTFIELD ve
svých prodejnách, specializovaných servisních střediscích a
přes své dealery. V případě profesioná lního používání je
záruka omezena na 12 měsíců.
Všeobecné záruční podmínky
1) Záruka platí ode dne zakoupení výrobku. Výrobní podnik
zdarma vyměňuje prostřednictvím obchodní a servisní
sítě vadné díly, jejichž vada byla způsobena materiálem,
zpracováním nebo výrobou. Záruka nezbavuje kupujícího
záko nných práv, které mu náležej í podle občanského
zákoníku, a které se vztahují na důsledky defektů nebo
vad způsobených prodaným výrobkem.
2) Tech ničtí pracovní ci provedou požadovaný zákrok co
nejdříve v rámci daných časových možností.
3) Při žád osti o oprav u v záru ce je nu tné př edlo žit
oprávněnému pracovníkovi níže uvedený záruční list
orazítkovaný prodejcem a úplně vyplněný, spolu s
ná ku pn í f ak tu rou n eb o p la tný m dok la de m o
zakoupení s datem nákupu.
S - BC 350 S) - 106.0 dB (A) (DS 3500 T - BC 350 T)
Zaručená hladina akustického výkonu: 112.0 dB (A) (DS 3500
S - BC 350 S) - 108.0 dB (A) (DS 3500 T - BC 350 T)
Tec hn ick á d ok ume ntac e u lože ná ve spr ávní m s ídle
společnosti: Technické vedení
Dáno v Bagnolo in Piano (RE) Italy - via Fermi, 4
Datum: 31.01.2014
Fausto Bellamico - předseda
4) Záruka pozbývá platnosti v případě:
• zjevného zanedbání údržby,
• nevhodného používání výrobku nebo jeho úprav,
• použití nevhodných maziv nebo paliv,
• použití jiných než originálních náhradních dílů,
• zásahů prováděných neoprávněnými pracovníky.
5) Záruka se podle výrobce nevztahuje na materiály, které se
opotřebovávají, a na části vystavené běžnému funkčnímu
opotřebování.
6) Záruka se nevztahuje na zásahy týkající se modernizace a
vylepšování výrobku.
7) Záruka se nevztahuje na seřizování a údržbové práce, i
když jsou prováděné v době záruky.
8) Případné škody způsobené při dopravě musí být ihned
oznámeny dopravci, jinak záruka propadá.
9) Pro motor y jiných značek (Briggs & Stratton, Su baru,
Hon da, Lomb ardin i, Kohler apo d.), namon tované na
naš ich stroj ích, plat í záruk a posk ytnutá př íslušný mi
výrobci motoru.
10) Záruka se netýká případných škod, přímých či nepřímých,
způsobených osobám nebo na věcech poruchou výrobku
nebo vyplývajících z dlouhodobého nuceného odstavení
výrobku.
s.p.a.
CZ
MODEL
SERIOVÉ Č.
KUPUJÍCÍ
Nezasílat! Přiložte pouze při případném vyzvání záruční služby.
DATUM
PRODEJCE
205
Page 65

15. ŘEŠENÍ PROBLÉMŮ
POZOR: jednotku vždy vypněte a odpojte zapalovací svíčku, než začnete provádět
kontroly doporučené v tabulce, mimo případy, kdy se vyžaduje jednotka v činnosti.
Když byly zkontrolovány všechny možné příčiny a problém nebyl vyřešen, spojte se s autorizovaným
servisním střediskem. Když zjistíte problém, který nebyl uveden v tabulce, spojte se s autorizovaným
servisním střediskem.
PROBLÉM MOŽNÉ PŘÍČINY ŘEŠENÍ
Motor nelze nastartovat
nebo zhasne několik
sekund po nastartování.
1. Svíčka nedává jiskru
2. Motor je přehlcený
1. Zkontrolujte jiskru svíčky.
Pokud svíčka nedává jiskru,
opakujte test s novou svíčkou
(BPMR7A).
2. Postupujte podle popisu na
str.192. Pokud se motor stále
nerozjede, opakujte postup s
novou svíčkou.
Motor se rozjede, ale řádně
nezvyšuje otáčky nebo při
vysokých otáčkách
nepracuje správně.
CZ
Motor nedosáhne plných
otáček a/nebo příliš kouří.
Motor nastartuje, funguje
a zrychluje, ale nedrží si
volnoběžné otáčky.
Motor se spustí a pracuje,
ale řezací nástroj se netočí
POZOR: Když je
motor v činnosti,
ni kd y se
n e d o t ý k e j t e
řezných nástrojů.
POZOR: Neprovádějte sami komplikovanější opravy, pokud vám chybí nutné vybavení
nebo technické znalosti. V případě špatně provedené opravy dochází automaticky k
zániku záruky a jakékoli odpovědnosti výrobce.
Karburátor se musí seřídit. Spojte se s autorizovaným
1. Zkontrolujte směs oleje s
benzínem.
2. Znečištěný vzduchový
ltr.
3. Karburátor se musí seřídit.
Karburátor se musí seřídit.
Spojka, kuželová spojka
nebo hnací hřídel jsou
poškozené
servisním střediskem pro seřízení
karburátoru.
1. Použijte nový benzín a olej
vhodný pro dvoutaktní motory.
2. Vyčistěte; viz pokyny v kapitole
Údržba vzduchového ltru.
3. Spojte se s autorizovaným
servisním střediskem pro
seřízení karburátoru.
Seřiďte šroub volnoběhu “T”
(obr.20) ve směru hodinových
ručiček pro zvýšení otáček; viz
kapitola Údržba karburátoru.
V případě potřeby vyměňte;
spojte se s autorizovaným
servisním střediskem
206
Page 66

 Loading...