


USER MANUAL
FIELDBEE
AND
RTK BEE STATION
VERSION 1.0.
WE PROVIDE ONLINE SUPPORT:
support@efarmer.mobi
info@efarmer.mobi
FULL VERSION

2
INTRODUCTION .............................................................................................................................................................. 3
3 WAYS OF USING FIELDBEE................................................................................................................................. 4
QUICK START ..................................................................................................................................................................... 5
PACKAGE CONTENTS ................................................................................................................................................. 6
CONFIGURATION .......................................................................................................................................................... 7
General requirements ..................................................................................................................................... 7
FieldBee as standalone sensor..................................................................................................................8
FieldBee with RTK correction provider ............................................................................................ 10
FieldBee with RTK Bee Station in Radio (LoRa) mode ........................................................... 12
FieldBee with RTK Bee Station in Wi-Fi mode ............................................................................. 14
INSTALLATION .............................................................................................................................................................. 16
FieldBee installation ...................................................................................................................................... 16
RTK Bee Station Fixed installation ....................................................................................................... 17
RTK Bee Station portable installation ............................................................................................... 18
CHARGING ........................................................................................................................................................................ 20
LEDINDICATION ....................................................................................................................................................... 21
TROUBLESHOOTING ................................................................................................................................................22
CONTACTS ........................................................................................................................................................................ 23
TABLE OF CONTENTS
CONTENTS

3
Dear customer, we are very happy that you have ordered FieldBee tractor navigation
system. We hope that it will become a real helper for you.
This is the user guide and installation manual for the FieldBee tractor navigation
system. We did our best to make it simple and easy-to-use, however in case you have
any questions you are welcome to contact us via chat in the app or on our website
www.efarmer.mobi or write to us at support@efarmer.mobi.
WHAT IS THIS
FieldBee tractor navigation system - it provides high accuracy (0-4 cm), it is easy to
install and change between tractors, it is used on your smartphone/tablet and can be
upgraded to the automatic steering system.
The FieldBee sensor works with eFarmer smartphone app for tractor navigation,
tracking, mapping and record keeping.
The FieldBee sensor may be used with other applications and systems, such as
automatic steering and variable rate application. In such cases, it needs a special
version of the software that can be ordered by contacting at info@efarmer.mobi.
WHAT DOES IT DO
The FieldBee is a smart sensor that improves accuracy of GPS signal so that tractor
operations or eld measurements are done with high accuracy.
HOW TO USE IT
There are 3 ways to use the FieldBee:
1. FieldBee as standalone sensor. Accuracy 0-1 m
2. With RTK correction provider. Accuracy 0-4 cm
3. With RTK Bee Station. Accuracy 0-4 cm
a. in Radio (LoRa) mode
b. in Wi-Fi mode
INTRODUCTION
4
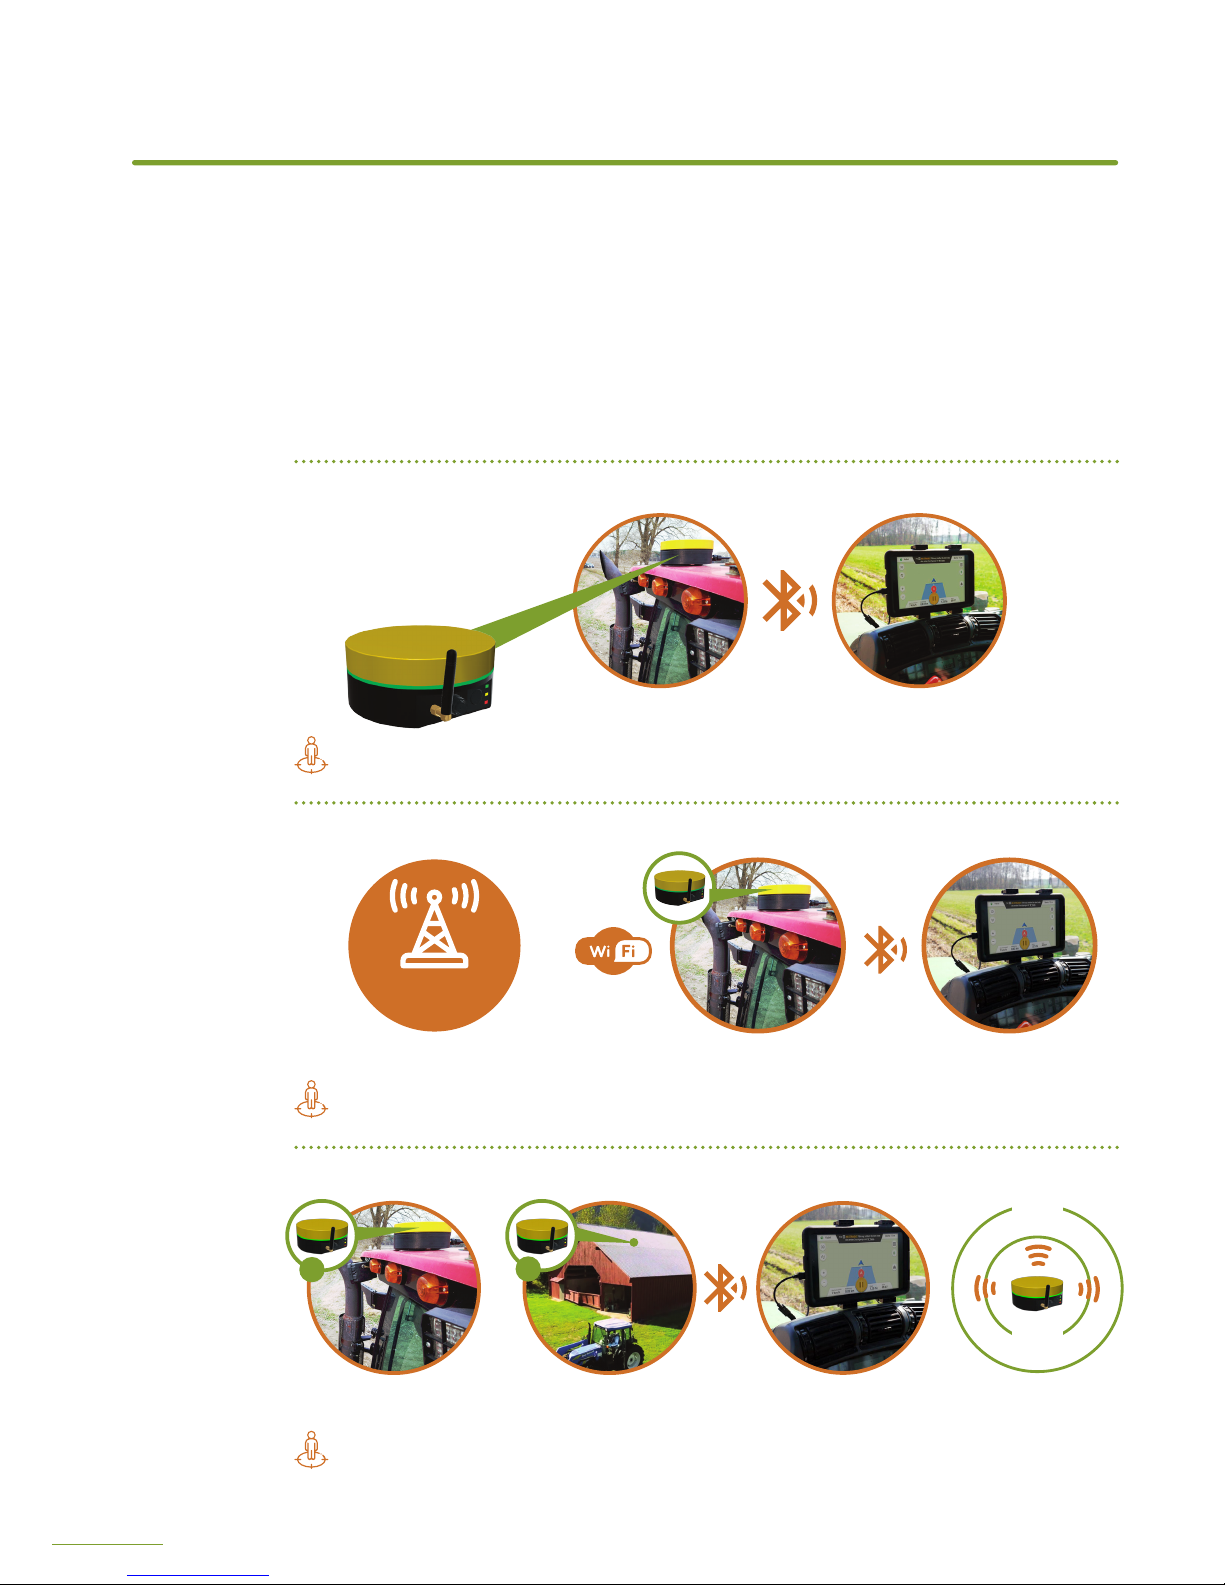
3 WAYS OF USING FIELDBEE
3 WAYS OF USING FIELDBEE
1
FieldBee rover antenna
on your tractor
FieldBee as standalone sensor
eFarmer app on your
smartphone/tablet
Navigation system with submeter accuracy (30-50 cm)
3
FieldBee with rtk bee station
+
FieldBee rover antenna
on your tractor
RTK Bee Station
on your house
eFarmer app on your
smartphone/tablet
in Radio (LoRa) mode
in Wi-Fi mode
Improve the accuracy of your navigation system to 0-4 centimeters
1
2
FieldBee rover antenna
on your tractor
eFarmer app on your
smartphone/tablet
PROVIDER
OF RTK
Access to the provider
of RTK correction signal
2
FieldBee WITH correction network
+
Improve the accuracy of your navigation system to 0-4 centimeters
RADIO
2 KM
WIFI
10 KM

5
Attach radio antenna
to the RTK Bee station.
Open FieldBee
app and follow
on-screen instructions.
First congure base station by
answering «Yes, I do» to «Do
You have an RTK Bee Station?»
question.
For 10+km range
connect 2 separate
Wi-Fi access points for FieldBee
and RTK Bee Station (you can use
Hotspot on your phone).
Mount FieldBee
rover and RTK
Bee Station.
In eFarmer app select
FieldBee as external
GPS source: Settings Gps
Source.
Start using
navigation
Open the eFarmer app
Enter Licence key (if rst time):
Shop Enter Subscription Key
Press Start Navigation.
Open FieldBee
app and follow
on-screen instructions.
Skip Base station conguration
by answering «I only have a
FieldBee» to «Do You have RTK
Bee Station?» question.
Mount
FieldBee sensor
on your tractor.
In eFarmer app
select FieldBee as
external GPS source:
Settings Gps Source.
Start using
navigation
Open the eFarmer app
Enter Licence key (if rst time):
Shop Enter Subscription Key
Press Start Navigation.
CONGRATULATIONS! YOU ARE AWESOME!
FieldBee app -
for FieldBee sensors conguration
https://goo.gl/yL9hGf
eFarmer app -
for navigation
https://goo.gl/KAiFtD
QUICK START
STEP 1
Download our apps
on Google Play
STEP 2 Choose one of 3 ways of using the FieldBee
FieldBee
as standalone sensor
FieldBee with RTK
correction provider
FieldBee
with RTK Bee Station
+
Register with your local
NTRIP provider and obtain
the following information:
Domain or IP address and port
Login and Password
Nearest mount point or
correction stream name.
Open FieldBee
app and follow
on-screen instructions to congure
the FieldBee. Tap «Connect to
NTRIP network»button. Enter the
information from the Step 1.
Select Wi-Fi access
point for FieldBee.
Mount FieldBee sensor
on your tractor.
In eFarmer app
select FieldBee as
external GPS source: Settings
Gps Source.
Start using
navigation
Open the eFarmer app
Enter Licence key (if rst time):
Shop Enter Subscription Key
Press Start Navigation.
1.
2.
3.
4.
5.
6.
1.
2.
3.
4.
5.
6.
+
1.
2.
3.
4.
6
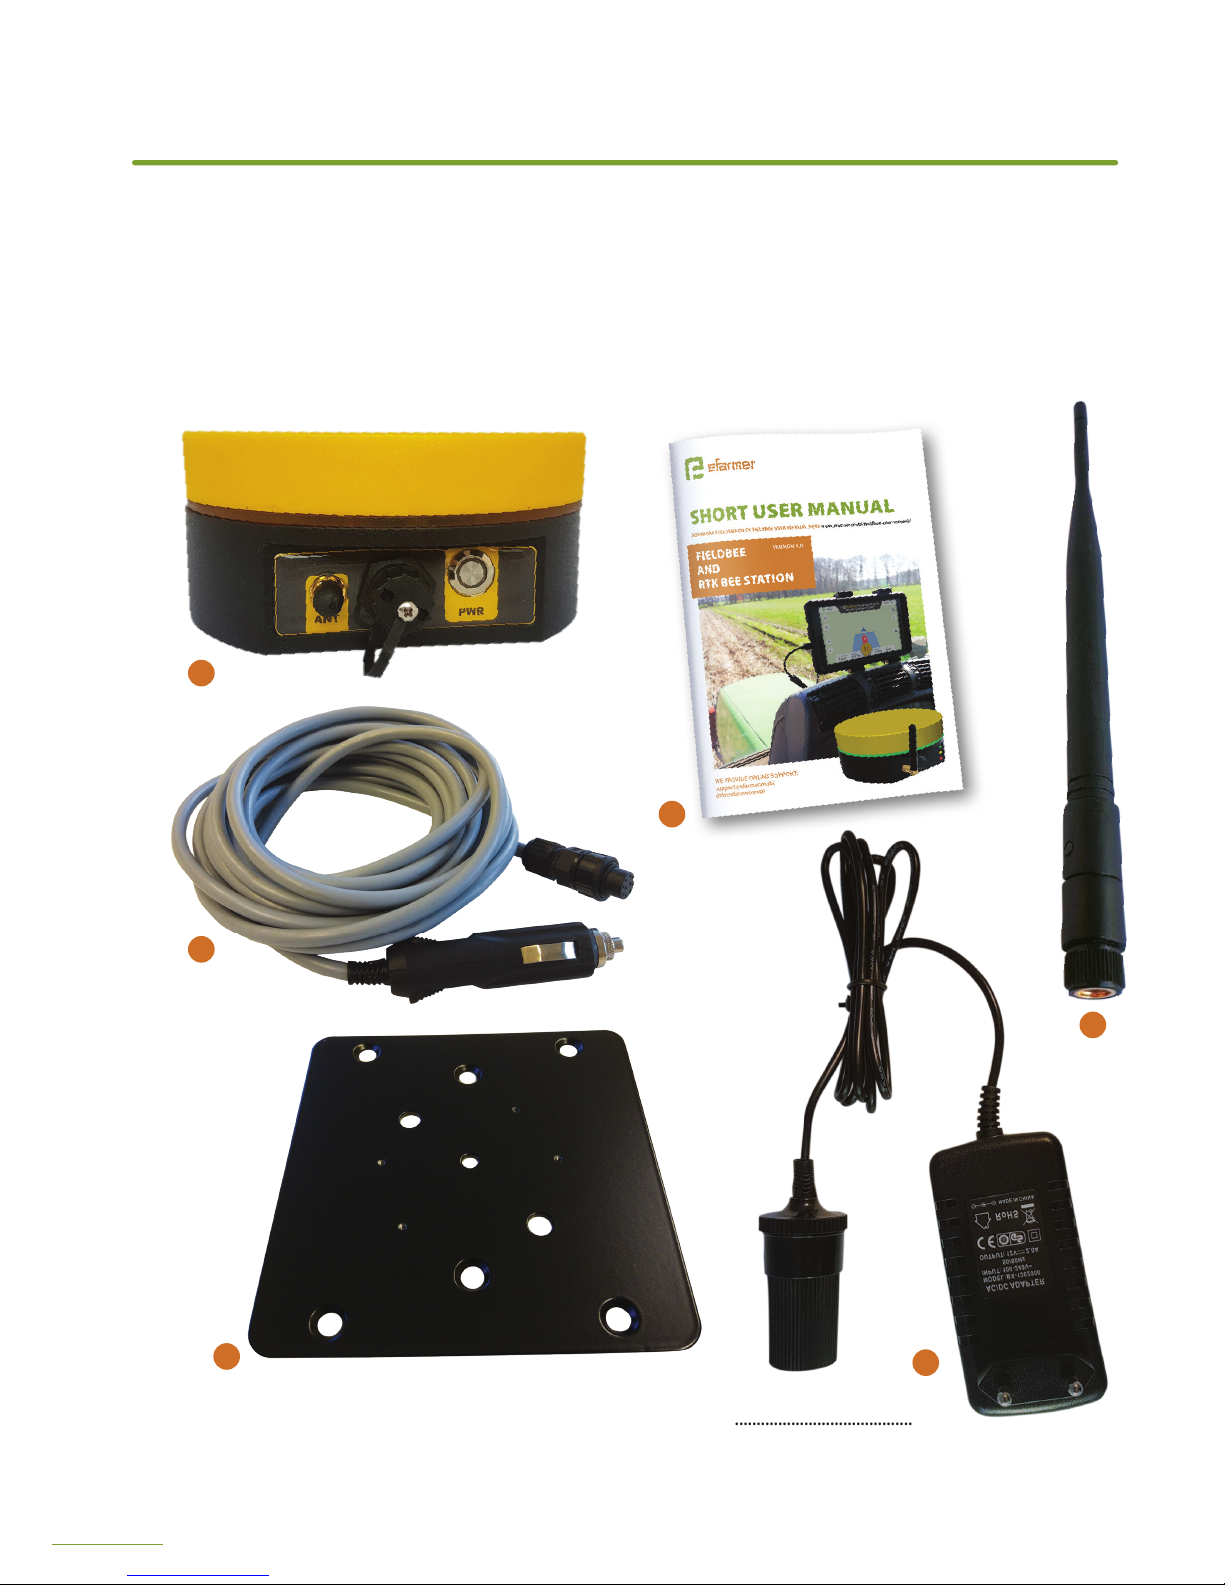
PACKAGE CONTENTS
PACKAGE CONTENTS
1. FieldBee GPS GNSS Antenna ..................
2. User manual ...................................................
3. Antenna 868/915Mhz ...............................
4. Cable 5m ...............................................
5. Metal plate ..........................................
6. Charger 220v/12v 2A ......................
1
2
3
4
5
6
7
GENERAL REQUIREMENTS
For initial conguration and all subsequent changes you will need:
1. Android smartphone or tablet with OS version 4.2 Jelly Bean or greater.
2. FieldBee application. You can install it from Google Play Store, follow the link or
simply search «FieldBee».
https://goo.gl/yL9hGf
3. FieldBee antenna.
4. RTK Bee Station (if applicable).
5. Registration with the local RTK correction signal provider (if applicable)
It is recommended to charge a battery to at least 20% before changing
congurations. Refer to the Charging section.
CONFIGURATION
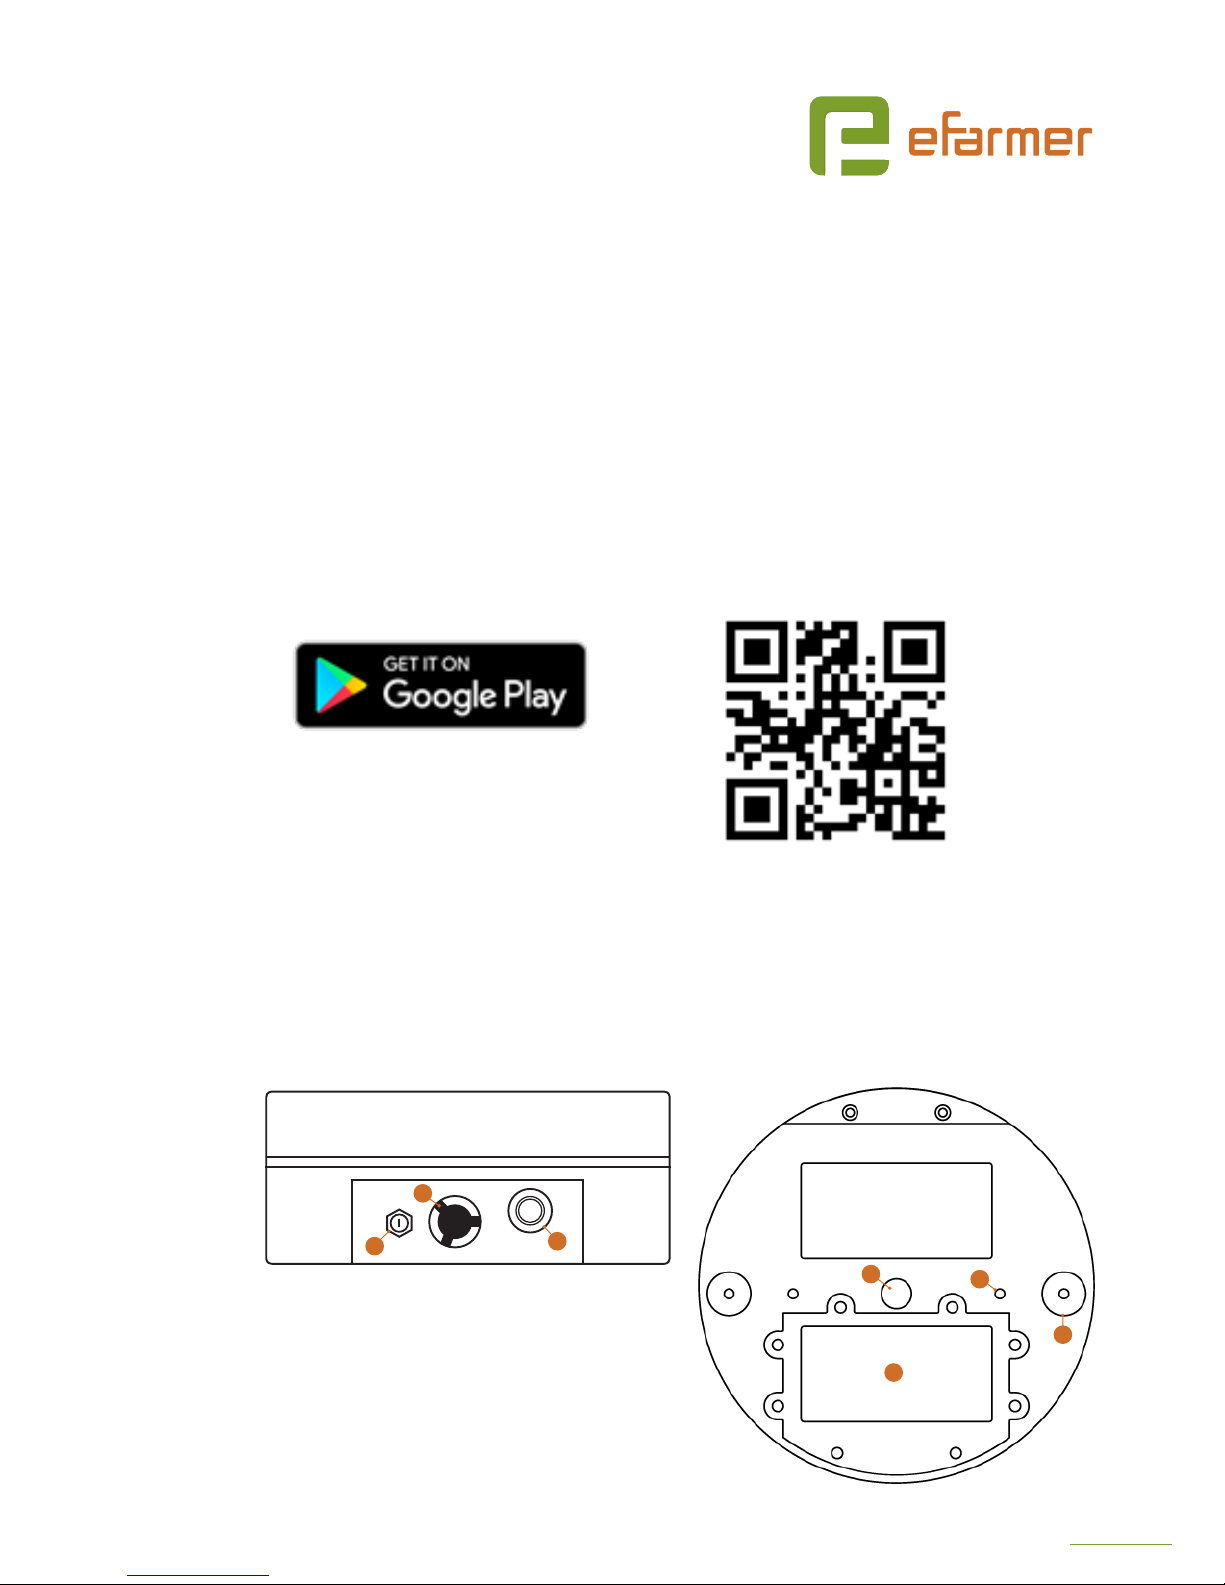
REAR PANEL DIAGRAM BOTTOM ELEMENTS
1. Antenna socket
915/868 Mhz
2. Power & data socket
3. PowerOn
4. Led Indicator
5. Washer for
mounting on tripod
6. Holes for xing
on a metal plate
7. Magnets for mounting
on metal plates
8. Battery compartment
1
2
3
5
8
6
7

8
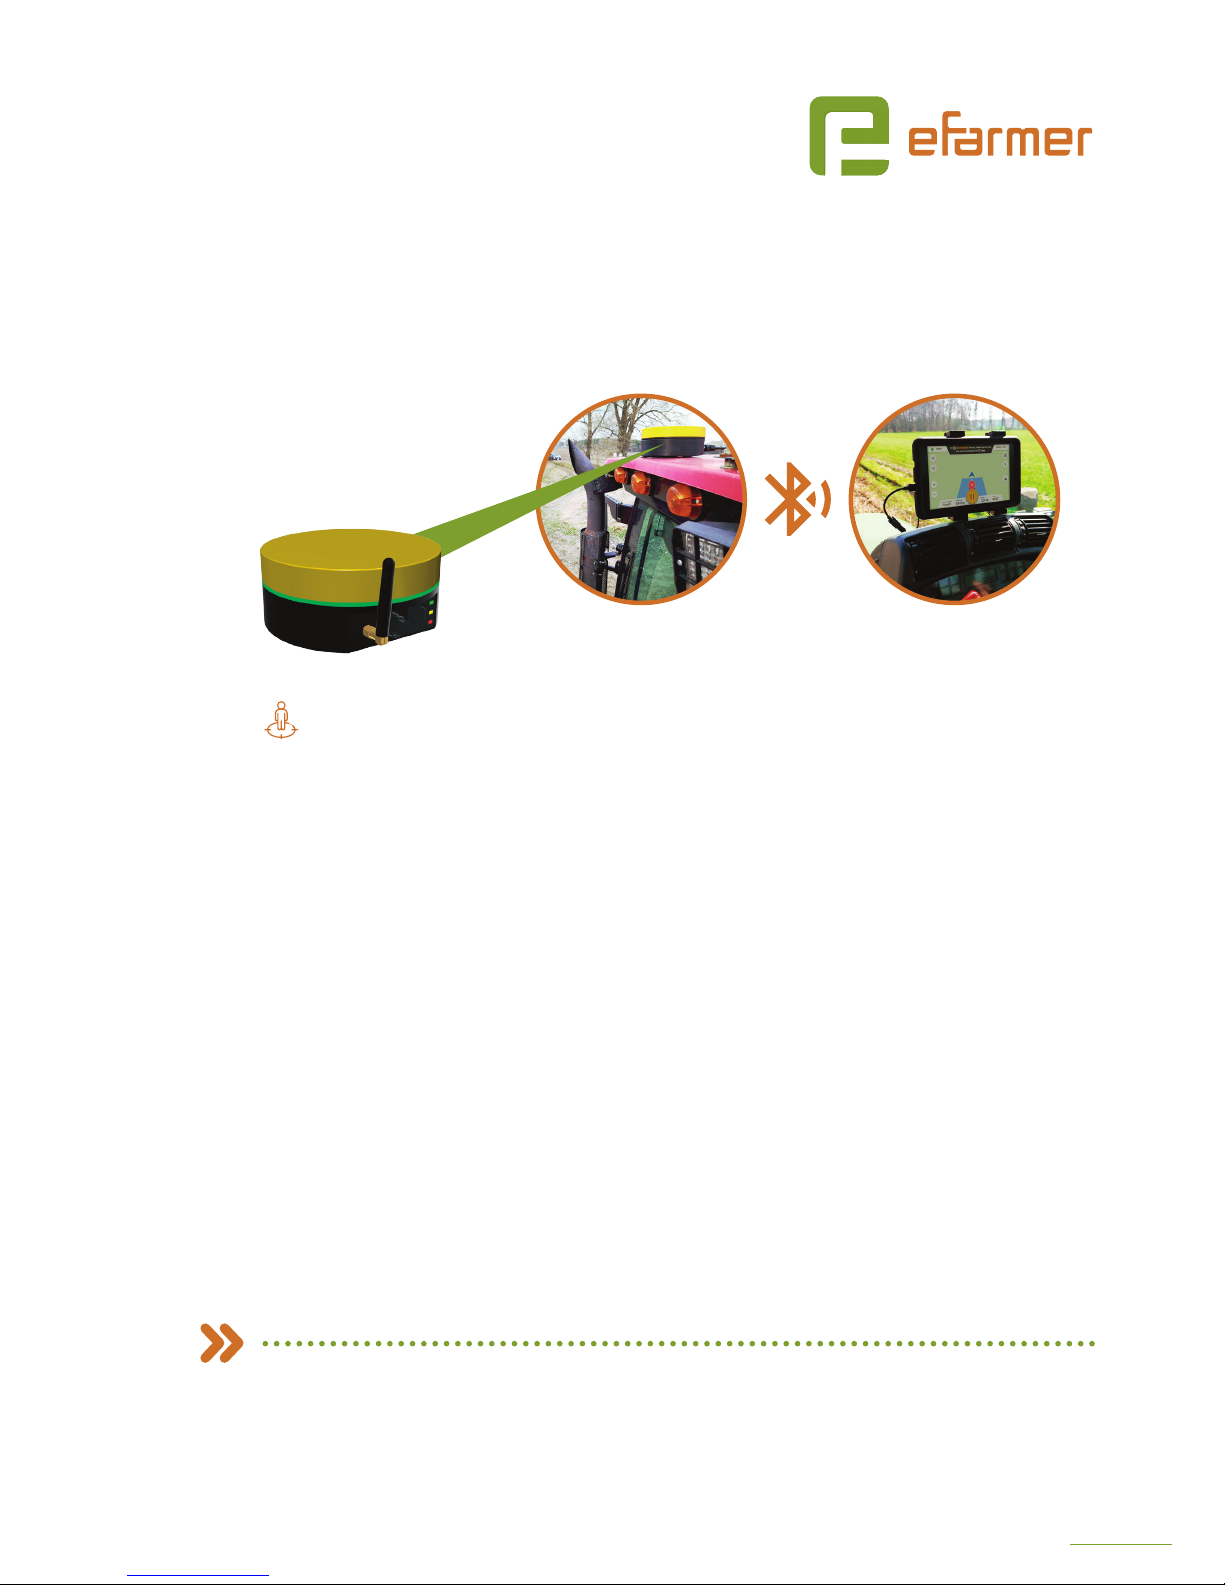
FIELDBEE AS STANDALONE SENSOR
The accuracy of the system will be below 1 meter and approximately
20-50 cm pass-to-pass. The system can be used for tracking and performing
operations that do not require high accuracy, for example spraying, or parallel
driving with wide implements.
Conguration
1. On your Android device turn on the Bluetooth .
2. Open the FieldBee app .
3. Skip Base station conguration by answering «I only have a FieldBee» to «Do You
have RTK Bee Station?» question.
4. Turn On FieldBee by pressing the Power button.
5. Wait until the antenna name will appear on the screen if it is not found - press
refresh button to restart the scan.
a. You may see a prompt requesting to turn on the Bluetooth, answer «Yes/OK» to
continue.
b. You may see a prompt requesting Location Permission, it is required to make
Bluetooth device scan, answer «Yes/OK» to continue.
c. If you have more than one FieldBee or RTK Bee Station you can look at the serial
number marked on the sticker on the bottom of the antenna and match it with
the name that appears on the screen.
6. Choose the antenna from the list.
a. When doing this rst time you will see pairing request, answer «Yes/OK» to
continue.
7. You will see a screen with antenna status:
1
Antenna name, connection status
(Connecting... / Connected / Disconnected)
2
Serial number and version, use this information
when contacting eFarmer support.
3
Battery level and charger status.
4
Working mode status.
5
Positioning quality: type of GPS x and
accuracy in meters, lower value - greater
accuracy.
6
Distance to base station: not relevant
7
Satellite count: number of visible GPS and
GLONASS satellites, more satellites - better
conditions, the value can vary from the amount
of satellites used for calculating location.
CONFIGURATION
Screen from FieldBee
app with antenna status
3
5
1
2
6
7
4
9
8. Perform system test. Go outside to receive a satellite signal, make sure that your
device is connected to the FieldBee (7a value: Connected) all the time.
How to know that the system works? Check the values on the screen with antenna
status:
a. 7d should display accuracy >1 meter for GPS (normal) x and <1 m for DGPS
(with satellite based correction)
b. 7f value should show 15-20 satellites.
9. If you receive poor or no result in 10 minutes, please refer to the troubleshooting
chapter.
10. Conguration is complete, close the app.
WHAT’S NEXT?
1. Install FieldBee on the tractor - see the chapter about installation
2. Connect your FieldBee to the eFarmer app and start using the system for your
fieldwork.
FIELDBEE AS STANDALONE SENSOR
Navigation system with submeter accuracy (30-50 cm)
FieldBee rover antenna
on your tractor
eFarmer app on your
smartphone/tablet

10
FIELDBEE WITH RTK CORRECTION PROVIDER
In this mode, FieldBee connects to RTK correction network that is available in your area.
The accuracy of the system in such case is 0-4 centimetres. Correction networks typically
have paid access, but in some countries, they are provided for free by the government.
For example FLEPOS network in Belgium.
Additional requirements
You will need to register with your local RTK correction provider (NTRIP provider) and obtain
the following parameters needed for connection:
a. Domain or IP address and port
b. Login and Password
c. Nearest mount point name or Correction stream name
When asking the information above, tell your provider that RTCM 3.x format is required. (We
do not support RTCM 2.x format).
IMPORTANT! You will need to have Wi-Fi access point with the Internet access or share Internet
from your Android device by enabling mobile Hotspot in Android Settings.
Conguration
1. Perform steps 1-7 from FieldBee in autonomous mode conguration.
2. Tap «Connect to NTRIP network» button.
3. Select Wi-Fi access point you want to use for FieldBee Internet connection. You will need to
use shared mobile internet (Hotspot) and/or portable hotspot. Icon on each item will show
Wi-Fi strength and if a network is protected.
a. If you select protected network a password prompt will appear. Enter network password.
You can always change the preferred Wi-Fi access point and enter a new password in the
Settings using FieldBee app.
4. Enter information from your correction provider: domain or
IP address and port separated by «:», log in and password.
A connection will be established to the server provided and
the list of streams or mount points will be loaded. Select your
stream/mount point from the list.
TIP: RTCM 3 and SkyTraq Raw formats are supported, we
recommend using «nearest» mount point with GPS+GLONASS
correction.
5. Antenna conguration update will start. If it doesn’t nish well,
tap «Try again».
6. You will see the screen with the antenna status:
1
Antenna name, connection status
2
Serial number and version, use this information when
contacting eFarmer support.
CONFIGURATION
Screen from FieldBee
app with antenna status
2
1
3
6
4
4

11
3
Battery level and charger status.
4
Positioning quality: type of GPS x and accuracy in meters, lower value - greater
accuracy.
5
Distance to base station: not relevant
6
Satellite count: number of visible GPS and GLONASS satellites, more satellites - better
conditions, the value can vary from the amount of satellites used for calculating
location.
7. Perform system test. Go outside to receive a satellite signal, make sure that your device
is connected to the FieldBee at all times and Wi-Fi connection is established. You will see
the status (6 a) changing from «Wi-Fi disconnected» to «Wi-Fi connected» and «NTRIP
connected». Make sure «NTRIP connected» status is maintained otherwise it means you
have problems with Wi-Fi connection or correction provider. Check the values 6d and 6f,
in a short time you should receive accuracy >1 meter for the GPS (normal) x and 15-20
visible satellites. Wait some time, x type (6d) should change to Float RTK or RTK, now you
have congured antenna for centimetre level accuracy.
a. If you receive poor or no result within 10 minutes, please refer to the troubleshooting
chapter.
8. Conguration is complete, close the app.
Make sure that Wi-Fi access point is in the eective range from the FieldBee during work,
otherwise precision will degrade.
WHAT’S NEXT?
1. Install FieldBee on a tractor - see the chapter about installation
2. Connect the FieldBee to eFarmer app - and start using it for eld work and mapping.
FieldBee rover antenna
on your tractor
eFarmer app on your
smartphone/tablet
PROVIDER
OF RTK
Access to the provider
of RTK correction signal
FIELDBEE WITH CORRECTION NETWORK
+
Improve the accuracy of your navigation system to 0-4 centimeters

12
FIELDBEE WITH RTK BEE STATION IN RADIO LORA MODE
Using the FieldBee with RTK Bee Station in LoRa mode will allow you to receive
centimetre level accuracy in 2 km range from the base station.
Conguration
1. On your Android device turn on the Bluetooth .
2. Open the FieldBee app .
3. Start Base station conguration by answering «Yes, I do» to «Do You have an RTK Bee
Station?» question.
4. Attach radio antenna to the RTK Bee station.
NEVER use RTK Bee Station without radio antenna,
failing to follow this rule may result in unrecoverable antenna damage.
5. Turn On RTK Bee Station by pressing the Power button.
6. Wait until the antenna name will appear on the screen if it is not found - press refresh
button to restart the scan.
a. You may see a prompt requesting to turn on the Bluetooth, answer «Yes/OK» to
continue.
b. You may see a prompt requesting Location Permission, it is required to make Bluetooth
device scan, answer «Yes/OK» to continue.
c. If you have more than one FieldBee or RTK Bee Station you can look at the serial number
marked on the sticker on the bottom of the antenna and match it with the name that
appears on the screen.
7. Tap antenna name.
a. When doing this rst time you will see pairing request, answer «Yes/OK» to continue.
8. You will see a screen with base station status:
1
Antenna name, connection status
2
Serial number and version, use this information when
contacting eFarmer support.
3
Battery level and charger status.
5
Radio (LoRa) mode status.
9. You will see a message that antenna conguration is being
updated if it doesn’t nish successfully tap the message to
try again.
10. Tap «Connect a Rover» button.
11. Repeat steps 4-6 for FieldBee rover.
12. Along with base station status, you will see FieldBee status:
a. Antenna name, connection status
b. Serial number and version, use this information when
contacting eFarmer support.
CONFIGURATION
2
1
3
4
Screen from FieldBee
app with antenna status

13
c. Battery level and charger status.
d. LoRa mode status.
e. Positioning quality: type of GPS x and accuracy in meters, lower value - greater
accuracy.
f. The distance between rover and base station.
g. Satellite count: number of visible GPS and GLONASS satellites, more satellites - better
conditions, the value can vary from the amount of satellites used for calculating
location.
13. Perform system test. Take RTK Bee Station and FIeldBee outside and place them above
ground level on an open sky leaving at least 1 meter in between. Make sure that your
device (smartphone/tablet) is connected to the FieldBee (12a) all the time and the Radio
(LoRa) connection is established (12d). Check the values 12e and 12g, in a short time you
should receive accuracy >1 meter for the GPS (normal) x and 15-20 satellites. Wait some
time, x type should change to Float RTK or RTK, now you have congured antenna for
centimetre level accuracy. If you move far away from the base station (12f) a correction
may be lost (more than 2 km).
a. If you receive poor or no result in 10 minutes, please refer to the troubleshooting
chapter.
14. Conguration is complete, close the app.
WHAT’S NEXT?
1. Install FieldBee on the tractor - see the chapter on installation
2. Connect your FieldBee to eFarmer app and start using it for eld work.
FIELDBEE WITH RTK BEE STATION
+
FieldBee rover antenna
on your tractor
RTK Bee Station
on your house
eFarmer app on your
smartphone/tablet
Improve the accuracy of your navigation system to 0-4 centimeters
1
2
RADIO
2 KM

14
FIELDBEE WITH RTK BEE STATION IN WIFI MODE
This mode uses Wi-Fi and Internet to deliver RTK correction to the FieldBee
and can be used in 10 km+ range from the base station
Additional requirements
Wi-Fi access point with Internet access or Android device with shared Internet
(Hotspot). You will need separate Wi-Fi points for RTK Bee Station and FieldBee
rover antenna, however, you can use same access point for initial system testing.
Configuration
1. Perform steps 1-11 from FieldBee with RTK Bee Station in Radio (LoRa) mode
configuration.
2. Tap «Connect to Wi-Fi» button.
3. Select Wi-Fi access point you want to use for RTK Bee Station Internet
connection. Icon on each item will show Wi-Fi strength and if network is
protected.
4. If you select protected network a password prompt will appear. Enter network
password. You can always change the preferred Wi-Fi access point and enter
new password in the Settings using FieldBee app.
5. You will see a screen with RTK Bee station status:
a. Antenna name, connection status
b. Serial number and version, use this information when contacting eFarmer
support.
c. Battery level and charger status.
d. Wi-Fi mode status.
6. Along with base station status you will
see FieldBee rover status:
1
Antenna name, connection status
2
Serial number and version, use this information
when contacting eFarmer support.
3
Battery level and charger status.
4
Wi-Fi mode status.
5
Positioning quality: type of GPS fix and accuracy
in meters, lower value - greater accuracy.
6
Distance between rover and base station.
7
Satellite count: number of visible GPS and
GLONASS satellites, more satellites - better
conditions, value can vary from amount of
satellites used for calculating location.
CONFIGURATION
2
1
3
4
5
6
6
Screen from FieldBee
app with antenna status
2
1
4
3

15
7. Perform system test. Take RTK Bee Station and FieldBee outside and place
them above ground level on a open sky leaving at least 1 meter in between.
Make sure that your device is connected to the RTK Bee Station (6a) and
FieldBee (7a) all the time and the Wi-Fi connection is established by both
antennas (6d, 7d). Check the values 7e and 7g, in a short time you should
receive accuracy >1 meter for GPS (normal) fix and 15-20 satellites. Wait some
time, fix type should change to Float RTK or RTK, now you have configured
antenna for centimeter level accuracy.
8. If you receive poor or no result within 10 minutes, please refer to the
troubleshooting chapter.
9. Configuration is complete, close the app.
WHAT’S NEXT?
1. Install FieldBee on the tractor - see the chapter on installation
2. Install RTK Bee Station
3. Connect your FieldBee to the eFarmer app and start using it for eldwork.
FIELDBEE WITH RTK BEE STATION
+
FieldBee rover antenna
on your tractor
RTK Bee Station
on your house
eFarmer app on your
smartphone/tablet
Improve the accuracy of your navigation system to 0-4 centimeters
1
2
RADIO
10 KM

16
This chapter provides recommendations on installing FieldBee and RTK Bee Station.
Most of them are required for proper work and to achieve maximal accuracy.
FIELDBEE INSTALLATION
Requirements
For tractors with plastic roof you will need a metal plate, you can order one at
www.efarmer.mobi/shop
Guide
1. Connect the power cable to FieldBee power socket.
2. If Radio (LoRa) mode is being used - screw in radio
antenna.
3. Install FieldBee on the tractor’s roof as close as
possible to the rear axis on the center line. (See the
picture) For plastic roof use a metal plate to provide
magnetic surface. Antenna back panel with power
button and sockets should face towards the rear end
of the tractor.
4. Lay down the wire through the rear window or
sunroof.
5. Insert power cable to cigarette lighter socket -
FieldBee will power on automatically.
INSTALLATION
DO NOT’S
Do not put
antenna on
the tractor hood
Do not change
orientation of
antenna
Do not put power
cable through
the door
INSTALLATION

17
RTK BEE STATION FIXED INSTALLATION
This installation is preferred when your elds t inside a circle with 10 km radius with
its centre near the house or other structure where the mounting can be made and
Wi-Fi Internet connection is possible.
Requirements
Flat metal surface or pole mount with 1/4-20 UNC thread (also used in most
consumer grade cameras). You can use a metal plate from our store
www.efarmer.mobi/shop
Additional tools and materials are required based on individual parameters of
installation.
For operation in Wi-Fi mode you will need Wi-Fi access point connected to the
Internet. We recommend to use one with external antenna(s).

18
Guide
1. Find a place for mounting that suites following parameters:
a. at surface
b. above the ground level
c. with open sky view
d. away from sources of electromagnetic radiation (generators, power lines, etc.)
e. away from large metal constructions
House or barn roof is a most common mounting place.
2. If using RTK Bee Station in Radio (LoRa) mode always connect radio antenna
before turning it on.
3. If using RTK Bee Station in Wi-Fi mode it is required to supply Wi-Fi access with
enough signal strength.
a. put your access point as close as possible to the mounting place, probably on
the last oor or under the roof.
b. turn on RTK Bee Station and congure it to use this
access point
c. go to the desired installation place and check the
Wi-Fi signal strength using the FieldBee app.
d. if signal strength is good you may continue
installation, if not you may require to move either
access point or base station. Using Wi-Fi repeater
for increasing signal strength is also an option.
4. Connect and lay down the power cable, otherwise,
remember to turn o antenna when not in use and
charge batteries when they are discharged.
RTK BEE STATION PORTABLE INSTALLATION
This method suits best when you have elds scattered on a territory
signicantly bigger than 10 km in any dimension, there is no mobile Internet
coverage and you don’t want to use additional RTK Bee Stations. Also this is
primary method for initial testing.
Requirements
Tripod mount with at metal head or with 1/4-20 UNC thread (also used
in most consumer grade cameras).
Additional tools and materials are required based on individual
parameters of installation.
For operation in Wi-Fi mode you will need Wi-Fi access point
connected to the Internet.
DO NOT’S
Do not change
orientation
of antenna
Do not make
holes in antenna
enclosure
Do not use wire
to tie antenna
in place
INSTALLATION

19
Guide
1. Find a place to mount that suites following
parameters:
a. at surface
b. with open sky view (away from mountains, big
rocks, forest)
c. away from sources of electromagnetic radiation
(generators, power lines, etc.)
d. away from large metal constructions
e. if possible, consider installing base station higher
than the eld you are performing operation on
(e.g. on the hill where the eld is under that hill)
2. If using RTK Bee Station in Radio (LoRa) mode always
connect radio antenna before turning it on.
3. If using RTK Bee Station in Wi-Fi mode it is required
to supply Wi-Fi access with Internet connection. If
stationary access point is being used, please follow
point 3 from RTK Bee Station stationary installation.
If portable access point is used - keep it as close as
possible to the base station but no closer than 30cm.
4. Install tripod mount, use level bubble (if any) to
achieve horizontal position
5. Mount RTK Bee Station by magnets or thread mount.
6. If base station is required to operate for more than 24 hours you may provide an
external battery, keep it no closer than 30cm to the RTK Bee Station, connect and
lay down the power cable. Otherwise, remember to turn o antenna when not in
use and charge batteries when they are discharged.
DO NOT’S
Do not change
orientation of
antenna
Do not use wire
to tie antenna in
place
Do not put
portable hotspot
directly near RTK
Bee Station
Do not use tripod
that can overturn
on the wind
Do not extend
tripod to
maximum height
if it makes RTK
Bee Station
unstable

20
CHARGING
The charger delivered with your FieldBee automatically checks for healthy voltages
of the two cells and only attempts charging if they are within limits.
The battery must be charged prior to using it for the rst time because it is delivered
with an energy content as low as possible.
Please, fully charge the battery with the external charger before turning on the Base
Station for the rst time and if you are going to use it without external power supply.
It is normal for the battery to become warm during charging.
While using FieldBee app you may check next charger information:
power source : external power, battery;
charger status : full charged, charging, discharging, low battery, error.
* If you see the charger status of the battery is low, please, connect cable for charging.
Please, don’t use battery with the low battery status it will negatively aect antenna's
future work.
voltage ( mV)
If you will see the voltage of your batteries is less than 3,35 mV ( low battery status) connect charger.
The voltage more than 3,8 mV is normal power mode. You can work with it while batteries
is not discharged to the low battery status.
SoC ( state of charge - %) - displaying batteries’ charging level in the percentages.
CHARGING

21
LEDINDICATION
FieldBee has LED-indicators, which shows working antenna modes.
The color set is the 5 signs sequence.
1. Every sequence will start with the green color.
*If there is no LED indicators sign light - check the power supply.
Battery can be сompletely discharged or be in the power save mode, which means you
need to charge it immediately.
2. Second light tells us about GPS status
3. Third light is static blue and divides two groups of connection parameters.
4. Fourth light tells us about Wi-Fi or Radio mode is working
5. Fifth light tells us about power supply type:
For example, the set of lights after turning on means :
RTK
FLOAT RTK
DGPS GPS
NO SIGNAL
BATTERY
EXTERNAL POWER
IS NO CONNECTION
CONNECTED TO WIFI
CONNECTED TO NTRIP
ANTENNA IS CHARGED TO THE NORMAL MODE
WITHOUT GPS SIGNAL RECEIVING
WITH NO CONNECTION TO ANY NETWORKS
DISCHARGING WHILE USING BATTERIES

22
The main problems can appear with Bluetooth connection and power supply while
installing the FieldBee. Please, read carefully the chapter CONFIGURATION in that
mode, which are you going to use FieldBee. If the problem persists after reading contact support. How to get support - read in the chapter CONTACTS (page ).
Frequently Asked Questions:
1. Why my FieldBee is not shining?
Check the power supply. Connect external power to the cigarette lighter or insert
the batteries. If the batteries have been already inserted - connect the antenna to the
charging cable.
2. There are no antennae in the available devices list
Go to the smartphone/tablet settings > nd Bluetooth settings > unpair the FieldBee,
which are you going to connect > open FieldBee app and retry search for available
devices.
3. How to change RTK Bee Station working mode?
If you want to change the RTK Bee Station working mode from LoRa mode to the Wi-Fi
mode you need to connect RTK Bee Station to the Wi-Fi network.
If you want to change RTK Bee Station working mode from Wi-Fi mode to the Radio
(LoRa) mode - disconnect RTK Bee Station from the Wi-Fi network.
4. If you have some other problem?
Please, contact the support.
TROUBLESHOOTING
TROUBLESHOOTING
TIP: Restarting
your devices (phone,
tablet, FieldBee, WiFi
router etc.) help to
solve 95%
of all issues.
23
Dear eFarmer, we provide assistance remotely. For this case, we can check the status
of your antenna and help you to solve the problems.
Please, use online chat for quick access to the support, if you have any questions
Press button and type your message.
Our support will answer you within 24 hours.
Also, you can use email: support@efarmer.mobi for describing your questions.
WARNINGS
Allowing your FieldBee to get wet can damage to its electronics and/or make it
operate incorrectly creating a hazardous condition.
Caution: to ensure regulatory compliance, use only the provided power and interface
cables.
Caution: do not open the unit. Do not perform any servicing other than that
contained in the installation and troubleshooting instructions. This device must
be installed and used in strict accordance with the manufacturer’s instructions as
described in the user documentation that comes with the product.
Do not cover the device, or block the airow to the device with any other objects.
Avoid using this product during an electrical storm. There may be a risk of electric
shock from lightning.
Do not use the battery with the low battery status it will make negatively aect the
antenna's future work.
Always use proper lifting and carrying techniques when handling components,
especially when working on a ladder, roof, or another area with a fall hazard.
The exterior antenna must not be co-located or operating in conjunction with any
other antenna.
Use caps for covering antenna’s output if you are going to leave FieldBee outside
without working for few days.
Check FieldBee Warranty policy on our website
https://efarmer.mobi/eldbee-warranty
CONTACTS
Need help?
 Loading...