


Original operating manual
EFA pneumatic circular saws
OM No.: 001 580 654
Version 26.06.2018
Original operating manual
Translation of the original operating manual
Pneumatic circular saws
EFA 17
EFA 19
EFA SK 08D
EFA SK 16D
EFA SK 16-8D
EFA SK 16-8DR
EFA SK 18-8D
This manual must be given to the user (worker)!
A copy of this manual must be given to all personnel working with this tool!
Schmid und Wezel GmbH
Maschinenfabrik
Maybachstraße 2
75433 Maulbronn, Germany
Telephone: +49 (0) 7043 / 102-0
Fax: +49 (0) 7043 / 102-78
E-mail: efa-verkauf@efa-germany.de
Website address: www.efa-germany.de

Original operating manual
Pneumatic circular saws
OM No.: 001 580 654
2 of 19
Version 26.06.2018
Table of contents
1. Verwendung, Lieferumfang, Zubehör ........................................................................................... 4
1.1 Symbole in dieser Anleitung ......................................................................................................... 4
1.2 Bestimmungsgemäße Verwendung .............................................................................................. 4
1.3 Unvorschriftsmäßiger Gebrauch ................................................................................................... 4
1.4 Restgefahren ................................................................................................................................. 5
1.5 Lieferumfang ................................................................................................................................. 5
2. Technische Daten ............................................................................................................................ 6
3. Sicherheitshinweise ........................................................................................................................ 6
3.1 Allgemeine Sicherheitshinweise ................................................................................................... 6
3.2 Verhalten am Arbeitsplatz ............................................................................................................. 7
4. Anschluss und Inbetriebnahme ..................................................................................................... 7
4.1 Arbeitsplatz ................................................................................................................................... 7
4.2 Installation ..................................................................................................................................... 7
4.2.1 Druckluft-Kreissäge anschließen ........................................................................................ 7
4.2.2 Filterdruckminderer ............................................................................................................. 8
4.2.3 Federzug ............................................................................................................................. 8
5. Handhabung..................................................................................................................................... 9
5.1 Schalterbetätigung ........................................................................................................................ 9
5.1.1 Einschalten .......................................................................................................................... 9
5.1.2 Ausschalten ....................................................................................................................... 10
5.2 Arbeiten mit der Druckluft-Kreissäge ..........................................................................................10
5.2.1 Vorbereitung ...................................................................................................................... 10
5.2.2 Tiefenanschlag einstellen ................................................................................................. 10
5.2.3 Arbeitsweise ...................................................................................................................... 10
5.2.4 Betriebssicherheit.............................................................................................................. 10
6. Montage ..........................................................................................................................................11
6.1 Sägeblattwechsel ........................................................................................................................11
6.1.1 Tiefenanschlag entfernen ................................................................................................. 11
6.1.2 Sägeblatt ausbauen .......................................................................................................... 11
6.1.3 Sägeblatt einbauen ........................................................................................................... 12
6.2 Einstellung des Federzugs ..........................................................................................................13
7. Reinigung und Schmierung während des Betriebs ...................................................................14
7.1 Tägliche Reinigung .....................................................................................................................14
7.1.1 Desinfektion ...................................................................................................................... 14
7.1.2 Reinigung der Druckluft-Kreissäge ................................................................................... 14

Original operating manual
Pneumatic circular saws
OM No.: 001 580 654
3 of 19
Version 26.06.2018
7.2 Tägliche Wartung ........................................................................................................................15
7.2.1 Werkzeuge und Zubehör .................................................................................................. 15
7.2.2 Schmierung ....................................................................................................................... 15
7.2.3 Sägeblatt ........................................................................................................................... 15
7.3 Erweiterte Wartung .....................................................................................................................15
7.3.1 Wartung der Säge ............................................................................................................. 15
7.3.2 Schärfen des Sägeblattes ................................................................................................. 16
7.3.3 Wartungseinheit ................................................................................................................ 16
8. Instandhaltung ...............................................................................................................................17
8.1.1 Reparatur durch den Kundendienst .................................................................................. 17
8.2 Reparaturen ................................................................................................................................18
9. Transport und Lagerung ...............................................................................................................18
10. Rücknahme ....................................................................................................................................18

Original operating manual
Pneumatic circular saws
OM No.: 001 580 654
4 of 19
Version 26.06.2018
1. Use, scope of supply,
accessories
General information concerning the proper
use of the equipment – please read this
section carefully!
This manual is intended for the machine
operator. Keep this manual accessible at all
times.
The pneumatic circular saw may only be
operated:
in a perfect technical state, in line with the
intended use, in consideration of all of the
safety- and hazard-relevant aspects,
with all the safety devices attached,
in compliance with the safety instructions,
after the operating personnel have read
and understood these instructions,
particularly Chapter 3 Safety Instructions
and Chapter 4 Connection and Startup.
It is assumed that the operating personnel
is sufficiently familiar with the use of
pneumatic circular saws. Instruction is
provided by our specialist personnel.
1.1 Symbols used in this manual
DANGER
Death, severe injury, or significant
property damage will occur if
proper precautions are not taken.
WARNING
Death, severe injury, or significant
property damage may occur if
proper precautions are not taken.
CAUTION
Minor Injury may occur if proper
precautions are not taken.
Mandatory sign
Danger to individuals who do not
follow the instructions given by the
corresponding symbol.
ATTENTION
Damage to property or the
environment may occur if the proper
precautions are not taken.
Text passages marked with this
symbol provide essential
information and useful tips.
1.2 Intended use
Depending on the design, the pneumatic
circular saw is designed for light and
demanding breaking, particularly for sawing
ribs in pigs and for cutting cattle, calves, and
game.
Pneumatic circular saws from Schmid & Wezel
(S & W) comply with the relevant safety
regulations.
1.3 Improper use
The machine is not equipped for a different
type of use. If the operator wishes to use the
device for other purposes, please consult
Schmid & Wezel GmbH (S&W) in advance.
We would like to point out that improper use
leads to greater risk of accidents and
increased wear. In the event of noncompliance, the liability shall be borne by the
user alone.
The pneumatic circular saw may pose a
hazard if untrained personnel use it
inappropriately or for improper purposes.
WARNING

Original operating manual
Pneumatic circular saws
OM No.: 001 580 654
5 of 19
Version 26.06.2018
Risk of immediate death or
death from bleeding due to
improper and incorrect
handling of the device!
Work carefully and according to
instructions.
Only trained, instructed, and authorized
individuals over the age of 16 may operate the
pneumatic circular saw. The responsibilities
and competences concerning the operation
must be clearly defined and complied with.
The pneumatic circular saw must not be
operated by individuals under the influence of
alcohol, medication or drugs.
Maintenance and repairs require special skills
and knowledge, which is why only specialized
persons who have been trained accordingly
are authorized to perform these tasks.
Conversions and modifications of the
pneumatic circular saw
Unauthorized modifications of the pneumatic
circular saw are not permitted for safety
reasons.
Spare parts and accessories have been
specially developed for the pneumatic circular
saw. We expressly point out that we only
accept spare parts and special designs
supplied by us.
The installation and/or use of such products
may have a negative effect on the active and
passive safety.
Schmid & Wezel GmbH accepts no liability for
damage caused using non-original spare parts
or special designs.
Modifications and alterations to the machine
are not permitted and exempt S&W from any
warranty and liability.
1.4 Residual risks
There is a risk of injury from the saw blades.
Pay attention to the correct use of the
machine.
Remain focused and act with caution when
working with the trimmer. Always wear
personal protective equipment.
A faulty compressed air connection and a high
proportion of water in the compressed air may
cause a jet of water escaping at the connection
point. Therefore, ensure that the hose
connection is correct and that the water
content in the compressed air is as low as
possible (drain the water separator regularly).
The water separator is not part of the machine
but must be connected upstream (see Chapter
4.2.1).
1.5 Delivery content
Delivery content EFA 17 & EFA 19
Pneumatic circular saw / rib saw
Threaded fitting
Screw-on nozzle
Single open-end wrench
Retention pin
Operating manual
Delivery content EFA SK 08 D
Pneumatic circular saw / rib saw
Single open-end wrench
Retention pin
Delivery content EFA SK 16 / 18 – 8 D / DR
Pneumatic circular saw / rib saw
Single open-end wrench
Retention pin
Accessories
For special accessories for the individual
machines
see spare parts list

Original operating manual
Pneumatic circular saws
OM No.: 001 580 654
6 of 19
Version 26.06.2018
3. Safety instructions
3.1 General safety instructions
It is essential to follow the safety precautions
when using the pneumatic circular saw:
WARNING
Cutting hazard: Limbs may be
severed!
Never reach into the area of the
saw blade.
CAUTION
Machine damage and danger to
third parties due to improper
use!
Use the machine correctly.
ATTENTION
Use only original EFA spare
parts!
This is the only way to ensure that
the machine functions properly
Wear personal protective
equipment!
Chain-mesh gloves
Eye protection
Select personal protection equipment
according to the regulations applicable on
the premises and to the accident
prevention regulations in force.
Carry out installations, maintenance, and
repair only with devices disconnected from
compressed air supply!
Read the operating instructions carefully,
comply with the instructions therein, and
store them in a place where they are
accessible to everyone at all times.
Only specialized persons are authorized to
perform any installation, maintenance, or
repair tasks.
Name
Unit
Performance characteristics
EFA 17
EFA 19
EFA
SK 8D
EFA
SK 16D
EFA SK 16-8D
EFA SK 16-8DR
EFA
SK 18-8D
Operating pressure
bar
6-8
6-8
6-8
6-8 7 7
Air consumption
at full load
m³ / min
1.2
1.2
0.6
0.75
0.9
0.9
Power
Watt
880
880
295
480
790
790
Speed (saw blade)
rpm
1800
1200
2800
2000
2000
2000
Saw blade Ø
mm
210
270
80
160
160
180
Cutting depth
mm
15-75
adjustab
le
100
20
15-75
adjustable
15-45 adjustable
60
Connections on the
maintenance unit
Inches ‚‘
R 3/8“
R 3/8“
R 3/8“
R 3/8“
R 3/8“
R 3/8“
Hose length
m 5 5 5 5 5 5
Weight
kg
8.4
9.0
1.1
2.5
2.7
3.1
Hand-arm vibration
m/s²
< 2.5
< 2.5
< 2.5
< 2.5
< 2.5
< 2.5
Sound pressure level
dB(A)
< 85
< 85
< 85
> 85
> 85
> 85
Cross-section
mm
d = 13
D = 18
d = 13
D = 18
d = 4
D = 11
d = 13
D = 18
d = 13
D = 18
d = 13
D = 18
2. Technical data

Original operating manual
Pneumatic circular saws
OM No.: 001 580 654
7 of 19
Version 26.06.2018
3.2 Conduct at the workplace
Keep your workplace tidy and in good
working condition. A cluttered or messy
workplace can lead to accidents.
Take into account environmental
influences. Ensure good lighting (min. 500
lux).
Keep other persons away from your
workplace. Remain focused and act with
caution during your work.
Do not use the pneumatic circular saw
when you are tired and/or unfocused.
Avoid wearing loose clothing and jewelry
that can be caught by moving parts. Wear
sturdy shoes during your work. Always
wear a hairnet!
Ensure that your workplace has a correct,
ergonomic set-up. Ensure safe footing and
keep your balance at all times.
Store the pneumatic circular saw in a safe
place. Store unused equipment in a dry
place.
Service your tools with care. Only use
sharp and undamaged saw blades to
ensure safe work.
Use only original EFA accessories. Use of
other accessories will void the warranty.
The use of other tool inserts or
accessories presents a risk of injury to you
and other persons.
Lay down the unused pneumatic circular
saw so that accidental contact with the
sharp saw blade is not possible
4. Connection and start-up
4.1 Place of work
The work space for the operator should be at
least 1.5 sqm.
No other place of work should extend into this
area as movements with the pneumatic circular
saw could result in the risk of injury.
The illumination at the place of work must be at
least 500 lux.
4.2 Installation
CAUTION
Danger due to automatic start!
Connect the pneumatic circular saw
to the power supply only when
switched off!
CAUTION
Tripping hazard!
Lay compressed air lines outside of
the working area.
CAUTION
Danger of malfunctions and
injuries!
Installation work may only be
carried out by authorized specialist
personnel.
4.2.1 Connecting the pneumatic circular
saw
The pneumatic circular saw is supplied ready
for operation.
ATTENTION
Device damage!
Operate the pneumatic circular saw
only with clean, anhydrous, oiled
air!
Attach the pneumatic circular saw (1) with
the threaded nipple of the compressed air

Original operating manual
Pneumatic circular saws
OM No.: 001 580 654
8 of 19
Version 26.06.2018
hose (2) to the maintenance unit (3) (with
filter pressure reducer). Make sure to
assemble the maintenance unit in the
following order: Water separator (4),
pressure gauge (5), oil mist blower (6).
To ensure lubrication of the pneumatics motor,
the maintenance unit must be set to 1-2 drops
of oil per minute (or one drop of oil for
approximately 15 cuts).
Pneumatic connection (schematic diagram)
Pneumatic connection (EFA 17 / 19)
Pneumatic connection (EFA SK 08D)
A faulty compressed air connection and a high
proportion of water in the compressed air may
cause water to escape at the connection point.
Therefore, ensure that the hose connection is
correct and that the water content in the
compressed air is low (drain the water
separator regularly).
If no dried air is available, the customer must
install a water absorber.
Before connection, remove impurities by
blowing air through the compressed air
hose using a compressed air gun.
4.2.2 Filter pressure reducer
The air from compressed-air systems is usually
contaminated and has accumulated moisture.
Therefore, a filter pressure reducer with water
separator should be installed between the
compressed air system and the tool. This not
only controls the operating pressure but cleans
and drains the compressed air. In addition, this
improves on the usefulness and increases the
service life of the pneumatic circular saw
significantly.
The filter pressure reducer should be installed
as close as possible to the pneumatic circular
saw.
Set the operating pressure on the filter
pressure reducer to max. 8 bar.
You can purchase a suitable filter pressure
reducer on request from our sales department
at Schmid & Wezel.
4.2.3 Spring balancer
The machine must always be operated in
combination with a weight relief system (spring
balancer). Install this with a sliding trolley
above the working area on an element
assembled higher or on the ceiling.
Information on fine adjustment of the spring
balancer is provided in Chapter 6.2.
Hang the pneumatic circular saw as top-heavy
as possible. The vertical position can be
adjusted if necessary.
Attaching or removing the weight relief may
result in a risk of the machine slipping or falling
due to weight (depending on the version
between 2.5 and 9 kg). Also make sure that
the machine is not jammed by the snap hook
3
2
1
5
6 4 3
2
1
5
6
4
1 1 2

Original operating manual
Pneumatic circular saws
OM No.: 001 580 654
9 of 19
Version 26.06.2018
or the hook of the air circular saw. Be careful!
CAUTION
Risk of injury when adjusting
the spring balancer with
pneumatic circular saw
attached!
Remove the pneumatic circular saw
before adjusting the spring
balancer!
5. Handling
5.1 Switch operation
ATTENTION
Read the operating manual and
connect the pneumatic circular saw
correctly before turning on!
CAUTION
Machine damage and danger to
third parties due to improper
use!
Use the machine correctly.
WARNING
Cutting hazard: Limbs may be
severed!
Never reach into the area of the
saw blade.
Wear eye protection or safety
goggles during work!
The pneumatic circular saw is equipped with a
valve lever (1) for connecting the compressed
air flow.
Operating the switch lever (here SK 18-8D)
Operating the switch lever (EFA 17 / 19)
5.1.1 Turning on
1. Make sure that the manual pneumatic
circular saw is connected to the local
compressed air supply (supply pressure: 7
bar).
2. Carry out a function test before starting
work.
3. Hold the unit firmly by the handle (1).
4. To turn on, actuate the switch lever with
your index and middle fingers.
ATTENTION
Improper handling will lead to
increased wear!
Hearing impairment!
Ear protection is recommended
when used in continuous operation!
1
1

Original operating manual
Pneumatic circular saws
OM No.: 001 580 654
10 of 19
Version 26.06.2018
5.1.2 Turning off
Release the switch lever
The switch automatically turns off by the return
spring.
After turning off, the pneumatic circular saw
comes to a standstill after a short follow-up.
The machine can be switched on and off at
any time.
5.2 Working with the pneumatic
circular saw
Wear eye protection or safety
goggles during work!
5.2.1 Preparation
Check before using the device whether
the operating data of the compressed air
supply and the device match.
the pneumatic circular saw is functional
the general safety instructions
(see Chapter 3.1) have been considered.
5.2.2 Setting the depth stop
EFA 17, SK 16D, SK 16-8D:
The pneumatic circular saws EFA 17, SK 16D
and SK 16-8D are equipped with an adjustable
depth stop (1). The stop must be set for the
respective application.
Adjust cutting depth with stop (if present),
loosen wing nut (2) and swivel stop (1)
over pivot point (3)
Tighten the wing nut (2) (see Abb 6).
Adjustment range: 15 - 65 mm
Adjusting the cutting depth (SK 16-8D)
5.2.3 Method of operation
EFA 17,19,SK08-D, SK16-8D, SK18-8D:
Hold pneumatic circular saw securely at
both handles and turn on (except SK168DR).
CAUTION
Blocking hazard!
Do not stop the saw during the
cutting process.
Insert into the meat while running.
Remove from the meat while running and
then turn off.
In case of work interruption, lay the
pneumatic circular saw flat on its side
without any load on the handle.
During prolonged stoppages in work,
disconnect the machine from the compressed
air network.
5.2.4 Operating safety
Work particularly carefully when the
machine is switched on.
Hold the machine firmly at both handles (if
present)
Never press the switch lever when the
machine is not in operation.
Do not tilt or jam the blade
Protective equipment on the saw must not
be removed to complete cutting
After turning off, the saw blade comes to a
1 2 3

Original operating manual
Pneumatic circular saws
OM No.: 001 580 654
11 of 19
Version 26.06.2018
standstill within 2 seconds. Only then may
the handles be released
To aid safe handling (guidance), the rib saw
should be hung on a spring balancer.
6. Assembly
WARNING
Cutting hazard!
Disconnect the saw from the
compressed air supply before
assembly operations!
6.1 Saw blade replacement
ATTENTION
Use only original EFA spare
parts!
This is the only way to ensure that
the machine functions properly
The following tools and accessories are
needed for disassembly / assembly:
Single open-end wrench (accessory)
Retention pin
6.1.1 Removing the depth stop
EFA 17, SK16D, SK16-8D:
1. Loosen the screw (1) at the pivot point
2. Unscrew the wing nut (2) and remove the
depth stop (3) (if installed).
Removing the depth stop (SK 16-8D) (1)
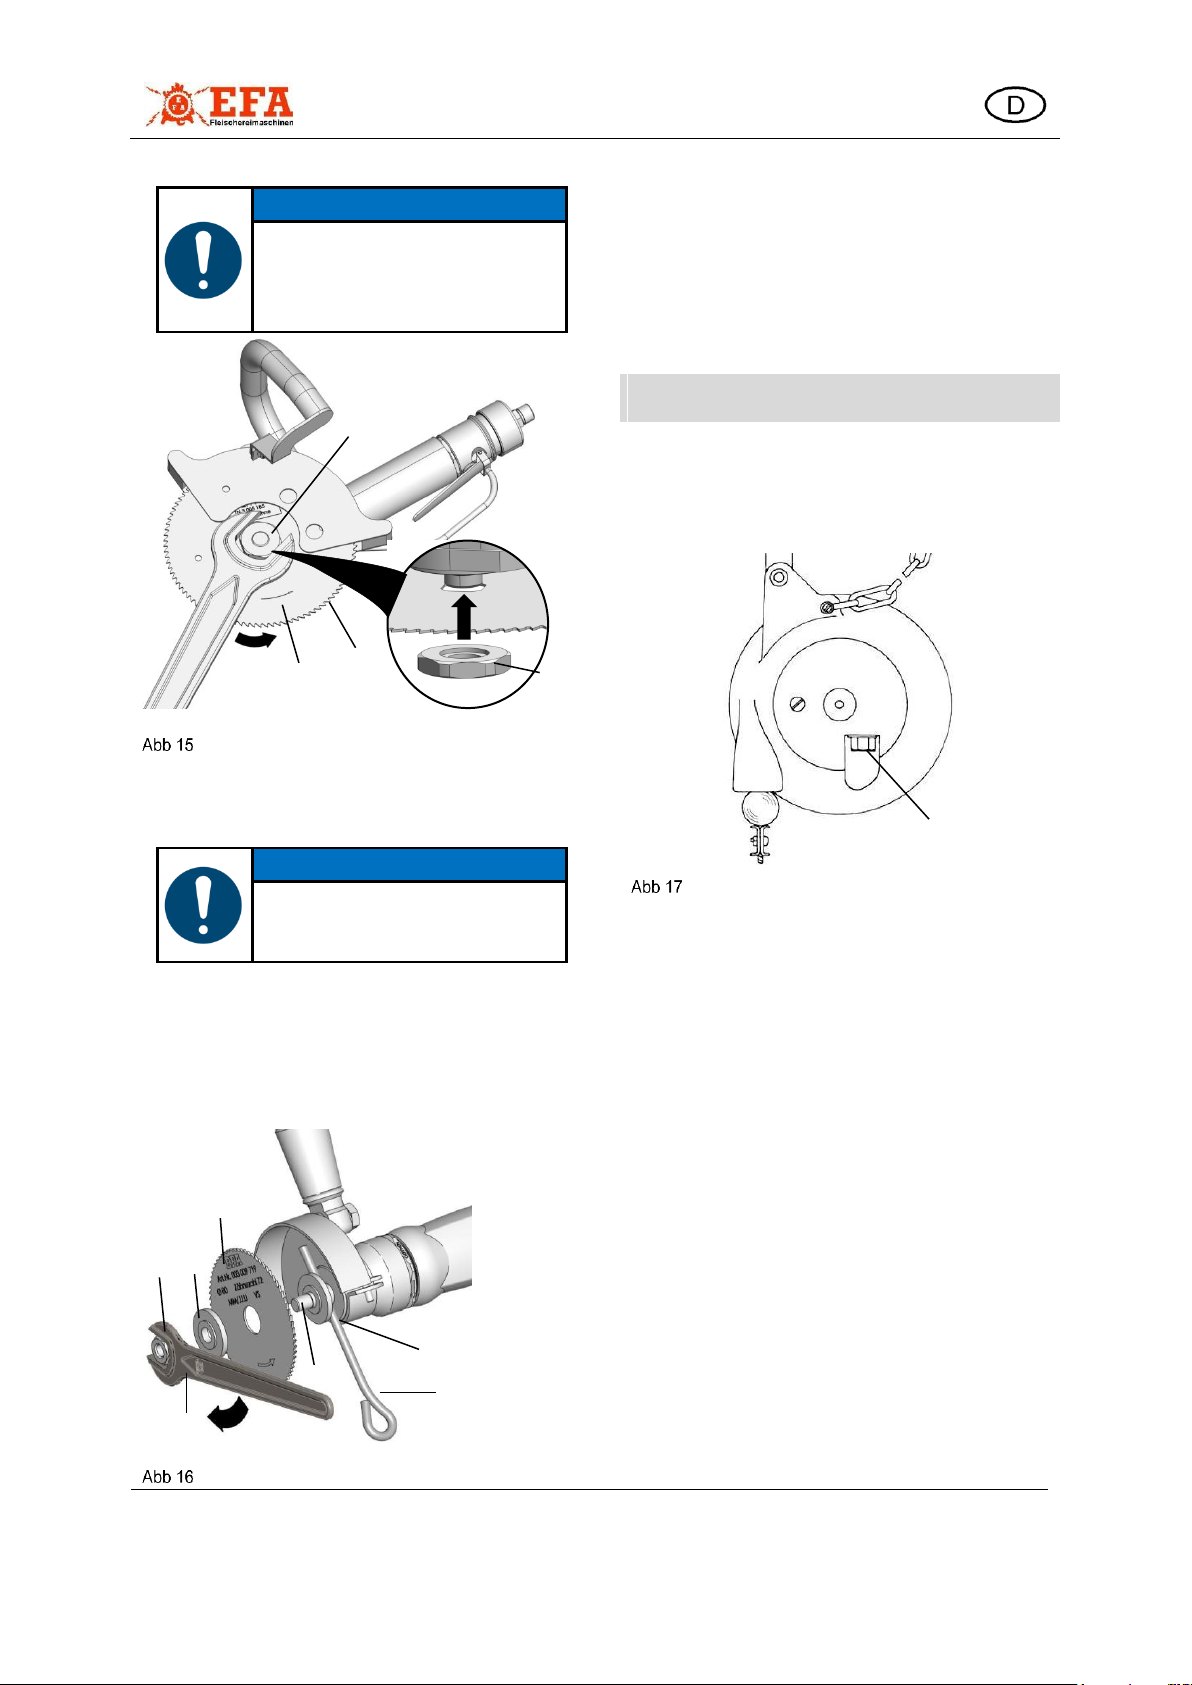
6.1.2 Removing the saw blade
3. Turn the saw blade manually until hole (1)
is congruent with hole (2).
Saw blade replacement (SK 16-8D) (2)
EFA 19, SK 16-8D, SK 18-8D:
Saw blade replacement (SK 18-8D) (3)
Wear cut-resistant protective gloves
when working!
4. Lock the saw blade (3) with a retaining pin
(4) (or a comparable tool) and unscrew the
clamping nut (5) with a single open-end
wrench (6) (right-hand thread) (Abb 10 and
Abb 11).
ATTENTION
SK16-8DR
Left-hand thread!
2 1 1 2 3 2 1

Original operating manual
Pneumatic circular saws
OM No.: 001 580 654
12 of 19
Version 26.06.2018
Saw blade replacement (SK 18-8D) (4)
Saw blade replacement (SK 16-8D) (5)
Saw blade replacement (SK 8-8D) (6)
5. The saw blade (3) can now be removed.
ATTENTION
The sealing washer (7) may adhere
to the saw blade (3) and may need
to be detached from the saw blade.
Do not remove the sealing washer
(7) with the saw blade (3)!
6.1.3 Installing the saw blade
Saw blade replacement (SK 18-8D) (3)
1. Place sealing washer (1) underneath and
new saw blade (2) on square (3) of drive
spindle.
3 7 4 4 6 5 3 5 2 1 3 5 4 3 6 7 1 1 2 3 4 5 6
EFA SK 08D
1. Insert retaining pin (1) into hole (2)
2. Hold drive arm (3) with retaining pin.
3. Loosen nut (4) with single open-end
wrench (5) and remove.
4. Remove spring washer (6) and saw blade
(7).
Saw blade replacement (EFA SK 08D)
Original operating manual
Pneumatic circular saws
OM No.: 001 580 654
13 of 19
Version 26.06.2018
ATTENTION
Note the movement direction of
the saw blade!
See the corresponding marking on
the saw blade (5).
Saw blade replacement (SK18-8D) (3)
2. Screw in clamping nut (4) with recess (see
detail) against the saw blade (2) and
tighten (right-hand thread).
ATTENTION
SK16-8DR
Left-hand thread!
EFA 17,19, SK 16, SK 16-8D:
3. Move the depth stop to the working
position. Tighten screw at pivot point and
wing nut.
EFA SK 08D
Installing the saw blade (EFA SK 08D)
1. Place saw blade (1) on lower spring
washer (2)
2. Slide the upper spring washer (3) over the
drive arm (4) onto the saw blade.
3. Secure the drive arm with the retaining pin
(5) and tighten the nut (6) with the single
open-end wrench (7).
6.2 Adjusting the spring balancer
The spring balancers from Schmid & Wezel
differ according to the maximum permissible
load.
Adjusting spring balancer (1)
The fine tuning of the spring balancer is done
with the PLUS / MINUS screw (1) on the
housing.
Turn the screw in MINUS direction until the
saw is hanging freely in equilibrium (with
the spring balancer) at working height.
If pulling out is not possible, the spring
balancer is jammed, and a readjustment is
necessary:
Turn the screw in PLUS direction until the
saw can be pulled out and start again with
fine adjustment
4
2 4 5
1
+ -
6
1
4 7 2
5
3

Original operating manual
Pneumatic circular saws
OM No.: 001 580 654
14 of 19
Version 26.06.2018
Spring balancers for devices up to 14 kg:
Before adjusting the load capacity,
attach the load with the rope fully
retracted.
Adjustment in direction "Plus" (+)
increases the load capacity.
Adjustment in direction "Minus" (-)
reduces load capacity.
The correct setting is achieved
when the attached load can be
pulled easily into the desired
position and returns to its original
position after releasing.
Adjusting spring balancer (2)
Use an Allen key on the adjusting screw
(2) to make the desired setting within the
permissible adjustment range.
The adjusting screw (2) acts on the spring
catch (3) which is provided with a marking on
the outside. This marking indicates the
adjustment.
7. Cleaning and lubrication
during operation
WARNING
Cutting hazard!
Turn off and disconnect the saw
from the compressed air supply
before starting maintenance!
7.1 Daily cleaning
After completion of breaking, the pneumatic
circular saw must be cleaned.
Trouble-free continuous operation is only
guaranteed if the pneumatic circular saw is
always kept hygienically clean. The machine
should normally be disinfected before each
cleaning.
Observe the applicable safety and
hygiene requirements.
7.1.1 Disinfection
Disinfect the machine during operation after
every cut with hot water (approx. 82 °C).
Disinfectants must not be allowed to come into
direct or indirect contact with foodstuffs. Rinse
the machine with clear water after disinfection.
ATTENTION
Do not use any aggressive solvents!
Do not use a steam blaster or highpressure cleaner! Do not immerse
the device in water!
7.1.2 Cleaning the pneumatic circular
saw
Clean the device after use with cloth, brush,
and warm water (40 - 55 °C). Soak stubborn or
encrusted residues.
Use a cleaning agent, preferably foam, and
apply to the surface to be cleaned and leave
for 15 - 20 minutes. Subsequently wash off the
loosened dirt manually with warm water.
Recommended cleaning agents
Diversey Lever Tego 2000:
Surface-active disinfectant
Diversey Lever GmbH
Mallaufstr. 50-56, 68219
Mannheim/Germany
P3-topax 91: Surface-active disinfectant
Henkel-Ecolab Deutschland GmbH
Postfach 13 04 06, 40554 Düsseldorf
A cleaning plan and further details can be
obtained from the above addresses.
The above-mentioned cleaning agents are only
recommendations. When using other cleaning
agents, the customer must check material
compatibility and hygiene regulations.
3
2

Original operating manual
Pneumatic circular saws
OM No.: 001 580 654
15 of 19
Version 26.06.2018
7.2 Daily maintenance
7.2.1 Tools and accessories
Grease gun
Suitable for contact with food
7.2.2 Lubrication
Each time the saw blade is cleaned, apply
a little acid-free, EFA special oil.
Lubricants
The lubricating grease and oil are subject to
the regulations required in the food industry.
Use only lubricants that comply with German
food regulations and FDA guidelines.
This relates to unintentional contact with the
processed product (food) that cannot be ruled
out with certainty. Therefore, use only food
grade lubricants.
You can buy suitable lubricating grease and oil
for your machine from the sales department of
Schmid & Wezel.
7.2.3 Saw blade
Inspect the saw blade at regular intervals.
If the self-locking effect of the hex. nut is no
longer assured, it must be replaced without
delay.
7.3 Advanced Maintenance
After approx. 50 operating hours, extended
maintenance is required.
7.3.1 Maintenance of the saw
Disconnect the saw from the compressed
air supply
To maintain the lubrication of ball bearings
and gearbox, grease the machine at the
grease nipples with 1 - 2 strokes out of the
grease gun (see Abb 19 and Abb 20).
Grease nipples (SK 18-8D)
Grease nipples (EFA 17 / EFA 19)
In case of decreasing performance or after
approx. 400 operating hours, the rotor
slides of the pneumatics motor must be
checked for wear and replaced if
necessary (we recommend sending the
pneumatic circular saw in this case to our
service department).
A dirty silencer (1) must be cleaned or
replaced.
1

Original operating manual
Pneumatic circular saws
OM No.: 001 580 654
16 of 19
Version 26.06.2018
Silencer (here EFA SK 08 D)
7.3.2 Sharpening the saw blade
ATTENTION
Incorrectly sharpened saw blades
lead to production losses and
endanger the user.
For sharpening, please contact the
sharpening service of the nearest
authorized workshop or contact our
head office directly.
Sharpening can also be carried out on
commercially available automatic circular saw
blade sharpening machines.
More detailed information on sharpening the
saw blade relating to the different saw blade
geometries (tooth shapes) is available on
request from our service department.
ATTENTION
Do not use force as parts could be
damaged! Only use original EFA
spare parts!
7.3.3 Maintenance unit
For proper operation and to maintain the
adequate service life of the pneumatic circular
saw, the maintenance unit (filter pressure
reducer) must be checked at regular intervals.
Remove any condensation and, if
necessary, fill up with special oil (available
from S&W).
Check the operating pressure (max. 8 bar)
at regular intervals.

Original operating manual
Pneumatic circular saws
OM No.: 001 580 654
17 of 19
Version 26.06.2018
Malfunctions may occur during operation, but
these are generally relatively simple to
remedy.
ATTENTION
Only qualified, instructed specialist
personnel may carry out all
operations.
Table 1: "Faults and corrective measures"
describes these malfunctions together with
their possible causes and suggests corrective
measures
The machine does not start up when
actuating the switch lever
Air filter on maintenance unit is dirty
Replace air filter
Loose hose connection
Check the proper connection of the
hoses
Rotor slide defective
Return to manufacturer for service.
Handle is difficult or impossible to
press
Valve spring broken
Valve jammed due to soiling
Return to manufacturer for service.
Handle iced
Air pressure set too high
Adjust to 6 - 8 bar
Machine does not start
Parts of the motor or transmission are
defective
Return to manufacturer for service.
Machine parts corroded
Water in inlet line. Air conditioner
defective
If necessary, replace maintenance unit
or return to manufacturer for service.
8.1.1 Repair by After-Sales Service
Only specialized persons are authorized to
perform repairs. Our service department is at
your disposal for any repairs needed.
If your equipment needs to be repaired, please
contact the nearest authorized service center
or our head office.
Upon request, spare parts lists can be
provided to any authorized service center.
In the event of malfunctions that cannot be
clearly localized, the device should be returned
to S&W for repair. Please state the error
symptoms if you do so.
For other faults that the system operator can
rectify, the fault list may provide information
about the cause and rectification of the fault.
Do not repair defective devices on
site (in the immediate vicinity of
food)!
Provide all of the necessary tools
and ensure that the work
environment is clean.
WARNING
Cutting hazard!
Disconnect the device from the
compressed air supply before
starting any repairs!
WARNING
Cutting hazard!
Turn off and disconnect the saw
from the compressed air supply
before starting maintenance!
CAUTION
Malfunction
Possible cause
Remedy
8. Maintenance
Tab 1 Malfunctions and their rectification

Original operating manual
Pneumatic circular saws
OM No.: 001 580 654
18 of 19
Version 26.06.2018
Danger of malfunctions and
injuries!
Only qualified, instructed specialist
personnel may carry out
maintenance.
Maintenance unit
Check the maintenance unit at regular
intervals, but at least once a week, remove the
condensation and add special oil.
Special oil for maintenance system:
EFA special oil 0.5 l part no. 001 365 611
EFA special oil 5.0 l part no. 001 365 612
Special grease for gear box and ball
bearings:
Bearings/planetary gear 0,8 kg
part no.: 001 365 644
Gearbox 1kg part no.: 001 365 623
Gearbox 5kg part no.: 001 365 624
8.2 Repairs
CAUTION
Danger of malfunctions and
injuries!
Only authorized specialist personnel
may carry out repairs.
WARNING
Cutting hazard!
Turn off and disconnect the saw
from the compressed air supply
before starting any repairs!
ATTENTION
Use only original spare parts!
This is the only way to ensure that
the machine functions properly
Our service department is at your disposal for
any repairs needed.
EFA Service
Phone: +49-(0) 7043 102-82
Fax: +49(0)7043 / 102-78
In the event of a repair, please contact your
nearest contract workshop or our parent
company directly.
9. Transport and storage
The machine must be stored in a dry room.
Clean the machine and transport only in a dry
condition.
Ensure that the machine is not damaged
during transport.
Use the original packaging.
10. Return of waste electrical
equipment
Return your waste electrical equipment to our
head office.

Original operating manual
Pneumatic circular saws
OM No.: 001 580 654
19 of 19
Version 26.06.2018
 Loading...