

EF BO-AE101-A Instructions For Installation And Use Manual

Multifunction Oven
BO-AE101-A
Instructions for installation and use
We recommend that you read the instructions in this owner’s manual carefully before use for the best
performance and to extend the life of your appliance, as it will provide you with all the instructions you require to
ensure its safe installation, use and maintenance. Always keep this owner’s manual close to hand since you may
need to refer to it in the future. Thank you.
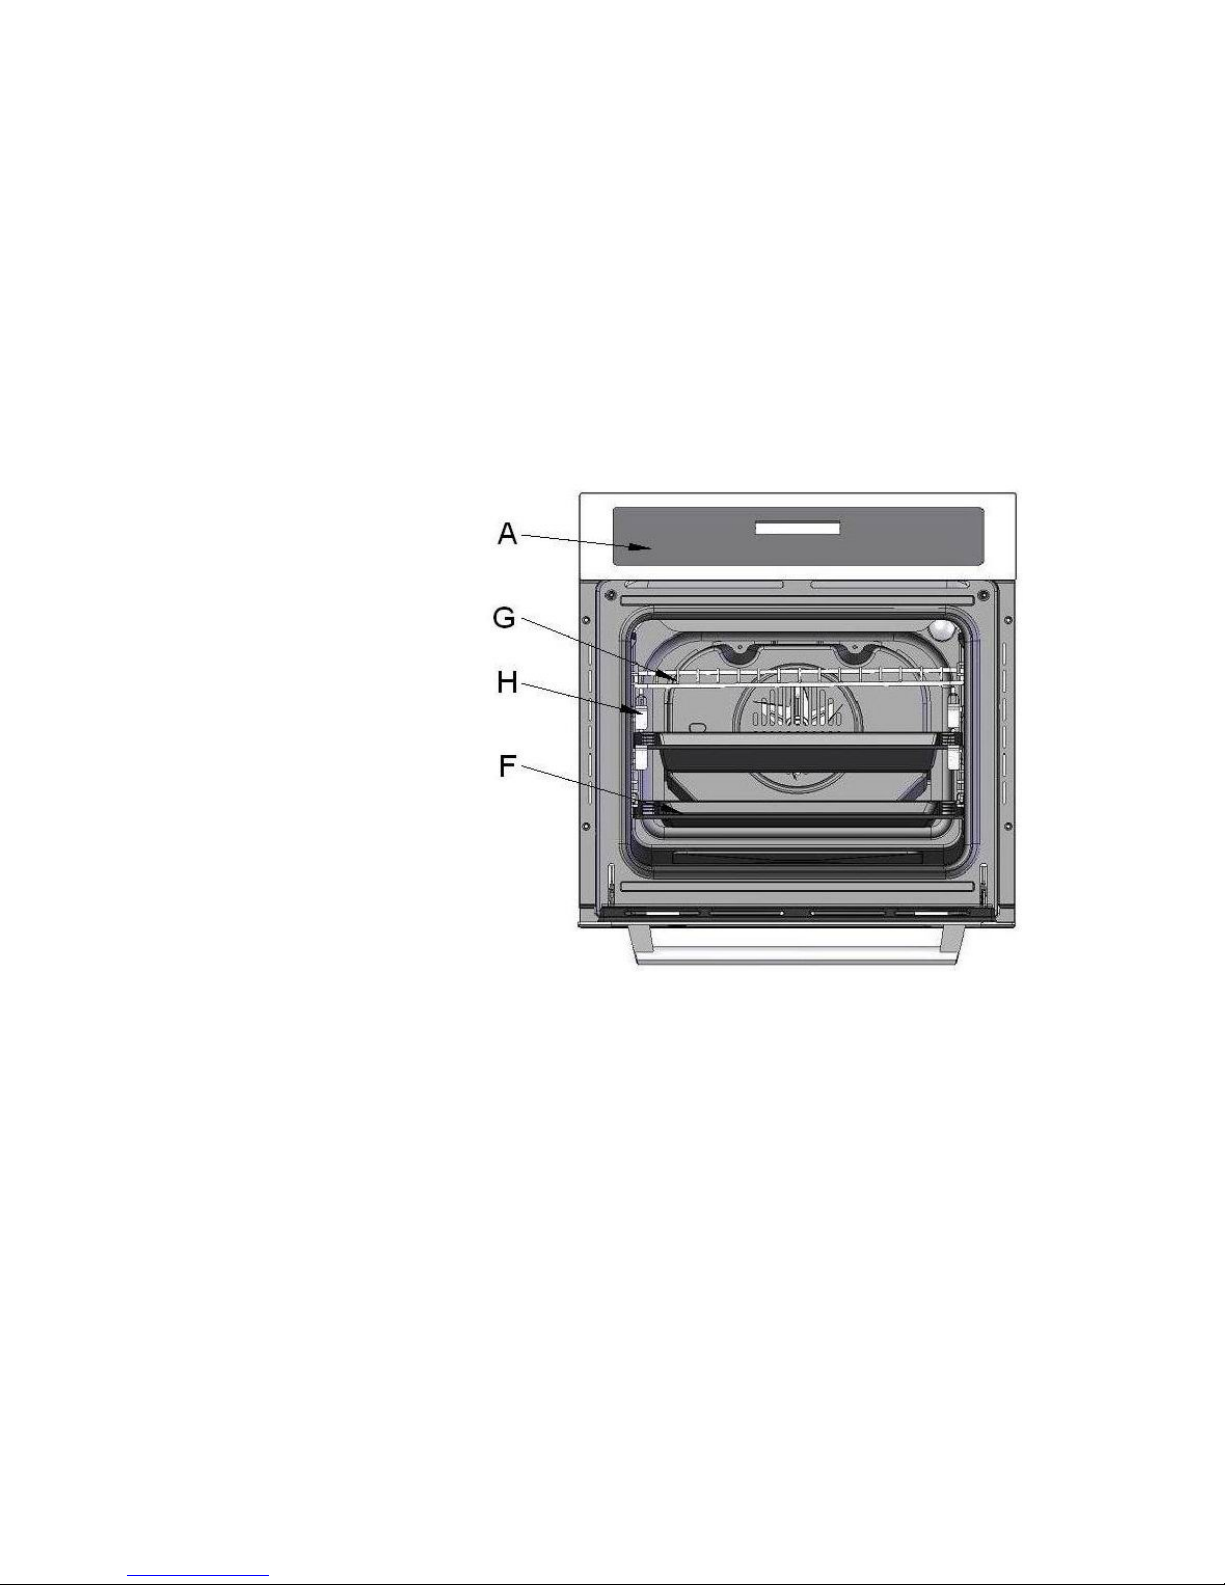
Close-up view
A. Control Panel
G. Oven Rack
H. Guides for sliding the racks or dripping in and out
F. Dripping Pan or Baking Sheet
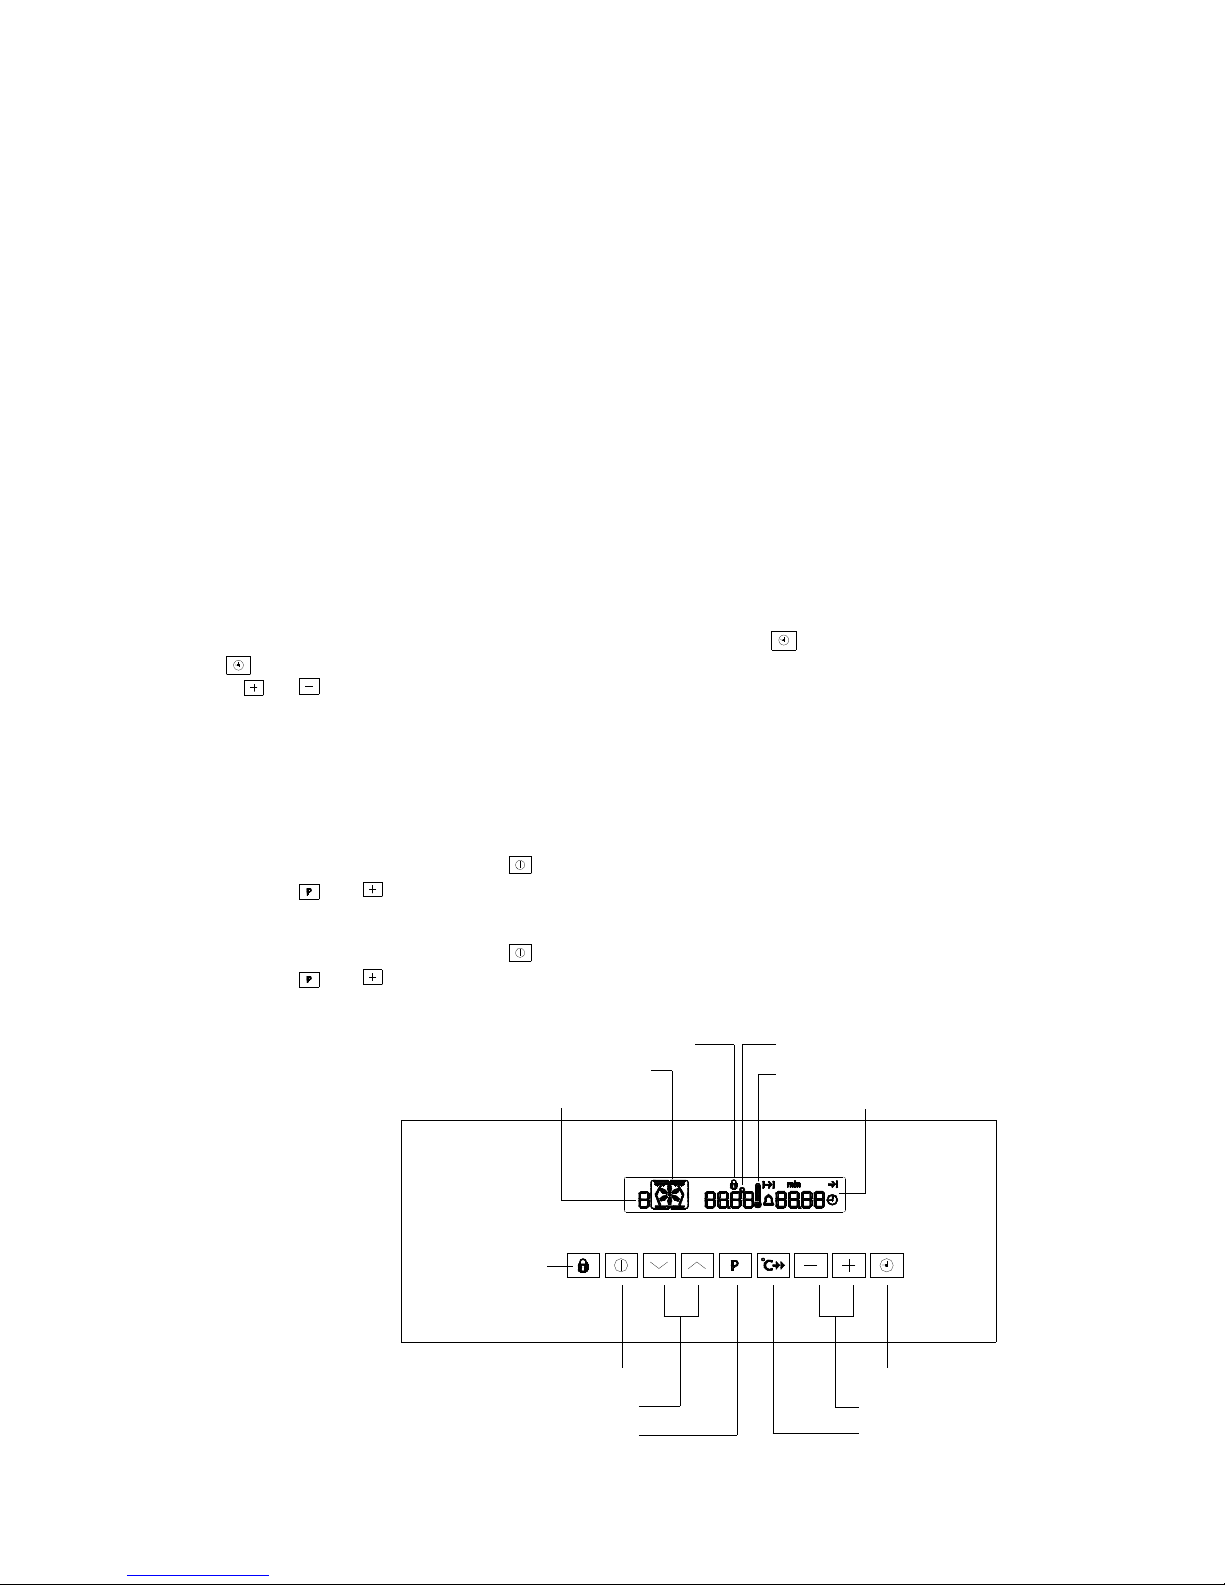
Memory function
Child safety device
ON/OFF button
Oven function selection
Clock Functions
Selector buttons
Oven Functions
Clock functions/Operating time
Thermometer symbol
Temperature
Memory: P / Test: d
Speekcook
Child safety device
How to use your oven
This multifunction oven combines the advantages of traditional convection oven with those of the more modern
fan assisted models in a single appliance.
It is an extremely versatile appliance that allows you to choose easily and safely between different cooking
modes.
Notice: The first time you use your appliance, we recommend that you set the thermostat to the highest setting
and leave the oven on for about half an hour with nothing in it, with the oven door shut. Then open the oven door
and let the room air in. The odor that is often detected during this initial use is due to the evaporation of
substances used to protect the oven during storage and until it is installed.
Notice: Place the dripping pan provided on the bottom shelf of the oven to prevent any sauce and/or grease from
dripping onto the bottom of the oven only when grilling food or when using the rotisserie (only available on certain
models). For all other types of cooking, never use the bottom shelf and never place anything on the bottom of the
oven during operation as this could damage the enamel finishing. Always place your cookware (dishes, aluminum
foil, etc. etc.) On the grid provided with the appliance inserted especially along the oven guides.
Before using for the first time
Setting and changing the current time
The oven only operates when the time has been set.
When the appliance is connected to the electrical supply or when there has been a power cut,the symbol for Time
flashes automatically.
1. To change a time that has already been set, press the Clock functions button repeatedly until the symbol
for Time flashes.
2. Using the or button, set the current time.
After about 5 seconds, the flashing stops and the clock displays the time of day set.
The appliance is now ready for use.
Getting to know the appliance
The appliance can be operated in test mode for testing or performing all operating steps. The oven will not heat
up during the test.
Switching on the test mode
1. Switch off the appliance using the On/Off button.
2. Press and hold and buttons at the same time until an acoustic signal is heard and “d” lights up in the
display.
Switching off the test mode
1. Switch off the appliance using the On/Off button.
2. Press and hold and buttons at the same time until an acoustic signal is heard and “d” goes up in the
display.
Operating the Oven
The Electronic Oven Control

General instructions
· Always switch the appliance on first by pressing the On/Off button.
· When the selected function is lit, the oven begins to heat up or the time set begins to count down.
· When the selected temperature is reached, an audible signal sounds.
· The oven light is switched on as long as an oven function is started.
The oven light is goes off after 10 minutes when the appliance switched off automatically.
· Switch appliance off using the On/Off button.
Selecting the oven function
1. Switch on the oven with the On/Off button.
2. Press the or button repeatedly until the desired oven function appears.
····A suggested temperature appears on the temperature display.
····If the suggested temperature is not changed within approx. 5 seconds, the oven begins to heat up.
Changing the oven temperature
Press the or button, to raise or lower the temperature.
The setting changes in steps of 5 ℃.
Thermometer symbol
····The slowly rising thermometer symbol indicates how hot the oven is as it heats up.
····The three segments of the thermometer symbol show that Fast Warm Up is working.
Changing the oven function
To change the oven function, Press the or button repeatedly until the desired oven function is displayed.
Switching off the oven
Switch off the appliance using the On/Off button.
Speedcook
After an oven function is selected, with the use of the additional function Speedcook the empty oven can be
pre-heated in a relatively shore time.
Important: Do not put the food to be cooked into the oven, until Speedcook is completed and the oven is
operating using the desired function.
1. Set the desired function. If necessary, change the suggested temperature.
2. Press the Speedcook button. The symbol lights up:
The bars flashing one after another show that Speedcook is operating.
When the temperature set is reached, the bars of the heat indicator light up. An audible signal sounds. The
symbol goes out.
The oven now continues heating according to the pre-set oven function and temperature. You can now place
the food in the oven.
Memory function
The Memory function can be used to save a setting which is frequently used.
1. Set oven function, temperature and If necessary the clock functions Clock time and/or End time .
2. Press and hold the button for approx. 2 seconds, until an acoustic signal sounds. The setting is saved.
To save another setting, press the button for approx. 2 seconds. The previously saved setting is replaced
by the new one.
Starting the Memory function
1. Switch the oven on using the button On/Off .
2. Using the button call up the saved setting.
Clock Functions
Countdown
To set a countdown. A signal sounds after the time has elapsed.

This function does not affect the operation of the oven.
Cook time
To set how long the oven is to be in use.
End time
To set when the oven is to switch off again.
Time
To set, change or check the time (See also section “Before Using for the First Time”)
General instructions
· After a clock function has been selected, the corresponding symbol flashes for approx. 5 seconds.During this
time,the desired times can be set or modified using the or button.
· When the desired times has been set,the symbol continues to flash for approx. 5 seconds. After this the symbol
lights up.The set Countdown begins to count down.
· The time set for Cook time and End time begins to count down after the selected function starts.
Countdown
1. Press the Clock Functions button repeatedly until the symbol for Countdown flashes.
2. Set the desired Countdown time using the or button (max.99.00minutes).
After approx. 5 seconds the display shows the time remaining.
The symbol for Countdown lights up.
When the time set has elapsed, an audible signal sounds for 2 minutes. “0.00”lights up and the symbol for
Countdown flashes.
To turn off the audible signal:
Press any button.
Cook time
1. Select oven function and using or button select temperature.
2. Press the Clock Functions button repeatedly until the symbol for Clock time flashes.
3. Using the or button set the desired cooking time.
The oven switches itself on. The symbol for Cook time lights up.
By repeatedly pressing the Clock Functions button, the current time can be called up.
When the time has elapsed, an audible signal sounds for 2 minutes.
The oven switches itself off.
“0.00”is displayed and the symbol for Cook time flashes.
To turn off the audible signal:
Press any button.
End time
1. Select oven function and using or button select temperature.
2. Press the Clock Functions button repeatedly until the symbol for End time flashes.
3. Using the or button set the desired switch-off time.
The symbols for End time and Cook time light up.
The oven will automatically switch itself on.
By repeatedly pressing the Clock Functions button, the current time can be called up.
When the time has elapsed, an audible signal sounds for 2 minutes.
The oven switches itself off.
“0.00”is displayed and the symbols for End time and Cook time flash.
To turn off the audible signal:
Press any button.
Cook time and End time combined
Cook time and End time can be used simultaneously, if the oven is to be switched on and off automatically
at a later time.
1. Select oven function and temperature.
2. Using the Cook time function, set the time that the dish needs to cook,
 Loading...