

Page 1

Users Manual
®
Retina
Network Security Scanner
Page 2

Retina Users Manual
Warranty
This document is supplied on an "as is" basis with no warranty and no support.
Limitations of Liability
In no event shall eEye Digital Security be liable for errors contained herein or for any direct, indirect, special,
incidental or consequential damages (including lost profit or lost data) whether base d on warranty, contract, tort, or
any other legal theory in connection with the furnishing, performance, or use of this material.
The information contained in this document is subject to change without notice.
No trademark, copyright, or patent licenses are expressly or implicitly granted (herein) with this manual.
Disclaimer
All brand names and product names used in this document are trademarks, registered trademarks, or trade names of
their respective holders. eEye Digital Security is not associated with any other vendors or products mentio ned in this
document.
Retina
© 2004-2005 eEye Digital Security. All rights reserved. | R-M-031405
This document contains information, which is protected by copyright. No part of this document may be photocopied,
reproduced, or translated to another language without the prior written consent of eEye Digital Security.
®
Network Security Scanner Users Manual
Collateral Information
For the latest updates to this document, please visit:
http://www.eeye.com/partners
Revision: 5-2-12
i
Page 3

Table of Contents
Retina Users Manual
Table of Contents
Table of Contents.............................................................................................................................................................i
Introduction.....................................................................................................................................................................1
Preface ..........................................................................................................................................................................1
Audience........................................................................................................................................................................1
Customer Support .........................................................................................................................................................1
Conventions Used in this Manual..................................................................................................................................1
Collateral Information ....................................................................................................................................................1
Installation.......................................................................................................................................................................1
Installation Requirements..............................................................................................................................................1
Installing Retina from the CD-ROM...............................................................................................................................1
Opening the Installation Wizard with Run Dialog..........................................................................................................7
Installing Retina from the Command Line.....................................................................................................................8
Uninstalling Retina.......................................................................................................................................................10
Uninstalling Retina from the Command Line...............................................................................................................12
Retina Sessions...........................................................................................................................................................13
Starting Retina.............................................................................................................................................................13
Startup Message................................................................................................................................................13
Using the Retina Interface...........................................................................................................................................13
Menu Bar.....................................................................................................................................................................13
Shortcut Bar.................................................................................................................................................................13
Status Bar....................................................................................................................................................................15
Tabs Pane...................................................................................................................................................................15
Options Dialog.............................................................................................................................................................15
Using the Getting Started Wizard................................................................................................................................16
Using the Discover Tab................................................................................................................................................25
Accessing the Discover Tab........................................................................................................................................25
Starting a Discovery Scan...........................................................................................................................................26
Creating a New Address Group from Scan Results....................................................................................................28
Appending to an Existing Address Group...................................................................................................................29
Clearing Discovered Items ..........................................................................................................................................30
Sorting the Scan Results.............................................................................................................................................30
Using the Audit Tab......................................................................................................................................................32
Accessing the Audit Tab..............................................................................................................................................32
Starting an Audit Scan.................................................................................................................................................33
Audit Results......................................................................................................................................................35
Creating and Modifying Groups...................................................................................................................................37
Port Groups........................................................................................................................................................37
Address Groups.................................................................................................................................................38
Audit Groups......................................................................................................................................................39
Always Groups...................................................................................................................................................40
Credential Management..............................................................................................................................................40
Overview............................................................................................................................................................40
Deployment/Installation Decisions.....................................................................................................................40
Local Access to non-Windows™ devices..........................................................................................................40
Managing Credentials........................................................................................................................................42
Using the Remediate Tab.............................................................................................................................................44
Accessing the Remediate Tab ....................................................................................................................................44
i
Page 4

Table of Contents
Retina Users Manual
Generating a Remediation Report...............................................................................................................................45
Printing a Remediation Report....................................................................................................................................46
Editing a Remediation Report in Microsoft Word™.....................................................................................................46
Saving a Remediation Report .....................................................................................................................................46
Using the Report Tab....................................................................................................................................................47
Accessing the Report Tab...........................................................................................................................................47
Generating a Report....................................................................................................................................................48
Printing a Report..........................................................................................................................................................49
Saving a Report...........................................................................................................................................................49
Scheduling Scan Jobs..................................................................................................................................................50
Using the Scan Jobs Pane...........................................................................................................................................52
Completing Scan File Procedures ..............................................................................................................................54
Opening a Scan File....................................................................................................................................................54
Deleting a Scan File ....................................................................................................................................................54
Options...........................................................................................................................................................................55
Customizing Retina .....................................................................................................................................................55
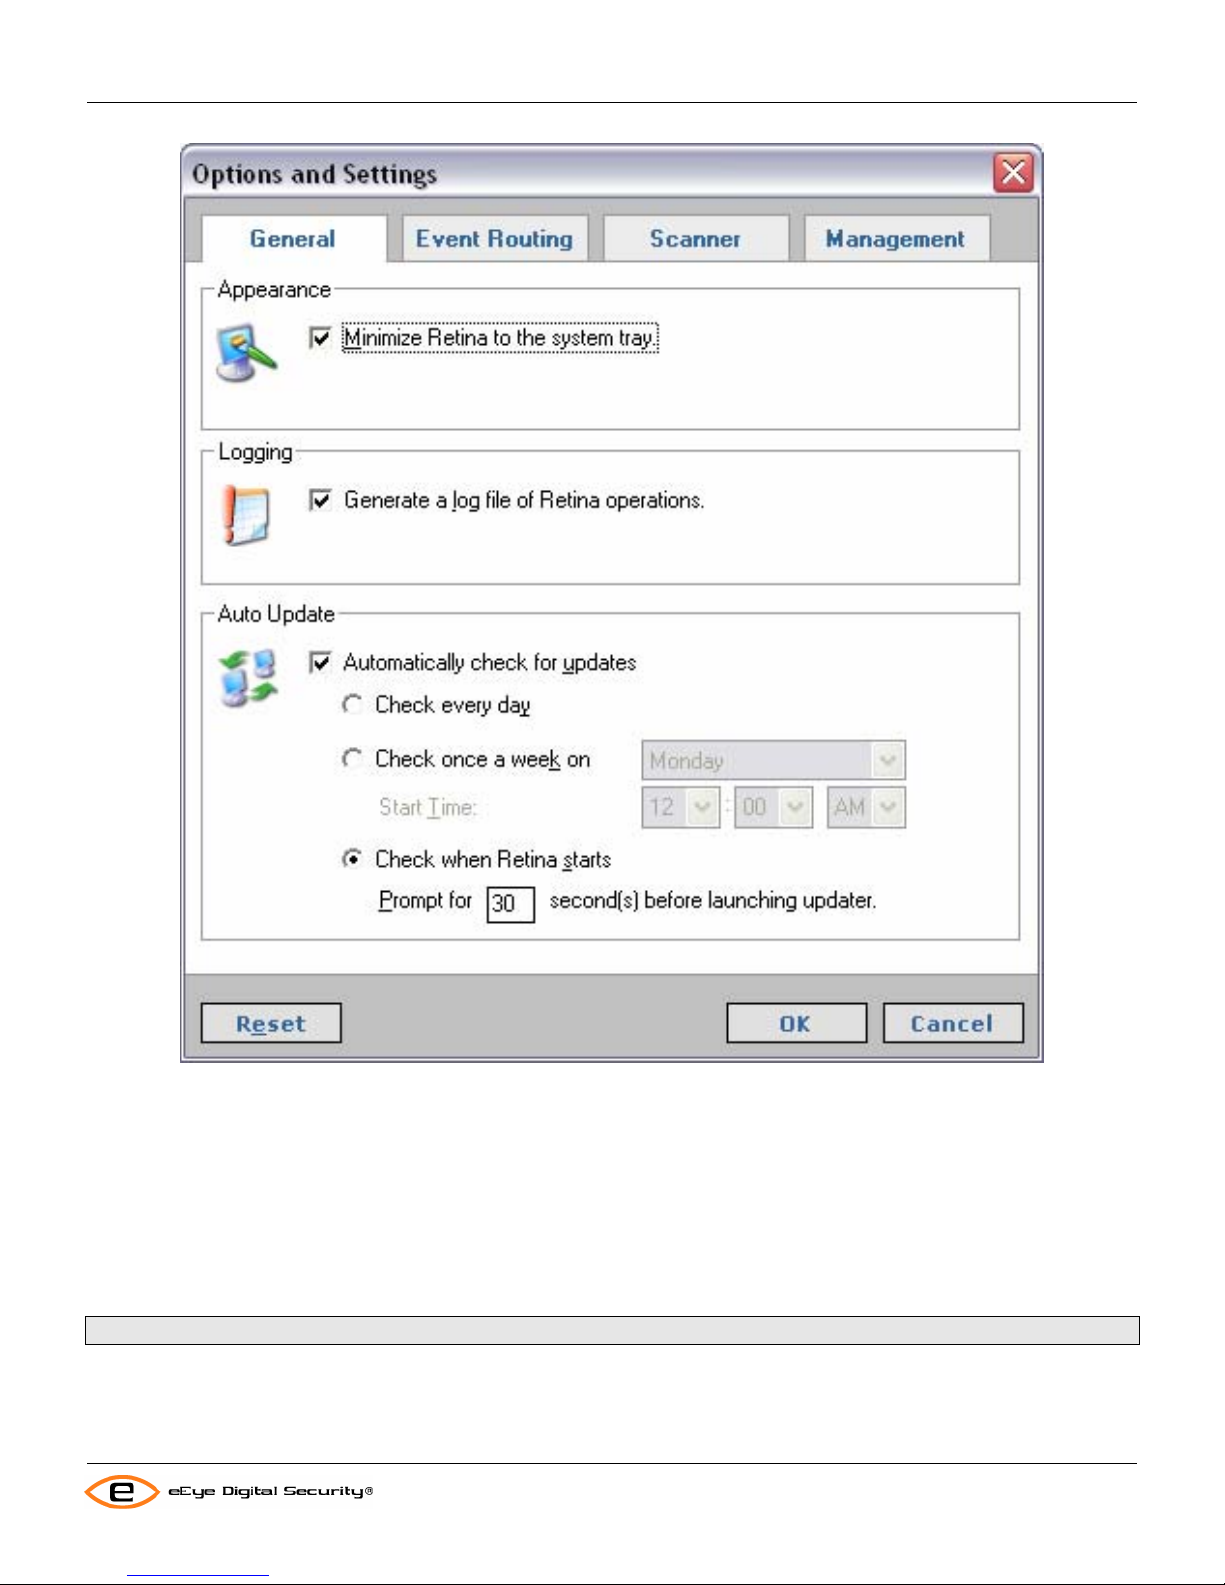
General Options ..........................................................................................................................................................55
Appearance........................................................................................................................................................56
Logging..............................................................................................................................................................56
Auto Update.......................................................................................................................................................57
Central Policy.....................................................................................................................................................57
Event Routing..............................................................................................................................................................57
REM...................................................................................................................................................................57
OPSEC ..............................................................................................................................................................57
Scanner.......................................................................................................................................................................57
Performance ......................................................................................................................................................58
Reliability............................................................................................................................................................59
Retina Extras.................................................................................................................................................................60
Using a DSN to Store Session Data............................................................................................................................60
Viewing Previous Jobs from a DSN ............................................................................................................................60
Auto Update...................................................................................................................................................................61
What is Auto Update....................................................................................................................................................61
Manual Update ..............................................................................................................................................................62
License Management....................................................................................................................................................65
Running Retina for the First Time ...............................................................................................................................65
Migrating Retina to a New Machine ............................................................................................................................65
Terminating a License.................................................................................................................................................66
Retina Audit Wizard......................................................................................................................................................67
Using the Plugins Wizard.............................................................................................................................................79
Using Retina From the Command Line ......................................................................................................................80
Retina.exe: ..................................................................................................................................................................80
RetRPC_Client.exe .....................................................................................................................................................80
ii
Page 5

Table of Contents
Retina Users Manual
Glossary.........................................................................................................................................................................82
iii
Page 6

Introduction
Retina Users Manual
Introduction
Preface
The Retina Network Security Scanner is designed to work in conjunction with your existing systems, networks,
security packages, databases, and user interfaces. This enables you to proactively guard against intrusion by
regularly testing the integrity of your network to uncover and fix potential security weaknesses.
Audience
This manual is intended for network security administrators who are responsible for protecting their organization's
computing assets. Readers are expected to be familiar with networking and security concepts, and should be capable
of performing routine network administration tasks.
Customer Support
eEye customer support can be reached by completing a support request form on the Contacts or Support page of
our Web site at
site.
http://www.eeye.com/. The most up-to-date customer service information is posted on the eEye Web
Conventions Used in this Manual
The following list shows typographic and usage conventions of this manual:
Bold text represents commands, interface buttons, and dialog names, except when they appear in window examples
or the contents of files.
Purple underline text indicates a hypertext link to a topic within the manual or a Web site.
Monospace text represents context specific values including Windows™ NT path names.
Underline Character underline represents the shortcut key or key combination you can enter as a command to cause
the specified function to occur.
For example, if the command is Add rule, you can press the letter A on your keyboard to display the wizard that you
can use to create a rule.
Collateral Information
For the latest updates to this document, complete the following:
• Log in to
• Enter your Client Username and Password in the provided fields.
• Your Client Username and Password are provided in your purchase confirmation e-mail.
• Click the Product Documentation link.
https://www.eeye.com/clients from your Internet browser.
• Click the Retina User Manual link.
• Click save to download a copy of the manual.
• The Security Page displays links to eEye product user manuals.
• Click the link of the manual you want to view.
1
Page 7
Installation
Retina Users Manual
Installation
Installation Requirements
To install the eEye Retina Security Scanner, your server must meet at least the following minimum system
requirements:
• Windows NT™ Version 4.0 SP3 or higher (Windows 2000 or 2003 Server recommended)
• Internet Explorer™ Version 4.01 or higher
• 32 MB of memory
• 16 MB of free disk space
• Internet connection (optional for remote scanning, required for regular updates)
To install the eEye Retina Security Scanner, we recommend the following system:
• Windows 2000™ or 2003 Server
• Internet Explorer™ Version 5.5 or higher
• 512 mb of memory
• 1 gb of free disk space
• Internet connection
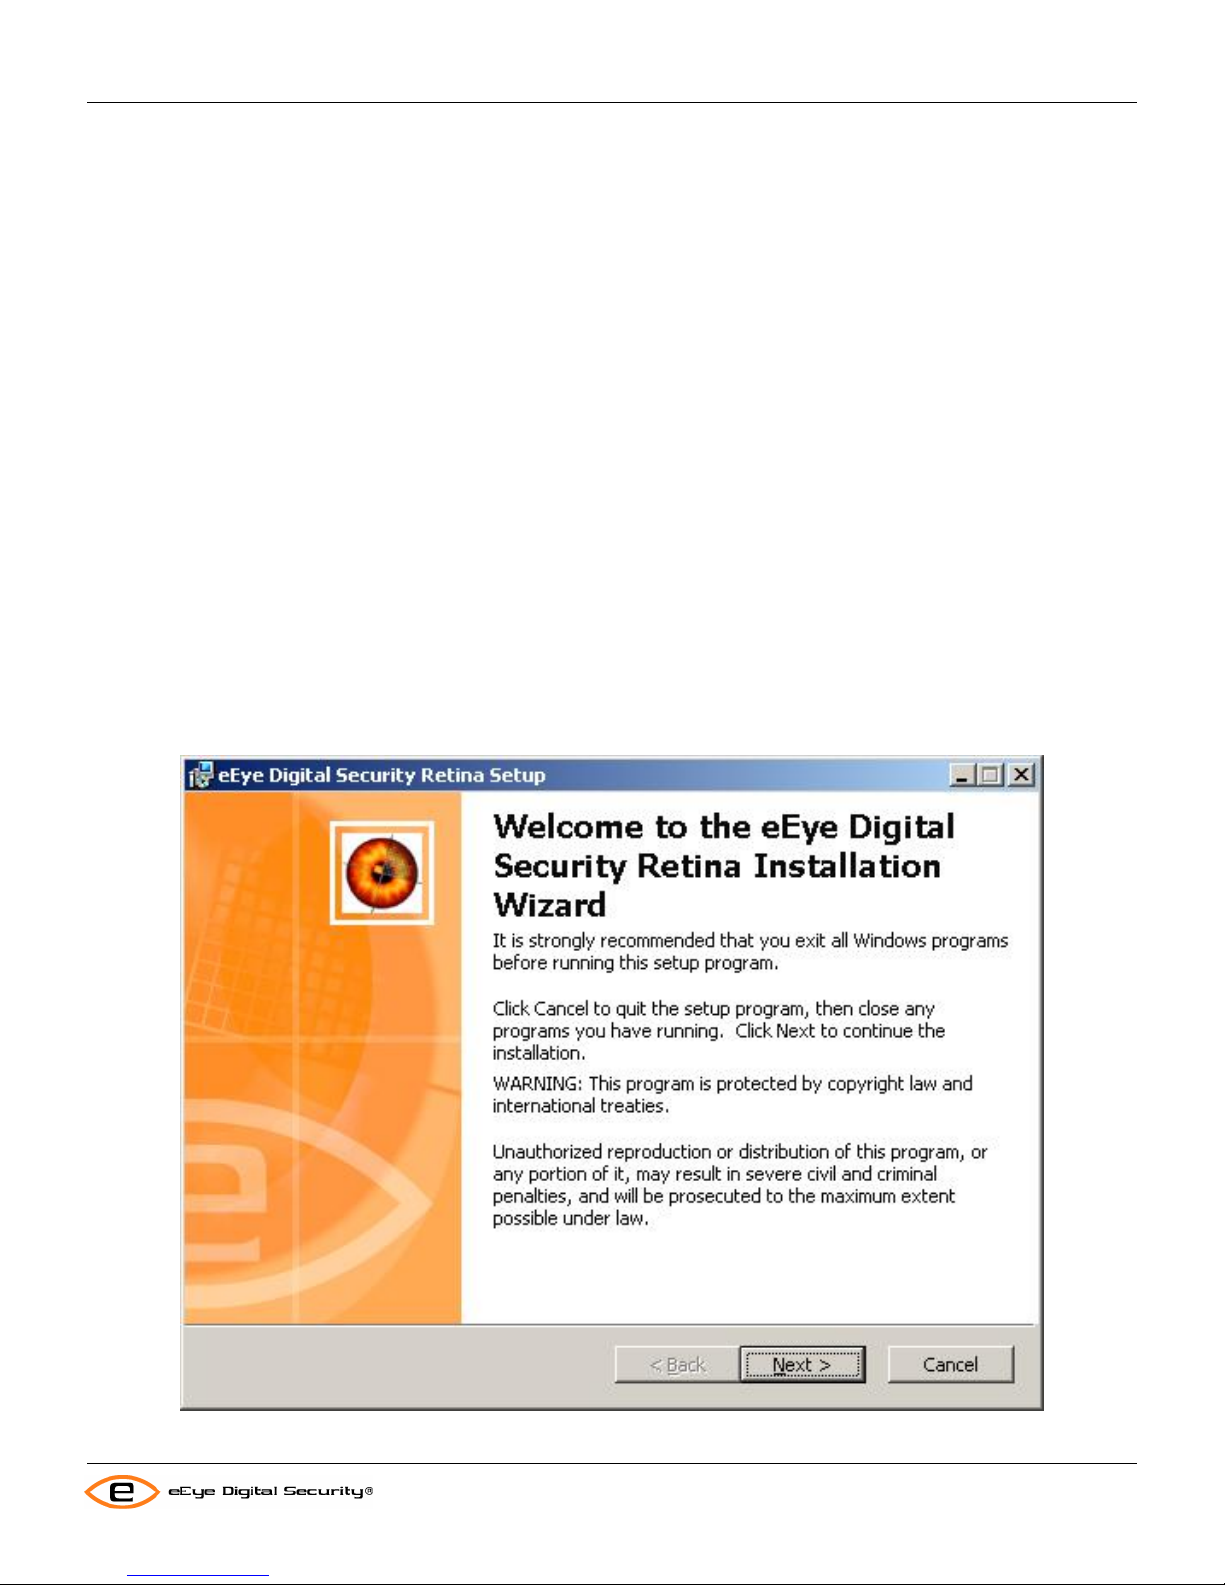
Installing Retina from the CD-ROM
If you meet the system requirements specified above, complete the following steps to install Retina from the provided
CD-ROM. eEye recommends that you exit all Windows™ programs before you run the Retina Installation Wizard
Insert the Retina CD into your workstation’s CD-ROM drive.
1. Select the CD-ROM drive, and then click
Note: If the Auto Play option is disabled for your CD-ROM drive, access the CD-ROM drive through
Windows™ Explorer or My Computer and double-click on the Ret i n a Setup.exe file.
The Welcome screen of the Retina Installation Wizard appears.
RetinaSetup.exe.
1
Page 8
Installation
Retina Users Manual
2. Click Next >.
The License Agreement window appears.
2
Page 9
Installation
Retina Users Manual
Review the End-User Software License Agreement.
You must accept the license agreement to continue using the Retina Installation Wizard.
3. Click Yes.
The Destination Folder window appears.
3
Page 10

Installation
Retina Users Manual
This window allows you to select the directory where the installation wizard will install the Retina files.
4. Do one of the following:
• Accept the default destination folder:
C:\Program Files\eEye Digital Security\Retina 5\.
• Click Browse, and select a folder where you want the Retina files to be installed.
5. Click Next >.
The Ready to Install the Application window appears.
4
Page 11
Installation
Retina Users Manual
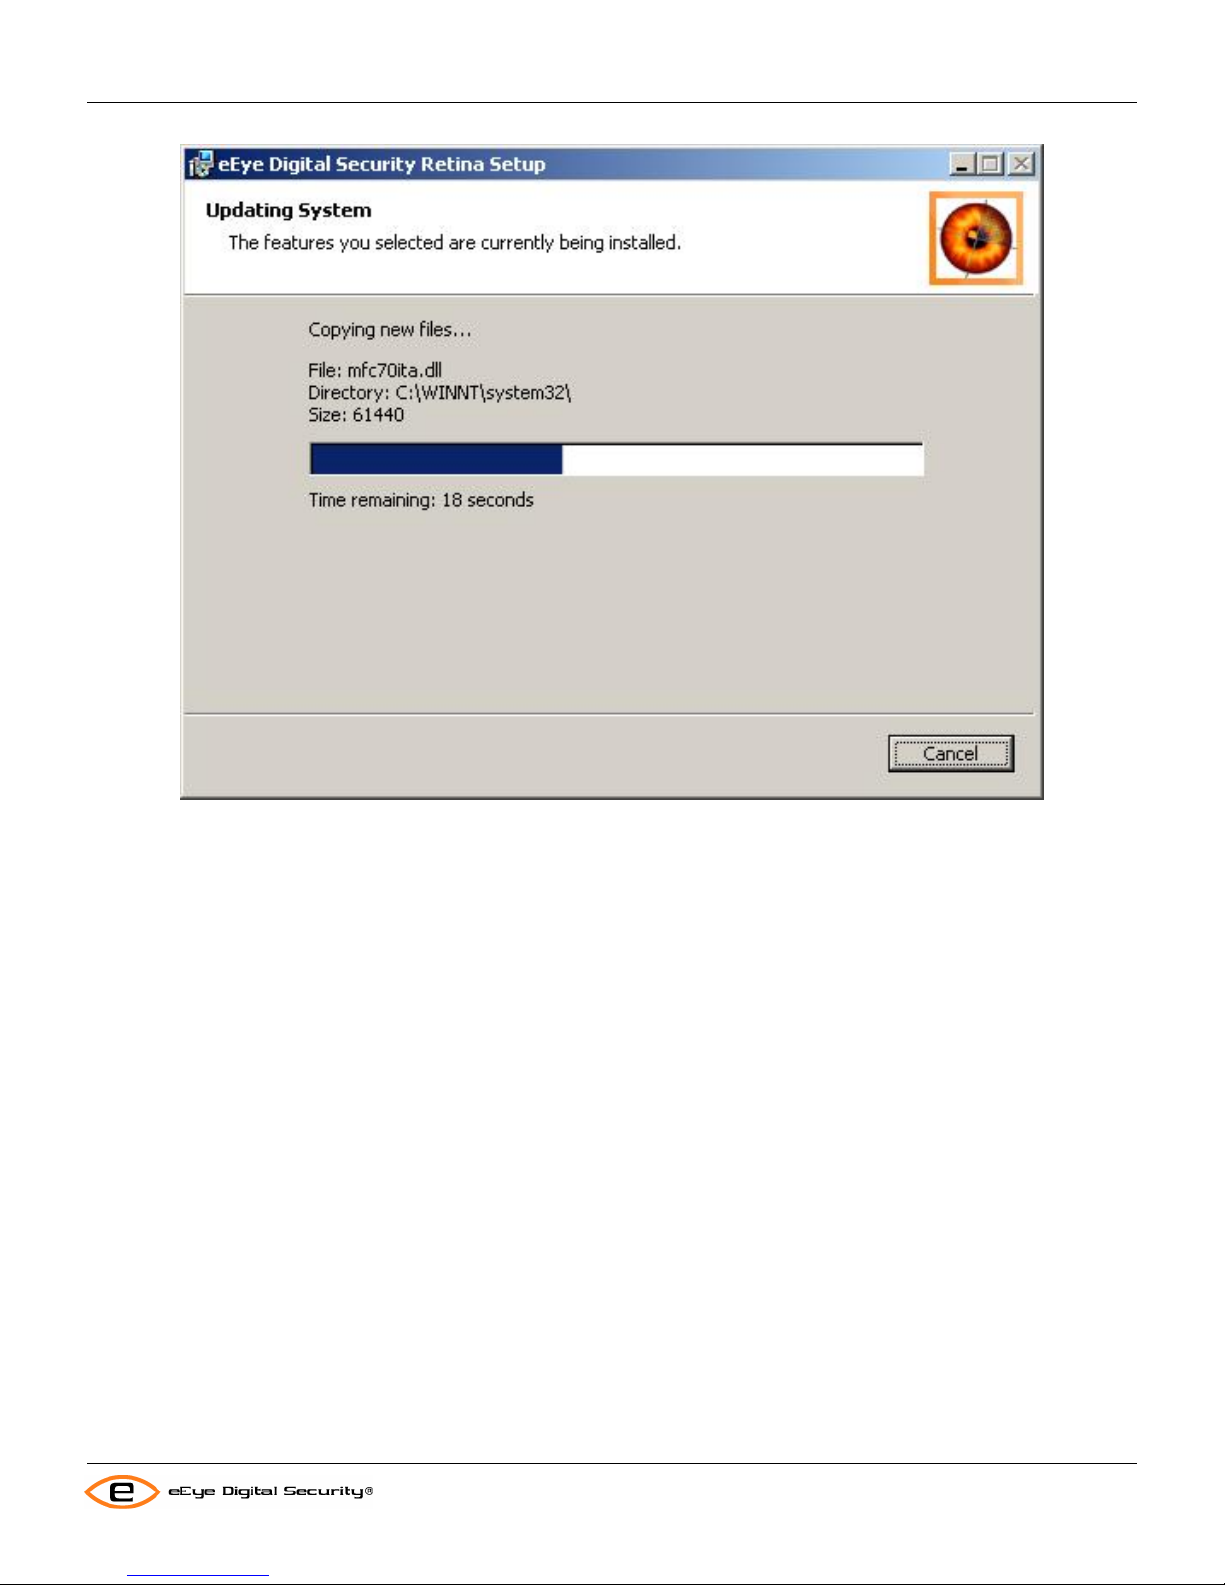
6. Click Next >.
The install program displays a progress bar and shows the files as the application copie s the m to your system.
5
Page 12
Installation
Retina Users Manual
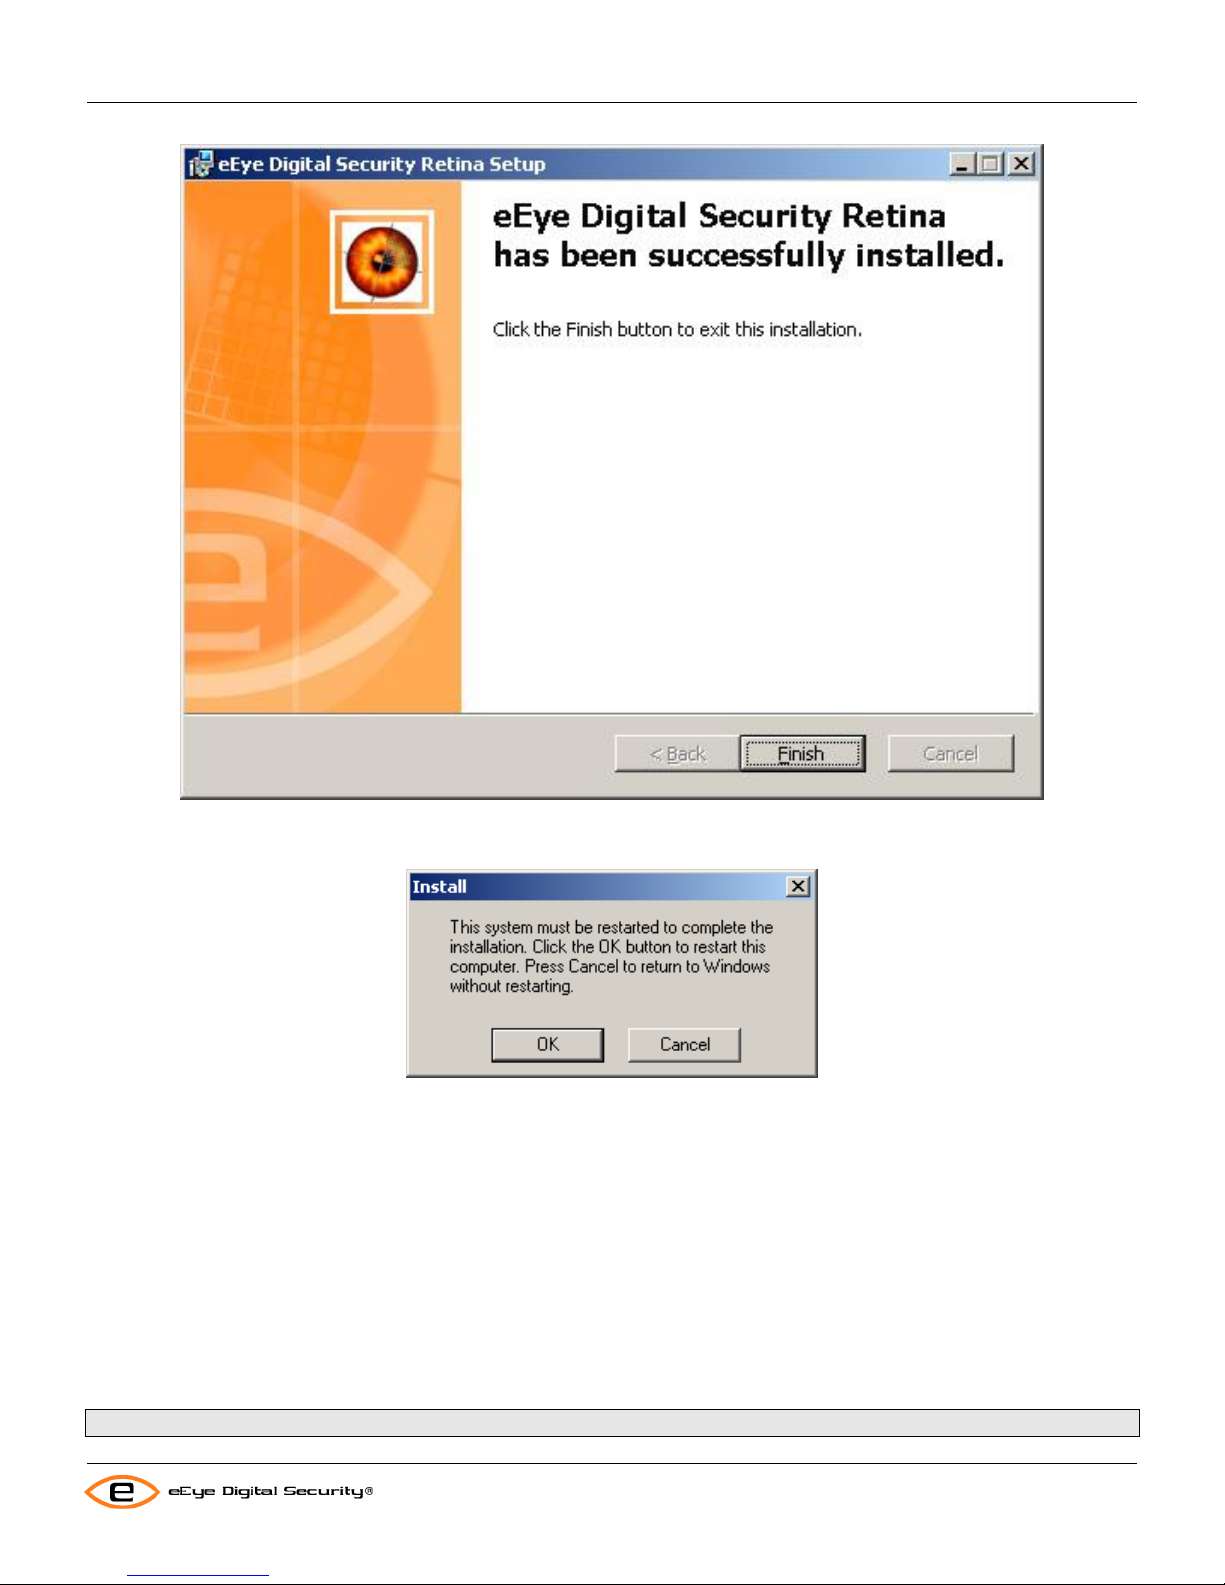
Once Retina is completely installed, the following screen displays to confirm a successful installation.
6
Page 13
Installation
Retina Users Manual
7. Click Finish.
The Retina Installation Wizard closes. If reboot is required the Installer Information window appears.
8. If the window appears, do one of the following:
• Click OK to have the installation program restart your system so the changes can take effect.
• Click Cancel if you plan to restart your system manually later.
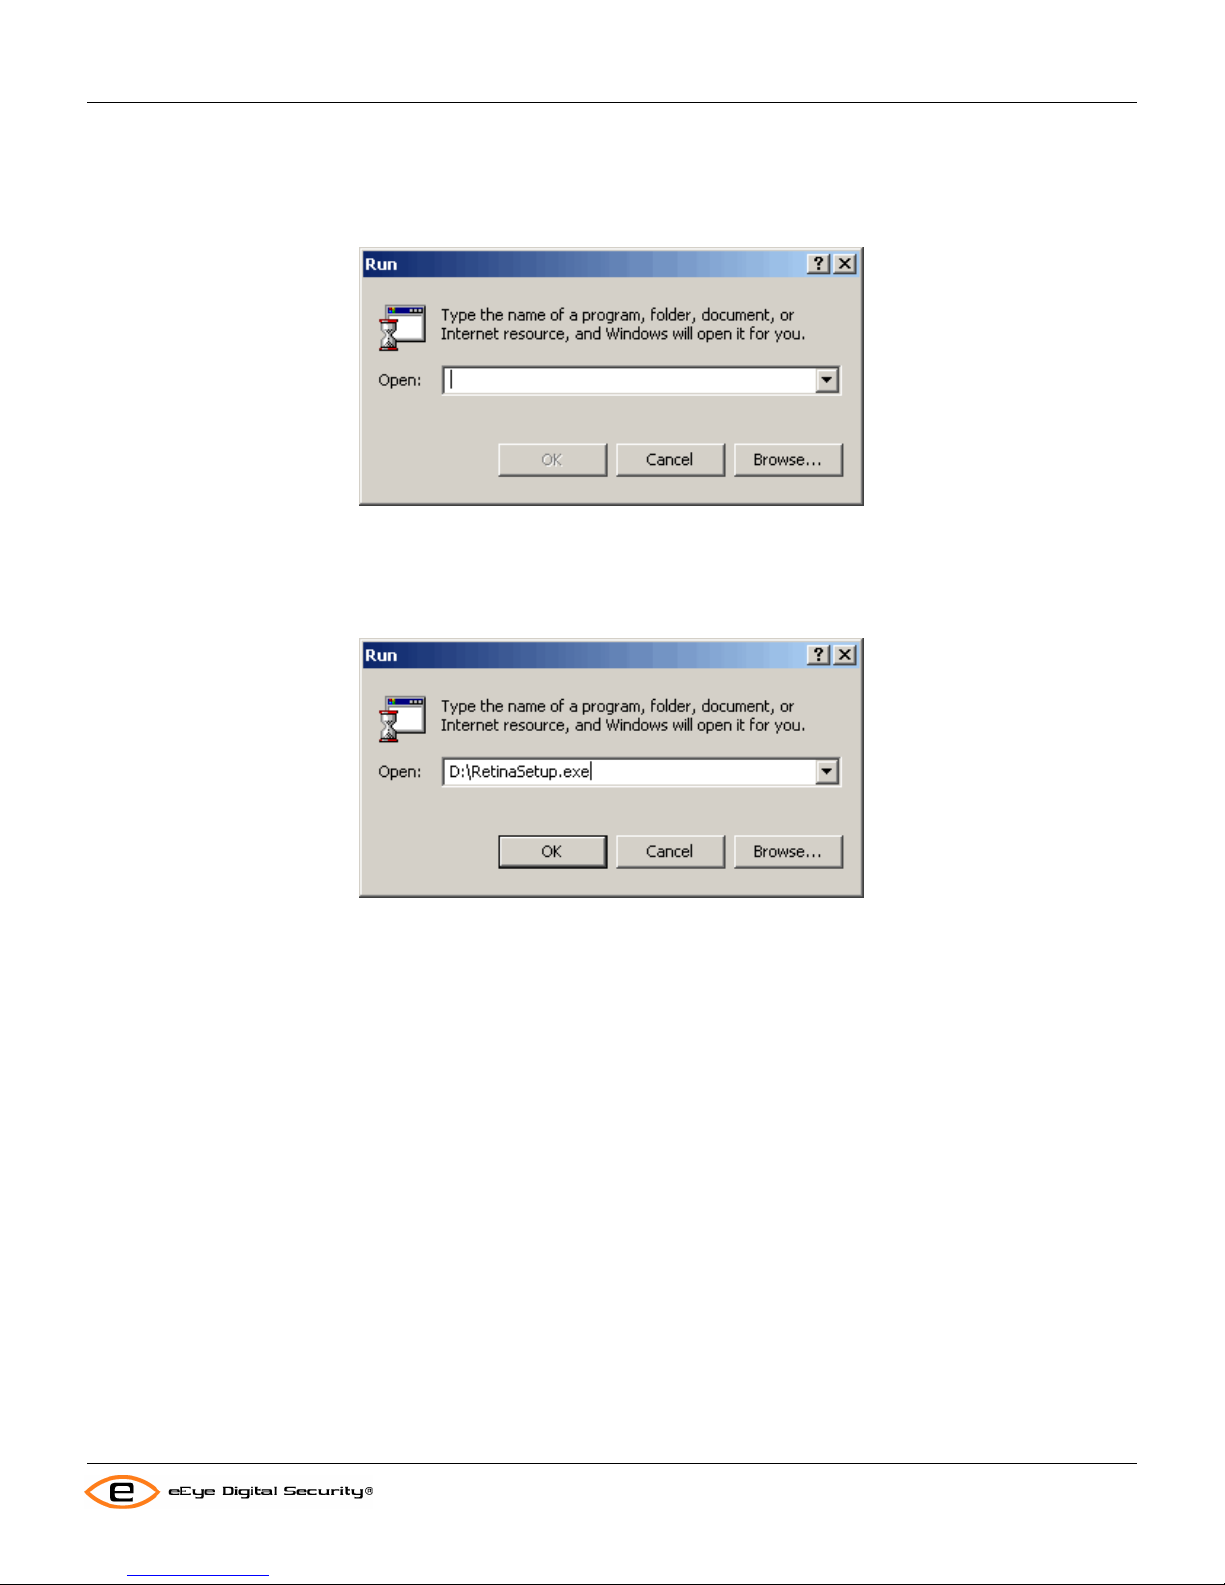
Opening the Installation Wizard with Run Dialog
Complete the following steps to open the Retina Installation Wizard from Windows™ Run Dialog rather than directly
off the CD-ROM. eEye recommends that you exit all Windows™ programs before you run the Retina Installation
Wizard.
Note: Make sure you have inserted the Retina CD into your workstation’s CD-ROM drive.
7
Page 14
Installation
1. Click the Windows™ Start button.
2. Click Run from the list of options.
The Run dialog box appears.
3. Type the drive letter of your CD-ROM drive.
For example, enter D:\ if your CD-ROM drive is the D drive.
Retina Users Manual
4. Type
In the following example, the entire path is D
5. Click OK.
One of the following occurs:
RetinaSetup.exe after the CD-ROM drive letter.
:\RetinaSetup.exe
• If you entered the correct path for RetinaSetup .exe, the Welcome window of the Retina Installation
Wizard appears.
• If you entered the incorrect path to RetinaSetup.ex e, an error message appears.
• If need be, complete the following steps to display the Welcome window of the Retina Installation Wizard:
• Click Browse.
• Find and double-click the Retina Setup icon.
• Click OK when the Run dialog box reappears and displays the path name you selected.
The following example is the Welcome window of the Retina Installation Wizard.
Installing Retina from the Command Line
Complete the following steps to open the Retina Installation Wizard from the Windows™ Command Prompt rather
than directly off the CD-ROM. eEye recommends that you exit all Windows™ programs before you run the Retina
Installation Wizard.
1. From the command prompt change directories to the location of RetinaSetup.exe (i.e. CD \windows\temp).
8
Page 15
Installation
Retina Users Manual
2. Then enter “RetinaSetup” and press enter.
At this point you can also use one or more of the following command line switches:
• REINSTALLMODE=”amus” – This will cause all files to be overwritten whether they are newer than the
installation files or not.
• /qn – Completely silent. No User interface is displayed. If a reboot is required, Windows Installer will
automatically reboot the system at the end of installation.
• /qb – Basic user interface. Only a progress dialog is displayed to the user. If a reboot is required, Windows
Installer will prompt the user to reboot.
• INSTALLDIR=”…” - Installation folder (where … is the path to install). Set this property to change the default
installation path.
• CREATEDESKTOPICON=”0” – Disables creation of a desktop icon for Retina. This option is enabled by
default. Set to 0 to prevent creation of the icon.
• CREATEQUICKLAUNCH=”0” – Disables creation of a quick launch icon for Retina. This option is enabled by
default. Set to 0 to prevent creation of the icon.
• /l*v “C:\RetinaInstallLog.txt” - Enables full logging. This should only be used for debugging if problems occur
during installation.
• REBOOT=”ReallySuppress” – Used to suppress the automatic reboot when using the /qn silent option above.
The reboot still needs to occur, for the software to run properly.
• SERIALNUMBER=”…” – Sets the serial number (where … is the actual serial number to use).
• CFPATH=”…” – Path for Common eEye Digital Security files such as eEye Auto Update. If another eEye
product is already installed, this parameter is ignored since the common path must be the same for all eEye
products.
3. The Welcome screen of the Retina Installation Wizard appears.
4. Continue from step 3 in Installing Retina from the CD-ROM (page
1).
9
Page 16
Installation
Retina Users Manual
6. Go to step 3 of Installing Retina from the CD-ROM for procedures on using the Retina Installation Wizard to
install Retina.
Uninstalling Retina
Complete the following steps to remove Retina from your workstation using the Retina Uninstall Wizard. eEye
recommends that you exit all Windows™ programs before you run the Retina Uninstall Wizard.
1. Click the Windows™ Start button.
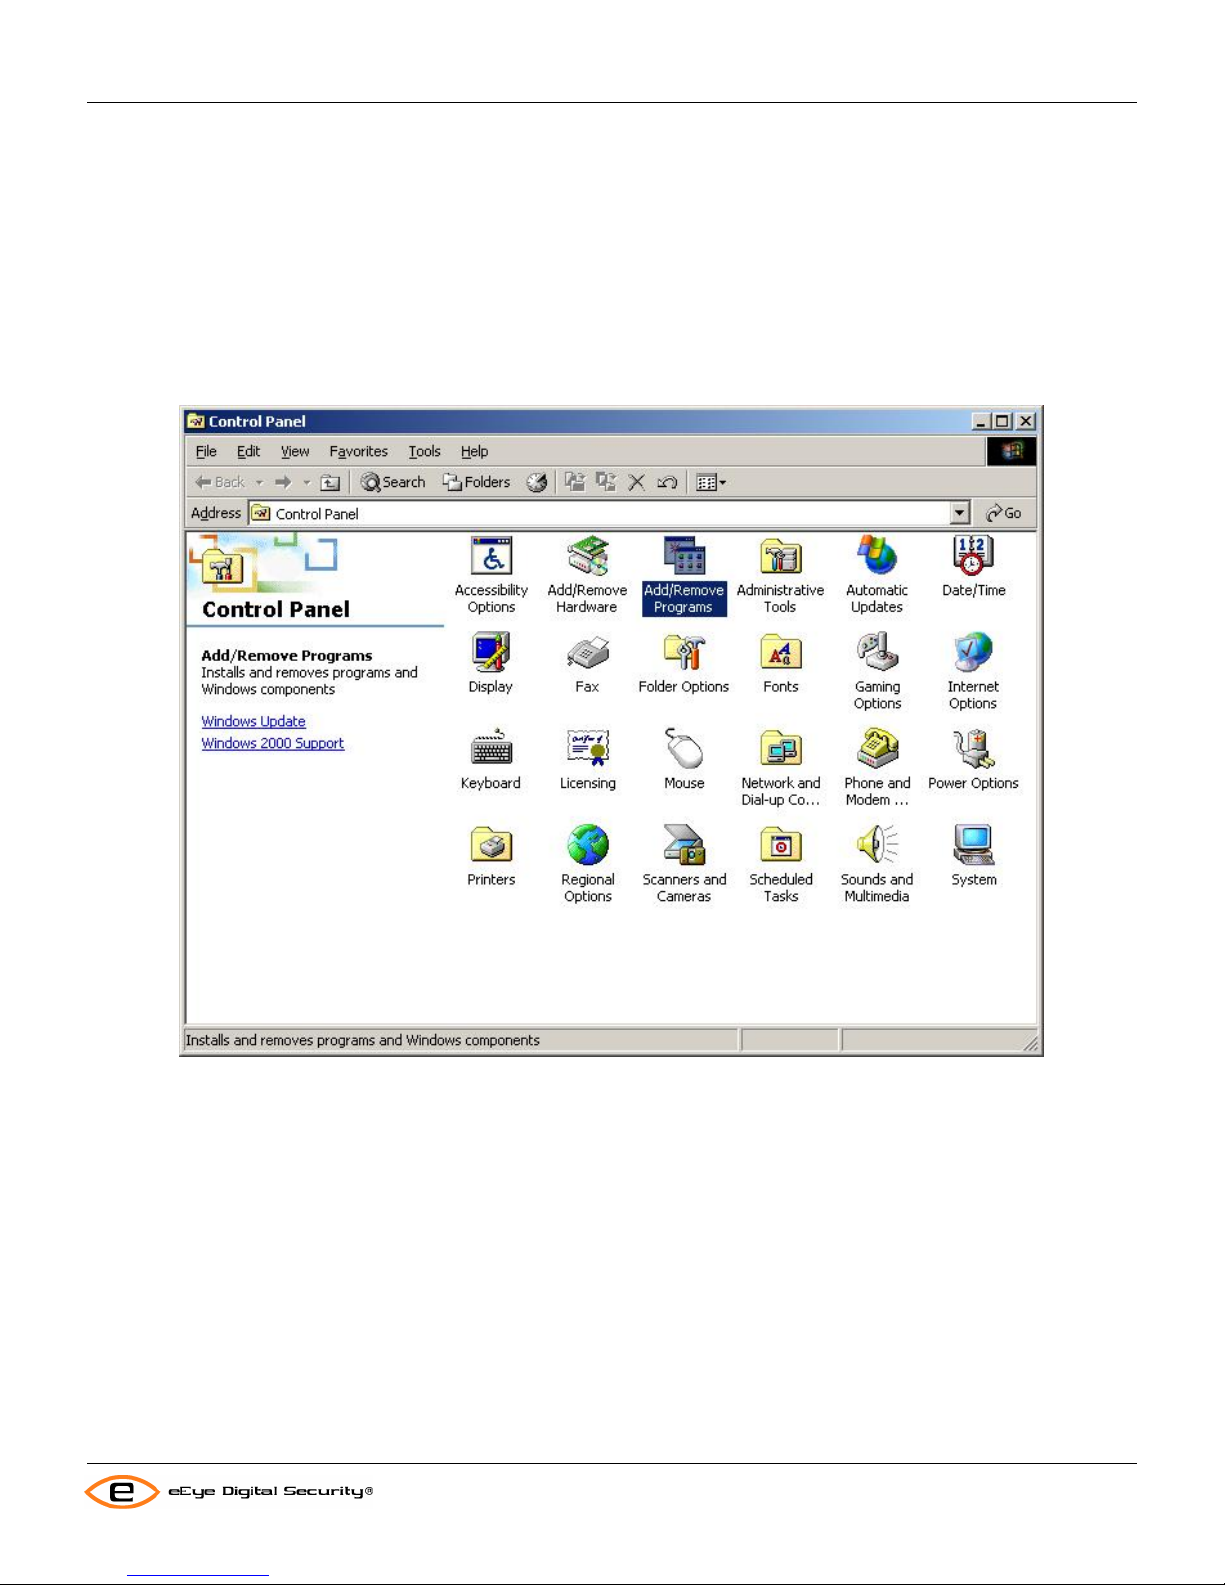
2. Go to Settings and click Control Panel.
The Control Panel appears.
3. Click Add/Remove Programs.
The Add/Remove Programs window appears.
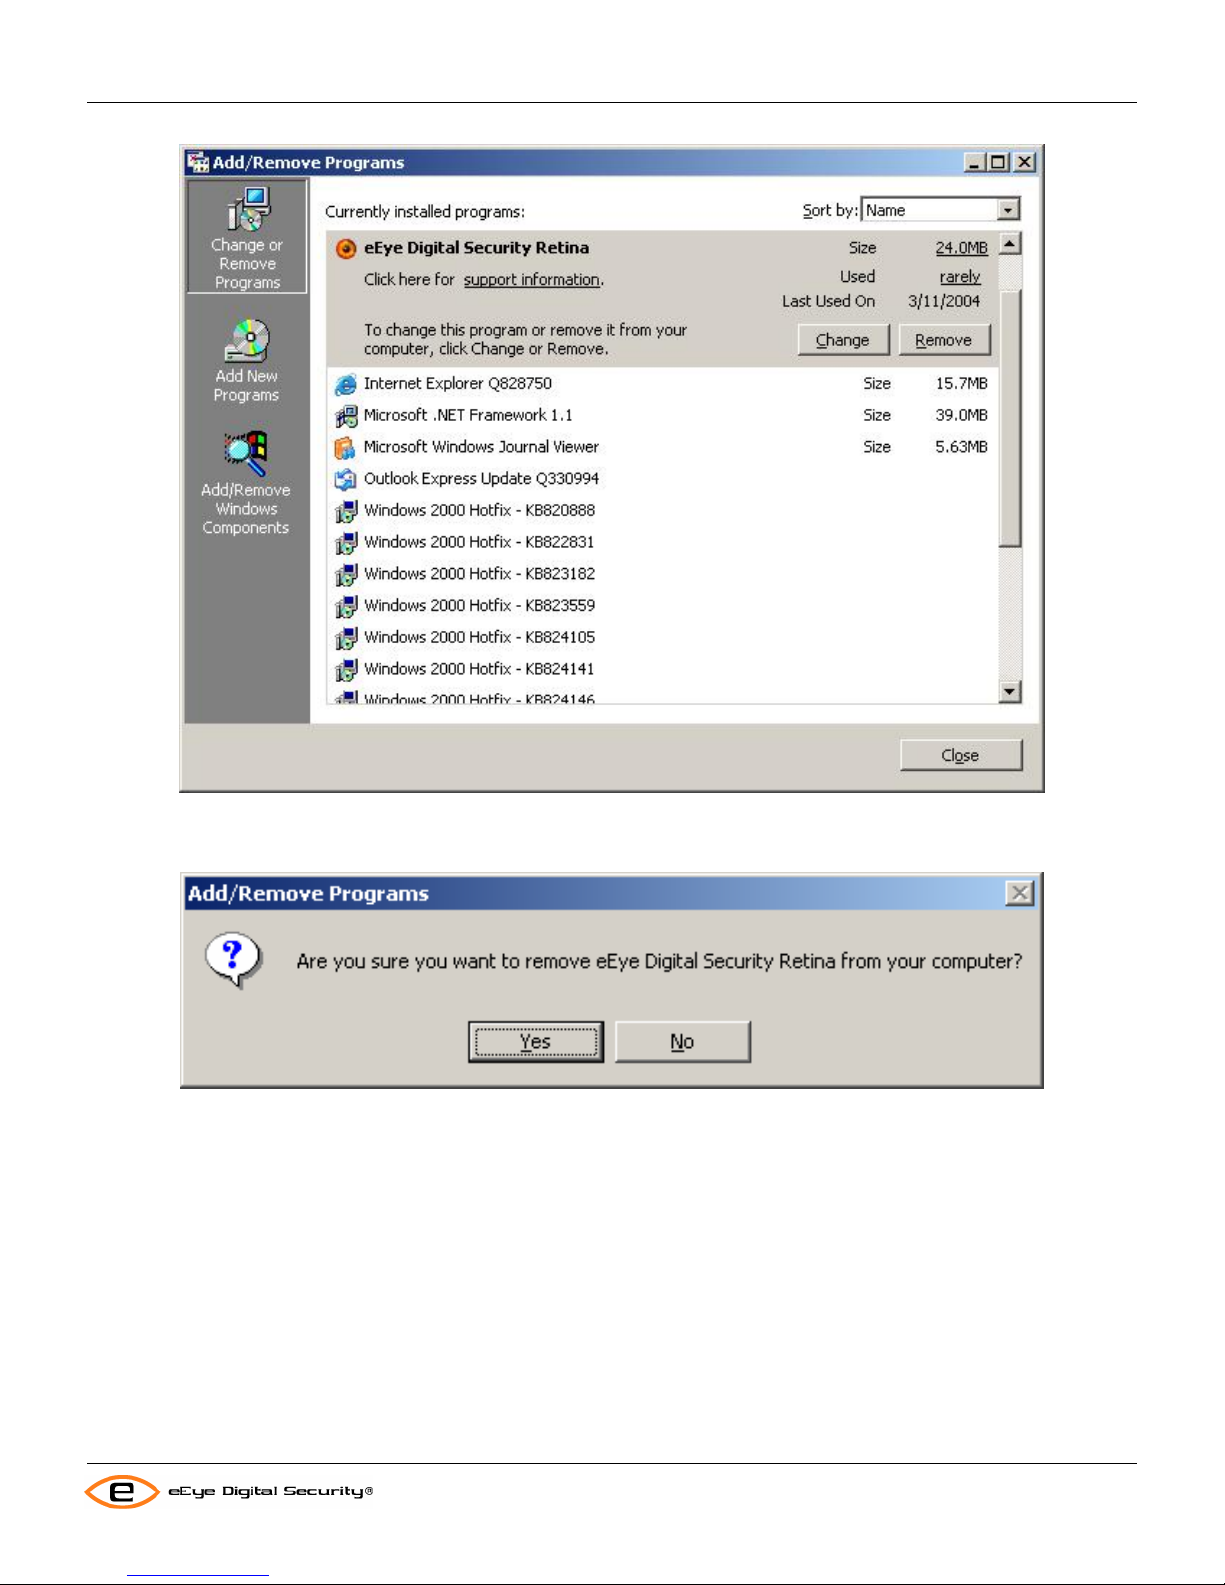
4. Click Retina from the list of installed programs.
10
Page 17
Installation
Retina Users Manual
5. Click Remove.
Windows™ displays a prompt to allow you to continue the uninstall of Retina. Select Yes to continue.
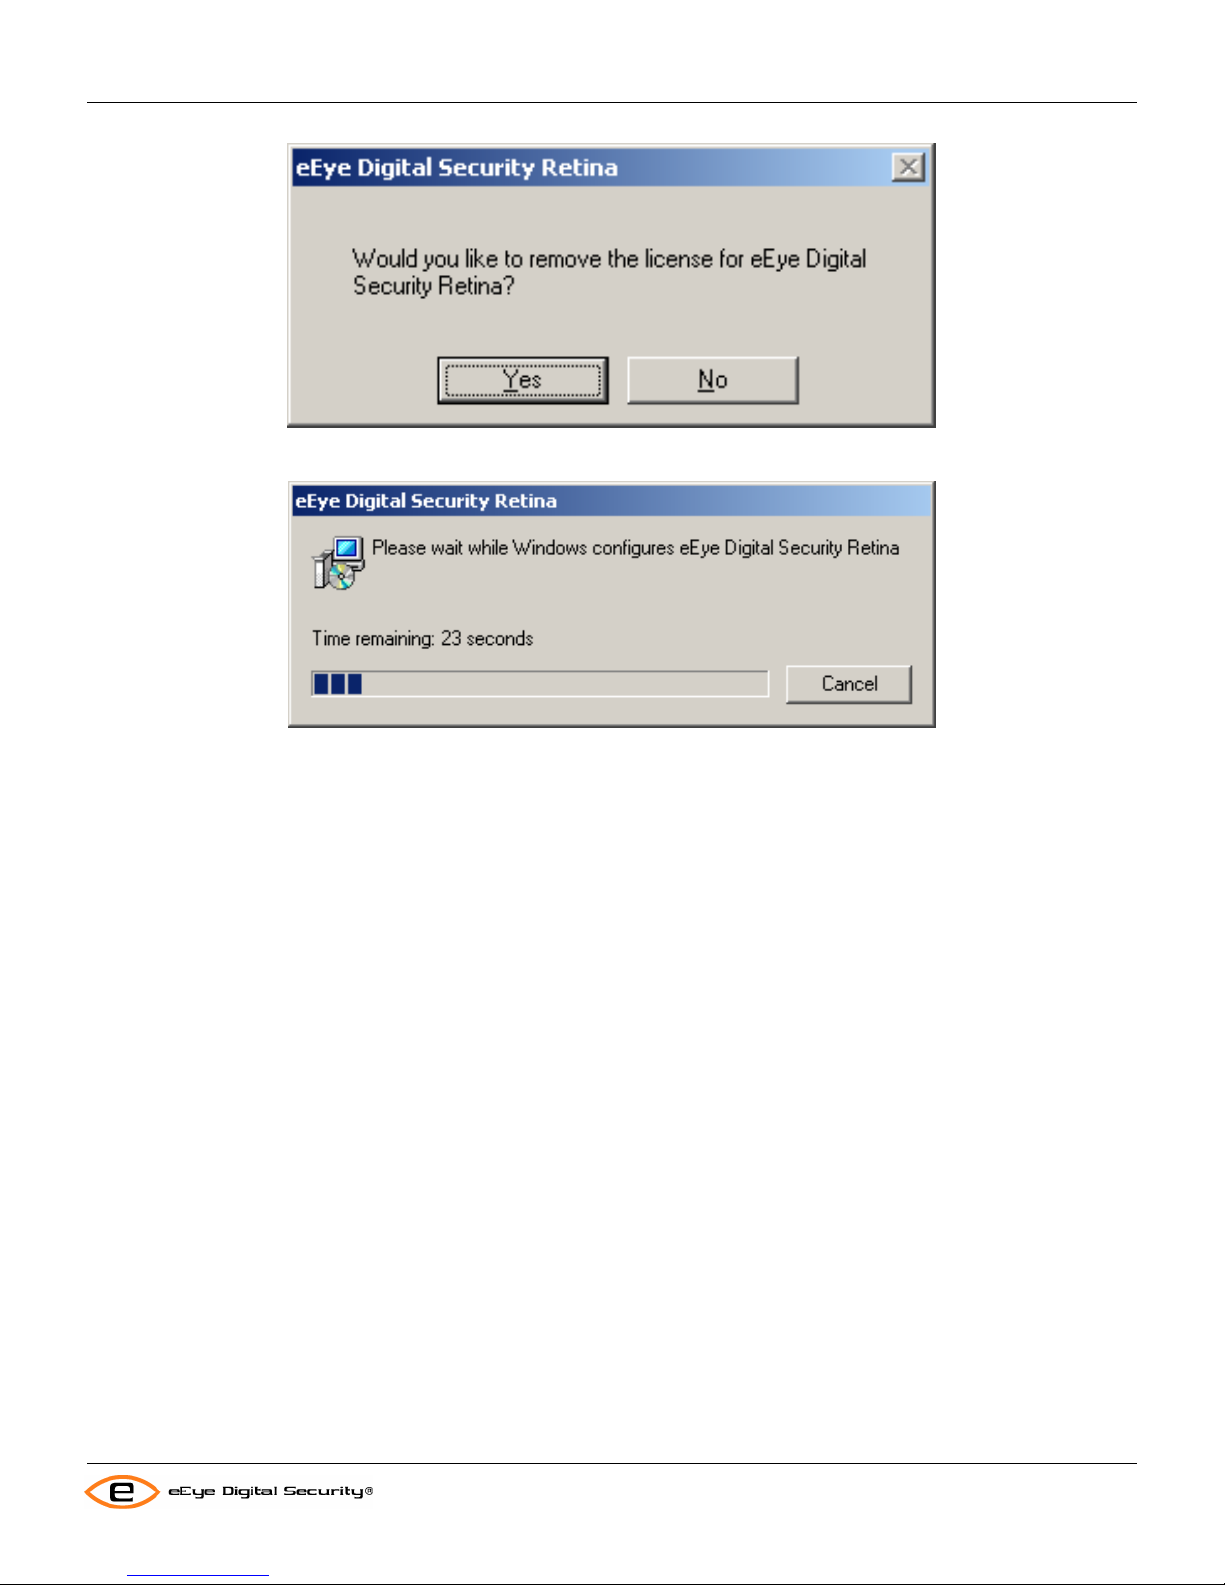
6. The uninstall displays a prompt asking if you would like to remove your Retina license from the machine. Select
Yes to remove the license, or No to keep the license for later use on the same machine.
11
Page 18
Installation
Retina Users Manual
7. A progress bar displays, showing the status of the uninstall. When the uninstall has completed, the progress
dialog closes.
In some system configurations, a system reboot may be required in order to complete the uninstall. If this is the case,
the uninstall will prompt if you would like to reboot now.
Uninstalling Retina from the Command Line
Complete the following steps to remove Retina from your workstation using the Windows™ Installer from the
command line. eEye recommends that you exit all Windows™ programs before you run the Windows™ I nstaller.
1. Open the Windows™ Command Prompt.
2. Enter “Msiexec.exe /x {59404E7D-BE5F-4668-9BDF-52C98FCA09D1} “ and press enter.
3. Follow the prompts.
There are a number of options available to uninstall from the command line. These are:
REMOVELICENSE=”1” – Remove the license during uninstall without prompting.
REMOVELICENSE=”0” – To keep the license without prompting during uninstall.
REMOVECONFIGURATION=”0” – To keep your configuration data without prompting.
REMOVECONFIGURATION=”1” – To remove configuration data without prompting.
12
Page 19
Installation
Retina Users Manual
Retina Sessions
Starting Retina
Complete the following steps to start the Retina Interface:
1. Click the Windows™ Start button.
2. Click Programs > eEye Digital Security > Retina Network Security Scanner
Note: If this is the first time you’ve used Retina, the License Management screen will appear. See License
Management on page 65, for instructions on installing your Retina license.
Retina starts and the main menu of the interface appears as shown in the following section.
Startup Message
To have Retina display information prior to starting, such as access warning messages. Place the text warning into a
file named “WarningInfo.htm” in the Retina installation directory. This file will display in a text box when Retina starts.
The user will have to click the OK button to start Retina or close the window to abort it. This text box is an HTML
display control, so common HTML elements may be used to add text formatting.
Using the Retina Interface
The Retina Interface is the first window that appears when you log on to the Retina software. You can select the
Retina features that you want to use from the toolbar or the provided tabs. The toolbar also provides options you can
use to navigate to the next or previous window. Drop-down menus provide lists of commands.
The Retina Interface always saves your preferences and displays your settings from previous sessions.
Menu Bar
The Retina Interface drop-down menus provide standard commands you can select. The menu bar always appears at
the top of the Retina Interface window.
The following drop-down menus are provided from the Retina Interface:
File – to open scan files and set DSN locations
Edit – normal cut, copy and paste editing functions
View – display or hide the QuickScan, Explorer or Status bars.
Tools – audits and plugins wizards; access to address, audit and port group modification dialogs; credential
management; updates and program options
Help – links to product help, support, eEye sales, license management and information about the product version
Shortcut Bar
Retina displays the following shortcut bars in the left vertical windowpane:
Tasks
13
Page 20
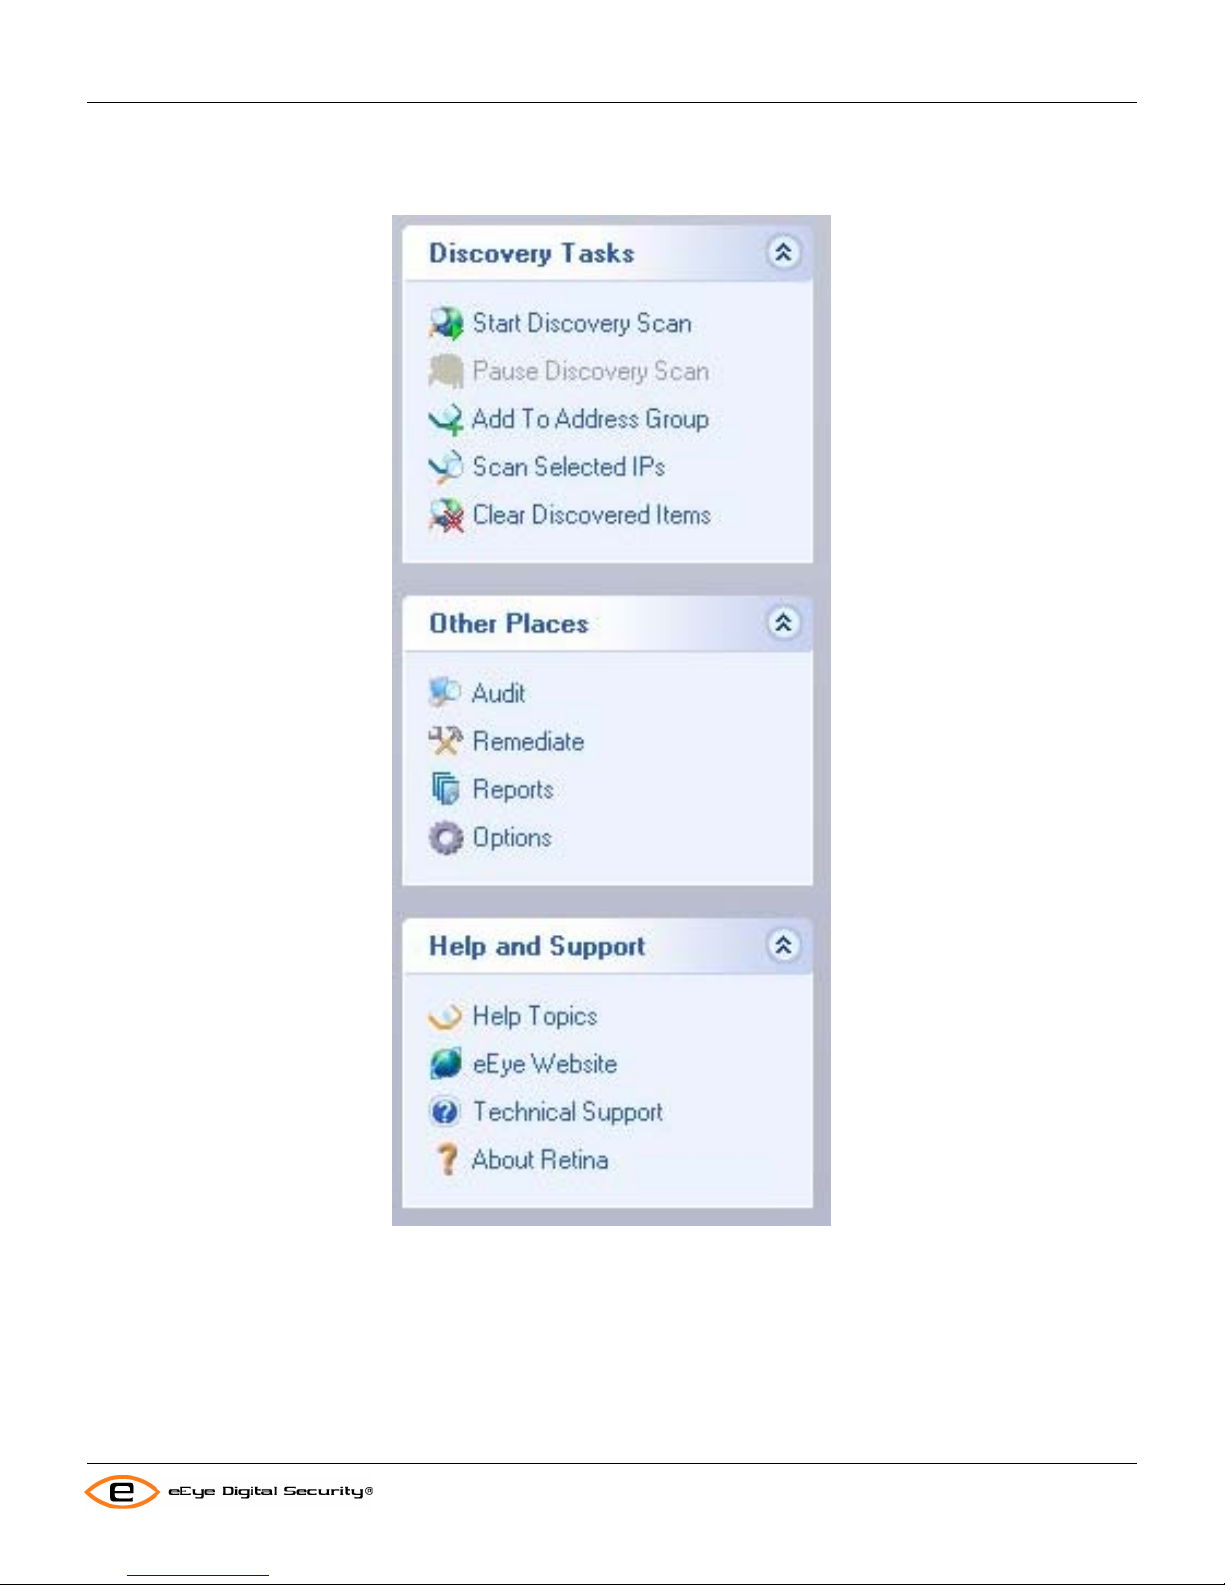
Installation
Other Places
Help and Support
Retina Users Manual
Tasks: appears at the top left pane of the Retina Interface window, and displays options for the selected Retina
security task tab. For example, the shortcut bar for the Remediate Tasks menu displays tasks including, Generate
Reports and Print Reports
Other Places: appears below the Tasks shortcut bar at the middle left pane of the Retina Interface window. This
displays the Retina tasks (except the task that is currently selected) that you can select and use such as Audit,
Reports, Remediate, and Options.
14
Page 21

Installation
Retina Users Manual
Help and Support: appears below the other shortcut bars at the bottom left pane of the Retina Interface window.
This provides options you can select to view general information about the Retina Network Security Scanner and
eEye Digital Security Solutions.
Status Bar
Retina uses the status bar at the bottom of the window to display messages from the task Retina is currently
processing.
Tabs Pane
The Tabs pane is the main window of the Retina Interface. It displays tabs you can select to use the features
associated with each Retina task. You can select from the following tabs:
Discover
Audit
Remediate
Report
Options Dialog
The Options dialog allows you to set your preferences for various Retina settings, such as event routing, automatic
updates, scanner tuning and other general configurations.
To access the Options dialog, select Tools > Options.
The following example shows the Options dialog. The General tab displays by default when you select Options.
15
Page 22
Installation
Retina Users Manual
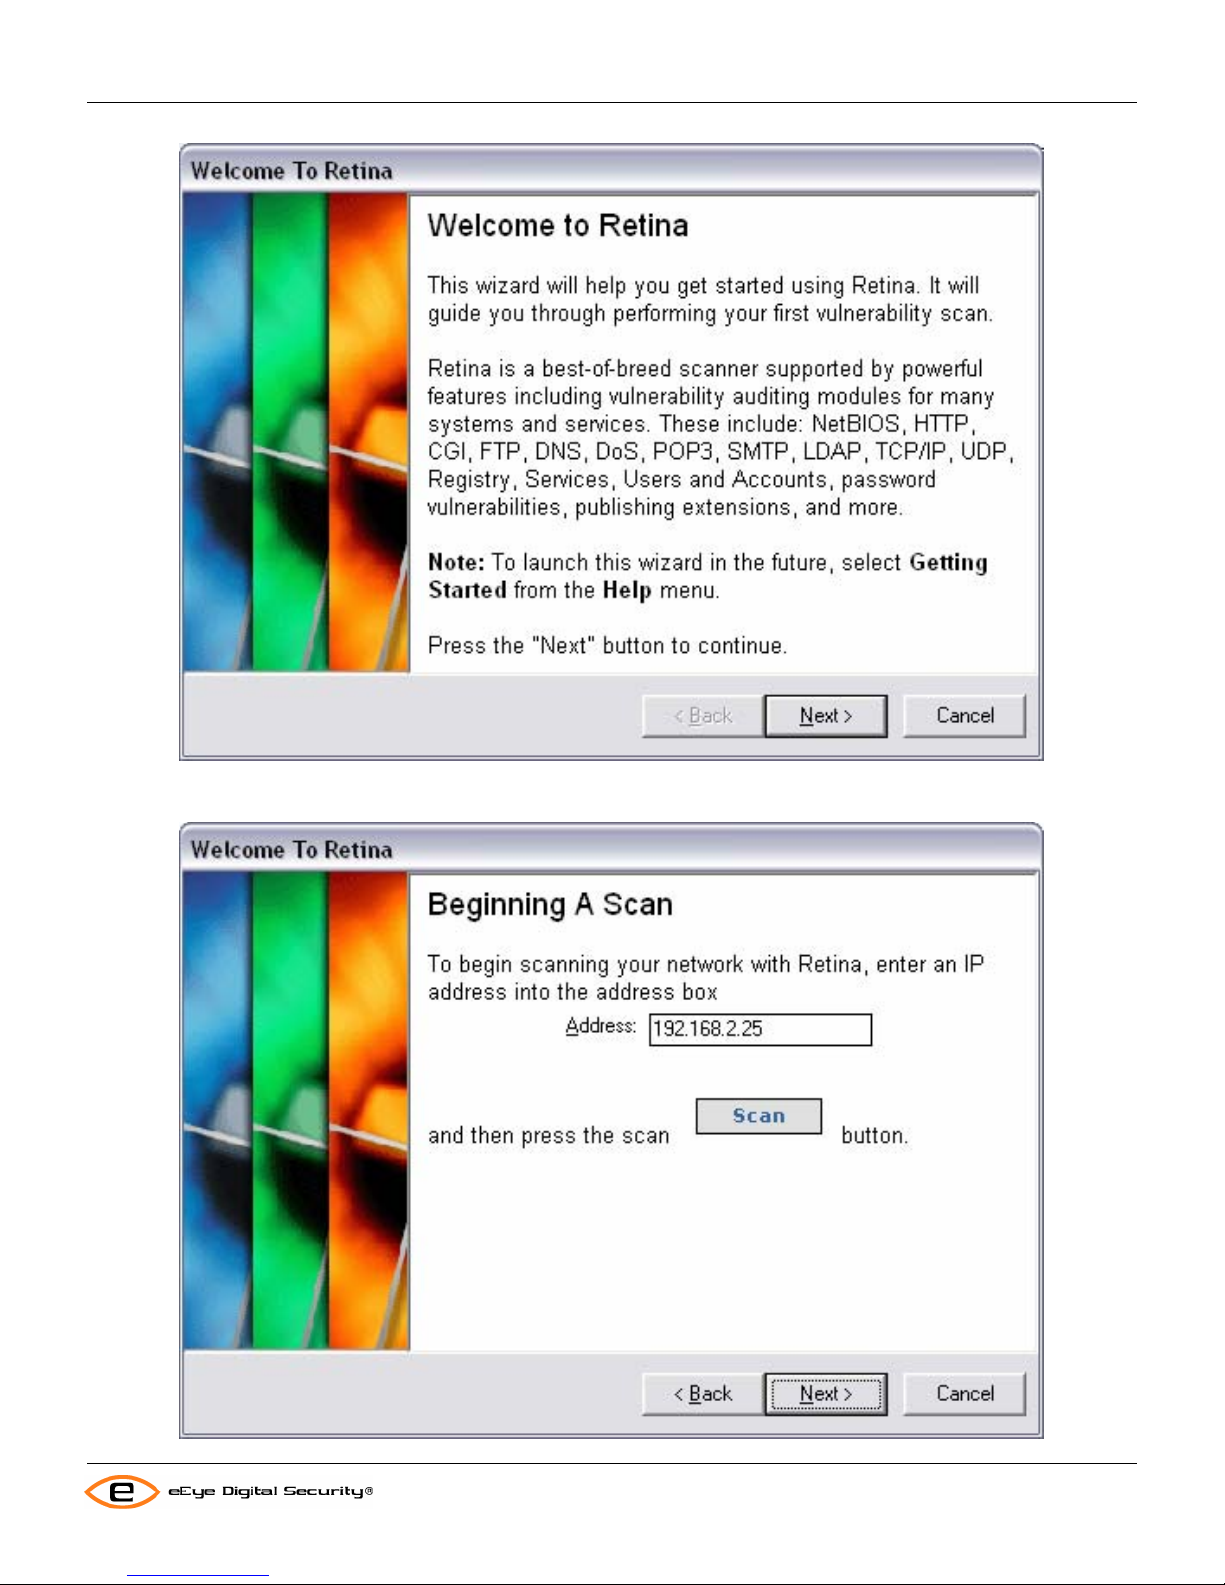
Using the Getting Started Wizard
The Retina Getting Started Wizard provides a brief introduction to using the Retina Network Security Scanner to
perform a vulnerability scan and analyze the results.
Complete the following procedure to use the Retina Getting Started Wizard:
1. Select Help > Getting Started from the Retina Interface menu bar.
Note: The wizard automatically also appears after you install Retina.
The Welcome to Retina window appears.
16
Page 23
Installation
Retina Users Manual
2. Click Next > on the Retina Getting Started Wizard.
The Beginning a Scan window appears.
17
Page 24
Installation
3. Select the Audit tab on the Retina Interface.
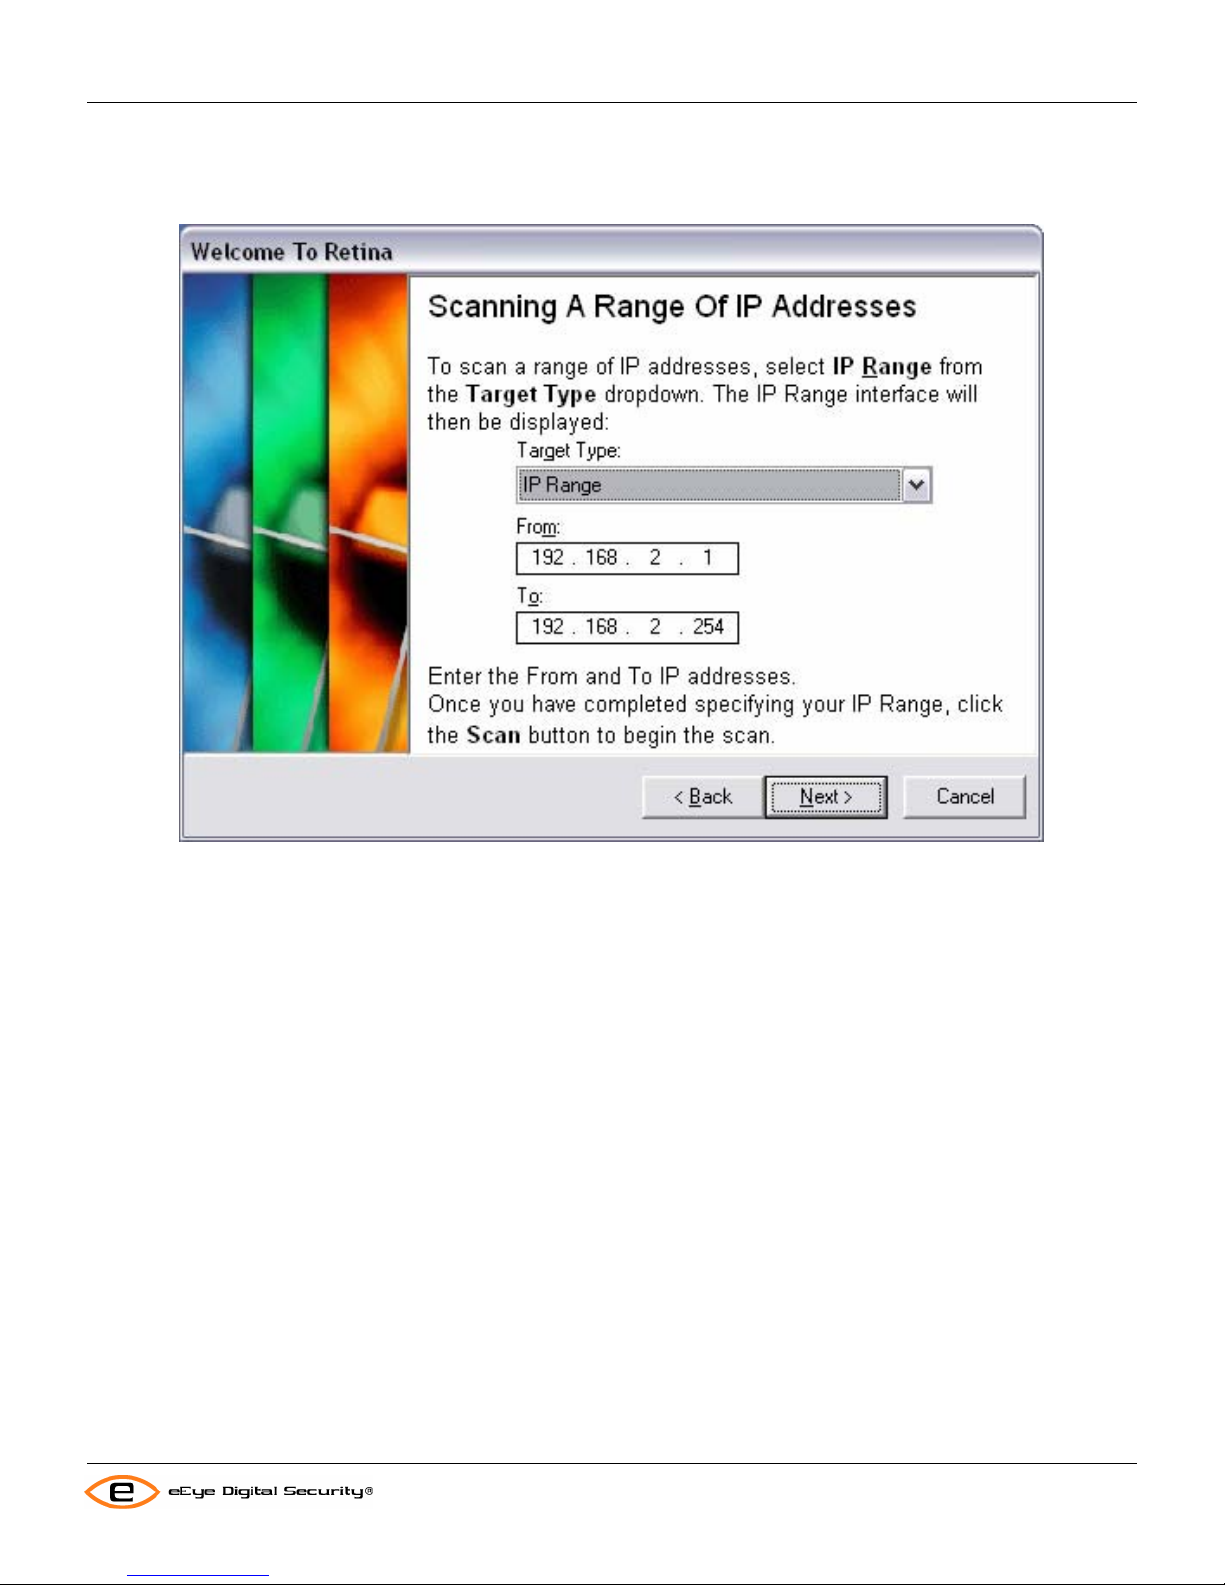
4. Click Next > on the Retina Getting Started Wizard.
The Scanning a Range of IP Addresses window appears.
Retina Users Manual
5. Do one of the following from the Audit tab:
• Enter an IP address for Retina to scan in the Address field, or complete the following procedure to enter a
range of IP addresses.
• Enter a range of IP addresses for Retina to scan as follows:
• Click the IP Range radio button
• Enter an IP address in the From field
• Enter another IP address in the To field
6. Click Scan from the Audit tab.
The status bar displays the scan’s progress. When the scan is complete, the main Retina pane displays general
information and audit details for the selected IP address(es).
7. Click Next > on the Retina Getting Started Wizard.
The Selecting Scanned Ports window appears.
18
Page 25

Installation
Retina Users Manual
8. Click Next > on the Retina Getting Started Wizard.
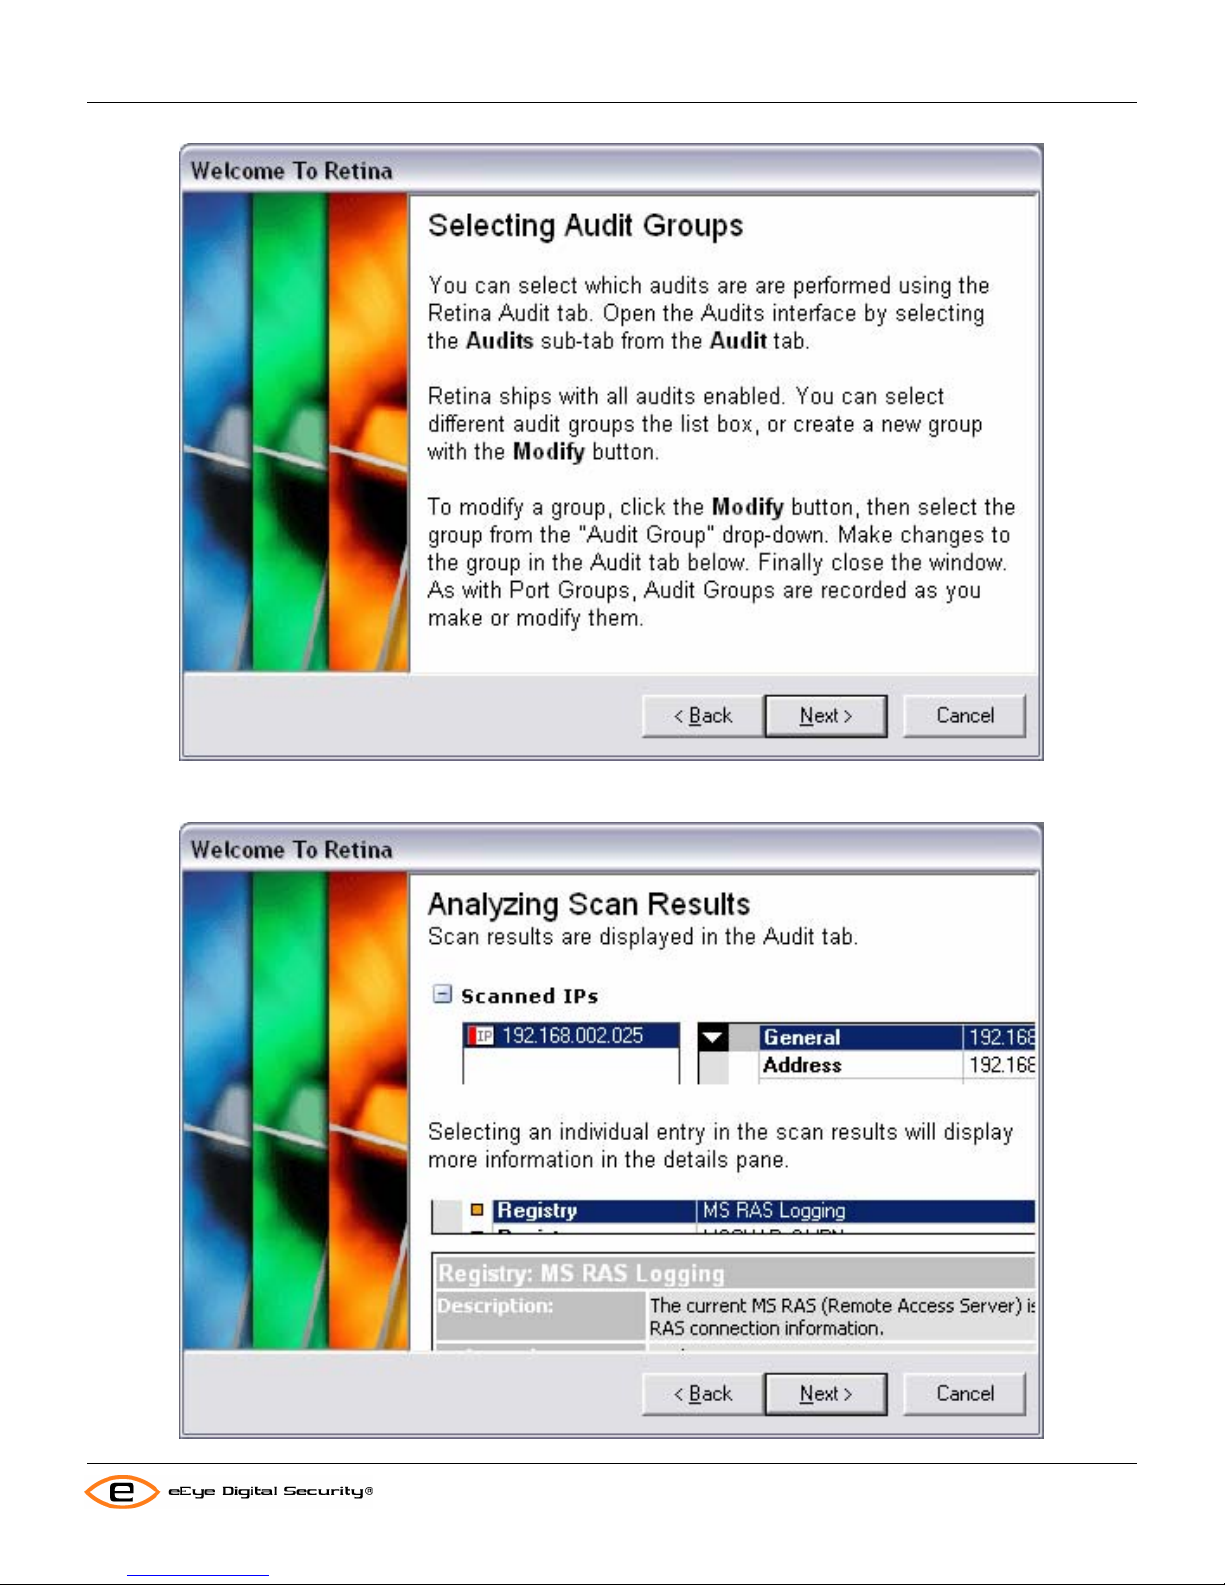
The Selecting Audit Groups window appears.
19
Page 26
Installation
Retina Users Manual
9. Click Next > the Retina Getting Started Wizard.
The Analyzing Scan Results window appears.
20
Page 27
Installation
Retina Users Manual
10. Review the scan information for the selected IP address(es) that appears in the main Retina pane of the Audit
tab.
The General section displays information including the IP addresses, report date, domain name, and so o n.
The Audits section displays images that represent the highest risk level of the audits found on the select system. The
image is color coded to match Retina’s audit risk level settings (see Audit Results on page
11. Click any entry from the Audits section to display more information in the Details pane.
12. Click Next > on the Retina Getting Started Wizard.
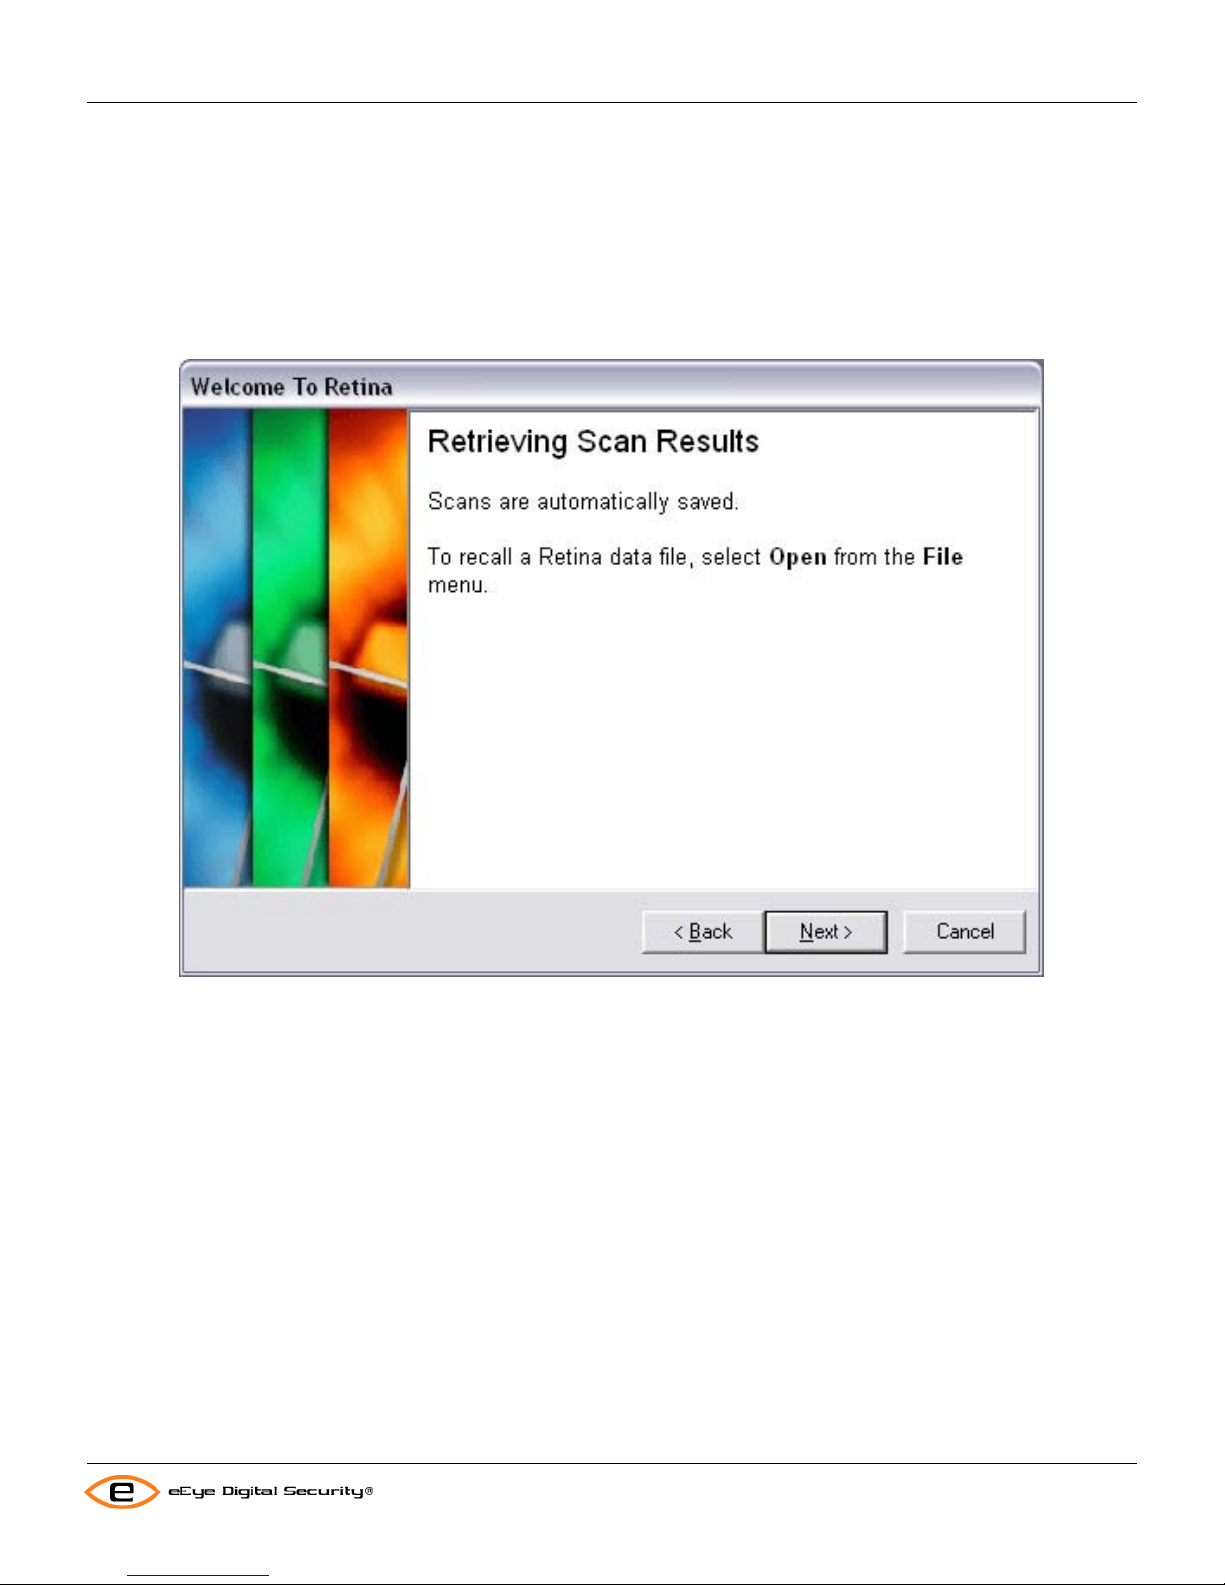
The Retrieving Scan Results window appears.
35 for more information).
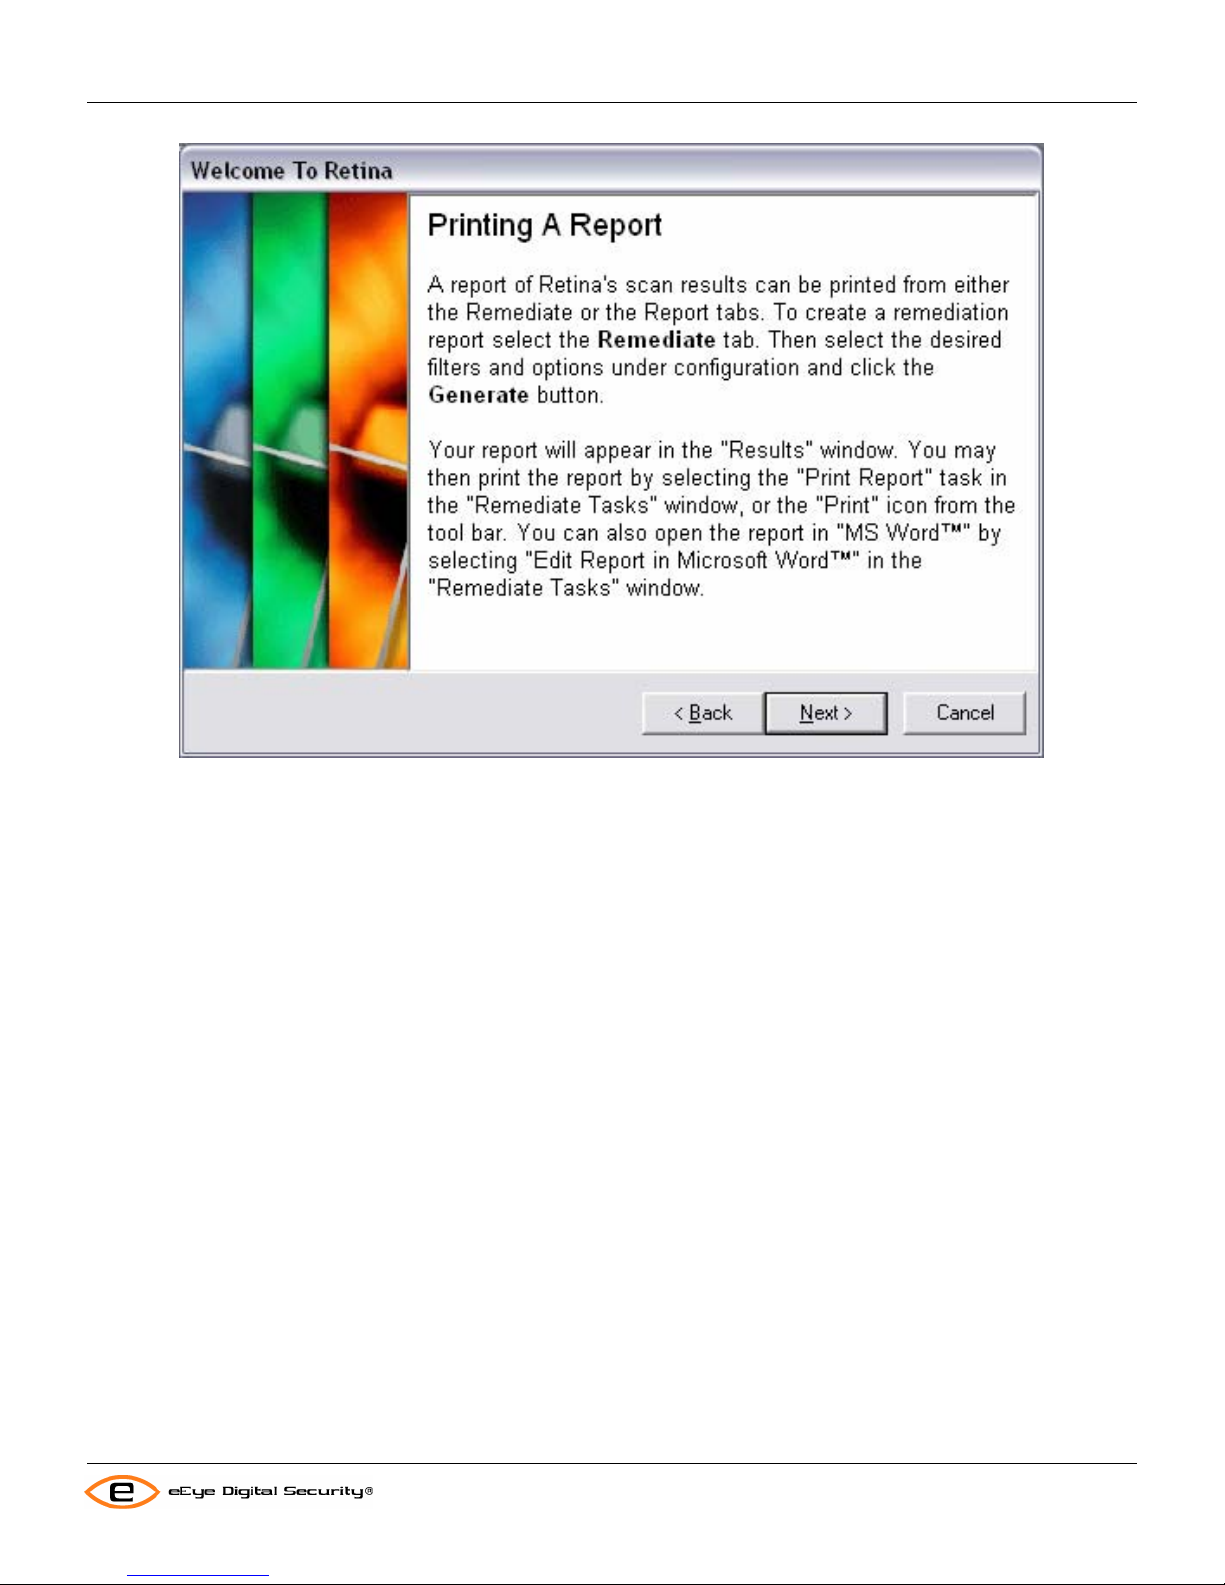
13. Click Next > on the Retina Getting Started Wizard.
The Printing A Report window appears.
21
Page 28
Installation
Retina Users Manual
14. Select the Reports tab on the Retina Interface if you want to create a report of your scan results. Then, click
Generate.
The report you created appears in the Results pane of the Retina Interface. Use the scroll box to move vertically
through the report.
To print your report, click Print Report from the Report Tasks shortcut bar.
15. Click Next > on the Retina Getting Started Wizard.
The Printing An Executive Report window appears.
22
Page 29

Installation
Retina Users Manual
16. Click Next > on the Retina Getting Started Wizard.
The Additional Information window appears.
23
Page 30

Installation
17. Click Finish to exit the Retina Getting Started Wizard.
Retina Users Manual
24
Page 31
Using the Discover Tab
Retina Users Manual
Using the Discover Tab
The Discover tab provides the ability to scan unlimited IPs to discover network machines—PCs, routers, printers, and
so on. The scan function is similar to a ping. However, features include customizable TCP, UDP, and ICMP discovery
methods, OS detection, and general machine information.
You can then use discovery results to create host files, or to launch a vulnerability assessment scan directly from the
discovery interface.
Accessing the Discover Tab
Complete the following step to access the Discover tab:
Click the Discover tab on the Retina Interface (unless it is already selected).
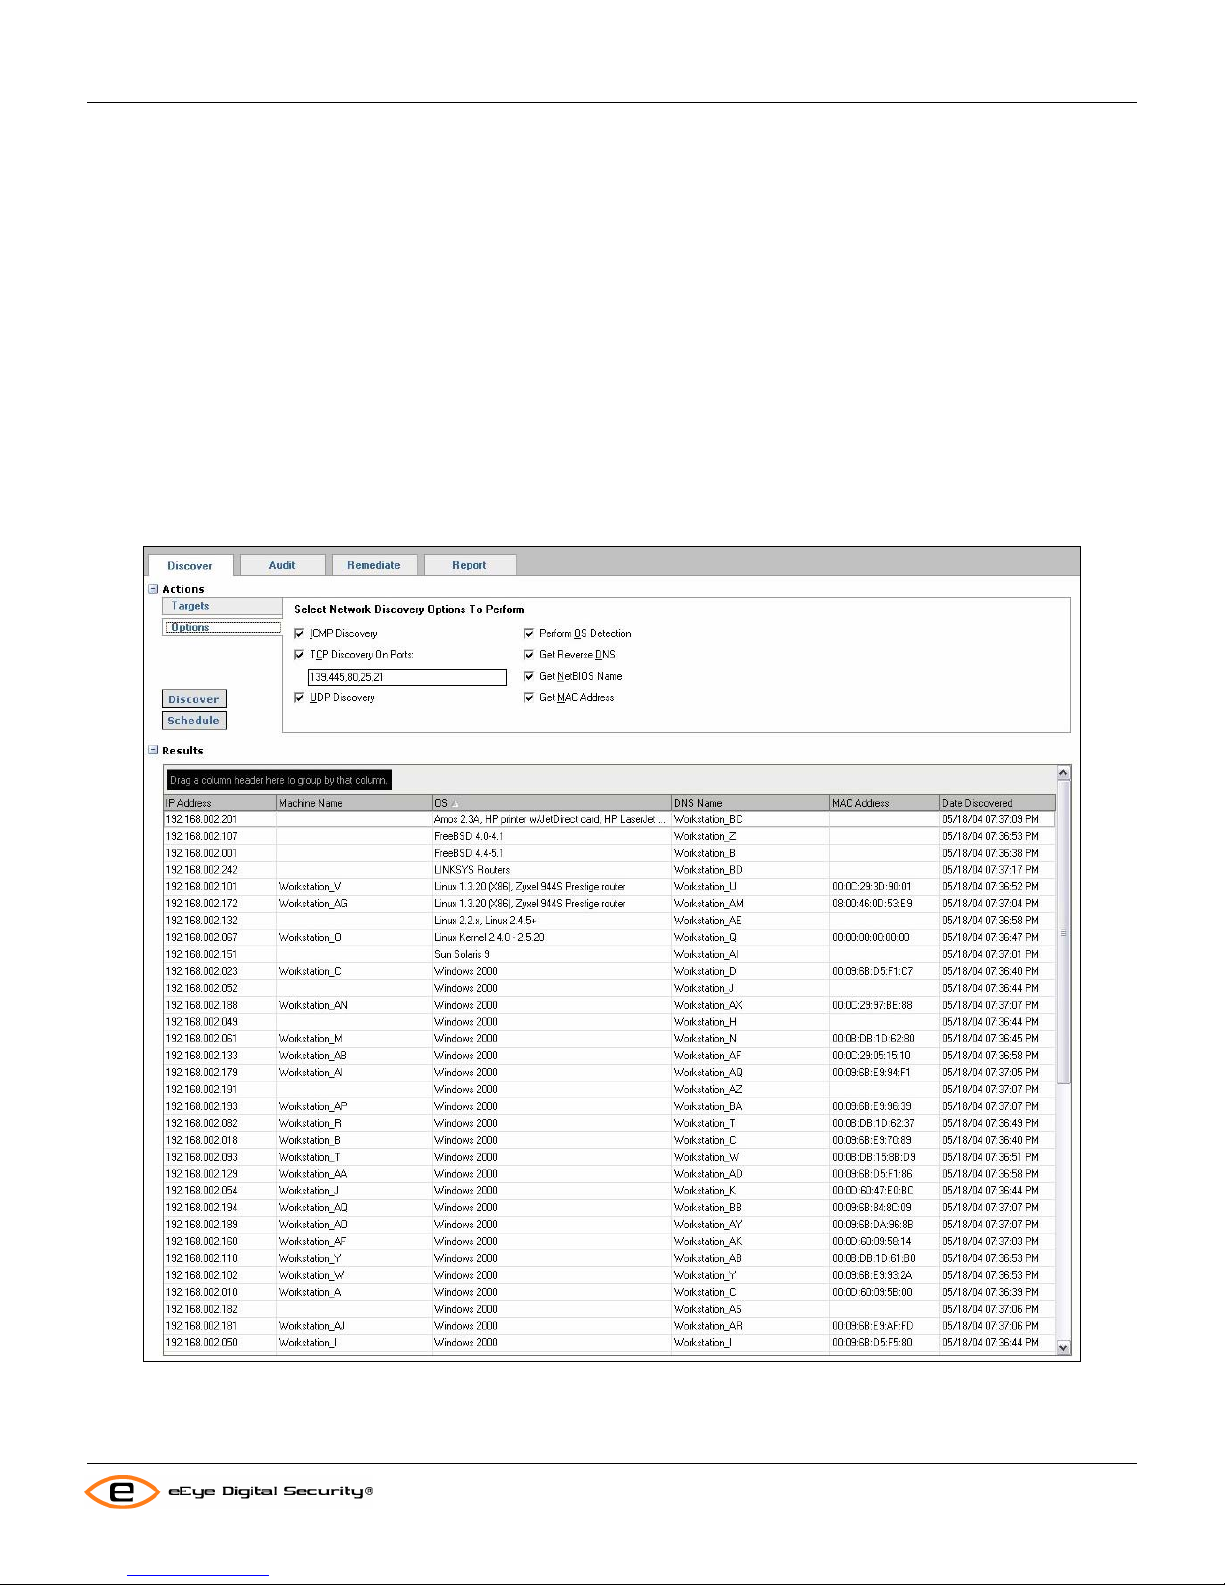
The following example shows the Discover tab of the Retina Interface.
The Discovery Tasks shortcut bar displays the following commands that you can select. Una v ailable menu options
appear dimmed.
25
Page 32

Using the Discover Tab
Retina Users Manual
• Start Discovery Scan
• Pause Discovery Scan
• Add to Address Group
• Scan Selected IPs
• Clear Discovered Items
The main window of the Discover tab is divided into two panes:
• The Actions pane, where you set targets, determine options and start or schedule scan jobs.
• The Results pane, where the devices found during a discover scan are listed.
Starting a Discovery Scan
Retina’s discovery scan feature is used to determine if a specific IP or range of IPs is active on your network. You can
also use scan results to determine if there are additional IPs with Retina licenses on your network that you did not
know about. Scan results can provide information about an outside source that is attempting to exploit your network.
Complete the following steps to start a discovery scan:
1. Select the Discover tab from the Retina Interface (unless it is already selected).
The Discover window appears.
2. Click Targets from the Actions pane (unless it is already selected).
The Select Targets options appear.
3. You may select a number of target types from the Target Type drop-down:
• Single IP – Then enter the IP address or the name of the server that you want Retina to scan in the Address
field.
By default, Retina displays the scanner’s IP address in the
• IP Range – Then enter a range of IP addresses for Retina to scans as follows:
• Enter the start range IP address in the
• Enter the end range IP address in the
By default, Retina displays the network and subnet numbers from your PC’s IP address in the From and To fields.
The default IP address in the
host number. 1 to 254 is the full range of IP addresses you can scan.
• CIDR Notation – Enter the IP address and network prefix in the Address fields.
For example, 192.168.205.0 /18 means the first 18 bits are used to represent the network and the remaining 14
bits are used to identify hosts. Common prefixes are 8, 16, 24, and 32 (Class A, B, C, and single host, respectively).
• Named Host – Then enter either the DNS or the NetBIOS name of the desired host.
• Address Groups – Select one or a number of address groups to be scanned. You may also modify, create or
import address groups by clicking the Modify button (see Modifying Address Groups on page
From field ends with 1 and the default IP address in the To field ends with 254 as the
From field
To field
Address field.
38).
26
Page 33

Using the Discover Tab
Retina Users Manual
• Advanced – Enter groups of addresses via wild cards.
Note: If you want to quickly start a discover scan at this point, press the Enter key on your keyboard and then go to
step 9 of this procedure.
4. Click Options on the Actions pane.
The Options choices appear.
5. Select any of the following network options you want Retina to perform. Also, deselect any of the following default
network options that you do not want Retina to perform.
• ICMP Discovery
• TCP Discovery on Ports
Enter the port number(s), comma separated, that you want Retina to scan in the provided field.
• UPD Discovery
• Perform OS Detection
• Get Reverse DNS
• Get NetBIOS Name
• Get MAC Address
6. To run the Discovery scan immediately click Discover. To run the Discovery scan in the future or on a regular
schedule, click Schedule. For information on scheduling, see Scheduling Scan Jobs on page
the discovery scan by clicking Start Discovery Scan on the Discovery Tasks shortcut bar or by pressing t he Enter
key.
7. Retina displays your results in the Results table as it scans the selected IP(s).
The following is an example of discover scan results.
49. You can also start
27
Page 34

Using the Discover Tab
Retina Users Manual
8. Complete the following optional steps when needed:
• Click Pause Discovery Scan on the Discovery Tasks shortcut bar or the Pause button if you want to pause
the scan and the display results.
• Click the Abort button to prevent Retina from displaying additional information.
• You can also select Abort Discovery Scan from the Discovery Tasks shortcut bar.
9. Review your scan data as needed.
Creating a New Address Group from Scan Results
IP address groups are sets of addresses that you can create, modify, and audit. The group itself can contain any
combination of IP addresses. or example, you can create a group that lists only your organization’s 2000 servers.
Complete the following steps to create an address group.
After completing the discover scan, the list box on the Discover tab will be populated with the devices discovered on
the network. The following steps refer to that list box.
1. Click the IP addresses you want to include in your new address group from the scan results listed in the Results
table.
To select consecutive IP addresses, hold down the Shift key and click the IPs you want to include. To select nonconsecutive entries, hold down the Ctrl key and click the IPs you want to include.
2. Click Add to Address Group from the Discovery Tasks shortcut bar.
The Add to Address Group dialog box appears.
28
Page 35

Using the Discover Tab
Retina Users Manual
3. Click the
4. Enter a name for your new address group in the provided field.
For example, if you are creating an address group for a group of servers, enter a descriptive name such as XP
Servers, as shown in the example below.
5. Click OK.
Retina saves your new address group.
6. When you want to view the list of IP addresses for the new group you created, click the Audit tab and click
Modify Address Groups.
Create a New Address Group radio button.
Appending to an Existing Address Group
You can add one or more IP addresses to an existing address group.
For example, if there is a new Windows 2000 server on your network, you can add the corresponding IP address to
the Windows 2000 address group. Also, if there is an IP address you forgot to add when you created the address
group, you can append it to the group at any time.
Complete the following steps to append to an existing address group:
1. Click the IP address(es) you want to include in the existing address group from the scan results listed in the
Results table.
2. Click Add to Address Group from the Discovery Tasks shortcut bar.
The Add to Address Group dialog box appears.
29
Page 36

Using the Discover Tab
Retina Users Manual
3. Accept the default setting of Append to Existing Address Group. Either use the group that appears by default,
or click the down arrow and select a different address group.
4. Click OK.
Retina saves the changes to the selected address group.
5. If you want to view the list of IP addresses for the group you appended, click the Audit tab and click Modify
Address Groups.
Clearing Discovered Items
Retina provides an option that allows you to quickly clear all of the scan results that appear in the Results table. You
should always clear your results before you create a new scan.
Complete the following step to clear your scan results:
1. Click Clear Discovered Items from the Discovery Tasks shortcut bar.
2. Click Yes when the Are you sure you want to clear discovered data? dialog appears.
Retina clears all of your results and displays a blank pane.
Sorting the Scan Results
Retina allows you to reorganize your scan results by column name. Complete the following step to sort your scan
results:
• Click and drag the column header that you want to group your scan results by to the top row of the Results
table.
30
Page 37

Using the Discover Tab
Retina Users Manual
For example, if you want to display your scan results by the date and time that the IPs were discovered during the
scan, click the Date Discovered column header and drag it to the top row of the Results table as shown in the
following example.
Retina sorts and displays your results by the column name you selected. In the example above the table has been
sorted by operating system (OS).
If you do not want future discovery scans sorted by the selected column name, drag and drop the column header back
to its original place in the table header area.
31
Page 38

Using the Audit Tab
Retina Users Manual
Using the Audit Tab
The Audit tab is an option you can select to scan for all known open ports and services on the specified target IP
address(es). You can then use the scan results to complete a network audit. Based on its findings, the scanner
module searches available services or open ports for security vulnerabilitie s. The scanner module also has a feature
that determines if a protocol running on a port uses protocol detection.
The main window of the Audit tab is divided into three panes:
1. The Actions pane, where you set targets, ports and audits; determine options and start or schedule scan jo bs.
2. The Scan Jobs pane, where you determine the status of scan jobs; view completed jobs; view scheduled jobs;
control active jobs; and delete or view completed jobs. To learn more about the Scan Jobs pane, see Using the
Scan Jobs Pane on page
3. The Scanned IPs pane, where the devices and information found during an audit scan are listed.
Accessing the Audit Tab
Complete the following step to access the Audit tab:
1. Click the Audit tab (unless it is already selected) from the Retina interface.
2. The following example shows the Audit tab of the Retina Interface.
51.
The Audit Tasks shortcut bar displays the following commands that you can select. Unavaila ble menu options appear
dimmed.
32
Page 39
Using the Audit Tab
• Start Scan – To begin or queue a new scan
• Modify Address Groups
• Modify Port Groups
• Modify Audit Groups
• Modify Credentials
Starting an Audit Scan
Complete the following steps to start an audit scan:
1. Select the Audit tab from the Retina Interface (unless it is already selected).
The Audit window appears.
Retina Users Manual
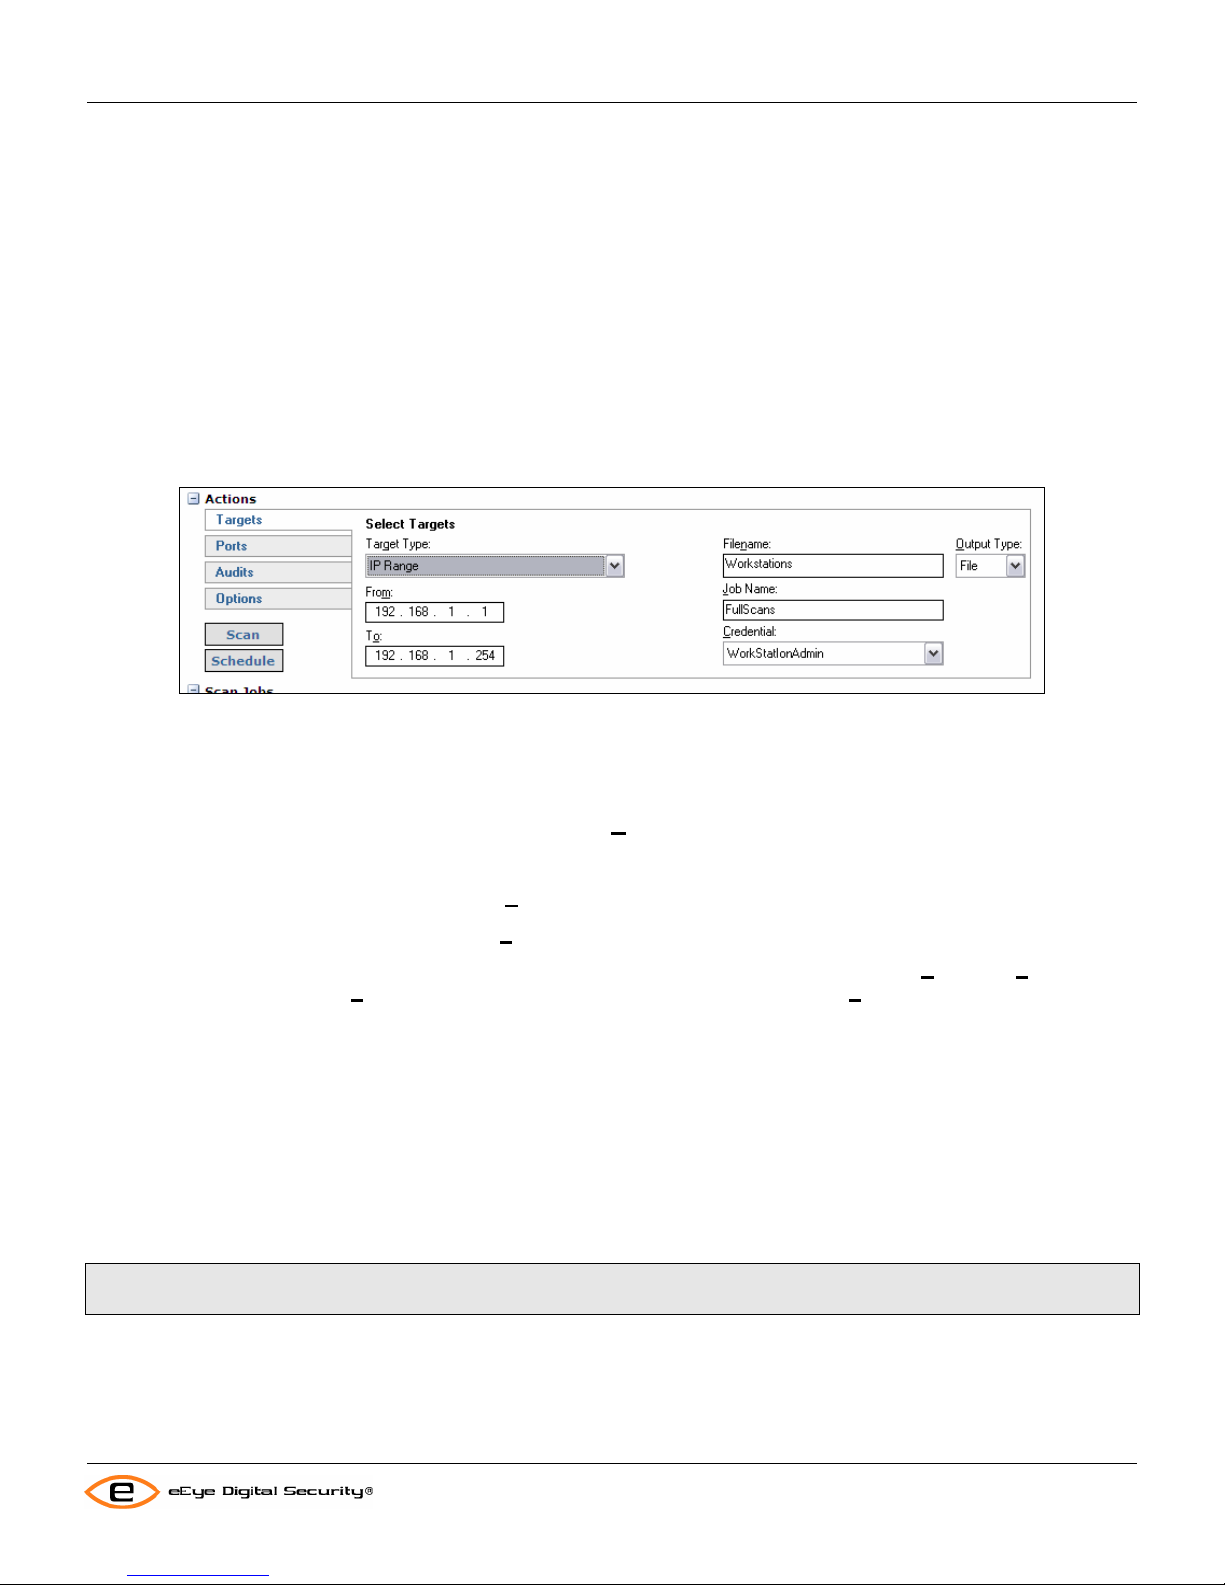
2. Click Targets from the Actions pane (unless it is already selected). The Select Targets pane appears.
3. You may select a number of target types from the Target Type drop-down:
• Single IP – Then enter the IP address or the name of the server that you want Retina to scan in the Address
field.
By default, Retina displays the scanner’s IP address in the
• IP Range – Then enter a range of IP addresses for Retina to scans as follows:
• Enter the start range IP address in the
• Enter the end range IP address in the
By default, Retina displays the network and subnet numbers from your PC’s IP address in the From and To fields.
The default IP address in the
host number. 1 to 254 is the full range of IP addresses you can scan.
• CIDR Notation – Enter the IP address and network prefix in the Address fields.
For example, 192.168.205.0 /18 means the first 18 bits are used to represent the network and the remaining 14
bits are used to identify hosts. Common prefixes are 8, 16, 24, and 32 (Class A, B, C, and single host, respectively).
• Named Host – Then enter either the DNS or the NetBIOS name of the desired host.
• Address Groups – Select one or a number of address groups to be scanned. You may also modify, create or
import address groups by clicking the Modify button (see Modifying Address Groups on page
• Advanced – Enter groups of addresses via wild cards.
From field ends with 1 and the default IP address in the To field ends with 254 as the
From field
To field
Address field.
38).
Note: If you want to quickly start an audit scan at this point, press the Enter key on your keyboard and then go to step
10 of this procedure.
4. Enter the name of the file you that want to store this scan in the Filename edit box. Use just the filename without
path or extension information. Retina now stores multiple scans in a single file, so you may wish to save scans to
files based on the type of scan run. For instance: servers, workstations, Sasser or any number of other more
descriptive filenames. If you do not enter a filename, Retina will generate one (though it won’t be displayed).
33
Page 40

Using the Audit Tab
Retina Users Manual
To store the scan in a DSN click the down arrow in the Output Type drop down box and select DSN. You may
then select your storage location from the list of configured DSNs. To configure a DSN see Using a DSN to Store
Session Data on page
5. Enter the name you will use to identify the job in the Job Name field. If you do not enter a name, Retina will
prompt you for one when you click scan (you may disable that popup when you see it). If you continue past the
popup without naming the job it will be named “unknown.”
6. If you wish to run a scan with registry access, click the down arrow in the Credential drop down box, and select a
pre-defined user to run the scan under. To set up pre-defined users see Credential Management on page
Note: If you want to start an audit scan at this point, click the Scan button. And go to step 10 of this procedure.
7. Click Ports on the Actions pane.
The Select Port Group(s) options appear.
8. Select any of the port group options you want Retina to scan. Deselect any of the following port group options that
you do not want Retina to scan. You can select more than one port group, in this manner you can combine
several custom groups for a single scan. Among others, we include:
All Ports – Scans on all ports
Discovery Ports – Scans those ports used in Discover
To modify port groups see Modifying Port Groups on page
60.
40.
37.
Note: If you want to start an audit scan at this point, click the Scan button. And go to step 10 of this
procedure.
9. Click the Audits sub-tab the Select Audit Groups pane appears. You may select from the pre-defined audits
that, as of this writing, are All, and 3 versions of the SANS 20 audits. Or you may select your own custom audit
groups that you have created. To create or modify audit groups see Modifying Audit Groups on page
10. Click the Options sub-tab and do the following as required:
All options affect the targeted device(s).
Perform OS Detection – Determine operating system on the target device.
Get Reverse DNS – Determine DNS name
Get NetBIOS Name – Determine NetBIOS
Get MAC Address – Determine MAC address of target NIC (only for Windows™ devices the local
segment.
Perform Traceroute – Track number of hops
Enable Connect Scan – Force a full TCP connection
39.
34
Page 41
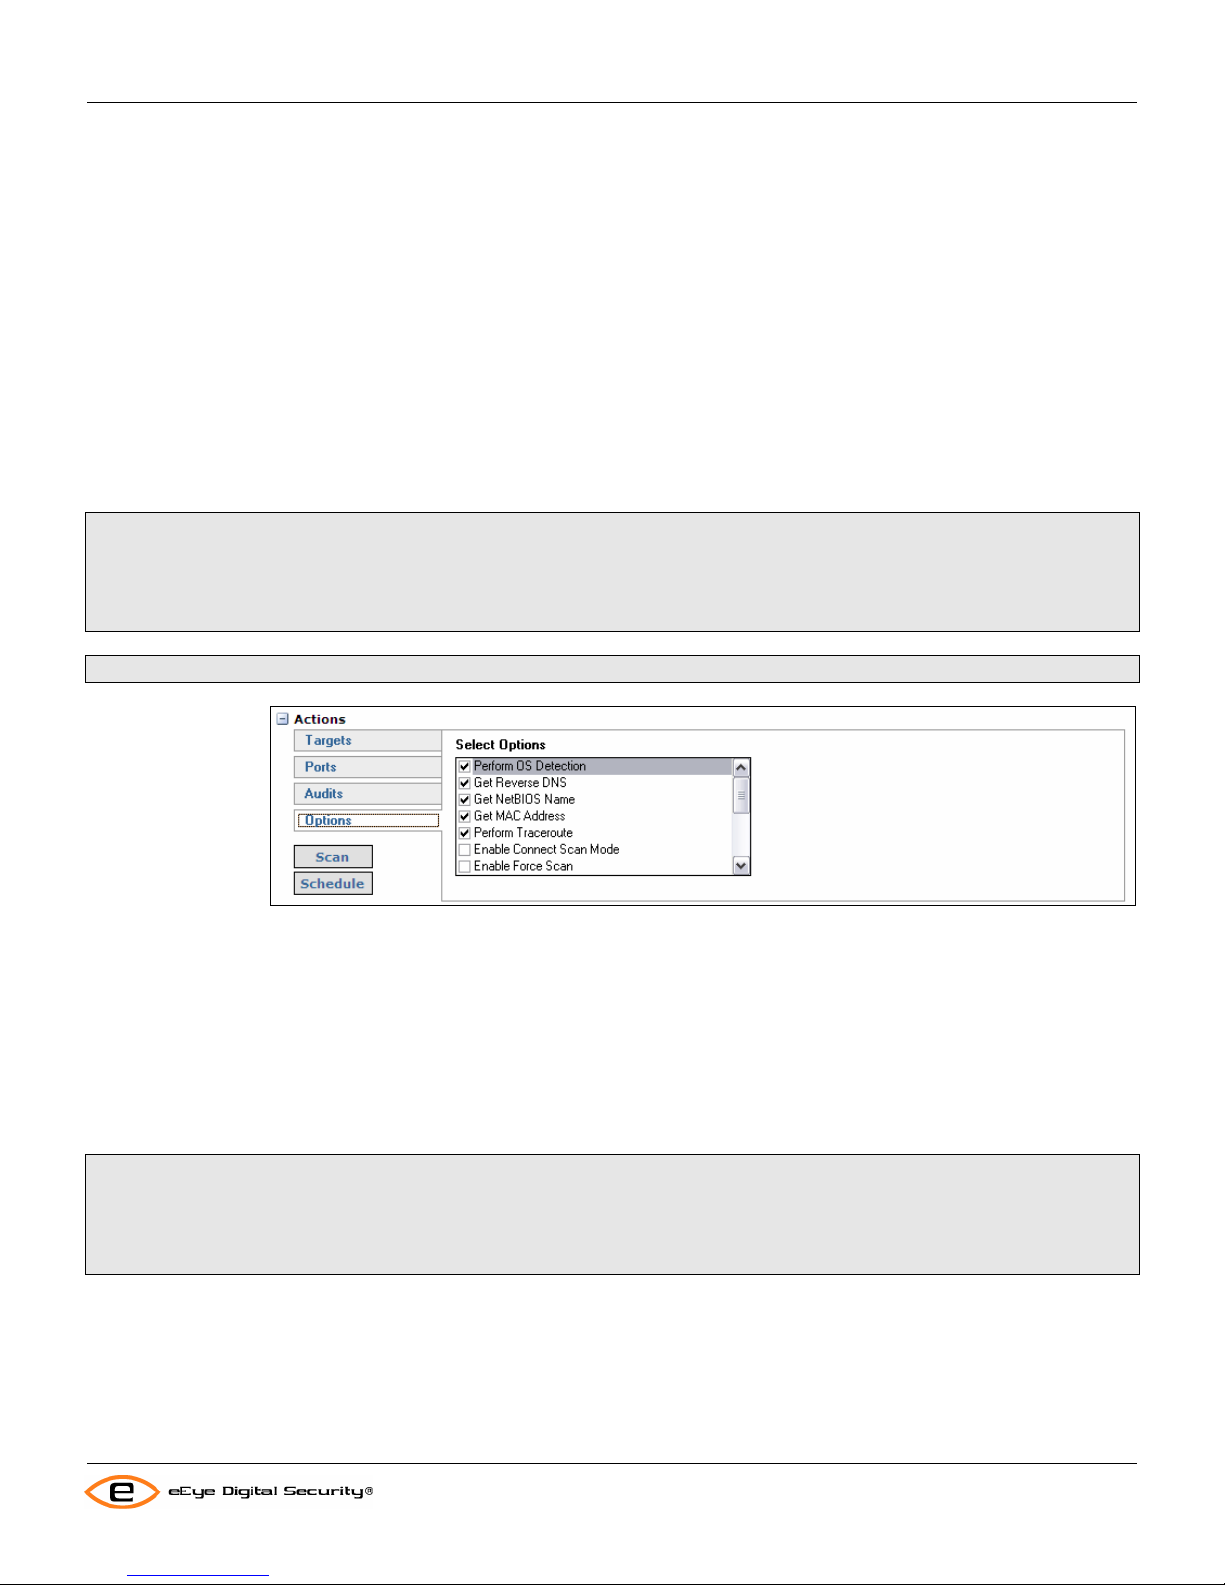
Using the Audit Tab
Retina Users Manual
Enable Force Scan – Force the scanner to audit ports that do not answer
Randomize Target List – Cause the list of targets to be scanned in a random order. Useful when
scanning load-balanced systems.
Enumerate Registry via NetBIOS – Access the registry
Enumerate Users via NetBIOS – List users
Enumerate Shares via NetBIOS – List directory or drive shares
Enumerate Files via NetBIOS – List file shares
Enumerate Hotfixes via NetBIOS – List all installed hotfixes.
Enumerate Named Pipes via NetBIOS – List named pipes
Enumerate Machine Information via NetBIOS – List system information
Enumerate Audit Policy via NetBIOS – List administrative policy settings
Enumerate Per-User Registry Settings via NetBIOS – List user settings
Enumerate Groups via NetBIOS – List groups in use and their members
Enumerate Processes via NetBIOS – List running processes and services
Enumerate User and Group Privileges via NetBIOS
Note: The Connect Scan and Force Scan options can increase the length of time required to complete the scan by a
significant amount. Force Scan should not be used across a range. Force Scan should only be selected for specific
targets that are known to filter or otherwise ignore TCP, UDP, or ICMP probes. The Retina scanning engine will drop
to Connect Scan automatically when required. Connect Scan should only be used to trouble shoot cases whe re the
network connection is known to be unreliable. OS detection cannot be performed with Connect Scan enabled.
Note: Enumeration options affect Windows™ devices only.
11. Click the Scan button to start the job immediately. Or Schedule to set the job to run in the future or on a
schedule. For information on scheduling see Scheduling Scan Jobs on page
49.
Audit Results
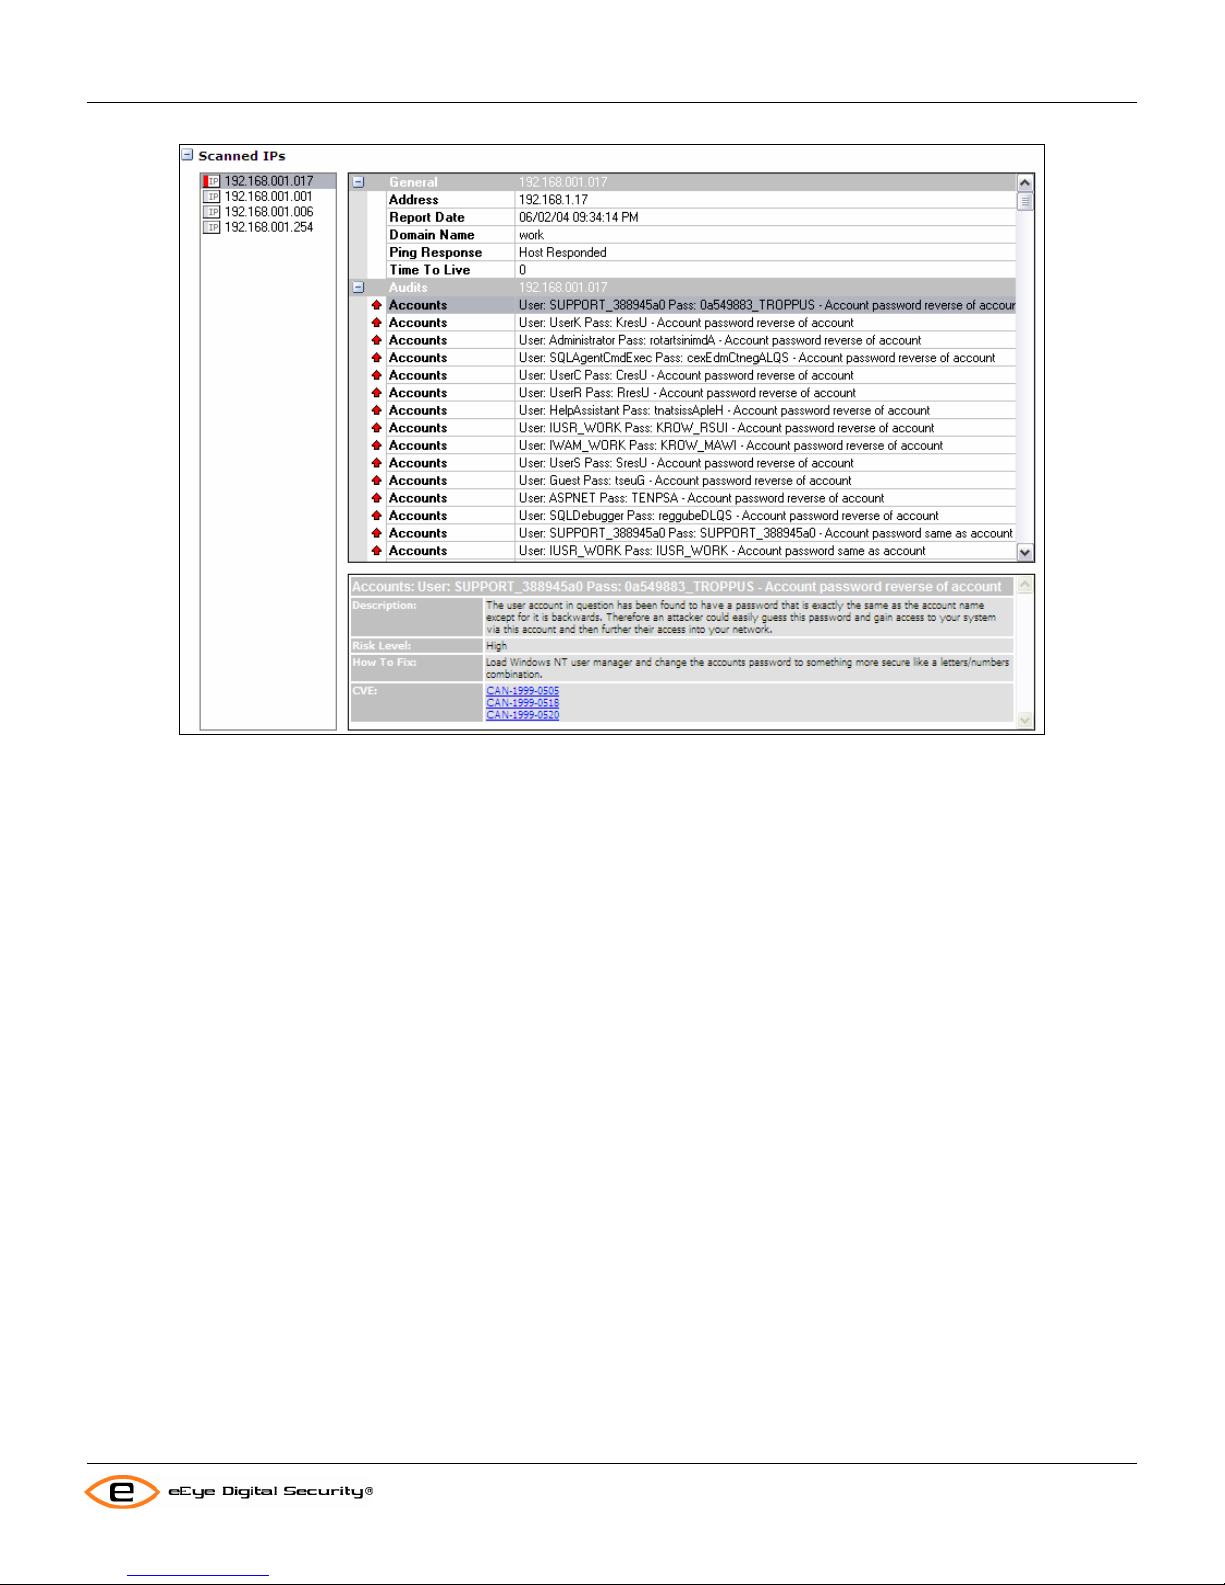
The results of an audit scan are displayed in the Scanned IPs pane. This pane is divided into three sections. The first
section on the left is the IP list, the upper section on the right is the information section, and the lower section on the
right is the description section.
Notes On Scanning Ranges: If you enter a range, address group, or CIDR block that exceeds your licensed IP limit,
Retina will audit scan the range up to the number of addresses that you have licensed. If there are more responsive
targets in the range Retina will provide machine information on these systems so that you know how many there are
and what types of machines there are. However, there will not be any audits run against the addresses above your
license limit.
35
Page 42
Using the Audit Tab
Retina Users Manual
The IPs displayed in the IP list can be sorted by vulnerability or IP. The list contains all of the IP addresses that
responded during a scan. Also, Retina displays an image representing the highest risk level of the audits found on the
specified system. The image is color coded to match Retina’s audit risk level settings including:
Grey = None
Green = Info
Yellow = Low
Orange = Medium
Red = High
The information section lists information and vulnerabilities found on the device selected in the IP list. The information
listed will be listed under collapsible headings such as:
• General – information about the device: address, report date, domain name and others
• Audits – vulnerabilities or audit information found on the device. Each audit or vulnerability will have an icon
matching the above color scheme indicating its relative risk level.
• Machine – OS, NetBIOS name, number of open ports, and other information that Retina could determine
from its scan
• Ports – ports which are open on the device and the service that was found running there
• Services – services found running on the device
• Shares – network directory and device shares that Retina was able to enumerate on the deice
• Users – the users that Retina was able to enumerate for the device
The description section will list what further information is available for the item selected in the information section. For
audits this will be:
• Description – a description of the problem and its possible affects
36
Page 43
Using the Audit Tab
Retina Users Manual
• Risk Level – the risk the vulnerability presents to the device
• How To Fix – the instructions for fixing the problem, including links to hot fixes.
• Related Links – if available, links to more information on the vulnerability
• CVE – if available, links to related CVE entries
• BugtraqID – if available, links to related Bugtraq vulnerabilities
Creating and Modifying Groups
Port Groups
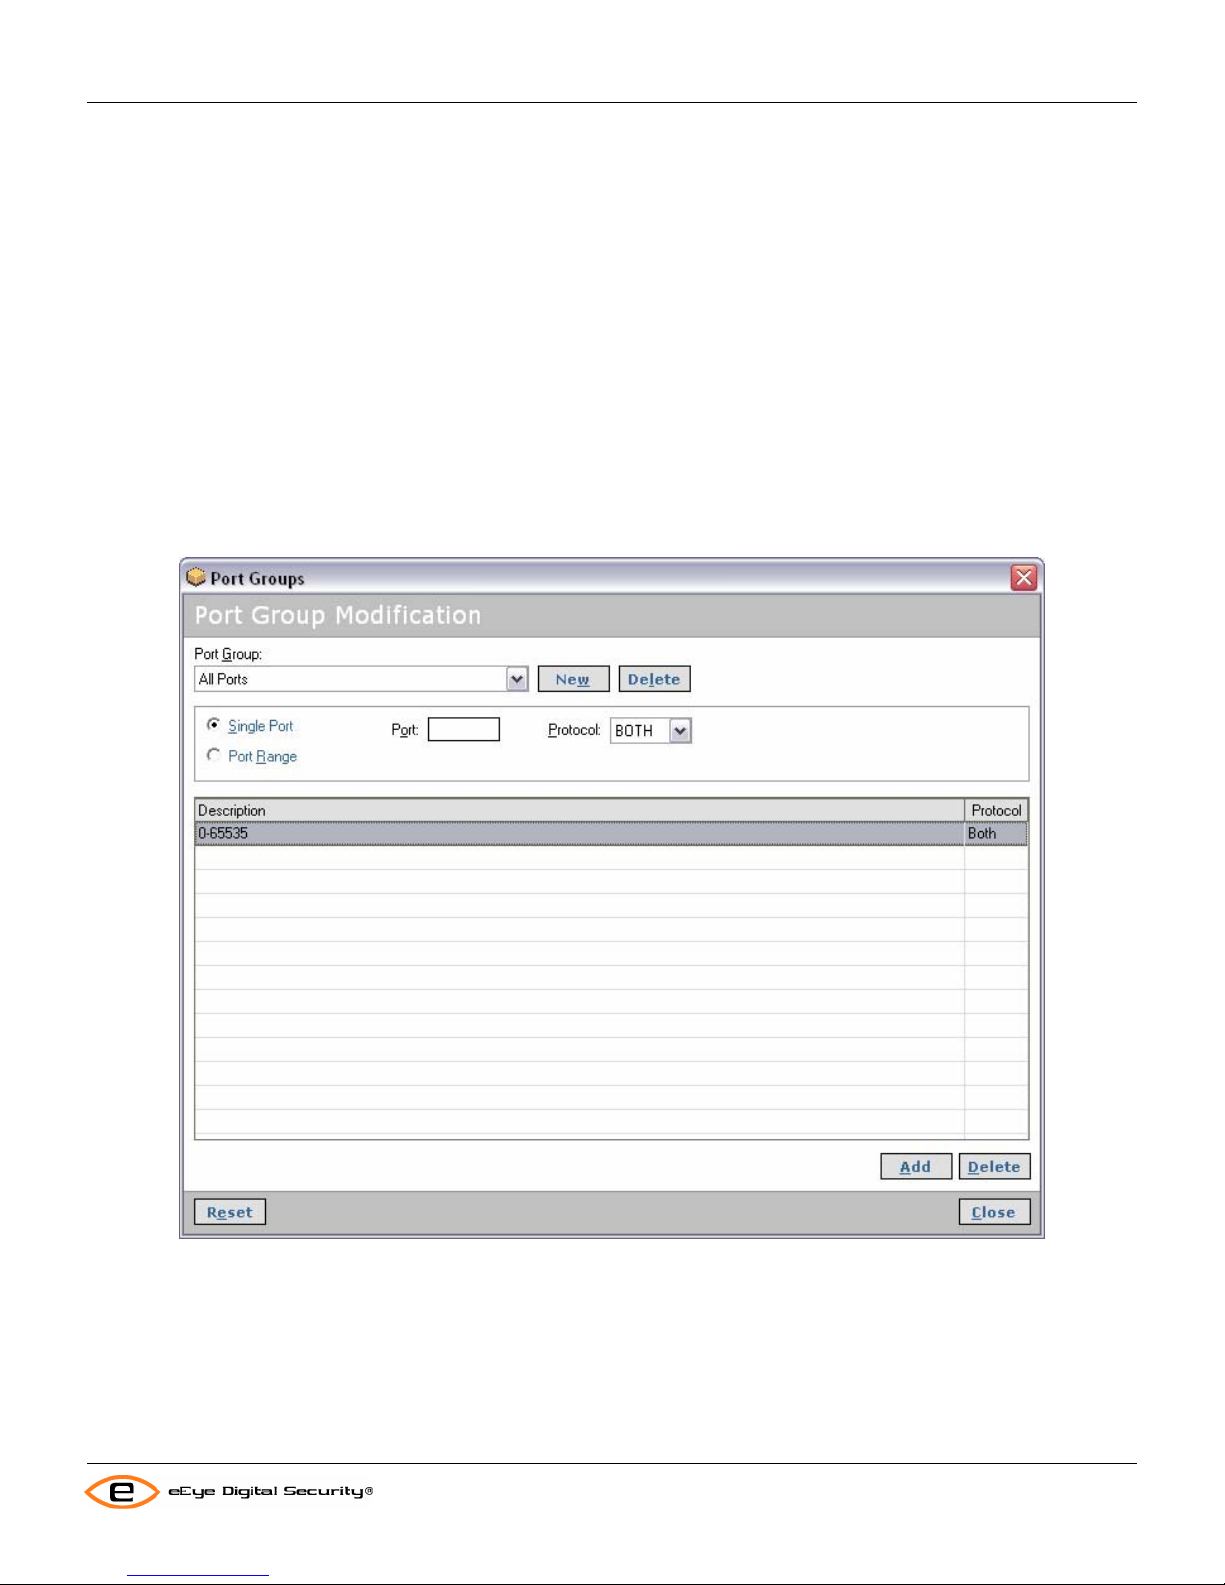
Complete the following steps to modify a Port group:
1. If you want to enter individual port numbers or groups of ports you want Retina to scan, click the Modify button
next to the Select Port Groups box on the Audit tab on the Ports sub-tab.
The Port Groups Modification dialog box appears.
2. Complete one of the following steps:
• Click the Port Group down arrow and select the port group you want Retina to scan, or accept the default
value, which is All Ports.
• To modify the list of ports for the selected group, click the provided field under the Description column
header and enter the port number. Click New to enter a new port group.
• Click Single Port to add a single port to the group, or Port Range to add a range of ports to the group.
37
Page 44

Using the Audit Tab
Retina Users Manual
• Click Reset to clear changes.
• Close the dialog box to save the group.
Address Groups
Complete the following steps to modify an address group:
1. Select the Audit tab from the Retina Interface (unless it is already selected).
2. Select Modify Address Groups on the shortcut bar. The Address Groups dialog box appears.
3. Click the Address Group down arrow, and select the address group you want to modify.
4. Click New and type the desired name in the Group Name edit field to create a new address group.
• To add a single host to the address group, select Single IP or Named Host, and then click Add.
• To add a continuous range of hosts to the group, select IP Range or CIDR Notation, and then click Add.
• To prevent a host or range of hosts from being scanned check the Omit this entry checkbox before clicking
Add.
• To import Retina 4.x host file (.rti) click Import and select the file in the file selection window.
Click Delete to remove an address group.
To remove a single address or multiple addresses from the group, select them in the Address list,
and click the Delete button at the bottom of the list.
To clear changes before saving, click the Reset button.
38
Page 45

Using the Audit Tab
Retina Users Manual
Audit Groups
Complete the following steps to modify an audit group:
1. Select the Audit tab from the Retina Interface (unless it is already selected).
2. Select Modify Audit Groups on the shortcut bar. The Audit Groups dialog box appears.
3. Click the Audit Group down arrow, and select the audit group you want to modify.
• Click New to enter a new audit group.
• Click Delete to remove an audit group.
4. To find a specific audit to perform:
Enter text related to the audit in the Look For text box.
Decide which type of text field you want to search, and select it in the Search In drop down box.
To limit your search to a single category, select it in the Filter drop down box.
Click the Find button.
To return the screen to all audits and categories, click the Clear button.
To select an audit by its CVE, or BugTraq ID (BID) number you can use the number in the Look
For text box or select the appropriate tab and scroll down the list to find it.
5. To add an audit to the audit group, check the box next to its Audit Name—to remove it, clear the checkmark.
6. To save the audit group, close the dialog box.
7. To clear changes that you’ve made prior to saving, click the Reset button.
39
Page 46

Using the Audit Tab
Retina Users Manual
8. To ensure that an audit group has any updated or new audits automatically selected when Retina is updated,
check the Automatically add new audits to this group checkbox, to prevent new audits from being added to
the group, uncheck it.
Hint: To keep track of what audits are updated or added in a Retina update, create a new audit group called New,
unselect all audits in the group and then check the box. The next time Retina updates you can scroll down the list to
see what is checked.
Hint: To keep track of what audits are updated or added in a Retina update, create a new audit group called New,
unselect all audits in the group and then check the box. The next time Retina updates you can scroll down the list to
see what is checked.
Always Groups
For target, port, and audit selections that you want enabled with every scan you can create an Always group. Always
groups will not display in the group selection box. They will only be listed in the group selection drop-down list. For
example to create an always address group to prevent scanning of a group of IPs do the following:
1. From the Audit tab select the Target Type: Address Group(s) on the Targets sub-tab.
2. Click the Modify button.
3. You will see the Address Group Modification window.
4. If the Always group does not exist, click the New button and enter Always for the group name to create an
Always group.
5. To omit a single host from all scans, select Single IP or Named Host, enter the information, click the Omit check
box and then click Add.
To remove a single address or multiple addresses from the group, select them in the Address list,
and click the Delete button at the bottom of the list.
To clear changes before saving, click the Reset button.
Credential Management
Overview
In Retina versions prior to 5.0, Retina ran as a desktop application, in that configuration it ran audits with the
permissions of the user logged in (or calling the executable from a script). This meant that if the user was a domain
administrator that there would be no problems with access when scanning a remote system on the same domain. In
Retina 5.0 the scanner runs as a service. In this mode the default installation runs as the LOCAL_SYSTEM user. This
user has no access to Windows Networking connections—such as NetBIOS and remote registries.
It should also be noted that Retina utilizes the operating system’s authentication settings and libraries. This means
that a Retina scanner installed on a system that has the Network security setting “LAN Manager authentication level”
set to “Send NTLMv2 response only\refuse LM & NTLM” won’t be able to log on to a client that is set to a lower level,
such as “Send NTLM response only.”
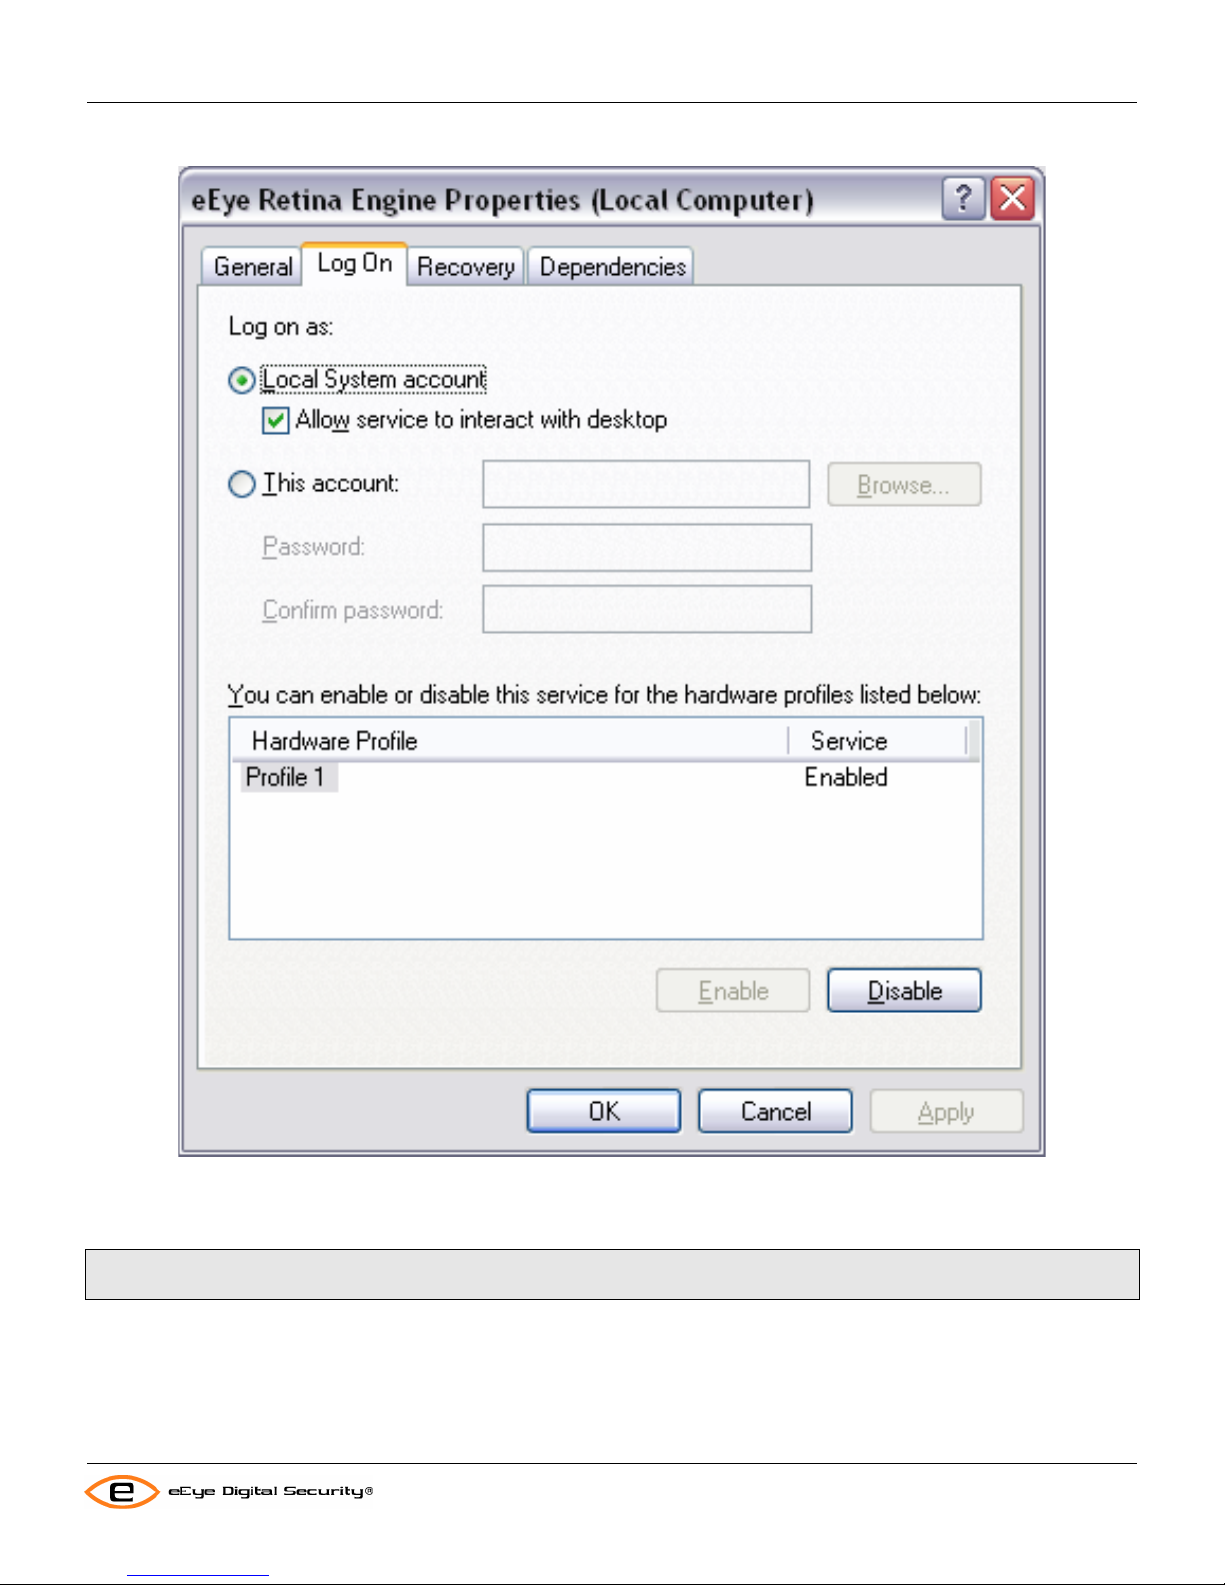
Deployment/Installation Decisions
eEye recommends that you install Retina in the default manner with the eEye Retina Engine service running as the
LOCAL_SYSTEM user and manage user credentials via the Retina Credential Management interface. However, to
meet your network requirements you may choose to install the eEye Retina Engine service to “Log On” a s a user
with Windows access (see “How-To configure how a service is started in the Microsoft Management Console™).
Otherwise Retina will use the credentials last selected via the Retina Audit->Credential interface.
Local Access to non-Windows™ devices
To access non-Windows™ devices for scanning, Retina utilizes an SSH connection to conduct its audits. This means
that an SSH server must be running on the target device. The userid/password combination selected as the
credentials for the scan must also exist on the target system and have sufficient access to perform the checks.
40
Page 47
Using the Audit Tab
Retina Users Manual
If you intend to also utilize other credentials, insure that the account used for Retina’s logon has access to the
Windows registry.
Note: While operating Retina in this manner presents no problem for the software, you should include this information
when reporting problems to eEye® as it can be important to know when troubleshooting.
If you have multiple segments or systems that require different credentials to access, then you should set up Retina to
use a different set of stored credentials for each scan (the default setup). To operate in this manner, see the
instructions that follow. Finally, to have a number of administrators with different access credentials use Retina
without accessing registry information on other segments or networks, you can have each administrator enter their
information using the steps in Managing Credentials, run their scan, and then delete their credentials.
41
Page 48
Using the Audit Tab
Managing Credentials
Using Credentials
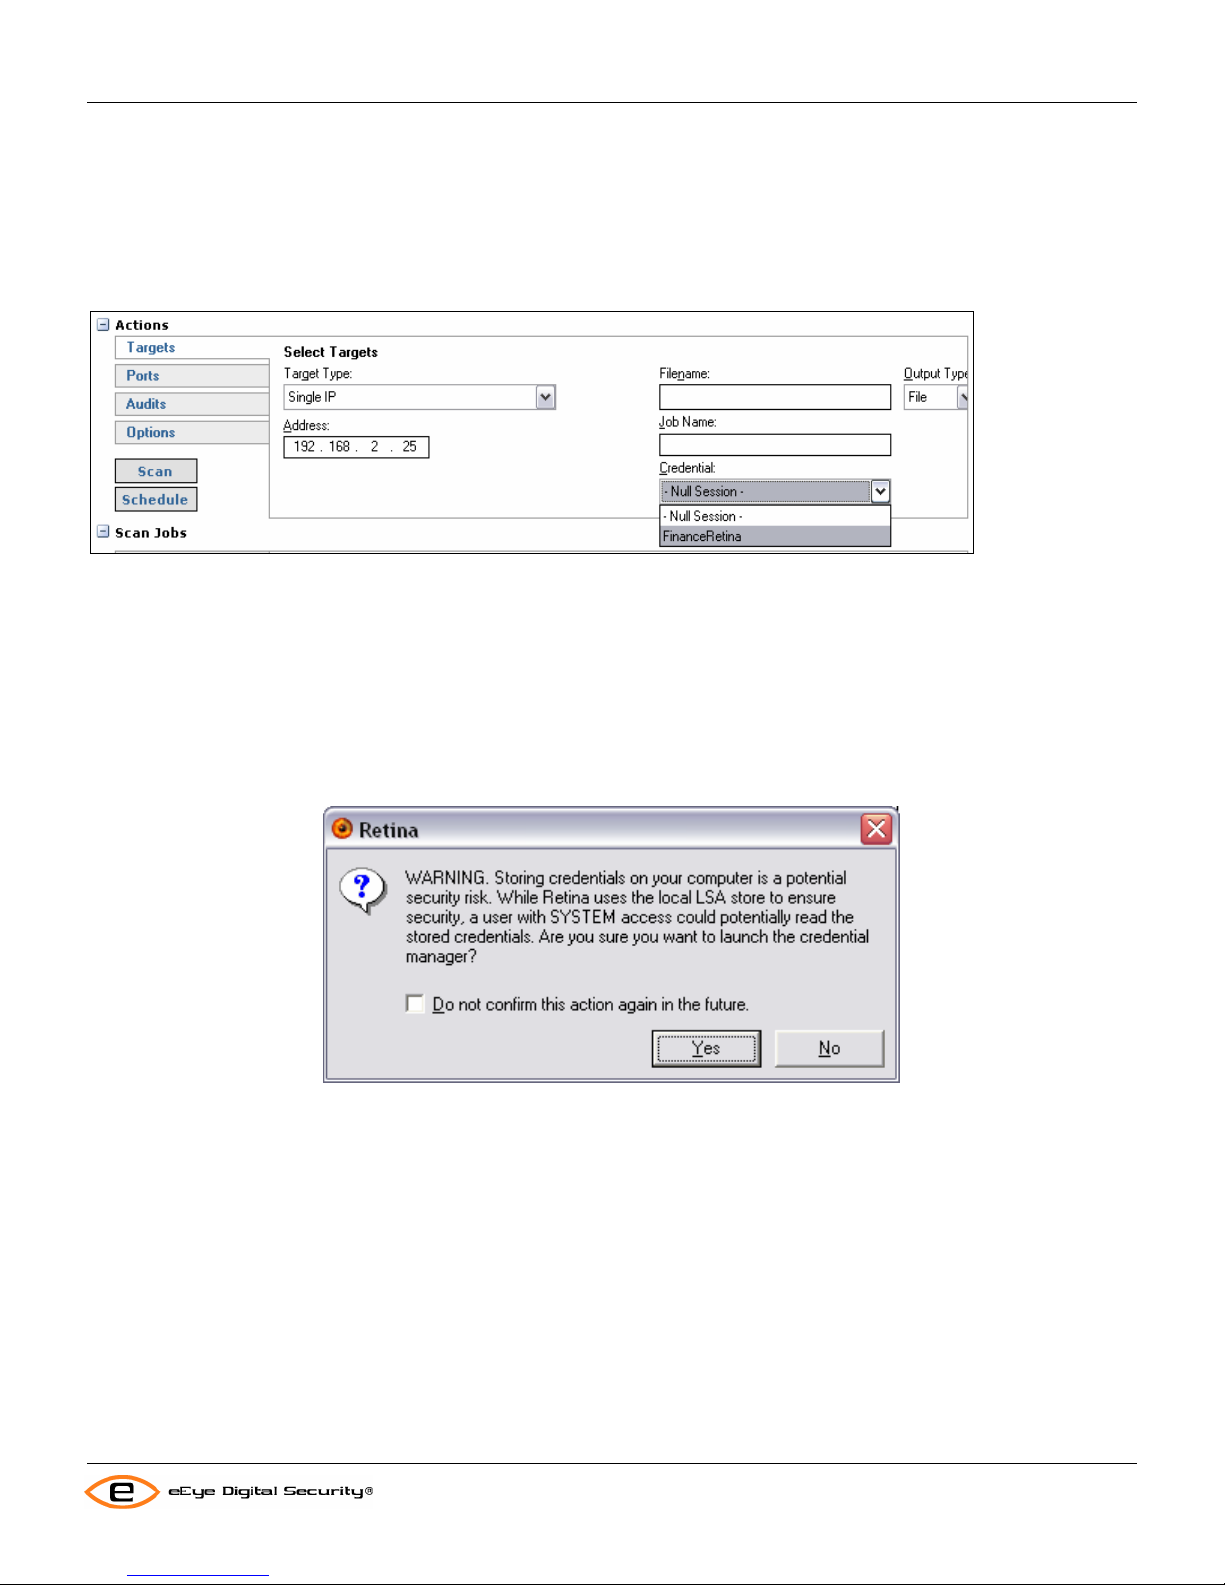
To use a set of credentials in a scan:
1. From the Audit tab select the Targets sub-tab.
2. Click the down button in the Credential drop-down box.
Retina Users Manual
3. Then select the desired user from the drop-down list. The user must have access to the registry or domain that
will be scanned.
4. Your scan will now run with the access provided by the user you selected.
Adding/Editing Credentials
To set up credentials for use:
1. Select Tools from the menu.
2. Select Credential Management from the drop-down menu.
3. You will see an information dialog informing you local that storage of credentials. You will have to decide if you
wish to store credentials. If so, select Yes. If not you will not be able to use credentials when scanning.
4. You will then see the Credential Management dialog. Enter the user ID that you wish to use for scanning in the
Username edit box, to enter a domain user ID enter the name of the domain, a backslash and the user ID i.e.:
Corporate\Administrator, otherwise Retina will use the entered credentials as a local user on the target systems;
the corresponding password into both the Password and the Confirm Password edit boxes. And finally enter a
name for the pair in the Description field.
42
Page 49

Using the Audit Tab
Retina Users Manual
5. Then select Add. You may enter a number of credentials here, by repeating steps 4 and 5.
6. To remove a stored credential, highlight the desired user name in the Username list box.
7. Select the Delete button.
8. When you are through managing credentials select the Close button.
43
Page 50

Using the Remediate Tab
Retina Users Manual
Using the Remediate Tab
The Remediate tab is used to generate reports or lists to be used in remediation management. The most us eful lists
are those of all machines with a certain vulnerability to be fixed, or all vulnerabilities for specific machines. This same
information can also be opened in MS Word™ or Internet Explorer™ to create customized reports.
The main window of the Remediate tab is divided into three panes:
1. The Configurations pane, where you set filters and options and generate Remediation li sts.
2. The Scan Jobs pane, where you determine the status of scan jobs; view completed jobs; view scheduled jobs;
control active jobs; and delete or view completed jobs. To learn more about the Scan Jobs pane, see Using the
Scan Jobs Pane on page
3. The Results pane, where the generated reports are displayed.
Accessing the Remediate Tab
Complete the following step to access the Remediate tab:
51.
Click the Remediate tab from the Retina interface (unless it is already selected).
The Remediate Tasks shortcut bar displays the following commands that you can select. Unavailable menu options
appear dimmed.
• Generate Report
• Save Report
• Print Report
44
Page 51

Using the Remediate Tab
• View in Microsoft Word™
• View in Web Browser
Generating a Remediation Report
1. Select the Remediate tab from the Retina Interface (unless it is already selected).
2. Select the Filter tab on the Configuration section of the main window.
Retina Users Manual
3. Select the report grouping, machine, and vulnerability sorting options by using the Group Report By, Sort
Machines By, and Sort Vulnerabilities By drop down boxes.
4. There will be a list of found vulnerabilities or scanned machines in the Include In Report window. Check or
uncheck these to include or exclude them from the report.
5. To change formatting for the report, click the Options tab and check or unchec k to select or deselect formatting
options. You can select from the following options:
• Insert page breaks between entries – Which will insert page breaks between the vulnerabilities or the IPs
depending on which selection you made in grouping the report.
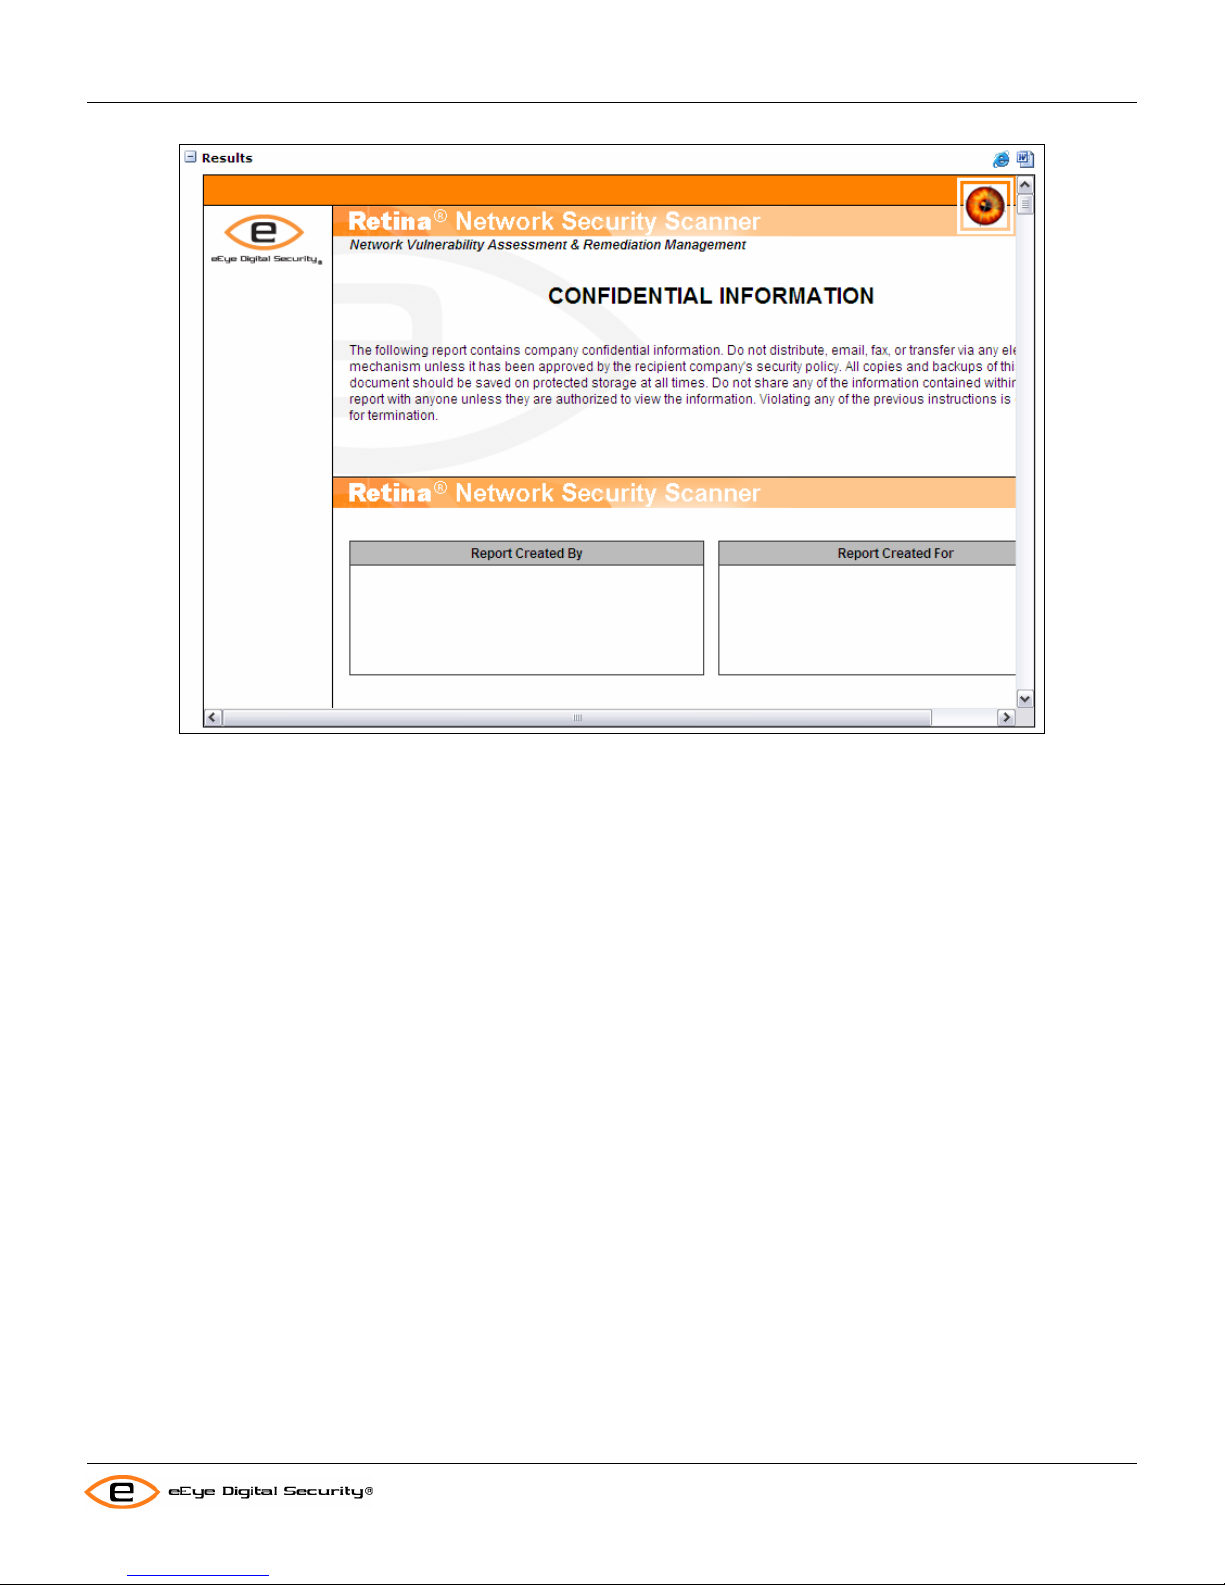
• Include confidentiality page – Which will include the Confidential heading a paragraph at the beginning of
the report.
• Include creation details page – Includes information entered in the Report Created By and Report
Created For text boxes.
• Expand URLs for printing – Displays the actual URL rather than the highlighted link.
• Include notes area after each section – Includes a notes area after each section.
6. Click the Generate button to produce the report. This could take several minutes, depending on the size of th e
scan and the number of vulnerabilities found.
45
Page 52

Using the Remediate Tab
Retina Users Manual
Printing a Remediation Report
To print a report, click either the Print Report button from the shortcut bar or the printer icon on the toolbar and follow
the prompts.
Editing a Remediation Report in Microsoft Word™
If you have Microsoft Word™ installed, you can click Open Report In Microsoft Word™ on the shortcut bar, and the
report will open in a Microsoft Word™ window ready for editing.
Saving a Remediation Report
You can save a Remediation Report in HTML format for future use. To save a Remediation Report, in the top line
menu, go to File->Save Report As… and follow the prompts for saving your report.
46
Page 53

Using the Report Tab
Retina Users Manual
Using the Report Tab
Retina reports provide detailed information gathered by the scanner and organized into sections, including General,
Audits, Machine, Ports, Services, Shares, and Users. The report, in its printable form, can be viewed by pressing the
Reports button on the toolbar. The Reports interface allows you to quickly and efficiently customize the output of
Retina reports to better suit your needs.
The main window of the Report tab is divided into three panes:
1. The Configurations pane, where you set filters and options and generate reports.
2. The Scan Jobs pane, where you determine the status of scan jobs; view completed jobs; view scheduled jobs;
control active jobs; and delete or view completed jobs. To learn more about the Scan Jobs pane, see Using the
Scan Jobs Pane on page
3. The Results pane, where the generated reports are displayed.
Accessing the Report Tab
Complete the following step to access the Report tab:
51.
Click the Report tab on the Retina interface (unless it is already selected).
The following example shows the Report tab of the Retina Interface.
The Report Tasks shortcut bar displays the following commands that you can select. Unavailable menu options
appear dimmed.
• Generate Report
• Save Report
47
Page 54

Using the Report Tab
Retina Users Manual
• Print Report
• View in Microsoft Word™
• View in Web Browser
Generating a Report
1. Select the Report tab from the Retina Interface (unless it is already selected).
2. To select what sections to include in the report click on the Sections tab of the Configuration pane and check
the sections you want in the report.
3. To change formatting for the report, click the Options tab and check or unchec k to select or deselect formatting
options.
4. Click the Generate button to produce the report. This could take several minutes depending on the size of th e
scan and the number of vulnerabilities found.
48
Page 55
Using the Report Tab
Retina Users Manual
Printing a Report
To print a report, click either Print Report on the shortcut bar or the printer icon in the toolbar, and follow the prompts.
Saving a Report
You can save a Report in HTML format for future use. To save a Report, in the top line menu, go to File->Save
Report As… and follow the prompts for saving your report.
49
Page 56

Scheduling Scan Jobs
Retina Users Manual
Scheduling Scan Jobs
The Scheduler works the same for Discover scans and Audit scans. The only exception is that there can be only
one Discover scan scheduled (named Discover) at any time. To get to the Scheduler click the Schedule button in
either the Discover or the Audit tab.
To run the scan once:
A. Enter the name that you would like for this scan.
B. Select Once in the Frequency drop-down.
C. Select the Start Time.
D. Select the Run Date (up to one year in the future).
50
Page 57

Scheduling Scan Jobs
E. Select OK.
To run the scan on a daily basis:
A. Select Daily in the Frequency drop-down.
B. Select the Start Time.
C. Select OK.
To run the scan on a weekly basis:
A. Select Weekly in the Frequency drop-down.
B. Select the Start Time.
C. Select one or more Day(s) of the Week to run the scan.
D. Select OK.
To run the scan on a monthly basis:
A. Select Monthly in the Frequency drop-down.
B. Select the Start Time.
C. Select the Day of the Month to run the scan
D. Select one or more Month(s) of the Year to run the scan.
E. Select OK.
Retina Users Manual
51
Page 58
Using the Scan Jobs Pane
Retina Users Manual
Using the Scan Jobs Pane
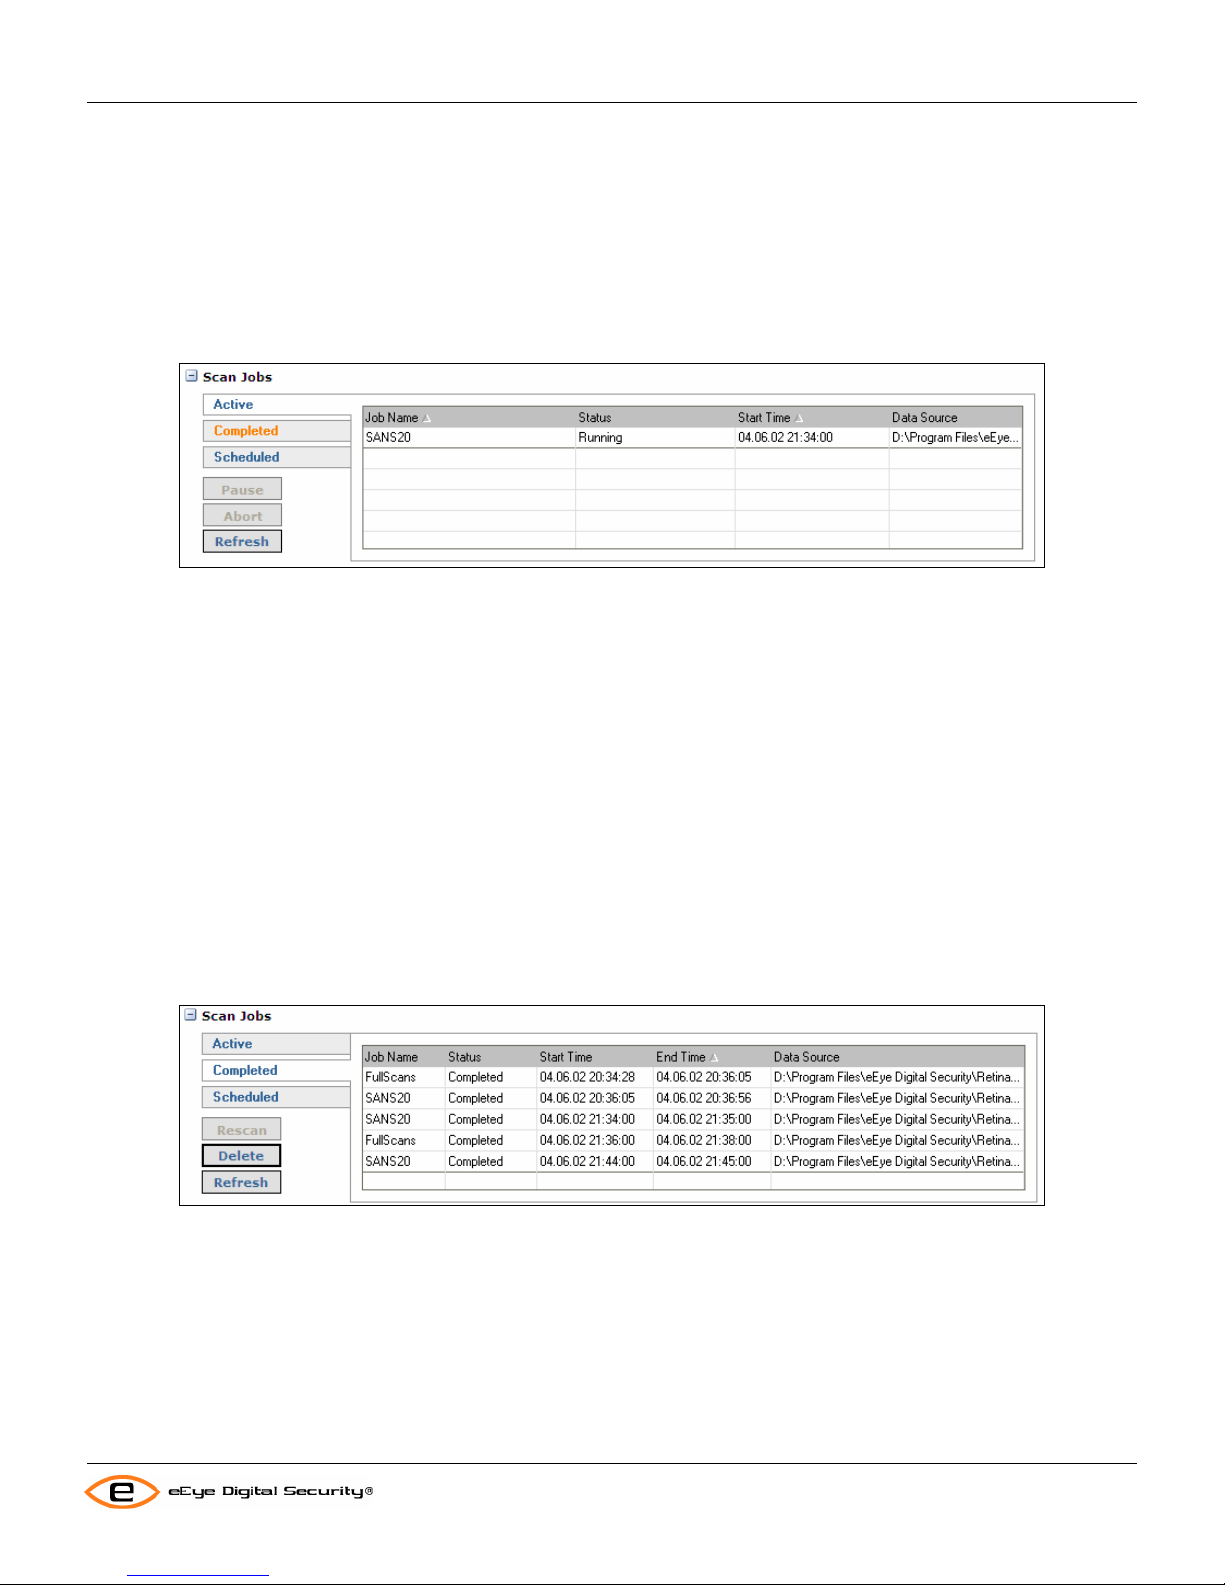
The Scan Jobs pane is available in the Audit, Remediate and Discover tabs. It consists of three sub-tabs:
Active
The Active tab lists jobs and their status. Jobs started from the Retina interface, the Retina command line utility or
sent from a REM Events server will display here.
Then Job Name column will be the name you assigned to the job, or “unknown” if you did not assign a name.
The Status column can be Running or Requested. A running job is currently being scanned. A requested job is a job
that is in the queue to be run and will start as soon as there are threads available.
The Start Time column is the time the job was Requested until the job starts. Once started it will be the time that the
job actually began scanning.
The Data Source is the filename or DSN that the job is being written to.
Each column can be sorted.
A job in the Active pane may be paused or aborted no matter how the job was started. To pause a job, select it in the
window and click the Pause button. To abort a job, select it in the window and click the Abort button.
Completed
The Completed tab lists jobs that have finished.
The Job Name, Start Time and Data Source columns are the same as the Active tab.
The Status is either Completed for a job that ran to its normal completion, or Aborted, for a job that a user aborted.
The End Time is the time that the job ended or was aborted.
Selecting the job and clicking the Delete button will delete jobs in the Completed tab. The job will be deleted from the
location it is stored, the file or DSN won’t be deleted.
52
Page 59

Using the Scan Jobs Pane
Retina Users Manual
The user can also Rescan a job in the Completed tab by selecting the job in the list and clicking the Rescan button.
The listed job will not be overwritten, but a new job with the same settings will be started.
Scheduled
The Scheduled tab displays jobs that are scheduled but not yet executed. Once a job starts it will be placed in the
Active tab and the next scheduled instance of the job will then show in the Scheduled tab.
The Job Name, Data Source and Start Time are the same as the other tabs.
The Status is only scheduled.
Jobs in the Scheduled tab can be edited and deleted. Selecting a job in the list and clicking on Edit will bring up the
Scan Job Scheduler (see Scheduling Scan Jobs on page
Selecting a job in the list and clicking Delete will remove the job from the schedule.
49 for information) window.
53
Page 60

Completing Scan file Procedures
Retina Users Manual
Completing Scan File Procedures
Retina automatically saves scans under either a generated name or using the name you entered when you started the
audit scan (see Starting an Audit Scan on page
Opening a Scan File
Complete the following steps to open a scan file:
1. Select File > Open from the menu bar.
2. Select the scan file you want to open.
3. The scans available in that file be displayed in the Job Status->Complete window.
Deleting a Scan File
Complete the following steps to delete a scan file:
1. Select File > Open from the menu bar.
2. Select the scan file you want to delete.
3. Press the Delete key on the keyboard.
Windows™ prompts you to confirm that you want to delete the selected file.
33). This section describes how to open, and delete scan files.
4. Choose Yes to delete the file. Otherwise, choose No.
Windows™ deletes the scan file from the list of files.
54
Page 61

Options
Retina Users Manual
Options
Customizing Retina
You can customize Retina to meet your specific needs by using the Options Dialog, located by selecting Tools >
Options.
General Options
You will see the Options dialog open to the General tab. This tab controls:
• Appearance
• Logging
• Auto Update
• Central Policy
55
Page 62
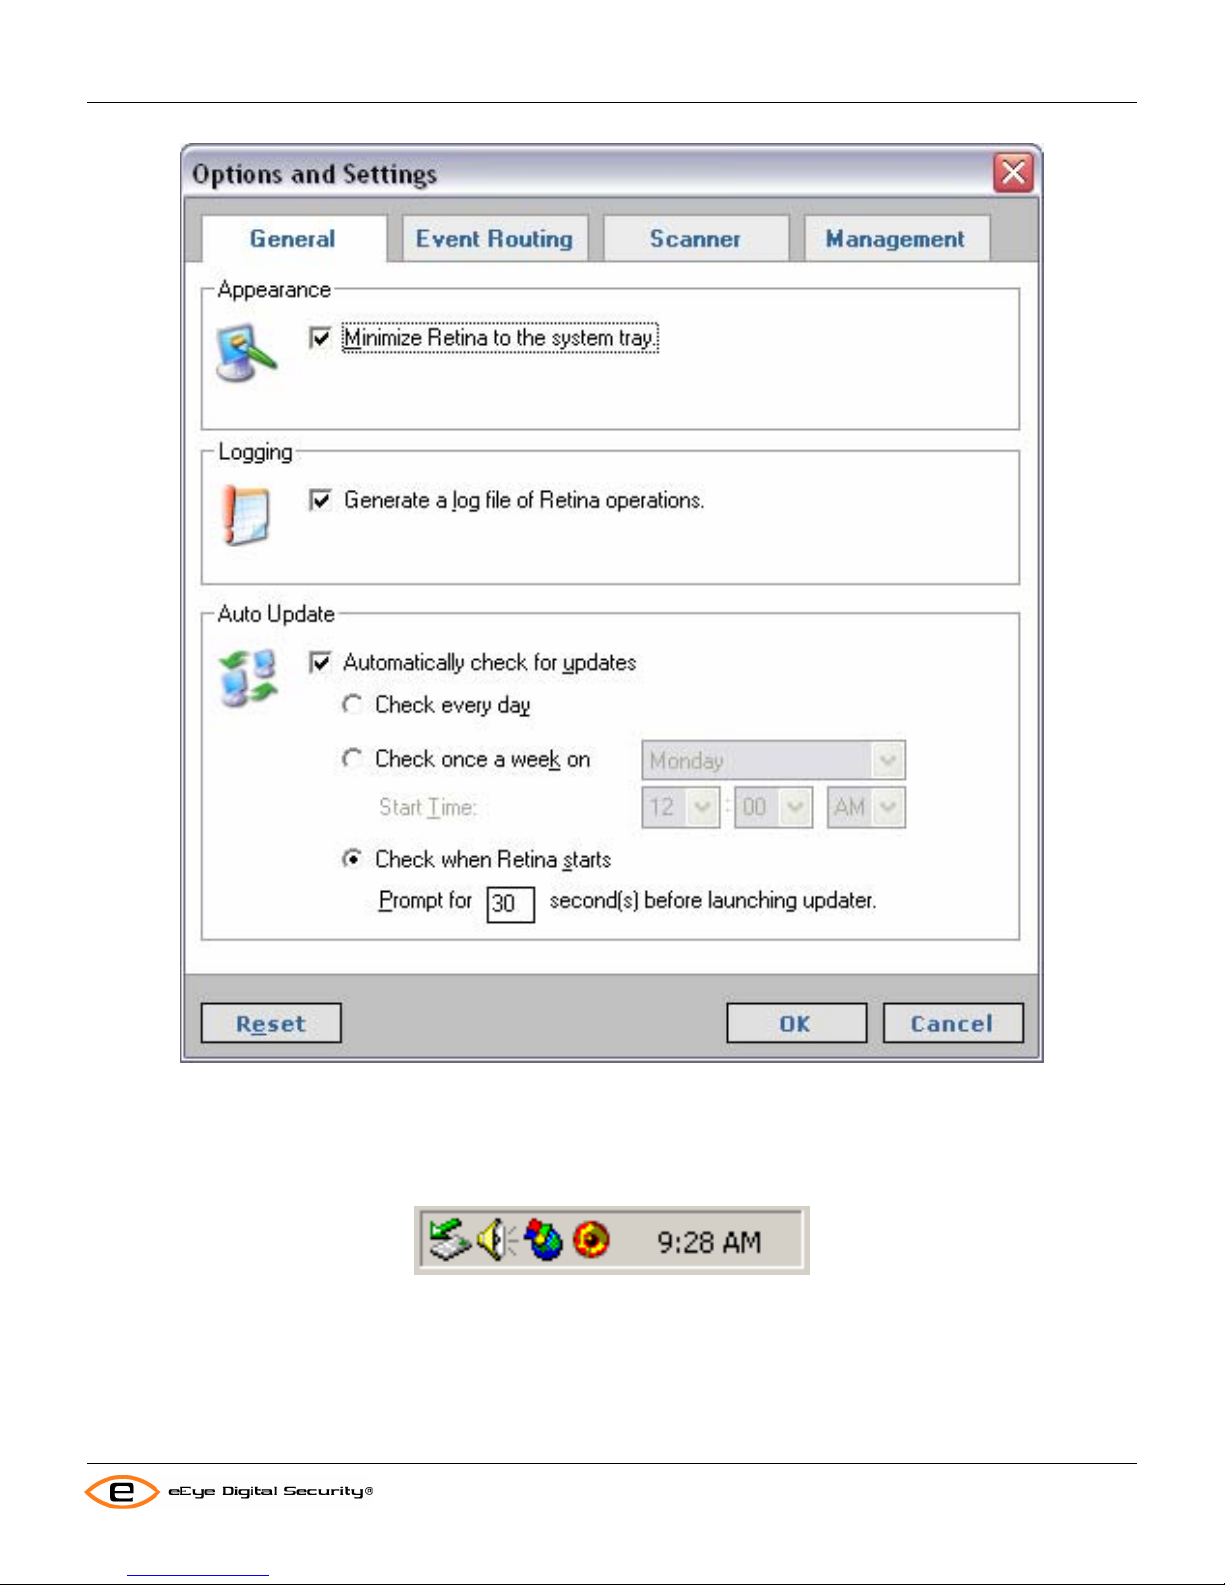
Options
Retina Users Manual
Appearance
You can select Minimize Retina to the system tray, which will cause Retina to drop to an icon in the system tray
when minimized:
Logging
The Generate a log file of Retina operations selection turns Retina logging on if checked, and off if unchecked. By
default, Retina logs to a file named
YYYY-MM-DD_NNNNNN_RetDebug.log in the installation directory.
56
Page 63

Options
Retina Users Manual
Auto Update
The Automatically check for updates when Retina Starts check box turns policy and software updates on and off.
The Prompt selection determines how long Retina will wait prior to starting the update.
Central Policy
The Enable Central Policy checkbox allows Retina to download audit files from a single REM server. The location of
the REM server must be entered in the Central Policy URI text box. Check for new policies every… determines
how often Retina will request updates from the REM server.
Event Routing
The Event Routing tab controls:
• REM Event Logging
• OPSEC Logging
REM
Enable logging to a REM Event server and determine what information to log.
OPSEC
Enable logging of specified audits to a syslog server and set the server address and port.
Scanner
The Scanner tab adjusts the performance of the scanner. The default settings should be acceptable for most
systems. You should only adjust them if you are having problems.
57
Page 64

Options
Retina Users Manual
Performance
Performance problems will normally show up in other problems on the either the physical scanner sy stem as such
problems as an unresponsive mouse or screen refreshes and HTTP or other network proto col timeouts. They typically
show up on target machines as dropped connections for other services. Though it can show up in the Retina logs in
such areas as known services not being found or known open ports not being id entified.
If you find that Retina is overloading the server it is installed on—the server loses other connections or is
unresponsive during scanning—try reducing the number of simultaneou s targets.
If you find that Retina is overloading your network or the target hosts, reduce the Adaptive Scan Speed.
58
Page 65

Options
Retina Users Manual
Reliability
Reliability problems can be caused by poor network connectivity or overloaded target sy stems. These problems are
not normally noted on the actual scanner server, except through longer scan times. They typically show up on target
machines as dropped connections for other services. Though it can show up in the Retina logs in such areas as
known services not being found or known open ports not being identified. If a single service is slow on the target
machine, this will show in the Retina logs as services that are initially connected, but with the banners and other
return information not displaying until some time after the check is complete.
These settings are used to allow Retina to compensate for network latency. If you find that pings are not returning in
time for Retina to detect them, adjust the Ping Timeout upward. If Retina doesn’t seem to be getting complete data
from devices, or you are scanning hosts with services that are under heavy load, adjust the Data Timeout upward.
Again, the default settings should be suitable, only adjust these when you’ve checked other possible problems with
the network
59
Page 66

Retina Extras
Retina Users Manual
Retina Extras
Using a DSN to Store Session Data
Complete the following steps to use a system DSN (Data Source Name) to store your Retina scan results.
• Select any of the existing system DSNs.
Creating a DSN to Store Session Data
See the Windows™ Help menu for instructions on using the User DSN Wizard to create a system DSN for your
Retina scan results. The target database must be configured to support Retina tables.
Viewing Previous Jobs from a DSN
Once you have assigned a DSN to Retina, you can then use it to store scan data. By default, Retina always displays
the most recent scan results when a DSN is selected.
Complete the following steps to view results of previous scans stored in your DSN.
1. The Select Job box appears.
2. Choose the scan file that you want to view, and click OK.
Retina displays the available scans in the Scan Jobs section of the Audit, Remediate, and Report tabs.
3. In the Completed sub-tab of the Scan Jobs section, select the job you wish to view, report or remediate and the
results will be available in the Scanned IPs section of the Audit tab or will be used for the Remediate or Report
when you click the Generate button.
60
Page 67

Auto Update
Retina Users Manual
Auto Update
What is Auto Update
Using an Internet connection, Auto Update allows you to easily keep up with the latest Retina improvements available
from eEye Digital Security. Once you have selected the Auto Update feature, Retina will update itself with the
necessary files—you do not have to deal with any messy file downloads that must be manually installed.
Auto-Update can be configured to run at the beginning of every Retina session. During this period, Auto-Update will
contact the eEye update server, and obtain the latest audits and software updates for eEye Digital Security’s Retina
scanner.
61
Page 68

Manual Update
Retina Users Manual
Manual Update
In addition to configuring Retina to automatically download the latest Retina improvements available from eEye Digital
Security, manual updates are also available from the file menu.
1. Select Tools > Updates from the menu bar.
Retina will be unloaded as suggested by the initial dialog box.
If you would rather not be questioned about this activity each time, put a checkmark in the box next to Do not confirm
this confirm this action again in the future.
2. Select Yes.
The list of Sync-It supported products will be presented. If there is not already a checkmark by Retina, select it from
the list.
62
Page 69

Manual Update
Retina Users Manual
3. Select Next >.
The Downloading window displays progress bars relating to the download and install of the updates.
63
Page 70

Manual Update
Retina Users Manual
4. Select Next >.
The Update Summary window appears, allowing you to review the status of the updates performed. Highlighting a
product from the list allows you to see the details of the update.
64
Page 71

Retina Audit Wizard
License Management
Running Retina for the First Time
Retina Users Manual
When you run Retina for the first time, you will see the registration screen, which prompts you for a serial number. To
obtain the serial number, you will first need to go to the licensing generation part of Retina’s Web site. After
purchasing Retina you should have received an email containing a username and password to use to gain access to
the licensing generation part of Retina’s Web site.
Full directions to obtain your serial number are included in the post purchase email that you receive after purchasing
Retina. Once you have entered a valid serial number you can begin using Retina.
Migrating Retina to a New Machine
To transfer your Retina serial number to a new machine, take the following steps:
1. Launch the License Management interface by selecting License Management from the Help drop down menu.
2. Select the Transfer License radio button and follow the on screen instructions.
65
Page 72

Retina Audit Wizard
Retina Users Manual
Terminating a License
To terminate your Retina license, follow the steps in Uninstalling Retina (page 10) and when prompted delete the
Retina license select Yes.
66
Page 73

Retina Audit Wizard
Retina Users Manual
Retina Audit Wizard
The Retina Audit Wizard creates custom Retina audits. These custom audits are add ed to Audits.XML, a file that
contains information that Retina uses to search a computer for particular security vulnerabilities. To use the Retina
Audit Wizard to create a custom audit, follow the following steps.
1. Start the Retina Audit Wizard, by either selecting the Audits
starting the Audits Wizard.exe in the Retina 5\Tools directory.
You should see the Welcome screen. Click
Next> to start creating the audit.
Wizard… from the Tools drop-down menu or by
2. You should now see the Audit Description screen. This is where you will set the name, category, and other
information for your audit. Click the
Next > button to continue building the audit.
67
Page 74
Retina Audit Wizard
Retina Users Manual
The information you can set here is:
• Audit Name – The name to give to the audit report on the Retina Interface when the audit has successfully
identified a vulnerability.
• Category – The category under which the audited vulnerability can be classified. The following categories
are available in Retina.
o Accounts – Audits that check for existing accounts or account information. Account audits also
include default passwords checks, and unprotected accounts, such as accounts without
passwords, expired accounts, and so on.
o CGI Scripts – Audits that check for the existence of CGI scripts that are known to contain
security vulnerabilities, such as the notorious
o DNS Services – Vulnerability checks or audits that pertain to the Domain Name Service protocol
comprise this category. For example, the Bind TSIG remote root buffer overflow that was
released in the later half of the year 2000 would fall under this category.
o DoS – Denial of Service attacks, such as the ICMP fragmentation attack, Ping of Death, and
other attacks that can take a machine or service offline and lead to the denial of service to
customers fall under this category.
o Database
o FTP Servers – Audits pertaining to the File Transfer Protocol, usually servers, fall under this
category.
o IP Services – Vulnerabilities in simple IP services fall under this category—services such as
CHARGEN, or ECHO.
o Mail Servers – Audits that examine SMTP, IMAP, POP2, POP3 and other Internet mail servers
for security vulnerabilities fall under this section.
o Miscellaneous – Audits that don’t fall under any other category fall here. You could also put
custom Audits/RTHs here.
o NetBIOS – Audit’s that use or examine the NETBIOS protocol for vulnerabilities fall under this
section. An audit that examined remote Windows™ File Sharing for permissions problems would
fall under this section.
/cgi/phf cgi script.
68
Page 75

Retina Audit Wizard
o Registry – This category is for checks that just check Registry for the existence of a value that
can be used to identify a vulnerability.
o Remote Access – The remote access category contains audits for security holes in remote
access agents. An example of a remote access audit might include an audit that checked for a
vulnerability in PCAnywhere.
o RPC Services – Audits in this category examine Remote Procedure Call (RPC) services for
vulnerabilities. For example, an audit that looked for the existence of a vulnerable rpc.statd server
running on a remote host would fall under this section.
o Service Control – Audits that examine administrative control panel services fall under this
category.
o SNMP Servers
o SSH Servers – This section contains vulnerability checks for Secure Shell server vulnerabilities.
o Web Servers – The audits in this section pertain to the identification of security holes in WWW
servers.
o Wireless
o Anti-Virus
o Windows
o Backdoors
o User
o Peer-To-Peer
o Spyware
o Package checks – These categories check for specific distribution package s from the
responsible vendor or group: Mandrake Local Security Audits, RedHat Local Security Audits,
SuSE Local Security Audits, Solaris Local Security Audits, MacOS X Local Security Audits,
FreeBSD Local Security Audits, Fedora Local Security Audits, Debian Local Security Audits,
Gentoo Local Security Audits, HPUX Local Security Audits, IRIX Local Security Audits, Local
Security Audits, Slackware Local Security Audits, Immunix Local Security Audits, Conectiva Local
Security Audits, EnGarde Local Security Audits, Trustix Local Security Audits, Caldera Local
Security Audits, SCO Local Security Audits, AIX Local Security Audits, OpenBSD Local Security
Audits, TurboLinux Local Security Audits, NetBSD Local Security Audits, Juniper Local Security
Audits
• Vulnerability Risk Level
In the upper left hand corner of the Vulnerability sub menu, you can set the severity level of the vulnerability
audit being created. The following severities are available:
o Information – A security vulnerability that gives the attacker more information, which then helps
him to target his attacks more successfully. These can be directory structures, account names,
network addresses, or the internal descriptions and information of other machines.
o Low – Low-risk vulnerability usually include vulnerabilities that can be exploited to read files
containing public information, or a vulnerability that gives an attacker very minimal access to a
remote system.
o Medium – Medium Level usually includes vulnerabilities that can be exploited to gain general
access to a system. Vulnerabilities that allow attackers to remotely view sensitive files can be
categorized here also.
o High – Full remote access. A vulnerability that can be exploited to gain total access of a machine
remotely falls under this category. These vulnerabilities are extremely severe, and tools to exploit
them are usually publicly available
• Vulnerability Description
Briefly describe the vulnerability in question—what it is, and where it exists.
• Vulnerability Fix
Retina Users Manual
69
Page 76

Retina Audit Wizard
Retina Users Manual
Provide information describing how to eliminate the security hole from the system being scanned. This
information can describe where to get a patch or how to change a configuration setting
3. Next you should see the Audit Type screen. After you have selected the type click Next> to continue creating the
audit.
Audit Type
This Section of the Audit Wizard Interface contains the information pertaining to the actual vulnerability check. You set
the check type you want make.
The following check types are currently available:
• Banner – This check type allows you to compare the scanned machine software version to one that you
believe to be vulnerable.
• CGI Script – This check allows you to check for the existence of a CGI script that you know to be
vulnerable.
• Registry – This check type pertains to checks that examine a registry key or key value to determine if a
vulnerable software product is installed, or if a vulnerable setting is effective on the computer being
scanned.
• Service Pack/Hotfix – This check allows you to create audits that determine if hotfixes have been installed.
You can also use the audit Wizard to create an audit check for a Hotfix depending on Service Pack
conditions. For example, you can create an audit check for Hotfix id q1234 only if Service Pack 1 is not
installed.
• Check File – Checks the version information for the named file.
• Remote Check – This check allows you to check packages on UNIX® or Linux systems.
70
Page 77
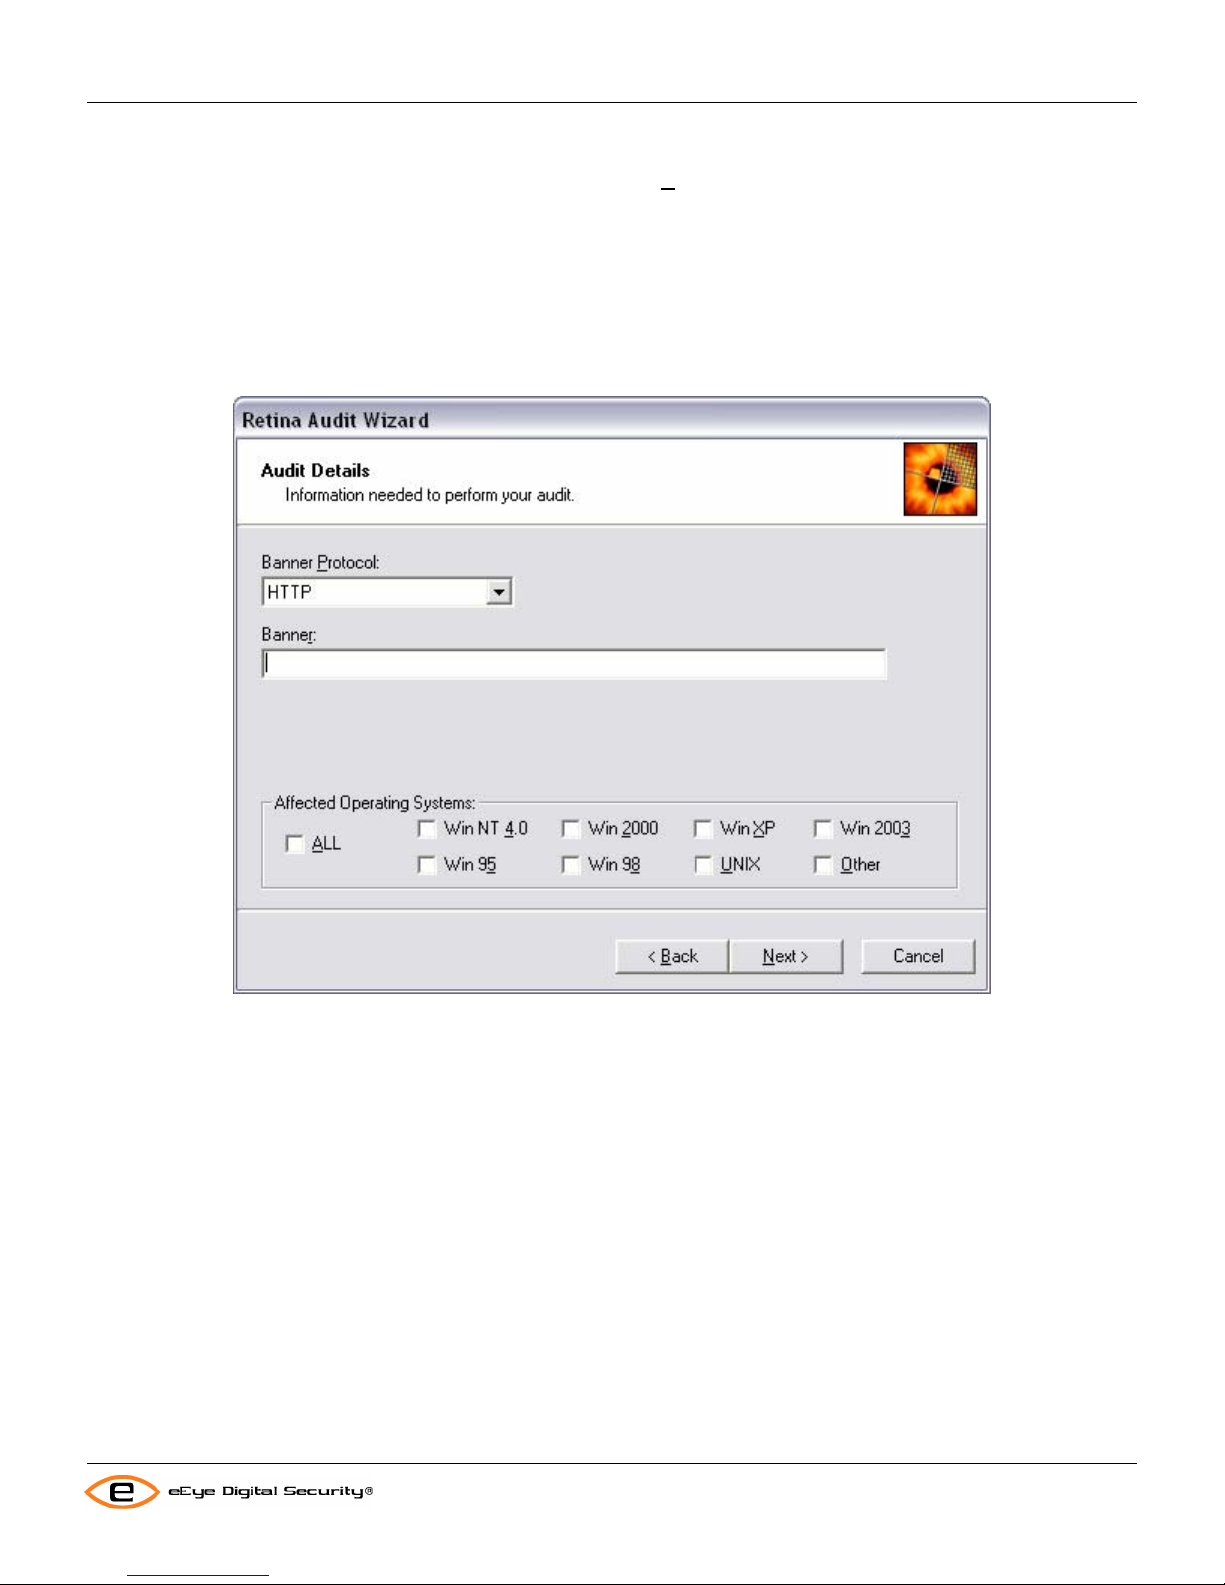
Retina Audit Wizard
Retina Users Manual
4. The next screen is the Audit Details screen and is different for each type of audit selected. Each screen is
detailed below. After you have set the audit details, click the
Banner
Select the type of service being checked, HTTP, POP3, SMTP, FTP, DNS, IMAP, LDAP, SSH, or TELNET. Then
enter the banner to be checked. Such as:
220 corp.ftp.com MyServer 5.0.4
Then check the selection box to determine which operating systems the scanner should check for this vulnerability.
Next> button to continue audit creation.
CGI Script
Enter the URL of the CGI script you want to check and select the associated operating systems.
71
Page 78
Retina Audit Wizard
Retina Users Manual
Registry
Select Path, Key, or Value for the type of registry entry you will be checking.
Then select does not exist or exists to test for the absence or presence of this registry item. Select the parent
to be searched, HKEY_CLASSES_ROOT, HKEY_CURRENT_USER, HKEY_LOCAL_MACHINE, HKEY_USERS, or
HKEY_CURRENT_CONFIG.
Enter the Registry Path to be compared. Also enter the Registry Key and Registry Value if required.
Finally, select the Affected Operating Systems.
Hive
72
Page 79
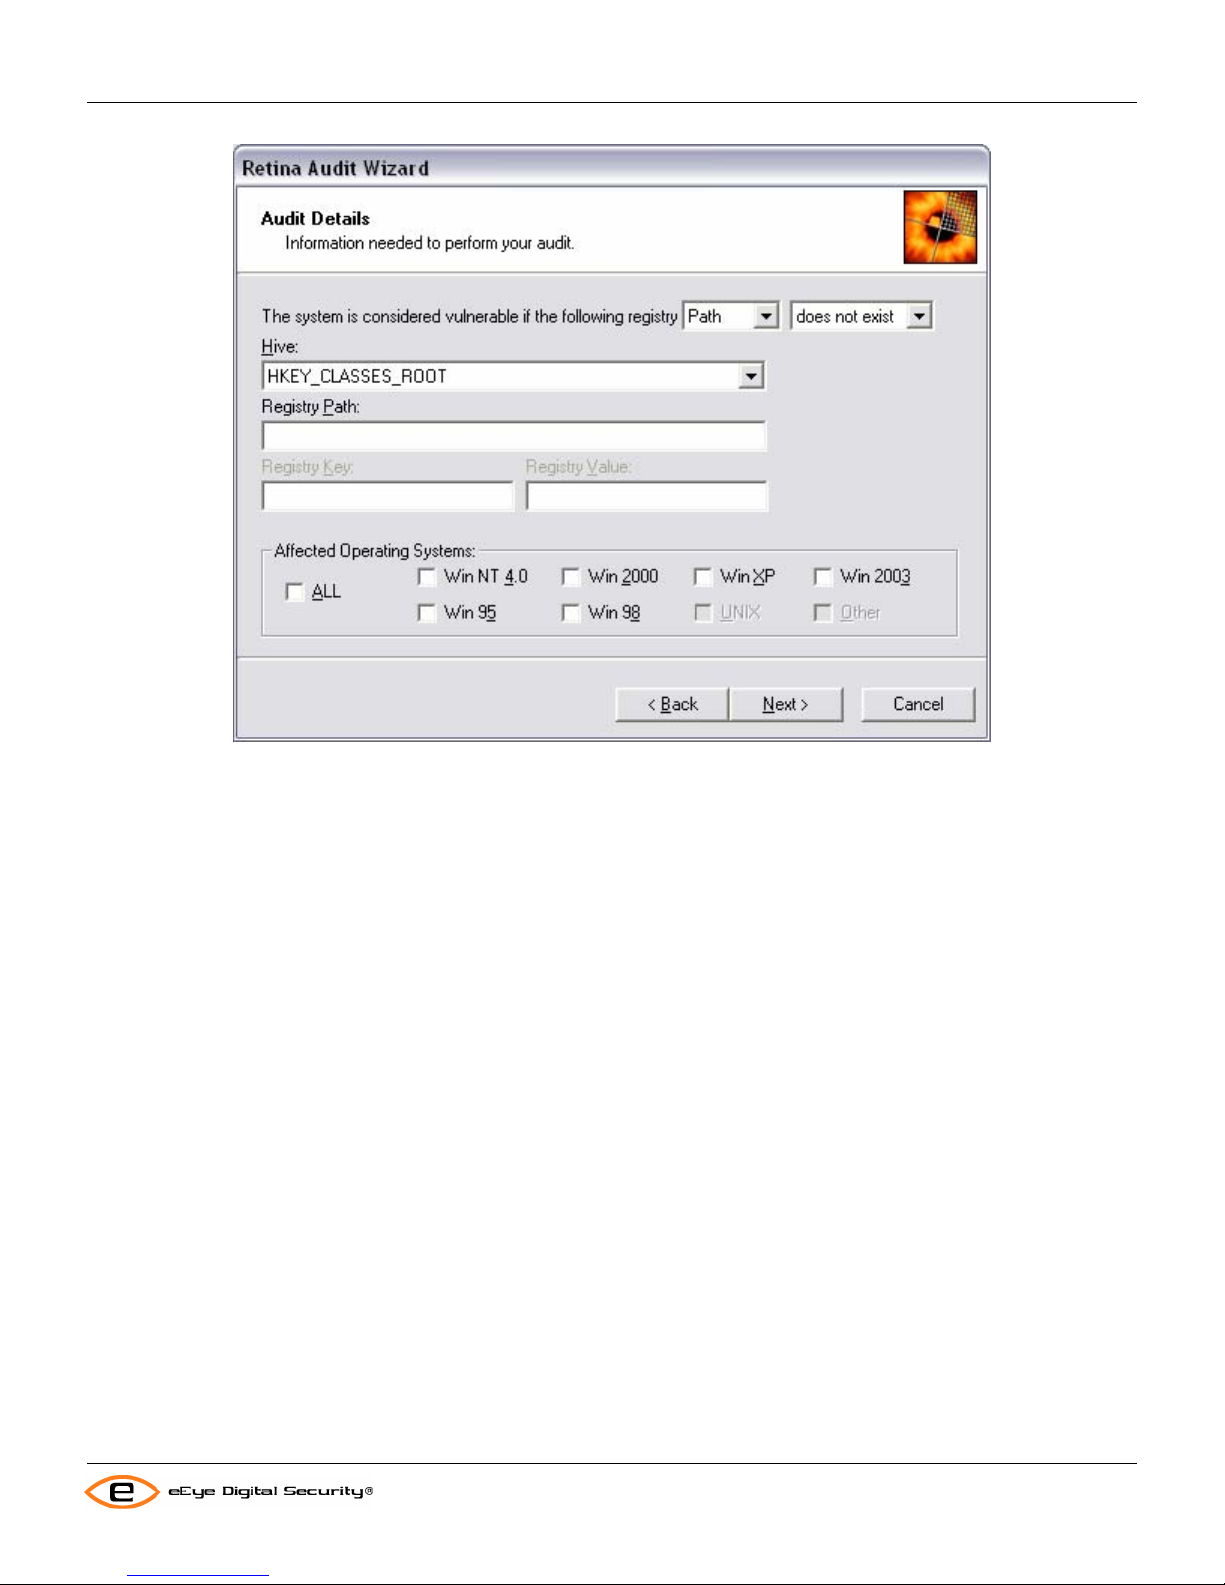
Retina Audit Wizard
Retina Users Manual
Service Pack/Hotfix
If you are creating an audit to check only for Internet Information Server patches then check the Perform this audit
only if IIS is installed checkbox.
To check for a service pack level, select t he Check to make sure service pack radio button and then fill in the
service pack number in the corresponding edit box.
To check for a Hotfix, select the Check to make sure hotfix radio button and enter the hotfix number in the
corresponding edit box.
To check for a hot fix in lieu of a service pack, select the If installed service pack is less than radio button and enter
the service pack number and hot fix number in the corresponding edit boxes.
Then select the Affected Operating Systems.
73
Page 80

Retina Audit Wizard
Retina Users Manual
Check File
To check a file version, enter the full pathname of the file in the Check if the File Version of edit box; then select
equal to, greater than, less than, greater than or equal to, or less than or equal to in the drop-down selection
box; and enter the version number in the edit boxes to the left of Version.
Then select the Affected Operating Systems.
74
Page 81

Retina Audit Wizard
Retina Users Manual
Remote Check
Remote checks are used to check for packages on non-Windows® devices.
To check for a package installed on a system, enter the regular expression that will match the desired package
(packages) in the Package edit box and check the Alert when matched checkbox.
To check to see if a package is not installed, enter the regular expression that will match the desired package in the
Package edit box and un-check the Alert when matched checkbox.
To check for a package installed on a system only if a second package is installed, enter the regular expression that
will match the desired package (packages) in the Package edit box; check the Alert when matched checkbox; check
the Only if installed package matches checkbox; enter the regular expression that will match the desired package in
the Installed Package edit box; and check the second Alert when matched checkbox.
To check for a package installed on a system only if a second package is not installed, enter the regular expression
that will match the desired package (packages) in the Package edit box; check the Alert when matched checkbox;
check the Only if installed package matches checkbox; enter the regul ar expression that will match the desired
package in the Installed Package edit box; and un-check the second Alert when matched checkbox.
To check to see if a package is not installed on a system only if a second package is installed, enter the regular
expression that will match the desired package (packages) in the Package edit box; un-check the Alert when
matched checkbox; check the Only if installed package matches checkbox; enter the regular expression that will
match the desired package in the Installed Package edit box; and check the second Alert when matched checkbox.
To check to see if a package is not installed on a system only if a second package is not installed, enter the regular
expression that will match the desired package (packages) in the Package edit box; un-check the Alert when
matched checkbox; check the Only if installed package matches checkbox; enter the regular expression that will
match the desired package in the Installed Package edit box; and un-check the second Alert when matched
checkbox.
75
Page 82

Retina Audit Wizard
Retina Users Manual
The Affected Operating System, Operating System drop-down box is currently only Custom. Enter the regular
expression to match the desired OS in the Version String edit box.
5. The Vulnerability Details screen comes up next. If you have BugTraq® or CVE numbers for the audit enter them
in the Bugtraq ID or CVE-ID edit boxes.
Enter URLs that link to information about the audit you are creating in the URL and URL Description edit boxes. You
may enter up to three.
Click the Next> button to continue creating your audit.
76
Page 83

Retina Audit Wizard
Retina Users Manual
6. The final screen will display.
77
Page 84

Retina Audit Wizard
Retina Users Manual
At this point you can click Finish to save the audit in the audits.XML file or click Cancel to abort audit creation.
78
Page 85

Using the Plugins Wizard
Retina Users Manual
Using the Plugins Wizard
You use the Retina Plugins Wizard to load and unload modules written using the Retina API. For information on the
Retina API see the Retina API documentation in your
C:\Program Files\Retina\Help\API directory.
New - Opens up a file explorer so you can locate the module you want to load.
• Edit - Allows you to alter various properties of the loaded module.
•
Remove – Unloads the selected module from Retina
79
Page 86

Using Retina From the Command Line
Retina Users Manual
Using Retina From the Command Line
In Retina 5 there are now two command line interfaces. Retina.exe can still be used from the command line with the
noted changes; and the Retina RPC client can be implemented as listed.
Notes:
In this document $RETINA is assumed to be the Retina 5 install directory.
Retina.exe:
Retina.exe Command Line Switches:
?
Displays Retina usage information.
Iprange
An nmap style IP range
Addressgroup
The name of an address group file to be used in the scan, this value overrides that of "iprange"
Scantemplate
The name of the scan template file to be used for the scan.
Outputfile
The name of output RTD file to generate, use "*" to have Retina auto-assign a name based on the current timestamp.
DSN
The name of the DSN to be used for data storage, this value overrides that of "outputfile".
Noupdate
Suppresses the launch of Sync-It.exe
Quietmode
Suppresses all dialog boxes.
Minimize
Launches Retina minimized to the system tray.
Policy
The same as "scantemplate"; Used for backwards compatibility with Retina 4.
Status
Name for the Retina scan status file.
NO LONGER SUPPORTED IN RETINA 5:
report
hostoutputfile
activityid
RetRPC_Client.exe
Retrpc_client returns no debug other information to the command line. All errors etc are sent to the Retina logs.
Usage: retrpc_client <command> <args>
StartScan <scan name>
StopScan <scan name>
PauseScan <scan name>
UnPauseScan <scan name>
SetWindowHandle <Window ID>
StopSchedule <scan name>
Config
ModifySchedule <scan name>
DelCredentials <user name>
SetCredentials <description> <user name> <password>
80
Page 87

Using Retina From the Command Line
Retina Users Manual
FixIt <audit id> <host ip> <credential name>
pipeclient
StartScan <scan name>
This starts <scan name>, where <scan name> is the name of a scan request file in $RETINA\Jobs\ScanRequests.
Scan requests have xml extensions. If <scan name> is already scheduled no action is taken. If <scan name> is an
immediate job, it will be queued.
StopScan <scan name>
This stops <scan name> where <scan name> is the name of a scan request file in $RETINA\Jobs\ScanRequests.
Scan requests have xml extensions. If <scan name> is not running, no action is performed.
PauseScan <scan name>
This pauses <scan name> where <scan name> is the name of a scan request file in $RETINA\Jobs\ScanRequests.
Scan requests have xml extensions. If <scan name> is not running, or paused, no action is performed.
UnPauseScan <scan name>
This continues <scan name> where <scan name> is the name of a scan request file in $RETINA\Jobs\ScanRequests.
Scan requests have xml extensions. If <scan name> is not running, or not paused, no action is performed.
SetWindowHandle <Window ID>
This sets a window handle ID. This is deprecated use PipeClient
StopSchedule <scan name>
This deletes <scan name> where <scan name> is the name of a scan request file in $RETINA\Jobs\ScanRequests.
Scan requests have xml extensions. This deletes all occurrences of <scan name> since removes the scanreque st.
Config
This reinititalizes many of the retina configuration values from $RETINA\retinaconfig.xml
ModifySchedule <scan name>
This forces a change in the time of a scheduled job <scan name> where <scan name> is the name of a scan request
file in $RETINA\Jobs\ScanRequests. Scan requests have xml extensions.
DelCredentials <user name>
This deletes the credentials for <user name>
SetCredentials <description> <user name> <password>
This creates a credential <user name> with password <password>, if <user name> exists it will be overwritten.
FixIt <audit id> <host ip> [credential name]
This performs a Fixit operation identified by <audit id> against host <host ip>. It can optionally use <credential name>
to authenticate
Pipeclient
This acts as a simple pipe client; seeing all the xml output that the interface would see.
81
Page 88

Glossary
Retina Users Manual
Glossary
A
Acceptable Use Policy: Many networks have policies in place that restrict how a network can be used.
Access Control List: Most network security systems operate by allowing selective use of services. An Access
Control List is the usual means by which access to, and denial of, services is controlled. It is simply a list of the
services available, each with a list of the hosts permitted to use the service.
Address: There are three types of addresses in common use within the Internet. They are email addresses, Internet
(IP) or Internet addresses, and network interface card (NIC) hardware or MAC addresses.
Address Mask: A bit mask used to identify which bits in an IP address correspond to the network and subnet portions
of the address. This mask is often referred to as the subnet mask because the network portion of the address can be
determined by the encoding inherent in an IP address.
Address Resolution: Conversion of an Internet address into the corresponding Domain Name.
Administrative Domain: A collection of hosts and routers, and the interconnecting network(s), managed by a single
administrative authority.
Agent: In the client-server model, the part of the system that performs information preparation and exchange on
behalf of a client or server application.
Alias: A name, usually short and easy to remember, that is translated into another name, usually long and difficult to
remember.
Anonymous FTP: Anonymous FTP allows a user to retrieve documents, files, programs, and other archived data
from anywhere on the Internet without having to establish a user ID and password. By using the special user ID of
"anonymous" the network user can bypass local security checks and will have access to publicly accessible files on
the remote system.
ANSI: American National Standards Institute. This organization is responsible for approving U.S. standards in many
areas, including computers and communications. Standards approved by this organization are often called ANSI
standards (e.g., ANSI C is the version of the C programming language approved by ANSI). ANSI is a member of ISO
(International Organization for Standardization).
AppleTalk: A networking protocol developed by Apple Computer for communication between Apple Computer
products and other computers. This protocol is independent of the network layer on which it is run. Current
implementations exist for LocalTalk, a 235Kb/s local area network, and EtherTalk, a 10Mb/s local area network.
Application Program Interface (API): A set of calling conventions that define how a service is invoked through a
software package.
Application: A program that performs a function directly for a user. FTP, mail and Telnet clients are examples of
network applications
Application Layer: The top layer of the network protocol stack. The application layer is concerned with the semantics
of work (e.g., formatting electronic mail messages). The issues of how to represent that data and how to reach the
foreign node are concerns for lower layers of the network.
82
Page 89

Glossary
Retina Users Manual
ARP: Address Resolution Protocol. Used to dynamically discover the low-level physical network hardware address
that corresponds to the high level IP address for a given host. ARP is limited to physical network systems that support
broadcast packets that can be heard by all hosts on the network. It is defined in RFC 826.
ARPANET: Advanced Research Projects Agency Network—a pioneering long haul network funded by ARPA (now
DARPA). It served as the basis for early networking research, as well as a central backbone during the development
of the Internet. The ARPANET consisted of individual packet switching computers interconnected by leased lines.
ASCII: American Standard Code for Information Interchange. It is a standard character-to-number encoding widely
used in the computer industry.
ATM: Asynchronous Transfer Mode. It is a method for the dynamic allocation of bandwidth using a fixed-size packet
(called a cell). ATM is also known as "fast packet.”
Authentication: The verification of the identity of a person or process.
B
Backbone: The primary connectivity mechanism of a hierarchical distributed system. All systems that have
connectivity to an intermediate system on the backbone are assured of connectivity to each other.
This does not prevent systems from setting up private arrangements with each other to bypass the backbone for
reasons of cost, performance, or security.
Bandwidth: Technically, the difference, in Hertz (Hz), between the highest and lowest frequencies of a transmission
channel. However, as typically used, the amount of data that can be sent through a given communications circuit.
BIND: Berkeley Internet Name Domain. The implementation of a DNS server developed and distributed by the
University of California at Berkeley. BIND provides an automatic means of hostname to IP address resolution.
BOOTP: The Bootstrap Protocol, described in RFCs 951 and 1084, is used for booting diskless nodes. See also:
RARP.
Bridge: A device that connects two or more physical networks, and forwards packets between them. Bridges can
usually be made to filter packets—that is, to forward only certain traffic.
Devices related to bridges include repeaters, which simply forward electrical signals from one cable to another, and
full-fledged routers, which make routing decisions based on several criteria.
Broadband: A transmission medium capable of supporting a wide range of frequencies. It can carry multiple signals
by dividing the total capacity of the medium into multiple, independent bandwidth channels, where each channel
operates only on a specific range of frequencies.
Broadcast: A special type of multicast packet, which all nodes on the network are always willing to receive.
Broadcast Storm: An incorrect packet broadcast onto a network that causes multiple hosts to respond all at once—
typically with equally incorrect packets, which causes the storm to grow exponentially in severity.
Brouter: A device that bridges some packets (i.e., forwards based on data link layer information) and rout es other
packets (i.e., forwards based on network layer information). The bridge/route decision is based on configuration
information.
C
CERT: See Computer Emergency Response Team.
83
Page 90

Glossary
Retina Users Manual
Checksum: A computed value that is dependent upon the contents of a packet. This value is sent along with the
packet when it is transmitted. The receiving system computes a new checksum based upon the received data, and
compares this value with the one sent with the packet. If the two values are the same, the receiver has a high degree
of confidence that the data was received correctly.
Circuit Switching: A communications paradigm in which a dedicated communication p ath is established between two
hosts, and on which all packets travel. The telephone system is an example of a circuit switched network. See also:
Connection-Oriented, Connectionless, and Packet Switching.
Client: A computer system or process that requests a service of another comput er system or process. A workstation
requesting the contents of a file from a file server is a client of the file server. See also: Client-Server Model and
Server.
Client-Server Model: A common way to describe the paradigm of many network protocols. Examples include the
name-server/name-resolver relationship in DNS, and the file-server/file-client relationship in NFS. See also: Client and
Server.
Congestion: Congestion occurs when the offered load exceeds the capacity (or bandwidth) o f a data communication
path.
Connection-Oriented: The data communication method in which communication proce ed s throu gh three welldefined phases: connection establishment, data transfer, and connection relea se. TCP is a connection-oriented
protocol.
Connectionless: The data communication method in which communication occurs between hosts with no previous
initialization. Packets between two hosts can take different routes, since each is independent of the other. UDP is a
connectionless protocol.
Research Networks (RARE), the CCIRN provides a forum for cooperative planning amongst the principal North
American and European research networking bodies.
Cracker: A cracker is an individual who attempts to access computer systems without authorization. These
individuals are often malicious, as opposed to hackers, and have many means at their disposal for breaking into a
system.
Cyberspace: A term coined by William Gibson in his fantasy novel Necromancer to describe the "world" of
computers, and the society that gathers around them.
84
Page 91

Glossary
Retina Users Manual
D
Daisy Chain: A local networking topology in which a single cable runs to multiple workstations. This tends to be less
expensive than the alternative "star" topology, but it is also less robust. A break anywhere along the "chain" disables
the entire chain. Daisy chains are most often used in PhoneNet or thinnet cabling.
DARPA: Defense Advanced Research Projects Agency. This is an agency of the U.S. Department of Defense
responsible for the development of new technology for use by the military. DARPA (formerly known as ARPA) was
responsible for funding much of the development of the Internet we know today, including the Berkeley version of Unix
and TCP/IP.
Data Encryption Standard (DES): DES is a popular standard encryption scheme. Developed by IBM in the 1970’s,
DES uses a 56-bit encryption key and was originally designed to run in hardware.
Datagram: A self-contained, independent entity of data carrying sufficient information to be routed from the source to
the destination computer without reliance on earlier exchanges between this source and destination computer and the
transporting network.
Default Route: A routing table entry that is used to direct packets addressed to networks not explicitly listed in the
routing table.
DES: See: Data Encryption Standard
Dialup: A temporary, as opposed to dedicated, connection between machines established over a standard phone
line.
Distributed Database: A collection of several different data repositories that looks like a single databa se to the user.
A prime example in the Internet is the Domain Name System.
DNS: See Domain Name System
Domain Name System (DNS): The DNS is a general purpose distributed, replicated, data query service. The
principal use is the lookup of host IP addresses based on host names. The style of host names now used in the
Internet is called "domain name" because they are the style of names used to look up anything in the DNS. Some
important domains are:
COM (commercial)
EDU (educational)
NET (network operations)
GOV (U.S. government)
MIL (U.S. military)
Most countries also have a domain such as, .US (United States), .UK (United Kingdom), .AU (Australia), and so on. It
is defined in std 13, RFCs 1034 and 1035. See also: Fully Qualified Domain Name.
Domain: A part of a naming hierarchy in the Internet. Syntactically, an Internet domain name consists of a sequence
of names (labels) separated by periods (dots).
DoS (Denial of Service): A DoS attack is a remote attack against a servers TCP/IP stack or services. DoS at tacks
can saturate a server’s bandwidth, saturate all available connections for a particular service, or even crash a server.
Dot Address (dotted decimal notation): Dot address refers to the common notation for IP addresses of the form
A.B.C.D, where each letter represents, in decimal, one byte of a four-byte IP address.
E
85
Page 92

Glossary
Retina Users Manual
Electronic Frontier Foundation (EFF): A foundation established to address social and legal issues arising from the
impact on society of the increasingly pervasive use of computers as a means of communication and information
distribution.
Electronic Mail (email): A system whereby a computer user can exchange messages with other computer users (or
groups of users) via a communications network. Electronic mail is one of the most popular uses of the Internet.
Email Address: The domain-based or UUCP address that is used to send electronic mail to a specified destination.
Encapsulation: The technique used by layered protocols in which a layer adds header information to the protocol
data unit (PDU) from the layer above.
For example, in Internet terminology, a packet contains a header from the physical layer, followed by a header from
the network layer (IP), followed by a header from the transport layer (TCP), and followed by the application protocol
data. This is also called tunneling, especially in reference to Novell's IPX protocol.
Encryption: Encryption is the manipulation of a packet's data in order to prevent any but the intended recipient from
reading that data. There are many types of data encryption, and they are the basis of network security. See also: Data
Encryption Standard.
Ethernet: A computer network cabling system designed by Xerox in the late 1970s. Originally Ethernet ran at 3
megabits per second (mps) over thick coaxial cable. Current Ethernet runs at 10mps over fiber, twisted-pair, and
several coaxial cable types.
EtherTalk: Networking protocol used by Apple equipment connected directly to Ethernet. Apple equipment on
PhoneNet uses LocalTalk.
F
FAQ: Frequently Asked Questions.
FDDI: Fiber Distributed Data Interface. A high-speed (100Mb/s) LAN standard. The underlying medium i s fiber optics,
and the topology is a dual-attached, counter-rotating token ring.
File Transfer: The copying of a file from one computer to another over a computer network.
Finger: A standard TCP/IP program for gaining access to user information. "Finger user@hostname" might yield the
user's full name, time last logged in, telephone number, and other user definable information. Frequently used by an
attacker to gain information on a remote server.
For Your Information (FYI): A sub-series of RFCs that are not technical standards or descriptions of protocols. FYIs
convey general information about topics related to TCP/IP or the Internet.
FQDN: Fully Qualified Domain Name.
Fragment: A portion of a packet. When a router is forwarding an IP packet to a network that has a maximum packet
size larger than the allowable packet size, it is forced to break up that packet into multiple fragments. The IP layer at
the destination host reassembles these fragments.
Frame: A frame is a data link layer "packet" which contains the header and trailer information required by the physical
medium. That is, network layer packets are encapsulated to become frames.
FTP: File Transfer Protocol. A protocol that allows a user on one host to access and transfer files to and from another
host over a network. Also, FTP is usually the name of the program the user invokes to execute the protocol.
86
Page 93

Glossary
Retina Users Manual
Fully Qualified Domain Name (FQDN): The full domain name of a system, rather than just its hostname. For
example, "brick" is a hostname and "brick.eeye.com" is an FQDN.
G
Gateway: The original Internet term for what is now called router or more precisely, IP router. In modern usage, the
terms "gateway" and "application gateway" refer to systems that do translation from some native format to another.
H
Hacker: A person who delights in having an intimate understanding of the internal workings of a system, computers
and computer networks in particular. The term is often misused in a pejorative context, where "cracker" is the correct
term.
Header: The portion of a packet, preceding the actual data, containing source and destination addresses, error
checking and other fields. A header is also the part of an electronic mail message that precedes the body of a
message and contains, among other things, the message originator, date and time.
Heterogeneous Network: A network running multiple network layer protocols, operating systems, and vendor
implementations.
Hierarchical Routing: The complex problem of routing on large networks can be simplified by reducing the size of
the networks. This is accomplished by breaking a network into a hierarchy of networks, where each level is
responsible for its own routing.
The Internet has three levels: the backbones, the midlevel, and the stub networks. The backbones know how to route
between the midlevel, the midlevel knows how to route between the sites, and each site (being an autonomous
system) knows how to route internally.
Hop: A term used in routing. A path to a destination on a network is a series of hops, through routers, away from the
origin.
Host: A node on the network. Usually refers to a computer that both initiates and accepts network connections.
Host Address: See: Internet address
Hostname: The name assigned to a machine. See also: Fully Qualified Domain Name.
Hub: A device connected to several other devices. In ARCNet, a hub is used to connect several computers together.
In a message handling service, a hub is used for the transfer of messages across the network.
I
IEEE: Institute of Electrical and Electronics Engineers
IETF: See: Internet Engineering Task Force
International Organization for Standardization (ISO): A voluntary, non-treaty organization founded in 1946 which is
responsible for creating international standards in many areas, including computers and communications. Its
members are the national standards organizations of the 89 member countries, including ANSI for the U.S. See also:
American National Standards Institute and Open Systems Interconnection.
Internet: (note the capital "I") The largest Internet in the world consisting of large national backbone nets (such as
MILNET, NSFNET, and CREN) and a myriad of regional and local campus networks all over the world.
87
Page 94

Glossary
Retina Users Manual
The Internet uses the Internet protocol suite. To be on the Internet you must have IP connectivity—i.e., be able to
Telnet to, or ping, other systems. Networks with only e-mail connectivity are not actually classified as being on the
Internet.
Internet address: A 32-bit address assigned to hosts using TCP/IP.
Internet Assigned Numbers Authority (IANA): The central registry for various Internet protocol parameters, such as
port, protocol and enterprise numbers, and options, codes and types.
Internet Engineering Task Force (IETF): The IETF is a large, open community of network designers, operato rs,
vendors, and researchers whose purpose is to coordinate the operation, management and evolution of the Internet,
and to resolve short-range and mid-range protocol and architectural issues.
IETF is a major source of proposals for protocol standards that are submitted to the IAB for final approval. The IETF
meets three times a year, and extensive minutes are included in the IETF Proceedings.
Internet Protocol (IP): The Internet Protocol, defined in STD 5, RFC 791, is the network layer for the TCP/IP Protocol
Suite. It is a connectionless, best-effort packet switching protocol. See also: packet switching, Request For
Comments, and TCP/IP Protocol Suite.
Internet Relay Chat (IRC): A worldwide "party line" protocol that allows one to converse with others in real time. IRC
is structured as a network of servers, each of which accepts connections from client programs, one per user. See
also: Talk.
Internet: A collection of networks interconnected by a set of routers that allow them to function as a single, large
virtual network.
Internet-Draft (I-D): Internet-Drafts are working documents of the IETF, its Areas, and its Working Groups. As the
name implies, Internet-Drafts are draft documents. They are valid for a maximum of six months and can be updated,
replaced, or made obsolete by other documents at any time. Very often, I-Ds are precursors to RFCs. See also:
Internet Engineering Task Force and Request For Comments.
Interoperability: The ability of software and hardware to communicate meaningfully on multiple machines from
multiple vendors.
IP: See: Internet Protocol
IP address: The 32-bit address defined by the Internet Protocol in STD 5, RFC 791. It is usually represented in dotted
decimal notation.
IP Datagram: See: Datagram
IPX: Internetwork Packet eXchange. Novell's proprietary protocol used by Netware. A router with IPX routing can
interconnect LANs so that Novell Netware clients and servers can communicate. See also: Local Area Network.
IRC: See: Internet Relay Chat
ISDN: Integrated Services Digital Network. This is an emerging technology that is beginning to be offered by the
telephone carriers of the world. ISDN combines voice and digital network services in a single medium making it
possible to offer customers digital data services as well as voice connections through a single "wire."
ISO: See: International Organization for Standardization
K
88
Page 95

Glossary
Retina Users Manual
Kerberos: Kerberos is the security system of MIT's Project Athena. It is based on symmetric key cryptography. See
also: Encryption.
L
LAN: See: Local Area Network
Layer: Communication networks for computers can be organized as a set of more or less independent protocols,
each in a different layer (also called level). The lowest layer governs direct host-to-host communication between the
hardware on different hosts; the highest consists of user applications. Each layer builds on the layer beneath it. For
each layer, programs on different hosts use protocols appropriate to the layer to communicate with each other.
TCP/IP has five layers of protocols; OSI has seven. The advantages of different layers of protocols is that the
methods of passing information from one layer to another are specified clearly as part of the protocol suite, and
changes within a protocol layer are prevented from affecting the other layers. This greatly simplifies the task of
designing and maintaining communication programs. See also: Open Systems Interconnection and TCP/IP Protocol
Suite.
Listserv: An automated mailing list distribution system.
Local Area Network (LAN): A data network intended to serve an area of only a few square kilometers or less.
Because the network is known to cover only a small area, optimizations can be made in the network signal protocols
that permit data rates up to 100Mb/s. See also: Ethernet, Fiber Distributed Data Interface, Token Ring, and Wide Area
Network.
LocalTalk: Networking protocol used by Macintosh computers to communicate over PhoneNet.
M
MAC Address: The physical hardware address of a device connected to a shared media.
Mail Gateway: A machine that connects two or more electronic mail systems (especially dissimilar mail systems on
two different networks) and transfers messages between them. Sometimes the mapping and translation can be quite
complex, and generally it requires a store-and-forward scheme whereby the message is received from one system
completely and goes through suitable translations before it is transmitted to the next system.
Mail Server: A software program that distributes files or information in response to requests sent via email.
Mailing List: A list of email addresses, used by a mail exploder, to forward messages to groups of people. Generally,
a mailing list is used to discuss a certain set of topics, and different mailing lists discuss different topics. A mailing list
can be moderated. This means that messages sent to the list are actually sent to a moderator who determines
whether or not to send the messages on to everyone else.
MAN: Metropolitan Area Network.
Management Information Base (MIB): The set of parameters an SNMP management station can query or set in the
SNMP agent of a network device (e.g., router). Standard, minimal MIBs have been defined, and vendors often have
Private enterprise MIBs. In theory, any SNMP manager can talk to any SNMP agent with a properly defined MIB. See
also: Client-Server Model and Simple Network Management Protocol.
Maximum Transmission Unit (MTU): The largest frame length that can be sent on a physical medium. See also:
Fragmentation and Frame.
89
Page 96

Glossary
Retina Users Manual
MDF: Main Distribution Frame. The main "telecommunications closet" in a building.
Metropolitan Area Network (MAN): A data network intended to serve an area approximating that of a large city.
Such networks are being implemented by innovative techniques, such as running fiber ca bles through subway
tunnels. A popular example of a MAN is SMDS. See also: Local Area Network, Switched Multimegabit Data Service,
and Wide Area Network.
MIB: See: Management Information Base
Mid-level network: Mid-level networks (a.k.a. regionals) make up the second level of the Internet hierarchy. They are
the transit networks that connect the stub networks to the backbone networks. See also: Backbone and Internet.
MIME: See: Multipurpose Internet Mail Extensions
Modem: A device used to permit computers and terminals to communicate over telephone lines.
Moderator: A person, or small group of people, who manage moderated mailing lists and newsgroups. Moderators
are responsible for determining which email submissions are passed on to the list. See also: Electronic Mail, Mailing
List, and Usenet.
MTU: See: Maximum Transmission Unit.
Multicast: A packet with a special destination address that multiple nodes on the network can be willing to receive.
See also: Broadcast.
Multihomed Host: A host that has more than one connection to a network. The host can send and receive data over
any of the links but does not route traffic for other nodes.
Multiport Repeater: An Ethernet device, typically with 8 thinnet ports and one transceiver cable port.
Multipurpose Internet Mail Extensions (MIME): An extension to Internet email that provides the ability to transfer
non-textual data, such as graphics, audio and fax. It is defined in RFC 1341. See also: Electronic Mail.
MX Record: Mail Exchange Record. A DNS resource record type indicating which host can handle mail for a
particular domain. See also: Domain Name System and Electronic Mail.
N
Name Resolution: The process of mapping a Hostname into the corresponding IP address. See also: DNS.
Name Server: A host that maps Hostnames into IP addresses.
Namespace: A commonly distributed set of names in which all names are unique.
National Institute of Standards and Technology (NIST): United States governmental body that provides assistance
in developing standards. Formerly the National Bureau of Standards.
National Science Foundation (NSF): A U.S. government agency whose purpose is to promote the advancement of
science. NSF funds science researchers, scientific projects, and infrastructure to improve the quality of scientific
research.
The NSFNET, funded by NSF, is an essential part of academic and research communications. It is a high speed
"network of networks" which is hierarchical in nature. At the highest level, it is a backbone network, currently
comprised of 16 nodes connected to a 45Mb/s facility that spans the continental United States.
90
Page 97

Glossary
Retina Users Manual
Attached to that are mid-level networks, and attached to the midlevels are campus and local networks. NSFNET also
has connections out of the U.S. to Canada, Mexico, Europe, and the Pacific Rim. The NSFNET is part of the Internet.
NetBIOS: Network Basic Input Output System. It is the standard interface to networks on IBM PC and compatible
systems.
Network Time Protocol (NTP): A protocol that assures accurate local timekeeping with reference to radio and atomic
clocks located on the Internet. This protocol is capable of synchronizing distributed clocks within milliseconds over
long time periods.
Network: A computer network is a data communications system that interconnects com puter systems at various
different sites. A network can be composed of any combination of LANs, MANs or WANs.
Network Address: The network portion of an IP address. For a class A network, the network address is the first byte
of the IP address. For a class B network, the network address is the first two bytes of the IP address. For a class C
network, the network address is the first three bytes of the IP address.
In each case, the remainder is the host address. In the Internet, assigned network addresses are globally unique. See
also: Internet, IP Address, Subnet Address, Host Address, and Internet Registry.
NFS: Network File System. A protocol developed by Sun Microsystems, and defined in RFC 1094, which allows a
computer system to access files over a network as if they were on its local disks. This protocol has been incorporated
in products by more than two hundred companies, and is now a de facto Internet standa rd.
NIC: Network Information Center. A NIC provides information, assistance and services to network users. See also:
NOC.
NIC.DDN.MIL: This is the domain name of the DDN NIC. See also: Domain Name System and Network Information
Center.
NIS: Network Information Services. It is a set of services, generally provided by a NIC, to assist users in using the
network. See also: Network Information Center.
NIST: See: National Institute of Standards and Technology
NNTP: Network News Transfer Protocol. A protocol, defined in RFC 977, for the distribution, inquiry, retrieval, and
posting of news articles. See also: Usenet.
NOC: Network Operations Center. A location from which the operation of a network or Internet is monitored.
Additionally, this center usually serves as a clearinghouse for connectivity problems and efforts to resolve those
problems. See also: NIC.
Node: An addressable device attached to a computer network. See also: Host and Router.
NSF: See: National Science Foundation.
NSFNet: The National Science Foundation Network. A collection of local, regional, and mid-level networks in the U.S.
tied together by a high-speed backbone. NSFNET provides scientists access to a number of supercomputers across
the country.
NTP: See: Network Time Protocol
O
91
Page 98

Glossary
Retina Users Manual
Octet: An octet is 8 bits. This term is used in networking, rather than byte, because some systems have bytes that are
not 8 bits long.
Open Shortest-Path First Interior Gateway Protocol (OSPF): A link state, as opposed to distance vector, routing
protocol. It is an Internet standard IGP defined in RFC 1247. See also: Interior Gateway Protocol and Routing
Information Protocol.
Open Systems Interconnection (OSI): A suite of protocols, designed by ISO committees, to be the international
standard computer network architecture. See also: International Organization for Standardization.
OSI Layer 1: Physical layer. The layer that provides the means to activate and use physical connections for bit
transmission. In plain terms, the Physical Layer provides the procedures for transferring a single bit across a Physical
Media.
OSI Layer 2: Data Link Layer. This layer handles the movement and routing of packets around a network.
OSI Layer 3: Network Layer. The layer that is responsible for routing, switching, and sub network access across the
entire OSI environment.
OSI Layer 4: Transport Layer. The layer that is responsible for reliable end-to-end data transfer between end
systems.
OSI Layer 5: Session Layer. The layer that provides the means for dialogue control between end system s.
OSI Layer 6: Presentation Layer. The layer that determines how Application information is represented (i.e., encoded)
while in transit between two end systems.
OSI Layer 7: Application Layer. The top-most layer of the OSI Model. It provides such communication services as
electronic mail and file transfer.
OSI Reference Model: A seven-layer structure designed to describe computer network ar chitectures and the way
that data passes through them. This model was developed by the ISO in 1978 to clearly define the interfaces in multivendor networks, and to provide users of those networks with conceptual guidelines in the construction of such
networks. See also: International Organization for Standardization.
OSPF: See: Open Shortest-Path First Interior Gateway Protocol
P
Packet Switch Node (PSN): A dedicated computer, the purpose of which is to accept, route and forward packets in
a packet switched network. See also: packet switching, router.
Packet: The unit of data sent across a network. "Packet" a generic term used to describe unit of data at all levels of
the protocol stack, but it is most correctly used to describe application data units. See also: Datagram and Frame.
Packet Switching: A communications paradigm in which packets (me s sages) are individually routed between hosts,
with no previously established communication path. See also: Circuit Switching, Connection-Oriented, and
Connectionless.
Physical Media: Any means in the physical world for transferring signals between OSI systems. Considered to be
outside the OSI Reference Model, and therefore sometimes referred to as "Layer 0." The physical connector to the
media can be considered as defining the bottom interface of the Physical Layer—i.e., the bottom of the OSI
Reference Model.
92
Page 99

Glossary
Retina Users Manual
PING: Packet Internet Groper. A program used to test reach ability of destinations by sending them an ICMP echo
request and waiting for a reply.
Point Of Presence (POP): A site where there exists a collection of telecommunications equipment, usually digital
leased lines and multi-protocol routers.
Point-to-Point Protocol (PPP): The Point-to-Point Protocol, defined in RFC 1171, provides a method for transmitting
packets over serial point-to-point links. See also: Serial Line IP.
POP: See: Post Office Protocol and Point Of Presence
Port: A port in the network sense is the pathway that a computer uses to transmit and receive data.
Post Office Protocol (POP): A protocol designed to allow single user hosts to read mail from a server. There are
three versions: POP, POP2, and POP3. Latter versions are NOT compatible with earlier versions. See also: Email.
Postmaster: The person responsible for taking care of email problems, answering queries about users, and other
related work at a site.
PPP: See: Point-to-Point Protocol
Privacy Enhanced Mail (PEM): Internet email that provides confidentiality, authentication and message integrity
using various encryption methods.
Protocol: A formal description of message formats and the rules two computers must follow to exchan ge those
messages. Protocols can describe low-level details of machine-to-machine interfaces (e.g., the order in which bits and
bytes are sent across a wire) or high-level exchanges between allocation programs (e.g., the way in whi ch two
programs transfer a file across the Internet).
Protocol Converter: A device/program that translates between different protocols that serve similar functions (e.g.,
TCP and TP4).
Protocol Stack: A layered set of protocols that work together to provide a set of network functions. See also: Layer
and Protocol.
Proxy ARP: The technique in which one machine, usually a router, answers ARP requests intended for another
machine. By "faking" its identity, the router accepts responsibility for routing packets to the "real" destination. Proxy
ARP allows a site to use a single IP address with two physical networks. See also: Address Resolution Prot ocol
PSN: See: Packet Switch Node.
Q
Queue: A backlog of packets or connections awaiting processing.
R
RARP: Reverse Address Resolution Protocol. A protocol, defined in RFC 903, which provides the reverse function of
ARP. RARP maps a hardware (MAC) address to an Internet address.
Diskless nodes primarily use RARP when they first initialize to find their Internet address. See also: Address
Resolution Protocol, BOOTP, Internet Address, and MAC Address.
93
Page 100

Glossary
Retina Users Manual
RBOC: Regional Bell Operating Company
Reassembly: The IP process in which a previously fragmented packet is reassembled before being passed to the
transport layer. See also: Fragmentation.
Remote Procedure Call (RPC): An easy and popular paradigm for implementing the client-server mod el of
distributed computing. In general, a request is sent to a remote system to execute a designated procedure, using
arguments supplied, and the result returned to the caller.
There are many variations and subtleties in various implementations, resulting in a variety of different (incompatible)
RPC protocols.
Remote Login: Operating on a remote computer, using a protocol over a computer network, as though locally
attached. See also: Telnet.
Repeater: A device that propagates electrical signals from one cable to another without making routing decisions or
providing packet filtering. In OSI terminology, a repeater is a Physical Layer intermediate system. See Bridge and
Router.
RFC: Request For Comments. This is the document series, begun in 1969, which describes the Internet suite of
protocols and related experiments. Not all (in fact very few) RFCs describe Internet standards, but all Internet
standards are written up as RFCs.
The RFC series of documents is unusual in that the proposed protocols are forwarded by the Internet research and
development community, acting on their own behalf, as opposed to the formally reviewed and standardized protocol s
that are promoted by organizations such as CCITT and ANSI. See also: For Your Information and STD.
Route: The path that network traffic takes from its source to its destination. Also, this can be a possible path from a
given host to another host or destination.
Router: A system that makes decisions about which of several paths that network (or Internet) traffic follows. To do
this, the system uses a routing protocol to gain information about the network, and algorithms to choose the best route
based on several criteria known as "routing metrics."
In OSI terminology, a router is a Network Layer intermediate system. See also: Gateway, Bridge, and Repeater.
Routing: The process of selecting the correct interface and next hop for a packet being forwarded. See also: Router.
Routing domain: A set of routers exchanging routing information within an administrative domain.
RPC: See: Remote Procedure Call
S
Server: A provider of resources (e.g., file servers and name servers). See also: Client, DNS, and NFS.
Services: A service is a program running on a remote machine that in one way or another provides a service. For
example, when you visit a Web site, the remote server displays a Web page via its Web server service.
SLIP: Serial Line IP. This is a protocol used to run IP over serial lines, such as telephone circuits or RS-232 cables,
interconnecting two systems. SLIP is defined in RFC 1055. See also: PPP
SMTP: Simple Mail Transfer Protocol. A protocol, defined in STD 10, RFC 821, used to transfer electronic mail
between computers. It is a server-to-server protocol, so other protocols are used to access the messages.
94
 Loading...