

Page 1

Hello there.
SONX USER GUIDE
Firmware 0.9.17 release
1
www.eers.ca/support
+1 (888) 375-0378 (x222)
[email protected]
Page 2

TABLE OF CONTENTS
INTRODUCTION 3
Product Overview 3
Your device – a quick overview 6
Amulet 7
Earpiece and Cable 8
Components, Parts and Accessories 9
WEARING THE DEVICE 11
Battery 11
Charging the Device 11
Battery Light Level 12
Securing the Device 13
Attaching the Ear Tips to the Earpiece 14
Learning to Identify Left & Right 14
Selecting a Size 14
Attaching to the Earpiece 15
Inserting the Earpiece 16
Ensuring a Good Acoustical Seal 16
Securing the Earpiece to your Head 19
Level-dependent protection 20
Intelligent Pass-Through 20
Protected Mode 20
USING THE DEVICE 21
Turning the Device On 22
Performing an Earpiece Fit Test 23
Talking in Noise (Push-to-talk/PTT) 26
Adjusting volume 27
Detecting Battery Level 27
Assiging Team-Based Groups 27
Using Override Functions 28
Turning SonX o 29
CLEANING AND MAINTENANCE 30
Cleaning the Amulet 30
Maintaining the Ear Tips 30
Attaching the Ear Hooks 31
TROUBLESHOOTING 32
QUICK GUIDE 34
Buttons and indicator lights 34
Proper Ear Tip insertion 35
2
Page 3

This User Guide was designed for the SonX. In this build, you will be able to enjoy the protection,
communication, Earpiece Fit Test, and Override functionalities.
INTRODUCTION
This User Guide explains functionalities, how to properly insert the earpieces, maintenance, and
troubleshooting. It is designed to give you clear instructions with simplied diagrams without technical
jargon.
Should you require technical support, customer service or want to give feedback for product
development, your comments are always welcome and we would love to hear from you.
Product Overview
EERS’ vision is to create real solutions to real world problems; developed and designed to be used by
everyone - no matter what industry you work in. We have developed SonX, an industrial Hearables IoT
(Internet of Things) device, that addresses three major factors: protection, communication
and monitoring.
3
Page 4

Protection
The best hearing protection in the world cannot protect if it is not tted properly. Using the On Demand
Earpiece Fit Test you can verify the t and protection level. If not tted properly, warning signals will alert you.
SonX ensures you are always correctly tted, always protected.
On Demand In Noise Fit-Test
Ensures you are properly tted at all times, indicating which ear (or both) needs to be re-tted.
Level dependent hearing with pass-through mode
Acoustically transparent when used in a quiet environment. SonX’ built-in auto protection mode
switches from passive or active protection based on ambient noise conditions.
Impulse noise protection
You are always ready for unanticipated loud sounds with impulse noise clipping.
Communication
A person who cannot communicate properly is not fully eective. A person who cannot hear is not safe. When
in active mode, SonX is designed to ensure you can communicate in high-noise environments while keeping
your hearing protected. In-ear earpiece microphones allow clear radio communication, without the aid of an
external device. Furthermore, built-in short-range radio allows you to talk without removing your protection
while in high-noise environments. Should you step into a quieter area, your SonX device will enter passive
mode. In passive mode, you can have a conversation all the while keeping your hearing protection in.
4
Page 5
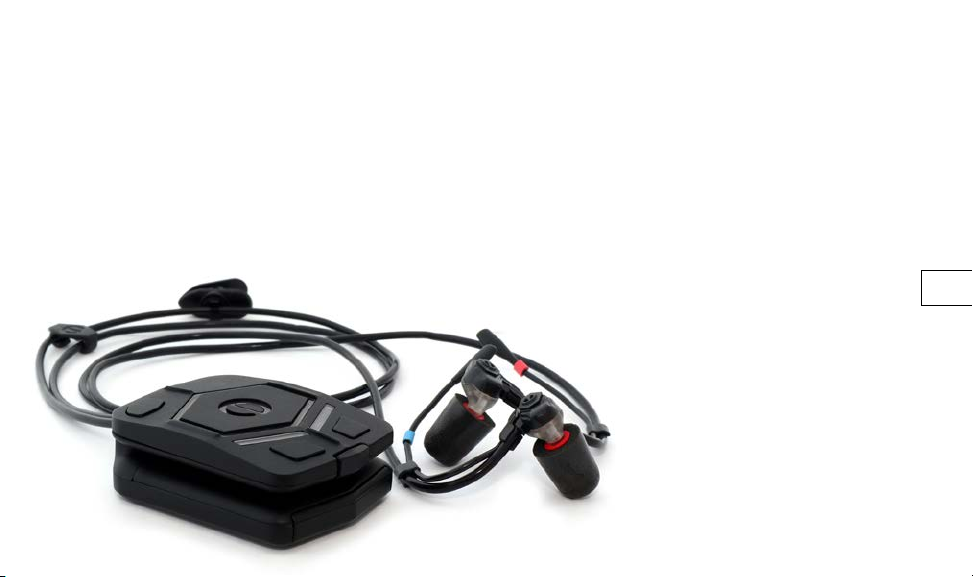
In-Noise Communication
Improve user safety and reduce accidents and lower the risk of errors by misunderstanding.
2-way communication with color-coded radio channels
Improve teamwork and productivity through sustained communication. On-site training can safely be done
in noise.
Perceptual comfort
Natural sound, no need to shout to be heard. Best-in-class acoustic transparency mode and pass-through
communication in low-noise situation. Low prole earpiece design provides outstanding 360-degree
situational awareness.
5
Page 6
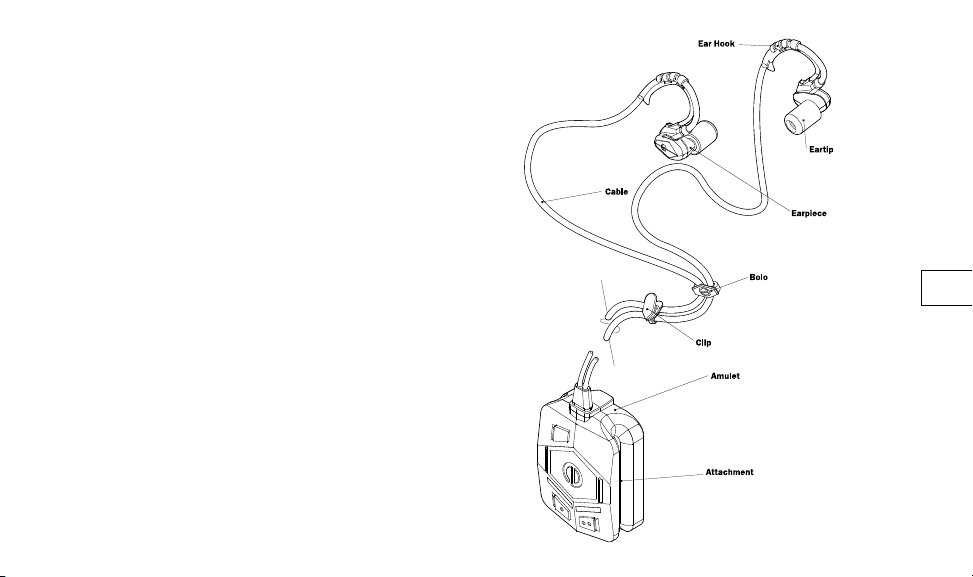
Your device – a quick overview
6
Page 7

Amulet
The amulet is a powerful device,
with state-of-the-art algorithms,
which constantly processes
information such as your
surrounding noise levels and
veries your t by taking in-ear
measurements. Powering your
device on or o, adjusting volume,
communication, and t test, are
accessed via the amulet with some
buttons having dual functions.
The amulet also houses the
rechargeable battery.
7
Page 8
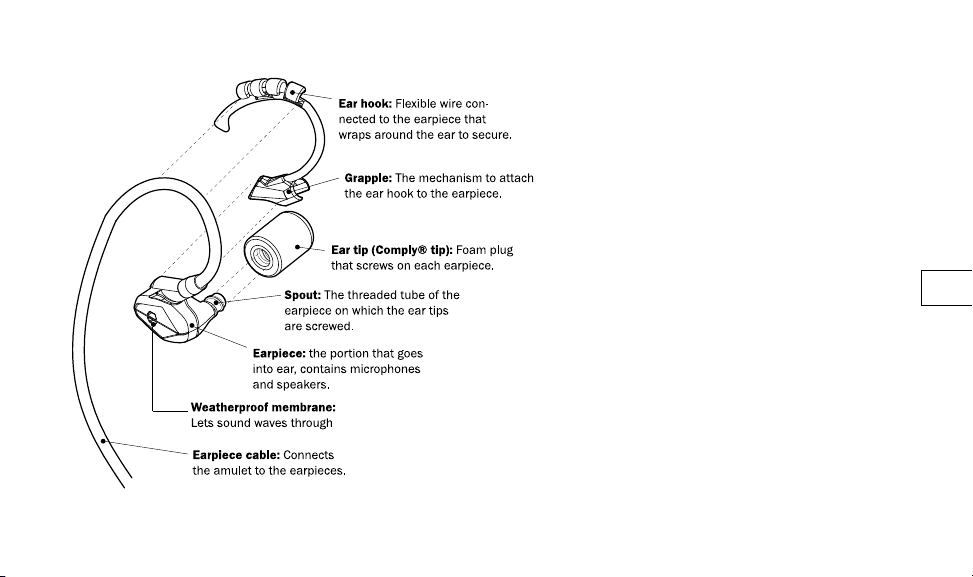
Earpiece and Cable
The earpiece is comprised of
microphones allowing voice pick-up
as well as noise level monitoring.
The cable includes a clip, an
adjustable bolo and detachable
ear hooks to assist you with
cable management and a more
comfortable wear.
8
Page 9
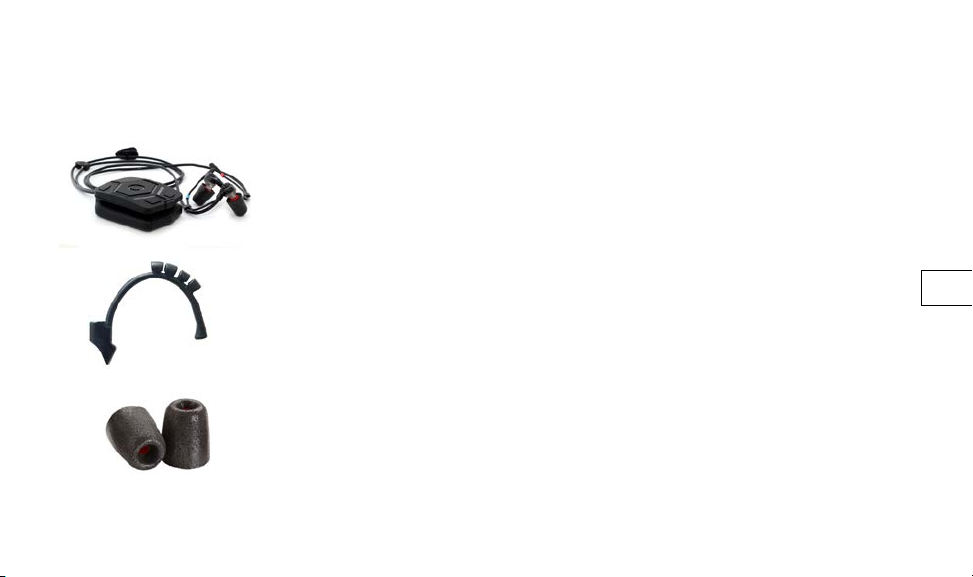
Components, Parts and Accessories
The following items are included:
SonX device: Attached to the amulet are the cables and earpieces.
Replaceable Ear Hooks: Ear hooks will already be tted to the device. For hygienic reasons, they can
be removed and replaced if you need to share or reassign the device. Your manager will have a few
extra pairs.
Reusable Comply™ Foam Tips: Included are 3 dierence sizes (Large, Standard, and Slim) to attach to
the earpiece for use in your rst tting. Your supervisor will have more when you need to replace them.
9
Page 10
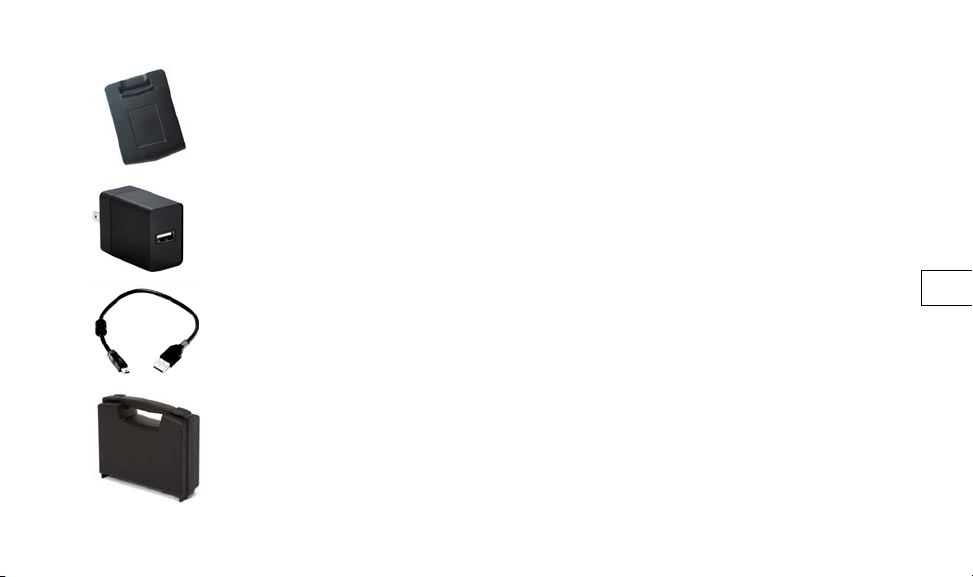
Battery: Your battery is shipped with a charge but may not be fully charged. Be sure to plug into your
individual or master charger before your next use.
One-Port USB Wall Charger: For use to recharge your battery.
Connecting micro USB cable: This micro USB cable works with the One-Port USB Wall Charger or master hub
charger your supervisor has been issued.
Carrying Case: Your device comes in a reusable carrying case for you to store your device.
10
Page 11
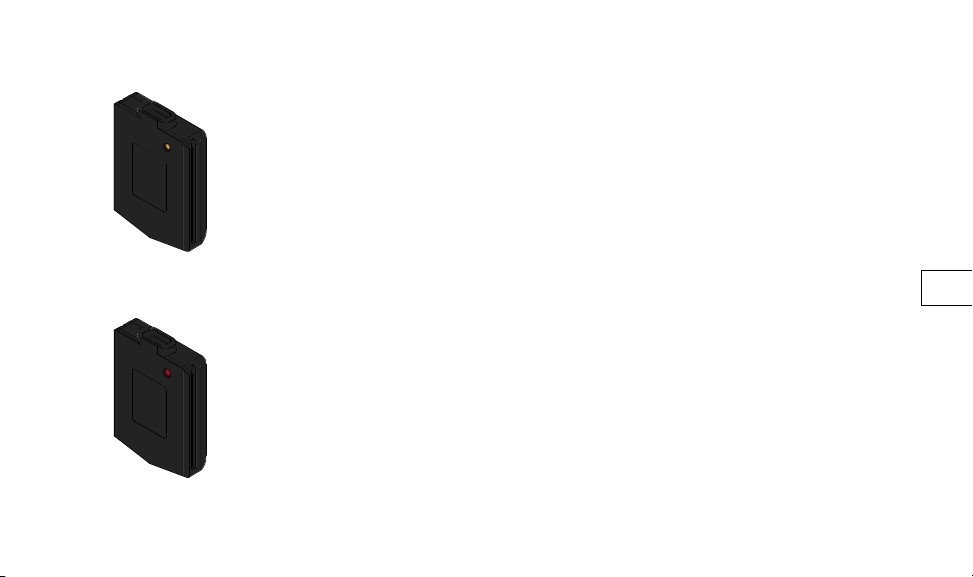
ORANGE Battery charging
RED Battery fully charged
WEARING THE DEVICE
Battery
Your SonX device is shipped with a battery. Depending on the amount of communication requirements, your
amulet should work up to 20-30 hours when fully charged.
To install the battery, turn the back of the amulet towards you and holding it by the sides, with the battery
label facing downwards, glide the battery male component into the female USB slot in the amulet.
To remove the battery, hold the sides of the amulet and grab the end of the battery. Pull until it slides out.
NOTE: Your battery is shipped with a charge but may not be fully charged. Be sure to plug into your individual
or master charger before your next use.
Charging the Device
To charge your amulet, remove the battery from the amulet and connect to the individual wall charger or 10port hub charger provided to your supervisor. When plugged in, a LED light will turn on “orange” for charging,
and then “red” to indicate the battery is fully charged and ready to use.
TIP:
1. To preserve battery life, turn your device o during breaks or when not in use.
2. The battery can be charged at any time, regardless of depletion.
3. Avoid overheating your battery and reducing its lifetime use: once fully charged remove the battery from
the charger.
11
Page 12
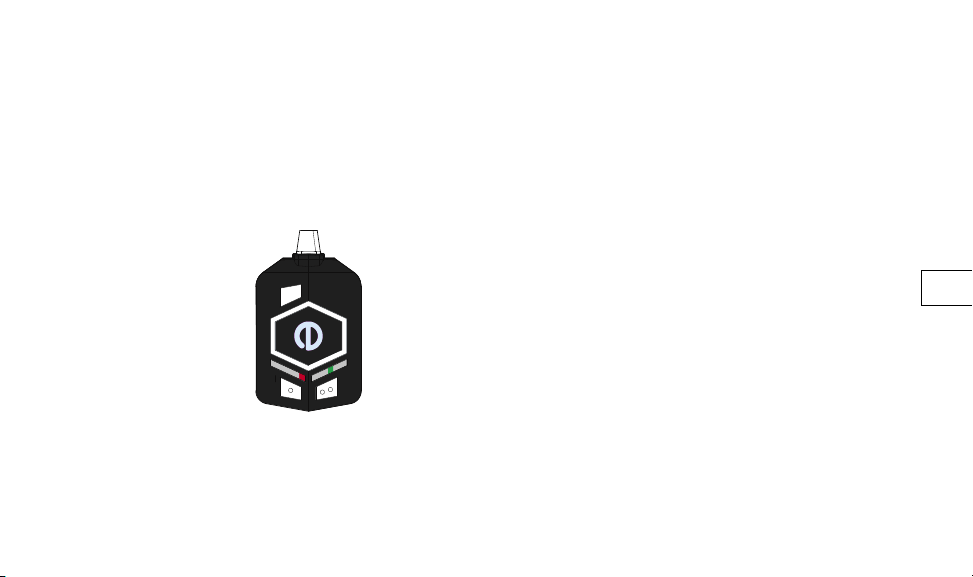
Battery Light Level
The indicator light will remain green until 20% battery life remains. At this point it will slowly blink RED and you
will hear an audio prompt every 10 seconds until the battery is changed out or drained completely. At critical
levels at 10% or below the RED indicator light will increase blink rate and you will hear the nal audio prompt
before it’s completely drained.
The battery indicator light measures in the following increments:
80-100%: ve green
60-79%: four green
40-59%: three green
20-39%: two green
<20%: (low batt): medium blinking red (1 blink/sec x5)
<10%: (batt critical): slow blinking red (1 blink/1.5sec forever)
<1%: (empty): slow blinking red (1 blink/1.5sec forever)
Low battery indicator
12
Page 13
Securing the Device
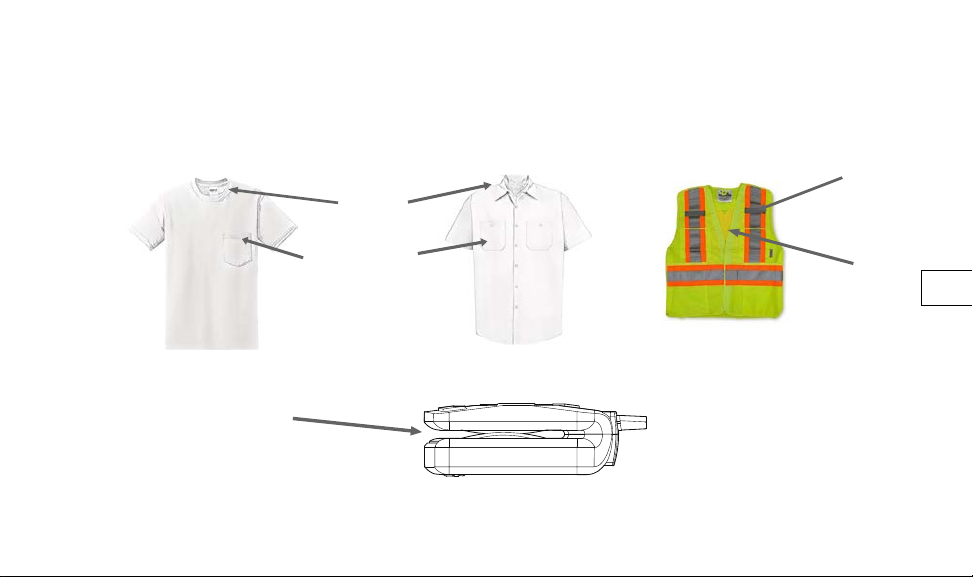
As shown in the illustrations below, the device can be worn in several dierent ways. For best performance
and easy access, we recommend securing the amulet close to your neck or shoulder, on your clothing or PPE
at one of these locations:
clip
collar
Your amulet attach mechanism is designed to slide into place with gentle pressure.
Attach mechanism
breast pocket
seam
13
Page 14

Attaching the Ear Tips to the Earpiece
Your ear tips, made by Comply™, are made from military grade heat-activated dynamic memory foam. When
compressed and properly inserted into your ear it conforms to the shape of your ear canal and creates a
perfect seal.
Learning to Identify Left & Right
Correctly identifying the left and right earpieces is important for comfort, t, and acoustical seal. Your
earpieces have color-coded bands on the ends of each ear hook:
Red = Right
Blue = Left
To help you remember which is which, here is a useful tip: Red and Right both begin with the letter R.
Selecting a Size
Three pairs of color-coded Comply™ Canal Tips are included with your SonX device (one pair of every size):
Slim = Ear tip has a Green inner core
Standard = Ear tip has a Red inner core
Large = Ear tip has a Blue inner core
A large percentage of the general population ts Standard-sized tips, so start by trying these rst. Do not worry
if this rst sizing exercise does not work for you, you can always move down or up a size.
14
Page 15
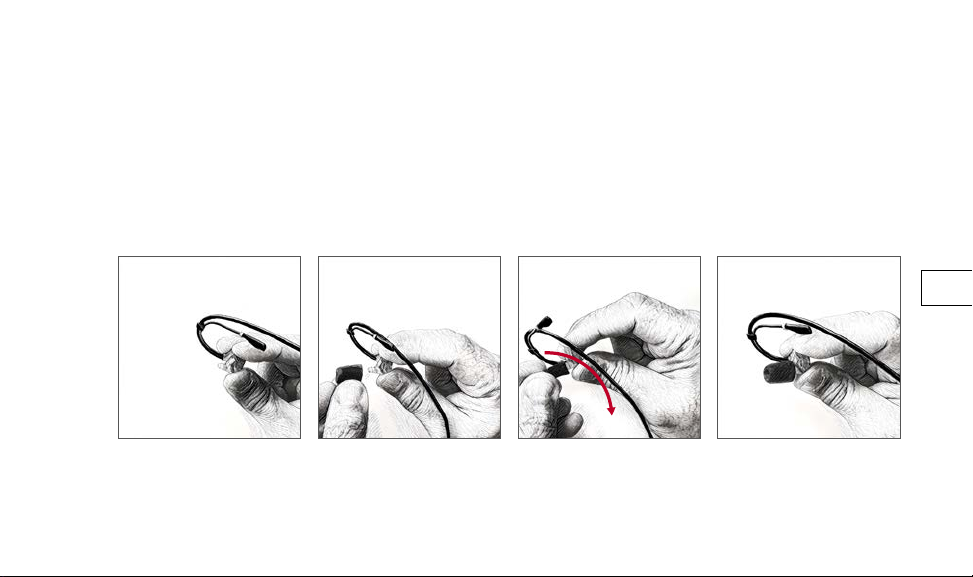
Attaching to the Earpiece
Most people are right-handed which is why the following steps will always start with “Right” as an example. If
you are left-handed, you might nd it easier to start by tting your left ear instead.
To attach the ear tip to the earpiece, screw the threaded core in a clockwise motion until it is fully secured as
shown by gures 1 through 4 below.
NOTE: Do not overtighten but make sure the ear tip is fully screwed in.
3 3 41
To detach the ear tip from the earpiece, reverse the process and unscrew the threaded core in a counterclockwise motion until it is fully unfastened.
15
Page 16
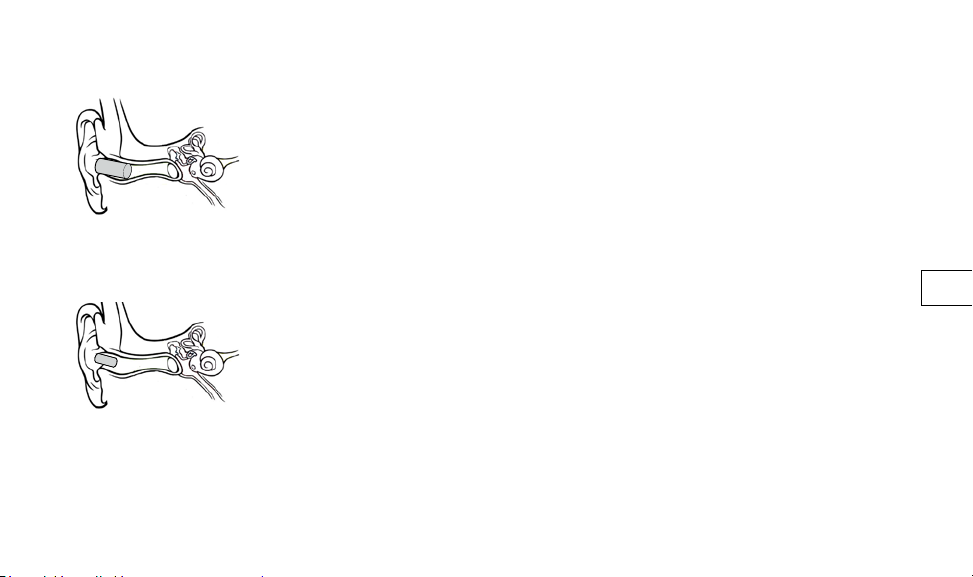
Good t: right size conforms
to canal and creates an
acoustical seal.
Bad t: wrong size – doesn’t
expand to ear canal.
Inserting the Earpiece
Ensuring a Good Acoustical Seal
Your ear tips (also called plugs) are meant to be worn fully inserted into your ear. Ear tips need to form a seal
with all the walls of your ear canal — like a cork in a wine bottle. Proper insertion is key: forming a tight seal
will enhance the performance of your SonX device.
Getting the perfect seal requires nding the correct tip size. Your device comes with assorted sizes of tips as
seen in Selecting a Size and Attaching the Tips. You started with the Standard-sized Comply™ tips. If Standard
size doesn’t give you an adequate seal, move down one size to the smaller tips. Try the largest size last —
you’d be surprised, but a smaller tip sometimes gives you the more comfortable seal. Ears are as unique as
ngerprints. In some cases, a person may require a mixed size of tips for a proper, comfortable t (Ex. Small
for Right ear and Medium for Left ear).
A good t is important: it means you are properly protected. A poor t will drop sound quality and will aect
your overall team’s quality of communication adding background noise or low volume output.
NOTE: To avoid dropping your device while tting your earpieces, hold the amulet in one hand and in the other
hand the earpieces. Hang it over your neck, or attach it to your clothing while attaching the amulet. This way
you can safely insert the earpieces and adjust the securing mechanisms (bolo and clip). With your amulet
attached, separate your Right from your Left earpiece by swinging your Left earpiece to the left side in front
of you.
16
Page 17
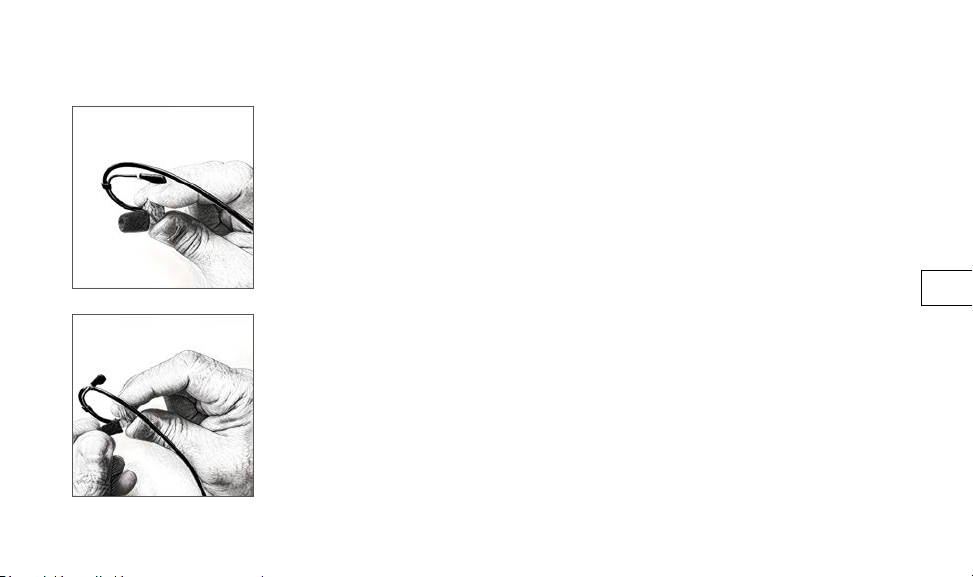
Proper placement of your device
1. Remember, Red/Right therefore Left is Blue. For your right ear, with your right hand, hold the right
earpiece between your thumb and two forengers (the ear hook needs to be over your ngers).
17
2. Using your left hand, compress the ear tip into a thin, round cylinder:
NOTE: Do not over pinch the top or create creases in the foam prior to insertion. This will aect
acoustical seal.
a. Press the tip of the plug down.
b. Working from the top toward end of the plug, compress the tip of the plug so it does not
inadvertently risk folding over and blocking the ear canal once it’s inserted.
c. Roll it between your 2 ngers for 15-20 seconds. With this method, the ear tip’s inner
exible tube is less likely to collapse.
Page 18
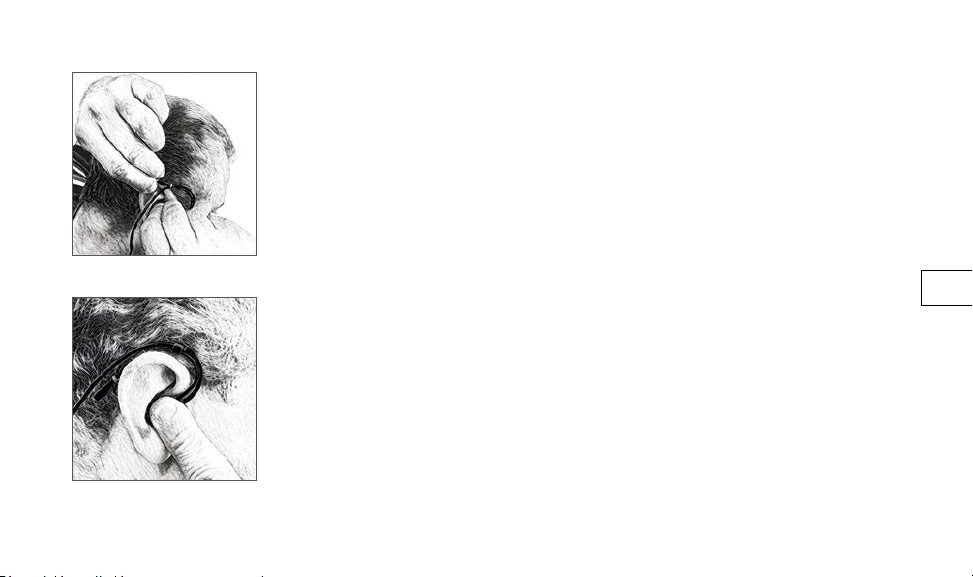
3. Once the tip is compressed, with your opposite hand over and behind your head, gently pull back your
ear (or pinna) to straighten the ear canal.
4. Hold the earpiece in your other hand with the ear hooks bent into a curve that mimics your ear shape.
5. Gently insert the ear tip as far as you can, then twist the earpiece and ear hook backwards into place.
6. After insertion, hold for 15-20 seconds to allow the foam to expand into place.
7. Repeat the same procedure for your other ear and adjust your ear hooks if necessary for maximum
comfort.
18
Page 19
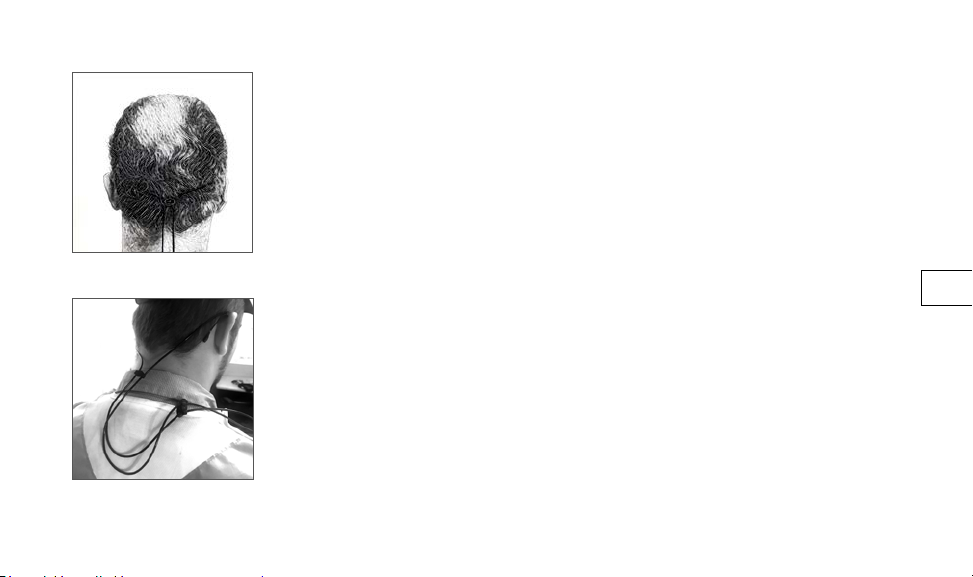
a: tight t
b: loose t
Securing the Earpiece to your Head
Your device comes with a bolo to secure the cables behind your head and a clip to attach the cables to
your clothing or equipment.
1. You can either
a. slide and secure the bolo to the center of the back of your head until you feel the cable is
snug and tight to your head (Image a, tight t) or;
b. Try a loose t at the base of your neck (images b & c, loose t).
2. Use the clip to secure the wire close to your body. A shirt collar is usually a good place to put it (for
more options, see section Securing the Device).
3. When the cables are securely placed, turn your head from left to right and right to left. If there is
a sensation of pulling, readjust the bolo and the clip so you may have as much free movement as
possible.
TIP: Some users have a lot of personal protection equipment (PPE) to wear: gloves, masks, etc., making
it a challenge to do the tting of the device to your head and clothing. We recommend using the “Buddy
System” to ensure a better success rate in the nal adjustments of your SonX device.
19
Page 20
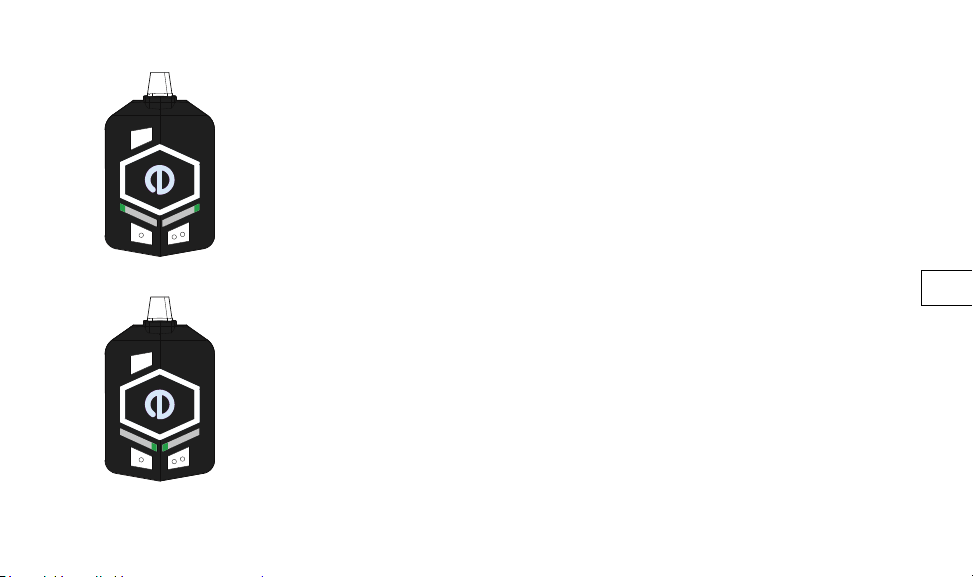
AUTO pass-through mode
AUTO protected mode
Level-dependent protection
Your device is constantly adapting to your environment to create the best perceptual comfort. With these 2
auto settings, Pass-through and Protected mode, you will have excellent 360-degree awareness. You can tell
which mode you are in by the change in the LEDs.
Intelligent Pass-Through
This mode operates when the ambient noise is lower than 85 dB(A).
In this mode, ambient sounds are reproduced by the inner speakers inside your ear so you don’t need to
keep taking o your earpieces. The intelligent pass-through mode includes a volume limiter, which caps the
intensity of loud sounds (e.g. impulsive sounds like a hammer). The inside LED lights from battery and volume
will be constant GREEN.
Protected Mode
This mode will be triggered, when ambient noise is higher than 85 dB(A) for more than 2 seconds. Once
it is triggered, this mode will disengage only if the ambient sound level dips below 80 dB(A) for more than
2 seconds. In this mode, ambient sounds are completely muted. Only SonX audio prompts and radio
communications can be heard. The far-left LED light from volume and far-right LED light battery (outside
lights) will be constant GREEN.
TIP: If you are not sure when you to perform your In-Noise Earpiece Adaptation, take note of when your amulet
lights switch to protected mode. At this time, noise levels are at the correct level and you can press SELECT to
start the t test.
20
Page 21
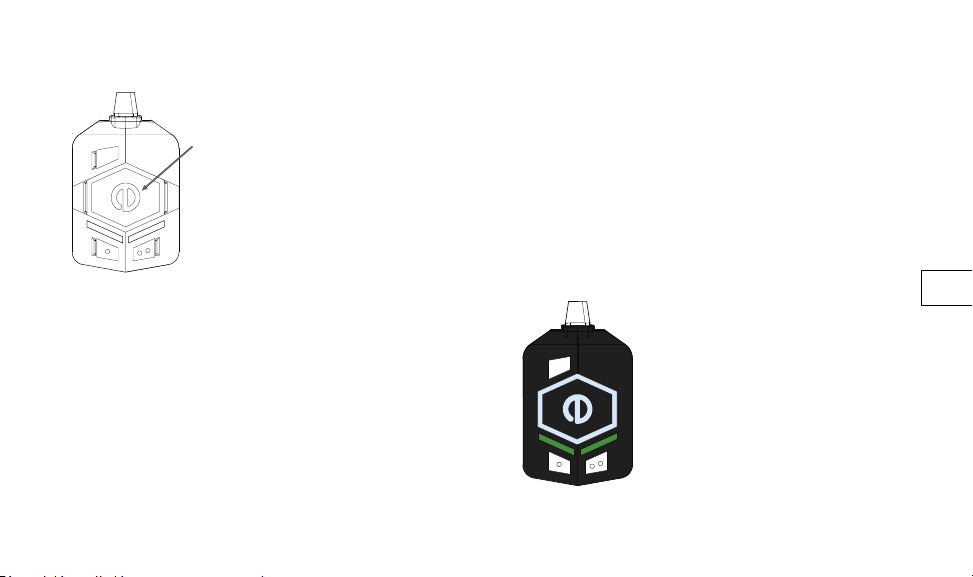
USING THE DEVICE
Once you have the right sizing and acoustical seal you are ready to turn on your device, perform your Earpiece
Fit Test, and start using your SonX.
Power
PPT
Turning the Device On
To turn on the device, do a long 2-second press the POWER button. The amulet will light up with the following
LED pattern and, if you have your ear tips inserted, you will hear a 7-second “ramping up” audio prompt. The
indicator lights will pulse regularly when in stand-by.
Note: Every time SonX is powered o and on, the device remembers your last volume setting. To increase or
decrease press up or down on the volume buttons.
Power ON
21
Page 22
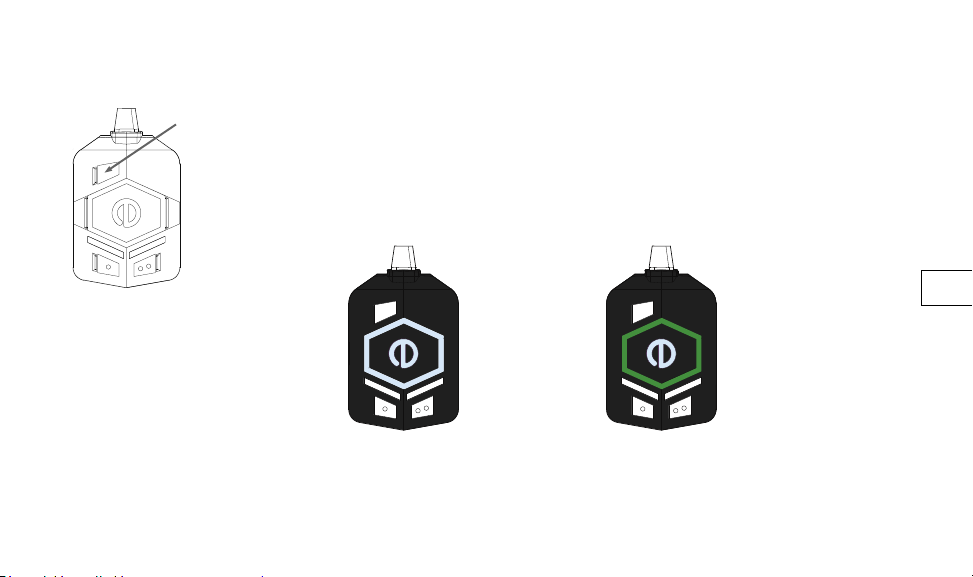
Performing an Earpiece Fit Test
Function
You will need to do an in-noise Earpiece Fit Test to ensure your communication works well. This test must be
done every time you power up your amulet or remove an earpiece. It needs to be done in noise (above 85dB)
and can be done at ANY time to ensure your hearing is always protected.
Press the “FUNCTION” button and release. While the unit is completing the Earpiece Fit Test, do not talk, chew
or touch any of the other buttons. You will hear a ramping up audio prompt and see the Amulet ash WHITE.
The test may take up to 10 seconds to complete. A successful PASS t test will look like this with an ascending
audio prompt.
If you have a poor t, you hear a descending audio prompt and see the ring light up a constant RED, on either
side with GREEN and RED, depending on your actual t.
Fit Test: initiation sequence Fit Test: PASS indicator lights
for a successful Earpiece Fit Test
22
Page 23
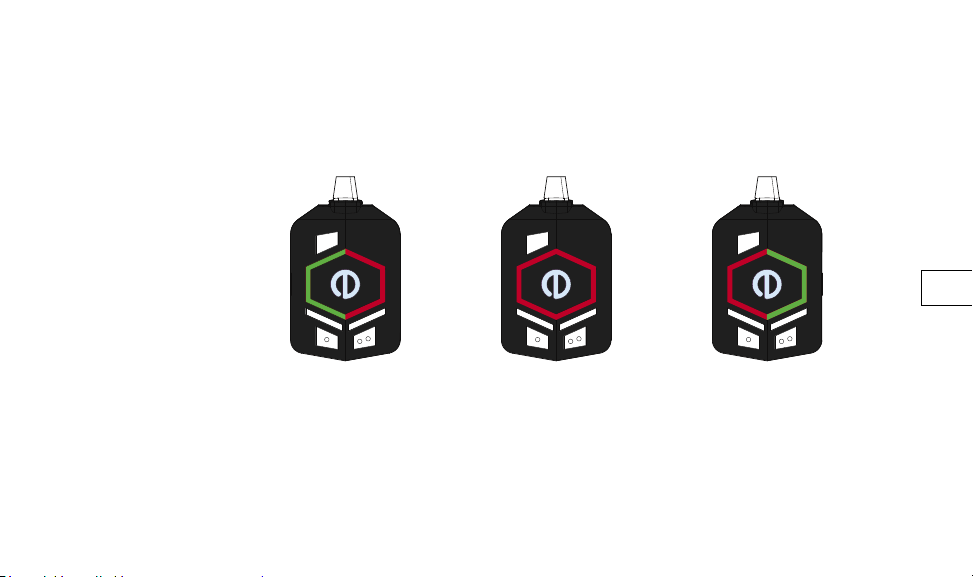
If the RED is on the left side of the amulet, your t was a FAIL on the left but a PASS on the right ear.
Conversely if it’s RED on the right side, you were successful on the left. To x the issue, move to a safe noise
level area, and repeat the process of ear tip insertion, for both or the failed left or right ear.
23
Fit test: Left ear FAIL
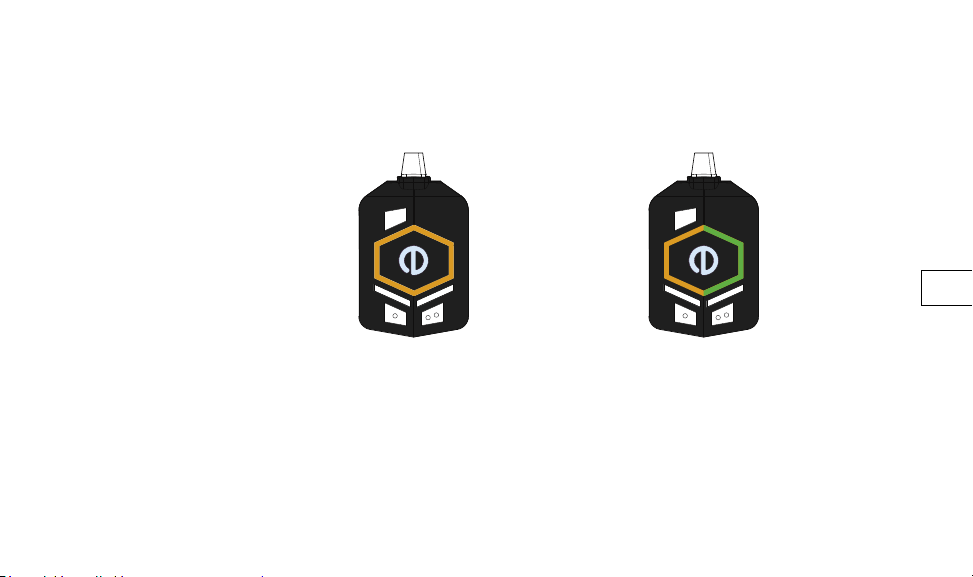
Your earpiece t sometimes will fall into a moderate rating: your protection is maintained but your t may
impact level of quality in your communication. The ORANGE visual prompt and a descending audio prompt will
indicate what ear(s) is moderate t. Here are some of the types of results you might get.
Fit test: Right ear FAILFit test: Both ears FAIL
Page 24
If you are still having trouble, ask with your supervisor or a super user for assistance. You may need to change
size tip, are not inserting the foam tip deep enough, or incorrectly compressing the tips before putting them in
your ear canal. Repeat the Earpiece Fit Test, and once successful, you are ready to use your amulet.
24
Fit Test: Both ears
MODERATE t
NOTE: It is the user’s responsibility to regularly perform an Earpiece Fit Test to ensure protection at all times.
The Earpiece Fit Test can be done in noise, by selecting the SELECT button. Anytime the device is turned o,
or battery is removed, a Fit Test will need to be performed.
When referring to Left and Right, it is anatomical to the way SonX is worn: when SonX is vertical as shown, the
left of the device is your left ear.
Fit Test: MODERATE t
right ear, PASS left ear.
Page 25
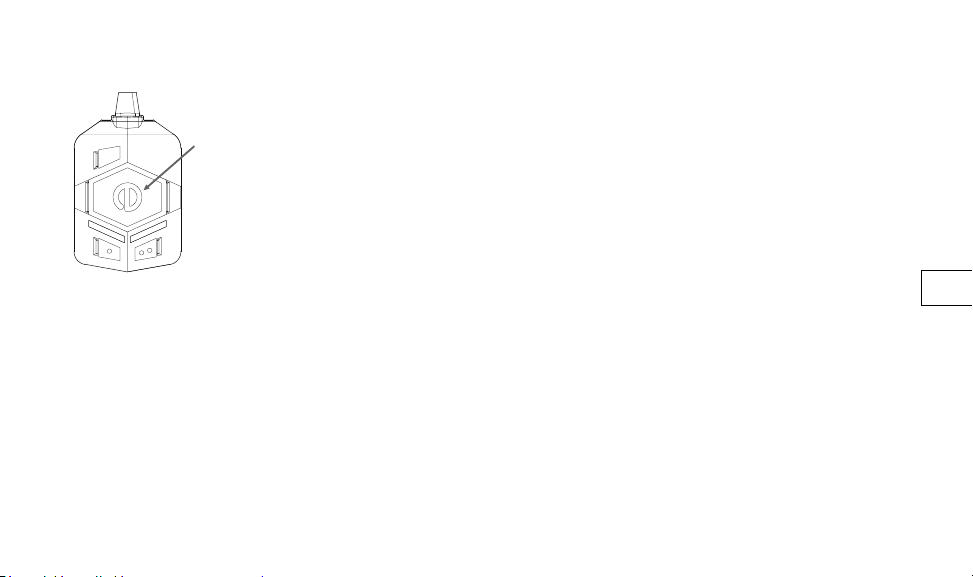
Talking in Noise (Push-to-talk/PTT)
Power
PPT
The center POWER button is used to turn the device on and to communicate. The push-to-talk works like a
walkie-talkie would - you must push the button each time for the duration you need to talk, and release to
hear anyone else who is also using a device. When pressed, the amulet will light up and you will hear a short
ascending “bi-dip” audio prompt: this means you are connected and that other team members can hear you.
You don’t need to shout or raise your voice. Everyone wearing the amulet on your radio band will hear you.
When you release, a short descending “bi-dip” can be heard: only you can hear this and is designed to let you
know your message has been sent.
If you hear a very short negative “beep” audio prompt: you and another user are trying to communicate at the
same time. Wait and try again.
NOTE: if you have a poor t, all team communication will be aected. Speak normally: speaking very quietly
will also aect sound quality.
TIP: You can use other communication devices (such as radio or mobile phone) without removing your SonX –
as long as you don’t touch the device to the SonX earpiece. Touching the sensitive membrane on the outside
of the earpiece could trigger the device to engage impulse clipping and temporarily block sound completely.
STOP: Until you have passed your Earpiece Fit Test you should
not use the communication functions in noise.
25
Page 26
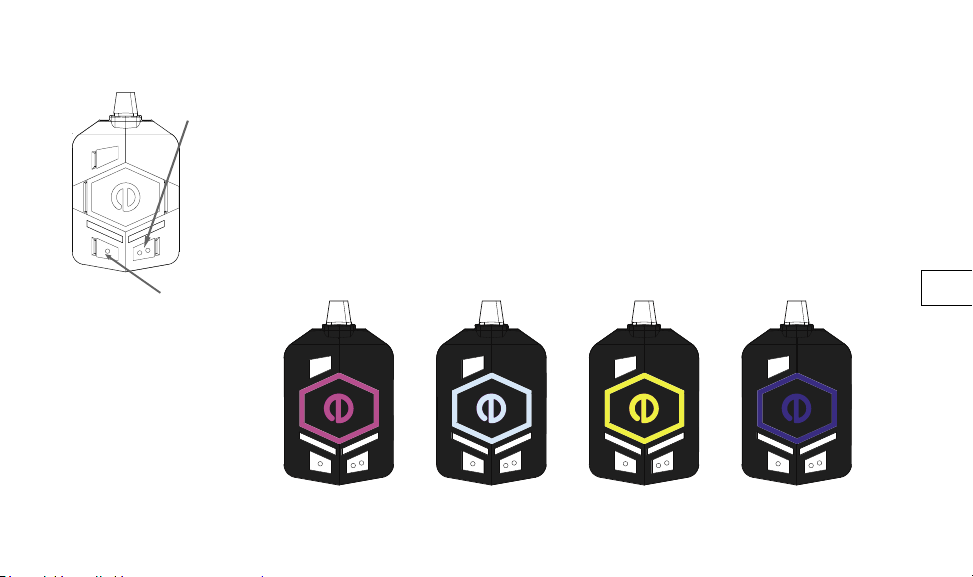
Volume up
Team bands
Battery status
Volume down
Power o
Battery status
Adjusting volume
Your device is always set to a default medium volume setting. To increase or decrease press UP or
DOWN on the volume buttons. The red light indicates your volume is at maximum.
Detecting Battery Level
A quick press of either VOLUME button will show you the battery level. A slow blinking red indicator
light means low battery with 20% remaining. At 10%, the low battery light will start to blink fast until
completely drained.
Assigning Team-Based Communication Groups
For team assignations, a long press of the VOLUME UP button will cycle through the available radio
channels available.
Team: Magenta Team: Turquoise Team: Yellow Team: Blue
26
Page 27
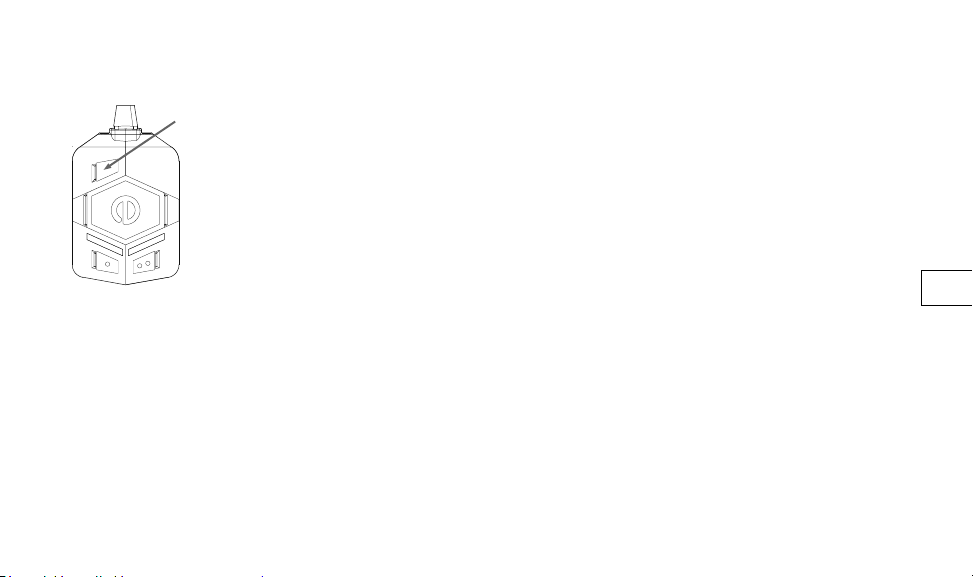
Function
Team assignations are useful for department work or project-based groups that need to keep communication
with each other. The available colors are Magenta, White, Yellow, Blue
NOTE: Some colors work better in high light (outdoor) environments.
Overriding Protection Functionalities
Sometimes you might need to override the level-dependent protection functionalities.
Forced Protected Mode
In some cases, external sounds, such as strong winds or wide variances in noise levels, can trigger the
“protected mode” to kick in, resulting in some lags in communication. In these instances, you can override
the auto protect functionalities. If you need to work in double protection work environments, using the forced
protected mode under your ear mus works well.
Forced Pass-through
Forced Pass-through is useful in a number of circumstances. If you are in a safe noise level but you need to
converse with someone who is not using a SonX. When selecting this mode, you will be able to hear them
clearly, while keeping your protection in place. It is also useful for long periods in quiet noise or answering your
radio or mobile phone, without risk of triggering your “protected mode”. Be mindful to reset functions.
Using Override Functions
With a very quick press of the FUNCTION button, SonX will cycle through your 3 options: Force Protected,
Forced Pass-through, and reset.
27
Page 28
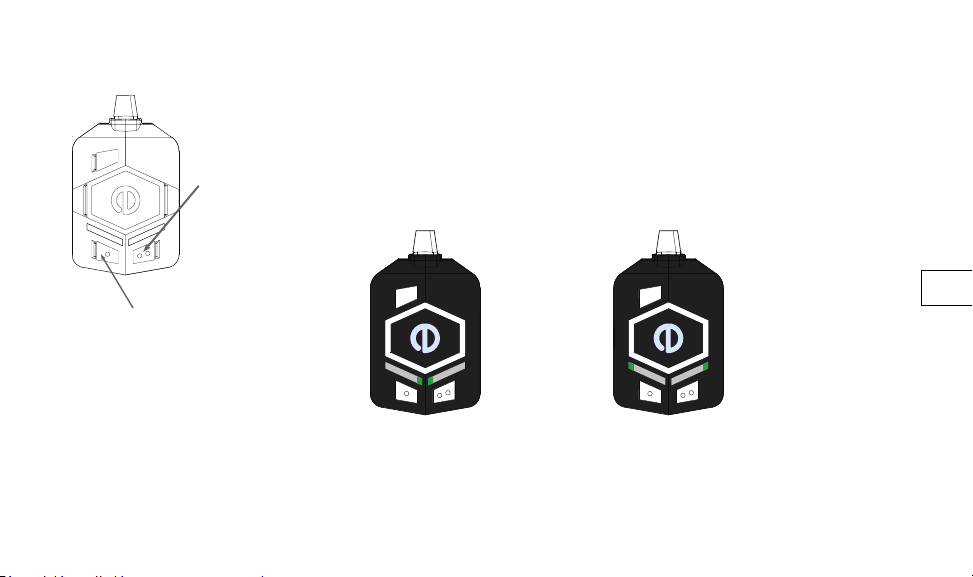
Volume up
Team bands
1. First press - Forced Protected Mode: You will hear a downward sliding audio prompt and the inside
LED lights from battery and volume will begin to ash GREEN.
2. Second press - Forced Pass-through: An upward sliding audio prompt will be heard with the far-left
LED light from volume and far-right LED light battery ashing GREEN.
3. Third press - Auto Protect: The third press in the cycle resets SonX back to Auto Protect. You will
hear a robotic mid tone audio prompt. Depending on your ambient the sound levels, the external LED
lights will stop ashing and will migrate to either solid GREEN inside or outside.
Volume down
Power o
28
Forced PROTECTED mode “ON” Forced PASS-THROUGH mode “ON”
Turning SonX off
Press the Volume DOWN button for hold 2 seconds. The indicator lights will go down in sequence with a
cascading descending audio prompt until the unit is powered down.
Page 29

CLEANING AND MAINTENANCE
Cleaning the Amulet
Inspect your amulet regularly for dust and grime. Wipe with a damp cloth using mild soap if necessary.
Do not use alcohol-based products. Store in its carrying case when not in use.
TIP: Compressed air works well to remove accumulated dust.
Maintaining the Ear Tips
Your ear tips are designed for long term use. Change ear tips as necessary. We recommend doing so
every 4 weeks. Inspect for lack of compression or excessive dust. To clean the foam ear tips, unscrew
from earpiece and gently wipe them with a clean, damp cloth. Use water only. Do not clean tips with
detergents or alcohol-based cleaning solutions. Let tips dry completely before next use.
NOTE: Using wet foam ear tips will not create an adequate acoustical seal: always use dry ones.
29
Page 30
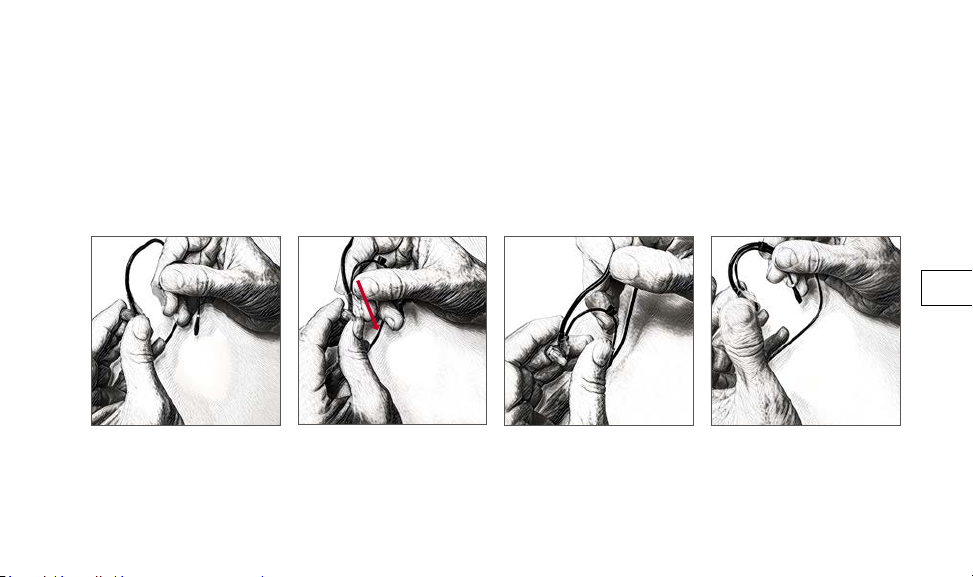
Attaching the Ear Hooks
Two detachable ear hooks are included with your SonX device and are pre-mounted onto the earpieces. In the
event they are not properly secured or you wish to replace them, follow these steps:
To attach the ear hook, insert the grapple around cable, slide down and push up to lock into hooked position
and then insert the wire into middle clip as shown by gures 9 through 12.
9
10 11
12
30
To detach ear hook, reverse the instructions: remove cable from middle clip. Then rock grapple gently back
and slide up to free from hook.
Page 31

TROUBLESHOOTING
Performing a Hard Reset
On occasion, the device may not respond properly. First line of defense is to perform a “hard reset”:
1. Power down the device.
2. Remove battery
3. Wait 5 seconds and reinsert.
4. Press the POWER button to turn back on.
Performing a Factory Reset
Simultaneously press single-dotted (volume down), double-dotted (volume up) and FUNCTION button. While
holding these 3 buttons, then press POWER button for 2 seconds, then release all 4 buttons. This operation
will take about 40 seconds.
NOTE: A factory reset should only be performed upon request by EERS tech support.
Locate Version Number of your SonX
For debugging purposes, you will need the version number. While in a quiet environment, hold the FUNCTION
button for 7 seconds. You will hear a voice read out the version number.
31
Page 32
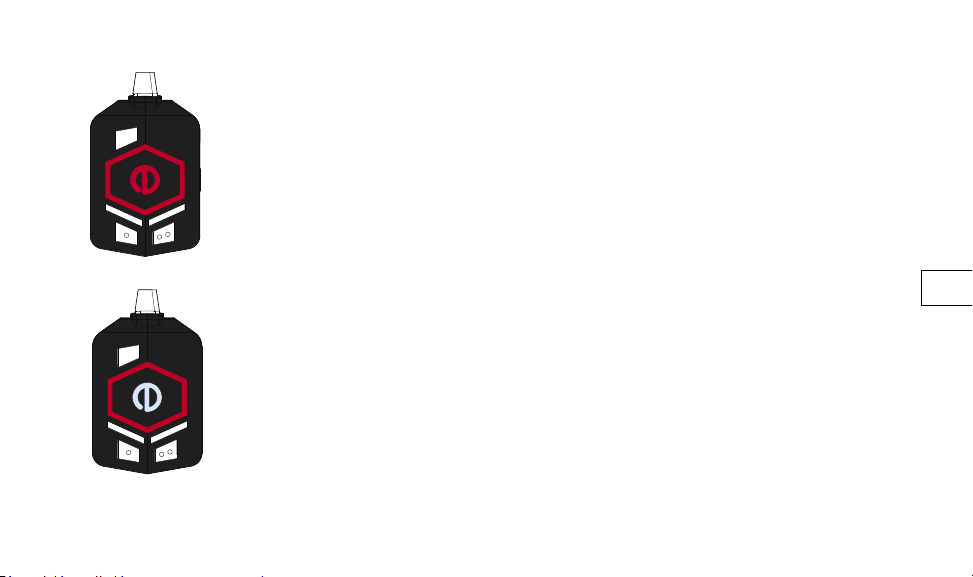
Ring Light Shows Red when Turning on Device
At start up the device shows an Red right light.
SOLUTION: Try a hard reset of your SonX by powering down the device. If the problem persists, contact your
supervisor.
Ring Light Shows Flashing when Performing an Earpiece Fit Test
If you get a ashing RED light while performing the Fit Test, there are 2 reasons why this might happen. First,
the noise level isn’t high enough or there was a volume drop during the test. Second, you might have been
pressing other buttons or speaking. In either of these cases, the amulet will show this visual pattern and have
a descending audio prompt.
SOLUTION: For either of these 2 situations, you do NOT need to ret your earpiece. Simply ensure you are in
constant high noise and press FUNCTION button again to redo the test. If the problem persists, contact your
supervisor.
32
Page 33

RADIO FREQUENCY WARNINGS
FCC
This device complies with part 15 of the FCC Rules. Operation is subject to the following two conditions:
(1) This device may not cause harmful interference, and (2) this device must accept any interference
received, including interference that may cause undesired operation.
Caution: Changes or modications not expressly approved by the party responsible for compliance
could void the user’s authority to operate this equipment.
If the device has removable antennas then a list of the antennas that may be used with the device must
be included in the user manual. The list should identify the type of antenna, impedance (usually 50
ohms), and the maximum gain in dBi.
IC
This device complies with Industry Canada licence-exempt RSS standard(s). Operation is subject to the
following two conditions: (1) this device may not cause interference, and (2) this device must accept any
interference, including interference that may cause undesired operation of the device.
33
Page 34

HEALTH CANADA RF EXPOSURE WARNING STATEMENT
This device complies with Health Canada’s Safety Code. The installer of this device should
ensure that RF radiation is not emitted in excess of the Health Canada’s requirement. Information can be
obtained at http://www.hc-sc.gc.ca/ewh-semt/pubs/radiation/radio_guide-lignes_direct/index-eng.php
34
Page 35
QUICK GUIDE
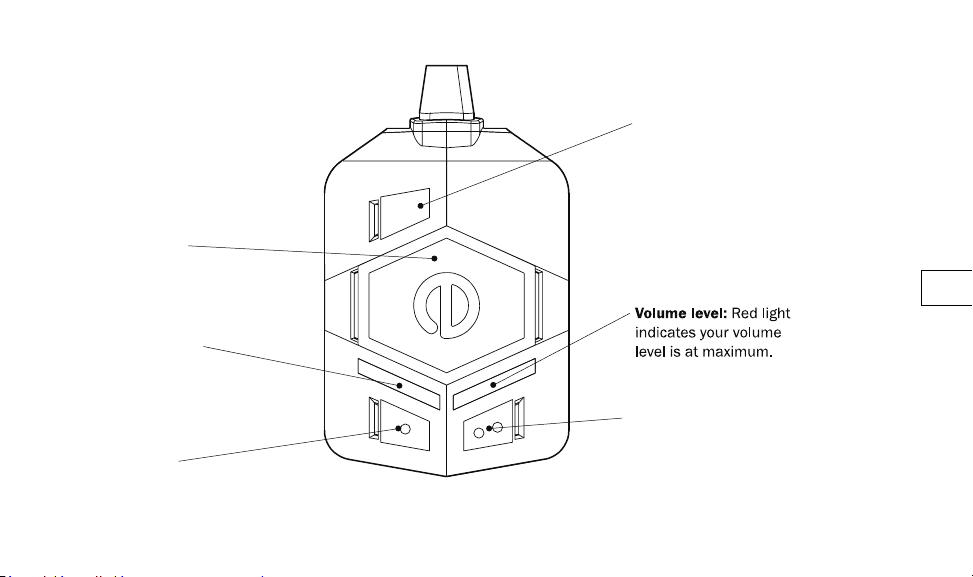
POWER button
Power ON: Hold for 2 seconds
Push-to-Talk: Press to talk
Battery life level:
Red light indicates
low battery.
Volume: Down
Power OFF: Hold for 2 seconds
Battery status: Quick press for
battery level.
FUNCTION button
SonX Fit Test: Long press triggers
test. P rompts notify test results and
push-to-talk is read y.
Overrides: Quick press cycles to
Forced Protect, Forced Pass-thr ough,
and resets t o Auto Protect.
35
Volume: Up
Team assignment: Long press
to cycle through and select team
radio band.
Battery status: Quick press for
battery level.
Page 36
PROPER EAR TIP INSERTION
36
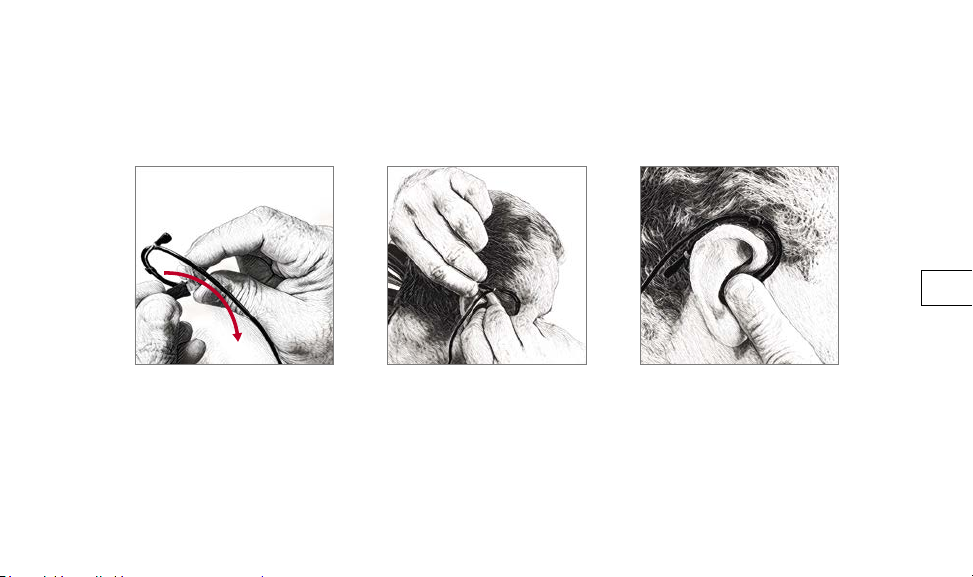
1. Roll between clean ngers to
compress and prepare ear tip.
2. Hold pinna upwards and back,
insert tip and twist. Fit ear hooks
into place.
3. Wait 15-20 seconds to create
good seal before doing other ear.
 Loading...