

EEG HD490 User Manual
DIGITAL SMART
ENCODER
MODEL HD490
EEG Enterprises, Inc.
586 Main Street
Farmingdale, New York 11735
TEL: (516) 293-7472 FAX: (516) 293-7417
Copyright (c), EEG Enterprises, Inc. 2000-2012
All rights reserved.

HD490 Smart Encoder
eeg
Table Of Contents
Introduction ________________________________________________ 2
Product Description ....................................................................................... 2
Selected Features ........................................................................................... 2
Installation _________________________________________________ 3
Front Panel .................................................................................................... 3
Rear Panel ..................................................................................................... 5
Encoder Operation __________________________________________ 7
Front Panel Menus ........................................................................................ 7
Web Configuration ........................................................................................ 12
Local Caption Entry ...................................................................................... 17
HD Output Types .......................................................................................... 22
XDS Insertion ................................................................................................ 25
URL and Text Encoding ............................................................................... 31
Applications _______________________________________________ 34
iCap™ Secure Internet Captioning ............................................................... 34
Additional Features__________________________________________ 36
Serial Port Configuration .............................................................................. 37
Encoder Status Commands ............................................................................ 42
Appendices ________________________________________________ 44
RS422 Configuration ..................................................................................... 44
Clone Port Option .......................................................................................... 45
Grand Alliance Protocol ................................................................................ 46
Smart Encoder Command List ...................................................................... 47
490 Specifications ___________________________________________ 50
Copyright 2000-2012, EEG Enterprises, Inc. All rights reserved. The contents of
this manual may not be transmitted o r reproduced in any fo rm without the written
permission of EEG.
The revision date for this manual is August 8, 2013.
Copyright © 2000-2012 EEG Ente rpris es , Inc. 1
All Rights Reserved.

HD490 Smart Encoder
eeg
Section 1: Introduction
Product Description
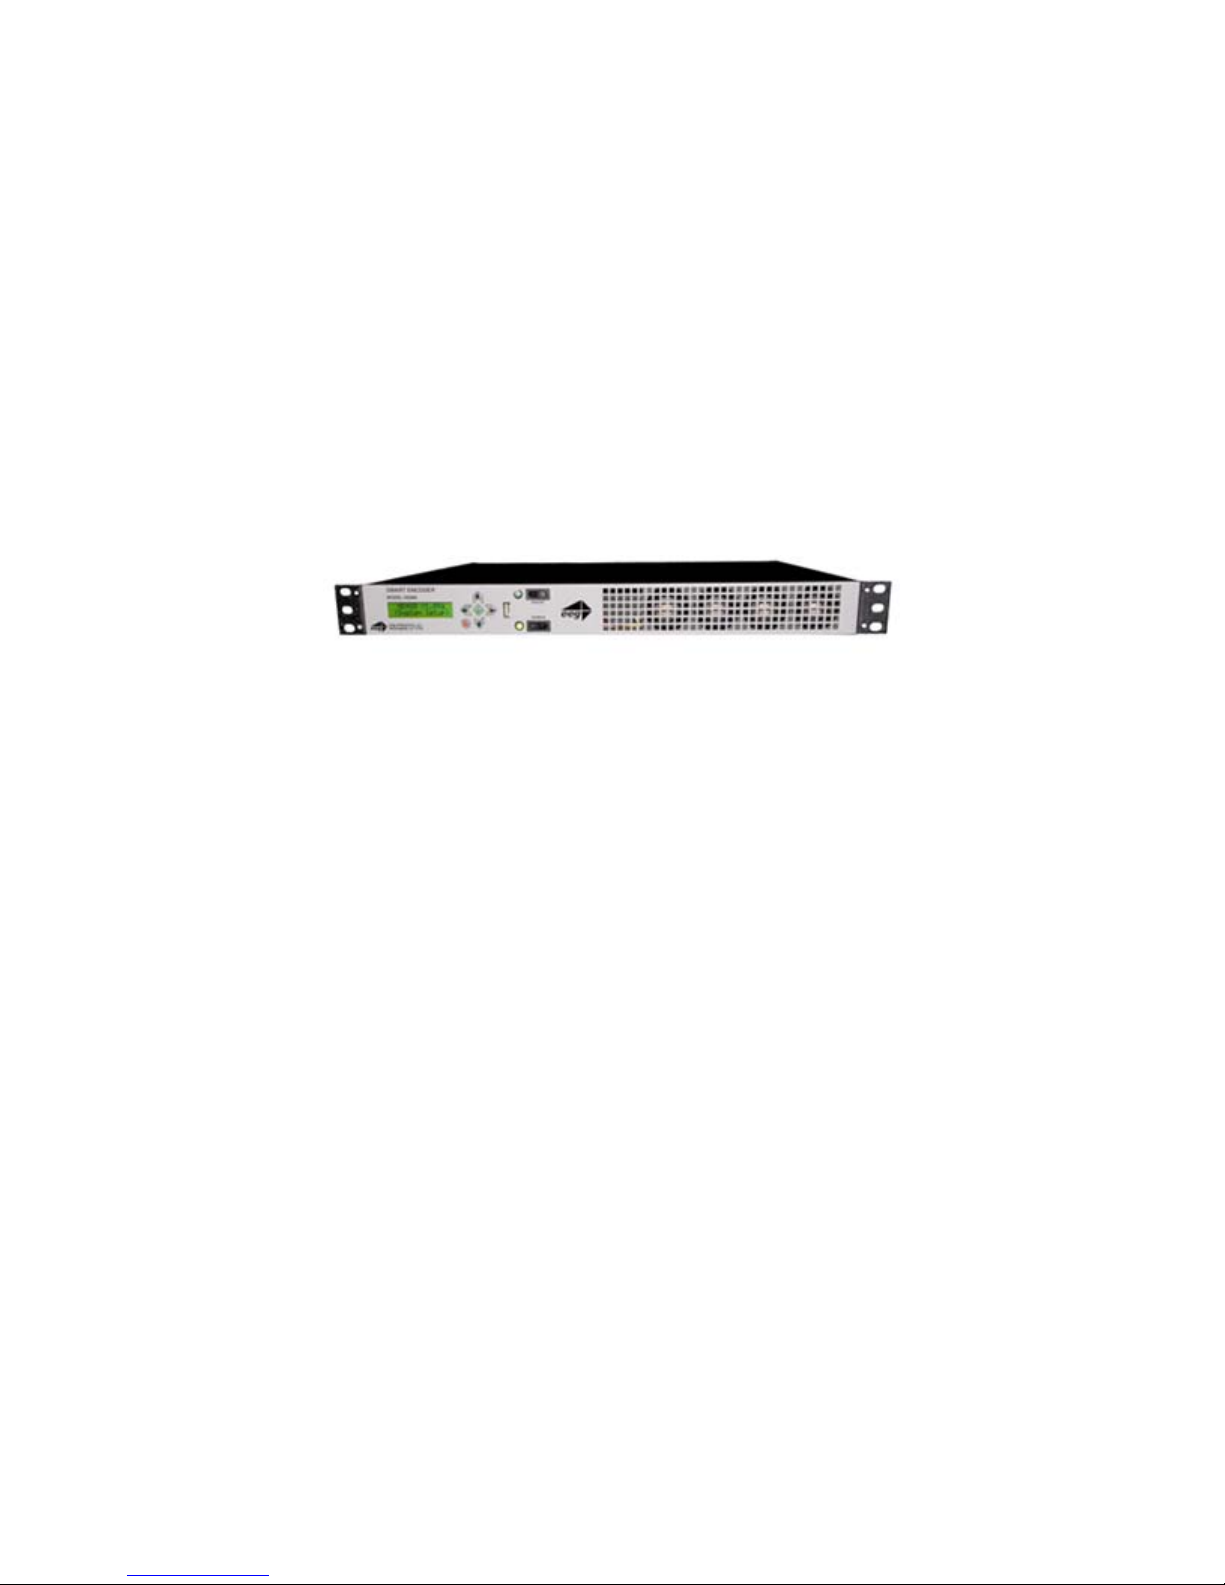
The 490-series Smart Encoder is a next-generation digital closed
captioning solution designed to streamline and integrate the Line
21/HD-VANC encoding process into one powerful box. The 490
revolutionizes closed caption encoding with a compact and robust new
platform designed to support a wide variety of powerful ancillary data
software on-board. All 490 encoders ship with the iCap™ internet
captioning package; other software, including CCPlay™, XDS
Xpress™, and custom packages, are available separately and can be
installed in the field at any time. In addition to its new features, the 490
includes the same industry-standard closed c aption and XDS data entry
functions as previous Smart Encoder generations, available through two
serial ports and a dial-up modem.
Selected Features
Relay-bypassed master video and auxiliary video paths
Encodes caption data sourced from previously encoded video
Includes iCap™ software for secure real-time internet-based
HD490 encodes CEA-708 standard closed captioning from native
Caption relocation from configurable GPI triggers
Ships network ready, with advanced Startup Settings editor and
Flash updates and fast file transfers through front panel USB port.
Full command set back-compatibility with 470 Smart Encoder III,
sources, two RS232 serial ports, or a dial-up modem (one included,
second modem optional)
captioning without dial-up phone lines or external audio couplers.
708 or legacy 608 (SD) sources
debugging terminal available over an intuitive web browser
interface
530 Smart Encoder IV, and 480 Smart Encoder V.
Copyright © 2000-2012 EEG Enterprises, Inc. 2
All Rights Reserved.
HD490 Smart Encoder
LCD Display Control Pad
Insert On
LED
Power On
LED
Insert On /
Bypass
Power
Switch
USB
Port
SMART ENCODER
MODEL HD490
eeg
eeg enterprises, inc.
farmingdale, ny 11735
eeg
Section 2: Installation
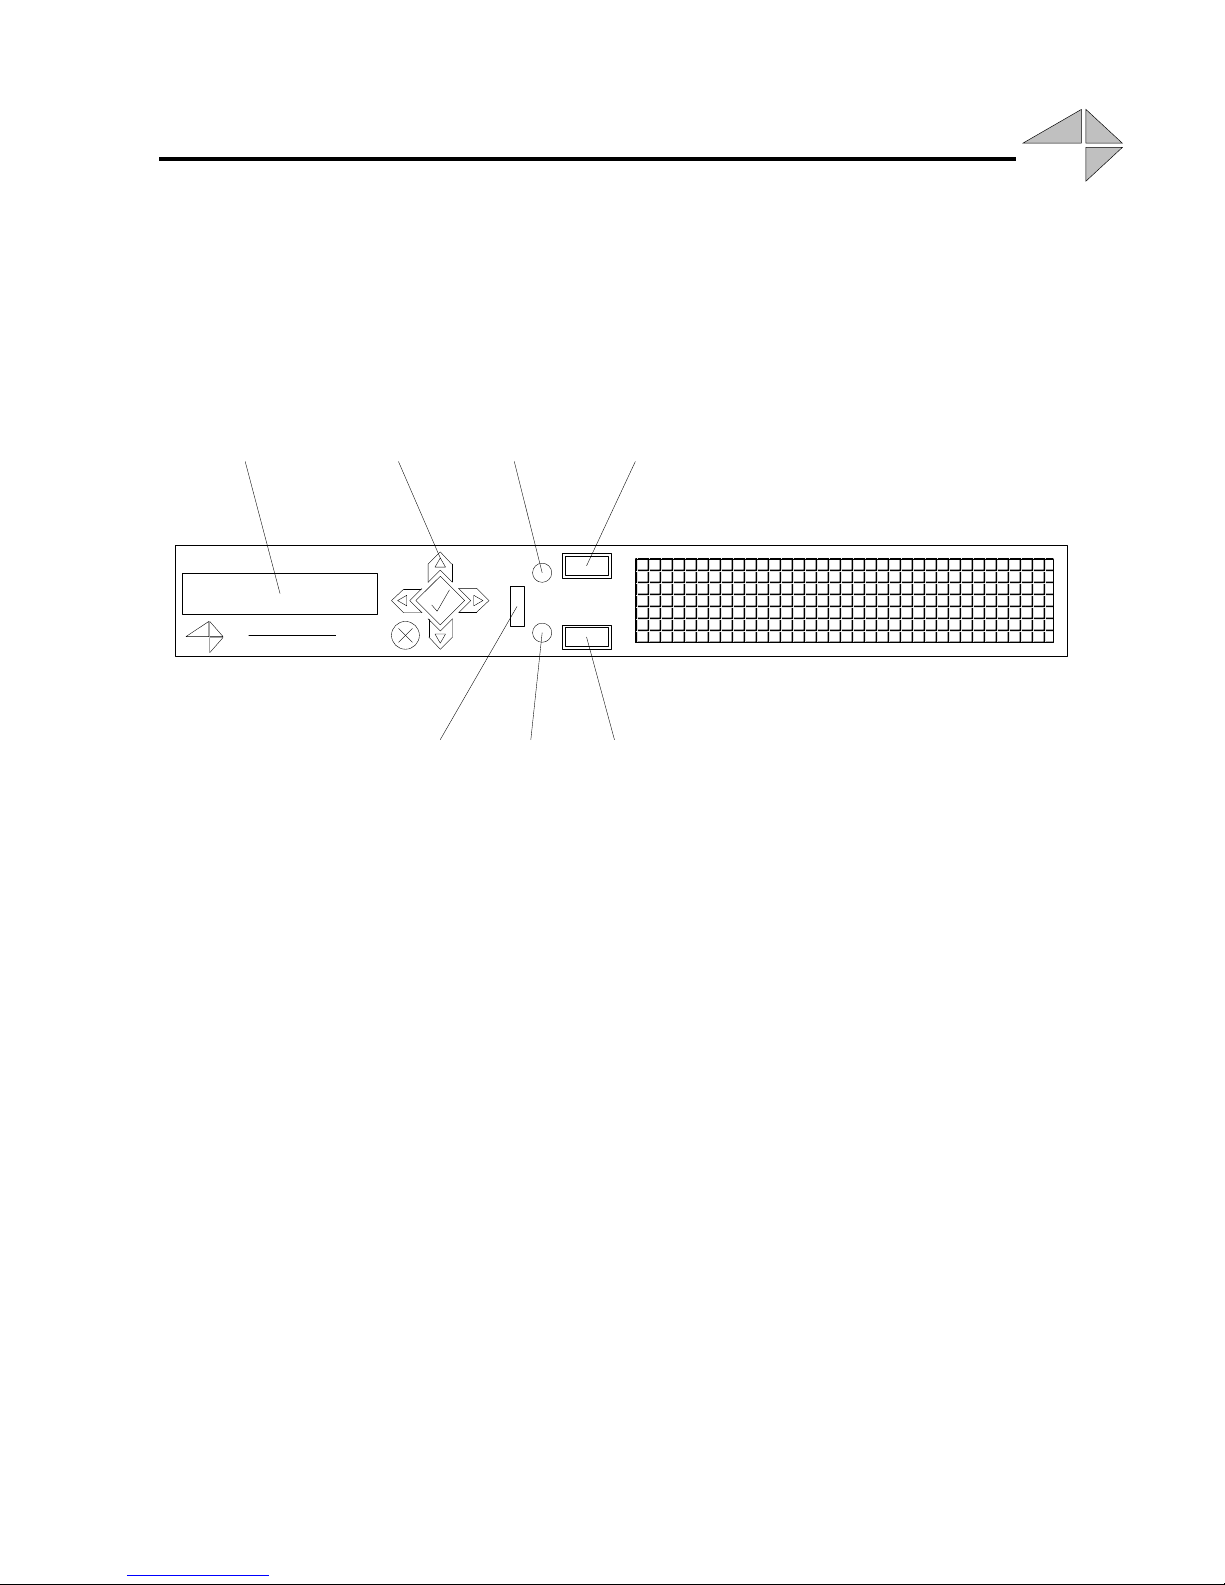
Front Panel
Power Switch This is the on/off switch for the unit.
Power On LED The Power On LED will light steady green when the unit is powered on.
Insert On Toggles the Encoder between active operations and Relay Bypass mode.
Insert On LED The Insert On LED will light green when the unit is in active operating
In Relay Bypass mode, the signal at the master video input is routed
directly through to the master video output, while the signal at the
auxiliary video input is routed directly through to the auxiliary/decoder
video output. Video output 2 is inactive.
mode. The LED will turn off when the Encoder is in Relay Bypass
mode.
3 Copyright © 2000-2012 EEG Enterprises, Inc.
All Rights Reserved.

HD490 Smart Encoder
LCD Screen The LCD Screen provides access to the unit’s front panel configuration
menu. On the HD490, st atus information is displayed when the menu is
not in use.
Control Pad The Control Pad provides menu navigation for the front panel
configuration menus. The control pad buttons are: ENTER ( marked by
a check), CANCEL (marked by an ‘X’), LEFT, RIGHT, UP, and
DOWN.
USB Port The front panel USB port provides firmware upgrade capability via a
flash memory device. For instructions on upgrading the firmware, see
page 8. Additional USB ports are available on the rear panel of the unit.
Copyright © 2000-2012 EEG Enterprises, Inc. 4
All Rights Reserved.

HD490 Smart Encoder
AC Power
Source
USB Port
LAN Port
Decoder
Out
Master
Video Out
GP In
GP Out
Master
Video In
Video
Out 2
Serial
Port 2
(RS232)
Serial Port 1
(333/GA Out)
Audio In
Modem B
Time
Code In
Modem A
Aux
Video In
HD490
Rear Panel
Primary AC Power AC power input, 120 – 240 V, 50-60 Hz tolerant. Connect to the unit’s
AC power source.
Master Video In Input for program video source. HD490 can use HD-SDI (SMPTE
292M) or SD-SDI (SMPTE 259M).
Master Video Out Relay-bypass protected primary video output.
Video Out 2 Non relay-bypass protected copy of the primary video output signal.
Decoder Out Relay-bypass protected output video signal with open caption display
for monitoring. On the HD-490, this is an HD signal with decoded 708
captioning.
Aux Video In The Aux Video In can be used as a source of caption data when
connected to a captioned HD-SDI or SD-SDI video source. Caption data
from the Aux Video In will be up-converted or down-converted as
necessary for encoding on to the Master Video signal. If caption data is
present at both the Master Video In and the Aux Video In, the signal
with HD data will take precedence.
Modem Standard phone jack data port. Connect to a phone line to enable dial-up
captioning. Modem A is installed in all 490 units; Modem B is an addon option.
5 Copyright © 2000-2012 EEG Enterprises, Inc.
All Rights Reserved.

HD490 Smart Encoder
Serial Ports 490 Encoders have two serial data ports. For HD490, port 1 is a 708
caption data output port to be connected to an ATSC encoder captioning
port (see page 22) and port 2 is an RS232/RS422 port for caption data
input. For more detailed descriptions of RS232/422 operation and
configuration, see pages 37 and 44.
LAN Connect the 490 Encoder to your local network to access web-based
configuration and use network features such as iCap™. The encoder
will be reachable on your network using the static IP address set in the
front panel configuration menu.
GP In & Out Two blocks of 8 GPI input switches and 8 GPO output notifications.
Switch functions vary based on software configurations. For the default
GPI functionality, see page 39; for the default GPO functionality, see
page 41.
Time Code In Balanced audio input for LTC time code. The HD495 can also read
VITC data embedded in the master SD video signal; this feature is not
available on the HD490.
Audio In Balanced audio input for program companion audio in analog, AES
digital format, or embedded audio. If using AES digital audio, an AES
pair of PCM encoded audio at 48kHz should be used. The iCap™
module uses the audio stream selected from the front panel for
encrypted IP transmission to a remote captioner’s iCap™ client. For
more details on iCap™ audio, see the front panel “Audio Setup” menu,
or the HD490 iCap™ Software Manual.
Copyright © 2000-2012 EEG Enterprises, Inc. 6
All Rights Reserved.

HD490 Smart Encoder
eeg
Section 3: Encoder Operation
Front Panel Menus
The front panel LCD screen and Control Pad are used to configure
encoder settings and networking, perform flash updates, and access
many add-on software features installed in the unit. The interface is
organized in a series of hierarchical m enus; use the LEFT and RIGHT
keys to scroll between menu options and the ENTER or DOWN keys
to select options or enter sub-menus. Press the CANCEL key from any
menu screen to return to the top of the menu hierarchy.
In the HD490, when the front panel menu is inactive, the display will
revert to a status screen. The top line shows the availability and format
of the video signals at the Master and Aux Video Inputs in the left and
right corners, respectively. The bottom line shows the current data
sources for the primar y and secondary HD caption Servi ces. Press any
key on the Control Pad to return to the top-level menu from the status
screen.
System Setup Menu
LCD Display The LCD Display menu contains display options for the front panel
LCD screen.
LCD Contrast sets the contrast level of the display screen. The
value ranges from 0 (lightest) to 20 (darkest). Use the UP and
DOWN keys to make changes, which will take effect on the screen
immediately. When you are finished making changes, use the
ENTER key to exit the menu and save changes, or the CANCEL
key to exit the menu and reject changes.
LCD Backlight sets the brightness level of the display screen’s
backlighting. The value ranges from 0 (darkest) to 50 (brightest).
Use the UP and DOWN keys to make changes, which will take
effect on the screen immediately. When you are finished making
changes, use the ENTER key to exit the menu and save changes or
the CANCEL key to exit the menu and reject changes.
L21 Pedestal Turns the Line 21 Pedestal feature on and off. Use the UP and DOWN
buttons to select ‘On’ or ‘Off’ and ENTER or CANCEL to exit.
7 Copyright © 2000-2012 EEG Enterprises, Inc.
All Rights Reserved.

HD490 Smart Encoder
Version View the current versions of hardware, firmware, and all software
modules installed on the unit. Use the UP and DOWN buttons to scroll
through the list and ENTER or CANCEL to exit.
Network Configuration
The Network Configuration menu contains the IP address and subnet
mask that the Encoder will use when connected to a local network.
IP Address selects the network address that the unit will request on
your LAN . Use the LEFT and RIGHT keys to move the cursor
between digits and the UP and DOWN keys to change the selected
digit. When you are finished making changes, use the ENTER key
to exit the menu and save changes or the CANCEL key to exit the
menu and reject changes.
Subnet Mask should be set to match the bit mask used on your
LAN.
Gateway should be set to the address of the computer or device that
the unit will use to communicate outside of your local network,
when applicable.
Firmware Update The Firmware Update utility provides a fast, simple, and convenient
way to upgrade your Encoder to the latest version of the EEG firmware
or add additional software modules. Begin by downloading a firmware
update file from the EEG website and transferring the file to any
standard USB memory device. Insert the memory stick into the front
panel USB port, navigate to the Update option in the System Setup
menu, and press ENTER. The update utility will find the installation
file on the memory device, display the revision number, and prompt you
to continue. Press ENTER to proceed and install the new firmware, or
CANCEL to end the utility. A message will appear on the LCD screen
when the update utility has finished. Do NOT remove the memory
device while the update utility is running. When the update utility is
finished, the new firmware has been installed. Some updates will
require a power-cycle before they take effect; in this case, the Encoder
will power down automatically once the update is complete.
In HD490 versions 2.3.8 and up, updates can also be applied over your
LAN on the HD490 Web Configuration page.
Copyright © 2000-2012 EEG Enterprises, Inc. 8
All Rights Reserved.

HD490 Smart Encoder
SD/HD Encode The SD/HD Encode utility allows you to specify if SD and HD captions
are simultaneously encoded on the output video. To encode both SD and
HD captions at the same time, select ‘SD/HD Encode’ by using the UP
and DOWN buttons to scroll through the list. Choose the ‘Decoder’
option to see the captions open decoded over the video being outputted
to master video. Press ENTER to save your selection or CANCEL to
exit.
Utilities
Test Captions The Test Caption menu allows you to enable a stream of caption text on
a single 608 channel of your choosing.
Enable starts the stream of captions on the selected channel, which
is CC1 by default. To enable test captions use the UP and DOWN
keys to select ON. To disable test captions select OFF. Use the
ENTER key to apply the changes. The test captions will stop if any
other port (i.e. 232, modem or Linux virtual port) enters caption
mode on the same channel and automatically change Enable to
OFF.
Set Channel allows you to select which 608 channel the test caption
stream will be appear on. The default channel is CC1. TO select a
different channel use the UP and DOWN keys to select a different
channel and press the ENTER key to apply the change.
Capture VANC Captures VANC data of the selected DID/SDID from the Master video
input and loads it onto a USB storage device. Use the UP and DOWN
keys to select the desired DID/SDID and insert a USB device into the
box. Press ENTER to begin downloading the VANC data or CANCEL
to exit. To stop capturing VANC data press any front panel key.
Depending on the size and type of memory device used, there may be a
momentary delay before the device is detected. If you see “Failed: Insert
USB Disk”, wait a few seconds and try again.
Capture All VANC Captures VANC data of the selected DID/SDID from the Master video
input and loads it onto a USB storage device. Use the UP and DOWN
keys to select the desired DID/SDID and insert a USB device into the
box. Press ENTER to begin downloading the VANC data or CANCEL
to exit. To stop capturing VANC data press any front panel key.
Depending on the size and type of memory device used, there may be a
momentary delay before the device is detected. If you see “Failed: Insert
USB Disk”, wait a few seconds and try again.
9 Copyright © 2000-2012 EEG Enterprises, Inc.
All Rights Reserved.

HD490 Smart Encoder
Force Regen Manually returns the encoder to upstream “Regeneration” mode (see
page 19). This command can be used to resume passing of upstream
caption data whenever it is being blocked by locally input caption data.
Any captioners or devices inserting local data will be removed from
caption mode immediately.
Audio Setup Menu
Input Select Selects whether the input audio format is analog, AES digital or
embedded audio. Use the LEFT and RIGHT keys to select the correct
format, then press ENTER to exit and apply changes or CANCEL to
exit and cancel changes. The HD490 does not currently support direct
input of Dolby® E or other compressed audio signals.
Peak Level Dynamically displays the peak signal level at the audio input. A
warning message will be displayed when clipping is detected at the
input. For optimal sound quality, the peak level bar should reach at least
60% across the screen, but should never display “Clipping!”
Scale Audio Adjusts the audio input level without adjusting the output level of your
source. The built-in digital input trim can boost or cut the audio input
level up by as much as 12 dB.
Audio Group Selects the SDI embedded audio channel group that the iCap™ mix is
sourced from. Up to 4 channel groups can be carried on an SDI signal,
though most commonly Group 1 carries the primary audio program.
Applies only when embedded audio input is selected.
Audio Mix Selects whether the iCap™ mix is being created from a Stereo or
Surround channel group. Choose “Stereo” to select a mix of the left and
right channels (1 & 2 or 3 & 4 within the selected Audio Group,
according to the Stereo Channel setting), or “Surround” to select a mix
of the left, right, and center channels (1, 2 & 3 within the selected Audio
Group). Applies only when embedded audio input is selected.
Stereo Channel Selects whether the iCap™ stereo mix is being created from channels 1
& 2 or channels 3 & 4 within the selected Audio Group. Applies only
when embedded audio input and stereo audio mix are selected.
Copyright © 2000-2012 EEG Enterprises, Inc. 10
All Rights Reserved.

HD490 Smart Encoder
Decoder Setup Menu
Decoder On/Off Turns the on-screen decoder display on or off. Use the UP and DOWN
keys to select an option, then press ENTER to exit and apply changes
or CANCEL to exit and cancel changes.
708 Font Selects the display font for the decoder output. Choose “Default” to see
the font style as it is encoded in the 708 caption data. Fonts are only
selectable when a 708 caption service is selected for decoding.
708 Size Selects the display size for the decoder output. Choose “Default” to see
the font size as it is encoded in the 708 caption data. The decoder can
also be forced to Small, Standard, or Large for easier viewing. Size
selection is only available when a 708 caption service is selected for
decoding.
708 Opacity Selects the opacity of the caption display for the decoder output. Choose
“Default” to see the colors and opacity as they are encoded in the 708
caption data. Opacity is only selectable when a 708 caption service is
selected for decoding.
Set HD Service Selects the service on an HD master video that is decoded to create the
caption display on the decoder output. The DE280 can display 708
caption Services 1 through 6, or 608 downconversion data for caption
channels CC1 through CC4. If an SD master video source is connected,
this setting is ignored.
Set SD Service Selects the service on an SD master video that is decoded to create the
caption display on the decoder output. Choose CC1 through CC4. If an
HD master video source is connected, this setting is ignored.
Subtitle Mode Setting Subtitle Mode On creates a display with yellow foreground text
and a transparent background appropriate for creating open caption
displays for subtitling.
11 Copyright © 2000-2012 EEG Enterprises, Inc.
All Rights Reserved.
HD490 Smart Encoder
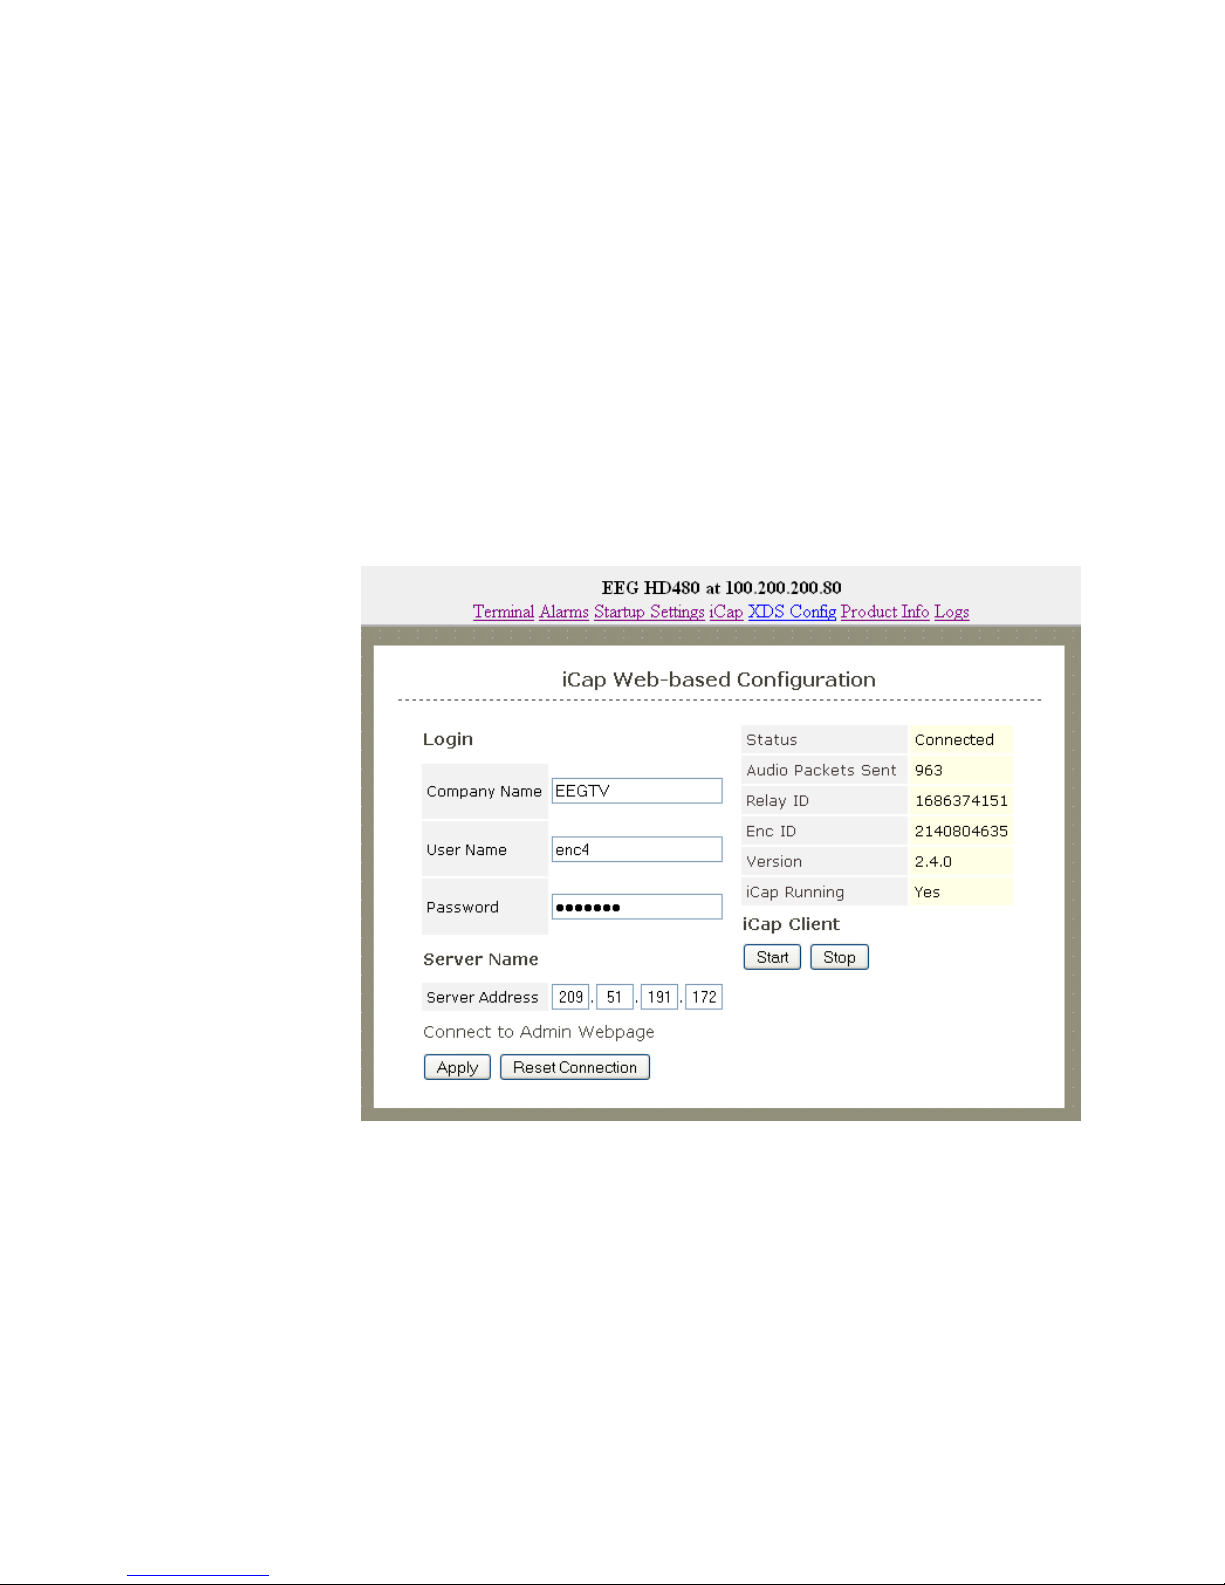
Web Configuration
The Web Configuration interface enables you to access configurations
and log files for your 490 applications from any computer on your local
network. Several web applications are installed at the factory for all
HD490 encoders: a Startup Setti ng editor, a web-based se rial-emulation
Terminal for entering Smart Encoder commands, a documentation
library, and the iCap™ application.
To use Web Configuration, first connect the Ethernet connector on the
rear panel of the HD490 to your local network. Then, use the front panel
LCD and button pad to give the encoder a valid IP address and subnet
mask for your network by navigating to System Setup | Network Setup
| IP Address and System Setup | Network Setup | Subnet Mask.
Once you have set up the front panel IP settings, you can leave your
encoder and open up a web browser on any PC on the same local
network. Navigate to the IP address that you configured on the
encoder’s front panel; for example, type 192.168.1.15 into the address
bar of the browser if that is the address you entered into the front panel.
If you cannot navigate to the page in your web browser, check with
your network administrator that the IP Address and Subnet Mask you
entered on the encoder front panel are valid parameters for your
network, since individual settings vary.
Copyright © 2000-2012 EEG Enterprises, Inc. 12
All Rights Reserved.

HD490 Smart Encoder
Once the page has loaded, you will see a list on the top panel of the
different web applications installed on your encoder. Click any of these
links to navigate to the page for that application.
Update
The Update page enables you to load and apply a software update to the
HD490 through the web interface. First, download the update file to
your local computer. Then, from the Update page, select ‘Choose File’
to navigate to the update file path, and ‘Upload’ to apply the update.
Follow any on-screen instructions to complete the update, and note that
some updates may require a reboot to take effect.
Product Info
The Product Info page contains the Documentation subpage at the top
and the Licensing subpage on the lower half of the page
The Documentation subpage contains PDF files of the HD490 manual
as well as software manuals for any installed modules. These files can
be downloaded or viewed in your web browser with a PDF reader such
as Adobe Acrobat Reader.
The Licensing subpage displays the status of the caption module, the
unit’s serial number and provides a way to enable the caption module
with a valid license key if it is not currently enabled. If your captioning
is not enabled and you would like to enable it, please contact an EEG
Sales Representative at sales@eegent.com for a license upgrade. Once
you have received your new license key, simply enter it into the input
box and click the ‘Submit’ button. A message box should appear
informing you that the upgrade was successful and your captioning will
now be enabled.
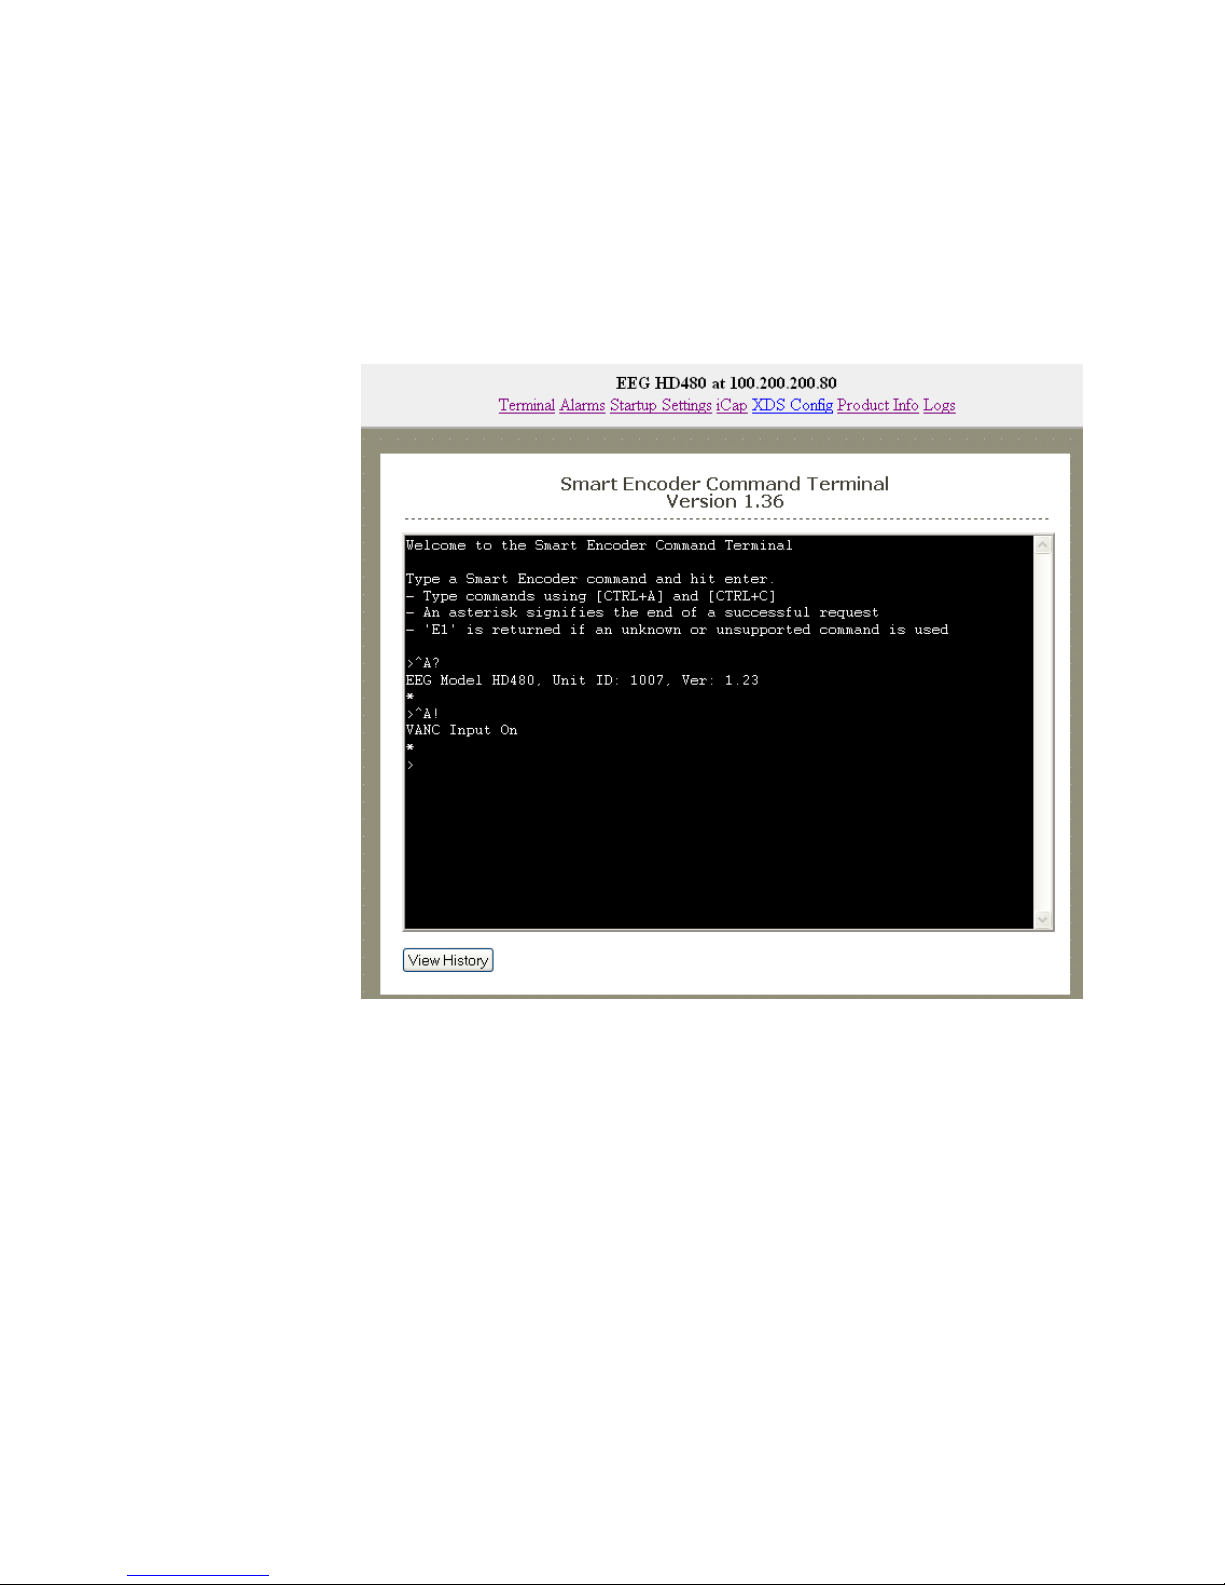
Terminal
The Terminal page gives you access to a Smart Encoder command
terminal that emulates the serial port interface to the encoder. You can
enter any of the commands detailed in this manual into the Web
Terminal, just as you would through a serial port terminal, using
<CTRL+A> and <C TRL+C>.
13 Copyright © 2000-2012 EEG Enterprises, Inc.
All Rights Reserved.
HD490 Smart Encoder
The Terminal page also has a feature that saves the past twenty-five
commands and responses from the web terminal, which can be seen by
clicking on the ‘View History’ button below the active web terminal.
This feature is useful for recalling past commands even after you
navigate away from the Terminal page or reset your HD490. To hide the
history window, click on the ‘Hide History’ button located between the
active web terminal and the open history window.
Copyright © 2000-2012 EEG Enterprises, Inc. 14
All Rights Reserved.
HD490 Smart Encoder
Alarms
The Alarms page allows you to set the timeout interval for each of the
GPI alarms listed in the table. The table shows the GPI Output, the
function of the alarm and gives a brief description of the alarm,
followed by an input box where you can set the time interval in
seconds. To apply any changes made to the time interval click the ‘Save
Changes’ button.
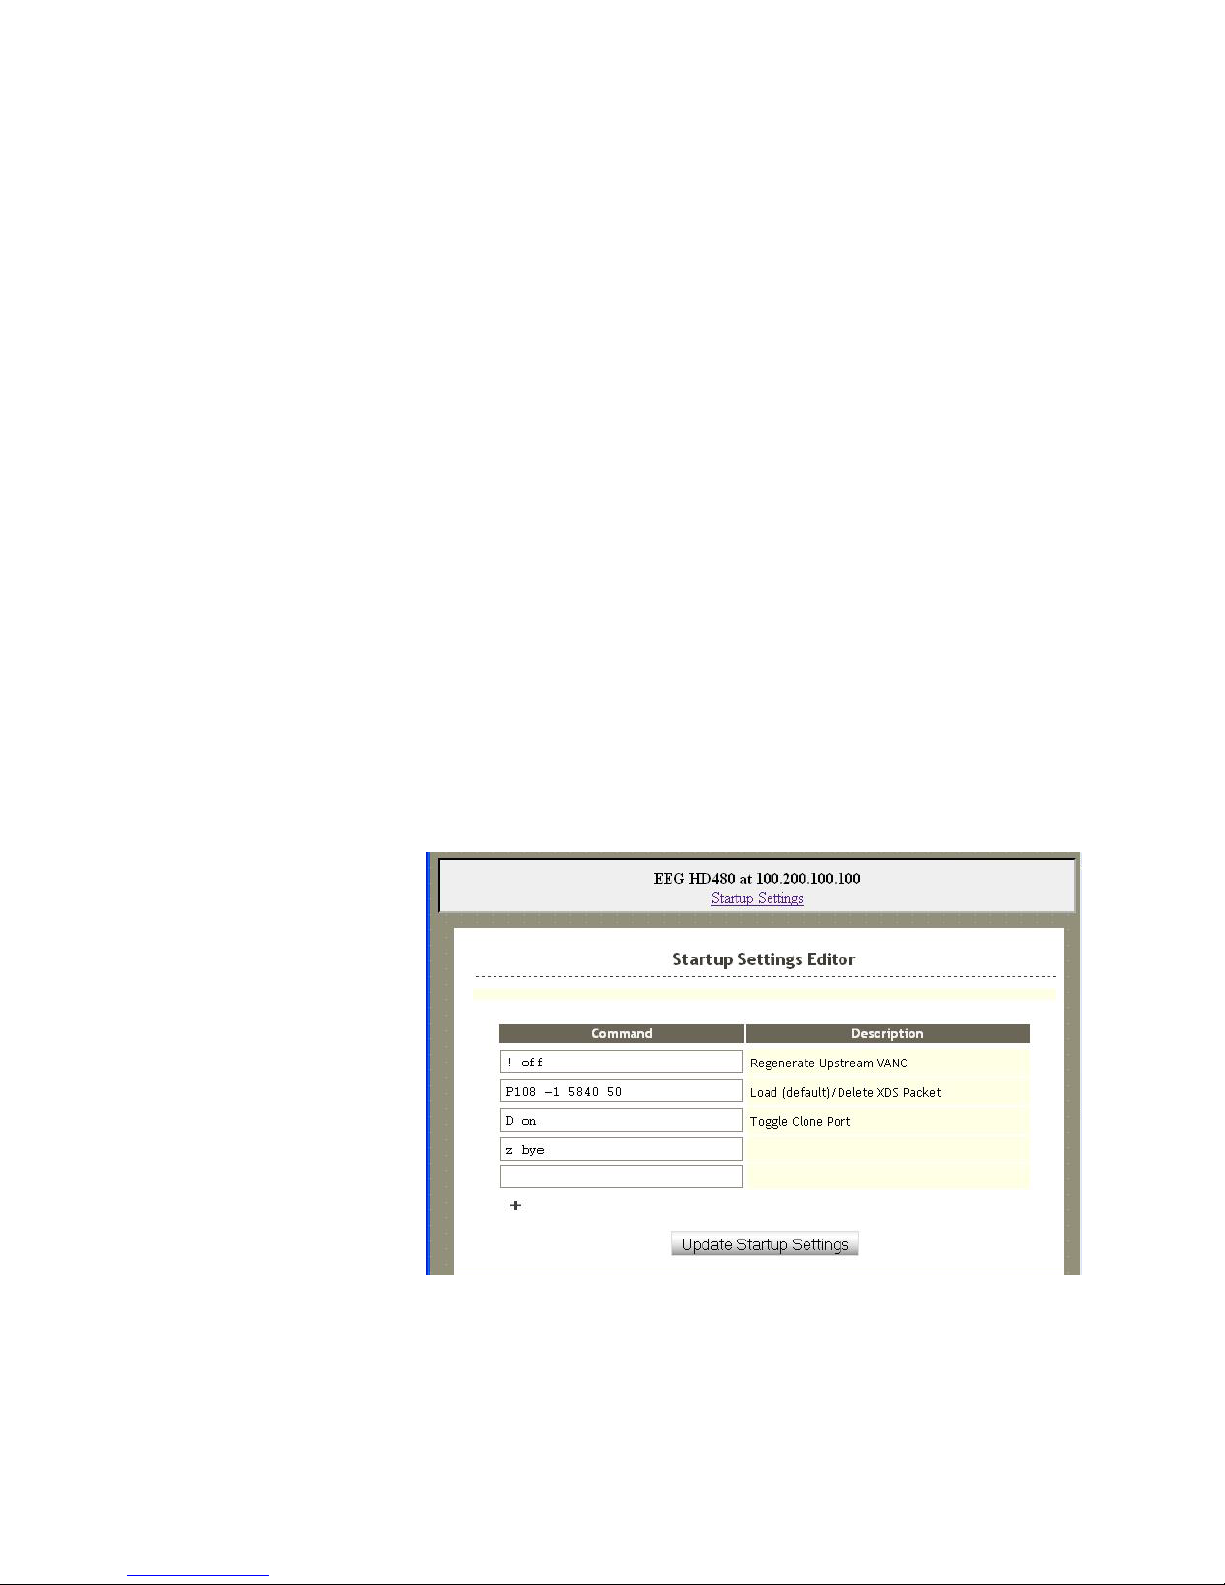
Startup Settings
The Startup Settings Editor enables entry of Smart Encoder commands
that will be run every time the encoder starts up. Use Startup Settings
whenever you want a setting to be “sticky”; settings entered through the
Web Terminal or the serial port only are not sticky and will revert to
defaults when the encoder is power-cycled.
To use the Startup Settings editor, type any Smart Encoder command
into the command box. Omit the <CTRL+A> character entirely- this
character is implied at the beginning of each line. To add additional
commands, press the ‘+’ button and more lines will appear.
When you have entered commands for all the settings that you want to
make sticky, click Update Startup Settings. The configuration changes
will take the next time the encoder starts up.
15 Copyright © 2000-2012 EEG Enterprises, Inc.
All Rights Reserved.
The ‘Description’ field provides a human-readable description for
future reference for many commonly used startup commands.
 Loading...