

Page 1

Page 2

Perpetual Digital DVR User’s Guide..............................................................................................................1
1. Introduction.................................................................................................................................................4
1.1. Overview..................................................................................................................................................4
1.2. Main Features..........................................................................................................................................4
1.3. Warning..................................................................................................................................................5
2. Start System................................................................................................................................................6
2.1. Before Starting System ..........................................................................................................................6
2.2. File System Setup ..................................................................................................................................6
2.3. Start System......................................................................................................................................... 10
3. System Setting...........................................................................................................................................14
3.1. Start System Setting............................................................................................................................. 14
3.2. System Setting .....................................................................................................................................15
3.3. Camera & Motion Setting.....................................................................................................................17
3.4. Recording Setting.................................................................................................................................21
3.5. Display & Pan Tilt Setting.....................................................................................................................22
3.6. Sensor Setting......................................................................................................................................23
3.7. Network Setting....................................................................................................................................24
3.8. Audio Setting........................................................................................................................................33
3.9. Notification Setting................................................................................................................................38
3.10. User Setting........................................................................................................................................40
4. PLAYBACK (Server Search) .................................................................................................................... 41
4.1. PLAYBACK Default Screen.................................................................................................................. 42
5. Remote Surveillance................................................................................................................................. 48
5.1. Start Remote Program (Single Mode)..................................................................................................48
5.2. Connect Main System..........................................................................................................................48
5.3. Setup Site.............................................................................................................................................49
5.4. Remote Navigation...............................................................................................................................51
5.5. Options.................................................................................................................................................53
5.6. Multi Remote Monitoring ......................................................................................................................56
5.7. Local Playback ..................................................................................................................................... 60
6. BACK-UP....................................................................................................................................................62
6.1. Log on...................................................................................................................................................62
6.2. Structure of Back-Up screen................................................................................................................62
6.3. Manual Back-Up...................................................................................................................................63
6.4. Backup to Backup.exe file....................................................................................................................65
6.5. Quick Back-Up......................................................................................................................................66
6.6. Auto Back-Up ....................................................................................................................................... 67
6.7. Backup Viewer......................................................................................................................................70
7. POS (Options)............................................................................................................................................71
7.1. Setting (Single Serial CR) ....................................................................................................................71
7.2. Setting (Multi Serial CR)....................................................................................................................... 73
7.3. Setting (Multi TCP CR)......................................................................................................................... 74
7.4. Transaction Search..............................................................................................................................75
7.5. Font Setup............................................................................................................................................ 85
8. DNS Service...............................................................................................................................................86
8.1. DNS Client Setting (In DVR Main)........................................................................................................86
8.2. RMS Setting (In RMS).......................................................................................................................... 90
Users Guide Page 2 of 98 Perpetual Digital
Page 3

9. Log Viewer.................................................................................................................................................91
9.1. Event ....................................................................................................................................................91
9.2. System..................................................................................................................................................92
9.3. Login.....................................................................................................................................................93
9.4. Network ................................................................................................................................................94
9.5. Pos .......................................................................................................................................................95
9.6. Filter...................................................................................................................................................... 96
9.7. Setting ..................................................................................................................................................98
Users Guide Page 3 of 98 Perpetual Digital
Page 4

1. Introduction
1.1. Overview
ARGUS is the state-of–the-art Digital Video Recording System. This system is PC based system and can be
operated at Windows systems (Windows 98 SE, ME, Windows XP and Windows 2000). It has Real time or
High speed monitoring features, digital recording and play back features and Remote Access features.
1.2. Main Features
Simultaneous Recording and Playback
Record up to 16 channels of video with time lapse and event based recording modes. Record multiple video
channels with simultaneous alarm conditions and motion detections. Also supports audio recording and text
insertion.
Renovated Database
A renovated Database system can support multiple cameras and Remote Access efficiently.
DB (Database) Recovery
The system was designed to recover the related Recording data automatically when the recordi ng data would
have a problem by abnormal operation or system shut down by interruption of electric power.
Remote Access
You can connect to multiple sites, and each site can be connected with multiple users at the same time.
User-Friendly Operation
Settings and menus are designed for non-expert users, so anybody can navigate the whol e system without
spending days learning how to operate it.
Multiple Picture Qualities and Resolutions
Configurations are so flexible, you can set each camera individually for resolution (up to 640 480),
compression, frame rate and recording events.
Multi-Zone Motion Detection
The systems support whole screen motion detection, or user defined area motion detection, with several
detection areas for each camera.
Scheduled Video Recording
Operate with 5 different recording modes, including alarm recording, scheduled recording, motion recording
and combinations of each. Each camera and mode can be defined hourly, daily, or weekly.
Live View Shutdown
Shut down the live screen, while all the cameras continue to record.
Users Guide Page 4 of 98 Perpetual Digital
Page 5

Networking Support
You can remotely connect to the server through multiple network configurations, including LA N/WAN/ISDN or
PSTN. You can also manually configure the ports of each DVR, which allows you to utilize a single highspeed connection to address multiple DVRs from a remote site. Then navigate and operate all the system
functions as if you were at the main system-the interface is the same remotely as it is at the server.
Pan/Tilt/Zoom
Control multiple PTZ camera formats, locally and from a remote location.
Watchdog
In the unlikely event system freezes, the system’s watchdog feature will automatically reboot the system.
Audio
Monitor live audio, record, playback and backup audio on one or multiple cameras.
Multi-Board
If you want to have a 8 cameras inputs DVR system from 4 cameras input system (like DIT-4 & DIT-4 PRO),
you can get a 8ch DVR system after installation of one more DIT-4 or DIT-4 PRO capture card in the existing
4ch DVR system.
DVR Server - RMS
You can use both RMS and DVR Server on the same PC at once.
1.3. Warning
CE (Communaut’ European)
This is a class A product. In a domestic environment this product may cause radio interference in which
case the user may be required to take adequate measures.
FCC (Federal Communications Commission)
This equipment has been tested and found to comply with the limits for a Class A digital device,
pursuant to Part 15 of the FCC Rules. These limits are designed to provide reasonable protection
against harmful interference when the equipment is operated in a commercial environment. This
equipment generates, uses, and can radiate radio frequency energy and, if not installed and used in
accordance with the instruction manual, may cause harmful interference to radio communications.
Operation of this equipment in a residential area is likely to cause harmful interference in which case the
user will be required to correct the interference at his own expense.
Users Guide Page 5 of 98 Perpetual Digital
Page 6

2. Start System
2.1. Before Starting System
User installed ARGUS through ARGUS Installation Guide. At first, User must setup the file system.
After User finish setting up the Database system, User can start the MAIN system.
2.2. File System Setup
User can start the “File Manager” program by clicking of StartProgramsArgusFile Manager
2.2.1. Logon to File System
When User starts the file manager (fsutil.exe) program, this program will ask Account and Password.
The system has Default Account which is “1”, and the Password is nothing “ “.
After entering account, click “OK” button to start the File Utility System.
Instead of using Keyboard, User can logon only with mouse. When User clicks the keyboard button (which is
right below the password field), the system will show the keyboard. User can click any keys as same as
keyboard typing.
Users Guide Page 6 of 98 Perpetual Digital
Page 7

2.2.2. Make Database
After logon the file system, the first window screen is as follows;
- Database Name : Enter the name of Database, this name will be used as the system’s
Database name.
- Max Camera : User can specify the maximum number of cameras that will be used for this DVR
system. The file system will generate the Database based on this number of camera s.
- Basket Size : Select the size of a basket, a basket is the unit to handle the image data. The
default basket size is 64MB.
- Select the hard disk drive: If User wants to use all hard drives that the system has, click the
hard drive one by one. Double click on the selected hard drive to setup the space that will be
used by the database.
Users Guide Page 7 of 98 Perpetual Digital
Page 8

- When User selects a hard disk drive, the File System Utility will prompt the user for the
percentage of space to be utilized for the database.
- User can select from 0% to 100% of a hard disk drive. (Use 90% - This is the recommended
setting)
- After selecting the rate, Click “OK” button.
When the File System finished the Database setup, this utility will show the following screen.
- This example uses hard disk drive D 100%( “Required Space” / “Total Space” ) of disk space
will be used.
- The name of Database in this example is “DVRDB”.
- This example has 16 cameras.
- In this example, the total size of Database is 27,328 MB.
Users Guide Page 8 of 98 Perpetual Digital
Page 9

Note : Data Base ( DB) Recovery
The system was designed to recover the related Recording data automatically when the recordi ng data would
have a problem by abnormal operation or system shut down by interruption of electric power.
When the system is rebooting, the system will check the status of the DB and recover the recording data
(DB). You can see following active window. (It would be taken about 10 minutes per size of the database.)
- Automatically fix file system errors : If you tick this box, the system will do DB recovery
automatically when system is rebooting.
- Scan for all data and recovery of bad baskets : If you tick this box, the system will do DB
recovery for full file systems ( DB). If you does not tick, the system will do DB recovery for the
damaged file systems (DB) only.
- Start : Start to scan and DB recovery.
- Stop : Stop DB recovery.
- Exit : Exit from the process.
Users Guide Page 9 of 98 Perpetual Digital
Page 10
2.3. Start System
2.3.1. Start Application
From the Windows “Desk Top”, double click the ARGUS Viewer icon , or run the DVR.exe program which is
in C:\Program Files\ARGUS\Main folder.
2.3.2. Monitoring Camera Screens
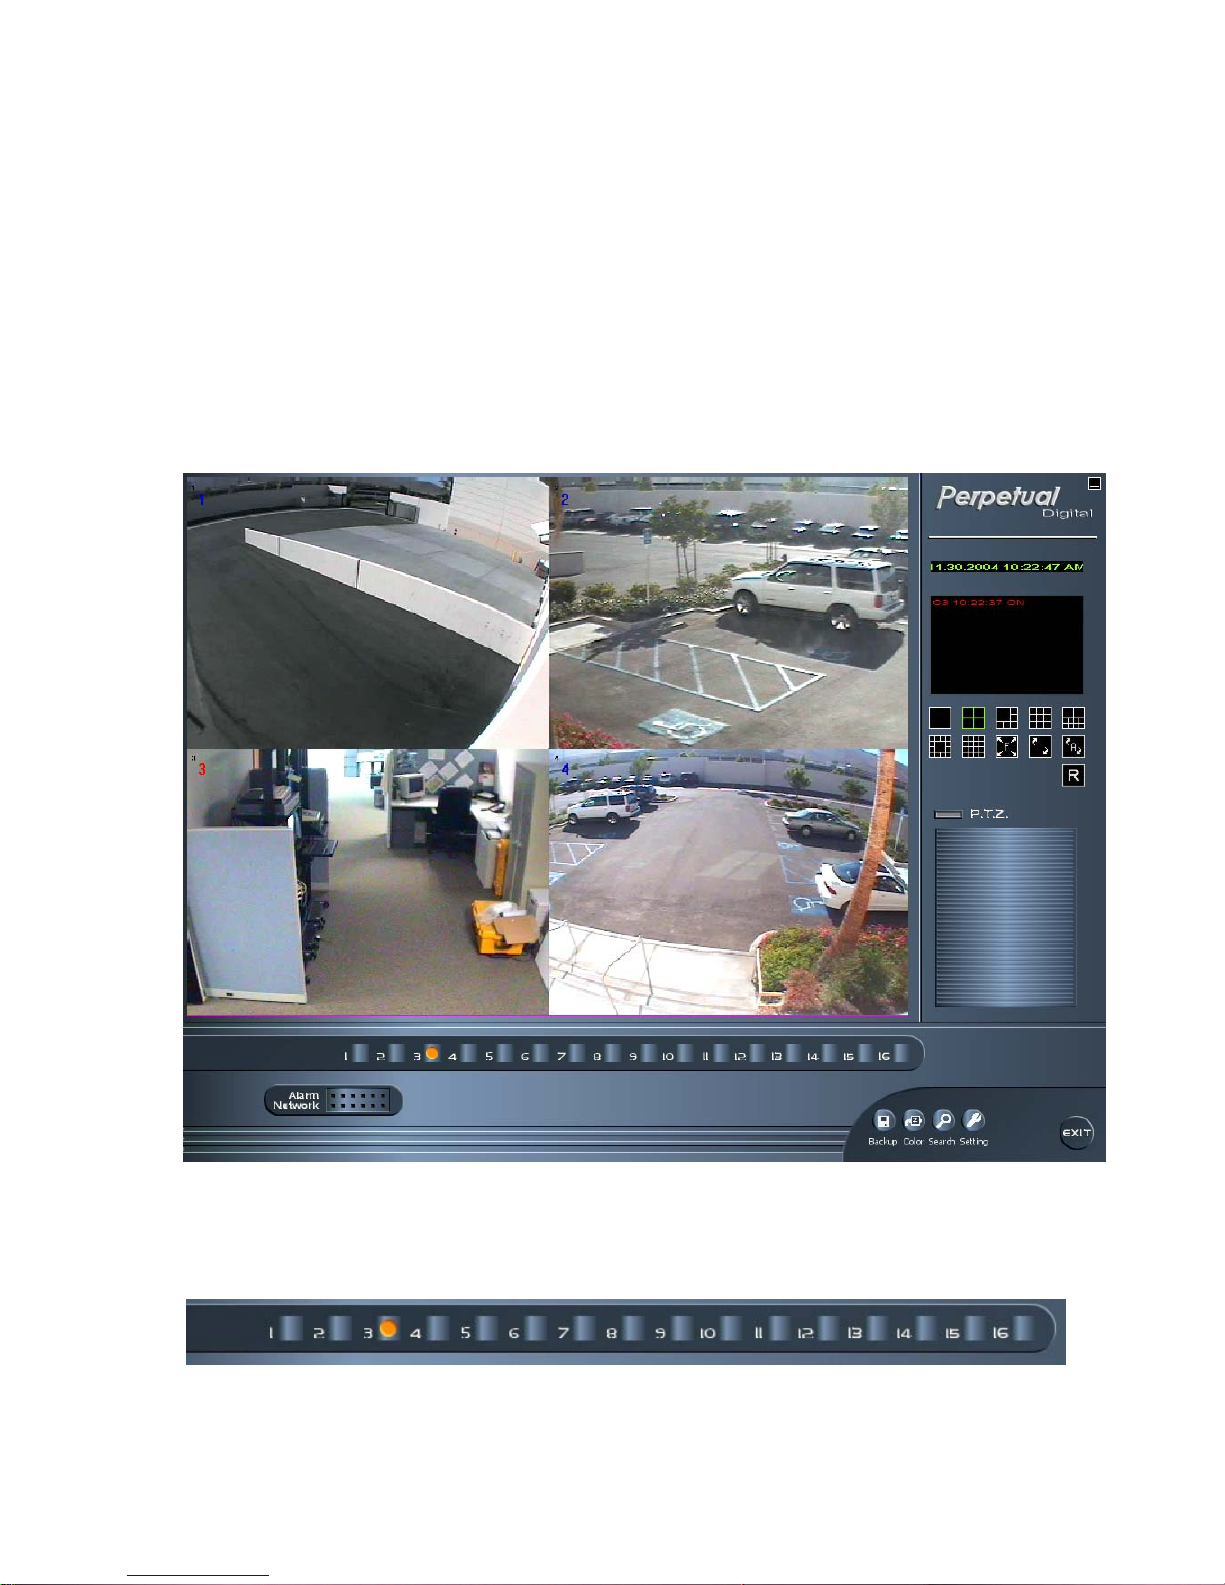
1) Default Screen
: When User starts DVR program, current captured images from cameras will be displayed as follows;
2) Camera Box
: The Camera Box is at the bottom. User can see the status of each camera that is installed.
- When a yellow circle appears in each box the camera is recording.
Users Guide Page 10 of 98 Perpetual Digital
Page 11

3) Action Buttons
: There will be four action buttons.
-
: When User clicks this button, Backup program will be running and display the Backup
screen.
-
: When User clicks this button, Color Setting Window will be displayed and User can
adjust the display camera colors.
-
: When User clicks this button, Search program will be running and display the Playback
screen.
-
: When User clicks this button, System Setting Window will be displayed and User can
configure the system settings.
4) Screen Mode Icons
: Beside the capture image, there are 11 different display type buttons.
-
: Single-Screen Mode : Display the captured image from one camera. User can select
a camera from the Camera Box.
-
: Multi-Screen Mode : Display 4 captured image from 4 different cameras.
-
-
: Multi-Screen Mode : Display 6 captured image from 6 different cameras.
: Multi-Screen Mode : Display 9 captured image from 9 different cameras.
- : Multi-Screen Mode : Display 10 captured image from 10 different cameras.
-
-
: Multi-Screen Mode : Display 13 captured image from 13 different cameras.
: Multi-Screen Mode : Display 16 captured image from 16 different cameras.
- : Full-Screen Mode : The Screen will be filled with captured image only.
-
: Next-Screen Mode : Whenever User clicks this icon, it will display the image from the
next camera.
-
-
-
Users Guide Page 11 of 98 Perpetual Digital
: Auto-Rotation Mode : In this mode, screen will be rotated automatically.
: Min-Screen Mode : Minimize the Window.
: Relay Control : Control relay 4 directly.
Page 12

click these buttons.
: Relay Off : Relay On
5) System Status Window
: System Status Window will show the status or events of the system.
- Events : Motion Detected (including camera number and time)
- Logs : System Setting Information
- ALARM icon : if occur input signal from extern sensors, will flicker the icon.
- NETWORK icon : if connect to this system from remote system, will flicker the icon.
Users Guide Page 12 of 98 Perpetual Digital
Page 13

6) PanTilt Control Box
: If PanTilt camera is installed, User can control Focus, Zoom, Light, and Camera directions through this
control box.
Users Guide Page 13 of 98 Perpetual Digital
Page 14

3. System Setting
3.1. Start System Setting
To start Setting menu, Click SETTING button from the Action Buttons.
1) Logon
: To modify the System Configuration, User must have proper accessibility. Enter LOGON ID and
password. The system has Default Account ID which is “1”, and the password is nothing “ “.
After entering Account ID and password, Click “OK” button to start the Setting Menu.
Instead of using Keyboard, User can configure the system only with mouse. When User click the keyboard
button. (which is left bottom below the tree structure), the system will show the keyboard. User can click any
keys as same as keyboard typing.
Users Guide Page 14 of 98 Perpetual Digital
Page 15

3.2. System Setting
Click “System”, the detailed system setting menu will be displayed.
1) Start Screen
: User can choose seven modes.
- 1 Split : Default Screen will display the image only from one camera.
- 4 Split : Default Screen will display 4 different image from 4 different cameras.
- 6 Split : Default Screen will display 6 different image from 6 different cameras.
- 9 Split : Default Screen will display 9 different image from 9 different cameras.
- 10 Split : Default Screen will display 10 different image from 10 different cameras.
- 13 Split : Default Screen will display 13 different image from 13 different cameras.
- 16 Split : Default Screen will display 16 different image from 16 different cameras.
- Full Screen : Without any menu or buttons, the Screen will be filled with captured image only at
Start System
- Auto startup : If User select the check box, the main program can run when the system is power
on.
- Auto Startup Viewer : If User select the check box, the viewer program could run when the
system is power on.
Users Guide Page 15 of 98 Perpetual Digital
Page 16

- When close viewer, close all service : If User select the check box, all DVR program would be
stopped.
2) Video Type
: User can choose two types.
- NTSC
- PAL
3) Pop up
- Popup : If motion or sensor event is occurred, corresponding camera will be popup.
- Interval : 1~100 sec(default : 3sec)
4) Display
- Border : This shows a white line between cameras.
5) CCTV
- Interval : Display switching time for Composite TV screen (unit : second – default : 3sec)
6) LogFile Setup
- Interval of Motion Event : If interval is set 60 sec, motion event will be recorded one time in 1
minute even though motion event occurred many times. This setting could prevent the system
log growing too big. (default – 60sec)
7) Site Information
- Site : Define the name of site.
- Location : Specify the information about the system location.
8) Shut Down
- Use : When User selects the Use, system will be shut down at the specified Time.
- Time : Hour and Minute : User can configure the Time when the system will be shut down.
9) Watchdog
- Use H/W : In case of abnormal status, System will be rebooted after notify the status to the
User by alert.
- Interval : User can choose the interval time to reboot the system.
10) Control Key
- Disable(Ctrl+Alt+Del) : When User selects this check box, User can not use the Control
Key(Ctrl+Alt+Del) and system will not allow to return to Window program ( locking of the “ EXIT”
button)
11) Backup setup
- Set the Back-up option or manage schedule of back-up. (refer to section 7-5 Auto Back-Up)
Users Guide Page 16 of 98 Perpetual Digital
Page 17

3.3. Camera & Motion Setting
1) Display Options
- Use : If User select the check box, specified camera will be used to capture image.
- ID : Individual Camera ID
- View on PC monitor : User can see the image at the connected PC Screen.
- View on TV monitor : User can see the image at the connected TV Screen.
- View on Remote monitor : User can see the image at the remote side(client).
2) Frame Rate
- Use Max Frames : If User select the check box, system could be recorded by the captured
image frame with maximum capacity and distributed image frame to each cam eras.
- Frame Rate : User can define the frame rate
- Time & Event Interval : User can select the interval (max. 30 sec.) for the recording at normal.
3) Compression Mode
- Mode : Select one of the compression modes from M-JPEG, M-MPEG4.
- Image Size : Screen resolution.
Users Guide Page 17 of 98 Perpetual Digital
Page 18

- Image Quality : User can control the quality of image ( Note : if you select high, the size of
recording image will be bigger)
-
4) Stamp
- Use : If User select the check box, stamp will be displayed at some part of a recording image .
- Date : If User select the check box, Date will be displayed.
- Position : User can choose the location of stamp (Left Top, Right Top, Left Bottom, Right
Bottom)
5) Pre/Post Record
: User can define the number of frames that will be recorded before and after detecting the motion
- Pre : Define the number of frames before detecting the motion.
- Post : Define the number of frames after detecting the motion.
(Note: If you want audio recording in the Sensor/ Motion/ Normal & Event modes, you need to set
the number of the “Post” as 30 frames over.)
6) Motion Detect
- Sensitivity : Define the Rate of Sensitivity(the default value is 10%).
- Whole Area Mode : Motion will be detected in whole area.
- User Area Mode : Motion will be detected in the defined area by the User.
- ADD : If User want to defined the area, Click this ADD button, and define the range through the
clicking the area at the displayed screen at the setting menu. After User add a area, system will
show the red box(see the sample picture below)
- Delete : If User want to delete the area that was defined(or added), Click this DEL button.
- Test : When User click this button, screen will display the detected area as red dots. So, User
can test the motion detection.
- ACTIVE : When the motion is detected, this button will be blinked.
- Relay Out : Use : If User want to send the Output, Click this check box. (Additional equipment is
required to send the Output.
- Relay Out : Relay Time : User can define the relay time of the Output from 1 second to 10
second.(If User select 5 second, the Output will be sent every 5 seconds.)
- Relay Out : Relay Ports : User can define the port that will be used to send the Output. (User
can select port 1, 2, 3, 4)
Users Guide Page 18 of 98 Perpetual Digital
Page 19

7) Advanced Setup
Users Guide Page 19 of 98 Perpetual Digital
Page 20

- Work Hour
. From: The start time of working hour
. To: The end time of working hour
. The system will work by original camera setup for recording schedule.
- After Hour
. The system will work by an advanced setup during the time outside the time zone established
as Work Hour.
- On Alarm or Motion
. If you want to use motion or sensor recording during after hour
Users Guide Page 20 of 98 Perpetual Digital
Page 21

3.4. Recording Setting
: ARGUS has 6 different recording modes. User can choose one of the modes. The recordin g schedule is
based on one week. So User can define the schedule according to the Day and Time in each day.
1) Normal Mode
- In this mode, system always will record all images from the selected camera.
2) Sensor Mode
- In this mode, system will record the images only if any event occurs at the sensor.
3) Event/ Normal Mode
- The system will be recorded each one frame per each setting second (1,2,3,,,20,30 max.).
- But the system will be recording maximum frame rate when there is motion detection or sensor.
4) Motion Mode
- In this mode, system will record the images only if any motion is detected at the defined area.
(User can choose Whole area or define a specific area at the Camera Settings).
5) Motion Sensor Mode
- In this mode, system will record the images when the sensor event is occurred and /or the
Motion is detected.
6) Watch Mode
- In this mode, system will not record any images from the selected camera, but display the
captured image at the screen.
Recording Schedule example
- Sunday – Saturday (09:00 – 18:00) : System will record all captured image.
- Sunday – Saturday (19:00 – 21:00) : System will record with Event & Normal Mode : System
will record captured image by the setting of the “Frame rate”.
- Sunday – Saturday (22:00 – 04:00) : System will record with Motion Detect Mode : System will
record captured image, only if any motion is detected.
- Sunday – Saturday (05:00 – 06:00) : System will record with Sensor Mode : System will record
captured image, only if any sensor event is detected.
- Sunday – Saturday (07:00 – 08:00) : System will record with Motion and Sensor Mode : System
will record captured image, any sensor event is detected or any motion is detected.
Users Guide Page 21 of 98 Perpetual Digital
Page 22

3.5. Display & Pan Tilt Setting
1) Screen Control Options
- Bright : Configure the Brightness of image.
- Contrast : Configure the Contrast of image
- Saturation : Configure the Saturation of image.
- Hue : Configure the Hue of image.
2) Transaction Data Control
- If capture board supports POS function, this button to active. (refer “POS Manual”)
3) Pan Tilt
- Use : User can configure all options for a Pan Tilt Camera
- Receive :
- Port :
- Speed :
- Parity :
- Stop Bits :
- Flow Bits :
- Type :
Users Guide Page 22 of 98 Perpetual Digital
Page 23

3.6. Sensor Setting
1) Options
- Use : When User selects this check box, the selected sensor will be enabl ed and used.
- Location : User can specify the location of a sensor.
2) Flags
- Sensor Type : According to the sensor, define the active type (high or low).
- Selected Camera : User can configure a sensor to the specific camera.
3) Sensor Output
- Use Relay Output : If User wants to send the Output, Click this check box. (Additional
equipment is required to send the Output.
- Output Port : User can define the port that will be used to send the Output. (User can select port
1, 2, 3, 4)
- Relay Time : User can define the relay time of the Output from 1 second to 10 second.(If User
select 5 second, the Output will be sent every 5 seconds.)
4) Sensor Test
: If you click the button of “Sensor”, the system shows all setting values for the connected sensors.
When you click the button of the “Test” right upper side, it shows current active status for the each
sensor.
: Active : No active
Users Guide Page 23 of 98 Perpetual Digital
Page 24

3.7. Network Setting
1) Use Network Connection
- Use : When User selects this check box, the system will allow the remote access through the
network.
- TCP/IP Port : TCP/IP port number. (Auto set to 9871)
2) Compression Mode
- Choose the Mode : User can choose M-JPEG or M-MPEG.
- Image Quality : User can control the quality of image that will be sent to the remote site.
Users Guide Page 24 of 98 Perpetual Digital
Page 25

< System setting for Modem (Dial-up) Connection >
h Setting in the Server system (Windows XP)
① Control Panel’Network Connections ‘Create a new connection’ .
② When the ‘New Connection Wizard’ shows, please click ‘Next’.
Users Guide Page 25 of 98 Perpetual Digital
Page 26

③ Select ‘Setup an advanced connection’ as “Network Connection Type” and click ‘Next’.
④ Select ‘Accept incoming connections’ as “ Advanced Connection Options” and click ‘Next’.
Users Guide Page 26 of 98 Perpetual Digital
Page 27

⑤ Select a correct connection device to corresponding with ‘Incoming Connections’ and click ‘Properties’ .
⑥ Please check if the port speed is same as installed Modem. If yes, please return to ‘New Con nection
Wizard’ and click ‘Next’.
Users Guide Page 27 of 98 Perpetual Digital
Page 28
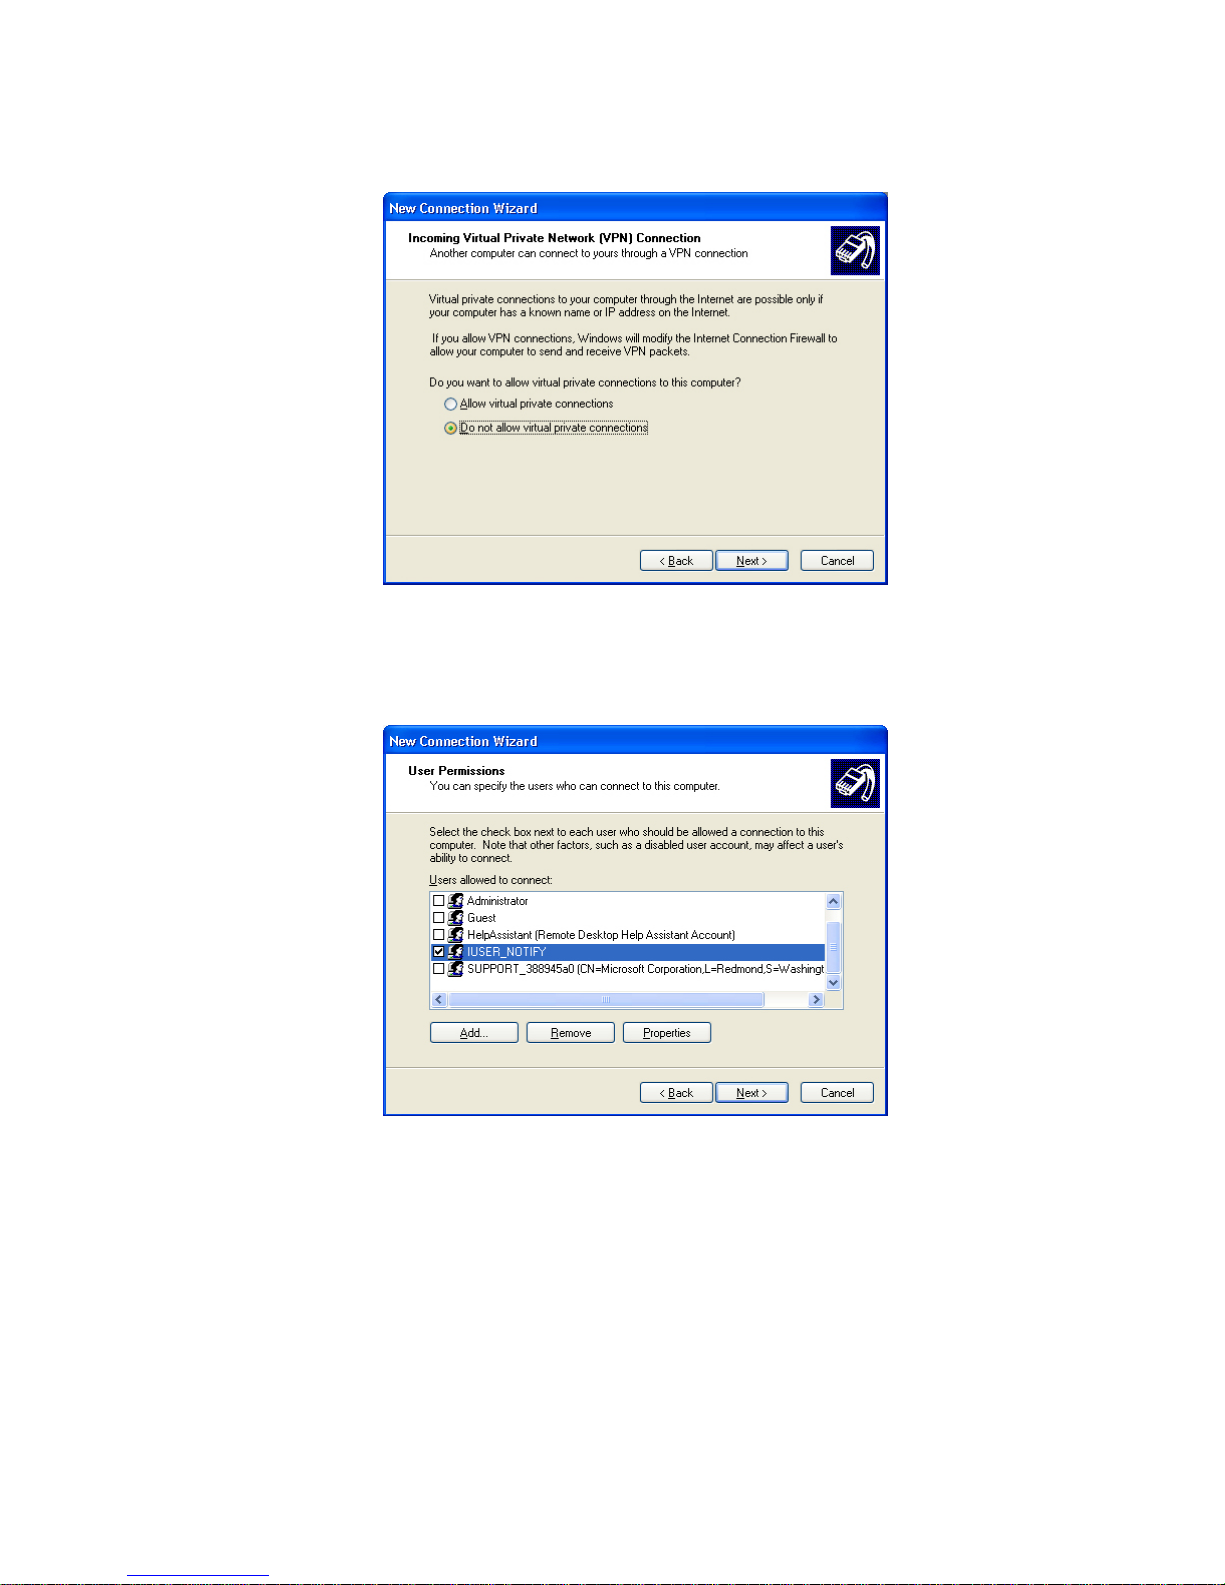
⑦ Tick on the ’Do not allow virtual private connection’ and click ‘Next’.
⑧ Please click ‘ Add’ to register of new user for Dial-up Networking connection. Please enter User ID &
Password and click ‘ OK’ , Then new user will be created. Please tick on the new user and click ‘ Next’.
Users Guide Page 28 of 98 Perpetual Digital
Page 29

⑨ Select ‘Internet Protocol(TCP/IP)’ and click ‘Properties’.
⑩ Please specify TCP/IP address for remote connection. (You can allocate a proper IP address)
Users Guide Page 29 of 98 Perpetual Digital
Page 30

⑪ Click ‘Finish’, then the setting is completed.
⑫ If you check the window of ’Network Connections’ , you can see new connection setting as ‘Incoming
Connections’.
Users Guide Page 30 of 98 Perpetual Digital
Page 31

h In case no Modem connection when remote system is using Windows98 SE, please correct a connection
setting as follows (don’t need setting in Windows XP)
① StartProgramsAccessoriesCommunicationsDial-Up Networking. When ‘Make New Connection’
is showing up, please insert computer name and select a proper Modem and click ‘Next’.
② Insert telephone number and click ‘Next’.
③ Click ‘Finish’.
Users Guide Page 31 of 98 Perpetual Digital
Page 32

④ Again StartProgramsAccessoriesCommunicationsDial-Up Networking. New icon for new
connection was created.
⑤ If you double clicking of new icon, following window is showing up. Select ‘Server Types’ and
check if “ TCP/ IP” was ticked.
Users Guide Page 32 of 98 Perpetual Digital
Page 33

3.8. Audio Setting
1) Options
- Use : When User selects this check box, the system records the sound.
2) Select Camera
- Camera : User can configure an Audio to the specific camera.
Note: Model DIT-4 PRO & DIT-1200 will support 4 channels of audio recording. DIT-2400 & DIT 4800 will
support 8 channels of audio. If the DVR system has a separate sound card, the system will support 5
channels of audio recording.
## If you want to communicate remote site for using Audio, you have a sound card. And In case of two-way
audio sound card cannot record audio in server.
That is you must use 4 channels for recording Audio in server. If you want to use two-way Audio from server
to Remote site (Client), you must use a sound card for communicating.
Users Guide Page 33 of 98 Perpetual Digital
Page 34

< Ref : Check point when Audio recording/Playback will not work normally >
h Case 1 : Please check if other recording program is running in the system firstly. If other recording
program is ON (running) in the system, the recording function on the DVR system will not work.
h Case 2 : Please check if the path for input signal will be select as Microphone. Please take following steps.
(OS : Windows XP)
① Run ‘Sounds and Audio Devices’ in the Control Panel.
Users Guide Page 34 of 98 Perpetual Digital
Page 35

② Click [Advanced] in the window of “Sounds and Audio Devices Properties”.
③ Select OptionsProperties.
Users Guide Page 35 of 98 Perpetual Digital
Page 36

④ Select ‘Recording’ and click “OK”.
⑤ Tick on the box of ‘Select’ in the ‘Microphone’. (If not, audio recording would not work sometimes.
If you want to playback the data with audio in the remote site, you need to take above steps in the
remote PC.)
Users Guide Page 36 of 98 Perpetual Digital
Page 37

⑥ After setting, please test if the setting is correct or not.
StartProgramAccessoriesEntertainmentSound Recorder.
h Note : When you playbacks the recording data including sound, please set the playback speed to 1x.
Also, please check there was no tick on the “Mute all” and proper level of volume control.
Users Guide Page 37 of 98 Perpetual Digital
Page 38

3.9. Notification Setting
User can configure the Notification that will alert the remote site (when any motion is detected or sensor
event is occurred.)
1) ADD
: User can ADD a remote site with following information
- IP/Tel No : The IP or Telephone number of the remote site.
- Port : TCP/IP Port number.
- Transfer Device : Choose a network type of the connection
- Lan, Modem, ISDN: Choose a way of transmission.
- Password of IUSER_NOTIFY : If you select MODEM or ISDN, insert password of
IUSER_NOTIFY that is exist in the Remote Surveillance System.
- Events : Check that event about notification from DVR Sever to Remote System.
- E-Mail Service
- E-Mail: Check to send e-mail on event
- To: Type a manager ‘s e-mail address to receive
- Outgoing mail (SMTP): Type Outgoing mail Server
- Port: Type Port number (ex 25)
- Attach video: Choose video image number to be attached
Users Guide Page 38 of 98 Perpetual Digital
Page 39

Modem can’t notify from DVR Server to Multi RMS
2) Update
: Select one of the added remote sites, and User can modify the information of the selected site.
3) Delete
: Select one of the added remote sites, and User can delete a site
4) Schedules
- Camera : Select a specific camera
- Notify : After push a button “Notify”, make a schedule draw a zone for remote notification.
- Eraser : Erase selected time zone.
- Copy All : Apply to all cameras.
Users Guide Page 39 of 98 Perpetual Digital
Page 40

3.10. User Setting
1) ADD
: Certified User can ADD a User with following information
- Access Mode : Admin - Administrator will have all accessibilities to the entire system.
- Access Level: User - when User selects this user category, User can define accessibilities of a
specified user.(Screen, File System, Setup, Search, Backup, Remote Control, Pan Tilt).
- Information Account : User ID(this will be used when a User logon to the system)
- Information Password : Password(this will be used when a User logon to the system)
- Detail Information : Detail Information : Name , Alias, Phone, E-Mail, Address
2) Delete
: Select one of the added Users, and User can delete a User
3) Update
: Select one of the added users, and User can modify the information of the selected User.
Users Guide Page 40 of 98 Perpetual Digital
Page 41

4. PLAYBACK (Server Search)
To play back the recorded image, User needs to execute the Search program. User can run the Search
program through clicking the PLAYBACK button at the Action Button.
When User starts the Search program, this program will ask LOGON ID and password.
After entering Account ID and password, click “OK” button to start the file Search program.
Users Guide Page 41 of 98 Perpetual Digital
Page 42

4.1. PLAYBACK Default Screen
: When User starts PLAYBACK program, a new PLAYBACK window will be displayed as follows;
4.1.1. Screen Mode Icons
: Beside the capture image, there are 9 different display type buttons.
-
: Single-Screen-Mode : Display the recorded image from one camera, User can select
a camera from the Record Table
-
-
-
-
-
-
Users Guide Page 42 of 98 Perpetual Digital
: Multi-Screen-Mode : Display 4 recorded image from 4 different cameras
: Multi-Screen-Mode : Display 9 recorded image from 9 different cameras
: Multi-Screen-Mode : Display 16 recorded image from 16 different cameras
: Panorama-Mode : Recorded image will be displayed as panorama style.
: Regular-Size-Mode : Recorded image will be displayed just same as captured image..
: Double-Size-Mode : Recorded image will be displayed as 2 times larger than
Page 43

captured image.
-
-
: Full-Screen-Mode : The Screen will be filled with playback image only.
: Min-Screen Mode : Minimize the Window.
4.1.2. Status Information Window
: This window will show the status of displayed image and captured time information.
- Date and Time information (Captured).
- Camera Information : Show the camera number.
- Record Mode : Show the recorded mode of displayed image.
- Type of Image : Show the type of captured image.
- Size of Image : Show the size of captured image.
4.1.3. Calendar Window
: This calendar will show the dates when image is recorded. If the color of a date is RED, there are some
recorded images in that date. If the color of a date is black, there is no recorded image in that date.
When User clicks the specific date in this calendar, Record Table will show the recorded time
information.
- Month and Year
- Left Arrow : to move to the last month, click this button.
- Right Arrow : to move to the next month, click this button.
Users Guide Page 43 of 98 Perpetual Digital
Page 44

4.1.4. Image Control Menu
: User can control or modify the captured image.
- SHARP : control sharpness the captured image
- BLUR : control blur the captured image
- ZOOM : could be zoom in for specific area of the captured image
- B / W : could be shown black & white image
- ORIGN : back to the original image
- CANCEL : cancel previous command one by one
- BRIGHT : control brightness -/+
- CONTRAST : control contrast -/+
4.1.5. Utility Menu
: User can control the speed, save the image, record displayed images, and print the display ed image.
-
SAVE : save the captured image into Floppy Diskette or, able to back up specific recording
data by AVI file.
-
-
PRINT : print out the captured image
SOUND : able to adjust play back volume.
-
SPEED : able to adjust play back speed
4.1.6. Play Menu
: User can select forward, backward play and stop.
- The first image
- Backward One image frame : Support only compression mode is M-JPEG.
- Stop
- Forward One image frame
- The last Image
- Backward Play : Support only compression mode is M-JPEG.
- Forward Play
Users Guide Page 44 of 98 Perpetual Digital
Page 45

4.1.7. Record Table
: When User selects a Date from the Calendar, system will show the recording information.
- Camera :
- Time Cell : show time zone for 24 hours
* The dark color Cell means recording with Audio data.
4.1.8. Record Table (Minutes Bar)
: When User selects a Time Cell, system will show the recording information in an hour.
4.1.9. Exit Button
: When User clicks this EXIT button, PLAYBACK (Search) program will be stopped.
4.1.10. Bookmark
: You can make a bookmark of some specific images for reference or review it again later.
1)
2)
: Review previous book-marked image.
: Review next book-marked image.
3)
4)
: Make a bookmark for existing image.
: Compile the book-marked image data. You can see following window when you click this
button.
Users Guide Page 45 of 98 Perpetual Digital
Page 46

- OK : Finish compilation of the book-mark.
- Cancel : Cancel compilation of the book-mark.
- Delete Item : Delete selected item.
- Delete All : Delete all items.
- Modification : Add note for the selected item.
4.1.11. Motion (Object) Search
: You can make a setting a motion detection for the specific object from the existing recording data and
make a data file for the sorted image data by the motion (object) search. If you click
window will show up.
, the following
Users Guide Page 46 of 98 Perpetual Digital
Page 47

1) Find Range
- Camera Number : Select Camera number.
- From : Starting time.
- Until : Finishing time.
- From First : From the image data by the first time of the date.
- Until Last : To the image data by the last time of the date.
2) Find Setup
- Whole Area Mode : Motion will be detected in whole area.
- User Area Mode : Motion will be detected in the defined area by the User.
- Add : If User want to defined the area, Click this “Add” button, and define the range through the
clicking the area at the displayed screen at the setting menu.
- Delete : If User want to delete the area that was defined(or added), Click this “Delete” button.
- Add to the bookmark with result data : If you click this box, the sorted image data will be book-
marked automatically.
- Sensitivity : Define the Rate of Sensitivity(the default value is 10%).
- Min. Blocks : The number of the blocks will be more sensitive.
3) Find All : Find all image data during setting time.
4) Find Next : Find image by image .
5) Clear All : Clear bookmark for all items.
6) Bookmark : Make a bookmark for selected items.
7) Search result
-
-
-
-
-
-
-
: Move to first item.
: Move to previous item.
: Move to previous item in serial.
: Move to next items in serial.
: Move to next item.
: Move to last item.
: Adjust the speed.
Users Guide Page 47 of 98 Perpetual Digital
Page 48

5. Remote Surveillance
5.1. Start Remote Program (Single Mode)
To use remote service from the remote site, User should install the “ARGUS Remote” program. After User
installed ARGUS Remote, User can start this program from the Windows “Desk Top”, double click the
ARGUS Remote icon, or run the DVRHost.exe program which is in C:\Program Files\ARGUS\Remote folder.
5.2. Connect Main System
: The first screen of ARGUS Remote program is almost same as the ARGUS Main screen. Remote Screen
has “CONNECT” button to connect the ARGUS Main System.
When User clicks “Connect” button, the Connection window will be displayed and ask User select the Site
that User wants to connect to. After select the Site, click “OK” button to start the remote session.
If it is the first time to use this Remote program, User should setup the Site first.
Users Guide Page 48 of 98 Perpetual Digital
Page 49

5.3. Setup Site
When User clicks the “Setup” button from the Connect window, the Site Information Window will be displayed
as follows;
1) ADD : User can add a new Site. When User Click “ADD” button, Site Information Window will be
displayed as follows;
- Site Name : Enter the Name of a Site, User can define any name that User can remember or
recognize easily.
- IP Address : Enter the IP address of a Site that User wants to connect.
- Port : Enter TCP/IP Port number, the default port number is “9871”
Users Guide Page 49 of 98 Perpetual Digital
Page 50

- Network : If you use dial up modem, check “Modem, ISDN” and enter “phone number, Windows
user ID and password out of ARGUS server.
2) Add Group
: When you use “Multi-Channel”, you can make a grouping for the desired server and cameras which
you want to connect by remote surveillance program. When you click “ Add Group”, you can see
following window and make your own group table out of the open server and cameras.
3) Delete
: At the Site Information Window, Click any Site that User wants to delete from the list, and Click
“Remove” button.
4) Modify
: At the Site Information Window, Click any Site that User wants to modify from the list, and Click
“Modify” button. The Site Information Window will be displayed and User can modify any information
attributes in this Window except the Site Name. Site Name can’t be changed. If User wants to change
the Site Name, User should delete a Site and add another Site.
Users Guide Page 50 of 98 Perpetual Digital
Page 51

5.4. Remote Navigation
1) Action Buttons
-
click this R. PLAYBACK button, the PLAY BACK Window will be displayed and operate just
same as Main’s PLAY BACK Menu. (Note : User can see action button of
this icon during the remote search, the icon will be changed to green and the
transmitting image data will be recorded at the remote PC)
-
User click this SETTING button, the Setting Menu Window will be displayed and operate just
R,PLAYBACK : User can search the recorded images from Server System. When User
. If user click
SETTING : User can configure any system parameters from the Remote system. When
Users Guide Page 51 of 98 Perpetual Digital
Page 52

same as Main’s Setting Menu except that User can not use “USER” setting from the remote
site.
-
L.PLAYBACK : User can search the recorded images from Client System. When User
click this L. PLAYBACK button, the PLAY BACK Window will be displayed and operate just like
as Main’s PLAY BACK Menu.
-
DISCONNECT : To disconnect the current session.
2) Screen Mode Icons
: Beside the capture image, there are 11 different display type buttons.
-
-
-
-
-
-
-
-
-
: Single-Screen-Mode
: Multi-Screen-Mode
: Multi-Screen-Mode
: Multi-Screen-Mode
: Multi-Screen-Mode
: Multi-Screen-Mode
: Full-Screen-Mode
: Next-Screen-Mode
: Auto-Rotation-Mode
-
: Local Save : If user click this icon, the icon will be changed to green and the remote
system will record current transmitting image data from server in the remote PC system.
-
-
: Min-Screen Mode : Minimize the Window.
: Relay Control : Control relay 4 directly over network.
click these buttons.
Users Guide Page 52 of 98 Perpetual Digital
Page 53

: Relay Off : Relay On
3) System Status Window
: System Status Window will show the status or events of the system.
- Sever name : Display User connect to name of DVR server system.
- Transmission speed : Display transmission speed of image.
4) Pan/Tilt Control Box
: If Pan/Tilt camera is installed, User can control Focus, Zoom, Light, and Camera directions through this
control box.
5.5. Options
If User click right button of mouse, on the display window, follow setting window is showing up.
1) Network : When User clicks the “Network” Menu, the Site Information Window will be displayed as follows;
(refer “5.3 setup site” in p.33)
Users Guide Page 53 of 98 Perpetual Digital
Page 54

2) Options : When User click the “Option” Menu, the setting window will be displayed as follows;
2-1) Remote Tab : determine viewer mode
- Auto startup : If User select the check box, system could be ready to receive a remote
notification from server when remote system power on.
- When close viewer, close all service : If User select the check box, all REMOTE services will be
shut down when user close the remote viewer program.
- Use buffering space for data receiving : If You use local LAN for data receiving, if would be
better to use the buffering space so the data transferring will be faster.(Recommend to set
4096KB)
- Startup with remote viewer : Select start made for the remote program.
- DNS (Dynamic IP) service : refer to No.8 (DNS Service)
-
Users Guide Page 54 of 98 Perpetual Digital
Page 55

2-2) Notification Tab :
- Use : Able to receive image data from server by remote notification.
- Alert
• Beep : Beep sound by remote notification.
• Popup : Pop up one screen which is transferred from server by remote notification.
• Emergency Save : When remote notification will be activate, the remote PC will back-up the
transferring data automatically and the action icon will be changed to Green color
.
If you click the action icon with green color, the remote back-up will be stop.
- Events : User can select the events which are applied to remote notification.
- Connection : If User save user’s Account ID and password, user can access systems without
separate Login during remote notification.
3) Two way Audio : If you select “Sound” , you can see following sub –menu box and you can send ,receive
the sound and enjoy two way audio communication between server and remote sites.
- Duplex : two way audio between server and remote (client) using micro-phone and speaker.
- Out : Send a sound data to server by microphone.
- In : Receive a sound from server by speaker.
- Off : No use audio.
*Note : When you use Multi Remote Monitoring viewer, you can set the two way audio mode by each server.
But in this case, the function will be going down due to the network traffic jam. Please be noted that it would
be recommended not to use it with 3 servers over.
4) About Remote
Users Guide Page 55 of 98 Perpetual Digital
Page 56

This Dialog box display version information and copyright
5.6. Multi Remote Monitoring
After run Remote program, if you select Multi Channel on the screen, you can monitor max. 16 cameras
which are installed at the each different server (location).
- Single : One remote PC able to connect with one Argus server .
- Multi-Channel : One remote PC able to connect max. 16 cameras (server).
1) Connection to Sever
1-1) Server connection per each camera (partitioned screen)
Please select desired channel (screen) by clicking mouse and cli c k “CONNECT”, then, a window will be
showing up and you can select a target site registered. Above shows No 1 camera was selected.
Users Guide Page 56 of 98 Perpetual Digital
Page 57

Insert ID and password for the server which can be connected.
After log on, the system showing up following window and it shows the cameras status whi ch were
connected at the server. Please select desired camera No which you want to monitor at the remote site.
Users Guide Page 57 of 98 Perpetual Digital
Page 58

If the connection is done, you can see image data on the No.2 screen of client.
You can connect other channels as above.
1-2) Using Group table
When you select “ Multi-Channel” and click “ CONNECT”, you can see following wind ow. If you select
desired group from group table and click “OK”, you can connect each grouped cameras.
Users Guide Page 58 of 98 Perpetual Digital
Page 59

2) Action Button
-
R,PLAYBACK : User can Search the recorded images from SELECTED Server System.
When User click this R. PLAYBACK button, the PLAY BACK Window will be displayed and
operate just same as Main’s PLAY BACK Menu. (Note : User can see action button of
.
If user click this icon during the remote search, the icon will be changed to green and the
transmitting image data will be recorded at the remote PC)
-
SETTING : User can configure selected system parameters from the Remote system.
When User click this SETTING button, the Setting Menu Window will be displayed and operate
just same as Main’s Setting Menu except that User can not use “USER” setting from the remote
site.
-
L.PLAYBACK : User can Search the recorded images from Client System. When User
click this L. PLAYBACK button, the PLAY BACK Window will be displayed and operate just like
as Main’s PLAY BACK Menu.
-
DISCONNECT : To disconnect the current session. When you click this button,
following window is showing up and you can see the connection status of Multi remote program.
Please select desired camera(s) and click “OK” for di sconnection.
Users Guide Page 59 of 98 Perpetual Digital
Page 60

5.7. Local Playback
User can Search the recorded images from Remote System. When User click this L. PLAYBACK button in
the “ARGUS Remote” program, the PLAY BACK Window will be displayed and operate just same as Main’s
PLAY BACK Menu.
- Site : If User select Site button, following window will be shown and User can select the desired
site for search of the recording data from remote system.
Users Guide Page 60 of 98 Perpetual Digital
Page 61

After User select the desired site, User need to select “ ORIGIN” or “ REMOTE”
- ORIGIN : User can record a transmitting image from Server system through remote search. If
User click this button, User can search those image data. (refer to section 5-4-1, Action
Buttons---Remote Search )
- REMOTE : User can record current transmitting image from Server system through Remote
Viewer. If User click this button, User can search those image data. (refer to section 5-4-3
System Status Window)
Users Guide Page 61 of 98 Perpetual Digital
Page 62

6. BACK-UP
6.1. Log on
Argus BACK-UP program able to back-up the recording data into a various devices such as HDD, DAT, DVD,
ONSTREAM, CD-RW etc. by manual or automatically.
For data back-up, please run Windows keyStartProgramsArgusImage Back-up(dvBackup.exe) or,
Click a button of “ BACKUP” from monitoring screen.
The initial Account is “ 1” and no password. Please insert “ 1” as Account and click “OK”
6.2. Structure of Back-Up screen
After log on, it shows following set up screen for BACK-UP.
Users Guide Page 62 of 98 Perpetual Digital
Page 63

- 1) Shows information of existing recording data of DVR server.
- 2) Shows device or folder for data back-up.
- 3) Shows the processing status of the Back-Up.
6.2.1. Tool Bar
- 1) Exit : Discontinue of Back-up Program
- 2) Start : Start button for manual back-up.
- 3) Backup to exe. File : See section 6.4
- 4) Quick Backup : Start button for Quick back-up
- 5) Stop : stop or pause button on the back-up.
- 6) Option : Setting “Manual Back-Up” or “Schedule Back-up
- 7) Viewer : Viewer button of Back-up data.
- 8) To be added later
6.2.2. Processing Bar
- Time : Shows sec (second) information under the current back-up.
- Processing ratio : Shows processing ratio of the current back-up .
6.3. Manual Back-Up
User can back-up a specific recording data into a back-up device by “Manual Back-up”.
Users Guide Page 63 of 98 Perpetual Digital
Page 64

6.3.1. Select desired recording data for Back-up
Shows exiting recording data of the DVR server User can select a desired recording data by/per camera,
hour, minute (minimum data unit is minute). If user select a data on the tick box, it will be change with red
color.
6.3.2. Select device or folder for Back-up
6.3.3. Start Manual Back-Up
After setting of the desired recording data and device (or folder), the start button will be activated with a blue
color.
Click “ Start “ Button and click “ Yes”
If the back-up is done successfully , bottom window shows a message of “Back-up exited normally with
code 0”, Processing bar shows “Not working” and new folder of “BACKUP” was created.
Users Guide Page 64 of 98 Perpetual Digital
Page 65

6.4. Backup to Backup.exe file
If you back-up the recording data (data size will be less than 2 GB) to Backup.exe file, you can playback the
backup data in the any 3 rd PC without the Backup Viewer program. Note : If the backup data would be
exceed 2 GB, it would be a problem.
6.4.1. Select desired recording data for Back-up
Please refer to section 6.3.1.
6.4.2. Make a Backup.exe file
If you select the data , please click icon of “EXE” out of tool bar as below.
Then, you can see a window and select a folder and put the file name (xxx.exe) and click “ SAVE”
Users Guide Page 65 of 98 Perpetual Digital
Page 66

If the backup is completed, you can see a screen as section 6.3.3. and you can find a named .exe file in the
selected folder. If you can execute the file, the back up viewer will be showing up and you can playback the
back up data.
6.5. Quick Back-Up
Click “Quick Backup” button from Tool bar, the quick backup setting menu will be displayed.
- Select Cameras : User select No. of cameras to back-up
- Start Time : User can select a desired start time of recording data.
Users Guide Page 66 of 98 Perpetual Digital
Page 67

- End Time : User can select a desired end time of recording data.
- Directory(Media) : Files saved from backup app will be put in this folder.
Above picture shows the recording data(09:00~15:00) of the No. of 1, 8, 9, 10, 14, 15, 16 cameras could be
backed up into “F:\” at now.
6.6. Auto Back-Up
6.6.1. Option setting
Click “ Option “ button out of Tool bar and select which you want.
- Run this program when Windows starts
- Allow this program to run in the background :
* Note : If the Backup program is running,
the program is hidden and you can see
following icon on the Task bar.
Users Guide Page 67 of 98 Perpetual Digital
Page 68

6.6.2. Setting of “ Concurrent Back-Up”
Click a tab of “Scheduled backup”, and setting the schedule back-up. “Disable” means that the Back-Up is
not working.
Check on the “Concurrent”.
Note : If user want to setting all cameras for
concurrent back up, please click a cell of
“ USE”.
- Lastest backup time : Shows latest back-up time of schedule back-up.
- Backup start pointer of time : Starting point for next back-up.
- Disable : Stop schedule back-up.
- Concurrent : Recording and Back-up could be done nearly concurrent time.
Users Guide Page 68 of 98 Perpetual Digital
Page 69

- Schedule(Weeks) : Back-up by daily or weekly.
- Files saved from backup app will be put in this folder : Device or folder for schedule back-up.
Above picture shows the recording data of the No. of 4, 6, 13, 14, 15, 16cameras could be backed up into
“F:\” .
6.6.3. Setting of “ Schedule Back-up’
User can back-up the whole recording data by daily or weekly by “ Schedule back-up”
Note 1. If user wants to set all cameras,
please click a “Day” cell.
If user wants to back up the data at same time
of the day for all cameras, please click a
“Time” cell.
Note 2. If the back up would be increased, the
performance of the system would be slower
and the recording frames (speed) would be
slower.
- User select No. of cameras and Day for desired back-up.
Users Guide Page 69 of 98 Perpetual Digital
Page 70

- Time : Starting time for back-up operation.
Above picture shows user wanted to back-up all data except the data of Sunday.
6.7. Backup Viewer
User can play back the back-up data by this Viewer.
If user click button of “Viewer” , the “Backup Viewer” program could be run and showing following windo w
for back-up viewer .
Please refer to “Play Back “ for operation of “Back-Up Viewer”
Users Guide Page 70 of 98 Perpetual Digital
Page 71

- Browse : If User click Browse button, following window will be shown and User can select the
desired directory for search of the back-up data from DVR system.
7. POS (Options)
7.1. Setting (Single Serial CR)
Users Guide Page 71 of 98 Perpetual Digital
Page 72

Main Dialog Displays the Serial port configurations.
- Use : Check Use option checkbox if you want to use the selected Device
Name.
- Device : Choose the cash register type(ex:Casio610001)
- Camera : Choose the camera number to display the cash register data.
- Port : Choose Port (these ports have to differ per cash register)
- Speed : 9600(default)
- Flow Bits : 8(default)
- Stop Bits : 1(default)
- Parity : NONE(default)
Add the selected Cash Register.
Update the selected Cash Register.
Delete the selected Cash Register.
Users Guide Page 72 of 98 Perpetual Digital
Page 73

7.2. Setting (Multi Serial CR)
Main Dialog Displays the Serial port configurations.
- Use : Check Use option checkbox if you want to use the selected Device
Name.
- Device : Choose the cash register type(ex:Fuijits1S)
- Camera : Choose the camera number to display the cash register data.
- Add : Add the selected camera
- Delete : Delete the selected camera
- Can select multi camera for CR
- Port : Choose Port (these ports have to differ per cash register)
- Speed : 9600(default)
- Flow Bits : 8(default)
- Stop Bits : 1(default)
- Parity : NONE(default)
Add the selected Cash Register.
Update the selected Cash Register.
Delete the selected Cash Register.
Users Guide Page 73 of 98 Perpetual Digital
Page 74

7.3. Setting (Multi TCP CR)
Main Dialog Displays the Serial port configurations.
- Use : Check Use option checkbox if you want to use the selected Device
Name.
- Device : Choose the cash register type(ex:Fuijits1S)
- Camera : Choose the camera number to display the cash register data.
- Add : Add the selected camera
- Delete : Delete the selected camera
- Can select multi camera for CR
- Port : Type Port no (except 9876)
Add the selected Cash Register.
Update the selected Cash Register.
Delete the selected Cash Register.
Users Guide Page 74 of 98 Perpetual Digital
Page 75

7.4. Transaction Search
These buttons are used to query transaction data.
Users Guide Page 75 of 98 Perpetual Digital
Page 76

POS Button: If you want to query all transaction list of the selected day, use this button
Below is the display screen when you click the POS button.
Transaction List Header meaning
Register
Register Time
Receipt No
E A B C D F
No
Time
CAM
Transaction list sequence Number
DVR save time of the transaction
Camera Number
Cash Register Type
Cash Register Time (EpsonCR Cash register don’t have)
Cash Register Receipt Number (EpsonCR Cash register don’t
have)
Total
Users Guide Page 76 of 98 Perpetual Digital
Total Price per transaction
Page 77

A
<< : Move to the first page
B
C
D
E
F
Refresh
If you click the Transaction list, the right dialog displays the original receipt data.
When you click the Play button, you can see the video clips of the selected transaction.
If you want to go back to the original search program click the POS button again.
use this button.
< : Move to the previous page
> : Move to the next page
>> : Move to the last page
Query : Extend Search
Report : Show the statistical graph
If you requery the transaction list, use the “Refresh” button.
POS CR Button: If you want to query all transaction list after selected video clip by time of the day,
Users Guide Page 77 of 98 Perpetual Digital
Page 78

Time : 09:33:31
Time : 09:34:09
POS Button and POS CR Button is toggle button
Users Guide Page 78 of 98 Perpetual Digital
Page 79

E : Query : If you want to extend search, click this button
Below is the display screen when you click the Query button.
A D
B E
C F
A
Start Day & Time : Choose start day & time
B
C
D
E
F
Query
Users Guide Page 79 of 98 Perpetual Digital
End Day & Time : Choose end day & time
Camera : Choose camera number
Item : Edit the Item to search
Code : Choose the Action Code to search
Value : Choose the
Query : Search about the condition
Page 80

Ex ) C: Select Camera Number : 3
Enter camer 3 and press Query to query to database.
Users Guide Page 80 of 98 Perpetual Digital
Page 81

Ex) D: Edit the Item : BANANA
Users Guide Page 81 of 98 Perpetual Digital
Page 82

Ex) E: Code : Select Action Code : Cash Amount
Users Guide Page 82 of 98 Perpetual Digital
Page 83

Ex ) E: Value : Edit the value : > 6.00
Users Guide Page 83 of 98 Perpetual Digital
Page 84

F : Report : If you want to see statistical graph, click this button.
Your computer has installed MS Excel program when you see this report.
Users Guide Page 84 of 98 Perpetual Digital
Page 85

7.5. Font Setup
You can change the size and type of the font, if the entire embedded transaction data is not di splayed
on screen.
Use Motion & Display Transaction Data Control Button to change the font
If displayed data on screen is still cut after you change the font size, now there is no way to display
entire data except change the resolution. Save the frames using 640 * 480 resolution.
Users Guide Page 85 of 98 Perpetual Digital
Page 86

8. DNS Service
8.1. DNS Client Setting (In DVR Main)
- Run DNSClient.exe in C:\Program Files \Argus\Main
General
- Domain name : insert the name of the domain within 32 characters
- Password : create your password within 16 characters
- E-Mail : insert E-Mail address for informing of the events.
Users Guide Page 86 of 98 Perpetual Digital
Page 87

- New Domain button : click to register a new domain name on the DNS Server.
- If you complete the necessary information, click “ register”
- If your on-line register is successful, following window is showing up.
- If your domain name is already duplicated on the DNS server, following window will be
showing up and you must use different new domain name.
Users Guide Page 87 of 98 Perpetual Digital
Page 88

- Check Domain button : check if your domain name is registered on the DNS server or not
Domain name is registered on the DNS server
Domain name is not registered on the DNS server
Users Guide Page 88 of 98 Perpetual Digital
Page 89

Connection
- DNS Server : insert DNS server IP
- Port : insert Port No
- Time out : Waiting time for connection with server.
- Apply button : click “Apply button” for running
@@ You must restart the System for application.
Users Guide Page 89 of 98 Perpetual Digital
Page 90

8.2. RMS Setting (In RMS)
- DNS server : insert DNS server IP (the same DVR Main)
- Port : insert Port No
- IP Address : insert the name of your domain registered on the DNS server in DVR Main
Users Guide Page 90 of 98 Perpetual Digital
Page 91

9. Log Viewer
Click C:\Programs Files\Argus\Main\LogViewer.exe
This program shows the event, system, login, network, pos log recorded.
9.1. Event
Time : This column shows the time when the Motion/Sensor event occurs.
Device : This column shows Camera No associated with the event.
Event :
1) Motion : This means motion event occurred.
2) Sensor : This means sensor event occurred.
3) Video Loss : This means video loss occurred.
Information :
1) Information: This shows information occurred.
2) Warning : This shows warning occurred.
3) Error : This shows error occurred.
** Double click on the log list will allow you to view related video in Playback.
If you view the Logon window to run Playback, type the User and Password.
** One click on the log list will record Bookmark of the Playback. So you can show the list in the
Bookmark.
Users Guide Page 91 of 98 Perpetual Digital
Page 92

9.2. System
Time : This column shows the time when the system event occurs.
Event : This column shows the following messages..
DVR Viewer Program Start DVR Viewer Program Exit
DVR Main Program Start DVR Main Program Exit
DVR Search Program Start DVR Search Program Exit
DVR Backup Program Start DVR Backup Program Exit
DVR Color Control Start PlugIn Load
Load Values Set Values
Service Restart Device Load
Video Initialize ~~~
Mode : This column shows whether events are being taken in local side or re mote side.
1) Local:
2) Lan:
Information :
1) Information: This shows information occurred.
2) Warning : This shows warning occurred.
3) Error : This shows error occurred.
Users Guide Page 92 of 98 Perpetual Digital
Page 93

9.3. Login
Time : This column shows the time when the system event occurs.
Process Name : Program Name
User Login : This column shows the ID of the login user.
User Loggout : This column shows the ID of the logout user.
Status : This column shows whether login or logout attempts were successful or failed.
Mode : This column shows whether events are being taken in local side or rem ote side.
Users Guide Page 93 of 98 Perpetual Digital
Page 94

9.4. Network
Time : This column shows the time when the network event occurs.
Event : This column shows whether RMS is connected or di sconnected.
1) RMS Connect
2) RMS Disconnect
Address : This column shows the IP/Address of RMS connected.
Mode : This column shows whether events are being taken in local side or re mote side.
1) Local:
2) Lan:
Information :
1) Information: This shows information occurred.
2) Warning : This shows warning occurred.
3) Error : This shows error occurred.
Users Guide Page 94 of 98 Perpetual Digital
Page 95

9.5. Pos
Time : This column shows the time when the pos event occurs.
Event : This column shows the following messages..
TranMain Start TranMain Exit
OpenDatabase Success OpenDatabase Fail
Device started ~~
Driver : This column shows the name of the driver to be loaded.
Port : This column shows the Port no associated with Driver.
Information :
1) Information: This shows information occurred.
2) Warning : This shows warning occurred.
3) Error : This shows error occurred.
Users Guide Page 95 of 98 Perpetual Digital
Page 96

9.6. Filter
9.6.1. Event
Time : Select Start time and End Time to search.
Camera : Select Camera No to search.
Event : Select the event to search.
Information : Select the type to search.
9.6.2. System
Time : Select Start time and End Time to search.
Event : Select the event to search.
Mode : Select the mode to search.
Information : Select the type to search.
9.6.3. Login
Time : Select Start time and End Time to search.
Process : Select the Program name to search.
Login : Type the ID of login to search.
Logout : Type the ID of logout to search.
Status : Select the status to search.
Mode : Select the mode to search.
Users Guide Page 96 of 98 Perpetual Digital
Page 97

9.6.4. Network
Time : Select Start time and End Time to search.
Event : Select the event to search
Address : Type the IP/Address of RMS to search.
Mode : Select the mode to search.
Information : Select the type to search.
9.6.5. Pos
Time : Select Start time and End Time to search.
Event : Select the event to search
Driver : Select the driver to search.
Port : Select the Port no to search.
Information : Select the type to search.
Users Guide Page 97 of 98 Perpetual Digital
Page 98

9.7. Setting
LogFile : Set to keep the log files in the storage for a set number of days.
- Save logfile period of 7 days
- Save logfile period of 15 days
- Save logfile period of 30 days
Change Search’s user and password : Type User and Password to run Search.exe.
Set to tray icon on exit : If you check this, this program is set to tray icon when you click exit button.
Auto startup LogServer service: If you uncheck this, you must run LogServer.exe manually.
Users Guide Page 98 of 98 Perpetual Digital
 Loading...