

Page 1
EE User Manual
Bright Box Wireless Router
Page 2

EE Bright Box User Manual
2
Document Identification
Version
Date
Comments
1.0
30/03/12
First Issue
2.0
18/10/12
Content update
Page 3

EE Bright Box User Manual
3
TABLE OF CONTENTS
TABLE OF CONTENTS ................................................................................................ 3!
Chapter 1: Introduction ............................................................................................. 7!
Introducing the Bright Box wireless router ........................................................................................... 7!
Document Information .............................................................................................................................. 7!
Router Technical Specification ............................................................................................................... 7!
Chapter 2: Router Identification and Panels ........................................................... 9 !
Router Identification ................................................................................................................................. 9!
Front Panel View and LED Status ........................................................................................................... 9!
Back Panel View ........................................................................................................................................ 11!
Bottom panel view ................................................................................................................................... 13!
Chapter 3: Installation ............................................................................................ 14!
Unpacking your Bright Box wireless router ......................................................................................... 14!
Setting up your ADSL broadband .......................................................................................................... 16!
Disconnecting your old equipment ................................................................................................... 16!
Connecting your new equipment ...................................................................................................... 16!
Connect and turn on your router ....................................................................................................... 16!
Check it over .......................................................................................................................................... 17!
Your home broadband is being set up ............................................................................................... 17!
You can now connect your devices .................................................................................................. 18!
Setting up your Fibre broadband .......................................................................................................... 18!
Disconnect Old Equipment ................................................................................................................. 18!
Engineer Visit ........................................................................................................................................ 18!
Connect and turn on your router ....................................................................................................... 18!
Check it over ......................................................................................................................................... 19!
Your Fibre broadband is being set up ............................................................................................... 20!
You can now connect your devices .................................................................................................. 20!
Moving to Fibre broadband .................................................................................................................... 20!
Engineer Visit ........................................................................................................................................ 20!
Reconfigure your current equipment ............................................................................................... 20!
Connect and turn on your router ........................................................................................................ 21!
Check it over .......................................................................................................................................... 21!
Six simple steps to move .................................................................................................................... 22!
Your Fibre broadband is being set up ............................................................................................... 23!
You can now connect your devices .................................................................................................. 23!
Setting up a Wired connection to your Bright Box ............................................................................ 23!
Setting up a wireless connection .......................................................................................................... 25!
Chapter 4: The Bright Box Admin Pages ................................................................. 27!
Accessing the Bright Box admin pages ................................................................................................ 27!
How to log in to the Bright Box admin pages ................................................................................. 27!
How to log out of the Bright Box admin pages ............................................................................... 29!
Possible Errors displayed when logging into the admin pages .................................................... 30!
Navigating the Bright Box admin pages .............................................................................................. 31!
Bright Box admin page descriptions ..................................................................................................... 33!
Status tab .............................................................................................................................................. 33!
Basic Set-Up tab ................................................................................................................................... 33!
Advanced Set-Up tab ........................................................................................................................... 34!
Making Configuration Changes ............................................................................................................. 38!
Help pages ................................................................................................................................................. 39!
Chapter 5: The Bright Box status page .................................................................. 40!
Internet status ......................................................................................................................................... 40!
Wireless Status ......................................................................................................................................... 42!
Page 4

EE Bright Box User Manual
4
Currently Connected Devices ............................................................................................................... 44!
USB Device ................................................................................................................................................ 45!
Information ............................................................................................................................................... 45!
Chapter 6: Bright Box Basic Set-Up pages ............................................................ 49!
Broadband Settings ................................................................................................................................ 49!
Description of Broadband Settings .................................................................................................. 49!
How to manually update the broadband username and password ............................................. 52!
How to change the broadband MTU ................................................................................................ 53!
How to set manual DNS addresses ................................................................................................... 54!
Migration Wizard ...................................................................................................................................... 55!
How to migrate to EE Fibre broadband ............................................................................................ 56!
How to migrate to EE ADSL broadband ........................................................................................... 57!
Wireless Settings ...................................................................................................................................... 59!
Description of Wireless Settings ....................................................................................................... 59!
A note on changing wireless settings .............................................................................................. 62!
How to enable or disable wireless ..................................................................................................... 63!
How to change the Wireless Network Name (SSID) ..................................................................... 64!
How to change the wireless WPA password .................................................................................. 66!
How to change the Wireless Mode ................................................................................................... 67!
How to change the wireless channel ............................................................................................... 69!
How to change the Broadcast SSID option ..................................................................................... 70!
How to change to wireless WEP security ........................................................................................ 72!
How to change to wireless WPA mode ............................................................................................. 75!
How to disable Wireless Security ...................................................................................................... 77!
Using the Intelligent Wireless feature .............................................................................................. 78!
Wi-Fi protected setup .............................................................................................................................. 79!
Description of WPS settings ............................................................................................................. 80!
How to enable and disable WPS ........................................................................................................ 82!
How to establish a WPS connection using push button configuration (PBC) ........................... 83!
How to establish a WPS connection using the personal identification number (PIN) method
................................................................................................................................................................ 86!
USB File Sharing ...................................................................................................................................... 88!
How to File Share with a USB Drive (Auto Share) ......................................................................... 88!
Description of USB File Sharing settings ........................................................................................ 90!
How to set a username and password on the USB drive .............................................................. 92!
Chapter 7: Bright Box Advanced Set-Up pages ...................................................... 95!
Broadband Settings ................................................................................................................................. 95!
Description of Advanced Broadband Settings ............................................................................... 96!
Using the button to force an Internet Connection/Disconnection ............................................. 97!
ADSL Mode ............................................................................................................................................... 98!
Description of ADSL Mode settings ................................................................................................. 98!
Migration Wizard ..................................................................................................................................... 98!
Wireless Settings ..................................................................................................................................... 98!
Channel and SSID .................................................................................................................................... 99!
Description of Channel and SSID settings ...................................................................................... 99!
How to change the wireless speed from 144Mbps to 300Mbps ............................................... 101!
How to set up multiple SSID’s (multiple wireless network names) ........................................... 102!
WEP .......................................................................................................................................................... 105!
How to set up a multiple SSID with WEP security ........................................................................ 105!
WPA .......................................................................................................................................................... 108!
Description of WPA settings ............................................................................................................ 108!
802.1x ...................................................................................................................................................... 110!
Description of 802.1x settings ......................................................................................................... 111!
Bandwidth Control .................................................................................................................................. 112!
Page 5

EE Bright Box User Manual
5
Description of Bandwidth Control settings .................................................................................... 113!
How to limit the wireless bandwidth on an SSID .......................................................................... 113!
USB File Sharing ...................................................................................................................................... 115!
Description of USB File Sharing settings ....................................................................................... 116!
How to add user account access to a USB drive. ......................................................................... 118!
Mobile Broadband ................................................................................................................................... 121!
DHCP ........................................................................................................................................................ 122!
Description of DHCP settings: ......................................................................................................... 123!
How to reserve an IP address for a computer or a device .......................................................... 124!
NAT ........................................................................................................................................................... 126!
Address Mapping .................................................................................................................................... 127!
Description of Address Mapping settings ...................................................................................... 128!
Port Forwarding ..................................................................................................................................... 128!
Description of Port Forwarding settings ........................................................................................ 130!
How to set up a port forwarding entry ............................................................................................ 131!
Port Triggers ........................................................................................................................................... 132!
Description of Port Trigger settings ............................................................................................... 133!
How to set up a port trigger rule ..................................................................................................... 134!
NAT mapping table ................................................................................................................................ 135!
Firewall ..................................................................................................................................................... 137!
Access Control ........................................................................................................................................ 138!
Description of settings on the Access Control page ................................................................... 139!
How to create an Access Control rule ............................................................................................ 140!
MAC Filter ................................................................................................................................................ 143!
Description of MAC Filter settings .................................................................................................. 144!
How to set up a MAC filter rule ....................................................................................................... 144!
URL Blocking ........................................................................................................................................... 145!
How to create a URL Blocking rule ................................................................................................. 146!
Schedule Rule ......................................................................................................................................... 150!
How to create a Schedule Rule for Access Control ...................................................................... 151!
Intrusion Detection ................................................................................................................................ 155!
Description of Intrusion Detection settings: ................................................................................. 156!
DMZ .......................................................................................................................................................... 157!
Description of DMZ settings ............................................................................................................ 158!
How to add a computer to the De-militarized zone (DMZ) ......................................................... 159!
QoS ........................................................................................................................................................... 160!
How to enable Quality of Service on the router ........................................................................... 161!
Traffic Mapping ...................................................................................................................................... 162!
How to create a Quality of Service Traffic Mapping rule ............................................................ 163!
Quality of Service Traffic Type descriptions: ................................................................................ 165!
Diffserv Groups ....................................................................................................................................... 166!
How to apply bandwidth prioritisation for Diffserv Groups ........................................................ 166!
WMM ........................................................................................................................................................ 168!
UPnP ......................................................................................................................................................... 170!
Tools .......................................................................................................................................................... 172!
Configuration ........................................................................................................................................... 172!
How to save a copy of your router’s settings ................................................................................. 173!
How to restore your router’s settings from a backup .................................................................. 174!
Restart ..................................................................................................................................................... 175!
How to restart your router ................................................................................................................ 176!
Factory Default ........................................................................................................................................ 177!
How to restore the router to factory defaults from the router admin page ............................. 177!
How to restore the router to factory defaults from the reset button on the router .............. 179!
Firmware Upgrade ................................................................................................................................. 179!
Page 6

EE Bright Box User Manual
6
How to upgrade your router with a firmware file ......................................................................... 180!
System ..................................................................................................................................................... 182!
Time Settings .......................................................................................................................................... 184!
Password Settings ................................................................................................................................. 186!
How to change the router’s admin password ............................................................................... 187!
How to change the time out period of the admin pages ............................................................ 188!
DDNS ........................................................................................................................................................ 189!
How to configure your router for Dynamic DNS ........................................................................... 190!
ADSL Status ............................................................................................................................................ 191!
System Log .............................................................................................................................................. 194!
Description of System Log entries .................................................................................................. 195!
Chapter 8: Troubleshooting .................................................................................. 198!
Unable to display the router admin pages using 192.168.1.1 ..................................................... 198!
Unable to connect to the Internet .................................................................................................. 199!
Unable to establish a wireless connection with the router ........................................................ 201!
Poor wireless signal strength and speeds or the wireless connection is lost ........................ 202!
Problem sharing files with a USB drive connected to the router. ............................................ 203!
Appendix A: Default Router Settings ................................................................... 204!
Page 7
EE Bright Box User Manual
7
CHAPTER 1: INTRODUCTION
INTRODUCING THE BRIGHT BOX WIRELESS ROUTER
The Bright Box Wireless Router is a wireless ‘N’ modem router offering speeds of up-to 300
Mbps when used with a compatible wireless ‘N’ adapter. It also has four 10/100 Mbps
Ethernet ports for wired connectivity.
The Bright Box Wireless Router supports ADSL2+ broadband connections
offering maximum
theoretical speeds of up to 24 Mbps on your EE
home broadband line. The Bright Box also
supports a simple ADSL setup over the EE
broadband network through remote configuration
– just plug it into your ADSL line and it works.
The Bright Box features Intelligent Wireless
- improving the reliability of your wireless
broadband signal by avoiding interference from other signals. You can control when your
connected devices move on to a different wireless channel to improve performance, giving
you the most reliable wireless connection for all your laptops, smartphones and tablets
throughout your home
.
The router also features the latest WPA2 (Wi
-Fi Protected Access) wireless security out-of-
the
-box, to ensure that your wireless connection is protected from external wireless intrusion.
The router is
also compatible with wireless ‘B’ and wireless ‘G’ standards
The Bright Box Wireless
Router supports connectivity from a variety of devices to include
Windows and Apple Mac computers, games consoles such as Xbox and Play Station 3, iPads,
iPhones, and other mobile smartphones including Signal Boost (UMA) compatible handsets.
It’s also possible to connect a USB memory device (e.g.
USB hard drive, or memory stick) to
the Bright Box wireless router to enable file sharing across the home network.
The Bright Box also has handy advanced features
such as Port Forwarding, Port Triggering,
Access Control, MAC Filtering, URL Blocking, Intrusion Detection, UPnP and Quality of Service
(QoS) settings among other
s in order to provide configuration options to suit your needs.
DOCUMENT INFORMATION
Throughout this document, the following icons will be used. Below is a description of what
the icons represent:
Information icon: this will be used to denote added information, which may be of
interest to the reader about a specific process or reason for completing a specific task within
a process. Alternatively, if there’s more than one way to complete a process, the most
efficient process will be documented, however the alternative may appear next to an
information icon.
Exclamation mark icon
: this will be used to highlight key points in the document of
specific importance, such as particular tasks that must be completed, or warning about the
implications of completing specific processes
.
ROUTER TECHNICAL SPECIFICATION
Feature
Specification
Model Name
Bright Box Wireless Router.
LAN Ports
3 x 10BASE-T/100BASE-Tx (RJ45).
WAN Ports
1 x 10BASE-T/100BASE-Tx (RJ45) – doubles as
additional LAN port.
Page 8

EE Bright Box User Manual
8
ADSL Ports
1 x RJ11.
ADSL Modes
G.DMT - G.992.1, ADSL2 - G.992.3, ADSL2+ - G.992.5,
Annex M
- G.992.3 & G.992.5
Broadband Modes
ADSL PPPoA, ADSL PPPoE, Routing Mode,
Fibre/Ethernet PPPoE, Bridge Mode.
USB Ports
1 x USB 2.0.
Wireless LAN
IEEE 802.11n, IEEE 802.11g, IEEE 802.11b.
Wireless Band
2.4 GHz (2.412 – 2.472).
Wireless Channels
Auto (Intelligent Wireless), 1 – 13 (plus extension
channels +/
- 4)
Wireless Speeds
Up to 145 Mbps (20MHz bandwidth) by default or up
to 300 Mbps (40MHz bandwidth).
Wireless Security Mode
WPA2-PSK, WPA-PSK, WEP (64/128 Bit), Unsecured
Mode, 802.1X, TKIP, AES.
Wi-Fi Protected Setup
WPS PBC Mode, WPS PIN Mode – disabled by
default
Gateway IP Address
192.168.1.1
Default MTU
1492 (configurable from 576-1500)
Power Adapter
230V, 50Hz Input
Power Supply (Input)
100-240V ~ 50-60Hz 0.5A
Power Supply (Output)
12V ~ 1.0A
Firmware/Software Version
v0.09.94.0006-OT (28 November 2011)
Boot Code Version
v1.00.09.0003-OT or v1.00.10.0001-OT
ADSL Code Version
A2pD035b-d23i
Hardware Version
01
Dimensions
165mm x 133mm x 30mm
Page 9
EE Bright Box User Manual
9
CHAPTER 2: ROUTER IDENTIFICATION AND PANELS
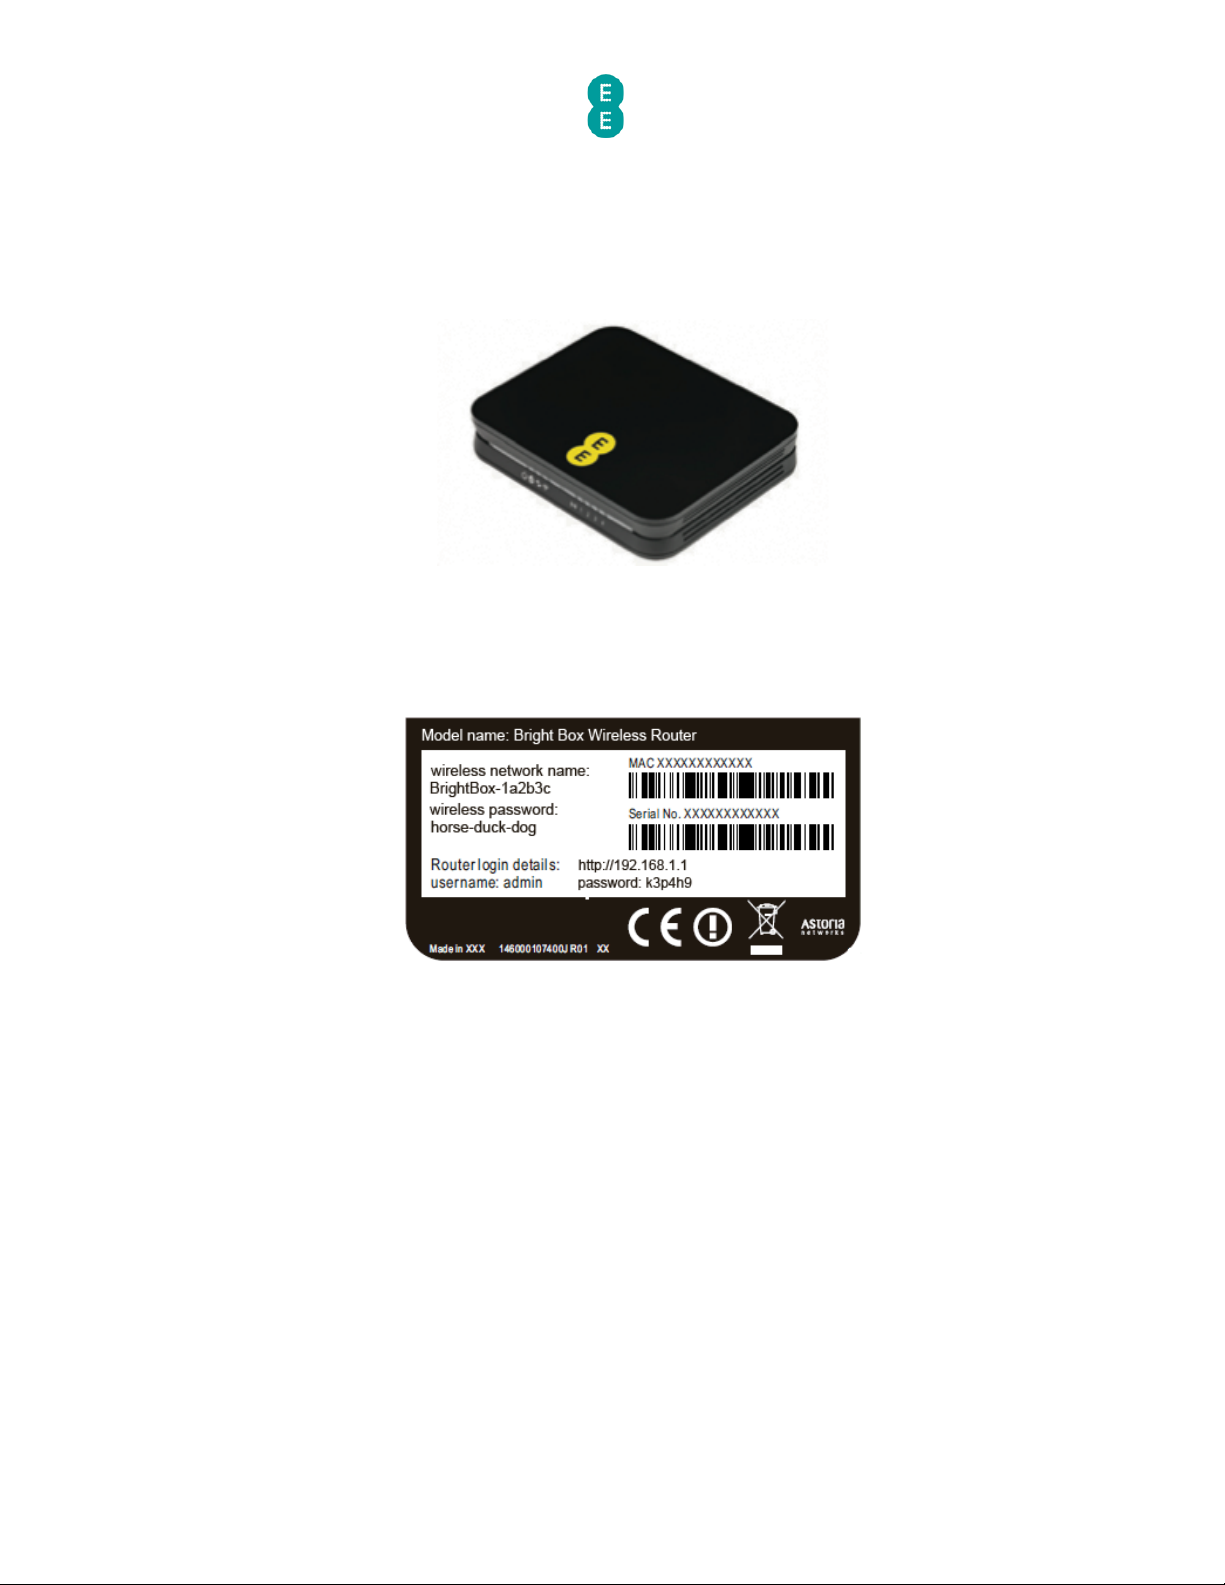
ROUTER IDENTIFICATION
The Bright Box Wireless Router is black with an EE logo printed on the top of the device, as
illustrated below:
On the bottom of the router you will find a sticker detailing the model name, MAC Address,
Serial Number and important wireless information including your wireless network name (also
known as an SSID) and wireless password. The sticker also includes the URL used for
accessing the router admin pages
(http://192.168.1.1) and the username and password to
login to the admin pages.
FRONT PANEL VIEW AND LED STATUS
On the front panel of the Bright Box Wireless Router, you’ll find 9 green LED lights, which can
be used to indicate the status of the router:
Page 10

EE Bright Box User Manual
10
When the router is connected to power, switched on and only a
broadband cable is
connected, the lights should
be lit as follows:
LED
LED Colour/Activity
Power
Solid green
Broadband
Solid green
Data
Off (Fibre) or flashing
green
(ADSL)
Wireless
Solid green
Intelligent Wireless/WPS
Off
Ethernet 1-3
Off
Ethernet 4
Flashing green (Fibre
Broadband) or Off
(ADSL
Broadband)
The table
below describes the LED light behaviour on the front panel and what they mean,
from left to right.
LED
Status
Description
Power
On
The router is receiving power this is normal
operation.
Off
The router is not receiving power, or has failed.
Broadband
On
The router is functioning correctly, and is
connected to broadband.
Fast
flashing
The router is training or synchronising with the
exchange.
Slow
flashing
The router has attempted to connect to the
Internet but has failed. This could be a problem
connecting to the
broadband exchange, however
will be most commonly experienced when the
Page 11

EE Bright Box User Manual
11
username and password have been entered
incorrectly.
Off
The router can’t detect a broadband signal.
If you are using
the EE Fibre broadband service
check that the Ethernet connection between the
WAN port on the Bright Box and LAN1 port on the
Fibre
modem is connected and the modem is
powered on.
Data
Flashing
Traffic is being sent or received between the
computer and router, or the router and the
internet
Off
For ADSL broadband that means that no data is
currently being sent or received from the router.
If you are using the EE Fibre broadband service,
this light will always be off, and this is normal.
Wireless
On
The wireless access point is enabled.
Flashing
Data is being sent via the wireless link.
Off
Wireless has been disabled.
Intelligent
Wireless/
WPS
On
A successful WPS connection has been made.
Fast
Flashing
The WPS button has been pressed - the router is
capable of setting up a WPS connection.
Slow
Flashing
The router is searching for a new wireless
channel as part of the Intelligent wireless
process.
Off
Default behaviour – WPS or Intelligent wireless
aren’t currently in progress.
Ethernet 1
4 (ADSL
Broadband
)
On
Ethernet connection has been established with
the indicated port.
Flashing
The Ethernet connection is sending/receiving
data.
Off
There is no Ethernet connection on the port.
Ethernet 4
(Fibre
Broadband)
On
A connection has been established between the
Bright Box and the Fibre
modem.
Flashing
Data is being sent between the Bright Box and
the Fibre
modem.
Off
The Ethernet connection between the Bright Box
and the Fibre
modem has been disconnected or
the modem is powered off.
Check that the Ethernet connection between the
WAN port on the Bright Box and LAN1 port on the
Fibre
modem is connected and the modem is
powered on.
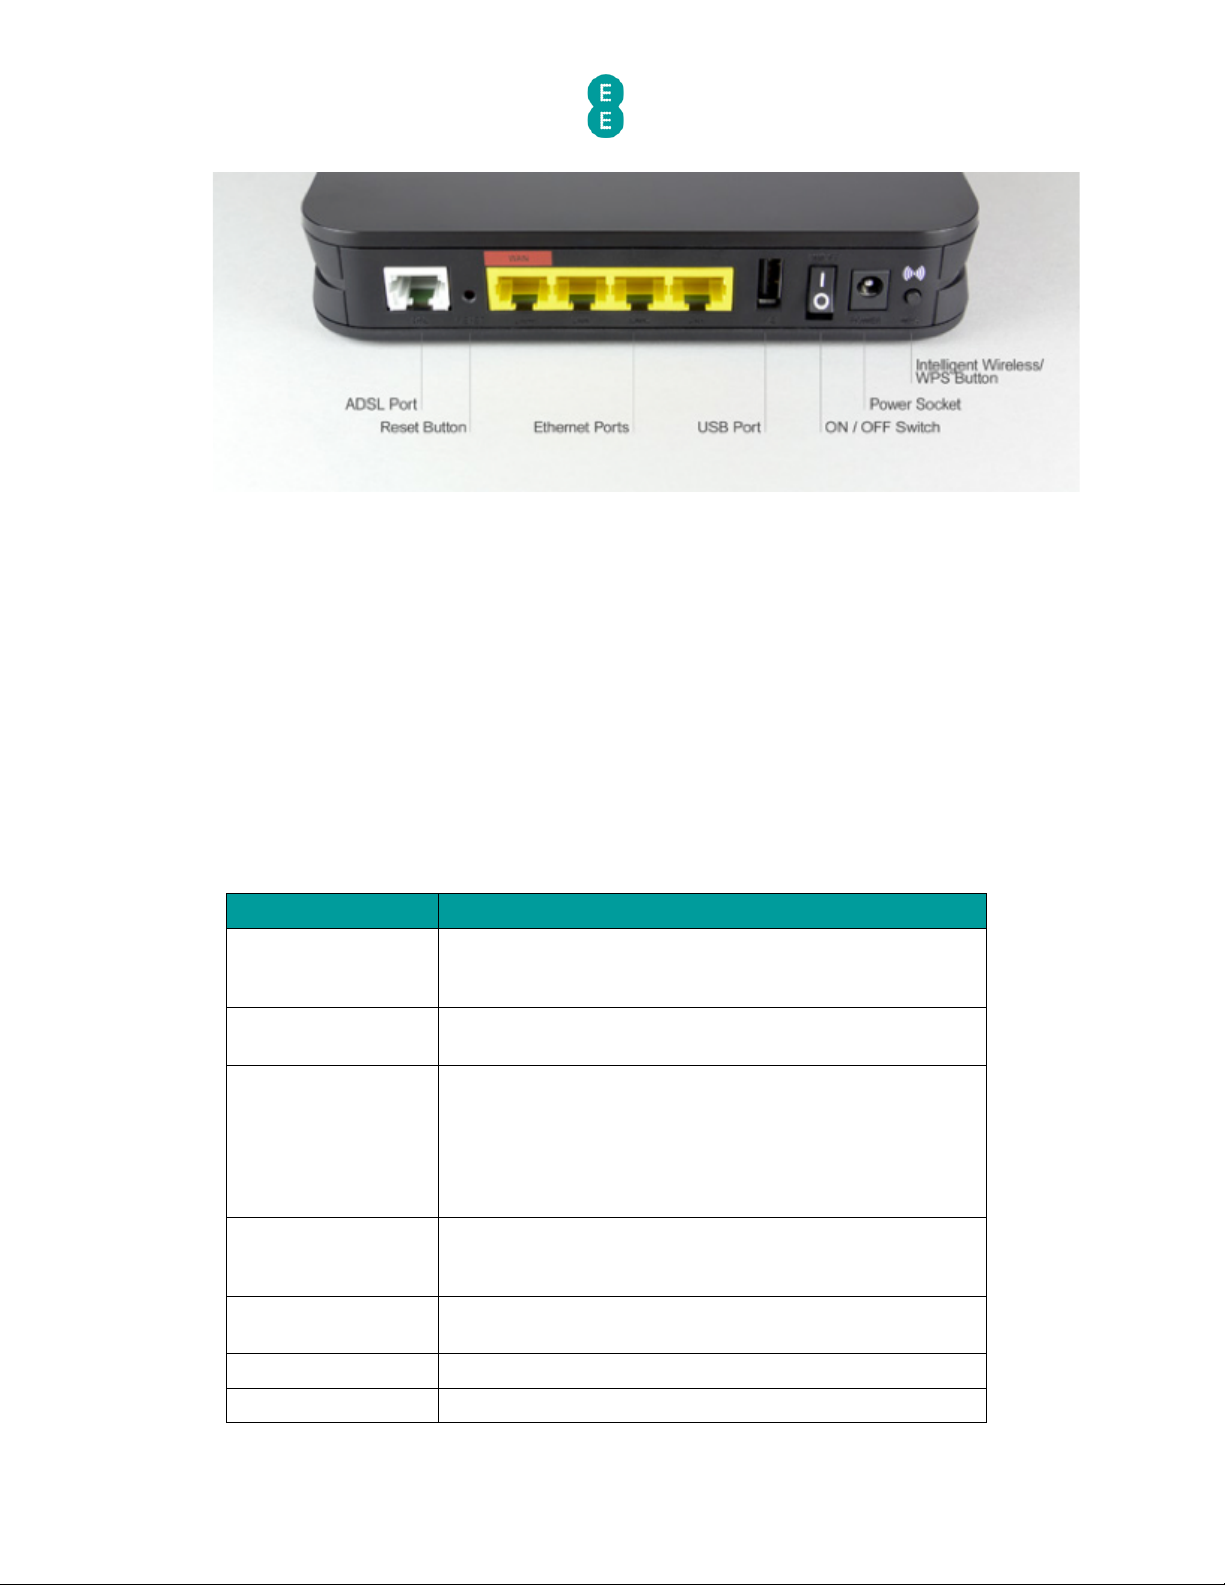
BACK PANEL VIEW
On the back panel of the Bright Box you will find the following ports, sockets and buttons:
Page 12
EE Bright Box User Manual
12
• DSL
port
• Reset
button
• Ethernet Ports
o WAN
port for Fibre broadband services (also known as LAN 4)
o LAN ports (1
-4)
• USB port
• ON/OFF
power switch
• Power
socket
• WPS
button
The table below describes the ports, sockets and buttons on the back panel of the Bright Box
router:
Item
Description
DSL port
For ADSL broadband, connect one end of a broadband
cable (RJ
-11) to this port and the other end to a filter and
the telephone line.
Reset button
Press briefly to restart the router, or press for 6 seconds to
return the router to factory default settings.
WAN port
For ADSL broadband, connect one end of an Ethernet
cable (RJ
-45) to this port to use as a normal LAN port (LAN
4).
For Fibre broadband, connect one end of an Ethernet
cable (RJ
-45) to this port and the other end to the Fibre
modem.
LAN port
Connect one end of an Ethernet cable (RJ-45) to this port,
and the other end to a computer (or other Ethernet
device) with a LAN card installed.
USB port
Connect a USB storage device such as a USB hard drive to
this port.
See
USB File Sharing
on page 88
Power switch
Use this switch to turn the router on/off.
Power socket
Connect the supplied power adapter to this socket.
Page 13

EE Bright Box User Manual
13
Intelligent
Wireless/WPS button
Press this button briefly to activate the Intelligent Wireless
process or press this button for 5
seconds to activate WPS
(WPS will only be available when enabled in the router’s
admin pages
– (see
Wi-Fi Protected Setup
on page 79)
BOTTOM PANEL VIEW
On the base or bottom of the router, you’ll find a sticker detailing the information below:
• Model name
of router (Bright Box Wireless Router)
• Wireless network name
(also known as SSID), e.g. BrightBox-1a2b3c
• Wireless password
– 6 character random password
• Router login details
– i.e. 192.168.1.1
• Router login username
and password
• The MAC address
and Serial number of the router
Page 14
EE Bright Box User Manual
14
CHAPTER 3: INSTALLATION
UNPACKING YOUR BRIGHT BOX WIRELESS ROUTER
To make your life easier, we’ve already set-up your Bright Box wireless router so it will
connect to the Internet once your broadband is ready. Simply plug it in and connect your
device. If you’d like a helping hand, follow this guide and you’ll be online in no time.
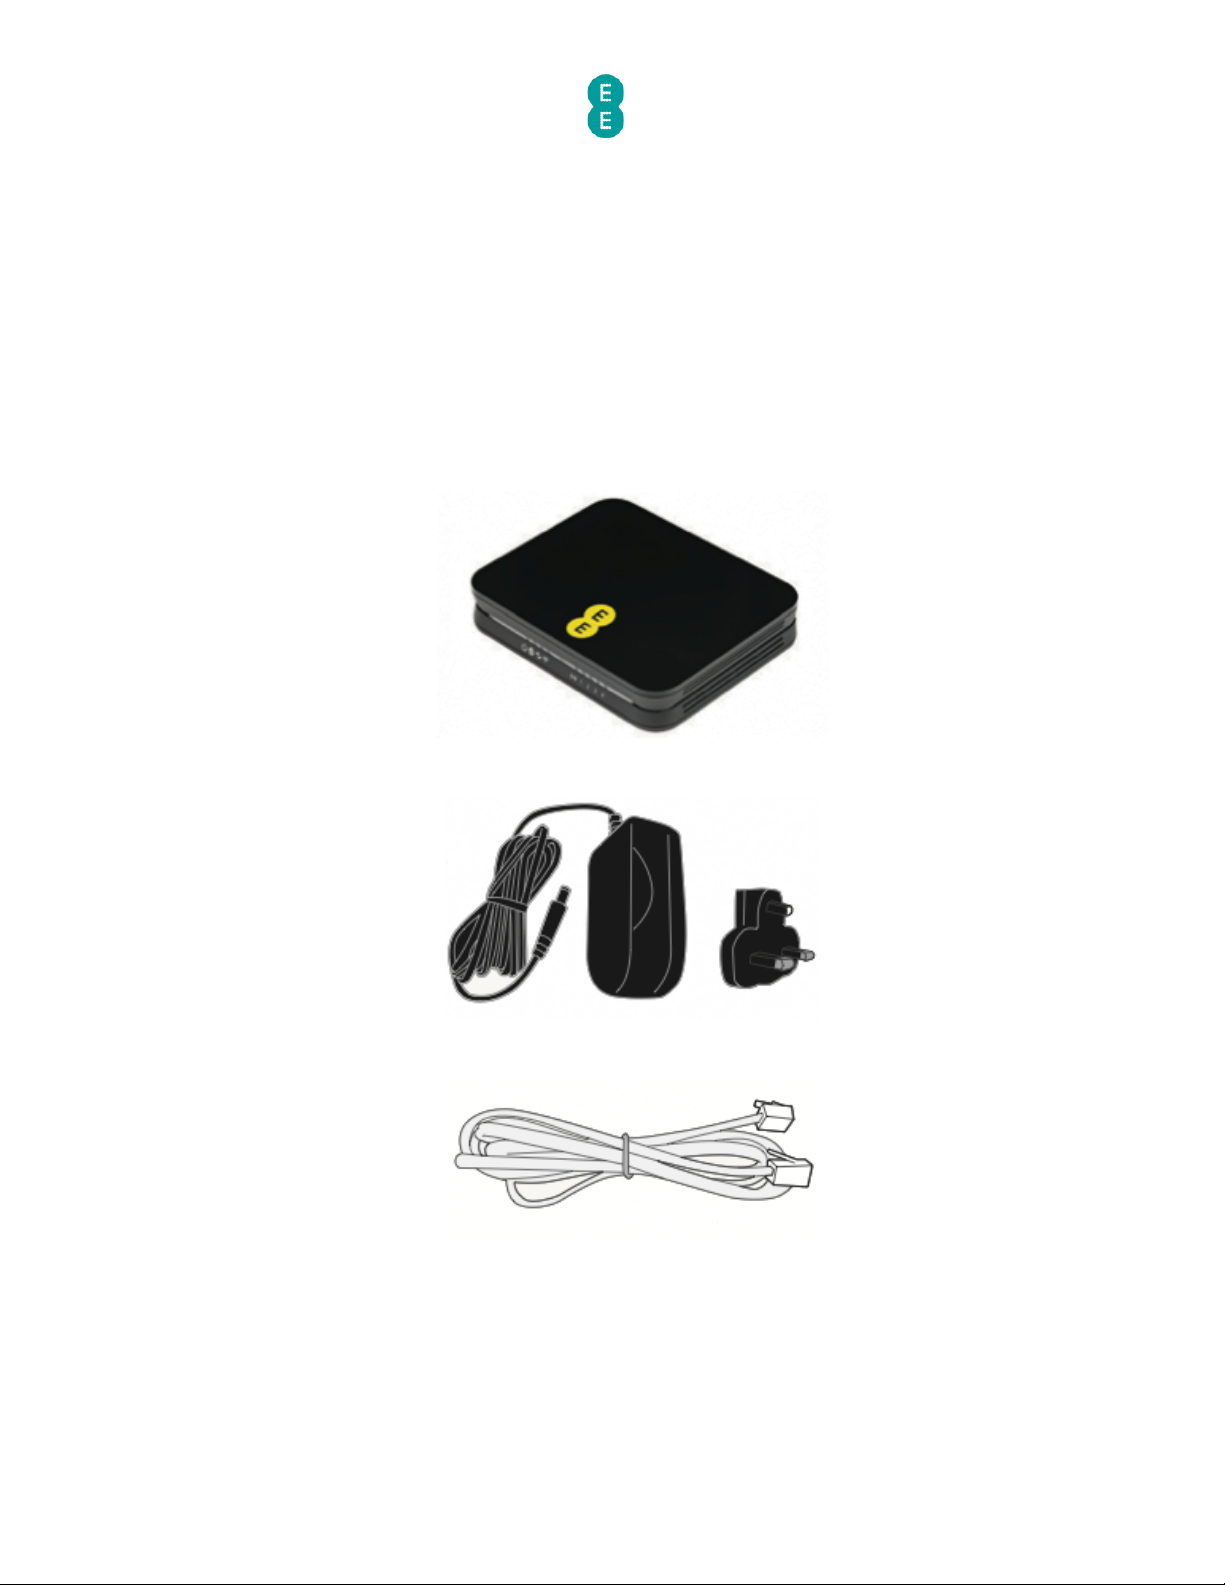
The box should include the following items:
A Bright
Box Wireless Router:
2-Part power supply
:
Grey
broadband cable (for ADSL broadband only)
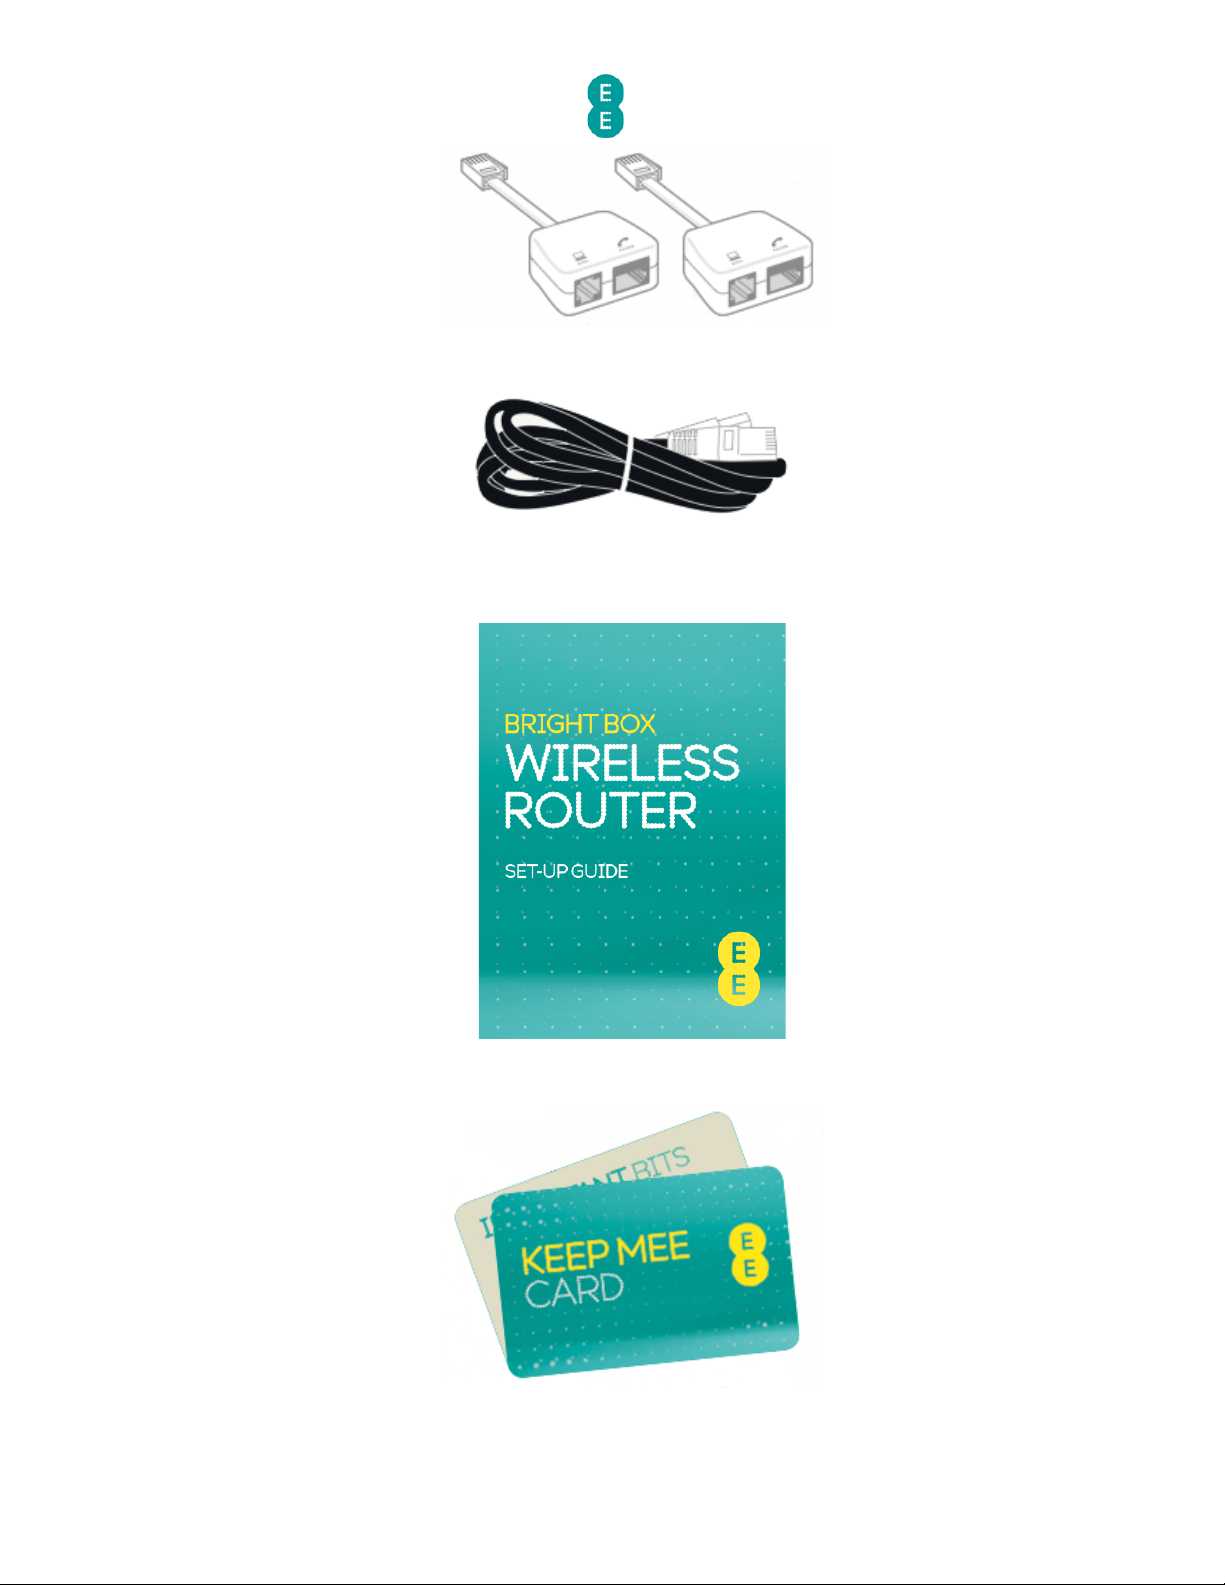
2 x broadband filters
Page 15
EE Bright Box User Manual
15
Black Ethernet cable:
Bright Box wireless router set
-up guide:
‘KEEP MEE’
card
If any of these items are missing or damaged please contact us on 0844 873 8586.
Page 16
EE Bright Box User Manual
16
SETTING UP YOUR ADSL BROADBAND
Follow these steps to set up your Bright Box Wireless Router for your ADSL EE broadband
service.
If you are using the EE Fibre optic broadband service, see the next section.
Disconnecting your old equipment
If you’ve already got a broadband modem or router connected to your line, unplug the power
supply and all other cables and put them to one side for now.
We recommend using the broadband filters provided in the box, especially to connect
your
new router. You can leave existing filters connected to other telephone sockets.
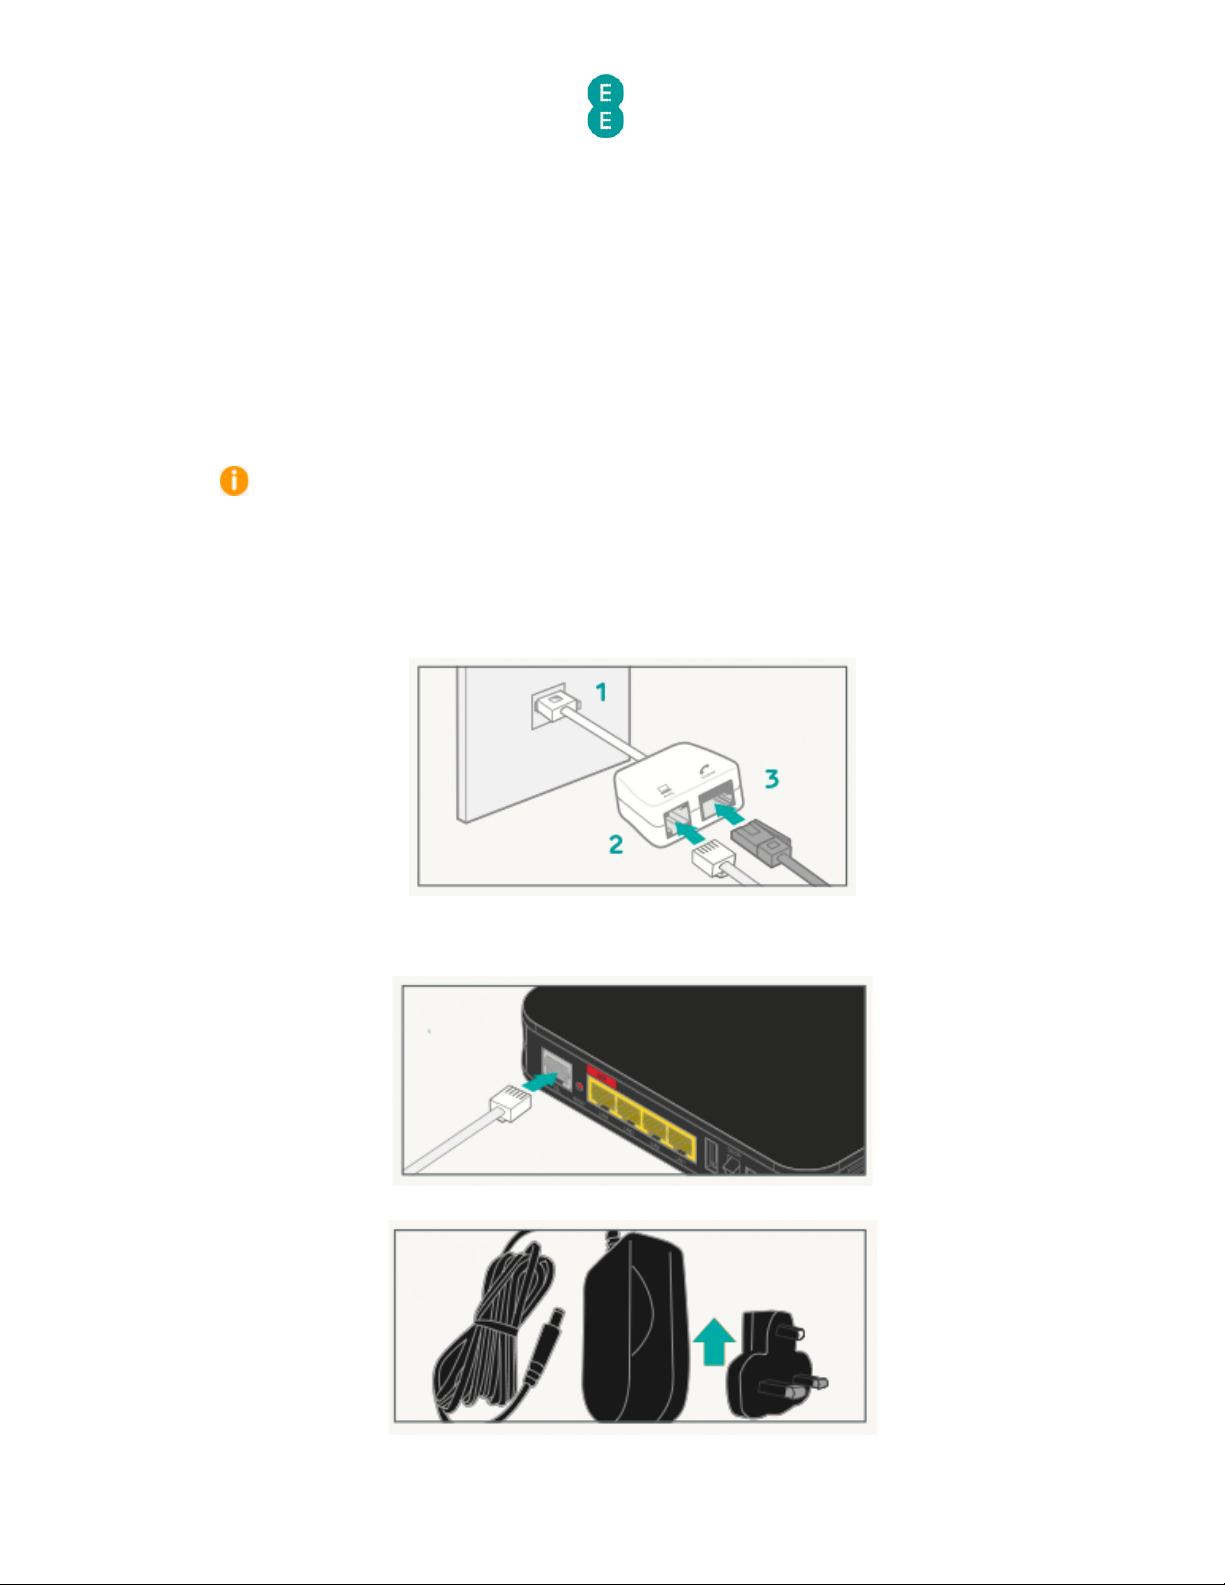
Connecting your new equipment
1. Connect the broadband filter to the telephone socket.
Connect your router to the main phone socket for better broadband speeds. make sure
to have a broadband filter connected to all sockets in use, this includes those for telephones,
answerphones, TV
box’s and alarm systems.
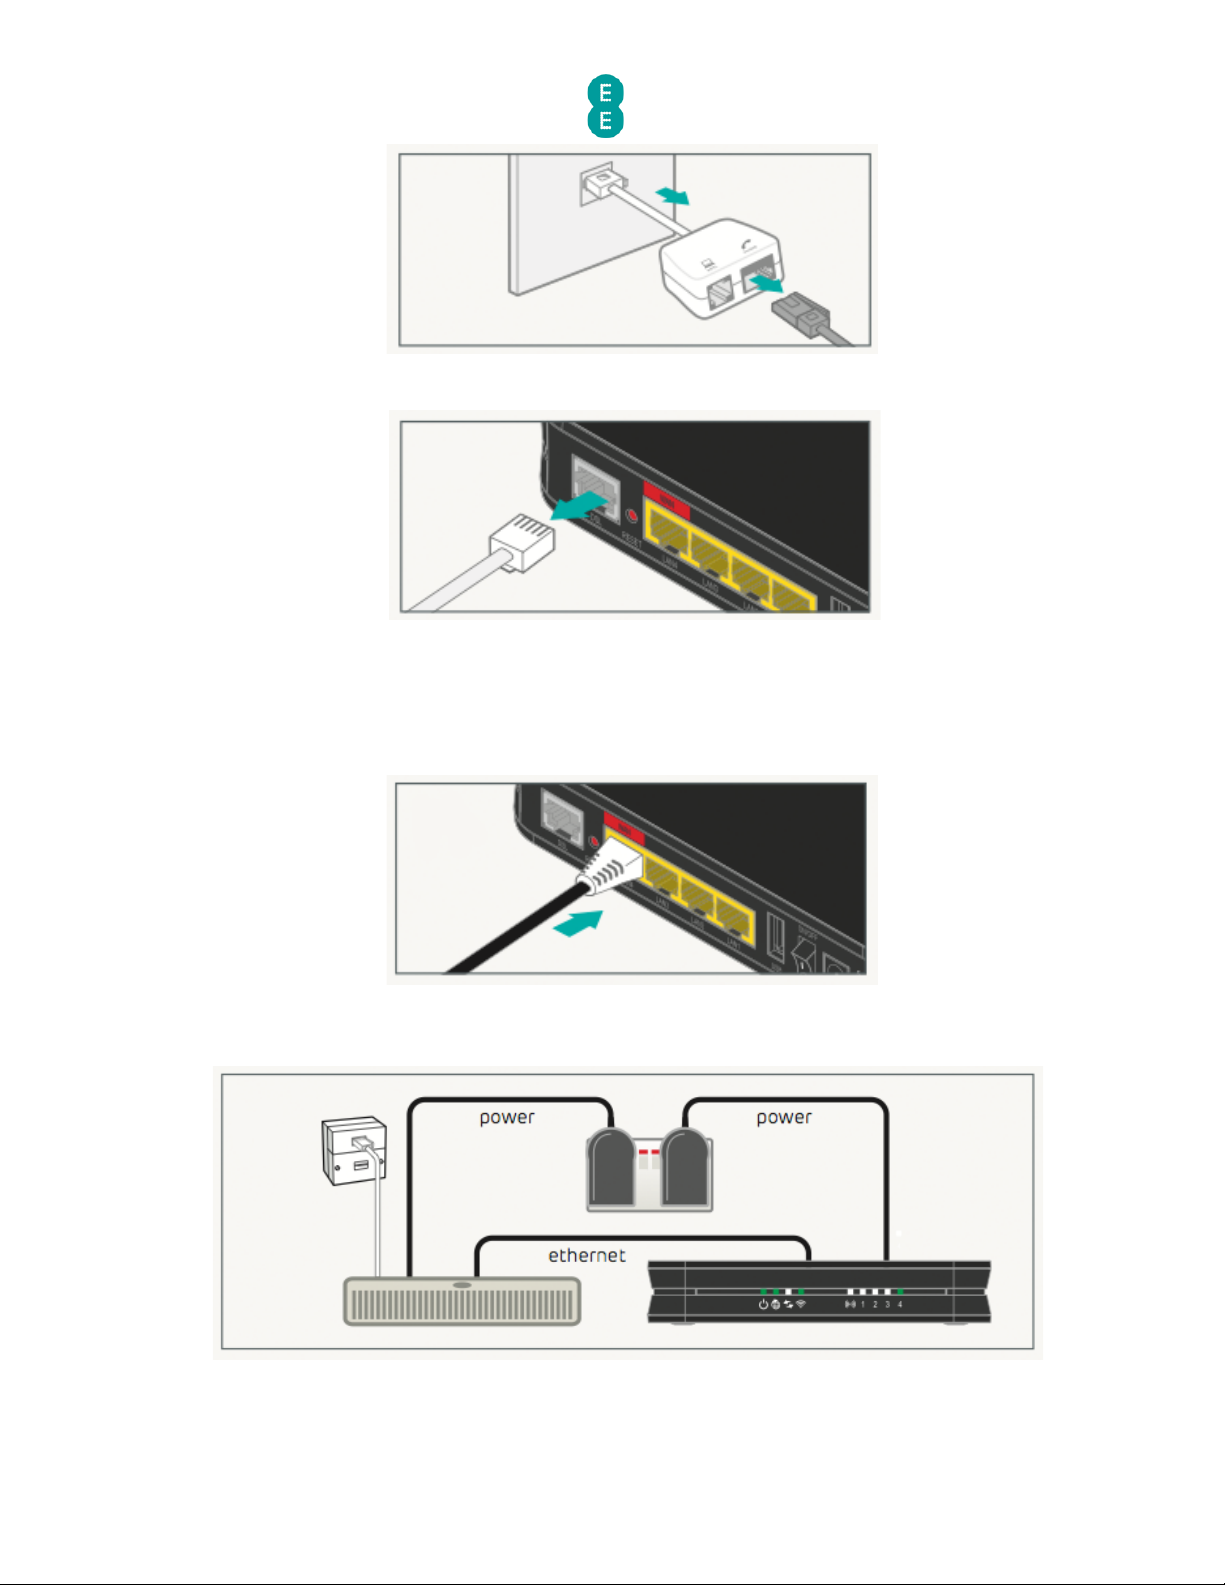
2.
Connect the grey broadband cable into the broadband filter:
3.
You can connect a telephone to the other available socket on the broadband filter (this
is optional):
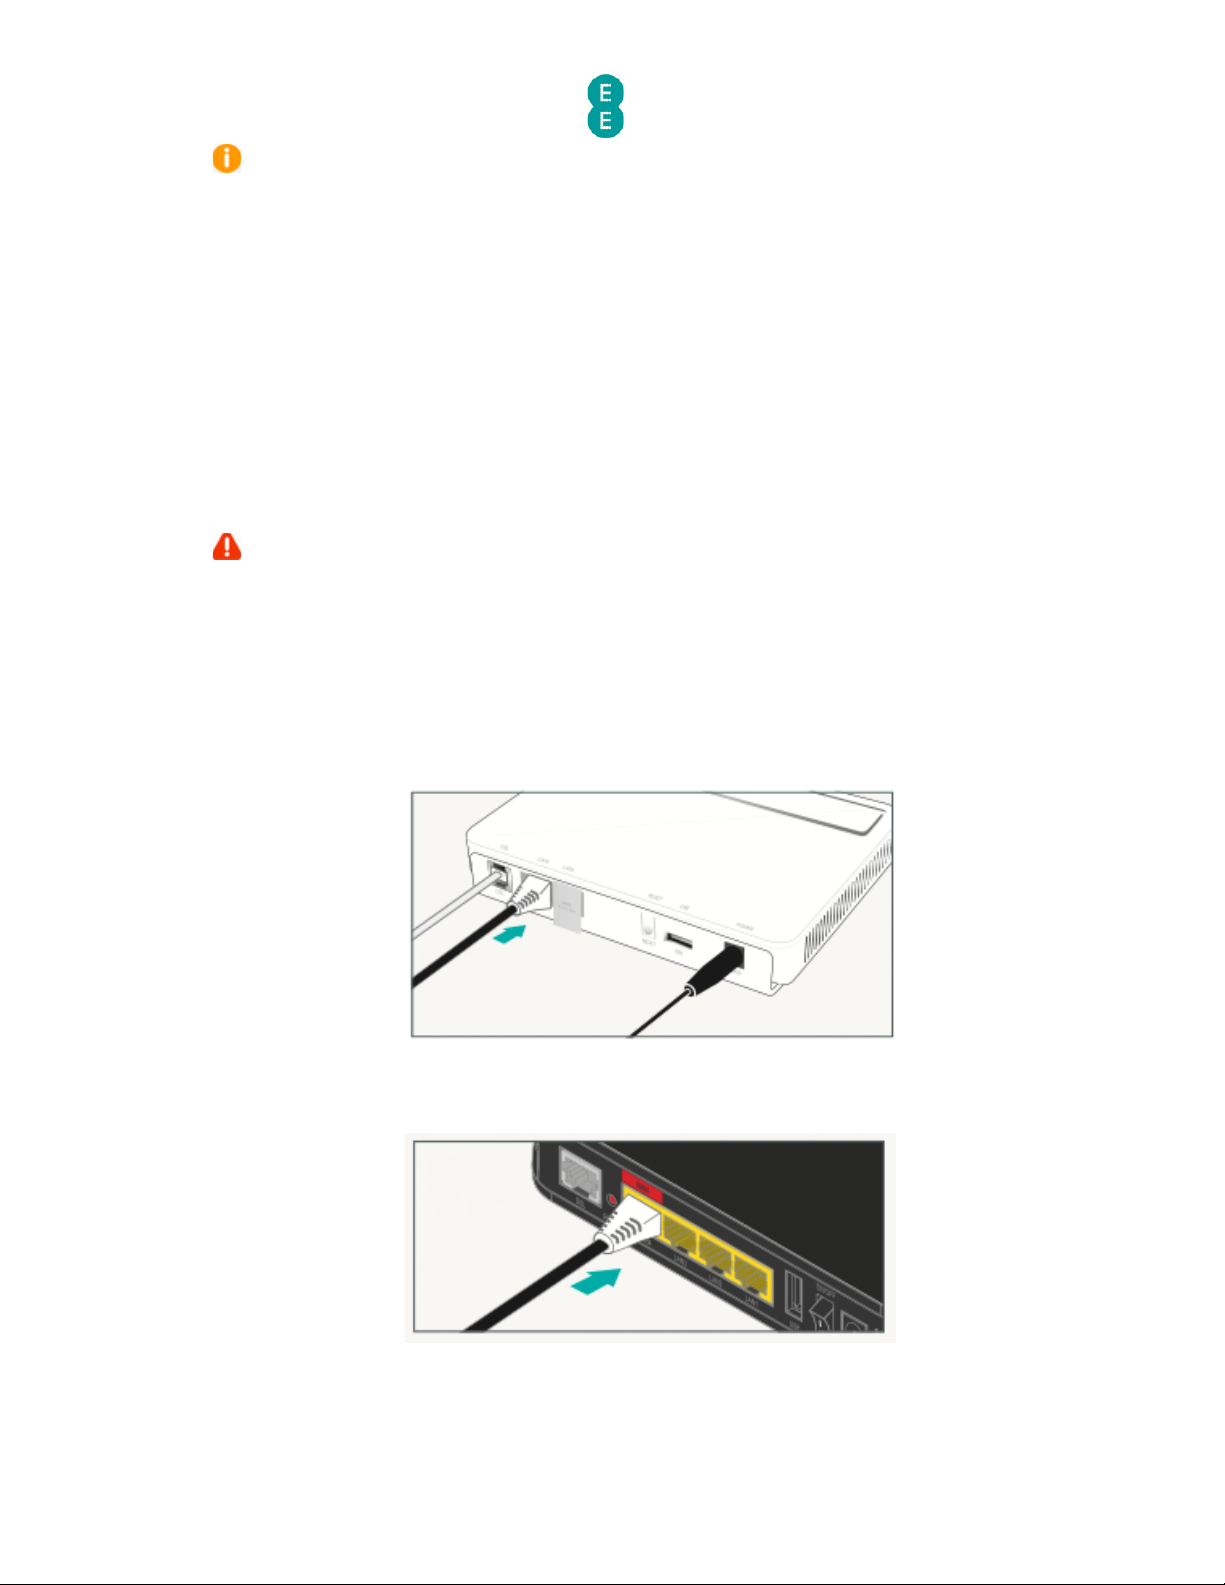
Connect and turn on your router
1. Plug the other end of the grey broadband cable into the DSL socket on your router:
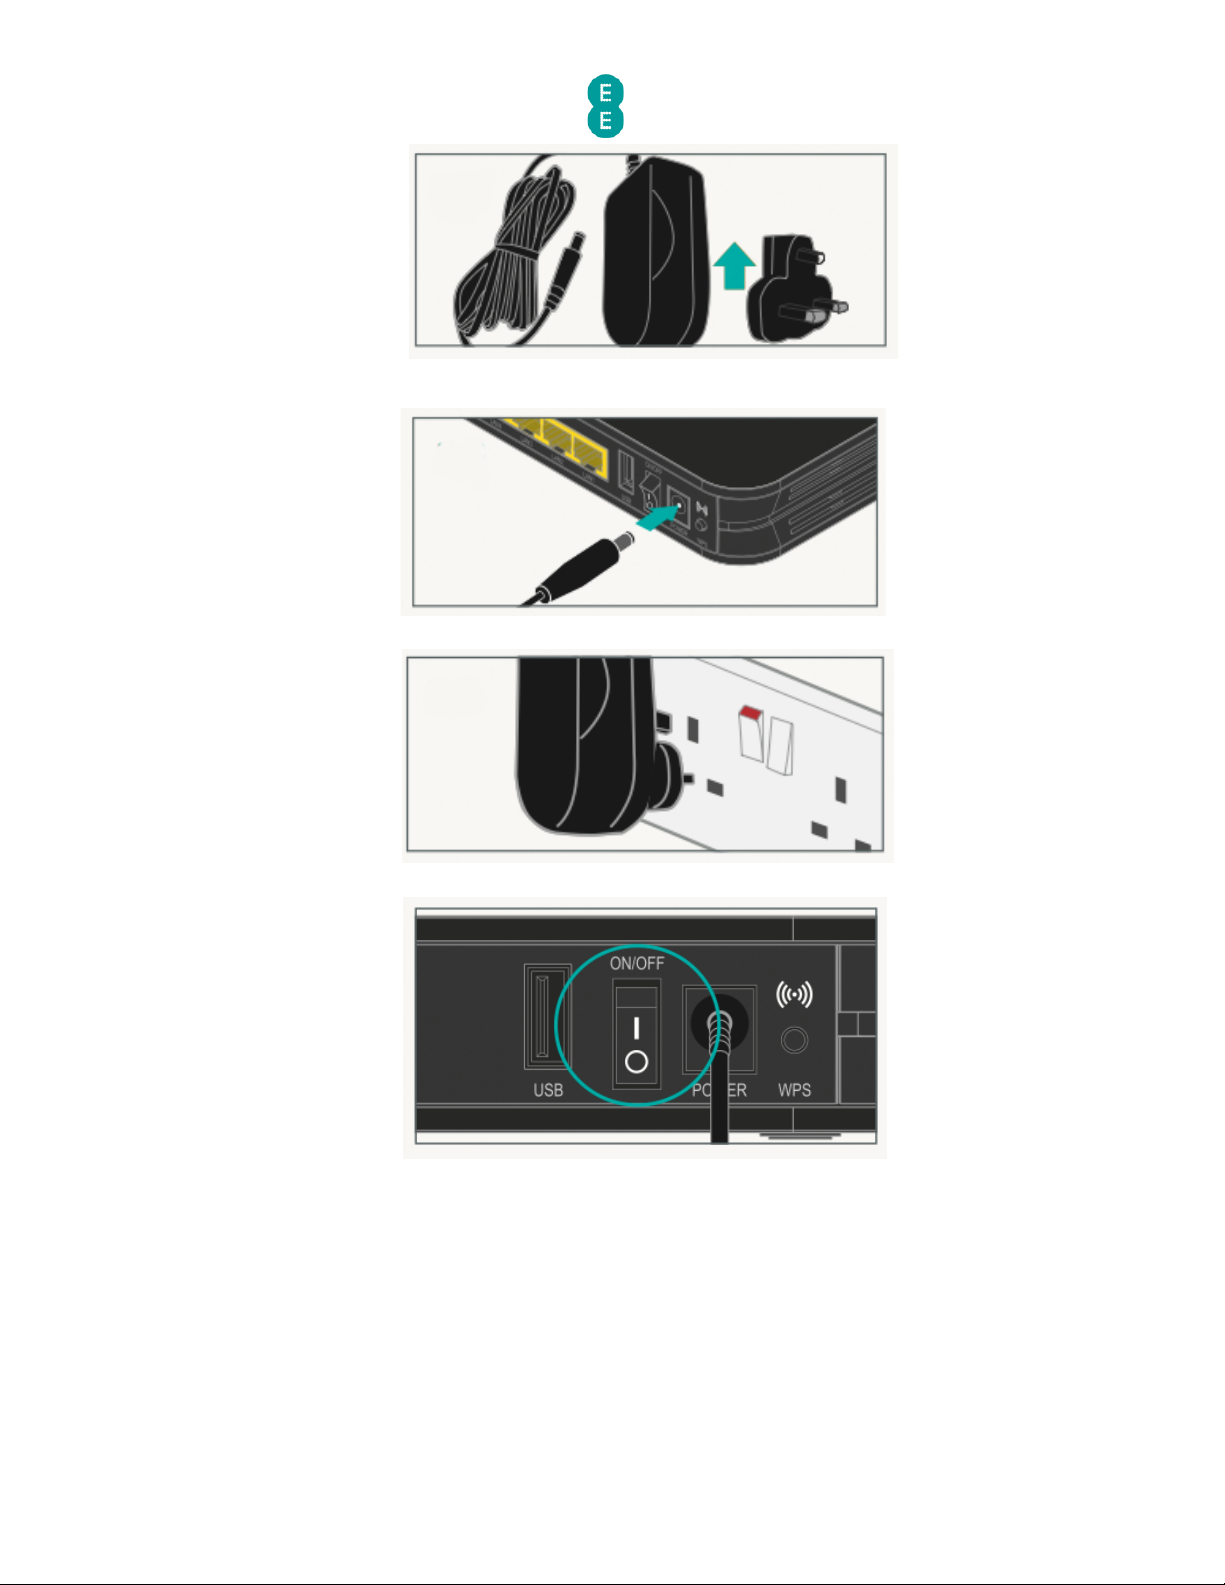
2.
Connect the two parts of the power supply together
Page 17
EE Bright Box User Manual
17
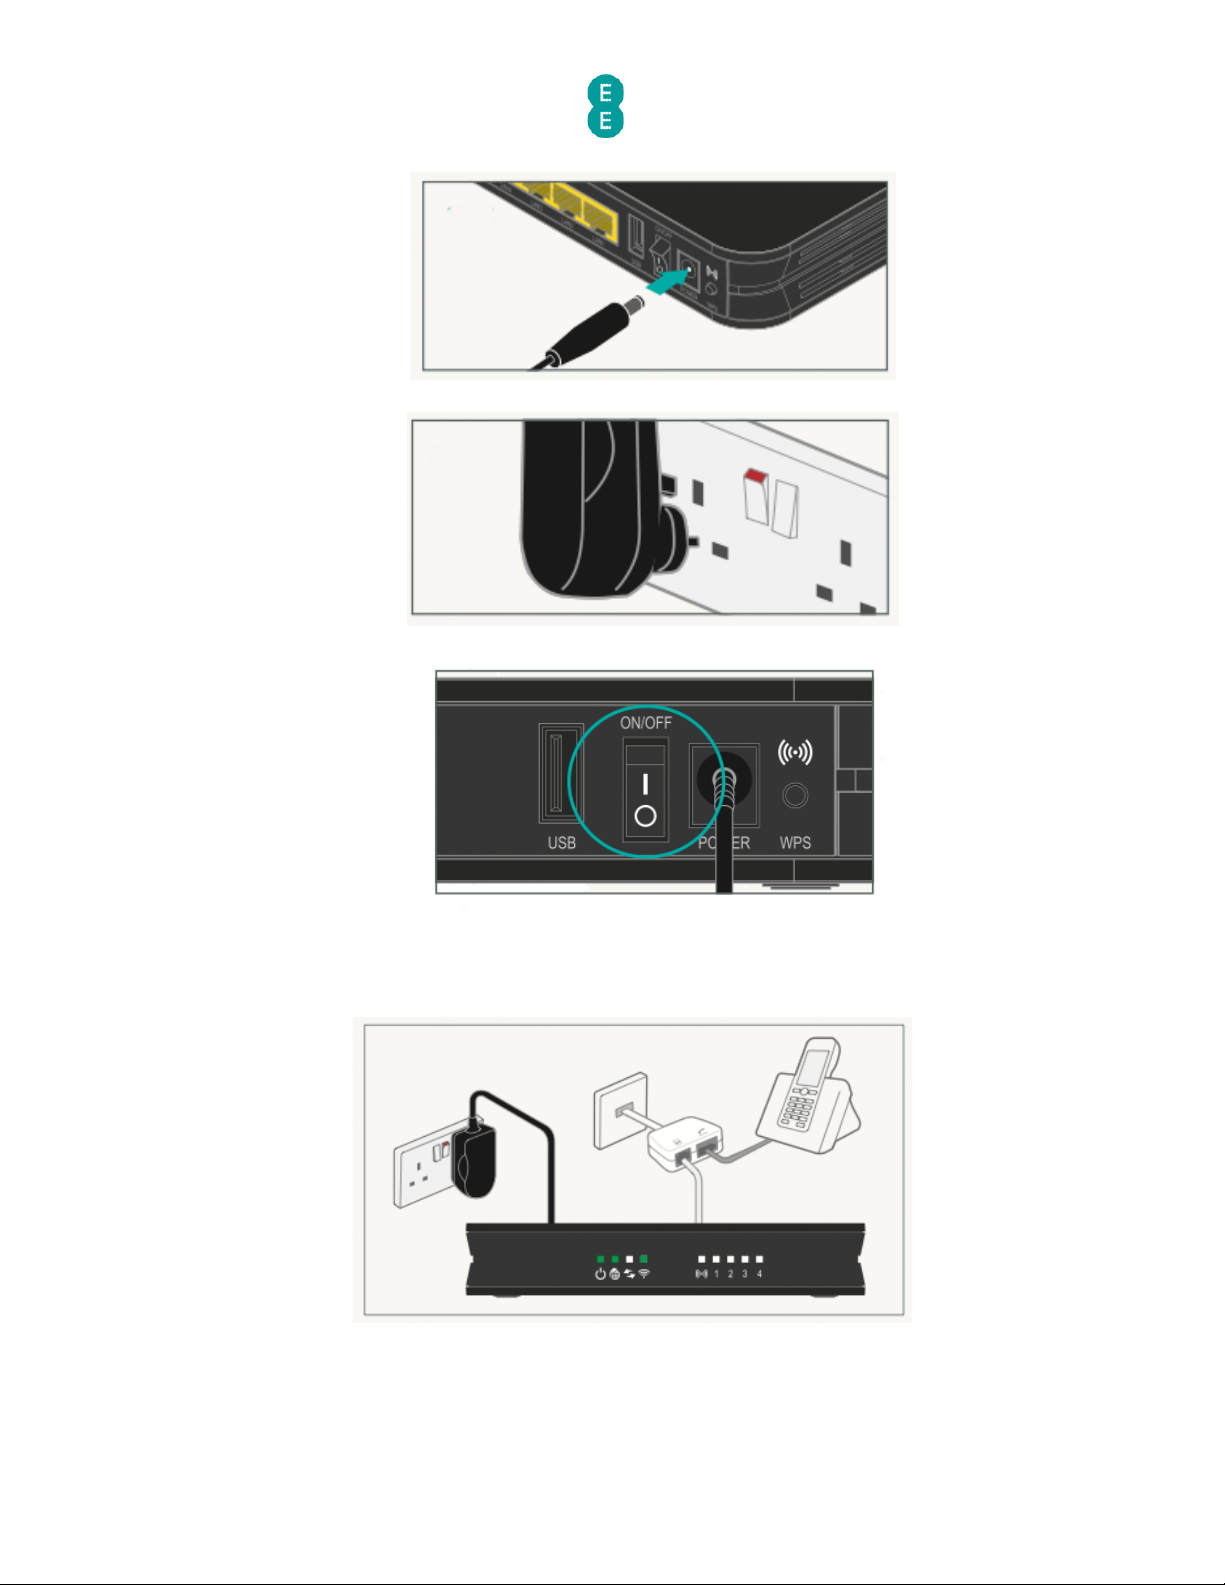
3. Plug the power cable into the router:
4. Plug the other end into a plug socket and turn it on:
5.
You can now switch on the router:
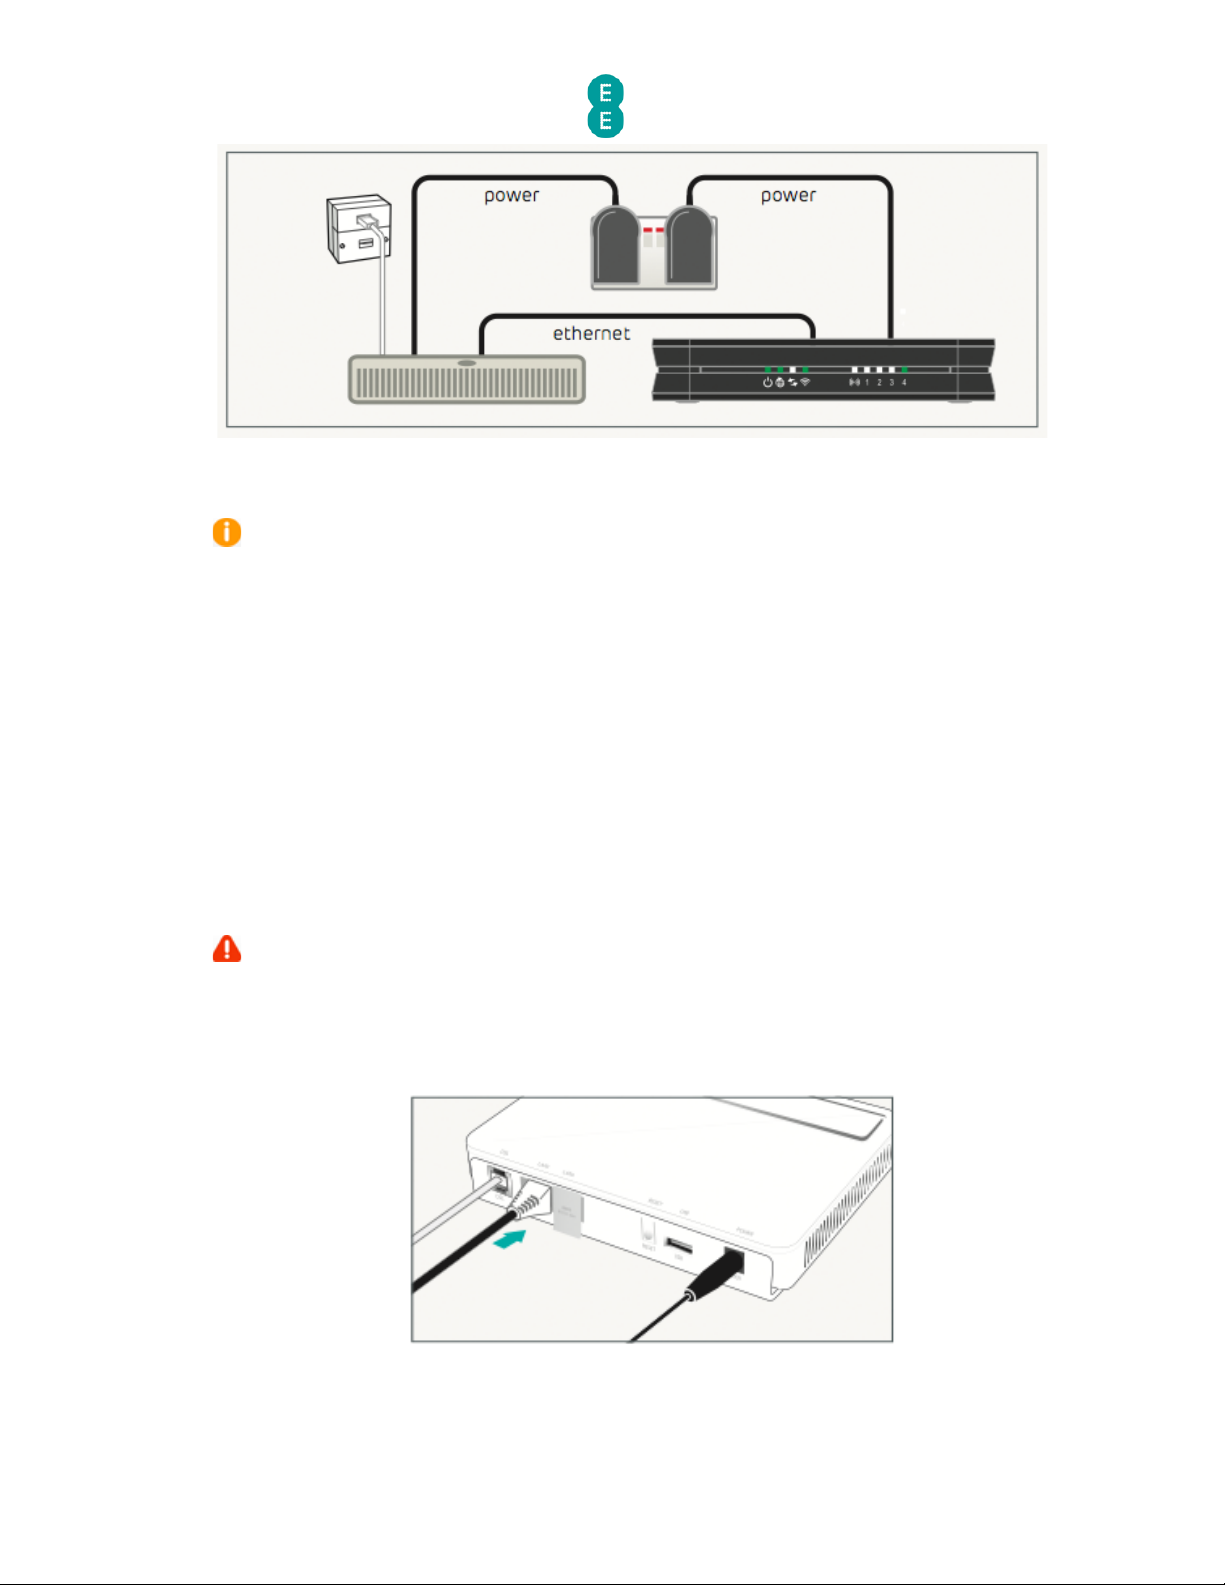
Check it over
1. The power light will go green and the broadband light will go green shortly afterwards.
2.
Your set up should now look like this:
Your home broadband is being set up
This will take up to 5 minutes, so relax and let us do the leg work.
Page 18
EE Bright Box User Manual
18
Please note that if you're redirected to the ‘Nearly there!’ holding page in your browser,
you may need to wait a few more minutes for us to set up your router.
If after 5 minutes, the
‘Nearly there!’ text is still visible when you reopen your browser window, reboot your PC and
then reopen the browser window again, you should now be able to view web pages. If this still
doesn’t work, you can manually enter your broadband
username and password in the router
user interface and make a connection to the Internet (see
how to manually update the
broadband username and password
on page 52)
You can now connect your devices
You can now connect your devices to your Bright Box router. Choose either wireless or wired
connection and follow the steps on page
s 23 and 25
SETTING UP YOUR FIBRE BROADBAND
Follow these steps to set up your Bright Box Wireless Router for your EE Fibre broadband
service.
Make sure that your Fibre broadband has been installed
– the engineer will confirm that
your line is ready to go
Disconnect Old Equipment
If you’ve already got a broadband modem or router connected to your line, unplug the power
supply and all other cables and put them to one side for now.
Engineer Visit
1. The engineer will change your telephone socket and connect the modem for you.
2.
Connect the black Ethernet cable, provided, to the modem:
Connect and turn on your router
1. Connect the other end of the black Ethernet cable into the red WAN port on your router:
2.
Connect the two parts of the power supply together:
Page 19
EE Bright Box User Manual
19
3.
Plug the power cable into the router:
4.
Connect the power supply into a plug socket and turn it on.
5.
You can now switch on your router.
Check it over
Everything should now look like this, the power light will go green and the broadband light
will go green shortly afterwards:
Page 20
EE Bright Box User Manual
20
Your Fibre broadband is being set up
This will take up to 5 minutes, so relax and let us do the leg work.
Please note that if
you're redirected to the ‘Nearly there!’ holding page in your browser,
you may need to wait a few more minutes for us to set up your router.
If after 5 minutes, the
‘Nearly there!’ text is still visible when you reopen your browser window, reboot your PC and
then reopen the browser window again, you should now be able to view web pages. If this still
doesn’t work, you can manually enter your broadband username and password in the
router
user interface and make a connection to the Internet (see
how to manually update the
broadband username and password
on page 52)
You can now connect your devices
You can now connect your devices to your Bright Box router. Choose either wireless or wired
connection and follow the steps on page
s 23 and 25
MOVING TO FIBRE BROADBAND
Follow these steps to move your Bright Box Wireless Router from an ADSL to EE Fibre
broadband service.
Make sure that your Fibre broadband has been installed
– the engineer will confirm that
your line is ready to go
Engineer Visit
1. The engineer will change your telephone socket and connect the modem for you.
2.
Connect the black Ethernet cable, provided, to the modem:
Reconfigure your current equipment
1. Disconnect any broadband filters from other telephone sockets.
Page 21
EE Bright Box User Manual
21
2.
If you have a telephone cable reconnect it directly to the telephone socket
3.
Disconnect the grey broadband cable from the Bright Box.
4.
Remove any Ethernet cables currently connected to the red WAN port, reconnect the
Ethernet cables to another available port (LAN1, LAN2 or LAN3)
Connect and turn on your router
Plug the other end of the black Ethernet cable connected to the modem into the red WAN
port on your router:
Check it over
Everything should now look like this:
The power light will go green, the broadband light will go green once you’ve completed the
next steps.
Page 22
EE Bright Box User Manual
22
Six simple steps to move
1. Open a web browser (you will not be connected to the Internet)
2.
Type http://192.168.1.1 into the browser address bar and click go. Your username is
admin and the password is on your ‘KEEP MEE’ card or on the sticker on the bottom of
your router.
3.
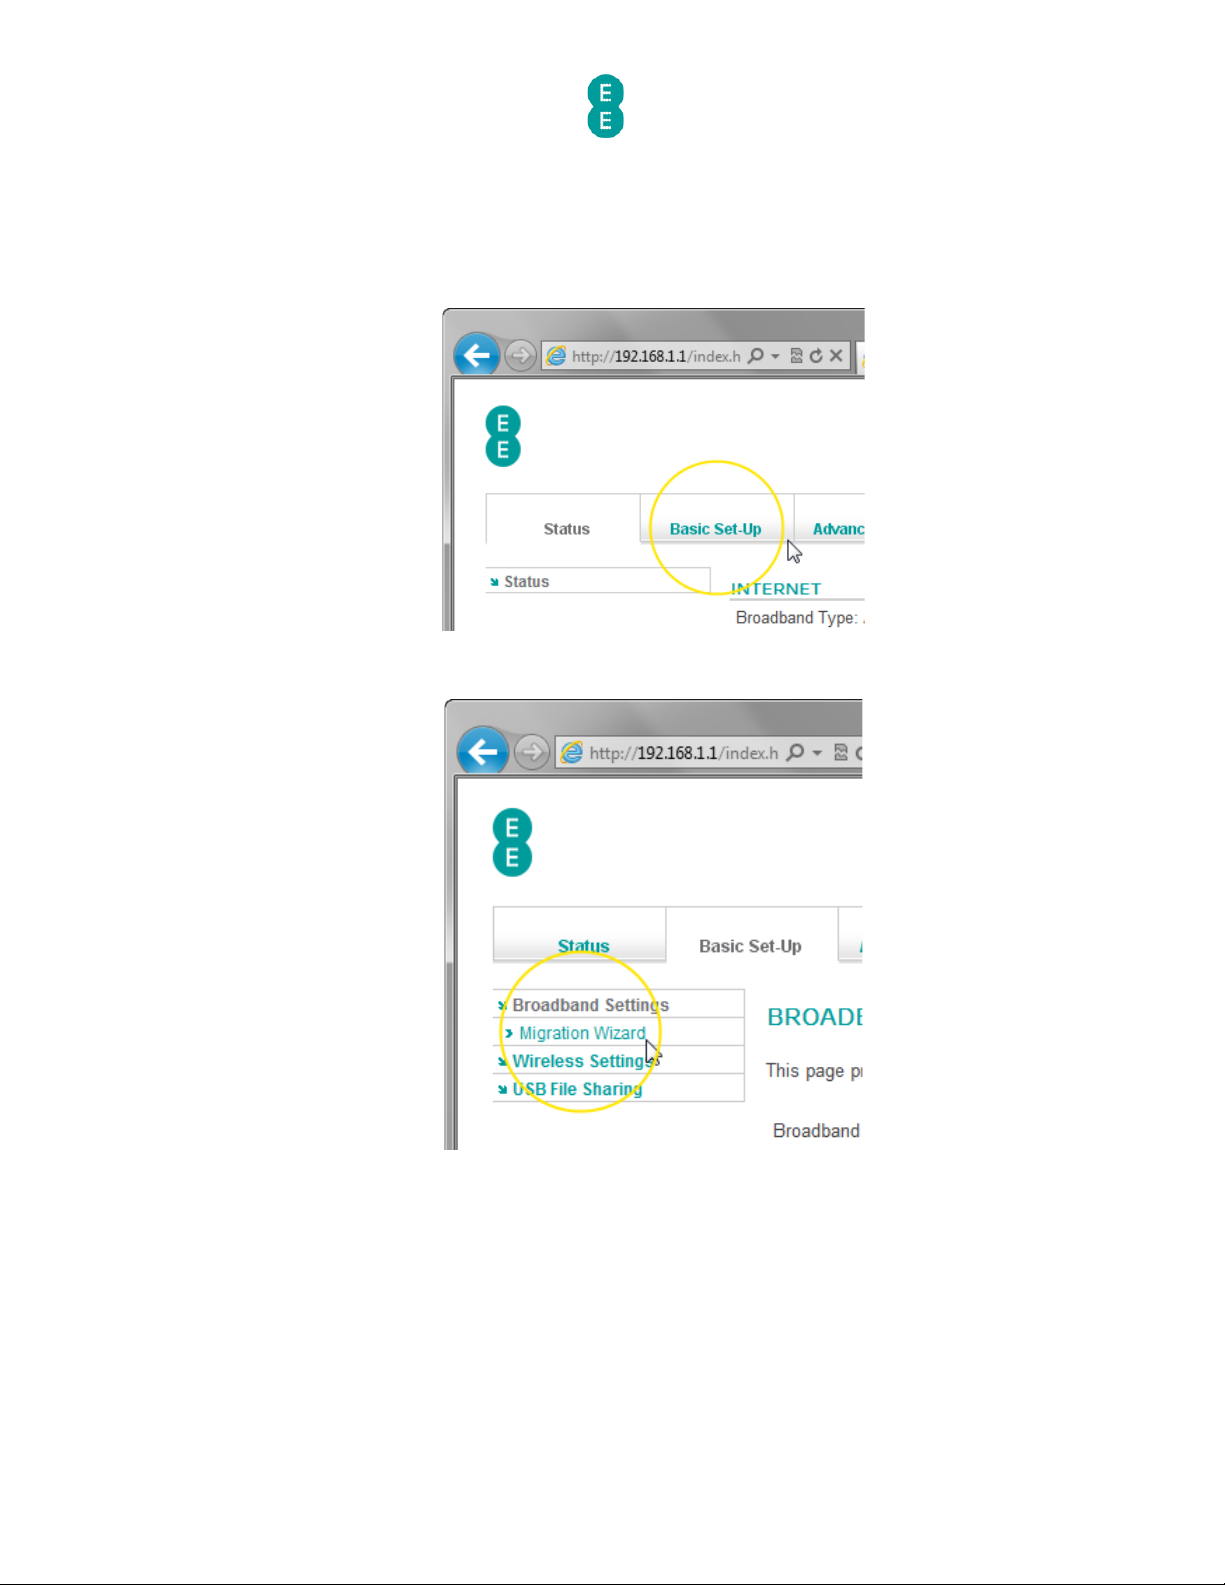
Select the Basic Set-Up tab at the top of the screen.
4.
Select the Migration Wizard from the menu on the left hand side menu:
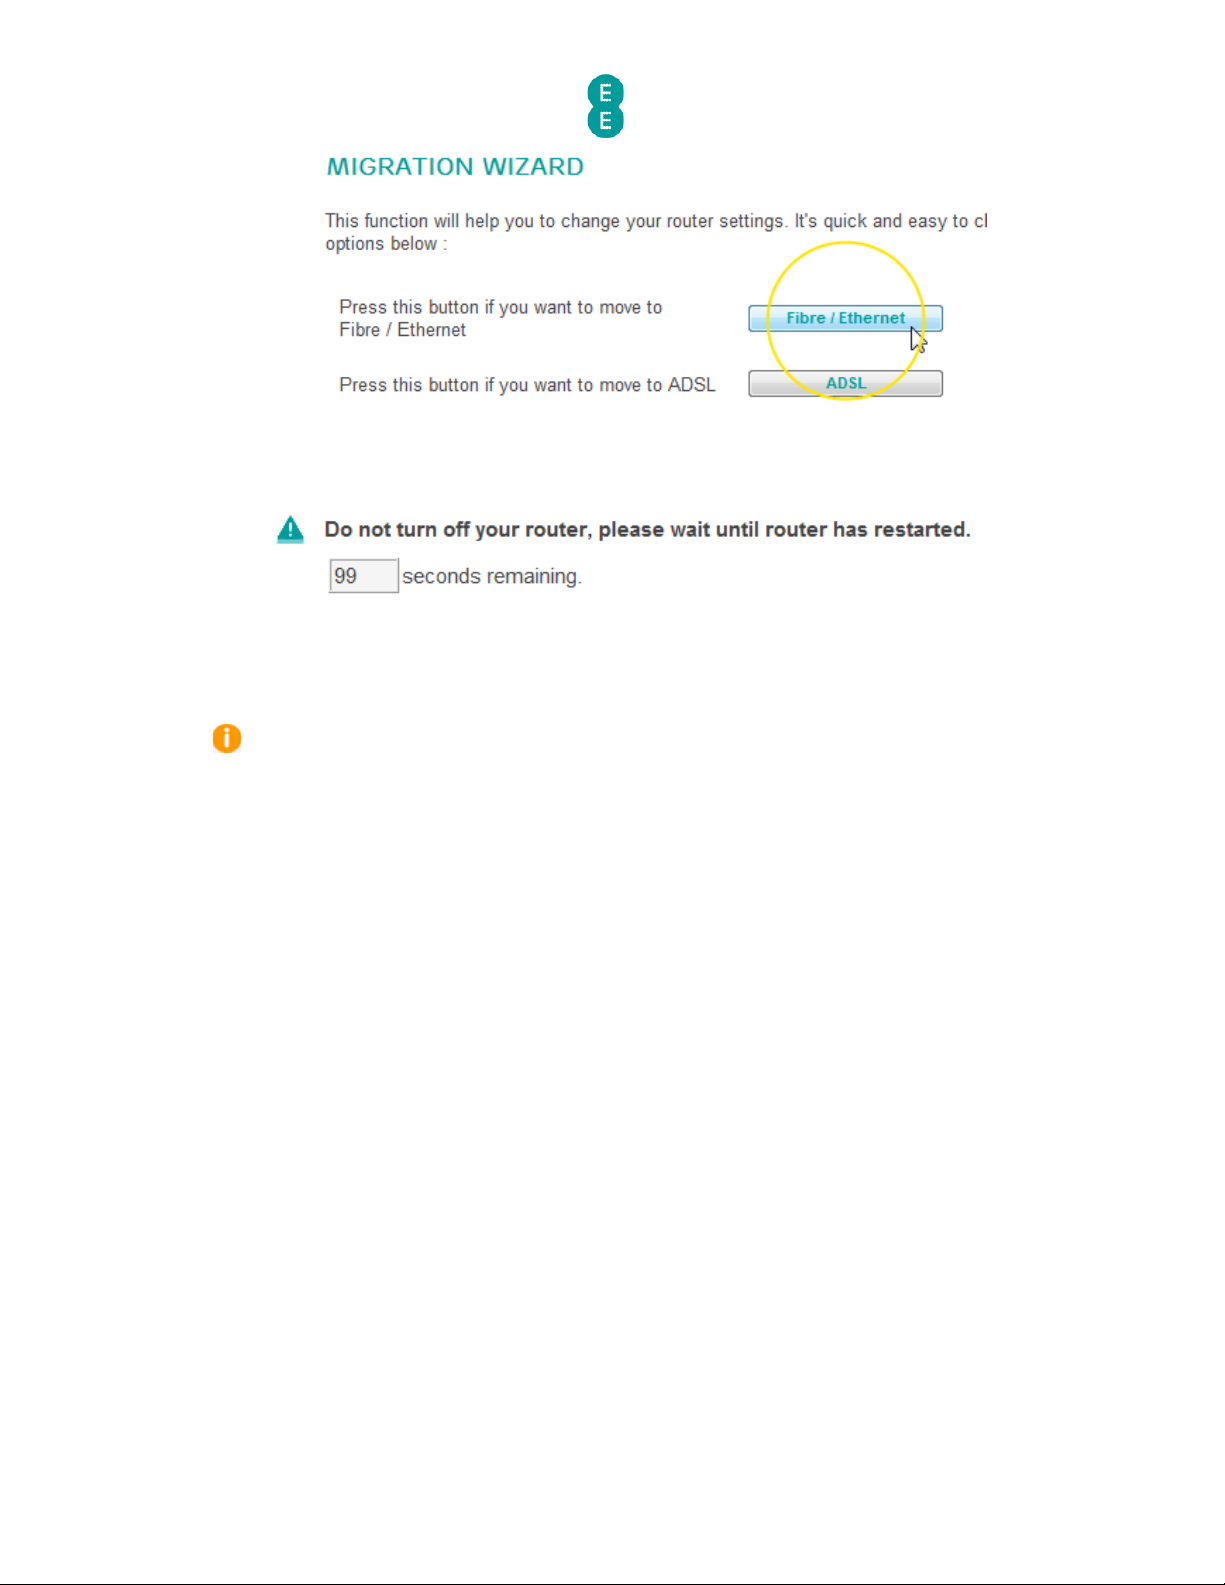
5. Press the Fibre/Ethernet button.
Page 23
EE Bright Box User Manual
23
6.
Press OK on the warning pop-up. The migration countdown will begin. You can now
close your browser.
Your Fibre broadband is being set up
This will take up to 5 minutes, so relax and let us do the leg work.
Please note that if
you're redirected to the ‘Nearly there!’ holding page in your browser,
you may need to wait a few more minutes for us to set up your router.
If after 5 minutes, the
‘Nearly there!’ text is still visible when you reopen your browser window, reboot your PC and
then reopen the browser window again, you should now be able to view web pages. If this still
doesn’t work, you can manually enter your broadband username and password in the router
user interface and make a connection to the Internet (see
how to manually update the
broadband username and password
on page 52)
You can now connect your devices
You can now connect your devices to your Bright Box router. Choose either wireless or wired
connection and follow the steps on page
s 23 and 25
SETTING UP A WIRED CONNECTION TO YOUR BRIGHT BOX
To set up a wired (Ethernet) connection between your computer and the Bright Box Wireless
Router, follow the steps below:
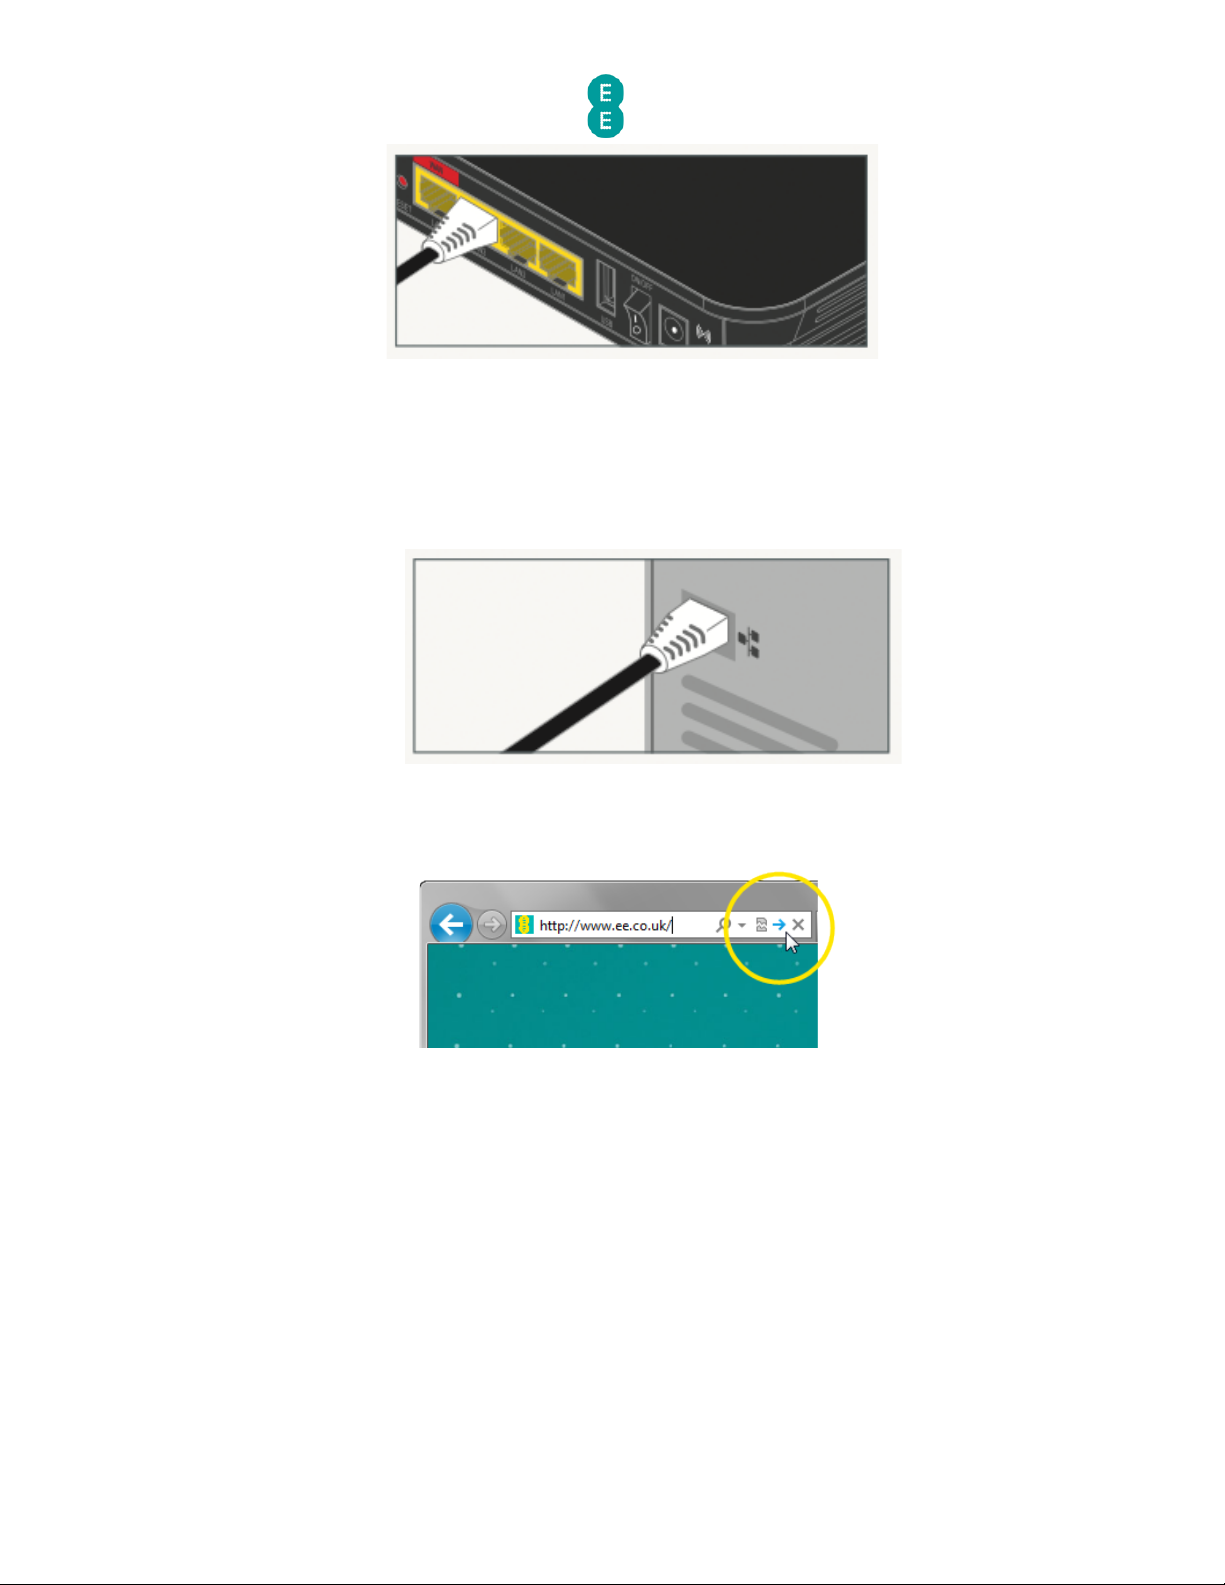
1.
For ADSL broadband, plug one end of the black Ethernet cable into any of the four yellow
Ethernet sockets on the back of your Bright Box Wireless Router
:
Page 24
EE Bright Box User Manual
24
2.
For Fibre broadband you should leave the black Ethernet cable connected to the red
WAN port on the Bright Box, but can plug another Ethernet cable into any of the other
LAN ports on the Bright Box (LAN1, LAN2 or LAN3).
3.
Plug the other end into the Ethernet socket on your device. You’ll hear a click when
you’ve connected the cable correctly:
4.
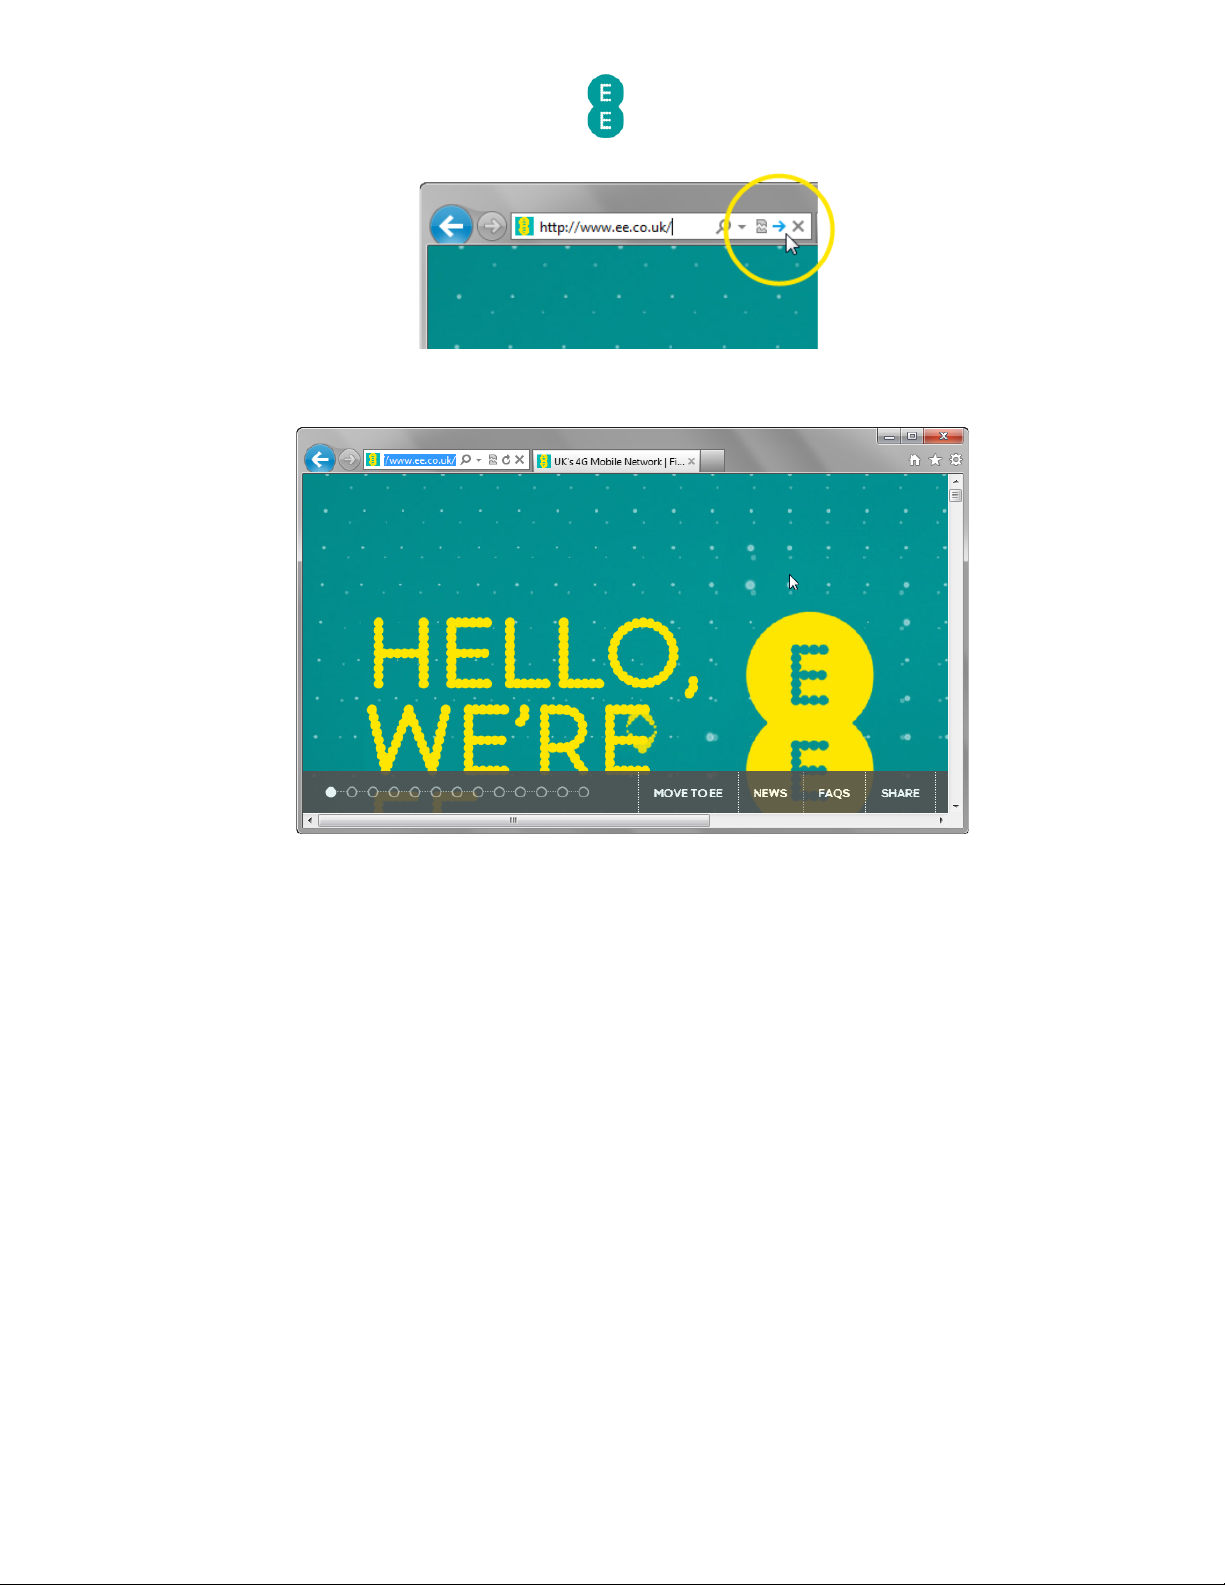
To check your connection, type ee.co.uk into a browser's address bar and click Go:
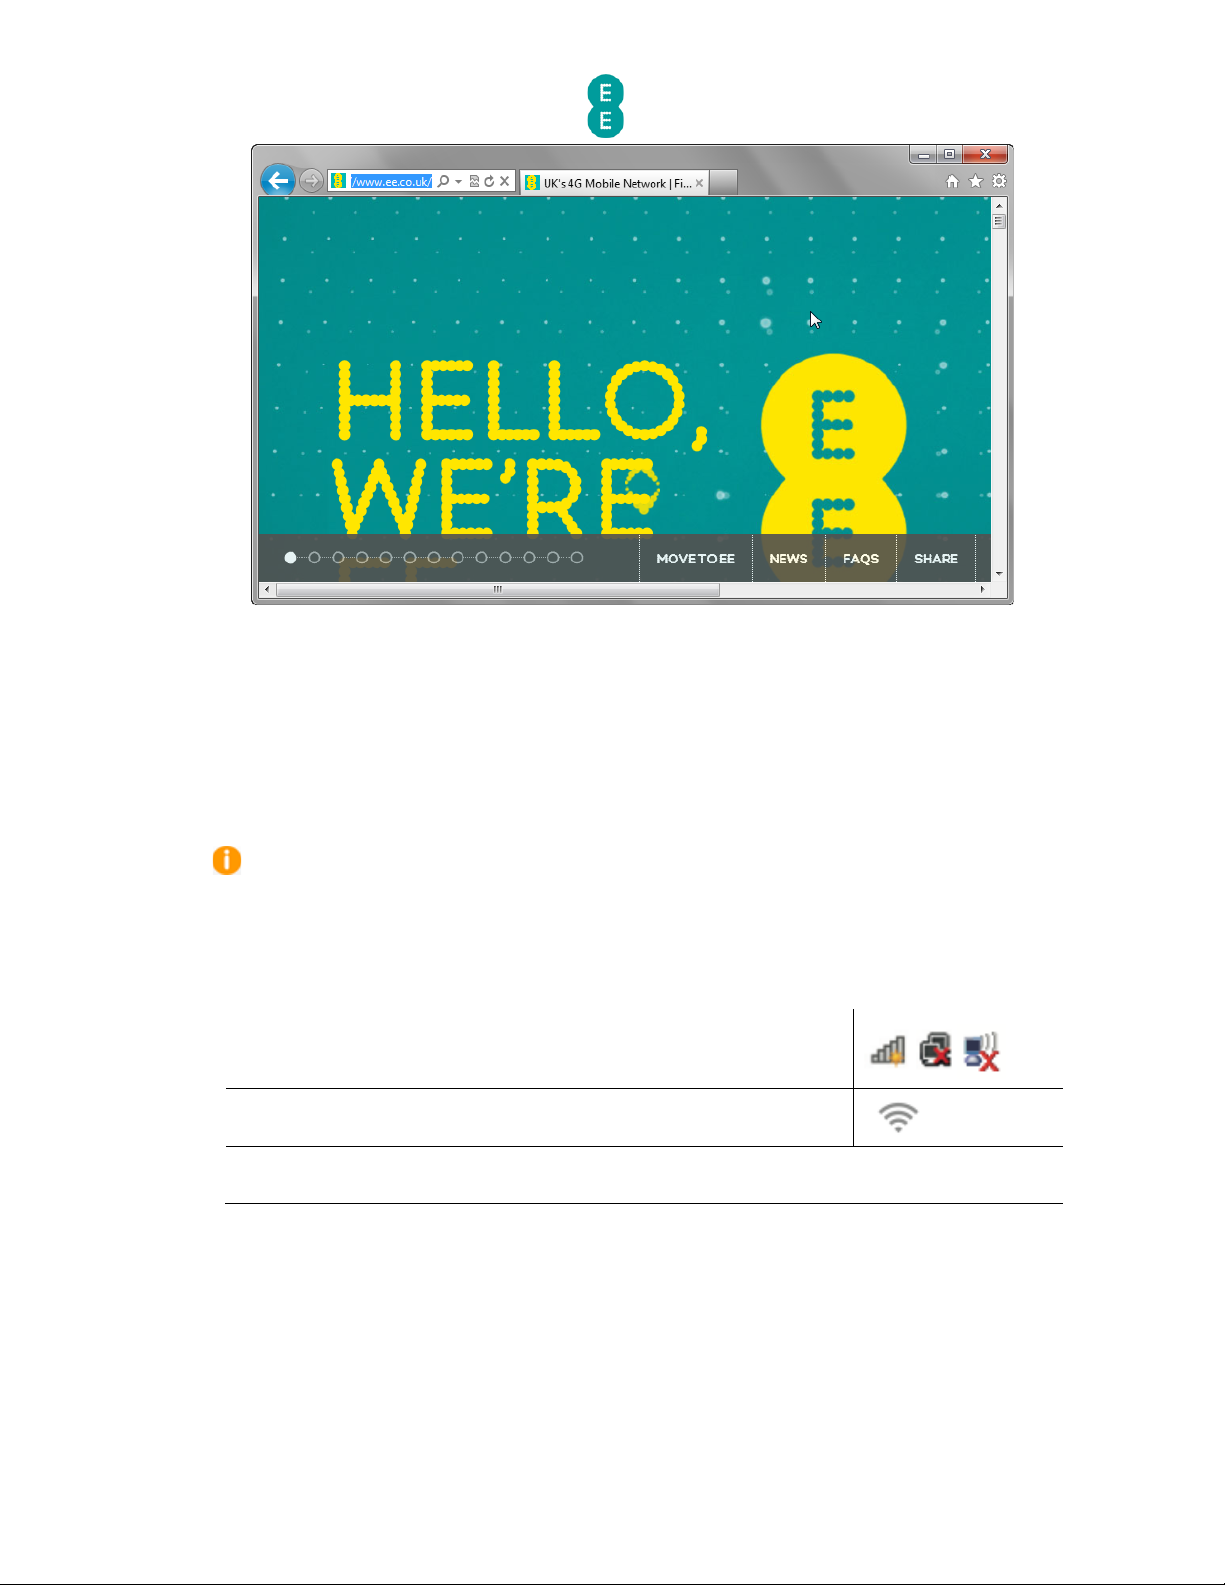
5.
The EE home page will load:
Page 25
EE Bright Box User Manual
25
If you can’t connect or are having problems, repeat all of the steps again ensuring that all
plugs are connected properly. If none of these work give us a call on 0844 873 8586 and
we’ll help get you up and running.
SETTING UP A WIRELESS CONNECTION
To set up a wireless connection to the Bright Box Wireless Router:
Your wireless network name
(SSID) and wireless password can be found on the ‘KEEP
MEE’ card or on the bottom of the router.
1.
If you’re using a wireless adapter, make sure it’s installed correctly and turned on.
2.
Open the wireless software on your device:
Windows – click the network icon in your device’s notification area
– if using Windows Vista, you’ll need to choose ‘connect to network’
Apple Mac – click the ‘AirPort’ icon in the menu bar
Other Devices – the list can usually be found in the settings menu next to ‘wireless’,
‘manage connections’ or ‘networks’
3. Look for your wireless network name in the list of networks.
4.
Select ‘connect’ or ‘join’ on your wireless network and when prompted enter your
wireless password.
5.
You should now be connected to the wireless network
6.
To check your connection, type ee.co.uk into a browser's address bar and click Go:
Page 26
EE Bright Box User Manual
26
1.
The EE home page will load:
Page 27
EE Bright Box User Manual
27
CHAPTER 4: THE BRIGHT BOX ADMIN PAGES
ACCESSING THE BRIGHT BOX ADMIN PAGES
In order to configure settings on the Bright Box wireless router, you will need to log in and
out of the router’s admin pages using your web browser.
The admin pages will only allow one user (defined by the IP Address of the connected
wireless or Ethernet device) to access the pages at one time. As such if swapping between a
wired or wireless connection on the computer it is advised that you log out of the pages once
you’ve finished the task. If you forget, you’ll receive an error, and need to wait 10 minutes, or
restart the router.
How to log in to the Bright Box admin pages
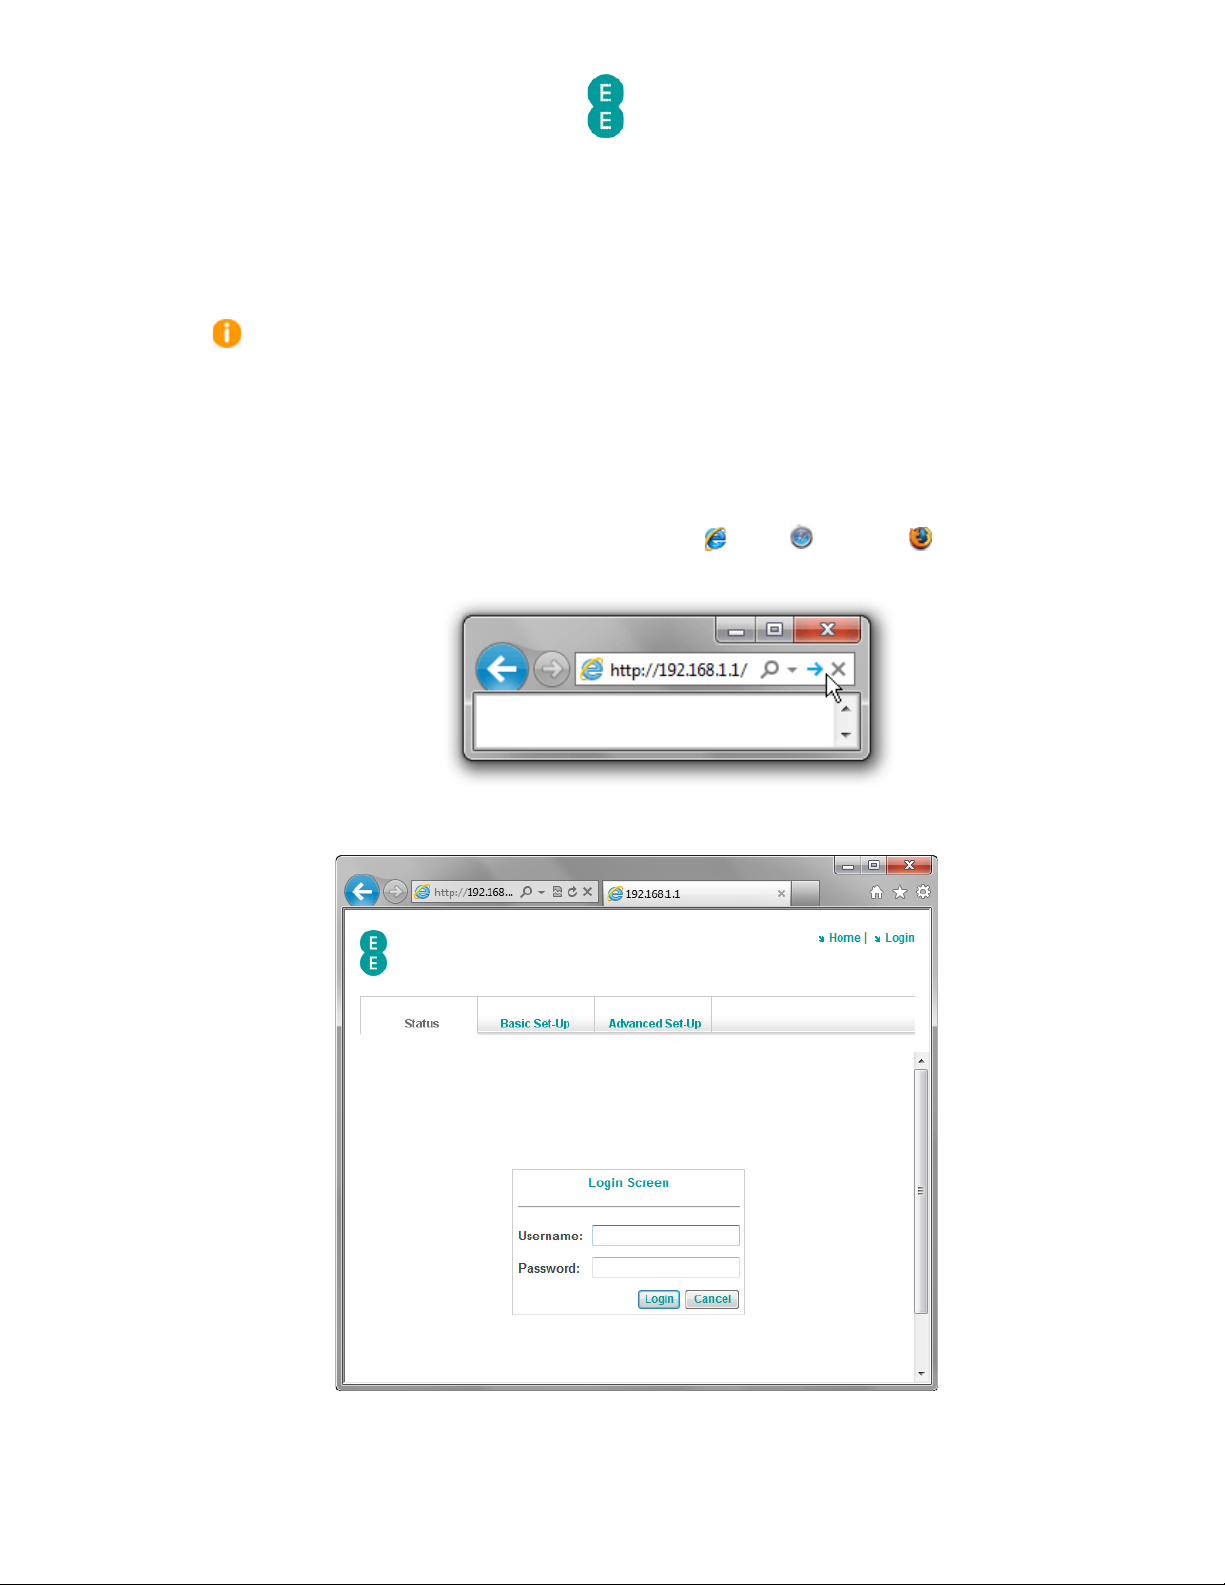
To log into the Bright Box wireless router admin pages:
1. Open a browser, for example Internet Explorer Safari or Firefox .
2.
In the address bar type, http://192.168.1.1
3.
The router’s admin page login will open:
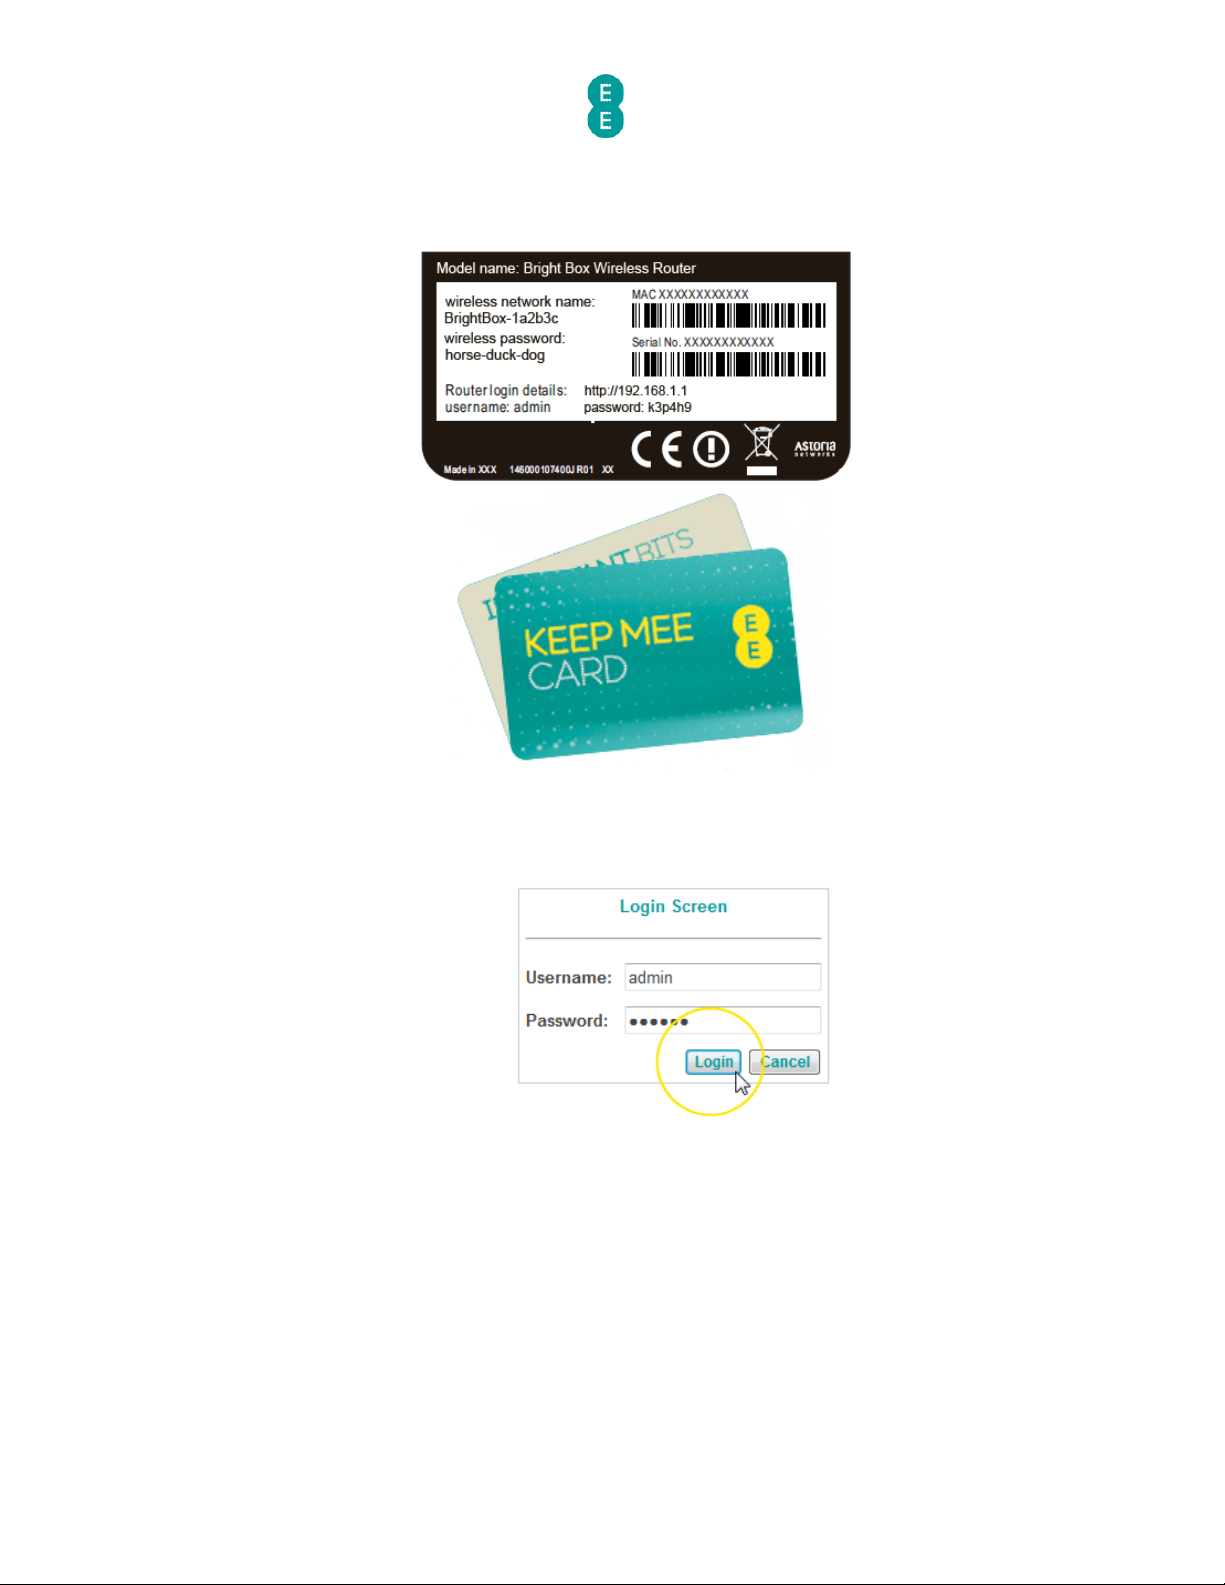
4.
Enter the Username and Password to login to the router admin pages:
Page 28
EE Bright Box User Manual
28
a. The Username is admin
b.
The Password can be found on the sticker on the bottom of the router (in the
Router Login Details section) and on
the ‘KEEP MEE’ card.
5.
Click L ogin
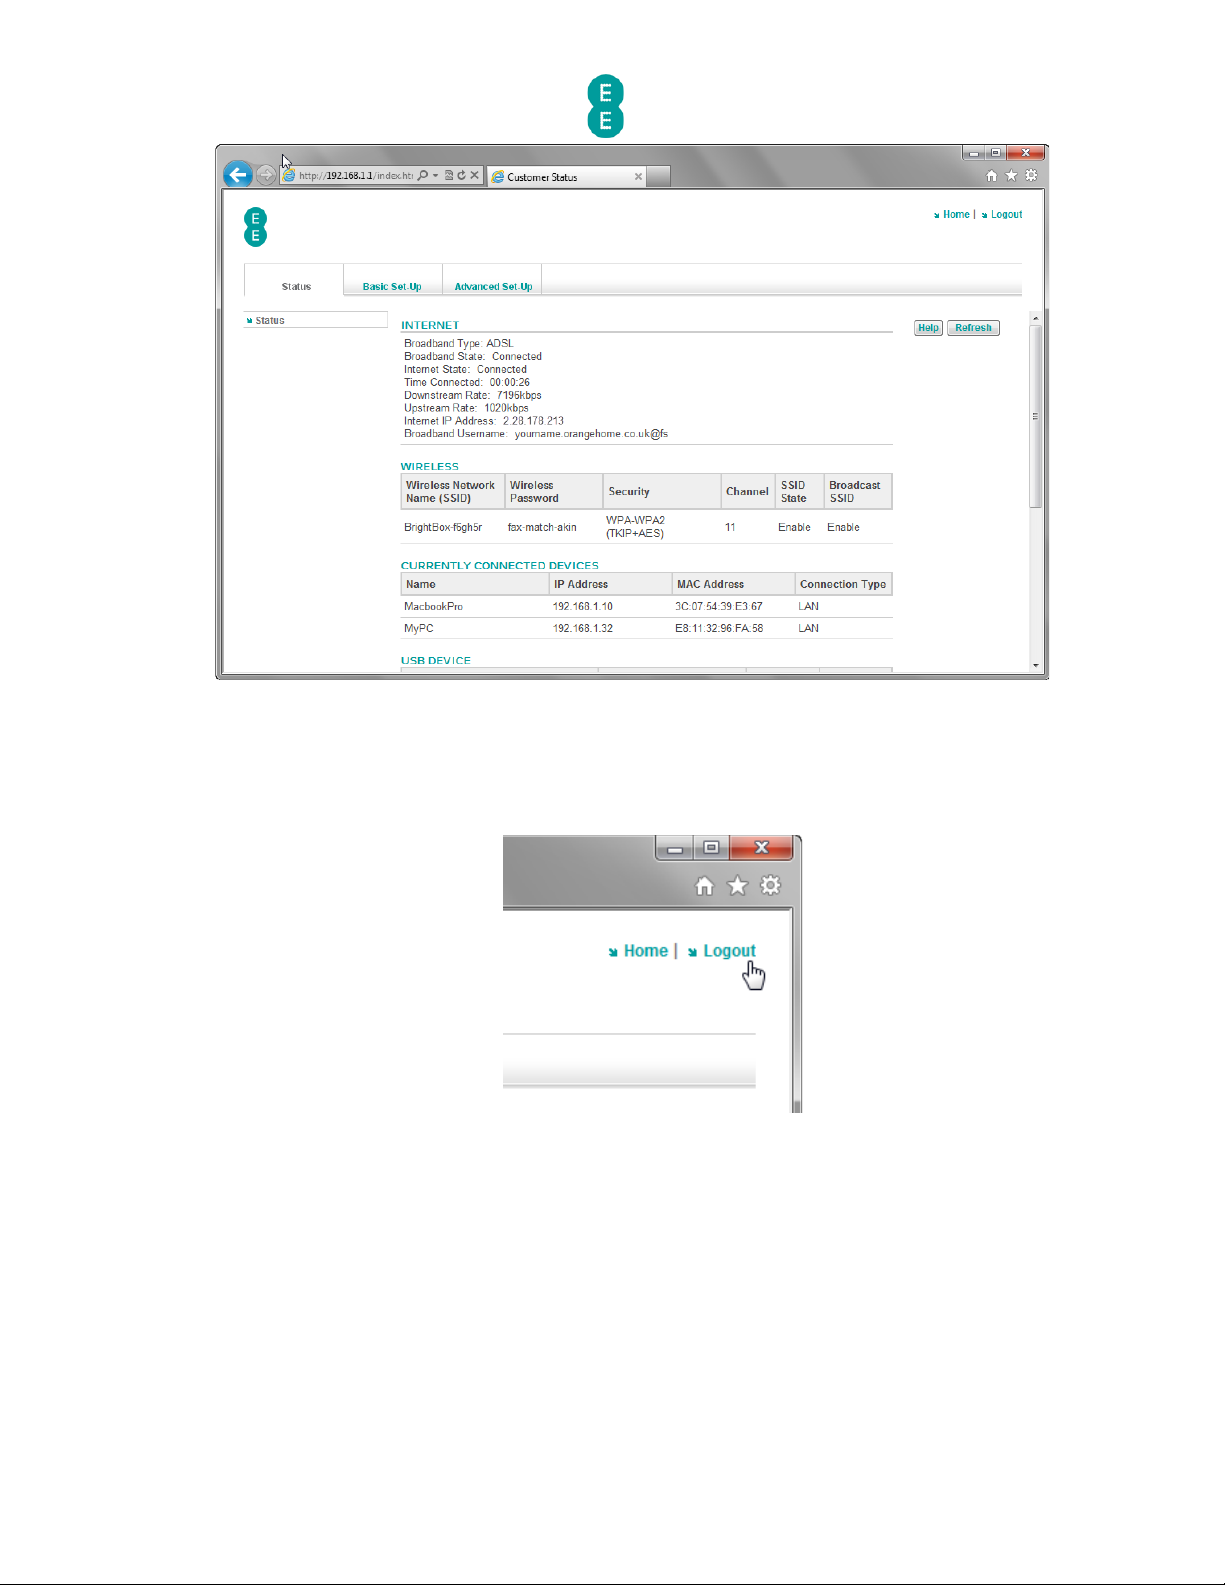
6.
The Bright Box ‘status’ page will be displayed:
Page 29
EE Bright Box User Manual
29
How to log out of the Bright Box admin pages
To logout of the router's admin pages:
1.
Click Logout – you’ll find this in the top right-hand corner of the router’s admin pages:
2.
You’ll be taken back to the login screen:
Page 30
EE Bright Box User Manual
30
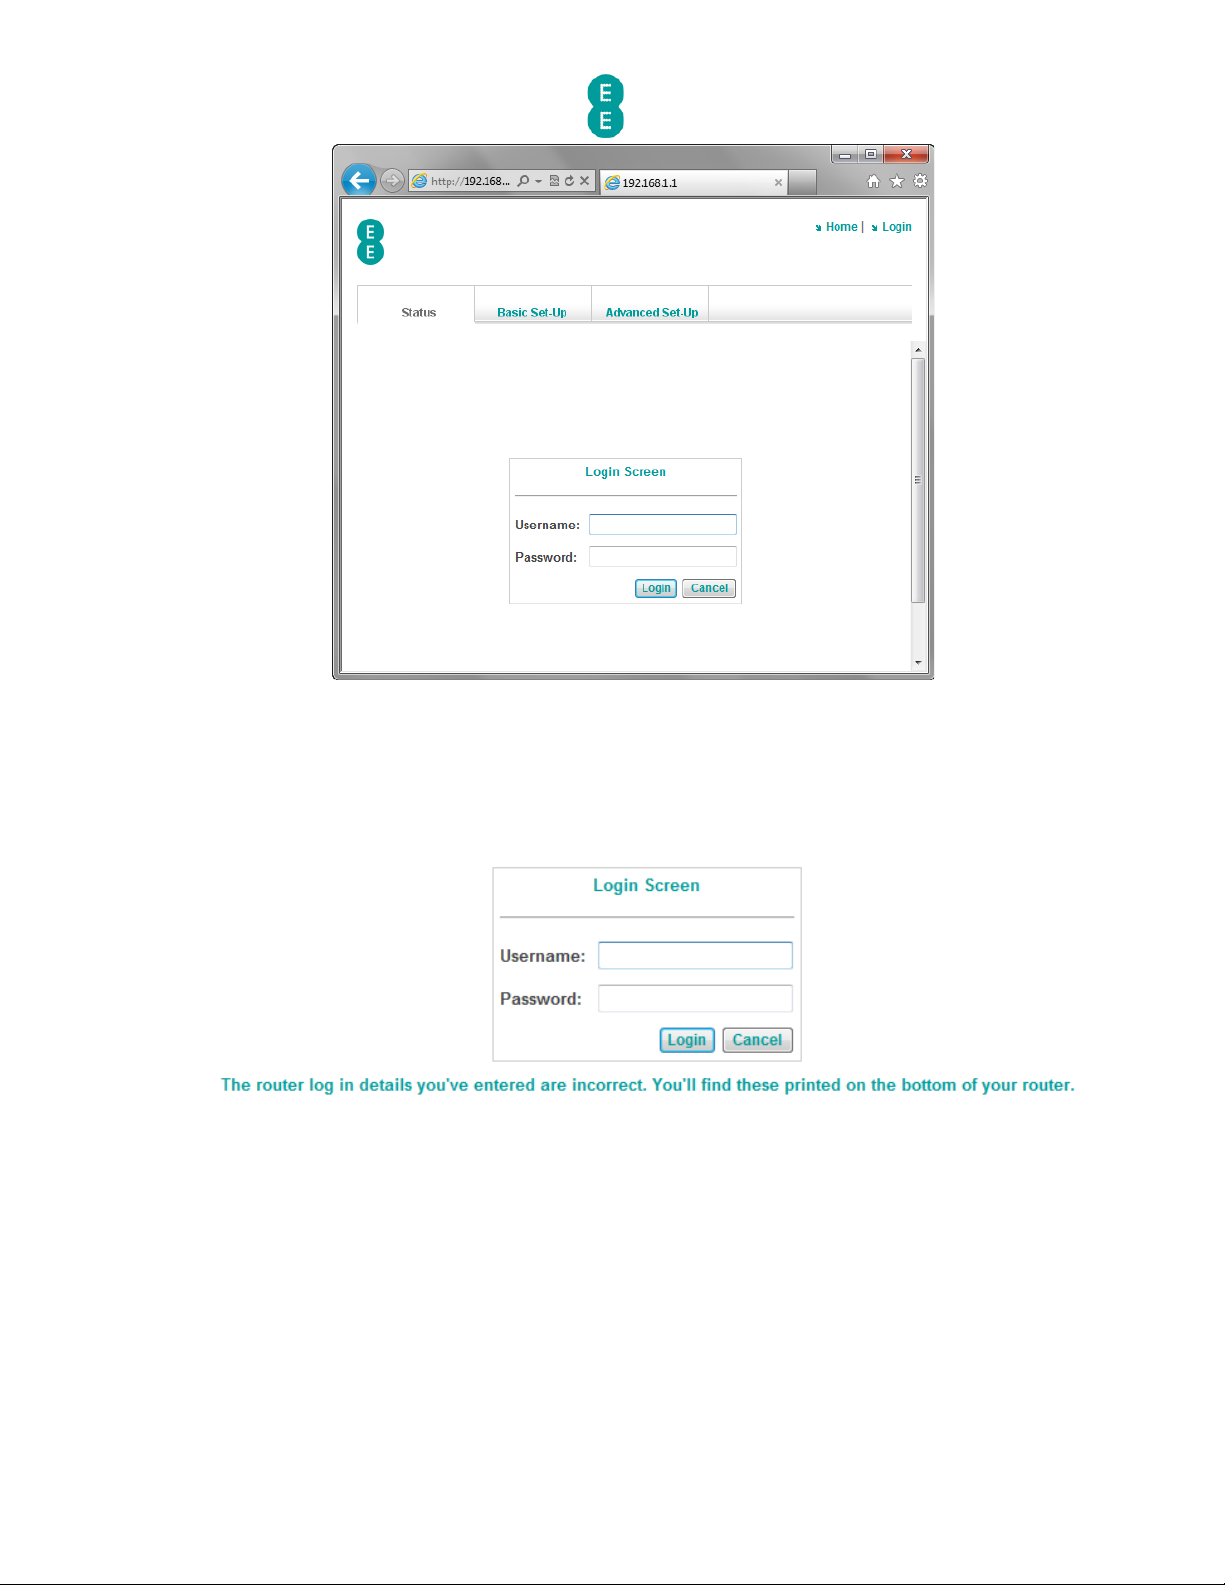
Possible Errors displayed when logging into the admin pages
You may experience one of the errors below while logging onto the admin pages:
‘The router log in details you’ve entered are incorrect. You’ll find these printed
on the bottom of your router
’
You’ll get this error if the username and/or password for the router’s admin pages have been
entered incorrectly or left blank.
Remember that the username and password are case sensitive
ensure that the Caps Lock on
your computer keyboard is not on when attempting to log on.
Close the browser window, and then
try to log on again using the details below:
• Username: admin
• Password: This can be found on the sticker on the bottom of the router (in the router
login details section) and on the ‘KEEP MEE’
card.
If you think you may have changed the password
for the router in the Advanced Set-Up >
System
> Password Settings page, and can’t remember the new password, you will need
to return the router to factory settings
using the reset button on the back panel of the router
(see
how to restore the router to it’s default settings
on page 179)
Page 31

EE Bright Box User Manual
31
Please note that you will lose any custom router settings you previously configured if you
factory reset the device using the reset button.
‘Duplicate Administrator – The device is managed by 192.168.1.xx currently’
The admin pages will only allow one user (defined by the IP Address of the connected
wireless or Ethernet device) to access the pages at one time.
You can prevent this error by logging off from the admin pages before using another
computer, or before switching between a wired and wireless connection on the same
computer.
To fix the error:
• Return to the computer (or connection type) that you were previously logged in using,
and logout.
• Turn the router off, then back on again
– the other computer will be logged out
immediately.
• Wait 10 minutes for the previous session to time out.
By default, it will
take 10 minutes for the session to time out before you can login on
another computer. Restarting the router will clear the session time out and allow you to log
back in immediately. You can change this session time out period in the Password Settings
page under Advanced Set
-Up > System in the router admin pages.
If this doesn’t fix the problem, or you believe that somebody else may be accessing your
admin pages:
• Change the login
password for the router to something different (in the Password
Settings
page under Advanced Set-Up > System in the admin pages)
• You may also like to check that wireless security is turned on, and change to WPA, and
change your WPA wireless security key
to something new (see
Wireless Settings
on
page 59
)
NAVIGATING THE BRIGHT BOX ADMIN PAGES
After logging into the Bright Box in your web browser, you can access each of the router
admin pages
by a combination of navigating the three tabs at the top of the page, and the
Page 32

EE Bright Box User Manual
32
left-hand column navigation menu. An example below shows the navigation elements as they
appear
in the basic set up > Wireless Settings page:
There are three main sections in the admin pages that are accessible by clicking on the
navigation tabs:
Section
Description
Status
This section consists of a single page that displays the
Bright Box status for Internet connectivity, wireless
connection status, currently connected device list (DHCP
table), USB device status and other LAN and WAN
settings.
Basic Set-Up
The section contains configuration pages for Broadband
Settings, Migration Wizard, Wireless Settings, Wi
-Fi
Protected Setup (WPS) settings and USB File Sharing
configuration.
Advanced Set-Up
This section contains advanced configuration pages for
Broadband Settings, ADSL Mode, Migration Wizard,
Wireless Settings, wireless channel and SSID (including
multiple SSID and VLAN binding), WEP, WPA, 802.1x,
wireless Bandwidth Control, USB File Sharing, Mobile
Broadband, DHCP settings, NAT, Address Mapping, Port
Forwarding (also known as Port Mapping), Port Triggers,
NAT Mapping table, Firewall, Access Control,, MAC
Filtering, URL Blocking, Schedule Rules, Intrusion
Detection, DMZ, Quality of Service (QoS), Traffic Mapping,
DiffServ Groups, WMM, UPnP, Backup and Restore
Configuration, Restart Router, Factory Default, Firmware
Upgrade, System Settings, Time Settings, Password
Settings, DDNS, ADSL Status and System Log.
Page 33

EE Bright Box User Manual
33
Some of the navigation menu pages are nestled underneath other headings according to
category. Click on the heading to view the associated sub
-pages and then click on the sub-
page heading to view the specific configuration page.
The example below displays the Channel and SSID
/WEP/WPA/802.11x/Bandwidth
Control
sub-pages nestled underneath the Wireless Settings category in the Advanced
Set
-Up tab:
Default Menu View:
View when clicking on the Wireless
Settings category:
BRIGHT BOX ADMIN PAGE DESCRIPTIONS
This section provides a description of the admin pages in the Bright Box router user interface,
by navigation tab section.
If the section name is preceded by a ‘>’, this indicates that the
section is nestled under a higher
-level menu item in the navigation menu.
Status tab
Section
Description
Status
This page displays the Bright Box status for internet
connectivity, wireless connection status, currently
connected device list (DHCP table), USB device status and
other LAN and WAN
settings. This is the first page
displayed after logging into the Bright Box admin pages.
Basic Set-Up tab
Section
Description
Broadband Settings
This page contains basic settings to connect to your
EE
broadband service. Two network types can be
configured here
– ADSL and Fibre/Ethernet. The
Page 34

EE Bright Box User Manual
34
Broadband Username and Password can be found
here, as well as ISP settings, DNS and MTU settings.
> Migration Wizard
This page contains a wizard that allows you to
change the default router configuration to work on
either EE Fibre broadband or EE ADSL broadband
services.
Wireless Settings
This page contains basic settings to configure your
wireless network. The wireless mode, channel,
wireless network name (SSID), wireless password,
broadcast SSID, security type and security modes
can be configured here.
You can also refresh the
Intelligent Wireless channel on this page.
> Wi-Fi Protected Setup
This page allows you to enable or disable the Wi-Fi
Protected Setup (WPS) capability on the router. This
option is disabled by default. You can also find the
WPS PIN and Push Button Configuration (PBC)
settings here.
USB File Sharing
This page contains basic settings to configure the
USB File Sharing
feature on the Bright Box router.
The Auto Sharing feature is enabled by default. The
Workgroup Name, Security Control and File
Permission settings can be set here.
Advanced Set-Up tab
Section
Description
Broadband Settings
This page contains more advanced settings for
configuring your EE
broadband service. It includes
the settings found in the Basic Set
-Up page and
additional settings such as Connection Type, Idle
Time, Authentication Protocols
and an option to
manually connect/disconnect your Internet
connection.
> ADSL Mode
This page contains options to manually configure
the ADSL connection mode on your router. By
default this is ‘Automatic’. but settings can be
changed in order to assist connection
troubleshooting.
> Migration Wizard
This page contains a wizard that allows you to
change the default router configuration to
work on
either EE Fibre broadband or EE ADSL broadband
services.
Wireless Settings
This page allows you to enable or disabled the
wireless LAN (WLAN) on the Bright Box router.
You
can also refresh the Intelligent Wireless channel on
this page.
> Channel and SSID
This advanced page allows you to set the Wireless
Mode (b/g/n, b/g, n only modes), Primary and
Secondary Channels, Wireless Bandwidth (20MHz
and 20/40 MHz modes), create multiple SSID’s and
bind SSID’s to a virtual LAN (VLAN) to create
isolated wireless networks
Page 35

EE Bright Box User Manual
35
> WEP
This advanced page allows you to configure the WEP
wireless security
settings for any of the transmitting
SSID’s. Settings include the WEP mode (64 or 128
-
bit), Key Entry type (Hex
or ASCII), WEP passphrase
and WEP key generation.
Please note that WEP security can only be
configured with the router set to
‘11b+11g’ wireless
mode.
> WPA
This page contains settings allowing you to
configure the WPA wireless security settings for any
of the transmitting SSID’s. Settings include WPA
Mode (WPA, WPA2 or WPA/WPA2 Mixed Mode),
Cipher Suite (Auto, AES or TKIP), Authentication
Type (Wireless Password or 802.1x), Wireless
Password type (Passphrase or Hex)
and the WPA
Wireless Password.
> 802.1x
This page contains configuration settings for 802.1x
RADIUS wireless authentication. 802.1x can be
enabled or disabled on this page (disabled by
default). Other settings include re
-authentication
and quiet period times and RADIUS server
parameters.
> Bandwidth Control
This page allows configuration of wireless
Bandwidth Control
for each of the wireless SSID’s.
This allows you to set a maximum throughput limit
for upstream or downstream traffic.
Please note that the QoS module must be enabled
for this feature to work
(see
Bandwidth Control
on
page 112
)
USB File Sharing
Advanced USB File Sharing options can be found in
this page. As with the Basic Set
-Up page, Auto
Sharing option and workgroup names can be
configured here. Additional features include
enabling/disabling Samba, creating user accounts, a
connected USB device list and NAS folder sharing
settings.
Mobile Broadband
Mobile Broadband support can be enabled on this
page, to allow use
of 3G mobile Internet connections
with supported 3G USB dongles. The page displays
the
current 3G connectivity status and PIN codes.
Please note that this is currently only a beta feature.
DHCP
This page contains configuration options for DHCP
in order for the router to dynamically allocate IP
addresses to your client PC’s. The DHCP server can
be enabled/disabled on this page and DHCP address
reservation set
-up. Other settings such as
Gateway/Subnet IP addresses, Lease Time, Domain
Name and DHCP Start/End ranges can be configured
here.
NAT
The NAT (Network Address Translation) setting can
be disabled/enabled on this page. Please note that
this feature is enabled by default.
Page 36

EE Bright Box User Manual
36
> Address Mapping
This page contains an Address Mapping table that
allows LAN IP addresses ranges to be mapped to
particular Internet IP addresses in order to isolate
internal networks.
EE
does not currently support this feature.
> Port Forwarding
This page allows you to configure the Port
Forwarding (sometimes
known as Port Mapping)
feature on the router so that remote users accessing
local services such as a
Web or FTP server can be
automatically redirected to the correct local IP
address. Up to 20 Port Forwarding entries can be
created on this page.
> Port Triggers
This page allows you to configure Port Trigger
services so that applications requiring multiple
connections can open the correct ports for inbound
traffic when the application calls on a specific
‘trigger port’. Up to 10 Port Triggering entries can be
created on this page.
> NAT mapping table
This page contains a table that displays a list of the
current port forwarding mappings.
Firewall
The Bright Box firewall features (Access Control,
MAC Filter, URL Blocking, Schedule Rule, Intrusion
Detection, DMZ) can be disabled and enabled from
this page.
> Access Control
This page contains settings to allow you to define
individual traffic types permitted or not permitted
from the Internet to devices on your local network.
The overall access control feature can also be
disabled or enabled from this page. Up to 10 device
access control rules can be created.
> MAC Filter
MAC Filters (also known as MAC Address Controls)
can be configured from this page for up to 32
devices. When a MAC filter is configure, only those
devices listed in the table can access your network.
> URL Blocking
You can block access to individual web sites by URL
or keyword on this page. Please note that an Access
Control filter with ‘WWW with URL Blocking’ must be
created for a particular device in order for URL
Blocking
to occur.
> Schedule Rule
This page allows configuration of Schedule Rules for
Access Control filters. You can configure rules to
apply for certain days and times and then associate
the rule with a particular Access Control in the
Access Control page.
> Intrusion Detection
This page allows the configuration of the Stateful
Packet Inspection (SPI) element of the router
firewall which is enabled by default. The SPI and
Anti
-DoS protection can be disabled or enabled on
this page as can individual SPI settings. The page
also allows you to configure the ‘Discard Ping to
WAN Interface’ option.
> DMZ
If you have a local client device that cannot run an
Page 37

EE Bright Box User Manual
37
Internet application properly from behind the
firewall, you can configure that device to have
unrestricted two
-way Internet access by defining a
virtual DMZ host on this page.
QoS
The Quality of Service (QoS) setting can be enabled
or disabled on this page. QoS is disabled by default,
but if enabled can allow you to configure particular
traffic types (for example gaming traffic) to have
priority over others.
> Traffic Mapping
You can configure up to 16 different Traffic
Mapping rules that classify different types of traffic
into forwarding groups from Highest to Lowest. For
example you can create a class for Online Games
with a traffic priority of ‘Highest’
> Diffserv Groups
You can configure each of the 8 DiffServ priority
groups (from Highest to Lowest) on this page.
Guaranteeing a minimal bandwidth percentage for
each group, associated with Traffic Mapping rule
priorities.
> WMM
You can enable and disable the WMM (Wi-Fi
Multimedia) setting on this page. This is enabled by
default and allows better quality multicast
(video/audio)
streaming over the wireless network
for supported applications.
UPnP
This page allows configuration of the Universal Plug
and Plug (UPnP) feature
in the router. This is
enabled by default and allows compatible network
devices to discover each other over the local
network and automates port forwarding for UPnP
supporting applications.
Tools
This page contains a ‘Please use these functions
with caution’ message.
> Configuration
This page allows you to backup the current
configuration settings of the router to a backup file.
The page also allows you to restore previously saved
configuration settings from a backup file.
> Restart
The router can be restarted (rebooted) from this
page.
> Factory Default
The router can be restored to factory default
settings (factory reset) from this page. Please note
that if the router is factory defaulted, any custom
configuration settings will be lost.
> Firmware Upgrade
The router firmware version can be upgraded from
this page by uploading a firmware file from a
connected computer.
System
This page contains the current Bright Box Runtime,
Boot, ADSL and Hardware versions, as well as the
router Serial Number, LAN and Wireless MAC
addresses.
> Time Settings
This page allows you to enable or disable the
Automatic Time Server Maintenance
to ensure the
Page 38

EE Bright Box User Manual
38
router time (as displayed in the System Log) is
always correct.
> Password Settings
You can configure the password to access the
router admin pages in this page. Please ensure you
have the current password to hand in order to make
this change. The admin page idle time out setting
can also be configured here.
> DDNS
This page allows you to configure the Dynamic DNS
settings to allow you to map a static domain name
(from DynDNS.com or TZO.com) to a dynamic IP
address. Please ensure you have setup an account
with DynDNS or TZO in order to use this feature.
> ADSL Status
This page displays statistics on your ADSL
broadband
connection, including Line Status, Link
Type, Operation Mode, ADSL sync data rate in Kbps,
Noise Margin, Attenuation, Error correction and cell
statistics.
> System Log
This page displays a log containing system events
such as administration login/logout and broadband
connection activities. You can save the log as a text
file or clear the log from this page.
MAKING CONFIGURATION CHANGES
Once you have made a configuration change on any Bright Box admin page, and you are
happy to proceed with the change click the Save Settings
button at the bottom of the page
to apply the change to the router:
An
‘Applying changes. Please wait. The process may take up to 30 seconds. If you are making
wireless changes you may need to reconnect to the wireless network
’ message may appear in
the browser window.
Once this change is applied, you will be returned to the page you were
previously configuring:
If you are making changes to the router settings over a Wi
-Fi connection you may need to
reconnect to the Bright Box wireless network after making those changes. This particularly
applies to any changes made to Wi
-Fi settings in the Basic Set-Up > Wireless Settings,
Basic Set
-Up > Wi-Fi Protected Setup, Advanced Set-Up > Wireless Settings,
Advanced Set
-Up > Channel and SSID, Advanced Set-Up > WEP, Advanced Set-
Up
> WPA, Advanced Set-Up > Bandwidth Control or Advanced Set-Up > 802.1x
pages.
Page 39

EE Bright Box User Manual
39
If you are having problems reconnecting after a change to the router’s wireless settings
you may also need to delete your old wireless network location for the Bright Box in Windows
or Mac OS X before trying again.
If you have accidently made a configuration change or multiple changes on an admin page
(and have not clicked Save Settings),
and you wish to cancel that change, click the cancel
button at the bottom of the page
:
You cannot cancel
a configuration change on a page after clicking the Save Settings
button as Save Settings
will apply the change to the page. If you click Save Settings and
then want to roll back on a previous setting, you will need to change that setting yourself and
click Save Settings
again to re-apply.
HELP PAGES
You can display contextual help information on admin pages by clicking the Help button on
any page:
This will open a window with the relevant help information for that particular admin page:
Page 40

EE Bright Box User Manual
40
CHAPTER 5: THE BRIGHT BOX STATUS PAGE
The status page is where you'll find all the information you need about the status and
settings on your router.
The status page is made up of five separate sections
– Internet, Wireless, Currently
Connected Devices, USB
device and Information.
The status page will automatically refresh every
15 seconds, however you can manually
refresh the page by clicking the refresh
button at the top of the page:
The follow sections describe the elements of the status page in more detail.
INTERNET STATUS
In this section you can check your Internet connection status, speed of your connection and
how long you’ve been connected for.
Page 41

EE Bright Box User Manual
41
Field
Description
Broadband Type
For EE ADSL broadband connections, this field should
display a value of ADSL. For EE Fibre broadband
connections a value of ‘Fibre/Ethernet’ should be
displayed. If the wrong Broadband Type is displayed, you
can migrate to the correct type (ADSL or Fibre/Ethernet)
on the
Basic Set-Up > Broadband Settings >
Migration Wizard page.
Broadband State
This field indicates the status of the ADSL broadband
connection. The field will display ‘Connected’ if the router
has successfully synchronised with the exchange. The
field will
display ‘Disconnected’ if the router is unable to
detect a broadband signal or is still synchronising with the
exchange.
If this field displays ‘Disconnected’ please check your grey
broadband cable is connected to the DSL socket on your
router and the other end of the cable is connected to the
DSL socket on the telephone filter. Ensure the filter is
connected to the master telephone socket.
Also see
chapter 8: troubleshooting
on page 198
For Fibre broadband customers a value of ‘N/A’ will be
displayed here.
Link Rate
(Fibre/Ethernet
Broadband Type
Only)
This field displays the physical link speed of the
Fibre/Ethernet connection. The value will generally be
100Mbps.
Please note that this is the physical link rate of
your connection and not the download speed available
over your Fibre broadband service.
This field will only be visible if the
‘Broadband Type’ value
is ‘Fibre/Ethernet’, and should not be visible if you are
using EE ADSL broadband.
Internet State
This field indicates the status of the Internet connection.
If
a connection to the Internet is available then this field
will display a value of ‘Connected’. The field will display a
value of ‘Disconnected’ if the router is unable to establish
a connection to the Internet.
If
this field displays ‘Disconnected’ please check your
Broadband Username and Broadband Password on the
Basic Set
-Up > Broadband Settings page is correct.
Also check the other settings on the Broadband
Settings
page to ensure these are correct for your EE
ADSL connection. Also see
chapter 8: troubleshooting
on
page 198
Time Connected
This field displays the length of time the Internet State
has been in the ‘Connected’ state in
Hours:Minutes:Seconds format. If the Internet State is
Page 42

EE Bright Box User Manual
42
‘Disconnected’ this field will display --:--:--.
Downstream Rate
This field displays the current ADSL synchronisation rate
in kilobits per seconds (kbps) for the downstream
connection. Please note that this is the sync
rate with the
exchange only, and this value may be higher than your
download speeds over the Internet.
This field will display
‘0kbps’ if no Internet connection is
available.
This field will not be visible when the Broadband Type is
‘Fibre/Ethernet’.
Upstream Rate
This field displays the current ADSL synchronisation rate
in kilobits per seconds (kbps) for the upstream connection.
Please note that this is the sync rate with the exchange
only, and may be higher than your upload speeds over the
Internet.
This field will display
‘0kbps’ if no Internet connection is
available.
This field will not be visible when the Broadband Type is
‘Fibre/Ethernet’.
Internet IP Address
This field displays the current Internet (WAN) IP address
automatically assigned to your router by EE. If no Internet
connection is available this will display 0.0.0.0
.
The IP address may also be a static IP address configured
in the Basic Set
-Up > Broadband Settings or
Advanced Set
-Up > Broadband Settings pages,
however this setting is not supported by EE
.
Broadband Username
This field displays your unique Broadband Username as
configured in the Basic Set
-Up > Broadband Settings
or Advanced Set
-Up > Broadband Settings pages.
The Username will
automatically be populated when you
first connect your router to your EE
Broadband line. If the
Username displays readytoconnect@fs then you may need
to configure the Username and Password manually on the
Basic Set
-Up > Broadband Settings page.
If this field is populated with your correct Broadband
Username, but your Internet State displays
‘Disconnected’,
ensure your Broadband Password and other broadband
settings are correct on the Basic Set
-Up > Broadband
Settings
page. Also see
chapter 8: troubleshooting
on
page 198
WIRELESS STATUS
In this section you can view the status of your wireless network, the wireless password,
security type, channel and status.
Page 43

EE Bright Box User Manual
43
The wireless status may contain up to three separate entries if SSID2 and SSID3 have also
been enabled in the Advanced Set
-Up > Channel and SSID page.
If this section displays ‘wireless is currently disabled’ then this means that the
wireless LAN on the Bright Box has been disabled. You can enable the wireless LAN in the
Basic Set
-Up > Wireless Settings or Advanced Set-Up > Wireless Settings pages.
Field
Description
Wireless Network
Name (SSID)
This field displays the wireless network name (also known
as a
SSID) as configured in the Basic Set-Up > Wireless
Settings
or Advanced Set-Up > Wireless Settings >
Channel and SSID
pages.
This is the wireless network name you will select when
connecting your wireless devices to the Bright Box router.
You can also find the default wireless network name on
the sticker on the bottom of the router or the ‘KEEP MEE’
card that came with the router
.
Wireless Password
This field displays the wireless password (sometimes
known as a wireless passphrase or WEP key) for the
listed
wireless network name.
This is the wireless password you will enter when
connecting your devices to the wireless network.
This field will display
‘—‘ if the wireless security type is set
to ‘None’.
You can also find the default wireless password on the
sticker on the bottom of the router or the ‘KEEP MEE’ card
that came with the router.
The wireless password can be configured in the Basic
Set
-Up > Wireless Settings or Advanced Set-Up >
Wireless Settings
> WEP or Advanced Set- Up >
Wireless Settings
> WPA pages.
Security
This field displays the wireless security mode/cipher suite
of the of the associated wireless network name. The
default wireless security mode is ‘WPA
-WPA2(TKIP+AES)’.
Other modes include ‘WPA(TKIP+AES)’, ‘WPA(TKIP)’,
‘WPA(AES)’,
‘WPA2(TKIP+AES)’, ‘WPA2(TKIP)’, ‘WPA2(AES)’,
‘WEP’ and ‘None’.
The wireless security mode can be configured in the
Basic Set
-Up > Wireless Settings or Advanced Set-
Up
> Wireless Settings > Channel and SSID pages.
The WPA cipher suite can be configured in the Advanced
Set
-Up > Wireless Settings > WPA page.
Channel
This field displays the wireless channel transmission for all
of the wireless network names. By
default, the wireless
channel is automatically selected by the Intelligent
Wireless function of the router. This determines the
channel with the least amount of interference and sets
the channel accordingly.
You can override the automatic Intelligent Wireless
channel selection in the Basic Set
-Up > Wireless
Settings
page and set the router to a manual channel
between 1 and 13.
If you have set the router to the 40MHz bandwidth setting
in Advanced Set
-Up > Wireless Settings > Channel
Page 44

EE Bright Box User Manual
44
and SSID page then the extension channel (+/- 4
channels from the primary) will also be displayed here.
SSID State
This field displays whether the particular wireless network
name (SSID) is currently enabled and transmitting. If this
value displays ‘Disable’ then the wireless network name is
configured, but is not transmitting and cannot be
connected to.
You can set the SSID
state by ticking or unticking the
‘Enable’ option for the relevant SSID on the Advanced
Set
-Up > Wireless Settings > Channel and SSID
page.
Broadcast SSID
This field displays whether the wireless network name
(SSID) is broadcasting and visible. If the value is ‘Enabled’
then the wireless network name is visible to wireless
devices when attempting to scan for networks.
If the value is ‘Disable’ then the wireless network name is
not transmitted or visible in a wireless
scan. A wireless
device may still connect to the wireless network by
manually entering the wireless network name even if the
broadcast SSID
option is ‘Disable’.
Please note that if the SSID
state value is ‘Disable’, then
you cannot connect to the wireless network, even if the
broadcast SSID
is displaying ‘Enable’.
You can configure the broadcast SSID
setting on the
Basic Set
-Up > Wireless Settings or Advanced Set-
Up
> Wireless Settings > Channel and SSID pages.
CURRENTLY CONNECTED DEVICES
In this section you can see all of the devices that are currently connected to your Bright Box
router, and whether these are wired (LAN) or wireless devices. This section is also known as a
DHCP table.
Field
Description
Name
This field displays the name of the connected device. If
the device does not provide a device name (some devices
don’t), the field value will read ‘Unknown Device’.
IP Address
This field displays the current IP address of the connected
device, as assigned by the routers DHCP (Dynamic Host
Control Protocol) server.
MAC Address
This field displays the 12-digit unique MAC (Media Access
Control) address of the connected device.
Connection Type
This field will display whether the connected device is
connected over a wired Ethernet connection (‘LAN’) or
over the router’s wireless connection (‘Wireless’).
Page 45

EE Bright Box User Manual
45
USB DEVICE
In this section you can see details of a storage device (such as a USB hard drive) connected
to the USB socket of the router.
See
how to file share with a USB drive
on page 88.
If this section displays ‘no supported device found’ then this means that either no
USB device is connected to the router’s USB socket, or the
connected device is not supported
by the router. The router currently supports FAT16, FAT32 and NTFS file systems. Apple Mac
HFS or HFS+ file systems are not supported.
Field
Description
Share Name
This field displays the volume name of the connected USB
drive as it will appear in your
operating system’s network
location as a shared folder.
File System
This field displays the file system type of the connected
USB drive. FAT16 or FAT32 drives will display a value of
‘FAT’ while NTFS drives will display a value of ‘NTFS’.
Note that Apple
Mac HFS or HFS+ file systems are not
currently supported by the Bright Box router.
Capacity
This field displays the total storage capacity of the
connected USB drive in Gigabytes (GB).
Free Space
This field displays the amount of free storage space
available on the connected USB drive in Gigabytes (GB).
INFORMATION
This section contains further details about your router, including more detailed Internet
settings along with other router features and settings. The section is comprised of three
areas
– Internet, Features and LAN & Wireless(Default)
Field
Description
Protocol
This field displays the network protocol for the active
Internet connection. On EE
ADSL broadband, the value will
Page 46

EE Bright Box User Manual
46
be ‘PPPoA’ and on EE Fibre broadband the value will be
‘PPPoE’
Alternative values of ‘DHCP’, ‘Fix’ or ‘Bridge’
may be
displayed if alternative ADSL or Ethernet connection
modes have been configured in the Basic Set
-Up >
Broadband Settings
or Advanced Set-Up >
Broadband Settings
pages.
VPI/VCI
This field displays the ATM Virtual Path Identifier (VPI) and
Virtual Channel Identifier (VCI) for the active Internet
connection. For EE
ADSL broadband the default value is
‘0/38’.
If the value is not ‘0/38’, then it may not be possible to
gain an Internet connection. These values
can be
configured on the Basic Set
-Up > Broadband
Settings
or Advanced Set-Up > Broadband
Settings
pages.
This setting will not be visible for EE Fibre broadband
customers.
Encapsulation
This field displays the ATM Encapsulation setting for the
active Internet connection. For EE
ADSL broadband the
default value is ‘VC MUX’.
An alternative value of ‘LLC’ may be displayed if this has
been configured on the Basic Set
-Up > Broadband
Settings
or Advanced Set-Up > Broadband
Settings
pages. Please note that it may not be possible
to gain an Internet connection in ‘LLC’ mode.
This setting will not be visible for EE Fibre broadband
customers.
ADSL Mode
This field displays the ADSL Standard for the active
Internet connection. For EE
Broadband, the value will
likely display either G992.1(G.DMT) or G992.5(ADSL2+)
but G992.3 (ADSL2), G993.3
- Annex M and G992.5 –
Annex M may also be displayed.
This value is automatically negotiated
between the router
and the broadband exchange when establishing an
Internet connection, and cannot be configured in the
admin pages.
If the value of this field is ‘
—‘ then a connection through
to the Internet has not been successfully established. Also
see
chapter 8: troubleshooting
on page 198
This setting will not be visible for EE Fibre broadband
customers.
Subnet Mask
This field displays the Subnet mask for the active Internet
connection. This value is automatically assigned by EE
Broadband when you establish an Internet connection, but
will generally be ‘255.255.255.255’.
The value can also be configured on the Basic Set
-Up >
Broadband Settings
or Advanced Set-Up >
Broadband Settings
for Internet connections with a
static IP addresses.
If the value of this field is ‘0.0.0.0’ then a connection
through to the Internet has not been successfully
established. Also see
chapter 8: troubleshooting
on page
198
Page 47

EE Bright Box User Manual
47
Gateway
This field displays the Gateway IP address for the active
Internet connection. This value is automatically assigned
by EE
broadband when you establish an Internet
connection.
If the value of this field is ‘0.0.0.0’ then a connection
through to the Internet has not been successfully
established. Also see
chapter 8: troubleshooting
on page
198
Primary DNS
This field displays the primary Domain Name Server (DNS)
for the active Internet connection. This value is
automatically assigned by EE
broadband when you
establish an Internet connection.
The value can also be configured on the Basic Set
-Up >
Broadband Settings
or Advanced Set-Up >
Broadband Settings
for Internet connections with a
static IP addresses.
If the value of this field is ‘0.0.0.0’ either a connection
through to the Internet has not been successfully
established, or there are problems with the EE
domain
name servers. Also see
chapter 8: troubleshooting
on page
198
Secondary DNS
This field displays the secondary Domain Name Server
(DNS) for the active Internet connection. This value is
automatically assigned by EE
broadband when you
establish an Internet connection.
The value can also be configured on the Basic Set
-Up >
Broadband Settings
or Advanced Set-Up >
Broadband Settings
for Internet connections with a
static IP addresses.
If the value of this field is ‘0.0.0.0’ either
a connection
through to the Internet has not been successfully
established, or there are problems with the EE
domain
name servers. Also see
chapter 8: troubleshooting
on page
198
Wireless
This field displays the status of the router’s wireless LAN
(WLAN) setting. By default this value is ‘Enabled’,
indicating that the wireless LAN is active. If the value is
‘Disabled’ the wireless LAN is switched off.
You can configure the wireless LAN setting on the Basic
Set
-Up > Wireless Settings or Advanced Set-Up >
Wireless Settings
pages.
Firewall
This field displays the status of the router’s internal
firewall. By default this value is ‘Enabled’, indicating that
the firewall is monitoring incoming and outgoing traffic. If
the value is ‘Disabled’ the firewall is not monitoring traffic
You can configure the firewall setting on the Advanced
Set
-Up > Firewall page.
UPnP
This field displays the status of the Universal Plug and
Play (UPnP) feature on the router. By default this value is
‘Enabled’ indicating that UPnP compatible network
devices can discover each other over the local network
and control port forwarding. If the value is ‘Disabled’ then
UPnP compatible devices cannot make use of this feature.
You can configure the UPnP setting on the
Advanced
Page 48

EE Bright Box User Manual
48
Set-Up > UPnP page.
Gateway
This field displays the gateway IP address for the routers
local area network
(LAN). This IP address is the same as
you use to login to the Bright Box admin pages, and is
‘192.168.1.1’ by default.
The value can be configured on the Advanced Set
-Up >
DHCP
page.
Subnet Mask
This field displays the subnet mask for the routers local
area network
(LAN). The value of this field is
‘255.255.255.0’ by default.
The value can be configured on the Advanced Set
-Up >
DHCP
page.
DHCP Server
This field displays the status of the router’s Dynamic Host
Control Protocol (DHCP). The value is ‘Enabled’ by default,
meaning that LAN IP addresses are automatically
allocated to client devices connecting to the router. If the
value is ‘Disabled’ then client devices must supply their
own LAN IP addresses in order to connect to the router.
The setting can be configured on the Advanced Set
-Up
> DHCP
page.
Page 49

EE Bright Box User Manual
49
CHAPTER 6: BRIGHT BOX BASIC SET-UP PAGES
Click the Basic Set
-Up tab to access the Basic Set-Up admin pages. You can configure your
basic broadband and wireless settings in addition to basic USB File Sharing
features on these
pages:
BROADBAND SETTINGS
Clicking on the Basic Set-Up tab will display the Broadband Settings page. You can also
access this page by clicking on the Broadband Settings item in the left hand navigation
menu when inside
the Basic Set-Up tab.
This page contains basic settings to connect to your EE
broadband service. The Broadband
Username and Password can be found here, as well as ISP settings, DNS and MTU settings.
Description of Broadband Settings
The following table contains a description of the fields and options in the Basic Set-Up
Broadband Settings
page:
Field
Description
Broadband Type
This setting allows you to configure the network setting
type for you Internet connection. For EE ADSL broadband
this should be set to ‘ADSL’. For EE Fibre broadband this
should be set to ‘Fibre/Ethernet’.
Select ‘ADSL’ for a standard PPPoA or PPPoE
ADSL
connection (including EE
broadband). This setting requires
entry of a Broadband Username and Password in order to
establish an Internet Connection
Select ‘Fibre/Ethernet’ for the router to be configured for
Bridging, Routing (if you only want to use the Bright Box
as a router and not a modem) or PPPoE Fibre Ethernet
modes. The easiest way to configure the router for EE
Page 50

EE Bright Box User Manual
50
ADSL or Fibre broadband services however is to use the
Migration Wizard page.
Broadband Username
This field is used to configure your PPPoA or PPPoE
Username provided
by your ISP.
EE
Broadband customers must remember to add @fs to
the end of the Username (for example
yourname.orangehome.co.uk@fs.
Broadband Password
This field is used to configure your Broadband Password
provided by your ISP. The field cannot be left empty.
Protocol
This dropdown allows you to configure the connection
protocol for the particular Broadband Type. By default this
value is ‘PPPoA’ for ADSL broadband or ‘PPPoE’ for Fibre
broadband.
Select ‘PPPoA’ for PPP over ATM connectivity. This is the
correct value for EE
ADSL broadband customers. You must
enter a Broadband Username and Broadband Password to
establish an Internet connection
Select ‘PPPoE’ for PPP over Ethernet
connectivity. This
option is available for both ADSL and Fibre/Ethernet
broadband types. You must enter a Broadband Username
and Broadband Password to establish an Internet
connection.
Select ‘Bridging’ to set the router to act as a bridge to
pass Internet traffic directly to the attached client PC
from another modem. This option is available for
Fibre/Ethernet broadband types only.
Select ‘Routing’ to set the router
to route Internet traffic
over the Ethernet connection where authentication is
handled by a modem.
This option is available for
Fibre/Ethernet broadband types only.
VLAN (Bridging
Protocol only)
This dropdown allows you to select the Virtual LAN group
the Bridged Internet connection is associated with in
order to configure separate internal networks.
The
‘default’ VLAN is select by default.
This dropdown will only be visible if the ‘Broadband Type’
is set to ‘Fibre/Ethernet’ and the ‘Protocol’ option of
‘Bridging’ is selected.
The VLAN
settings are configured in Advanced Set-Up
> DHCP
page. See
DHCP
on page 122 for further
information.
VPI/VCI (ADSL
Broadband Type
only)
This field is used to configure the ATM Virtual Path
Identifier (VPI) and Virtual Channel Identifier (VCI) for the
active Internet connection.
For EE
ADSL broadband the default value is ‘0/38’.
Entering other values may prevent
you connect to the
Internet.
This field is not visible for the Fibre/Ethernet Broadband
Type.
Encapsulation (ADSL
Broadband Type
only)
This dropdown allows you to configure the ATM
Encapsulation setting for the active Internet connection.
For EE
ADSL broadband the default value is ‘VC MUX’.
Page 51

EE Bright Box User Manual
51
Select ‘VC MUX’ for Virtual Circuit Multiplexing Internet
connections, including EE
ADSL broadband.
Select ‘LLC’ for Logical Link Control Internet connections.
This field is not visible for the Fibre/Ethernet Broadband
Type.
Internet IP Address
This dropdown allows you to configure how the Internet IP
Address is allocated.
For EE Broadband the default value is
‘Dynamic’.
Select ‘Dynamic’ if the Internet IP address is assigned by
your ISP, this is the standard setting for EE
broadband.
Select ‘Static’ if you have been given a fixed IP address by
your ISP. If you select ‘Static’ you must also configure the
‘IP Address’ and ‘Subnet Mask’ fields.
IP Address
Use this field to enter the static IP Address provided by
your ISP when the ‘Internet IP Address’ option is set to
‘Static’.
This field does not allow value
entry if the ‘Internet IP
Address’ field is set to ‘Dynamic’.
Static IP Addresses are not currently supported by EE
broadband.
Subnet Mask
Use this field to enter the subnet mask provided by your
ISP when the ‘Internet IP Address’ option is set to ‘Static’.
This field does not allow value entry if the ‘Internet IP
Address’ field is set to ‘Dynamic’
Static IP Addresses are not currently supported by EE
broadband.
DNS IP Address
This dropdown allows you to configure how your Dynamic
Name Server IP addresses are selected. For EE
broadband
the default value is ‘Obtain from ISP’.
Select ‘Obtain from ISP’ if the DNS servers are provided by
your Internet Service Provider.
Select ‘Manual’ if you intend to use DNS servers other
than those provided by your ISP. If you select this option
you must configure the ‘Primary DNS’ and ‘Secondary DNS’
fields.
Primary DNS
Use this field to enter the Primary Domain Name Server IP
address when the ‘DNS IP Address’ option is set to
‘Manual’.
Secondary DNS
Use this field to enter the Secondary Domain Name Server
IP address when the ‘DNS IP Address’ option is set to
‘Manual’.
MTU (576~1500
PPPoA or 576
-1492
PPPoE)
This field is used to configure the Maximum Transmission
Unit size in bytes
for data packets over the Internet. The
default for EE
broadband is 1492.
Please note that changing this value may cause problems
with your Internet connection such as issues resolving
websites or secure pages.
Page 52

EE Bright Box User Manual
52
How to manually update
the broadband username and password
When you first connect your EE Bright Box router to your EE line, your Broadband Settings
will be automatically configured, however you can
also manually update your broadband
username and
password on the router from the Broadband Settings page. To do this:
1.
Login to the router’s admin pages.
2.
Click on the Basic Set-Up tab.
3.
In the 'Broadband Username' field, enter your broadband username – enter letters in
lower case, and remember to add @f
s at the end (for example
yourname.orangehome.co.uk@fs)
4.
In the 'Broadband Password' field, enter your the broadband password - this is case
sensitive so 'Password' is not the same as 'PaSsWoRd':
5.
Click Save Settings:
6.
You'll be prompted that the router is 'applying changes':
7.
You'll be redirected back to the Basic Set-Up (Broadband Settings) page
8.
Click on the status tab - the 'Broadband State' and 'Internet State' should both show
'Connected' to indicate that your router is now connected to the Internet:
Page 53

EE Bright Box User Manual
53
How to change the broadband MTU
The Maximum Transmission Unit (MTU) value is optimised on the Bright Box router for the EE
network with a default value of 1492. In some cases (if web pages are not loading
or secure
web sites are timing out for example) it
may be necessary to adjust the MTU value. To do this:
1.
Login to the router’s admin pages.
2.
Click on the Basic Set-Up tab.
3.
Scroll down to the ‘MTU (576~1500)’ or ‘MTU (576-1492)’ field enter the new MTU value
– for example 1500:
9.
Click Save Settings:
10.
You'll be prompted that the router is 'applying changes':
11.
You'll be redirected back to the Basic Set-Up (Broadband Settings) page.
Page 54

EE Bright Box User Manual
54
How to set manual DNS addresses
The Bright Box router is set to automatically obtain the Domain Name Server (DNS) IP
address from EE
broadband when establishing an Internet connection. The DNS server
translates Internet names and URL’s to IP addresses in order to display web pages or other
Internet services.
It is possible to override the default ‘Obtain from ISP’ configuration for DNS settings and
enter custom DNS addresses. To do this:
1.
Login to the router’s admin pages.
2.
Click on the Basic Set-Up tab.
3.
In the ‘DNS IP Address’ dropdown, select the ‘Manual’ option.
4.
In the ‘Primary DNS’ field, enter the Primary IP address of your DNS server (for example
the Primary Google DNS IP address is ‘8.8.8.8’)
5.
In the ‘Secondary DNS’ field enter the Secondary IP address of your DNS server (for
example the Secondary Google DNS IP address is ‘8.8.4.4’
)
6.
Click Save Settings:
7.
You'll be prompted that the router is 'applying changes':
8.
You can confirm that the DNS settings have been changed by clicking on the status tab.
The ‘Primary DNS’ and ‘Secondary DNS’ fields will display the new DNS IP addresses:
Page 55

EE Bright Box User Manual
55
In order to change
back from manually configured DNS Servers to automatic DNS
addresses, click on the Basic Set
-Up tab. In the ‘DNS IP Address’ dropdown, select ‘Obtain
from ISP’ and click the Save Settings
button:
MIGRATION WIZARD
This page allows you to easily migrate your Broadband service from EE ADSL to EE Fibre
broadband or vice
-versa. The page also displays the current default Broadband Type (either
ADSL or Fibre/Ethernet).
For ADSL customers migrating to the EE Fibre broadband service, the Migration Wizard may
need to
be run after the BT engineer has installed your Fibre modem in your home
Running the Migration Wizard will set the router to the correct Broadband Settings for the
broadband service
you want to use at home. During the Migration Wizard process, the router
will be restarted.
Please note that only the Broadband Settings on your router will be changed when running
the wizard, any other settings you may have configured (Wireless Settings, Advanced Settings
etc) will be kept as they were previously. When running the wizard it may take up to 5
minutes for us to automatically configure your router for the correct broadband service.
If you factory reset your router at any stage
the router will be set back to the connection
type previously displayed in the ‘Your router is currently set to the default Broadband Type:’
field. You can use the Migration Wizard to change your default Broadband Type if you need
to.
Page 56

EE Bright Box User Manual
56
How to migrate to EE Fibre broadband
When your EE Fibre service has been provisioned
and an engineer has installed your Fibre
modem
you may need to migrate the router to the EE Fibre broadband settings using the
Migration Wizard
.
Before you do this, please ensure the Bright Box has been correctly connected to the
Fibre
modem as described in
Setting up your Fibre broadband
on page 18.
To migrate the Bright Box settings for EE Fibre broadband:
1.
Login to the router’s admin pages.
2.
Select the Basic Set-Up tab at the top of the screen.
3.
Select the Migration Wizard from the menu on the left hand side menu:
4.
Press the Fibre/Ethernet button.
5.
Press OK on the warning pop-up:
Page 57

EE Bright Box User Manual
57
6.
The migration countdown will begin. You can now close your browser.
7.
The complete migration process may take up to 5 minutes to establish a connection to
the Internet.
Please note that if
you're redirected to the ‘Nearly there!’ holding page in your browser,
you may need to wait a few more minutes for us to set up your router.
If after 5 minutes, the
‘Nearly there!’ text is still visible when you reopen your browser window, reboot your PC and
then reopen the browser window again, you should now be able to view web pages. If this still
doesn’t work, you can manually enter your broadband username and password in the router
user interface and make a connection to the Internet (see
how to manually update the
broadband username and password
on page 52)
How to migrate to EE ADSL broadband
There may be an occasion when you need to migrate your Bright Box router from EE Fibre
broadband settings to EE ADSL broadband (for example if you are moving to a house that no
longer has a Fibre connection). You can also use the Migration Wizard to set
the router to EE
ADSL settings.
Before you do this, please ensure the Bright Box has been correctly connected to the
ADSL line as described in
Setting up your ADSL broadband
on page 16.
To migrate the Bright Box settings for EE ADSL broadband:
1.
Login to the router’s admin pages.
2.
Select the Basic Set-Up tab at the top of the screen.
3.
Select the Migration Wizard from the menu on the left hand side menu:
Page 58

EE Bright Box User Manual
58
4.
Press the ADSL button.
5.
Press OK on the warning pop-up:
6.
The migration countdown will begin. You can now close your browser.
Page 59

EE Bright Box User Manual
59
7.
The complete migration process may take up to 5 minutes to establish a connection to
the Internet.
Please note that if
you're redirected to the ‘Nearly there!’ holding page in your browser,
you may need to wait a few more minutes for us to set up your router.
If after 5 minutes, the
‘Nearly there!’ text is still visible when you reopen your browser window, reboot your PC and
then reopen the browser window again, you should now be able to view web pages. If this still
doesn’t work, you can manually enter your broadband username and password in
the router
user interface and make a connection to the Internet (see
how to manually update the
broadband username and password
on page 52)
WIRELESS SETTINGS
This page contains basic settings to configure your wireless network. The wireless mode,
channel, wireless network name (SSID), wireless password, broadcast SSID, security type and
security modes can be configured on this page.
To access the Bright Box router’s basic wireless settings page:
1.
Login to the router’s admin pages.
2.
Click on the Basic Set-Up tab and then select Wireless Settings from the left
hand menu:
Description of Wireless Settings
The following table contains a description of the fields and options in the Wireless Settings
page:
Page 60

EE Bright Box User Manual
60
Field
Description
Enable or disable
wireless
This option is used to configure the Wireless LAN
interface on the router. The Wireless LAN is enabled by
default, meaning that it is possible to connect your
wireless devices to the router.
Select ‘Disable’ to switch off the Wireless LAN
interface on
the router. If set to ‘Disable’, it is not possible to connect
your wireless devices to the router. The WLAN light on the
front of the router will not be lit if this option is selected.
Select ‘Enable’ to switch the Wireless LAN interface on,
allowing you to connect wireless devices to the router.
The WLAN light on the front panel of the router will be lit
if this option is selected.
Wireless Mode
This dropdown is used to configure the 802.11 wireless
mode the router is transmitting on. By default the router is
set to
transmit on ‘11b+11g+11n’ mode for maximum
compatibility.
Select ‘11n only’ to set the router to 802.11n mode only.
Only wireless adapters or devices supporting 802.11n can
connect to the router if this mode is selected and older
802.11b/g adapters will not be able to connect to the
network.
A connection speed of up to 300Mbps is
supported in this mode.
Select ‘11b+11g’ to set the router to 802.11b/g mode only.
Select this mode if you are only using wireless 802.11b or
802.11g wireless adapters or devices.
802.11n wireless
devices will not be able to connect to the network. In
order to connect with WEP security, you must select
‘11b+11g’ mode. The connection speed will be limited to
54Mbps in this mode.
Select ‘11b+11g+11n’ for maximum compatibility with both
the newer 802.11n and 802.11b/g standards. A connection
speed of up to 300Mbps is supported in this mode.
Channel
This option is used to configure the 2.4GHz radio channel
for wireless communication. By default the router will
select the wireless channel with the least interference in
the ‘Auto’ mode using the Intelligent Wireless feature.
Select ‘Auto’ for the router to determine which wireless
channel to use automatically based on the least channel
interference (Intelligent Wireless).
Select channels 1
-13 to set a radio channel manually.
Please note that some wireless devices do not support the
European channels 12 and 13. If in doubt, only select from
Channels 1
-11.
Wireless Network
Name (SSID)
This field is used to configure the Wireless Network Name
(also known as a SSID) that is transmitted by the router,
and displayed in the wireless network list when making a
connection to the router.
By default your router will have a unique SSID applied by
EE. For example ‘BrightBox
-1a2b3c’.
Broadcast SSID
This option is used to configure whether the Wireless
Network Name (SSID) is being broadcast by the router. By
Page 61

EE Bright Box User Manual
61
default the SSID is being broadcast.
Select ‘Enable’ to broadcast the SSID, meaning that it will
appear in a devices wireless network list when scanned.
Select ‘Disable’ to stop the SSID from being broadcast,
meaning that it will not appear in a wireless list when
scanned. Please note that it is still possible to connect to
the wireless network SSID manually if the Broadcast SSID
option is set to ‘Disable’.
Security
This option is used to configure the wireless security
mode the wireless network is operating in. By default the
Security is ‘WPA’.
Select ‘WPA’ to set the router to Wi
-Fi Protected Access
mode. This is the most
secure wireless mode, and offers
wireless speeds of up to 300Mbps.
Select ‘WEP’ to set the router to Wired Equivalent Privacy
mode. This setting should be used for wireless devices
that only support WEP mode. The Wireless Mode must be
set to ‘11b+11g’ in order to select WEP security.
Select ‘No security’ to switch off wireless security on the
router. This mode will allow anyone in range to connect to
the router’s wireless connection without requiring a
password, but may present a security risk.
WPA Mode
This option is used to configure the Wi-Fi Protected
Access security type mode. By default the WPA Mode is
‘WPA/WPA2 Mixed Mode’ in order to provide maximum
compatibility.
Select ‘WPA’ for legacy devices that do not support the
newer, more secure WPA2 security mode.
Select ‘WPA2’ for devices that support the highly secure
WPA2 mode. Note that older devices that only support the
WPA mode may not be able to connect to the router with
this setting
Select ‘WPA/WPA2 Mixed Mode’ for maximum wireless
compatibility.
Wireless devices supporting the highly
secure WPA2 mode will connect in this mode, while older
WPA only devices will also be able to connect to the
router.
Wireless Password
This field is used to configure the WPA wireless password
used when making a wireless connection to the router.
By default the wireless password will be a randomly
generated by EE. You can change this to something more
memorable, between 8 and 63 characters (a
-z, A-Z, 0-9).
Please note that the wireless password is case sensitive.
WEP Mode
This option is used to configure the WEP key mode for the
WEP security type. This option is only visible when the
Security option is set to ‘WEP’.
Select ’64
-bit’ for WEP-40 security (5 character ASCII or
10 character Hex keys).
Select ‘128
-bit’ for WEP-104 security (13 character ASCII or
26 character Hex keys).
Key Entry Method
This option is used to configure the key method used for
Page 62

EE Bright Box User Manual
62
making a wireless connection to the router with WEP
security.
Select ‘ASCII’ for 5 or 13 character
key entry using a
character range of a
-z, A-Z and 0-9.
Select “HEX’ for 10 or 26 character key entry using a
character range of A
-F and 0-9 (hexadecimal key).
Default Key ID
Use this option to set a Default Key ID to use making a
wireless connection with WEP security. There are a total
of 4 keys, with the default used being Key 1. You can
configure the individual Key passwords using the Key1
-
Key4 fields.
Passphrase
This field allows you to enter a 1 – 32 character
passphrase, used to easily generate hexadecimal WEP key
passwords for the Key1-Key4 fields.
The length of the Key generated is determined by the
‘WEP Mode’ dropdown.
Please note that if the ‘Key Entry Method’ is set to ‘ASCII’,
the passphrase field is greyed out.
Key1 – Key4
These fields are used to configure the WEP key used when
making a wireless connection to the router in WEP mode.
The field length and characters is determined by the ‘WEP
Mode’ and ‘Key Entry Method’ fields.
64
-bit/HEX Mode requires a 10 hexadecimal character key
(A
-F, 0-9)
64
-bit/ASCII Mode requires a 5 ASCII character key (a-z, A-
Z, 0
-9)
128
-bit/HEX Mode requires a 26 hexadecimal character
key (A
-F, 0-9)
128
-bit/ASCII Mode requires a 13 ASCII character key (a-z,
A-Z, 0-9).
Intelligent Wireless
This section displays the current ‘Wireless Channel’
selected by the router (if the ‘Channel’ is set to ‘Auto’
option) or set manually (if the ‘Channel’ is set to any value
between 1 and 13).
Clicking on the Intelligent Wireless button will cause the
router to re
-scan for the best wireless channel to use to
avoid interference.
A note on changing wireless settings
Making a change to any wireless settings in the Bright Box router may cause your wireless
computers or other wireless devices to become disconnected from the network. If this occurs
you will
need to reconnect to the wireless network again.
In some instances you may have trouble re
-connecting to the wireless network after
making changes
to wireless settings. If this occurs you may need to delete the old wireless
network from your saved network list, and reconnect again.
Page 63

EE Bright Box User Manual
63
How to enable or disable wireless
To enable or disable wireless on the router, follow the steps below:
3.
Login to the router’s admin pages.
4.
Click on the Basic Set-Up tab and then select Wireless Settings from the left
hand menu:
1.
The Wireless Settings page will open:
2.
In the 'Enable or disable wireless' field, select your required option in the example below
we're going to 'Disable' wireless on the router:
Page 64

EE Bright Box User Manual
64
3.
Click Save Settings:
4.
The router will apply the new settings:
5.
You can verify whether wireless is enabled or disabled on the router by looking at the
wireless light on the front of the router:
6.
If the light is on or flickering, wireless is enabled. If the light is off wireless is disabled.
How to change the Wireless Network Name (SSID)
You may wish to change the Wireless Network Name (also known as an SSID) transmitted by
the Bright Box router to a more memorable name. To do this:
1.
Login to the router’s admin pages.
2.
Click on the Basic Set-Up tab and then select Wireless Settings from the left hand
menu:
Page 65

EE Bright Box User Manual
65
3.
On the Wireless Settings page, click in the ‘Wireless Network Name (SSID)’ field and
overwrite the default wireless network name with a new one up to 32 characters in
length.
4.
Click Save Settings:
5.
The router will apply the new settings:
Page 66

EE Bright Box User Manual
66
6.
You can confirm that the wireless network name (SSID) has been updated by scanning
for wireless networks in your operating system. The screen shot below is an example for
Windows 7:
How to change the wireless WPA password
You may like to change your wireless WPA password to something more memorable or for
security purposes. To do this:
1.
Login to the router’s admin pages.
2.
Click on the Basic Set-Up tab and then select Wireless Settings from the left hand
menu:
3.
On the Wireless Settings page click on the ‘Wireless Password’ field and overwrite the
default password with a new one between 8 and 63 characters in length. Please note
that the password you enter is case sensitive, so a password such as ‘MySecretPassword’
is different to ‘mysecretpassword’, and will need to be entered exactly as typed when
making a connection to the wireless network:
Page 67

EE Bright Box User Manual
67
4.
Click Save Settings:
5.
The router will apply the new settings:
6.
Now you can reconnect to your wireless network using the new wireless password.
How to change the Wireless Mode
The Bright Box Wireless router supports 3 wireless modes:
• 802.11n
- this will only allow wireless adaptors supporting 802.11n to connect to the
router
.
• 802.11b+11g
- select this if you're using an older wireless adaptor or software that only
supports WEP
.
• 802.11b+11g+11n
- use this if you want to connect 11b, 11g and 11n devices to your
network and this is the most compatible mode.
By using 802.11n or 802.11b+11g+11n the router will support up
-to 300Mbps speeds
(depending on the ‘Bandwidth’ setting)
on your internal wireless network when used with a
compatible wireless adaptor. 802.11b+11g will limit the connection speed up to 54Mbps.
To change the wireless mode:
1.
Login to the router’s admin pages.
2.
Click on the Basic Set-Up tab and then select Wireless Settings from the left hand
menu:
Page 68

EE Bright Box User Manual
68
3.
On the Wireless Settings page, click on the ‘Wireless Mode’ dropdown box and select
the new wireless mode
from the list. In this example we will change to ‘11b+11g’:
4.
Click Save Settings:
5.
The router will apply the new settings:
Page 69

EE Bright Box User Manual
69
How to change the wireless channel
The channel is the radio channel used for wireless communication. By default the router will
automatically select the channel with the least interference in your area
using the routers
‘Intelligent Wireless’ feature. If you'd prefer you can select your own channel between 1 and
13. To do this:
1.
Login to the router’s admin pages.
2.
Click on the Basic Set-Up tab and then select Wireless Settings from the left hand
menu:
On the Wireless Settings
page, click on the ‘Channel’ dropdown box and select from
Channels 1 to 13, or
‘Auto’ to allow the router to automatically select the best wireless
channel. In this example we will change to Channel 6:
3.
Click Save Settings:
Page 70

EE Bright Box User Manual
70
4.
The router will apply the new settings:
Channels
1, 6 and 11 are non-interlapping wireless channels. If you find that your wireless
connection is affected by interference from a neighbouring Wi
-Fi network transmitting on
Channel 1 for example, it would be best to select either 6 or 11 when switching to a new
channel.
Alternatively setting the option to ‘Auto’ will automatically select the least
congested channel to use.
Some Wi
-Fi devices, particularly those purchased outside of Europe may not be able to
see, or connect to a Wi
-Fi network operating on Channels 12 and 13. If you are having
problems connecting to the Bright Box wireless network after setting the Channel to 12 or 13,
try change the channel to between 1 and 11 or setting to ‘Auto’ mode.
How to change the Broadcast SSID option
Broadcasting the wireless network name (SSID) helps when setting up a wireless connection
for the first time. If you'd prefer not to broadcast the SSID, you can disable this option.
To enable or disable the Broadcast SSID option:
1.
Login to the router’s admin pages.
2.
Click on the Basic Set-Up tab and then select Wireless Settings from the left hand
menu:
3.
In the ‘Broadcast SSID’ field select your required option, either ‘Enable’ or ‘Disable’. In the
example below we're going to 'Disable' broadcasting of the SSID on the router:
Page 71

EE Bright Box User Manual
71
4.
Click Save Settings:
5.
The router will apply the new settings:
6.
To connect to the non broadcasting SSID, you will have to enter the wireless network
name, security type and security key (wireless password)
in the operating system
wireless software manually. For example here is a screenshot from Windows 7 (please
note that exact steps will differ between operating systems):
Page 72

EE Bright Box User Manual
72
7.
The wireless connection can then be established manually:
You may need
to update your computer’s wireless settings to 'Connect even if the
network is not broadcasting its name (SSID)' after making this change. Also if you connect a
new device to the wireless network, you will need to enter the wireless network name (SSID)
into the device manually, or enable the Broadcast SSID option.
Disabling the Broadcast SSID option should not be relied upon as a wireless security
measure by itself. Some software is capable of scanning for non
-broadcasting SSID’s and if
wireless security is disabled may be able to connect to your router. Use the Broadcast SSID
setting in conjunction with a strong wireless security mode setting such as WPA to prevent
unwarranted intrusion onto your wireless network.
How to change to wireless WEP security
If you're using a wireless adapter or software that doesn’t support the WPA security standard,
and isn’t able to update software (for example by installing Windows XP Service Pack 2 or 3),
then you may need to set the router to WEP security mode to establish a wireless connection
to the router.
Page 73

EE Bright Box User Manual
73
WEP security mode is only available as an option in the ‘Security’ dropdown when the
router is in ‘11b+11g’ Wireless Mode.
Please note that WEP mode security is not as secure as the more modern WPA/WPA2
wireless security standard, and should only be used if a device you wish to connect to the
network will only support WEP
security mode.
To change to WEP security:
1.
Login to the router’s admin pages.
2.
Click on the Basic Set-Up tab and then select Wireless Settings from the left hand
menu:
3.
Select the ‘Wireless Mode’ dropdown and choose the ‘11b+11g’ option
4.
Select the ‘Security’ dropdown and choose the ‘WEP’ option. Your wireless settings
should look like this:
5. Scroll down to the Security Setting section of the page and choose the ‘WEP mode’
option. In this example we select ’128
-bit’
6.
Select a ‘Key Entry Method’ of ‘HEX’
Page 74

EE Bright Box User Manual
74
7. In the ‘Passphrase’ field tick the box and then enter any phrase, in this example we use
‘brightbox’, but enter your own unique one for when you follow this step.
8.
Click the Generate Key button. Your screen should look like the example below:
8.
Make a note of the ‘Key1’ value, in this example with 128-bit HEX mode, a 26-digit
hexadecimal key will be generated. This value will be entered into your wireless software
to make a connection to the wireless network:
9.
Click Save Settings:
10.
The router will apply the new settings:
12.
Now you can connect your wireless computer or devices to your wireless network in WEP
mode. When presented with the
option to enter the wireless password, enter the ‘Key1’
value recorded in step 9 (in this example ‘3AE317D4982C4C1AC36ED18936’)
Page 75

EE Bright Box User Manual
75
The combination of ‘WEP Mode’ and ‘Key Entry Method’ will determine the length and
characters used in the Key field:
• 64
-bit/HEX Mode requires a 10 hexadecimal character key (A-F, 0-9)
• 64
-bit/ASCII Mode requires a 5 ASCII character key (a-z, A-Z, 0-9)
• 128
-bit/HEX Mode requires a 26 hexadecimal character key (A-F, 0-9)
• 128
-bit/ASCII Mode requires a 13 ASCII character key (a-z, A-Z, 0-9).
If the ASCII ‘Key Entry Method’ is selected, then the Key field must be entered manually. A
Key can only be automatically generated with a ‘Key Entry Method’ of HEX.
How to change to wireless WPA mode
The most secure wireless security mode on the Bright Box router is WPA (Wi-Fi Protected
Access)
and this is the default router setting. It is also possible to select the type of WPA
mode used to secure the wireless connection:
• WPA/WPA2 Mixed mode is compatible with most operating systems. If an adapter
supports WPA2 mode, it will connect in this more secure mode, if not it will connect in
WPA mode. This is the default router setting.
• WPA is offers increased compatibility with older operating systems, but wireless speeds
are
limited to 54 Mbps.
• WPA2 offers more security, and up
-to 300 Mbps speeds, however isn't compatible with
Windows XP SP2 and below.
To set the Bright Box router to wireless W
PA security, do the following:
1.
Login to the router’s admin pages.
2.
Click on the Basic Set-Up tab and then select Wireless Settings from the left hand
menu:
Page 76

EE Bright Box User Manual
76
3.
Select the ‘Security’ dropdown and choose the ‘WPA’ option.
4.
Scroll down to the ‘Security Setting’ dropdown and choose the WPA mode you wish to
use. In this example we will select ‘’WPA/WPA2 Mixed Mode’ (the most secure and
compatible):
4.
Click Save Settings:
5.
The router will apply the new settings:
Page 77

EE Bright Box User Manual
77
How to disable Wireless Security
It is possible to disable the wireless security mode on the Bright Box router so that wireless
devices can connect to the router without having to enter a password.
Disabling wireless security should only be done with great care. With wireless security
disabled, anyone in range of the router can establish a wireless connection with the router
and use your Internet connection. This setting is not recommended by EE
.
In order to disable wireless security:
1.
Login to the router’s admin pages.
2.
Click on the Basic Set-Up tab and then select Wireless Settings from the left hand
menu:
3.
Select the ‘Security’ dropdown and choose the ‘No security’ option:
Page 78

EE Bright Box User Manual
78
4.
Click Save Settings:
5.
The router will apply the new settings:
Using the Intelligent Wireless feature
The Bright Box router has a great feature called 'Intelligent Wireless'. Intelligent Wireless is
enabled on the Bright Box router by default. When starting up the router, it'll automatically
search for and use the least congested Wi
-Fi channel, reducing the effect of interference, and
providing you with the best wireless performance.
By pressing the
WPS button on the back of your router briefly, 'Intelligent Wireless' will re-
check
to see if the router's using the least congested frequency and change channel if
required.
After pressing the WPS button briefly, the WPS light on the front of the router will flash
slowly several times to indicate that the Intelligent wireless feature is re
-checking for the
best wireless channel to use.
You can also run the Intelligent Wireless
feature from inside the router’s admin pages by
logging into the admin pages and navigating to Basic Set
-up > Wireless Settings (or
Advanced Set
-up > Wireless Settings). Click on the Intelligent Wireless button on
the page:
Page 79

EE Bright Box User Manual
79
The ‘Applying changes’ message will be displayed, and after a short time
the page will be
refreshed. If a less congested Wireless Channel is discovered, the router will be set to the new
channel and this will be displayed in the Intelligent Wireless section of the page.
Intelligent Wireless will be disabled if you have manually selected a wireless channel from
1 to 13 on the Wireless Settings
page. To re-enable Intelligent Wireless, either set the
‘Channel’ dropdown to ‘Auto’ or briefly press the WPS
button on the back of the router (this
will also set the Channel back to ‘Auto’ mode).
Don't forgot that moving sources of interference away from the router, such as cordless
phones, microwave ovens, baby monitors and Hi
-Fi speakers can make a huge difference to
the wireless performance. Moving the router off the floor, and clear from obstructions will
also help
your signal.
WI-FI PROTECTED SETUP
Wi-Fi Protected Setup (WPS) is a feature that allows compatible wireless software and
devices to securely connect to your router’s wireless network at the push of a button, rather
than having to enter a wireless password. WPS is disabled by default on the Bright Box router,
but can be easily enabled in the routers admin pages.
WPS on the Bright Box supports two modes:
• Push Button Configuration (PBC)
– You establish a connection to the router’s wireless
network by pushing a physical or software button on the wireless adapter to initiate the
PBC connection, and then push
the WPS button (or activate in the router WPS admin
page) on the router within two minutes. The wireless connection is then automatically
established between the wireless adapter and the router.
On the Bright Box, the WPS
push button is on the back panel of the router and must be held for 5 seconds to initiate
the WPS connection.
• PIN Method
– The wireless router or wireless adapter generates an 8-digit PIN number,
which can then be entered into the WPS PIN page
on the other device to establish a
wireless connection between the adapter and the router.
The WPS feature is also supported on Windows Vista Service Pack 2 and Windows 7 (No
Service Pack, or Service Pack 1). Apple Mac OS X does not support the WPS feature.
While WPS is built in to Windows Vista SP2 and Windows 7, the wireless adapter must also
support WPS for this feature to work. Compatible devices may carry this WPS logo to identify
support for this feature:
Page 80

EE Bright Box User Manual
80
Even if WPS is enable
d, you can still connect to your computer using the password
method.
To access the WPS admin pages in the Bright Box router:
1.
Login to the router’s admin pages.
2.
Click on the Basic Set-Up tab and then select Wireless Settings from the left hand
menu.
3.
Select Wi-Fi Protected setup from the left hand menu:
Description of WPS settings
The following table contains a description of the fields and options in the Wi-Fi protected
setup page. Note that the full page contents will only be visible if the ‘Wi
-Fi Protected Setup
(WPS)’ option is set to ‘Enable’
.
Field
Description
Wi-Fi Protected
Setup (WPS)
This option is used to configure the Wi-Fi Protected Setup
(WPS) feature on the Bright Box router.
WPS is set to disabled by default.
Select ‘Enable’ to switch on the WPS feature on the
router. You may now connect with WPS PBC, WPS PIN or
by the normal manual password method when making a
wireless connection to the router (WPS availability is
dependent on the wireless adapter also supporting the
feature).
Select ‘Disable’ to switch off the WPS feature on the
router. You can only connect with the manual password
Page 81

EE Bright Box User Manual
81
method when making a wireless connection to the router.
Your router’s PIN
number
This is the PIN number you will enter into the wireless
adapter software when requested in order to establish a
WPS connection using the PIN method.
If you are entering a PIN number supplied by the wireless
adapter into the ‘device PIN’ field, you can ignore the
router’s PIN number.
PIN Status
This field displays the current status of the WPS PIN
method connection.
‘Idle’ means that the WPS PIN session
has not been
activated.
‘In Progress
– Please wait…’ means that the WPS PIN
connection method has been activated and is currently
trying to establish a connection with the wireless adapter.
This will only be visible for 2 minutes.
‘Error Detected
– Please Try Again’ means that the WPS
PIN connection method has not been successful. Try again
or connect using WPS PBC
or by manually entering the
wireless password.
‘Success
– The device is connected to the router’ means
that the WPS PIN connection method has been successful
and a wireless connection between the router and the
wireless adapter has been established.
device PIN
In this field, enter the PIN number supplied by the wireless
adapter and press Connect to begin a WPS PIN connection
session.
Please note that this field will only require a PIN number if
the wireless adapter is initiating the session and supplies a
PIN. This field does not need to be completed if you enter
the PIN number supplied by the router in the wireless
adapter software.
start PBC
Click this button to begin the WPS Push Button
Configuration (PBC) session from the router. You will have
2 minutes to complete the session by pressing the WPS
PBC button on
the wireless adapter or software.
PBC Status
This field displays the current status of the WPS PBC
method connection.
‘Idle’ means that the WPS PBC session has not been
activated.
‘In Progress
– Please wait…’ means that the WPS PIN
connection method has been activated and is currently
trying to establish a connection with the wireless adapter.
This will be visible for 2 minutes.
‘Error Detected
– Please Try Again’ means that the WPS
PBC connection method has not been successful. Try
again or connect using
WPS PBC or manual password
methods.
‘Success
– The device is connected to the router’ means
that the WPS PBC connection method has been
successful and a wireless connection between the router
and the wireless adapter has been established.
Page 82

EE Bright Box User Manual
82
manual setup
This section displays the current wireless settings of the
Bright Box router. These settings can be used to manually
establish a wireless connection to the router. In most
cases only the ‘Network Name (SSID)’ and ‘Network Key’
(also known as the wireless password) are required to
establish a connection.
How to enable and disable WPS
Wi-Fi Protected Setup (WPS) is disabled by default on the Bright Box router. The setting can
be enabled and disabled in the
Wi-Fi Protected setup admin page:
1.
Login to the router’s admin pages.
2.
Click on the Basic Set-Up tab and then select Wireless Settings from the left hand
menu.
3.
Select Wi-F i Protected Setup from the left hand menu:
4.
The Wi-Fi protected setup page will open:
Page 83

EE Bright Box User Manual
83
5.
In the ‘Wi-Fi Protected Setup (WPS)’ field select the option you wish to use. In this
example we will select ‘Enable’ to enable the WPS feature:
6.
Click Save Settings:
7.
The router will apply the new settings:
8.
You can now connect to your router using a compatible WPS device.
How to establish a WPS connection using push button configuration
(PBC)
To connect the Bright Box router to a WPS device that supports Push Button Configuration
(PBC) mode
, you will need to do the following:
Page 84

EE Bright Box User Manual
84
1. Press and hold the WPS button on the back of the router for 5 seconds (and then release
the button):
2.
Alternatively you can click on the start pbc button in the Wi-Fi Protected Setup
page in the router admin pages:
3.
The WPS light on the front of the router will begin to flash quickly:
Page 85

EE Bright Box User Manual
85
4. Launch the wireless connection software in your operating system (Windows Vista SP2
or Windows 7). In Windows 7 the screen should look like this:
5.
In Windows Vista (SP2) the screen should look like this:
6.
Click Next (Windows Vista SP2) or, in Windows 7 wait and the wireless connection will
be established automatically.
7.
Alternatively, some wireless devices have their own WPS button on their case – you can
also press this button to establish a wireless connection to the router.
After you press the WPS button on the router, you will have a maximum of two minutes to
complete the WPS connection on your wireless device or adapter. After two minutes of
inactivity
, the WPS session will be terminated. If a connection has not been established in this
time you will need to repeat the process above.
If, for whatever reason you are unable to successfully establish a wireless connection
using WPS, we recommend
connecting using the manual password method. See
setting up a
wireless connection
on page 25 for further information
Some wireless adapters use their own software to establish a wireless connection with
WPS. Please follow the manufacturers instructions for WPS if this is the case.
Page 86

EE Bright Box User Manual
86
How to establish a WPS connection using the personal identification
number (PIN) method
To connect the Bright Box router to a WPS device using the PIN method you will need to do
the following:
1.
Login to the router’s admin pages.
2.
Click on the Basic Set-Up tab and then select Wireless Settings from the left hand
menu.
3.
Select Wi-Fi Protected Setup from the left hand menu:
4.
Scroll down to the personal identification number (PIN) section of the page and
make a note of the router’s PIN number:
5.
Launch the wireless connection software in your operating system and when prompted,
enter the PIN number of the router and click Next
to establish a connection using WPS.
Page 87

EE Bright Box User Manual
87
6.
Alternatively, some wireless devices may provide their own PIN number for establishing a
WPS connection:
7.
If this case, type the key provided into the ‘device PIN’ field on the Wi-Fi protected
setup page and press the
Connect button to establish a connection:
Page 88

EE Bright Box User Manual
88
If
you are unable to successfully establish a wireless connection using WPS, we
recommend connecting using the manual password method. See
setting up a wireless
connection
on page 25 for further information.
USB FILE SHARING
The Bright Box router has a USB port which allows you to connect a USB memory stick or
USB hard drive to the router to share files and folders over your home network.
The router currently supports NTFS, FAT16 or FAT32 formatted drives.
How to File Share with a USB Drive (Auto Share)
The router is configured with USB automatic file sharing enabled by default. It should be a
case of simply plugging your USB drive into your router for this feature to work
1.
To connect a USB hard drive to the Bright Box router simply plug the USB drive into the
USB socket
on the back of the router as illustrated:
2.
The router should automatically appear in your Network section on Windows Vista and
Windows 7, or My Network Places
section in Windows XP.
Page 89

EE Bright Box User Manual
89
3.
On Apple Mac OS X, the router should automatically appear in the Finder under Shared:
4.
Click on the Brightbox router item in Network or Finder to view and access the shared
USB drive:
Page 90

EE Bright Box User Manual
90
If the USB
drive doesn’t automatically appear in your Windows or Mac OS X network
location, then you can manually access the drive using the following methods:
• On Windows XP, Windows Vista or Windows 7 select
Start > Run and enter
\\brightbox. Click OK to open the network drive.
• On Mac OS X open the Finder window and select Go > Connect to Server…
and enter
smb://brightbox
and click Connect to open the network drive.
Description of USB File Sharing settings
While the Bright Box router is configured to automatically share a USB drive over the network
when it is connected to the router, you can configure basic USB File Sharing
settings.
To access the USB File Sharing
admin pages in the Bright Box router:
1.
Login to the router’s admin pages.
2.
Click on the Basic Set-Up tab and then select USB File Sharing from the left hand
menu:
Page 91

EE Bright Box User Manual
91
The following table contains a description of the fields and options in the Wireless Settings
page:
Field
Description
Auto Share
This option is used to configure the Auto Sharing feature
of USB File Sharing. Auto Sharing enables ‘plug and play’
of USB drives into the Bright Box.
Select ‘Enable’ to enable auto sharing of USB drives. When
a compatible (NTFS, FAT16 or FAT32) drive is connected
to the router, the drive will automatically appear in the
Network section of Windows or the Finder for Mac OS X.
Select ‘Disable’ to switch off the automatic sharing of USB
drives. When a compatible drive is connected to the
router, the drive will not be added to the Network section
of Windows or the Finder for Mac OS X. You can still share
a drive with Auto Share disabled, but you must manually
configure the individual sharing settings for the drive in
the Advanced Set
-Up > USB File Sharing page.
Workgroup Name
This field is used to configure the Windows Workgroup
that the shared USB drive belongs to. By default the
workgroup associated with the USB drive is called
‘Workgroup’. This is the standard workgroup name for
Windows XP (Professional), Windows Vista and Windows 7.
If you’ve changed your workgroup name
in Windows, you
may need to change the Workgroup Name field to match
your Windows workgroup in order to access the USB drive
over the network.
Note that for Windows XP Home Edition the workgroup
name is often ‘Mshome’, so it may be necessary to
change
the
Workgroup Name field to ‘Mshome’ to share the USB
drive.
File Permissions
This option is used to configure the file access
Page 92

EE Bright Box User Manual
92
permissions for the attached USB drive. By default this
setting is ‘Read & Write’.
Select ‘Read & Write’
to allow people on your network to
be able to both read from and write to the attached USB
drive.
Select ‘Read Only’ to allow people on your network to open
files or copy files on your USB drive. Files cannot be
deleted, modified or moved
to the USB drive.
Security Control
This option is used to configure whether a username and
password must be entered in order to access the attached
USB drive.
This option is disabled by default.
Select ‘Enable’ to control access to the USB drive by
requiring a user to enter a username and password
to
access the drive. You cannot view the drive contents
without entering the correct username and password.
Select ‘Disable’ to switch off security access control on
the attached USB drive. With this setting anybody on the
network is able to access the drive contents.
User Name
This field is used to configure the Username required to
access the attached USB drive contents if Security
Control option is set to ‘Enable’
Password
This field is used to configure the Password required to
access the attached USB drive contents if Security
Control option is set to ‘Enable’
How to set a username and password on the USB drive
You may wish to limit access to a USB drives to certain users, requiring them to enter a
username and password to access the drive over the
network.
To set a username on attached USB drives:
1.
Login to the router’s admin pages.
2.
Click on the Basic Set-Up tab and then select USB File Sharing from the left hand
menu:
Page 93

EE Bright Box User Manual
93
3.
In the ‘Security Control’ field, set the option to ‘Enable’
4.
Update the ‘User Name’ and ‘Password’ fields as appropriate:
5.
Click Save Settings:
6.
The router will apply the new settings:
Page 94

EE Bright Box User Manual
94
7.
The next time you attempt to access the attached USB drive, you will be prompted to
enter the username and password. Enter the username and password as configured in
Step 5 (Windows 7 and Mac OS X 10.7 screenshot examples below):
8.
Click OK or Connect to complete the connection to the attached USB drive. The files
and folders on your drive will
now be visible.
Page 95

EE Bright Box User Manual
95
CHAPTER 7: BRIGHT BOX ADVANCED SET-UP PAGES
The Advanced Set-Up pages contain configuration pages for a wide variety of advanced
Bright Box router features.
To access the Advanced Set
-Up pages:
1.
Login to the router’s admin pages
2.
Click on the Advanced Set-Up tab.
3.
You’ll be advised to ‘Please proceed with caution..’. Click Accept.
BROADBAND SETTINGS
The advanced Broadband Settings page is the first page displayed when accessing the
Advanced Set
-Up tab. The page contains many of the Broadband Settings in the Basic
Set
-Up > Broadband Settings page, with a few advanced configurable settings.
You can return to the advanced Broadband Settings
page by clicking on the Broadband
Settings
item in the left hand navigation menu on the Advanced Set- Up pages:
Page 96

EE Bright Box User Manual
96
Description of Advanced Broadband Settings
Many of the advanced Broadband Settings are identical to those described in the Basic SetUp
> Broadband Settings page. See
Description of Broadband Settings
on page 49 for
further information.
The following additional settings can be configured on the advanced page:
Section
Description
Connection Type
This dropdown allows you to configure whether the
Internet connection remains connected at all times,
or whether the connection can go into an idle state
after a period of inactivity. The router is set by
default to be always connected.
Select ‘Always Connected’ if you want your Internet
connection to remain connected regardless of
whether there is Internet traffic across the network.
Select ‘Auto
– Trigger by Traffic’ if you want to
configure an idle timeout of the Internet connection
after a certain period of inactivity.
The Internet
connection will be automatically re
-established
when the router detects Internet traffic. You must
also set the idle timeout period in the ‘Idle Time’
field below.
Idle Time
This field lets you configure the amount of time that
elapses before the Internet connection is terminated
without detecting Internet traffic.
The ‘Connection Type’ dropdown must be set to
‘Auto
– Trigger by Traffic’ for this field to be
configurable.
Authentication Protocol
This dropdown allows you to configure the type of
authentication used for connecting to your Internet
service. This option is set to ‘CHAP’ by default for EE
Page 97

EE Bright Box User Manual
97
Broadband.
Select ‘Auto’ for automatic detection
of the
authentication protocol used to connect to you
Internet service.
Select ‘CHAP’
to use the Challenge Handshake
Authentication Protocol for establishing an Internet
connection. This is the correct setting for EE
Broadband.
Select ‘PAP’ to use the Password Authentication
Protocol for establishing an Internet connection.
Internet State
This section shows the current state of your Internet
connection, either ‘Connected’ or ‘Disconnected’.
You can also manually force the Internet connection
to connect or
disconnect by clicking on the
‘Connect’ or ‘Disconnect’ button to the right.
Using the button to force an Internet Connection/Disconnection
Whenever you make changes to any of the settings on the Advanced Set-up > Broadband
Settings
page, and press the Save Changes button, your Internet connection (PPP) will
attempt to be re
-established.
There may be occasions, say for troubleshooting
, where you might want to manually Connect
or Disconnect your Internet Connection
(PPP) without making Broadband Settings changes.
If you are connected to the Internet (the ‘Internet State’ displays ‘Connected’) and you want
to disconnect, click on the Disconnect
button:
The ‘Applying changes’ message will be displayed, and the page will be displayed with the
Internet State of ‘Disconnected’ visible. In the Advanced Set
-up > System > System Log
page the disconnected state appears as ‘PPP connection down (VC1)’.
If you are disconnected from the Internet (the ‘Internet State’ displays ‘Disconnected’) click
on the Connect
button to attempt a reconnection:
The ‘Applying changes’ message will be displayed, and the page should be displayed with the
Internet State of ‘Connected’ visible. In the Advanced Set
-up > System > System Log
page the disconnected state appears as ‘PPP connection up (VC1)’.
Please note that the
Connect button will only successfully re-establish an Internet
connection if your Internet service is working and the Bright Box has been setup correct. See
Chapter 3: Installation
on page 14 or
Chapter 8: Troubleshooting
on page 198 for further
information.
Page 98

EE Bright Box User Manual
98
ADSL MODE
The ADSL Mode page allows you to change your ADSL connection mode (sometimes known
as modulation type). The ADSL mode is used to establish a connection between your Bright
Box router and your local Broadband exchange
.
By default, the ADSL Mode
is set to ‘Automatic’, and this is generally the best mode for your
connection, as the correct connection type will be automatically negotiated between the
exchange and your router. Bit Swapping and SRA (Seamless Rate Adaption) are also enabled
by default. You can change these settings for troubleshooting purposes.
Setting an incorrect ADSL Mode, Bit Swapping or SRA setting may prevent you from
successfully connecting to the Internet. If you make changes to these settings and lose your
Internet connection, please set back to ‘Automatic’ (with Bit Swapping and SRA enabled) and
click Save Settings
Description of ADSL Mode settings
The following settings can be configured on the ADSL Mode page:
Section
Description
ADSL Mode
This dropdown is used to configure the ADSL
connection mode (modulation). This is set to
‘Automatic’ by default and this is usually the best
option. You can also set the mode manually
to
‘G.992.1 (G.DMT)’, ‘G.992.3 (ADSL2)’, ‘G.992.5
(ADSL2+)’, ‘G.992.3 Annex
-M’ and ‘G.992.5 Annex-M’
Bit Swapping
This option is used to enable or disable Bit Swapping
on your ADSL connection. Bit Swapping is enabled
by default and is used to help keep your ADSL line
connection stable.
SRA
This option is used to enable or disable Seamless
Rate Adaption (SRA) on your ADSL connection. SRA
is enabled by default, and helps adapt your line sync
speed automatically without disconnecting your
Internet connection.
MIGRATION WIZARD
This page allows you to easily migrate your Broadband service from EE ADSL to EE Fibre
broadband or vice
-versa. The page also displays the current default Broadband Type (either
ADSL or Fibre/Ethernet) and is identical to the Migration Wizard found in Basic Set
-up >
Broadband Settings > Migration Wizard. For further details see
Migration Wizard
on
page 55
WIRELESS SETTINGS
The advanced Wireless Settings page allows you to Enable or Disable the wireless LAN on the
Bright Box router, and works in the same was as on the Basic Set
-Up > Wireless Settings
page.
See
How to enable or disable wireless
on page 63 for further details.
The page also allows you to manually run an Intelligent Wireless scan to find the least
congested wireless channel. See
Using the Intelligent Wireless feature
on page 78 for further
details.
Page 99

EE Bright Box User Manual
99
CHANNEL AND SSID
The Channel and SSID page contains some advanced wireless configuration settings that
give you extra control over the wireless channel and wireless bandwidth used by the Bright
Box.
In addition you can configure the router to enable two additional SSID’s to be broadcast
providing different wireless network names and security types. You can also bind any of the
router SSID’s to separate Virtual LANs (VLAN’s) to isolate local wireless networks.
To access the Channel and SSID
page:
1.
Login to the router’s admin pages.
2.
Click on the Advanced Set-Up tab and click Accept on the ‘Please proceed with
caution’ page.
3.
Click on Wireless Settings in the left hand navigation menu to expand the Wireless
Settings
menu.
4.
Click Channel and SSID in the left hand navigation menu:
Description of Channel and SSID settings
The following settings can be configured on the Channel and SSID page:
Section
Description
Wireless Mode
This dropdown is used to configure the 802.11
wireless mode the router is transmitting on. By
default the router is set to transmit on ‘11b+11g+11n’
mode.
See
how to change the wireless mode
on page 67
for further information.
Channel
This option is used to configure the 2.4GHz radio
channel for wireless communication. By default the
router will select the wireless channel with the least
interference in the ‘Auto’ mode using the Intelligent
Page 100

EE Bright Box User Manual
100
Wireless feature.
See
how to change the wireless channel
on page 69
for further information.
Extension Channel
This option is used to configure the wireless
extension channel when the ‘Bandwidth’ option is
set to 20/40MHz mode,
‘Channel’ is set to 1-13 and
‘Wireless
Mode’ is set to ‘11b+11g+11n’ or ‘11n only’.
The extension channel is used to double the wireless
bandwidth of the router, allowing for faster transfer
speeds across the wireless network.
The extension channel is four channels above or
below the primary wireless channel.
Channels 5, 6, 7, 8 and 9 allow you to choose
whether the extension channel is a frequency range
above or below the primary channel to help avoid
interference.
Channels 1, 2, 3, 4, 10, 11, 12 and 13 will
automatically select the extension channel for you
(as only one extension channel will be available.)
If your ‘Channel’ is set to ‘Auto’ then the Bright Box
will decide which extension channel to use
automatically based on the router’s Intelligent
Wireless feature.
Bandwidth
This option is used to configure the wireless
bandwidth used for wireless N. This option is only
available if the
‘Wireless Mode’ is set to
‘11b+11g+11n’ or ‘11n only’.
The wireless bandwidth is set to 20MHz by default
on the Bright Box router.
Select ‘20MHz’ for
speeds up to 144Mbps over your
wireless network.
Select ‘20/40MHz’ to bond the wireless channels
allowing you to double wireless speeds on your
network up to 300Mbps.
Please note that the wireless router is required to
automatically use the 20MHz mode when another
wireless network
is transmitting in the same wireless
frequency range
s. If the router is set to 20/40MHz
bandwidth, it may still operate
in 20MHz mode if it
detects another wireless access point transmitting
in a neighbouring frequency range.
Multiple SSID Enable
This setting allows you to enable or disable any of
the three wireless network names (SSID’s
) supported
by the router.
By default, only SSID1 is enabled – this
is your default wireless network.
Tick the box to enable the relevant SSID. Ensure
that you also enter a ‘wireless network name (SSID)’
in the field, set the ‘security’ and tick the ‘broadcast
SSID’ option in order to configure an SSID to be
transmitting the wireless network name.
Untick the box to disable the relevant SSID and
prevent it from transmitting over the wireless
network.
 Loading...