

Page 1

4GEE Capture Cam
USER MANUAL
Page 2

ii
Table of contents
Copyright ............................................................................................................................................... 1
Disclaimer.............................................................................................................................................. 1
About this user manual ........................................................................................................................ 1
Before you start....................................................................................................................................2
Important safety information ............................................................................................................. 2
Battery usage ........................................................................................................................................ 3
Getting started ..................................................................................................................................... 3
Box contents ......................................................................................................................................... 3
Overview................................................................................................................................................. 4
Front view .......................................................................................................................................... 4
Rear view ........................................................................................................................................... 4
Setting up your camera ....................................................................................................................... 5
Removing the nano-SIM/microSD card ......................................................................................... 6
Charging the camera ............................................................................................................................ 6
Attaching the accessory adaptor .......................................................................................................7
Removing the accessory adaptor ...................................................................................................7
Using your 4GEE Capture Cam ...........................................................................................................8
Turning your camera on/off ................................................................................................................ 8
Identifying the light indicators ........................................................................................................... 8
Checking the battery/camera status ............................................................................................ 8
Battery ............................................................................................................................................... 9
Camera ............................................................................................................................................... 9
Checking the network signal status............................................................................................ 10
Selecting modes ................................................................................................................................. 10
Taking photos ...................................................................................................................................... 10
Recording videos ................................................................................................................................. 11
Managing photos and videos ............................................................................................................. 11
Sending an emergency SMS ..............................................................................................................12
Resetting your camera ........................................................................................................................12
Your 4GEE Action Cam app (compatible with your 4GEE Capture Cam) .....................................12
Features ................................................................................................................................................12
Operating system requirements ........................................................................................................13
Installing the app .................................................................................................................................13
Setting up the app ...............................................................................................................................13
Initiating the app ................................................................................................................................ 14
Main screen overview .....................................................................................................................15
Page 3

iii
Selecting modes ............................................................................................................................. 16
Setting up your account to live stream to skeegle ....................................................................... 16
Sharing live streaming videos ........................................................................................................... 19
Replaying live streaming videos ........................................................................................................21
Taking photos ...................................................................................................................................... 23
Recording videos ................................................................................................................................24
Starting a live stream from the app ................................................................................................. 24
Managing photos and videos ............................................................................................................26
Setting up your camera ..................................................................................................................... 27
Reading your messages ..................................................................................................................... 27
Checking your data usage ................................................................................................................. 27
Looking for help .................................................................................................................................. 27
Setting up your 4GEE Capture Cam ................................................................................................ 28
Network data ....................................................................................................................................... 28
Network roaming ................................................................................................................................ 28
GPS ........................................................................................................................................................28
Video live resolution (Live streaming mode) ..................................................................................29
Video record resolution (Record video mode) ...............................................................................29
Time-lapse ............................................................................................................................................ 29
Video loop ............................................................................................................................................29
Photo resolution .................................................................................................................................29
Photo shot mode.................................................................................................................................29
Volume .................................................................................................................................................. 29
Auto power off ....................................................................................................................................30
Time settings ....................................................................................................................................... 30
Orientation ........................................................................................................................................... 30
Changing the WiFi password ............................................................................................................ 30
Resetting the WiFi password .............................................................................................................31
Checking the storage ..........................................................................................................................31
Emergency SMS ...................................................................................................................................31
Change device name ...........................................................................................................................31
Checking your camera’s firmware version ...................................................................................... 32
Formatting ........................................................................................................................................... 32
Resetting your camera settings to default .................................................................................... 32
Updating your camera ....................................................................................................................... 32
File sorting ........................................................................................................................................... 33
Checking your app version ................................................................................................................ 33
Transferring camera files to a computer .........................................................................................33
Troubleshooting ..................................................................................................................................34
Page 4

iv
Appendix .............................................................................................................................................35
Specifications ...................................................................................................................................... 35
RF exposure ......................................................................................................................................... 36
CE SAR compliance ........................................................................................................................ 36
Caution ............................................................................................................................................. 36
Limit your exposure to radio frequency (RF) ............................................................................. 36
Disposal of your old product .............................................................................................................36
EC Declaration of Conformity ........................................................................................................... 37
Page 5

1
Copyright
Copyright 2015 EE Limited. All rights reserved. No part of this publication may be reproduced,
transmitted, transcribed, stored in a retrieval system or translated into any language or
computer language, in any form or by any means, electronic, mechanical, magnetic, optical,
chemical, manual or otherwise, without the prior written permission of EE Limited.
IOS is a trademark or registered trademark of Cisco in the U.S. and other countries and is used
under license. App Store is a service mark of Apple Inc.
Android, Google, Google Play and other marks are trademarks of Google Inc.
All other logos, products, or company names mentioned in this manual are the registered
trademarks or copyrights of their respective companies, and are used for informational
purposes only.
Disclaimer
Except as required by law, EE Limited makes no representations or warranties, either expressed
or implied, with respect to the contents hereof. Further, EE Limited reserves the right to
revise this publication and to make changes from time to time in the contents hereof without
obligation of EE Limited to notify any person of such revision or changes. To the maximum
extent permitted by law, in no event shall EE Limited be liable for damages in excess of the
purchase price of the product or for, without limitation, loss of profits, business, revenue; loss of
use, time, data, reputation, opportunity, goodwill, or savings; inconvenience; incidental, indirect
or consequential damages; or damages arising from the use or inability to use the product.
About this user manual
• Information contained in this user manual is correct at the time of release and subject to
change without notice. Visit
ee.co.uk/camwelcome
to download the latest version of this
manual.
• Screen images and icons in this manual are simulated for illustrative purposes only. Actual
displays may vary.
• Make sure you have read all the notes and warnings mentioned in this user manual.
•
Note:
Useful tips or additional information that help you get better use of this camera.
•
WARNING:
Instructions that must be followed. Failure to observe can cause damage to
this camera, or result in personal injuries.
Page 6

2
Before you start
Please read the following important safety instructions carefully before using your
4GEE Capture Cam (hereinafter called “camera”).
WARNING:
Failure to observe these instructions may result in personal injuries or damage to
this camera.
Important safety information
• Observe all laws, regulations and common safety practices while using this camera. To
reduce the risk of accidents, please do not use while driving.
• Do not use the camera where prohibited.
• Do not place this camera under direct sunlight or near heat sources, such as in a closed car
under sunlight or near a stove. The outer casing of this camera may become deformed and
the sophisticated components inside may become damaged due to excessive heat.
• Do not use this camera near water, in the rain or allow any liquid to get inside this camera.
Water and moisture may cause the electronic components to short circuit and lead to a
malfunction.
• Do not use this camera near strong electromagnetic sources, such as a microwave oven. The
electromagnetic interference may cause this camera to malfunction.
• Do not drop or apply shock/vibration to this camera. Strong impacts may damage the
components inside.
• Standard 5V/1A charging head required. The power adapter shall be certified according to
IEC/EN 60950-1 and fulfilled the requirement of SELV and LPS. Connecting this camera to a
power adapter that does not meet the above requirements is very dangerous and may lead
to fire or explosion.
• Do not cut, bend, modify, place heavy objects, or step on the USB cable. Otherwise the
external insulation may be damaged and result in short-circuit or fire.
• If there are strange odours or heat emitting from this camera or any signs of malfunction,
disconnect this camera from the power immediately and contact EE for an inspection or
service.
• If a foreign substance or water gets in this camera, turn the power off immediately and
disconnect the power adapter. Then contact EE to arrange a service.
• Do not attempt to disassemble or modify this camera. There are no user serviceable parts
inside this camera, and unauthorised modifications will cause the warranty to void.
• Use this camera in environmental temperatures between 0 °C to 35 °C.
• Keep good ventilation during charging. Do not cover the power adapter with paper or
objects that will reduce cooling.
• Connect the power adapter to a proper electrical outlet and power source. The voltage
requirements are found on the product packaging.
• Do not use the power adapter in a highly humid environment.
• Never touch the power adapter with wet hands.
• Do not attempt to repair the power adapter. Replace the power adapter if it is damaged or
exposed to excessive moisture. Contact EE or head to your nearest store for help.
• The maximum operational ambient temperature (TMA) as specified by the manufacturer is
35 °C.
Page 7

3
Battery usage
WARNING:
The camera’s battery is non-removable. Do not attempt to remove the battery.
• Using an unapproved battery may cause your camera to explode and result in serious
damage to your health or property.
• Do not disassemble the camera or throw the camera in fire as it may explode.
• Incorrect use of the battery may cause a leak of chemicals or explosion.
• The leak of chemicals may harm the skin and erode the metal contacts. If any chemicals leak
from the device, use a dry cloth to wipe it clean and contact EE for help.
Getting started
This 4GEE Capture Cam provides high speed data transmission and wider bandwidth for
multimedia streaming needs.
Note:
The availability and performance of 4G LTE services depend on some factors such as your
distance from a 4G base station, weather or local geographic factors. You can always check 4G
coverage at
ee.co.uk/coveragechecker
.
Box contents
Check the sales package for the following items. If any item is missing or damaged, contact EE
immediately.
• 4GEE Capture Cam (this camera) with non-removable battery
• USB cable
• Accessory adaptor
• QUICK START GUIDE
• WARRANTY AND DISCLAIMERS
• KEEP ME CARD
Page 8
4
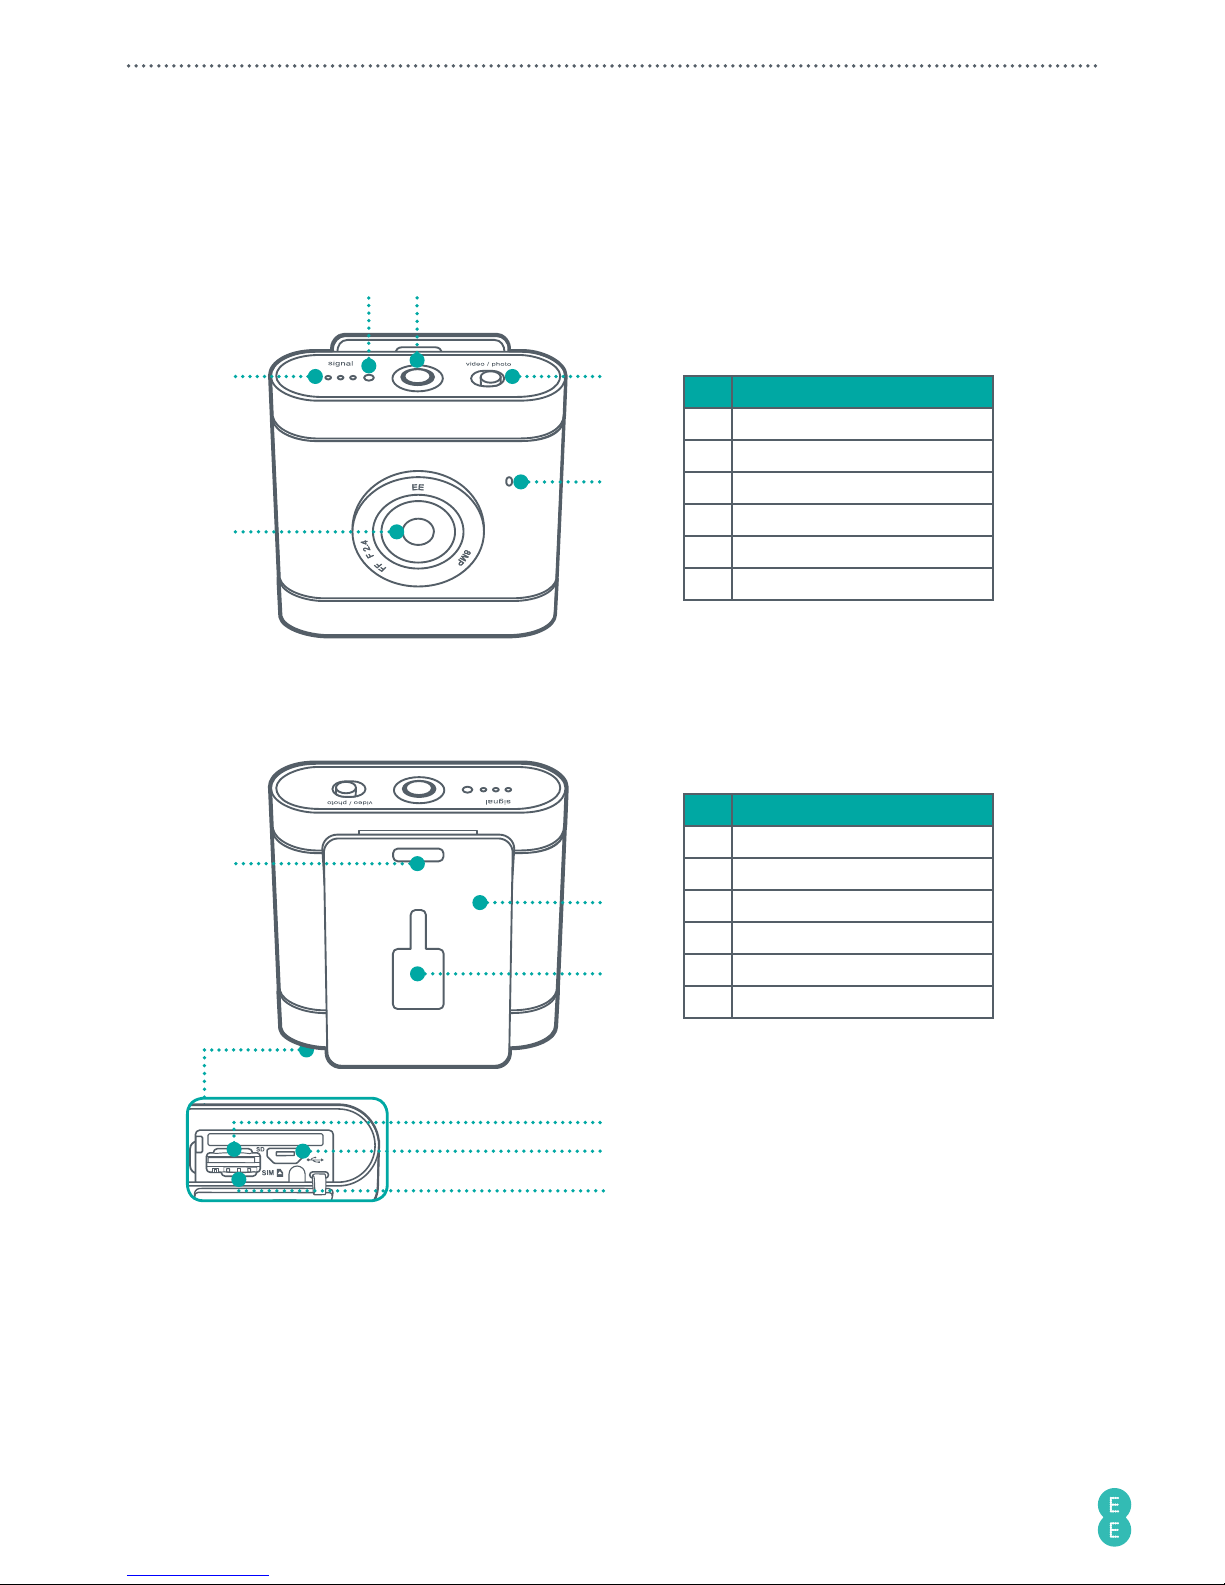
Overview
Front view
2 3
1
4
5
6
No. Item
1 Signal indicator
2 Microphone
3 Power button/status light
4 Toggle switch
5 Speaker
6 Camera lens
Rear view
7
Bottom view
8
9
10
11
12
No. Item
7 Lanyard hole
8 Camera clip
9 Accessory adaptor slot
10 MicroSD card slot
11 Micro USB port
12 Nano-SIM card slot
Note:
To understand the lighting patterns of the indicators and the meanings they represent,
please refer to
“Identifying the light indicators” on page 8
.
Note:
The camera clip itself is designed for easy carrying. To perform extreme sporting
events, use accessories compatible with the accessory adaptor slot or the lanyard hole for
security. These accessories are available separately to buy at your nearest EE store or online at
accessories.ee.co.uk
.
Page 9
5
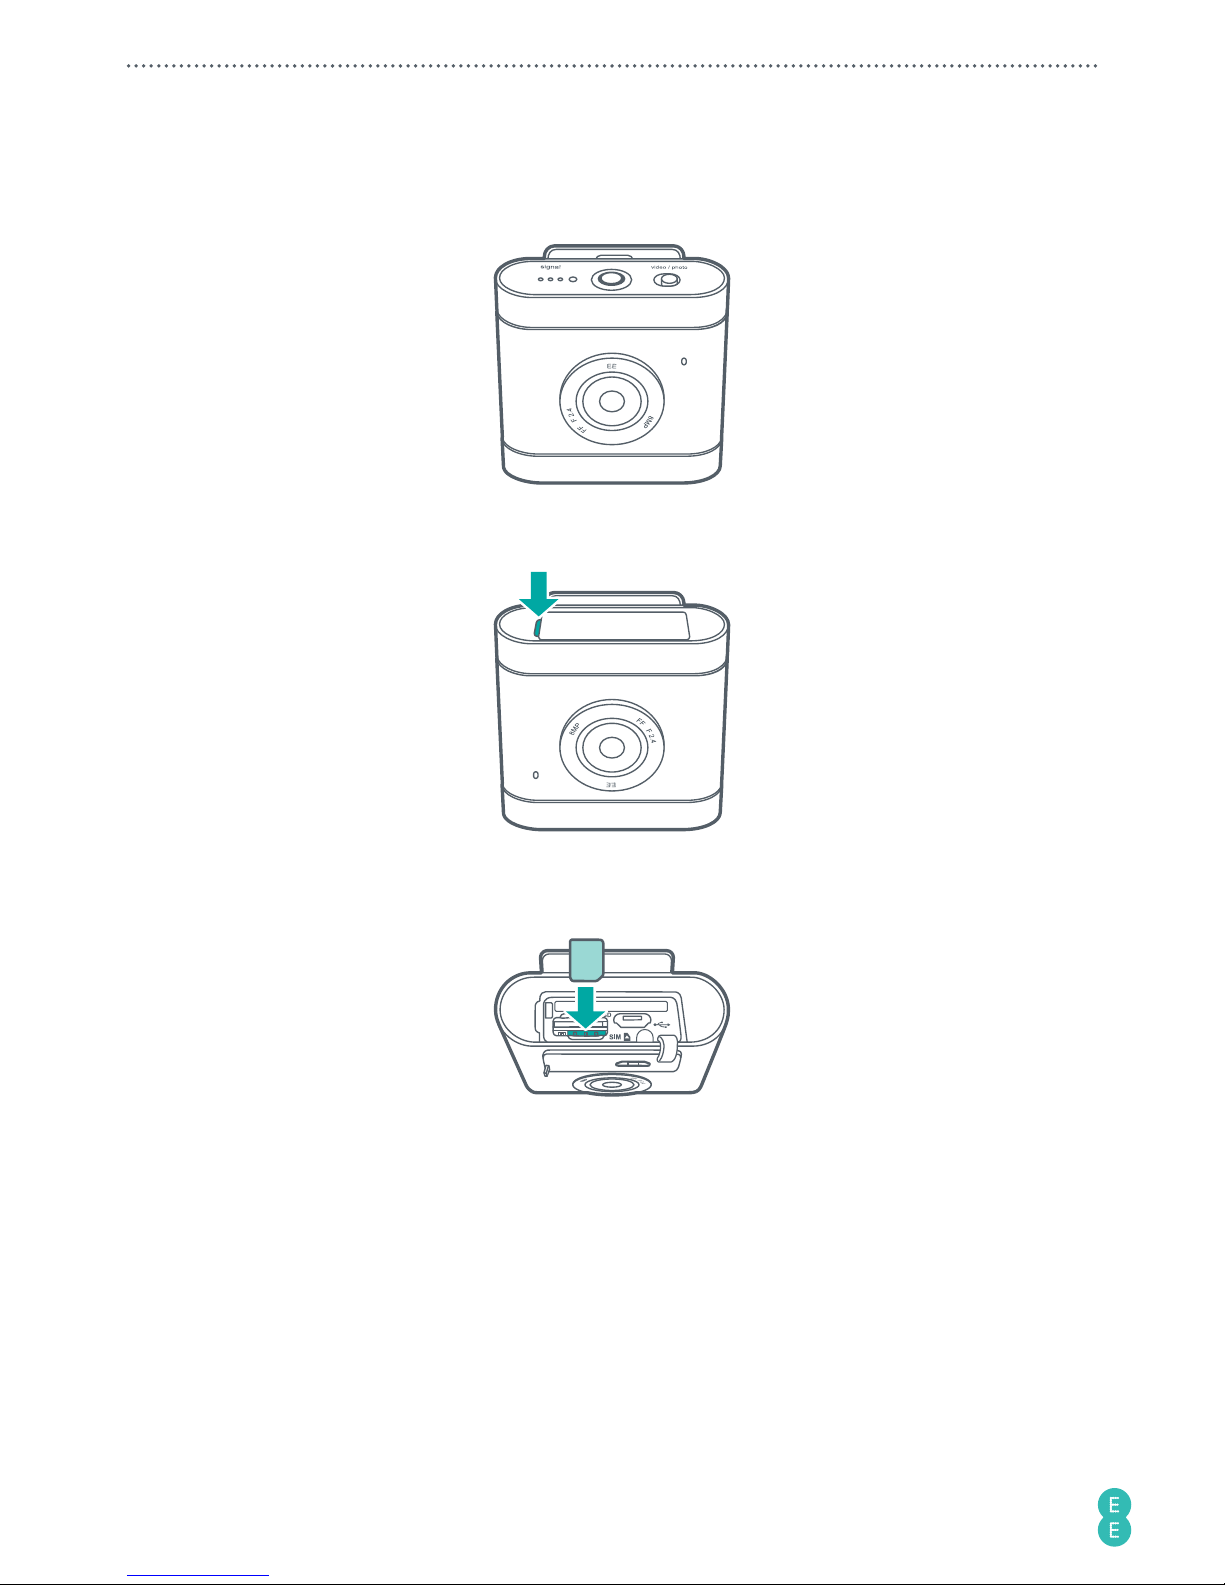
Setting up your camera
1. Turn the camera upside down.
2. Stick your fingernail into the notch, and carefully flip the camera cover open.
3. Slip in the nano-SIM card with the cut corner at the lower right and its metal contacts
facing towards the camera clip. Depress until it clicks into place.
WARNING:
To avoid damaging your camera and nano-SIM card, do not use a micro-SIM card.
Using incompatible SIM cards may damage the card or the camera.
Page 10

6
4.
(Optional)
If you have a microSD card, insert it into the microSD cart slot until it clicks
into place.
Note:
The camera supports microSD cards (formatted in FAT32 only) up to 64 GB in size.
You can purchase a microSD card separately from an EE store or online at
accessories.ee.co.uk
.
Note:
Your camera automatically selects the source for multimedia file storage. If you have
inserted a microSD card into your camera, photos/videos captured will be stored in the
microSD card storage. If no microSD card is inserted, photos/videos captured will be stored
in your camera’s internal storage (limit: approximately 2.4 GB). The actual storage space in
your camera available for use depends on the amount of space the preloaded content takes.
Removing the nano-SIM/microSD card
Push the nano-SIM/microSD card in to release it from the card slot, then pull out the nanoSIM/microSD card.
Charging the camera
1. Insert the smaller end of the USB cable into your camera’s micro USB port.
2. Insert the larger end of the USB cable into the matching power adapter (standard 5V/1A
charging head required).
3. Plug the power adapter into an electrical outlet to start charging. The Power button/
status light flashes red/amber/green
/ / .
4. When charging is complete (approximately 2 hours), the Power button/status light turns
solid green
.
Page 11

7
Note:
The power adapter shall be certified according to IEC/EN 60950-1 and fulfilled the
requirement of SELV and LPS. If required you can purchase a power adapter separately online
at
accessories.ee.co.uk
.
WARNING:
Using power adapters that do not meet the above requirements may cause damage
to your camera or result in personal injury.
Attaching the accessory adaptor
Use the accessory adaptor to connect your camera to screw-lock type accessories (separate
purchase).
1. Pinch the plastic clip and slip in the accessory adaptor.
Plastic
clip
2. Attach the screw-lock type accessory.
These accessories are available separately to buy at your nearest EE store or online at
accessories.ee.co.uk
.
Removing the accessory adaptor
Pinch the plastic clip and slide back.
Page 12
8
Using your 4GEE Capture Cam
Note:
A nano-SIM card is required to use cellular services when connecting to 4G or 3G
networks.
Turning your camera on/off
Press and hold the Power button/status light for approximately 4 seconds until you hear the
power on sound.
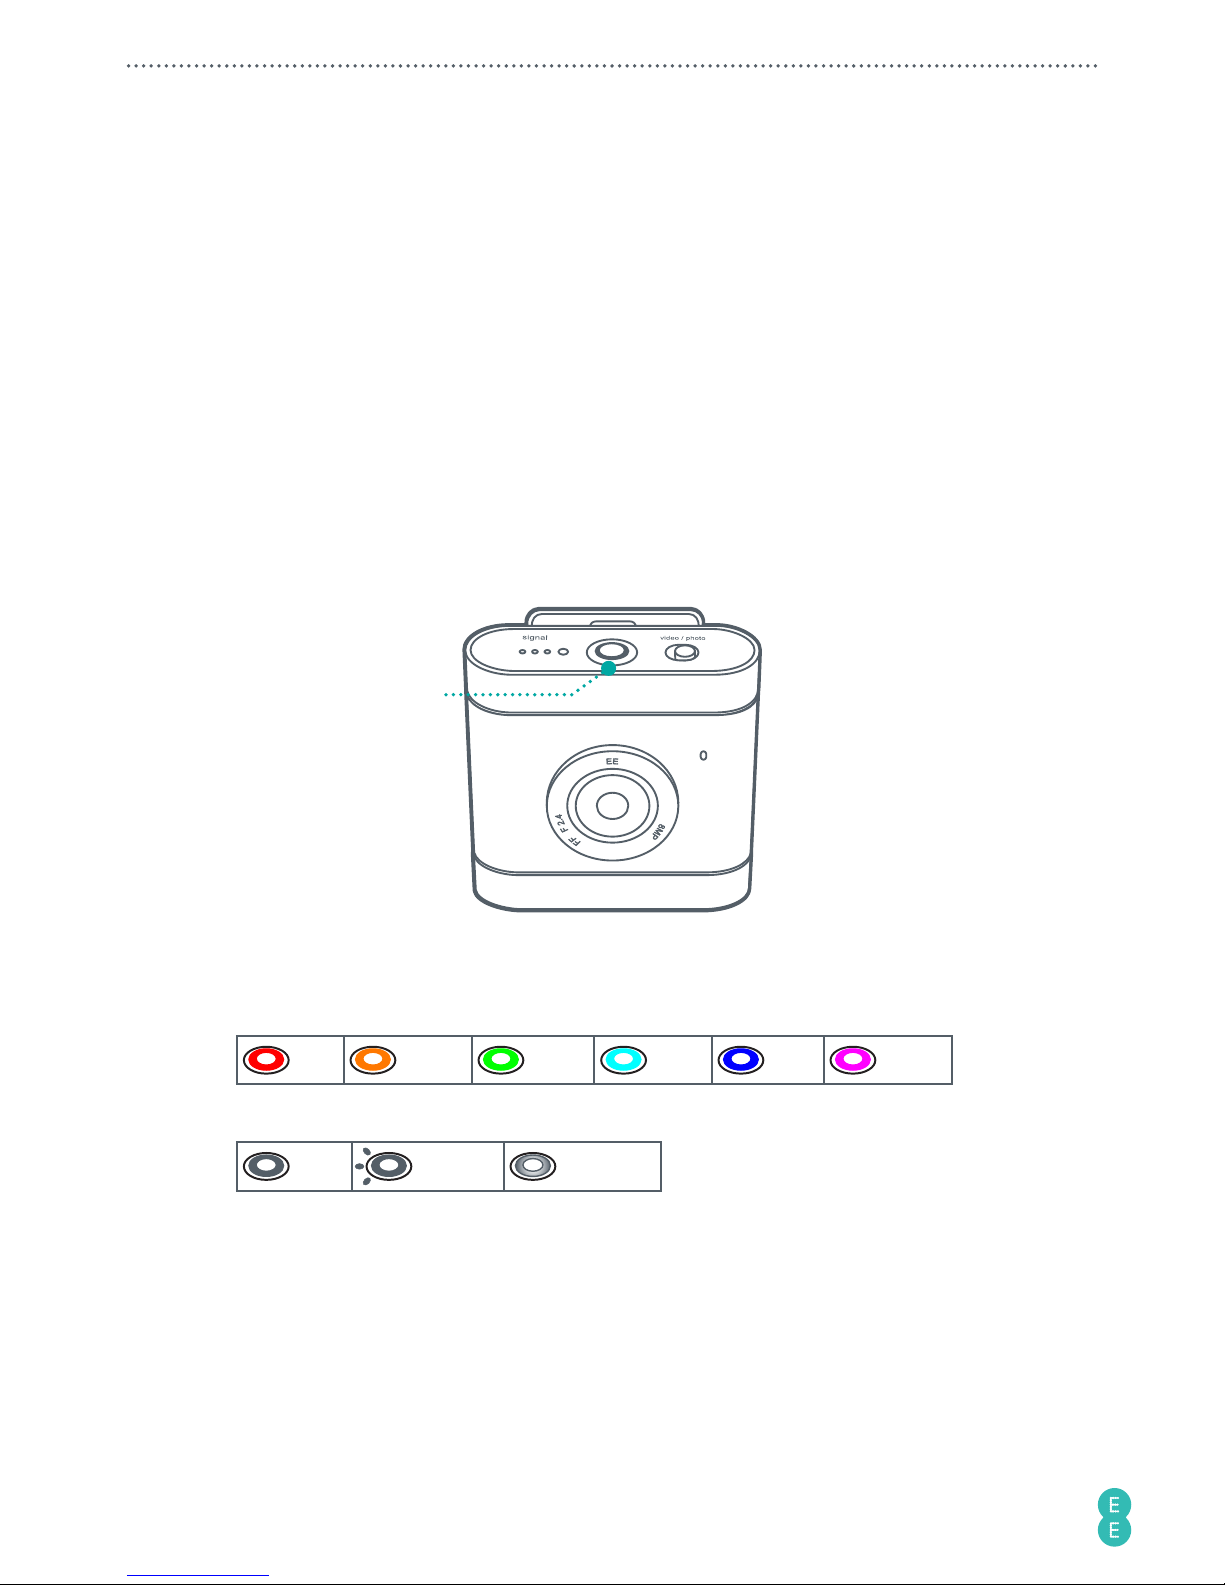
Identifying the light indicators
Checking the battery/camera status
Power button/
status light
Definition of the status lights:
Colour
Red Amber Green Cyan Blue Purple
Behaviour
Solid Flashing Breathing
Page 13
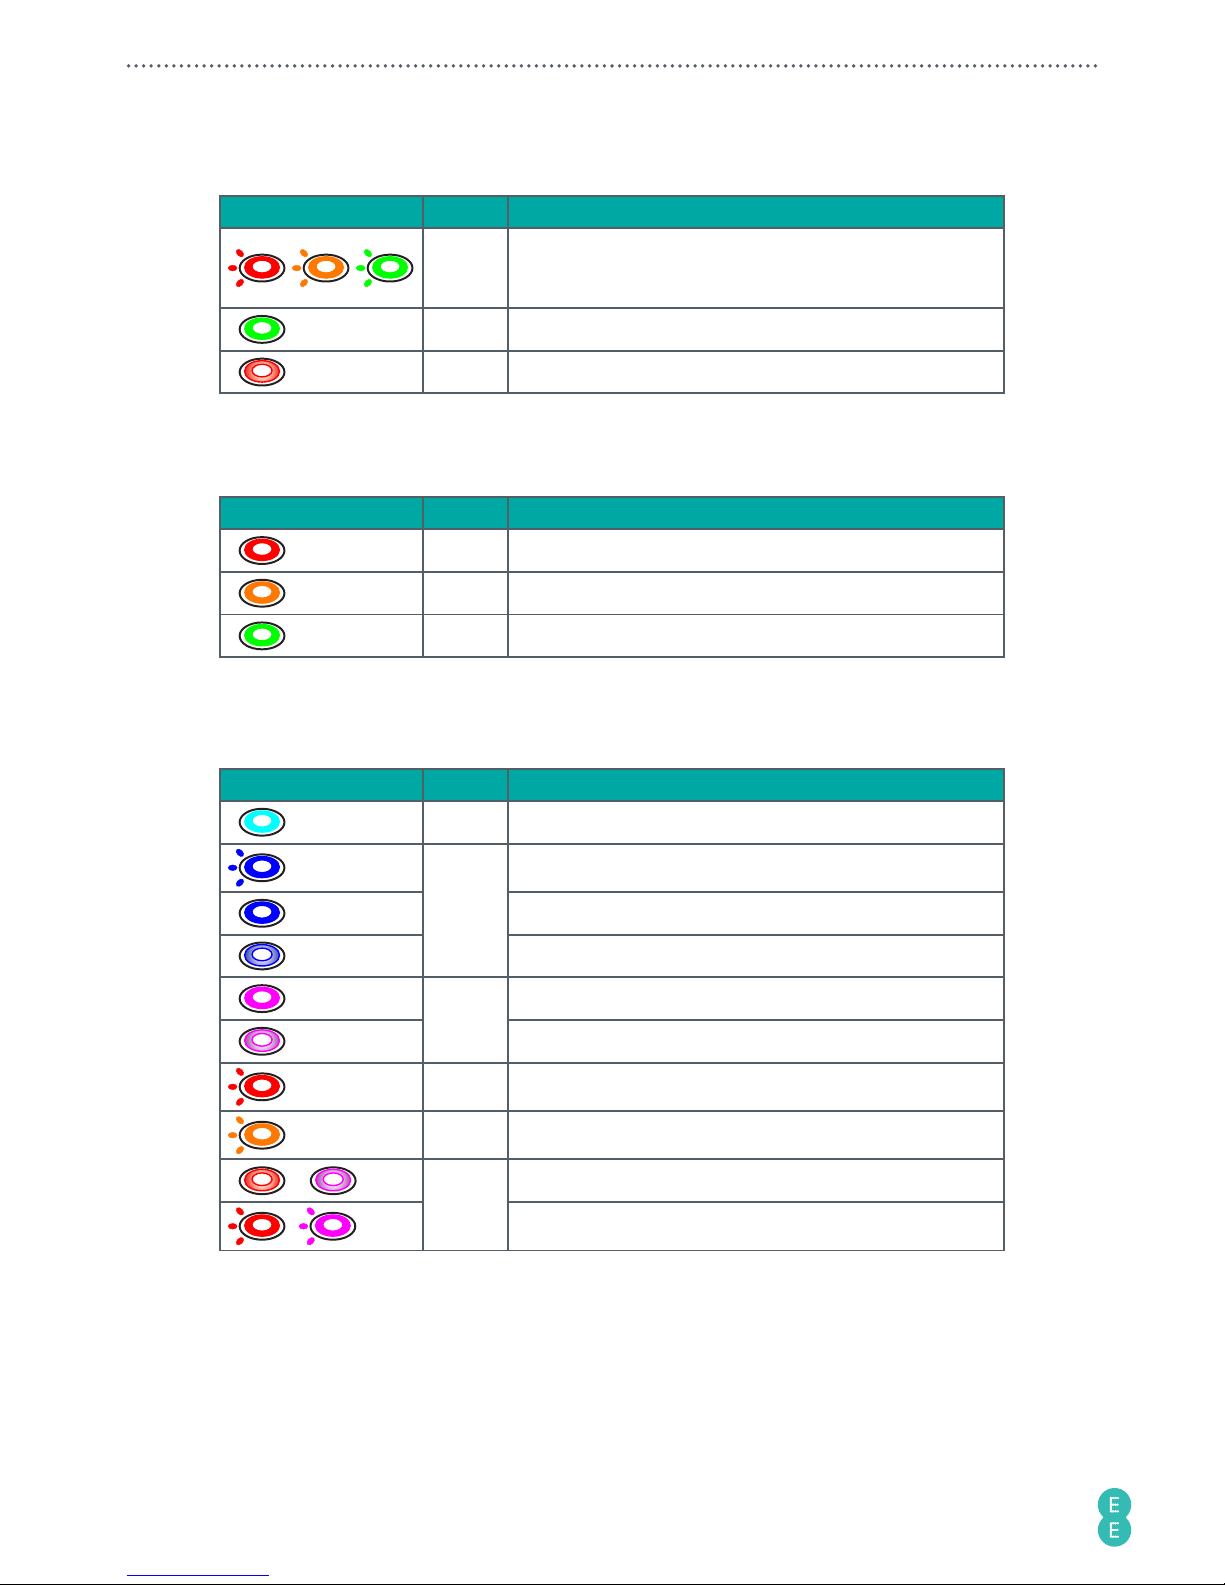
9
Battery
Status light
Colour
Meaning
/ /
Red/
Amber/
Green
The battery is charging.
Note:
After the battery is fully charged, the Power button/
status light turns solid green.
Green The battery is full.
Red The battery power is low.
To check the battery status, press the Power button/status light twice and observe the
status light below.
Status light Colour Meaning
3 sec
Red Battery level 0% - 19%
3 sec
Amber Battery level 20% - 59%
3 sec
Green Battery level 60% - 100%
Camera
Status light Colour Meaning
Cyan The camera is turning on.
x 2
Blue
Take photos.
Video recording is in progress.
The camera is ready for photo/video shooting.
Purple
Live streaming is in progress.
The camera is ready for live streaming.
x 3
Red An error has occurred. Refer to the app notifications.
4 sec
Amber The camera is rebooting.
+
Red +
Purple
The camera software is downloading.
+ The camera is updating or resetting.
Page 14

10
Checking the network signal status
Signal
indicator
Status light Colour Meaning
Green Indicates network signal strength.
Red No signal/No nano-SIM card/No network connection.
Selecting modes
Use the camera’s Toggle switch to select Photo or Record video/Live streaming modes.
• To take a photo, move the Toggle switch to
Photo
.
• To record a video or start a live stream, move the Toggle switch to
Video
.
Your camera is set to Record video mode by default. To use Live streaming mode, you will
need to pair your mobile phone with your camera, then use the 4GEE Action Cam app
(compatible with your 4GEE Capture Cam) installed on your phone for selection. For detailed
instructions, please refer to
“Your 4GEE Action Cam app (compatible with your 4GEE Capture
Cam)” on page 12
.
Taking photos
Note:
If you wish to have a preview of your photos before taking them, use the 4GEE Action
Cam app (compatible with your 4GEE Capture Cam) installed on your mobile phone. For
detailed instructions, please refer to
“Your 4GEE Action Cam app (compatible with your 4GEE
Capture Cam)” on page 12
.
Note:
To view the photos taken, use the 4GEE Action Cam app installed on your mobile phone
or transfer files to your computer. For detailed instructions, please refer to
“Managing photos
and videos” on page 26
and
“Transferring camera files to a computer” on page 33
.
Your camera allows you to take photos using the following photo shot modes:
• Normal: Take a single photo at a time. This is also the default photo mode.
• Burst: Quickly capture a number of consecutive shots.
• Timer: Take photos using the self-timer.
Page 15

11
To specify the photo shot mode you’re using on the camera, use the 4GEE Action Cam app
installed on your mobile phone for selection. For detailed instructions, please refer to
“Your
4GEE Action Cam app (compatible with your 4GEE Capture Cam)” on page 12
and
“Taking
photos” on page 23
.
1. Move the Toggle switch to
Photo
.
2. Press the Power button/status light to take photo(s).
Recording videos
Note:
If you wish to preview your video before recording videos, use the 4GEE Action Cam
app (compatible with your 4GEE Capture Cam) installed on your mobile phone. For detailed
instructions, please refer to
“Your 4GEE Action Cam app (compatible with your 4GEE Capture
Cam)” on page 12
.
Note:
To watch the videos recorded, use the 4GEE Action Cam app installed on your mobile
phone or transfer files to your computer. For detailed instructions, please refer to
“Managing
photos and videos” on page 11
and
“Transferring camera files to a computer” on page 33
.
By default, your camera is set to record video in normal mode. Your camera also allows you to
record videos using the following video modes.
• Time-lapse: Capture continuous shots at the preset interval time and save them into one
video automatically. The recorded video is played back in fast motion, producing a time
passage effect, such as traffic flow, sunrise/sunset, plant growth, etc.
• Video loop: Enable this function to record videos continuously and saved in separate files
with specified time segments. Once the internal or the microSD card storage is full, the
saved video loops will be overwritten with new ones until you manually stop loop recording.
To specify the video mode you’re using on the camera, use the 4GEE Action Cam app installed
on your mobile phone for selection. For detailed instructions, please refer to
“Your 4GEE Action
Cam app (compatible with your 4GEE Capture Cam)” on page 12
and
“Recording videos” on
page 24
.
1. Move the Toggle switch to
Video
.
2. Press the Power button/status light to start recording. The Power button/status light
turns solid blue
.
3. Press the Power button/status light again to stop recording.
Managing photos and videos
To view or share the photos and videos captured with your camera, use the 4GEE Action Cam
app (compatible with your 4GEE Capture Cam) installed on your mobile phone, or transfer the
files to your computer. For detailed instructions, please refer to
“Your 4GEE Action Cam app
(compatible with your 4GEE Capture Cam)” on page 12
and
“Transferring camera files to a
computer” on page 33
.
Note:
Playback performance of the videos on your computer may vary depending on the
operating system, CPU and the media player you use.
Page 16

12
Note:
Playing back videos on your phone using the VLC media player provides the optimal
playback performance.
Sending an emergency SMS
Note:
To use the emergency SMS service, you will need to add emergency contact information
first using the 4GEE Action Cam app (compatible with your 4GEE Capture Cam) installed
on your mobile phone. For detailed instructions, please refer to
“Your 4GEE Action Cam app
(compatible with your 4GEE Capture Cam)” on page 12
and
“Emergency SMS” on page 31
.
Press and hold the Power button/status light, then quickly move the Toggle switch back
and forth twice within 4 seconds. The preset SMS contents will be sent to your designated
contact(s).
Resetting your camera
Performing this action will restore your camera to its factory state including WiFi password and
erase all your stored data.
1. Press and hold the Power button/status light (approximately 13 seconds) until it flashes
amber
.
2. Without releasing the Power button/status light, quickly move the Toggle switch back
and forth twice within 4 seconds until it flashes red and purple
+ .
WARNING:
This operation is irreversible. Consider backing up photos/videos captured to your
computer or a secondary storage device first.
Your 4GEE Action Cam app (compatible with your 4GEE
Capture Cam)
Features
The 4GEE Action Cam app is used to control your camera, including live preview on your mobile
phone when capturing photos/videos, reading your messages, syncing your camera to skeegle,
allowing you to live stream videos, managing your data account and setting up your camera.
Note:
For detailed instructions on how to set up your camera, please refer to
“Setting up your
4GEE Capture Cam” on page 28
.
Page 17

13
Operating system requirements
• iOS 7 or later
• Android™ OS 4.3 or later
Note:
Operations, screen images and icons described in the following sections about using the
app are written based on using an Android phone. If you are using an iOS phone, part of the
user interface and operations may be different.
Installing the app
1. Search for and download the 4GEE Action Cam app from the APP Store (for iOS) or the
Google Play™ store (for Android OS) on your mobile phone.
2. Install the app.
Setting up the app
Note:
Before setting up the app, make sure you have turned on your camera (refer to
“Checking
the battery/camera status” on page 8
).
1. On your mobile phone, go to WiFi settings.
2. Select “4GEE Capture Cam XXXXX” on the WiFi network list.
Note:
XXXXX indicates the last 5 digits of your camera’s IMEI number.
Page 18

14
3. Enter the default password (00000000) and select “Connect”.
When the status bar at the top shows , your phone’s WiFi connection is successful.
Note:
If you have performed the steps above and pairing does not start, please refer to
“Troubleshooting” on page 34
.
Initiating the app
1. On your phone, touch to start the app.
2. You will be requested to change the WiFi password for the first time. Touch OK and
follow the on-screen instructions to set up your personal password.
3. After changing the WiFi password, your phone will automatically be disconnected from
the camera. Go to WiFi settings on your phone, select “4GEE Capture Cam XXXXX” on
the WiFi network list, then select “Forget”.
4. Select “4GEE Capture Cam XXXXX” again on the WiFi network list, enter your new
password and select “Connect”.
5. Touch
to re-start the app.
Page 19

15
Main screen overview
82 3 41
1011131415 12
9
65 7
No. Meaning
1
: WiFi signal strength
2
Camera battery level
•
: battery is empty
•
: battery is charging
•
: battery is fully charged
3
Nano-SIM card status
•
: Your nano-SIM card is detected
•
:No nano-SIM/Your nano-SIM card cannot be detected
•
: Your nano-SIM card is protected by a SIM PIN.
4
: You have an SMS message
5
•
: A software update is available for download
•
:The software download is complete
6
: The GPS function is turned on.
7
MicroSD card status and remaining storage
•Photo mode: Number of photos remaining
•Record video mode: Recording length of videos remaining
•Live streaming mode: N/A
8 Preview screen
9 Photo/Video resolution
10 Live streaming mode
Page 20

16
No. Meaning
11 Photo mode
12 Record video mode
13
Shutter
Touch Shutter to take photos or start/stop recording or
live streaming videos.
14 Manage photos/videos captured
15
Settings
Set up your camera, manage your account or looking for help.
Note:
To read your messages, access your account or sync your camera to skeegle, a valid
nano-SIM card must be inserted in your camera (please refer to
“Setting up your camera” on
page 5
).
Note:
If your nano-SIM card cannot be detected, please refer to
“Troubleshooting” on
page 34
.
Selecting modes
• Photo mode: Move the Toggle switch to
Photo
on your camera.
• Record video mode:
a. Move the Toggle switch to
Video
on your camera.
b. In the app, touch
.
• Live streaming mode:
a. Move the Toggle switch to
Video
on your camera.
b. In the app, touch
.
Note:
The icon of the currently selected mode will be displayed in yellow:
/ /
.
Setting up your account to live stream to skeegle
Note:
Before setting up your live streaming account, make sure you have paired your phone to
your camera (refer to
“Setting up the app” on page 13
) and that your camera is connected to
the 3G/4G network.
Page 21

17
A. For Pay monthly customers
1. In the main screen of the app, touch to display the
SETTINGS
screen.
2. Touch
LIVE STREAM
>
skeegle
. Enter your Facebook credentials followed by your
mobile phone number (not your camera number) to create your live streaming
account.
Note:
When entering your number do so without the 1st zero.
Page 22

18
3. Download the skeegle app* on to your phone from the App Store or Google Play store.
In the app, go to Contacts
and in here you’ll be able to create circles of friends
you wish to live share your videos with. The camera icon
indicates your default
group.
*Skeegle is a private video sharing service where your can stream live videos to your
contacts.
4. To start a stream make sure the Toggle switch is set to
Video
. Back in the 4GEE
Action Cam app select Live streaming mode on the main screen. Then press the Power
button/status light to go live.
B. For Pay as you go customers (activating your SIM)
1. Once your camera and your phone are paired successfully, you will be automatically
redirected to a web page to register your SIM and activate your data add-on. If this
doesn’t happen automatically, just open your phone’s browser and visit
add-on.ee.co.uk/status
.
Page 23

19
2. Follow the instructions on screen to register and activate your 4GEE Capture Cam
SIM.
3. Go back to the 4GEE Action Cam app and follow steps 1-4 for Pay monthly customers.
Note:
You only have to set up your live streaming account for the first time.
Sharing live streaming videos
When you live stream a video to skeegle, you can notify your friends and share the video with
them. A circle is where you organise contacts into a group, allowing you to easily find specific
contacts. You can add as many people as you like to a circle but can only stream to one circle
at any one time from the camera.
1. On the main screen of the skeegle app, touch Contacts
.
Page 24

20
2. On the
CIRCLES
screen, touch
ADD A CIRCLE
.
Numbers of
people added
in this circle
3. Enter the name of the new circle and touch
DONE
.
4. On the
CIRCLES
screen, touch the new circle followed by the plus icon top right
. A
list of contacts from your phone book appears. Select the desired contacts then touch
. These contacts are added to the new circle.
Page 25

21
5. On the
CIRCLES
screen, drag the camera icon to the new circle. This icon indicates
what circle is your default one and so the next time you go live from the camera, it will
stream to that circle.
The next time you start a live stream from your camera, the contacts in your selected circle will
be notified with a text message containing a web page link to your video stream. Your friends
and family simply need to click on the link to start watching you in action in real time.
Replaying live streaming videos
When you live stream a video to skeegle, a copy of this recording will be saved. You can later
use the 4GEE Action Cam app* (please refer to
“Managing photos and videos” on page 26
) or
the skeegle app to replay the streaming video/event.
*If you have at least 500 MB of available memory.
A. To replay your streamed videos
1. On the top left corner of the main screen of the skeegle app, touch your profile
picture.
Page 26

22
2. On the
MY PROFILE
screen, your streaming videos/events will be listed in descending
date/time order. Touch the video/event to watch a replay of that recording.
Scroll
up
for
more
replays
Video view
counts
Number
of videos
B. To replay videos streamed to you from your friends
1. On the main screen of the skeegle app, touch .
2. All the videos streamed to you from your friends and family will be listed in ascending
date/time order. Touch the video/event to watch a replay of that recording.
Scroll
up for
more
replays
Page 27

23
Taking photos
3
4
2
1. On your camera, move the Toggle switch to
Photo
.
2. In the main screen of the 4GEE Action Cam app, touch
>
CAMERA
>
Photo shot
mode
> select your desired photo shot mode:
• To take a single photo at a time (default), touch
Normal
.
• To take 20 photos continuously (burst mode), touch
Burst
.
• To take photos using the self-timer, touch
Timer 2S/Timer 10S
.
3. Aim your camera at your subject, which will be shown on the preview screen of your
phone.
4. Back in the app, take photo(s) by touching
(single) / (burst) / (self-
timer).
Page 28

24
Recording videos
4
2
5, 6
3
1. On your camera, move the Toggle switch to
Video
.
2. In the main screen of the app, touch
to enter Record video mode.
3. Touch
>
CAMERA
.
• To record a video at normal speed (default), make sure
Timelapse
and
Video loop
are
turned off.
• To record a time-lapse video, touch
Timelapse
> desired time interval.
• To record videos on a loop, touch
Video loop
> On.
4. Aim your camera at your subject, which will be shown on the preview screen of your
phone.
5. Back in the app, start recording by touching
(normal or loop) / (time-lapse).
The Shutter icon turns red, and
displays at the upper left, indicating the elapsed
time
of the current recording.
6. To stop recording, touch
(normal or loop) / (time-lapse).
Starting a live stream from the app
Note:
If you are using this function for the first time, you have to set up and log into your live
streaming account first. For detailed instructions, please refer to
“Setting up your account to
live stream to skeegle” on page 16
.
Note:
Your camera does not support live streaming and charging at the same time.
Page 29

25
Note:
Each time before live streaming videos to skeegle, your camera must be connected to the
3G/4G network. Live streaming over a 4G network will provide the best experience.
3
2
4, 5
1. On your camera, move the Toggle switch to
Video
.
2. In the main screen of the app, touch
to enter Live streaming mode.
3. Aim your camera at your subject, which will be shown on the preview screen of your
phone.
4. Back in the app, touch
to start live streaming. The Shutter icon turns red, and
and
displays at the upper left, indicating the elapsed time and uploading
megabytes
since live stream began.
Note:
The preview screen goes black during live streaming.
5. Touch
to stop live streaming. Your camera will save a copy of the streaming video
to the internal or microSD card drive as well.
Note:
you need to have at least 500 MB of spare storage either on the camera or microSD
card for the camera to save a copy of your stream. Otherwise you can watch a playback of
your stream through skeegle.
Page 30

26
Managing photos and videos
1. In the main screen of the app, touch to display the following screen.
Indicates files saved in the camera’s internal drive
Indicates files saved in the microSD card drive
Album list
Note:
If you have over 1000 photos or videos saved to 1004GCAM, the camera will
automatically create a new folder called 1014GCAM where new files will now be available
from.
2. Touch
to select your camera as the file source.
3. To view video files recorded, touch
; to view photo files taken, touch .
4. Touch an album from the album list, then scroll and touch a desired video or photo
thumbnail. The selected video or photo plays back or displays in full screen.
5. Touch these action icons to manage your video or photo:
•
: Delete the file.
•
: Share the file by available apps.
•
: Download the file to your phone’s internal memory.
Note:
To perform the same action to multiple files, touch
Select all
then touch unwanted
files to deselect them.
Note:
Downloading or playing back a 1080p may take some time. After downloading files
to your phone, you can play back these files on your phone without being paired to the
camera. To view downloaded files, touch
.
Note:
Playing back these videos on your phone using the VLC media player provides the
optimal playback performance.
Page 31

27
Setting up your camera
You can use the 4GEE Action Cam app to set up your camera. During setup, your camera and
the mobile phone must remain paired.
1. In the main screen of the app, touch
to display the
SETTINGS
screen.
2. Touch
CAMERA
.
3. Touch the setting you wish to adjust, and touch to select your preferred option from the
popup menu.
Note:
For detailed instructions, please refer to
“Setting up your 4GEE Capture Cam” on
page 28
.
Reading your messages
1. In the main screen of the app, touch to display the
SETTINGS
screen.
2. Touch
YOUR ACCOUNT
>
MESSAGES
.
3. Touch to read a message.
•
: Unread message
•
: Read message
Checking your data usage
You can check how much data you have left.
In the main screen of the app, touch
>
YOUR ACCOUNT
>
DATA MANAGEMENT
. You will
be automatically directed to a web page to see the status of your data account.
Looking for help
In the main screen of the app, touch >
HELP
. You will be automatically directed to a web
page with all the information and instructions you need about your camera.
Page 32

28
Setting up your 4GEE Capture Cam
You can use the 4GEE Action Cam app to set up your camera. During setup, your camera and
the mobile phone must remain paired.
1. In the main screen of the app, touch
to display the
SETTINGS
screen.
2. Touch
CAMERA
.
Network data
This function is switched on by default and allows you to stream live videos, top up your
SIM, share your camera’s mobile data connection as a portable WiFi hotspot or look for help.
However, more battery power may be consumed. To turn off this function, perform the following
steps.
Touch
Network data
>
Off
.
Network roaming
Turn on this function to enable international data roaming when travelling abroad.
Note:
Extra charges may occur. Contact your mobile service provider for information about
availability and fees.
Touch
Network roaming
> On.
GPS
Enable this function to let your camera collect your location data from the satellites and add
the data to the photos you take.
Touch
GPS
> On.
Note:
If you have privacy or security concerns over your location data, disable location data
collection.
Page 33

29
Video live resolution (Live streaming mode)
Set the video resolution when in Live streaming mode.
Touch
Video live resolution
> desired resolution.
Video record resolution (Record video mode)
Set the video resolution when recording in Record video mode (for video recording to the
internal or the microSD card drive).
Touch
Video record resolution
> desired resolution.
Time-lapse
Your camera can capture continuous shots at the preset internal time and save them into one
video automatically. The recorded video is played back in fast motion, producing a time passage
effect, such as traffic flow, sunrise/sunset, plant growth, etc.
To enable this function and set the internal time, touch
Timelapse
> desired time interval.
Video loop
Enable this function to record videos continuously and saved in separate files with specified
time segments. Once the internal or the microSD card storage is full, the saved video loops will
be overwritten with new ones until you manually stop loop recording.
Touch
Video loop
> On.
Photo resolution
To set the photo resolution, touch
Photo size
> desired resolution.
Photo shot mode
Select the type of photo shot mode to use when taking photos. For detailed instructions, please
refer to
“Taking photos” on page 10 and “Taking photos” on page 23
.
Volume
Adjust or turn off the camera sounds. Touch
Volume
.
Page 34

30
Auto power off
Enable this function to power off your camera automatically after a set period of inactivity.
Touch
Auto power off
> desired interval time.
Time settings
Your camera is set to use your mobile network as the time source by default. To manually set
current date and time, preform the steps below.
1. Touch
Time settings
>
Manual
.
2. Touch
Date Setting
. Scroll to select the month/date/year field, touch to adjust the value,
then touch “Done”.
3. Touch
Time Setting
. Scroll to select the hour/minute/AM/PM fields, touch to adjust the
value, then touch “Done”.
4. Touch
Confirm
to apply changes.
Orientation
Set the screen orientation. This is useful when you mount the camera upside down.
Touch
Orientation
> your preferred orientation.
Changing the WiFi password
For security purposes, change your WiFi password regularly.
1. Touch
Change wifi password
.
2. Enter the current WiFi password, then touch OK.
3. Enter the new password, then touch OK.
4. Enter the same new password again for confirmation, then touch OK.
Note:
After changing the WiFi password, your phone will automatically be disconnected from
the camera. Go to WiFi settings on your phone, select “4GEE Capture Cam XXXXX” then select
“Forget”. Select “4GEE Capture Cam XXXXX” again from the list, enter your new password then
select “Connect”.
Page 35

31
Resetting the WiFi password
If you have changed or forgotten the WiFi password for your 4GEE Action Cam app, you can use
this option to reset it back to default.
1. Touch
Reset wifi password
.
2. Touch OK for confirmation.
Note:
After resetting the WiFi password, your phone will automatically be disconnected from
the camera. Go to WiFi settings on your phone, select “4GEE Capture Cam XXXXX” then select
“Forget”. Select “4GEE Capture Cam XXXXX” again from the list, enter the default password
(default: 00000000) then select “Connect”.
Note:
If required you can use your camera to restore your camera to its factory state including
the WiFi password. However, all your stored data will also be erased. For detailed instructions,
please refer to
“Resetting your camera” on page 12
.
Checking the storage
Scroll to
SD card space/Storage space
to check the total and free storage available in the
microSD card and internal storage.
Note:
To check the micorSD card storage, a valid microSD card must be inserted in your camera.
Emergency SMS
Edit emergency SMS contents and add designated people from your contacts.
1. Touch
Emergency SMS
.
2. Touch
. Select up to three receivers from your contacts.
3. Touch the blank text field and start typing contents. Touch “Done” when you’re finished.
4. Touch
Save
.
After adding emergency contacts, you can send an emergency SMS whenever needed. For
detailed instructions, please refer to
“Sending an emergency SMS” on page 12
.
Change device name
Your device name is set to 4GEE Capture Cam XXXXX by default, which is also the name
displayed on the WiFi list. You can use this function to change the device name.
1. Touch
Change device name
.
2. Enter the new device name, then touch OK.
Page 36

32
Note:
After changing the device, your phone will automatically be disconnected from the
camera. Go to WiFi settings on your phone, select your new device name from the list, enter
your current password, then select “Connect”.
Note:
To check your device name if forgotten, scroll to
Product name
.
Checking your camera’s firmware version
Scroll to
Firmware version
.
Formatting
Performing this action will erase all your stored data from your camera’s internal storage or the
microSD card storage.
WARNING:
This operation is irreversible. Consider backing up photos/videos captured to your
computer or a secondary storage device first.
Note:
To format the micorSD card storage, a valid microSD card must be inserted in your
camera.
• To format the microSD card storage, touch
Format SD card
>
Format
.
• To format your camera’s internal storage, touch
Format storage
>
Format
.
Resetting your camera settings to default
Performing this action will restore your camera to its factory state, including the WiFi password,
and erase all your user settings from your camera’s internal storage.
Warning:
This operation is irreversible.
Touch
Reset Setting to default
> OK to confirm and reset your camera.
Updating your camera
When your camera has a mobile data connection, it automatically checks and starts
downloading the update package for system updates and notifies you on the main screen of
the app.
WARNING:
Before updating your camera, ensure that your camera has sufficient space to
download the update package, you have backed up your camera’s important data to your
computer or a secondary storage device, and your camera has a strong mobile data connection.
After the update package is downloaded, a message displays on the main screen of the app
asking whether or not to update your camera now. Touch
Update now
to update the system,
then your camera automatically restarts.
Page 37

33
Note:
If you choose to update later, you can always go to
Camera update
>
Update now
whenever you’re ready for camera update.
File sorting
When viewing your photos/videos in the app, these files are sorted based on the date/time
taken. To change the order from latest to oldest, touch
File sorting
.
Checking your app version
Scroll to
App version
.
Transferring camera files to a computer
1. Insert the smaller end of the USB cable into your camera’s micro USB port.
2. Insert the larger end of the USB cable into your computer’s USB port.
3. On your computer, your camera is detected as a media device. Click on the device or
select an action from the data transfer window that appears. Copy or move your camera
files to the computer.
Note:
When a microSD card is inserted into your camera, the microSD card and your camera’s
internal storage are mounted as two drives on your computer. You can click on the drive where
you want to transfer files between your camera and the computer.
WARNING:
Do not interrupt USB connection during data access process. Stored data may be
lost or damaged.
Page 38

34
Troubleshooting
Frequently asked questions and common problems that may occur while using your camera are
explained in this section. If a problem persists and you can’t resolve it at
ee.co.uk/camhelp
then
contact EE or head to your nearest EE store.
Question:
My camera does not switch on or charge.
Answer:
If the battery is fully discharged, the camera cannot be switched on immediately when
the power adapter is connected. You must allow an empty battery to charge for a period of
time (approximately 5 minutes) before you can switch on the camera.
Question:
The nano-SIM card cannot be detected.
Answer:
Check and ensure that you have fully inserted the nano-SIM card into the card slot in
the correct direction. Please refer to
“Setting up your camera” on page 5
.
Question:
How can I save battery power?
Answer:
Check and perform the following actions:
• Turn off the camera power when not in use.
• Mute the sound of your camera.
• Switch off network data.
Question:
I have trouble pairing my camera with my mobile phone.
Answer:
Check and perform the following actions:
• The WiFi connection icon appears on your phone’s status bar and shows strong signals.
If the access point name of your camera does not appear on your phone’s WiFi list, select
“Refresh” or “Scan” on your phone.
• Reset your camera. For detailed operations, please refer to
“Resetting your camera” on
page 12
.
Page 39

35
Appendix
Specifications
Note:
Specifications are subject to change without prior notice. For most up-to-date
information, please visit
ee.co.uk/camwelcome
.
Item Specifications
Core Chip Qualcomm® Snapdragon™ MSM8926
1.2 GHz quad-core processor
Image Sensor 1/4" 8M CMOS sensor
Objective F 2.4 (Fixed focus)
Functional Sensor GPS
Interface
MicroSD Card
Micro USB
Microphone Mono microphone
Internal Memory 4GB eMMC
Video
Resolution
Local: 1080P (16:9): 24, 30 fps
720P (16:9): 30, 60 fps
480P (16:9): 30, 60 fps
Streaming: 720P (16:9): 24, 30 fps
480P (16:9): 24, 30 fps
Time Lapse 1, 3, 5, 10, 30, 60 seconds
Format H.264 MP4
Photo
Resolution
Megapixels FOV: 8MP (4:3; FOV 84°), 6MP (16:9; FOV 79°),
3MP (4:3; FOV 84°), 2.4MP (16:9; FOV 79°)
Burst 20 Photos/Shots
Self-timer 2, 10 seconds
Format JPEG (EXIF 2.3), DCF
Network
LTE: Band 3 (1800 MHz), 7 (2600 MHz), 20 (800 MHz)
UMTS: 900/2100 MHz
SIM Card Type Nano-SIM
Advanced Feature
WiFi
Auto White Balance
Looping Video
Auto Power Off: 5, 10, 20, 30 minutes
Dimension 55 (W) X 55 (H) X 19.0 (D) mm (without camera clip)
55 (W) X 55 (H) X 28.2 (D) mm (with camera clip)
Weight 90.5 g
Power Source Rechargeable Li-ion battery (1275 mAh)
Page 40

36
RF exposure
CE SAR compliance
This camera meets the EU requirements (1999/519/EC) on the limitation of exposure of the
general public to electromagnetic fields by way of health protection.
The limits are part of extensive recommendations for the protection of the general public.
These recommendations have been developed and checked by independent scientific
organisations through regular and thorough evaluations of scientific studies. The unit
of measurement for the European Council’s recommended limit for mobile devices is the
“Specific Absorption Rate” (SAR), and the SAR limit is 2.0 W/kg (head/body) and 4 W/kg
(limbs) averaged over 10 gram of tissue. It meets the requirements of the International
Commission on Non-Ionising Radiation Protection (ICNIRP).
For body and limbs operation, this camera has been tested and meets the ICNIRP exposure
guidelines and the European Standard EN 50566 and EN 62209-2, for use with dedicated
accessories. Use of other accessories which contain metals may not ensure compliance
with ICNIRP exposure guidelines.
SAR is measured with the device at 0 mm to the body, while transmitting at the highest
certified output power level in all frequency bands of the device.
The maximum SAR value is 2.34 W/kg over 10 gram of tissue.
SAR is measured when the camera is at its highest transmitting power. However, the actual
SAR of your camera is usually below the test level. This is because your camera is designed
to use the minimum power necessary to upload videos.
Caution
Standard 5V/1A charging head required. The power adapter shall be certified according to
IEC/EN 60950-1 and fulfilled the requirement of SELV and LPS.
Limit your exposure to radio frequency (RF)
• Keep your camera from your body while uploading videos.
• You can find more information from the WHO fact sheet N°193 on the WHO home page at:
http://www.who.int/mediacentre/factsheets/fs193/en
Disposal of your old product
When the crossed-out wheelie bin symbol is marked on a product, it means that
this product is compliant with the European Directive 2012/19/EU.
All electrical and electronic products must be disposed of separately from
household waste, by way of collection sites designated by the government or local
authorities.
The proper disposal of your old product will contribute to preventing any potential
negative impact on the environment and human health.
For more information on the proper way to dispose of your old product, consult your local
authorities, your waste disposal service or the store in which you purchased the product.
Page 41

37
EC Declaration of Conformity
Hereby,
Name of manufacturer: BenQ Corporation
Address: 16 Jihu Road, Neihu, Taipei 114, Taiwan
City: Taipei 114
Country: Taiwan
declares that this equipment:
Product description: Camera
Type designation(s): 4GEE Capture Cam
Trademark: EE
is in compliance with the essential requirements and other relevant provisions of Directive
1999/5/EC
1. Health (Article 3.1(a) of the R&TTE Directive)
• EN 62209-2:2010, EN 50566:2013/AC: 2014
2. Safety (Article 3.1(a) of the R&TTE Directive)
• EN 60950-1:2006+A11:2009+A1:2010+A12:2011+A2:2013
3. Electromagnetic compatibility (Article 3.1 (b) of the R&TTE Directive)
• EN 301 489-1 V1.9.2, EN 301 489-3 V1.6.1
• EN 301 489-17 V2.2.1, EN 301 489-24 V1.5.1
• EN 55022:2010+AC:2011, EN 55024: 2010
• EN 61000-4-3:2006+A1:2007+A2:2010
4. Radio frequency spectrum usage (Article 3.2 of the R&TTE Directive)
• EN 301 908-13 V6.2.1, EN 301 908-1 V7.1.1
• EN 301 908-2 V6.2.1, EN 300 328 V1.8.1
• EN 300 440-2 V1.4.1, EN 300 440-1 V1.6.1
We hereby declare that the above named product is in conformance to all the essential
requirements of the Directives:
R&TTE Directive (1999/5/EC)
All the reports of the applied standards under R&TTE Directive have the Positive Opinion of
Notified Body:
Telefication B.V., Edisonstraat 12A, 6902 PK Zevenaar, The Netherlands
Identification mark:
0560
(Notified Body)
CE
The technical documentation relevant to the above equipment will be held at:
BenQ Corporation
16 Jihu Road, Neihu, Taipei 114, Taiwan
 Loading...